5. 3D scanning and printing
## Assignment:
- design and 3D print an object (small, few cm3, limited by printer time) that could not be made subtractively
- 3D scan an object (and optionally print it)
Introduction 2020 documentation:
In the exploration of 3D printing and scanning during Week #5, a multifaceted journey unfolded, encompassing practical printer testing, design challenges, and the complexities of 3D scanning.
Printer Testing and Troubleshooting:
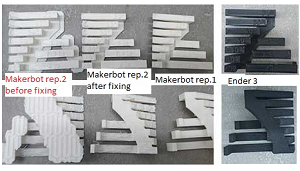
Group assignment
Our lab, equipped with MakerBot 2 Replicators, a MakerBot Replicator Mini, and an Ender-3, underwent rigorous testing. The MakerBot Replicator Mini and Ender-3 demonstrated superior performance after troubleshooting and calibration sessions. The group assignment involving overhang and bridge tests highlighted the varying capabilities of the printers. As part of a group project, we tested the capabilities of our 3D printers. We downloaded overhang and bridge test models from Thingiverse and printed them using both of our Makerbot Replicator printers. One printer performed well, producing high-quality prints without needing support for overhangs up to 50 degrees. However, the other printer experienced issues such as leaking material and poor print quality. We found helpful troubleshooting resources online, although it still didn’t match the quality of the first print. We also tested an Ender 3 printer, which produced excellent prints with no leaking material or curvature issues. Overall, the Ender 3 performed comparably to the first Makerbot printer in terms of print quality and support-free printing for overhangs
During testing, I realized that there are several critical parameters and features in 3D printing. Layer height plays a crucial role in print quality, while infill is essential for strength. Supports become necessary when printing complex objects. Personally, I found adjusting the print bed to be the most frustrating aspect of the process.
Additive vs. Subtractive Manufacturing:
Fundamental insights into additive and subtractive manufacturing processes were gained, emphasizing their distinctive approaches and overlapping applications.
Challenges in Designing:
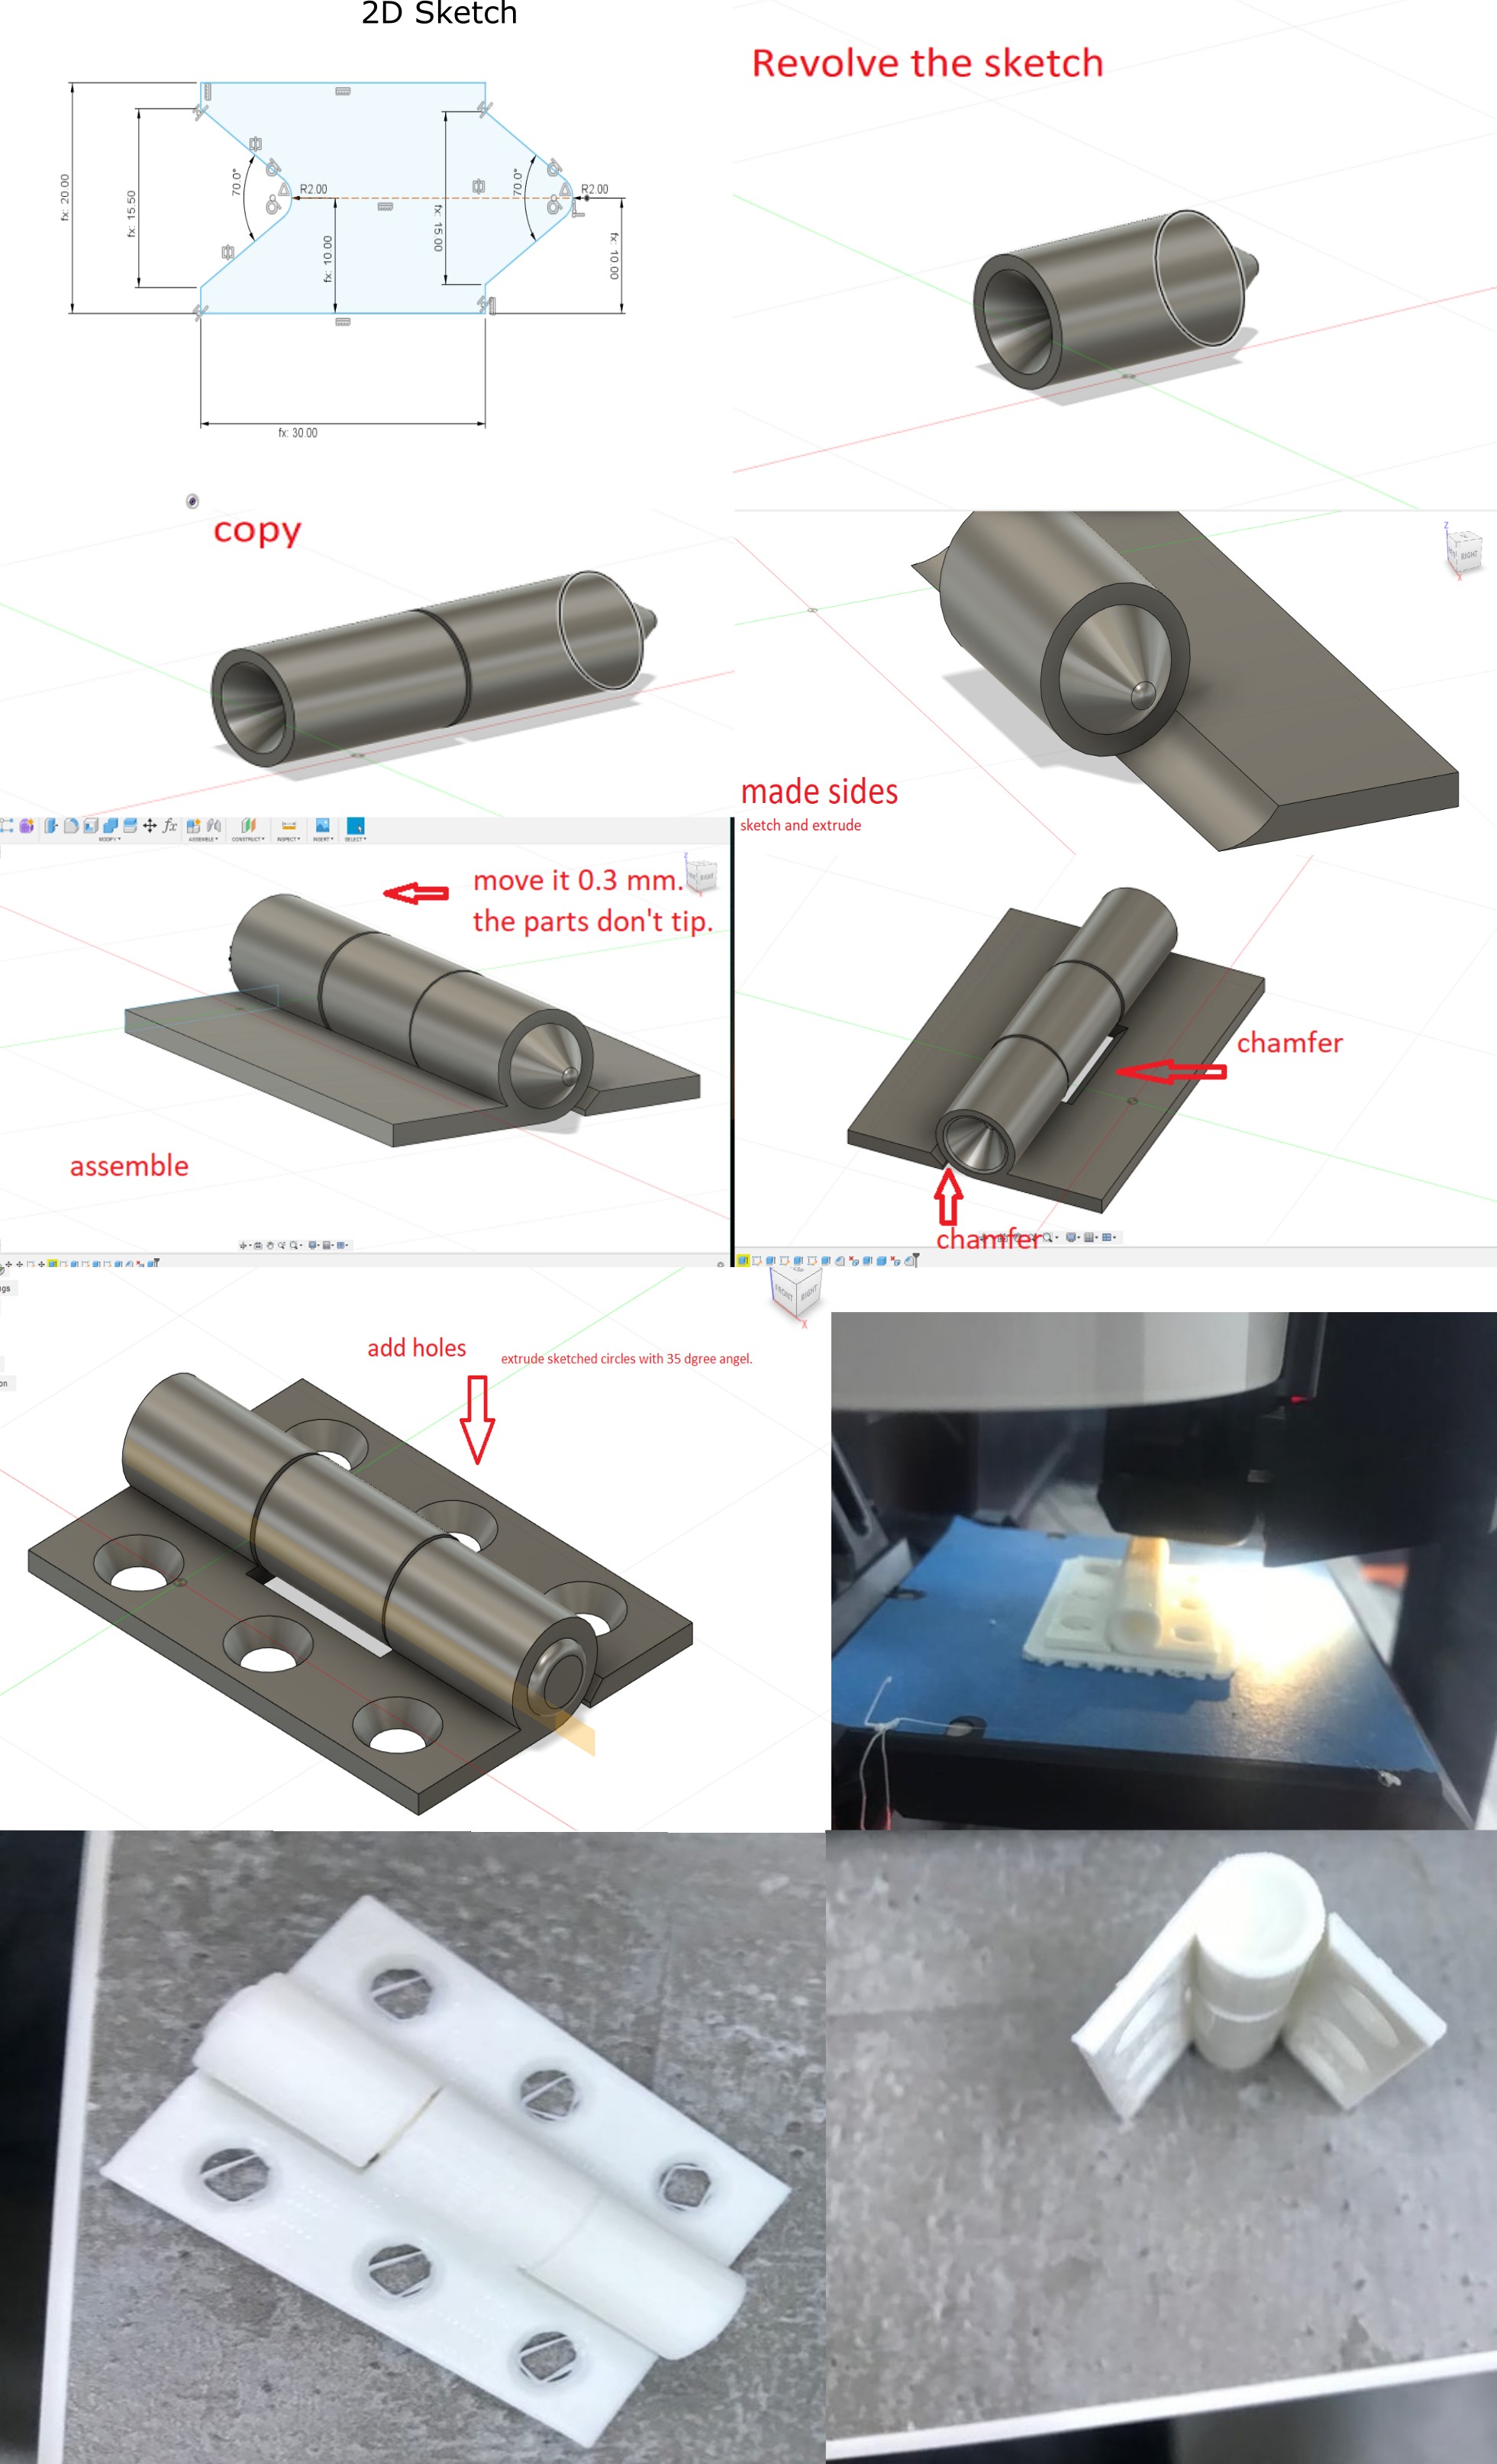
The design process commenced with the creation of a functional hinge, printed successfully on the MakerBot Mini.
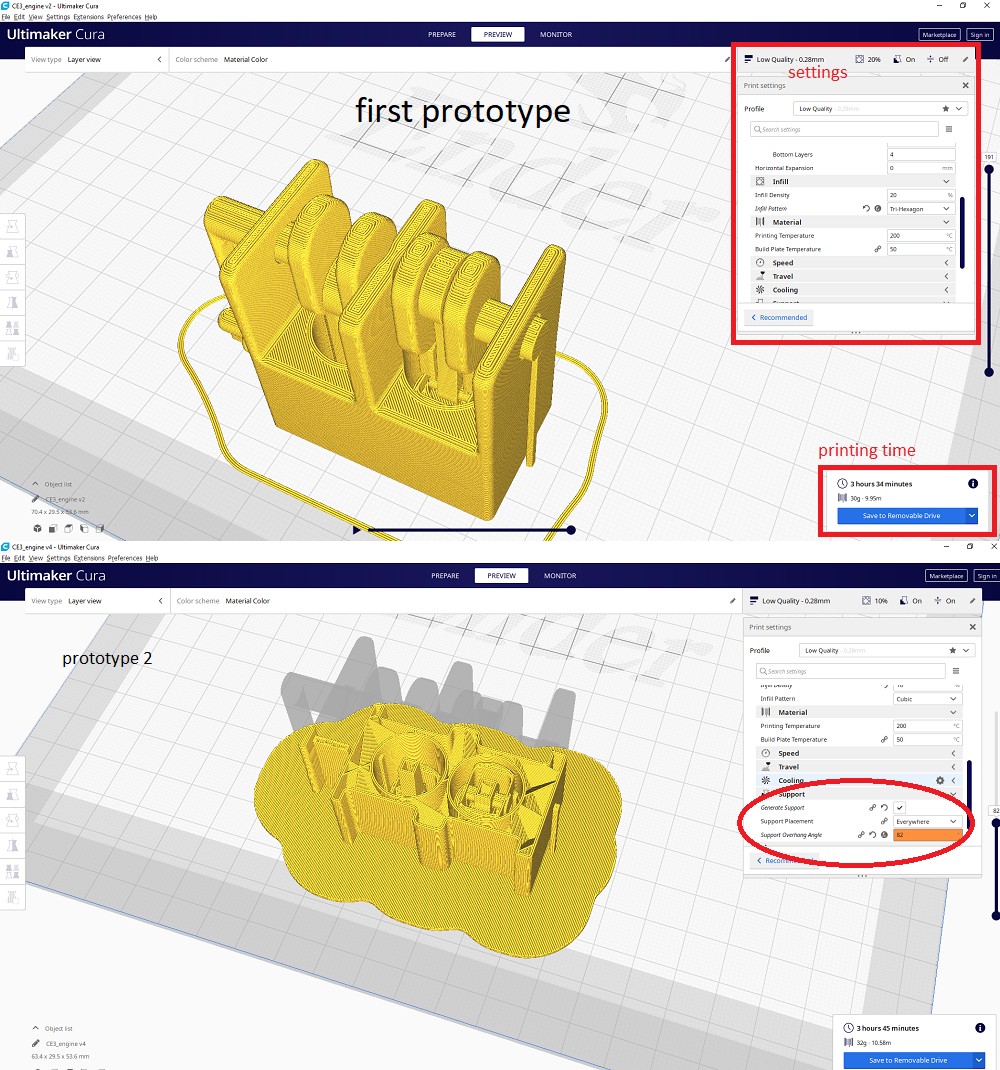
The subsequent challenge involved designing a small engine with components such as a crankshaft, pistons, connecting rods, and an engine block. Iterative designing in Fusion 360 addressed issues like thin walls and support optimization. Multiple attempts were made, each contributing to a better understanding of design considerations for 3D printing.
Engine Designing Process:
Inspiration and Conceptualization: Driven by a personal interest in mechanics, the decision to design a small engine involved conceptualizing components such as a crankshaft, pistons, connecting rods, and an engine block.
CAD Modeling: The meticulous CAD modeling process in Fusion 360 included considerations for both functionality and aesthetics, with challenges in determining appropriate dimensions and optimizing for 3D printing.
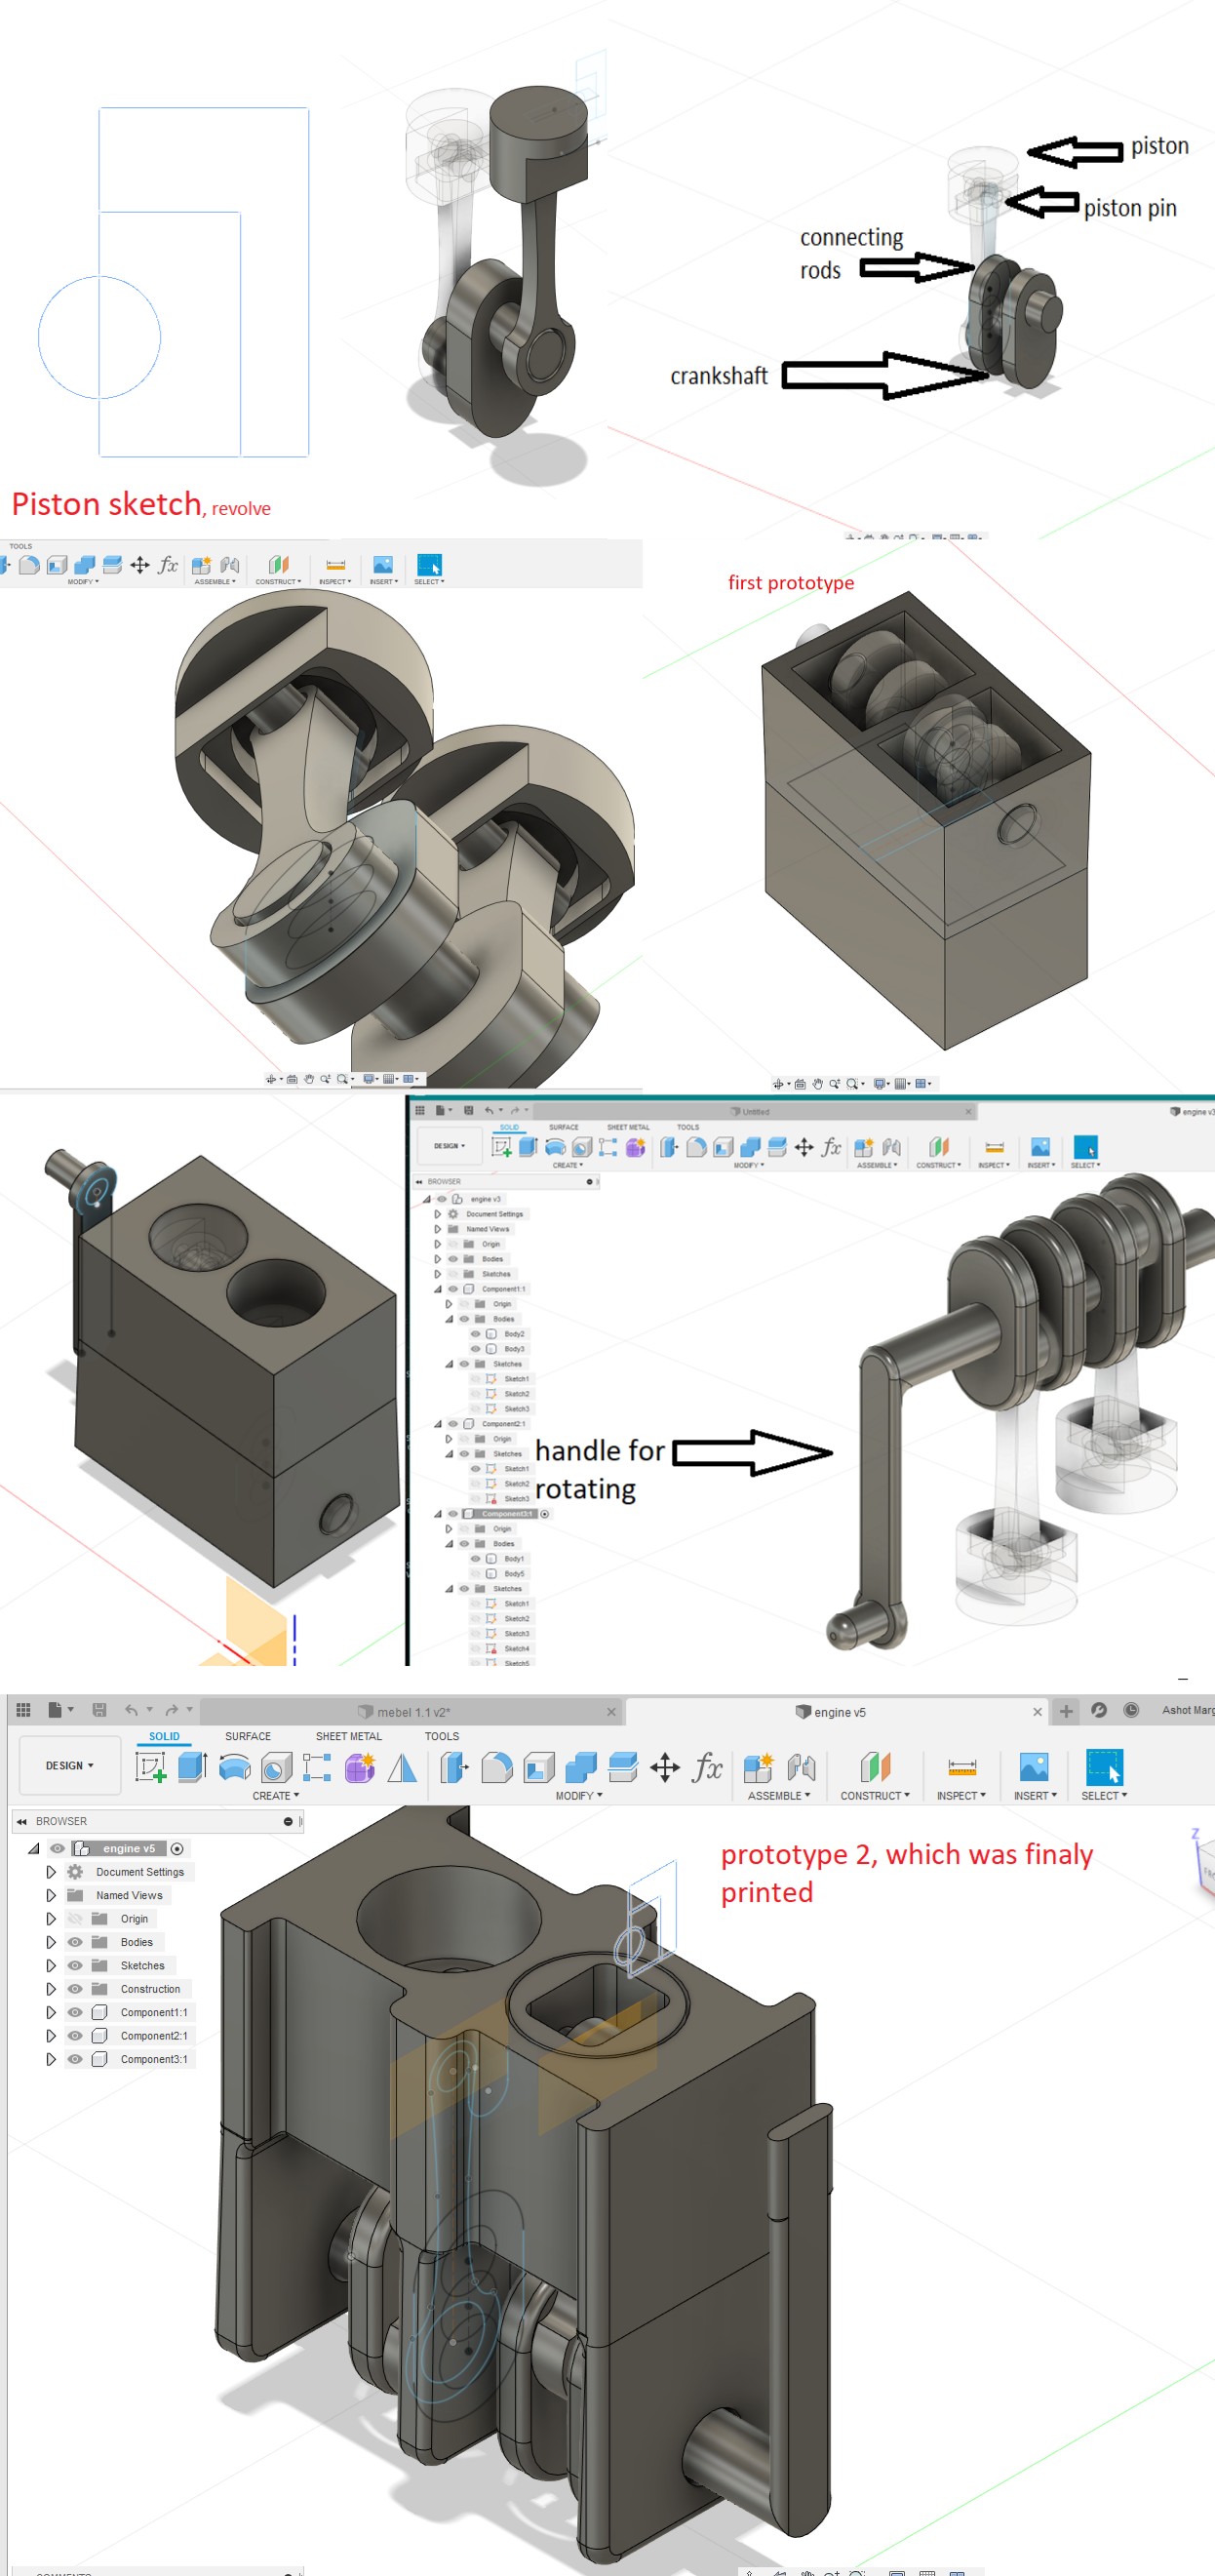
Iterative Designing: Multiple design revisions addressed challenges, including adjusting the thickness of connecting rod walls, optimizing for printing speed, and designing custom supports in Fusion 360.
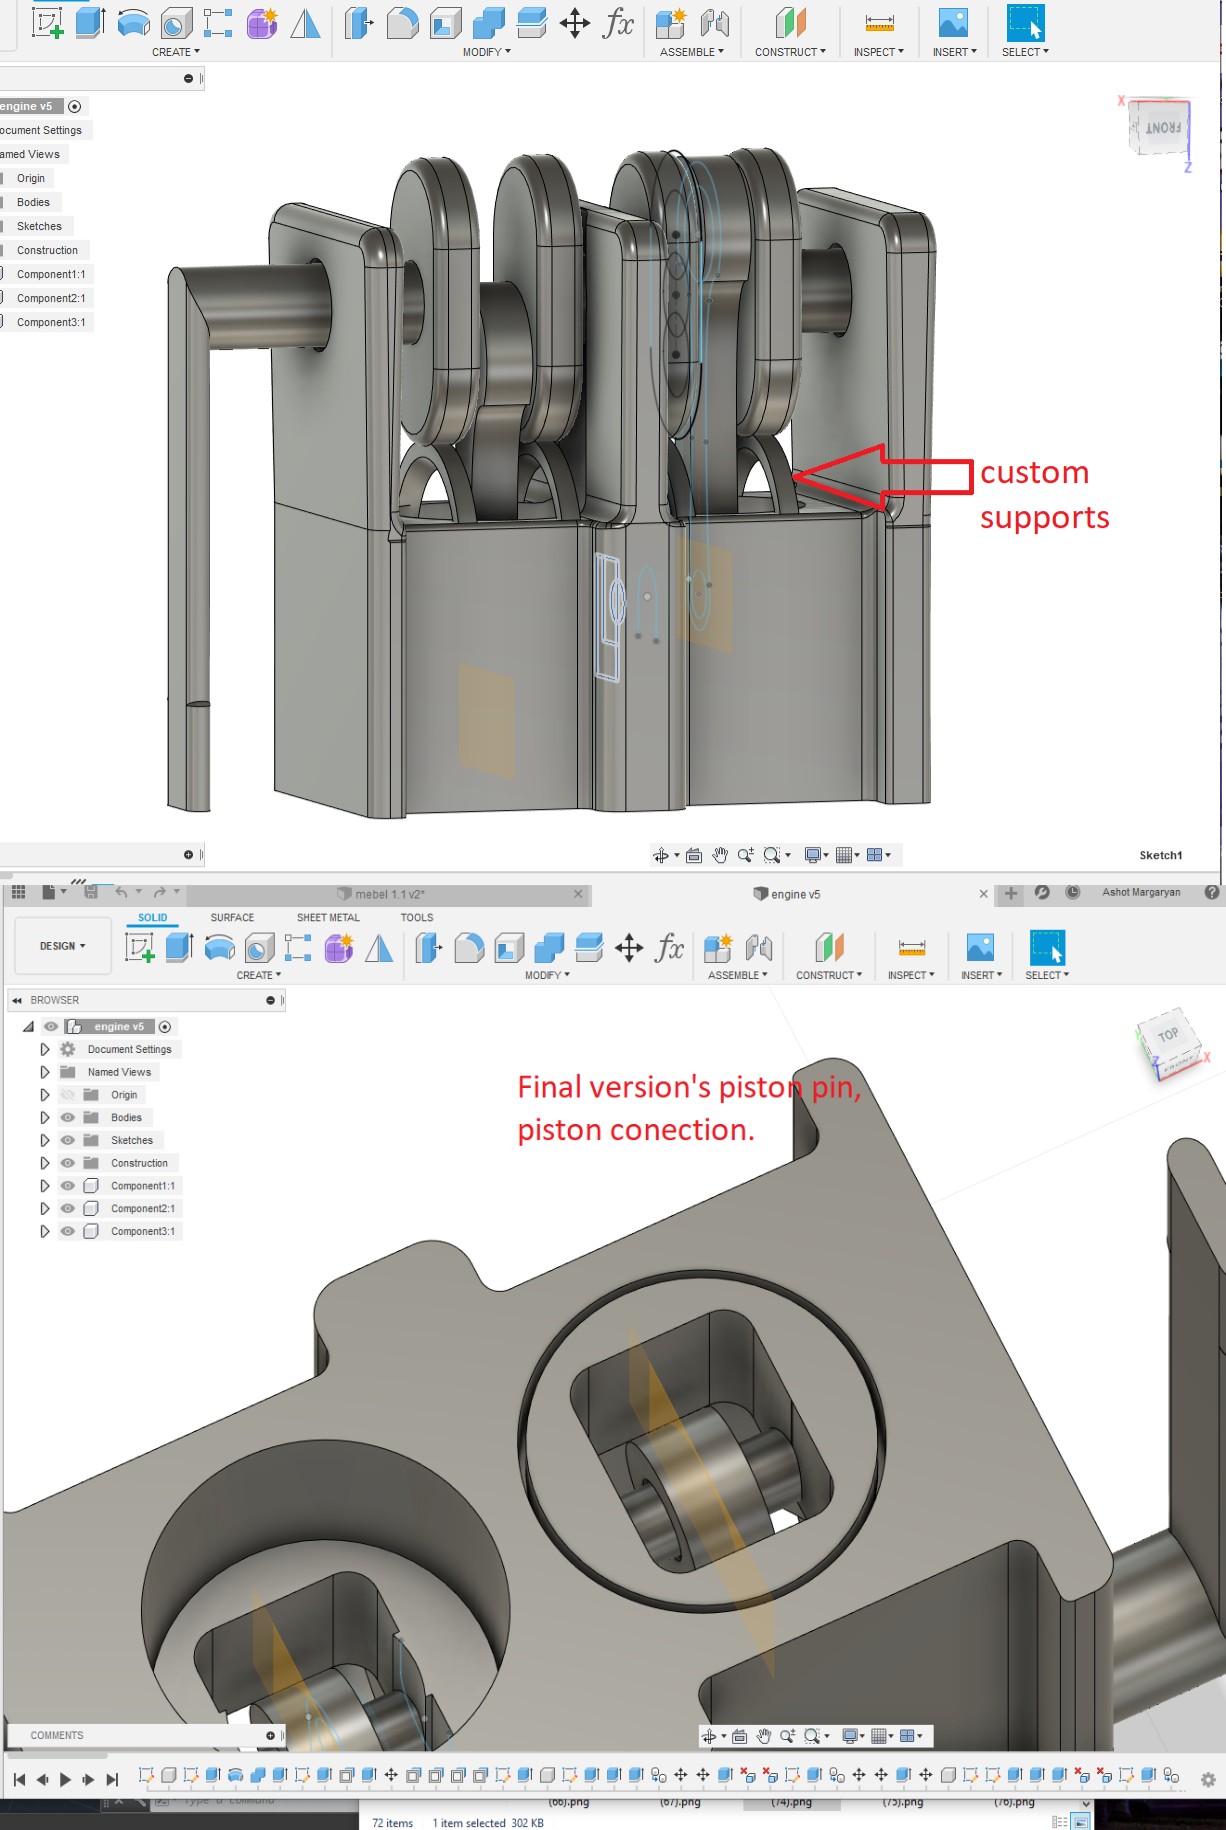
Optimizing for Success: The final attempt included adjustments for wall thickness, fine-tuning custom supports, and a strategic decision to print without a build plate for expedited printing.
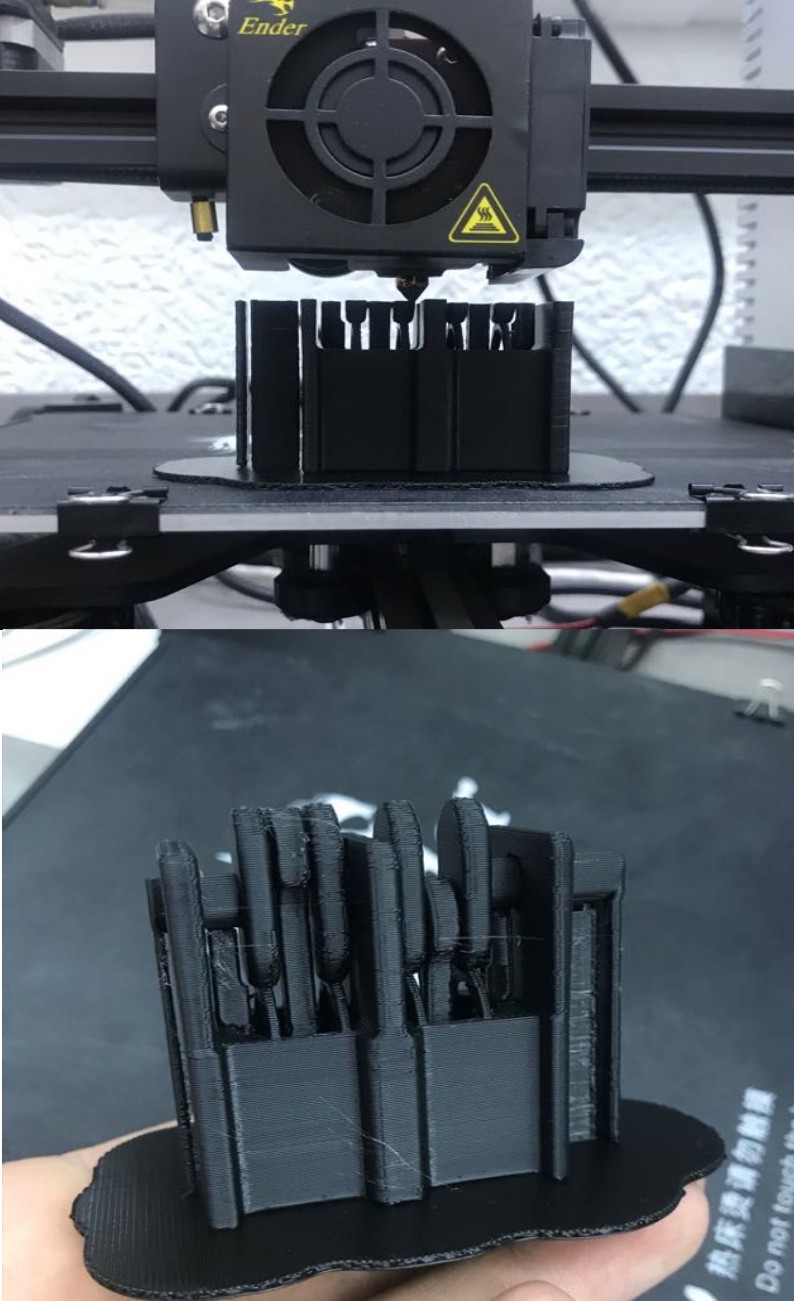
Final Print and Post-Processing: Successful printing was achieved, though post-processing challenges included breaking connecting rods and a stuck crankshaft. Manual manipulation and tolerance adjustments enabled a freely rotating engine.
Scanning Experience:
Exploration into 3D scanning involved using Xbox’s Kinect with Kscan3d software and photogrammetry with Recoup Photo from Autodesk. Challenges in achieving accurate scans, including the humorous issue of having multiple noses, were encountered. The documentation emphasizes the complexity of working with mesh and the time-consuming nature of photogrammetry.

Learnings and Future Considerations:
Insights gained from the entire process contribute to a deeper understanding of design considerations for 3D printing. Future considerations may include refining tolerances, exploring alternative support strategies, and experimenting with different printing settings.
FILES FROM 2020
2024 Documentation
In 2024, let’s try something new: generative design. Instead of sticking to the usual methods, I’ll use advanced algorithms and AI to explore a range of creative options. This approach breaks free from the norm, letting us input design goals and watch the system generate diverse solutions. Generative design simplifies the process, optimizing for performance and aesthetics. It’s a fresh way to work, promoting efficiency and resource optimization. This shift allows us to push creative boundaries and reshape how we approach design in the evolving landscape of 2024.
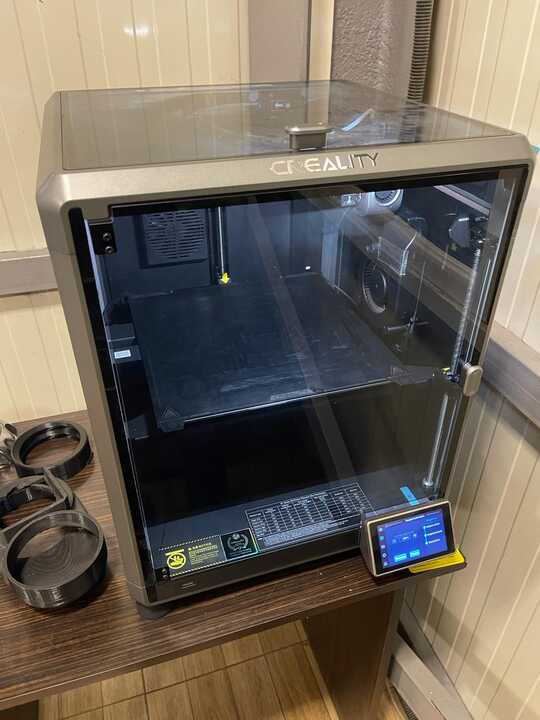
In 2020, I used the Creality 3 for 3D printing, but this time around in 2024, I’ve upgraded to my own printer, the Ender Creality K1 Max. This means I can now compare the advancements in 3D printing technology between the two models. The K1 Max brings new capabilities, improved features, and possibly enhanced printing precision compared to the Creality 3. It’s exciting to witness how technology evolves, and using my own K1 Max allows me to experience firsthand the progress made in 3D printing from 2020 to 2024.
### Here is some usefull tutorial links.
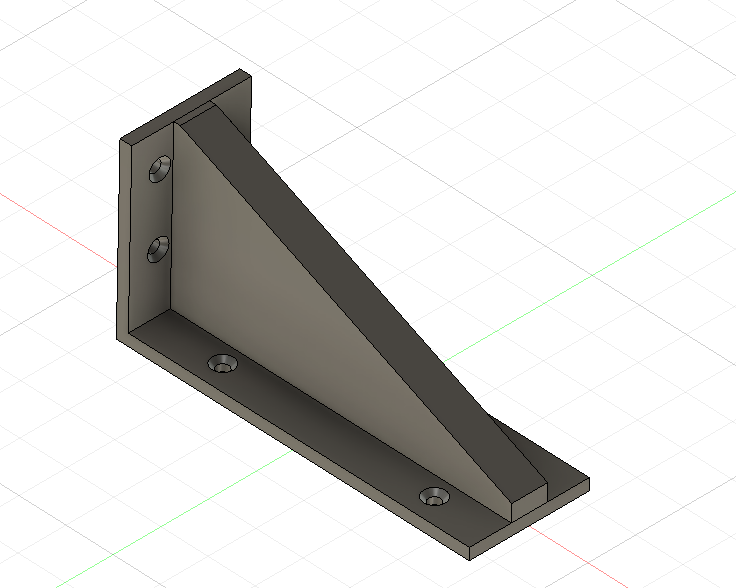
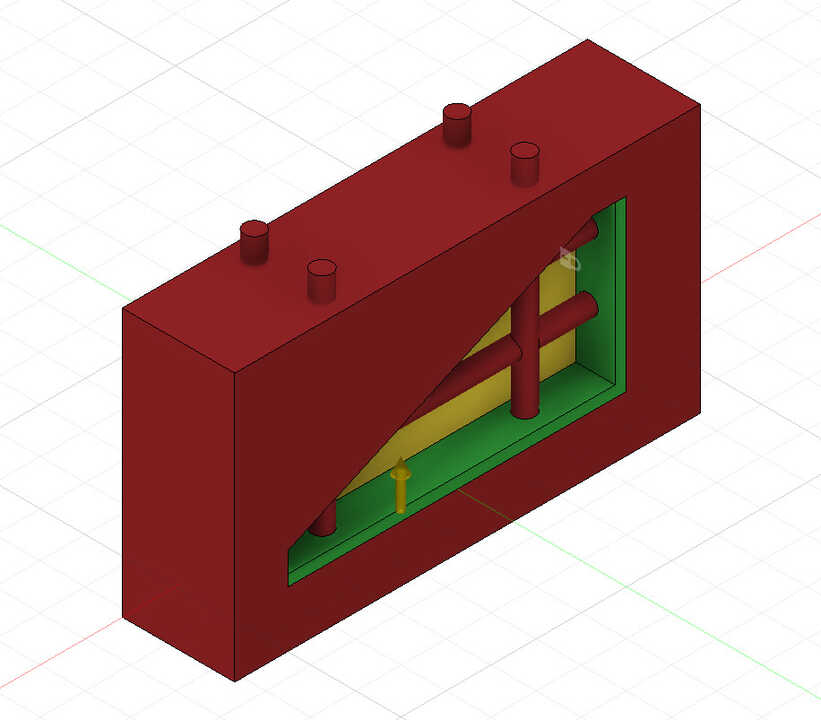
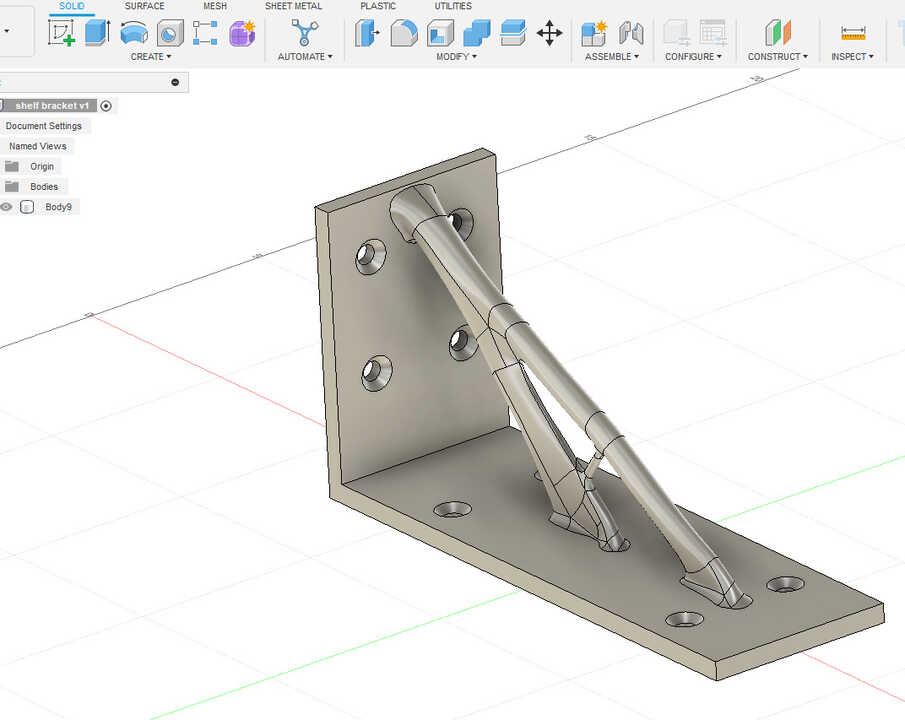
Designing a shelf bracket using generative design in Fusion 360 involves several steps. Here’s a general overview of the process: here is initial shelf bracket that I designed in few steps.
-
Define Design Goals and Constraints:
Start by defining the design goals for shelf bracket. This could include factors like load-bearing capacity, material preferences, manufacturing constraints, and any specific aesthetic considerations. In our case it is 200nm. Set constraints such as the available space for the bracket, the preferred material, and any other parameters that are crucial for your design.
-
Create a New Generative Design Study:
Open Fusion 360 and create a new generative design study. Define the study type, specifying whether it’s a single or multiple load case study based on the requirements of your shelf bracket.
-
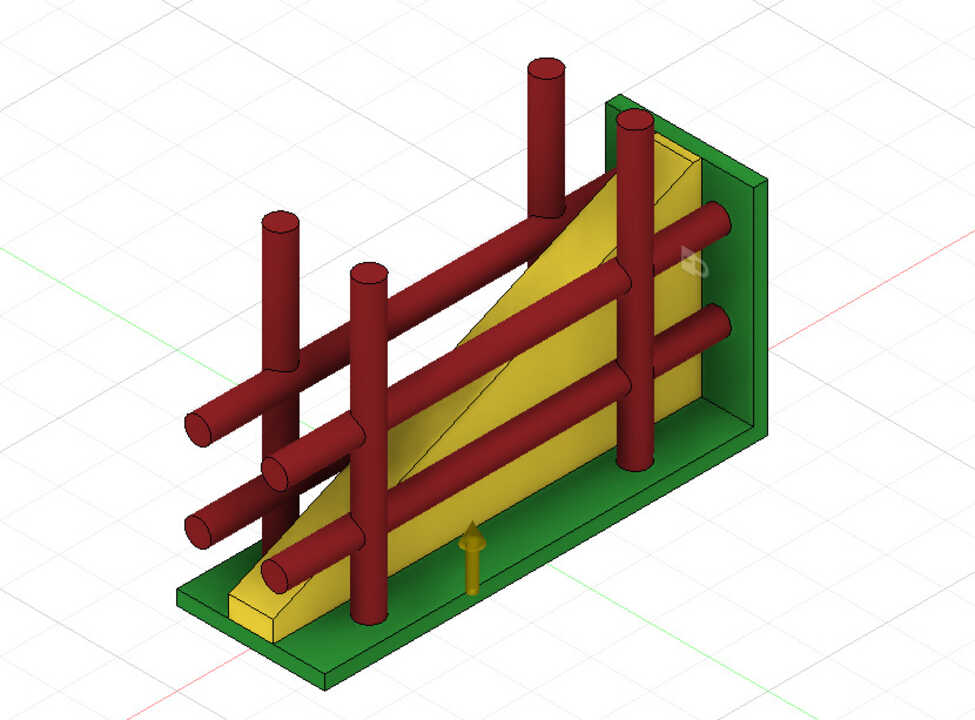
Set up the Workspace:
Import or create the geometry of the initial bracket design. This will serve as the starting point for the generative design process. Define the preserve regions, which are areas of the bracket that should remain unchanged during the generative design iterations.
-
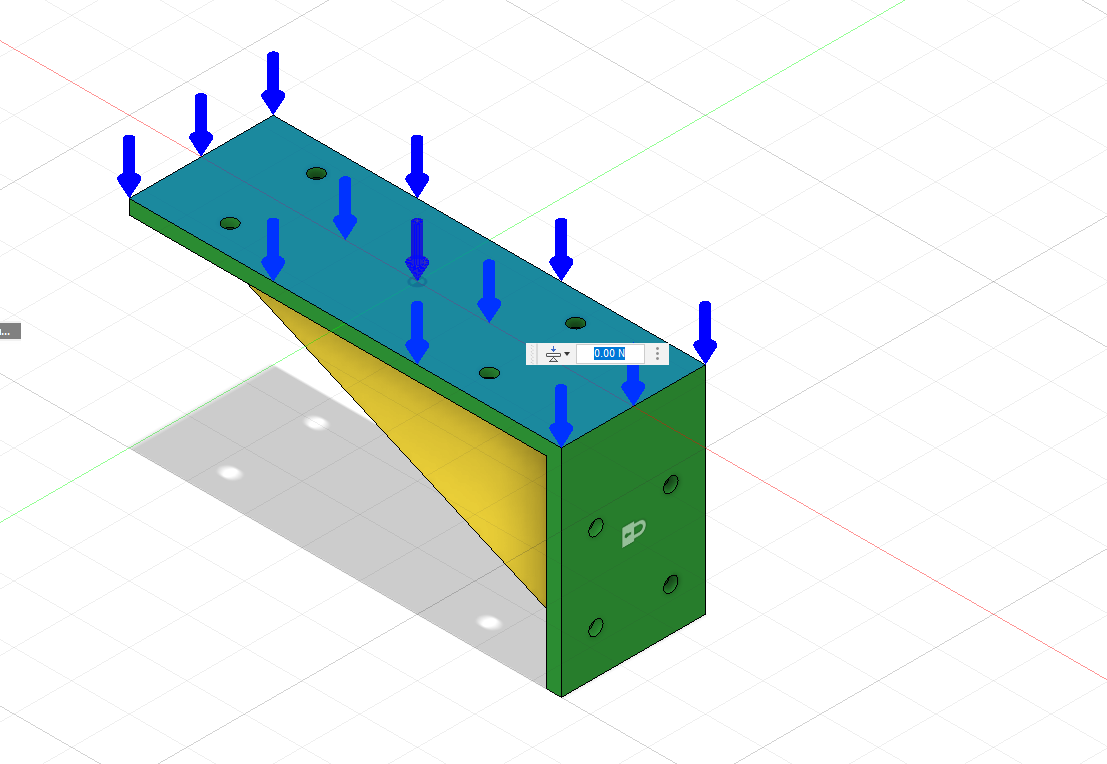
Specify Loads and Constraints:
Apply loads and constraints to simulate real-world conditions. For a shelf bracket, consider the expected load it needs to support and any relevant constraints, such as mounting points and contact surfaces.
-
Define Materials:
Specify the material properties for the generative design process. Fusion 360 allows you to choose from a range of materials, and the software will consider these properties during the optimization.

-
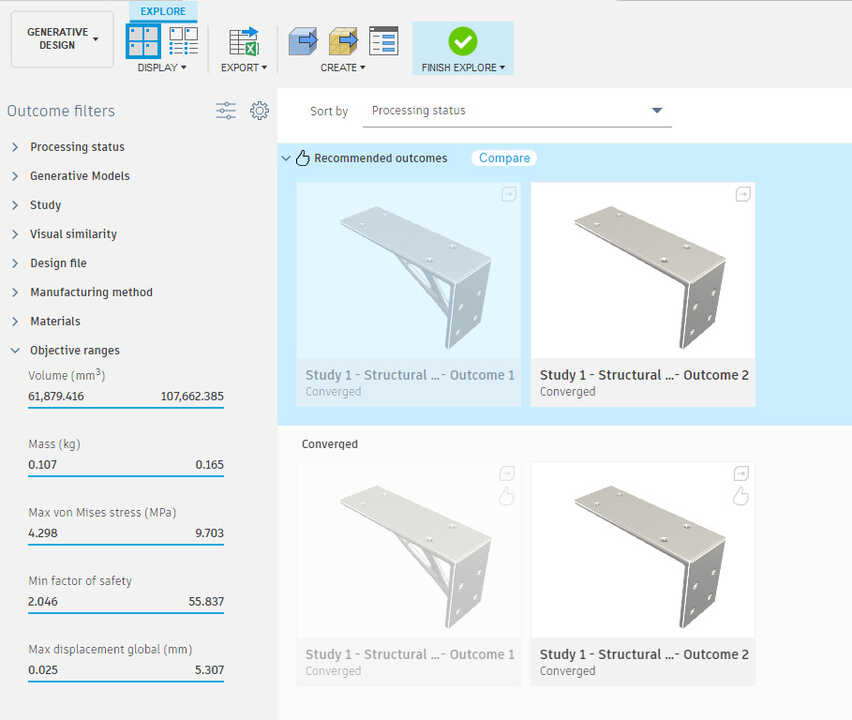
Generate Designs:
Initiate the generative design process. Fusion 360 will use algorithms to explore different iterations of the shelf bracket based on the defined goals, constraints, and parameters. The software will present you with a variety of design options, showcasing different geometries that meet the specified criteria.
-
Evaluate and Refine:
Review the generated designs and evaluate them based on your criteria. Fusion 360 provides tools for comparing and analyzing different iterations. Select a design that aligns with your preferences and requirements.
-
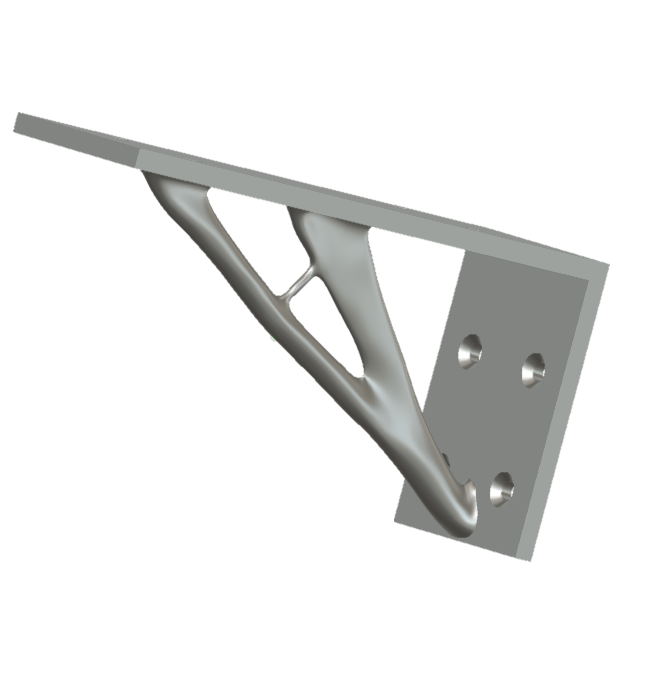
Integrate with Traditional Design:
Once you’ve chosen a generatively designed bracket, integrate it back into the traditional design environment in Fusion 360. Refine the design further, considering additional details, fillets, and any other features required for manufacturing.
-
Simulation and Validation:
Perform simulations and validations to ensure that the selected design meets performance expectations under various conditions. Confirm that the generatively designed shelf bracket is structurally sound and functional.
-
Export for Manufacturing:
Prepare the final design for manufacturing by exporting it in the appropriate file format. Fusion 360 supports various file formats commonly used in manufacturing processes. In our case it is stl format for 3d printing.
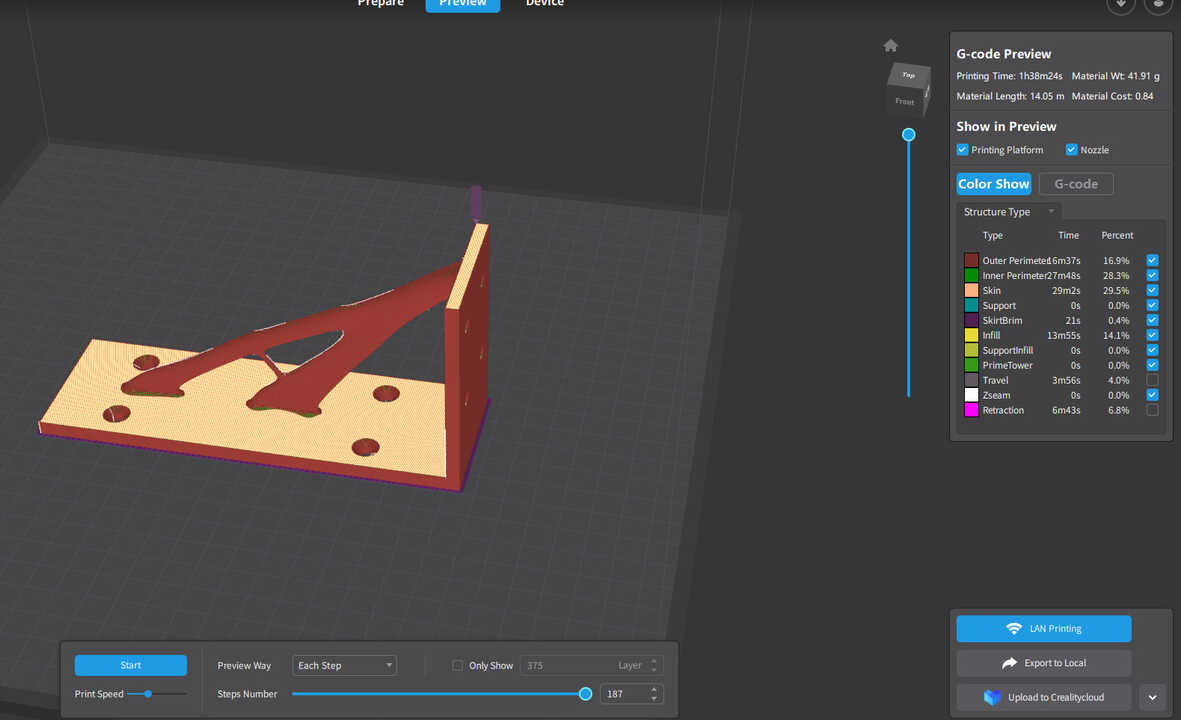
## Printing
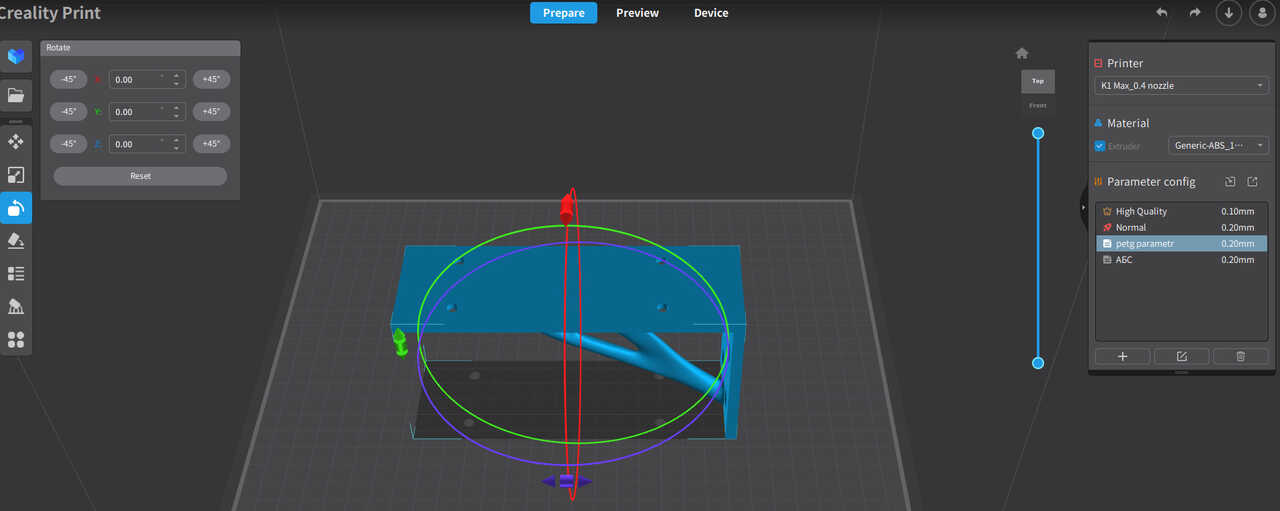
I’m going to use creality k1 max. And creality print slices.
Loading a 3D Model: Load a 3D model into the slicing software and generate the G-code, which is the set of instructions the printer will follow.Printing: Transfer the G-code to the printer . Start the printing process and monitor the initial layers to ensure proper adhesion and print quality. sting up the quality; layer thikness, filament that I’m going to use (petg) and speed of trinting (180mm/min). After seting we can see actual printing time 1 our 38 min and mass of print. placing printing part in workspace of printer and scaling the part if the sizes don’t metch.
Conclusion
the documentation spanning from 2020 to 2024 offers a rich narrative of the evolving landscape of 3D printing, encapsulating the challenges, triumphs, and technological advancements experienced over this period. The initial exploration in 2020, marked by printer testing, troubleshooting, and design challenges, laid the groundwork for a deeper understanding of additive and subtractive manufacturing processes.
The transition to generative design in 2024 signifies a pivotal shift in approach, leveraging advanced algorithms and AI to push creative boundaries. The comparison between the Creality 3 in 2020 and the upgraded Ender Creality K1 Max in 2024 exemplifies the rapid progress in 3D printing technology. The documentation effectively captures the excitement of firsthand experience with the enhanced capabilities of the K1 Max.
The tutorial links provided for generative design serve as valuable resources for those delving into this innovative design methodology. The detailed steps in designing a shelf bracket using generative design in Fusion 360, along with images illustrating each stage, offer a comprehensive guide for those interested in adopting this cutting-edge approach.
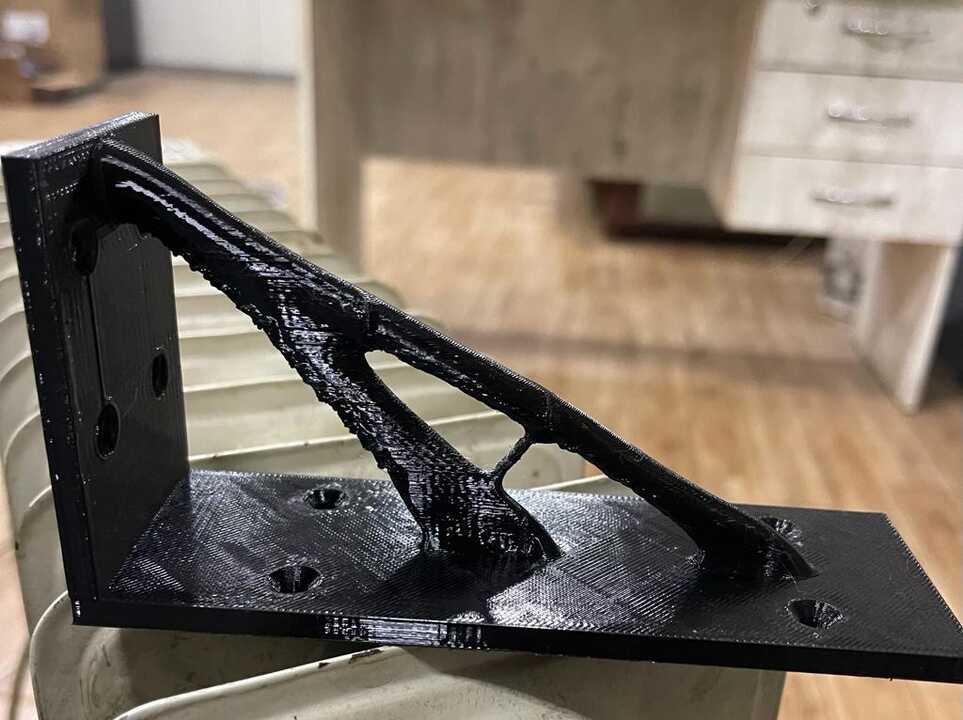
The documentation concludes with a practical demonstration of the printing process using the Creality K1 Max, highlighting key considerations such as material choice, print settings, and actual printing time. This provides a tangible application of the design journey, bridging the conceptual and digital phases to the physical realization of the generatively designed object.
2024 3d printing file. bracket