Week 6
3D printing from outter space
MOOD OF THE WEEK

This week was a bit hard for me… I’m starting to feel tired, had no week-end because I worked all of it… It was cool, I did workshops for adults and kids teaching them programming and 3D printing. But then no real time to rest ! In those moments, fails are harder to deal with ^^' And of course, I had several ! But one quiet day at home documenting helped a lot, I have to spare myself some time like this in the future. And the important thing is, my 3D printing worked :)
I had no time to do the 3D scanning, but I’ll keep some time for it next week. Let me show you now what I did !
Let's do some 3D printing
This week's assignments :
- Group assignment
- test the design rules for your 3D printer(s)
- Han Solo assignments :
- design and 3D print an object (small, few cm3, limited by printer time) that could not be made subtractively
- 3D scan an object (and optionally print it)
Group Assignment
Here is the link to our documentation for the group assignment : http://fabacademy.org/2019/labs/sorbonne/group_work/3D-print/
Han Solo Assignment
3D printing from outter space
3D printing is more and more mainstream and popular, and easier and easier to use. In this page I’ll explain to you exactly how it works.
How does 3D printing works ?
A 2D printer works by adding ink on paper, on an horizontal plan. Image you’d print a thousand pages and add them on top of one another. What would it look like ? It would become an image embossed !
3D printing works by layering layers. Each layer on top of one another, and you end up with a 3D object !
Different printing process
Depending on the type of machine you’ll be using, you’re gonna use different printing process. The difference leans in the way the layers are deposited and in the type of material used.
For exemple, industrial 3D prints use selective laser sintering, or stereolithography that prints with ultraviolet ray.
FDM (Fused Deposition Modelling)
The printing process I used is called FDM (Fused Deposition Modeling). The printer deposits material directly on the plate. It’s the process most commonly used for the mainstream 3D printers, mainly because it’s the less expensive. Here’s a schematic to show you how it works :
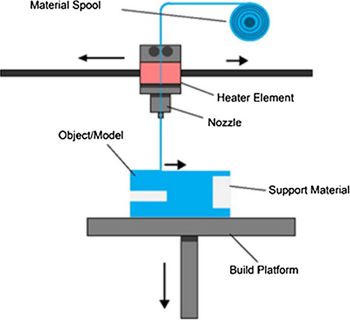
The plastic wire goes through the printhead (composed of a heater element and a nozzle), that generally heats up to 230° to melt it.
The printhead draws the base of the object and goes up to the top, building it layer by layer.
You can see this all the process on this video I made a few years back : video (FR)
How do we do a 3D printing ? Do we just have to press the “print” button and it works ?
There are several steps to follow before pushing the “print” button :)
Step 1 : draw your idea
First, you [obviously] have to find an idea ! In order to do that, just take a pen and paper and try drawing it. If you don’t know what to do, you can always go to Thingiverse to find inspiration ! This website is great, because all around the world contributors put on their 3D models and you can just download them, modify if you want and print them !
When you draw your idea, do not forget some basic rules that will have an impact when you print your object.
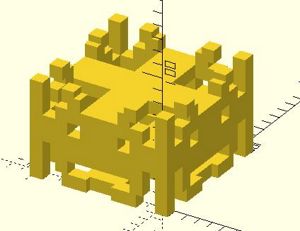
I went online to find some ideas, I decided to do a small Space Invader lamp :) Here is my sketch :
Orthonormal landmarks
I really rapidly talked about the difference between 2D and 3D in the beginning of this page. Let me stay a little bit longer on this part.
What are orthonormal landmarks ?
It is a set of graduated axes, with the same unit and same origin. Let me explain more precisely. Let’s go from a simple Space Invader.
Here is an orthonormal landmark, you can see the Y axe and the X axe. The Space Invader we’d like to do on this orthonormal landmark would be in 2 dimensions.

In the 3D world, you need a third axe in order to give our space invader some volume (since we are in 3 dimensions : width, lenght and height). So we have three axes : X, Y and Z.
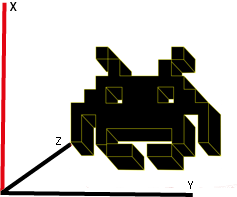
In order to print our Space Invader, our 3D printer will work on several plans (that we also call dimensions) : XY, XZ, YZ.
Like in 2 dimensions, those axes naturally crosses at their origin and it is defined as the graduation 0 of the axes.
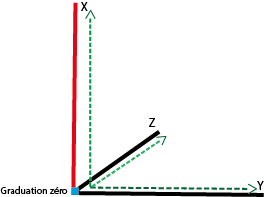
That’s how we’ll be able to visualize how we’ll modelize our object. And most important, that’s how the 3D printer works and knows how to print in 3 dimensions the object you want :)
Step 2 : modeling your idea in 3D
Now that we are okay with all the concepts we need, let’s modelize !
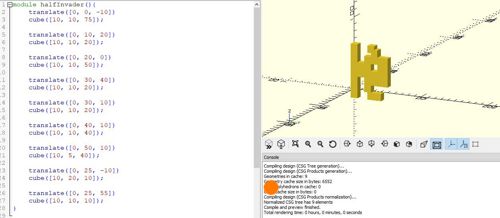
In order to do this part, you’ll need a 3D modeling software (or also called CAD - Computer-Aided Design). You already know my love for OpenScad… and I used it for this project also :)
I had no particular problems modeling this one, as I'm starting to be more familiar with the software. I was a bit lazy, and used no complicated formulas. Bu ti used one new function I hadn't used before on OpenScad : mirror.
Mirror : "Mirrors the child element on a plane through the origin. The argument to mirror() is the normal vector of a plane intersecting the origin through which to mirror the object."
Here is the exemple in my code. I first coded half of a Space Invader
Then thanks to the mirror function, I made a full Space Invader.
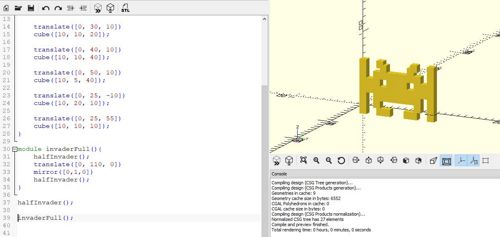
Here is the full version of my Space Invader module :
Most of the CAD softwares will allow you to save your modelisation as an STL file (an abbreviation of "stereolithography"). But an STL file is not a printable object. The printer needs precise indications to print the object in its integrality, it does not just show the machine the final shape of it.
Step 3 : slicing software
As I said just before, we have our 3D printed object modelized but our printer cannot yet understand it and therefor, print it.
We’ll need a slicing software. A slicing software translates digital models in physical instructions for the 3D printer. We can imagine them as a tangle of trajectories that will follow the printhead. The most commonly used output format is G-code.
I’m gonna show you the slicing software I used, called Cura. Here is the link to download and install it : Cura.
When you open it, here’s what it looks like :
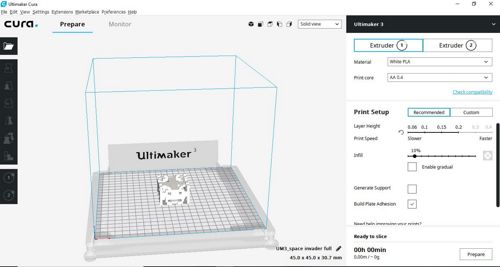
On the right side of the screen, you can see the parameters’ window. You have to prepare the object for printing.
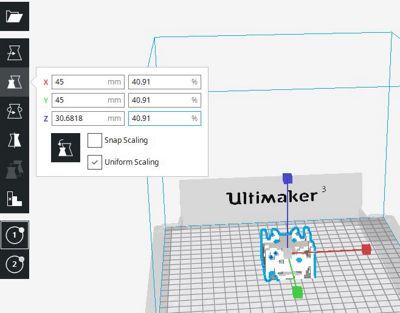
Adjust the model
You can adjust your model in order for it to be perfect for you :) You can easily position the model, scale it, rotate it and mirror it. It’s on the left window of your screen.
Prepare for slicing

- Extruder 1 : I’m using only one extruder on my Ultimaker 3. So I’m selecting it and changing the parameters of this one.
-
Material : you have to select the proper material you’re gonna use. Here, I selected the white PLA.
What is PLA ? “Poly(lactic acid) or polylactic acid or polylactide (PLA) is a biodegradable and bioactive thermoplastic aliphatic polyester derived from renewable resources, such as corn starch (in the United States and Canada), cassava roots, chips or starch (mostly in Asia), or sugarcane (in the rest of the world). (source : wikipedia)
- Print core : you define the size of your print core (it can be 0.25 mm up to 0.6 mm). Here I’ll choose the 0.4 mm, since it’s the one I’m using.
-
Layer height/print speed : the layer height is the thickness of one printed layer (in mm). A thin layer increases the quality of the print. On the other hand, thicker layers can decrease the print time substancially.
You can change this parameter from 0.06mm (layers barely visible) to 0.2mm (used for fast print).
I’ll use a medium one, 0.1 mm. Layers will be thin but not so much as to increase the print time. - Infill : there you can define the infill density. It’s the amount of plastic used on the inside of the object. A higher infill means a stronger object. Usually I use a 10% infill, which is more than enough for a decorational object.
-
Generate support : some 3D models you’ll try to print have overhanging parts, so you have to print a support structure under the model to prevent the plastic from falling down.
Here I don’t need one, so I won’t select the option. -
Build plate adhesion : I always use a raft for my printing, to make sure it won’t bend and will stick well to the building plate.
It’s like a thick grid between the object and the building plate.
I only changed the recommended parameters, but there’s a lot more stuff you can change when you select “Custom” and look it up if you want :)
Now that I am happy with my settings, I just have to click on the “Prepare” button and here we go ! One Space Invader lamp incoming !
Step 4 : printing the object
Once you pressed the “Prepare” button, the estimated time of printing will appear. More or less 5 hours for me… well let’s get started!
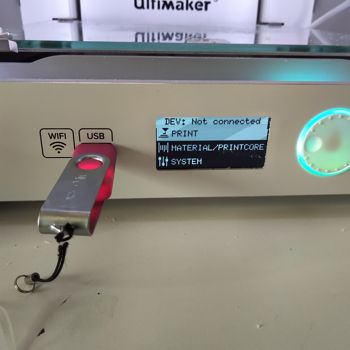
I put on a USB in my laptop, and click on “Save to removable disk”.
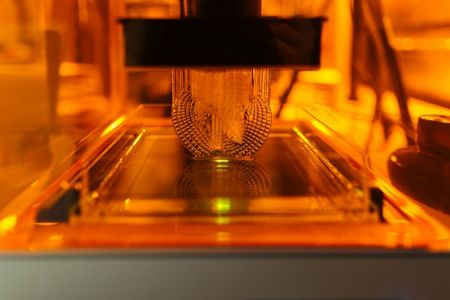
Once your file is saved on your USB disk, I went to one of the fablab’s 3D printer to print my super Space Invader !
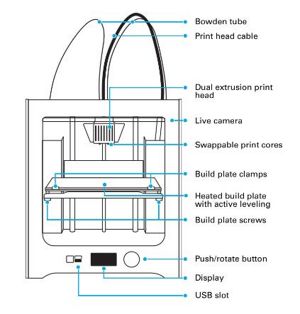
I chose the Ultimaker 3. Here is how it looks like :
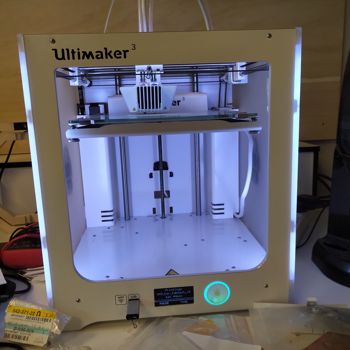
and how it is composed :
I used it dozens of times, everytime it went super smoothly…. and of course it didn’t work at all this time ^^'
Step 5 : fail… over and over again ^^'
I experienced a loooot of bugs and failed printings.
Well, a lot… at least 4 or 5. I had one main issue : the print didn’t want to stick to the building plate.
I had to start over a bunch of times because, as you can see right below, the plastic wire didn’t work well and it went all crazy on the 3D building.

How did we solve it ?
First, I tried to redo the levels of the building plate. First I tried automatically, but it failed also.
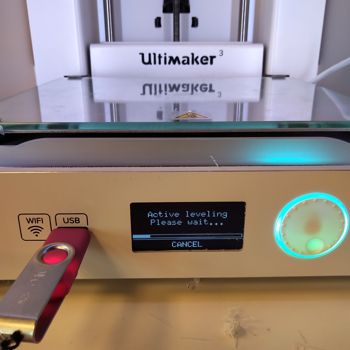
Then Adel, our local instructor, showed me how to do it manually. It’s actually pretty easy you just have to follow the instructions given by the machine. But still, it didn’t work.
Then, with Adel we tried changing the filament. And actually… it worked ! It seemed that the previous filament was grinded by the extruder. It looks like this :
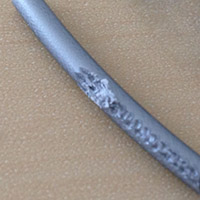
We used PLA instead of the original PC material that was in the machine. Alleluia, my printing can start after more or less 3 hours of failures and looking for solutions ^^'
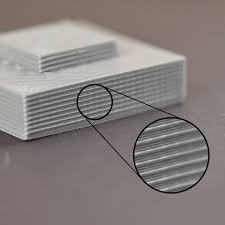
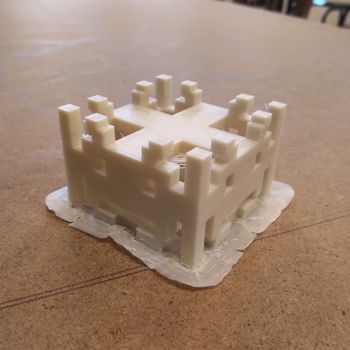
Here is the final result of my doing ! :)
SCANN3D (mobile app)
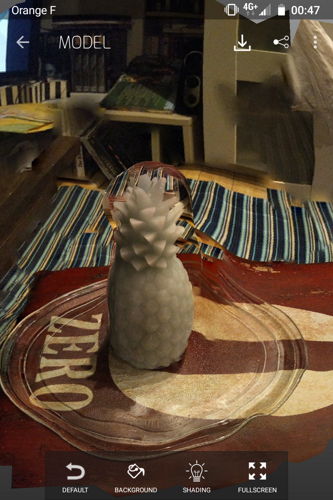
We also have to use a 3D scan to be more familiar with this technique. I decided to use an app on my phone : SCANN3D.
I found out about this app in an article written by Sculpteo.
The use of it is pretty simple. First go to your app store and install the application. Once it's installed and opened, the process is simple : take pictures, at least 20, while turning around the object you want to scan.
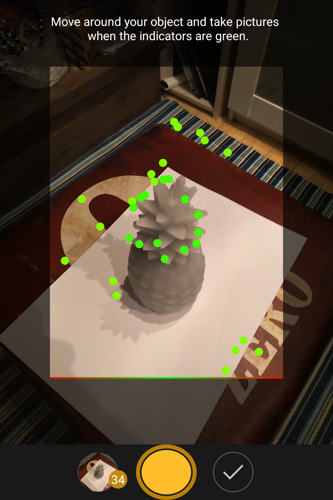
As you can see in the image above, there are green dots that indicates if the picture you are taking matches the previous one. If not, they appear red.
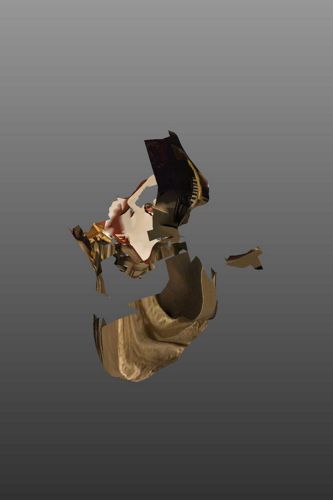
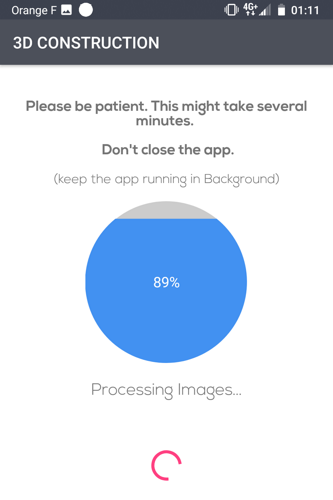
You need at least 20 pictures, but you can take more if you want ! I took around 25. A screen appears while the app is calculating the 3D model based on all those pictures you took. Then comes the result ! And it is.... well pretty awfull ^^' Looks like my appartment mutated !
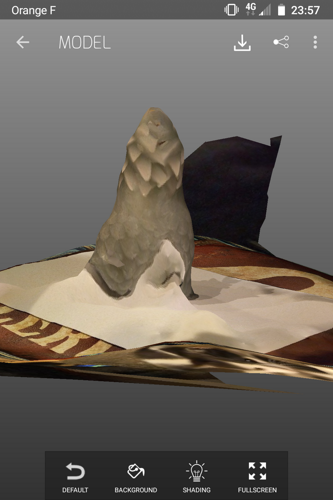
I tried again with different lights and more pictures... after four tries, it came out not too bad :)
Fun ! Unfortunately, I can't download the .stl version of the file to upload it here, so I'll try another app.
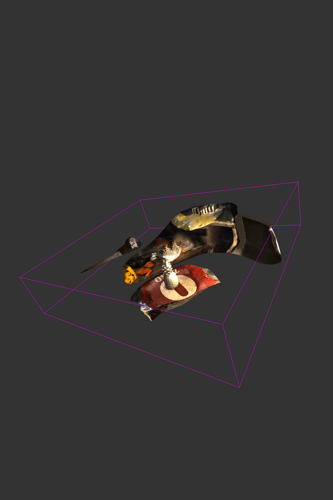
3D Scanner (mobile app)
Not too much originality in the name, but let's try it :)
Same process as before, so I won't describe it here. Here is was the interface looks like. Not as fancy as before, but let's try it and we'll see ! This time I took over 40 pictures.
I must say the result is pretty cool for a first try compared to the other app ! Then again, I couldn't find a way to download the .stl file.
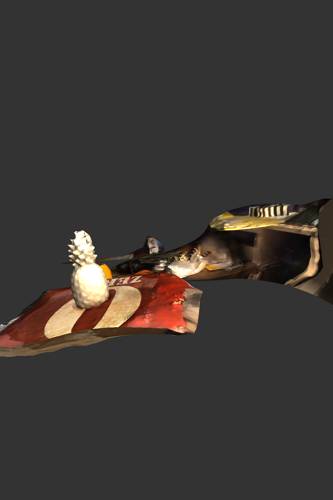
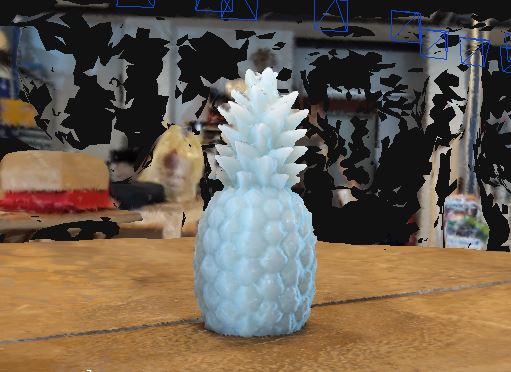
3DF Zephyr (desktop software)
My computer doesn't have NVIDIA so I had to find a software that could do photogrametry without it. And I found it ! It's called 3DF Zephyr and there is a freemium version.
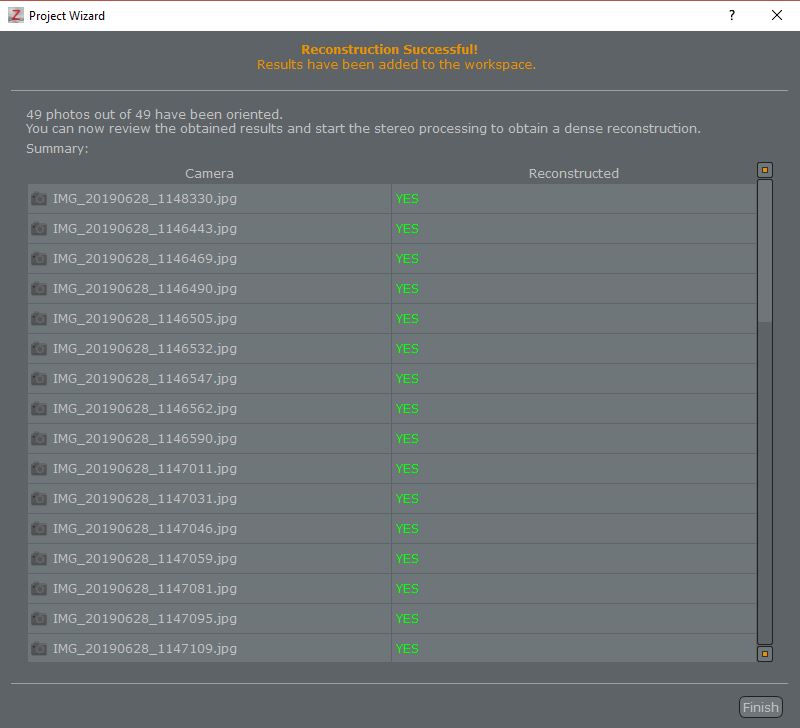
As for the apps, it needs pictures of the object. With this free version it cannot process more than 50 pictures so it won't be very detailed, but that's not a problem, as long as it gives me a result for the assignment :)
To download the software, you can go directly on the website : https://www.3dflow.net/3df-zephyr-free/
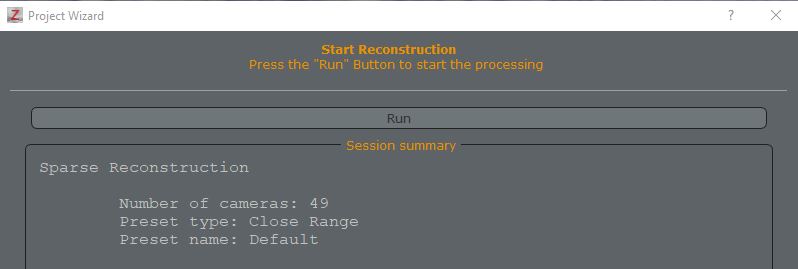
There are a few steps to make the photogrametry :
First, you need to upload the pictures in the software. It will analyze them to see if they fit all together and if you need to make them again or add some. But apparently the ones I took went okay !
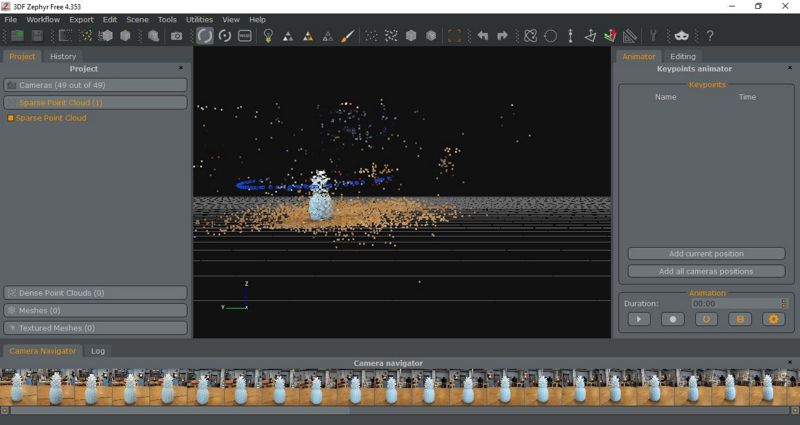
Then you need to reconstruct from those pictures the 3D image of the pineapple by clicking on the "sparse point cloud" button and wait for the process to end. It can take a few minutes !
You get a first rendering, and it's already looking good ! Now we have to make it more precise
Now, we have to make the sparse point denser, so just click on the "dense point cloud" button and it does the tricks !

I can say it went even better ! Here is what it looks like :)
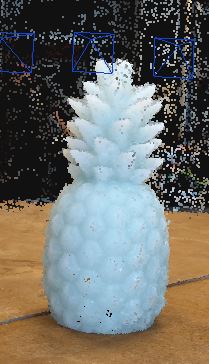
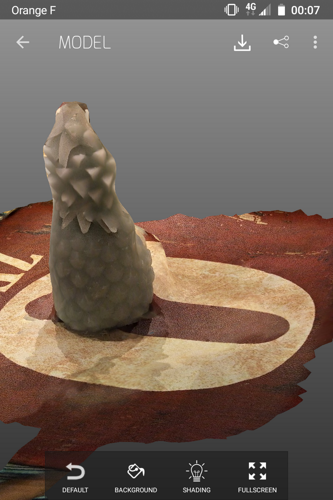
Now let's launch the mesh process by clicking on the "textured mesh generation". Like this the texture and the image will be even smoother and more details. It took a few minutes but I'm so glad with how it came out !
And here's a video so you can see it even better :)
And the Sketfab visualisation !
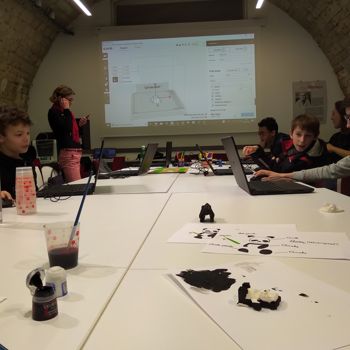
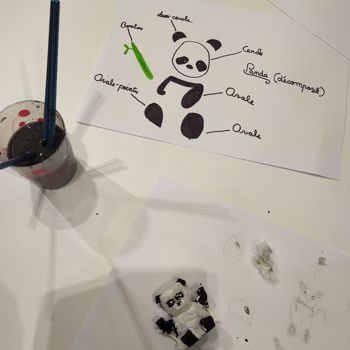
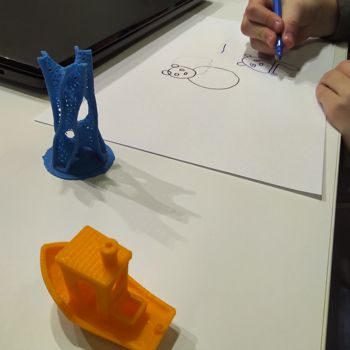
BONUS TRACK : teaching 3D printing :)
Here are some pictures of the 3D printing workshop I did last saturday :)
BONUS BONUS TRACK : adding a new page to my website :)
I decided to celebrate my most beautiful failures on my website, maybe it can inspire some of you :) You can find them on the "Wall of Fails" page ! :)
Wanna try by yourslef ?
Here are all the links to my files, feel free to download them :
| Name of the documents | Link to download |
|---|---|
| 3D Space Invaders | OpenScad File |
| 3D Space Invaders | STL File |
| 3D Scan | ZEP File |
| 3D Scan | OBJ File |