16. Interface and application programming
Group work
This week we did the group work together with whole Oulu group. Several of us used Processing, also Python, Blynk and PyQt5 were used. Here is some comparison of the used programs.
Processing
See Processing web site.
Processing is a flexible software sketchbook and a language for learning how to code within the context of the visual arts. Since 2001, Processing has promoted software literacy within the visual arts and visual literacy within technology. There are tens of thousands of students, artists, designers, researchers, and hobbyists who use Processing for learning and prototyping.
- Free to download and open source
- Interactive programs with 2D, 3D, PDF, or SVG output
- OpenGL integration for accelerated 2D and 3D
- For GNU/Linux, Mac OS X, Windows, Android, and ARM
- Over 100 libraries extend the core software
- Well documented, with many books available
Here is an example of a code (screenshot of my individual assignment) that reads serial data:
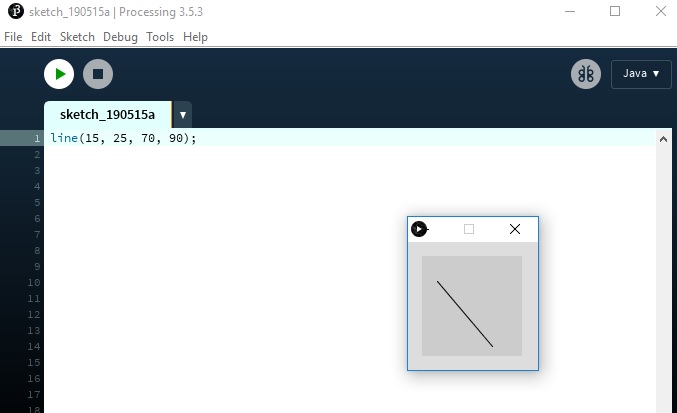
The Processing equivalent of a “Hello World” program is simply to draw a line:
line(15, 25, 70, 90);
it will draw a line in a window
Blynk
See Blynk we site.
Blynk supports hardware platforms such as Arduino, Raspberry Pi, and similar microcontroller boards to build hardware for your projects.
Blynk supports the following connection types to connect your microcontroller board (hardware) with the Blynk Cloud and Blynk’s personal server:
- Ethernet
- Wi-Fi
- Bluetooth
- Cellular
- Serial
The Blynk platform includes the following components:
- Blynk app builder: Allows to you build apps for your projects using various widgets. It is available for Android and iOS platforms.
- Blynk server: Responsible for all the communications between your mobile device that’s running the Blynk app and the hardware. You can use the Blynk Cloud or run your private Blynk server locally. It’s open source, could easily handle thousands of devices, and can even be launched on a Raspberry Pi.
- Blynk libraries: Enables communication with the server and processes all the incoming and outcoming commands from your Blynk app and the hardware. They are available for all the popular hardware platforms.

Hello world with Blynk looks like this:
BLYNK_LOG1("Hello World"); // Print a string
PyQt5
See PyQt5 web site.
Qt is set of cross-platform C++ libraries that implement high-level APIs for accessing many aspects of modern desktop and mobile systems. These include location and positioning services, multimedia, NFC and Bluetooth connectivity, a Chromium based web browser, as well as traditional UI development.
PyQt5 is a comprehensive set of Python bindings for Qt v5. It is implemented as more than 35 extension modules and enables Python to be used as an alternative application development language to C++ on all supported platforms including iOS and Android.
PyQt5 may also be embedded in C++ based applications to allow users of those applications to configure or enhance the functionality of those applications.

Hello world in a window with PyQt5:
import sys
from PyQt5.QtWidgets import QApplication, QWidget
if __name__ == '__main__':
app = QApplication(sys.argv)
w = QWidget()
w.resize(250, 150)
w.move(300, 300)
w.setWindowTitle('Hello World')
w.show()
sys.exit(app.exec_())
Python
Python is an interpreted, high-level, general-purpose programming language used for developing both desktop and web applications. Python is also used for developing complex scientific and numeric applications and its design philosophy emphasises code readability with its notable use of significant whitespace.
A simple program for addition and calculating savings in Python is presented below :
# Create a variable savings
savings = 100
# Create a variable factor
factor = 1.10
# Calculate result after 7 years
result = savings * (factor ** 7)
# Print out result
print (result)
Hello world is simply or you can save it in a variable as above and print it:
print(“Hello, World!”)?
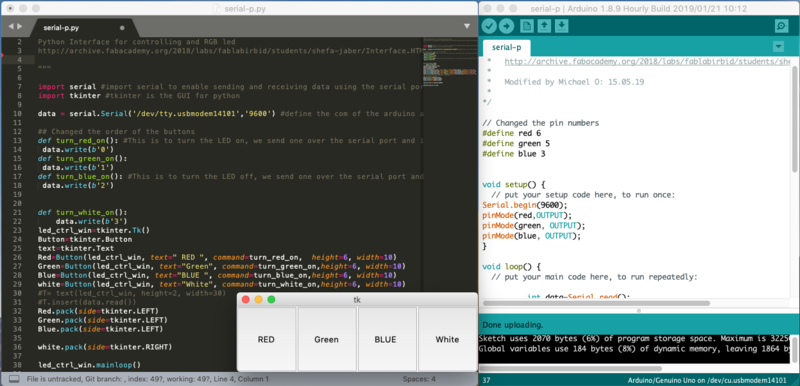
For the assignment, we followed this example for controlling an RGB LED with Python and Arduino.
Individual assignment
Our instructor Ivan gave us a lesson about interface and application programming. Based on that I wanted to use Processing for the programming. First I watched a tutorial and then downloaded Processing to my computer.
I decided to use my Sensor board from Week11 and create an interface to visualize the touch sensors.
There are eight sensor pads in my touch sensor that will control the brightness of my final project Led lamp. I wanted to create an interface monitor that will show which sensor pad is touched. When I touch sensor 1, a small star will be drawn. When I touch sensor 2, a little bit bigger star is drawn. And so on till sensor 8 with the biggest star. If you are pressing two (or more) pads at the same time, the biggest star is drawn.
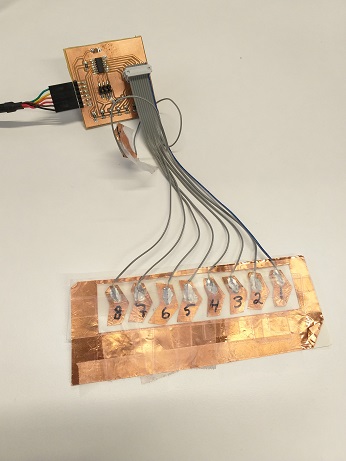
Sensor buttons are numbered from 1 to 8. When the user presses a button, the raw values of all sensors are sent to the serial line as a string ending with \n. The receiving end will compare the raw values to the threshold, and identify the highest button that was pressed.
measurements[0] = check_pin(sense0);
measurements[1] = check_pin(sense1);
measurements[2] = check_pin(sense2);
measurements[3] = check_pin(sense3);
measurements[4] = check_pin(sense4);
measurements[5] = check_pin(sense5);
measurements[6] = check_pin(sense6);
measurements[7] = check_pin(sense7);
int i;
for(i = 0; i<8; i++)
{
print_int(measurements[i]);
}
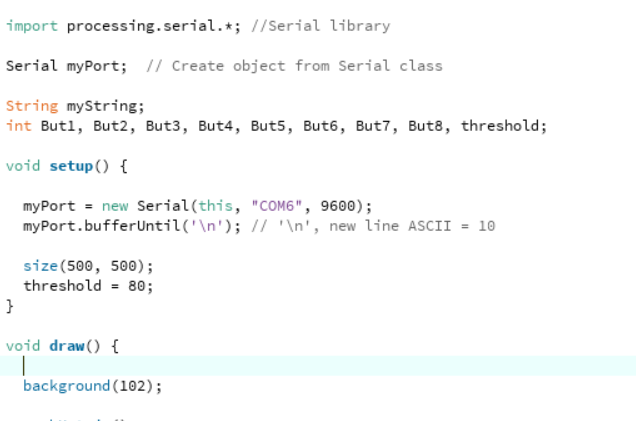
First I created the setup() that defines the serial port used and the baud rate.
myPort = new Serial(this, "COM7", 9600);
The setup() function is run once, when the program starts. It’s used to define initial enviroment properties such as screen size and to load media such as images and fonts as the program starts.
I defined a background process that buffers the serial data until new line is received. This data has the sensor values of all sensor pads in one row (one value for each sensor pad), this data comes from sensor board.
myPort.bufferUntil('\n'); // '\n', new line ASCII = 10
serialEvent() is called when data is available. It can be used with the read() method to capture this data or it can be set with buffer().
I used serialEvent() function to read serial data, row by row.
void serialEvent(Serial p) {
myString = p.readString();
The rows are split into 6 character long substrings and converted to integers that will be the values of the sensor pads. Those values (But1…But8) will be used in drawing.
But1 = int(myString.substring(0, 5).trim());
But2 = int(myString.substring(6, 11).trim());
But3 = int(myString.substring(12, 17).trim());
...
The draw() function is drawing a star and the size of the star is depending of which sensor is touched (sensor1 -> small star, sensor8 -> big star). I defined a threshold value, that will filter out the interference values of the sensor pads. The threshold value needed seems to be different depending on the environment where the testing is done. The idea is that only when touching the sensor pad, the value triggers a touch function and a star will be drawn. Threshold value is defined by testing which is proper value. If this sensor implementation would be used in bigger volumes in different kind of set-ups, automatic threshold configuration would be useful. In this assignment manual threshold value configuration was feasible.
The draw() function continuously executes the lines of code contained inside its block until the program is stopped or noLoop() is called.
if (But1 > threshold) star(0, 0, 30, 20, 10);
if (But2 > threshold) star(0, 0, 60, 40, 10);
if (But3 > threshold) star(0, 0, 90, 60, 10);
...
and the color of the star is defined in the fill() function
fill(255,255,0);
In star() function the shape of the star is defined
void star(float x, float y, float radius1, float radius2, int npoints)
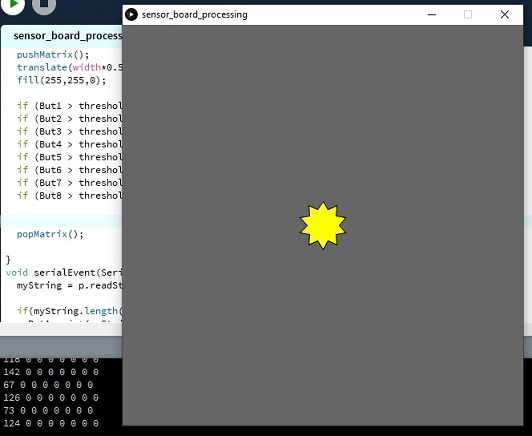
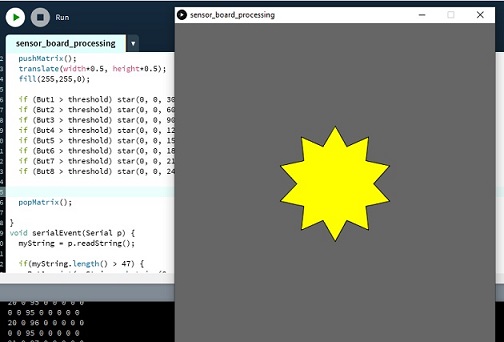
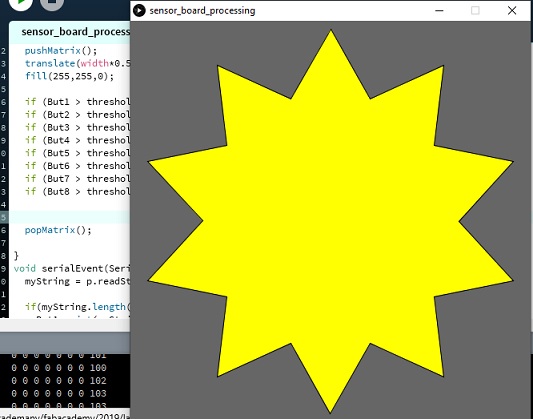
I connected the sensor board to COM7 with FTDI cable and run the Processing program. I checked from Device Manager which com port is used at the moment. When touching the sensor pads 1-8, the program is drawing a star and the size of the star depends on the sensor pad that is touched.
Touching sensor1:
Touching sensor3:
Touching sensor8:
Reflection
Local class by Ivan gave good idea how to start the individual work. It was nice to be able to use the board from Input week, this will also help me to in making the final sw for my final project when thinking about the logic of the touch sensors.
Processing is easy to use and with it you can easily make visual expression of the sensors used.
I had to do some thinking and testing how to get the values correctly from the sensor board, so that I can have the drawing logic correctly. For String and Substring handling I needed to google and find examples. Sensor board SE sends all button values in one long line, 6 space-padded bytes per button. I needed to extract the value for each button by picking up the relevant part from the long line for each button, and then trimming the extra spaces away, and only then translating the number from string to binary integer. Processing.org has good explanation of functions and examples that help.