Wild Card Week
Have you:
[x] Shown how you made your mould and created the composite
[x] Described problems and how you fixed them
[x] Included your design files and ‘hero shot’ photos of the mould and the final part
[x] Read and linked to the material safety data sheet (MSDS) and technical data sheet (TDS) for the resins that you're using
For wildcard week, I fabricate the lid, tank, and end caps for Abundance. I accomplish this by using burlap and resin to make composite parts for the structure. The main aesthetic of my final project is to be an artifact from a speculative future in which plants and machines form a mutualistic relationship. So, I want to have a blend of synthetic and organic parts to give a salvaged look evocative of that future.
I started by modeling my parts in FreeCAD. I modeled negatives for the tank, lid, and end caps of the project. Each is a series of cubes and cylinders which are joined or subtracted through boolean operations.
After modeling the parts, I then exported the negative and positive versions into Rhino 7. I then processed the toolpaths for the parts. I decided to use the positive versions for the tank and lid. For the end caps, I kept the molds negative. I used a 12mm ball end mill with a speed of 24000 RPM. The roughing pass is horizontal while the finishing pass is parallel.
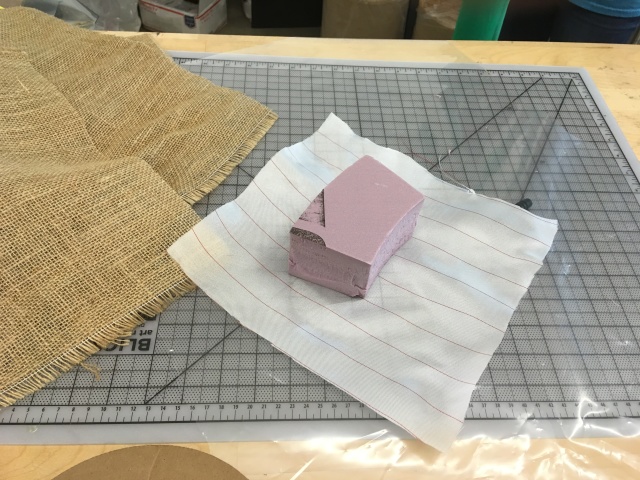
I then fixed the extruded polystyrene rigid foam to the Raptor X SL3200 with double sided tape. For additional support, I screwed in few scrap wood block at strategic points to hold the stock in place. The dongle that we usually use to zero the end mill actually did not fit in between the height of the stock and the bottom of the end mill when the Z-axis is at max height. So, I had to zero the end mill manually. After that I ran the job.
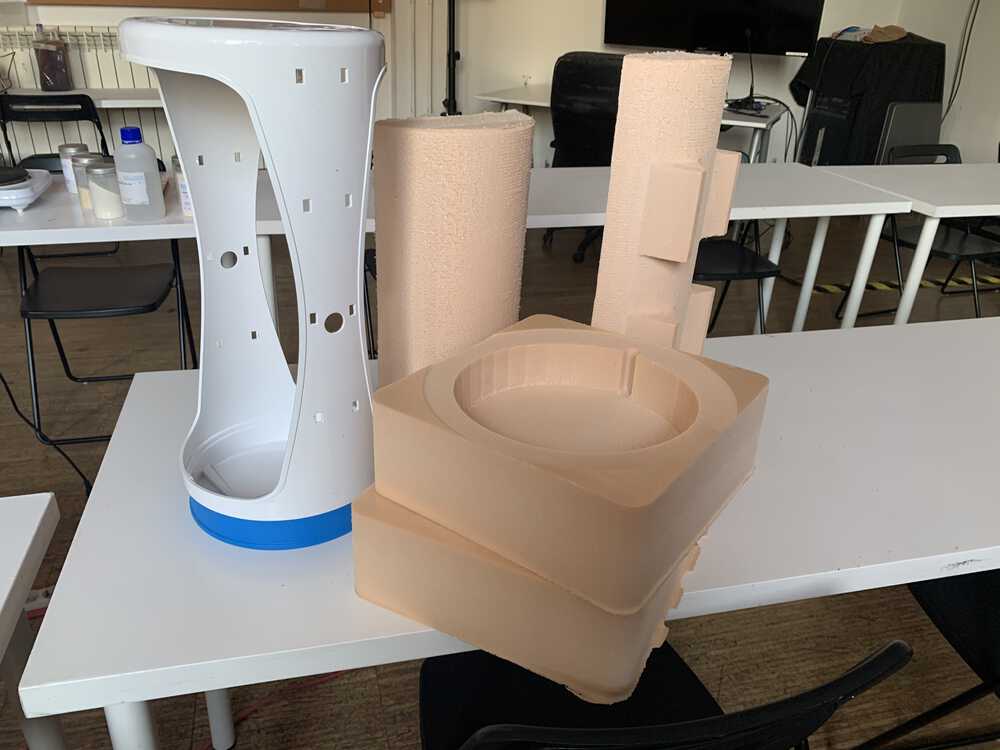
Before making composite parts, I tested the foam molds against the main structure of Abundance. The plastic part is actually an Orbit gum display that I salvaged from waste bins in the Poble Nou neighborhood. I needed to fit the tank inside the structure with some room for electronics housing. I also tested the end cap molds against the structure to be sure there was room for those as well.
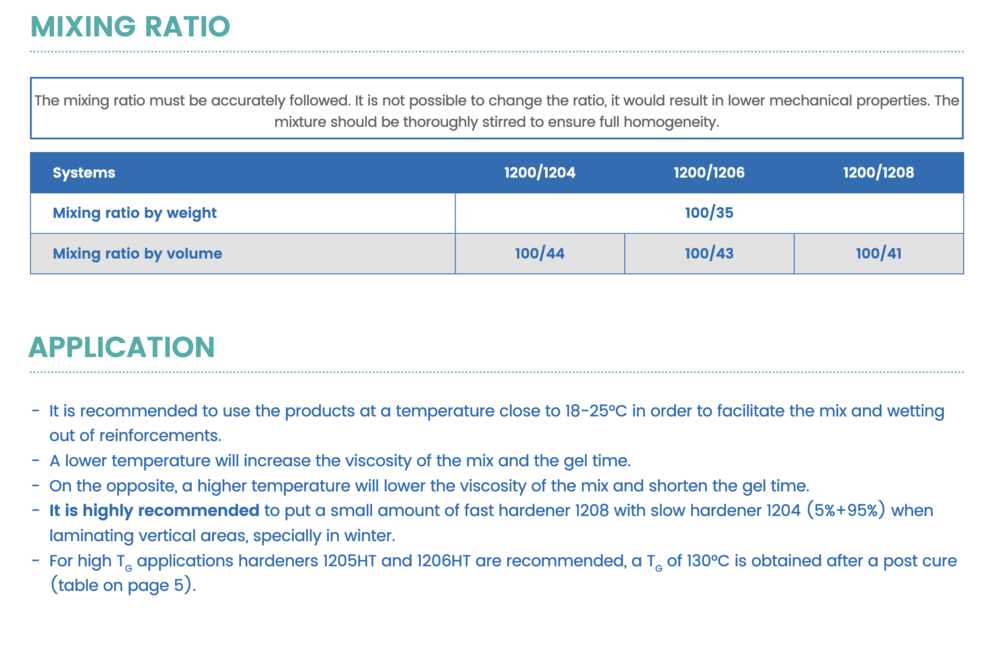
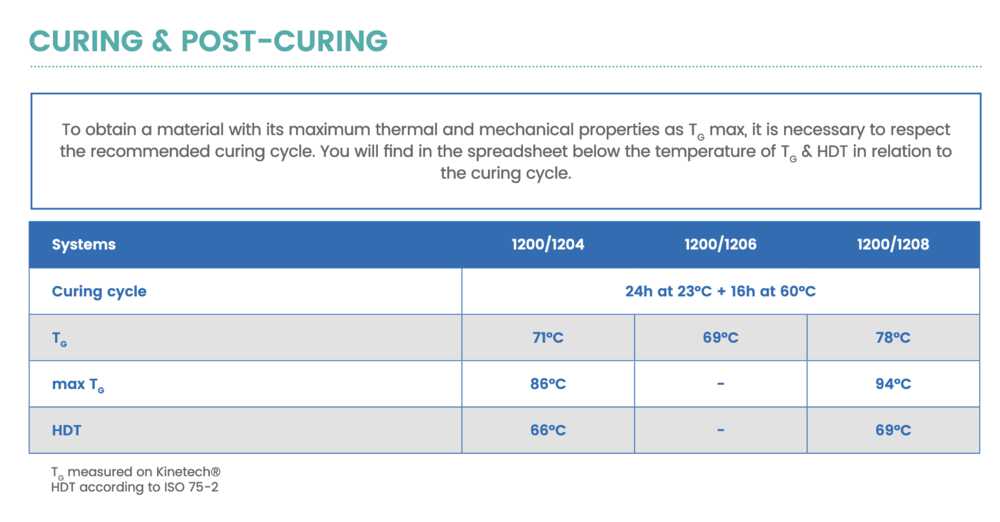
For this project, I used Castro composites 1200 resin and 1208 hardener. It has a mixing ratio of 100/41. The curing cycle is at least 24 hours.
Link to Datasheet:
https://www.castrocompositesshop.com/img/cms/DS%20-%201200.pdf
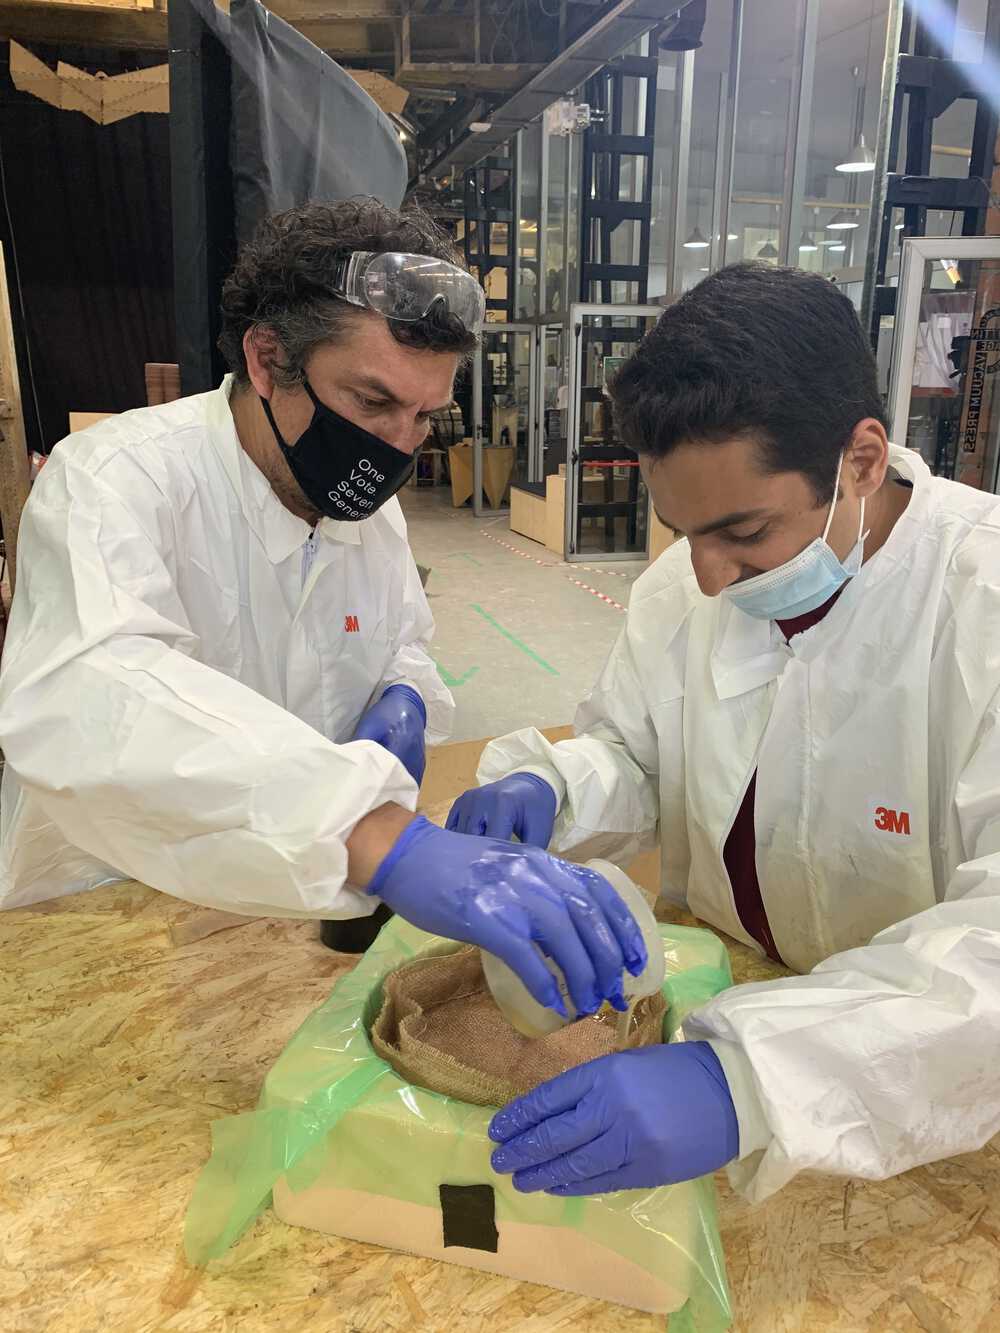
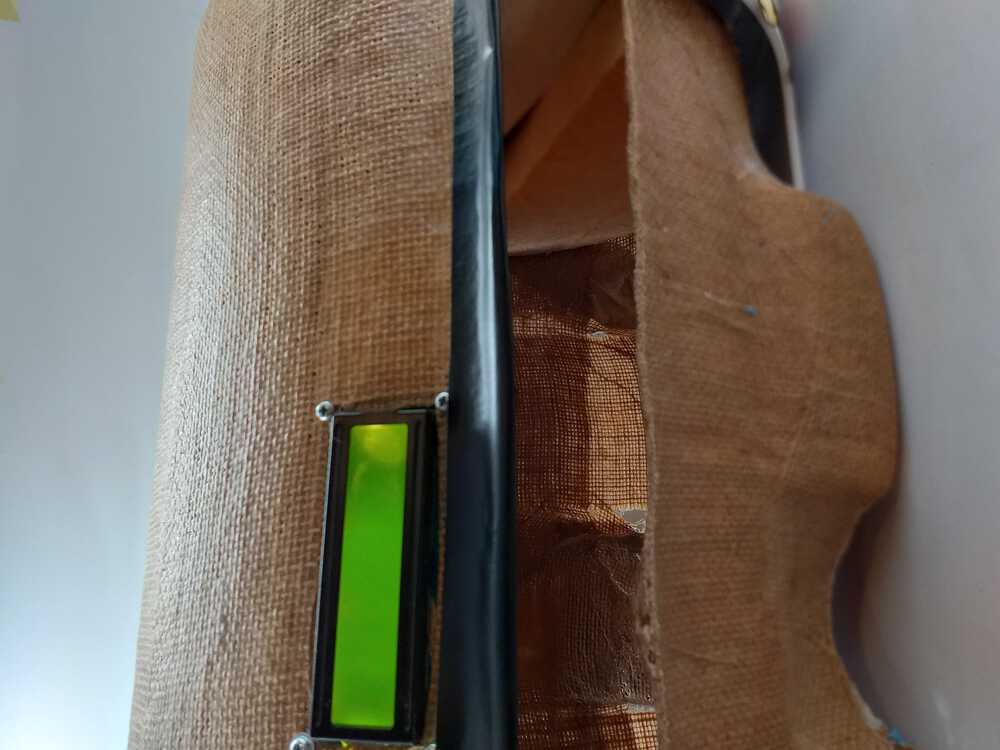
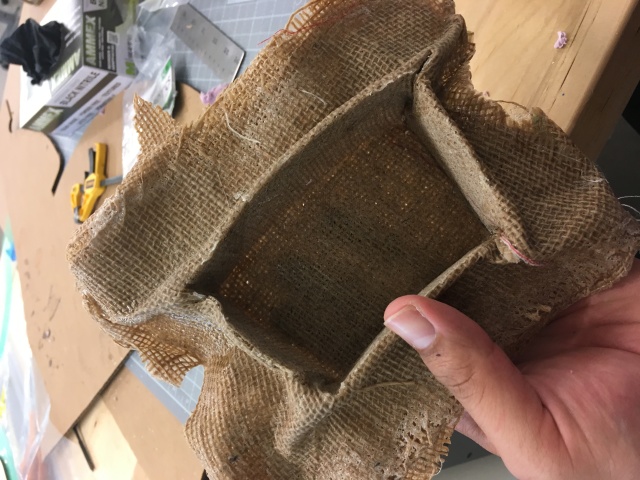
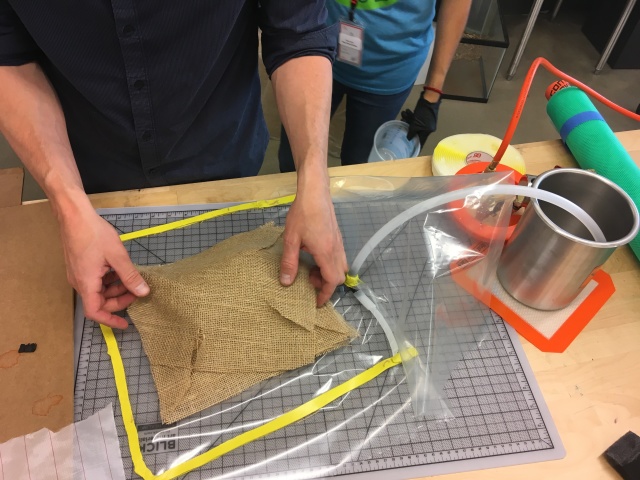
I applied double stick tape to the positive molds. Afterwards, I applied the release film. I then laid a layer of burlap to the mold. The tank and the end caps proved to be the most challenging. For the lid, I lasercut two pieces of burlap to provide a window for the 16x02 LCD screen. I then handcut strips of burlap from the jute. For the lid and tank, I supported both with blocks of wood to give the pieces more height than what the foam molds alone would allow. For the tank, laying the burlap follows a procedure of wrapping the feet first. Then, I laid strips to cover the rest of the structure. I covered each part with a layer of breather material, a doubled layer of quilt batting, and a final layer of release material.
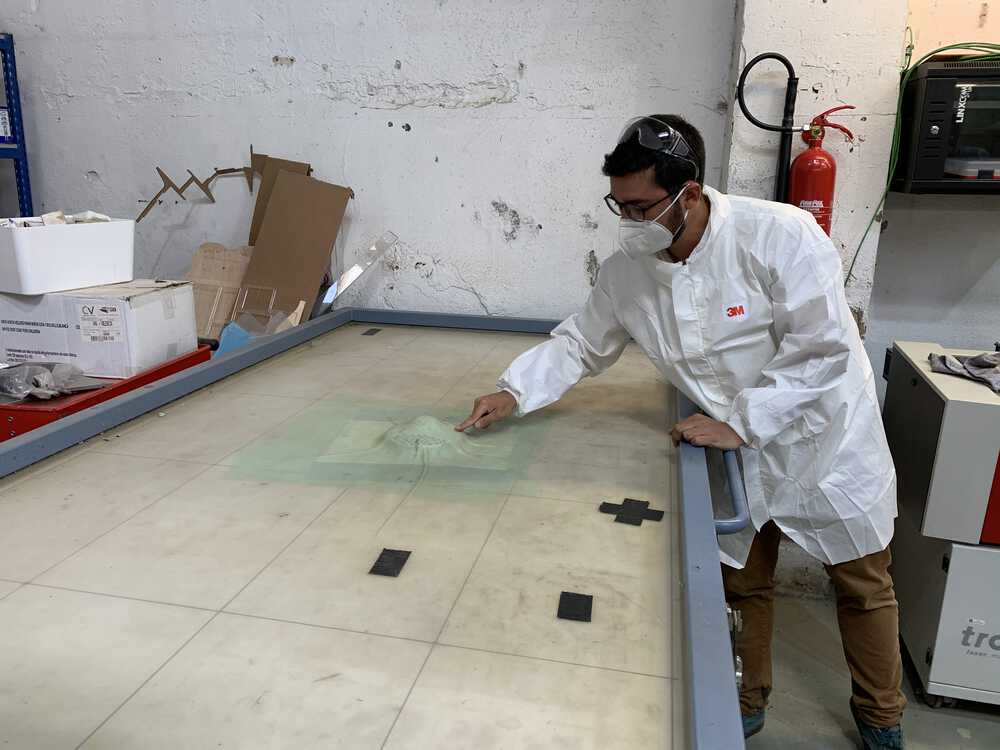
For the tank and lid, these parts were both curing on positive molds. I placed both in the vacuum forming table in the laser cutter room of Fab Lab BCN. I had to be careful not to touch the table with dirty gloves. Once the table was set and checked for any air escaping. I left the parts to cure overnight. For the end caps, I placed both in vacuum bags and suctioned the air out of both with a ShopVac.
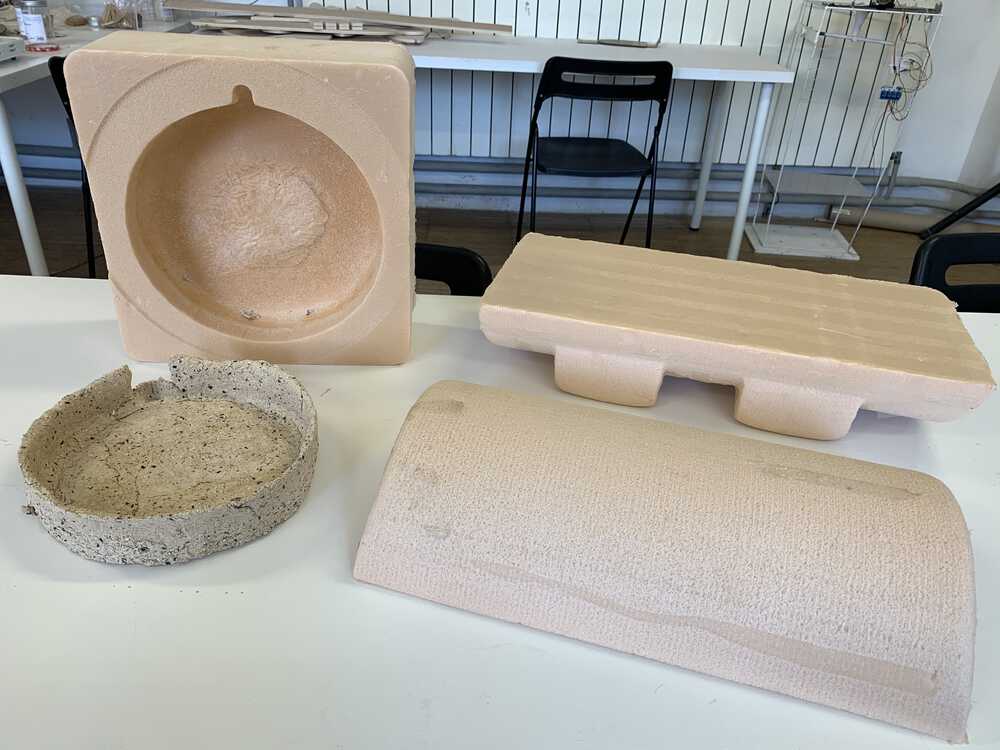
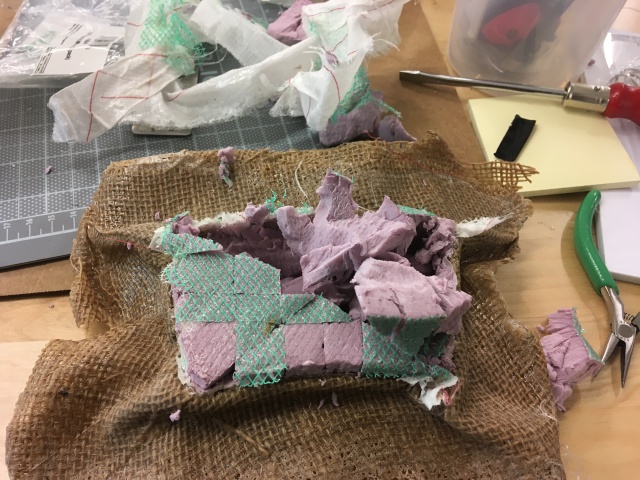
The tank and lid were fairly successful. The lid especially was not challenging. The tank had some holes in the feet, but I resolved to line the tank. The duckweed that will grow in Abundance needs a dark tank in order to avoid algae. The end caps were the most challenging as I may have had an incorrect mixing ratio. I may have also applied too much of the mixture. I returned to the sawdust clay recipe from molding and casting week. Again, that is NOT food safe. While the part that I molded was not successful for an endcap, I do think I can find a use for the plate.
- Design files: Right click + Save As
Testing Composites - 2018
We decided to make a test composite as a group. We found a 3" x 5" x 1.75" piece of foam. We measured and cut out a piece of nylon film (Composite Envisions Model 1952). This would form a vacuum bag that was approxiamtely 12" x 12" when folded over. The reason for the space was to accomodate for the height of the part. We did a mockup of layups for the compsite. Belo the tooling we place a piece of Green Resin Flow (Composite Envisions Model 1303). This served as a bottom bleeder layer. Above the tooling, we placed a piece of Airtech Econostitch Peel Play (Composite Envisions Model 1311). This would allow for easier removal of the tooling. We laid three plies of burlap. We cut enough of the fabric to allow for a lip at the bottom of the part. We also cut the fabric diagonally at the corners to fold the fabric over. We added a top layer of peel ply and then finally a layer of green resin flow. We did consider using quilting batting for a breather layer. Jean-Michel Molenaar advised that this was optional.
We started the lay up with a 1:1 ratio of epoxy (Entropy Resins Super Sap ONE) to hardener (Entropy Resins Super Sap ONF). We mixed the parts A & B for about a minute. We took care not to vigorously mix and start the curing process. Once the mixture was ready, we placed each piece of burlap in the mixture to impregante the fabric. From the point of mixing on, everyone who was in contact with the mixture wore nitrile gloves. As each piece was done, we laid them onto the peel ply on the tooling. Each time, we took care to recreate our decisions of lay up during the mock up stage. The decisions were based on the warp and weft of the fabric and trying our best to alternate the directions.
Once the tooling, peel ply, impregnated fabric, and bleeder layers were set; we set a nozzle and PVC tubing into the vacuum bag. We used vacuum bag sealant fom General Sealants on the nozzle and the edges of the vacuum bag. With the bag closed up, we attached a PVC tube to a vacuum chamber and air compressor (CPS VP4D 2 Stage Vacuum Pump).
Upon review of the Super Sap Technical Data Sheet, the pot life is 18 minutes. This is the time needed for a mixture's viscosity to double or quadruple. The tack free time for the fast hardener is 3 hours. This is the time when a coating is properly adhered and protecting the surface. The mix ratio is actually 2:1 on the technical data sheet and not 1:1 as we mixed it.

We began vacuuming the air and excess mixture out of the vacuum bag. There were areas where the sealant was not air tight. We used a clamp to adjust. We initially set the vacuum for 18 minutes, thinking of the pot life. An hour went by, and the vacuum was still running. The air compressor began to smoke. So, we decided to shut this off. We started to take apart the vacuum bag, but noticed that the part, peel ply, and bleeder layers were still very tacky. So, we decided to leave this overnight to air dry in the fab lab.
The next day, we returned to the lab to check on the part. It was not as tacky as the day before. It took a lot of hand work to pry the peel ply and bleeder layers from the part. Between the composite part and the tooling, the peel ply was harder to pull up. I decided to break apart the foam tooling and dig out the peel ply. Once everything was cleared, I started the "whack test."
- Design files: Right click + Save As