The process
Individual assignment:
To use the time wisely, I decided to spend my Wildcard Week on the IoT layer of the project — making sure I had end-to-end communication working in time for the final project. At this point in the academy, time management is the most important skill to apply: I'd feel invincible if I could master it, but I'm holding that judgement until I finish my final project and present it on the 12th of June 2026.
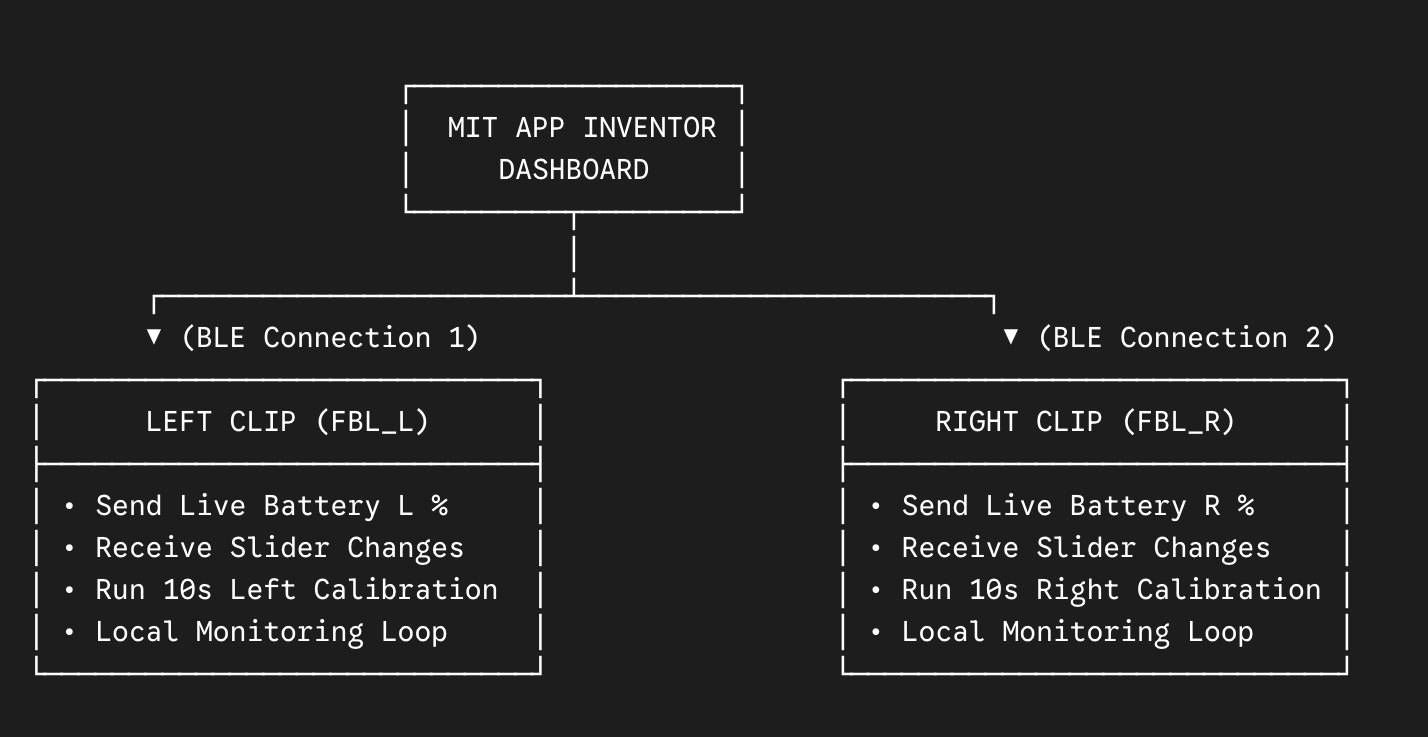
My final project uses two clips, each with an ESP32-C3 XIAO microcontroller and identical components and PCB design — one left, one right. Both clips talk to a phone app I built with MIT App Inventor. I tried several integration patterns this week to see what works and what doesn't; by the end of the week I'd shortlisted the functionalities for the final build.
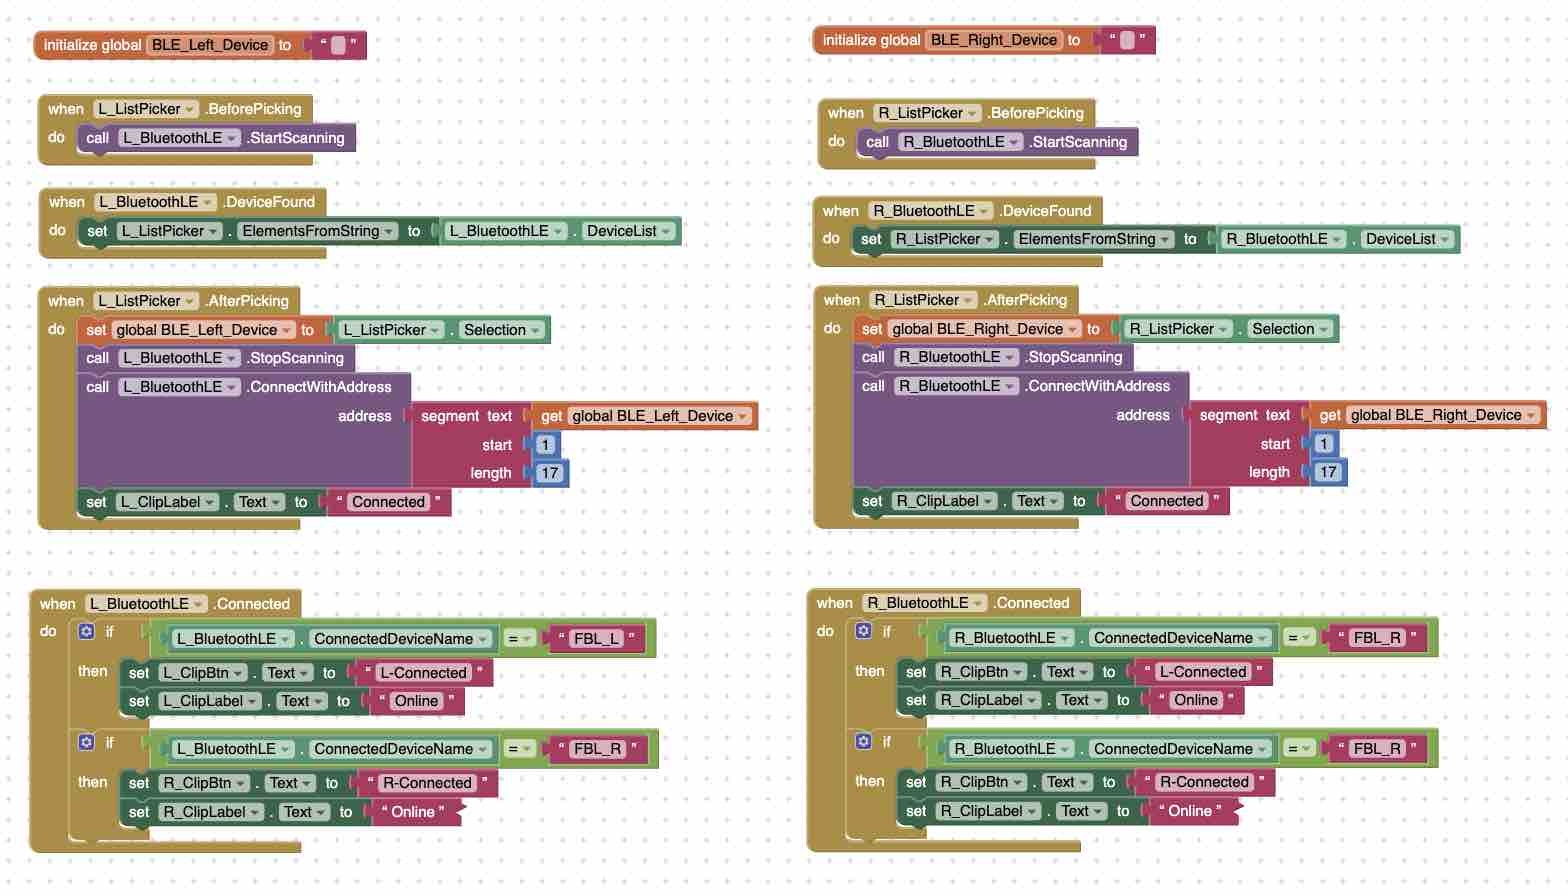
App Inventor provides block-programming functionality that hides most of the syntax overhead — also documented in detail in Week 14 — Interface and Application Programming and Week 15. I duplicated the same blocks for the left and right clips: opening the Bluetooth connection and sending parameters to the ESP32-C3 microcontroller. that started the discussion for developing the code for the integration between the clips and the app.
My prompt to Gemini: …before that, let's make sure the main logic is correct. OK, let's define the exact functionality between App Inventor and the microcontroller. We will have 1 app and 2 identical microcontroller clips — one left, one right. The app will first detect the clips, connect to them, (2) show the battery level, (3) initialize calibration when a button is clicked, (4) using the sliders on the app, the user can define 3 things on the slider: vibration strength, delay before the vibration and LED blinking start, and the angle for the "accepted threshold". The microcontroller should be on and working. (Verbatim prompt — kept as sent.)
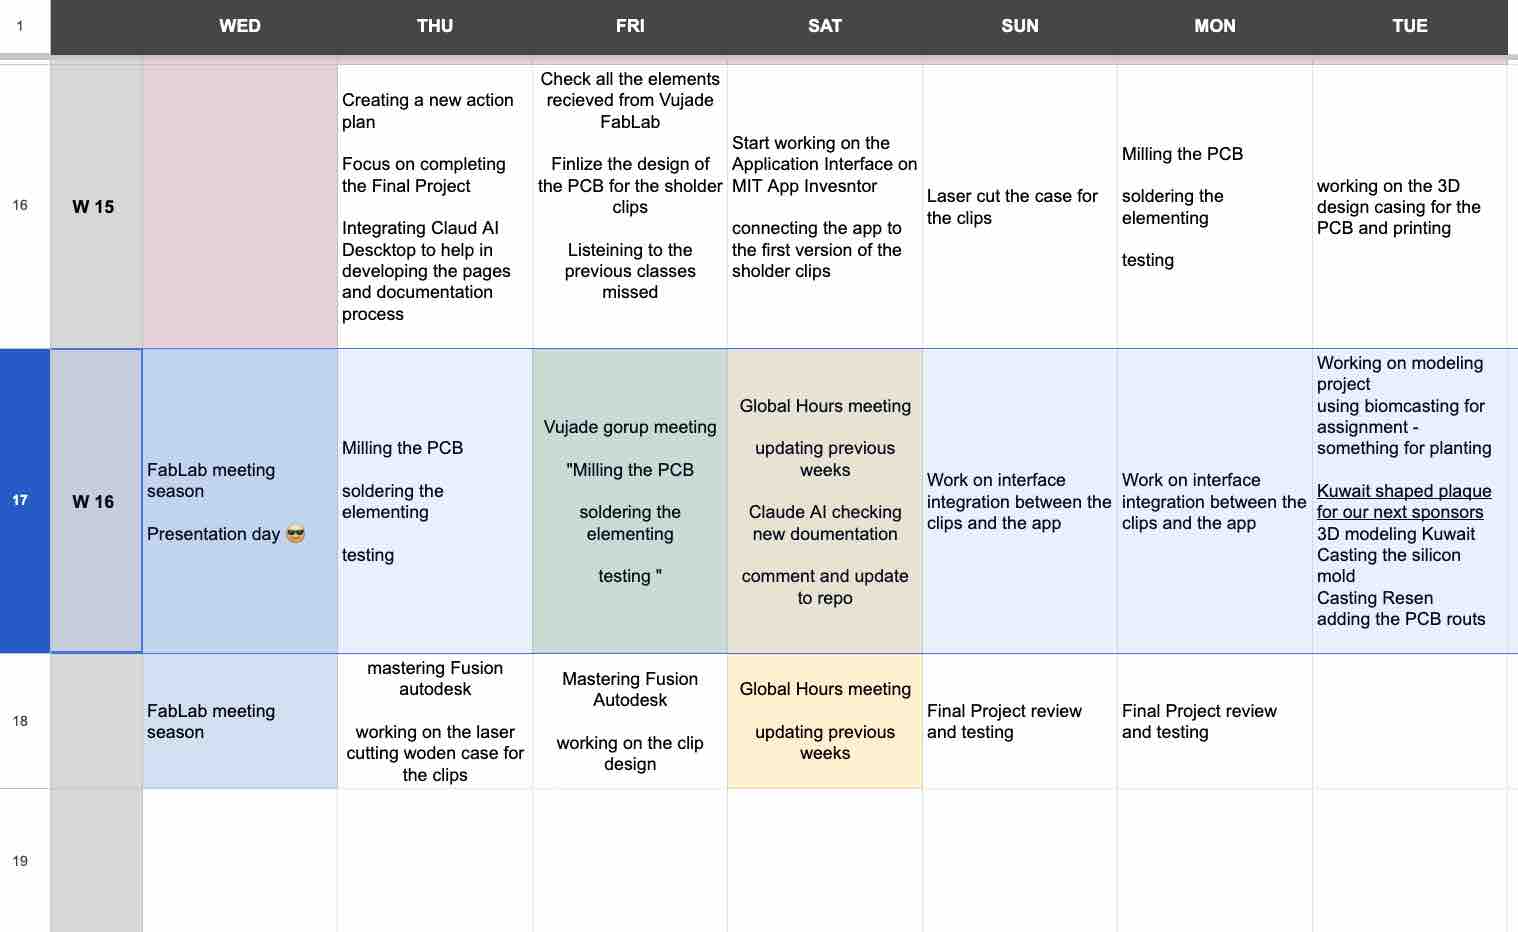
01: Schedule
02: Use of AI
In this assignment I used Google Gemini as my virtual coach, kicking off with — fed in after the earlier coding and programming work on the microcontrollers. It guided both the App Inventor blocks and the MicroPython code on the clips. the full converstaioncan be accesses here
Prompt to Gemini: I will create another copy of the app, keep the design and the naming, and start with fresh code . then we will take things step by stem and I will need you follow my guidance .. other than wanting to make this project works, i need to documnet in my website and repo so somesteps i migh suggest is to fill in the Interface assignsnt and the IOT assignmnet as well as getting the final project completed. I really want to finish this today so that I world on the other parts of the project as well (Verbatim prompt — kept as sent.)

03: IoT — Clips ↔ App integration
I kept the MicroPython code in Thonny and the App Inventor designer / blocks editor open side by side on the same screen, with Gemini active for paired debugging. I worked one function at a time — define → build → test → debug → confirm on both Thonny and the app — before moving to the next functionality.
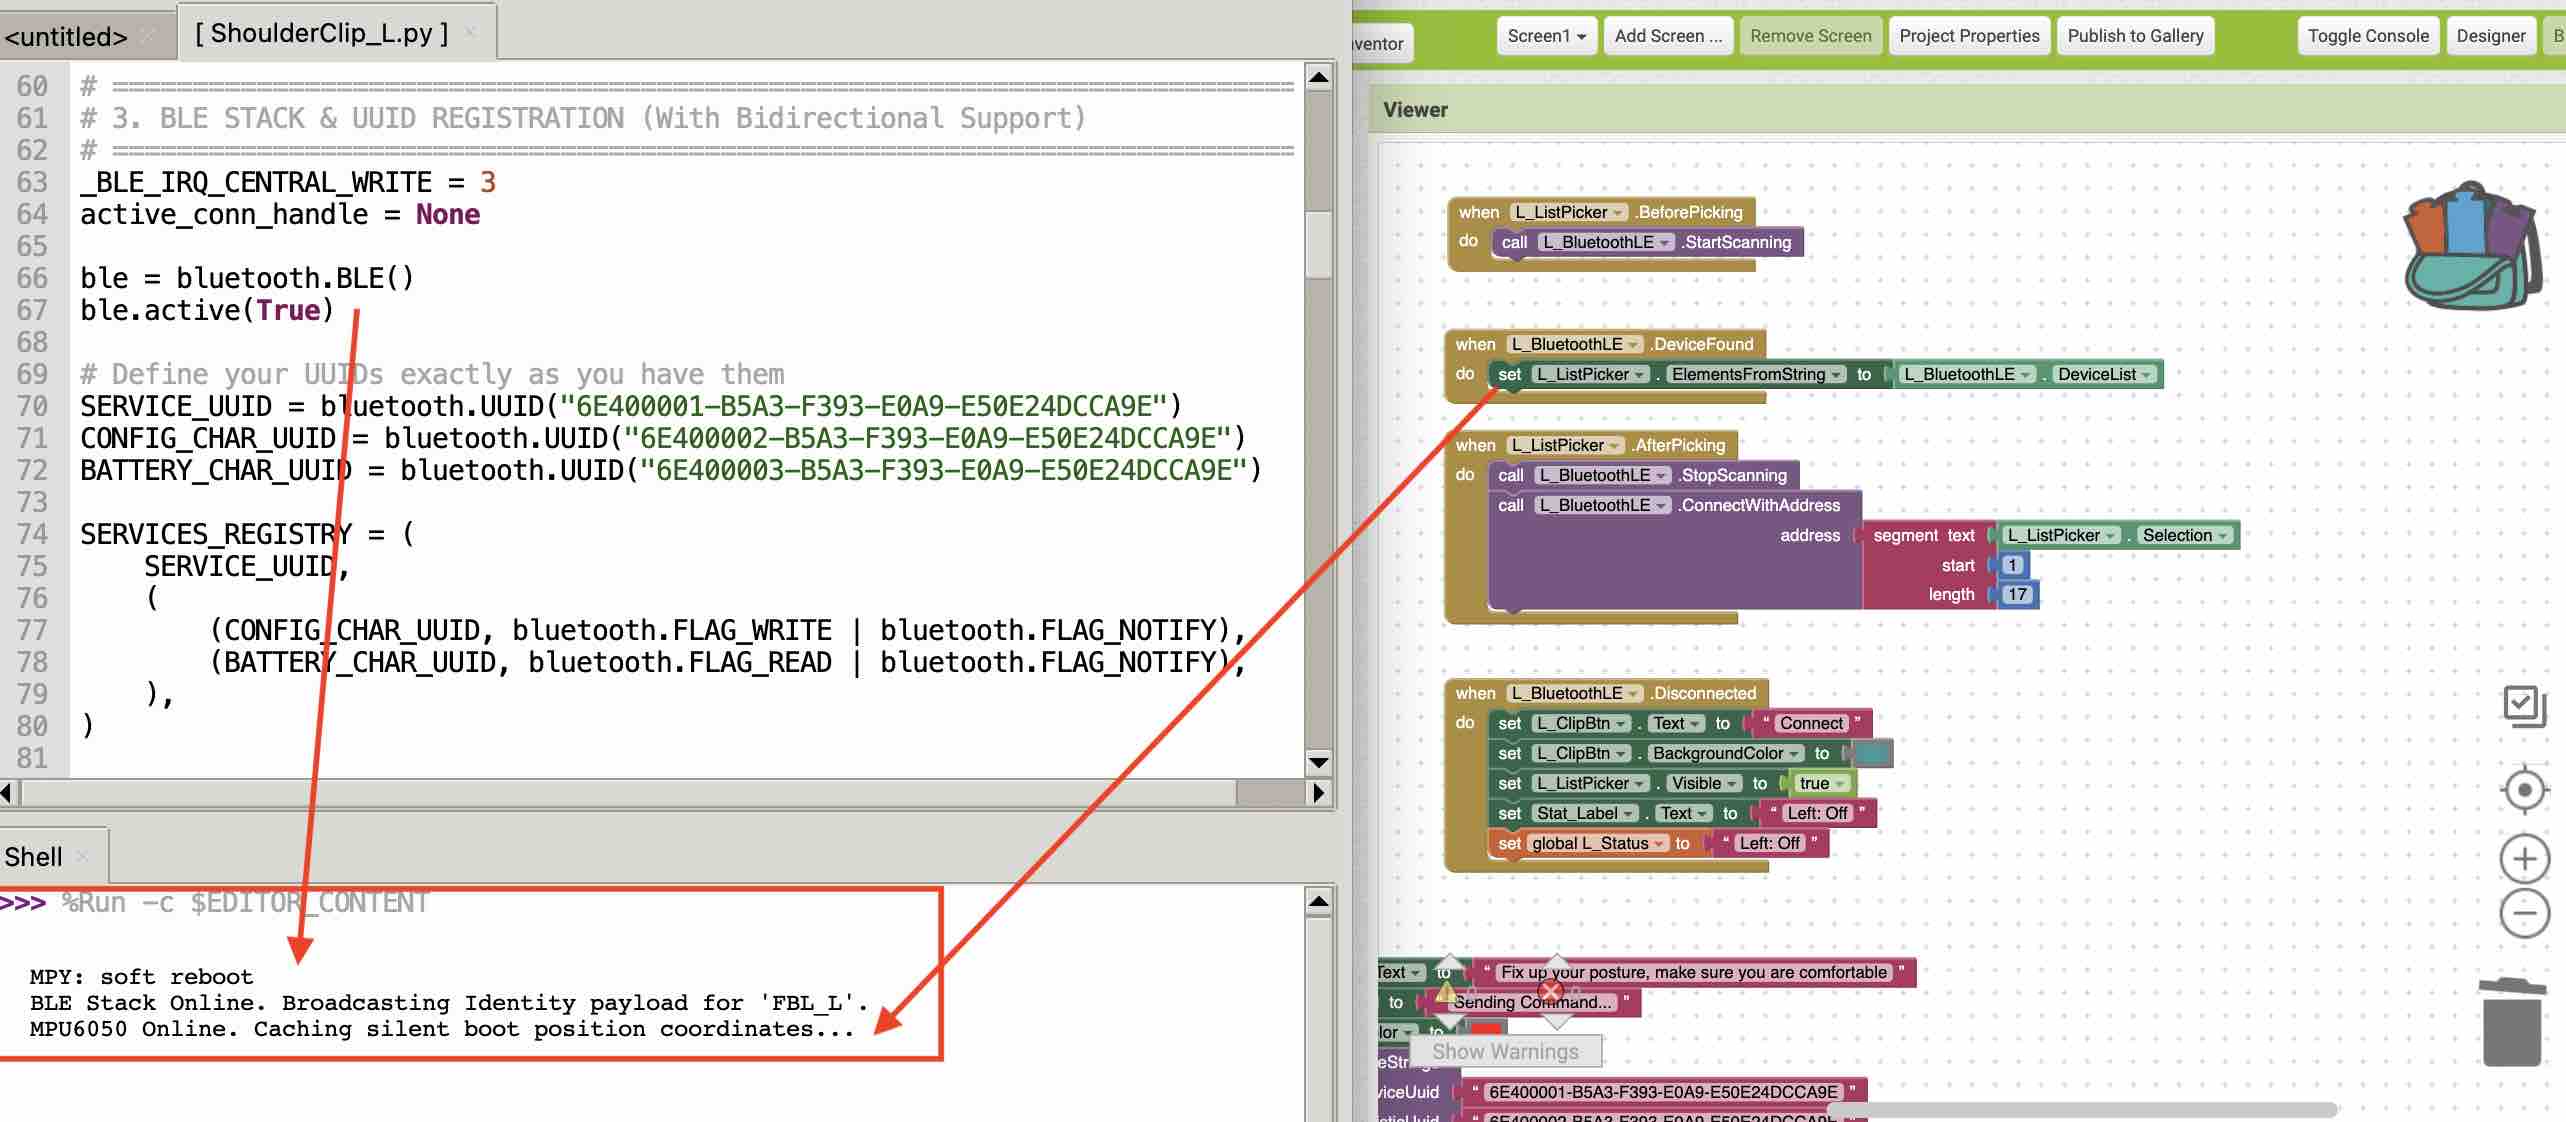
01 | Connection. I used as the main channel between the left clip "FBL_L" and the app. The clip advertises its name and UUID → the app scans for Bluetooth devices → lists them → on selection, only the first 17 characters of the UUID are used → the connection button is disabled and relabelled "Connected" → the BLE link is established → a handshake flag prints in Thonny → the clip status updates to "Connected! Ready for Calibration".
Bluetooth Low Energy, also referred to as Bluetooth LE or simply BLE, is a new communication protocol similar to classic Bluetooth except that it is designed to consume less power while maintaining comparable functionality. For this reason, Bluetooth LE is the preferred choice of communication with IoT devices that have limited power resources.
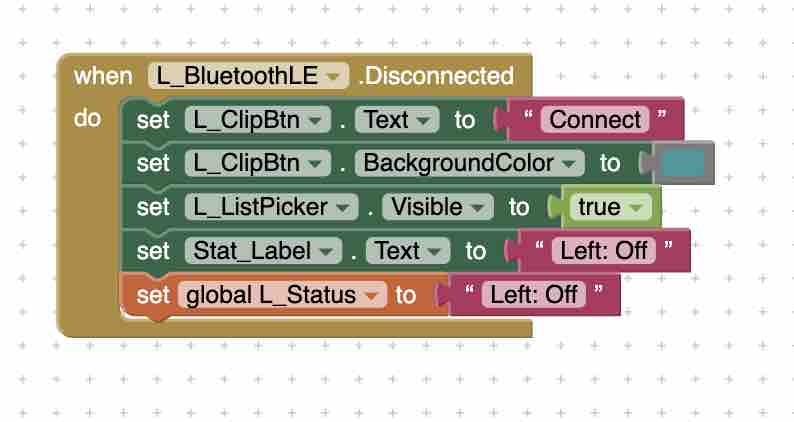
02 | Disconnect. Before moving to the other parts of the program I wanted a clean way to end the connection. When the connection button is clicked → BLE link is disconnected → the button colour changes back to enabled → status changes to "Clip Off".
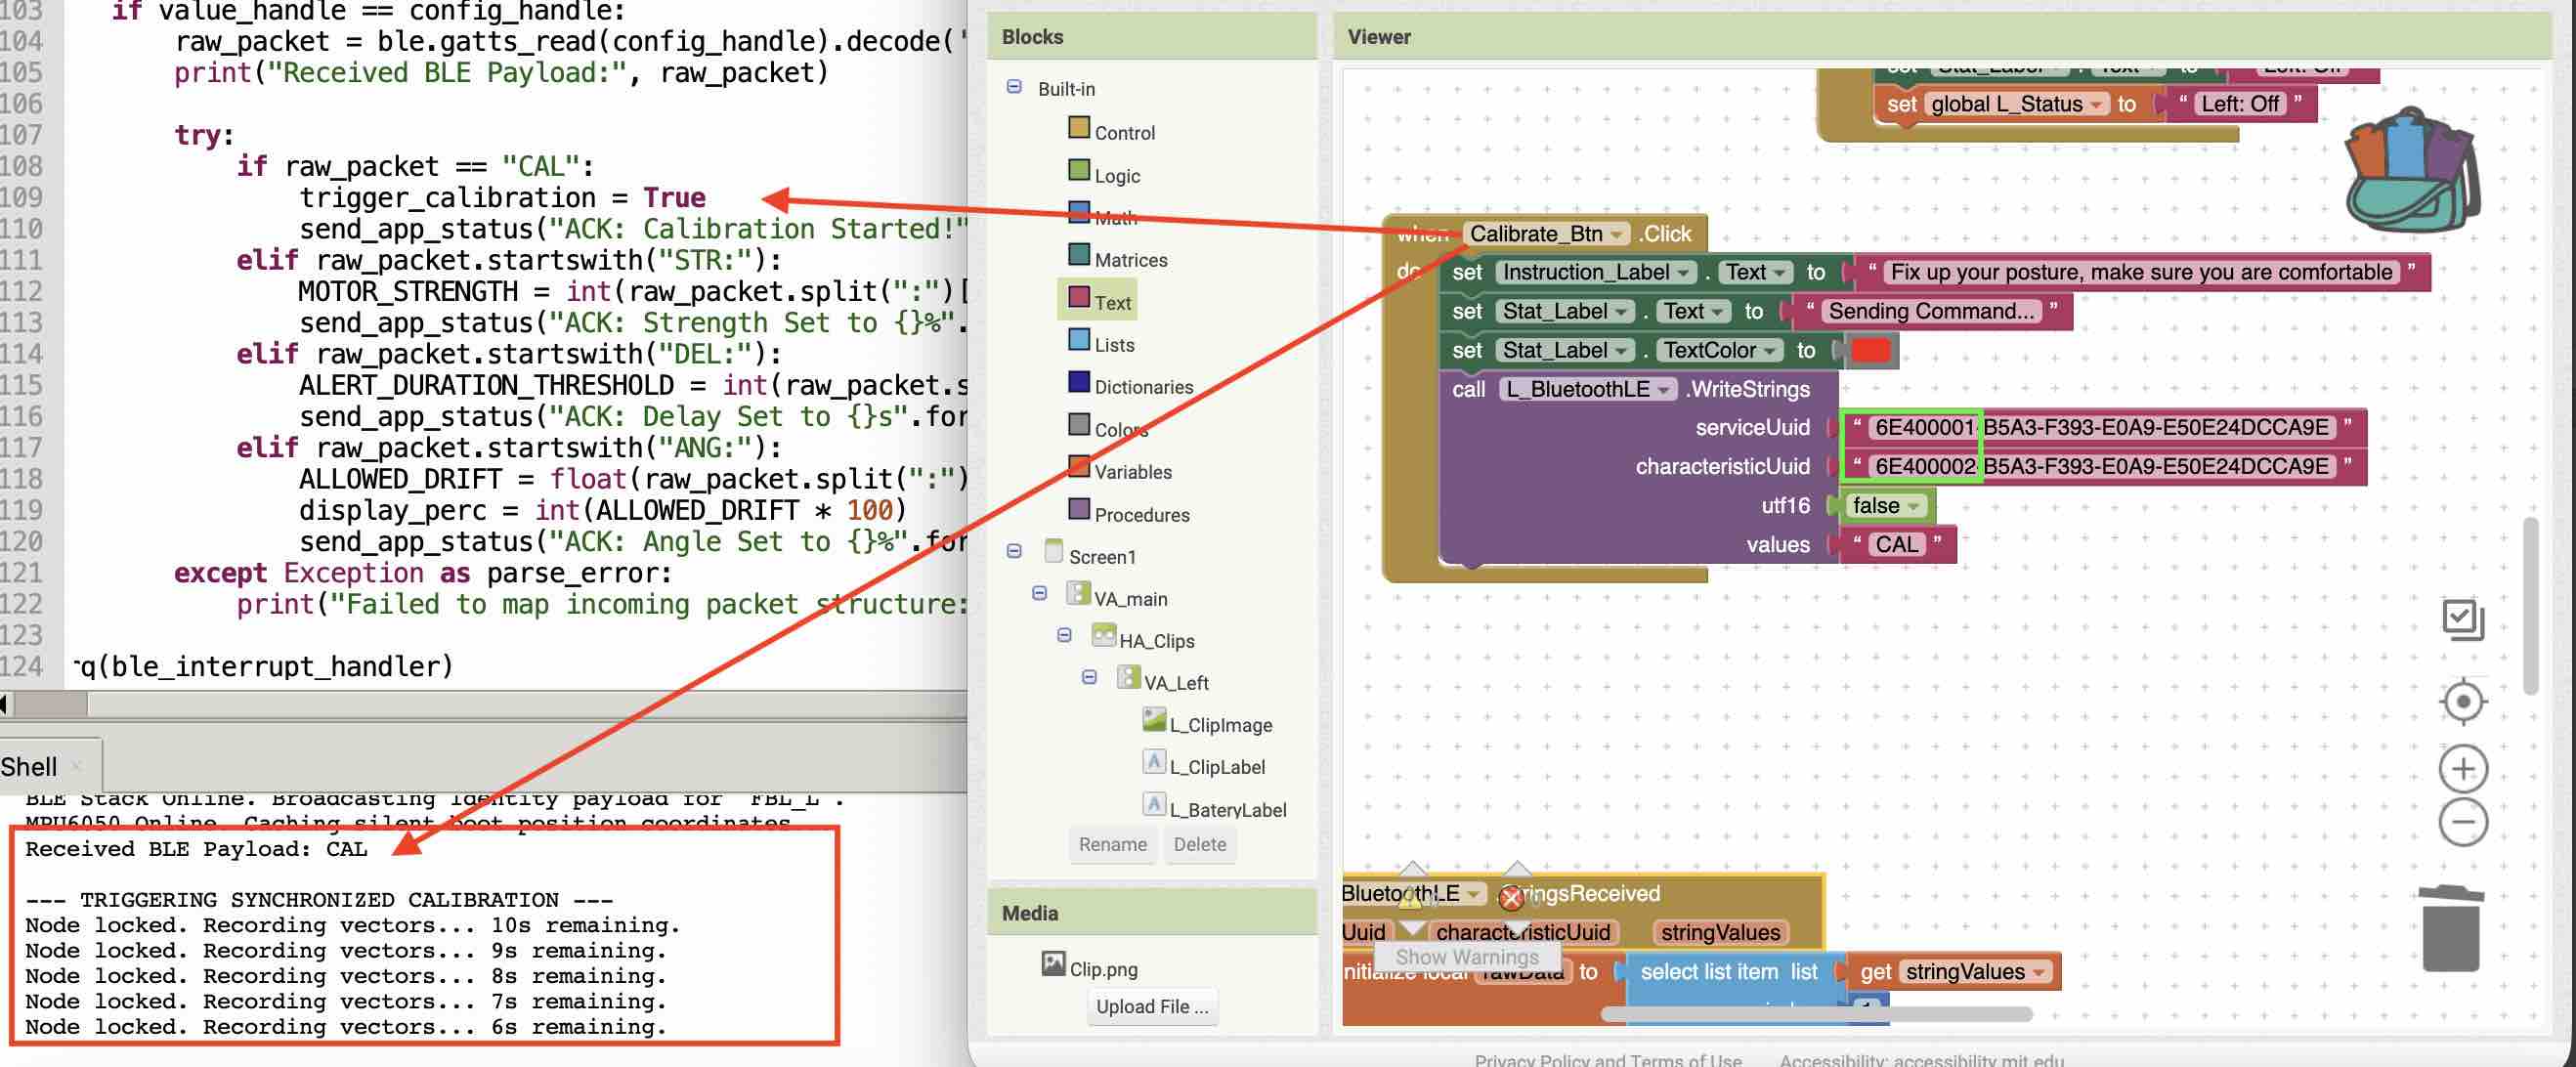
03 | Calibration. When the Calibration button is clicked → the app sends the clip a command to start a 10-second countdown → Thonny prints "countdown starting" → the clip streams the count back to the app → the app displays the countdown → at second 0 the clip locks the XYZ baseline values captured from the MPU6050 (see Week 09 — Input Devices) → the values are sent back and shown on the app.
04 | Display of information. The StrengValue string contains the raw bytes transferred between clip and app — it looks like CAL:10 → CAL:9 → … (XYZ:-1.8,4.2,8.1), which is not user-friendly to surface directly.
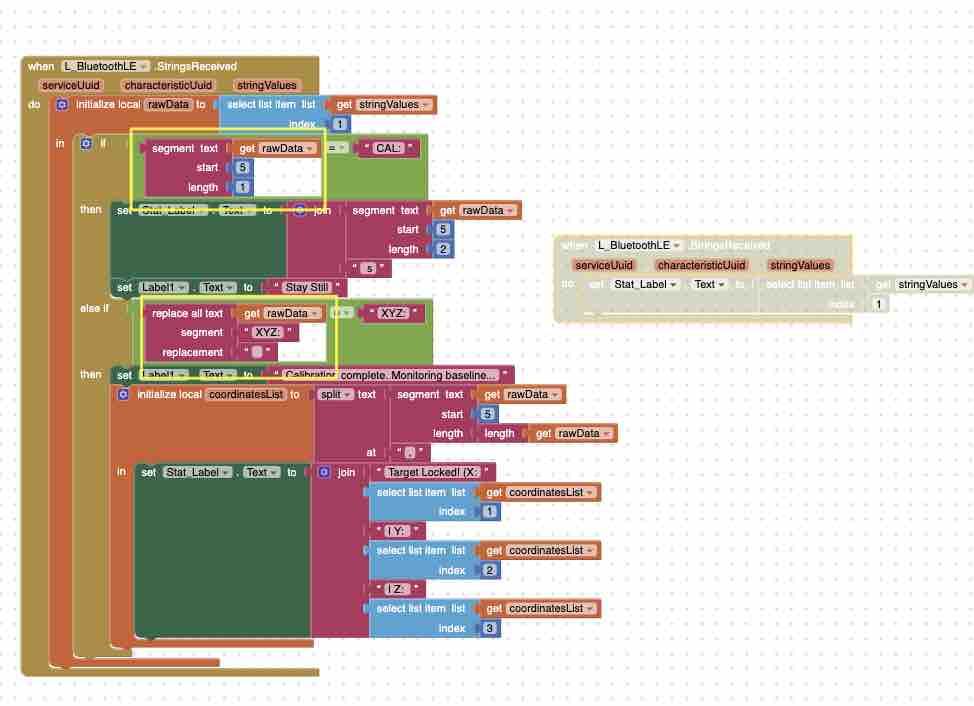
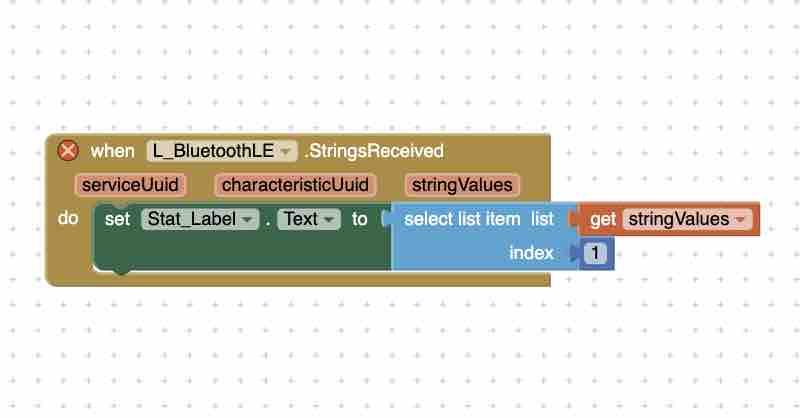
05 | Reformatting the value. These are the blocks I used to slice and segment the value received from the clip, joining it with other strings to produce user-friendly status updates. This was the most exhausting and time-consuming part — many errors and warnings from juggling multiple local variables, plus learning the differences between segment text (depends on counting characters / segment length), select list item (picks the segment regardless of length), and replace all text (which can't be used inside an if mathematical condition block).

06 | After more than 5 hours of debugging, it worked — the status was updated on the app and synced with the clip.
07 | Pivot — architecture change. At this point I wasn't confident about duplicating all the same blocks for the second clip "FBL_R", so I pivoted from my original plan. Instead of connecting both clips to the app, I now connect: the left clip to the app over BLE → and the left clip to the right clip over ESP-NOW → this avoids the app having to maintain two parallel BLE sessions → all functionality and data are sent to Clip_L → which forwards them to Clip_R.
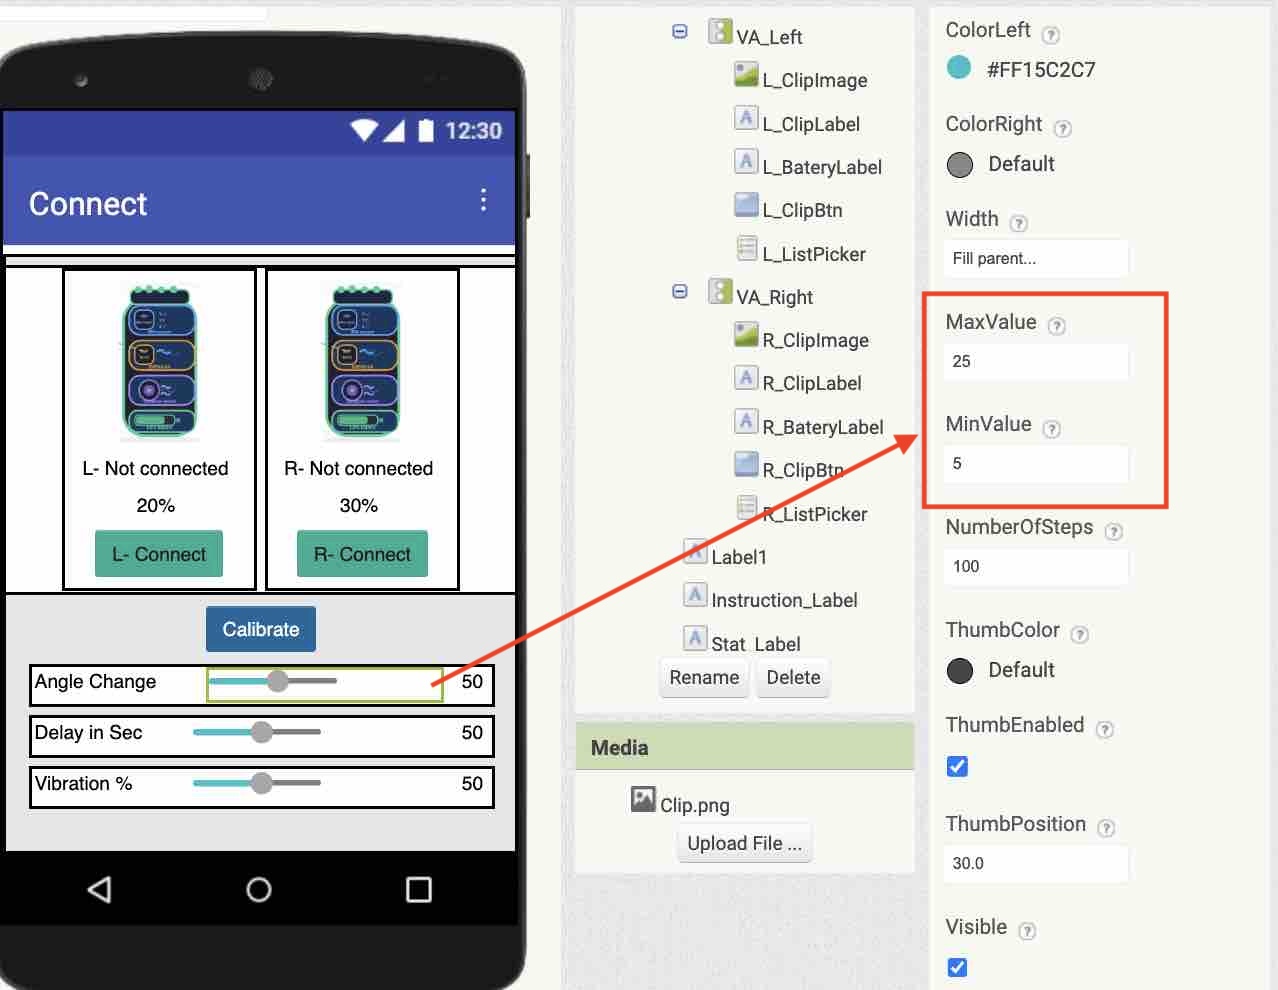
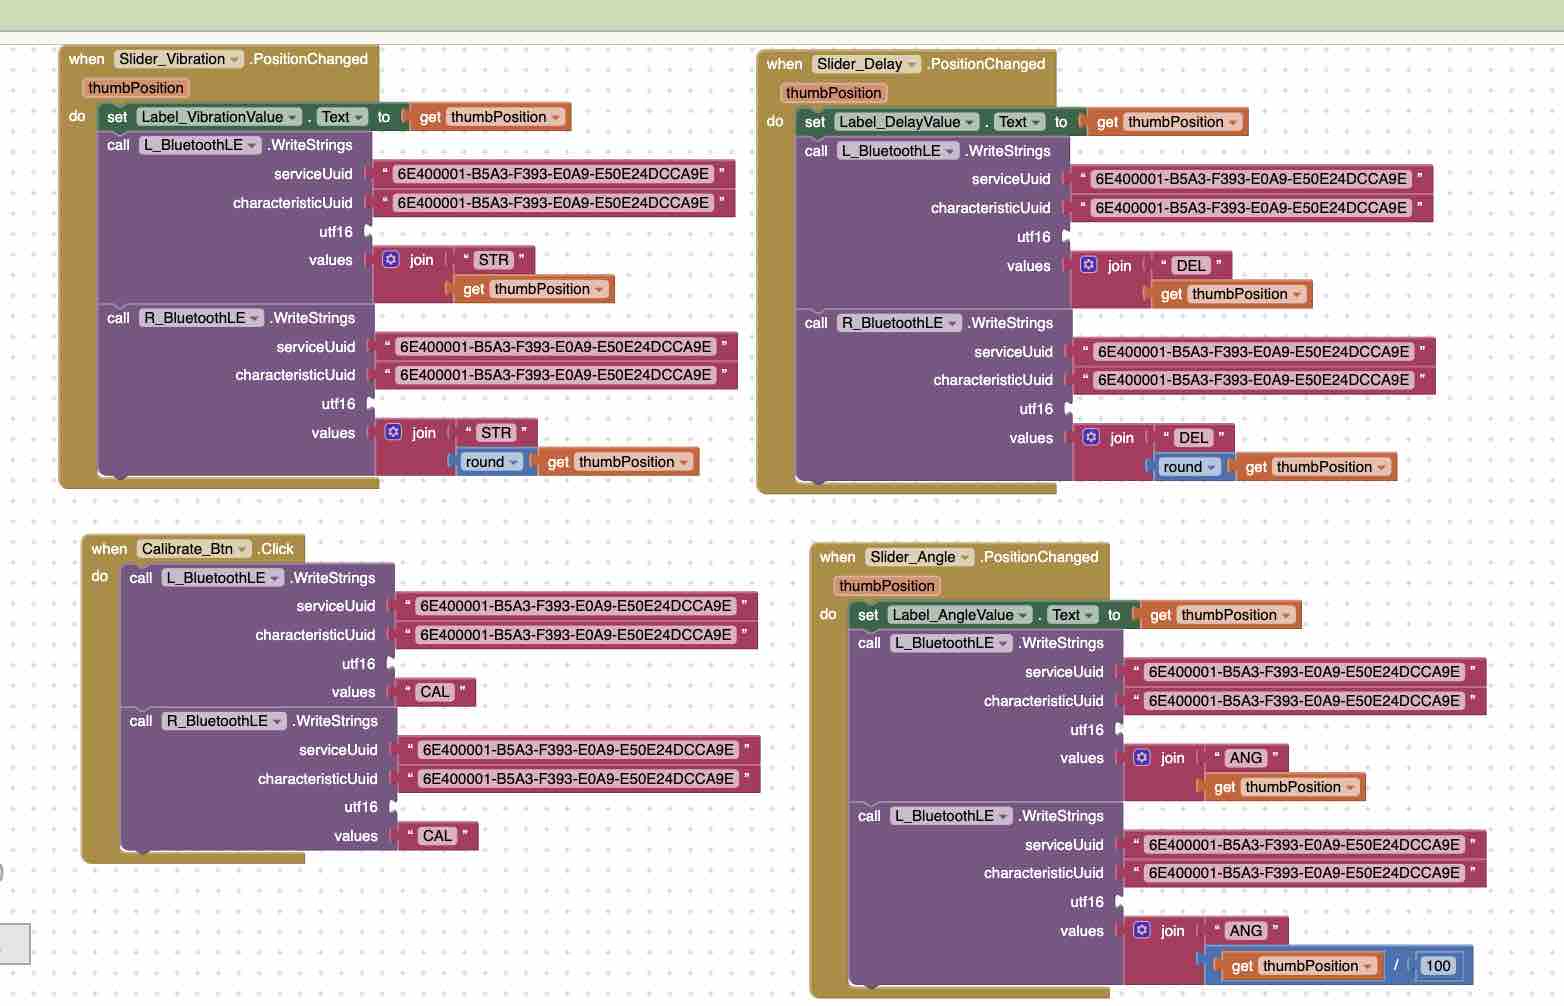
08 | User preferences. Before adding the right clip to the system I built the blocks for the user to define the thresholds: vibration strength, delay (seconds) before the notification / vibration starts, and accepted angle of deviation. → I used three Slider components in the app and set the min / max on each → vibration and deviation are expressed as a percentage, delay is in seconds.
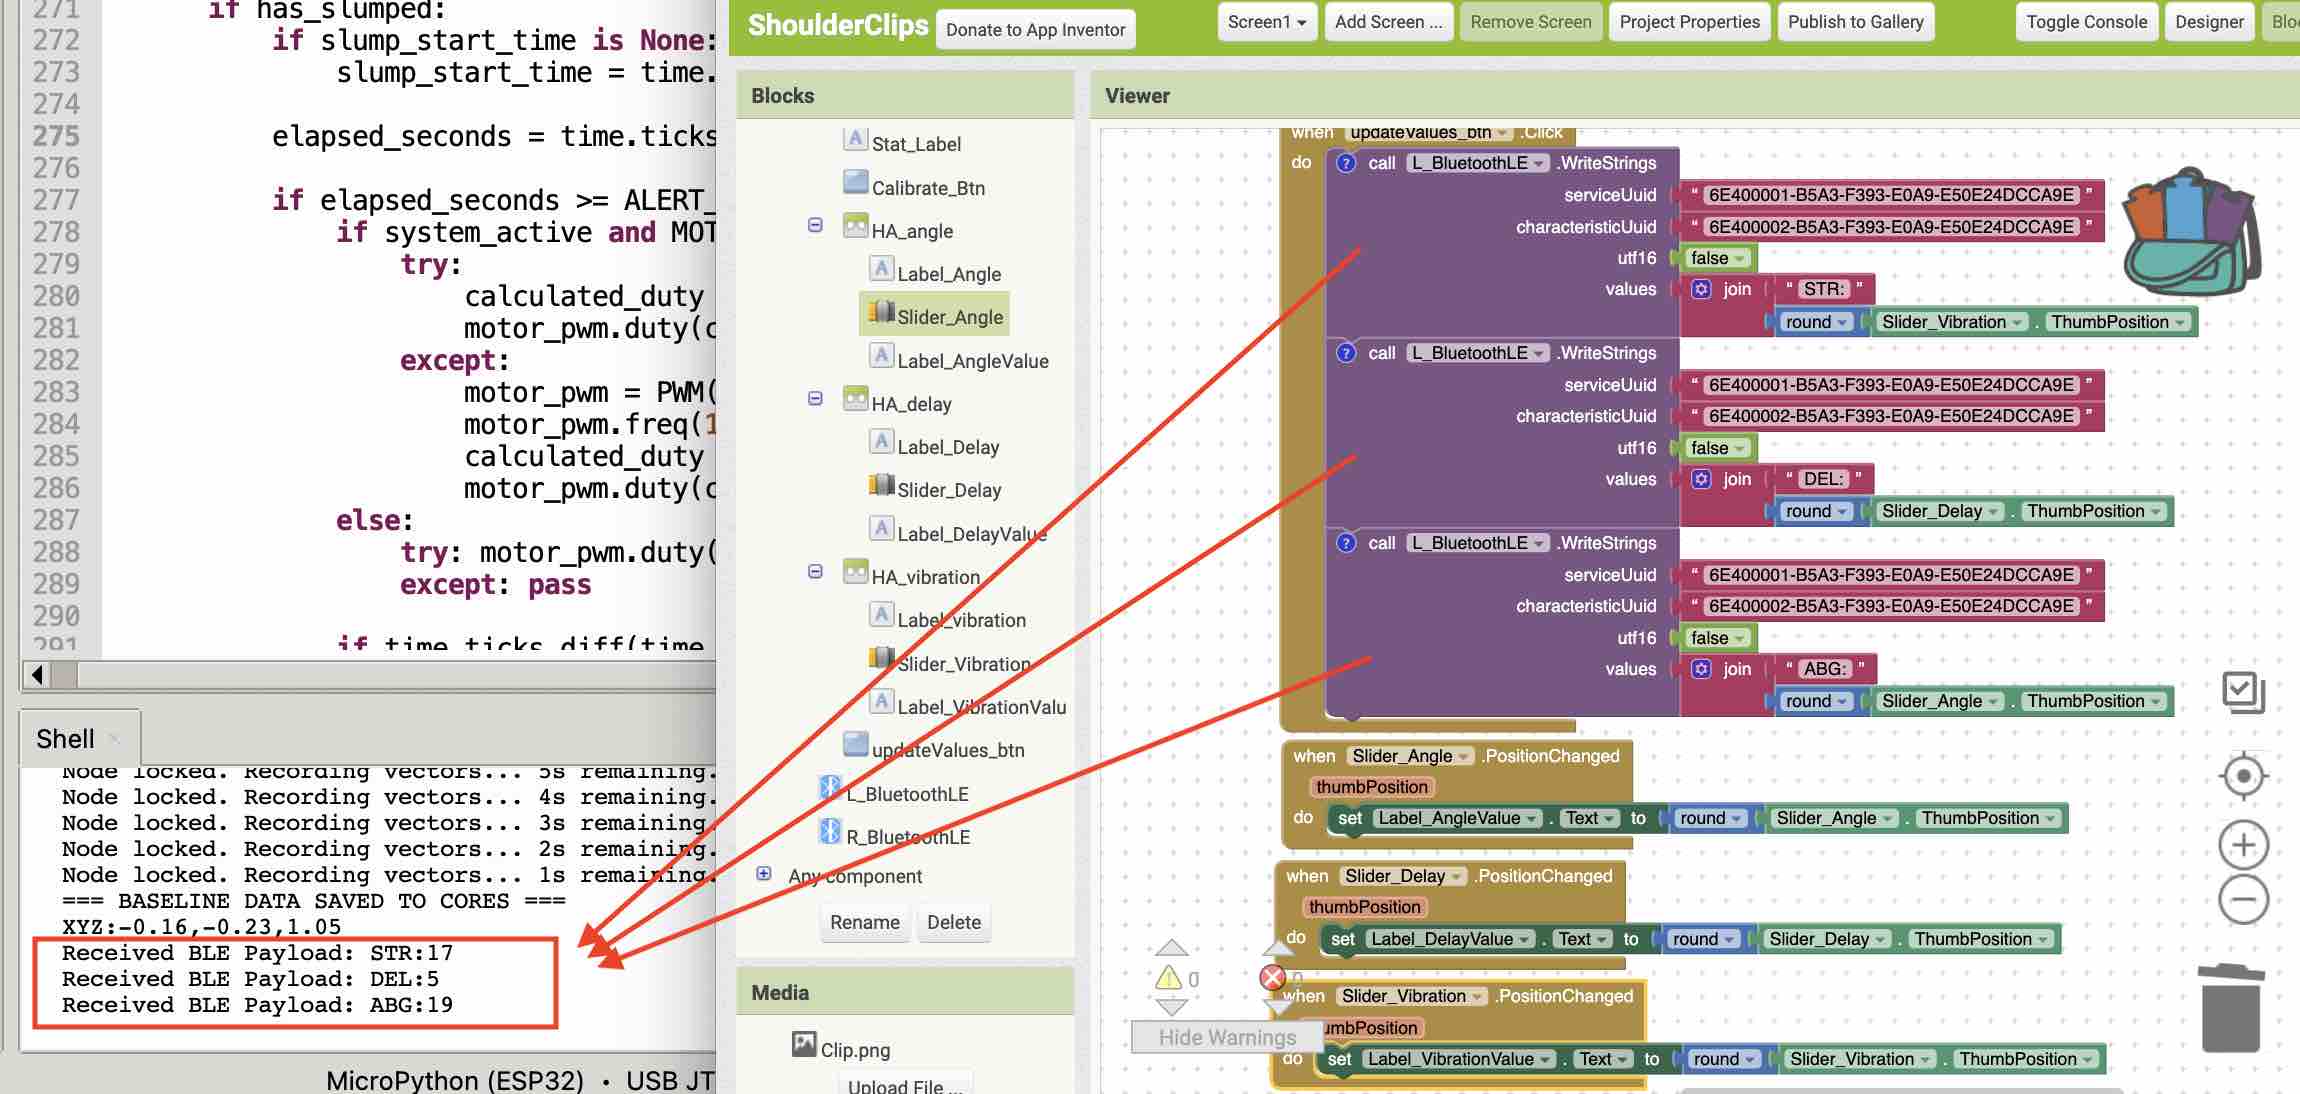
09 | With these blocks the app sends the values to the clip once the "Update values" button is clicked → each slider's value is also shown live on the label next to it in the designer.
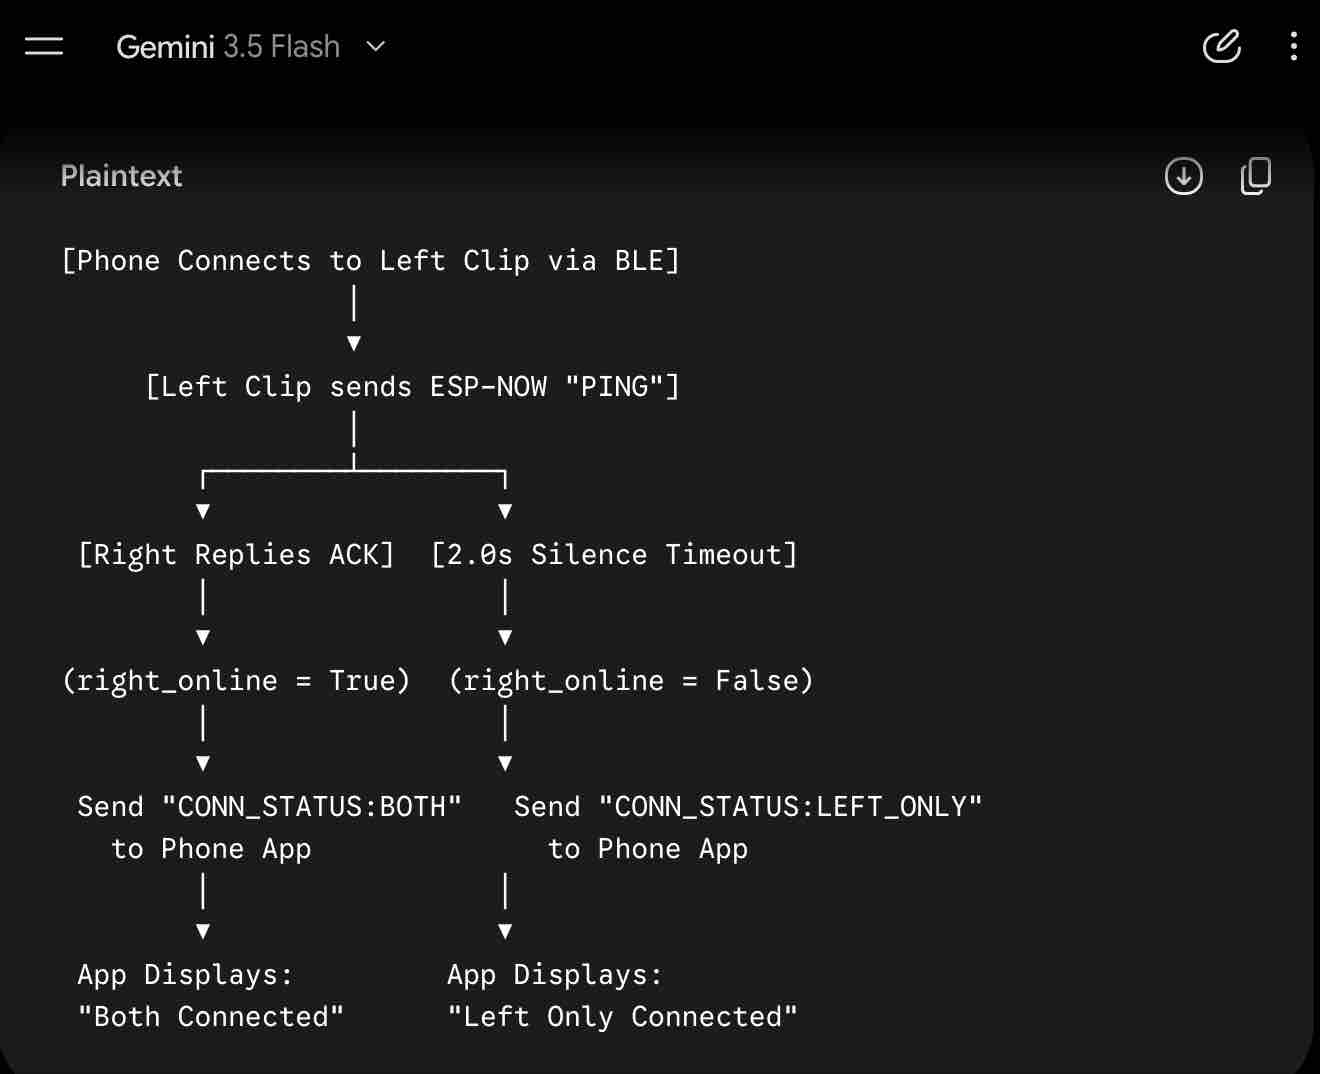
10 | Right clip — ESP-NOW. Time to wire the right clip to the left. To avoid overloading the app with two parallel BLE sessions, I used the ESP-NOW protocol instead → left clip = Gateway / Master → right clip = Receiver / Node → first step: find the unique hardware MAC address of the right clip.
11 | I updated the logic with Gemini and then walked through the generated code line by line, reviewing and editing to make sure all three components (app, left clip, right clip) integrate cleanly.
Prompt to Gemini: Update the architecture: the app talks only to the left clip ("FBL_L") over BLE; the left clip relays commands to the right clip ("FBL_R") over ESP-NOW. Keep the existing BLE pairing, calibration, and slider-threshold logic on the left clip, and add an ESP-NOW sender block that forwards {vibration_strength, delay, angle_threshold, calibration_baseline} to the right clip. On the right clip, add an ESP-NOW receiver that applies the same thresholds and acts on its own MPU6050. Make the failure mode safe: if ESP-NOW drops, the right clip falls back to its last known thresholds. (Verbatim prompt — kept as sent.)
12 | Next. Carry this wiring into final-project assembly — flash the BLE / ESP-NOW firmware onto both PCBs, confirm the MAC pairing, and run the full Calibration → Threshold → Alert loop end-to-end on the wearable.