
.jpg)


Group Assignment Documentation
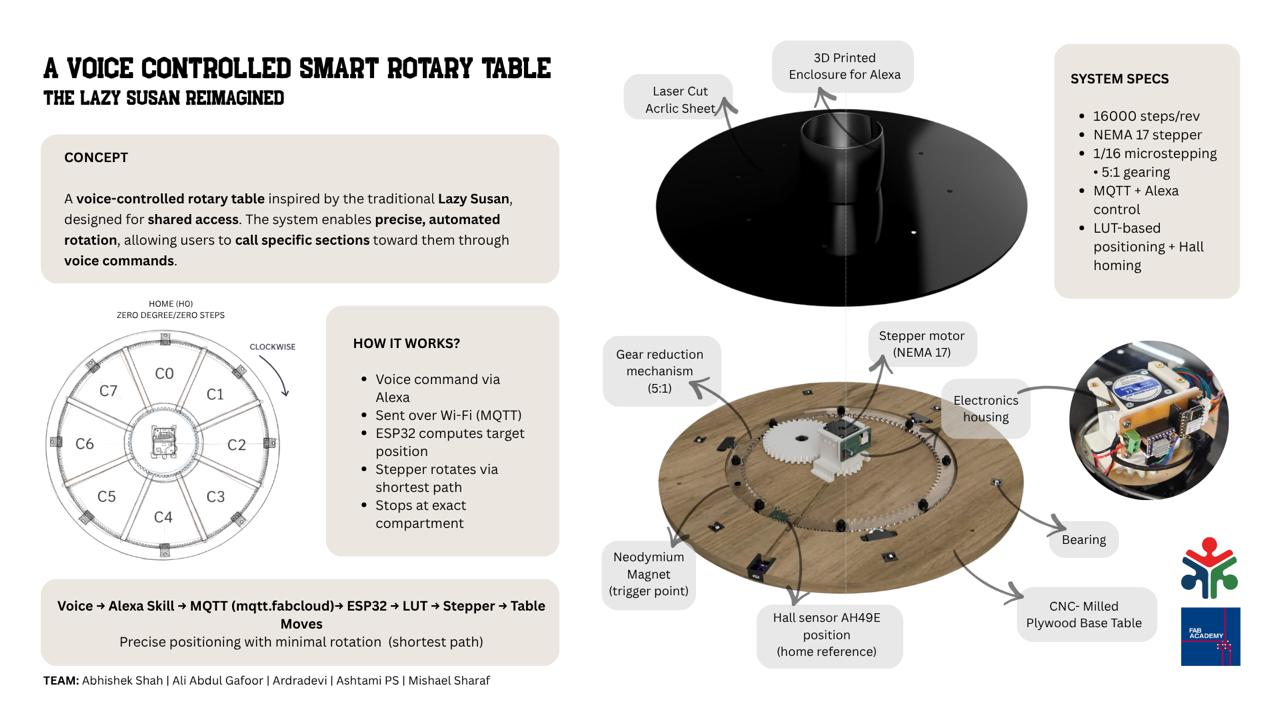
A Voice Controlled Smart Rotary Table
The lazy Susan reimagined
Slide
Video
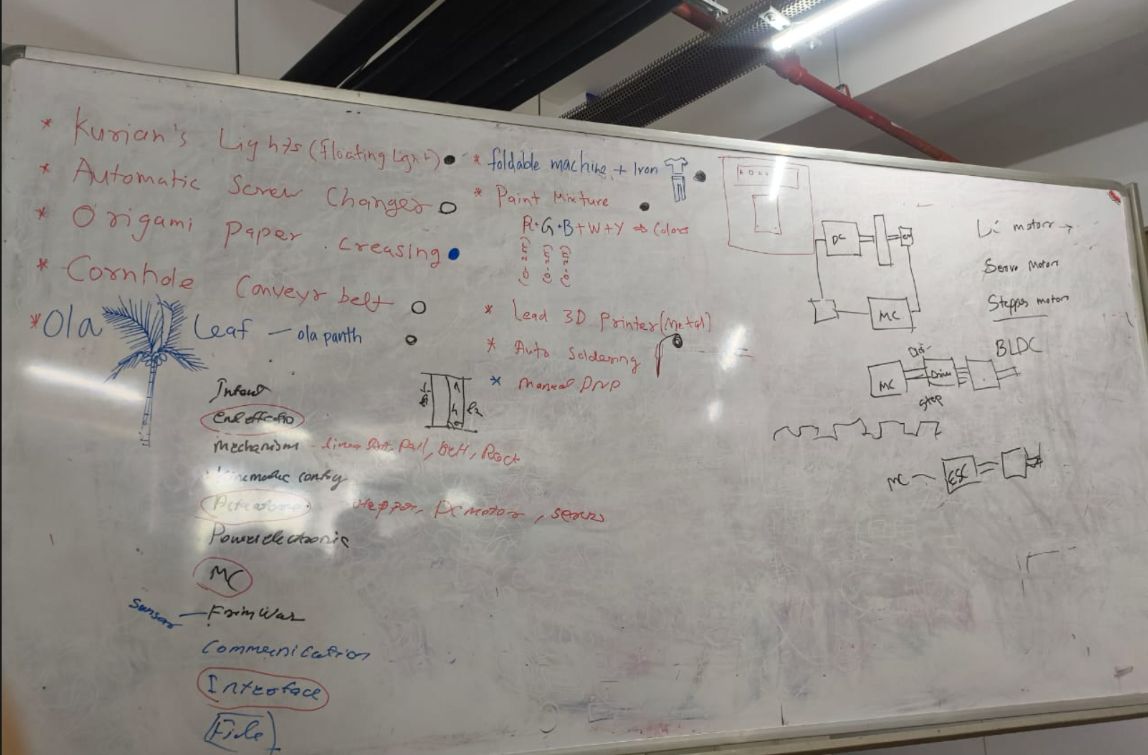
1. Brainstorming
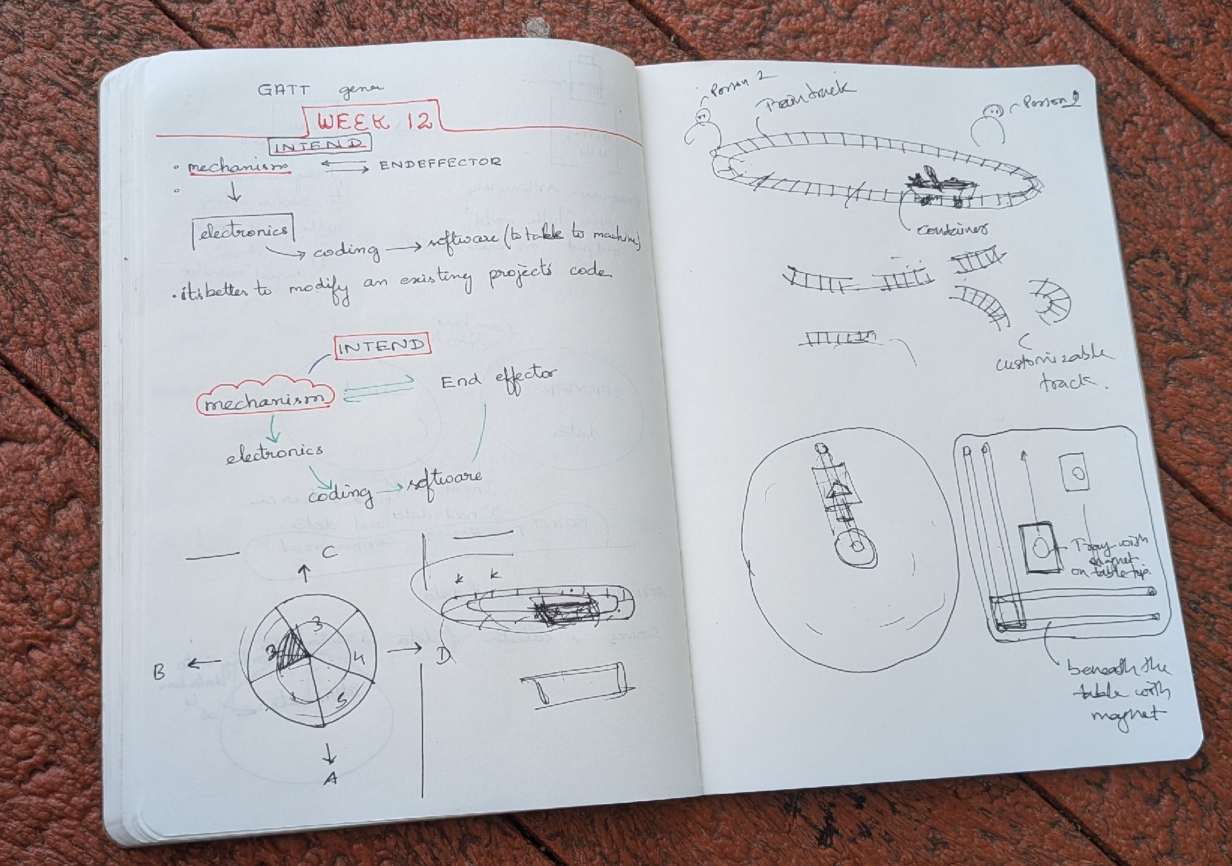
Finalizing The Project
Project Brief
This project is a playful reinterpretation of the traditional Lazy Susan, centered around the idea of shared access through controlled motion and automation. The system is built as a motorized rotary platform with indexed compartments that can be precisely positioned using voice or remote commands. Inspired by the original Lazy Susan, the table retains its core idea of shared access, but extends it through programmable control. Users can call specific sections of the table toward them, creating a responsive and interactive experience.
The system is designed as a flexible platform rather than a single-use object, adaptable for organizing tools, holding art supplies, or managing shared resources in a workspace. Its functioning relies on the integration of mechanical design, electronics, and embedded control: a geared rotary mechanism enables smooth motion, a motor driver and sensing system establish positional reference, and firmware logic ensures accurate, repeatable alignment. Together, these layers allow the table to respond reliably to user input while maintaining precision in movement.
Team Members & Roles
- Abhishek Shah - In charge of mechanical design
- Ardradevi - In charge of electronics
- Ali Abdul Gafoor -** In charge of fabrication and assembly
- Mishael Sharaf - In charge of firmware and project coordination
- Ashtami - In charge of user interface and Alexa integration

Project Planning
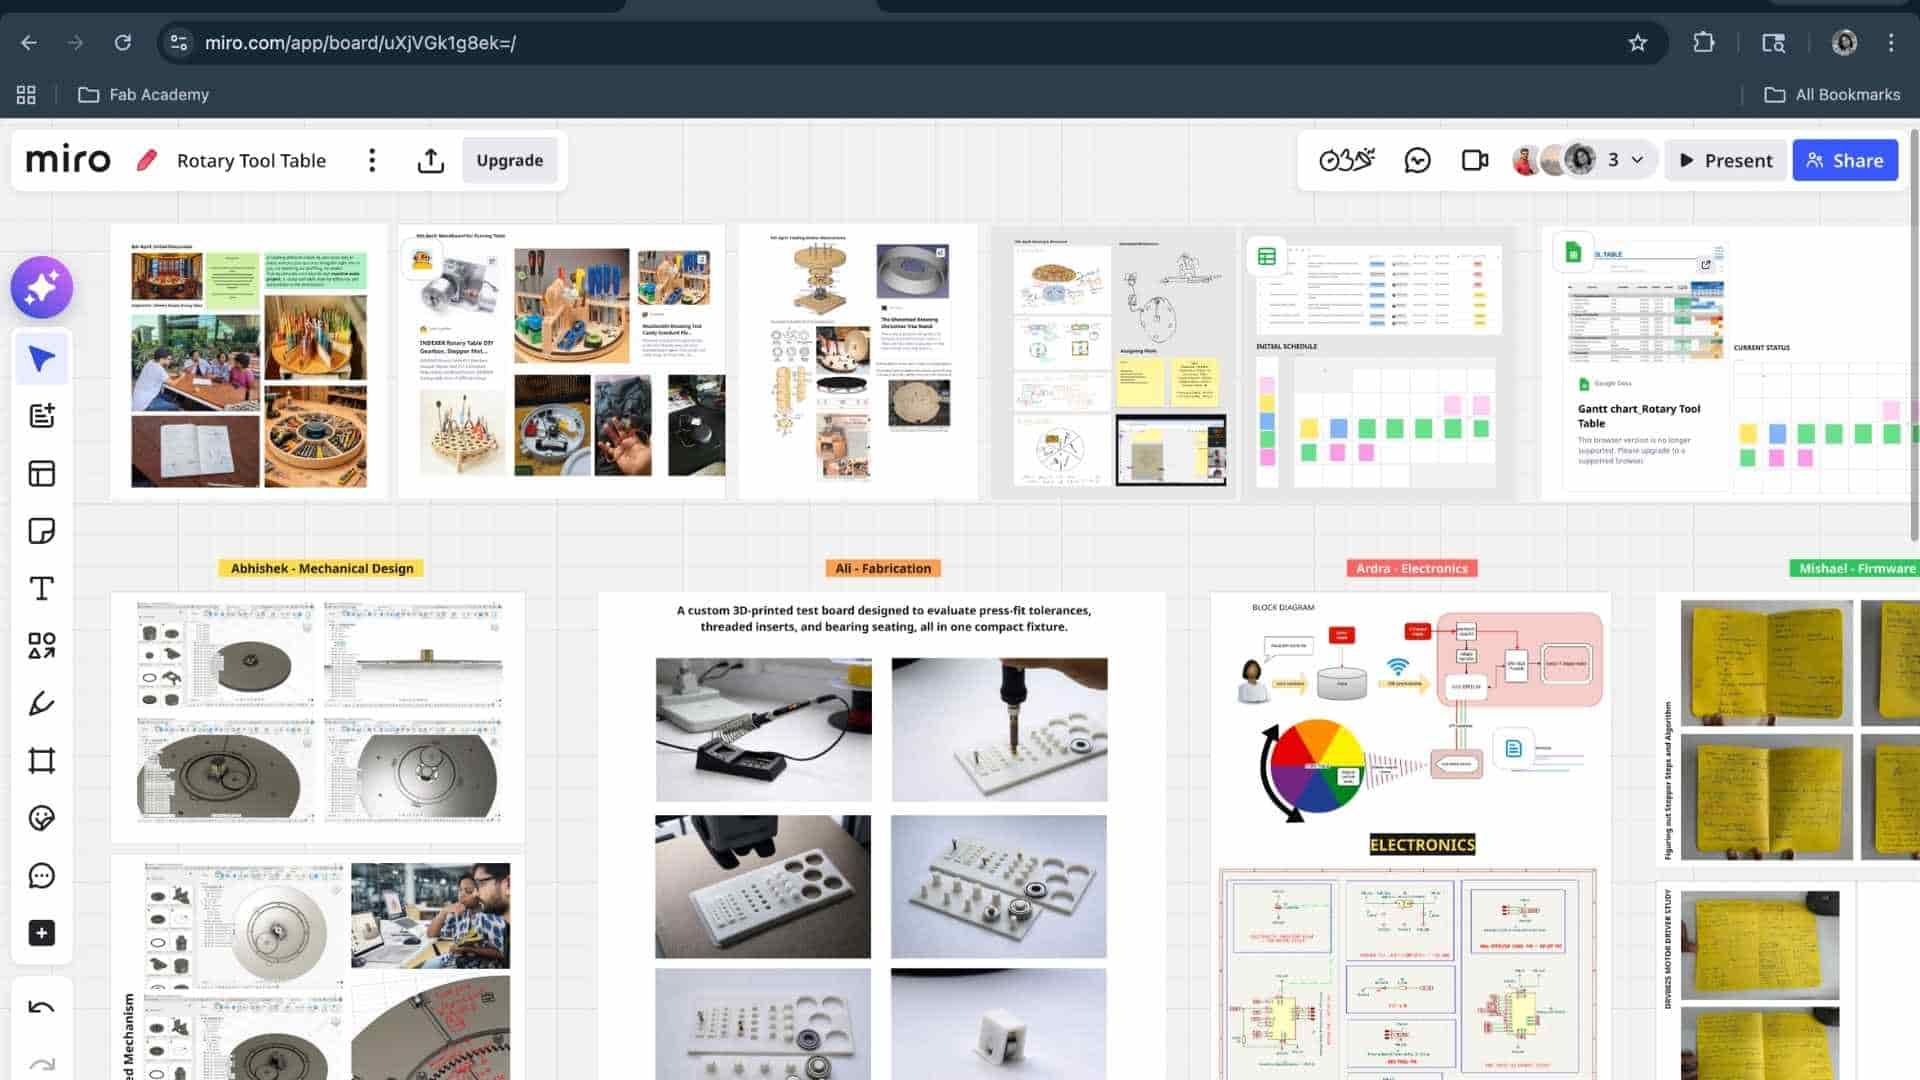
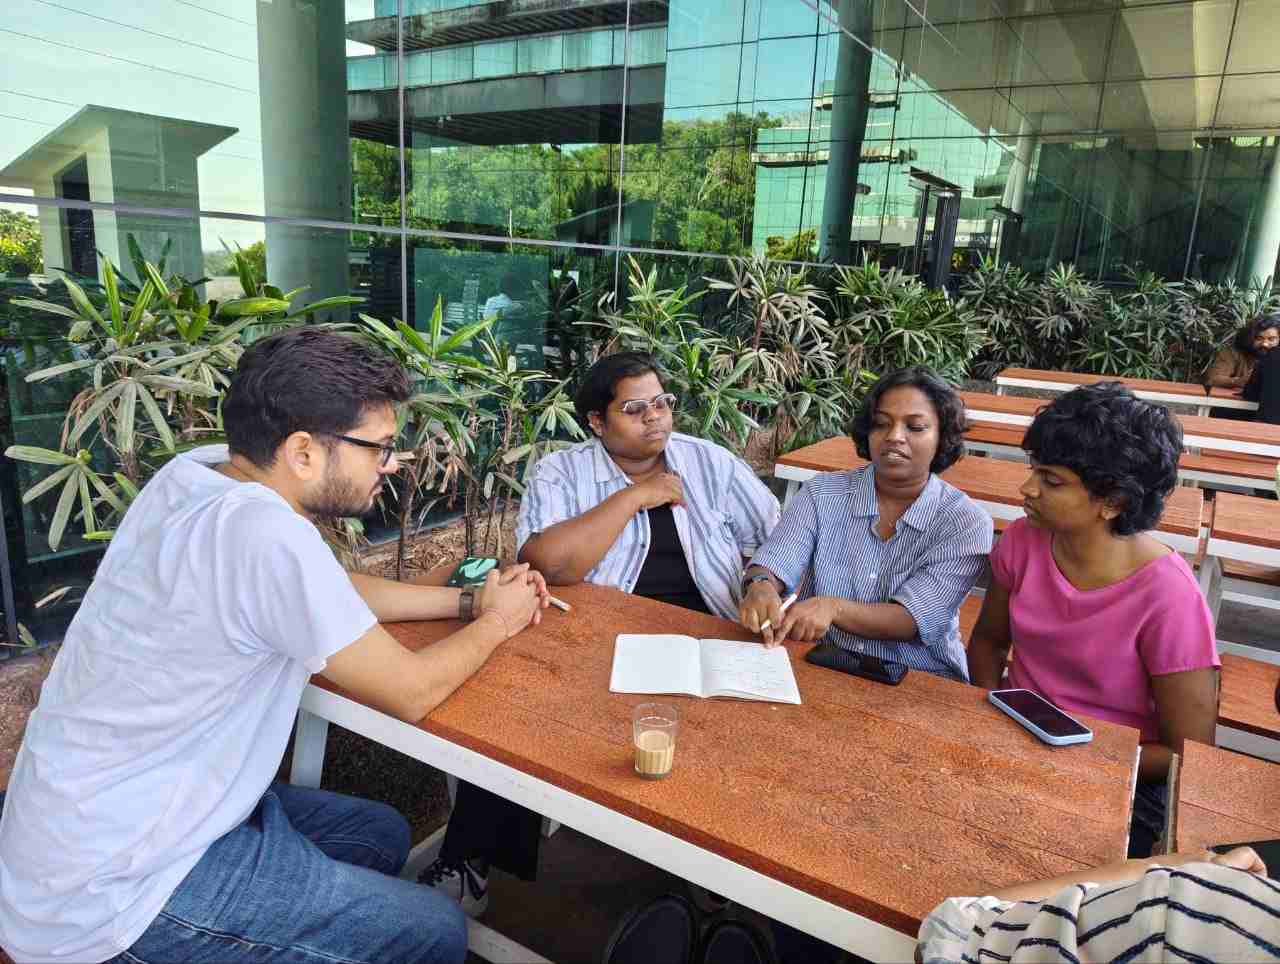
We used a shared Miro board as a live micro collaborative space to bring together ideas, sketches, references, and system breakdowns in one place. It allowed all team members to contribute simultaneously, making the process non-linear and highly interactive. By visually clustering concepts and mapping subsystems, we were able to move efficiently from initial ideation to a clearer system architecture while maintaining visibility of each member’s contribution. This reduced communication gaps and supported faster, more informed decision-making.
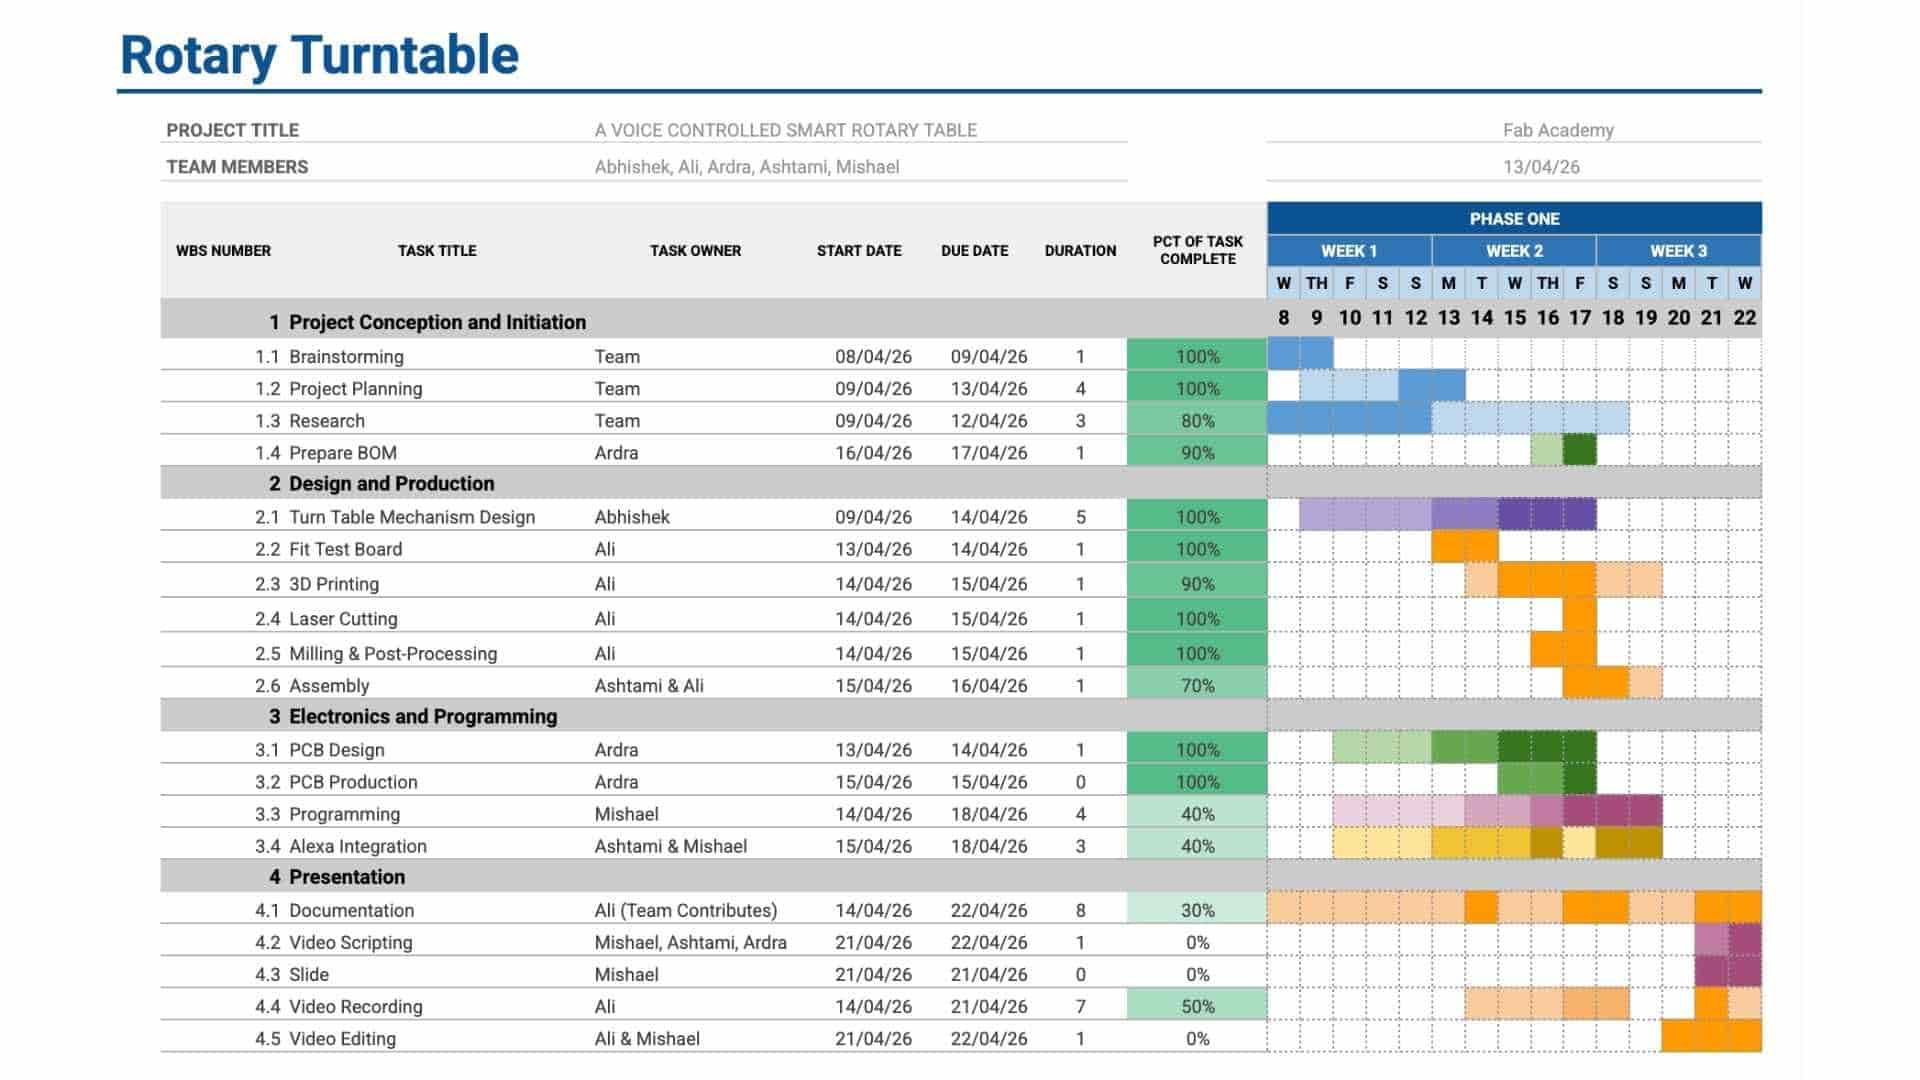
We used a Gantt chart to structure and monitor the execution of the project. Tasks were broken down into phases, assigned to team members, and mapped across a timeline with defined start and end points. Regular updates helped track progress and identify delays early. This made dependencies between tasks explicit and ensured that work across different domains remained aligned and coordinated.
Combined Workflow
Together, Miro functioned as the thinking and planning layer, while the Gantt chart acted as the execution and tracking layer. This combination allowed us to transition smoothly from concept to implementation, maintain clarity across the team, and ensure consistent progress throughout the project.
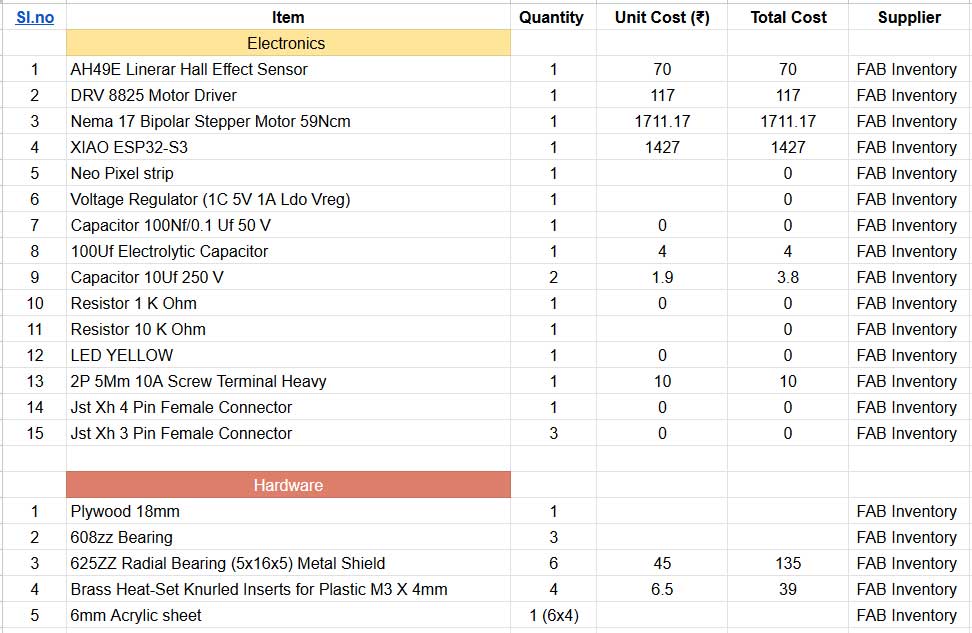
BOM
We got our materials from our Fab inventory at Fab Lab Kochi. fab stash : https://inventory.fablabkerala.in/
JIG TESTS
For extended development notes and intermediate versions, refer to Ali's Fab Journal
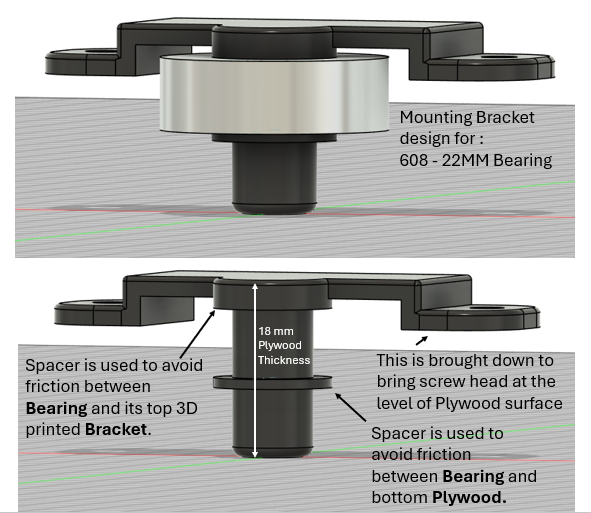
The purpose of the screw hole test is to determine the appropriate tolerances required for proper screw fitting, heat-threaded insert installation, and bearing press-fit. This ensures accurate assembly, secure fastening, and optimal mechanical performance of all components. 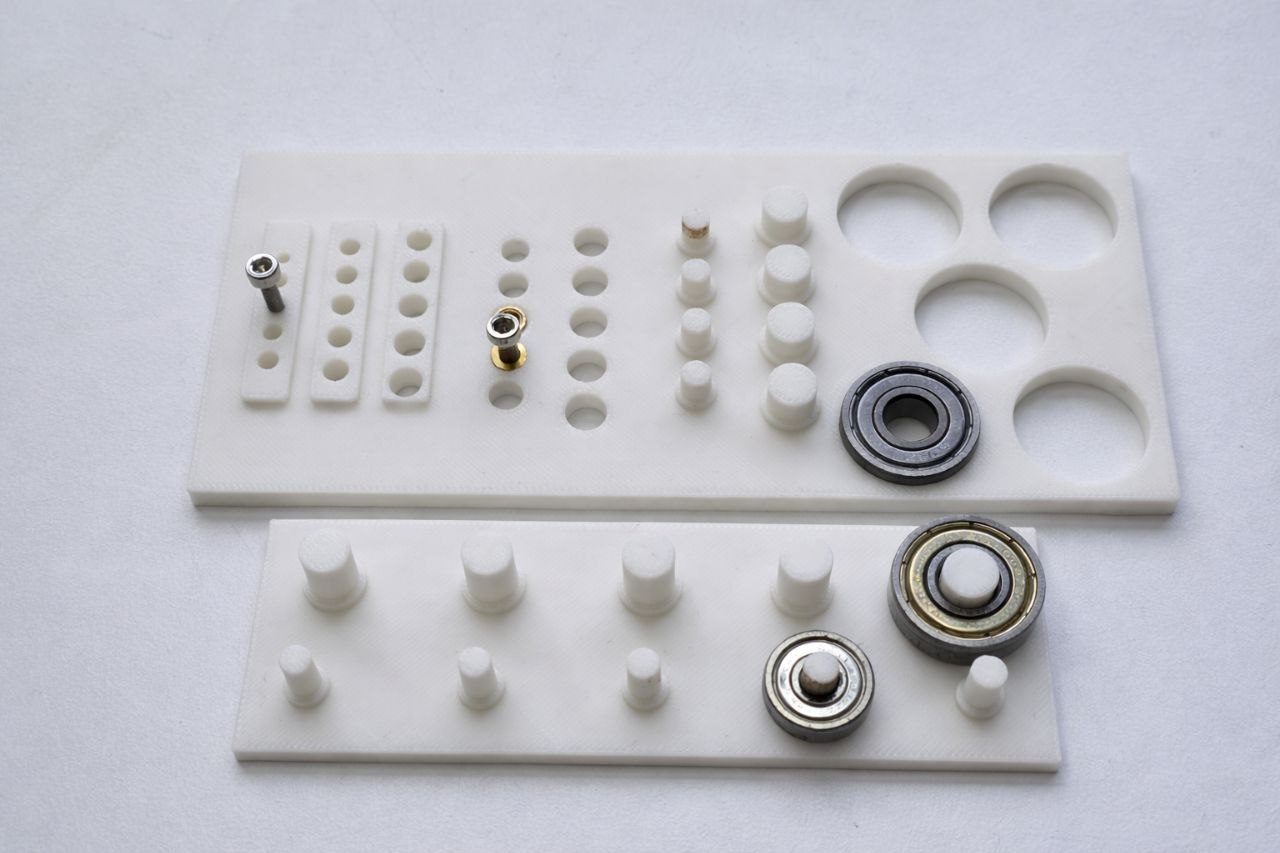
Clearance / Tolerance Values
| Component | Hole Size (mm) | Clearance (mm) |
|---|---|---|
| M3 Heat Insert | 5.20 | +0.10 |
| M4 Heat Insert | 5.00 | +0.05 to +0.10 |
| 608ZZ Bearing (Outer) | 22.10 | +0.10 |
| 608ZZ Bearing (Inner) | 8.20 | +0.20 |
| 625ZZ Bearing (Inner) | 5.10 | +0.10 |
- Outcome: Initial errors were identified and fixed through reprinting. Even small tolerance changes (~0.1 mm) significantly affected fit.
The jig ensured accurate alignment, proper fitting, and reliable assembly.
Mechanical Design
For extended development notes and intermediate test versions, refer to Abhishek's Fab Journal
The below is the first sketch that we made for first brainstorming section with the team and with all instructors.
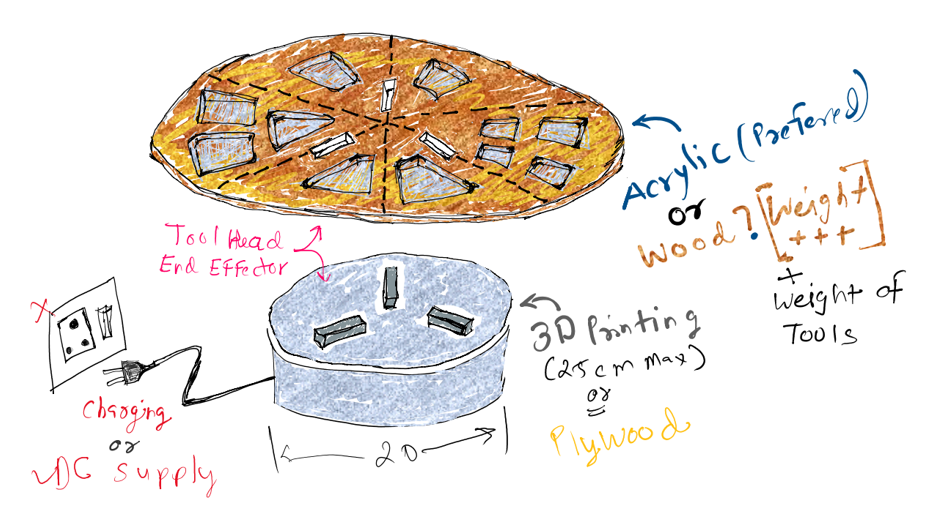
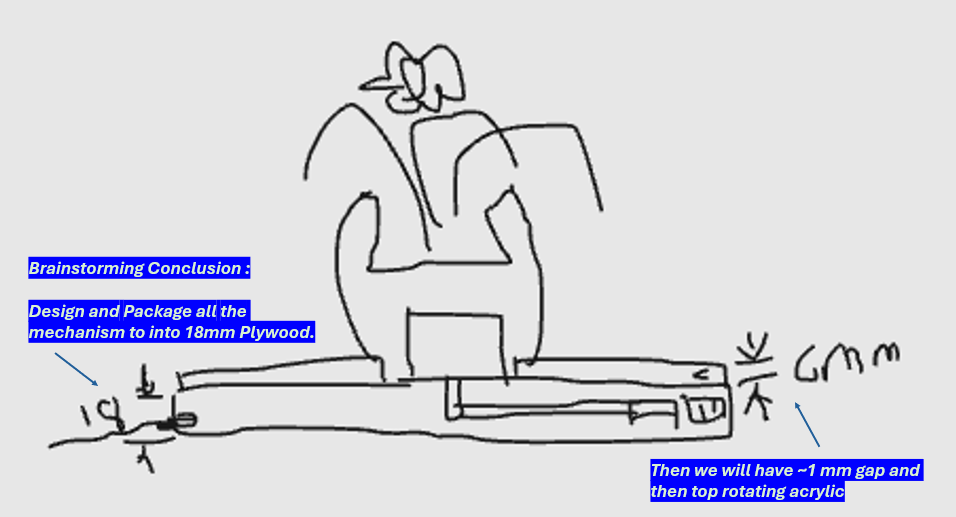
During the first brainstorming, we identified that we need to make the design slick and slim the motor height and width is the issue so we brainstormed below sketch design.
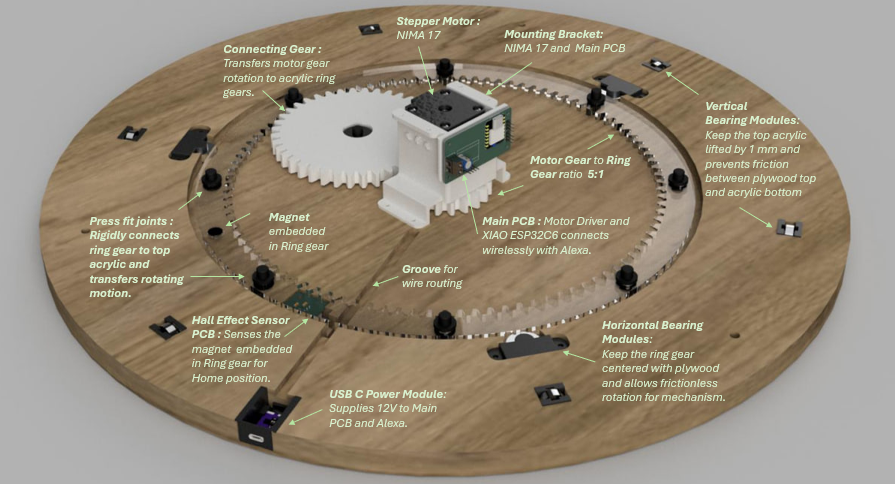
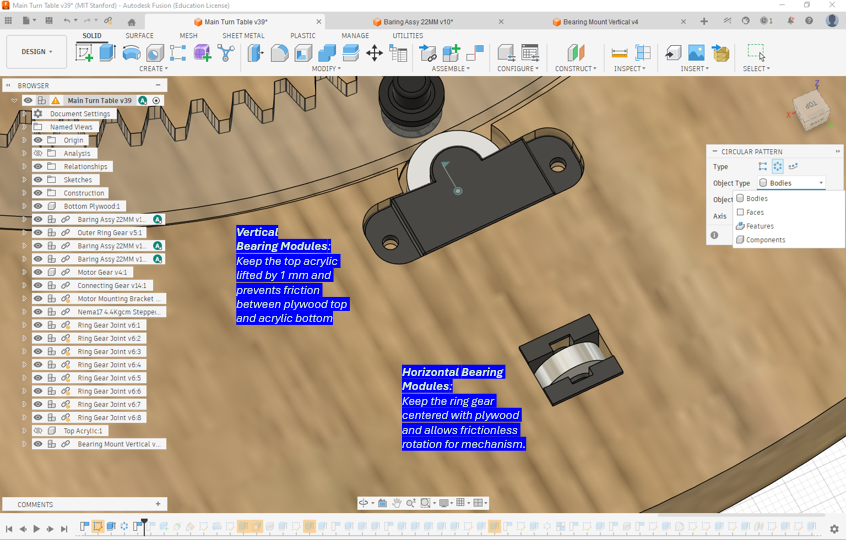
We used Hierarchical Assembly Structure to make the 3D model of entire turn-table to that team can collaborate, we can edit the sub-assembly and then use “get latest version” function on the later update the main 3D file.
Electronics
For extended development notes and intermediate test versions, refer to Ardradevi's Fab Journal
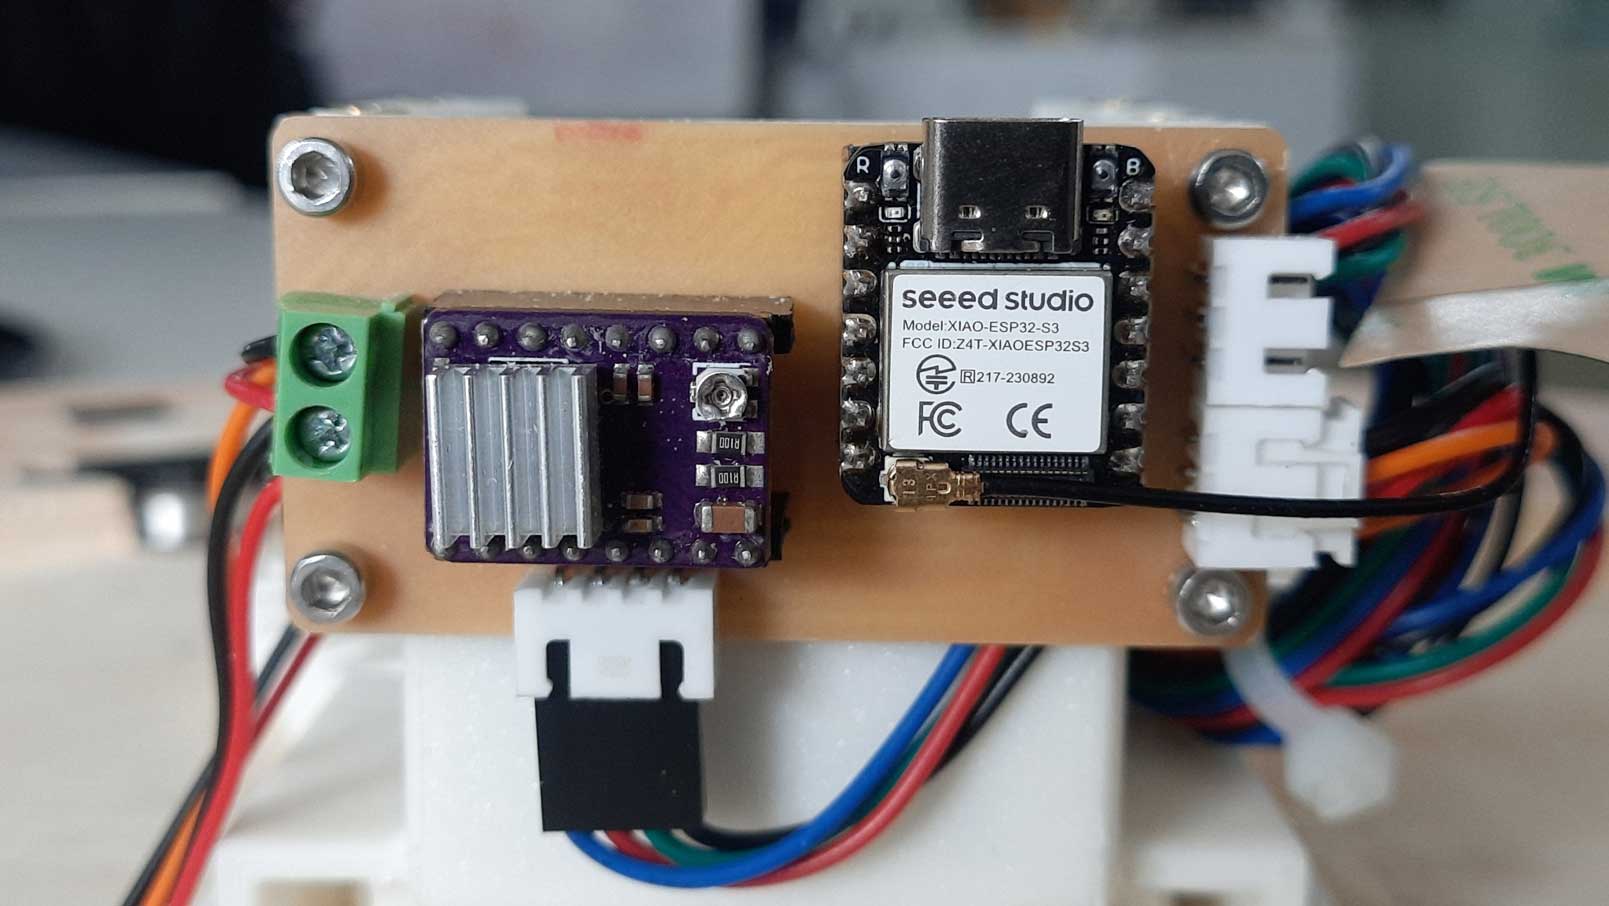
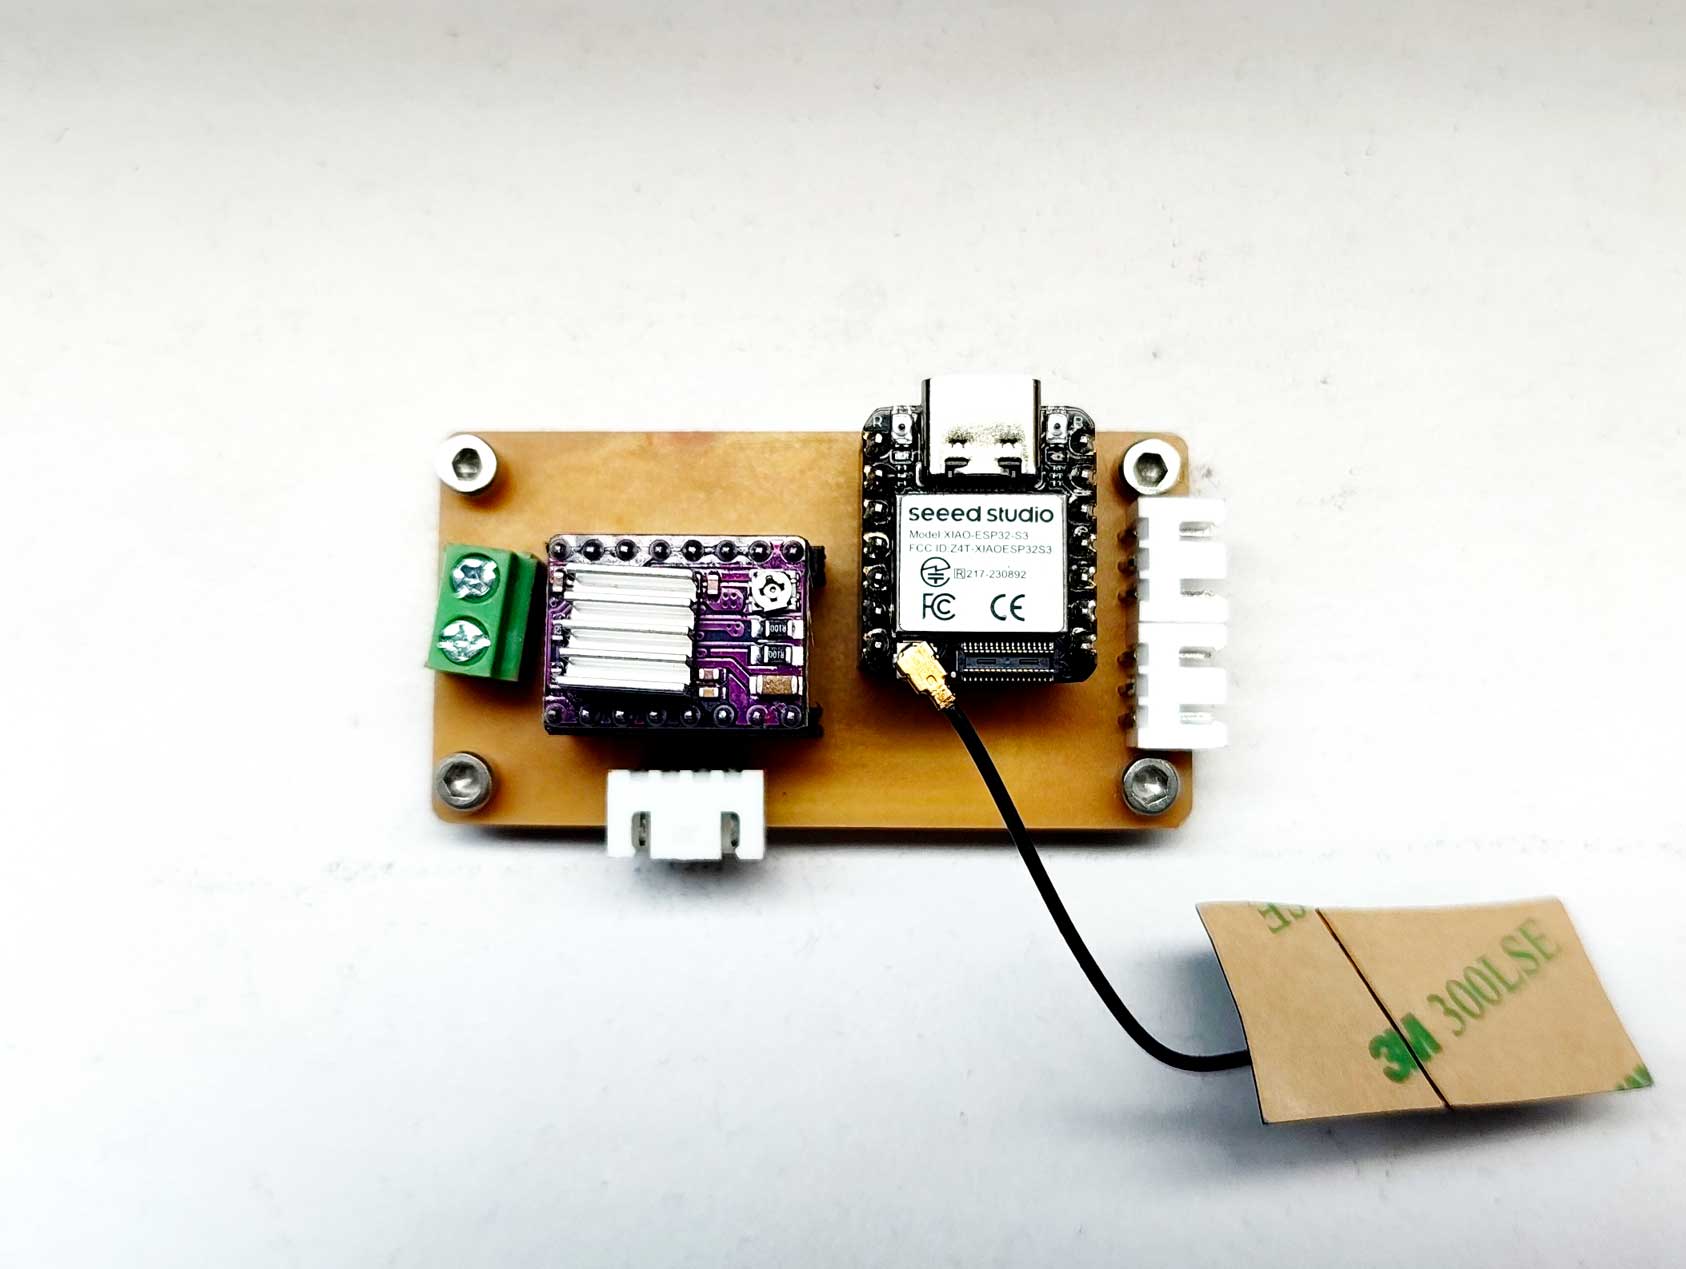
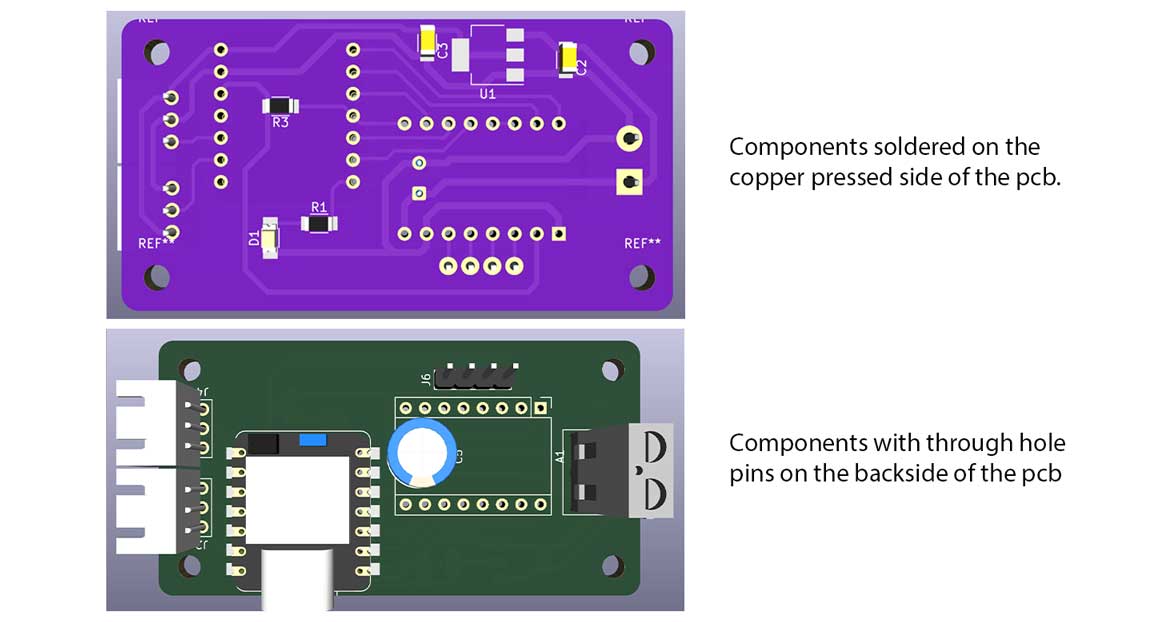
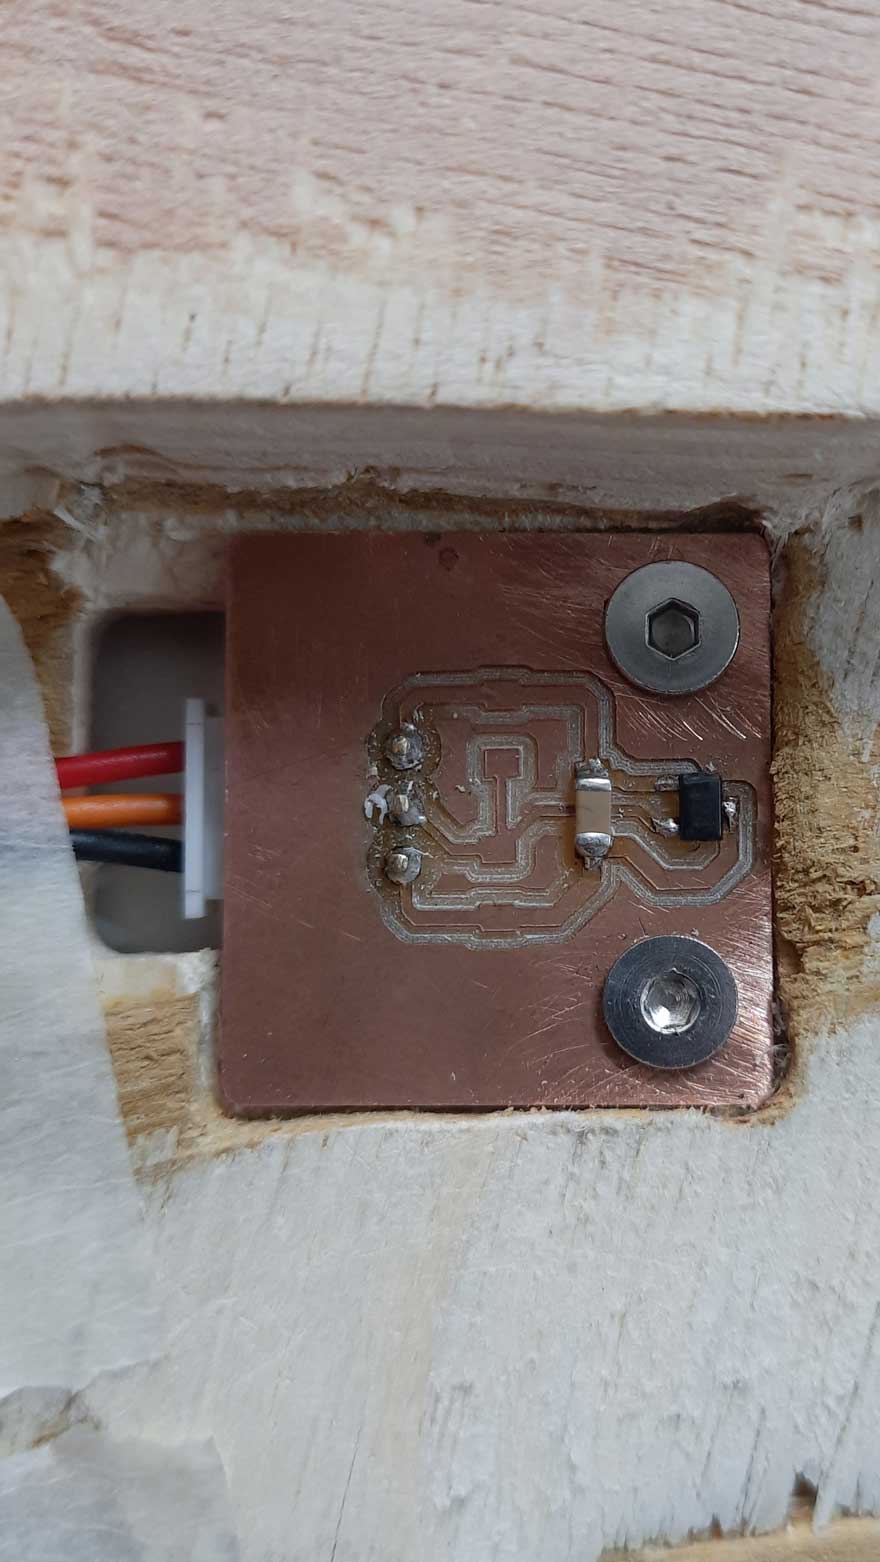
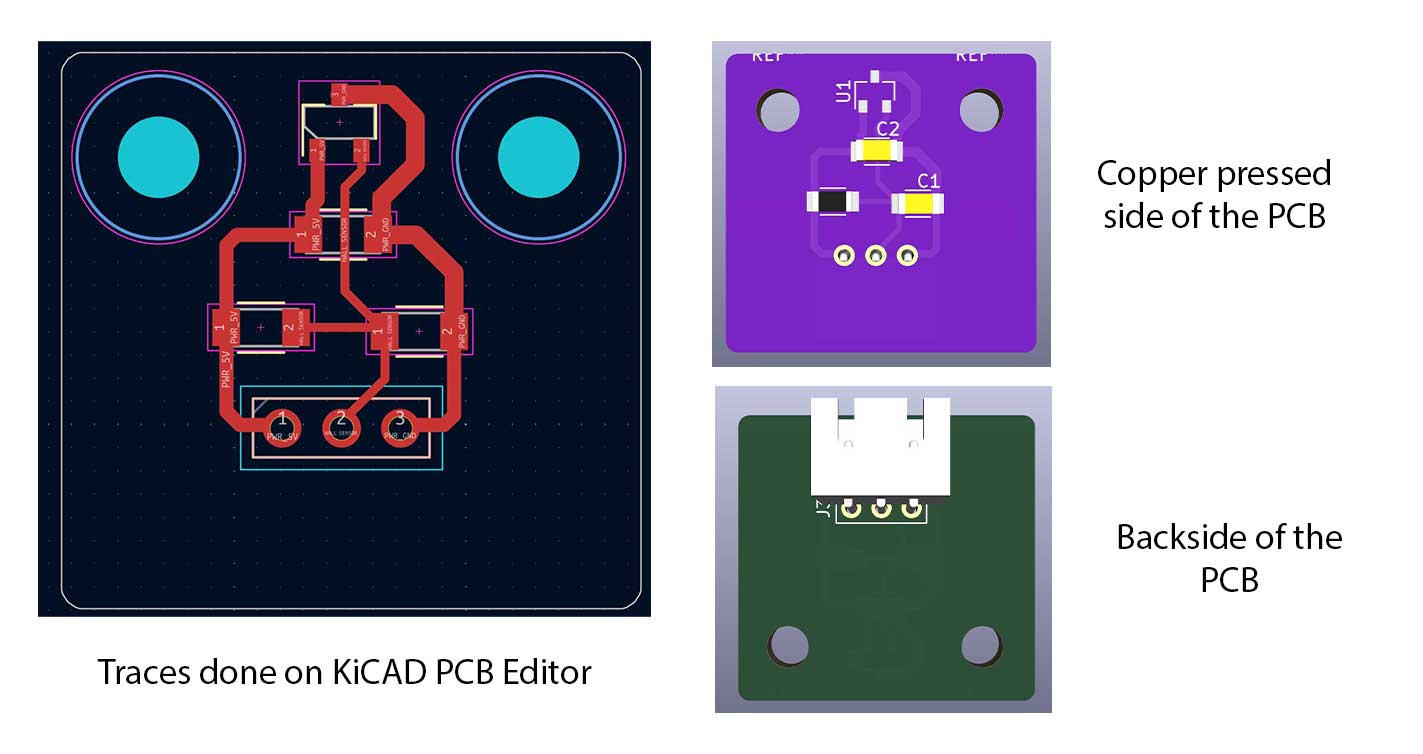
Main pcb board
The pcb board has through hole pins and these components are connected on the backside.
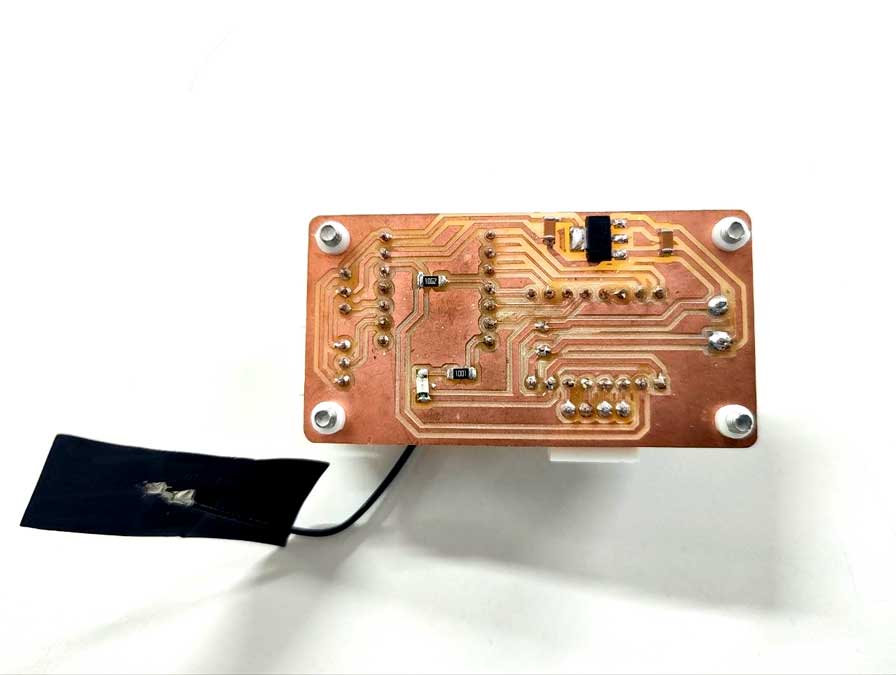
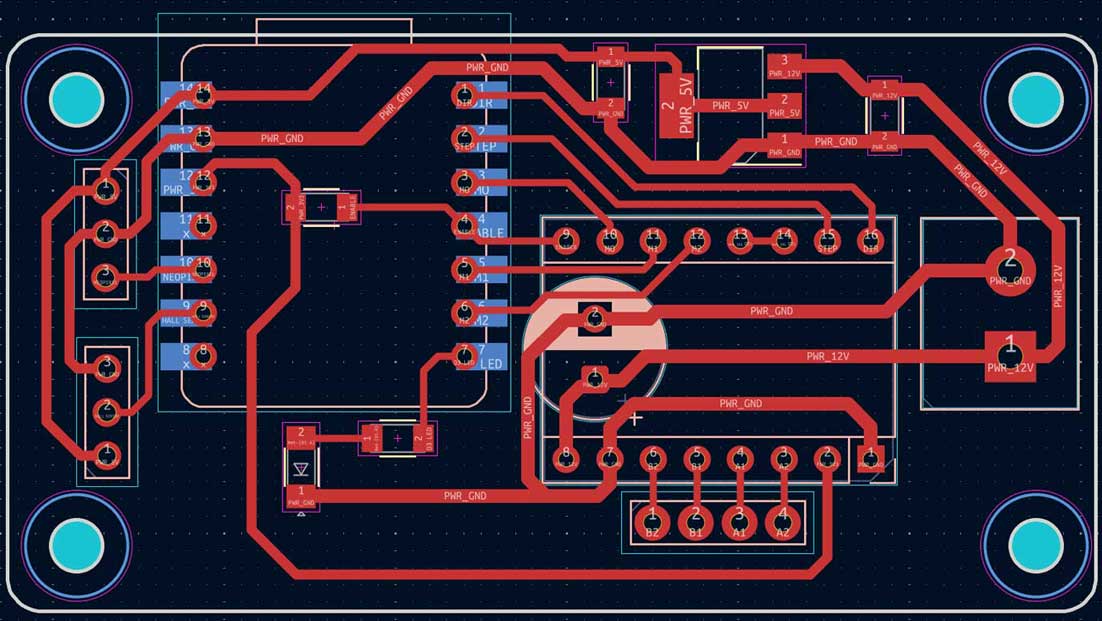
 PCB editor - KiCAD
 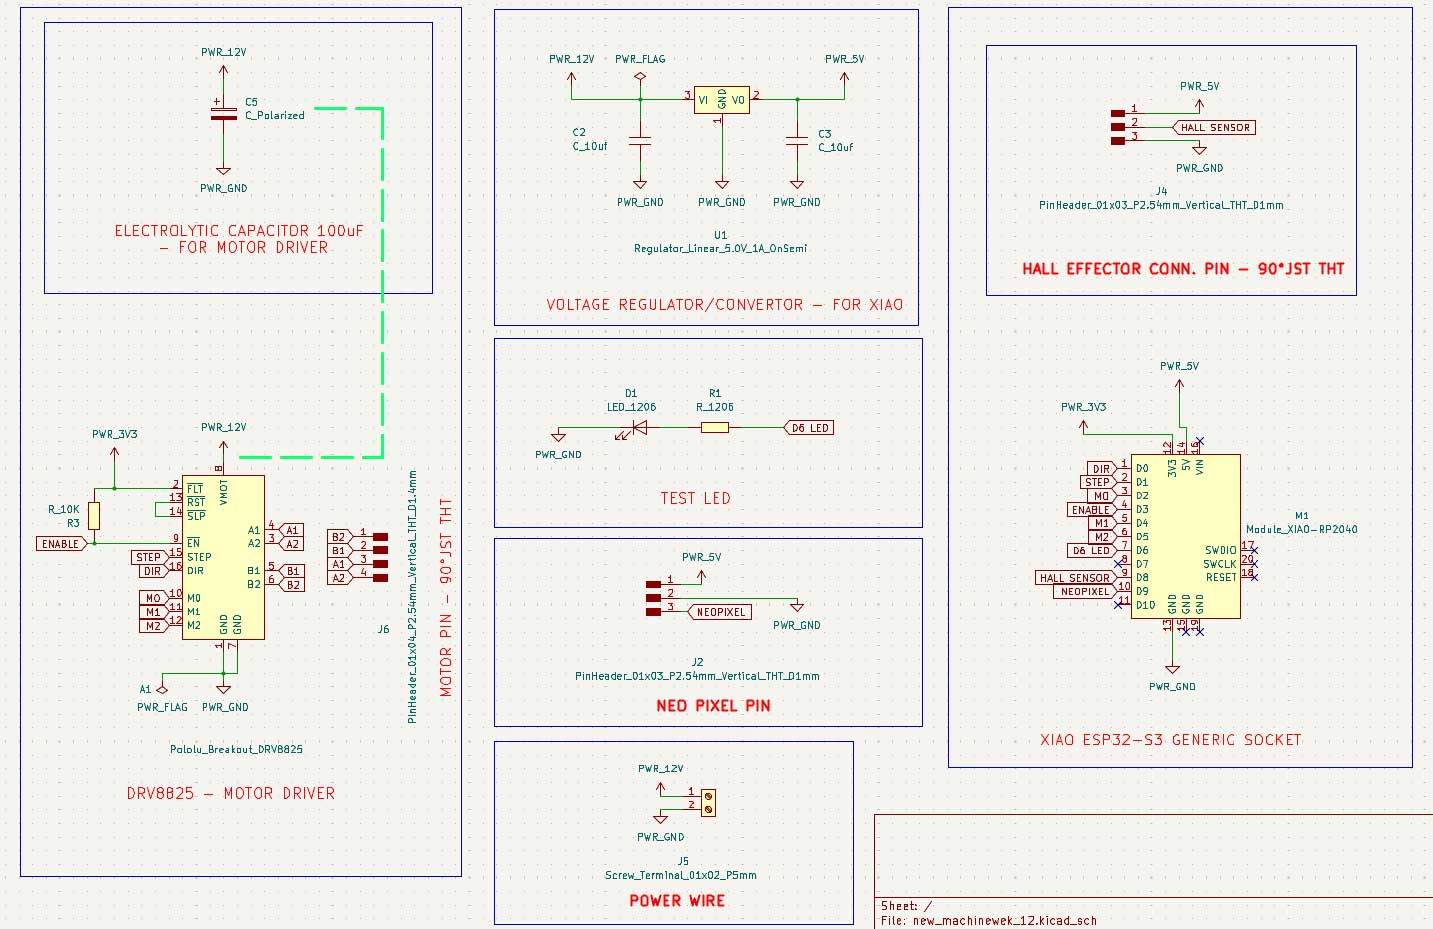 schematic drawing _KiCAD
Microcontroller: XIAO ESP32-S3 – for its complete 2.4 GHz Wi Fi subsystem
Motor: NEMA 17 17HS19 2004S1 is a high torque bipolar stepper motor (42 × 42 × 48 mm)
Motor driver: DRV8825 features adjustable current limiting, over current and over temperature protection, and six microstep resolutions
Polarised Electrolytic Capacitor: The capacitor used is a 63 V 100 µF polarised electrolytic capacitor – Keltron
JST pins: used to connect the NeoLights and Hall effect sensor
Screw terminal: used to connect the power wires.
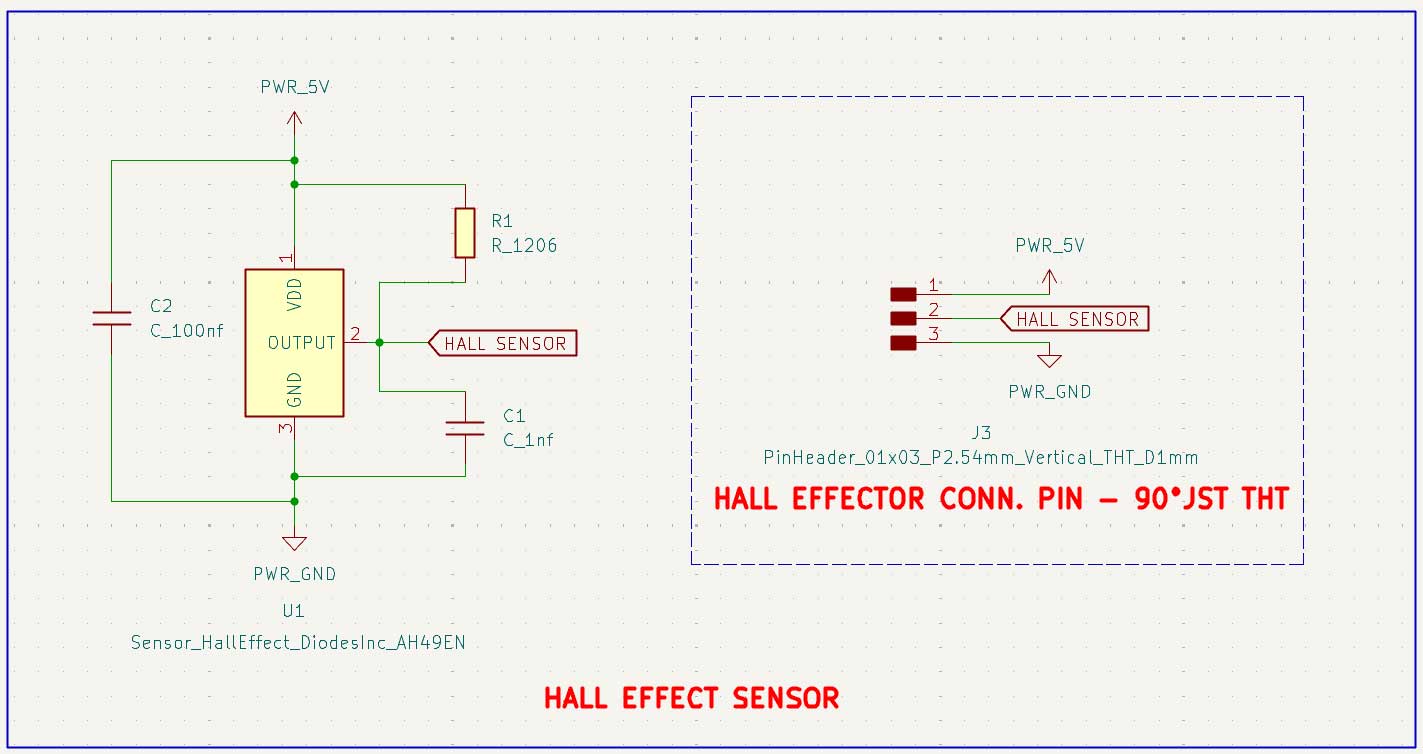
Hall effect sensor
Hall Effect Sensor: AH49E Linear Hall Effect Sensor – a digital switch sensor that detects a magnetic field, specifically the south pole of a magnet.
In this machine, it is used to mark the home position of the rotating table. A magnet is attached to the inner ring gear, and the sensor is fixed on the plywood below along its path. When the magnet passes the sensor, it detects the field and sends a signal to the microcontroller, allowing the system to identify and reset to the home position.
Fabrication & Assembly
For extended development notes and intermediate versions, refer to Ali's Fab Journal
Firmware
Code Logic (Step-by-Step)
For extended development notes and intermediate test versions, refer to Mishael's Fab Journal.
1. System Initialization (What loads first)
We begin by importing required libraries that handle motion, networking, and communication.
#include<AccelStepper.h>
#include<WiFi.h>
#include<PubSubClient.h>AccelStepper→ motion control with accelerationWiFi→ network connectionPubSubClient→ MQTT messaging This defines the system capabilities before execution begins.
2. Hardware + Motion Configuration
We define motor resolution and mechanical scaling.
#defineMOTOR_STEPS   200
#defineMICROSTEPS    16
#defineGEAR_RATIO    5
#defineSTEPS_PER_REV (MOTOR_STEPS * MICROSTEPS * GEAR_RATIO)
Interpretation:
- Microstepping: 16 → smoother motion
- Gear ratio: 5 → increases precision
Final resolution:
- Base motor: 200 steps/rev
- 16000 steps per full table rotation
This becomes the fundamental unit for all positioning.
3. Lookup Table (Core Position Logic)
Instead of calculating positions every time, we predefine them.
constlongLUT[7][6] = {
  {0,0,0,0,0,0},
  {0,0,3200,6400,9600,12800},
  {0,2667,5867,9067,12267,15467},
  ...
};
What this does:
- Maps → (Compartment, User Position) → Step Position
- Uses modular arithmetic internally:
Position=(C$offset$+H$offset$) mod 16000
Why this matters:
- No runtime math
- Faster execution
- No accumulated error
4. Hall Sensor Processing (Noise Handling)
Raw sensor data is unstable, so we filter it.
filtered =0.8f*filtered+0.2f*raw;We also use hysteresis:
if (!hallState&&filtered>ON_THRESHOLD)hallState =true;
if (hallState&&filtered<OFF_THRESHOLD)hallState =false;
Result:
- Clean digital signal from noisy analog input
- Prevents flickering detection
5. Finite State Machines (Control Backbone)
We structure behaviour using two FSMs:
enumHomingState {SEARCH,BACKOFF,APPROACH,HOMING_DONE };
enumSystemState {HOMING,POSITIONING,IDLE };
Why FSM:
- Eliminates blocking code
- Makes behavior predictable
- Separates responsibilities
6. Homing Algorithm (First Action After Start)
Homing establishes the zero reference.
SEARCH
stepper.setSpeed(SEARCH_SPEED);
stepper.runSpeed();- Rotate until magnet is detected
BACKOFF
stepper.setSpeed(-BACKOFF_SPEED);- Move away from magnet
APPROACH
stepper.setSpeed(APPROACH_SPEED);- Re-approach slowly for precision
Finalization
stepper.setCurrentPosition(0);
turntableStepPos =0;
Outcome:
- Defines Home = C1 at H1
- All future movement is relative to this
7. Command Interpretation Layer
Commands are converted into motion instructions.
if (cmd.length()==4&&cmd[0]=='C'&&cmd[2]=='H') {
intc =cmd[1]-'0';
inth =cmd[3]-'0';
}
Example:
C2H3→ Move compartment 2 to position 3 Also supports:
HOME
POS
8. Movement Planning (Shortest Path Logic)
We compute required motion:
longdelta =target-turntableStepPos;Then optimise:
if (delta>STEPS_PER_REV/2)delta-=STEPS_PER_REV;
if (delta<-STEPS_PER_REV/2)delta+=STEPS_PER_REV;
Meaning:
- Avoid long rotation
- Always take minimum angular path
Effect:
- Faster movement
- Less mechanical strain
9. Motion Execution Strategy
We execute motion in two phases:
High-speed travel
stepper.setMaxSpeed(MOVE_MAX_SPEED);
stepper.moveTo(current+delta);
Precision (Crawl Mode)
if (abs(distanceToGo)<CRAWL_THRESHOLD) {
stepper.setMaxSpeed(CRAWL_SPEED);
}
Why:
- Prevent overshoot
- Improve final alignment
10. MQTT Communication (External Control)
Incoming messages are handled here:
client.setCallback(callback);Inside callback:
msg.replace(":","");
parseCommand(msg);
Function:
- Receives wireless commands
- Cleans formatting
- Passes to parser
11. Setup Function (Boot Sequence)
This runs once at startup:
setup_wifi();
client.setServer(mqtt_server,mqtt_port);
Also:
- Enables motor driver
- Configures microstepping
- Starts homing
12. Main Loop (Continuous Execution)
Core runtime behaviour:
switch (sysState)HOMING
- Runs homing FSM
POSITIONING
stepper.run();- Executes movement
IDLE
if (Serial.available())- Waits for commands
13. Full Algorithm Flow
Complete system behaviour:
- Power ON
- Initialize system
- Start homing
- Set reference position (0)
- Wait for command
- Parse command (C, H)
- Lookup target (LUT)
- Compute shortest path
- Execute motion
- Return to IDLE
14. Final Code
#include <AccelStepper.h>
#include <WiFi.h>
#include <PubSubClient.h>

// ================== PIN DEFINITIONS ==================
#define STEP_PIN D1
#define DIR_PIN  D0
#define EN_PIN   D3

#define M0_PIN   D2
#define M1_PIN   D4
#define M2_PIN   D5

#define HALL_PIN D8

// ================= WIFI =================
const char* ssid = "Ali";
const char* password = "00000000";

// ================= MQTT =================
const char* mqtt_server = "mqtt.fabcloud.org";
const int mqtt_port = 1883;
const char* mqtt_user = "fabacademy";
const char* mqtt_pass = "fabacademy";

const char* sub_topic = "fabacademy/ashtami/tool";

WiFiClient espClient;
PubSubClient client(espClient);

// ================== HALL THRESHOLDS ==================
#define ON_THRESHOLD  3800
#define OFF_THRESHOLD 3400

// ================== TURNTABLE CONSTANTS ==================
#define MOTOR_STEPS   200
#define MICROSTEPS    16
#define GEAR_RATIO    5
#define STEPS_PER_REV (MOTOR_STEPS * MICROSTEPS * GEAR_RATIO)  // 16000

// ================== SPEED SETTINGS ==================
#define SEARCH_SPEED    800
#define BACKOFF_SPEED   400
#define APPROACH_SPEED  200

#define MOVE_MAX_SPEED  1200
#define MOVE_ACCEL      800
#define CRAWL_SPEED     300
#define CRAWL_THRESHOLD 200

// ================== LOOKUP TABLE ==================
// Formula: LUT[C][H] = (C_offset + H_offset) % 16000
//
// C offsets — 6 compartments equally spaced:
//   Nachos=0, Juice=2667, Lays=5333, Snickers=8000, Popcorn=10667, Cookies=13333
//
// H offsets — 5 positions equally spaced:
//   Abhishek=0, Ardra=3200, Ali=6400, Ashtami=9600, Mishael=12800
//
//                 [0]  [H1=Ab]  [H2=Ar]  [H3=Al]  [H4=As]  [H5=Mi]
const long LUT[7][6] = {
  {0,      0,      0,      0,      0,      0 }, // row 0 unused
  {0,      0,   3200,   6400,   9600,  12800 }, // C1 Nachos
  {0,   2667,   5867,   9067,  12267,  15467 }, // C2 Juice
  {0,   5333,   8533,  11733,  14933,   2133 }, // C3 Lays
  {0,   8000,  11200,  14400,   1600,   4800 }, // C4 Snickers
  {0,  10667,  13867,   1067,   4267,   7467 }, // C5 Popcorn
  {0,  13333,    533,   3733,   6933,  10133 }, // C6 Cookies
};

const char* COMP_LABEL[7] = {"", "Nachos","Juice","Lays","Snickers","Popcorn","Cookies"};
const char* HOME_LABEL[6] = {"", "Abhishek","Ardra","Ali","Ashtami","Mishael"};

// ================== STEPPER ==================
AccelStepper stepper(AccelStepper::DRIVER, STEP_PIN, DIR_PIN);

// ================== HALL FILTER ==================
float filtered  = 0.0f;
bool  hallState = false;

// ================== STATE MACHINES ==================
enum HomingState { SEARCH, BACKOFF, APPROACH, HOMING_DONE };
enum SystemState { HOMING, POSITIONING, IDLE };

HomingState homingState = SEARCH;
SystemState sysState    = HOMING;

// ================== POSITION TRACKING ==================
long turntableStepPos = 0;
int  lastComp = 0;
int  lastHome = 0;

// ================== HALL SENSOR ==================
bool readHallDigital() {
  int raw = analogRead(HALL_PIN);
  filtered = 0.8f * filtered + 0.2f * raw;
  if (!hallState && filtered > ON_THRESHOLD) hallState = true;
  if ( hallState && filtered < OFF_THRESHOLD) hallState = false;
  return hallState;
}

// ================== HOMING ==================
void runHoming() {
  static bool lastHall = false;
  bool currentHall = readHallDigital();

  switch (homingState) {

    case SEARCH:
      stepper.setSpeed(SEARCH_SPEED);
      stepper.runSpeed();
      if (currentHall && !lastHall) {
        Serial.println("[HOMING] Magnet detected → BACKOFF");
        homingState = BACKOFF;
      }
      break;

    case BACKOFF:
      stepper.setSpeed(-BACKOFF_SPEED);
      stepper.runSpeed();
      if (!currentHall && lastHall) {
        Serial.println("[HOMING] Magnet cleared → APPROACH");
        homingState = APPROACH;
      }
      break;

    case APPROACH:
      stepper.setSpeed(APPROACH_SPEED);
      stepper.runSpeed();
      if (currentHall && !lastHall) {
        stepper.setSpeed(0);
        stepper.setCurrentPosition(0);
        turntableStepPos = 0;
        lastComp = 1;
        lastHome = 1;

        stepper.setMaxSpeed(MOVE_MAX_SPEED);
        stepper.setAcceleration(MOVE_ACCEL);

        homingState = HOMING_DONE;
        sysState    = IDLE;

        Serial.println("HOMING COMPLETE → Nachos at Abhishek");
      }
      break;

    case HOMING_DONE:
      break;
  }

  lastHall = currentHall;
}

// ================== MOVE (SHORTEST PATH) ==================
void moveCompartmentToHome(int c, int h) {

  if (c < 1 || c > 6) { Serial.println("[ERR] C must be 1-6"); return; }
  if (h < 1 || h > 5) { Serial.println("[ERR] H must be 1-5"); return; }

  long target = LUT[c][h];
  long delta  = target - turntableStepPos;

  // Shortest path
  if (delta >  STEPS_PER_REV / 2) delta -= STEPS_PER_REV;
  if (delta < -STEPS_PER_REV / 2) delta += STEPS_PER_REV;

  if (delta == 0) {
    Serial.println("[INFO] Already at target");
    return;
  }

  stepper.setMaxSpeed(MOVE_MAX_SPEED);
  stepper.moveTo(stepper.currentPosition() + delta);
  sysState = POSITIONING;

  turntableStepPos = target;
  lastComp = c;
  lastHome = h;

  Serial.print("Moving ");
  Serial.print(COMP_LABEL[c]);
  Serial.print(" → ");
  Serial.println(HOME_LABEL[h]);
  Serial.print("Steps: ");
  Serial.println(delta);
  Serial.print("Direction: ");
  Serial.println(delta > 0 ? "CW" : "CCW");
}

// ================== COMMAND PARSER ==================
void parseCommand(String cmd) {

  cmd.trim();
  cmd.toUpperCase();

  if (cmd.length() == 4 && cmd[0]=='C' && cmd[2]=='H') {
    int c = cmd[1] - '0';
    int h = cmd[3] - '0';
    moveCompartmentToHome(c, h);
    return;
  }

  if (cmd == "HOME") {
    homingState = SEARCH;
    sysState    = HOMING;
    stepper.setMaxSpeed(SEARCH_SPEED);
    Serial.println("[HOMING] Restarting...");
    return;
  }

  if (cmd == "POS") {
    Serial.print("Steps: ");
    Serial.println(turntableStepPos);
    return;
  }

  Serial.println("[ERR] Unknown command");
}

// ================== MQTT CALLBACK ==================
void callback(char* topic, byte* payload, unsigned int length) {

  Serial.println("\n MQTT MESSAGE RECEIVED");

  String msg = "";
  for (int i = 0; i < length; i++) {
    msg += (char)payload[i];
  }

  Serial.print("MQTT RAW: ");
  Serial.println(msg);

  msg.replace(":", "");

  Serial.print("Cleaned: ");
  Serial.println(msg);

  parseCommand(msg);
}

// ================== WIFI ==================
void setup_wifi() {
  Serial.print("Connecting WiFi");
  WiFi.begin(ssid, password);
  while (WiFi.status() != WL_CONNECTED) {
    delay(500);
    Serial.print(".");
  }
  Serial.println("\n WiFi Connected");
}

// ================== MQTT RECONNECT ==================
void reconnect() {
  while (!client.connected()) {
    Serial.println("Connecting MQTT...");
    if (client.connect("ESP32S3", mqtt_user, mqtt_pass)) {
      Serial.println("MQTT Connected");
      client.subscribe(sub_topic);
      Serial.print("Subscribed: ");
      Serial.println(sub_topic);
    } else {
      Serial.print("Failed rc=");
      Serial.println(client.state());
      delay(2000);
    }
  }
}

// ================== SETUP ==================
void setup() {

  Serial.begin(115200);

  pinMode(EN_PIN, OUTPUT);
  digitalWrite(EN_PIN, LOW);

  pinMode(M0_PIN, OUTPUT); digitalWrite(M0_PIN, LOW);
  pinMode(M1_PIN, OUTPUT); digitalWrite(M1_PIN, LOW);
  pinMode(M2_PIN, OUTPUT); digitalWrite(M2_PIN, HIGH);

  filtered = analogRead(HALL_PIN);
  stepper.setMaxSpeed(SEARCH_SPEED);

  Serial.println("Starting homing...");

  setup_wifi();

  client.setServer(mqtt_server, mqtt_port);
  client.setCallback(callback);

  Serial.println("MQTT Ready");
}

// ================== LOOP ==================
void loop() {

  if (!client.connected()) reconnect();
  client.loop();

  switch (sysState) {

    case HOMING:
      runHoming();
      break;

    case POSITIONING:
      if (stepper.distanceToGo() != 0) {

        if (abs(stepper.distanceToGo()) < CRAWL_THRESHOLD) {
          stepper.setMaxSpeed(CRAWL_SPEED);
        } else {
          stepper.setMaxSpeed(MOVE_MAX_SPEED);
        }

        stepper.run();

      } else {
        stepper.setMaxSpeed(MOVE_MAX_SPEED);
        Serial.println("Move complete");
        sysState = IDLE;
      }
      break;

    case IDLE:
      if (Serial.available()) {
        String cmd = Serial.readStringUntil('\n');
        parseCommand(cmd);
      }
      break;
  }
}
User Interface - Alexa Integration
For extended development notes and intermediate test versions, refer to Ashtami's Fab Journal.
Alexa developer console
It's a web-based portal where we can create, test, manage, and publish Alexa skills. 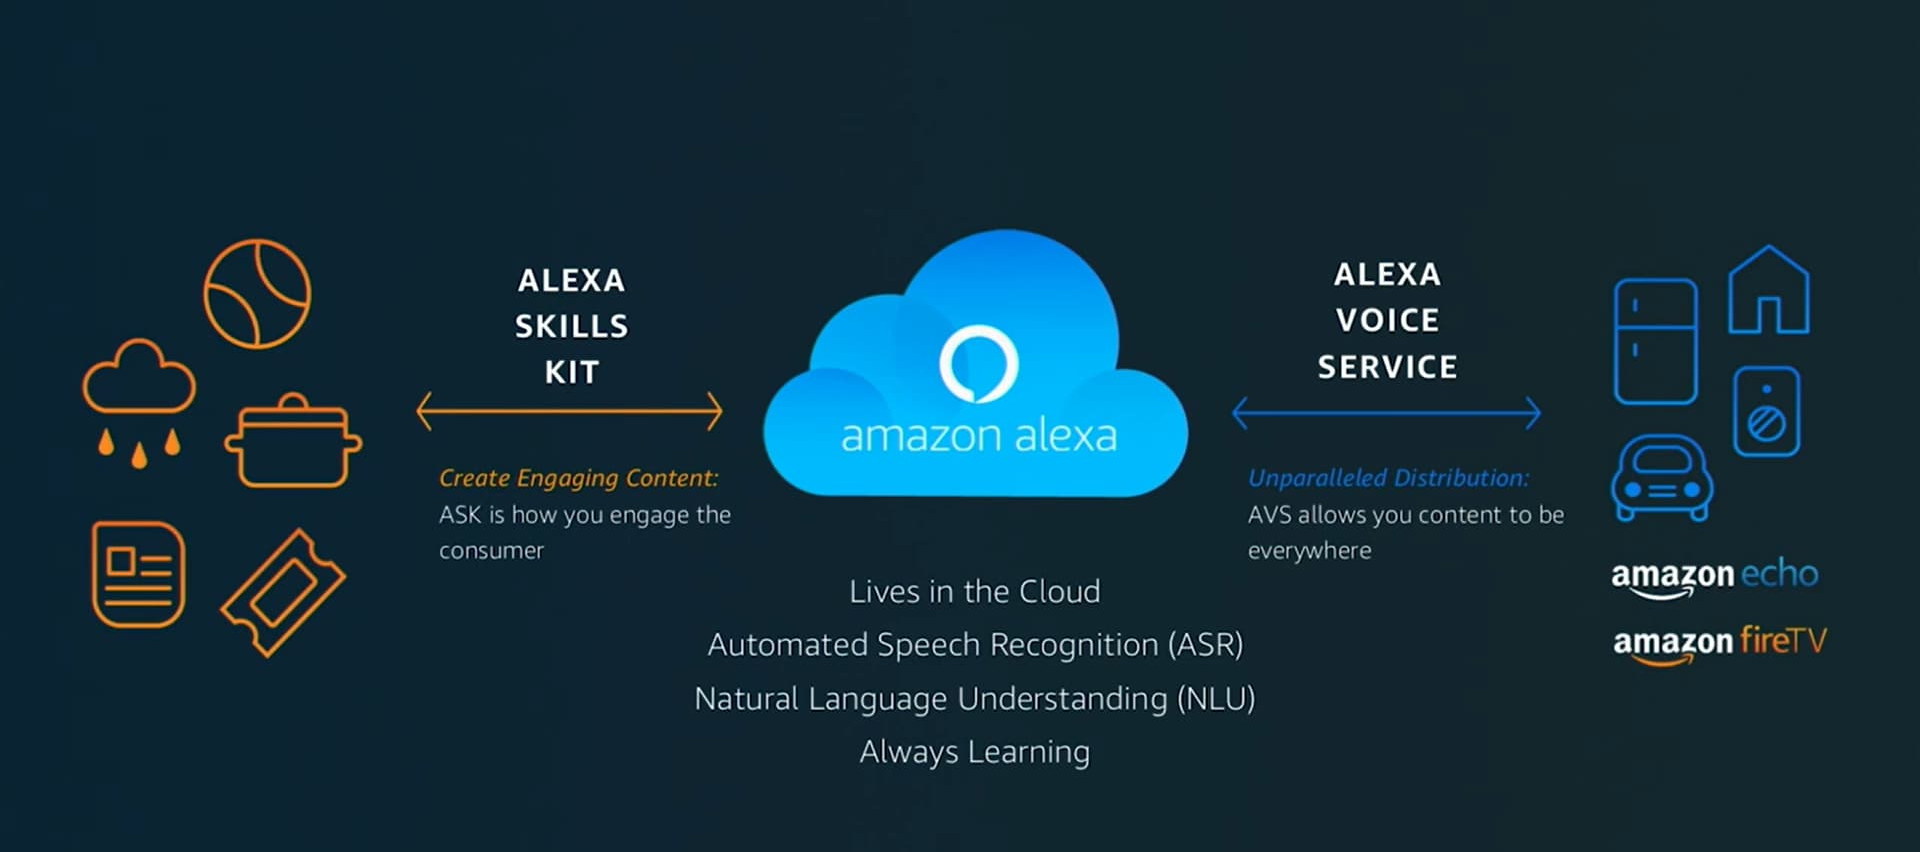 An Alexa Skill is like an app for Amazon Alexa.
It allows you to add new features or commands to Alexa so it can do specific tasks beyond its default abilities. Like a new ability you give to Alexa. Like I'm learning how to play sitar, it adds up to my skillset. 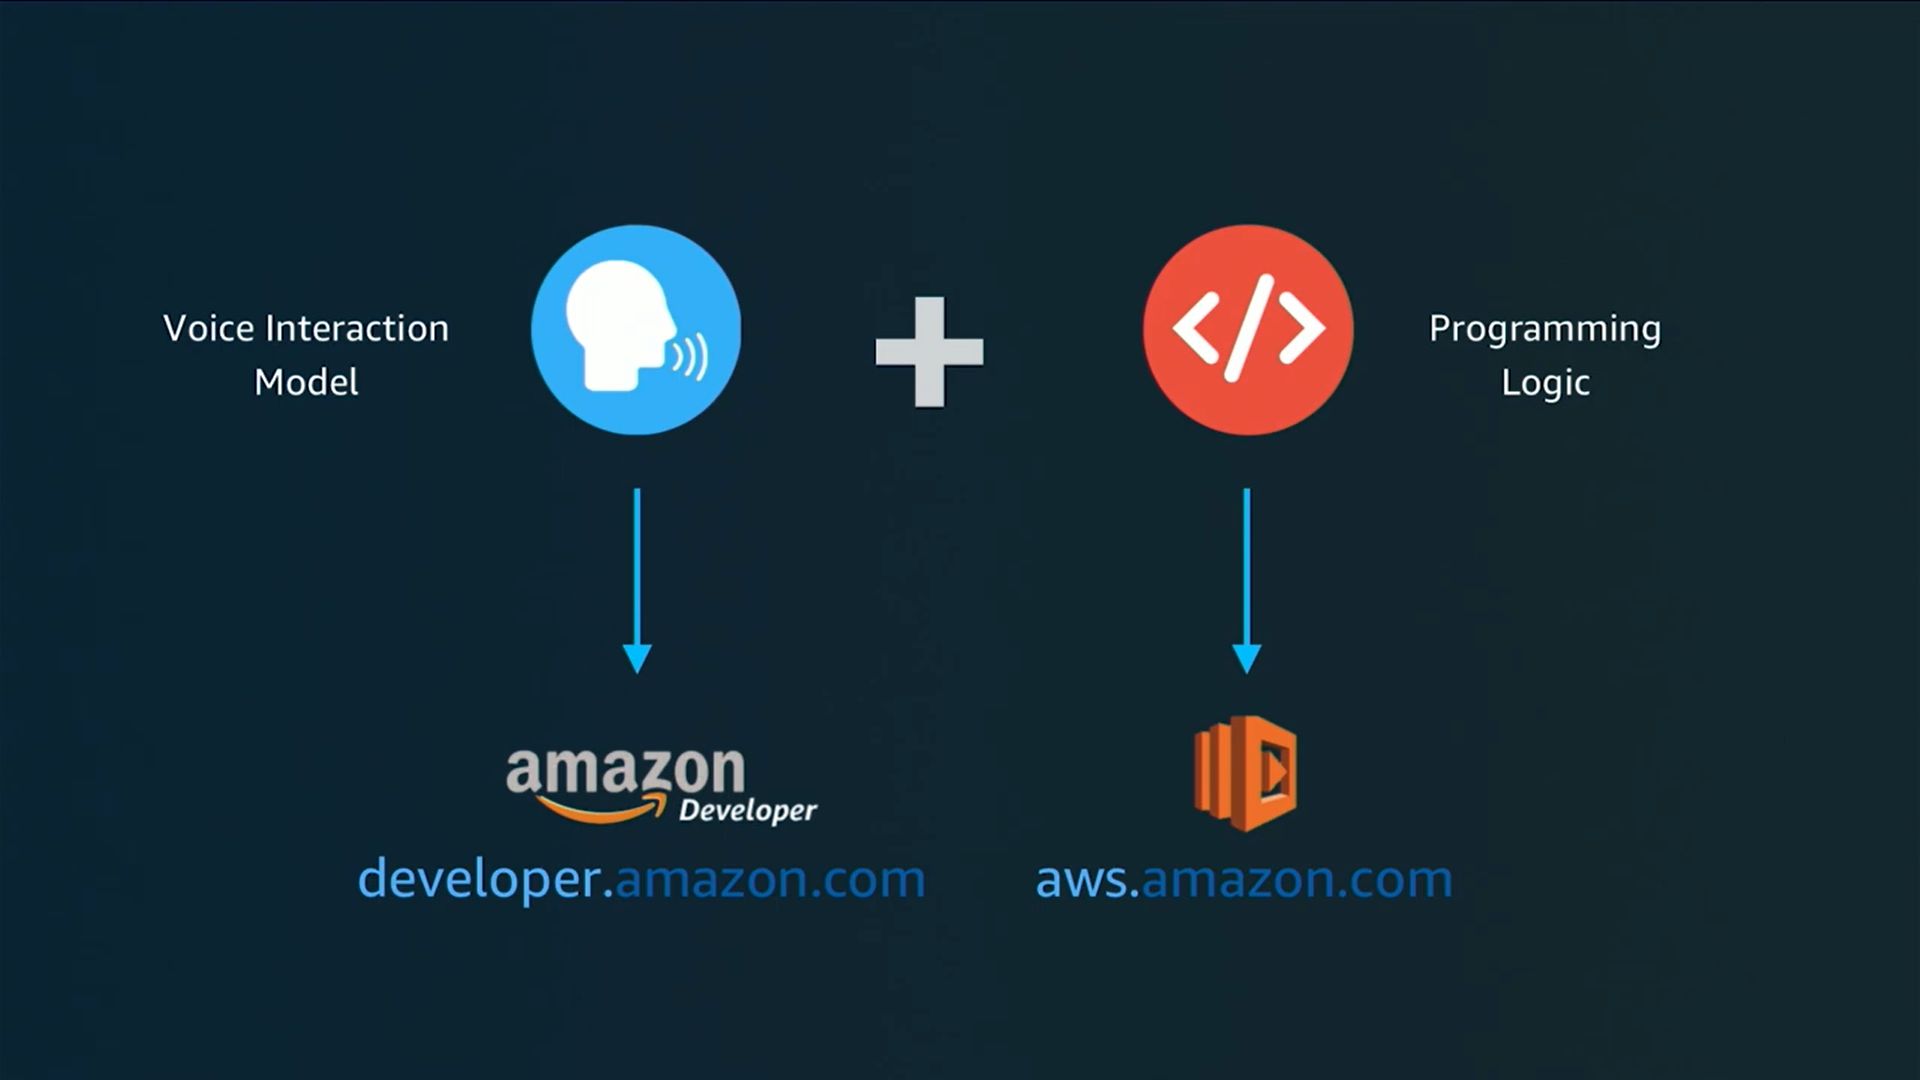
Building an Alexa skill requires two main parts: the Voice Interaction Model and the Programming Logic.
The Voice Interaction Model is created in the Amazon Developer Console and defines how the user speaks to Alexa, including the invocation name, intents, utterances, and slots. It helps Alexa understand what the user is saying.
The Programming Logic is written in code (using Python or Node.js) and runs on AWS. This part decides what action should happen after Alexa understands the command.
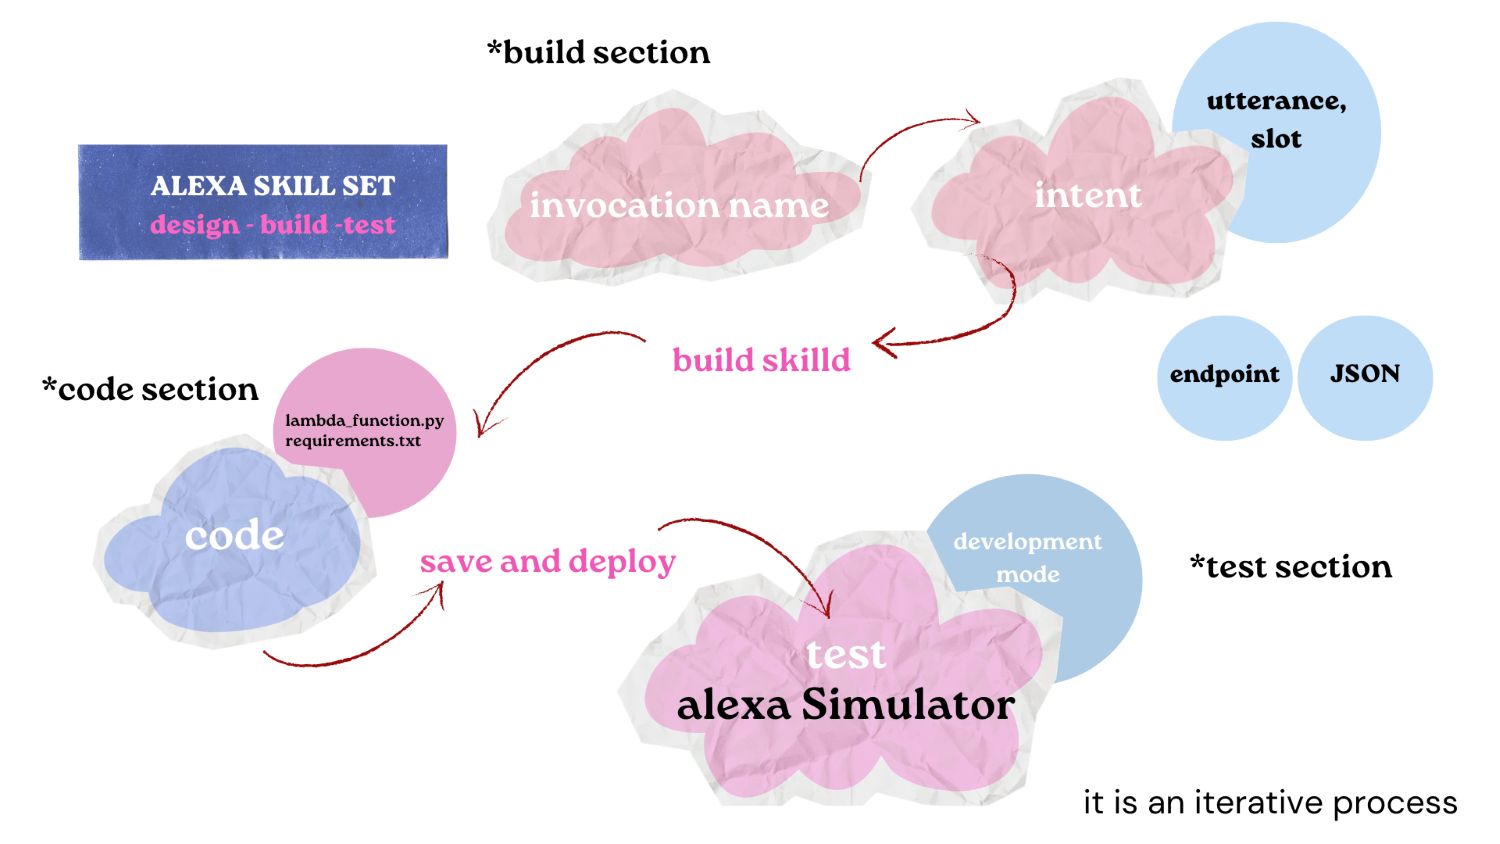
Creating an Alexa Skill
After logging into the Alexa Developer Console with Amazon account, we created a skill by following these steps:
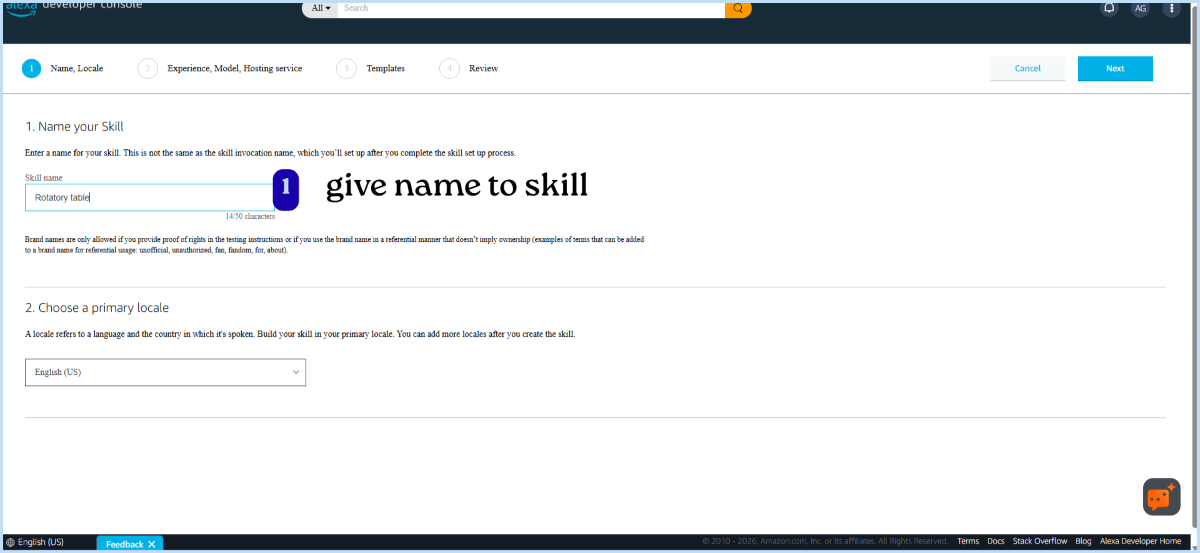
1. Skill Name
First, give a name to your skill.
Next, select the primary language (locale) for your skill (e.g., English - India).
- Make sure the Alexa app language and skill locale match.
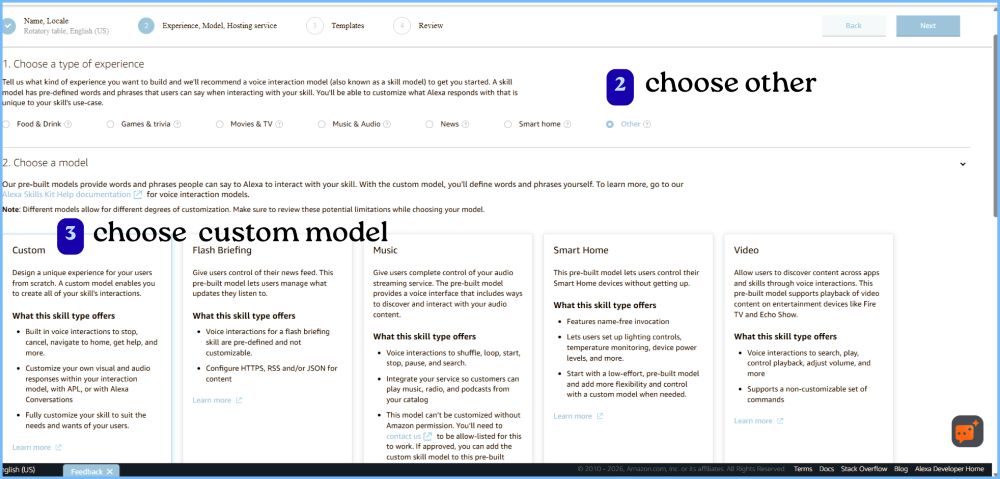
2. Choose Type of Experience
Since this project is a custom system (rotary table), select: “Other”
3. Choose a Model - selected custom model
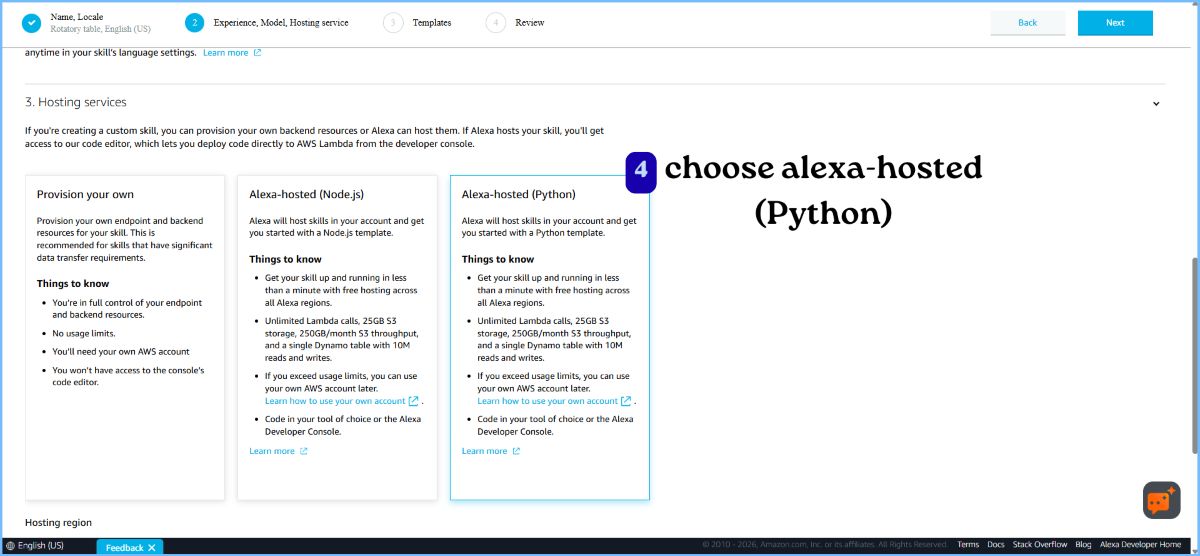
4. Hosting Service
Choose: Alexa-hosted (Python): provides a free cloud environment to run your code and don’t need to set up your own server.
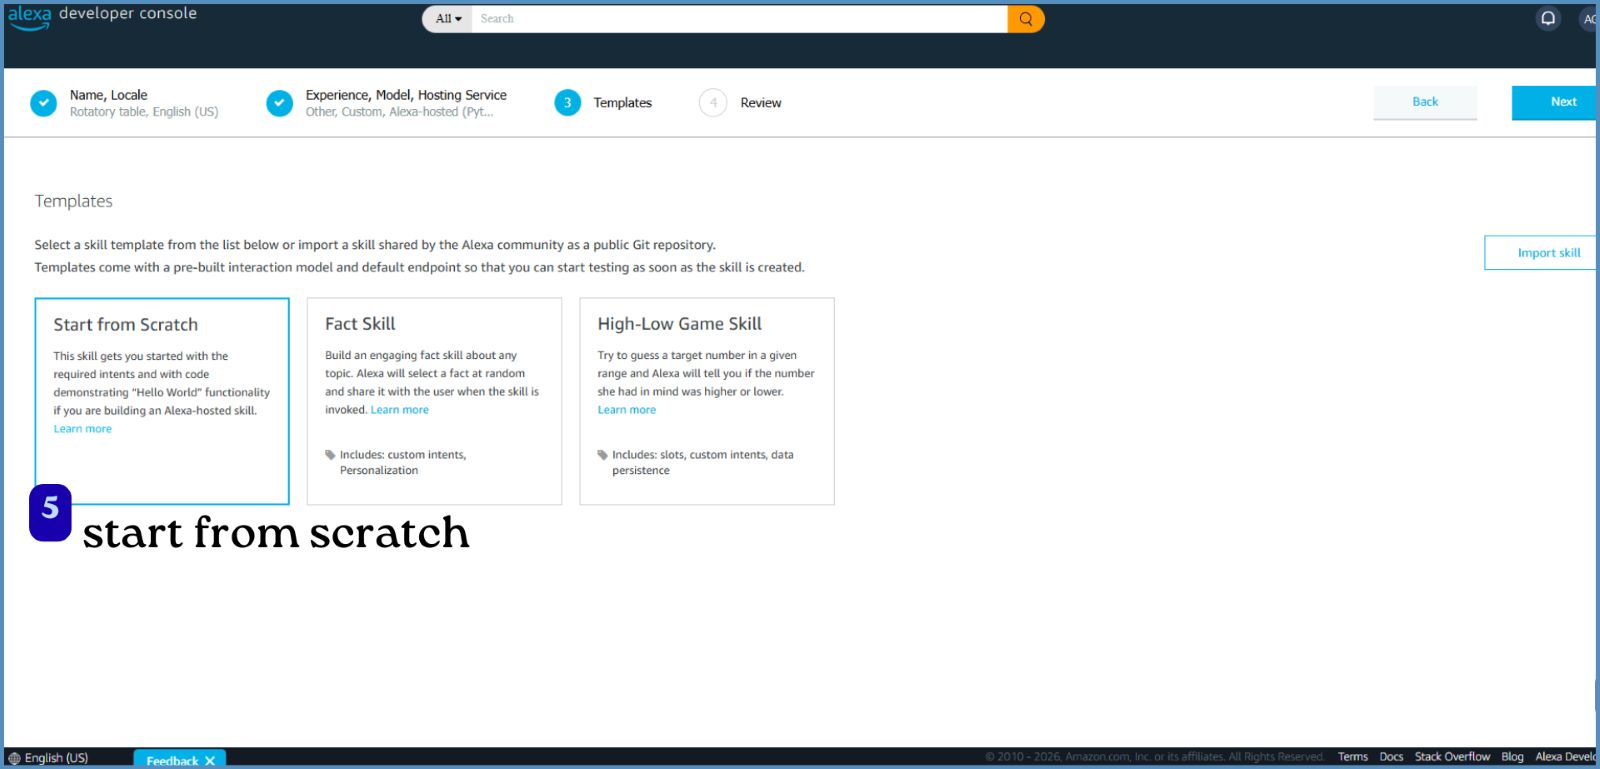
5. Template
Choose: Start from scratch - build everything from the beginning (intents, logic, responses)
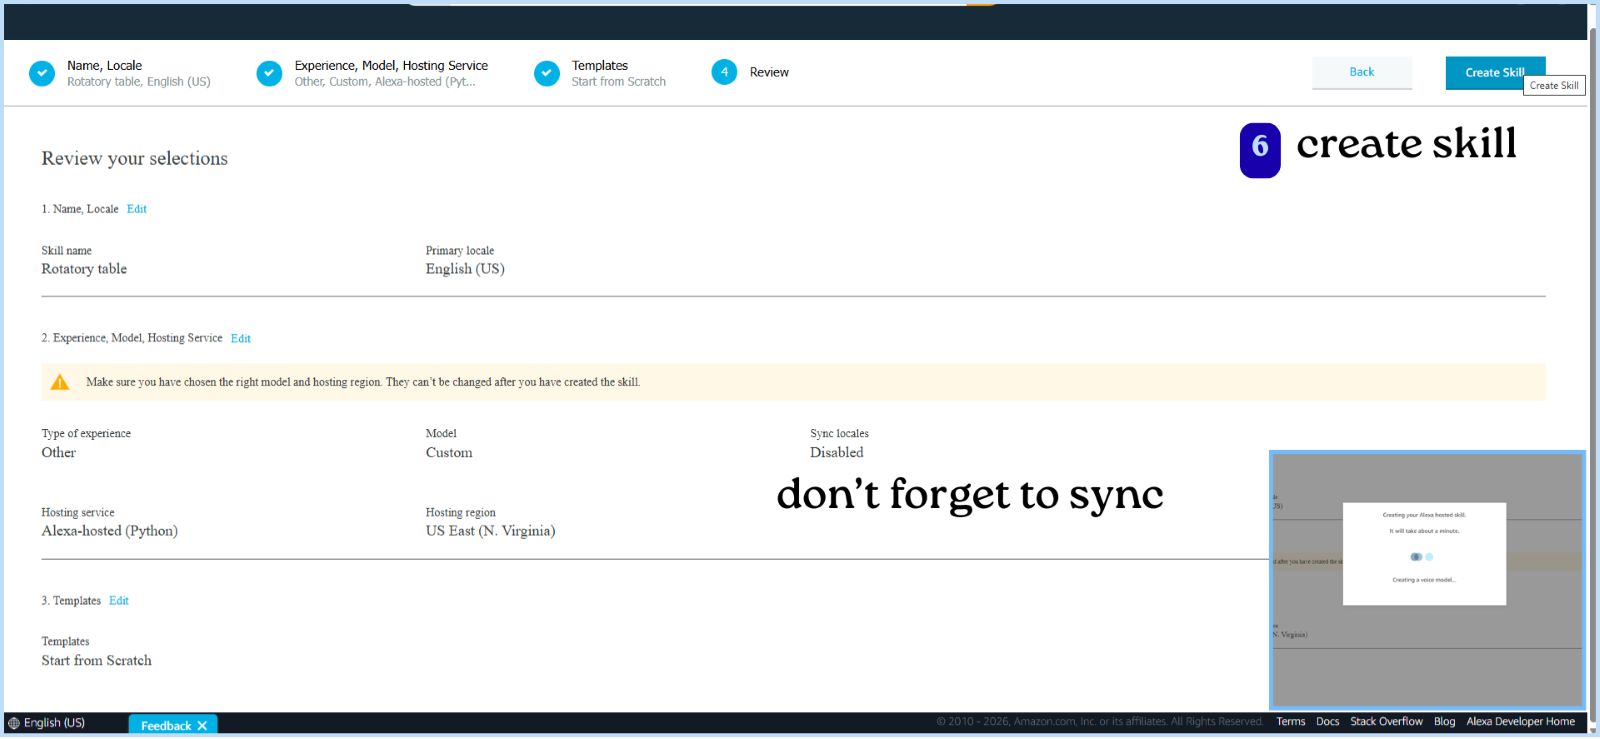
- Review all selected options
- Click Create Skill
Build Skill
Invocation Name:
The name you use to open your skill.
How it works: You must say it to Alexa to start your skill.
The name must follow specific rules — it usually needs at least two words, and you cannot use launch words like “open”, “start”, or “ask” as the name.
We named it lazy susan
Intent
An action Alexa should perform based on what the user says.
Utterance
The different ways a user can say the same command(phrases). Alexa uses these to understand and match the user’s speech to the correct intent.
Intent – MoveToolIntent
| Utterance |
|---|
| move {snacks} to |
| give me {snacks} to |
| show me |
| go to |
| give me |
Slot
A variable value inside an intent (dynamic input from user).
Slots – MoveToolIntent
| Slot Name | Slot Type |
|---|---|
| snacks | compartmenttype |
| person | positiontype |
Slot type
Defines what kind of values a slot can take.
There are in build slot types like AMAZON.SearchQuery -A built-in slot type used to capture any free-form text or phrase the user says.
Slot Type: compartmenttype
| Value | Synonyms |
|---|---|
| cookies | biscuit, biscuits, cookie |
| popcorn | pop corn |
| snickers | chocolate |
| lays | chips, lace, laze, orange lays, red lays, green lays, blue lays |
| juice | drink, mango juice |
| nachos | nacho |
Slot Type: positiontype
| Value | Synonyms |
|---|---|
| mishael | mishail, mitchel, mishell, mi shael, mishel, michael |
| ashtami | ash tommy, ash tumy, ash tamy, ashthami, ashtomy, ashtamy |
| ali | ally, alee |
| ardra | ar dra, ar da ra, rthra, andra, adra, ardhra |
| abhishek | abhisek, abishek |
Code
To communicate between Alexa and the XIAO ESP32-S3, we used MQTT with FabAcademy’s broker "mqtt.fabcloud.org"
Alexa (via AWS Lambda) converts natural language commands into messages and publishes them to a topic, and the ESP32 subscribes to that topic to receive and act on them.
MQTT is a lightweight communication protocol for IoT based on a publish–subscribe system.
It works like a messaging system:
- Publisher → sends message
- Broker → middle server (FabAcademy broker)
- Subscriber → receives message
Any device can be both a publisher and a subscriber.
Inside requirements.txt
paho-mqtt is a Python library used to send and receive MQTT messages.
boto3==1.28.78
ask-sdk-core==1.19.0
paho-mqtt //Python library to communicate with a MQTT broker.
Lambda_function.py
import json
import paho.mqtt.client as mqtt
import random

# ================= MQTT CONFIG =================
MQTT_BROKER = "mqtt.fabcloud.org"
MQTT_PORT = 1883
MQTT_TOPIC = "fabacademy/ashtami/tool"

MQTT_USER = "fabacademy"
MQTT_PASS = "fabacademy"

def send_mqtt(message):
    try:
        client = mqtt.Client()
        client.username_pw_set(MQTT_USER, MQTT_PASS)
        client.connect(MQTT_BROKER, MQTT_PORT, 60)
        client.publish(MQTT_TOPIC, message)
        client.disconnect()
    except Exception as e:
        print("❌ MQTT Error:", str(e))

def lambda_handler(event, context):

    print("📥 EVENT:", json.dumps(event))

    request_type = event["request"]["type"]

    # ================= LAUNCH =================
    if request_type == "LaunchRequest":
        speech = "Hey! What do you want, and who should I give it to?"
        return build_response(speech, False)

    elif request_type == "IntentRequest":

        intent = event["request"]["intent"]
        intent_name = intent["name"]
        slots = intent.get("slots", {})

        if intent_name == "MoveToolIntent":

            # ✅ FINAL SLOT NAMES
            tool = slots.get("snacks", {}).get("value")
            position = slots.get("person", {}).get("value")

            # CLEAN INPUT
            if tool:
                tool = tool.lower().strip()
            if position:
                position = position.lower().strip()

            # ================= SYNONYMS =================
            tool_alias = {
                "nacho": "nachos",
                "juices": "juice", "drink": "juice", "drinks": "juice",
                "chips": "lays", "lace": "lays", "laze": "lays",
                "chocolate": "snickers", "snicker": "snickers",
                "pop corn": "popcorn",
                "cookie": "cookies", "biscuit": "cookies", "biscuits": "cookies",
            }

            name_alias = {
                "adra": "ardra", "andra": "ardra", "andre": "ardra", "r dra": "ardra",
                "ashthami": "ashtami", "ashtamy": "ashtami", "ash": "ashtami", "ash tommy": "ashtami",
                "michael": "mishael", "mishel": "mishael", "mishail": "mishael",
                "mis sail": "mishael", "missile": "mishael",
                "alee": "ali", "ally": "ali",
                "abhisek": "abhishek", "abhi": "abhishek",
            }

            if tool in tool_alias:
                tool = tool_alias[tool]

            if position in name_alias:
                position = name_alias[position]

            # ================= MAPS =================
            snack_map = {
                "nachos": "C1",
                "juice": "C2",
                "lays": "C3",
                "snickers": "C4",
                "popcorn": "C5",
                "cookies": "C6"
            }

            name_map = {
                "ali": "H3",
                "abhishek": "H1",
                "ardra": "H2",
                "ashtami": "H4",
                "mishael": "H5"
            }

            reverse_map = {v: k for k, v in name_map.items()}

            # ================= VALIDATION =================

            if not tool:
                return build_response("What do you want?", False)

            if tool not in snack_map:
                return build_response("Hmm, I don’t have that. Want something else?", False)

            if not position:
                return build_response(f"Got it, {tool}. Who should I give it to?", False)

            if position not in name_map:
                return build_response("I didn’t catch the name. Who should I give it to?", False)

            # ================= ACTION =================

            tool_code = snack_map[tool]
            position_code = name_map[position]

            message = f"{tool_code}:{position_code}"
            send_mqtt(message)

            spoken_name = reverse_map.get(position_code, position)

            responses = [
                f"Alright, bringing {tool} to {spoken_name}.",
                f"Got it, sending {tool} to {spoken_name}.",
                f"Okay, {spoken_name} gets the {tool}."
            ]

            speech = random.choice(responses)

            return build_response(speech, True)

    return build_response("Hmm, I didn’t catch that. Try again?", True)

def build_response(speech, end_session):
    return {
        "version": "1.0",
        "response": {
            "outputSpeech": {
                "type": "PlainText",
                "text": speech
            },
            "shouldEndSession": end_session
        }
    }
Testing
Learnings & Insights
We concluded on a simple idea to rotate the table using a voice command. Although the idea seemed simple, the execution came with its own challenges, as all of us were new to building a machine. We referred to existing Lazy Susan mechanisms for guidance, but the design evolved through both ideation and practical constraints.
The design process required careful attention to even the smallest details, such as heat insert screw holes, bearings, and their distribution. While space for wires was considered, we did not fully account for the thickness and number of wires that would be used. The gears were successfully fabricated without errors, and we used two different materials for them. We had also included holders to manage the wires, but the actual number of wires was underestimated.
The enclosure was designed towards the end. It is currently screwed on from the top, but a press fit solution would have been better. Especially since we had to open it repeatedly for testing and code updates.
Overall, the project was a strong learning experience in translating a simple idea into a functional system. It highlighted the importance of thinking through both design and assembly at the same time, and of anticipating real world constraints early in the process. These insights will help us approach our final projects with better planning, integration, and adaptability.
Future Outlook
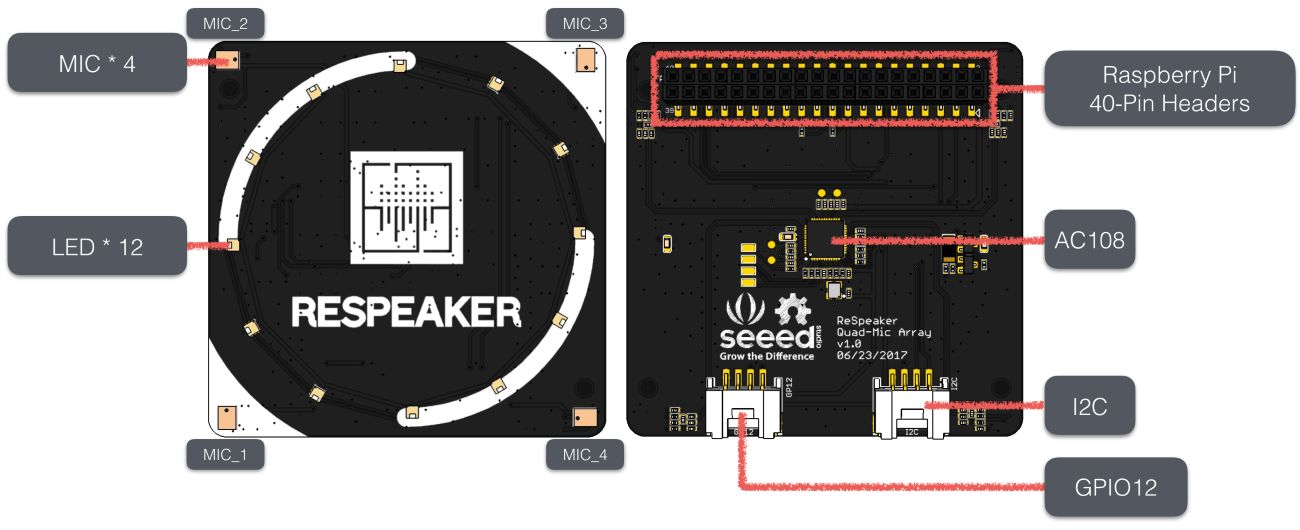
In the future, the system can be improved by integrating the ReSpeaker 4-Mic Array for Raspberry Pi, which can detect the direction of arrival (DOA) of the user’s voice. This allows the system to understand which person is speaking based on their position, making the interaction more natural and accurate.
Since the system knows where the command is coming from, it can rotate the compartment toward the detected direction instead of requiring the user to specify a person’s name.
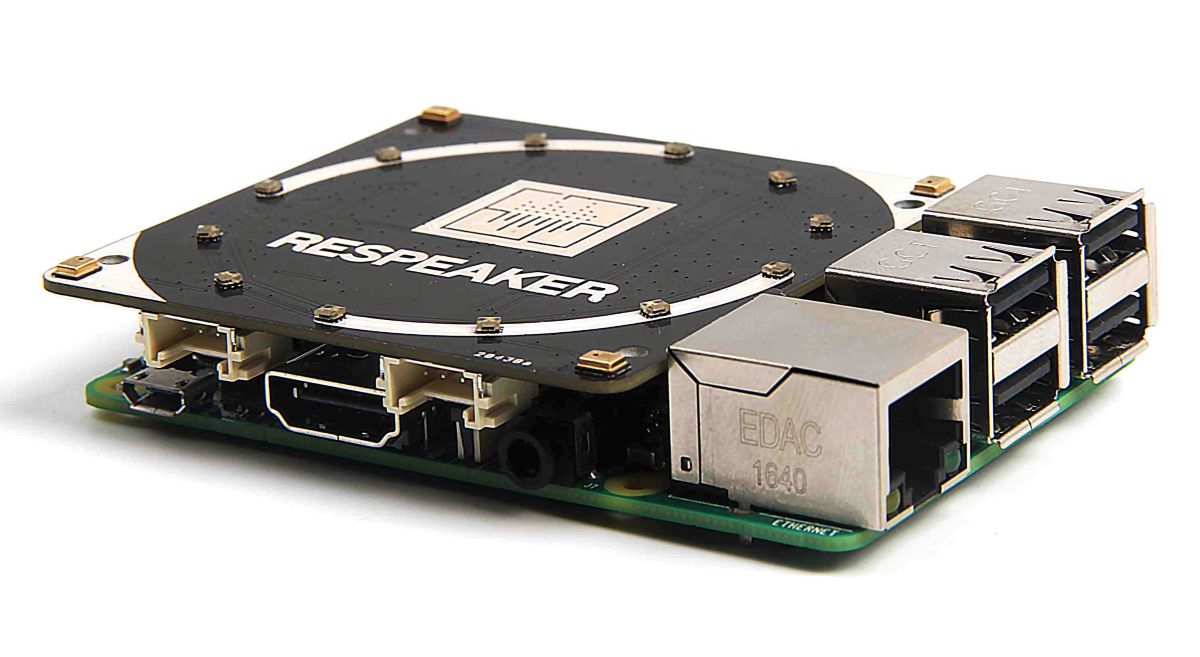
reSpeaker 4-Mic Array for Raspberry Pi | Seeed Studio Wiki
Specifications
- Microphones: 4 microphones placed around the board for spatial audio capture
- Audio Chip: AC108 quad-channel ADC for high-quality audio input
- Voice Features: Supports direction detection (DOA), noise reduction, and voice focusing
- LEDs: 12 APA102 RGB LEDs for visual feedback (like Google Home / Alexa style indicators)
- Audio Output: No built-in speaker (uses Raspberry Pi headphone jack or HDMI)
- Software Support: Demo code, libraries, and hotword detection support
Improvement in Voice Interaction
Instead of relying on cloud-based assistants like Alexa, we can use offline tools such as Picovoice and Porcupine to create custom wake words and commands.
So instead of saying:
“Alexa, ask Lazy Susan to move nachos to Abhishek”
we can directly say:
“Move nachos ”
Custom wake words like “lazy susan”, “turntable”, “working susan”….
Benefits
- Faster response (low latency)
- Works offline (no internet required)
- Better privacy (no cloud processing)
- More natural and user-friendly interaction