Appearance
Week 5 - 3D Scanning and printing
Group Assignment
- Test the design rules for your 3D printer(s)
3D Printing Basics
The type of machine used in this 3D printing practice is FDM (Fused deposition modeling).
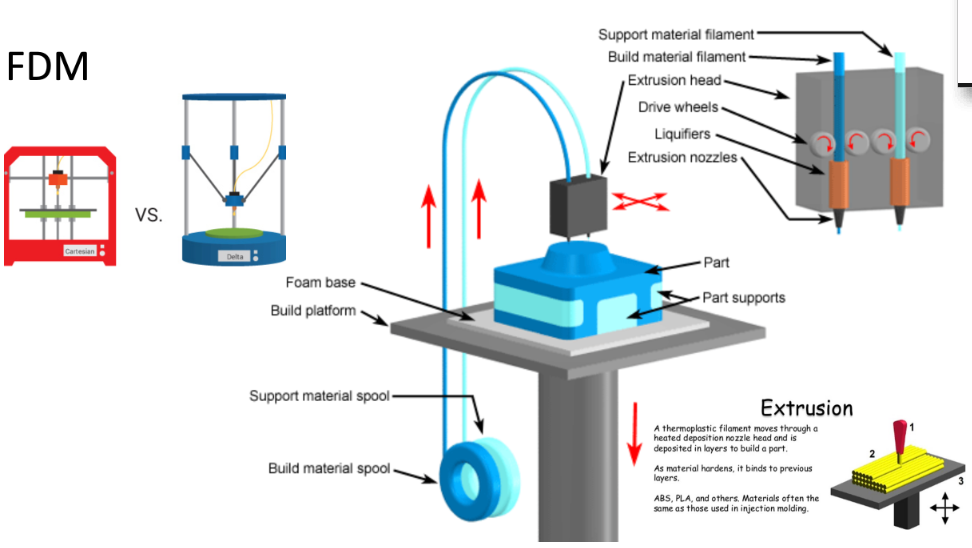
There are 2 kinds of FDM 3D printing Cartesian(left one:Red): 3 motor control x,y,z axis and the machine is stable; Delta(Right one: Blue): The key design feature is the use of parallelograms in the arms, which maintains the orientation of the end effector which restrict the movement of the end platform to pure translation, i.e. only movement in the X, Y or Z direction. The printer used in this session is the RED type.
Advantages of the 3D printing:
- Flexible Design - 3D printing allows for the design and print of more complex designs than traditional manufacturing processes. More traditional processes have design restrictions which no longer apply with the use of 3D printing.
- Rapid Prototyping - 3D printing can manufacture parts within hours, which speeds up the prototyping process. This allows for each stage to complete faster. When compared to machining prototypes, 3D printing is inexpensive and quicker at creating parts as the part can be finished in hours, allowing for each design modification to be completed at a much more efficient rate.
- Print on Demand - Print on demand is another advantage as it doesn’t need a lot of space to stock inventory, unlike traditional manufacturing processes. This saves space and costs as there is no need to print in bulk unless required.
- Strong and Lightweight Parts - The main 3D printing material used is plastic, although some metals can also be used for 3D printing. However, plastics offer advantages as they are lighter than their metal equivalents. This is particularly important in industries such as automotive and aerospace where light-weighting is an issue and can deliver greater fuel efficiency.
- Fast Design and Production - Depending on a part’s design and complexity, 3D printing can print objects within hours, which is much faster than moulded or machined parts. It is not only the manufacture of the part that can offer time savings through 3D printing but also the design process can be very quick by creating STL or CAD files ready to be printed.
- Minimising Waste - The production of parts only requires the materials needed for the part itself, with little or no wastage as compared to alternative methods which are cut from large chunks of non-recyclable materials. Not only does the process save on resources but it also reduces the cost of the materials being used.
- Cost Effective - As a single step manufacturing process, 3D printing saves time and therefore costs associated with using different machines for manufacture. 3D printers can also be set up and left to get on with the job, meaning that there is no need for operators to be present the entire time. As mentioned above, this manufacturing process can also reduce costs on materials as it only uses the amount of material required for the part itself, with little or no wastage. While 3D printing equipment can be expensive to buy, you can even avoid this cost by outsourcing your project to a 3D printing service company.
- Ease of Access - 3D printers are becoming more and more accessible with more local service providers offering outsourcing services for manufacturing work. This saves time and doesn’t require expensive transport costs compared to more traditional manufacturing processes produced abroad in countries such as China.
- Environmentally Friendly - As this technology reduces the amount of material wastage used this process is inherently environmentally friendly. However, the environmental benefits are extended when you consider factors such as improved fuel efficiency from using lightweight 3D printed parts.
- Advanced Healthcare - 3D printing is being used in the medical sector to help save lives by printing organs for the human body such as livers, kidneys and hearts. Further advances and uses are being developed in the healthcare sector providing some of the biggest advances from using the technology.
Disadvantages of the 3D printing:
- Limited Materials - While 3D Printing can create items in a selection of plastics and metals the available selection of raw materials is not exhaustive. This is due to the fact that not all metals or plastics can be temperature controlled enough to allow 3D printing. In addition, many of these printable materials cannot be recycled and very few are food safe.
- Restricted Build Size - 3D printers currently have small print chambers which restrict the size of parts that can be printed. Anything bigger will need to be printed in separate parts and joined together after production. This can increase costs and time for larger parts due to the printer needing to print more parts before manual labour is used to join the parts together.
- Post Processing - Although large parts require post-processing, as mentioned above, most 3D printed parts need some form of cleaning up to remove support material from the build and to smooth the surface to achieve the required finish. Post processing methods used include waterjetting, sanding, a chemical soak and rinse, air or heat drying, assembly and others. The amount of post processing required depends on factors including the size of the part being produced, the intended application and the type of 3D printing technology used for production. So, while 3D printing allows for the fast production of parts, the speed of manufacture can be slowed by post processing.
- Large Volumes - 3D printing is a static cost unlike more conventional techniques like injection moulding, where large volumes may be more cost effective to produce. While the initial investment for 3D printing may be lower than other manufacturing methods, once scaled up to produce large volumes for mass production, the cost per unit does not reduce as it would with injection moulding.
- Part Structure - With 3D printing (also known as Additive Manufacturing) parts are produced layer-by-layer. Although these layers adhere together it also means that they can delaminate under certain stresses or orientations. This problem is more significant when producing items using fused deposition modelling (FDM), while polyjet and multijet parts also tend to be more brittle. In certain cases it may be better to use injection moulding as it creates homogenous parts that will not separate and break.
- Reduction in Manufacturing Jobs - Another of the disadvantages of 3D technology is the potential reduction in human labour, since most of the production is automated and done by printers. However, many third world countries rely on low skill jobs to keep their economies running, and this technology could put these manufacturing jobs at risk by cutting out the need for production abroad.
- Design Inaccuracies - Another potential problem with 3D printing is directly related to the type of machine or process used, with some printers having lower tolerances, meaning that final parts may differ from the original design. This can be fixed in post processing, but it must be considered that this will further increase the time and cost of production.
- Copyright Issues - As 3D printing is becoming more popular and accessible there is a greater possibility for people to create fake and counterfeit products and it will almost be impossible to tell the difference. This has evident issues around copyright as well as for quality control.
Printing Process
Filament Checking:
- First, check the filament label to ensure they are dry and organized on the roll.
- Verify if the remaining PETG/PLA on the roll is sufficient for your project.
- Ensure the filament is free from tangles and knots.
- Make sure the software settings match the filament specifications.
PrusaSlicer:
- Use PrusaSlicer to turn the STL file into G-code.
- Ensure the machine settings in the slicer are consistent with your printer.
- Check and set the printing temperature for the material.
- Set the infill percentage (5-15%) and add a skirt for better adhesion.
- Ensure the slicer software version is up to date.
- Check and adjust the bed leveling settings if necessary.
Spray Glue on the Printing Bed:
- Remove the printing platform and lightly spray it with adhesive (only for PETG).
- Use just a small amount (equivalent to a perfume spritz) to prevent warping.
- Evenly distribute the glue and avoid excessive buildup.
Check the Printing Bed:
- Ensure the printing bed is clean to avoid debris affecting the balance.
- Clean the bed with isopropyl alcohol or a lint-free cloth if needed.
Set Up the Printing Bed to the Right Position:
- Clamp the platform securely on the two cylinders at the back.
- Make sure the platform is properly positioned and not resting on the cylinders to maintain balance.
Pre-heating:
- Choose the correct file and start the preheating process.
- Check the nozzle and bed temperatures to match the filament type.
- Remove any waste extruded from the nozzle before starting the print.
- Specify preheating temperatures for both the bed and nozzle according to the filament type.
Start Printing:
- Monitor the first few layers to ensure proper adhesion.
- Stay there until the first several layers of printing are finished. If there is an error, check whether there is an error in the above steps.
- If an error occurs, check the previous steps and correct any issues before re-printing. 90% of errors can be avoided if the first layer is running well.
- Suggest having tools like tweezers and a spatula handy for quick adjustments.
Common Filaments
- PLA (Polylactic Acid)
Advantages:
- Student-friendly and mostly used in schools.
- Cheap.
- Non-toxic, easy to print.
- Low shrinkage rate at low temperature, rarely has edge warping during printing. Disadvantages:
- Low intensity, better for decorative parts, not strong enough for engineering parts.
- Deterioration by UV exposure. Settings:
- Nozzle temperature: 190-210°C.
- Hot bed temperature: 50-60°C.
- The fan turns on automatically.
- Low retraction (no wire drawing, no plugging).
- PETG (Polyethylene Terephthalate Glycol-Modified) Advantages:
- Can be used for engineering parts and structural joints.
- Relatively non-toxic, very easy to print compared to ABS.
- Cheap. Disadvantages:
- It is difficult for novices to manage the edge warping problem with PETG; PETG will tend to adhere to the more sticky one of the nozzle and the printing bed (when the first layer is applied, make the nozzle closer to the printing bed than usual, and make sure you put some spray glue on the PEI printing bed).
- Gets wet easily.
- Make sure the fan is on while printing. Settings:
- Nozzle temperature: 210-240°C.
- Printing bed temperature: 70-90°C.
- First layer: 220°C nozzle / 75°C bed.
- Retraction: 2mm or 1mm.
- TPU (Thermoplastic Polyurethane) Advantages:
- Non-toxic.
- Less prone to moisture in comparison. Disadvantages:
- High flexibility can cause issues with certain extruder types (especially Bowden extruders). Settings:
- Retraction should be less than 0.15 - 0.3mm, speed 25mm/s.
- Fan should be off.
- If the extruder of the printer is remote type (Bowden), it might cause problems while printing with TPU.
- ABS (Acrylonitrile Butadiene Styrene) Advantages:
- High strength, suitable for engineering.
- High adhesion to the bottom plate. Disadvantages:
- Toxic and pungent smell, requires strong exhaust.
- Needs to be enclosed in a box to prevent toxic fumes from leaking out. Settings:
- Nozzle temperature: 220-250°C.
- Bed temperature: 100-110°C.
- Enclosure recommended for stability and to reduce warping.
Key settings in slicing tool
Layer Height:
- Determines the thickness of each layer in the 3D print.
- A lower layer height gives a smoother finish but increases print time.
- Typical range: 0.1mm to 0.3mm.
Print Speed:
- Controls how fast the printer's extruder moves.
- Higher speeds reduce print time but may affect print quality.
- Typical range: 40mm/s to 80mm/s.
Infill Density:
- Defines how much material is used inside the printed object.
- Higher infill provides more strength but uses more material and increases print time.
- Typical range: 0% (hollow) to 100% (solid).
Infill Pattern:
- The pattern used for the internal structure of the print.
- Common patterns: grid, honeycomb, triangle, gyroid.
Nozzle Temperature:
- The temperature of the printer's extruder nozzle.
- Must match the material being used (e.g., PLA, ABS, PETG).
Bed Temperature:
- The temperature of the printer's build platform.
- Helps improve adhesion and reduce warping.
Retraction:
- Controls the distance and speed at which filament is pulled back to prevent oozing.
- Important for reducing stringing between parts of the print.
Supports:
- Additional structures added to support overhanging parts of the print.
- Can be generated automatically by the slicer and removed after printing.
Cooling:
- Controls the printer's cooling fans.
- Helps solidify the filament quickly, improving print quality.
Skirt, Brim, and Raft:
- Skirt: A single layer outline around the print to ensure smooth extrusion.
- Brim: A flat area attached to the edges of the print for better adhesion.
- Raft: A thick grid under the print to improve stability and adhesion.
Shell/Perimeter:
- The outer walls of the print.
- Increasing the number of shells can improve strength and finish quality.
Extrusion Multiplier:
- Adjusts the amount of filament extruded.
- Used to calibrate and fine-tune extrusion settings.
Group working
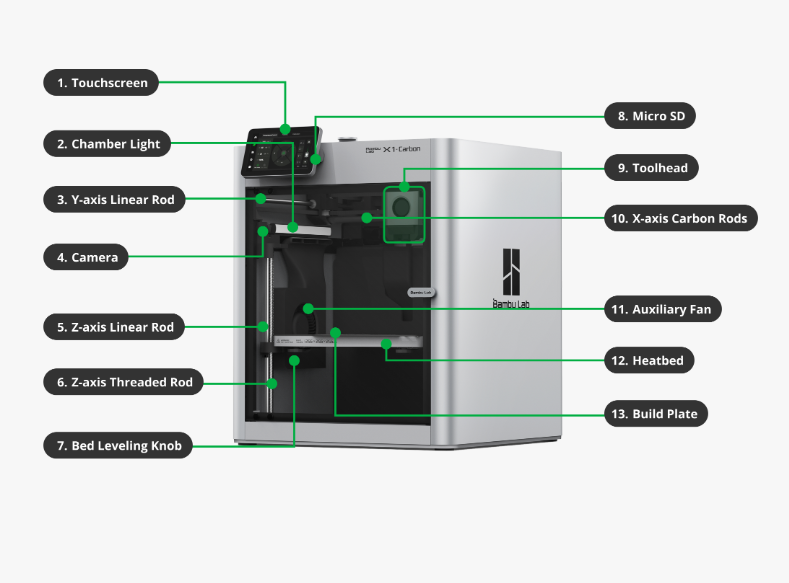
Printer in 2025 (Bambu Lab X1 Carbon 3D Printer)
The Bambu Lab X1 Carbon is a high-performance FDM (Fused Deposition Modeling) 3D printer that employs multiple innovative technologies to achieve high-speed and high-precision printing.
Main Technical Specifications & Features
| Parameter | Specification |
|---|---|
| Print Size | 256 × 256 × 256mm |
| Print Speed | Up to 500mm/s |
| Minimum Layer Height | 0.1mm |
| Nozzle Diameter | 0.4mm |
| Maximum Bed Temperature | 110°C |
| Maximum Nozzle Temperature | 300°C |
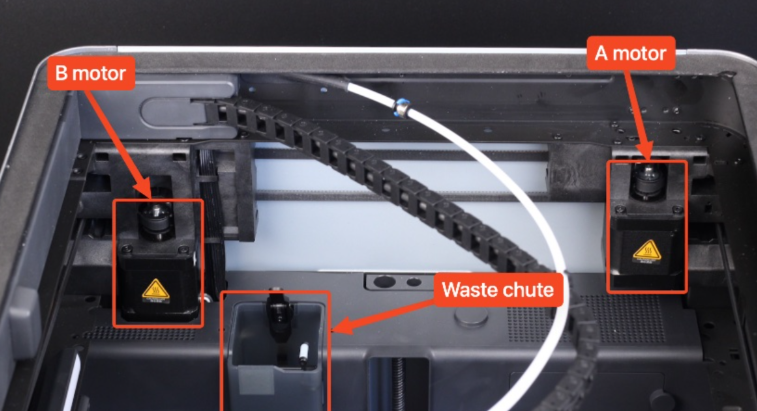
Motion System
The Bambu Lab X1 uses a CoreXY motion system, consisting of two stepper motors that work together to control the toolhead movement. Each stepper motor has an independent belt connected to the toolhead, and the system uses a pair of belts to control the toolhead position. Compared to traditional Cartesian printers, the X1 with CoreXY system achieves faster printing speeds.
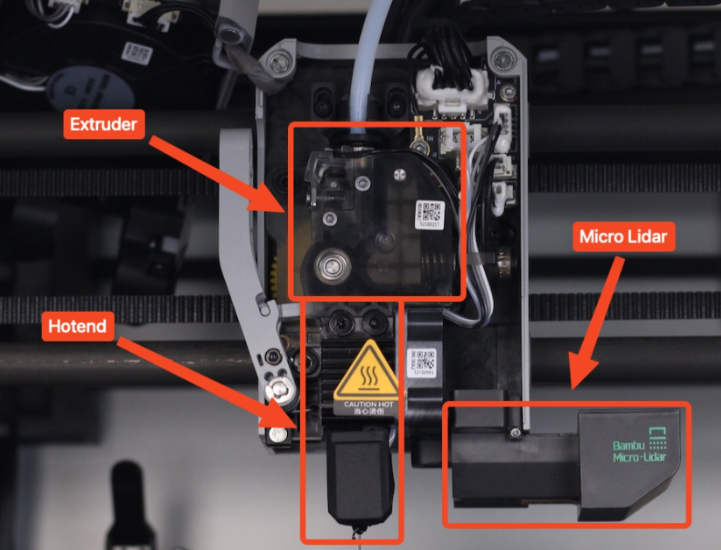
Hot End System
The hot end is responsible for heating the filament to a specified temperature, melting and depositing it in layers to create the model. Different materials require different heating temperatures. The Bambu Lab X1 printer features an integrated hot end design, combining the nozzle and heat block, connected to the heat sink via a thin metal tube for optimal performance.
3D Printing Workflow
Material Preparation
Confirm filament type, using PLA for this print, check if there's sufficient material to complete the printing task, ensure the filament is not damp or damaged 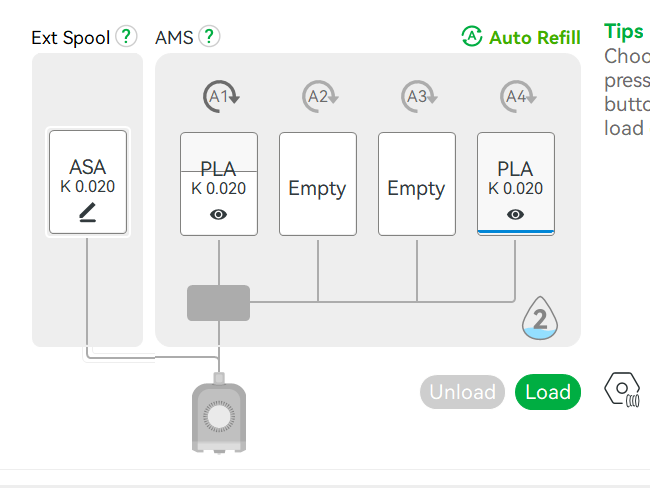
Slicer Software Installation and Parameter Settings
Using Bambu Lab's officially recommended slicer software Bambu Studio. Bambu Studio has hundreds of slicing parameters, mainly divided into three categories: printer, filament, and process
Parameter Settings
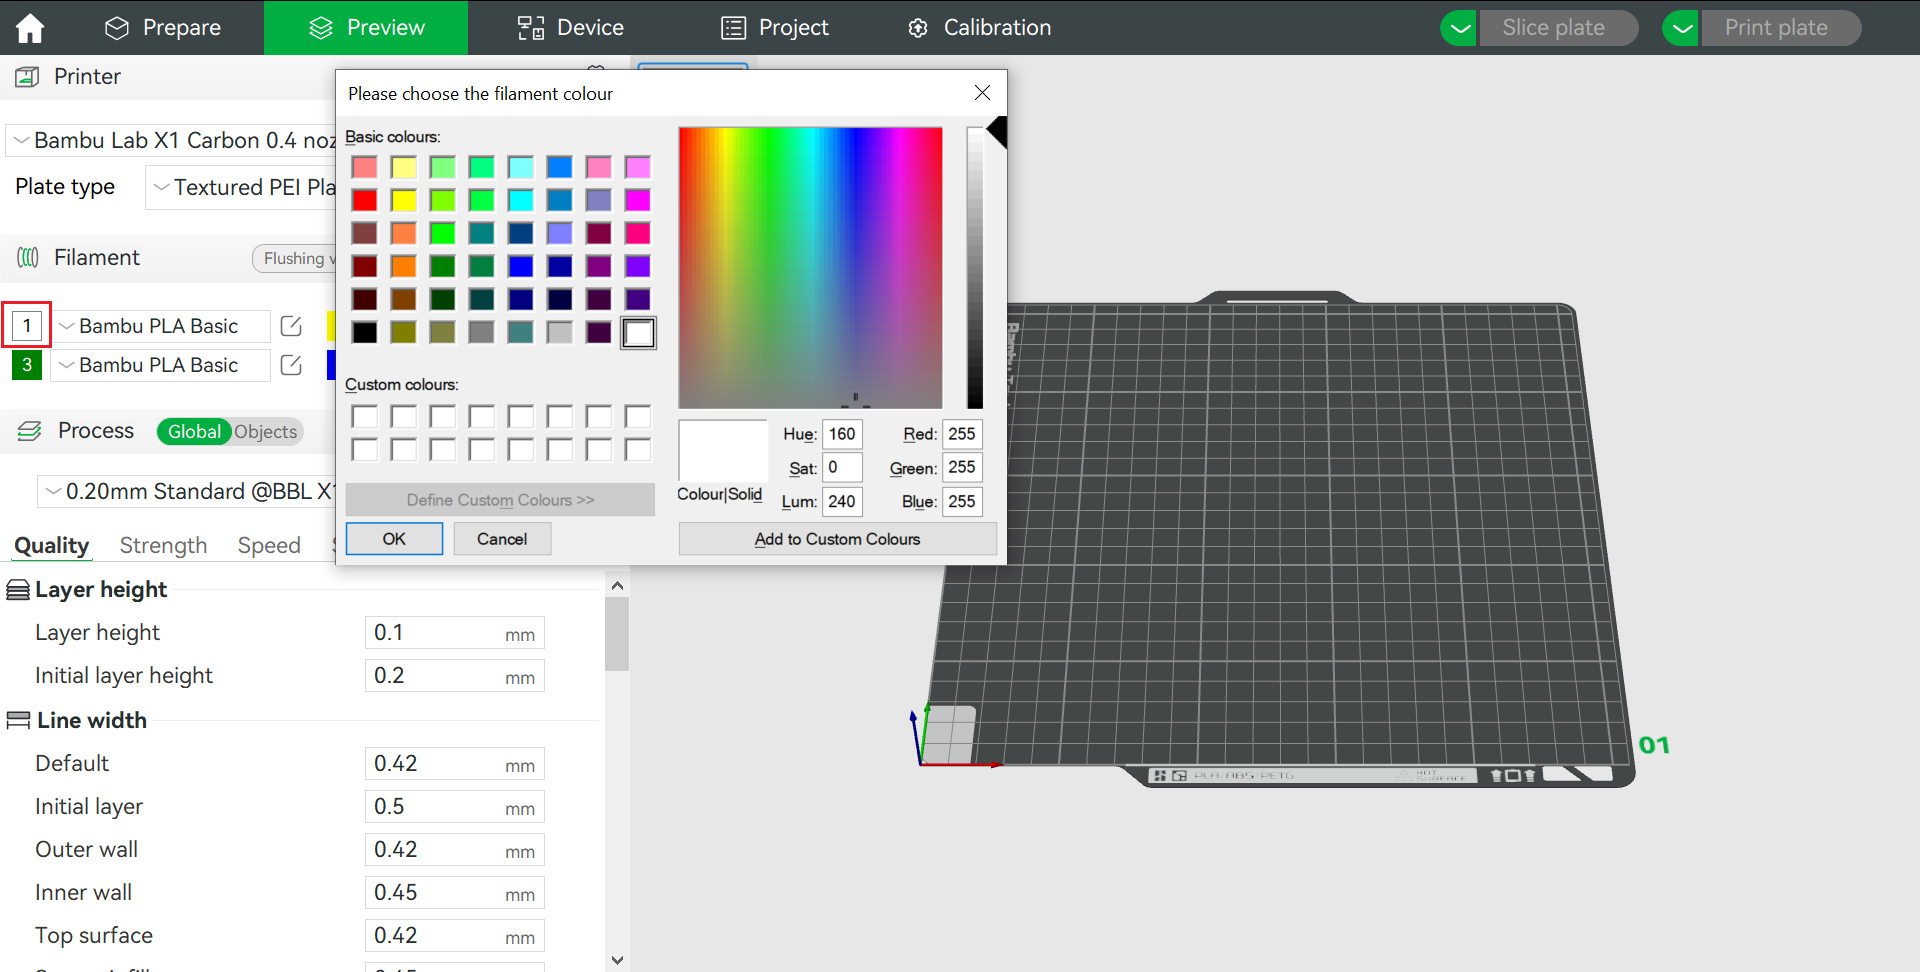
Printer Parameters
- Printer Model: X1 Carbon, Hot End Specification: 0.4mm, where 0.4mm represents the nozzle diameter; smaller diameters can print finer features but require longer printing times
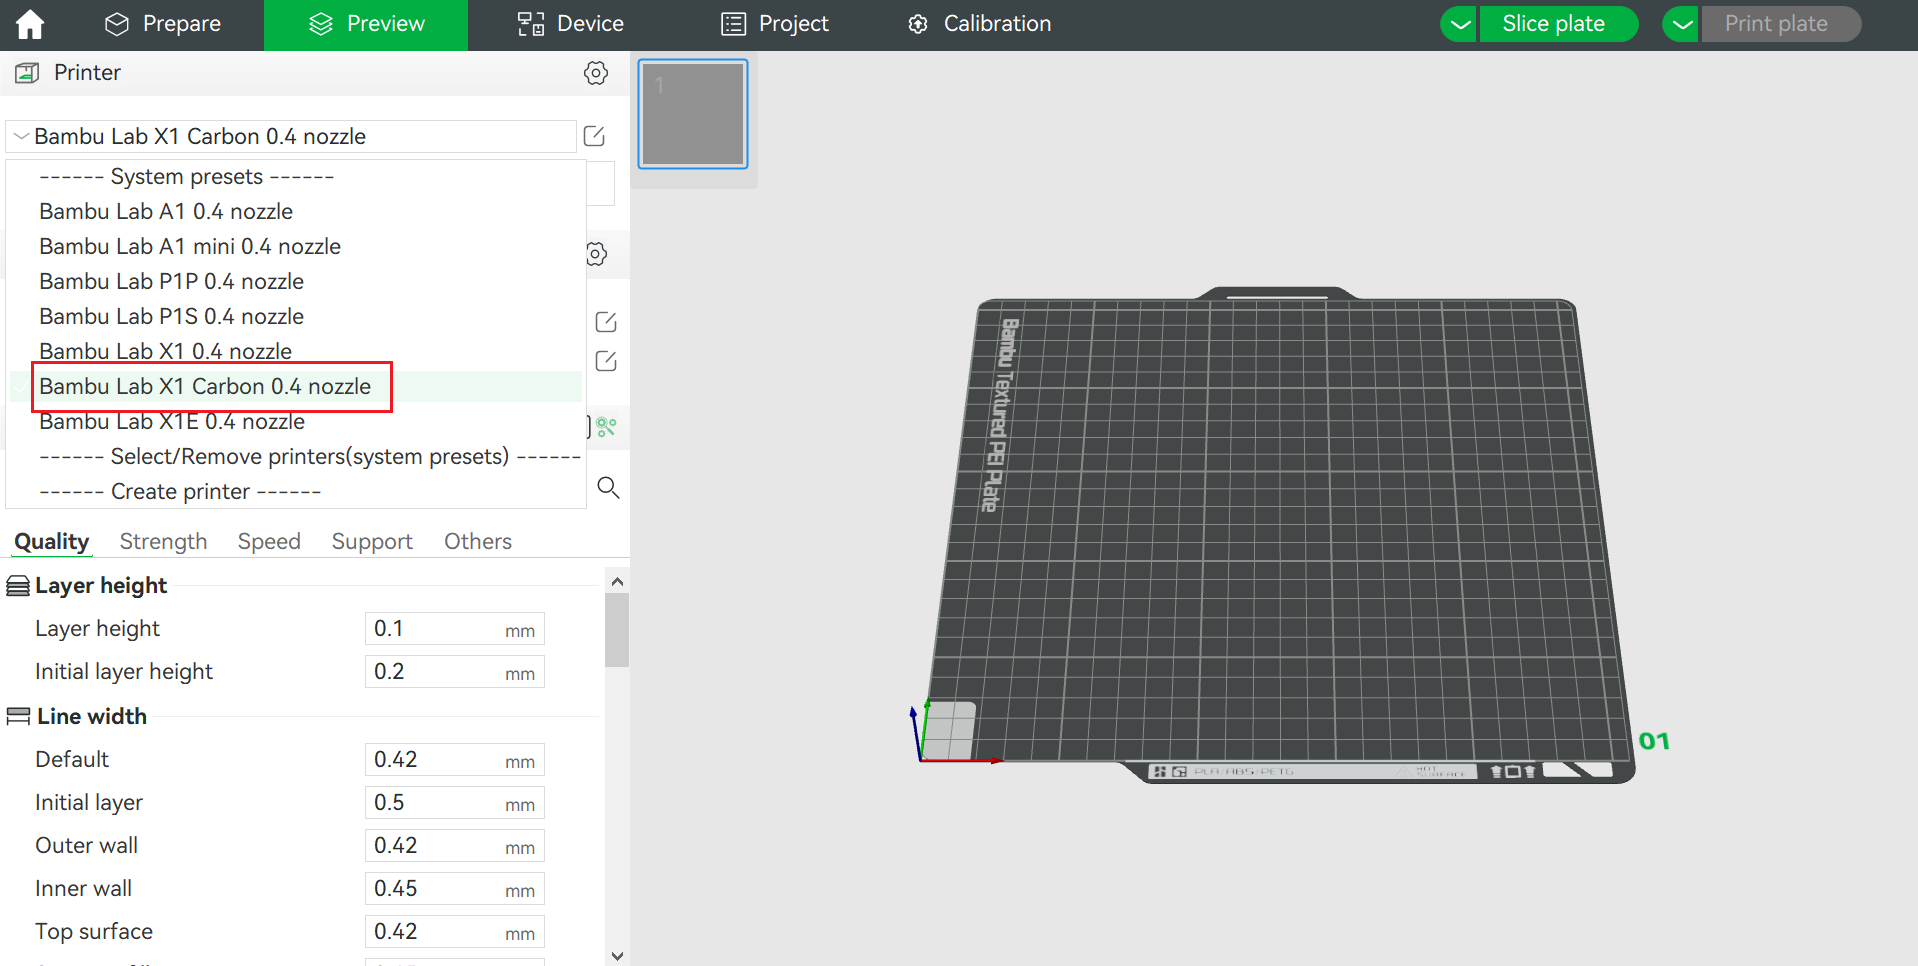
- Print Platform: Textured PEI print plate, which leaves a specific texture effect on the bottom of prints
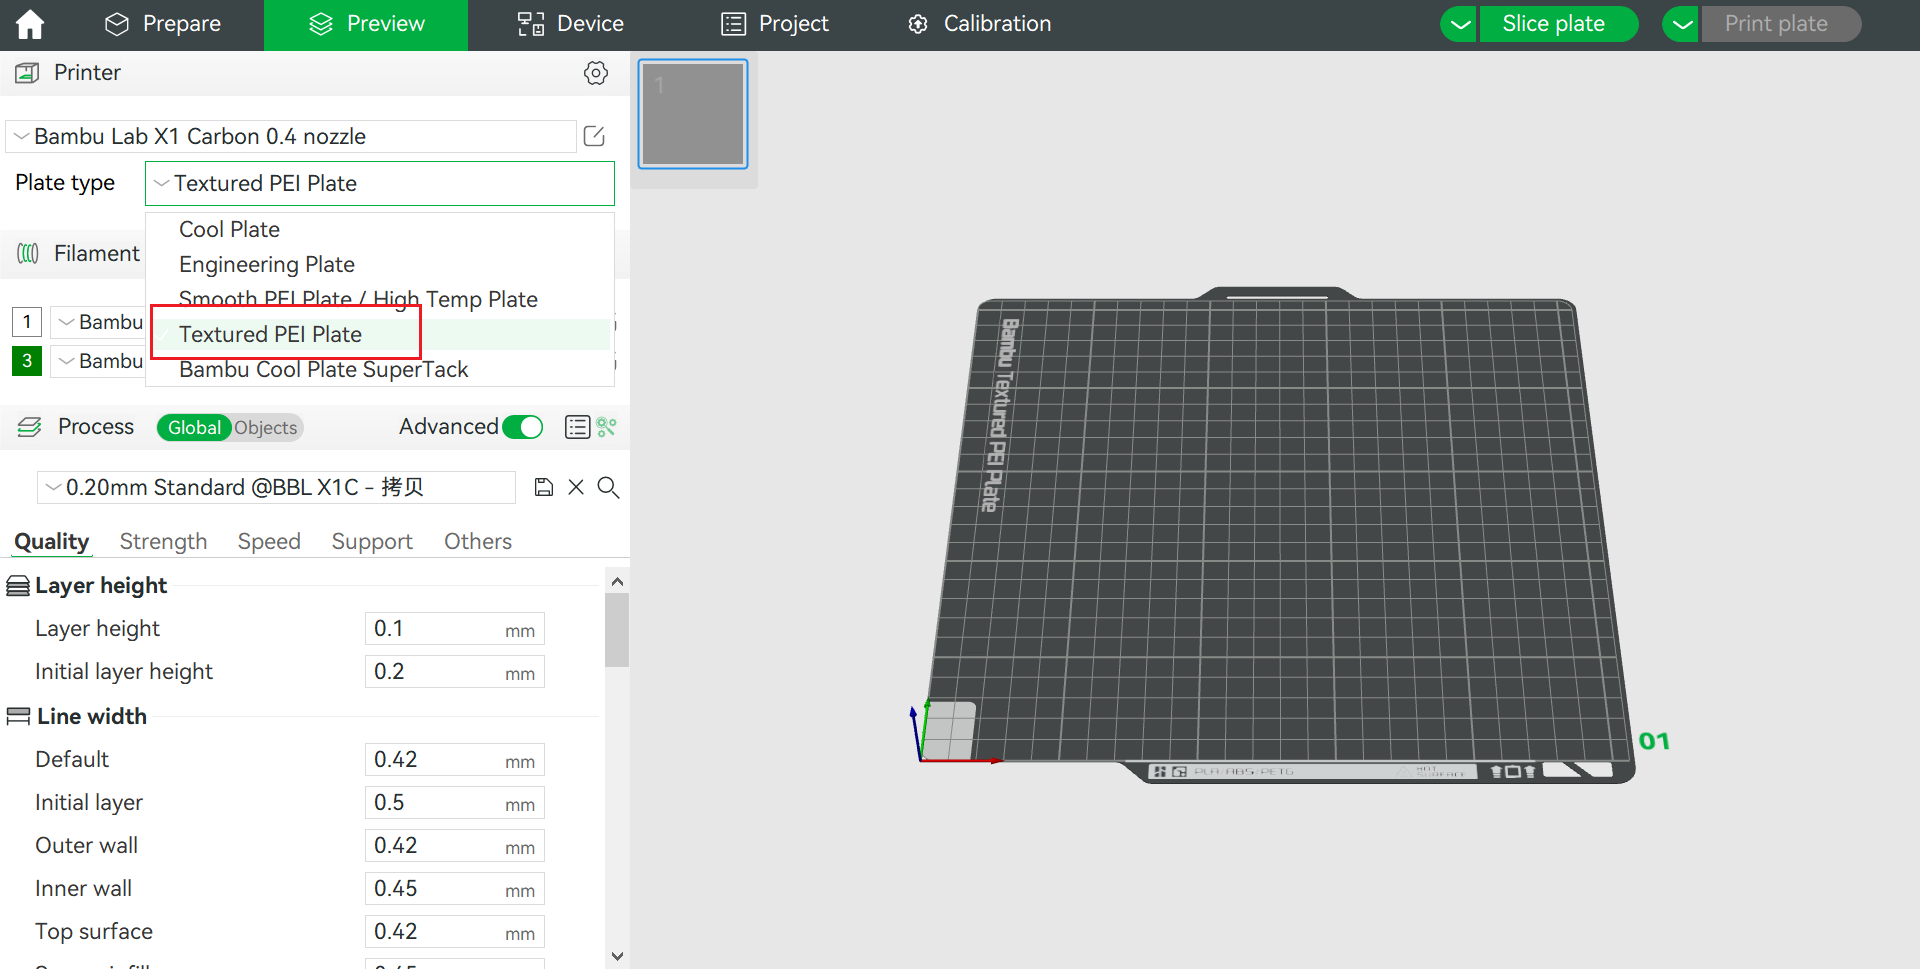
Filament Parameters
- Add/remove filaments using the "+" "-" buttons

- Click color blocks to modify filament color
- Click the edit icon to adjust filament configuration parameters
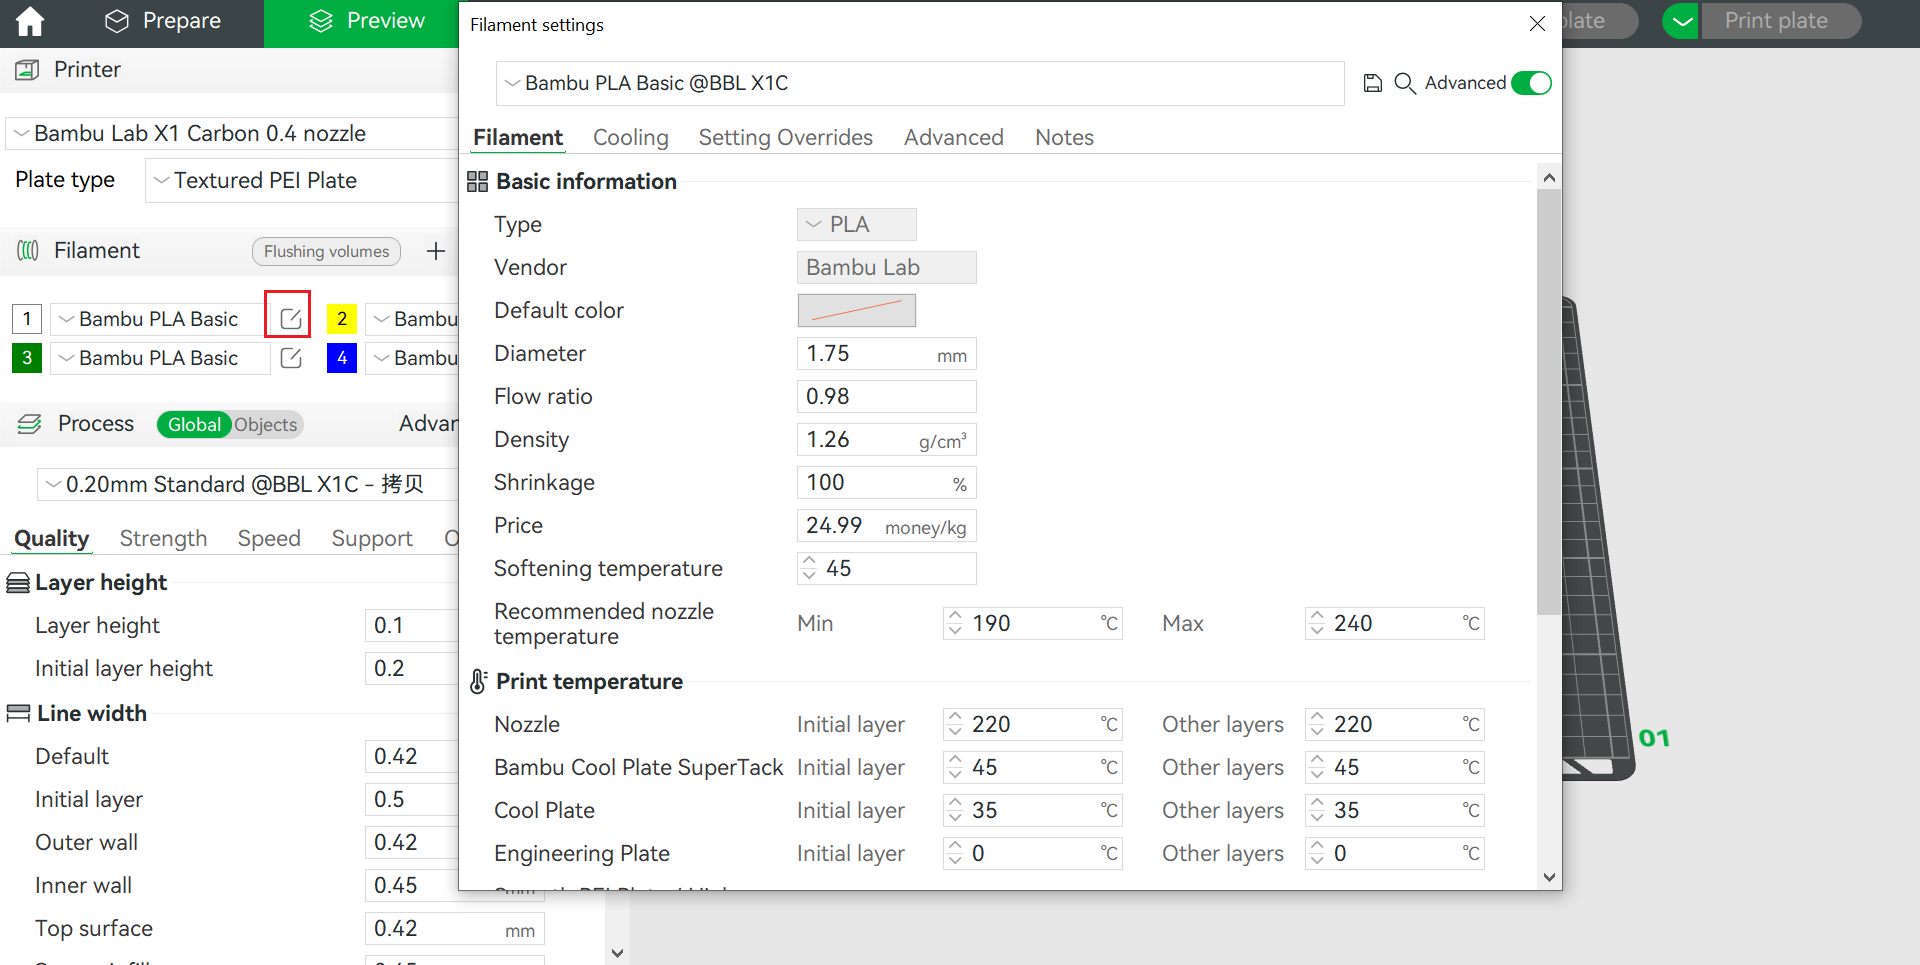
- Add/remove filaments using the "+" "-" buttons
Process Parameters
| Parameter Type | Range | Description |
|---|---|---|
| Layer Height | 0.08-0.28mm | - Small layer height (0.08-0.12mm) suitable for fine models, good surface quality - Medium layer height (0.2mm) suitable for daily printing - Large layer height (0.28mm) suitable for quick printing, sacrificing surface quality |
| Infill Density | 5-100% | - 5-15%: Decorative items, non-load bearing parts - 20-50%: General functional parts - 50-100%: High-strength requirements |
| Print Temperature | Material dependent | - PLA: 190-220℃ - ABS: 230-250℃ - PETG: 230-240℃ - TPU: 220-235℃ |
| Support Settings | Optional | - Support needed for overhang angles >60° - Support density typically set to 15-30% - Tree or normal support options available |
| Speed Control | 20-150mm/s | - Outer walls: 20-40mm/s - Inner walls: 40-60mm/s - Infill: 60-150mm/s - Supports: 60-120mm/s |
| Cooling Parameters | 0-100% | - PLA: 100% fan - ABS: 0-30% fan - PETG: 50-70% fan - TPU: 30-50% fan |
Printer Performance Testing
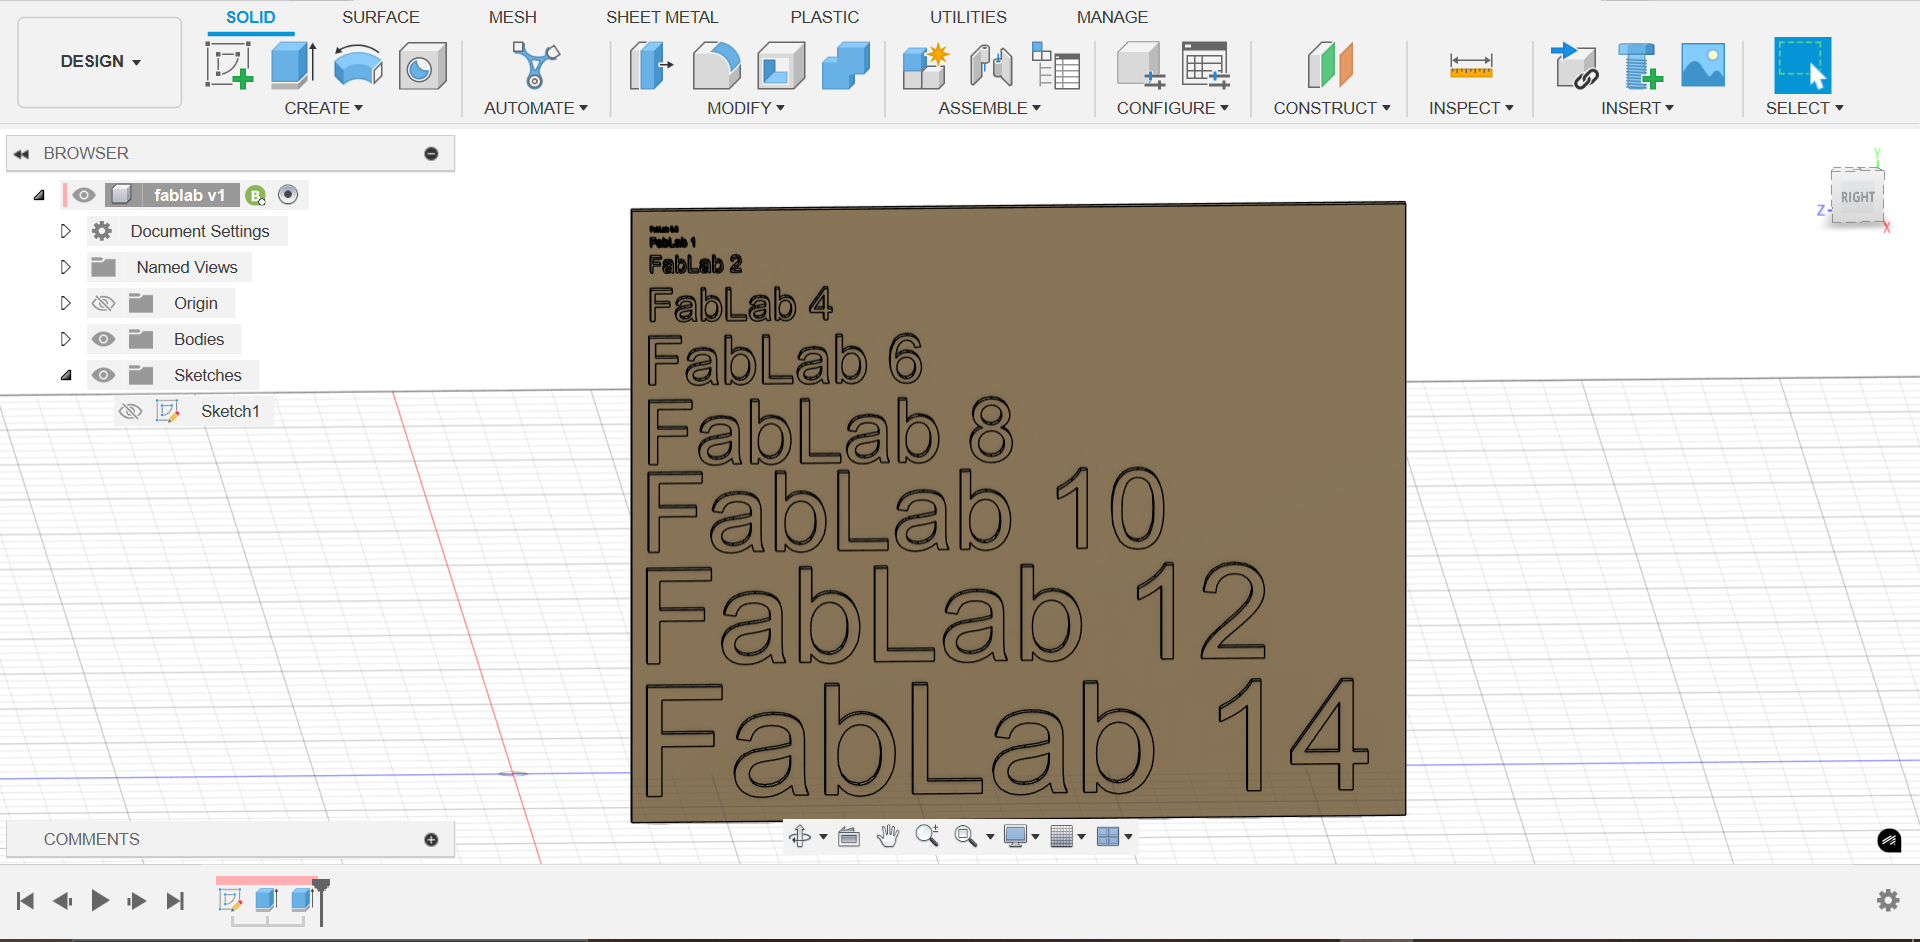
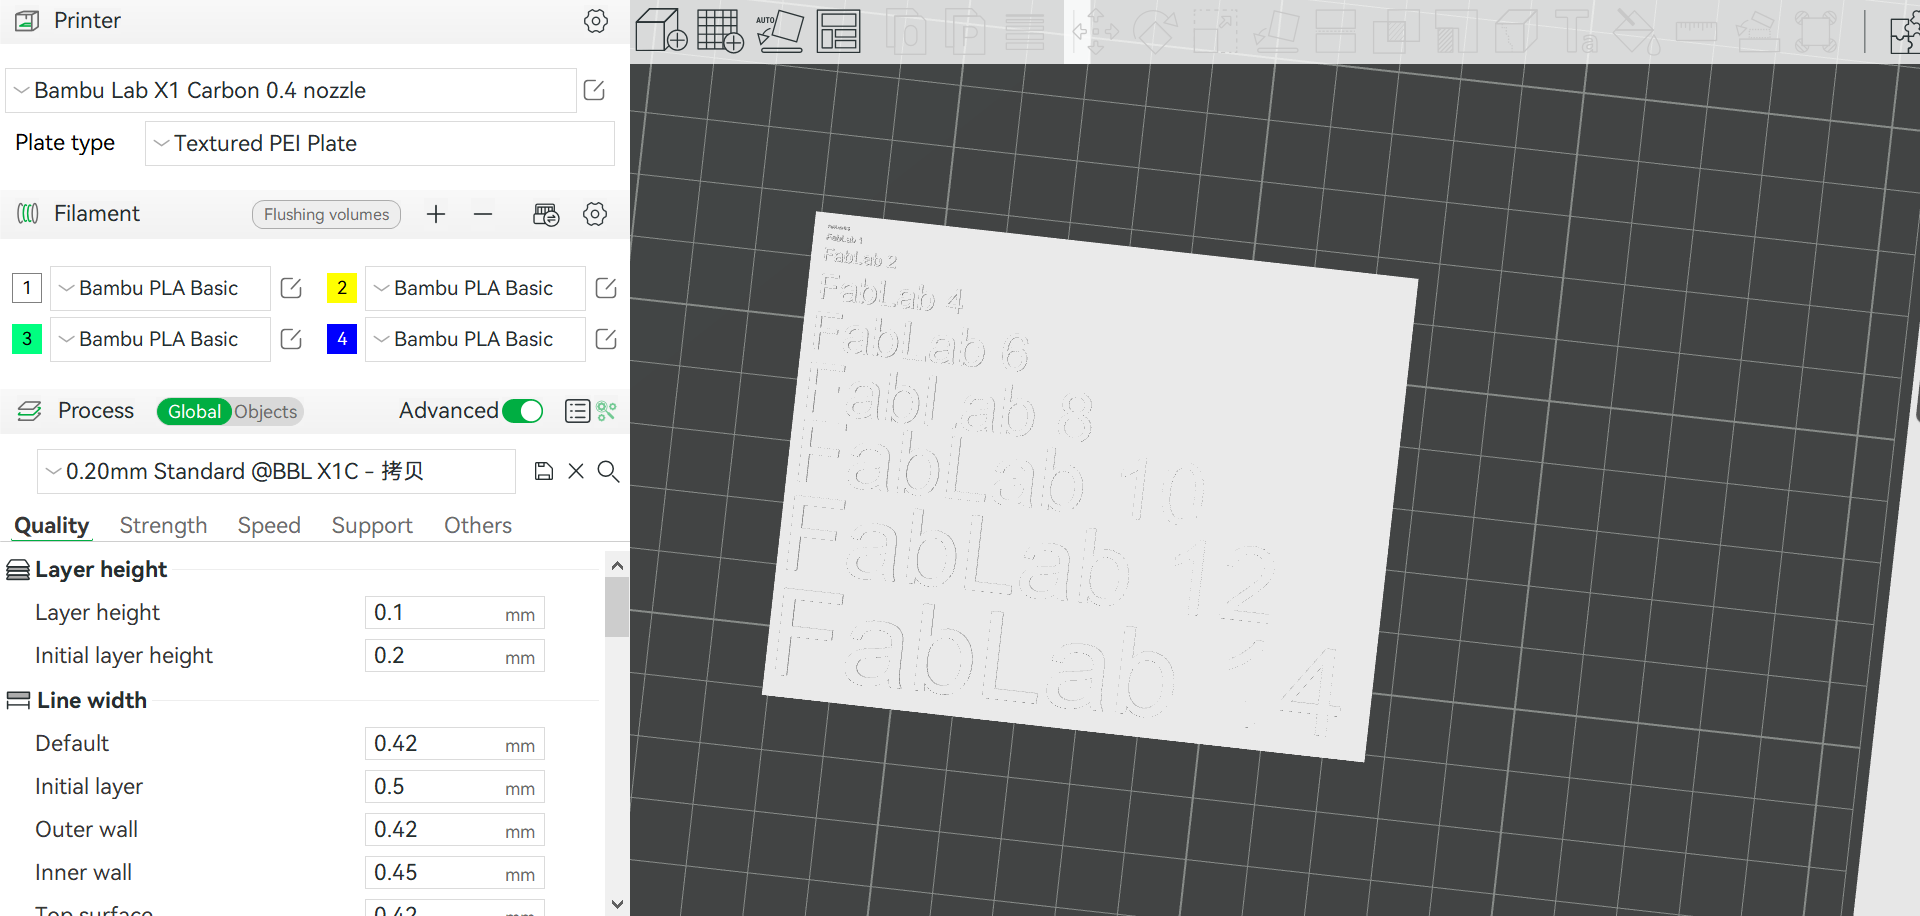
To evaluate the Bambu Lab X1 Carbon's printing performance, I designed a comprehensive test model in Fusion 360. This model contains multiple feature structures to test the printer's precision at different sizes and angles, particularly minimum printable wall thickness and gaps.
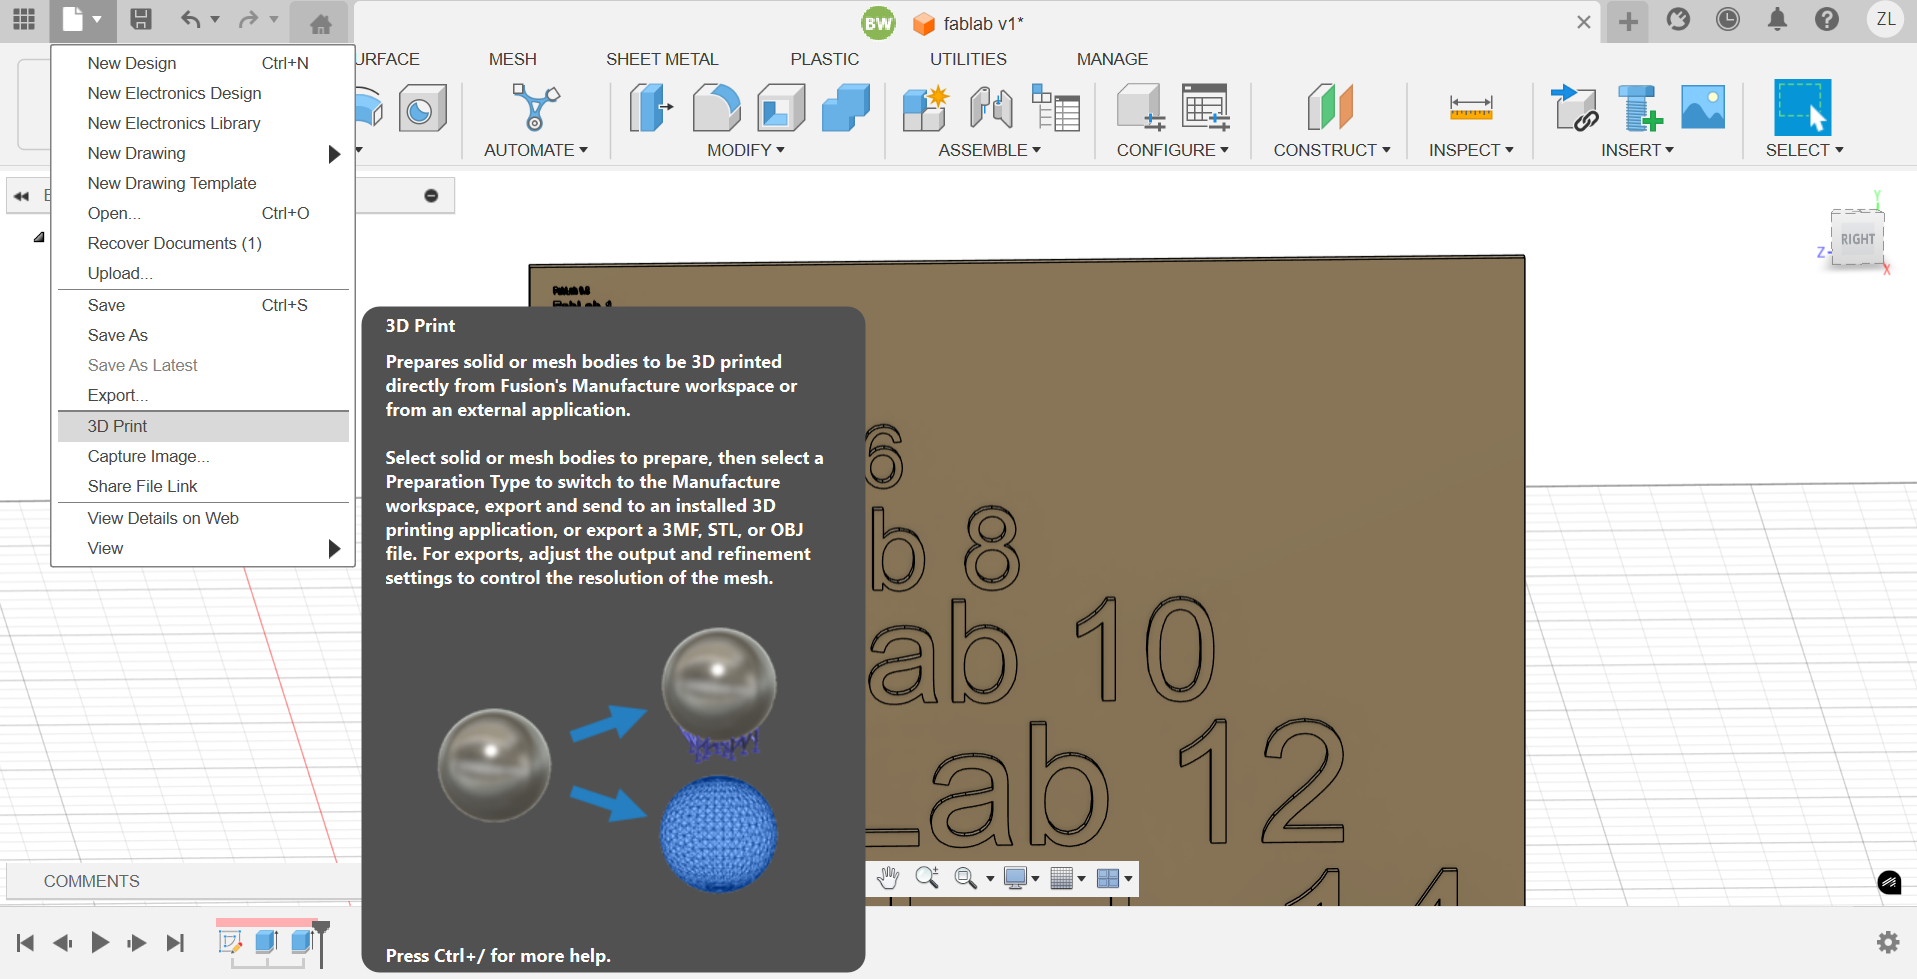
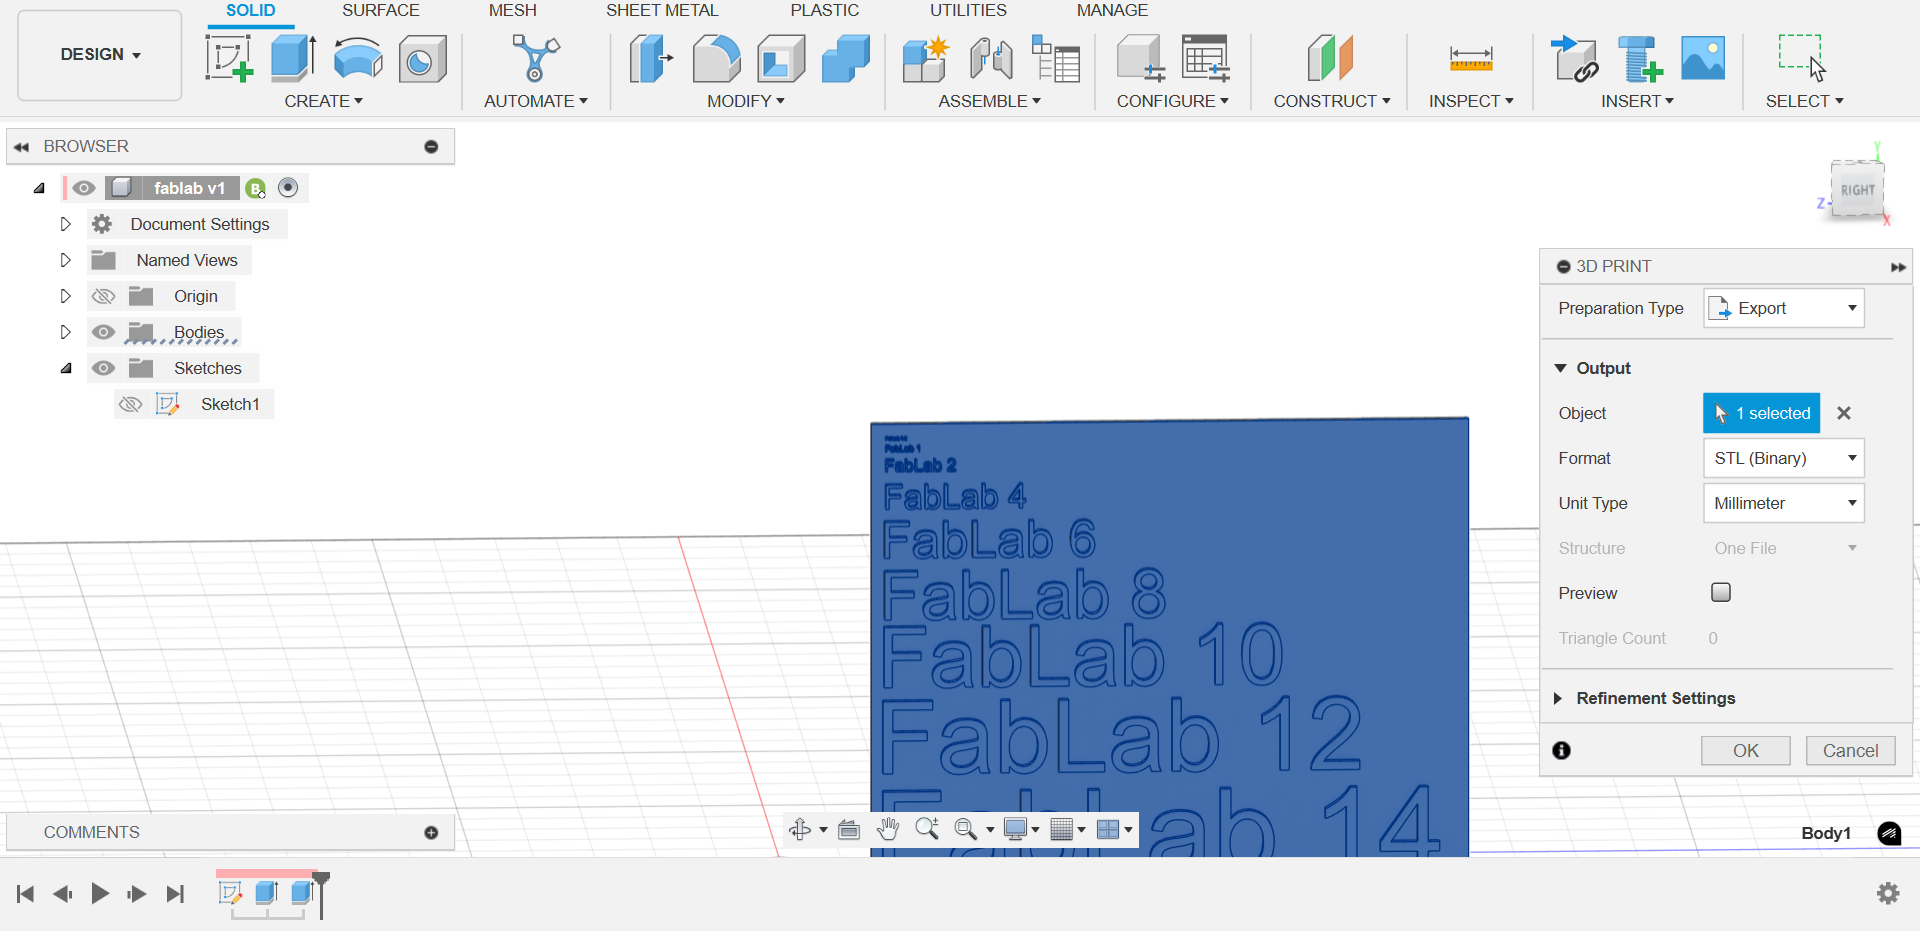
Model Export and Slicing Preparation
After completing the model design in Fusion 360, export the STL file using the built-in 3D printing function
Prepare for slicing in Bambu Studio:
- Import STL file using the "Add" function
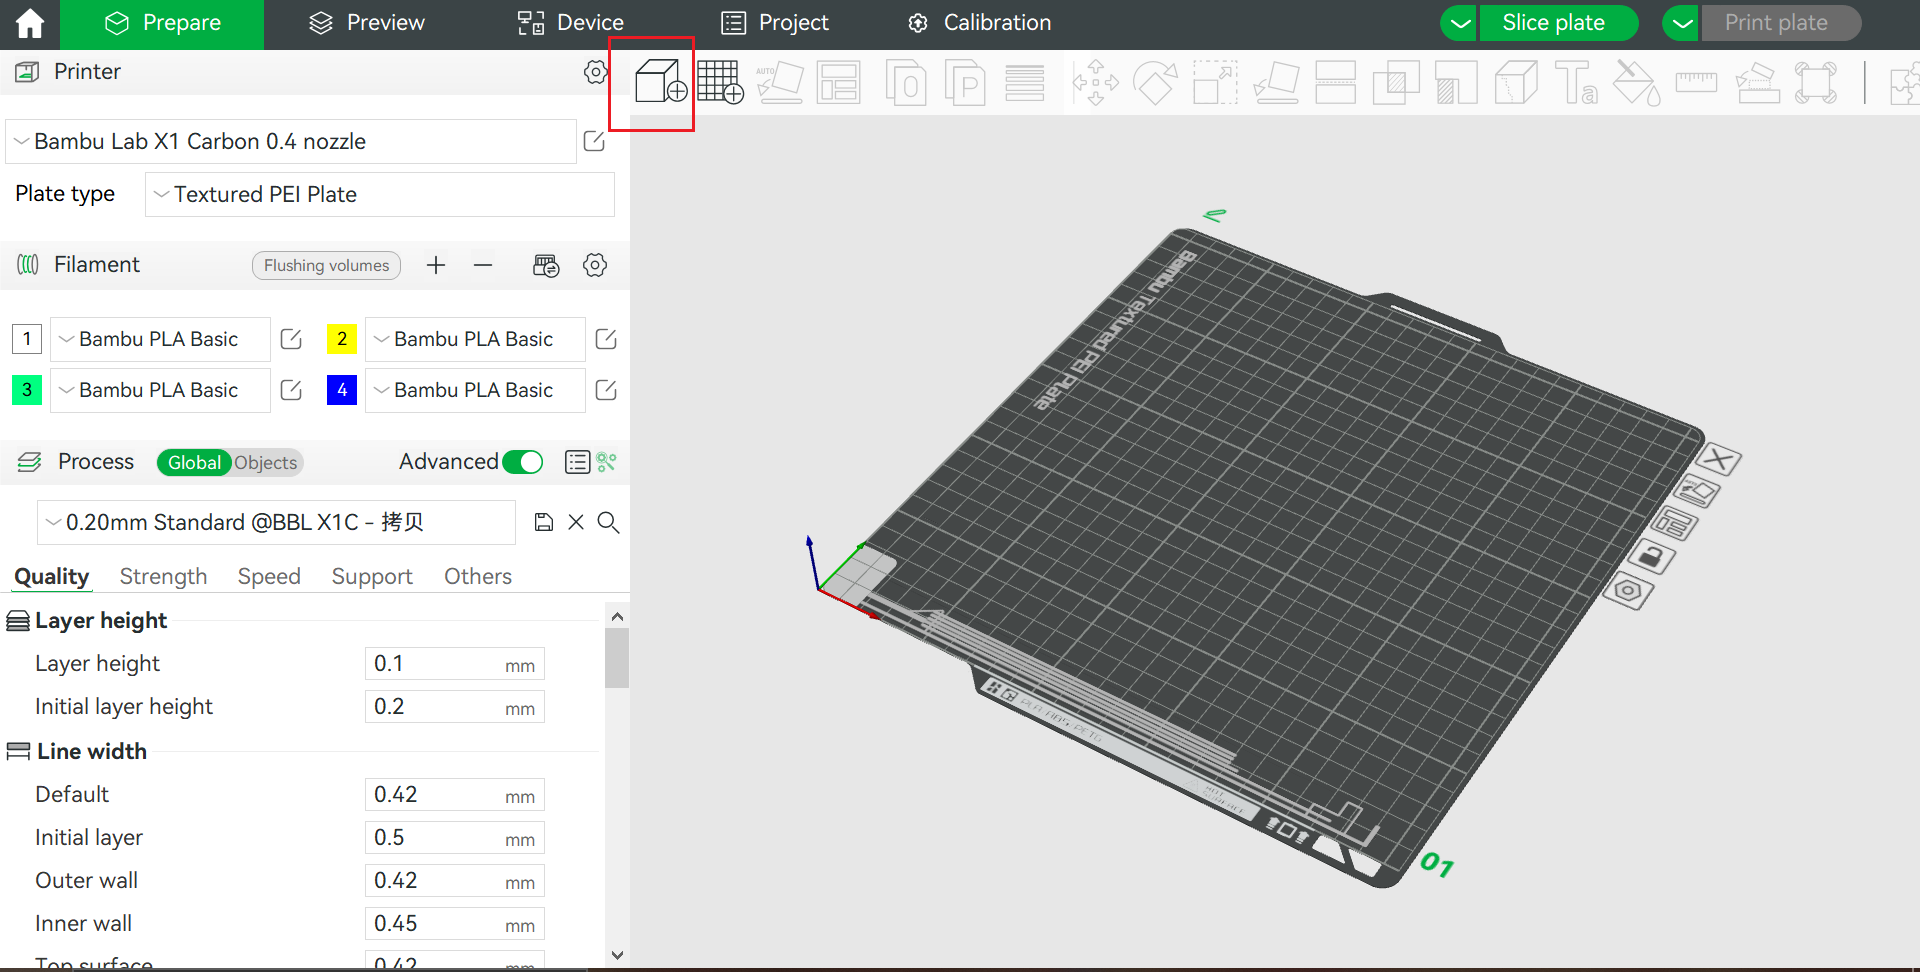
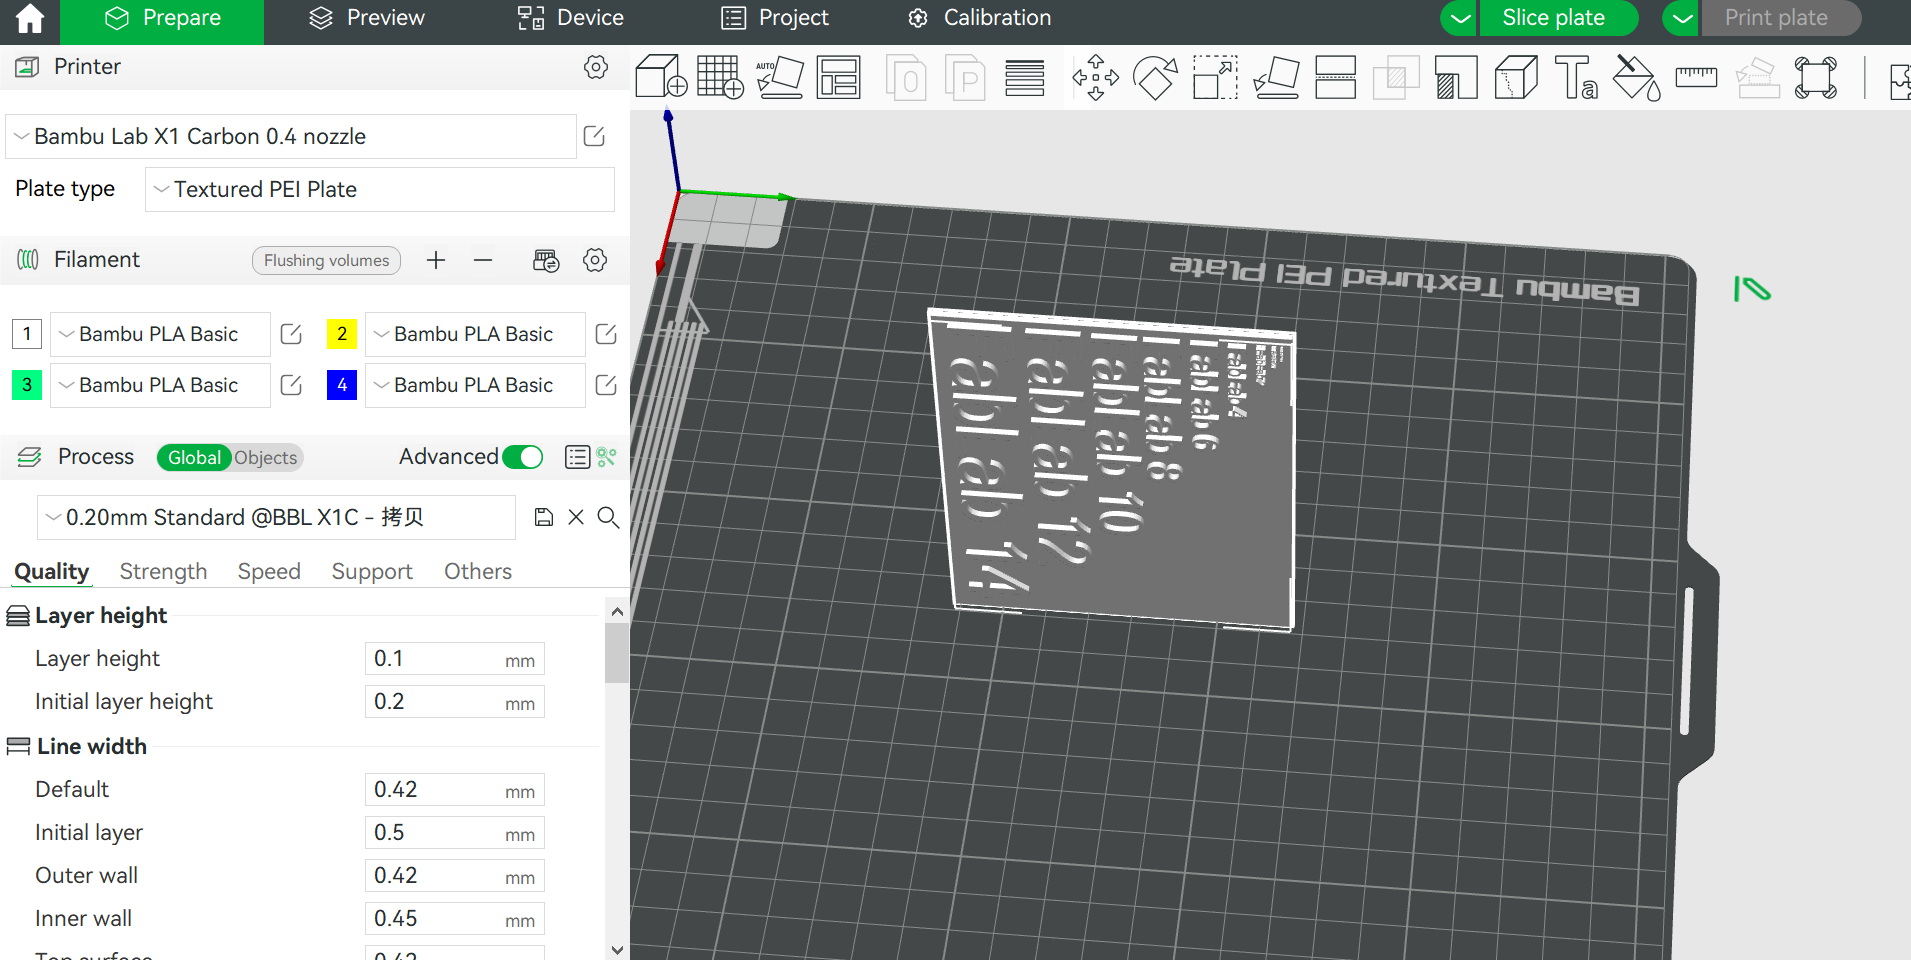
- Use "Lay on Face" function to optimize print orientation, selecting the appropriate bottom surface for optimal print results
- Import STL file using the "Add" function
Print Parameter Configuration
| Parameter | Value | Optimization Notes |
|---|---|---|
| Layer Height | 0.2mm | Selected standard layer height, balancing precision and efficiency |
| Wall Count | 5 | Ensure model structural stability and test feature accuracy |
| Sparse Infill Density | 12% | Moderate infill, ensuring support strength while optimizing print time |
Slicing and Printing
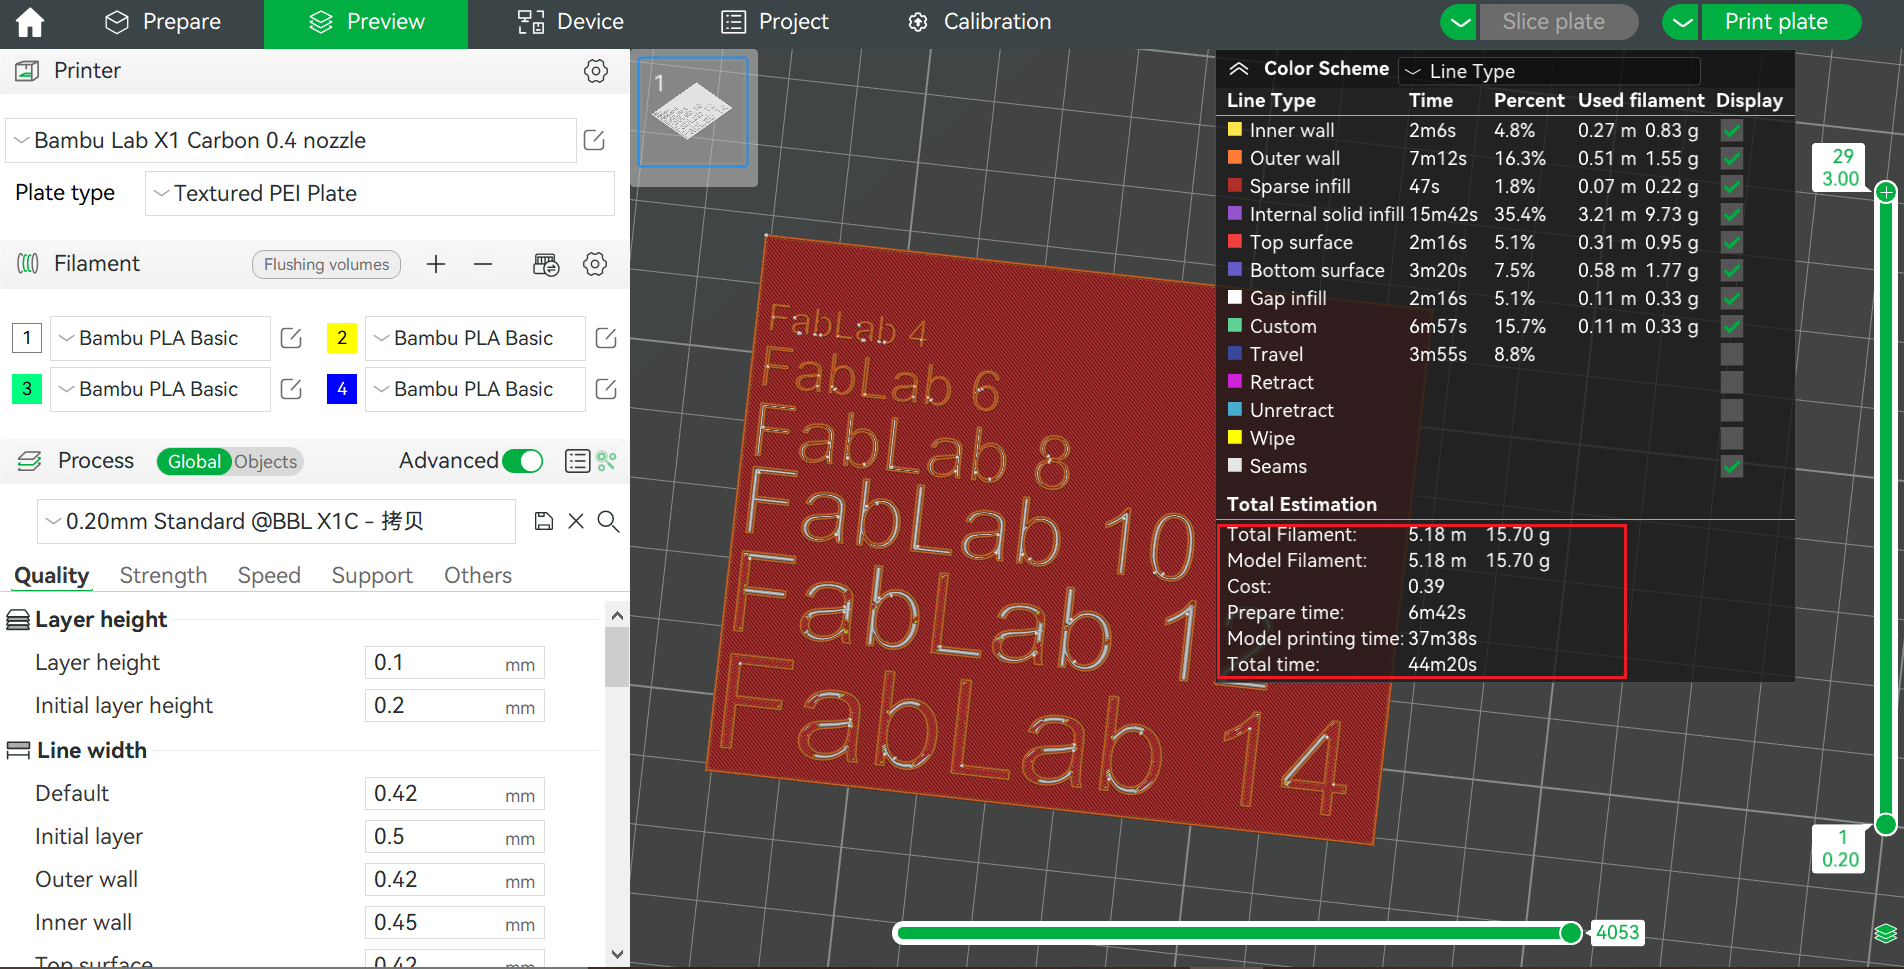
Use Bambu Studio's "Slice plate" function in the top right corner for slicing 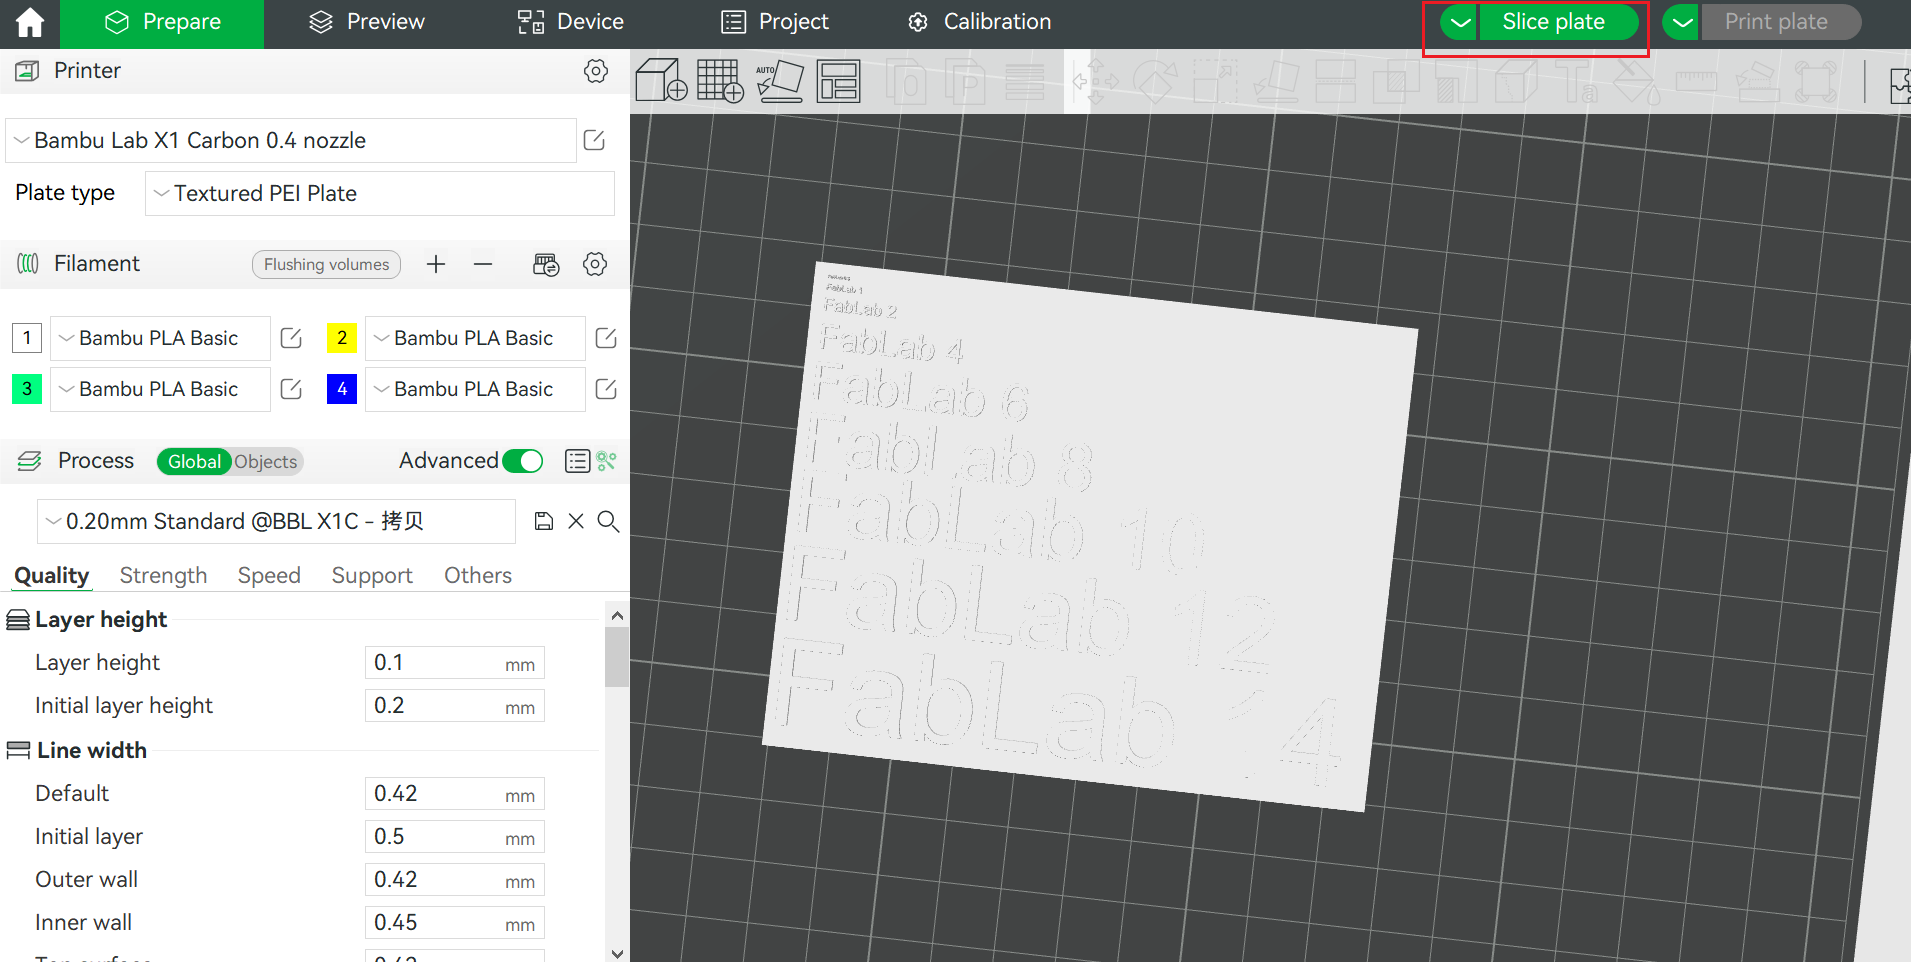
Slicing analysis shows:
- Estimated print time: 44 minutes
- Material usage: 15.70g PLA
Test Results Analysis
After printing, the following performance parameters were measured:
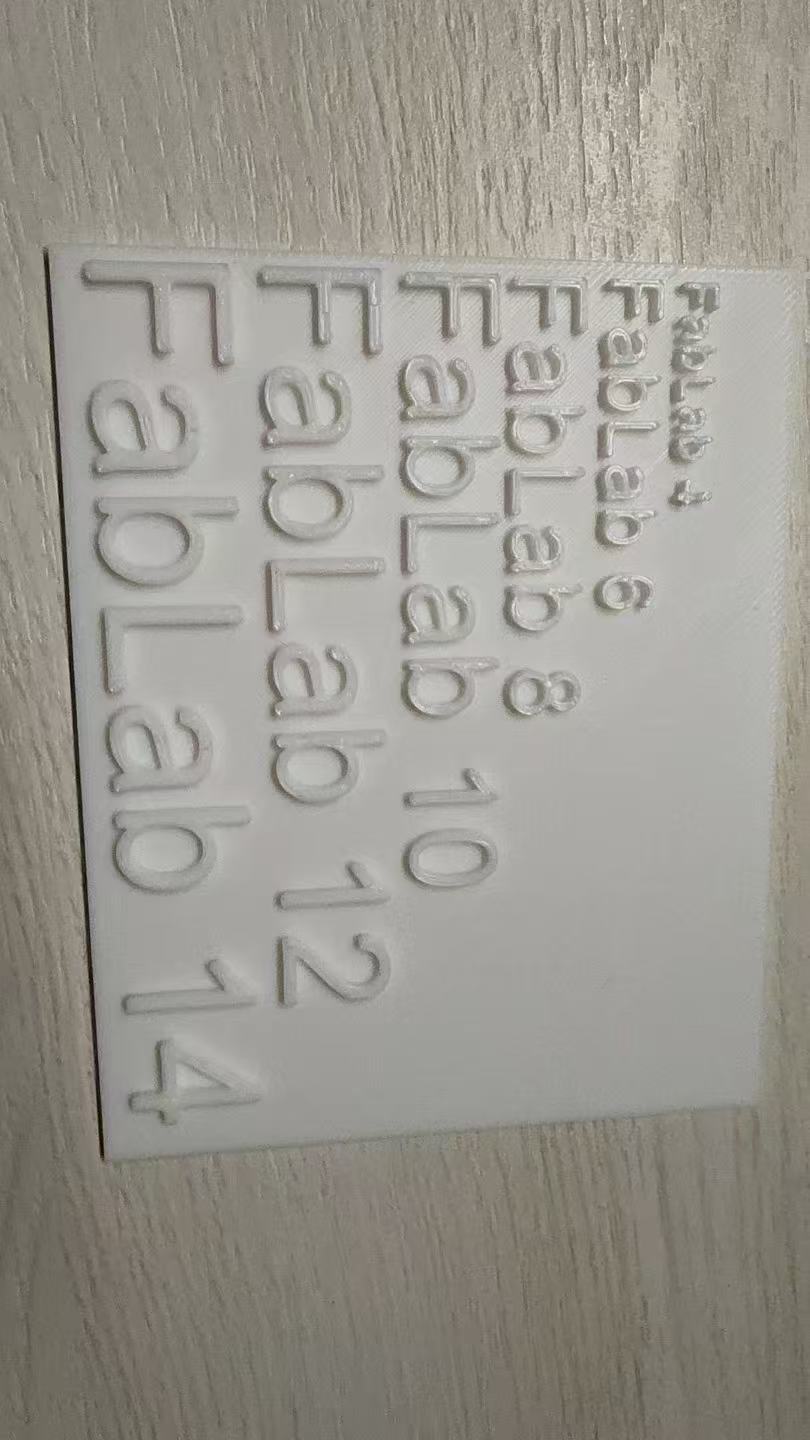
- Minimum printable wall thickness: 0.4mm
- Minimum printable gap: 0.1mm
These data indicate that the Bambu Lab X1 Carbon has excellent fine feature printing capabilities, meeting most regular printing requirements.
Other Test Parts(checking)
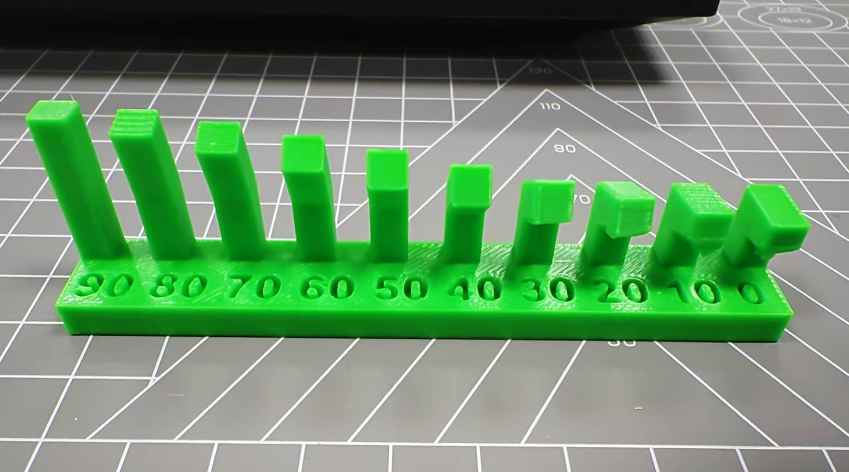
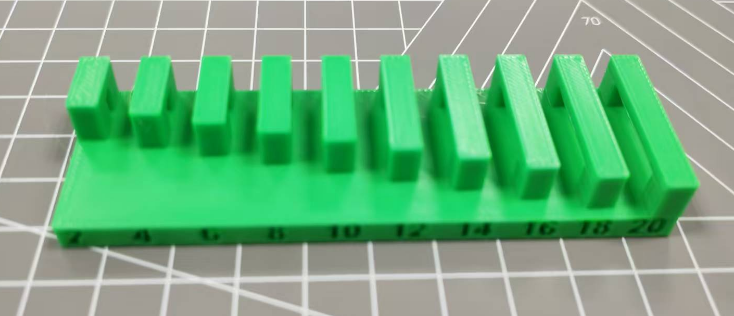
Other test parts downloaded from this week's fab course content were also printed and the result is shown as below.
The maximum printing angle without visible deformation is 40 degrees.
All printed bridges have no visible defects.
The minimum printable thickness is 0.4mm.

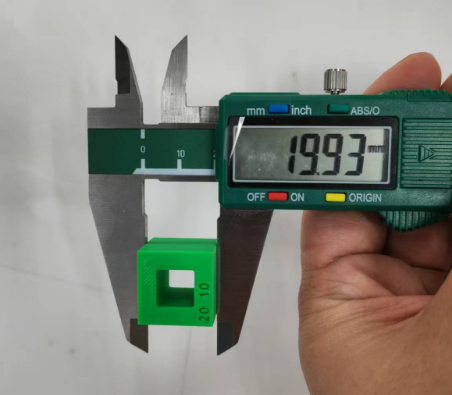
The inner diameter printing tolerance is approximately 0.09mm.
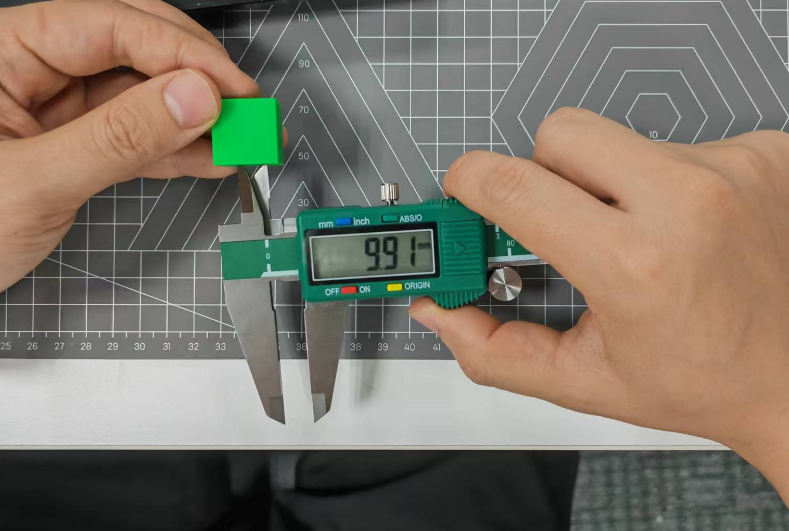
The outer diameter printing tolerance is approximately 0.07mm.
Reference
All original files can be found at my repo (https://gitlab.fabcloud.org/academany/fabacademy/2023/labs/ningbo/students/yaorun-zhang/-/tree/main/docs/assignments/week5/matierals).