Final Project
This page documents my Final Project and is organized into four sections
Final Project Questions
What does it do?
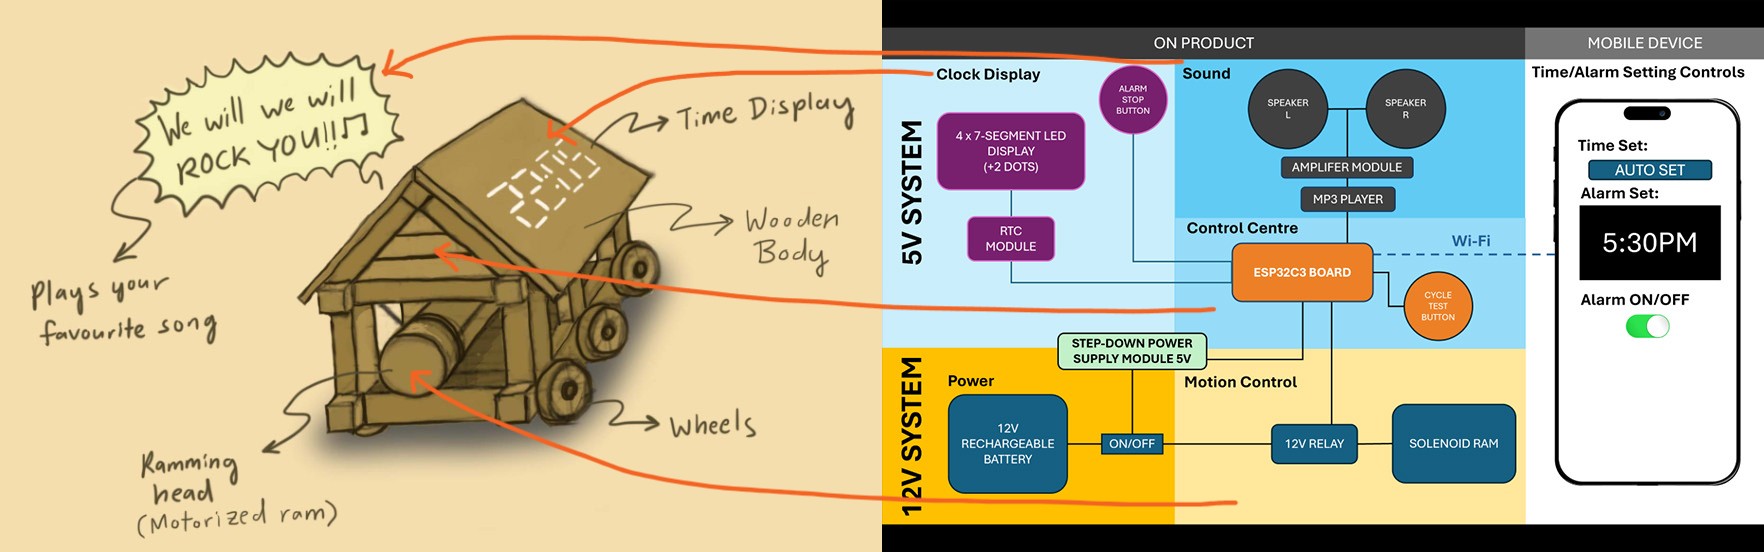
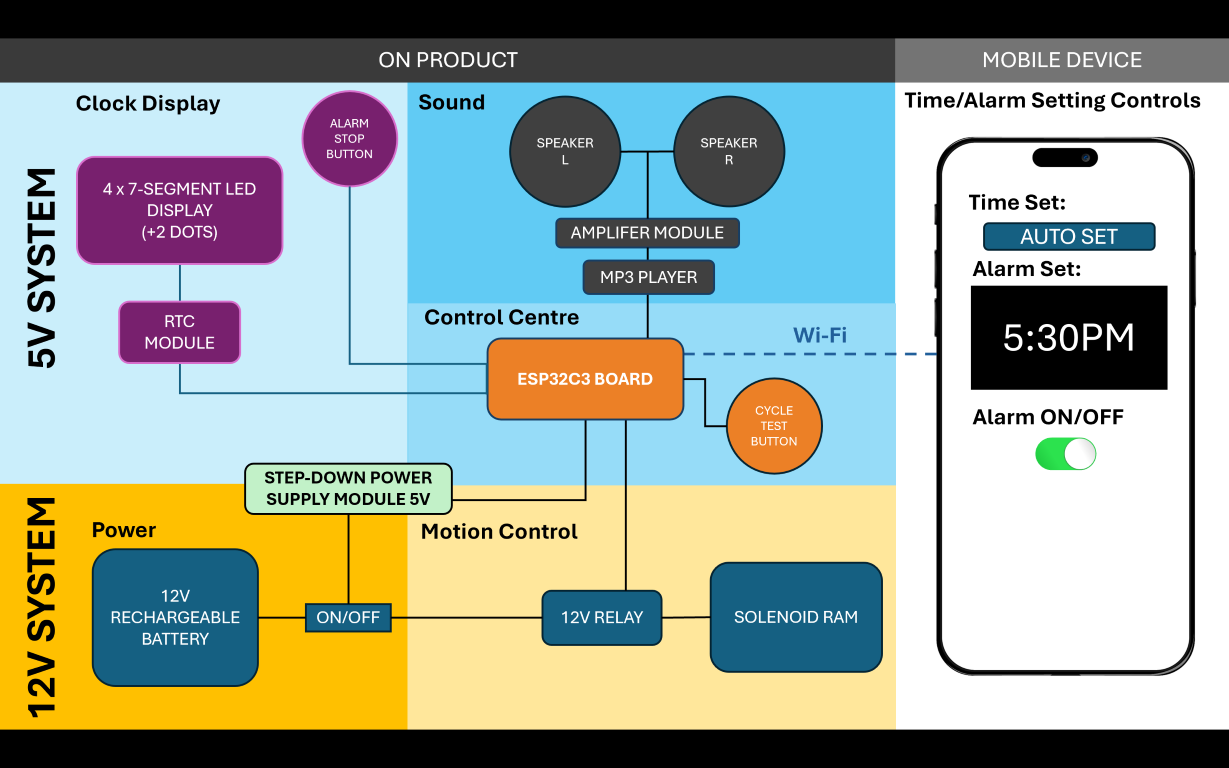
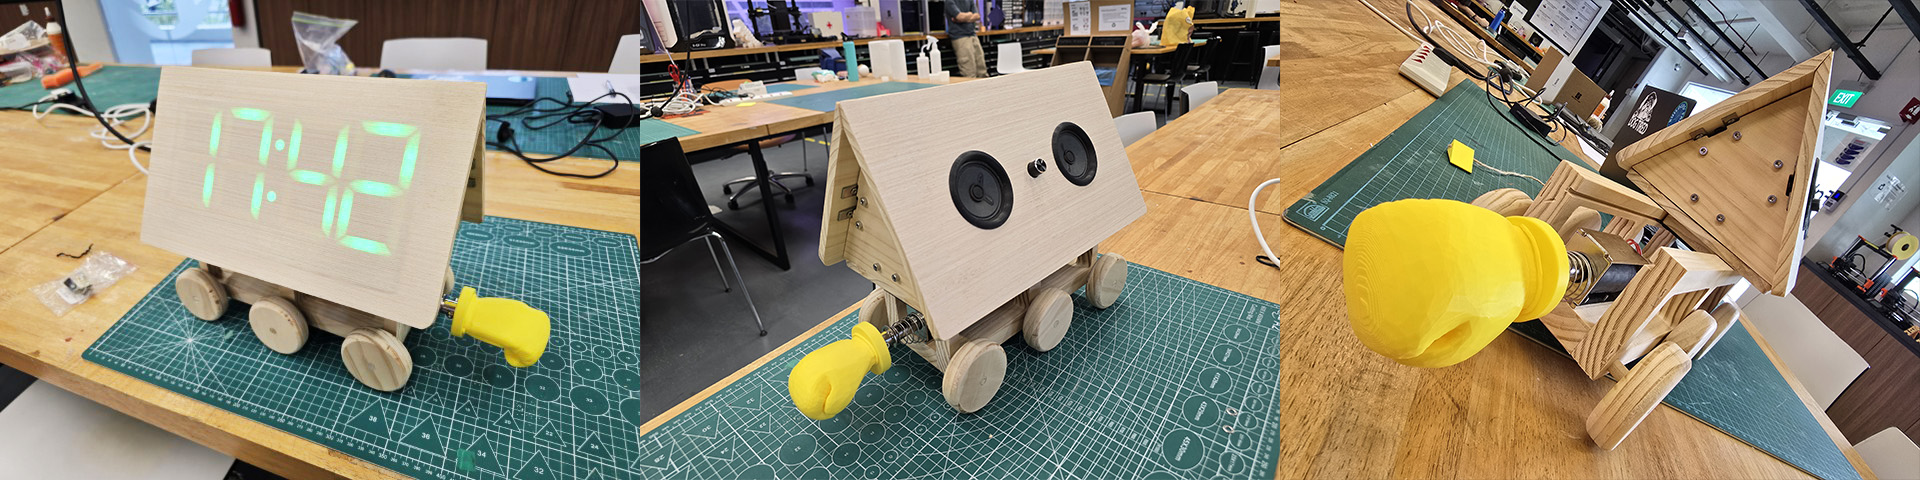
As shown in the Final Project video, this is an alarm clock with a 7-segment LED clock display. When the alarm is triggered, it makes sounds/plays music and produces a ramming action to alert the user.
Who's done what beforehand?
Please refer to Week 17’s assignment that answers this question (with pictures and details). There have been many LED clocks (both commercial and made by makers) before this one. Yet to the best of my knowledge, no one has actually put a battering ram and an alarm clock together in one product.
What did you design?
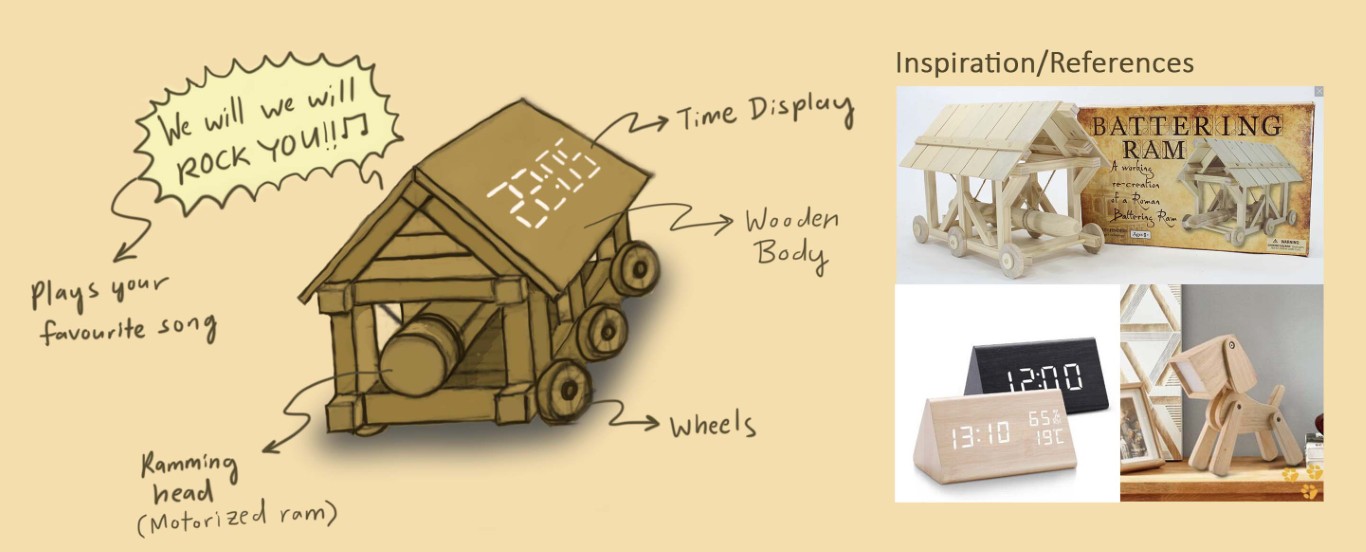
My Final Design can be seen in the Final Project Slide. It is based on the concept sketch and systems diagram shown here:
Please also refer to Week 17’s assignment that answers the question “What will you design?” to compare what I set out to do to my Final Design.
What sources did you use?What materials and components were used? Where did they come from? How much did they cost?
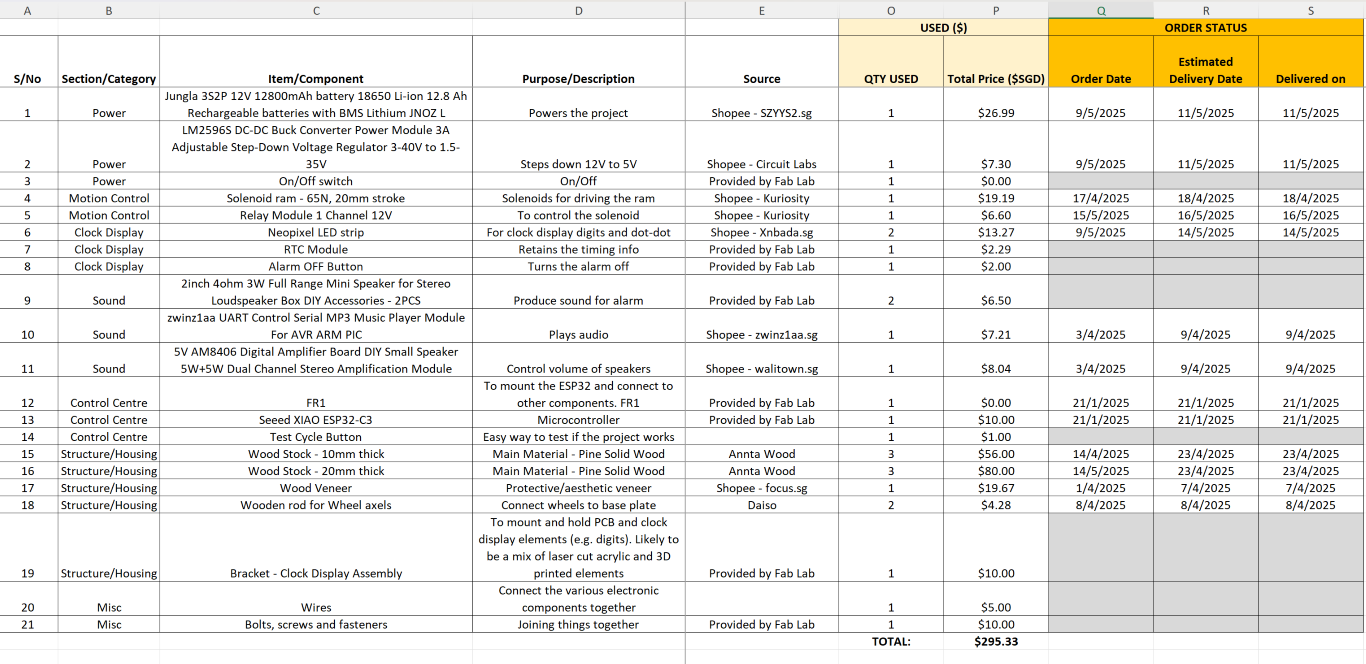
The materials/components have mainly come from 2 main sources:
1. Online shopping platform (Shopee)
2. Provided by Fab Lab
The project will cost around $300 Singapore dollars (approx. $233 USD), with the main cost coming from the furniture grade pine wood.
What parts and systems were made? What processes were used?
I made (almost) everything!
| What I Made | Processes Used |
|---|---|
| Clock Display panel | Frame – CNC milled from pine wood Securing Panel – Laser cut from acrylic 7-segment Digits and Dot-dot – 3D Printed in PLA |
| Sound Panel | Frame – CNC milled from pine wood Securing Panel – Laser cut from acrylic Tray to hold amplifier – 3D Printed in PLA |
| Prism Base Board | Base Board - CNC milled from pine wood Sliding plate - Laser cut from acrylic |
| ESP32 Board | CNC milled on the STEPCRAFT 420 |
| Wheels and Lower Chassis | Chassis and wheel – CNC milled from pine wood (Wheels were finished with a router) |
Please refer to Week 15’s Systems Integration assignment that covers the details of what was made and the processes used to make them.
What questions were answered?
In Week 17’s assignment, I thought that the following questions (if answered) would help me make the best progress on my project. While you can refer to Week 15’s Systems Integration assignment for the details about my project project, I will attempt to answer them briefly here:
• How can the clock display panel be finalized?
I knew the clock display panel was the most critical part of the project. I managed to finalize it by building and testing it step-by-step:
1. Single digit test – I built a single digit and tested it to see if it could display numbers coherently
2. Four digits together – When the single digit worked, I built another three digits and tested it to see if it could display the time.
3. Dot-dot – I then built and tested the two dots that separate the hour and minute digits.
4. Integrate into the panel and testing the lighting/display effect – I was worried about the result of how the digits would show through the wood veneer but after assembling the digits and dot-dot into the frame, the result looked good.
• How does the clock panel connect to the triangular frame?
I found some L-brackets in our Fab Lab and these helped to connect the panels to the triangular frame.
• How does each component connect together in the schematic? How should the board be designed?
This question was answered when designing my final board.
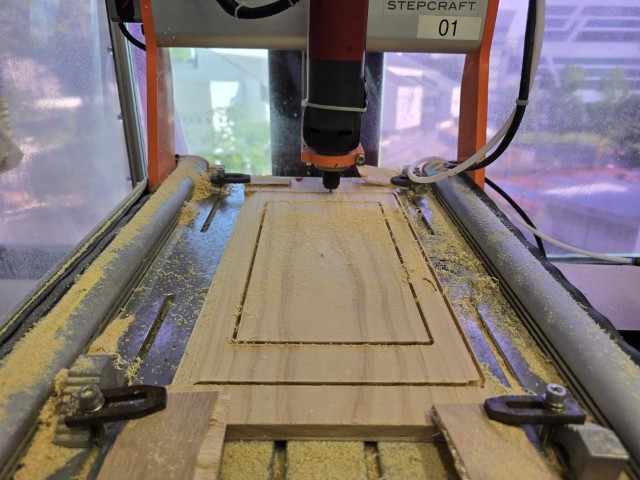
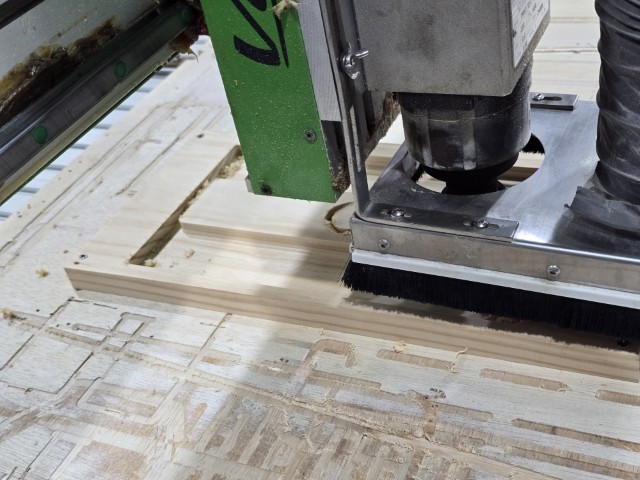
• How will the wooden parts be milled?
Initially, I thought all the wooden parts would be milled using the STEPCRAFT 420 desktop CNC milling machine. I managed to mill out most of the pieces but the final piece, the prism base board, would take very long (10 hours) on this machine. With help from my Fab Academy buddy Haw Ren, I managed to mill out the last piece in less than an hour on a larger CNC machine (EAS Versatil 2500).
• How will the components be tested?
Here are the videos of tests that were performed:
One Digit Test
4 Digit Test
Alarm set test
Clock Display Panel Test
Final Test (before Presentation)
What worked? What didn't?
This is a question with so many layers and dimensions. There were things that didn’t work but eventually did (and vice versa). However here are the answers that first comes to mind.
Things that worked
• The lighting effect of the LEDs through the wood veneer worked well on the clock display
• Pine wood is a material that is very easy to work with. It is easy to machine and is also easy to repair if accidentally damaged.
• 3D Printing a test prototype (before making the actual) is a good strategy. While seemingly “an extra step”, having the test prototype allowed me to identify and avoid problems that were not apparent during the design stage.
Things that didn’t work
• The Dupont cables used for the project are not very durable and tend to break easily.
• The battery sometimes does not supply enough power for the solenoid ram to trigger.
• I did not anticipate the entire Battering Ram Alarm Clock rolling backwards when the solenoid ram struck a surface. This will cause the solenoid ram to become out of range on subsequent strikes. I managed to solve this problem by creating some anti-rollback wedges.
How was it evaluated?
From Week 17’s assignment that asks the question “How will it be evaluated?” I proposed that it should be evaluated as follows, and here is how I evaluated my Final Project according to the criteria proposed.
| Weightage | Score | |
|---|---|---|
| The clock display tells the time accurately. | 30% | 30% |
| The alarm can be set to trigger sounds and actions. | 20% | 20% |
| Ease of use. Users do not find it annoying to use. | 10% | 8% |
| Build quality. It is put together and finished well. | 10% | 8% |
| Aesthetic quality. It looks appealing. | 10% | 8% |
| I am proud of making this and want to keep it with me for a long time. | 20% | 15% |
| TOTAL SCORE: | 89% |
I think there are minor issues with finishing and perhaps the touch buttons are “too hidden” for users other than me. But overall, I think I did well with my Final Project and I give it 89%.
What are the implications?
I have no intention of commercializing this idea and the thought of selling it does not appeal to me. Now that my Wooden Battering Ram Alarm Clock is completed, it could be valuable as an education and showcasing tool. Please refer to Week 18’s Invention, Intellectual Property and Income for more details.
Chronological Progress
Week 01
For this first week I sketched out what I envisioned for my final project. At this point, given that it is still in the early stages of Fab Academy, the idea is purely aesthetic. I have not figured out things such as the dimensions, mechanisms and the electronic components required. I have some idea how this project could be accomplished but I will need to learn some (missing) core skills to make this project a reality.
Week 02
This week I modelled my battering ram alarm clock in both 3Ds Max and Fusion 360. By attempting to rig the ramming mechanism in 3Ds Max, I have a good idea of how the ramming mechanism should work mechanically.
Week 03
This week's topic was computer controlled cutting and for the individual assignment, I made a pressfit construction kit. Looking back at my own Final Project idea, I wondered if the body of the battering ram alarm clock could be made of something other than wood. Hence, I attempted to use my pressfit construction kit to build a battering ram and here is the result.
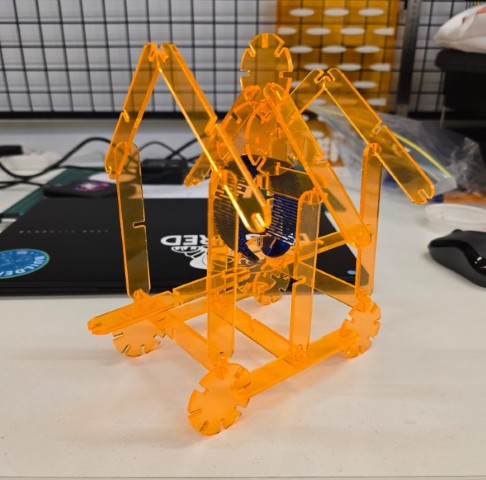
The possibility of creating a body out of transparent acrylic is certainly an interesting aesthetic choice. Right now, I doubt I will go in that direction and will still stick with a wooden body. However, I think some of the laser cutting techniques I learnt today can still be applied for things such as casings for electronic components.
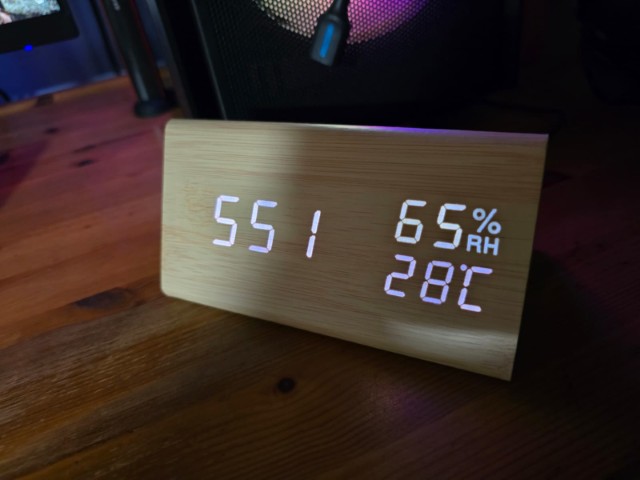
I realized that while I continue to explore the form of the project, I cannot neglect thinking about the internal components. As such, I purchased a wooden clock that has a similar effect to what I would like to achieve to study.
I also searched for similar projects to look at. Here is a project from Instructables for a wooden clock which was useful in helping me to understand how to create a clock that is similar to the one I bought. I probably need to think more about some aspects of the clock such as:
- What are the parts, materials and components needed?
- How should it be constructed?
- Should it have buttons? What do those buttons control? What are the functions?
- What will spiral development look like for this project?
All these to come in the weeks ahead!
Week 04
This week’s topic is about embedded programming, and it introduced me to the different types of microcontrollers I could use. Right now, I think I would like to use the RP2040 as the microcontroller for my project, with the ESP32 in consideration if connectivity is required. I also started thinking about spiral development for this project in terms of the functions and what I want to accomplish for this project.
| LEVEL 1 Passable | LEVEL 2 Average | LEVEL 3 Very Good | LEVEL 4 Excellent | |
|---|---|---|---|---|
| Description | Passable. Fulfills all the assessment requirements (just barely). | Decent. Not sloppy but not “wow” either. | Looks good. Some “wow”. It isn’t perfect but only minor issues remain. | Ideal and aspirational state. This is the best I can do with current skills and knowledge. Something that I would be proud to make and keep for a long time. |
| Form/Body | Just a shell/structure to hold everything together. | Simple structure but with some minor design touches. | Purposefully designed body with an intuitive user interface that considers: • Maintenance (e.g. Battery change) • Reconfiguration |
Purposefully designed body with an intuitive user interface that considers: • Maintenance (e.g. Battery change) • Reconfiguration • Carrying the object around to be deployed differently |
| Aesthetics | Just basic forms “raw” look | Simple but well finished | Exhibitable showpiece quality | Looks like something you can buy commercially |
| Interface | • Minimal - push buttons to set the time/alarm. | • Push buttons to set the time/ alarm. • Ram test button |
• Push buttons to set the time/ alarm. • Ram test button • Alarm test button • Removable top for ease of maintenance • Modular top so that the clock can be viewed from other angles |
• Push buttons to set the time/ alarm. • Ram test button • Alarm test button • Removable top for ease of maintenance • Modular top so that the clock can be viewed from other angles • Remote or app control (e.g. Doorbell function) |
| Power source | Plug in (USB) | Plug in (USB) + Battery | Plug in (USB) + Battery | Plug in (USB) + Battery Additional power source for rem |
| Clock | Simply tells the time | Tells Date and Time | Tells Date and Time + 1 other useful reading (e.g. Light level, temperature, battery level) | Tells Date and Time + Full suite of useful readings (e.g. Light level, temperature, battery level) Sync to internet clock |
| Alarm | Basic: 1. Something to set alarm 2. Something to alert users (e.g. sound speakers) 3. Something to turn off alarm |
Basic features only | Basic features + customizable sound/music for alarm | Basic features + customizable sound/music for alarm + radio |
| Moving Ram | Simple striking mechanism. Just a rod. | Simple striking mechanism. Just a rod. | Variable speed control for ram (manual control) | Variable speed control for ram (manual control) + Sync ramming motion with audio |
| Connectivity to other devices | None | None | None | App or remote for additional function |
Week 05
Since this week’s topic was 3D printing, I looked into some interesting mechanisms that I can study using 3D printing as a prototype testing tool. I found this mechanism called a Scotch yoke mechanism that looks like a promising possibility for what I need to drive the ramming action. I found this 3D print from Thingiverse by WayTooManyHobbies, and printed it out to study its action.
Promising! While I am only turning it with my hand now, using a motor to drive this action will undoubtedly make the action smoother. Also, this mechanism is quite compact, and I can keep it all in the lower half of the battering ram clock (including the motor). This will help me to implement the removable/modular top design that I had in mind.
Week 06
I won the presentation lottery last week, where Professor Neil saw my Final Project idea and suggested that I look at solenoids to perform the ramming action on my alarm clock. Thus, this week I did. I found a YouTube by Science Buddies on solenoids which basically provided me with the blueprint of what I need to get my own solenoid ram going.
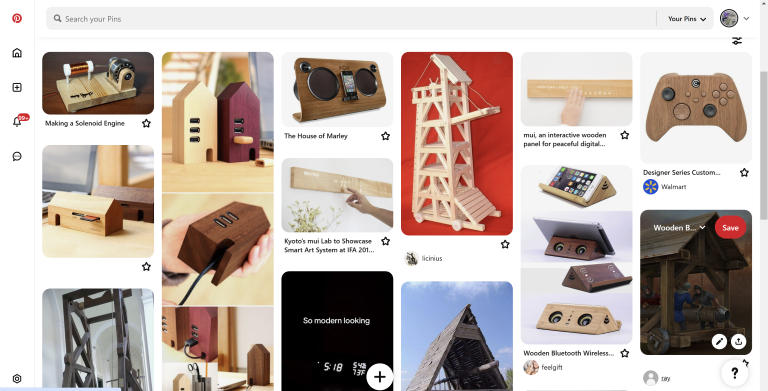
I also started a Pinterest board to collect all my ideas about what I would like to have in the design of my battering ram alarm clock. You can view my board HERE.
I also came to the realization that while all these references are nice, I really need to start trying to do things physically in real-world scale in order to deliver a good project. Hence, I decided to 3D print the model that I created in Week 02 so that I have a prototype to work with and develop ideas on.
I 3D printed it! =)
Week 07
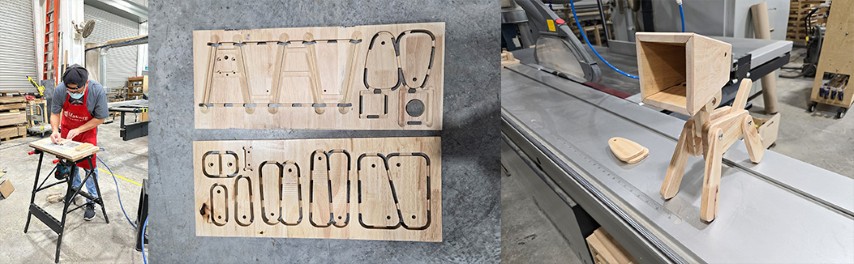
Since this week’s topic was on CNC machining, I did a short exploration on how CNC can be used for my Final Project. I have always wanted to make this project out of wood, so I revisited a project for a wooden dog lamp that I had made last year to get reacquainted with the woodworking techniques that I learnt to make this dog lamp. Compared to this week’s build of a large material shelf, I will probably not need such a huge CNC machine for my Final Project.
Week 08
No updates this week.
Week 09

Week 09 is the halfway point of Fab Academy, and it is also where I was introduced to input device. This got me thinking about two things:
1. I should probably start getting some parts of my final project sorted out.
2. I should probably start buying components that I need for my final project
I think the components that I need have a lot to do with the functions required. By drawing where I wanted some of the components and buttons to be on my 3D printed model, it helps me visualize what sort of things I wanted on my final project, where and how the buttons were placed, and overall, how the final project felt as a product.
Week 10
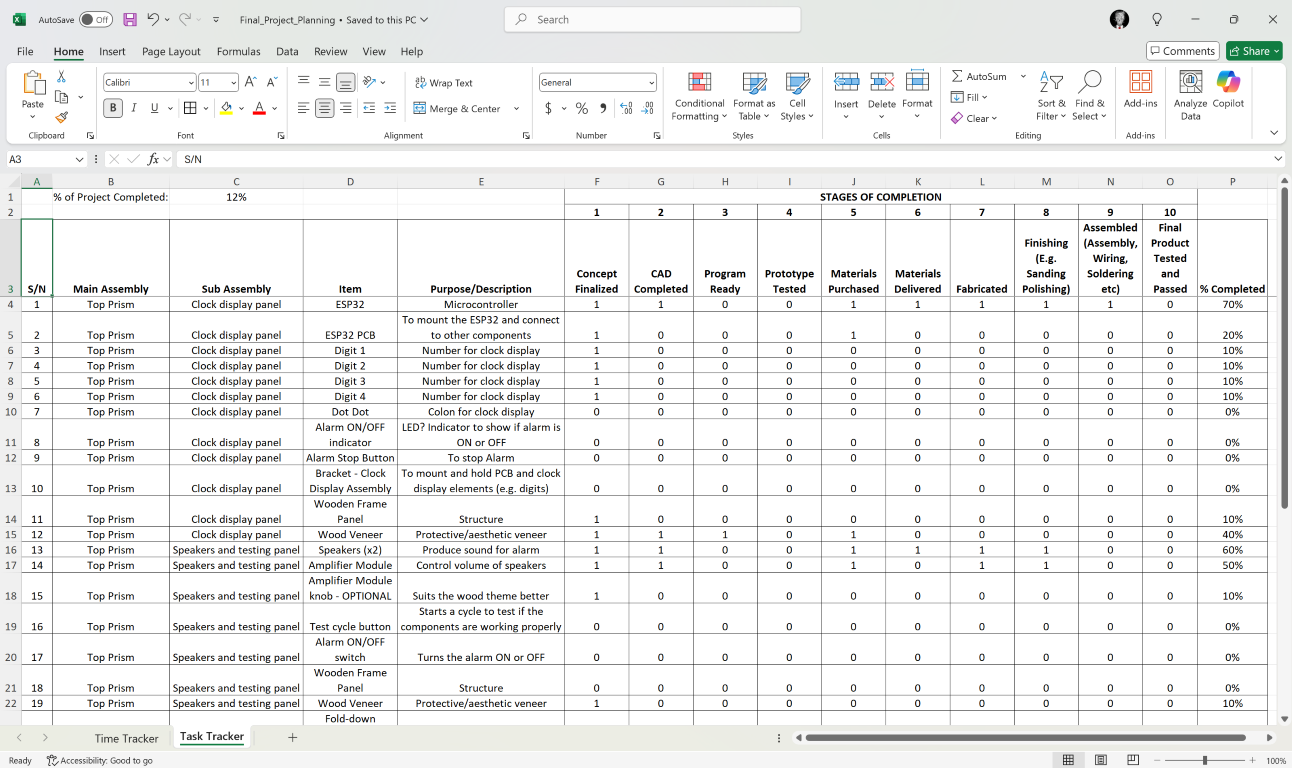
Everything is converging. Not so much in a plan coming together way more like a massive traffic jam forming. The Fab Academy assignments need to be done, the machine building week will start soon, and the Final Project is less than 60 days until the deadline. With all of these things going on, I started my excel tracker to make sure my final project was progressing. This helped me to figure out how much ground I needed to cover. It is currently at 12% done with a lot of this week spent on selecting and buying the components required for the Final Project.
Week 11
This week I made an ESP 32 board and also started looking at some examples of electronics projects as project references (e.g. ESP 32 alarm clocks, solenoid tutorials). You can find my playlist here.
Admittedly, I have not absorbed all of this knowledge, but I think this will be useful when my components arrive, and I begin testing them.
I also started a project tracking document to help me keep track of my project progress. I have created a link to the excel sheet at the start of the Final Project page.
Week 12
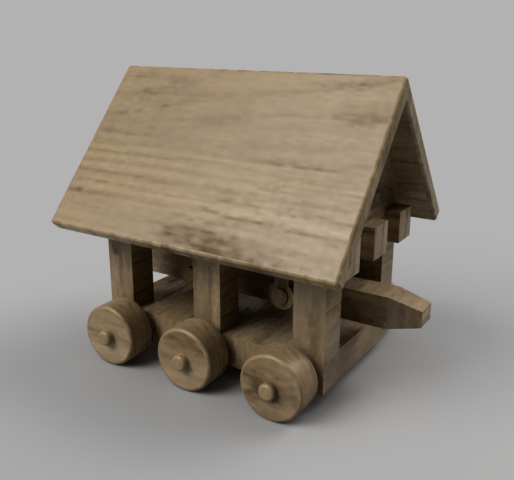
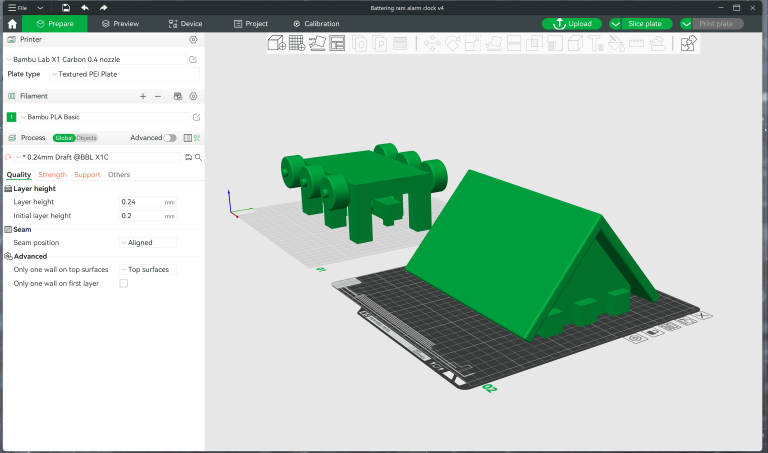
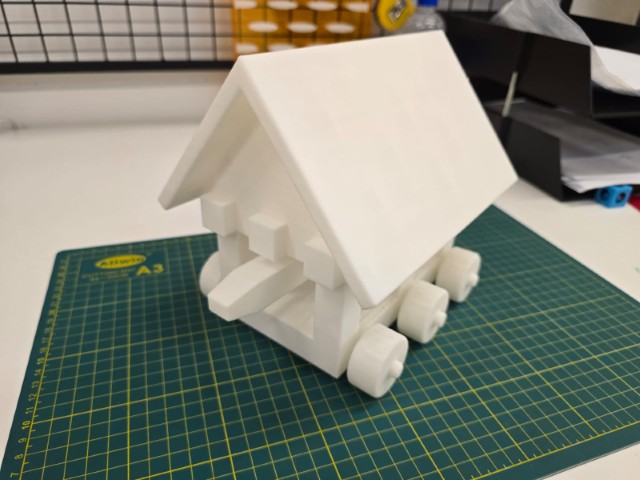
This week is machine building week and while I had to work on my machine project, I managed to find a little bit of time for my Final Project, I updated Fusion 360 CAD of the bottom car and 3D printed it as a test for my final build which will be done in solid pine wood. It will also help me to finalize my concept, which is something that needs to be completed quite urgently.

I also bought the wrong solenoid, a 9A, 12V, 50N massive monster that would probably put a dent on your wall. I had to buy another one, this time I had more experienced eyes help me look at it before I bought it.
Week 13 – 15
These 3 weeks have been a flurry of activity as I had to fight hard to keep up with my assignments as I had fallen behind.
With the help from my more experienced colleagues, I have finally managed finalize my systems diagram.
I have also managed to secure almost all of the components I require for this project. You can see these in Week 15’s Assignment on System Integration. It is not currently complete at the time of writing, but I will continue to update it as I progress.
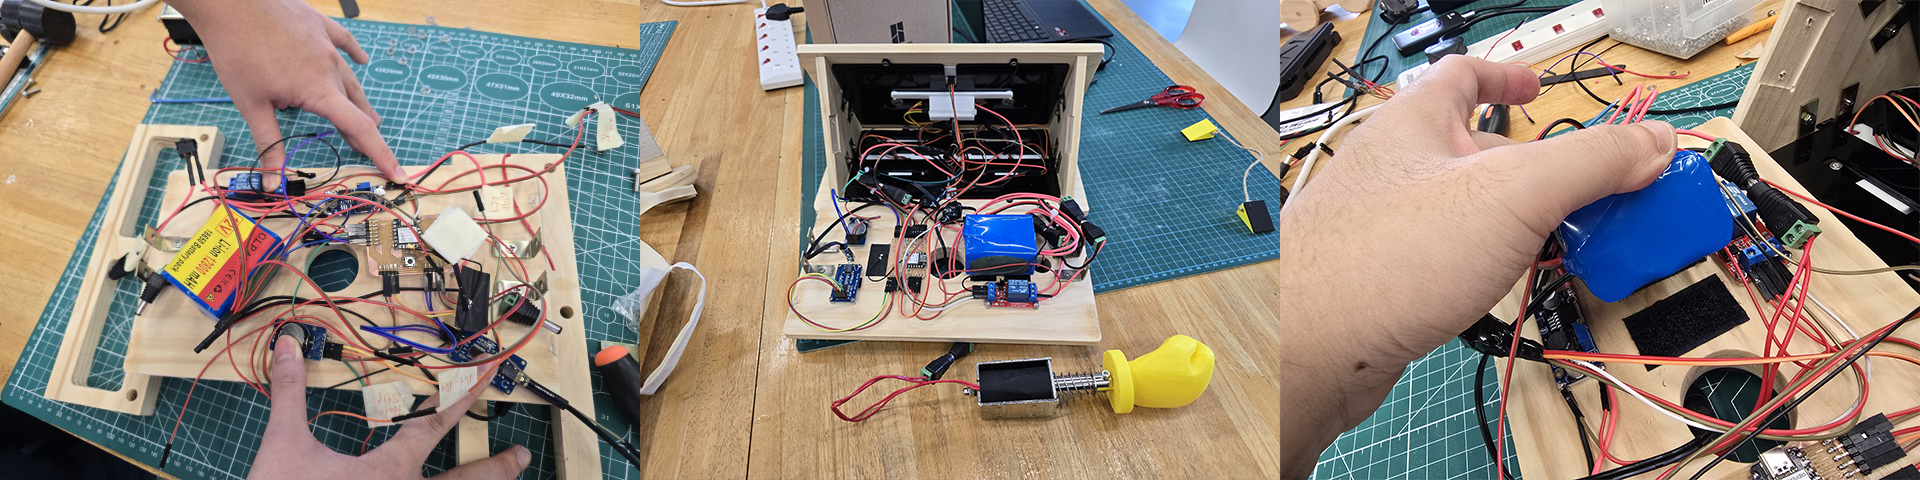
Week 16 - 18
These few weeks just flew past in a flurry. Here are some milestones that were achieved during this time.
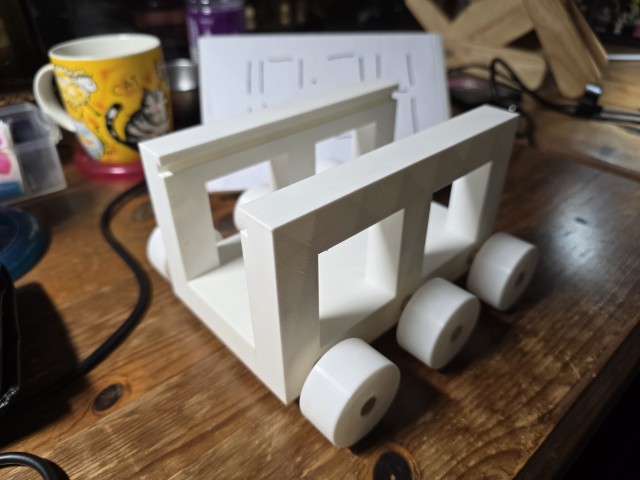
• Made and tested all four digits of the clock display

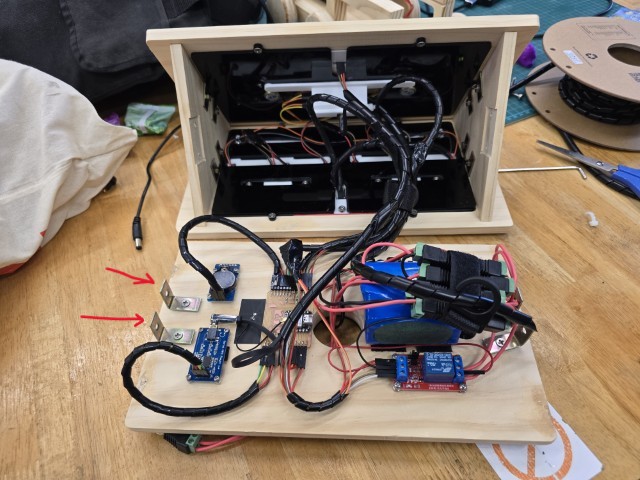
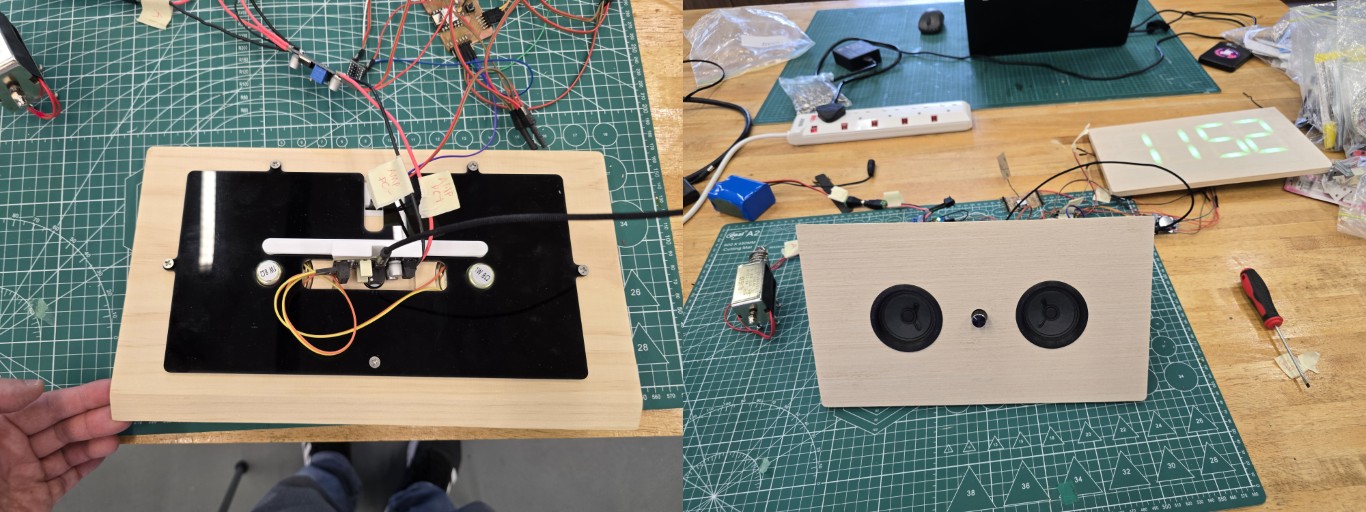
• Connected up and tested the components
As I head into the end zone now, there are more and more things to do and never enough time to do them. I have not reached the point where I feel I can turn the tide but the idea of getting this project done feels really exciting.
The design files and programs up till this point are available here.
Weeks 19-20 – The End Zone
These are the last two weeks before the final presentation and I press on towards the finish line. I remember it was a busy, furious blur of activity of which I had no idea whether I am able to finish my project until the very last week.
While you can find a more detailed account of the work completed during this time under Week 15’s System Integration assignment, here is a summary of the work I completed during this period:
• Tested the clock display with wood veneer effect and different colors and completed milling and assembly (and the final test) of the Clock Display Panel

• Completed milling, testing and assembly of the Sound Panel
The design files for the Sound Panel are available here.
• Designed and milled the final ESP32-C3 board.

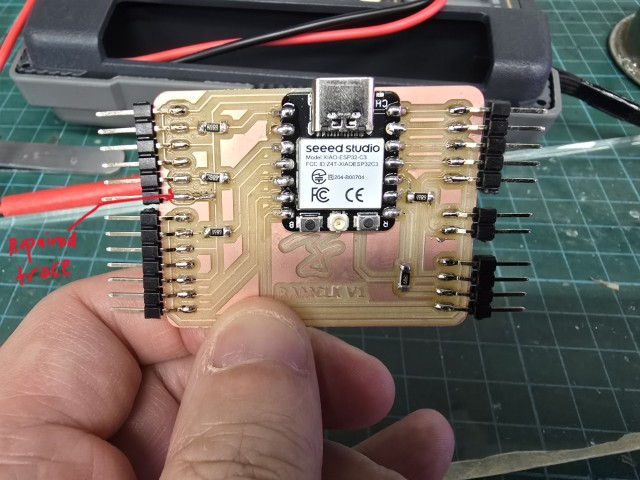
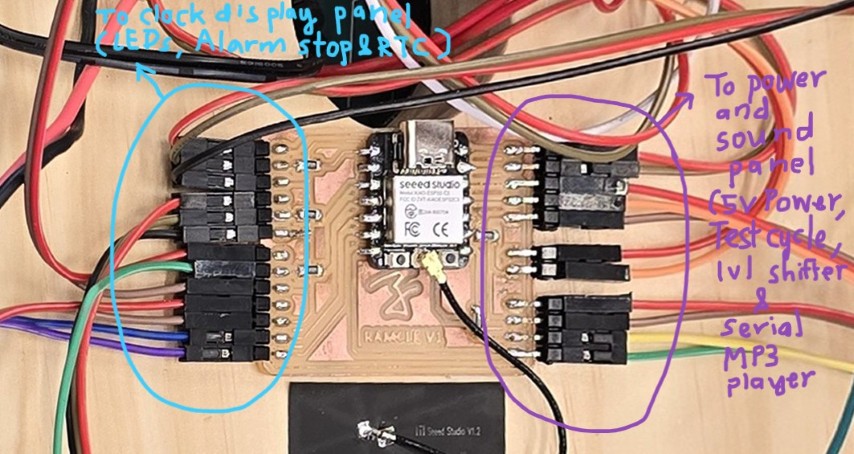
The design files for the board are available here.
• Uploaded the final program onto the board (the explanation for the program can be found under the Control Centre section under Week 15’s System Integration assignment.
The final program files are available here.
• Secured the components onto the prism base board
• Created the “boxing glove” attachment that was remixed from a Thingiverse model (License: CC BY-SA - Creative Commons - Attribution - Share Alike license) by Gromozekaa.

• Completed CAD, production (milling, sanding, routing) and assembly of the Final Project.
The CAD model of the Final Project can be found here.
The final testing video just before the day of presentation can be found here. I am so glad I completed this =)
Closing Thoughts
Now that I have finished my Final Project and have presented it to Professor Neil, my instructors, and my fellow Fab Academy 2025 students, I feel a cocktail of relief, joy, fatigue, satisfaction, and gratitude all at once.
Relief: This is the first weekend in 6 months that I did not spend looking over my shoulder having to complete an assignment or project milestone.
Joy: I told myself I would reward myself if I completed Fab Academy and while it is still slightly premature (I have not cleared Global Evaluation yet), I just went ahead and got myself a reward – A Lego X-Mansion set. Because dammit, I deserve it.
Fatigue: I feel tired. Quite often, I did not get to sleep enough because of my Fab Academy assignments and project work. I remember many nights where an issue/problem kept me awake and restless all night, only for it to be resolved the very next day.
Satisfaction: It feels good finishing something that you worked hard for. I gave Fab Academy my best effort and I am proud and satisfied with what I have accomplished.
Gratitude: It is an understatement to say that I did not get here alone. So many people helped me along the way to help me complete Fab Academy. I am indeed blessed to have all of them support my Fab Academy journey. I wish to extend a very special thanks to the following people:
• My Fab Academy Instructor, Steven Chew. For your patience, dedication and kindness in guiding me through all my assignments
• My Fab Academy Buddy, Chaik Haw Ren. The best Fab Academy buddy ever! We embarked on this challenging journey together and I can’t imagine how it would have been without your unselfish support and inspiring can-do attitude
• Fab Lab Alumni, Yew Zi Hon. Your timely assistance prevented my Final Project schedule from derailing entirely. I would stumble into a project disaster and Zi Hon will just say “This is fine” and then help me resolve it calmly like a Zen master.
• Fab Lab SP Colleagues. I appreciated that you would take the time to help and support me, even when you were busy.
For future batches of Fab Academy students that may chance upon this website. I wish you all the best for your own journeys. It will be a tough but rewarding journey. Don't be afraid to ask for help if you get stuck, and I hope that my documentation and account of Fab Academy might be useful for you.