1. Interface and Application Programming
I plan to implement an HTTP API service on the device, which can then be accessed via a web browser on a PC. The device is controlled over the HTTP protocol. The hardware used is the concurrent-version development board I designed in Week 8. The software is developed using both ESP-IDF and Arduino IDE.
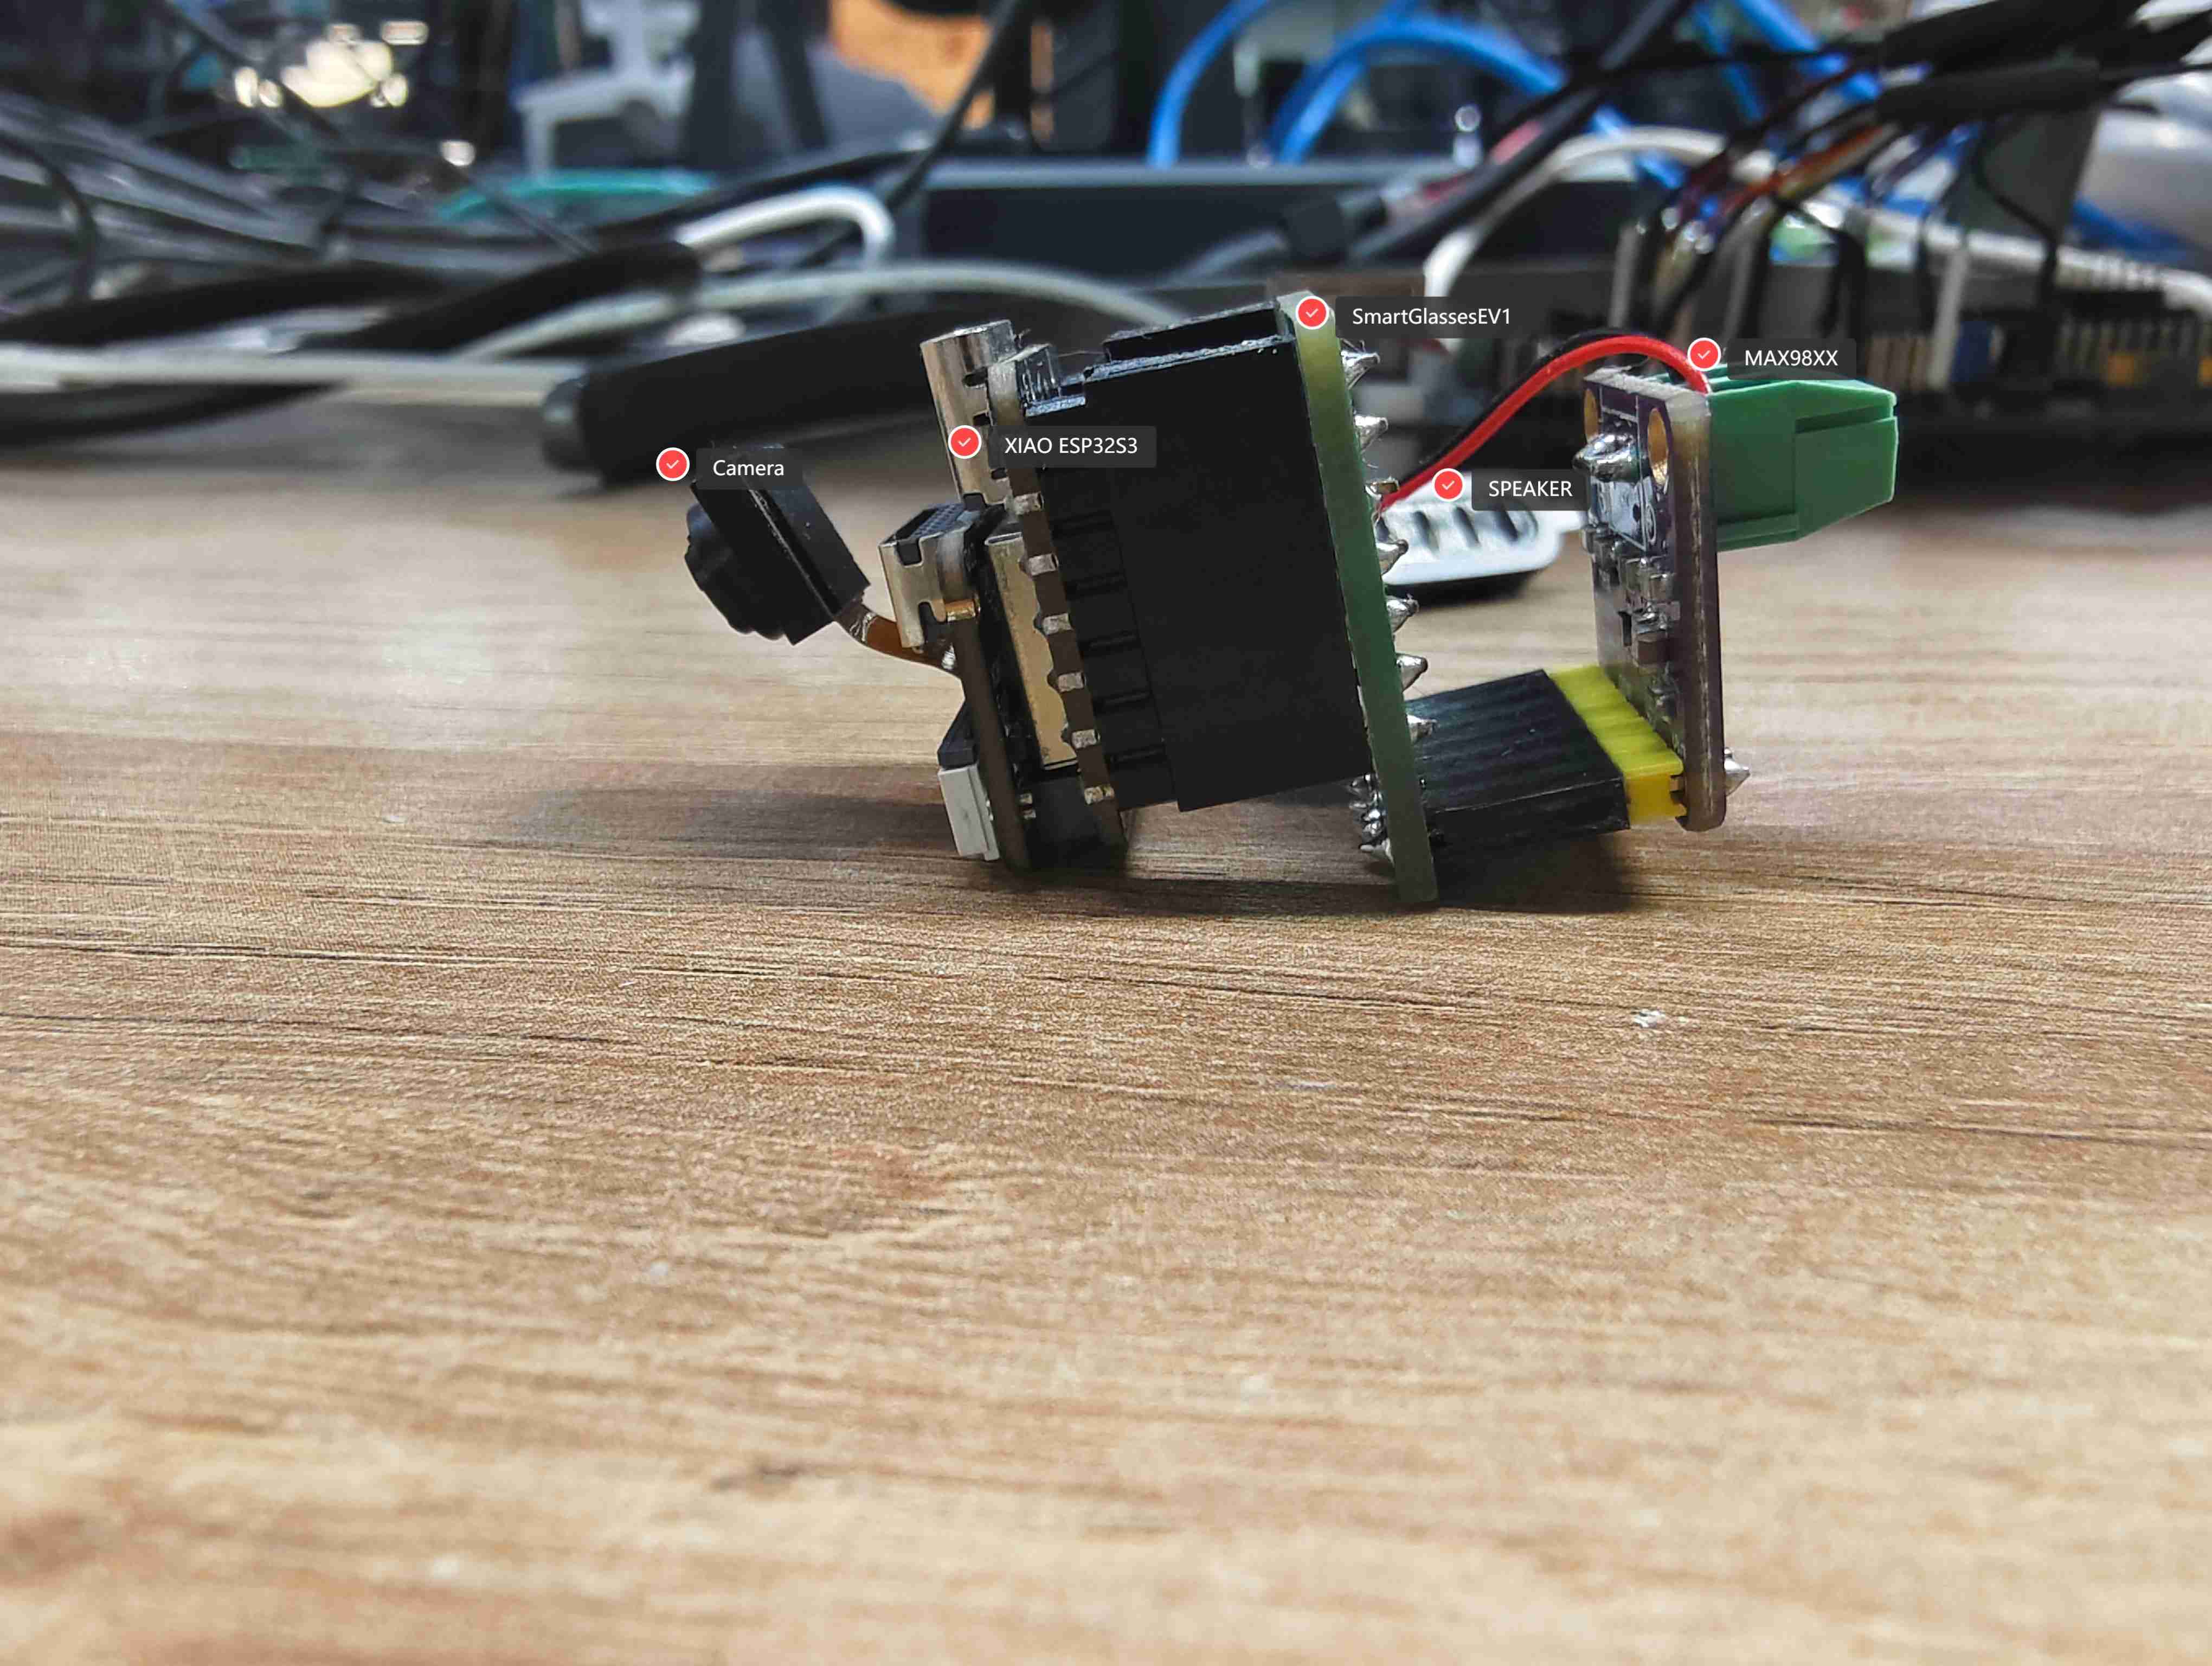
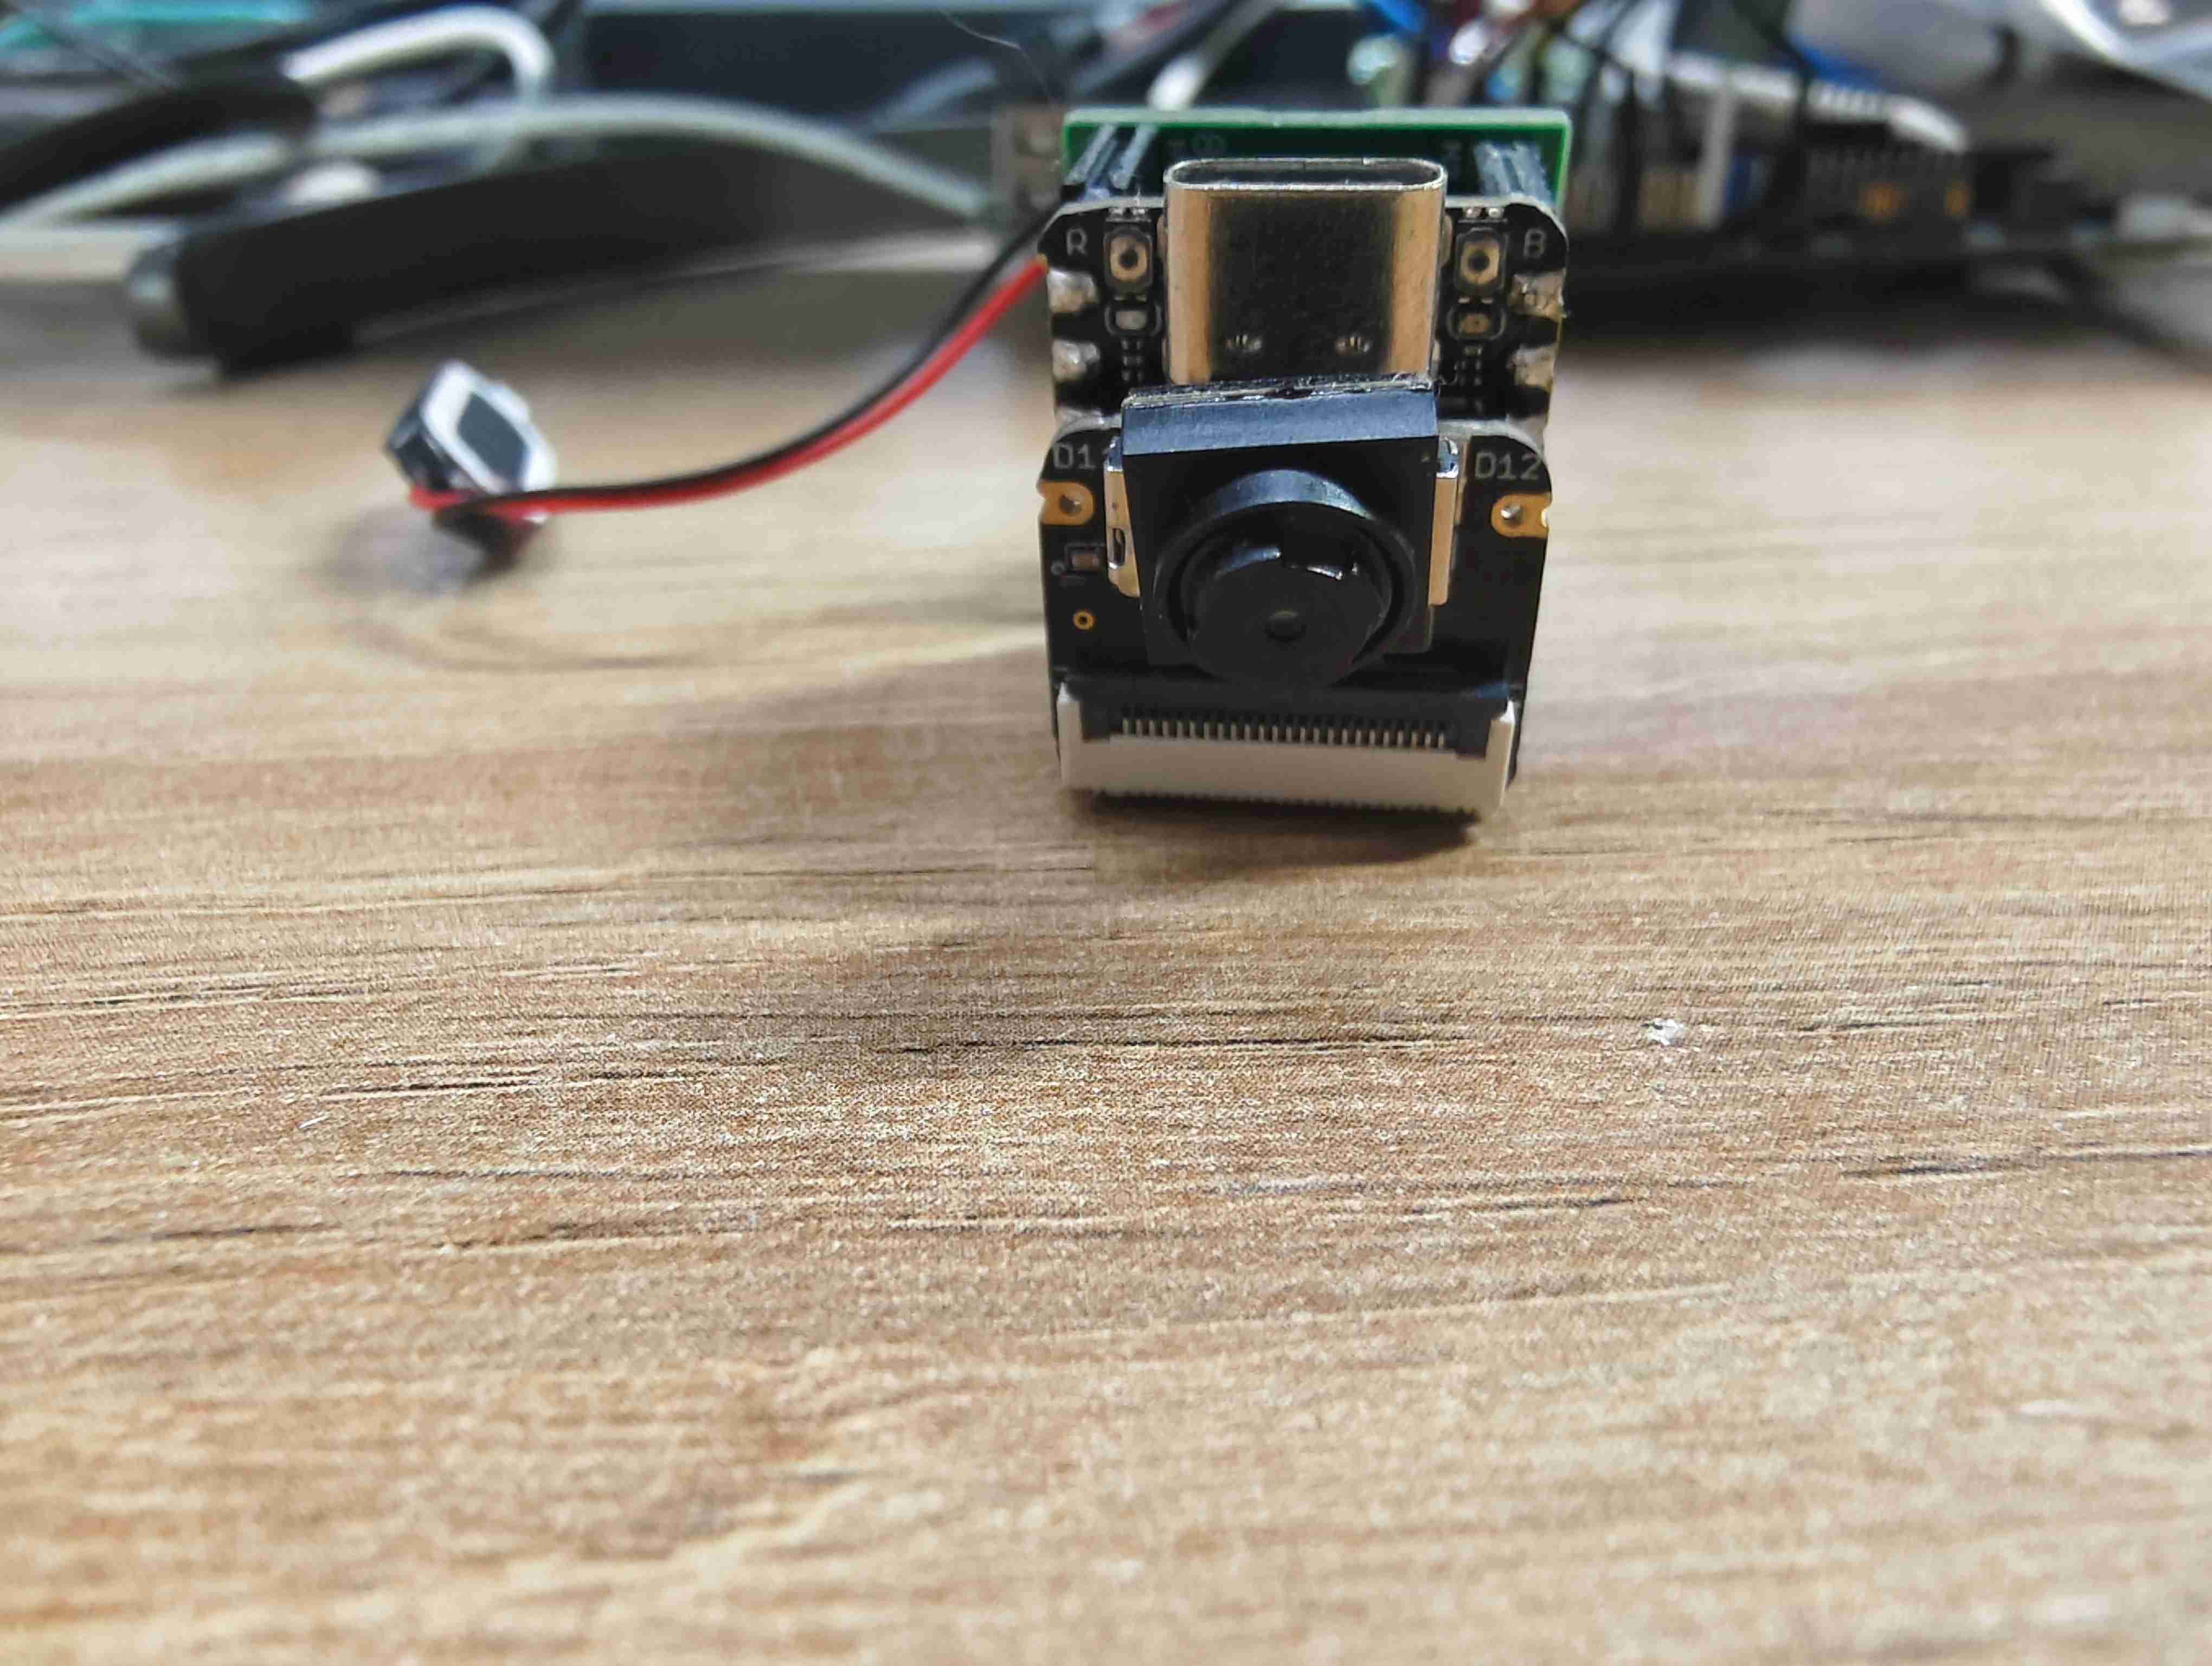
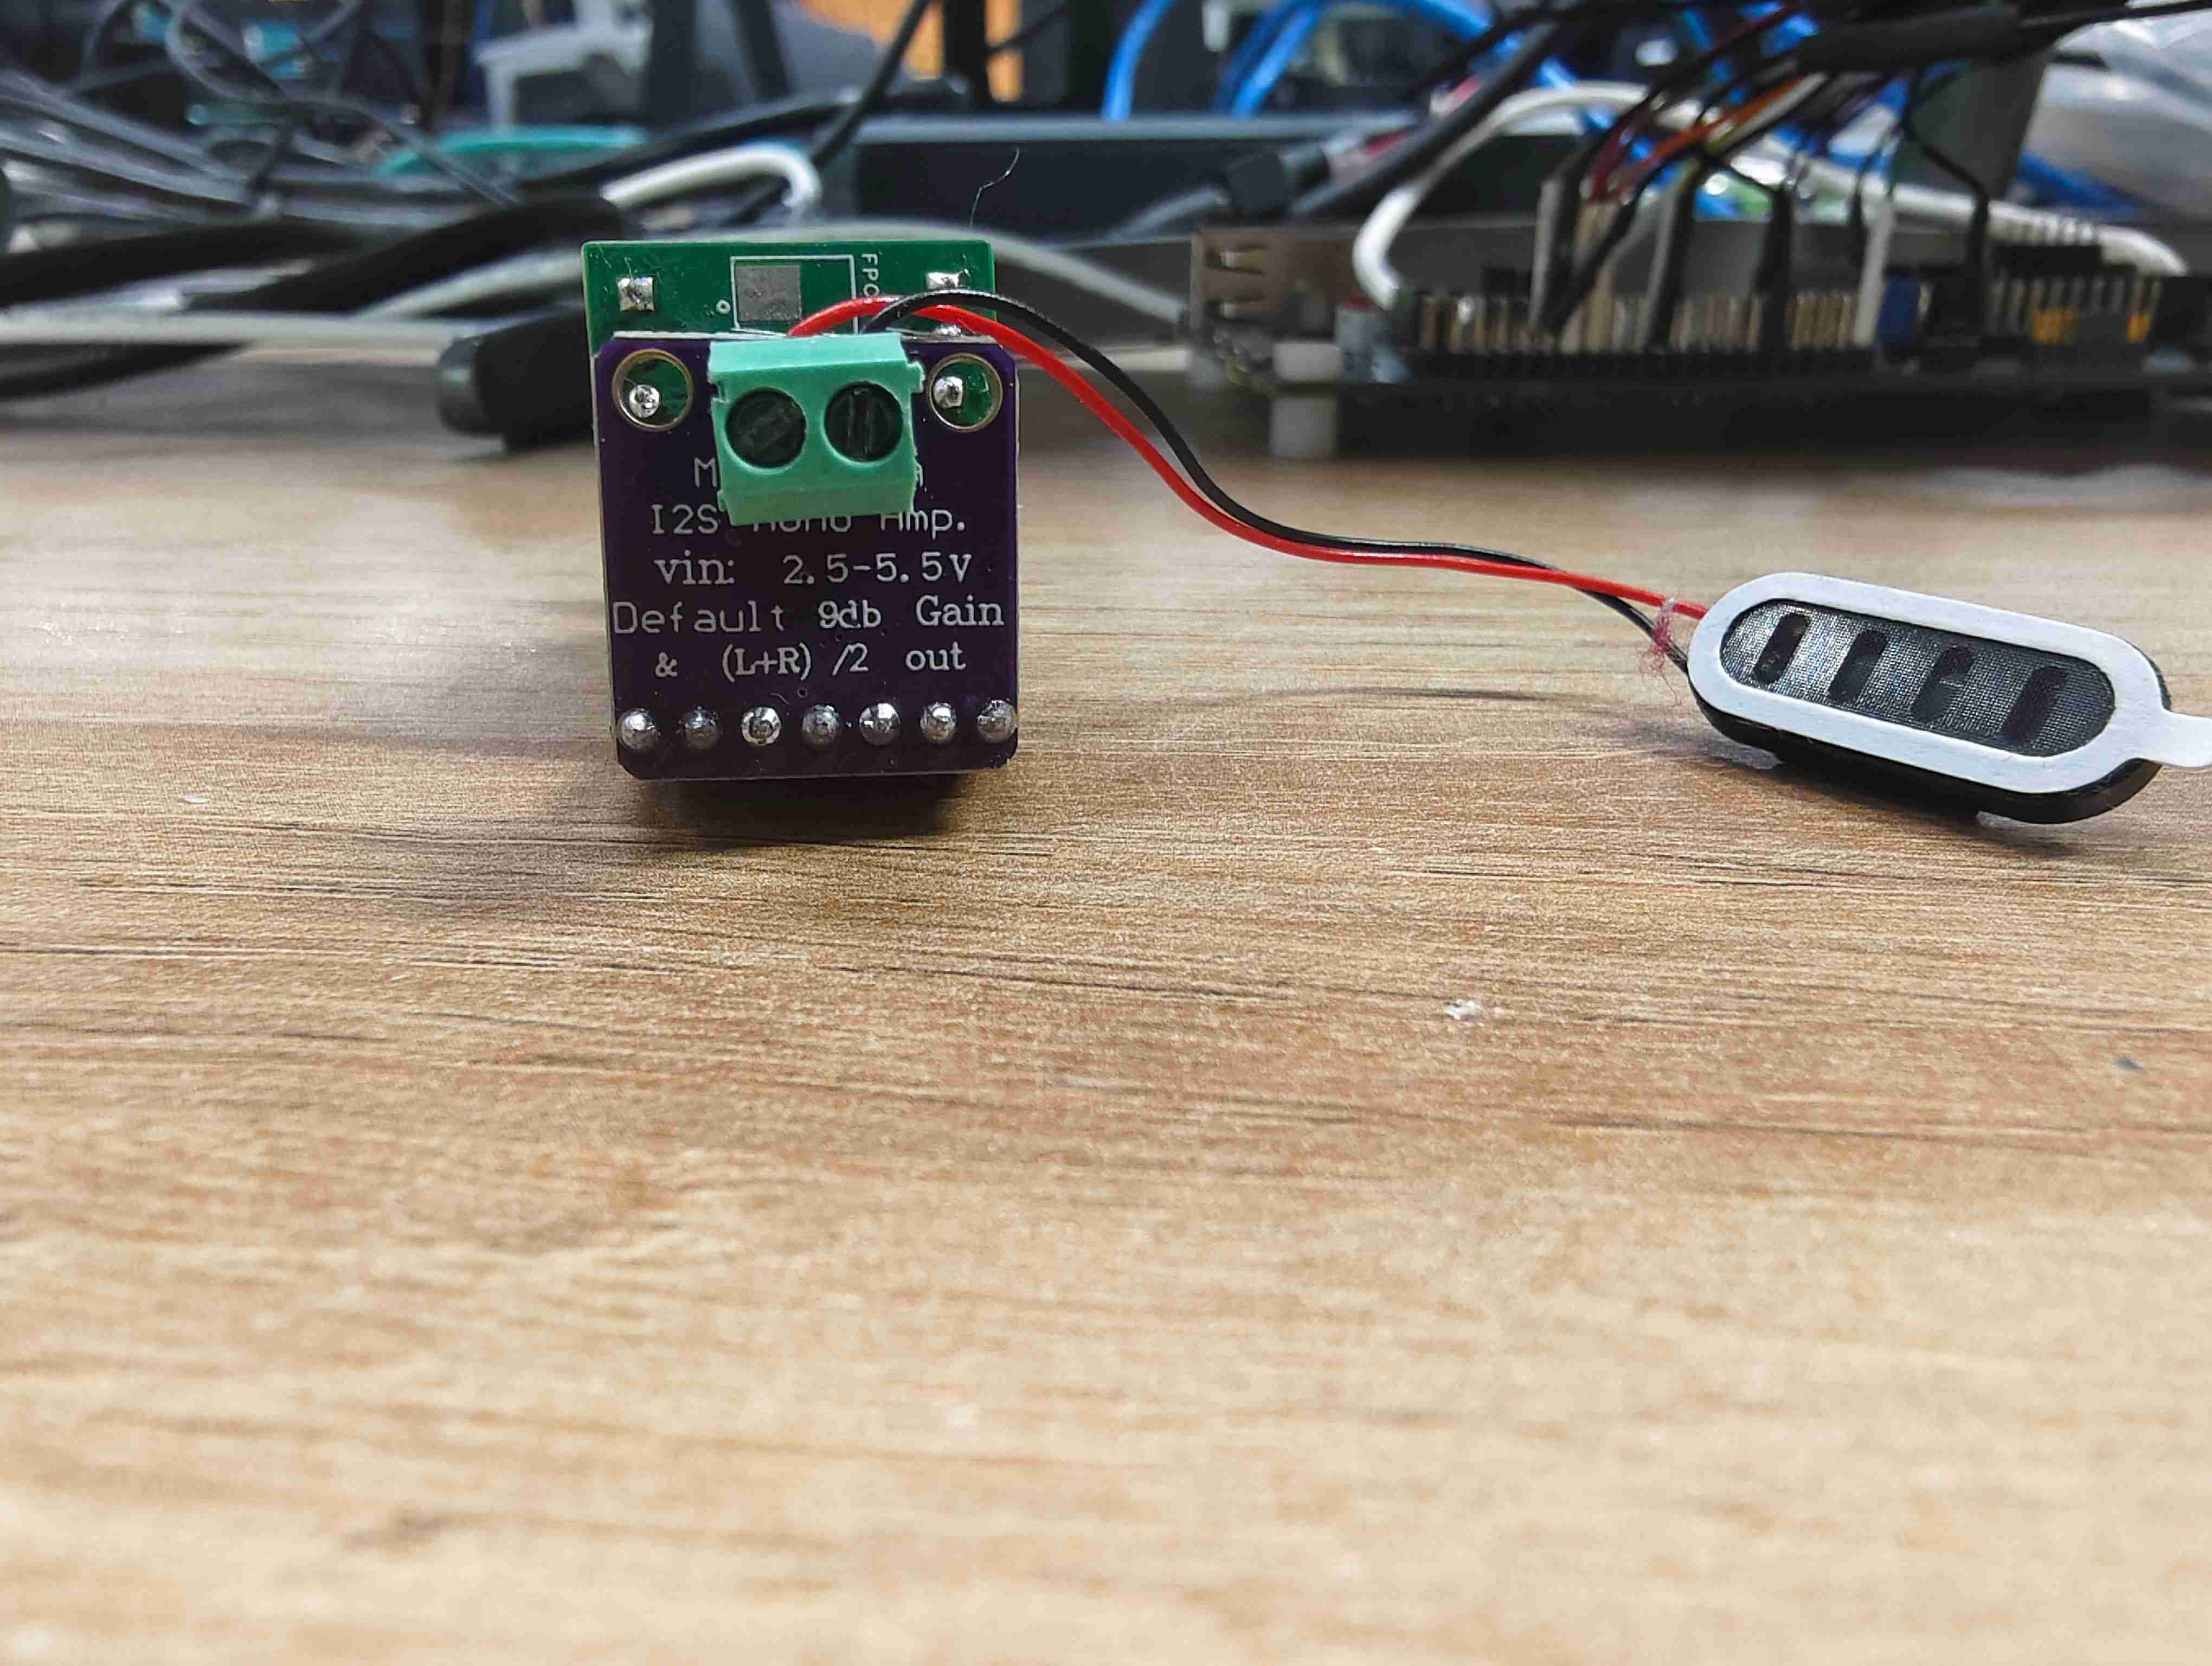
The board shown above is the SmartGlassEV1, which I designed in Week 8. Its primary purpose is to connect the XIAO ESP32S3 development board to a screen and a speaker.
1.1 Image Capture
The device captures images and uploads them to a web server via HTTP. The server then displays the images on a web page.
1.1.1 Device-Side Implementation
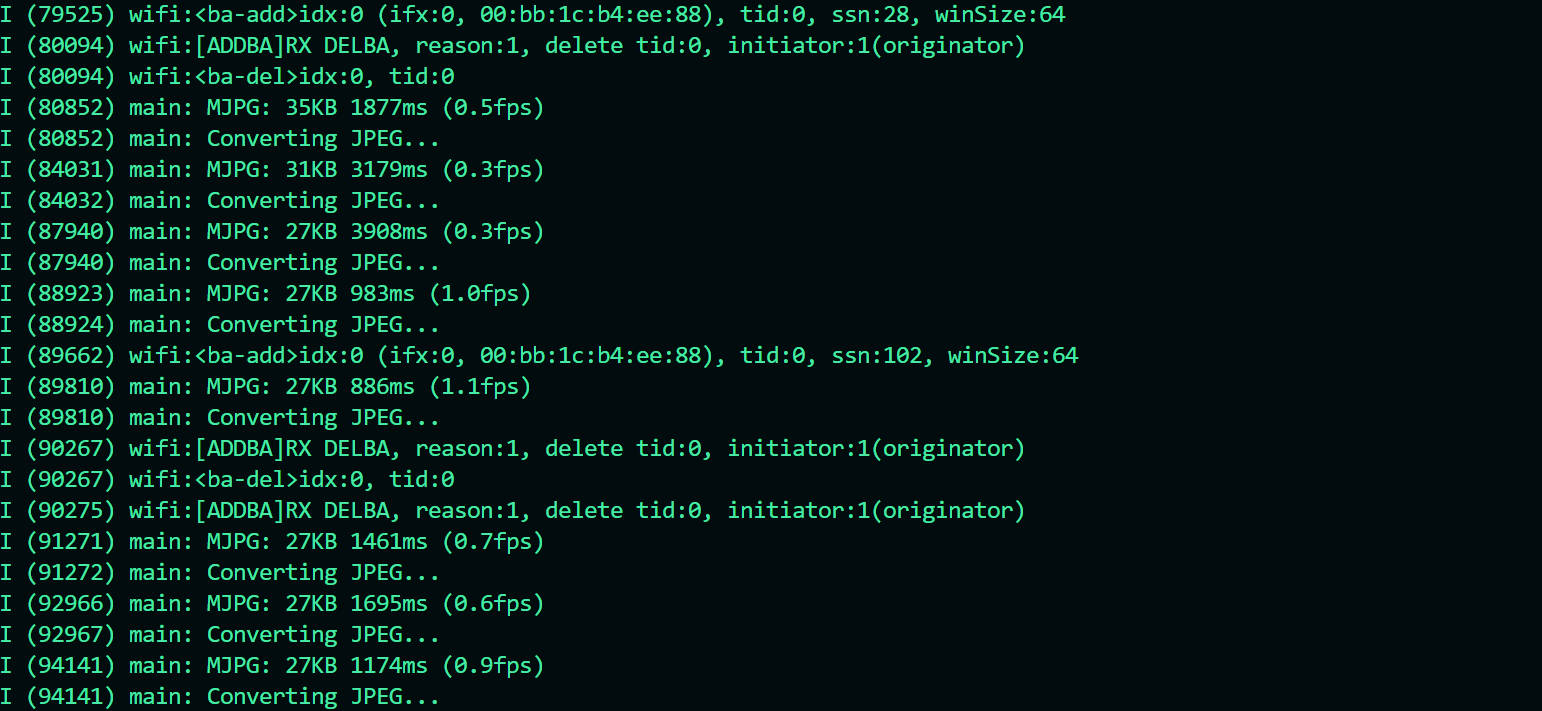
The firmware is developed using ESP-IDF. It utilizes the ESP32-CAM module to capture images, encodes them in MJPEG format, and uploads them to the web server over HTTP.
#include <esp_log.h>
#include <esp_system.h>
#include <nvs_flash.h>
#include <sys/param.h>
#include <string.h>
#include <driver/i2c.h>

#include "freertos/FreeRTOS.h"
#include "freertos/task.h"

#include "esp_netif.h"
#include "nvs_flash.h"
#include "esp_wifi.h"
#include "esp_event.h"

#include "esp_camera.h"
#include "esp_http_server.h"
#include "esp_timer.h"

#include "iperf_cmd.h"

#include "console_wifi.h"

#define PART_BOUNDARY "123456789000000000000987654321"
static const char *_STREAM_CONTENT_TYPE = "multipart/x-mixed-replace;boundary=" PART_BOUNDARY;
static const char *_STREAM_BOUNDARY = "\r\n--" PART_BOUNDARY "\r\n";
static const char *_STREAM_PART = "Content-Type: image/jpeg\r\nContent-Length: %u\r\n\r\n";

#define TAG "main"

esp_err_t jpg_stream_httpd_handler(httpd_req_t *req)
{
    camera_fb_t *fb = NULL;
    esp_err_t res = ESP_OK;
    size_t _jpg_buf_len;
    uint8_t *_jpg_buf;
    char *part_buf[64];
    static int64_t last_frame = 0;
    if (!last_frame)
    {
        last_frame = esp_timer_get_time();
    }

    res = httpd_resp_set_type(req, _STREAM_CONTENT_TYPE);
    if (res != ESP_OK)
    {
        return res;
    }

    while (true)
    {
        fb = esp_camera_fb_get();
        if (!fb)
        {
            ESP_LOGE(TAG, "Camera capture failed");
            res = ESP_FAIL;
            break;
        }
        if (fb->format != PIXFORMAT_JPEG)
        {
            ESP_LOGI(TAG, "Converting JPEG...");
            bool jpeg_converted = frame2jpg(fb, 80, &_jpg_buf, &_jpg_buf_len);
            if (!jpeg_converted)
            {
                ESP_LOGE(TAG, "JPEG compression failed");
                esp_camera_fb_return(fb);
                res = ESP_FAIL;
            }
        }
        else
        {
            _jpg_buf_len = fb->len;
            _jpg_buf = fb->buf;
        }

        if (res == ESP_OK)
        {
            res = httpd_resp_send_chunk(req, _STREAM_BOUNDARY, strlen(_STREAM_BOUNDARY));
        }
        if (res == ESP_OK)
        {
            size_t hlen = snprintf((char *)part_buf, 64, _STREAM_PART, _jpg_buf_len);

            res = httpd_resp_send_chunk(req, (const char *)part_buf, hlen);
        }
        if (res == ESP_OK)
        {
            res = httpd_resp_send_chunk(req, (const char *)_jpg_buf, _jpg_buf_len);
        }
        if (fb->format != PIXFORMAT_JPEG)
        {
            free(_jpg_buf);
        }
        esp_camera_fb_return(fb);
        if (res != ESP_OK)
        {
            break;
        }
        int64_t fr_end = esp_timer_get_time();
        int64_t frame_time = fr_end - last_frame;
        last_frame = fr_end;
        frame_time /= 1000;
        ESP_LOGI(TAG, "MJPG: %luKB %lums (%.1ffps)", (uint32_t)(_jpg_buf_len / 1024), (uint32_t)frame_time, 1000.0 / (uint32_t)frame_time);
    }

    last_frame = 0;
    return res;
}

#define CAM_PIN_PWDN  -1
#define CAM_PIN_RESET -1

#define CAM_PIN_VSYNC 38
#define CAM_PIN_HREF  47
#define CAM_PIN_PCLK  13
#define CAM_PIN_XCLK  10

#define CAM_PIN_SIOD 40
#define CAM_PIN_SIOC 39

#define CAM_PIN_D0 15
#define CAM_PIN_D1 17
#define CAM_PIN_D2 18
#define CAM_PIN_D3 16
#define CAM_PIN_D4 14
#define CAM_PIN_D5 12
#define CAM_PIN_D6 11
#define CAM_PIN_D7 48

static camera_config_t camera_config = {
    .pin_pwdn = CAM_PIN_PWDN,
    .pin_reset = CAM_PIN_RESET,
    .pin_xclk = CAM_PIN_XCLK,
    .pin_sccb_sda = CAM_PIN_SIOD,
    .pin_sccb_scl = CAM_PIN_SIOC,

    .pin_d7 = CAM_PIN_D7,
    .pin_d6 = CAM_PIN_D6,
    .pin_d5 = CAM_PIN_D5,
    .pin_d4 = CAM_PIN_D4,
    .pin_d3 = CAM_PIN_D3,
    .pin_d2 = CAM_PIN_D2,
    .pin_d1 = CAM_PIN_D1,
    .pin_d0 = CAM_PIN_D0,
    .pin_vsync = CAM_PIN_VSYNC,
    .pin_href = CAM_PIN_HREF,
    .pin_pclk = CAM_PIN_PCLK,

    .xclk_freq_hz = 20000000,
    .ledc_timer = LEDC_TIMER_0,
    .ledc_channel = LEDC_CHANNEL_0,

    .frame_size = FRAMESIZE_VGA,

    .jpeg_quality = 12, // 0-63, for OV series camera sensors, lower number means higher quality
    .fb_count = 2,      // When jpeg mode is used, if fb_count more than one, the driver will work in continuous mode.
    .fb_location = CAMERA_FB_IN_PSRAM,
    .grab_mode = CAMERA_FB_IN_PSRAM,
};

void app_main(void)
{
    ESP_ERROR_CHECK(esp_netif_init());
    ESP_ERROR_CHECK(esp_event_loop_create_default());
    esp_err_t ret = nvs_flash_init(); // Initialize NVS
    if (ret == ESP_ERR_NVS_NO_FREE_PAGES || ret == ESP_ERR_NVS_NEW_VERSION_FOUND)
    {
        ESP_ERROR_CHECK(nvs_flash_erase());
        ret = nvs_flash_init();
    }

    ESP_ERROR_CHECK(esp_camera_init(&camera_config));

    sensor_t *sensor = esp_camera_sensor_get();
    // sensor->set_vflip(sensor, 1);
    sensor->set_hmirror(sensor, 1);

    httpd_handle_t server = NULL;
    httpd_config_t config = HTTPD_DEFAULT_CONFIG();

    /* Use the URI wildcard matching function in order to
     * allow the same handler to respond to multiple different
     * target URIs which match the wildcard scheme */
    config.uri_match_fn = httpd_uri_match_wildcard;

    ESP_LOGI(TAG, "Starting HTTP Server on port: '%d'", config.server_port);
    ESP_ERROR_CHECK(httpd_start(&server, &config));

    /* URI handler for getting uploaded files */
    httpd_uri_t stream = {
        .uri = "/stream", // Match all URIs of type /path/to/file
        .method = HTTP_GET,
        .handler = jpg_stream_httpd_handler,
        .user_ctx = NULL // Pass server data as context
    };

    httpd_register_uri_handler(server, &stream);
    uint32_t frame_time = 0;

    // Initialize console REPL
    ESP_ERROR_CHECK(console_cmd_init());

    ESP_ERROR_CHECK(console_cmd_wifi_register());

    // start console REPL
    ESP_ERROR_CHECK(console_cmd_start());
}
1.1.2 Web Interface Implementation
I asked ChatGPT to write the HTML code for the webpage, and it gave me the following code:
Help me write a good-looking webpage that displays JPEG stream images. You should include an input field where the user can enter the JPEG stream URL.

\#define PART\_BOUNDARY "123456789000000000000987654321"
static const char \*\_STREAM\_CONTENT\_TYPE = "multipart/x-mixed-replace;boundary=" PART\_BOUNDARY;
static const char \*\_STREAM\_BOUNDARY = "\r\n--" PART\_BOUNDARY "\r\n";
static const char \*\_STREAM\_PART = "Content-Type: image/jpeg\r\nContent-Length: %u\r\n\r\n";
<!DOCTYPE html>
<html lang="en">
  <head>
    <meta charset="UTF-8" />
    <meta name="viewport" content="width=device-width, initial-scale=1.0" />
    <title>MJPEG Stream Viewer</title>
    <script src="https://cdn.tailwindcss.com"></script>
  </head>
  <body class="bg-gray-100 flex items-center justify-center min-h-screen p-4">
    <div class="bg-white p-6 rounded-xl shadow-md w-full max-w-2xl">
      <h1 class="text-2xl font-bold text-center mb-6">MJPEG Stream Viewer</h1>

      <div class="flex gap-2 mb-4">
        <input
          id="streamUrl"
          type="text"
          placeholder="Enter MJPEG Stream URL (e.g. http://192.168.x.x:81/stream)"
          class="flex-1 p-3 border border-gray-300 rounded text-sm"
        />
        <button
          onclick="startStream()"
          class="bg-blue-600 hover:bg-blue-700 text-white font-semibold px-4 py-2 rounded"
        >
          Load
        </button>
      </div>

      <div class="border rounded overflow-hidden shadow-inner">
        <img
          id="streamImage"
          class="w-full max-h-[600px] object-contain bg-black"
          alt="Stream will appear here"
        />
      </div>
    </div>

    <script>
      function startStream() {
        const input = document.getElementById("streamUrl");
        const img = document.getElementById("streamImage");
        const url = input.value.trim();

        if (!url) {
          alert("Please enter a valid MJPEG stream URL.");
          return;
        }

        img.src = url;
      }
    </script>
  </body>
</html>
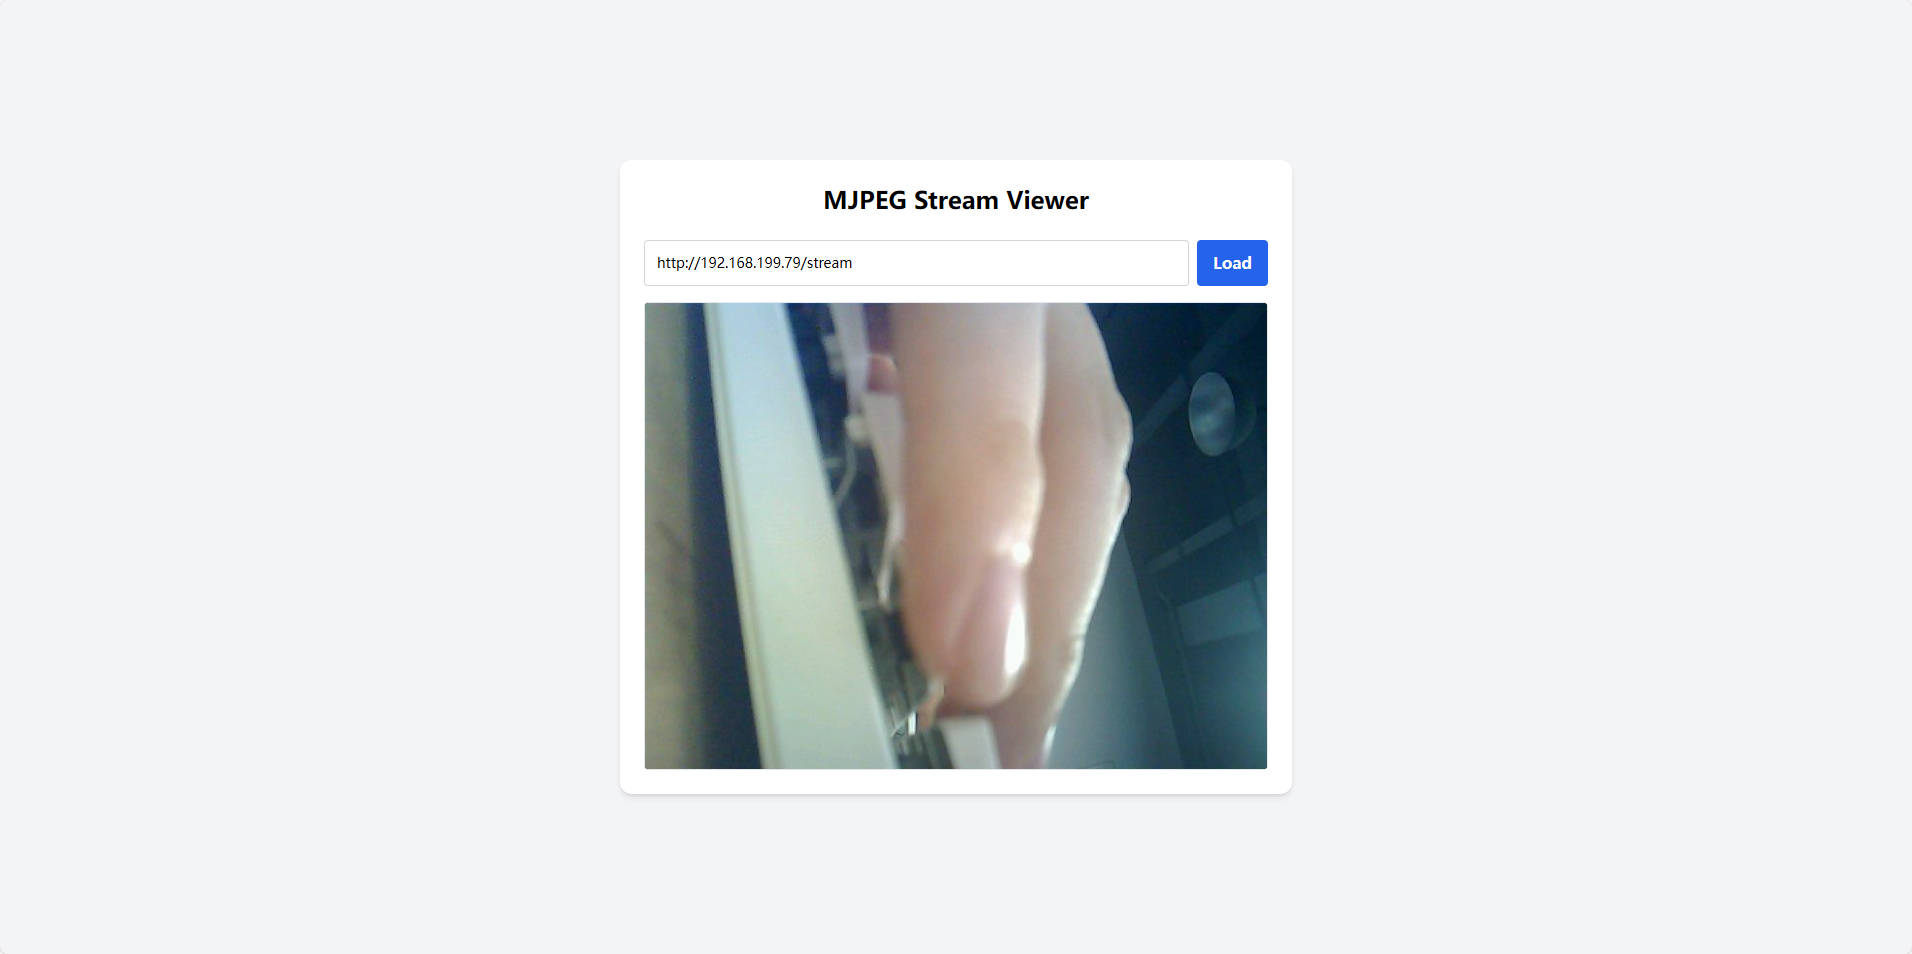
1.1.3 Demonstration
- The device successfully connects to Wi-Fi
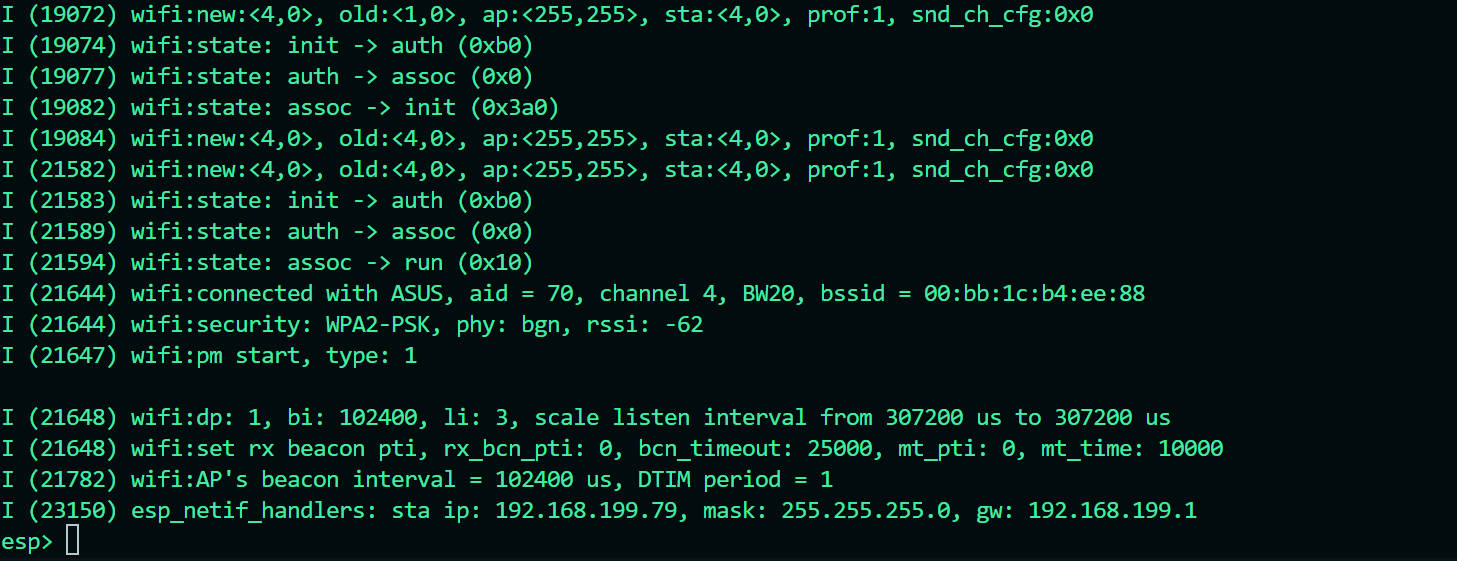
- The HTTP service starts successfully on the device
- Open the following web page in your browser:
MJPEG VIDEO. Enter the device’s IP address and click
“Load” to view the live video feed from the device.
1.2 Radio Station Controller
The device is controlled via the HTTP protocol to switch radio stations and adjust the volume. A simple web interface is used to send control commands.
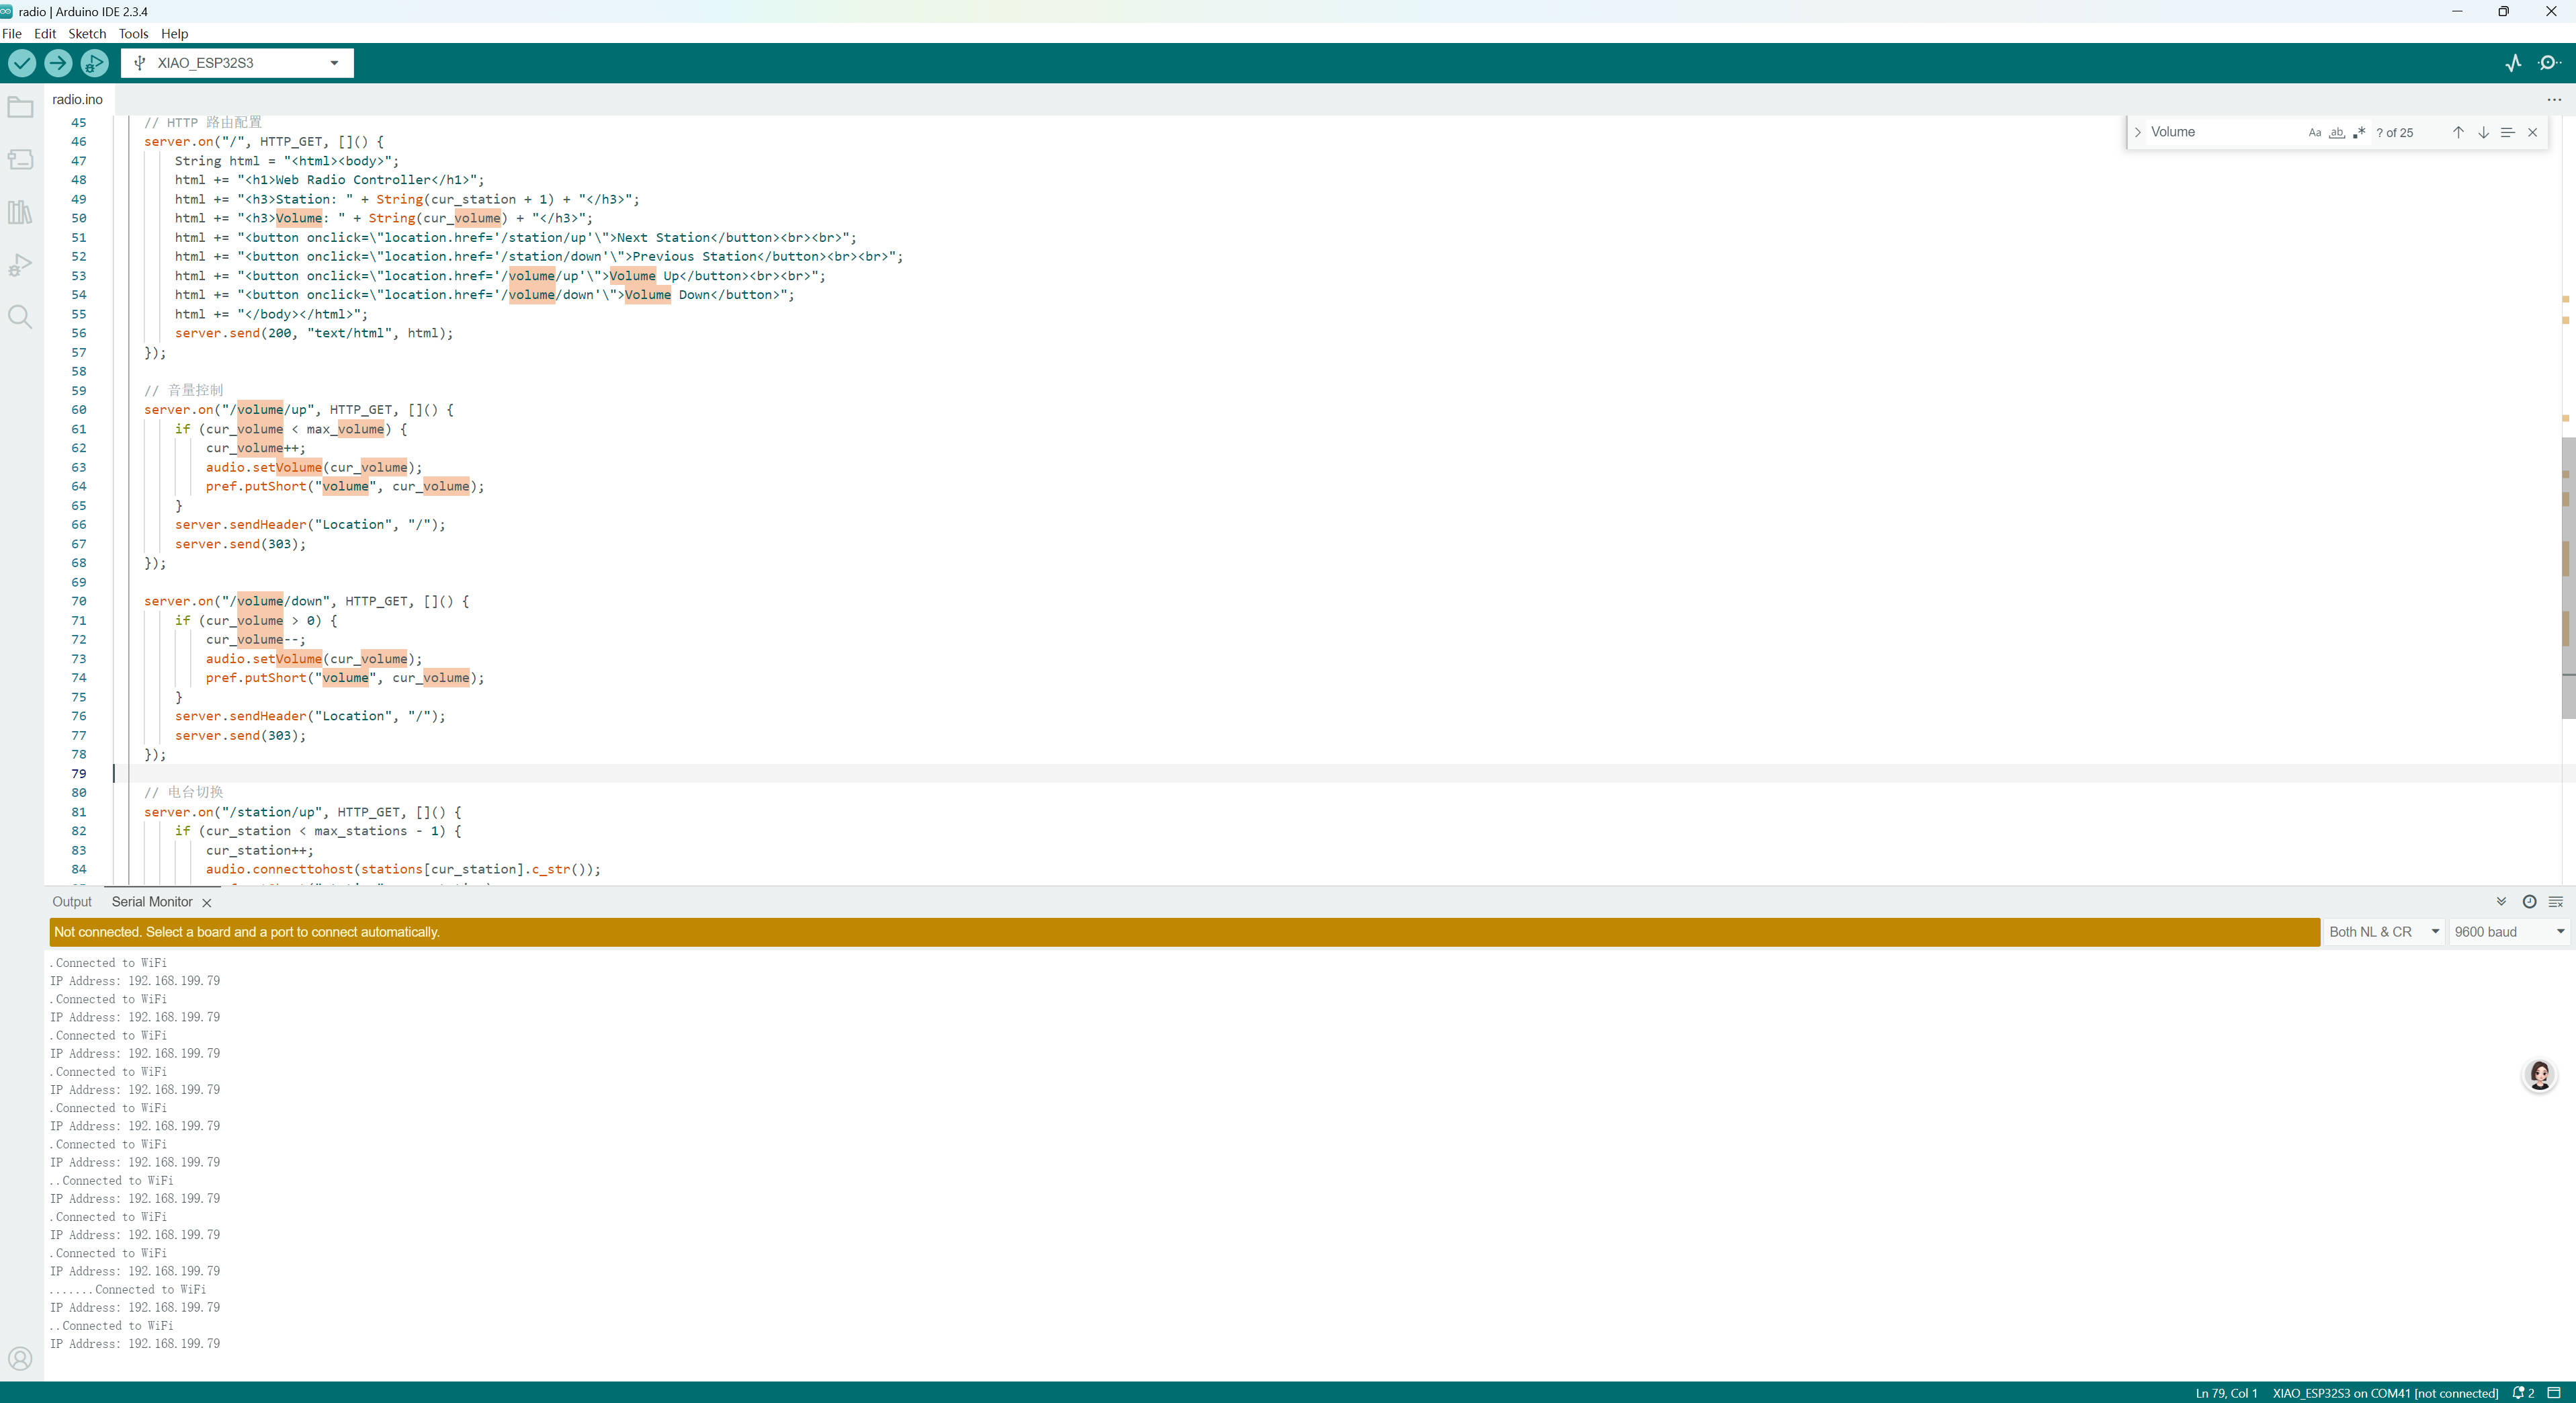
1.2.1 Device-Side Implementation
The firmware is developed using the Arduino IDE. Audio is played through the I2S interface, and the device responds to HTTP requests for control from the web page.
#include <Arduino.h>
#include <Preferences.h>
#include <WiFi.h>
#include <WebServer.h>
#include "Audio.h"

#define I2S_DOUT      1
#define I2S_BCLK      2
#define I2S_LRC       3

Preferences pref;
Audio audio;
WebServer server(80);

String ssid = "********";
String password = "******";

String stations[] ={
  "http://vis.media-ice.musicradio.com/CapitalMP3",
  "http://livestream.1766.today:1769/live1.mp3",
  "http://livestream.1766.today:1781/live2.mp3",

};

uint8_t max_volume = 100;
uint8_t max_stations = sizeof(stations) / sizeof(stations[0]);
uint8_t cur_station = 0;
uint8_t cur_volume = 50;

void setup() {
    Serial.begin(115200);
    WiFi.begin(ssid.c_str(), password.c_str());
    while (WiFi.status() != WL_CONNECTED) {
        delay(2000);
        Serial.print(".");
    }
    Serial.println("Connected to WiFi");
    Serial.print("IP Address: ");
    Serial.println(WiFi.localIP());

    audio.setPinout(I2S_BCLK, I2S_LRC, I2S_DOUT);
    audio.setVolume(cur_volume);
    audio.connecttohost(stations[cur_station].c_str());

    // HTTP Server
    server.on("/", HTTP_GET, []() {
        String html = "<html><body>";
        html += "<h1>Web Radio Controller</h1>";
        html += "<h3>Station: " + String(cur_station + 1) + "</h3>";
        html += "<h3>Volume: " + String(cur_volume) + "</h3>";
        html += "<button onclick=\"location.href='/station/up'\">Next Station</button><br><br>";
        html += "<button onclick=\"location.href='/station/down'\">Previous Station</button><br><br>";
        html += "<button onclick=\"location.href='/volume/up'\">Volume Up</button><br><br>";
        html += "<button onclick=\"location.href='/volume/down'\">Volume Down</button>";
        html += "</body></html>";
        server.send(200, "text/html", html);
    });

    // volume control
    server.on("/volume/up", HTTP_GET, []() {
        if (cur_volume < max_volume) {
            cur_volume++;
            audio.setVolume(cur_volume);
            pref.putShort("volume", cur_volume);
        }
        server.sendHeader("Location", "/");
        server.send(303);
    });

    server.on("/volume/down", HTTP_GET, []() {
        if (cur_volume > 0) {
            cur_volume--;
            audio.setVolume(cur_volume);
            pref.putShort("volume", cur_volume);
        }
        server.sendHeader("Location", "/");
        server.send(303);
    });

    // Radio Station Control
    server.on("/station/up", HTTP_GET, []() {
        if (cur_station < max_stations - 1) {
            cur_station++;
            audio.connecttohost(stations[cur_station].c_str());
            pref.putShort("station", cur_station);
        }
        server.sendHeader("Location", "/");
        server.send(303);
    });

    server.on("/station/down", HTTP_GET, []() {
        if (cur_station > 0) {
            cur_station--;
            audio.connecttohost(stations[cur_station].c_str());
            pref.putShort("station", cur_station);
        }
        server.sendHeader("Location", "/");
        server.send(303);
    });

    server.begin();
}

void loop() {
    server.handleClient();
    audio.loop();
}
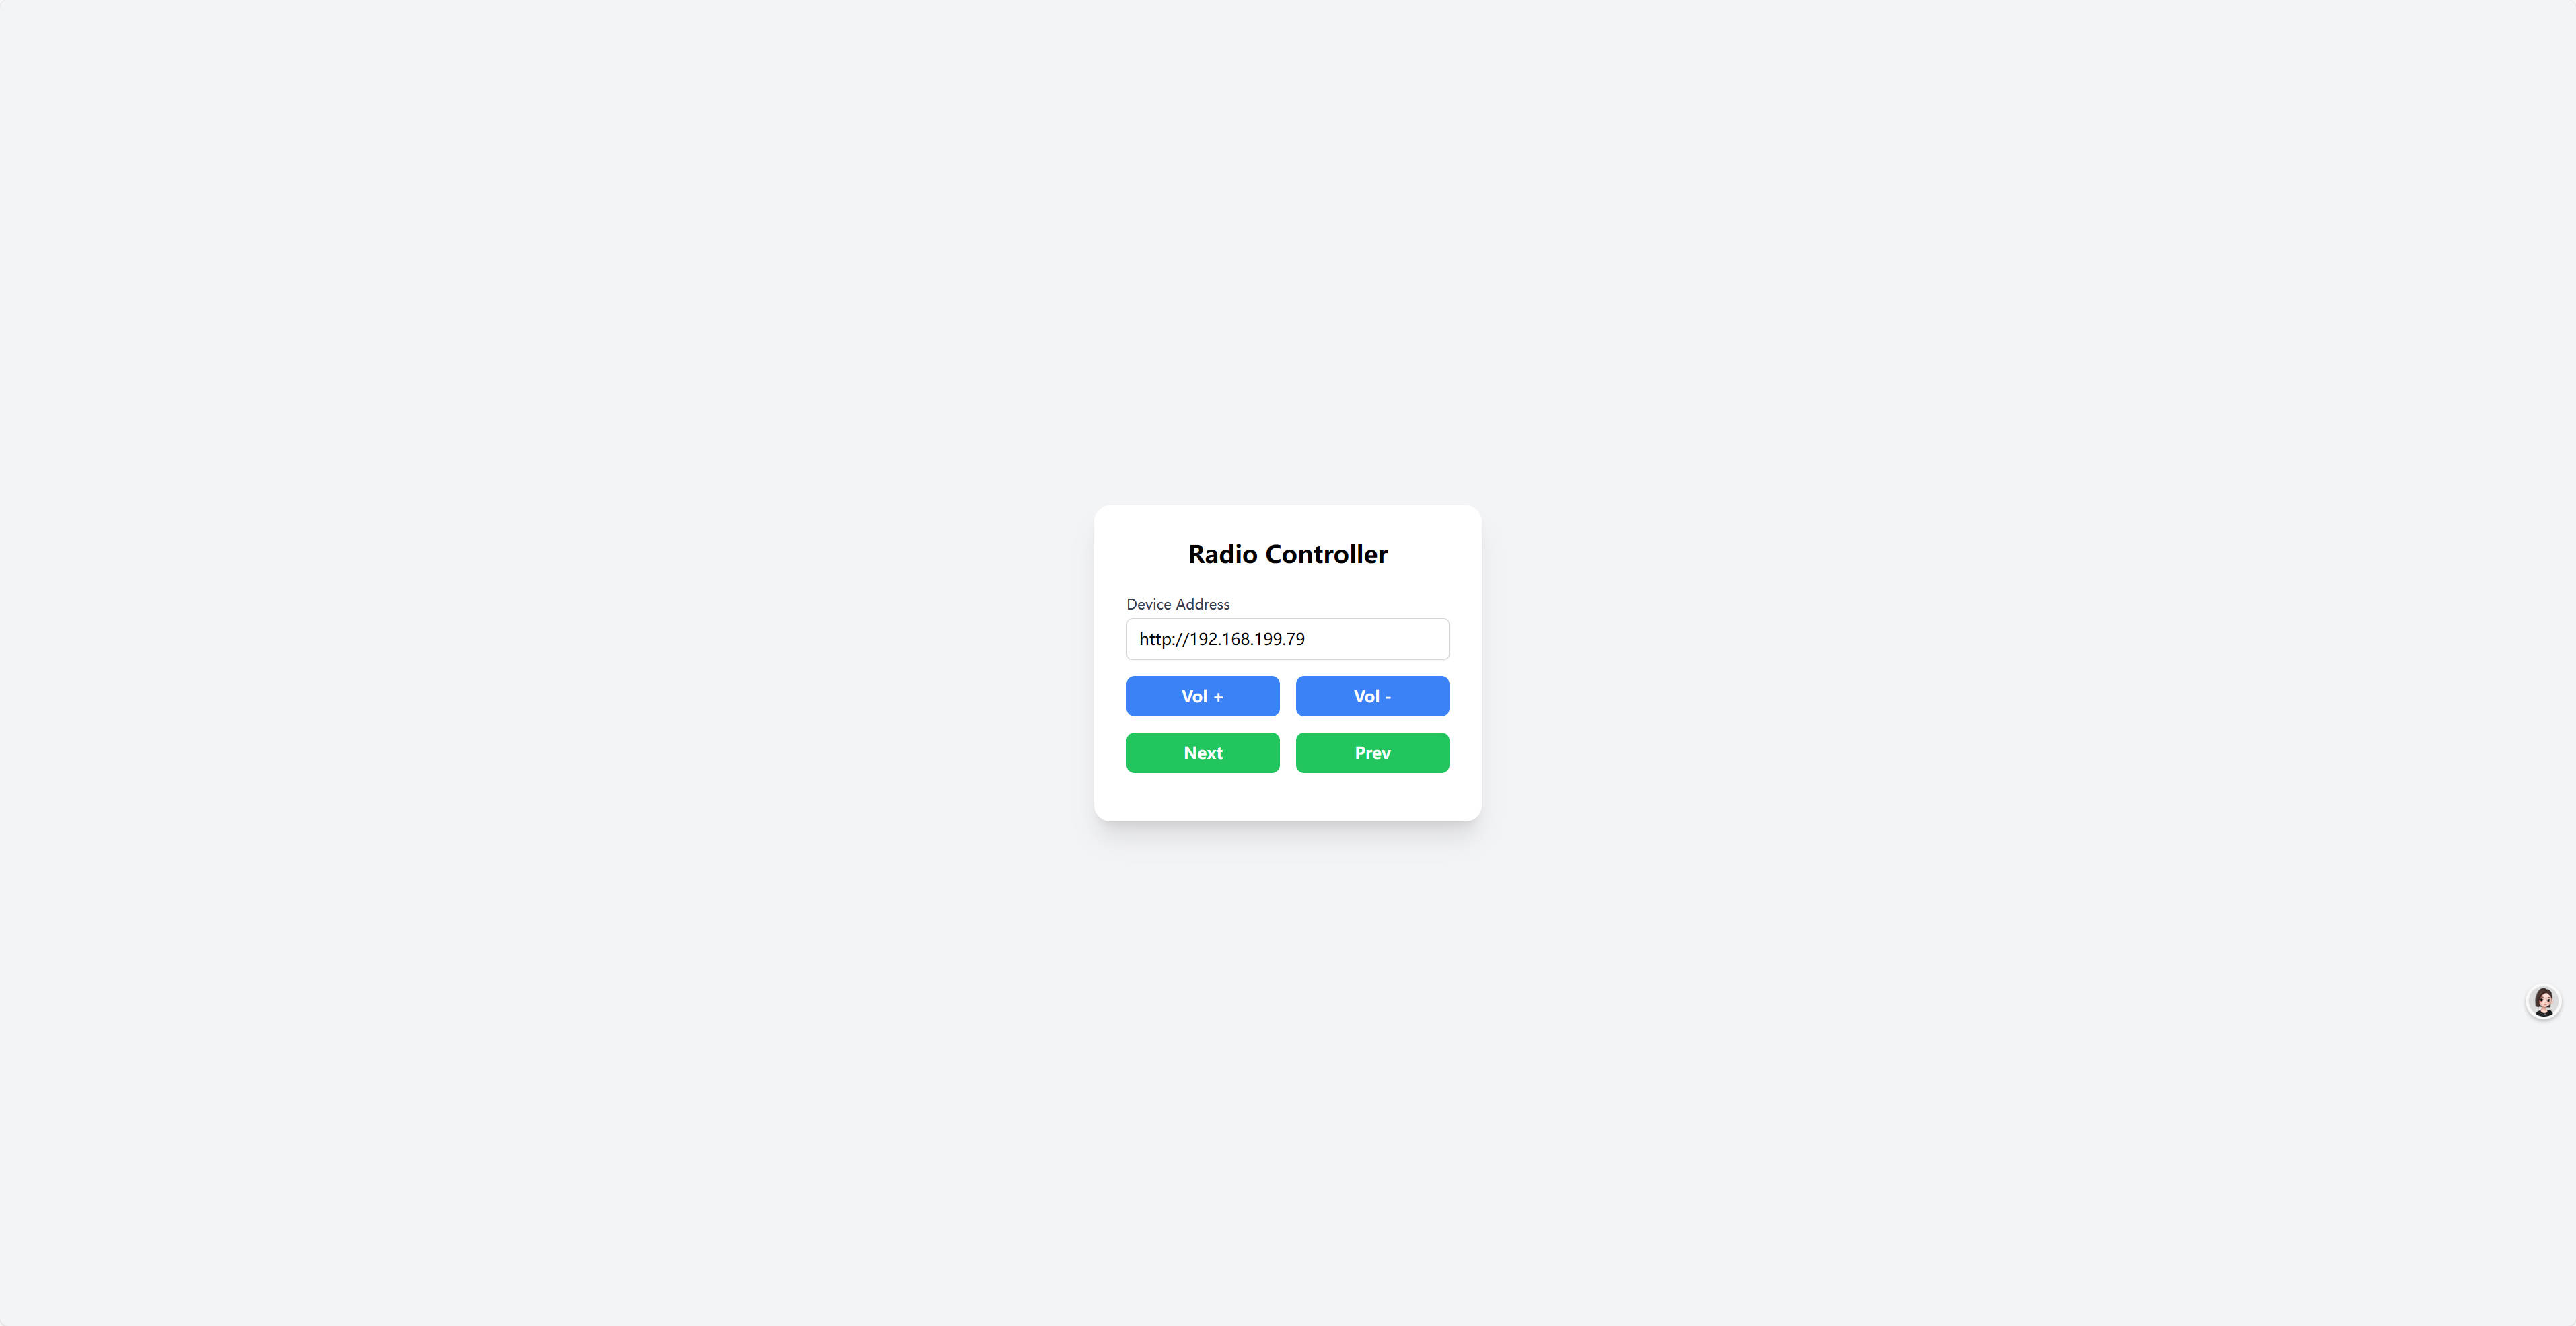
1.2.2 Web Interface
I used ChatGPT to help generate the web interface code. Below is the sample code it provided:
I have the following APIs to control a radio. Please help me create a nice-looking web page to control it. Make sure to include a field for entering the device address:
/volume/up
/volume/down
/station/up
/station/down
<!DOCTYPE html>
<html lang="en">
<head>
  <meta charset="UTF-8" />
  <meta name="viewport" content="width=device-width, initial-scale=1.0"/>
  <title>Radio Controller</title>
  <script src="https://cdn.tailwindcss.com"></script>
</head>
<body class="bg-gray-100 flex items-center justify-center min-h-screen">
  <div class="bg-white shadow-xl rounded-2xl p-8 max-w-sm w-full">
    <h1 class="text-2xl font-bold text-center mb-6">Radio Controller</h1>

    <div class="mb-4">
      <label for="deviceAddress" class="block text-sm font-medium text-gray-700">Device Address</label>
      <input id="deviceAddress" type="text" placeholder="http://192.168.1.100" class="mt-1 block w-full px-3 py-2 border border-gray-300 rounded-md shadow-sm focus:outline-none focus:ring-indigo-500 focus:border-indigo-500">
    </div>

    <div class="grid grid-cols-2 gap-4 mb-4">
      <button onclick="sendCommand('volume/up')" class="bg-blue-500 hover:bg-blue-600 text-white font-semibold py-2 rounded-lg">Vol +</button>
      <button onclick="sendCommand('volume/down')" class="bg-blue-500 hover:bg-blue-600 text-white font-semibold py-2 rounded-lg">Vol -</button>
      <button onclick="sendCommand('station/up')" class="bg-green-500 hover:bg-green-600 text-white font-semibold py-2 rounded-lg">Next</button>
      <button onclick="sendCommand('station/down')" class="bg-green-500 hover:bg-green-600 text-white font-semibold py-2 rounded-lg">Prev</button>
    </div>

    <div id="status" class="text-center text-sm text-gray-600"></div>
  </div>

  <script>
    function sendCommand(command) {
      const address = document.getElementById("deviceAddress").value;
      const status = document.getElementById("status");

      if (!address) {
        status.textContent = "Please enter a valid device address.";
        return;
      }

      fetch(`${address}/${command}`)
        .then(response => {
          if (response.ok) {
            status.textContent = `Command "${command}" sent successfully.`;
          } else {
            status.textContent = `Failed to send "${command}".`;
          }
        })
        .catch(error => {
          status.textContent = `Error: ${error.message}`;
        });
    }
  </script>
</body>
</html>
1.2.3 Demonstration
- The device successfully connects to Wi-Fi
- Open the following web page in your browser:
Radio Controller. Enter the device’s IP address and
click “Load” to view the live video feed from the device.