Week15 - Interface and Application Programming
File Sharing
The task of the assignment
- Individual assignment:
- Write an application that interfaces a user with an input &/or output device that you made
ESP32C3 Web Server
I have finished an assignment in week11, which contains interface for showing data on the website. I get the position data via BDS Antennia module and show the latitude and longitude information on the website, and embed on a map.
I would like to build a simple web server to display some sensing data.
A web server is a place where web pages are stored, processed, and served to web clients. A web client is just a web browser that we use on our computers and phones. A web client and a web server communicate using a special protocol known as Hypertext Transfer Protocol (HTTP).

In this protocol, a client starts a conversation by sending an HTTP request for a specific web page. The server then sends back the content of that web page or an error message if it can’t find it (like the famous 404 Error).
Station Mode is used for my assignment, ESP32C3 connects to an existing WiFi network.
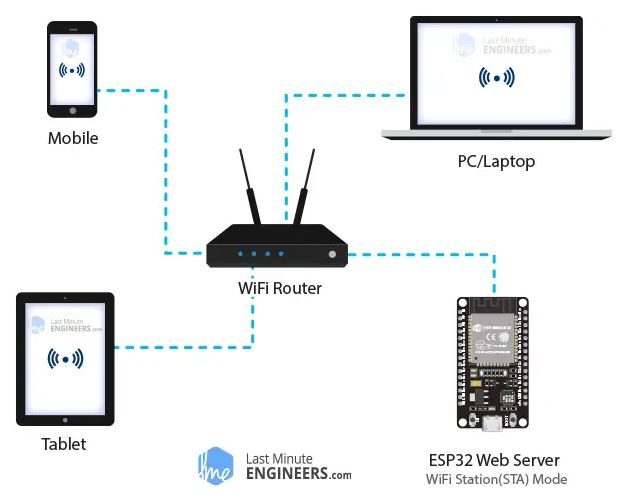
In STA mode, the ESP32 obtains an IP address from the wireless router to which it is connected. With this IP address, it can set up a web server and serve web pages to all connected devices on the existing WiFi network.
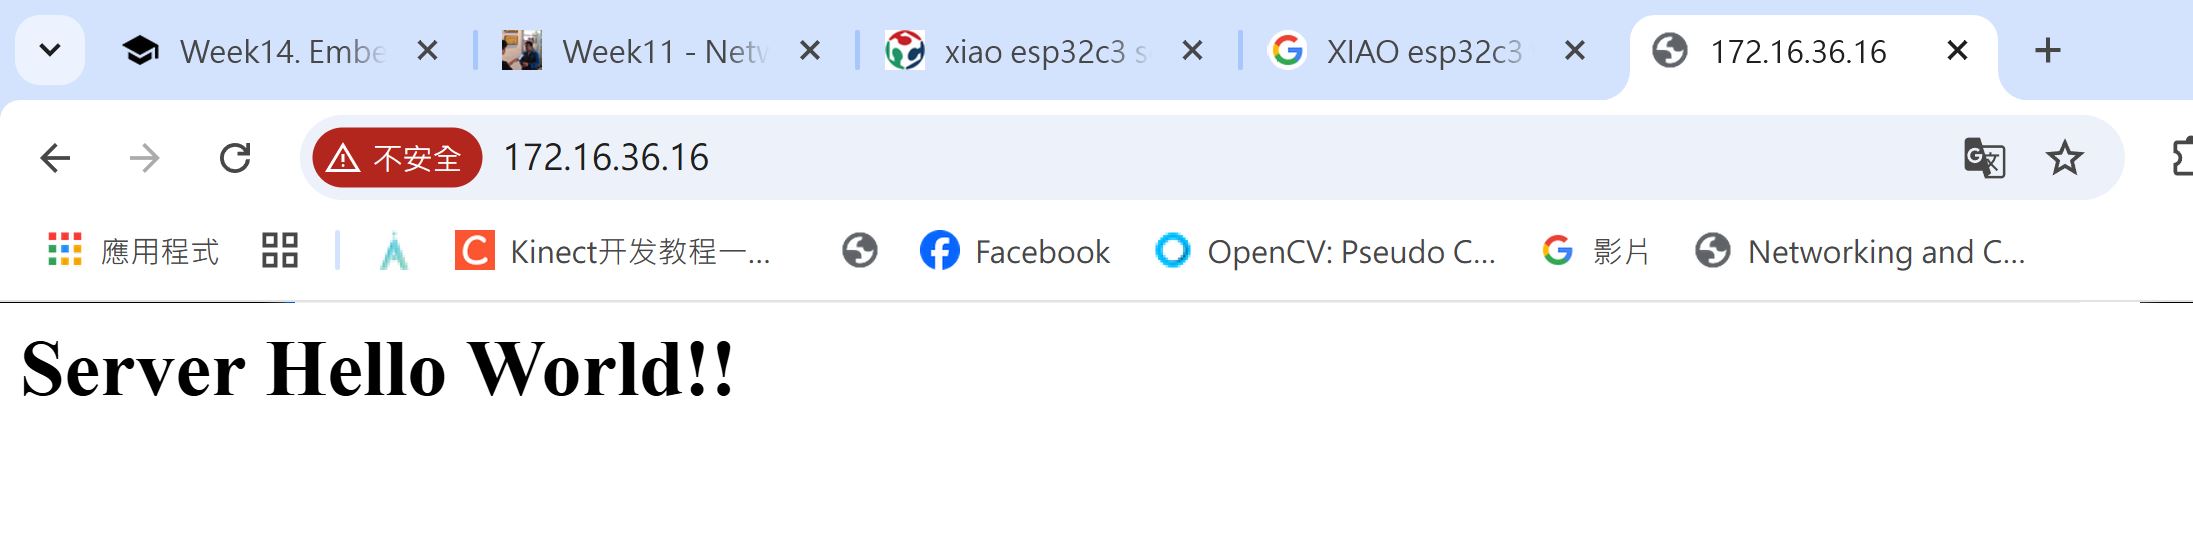
First, I built up a web server which connect to my WiFi network and show "Server Hello World!!" in a website.
Web server code
#include <WiFi.h>
#include <WebServer.h>

// Replace with your network credentials
const char* ssid = "yourssid";
const char* password = "password";

WebServer server(80); // Create a web server on port 80

void setup() {
  // Initialize serial communication
  Serial.begin(9600);
  while (!Serial); // Wait for Serial Monitor to open

  // Initialize WiFi
  WiFi.begin(ssid, password);
  Serial.println("Connecting to WiFi...");
  while (WiFi.status() != WL_CONNECTED) {
    delay(500);
    Serial.print(".");
  }
  Serial.println();
  Serial.println("Connected to WiFi");
  Serial.print("IP address: ");
  Serial.println(WiFi.localIP());

  // Define the web server route
  server.on("/", handleRoot);

  // Start the web server
  server.begin();
  Serial.println("HTTP server started");
}

void loop() {
  // Handle client requests
  server.handleClient();
}

void handleRoot() {

  // Print sensor data to Serial Monitor
  Serial.print("Server Hello World!!");


  String html = "<html><body>";
  html += "<h1>Server Hello World!!</h1>";
  html += "</body></html>";

  // Send the response to the client
  server.send(200, "text/html", html);
}
Here's the flowchart of the code.
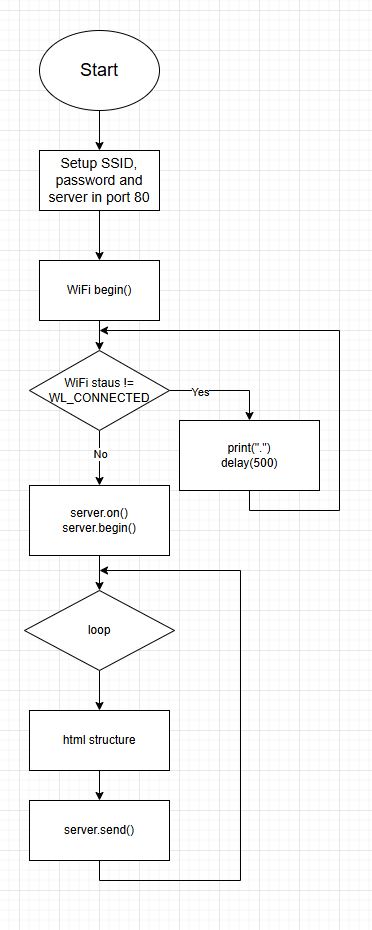
In setup function, the following code is used for initialize WiFi function and connecting WiFi by your microcontroller. As the server function is available with connecting to the wireless router, wifi.begin() function is essential.
// Initialize WiFi
  WiFi.begin(ssid, password);
  Serial.println("Connecting to WiFi...");
  while (WiFi.status() != WL_CONNECTED) {
    delay(500);
    Serial.print(".");
  }
There's a function handleRoot() in loop function, which is used for loading the raw html code. A text "Server Hello World!!" is shown in a website. In html variable, it's html structure.
void handleRoot() {

  // Print sensor data to Serial Monitor
  Serial.print("Server Hello World!!");


  String html = "<html><body>";
  html += "<h1>Server Hello World!!</h1>";
  html += "</body></html>";

  // Send the response to the client
  server.send(200, "text/html", html);
}

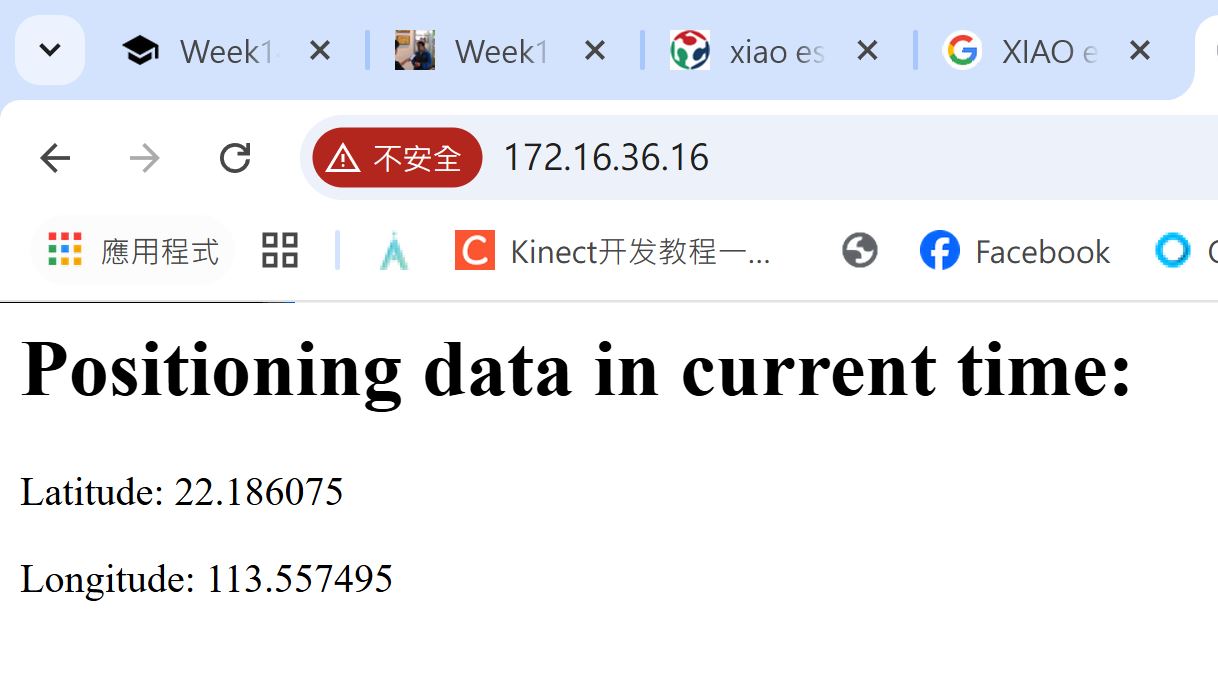
An IP address is generated after the web server is built. In this case, the IP address is 172.16.36.16. Input the IP address to the browser and the text "Server Hello World!!" is shown in the website.
In week 9, I learnt how to use the sensors to sense the enviroment. It's not general that observing the sensing data through the serial monitor.
It means a interface is needed for indicate the sensing data. Website is one of the general interface to show the sensing data more intuitive.
Refer to my week9 assignment, I built a BDS (Beidou Satellite System) antennia to receive the position data.
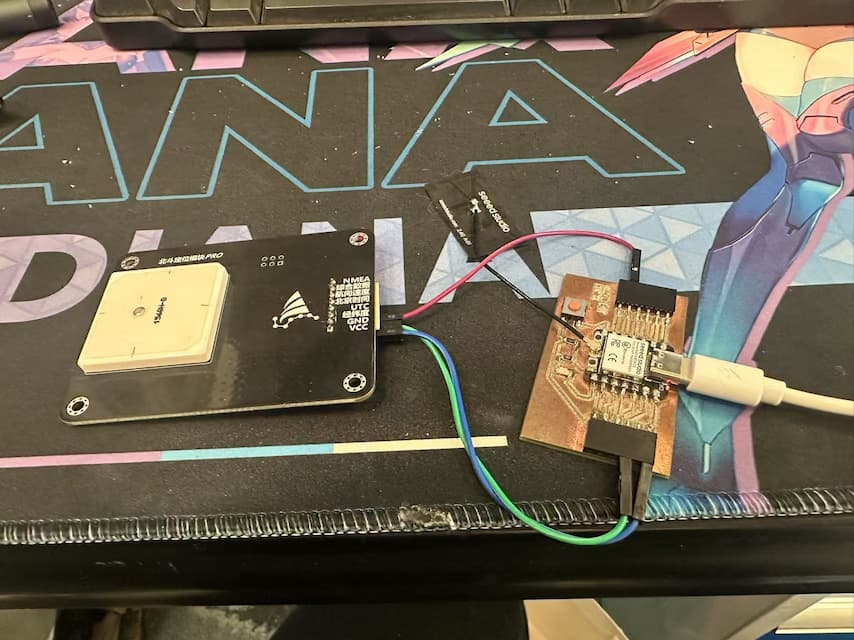
Then, I mix the sensing program to the web server and show the position data to the website through the following code.
Web server code with BDS positioning data
#include <WiFi.h>
#include <WebServer.h>
#include <SoftwareSerial.h>
SoftwareSerial MySerial(D4, D3);

// Replace with your network credentials
const char* ssid = "MSC-Person";
const char* password = "Msc@2333";

WebServer server(80); // Create a web server on port 80

void setup() {
  // Initialize serial communication
  Serial.begin(115200);
  MySerial.begin(9600); //Set 9600 baud rate to get the latitude/longitude information only.
  while (!Serial); // Wait for Serial Monitor to open

  // Initialize WiFi
  WiFi.begin(ssid, password);
  Serial.println("Connecting to WiFi...");
  while (WiFi.status() != WL_CONNECTED) {
    delay(500);
    Serial.print(".");
  }
  Serial.println();
  Serial.println("Connected to WiFi");
  Serial.print("IP address: ");
  Serial.println(WiFi.localIP());

  // Define the web server route
  server.on("/", handleRoot);

  // Start the web server
  server.begin();
  Serial.println("HTTP server started");
}

void loop() {
  // Handle client requests
  server.handleClient();
}

void handleRoot() {
  // Get position data from the Beidou Antennia
  // Get & Print BDS data to Serial Monitor
  String long_BD = "";
  String lat_BD = "";
  if(MySerial.available()!=0){
      long_BD = String(MySerial.readStringUntil(','));
      lat_BD = String(MySerial.readStringUntil('\r\n'));
      Serial.print(lat_BD);
      Serial.print(",");
      Serial.println(long_BD);
  }else{
    Serial.println("Nothing Read!!");
  }

  // Server Update hints
  Serial.println("Server Update Hint");

  /// HTML structure
  String html = "<html><body>";
  html += "<h1>Positioning data in current time:</h1>";
  html += "<p>Latitude: " + String(lat_BD) + "</p>" ;
  html += "<p>Longitude: " + String(long_BD) + "</p>" ;
  html += "</body></html>";

  // Send the response to the client
  server.send(200, "text/html", html);
}
The BDS antennia module sends the position data through UART communication and save them to the following variables: long_BD and lat_BD, which save longitude and latitude, respectively.
void handleRoot() {
  // Get position data from the Beidou Antennia
  // Get & Print BDS data to Serial Monitor
  String long_BD = "";
  String lat_BD = "";
  if(MySerial.available()!=0){
      long_BD = String(MySerial.readStringUntil(','));    //save the longitude data to long_BD
      lat_BD = String(MySerial.readStringUntil('\r\n'));  //save the latitude data to lat_BD
      Serial.print(lat_BD);
      Serial.print(",");
      Serial.println(long_BD);
  }else{
    Serial.println("Nothing Read!!");
  }

  // Server Update hints
  Serial.println("Server Update Hint");

  /// HTML structure
  String html = "<html><body>";
  html += "<h1>Positioning data in current time:</h1>";
  html += "<p>Latitude: " + String(lat_BD) + "</p>" ;
  html += "<p>Longitude: " + String(long_BD) + "</p>" ;
  html += "</body></html>";

  // Send the response to the client
  server.send(200, "text/html", html);
}
Then, I can see the position data in the website.
The latitude, longitude information is shown in the website.
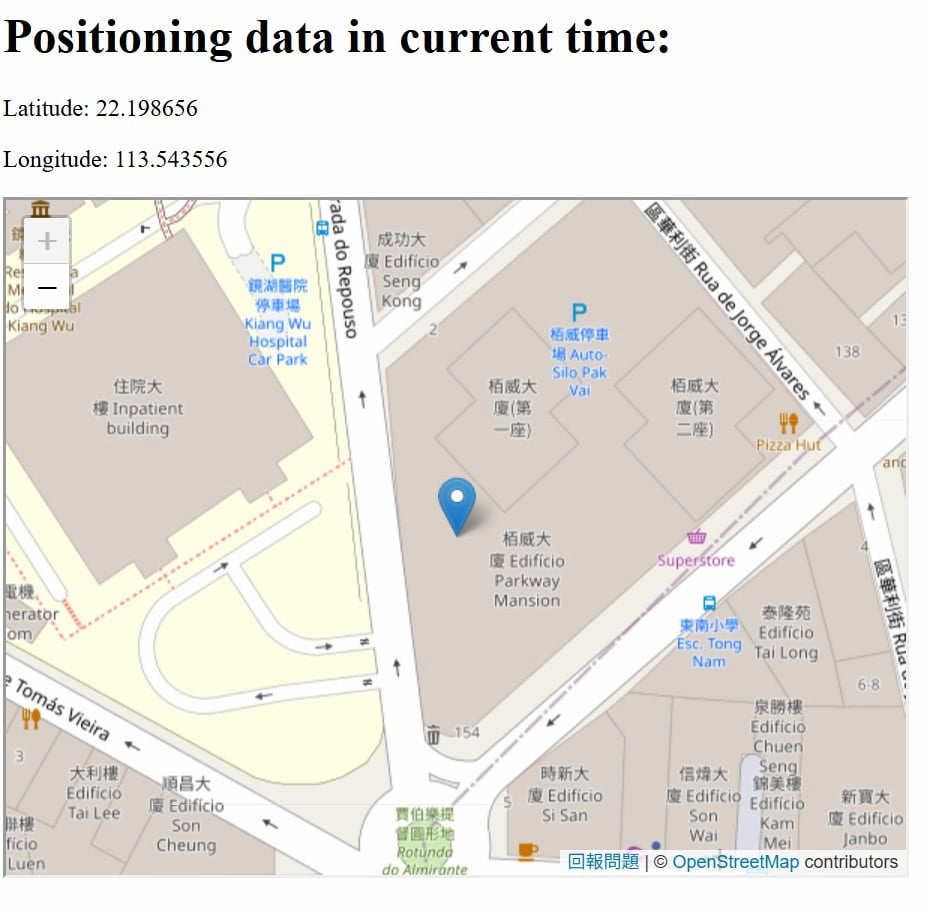
Then, I embed the openstreetmap to the web server and the position data can be shown on the map!!
Here's the code which updated for embedding openstreetmap.
Web server code with openstreetmap
#include <WiFi.h>
#include <WebServer.h>
#include <SoftwareSerial.h>
SoftwareSerial MySerial(D4, D3);

// Replace with your network credentials
const char* ssid = "yourssid";
const char* password = "password";

WebServer server(80); // Create a web server on port 80

void setup() {
  // Initialize serial communication
  Serial.begin(115200);
  MySerial.begin(9600); //Set 9600 baud rate to get the latitude/longitude information only.
  while (!Serial); // Wait for Serial Monitor to open

  // Initialize WiFi
  WiFi.begin(ssid, password);
  Serial.println("Connecting to WiFi...");
  while (WiFi.status() != WL_CONNECTED) {
    delay(500);
    Serial.print(".");
  }
  Serial.println();
  Serial.println("Connected to WiFi");
  Serial.print("IP address: ");
  Serial.println(WiFi.localIP());

  // Define the web server route
  server.on("/", handleRoot);

  // Start the web server
  server.begin();
  Serial.println("HTTP server started");
}

void loop() {
  // Handle client requests
  server.handleClient();
}

void handleRoot() {
  // Get position data from the Beidou Antennia
  // Get & Print BDS data to Serial Monitor
  String long_BD = "";
  String lat_BD = "";
  if(MySerial.available()!=0){
      long_BD = String(MySerial.readStringUntil(','));
      lat_BD = String(MySerial.readStringUntil('\r\n'));
      Serial.print(lat_BD);
      Serial.print(",");
      Serial.println(long_BD);
  }else{
    Serial.println("Nothing Read!!");
  }

  // Server Update hints
  Serial.println("Server Update Hint");

  // Size of the map
  String size_length1_map = String(long_BD.toDouble() - 0.00025, 6);
  String size_length2_map = String(long_BD.toDouble() + 0.00025, 6);
  String size_height1_map = String(lat_BD.toDouble() - 0.00025, 6);
  String size_height2_map = String(lat_BD.toDouble() + 0.00025, 6);

  /// HTML structure
  String html = "<html><body>";
  String url_map = "https://www.openstreetmap.org/export/embed.html?bbox="+ size_length1_map +"%2C" + size_height1_map + "%2C"+ size_length2_map +"%2C" + size_height2_map + "&layer=mapnik&marker="+ String(lat_BD.toDouble(),6) +"%2C" + String(long_BD.toDouble(),6);
  Serial.println(url_map);
  html += "<h1>Positioning data in current time:</h1>";
  html += "<p>Latitude: " + String(lat_BD) + "</p>" ;
  html += "<p>Longitude: " + String(long_BD) + "</p>" ;
  html += "<iframe src=" + url_map + " width=" + String(600) + " height=" + String(450) + "></iframe>";
  html += "</body></html>";

  // Send the response to the client
  server.send(200, "text/html", html);
}
A link for openstreetmap is essentail for embedding the map into the web server. It need the position data and insert the data into the link. I insert the position data through adding the string with the position variables in function handleRoot().
String html = "<html><body>";
  String url_map = "https://www.openstreetmap.org/export/embed.html?bbox="+ size_length1_map +"%2C" + size_height1_map + "%2C"+ size_length2_map +"%2C" + size_height2_map + "&layer=mapnik&marker="+ String(lat_BD.toDouble(),6) +"%2C" + String(long_BD.toDouble(),6);
  Serial.println(url_map);
  html += "<h1>Positioning data in current time:</h1>";
  html += "<p>Latitude: " + String(lat_BD) + "</p>" ;
  html += "<p>Longitude: " + String(long_BD) + "</p>" ;
  html += "<iframe src=" + url_map + " width=" + String(600) + " height=" + String(450) + "></iframe>";
  html += "</body></html>";
MQTT connect with XIAO boards through MQTT Dash App
I am going to use Arduino IDE to write an application that interfaces a user, which control the switch and color conversion of lights remotely.
Refer to Dion-Tsang's assignment, something should be setup.
Configuring MQTT Dash App
MQTT Dash is one of the best free apps for using MQTT on your smartphone. It has a very nice interface with many graphic resources and is very simple to use.
This app can be downloaded in Google Play or install apk.
Here's a example.
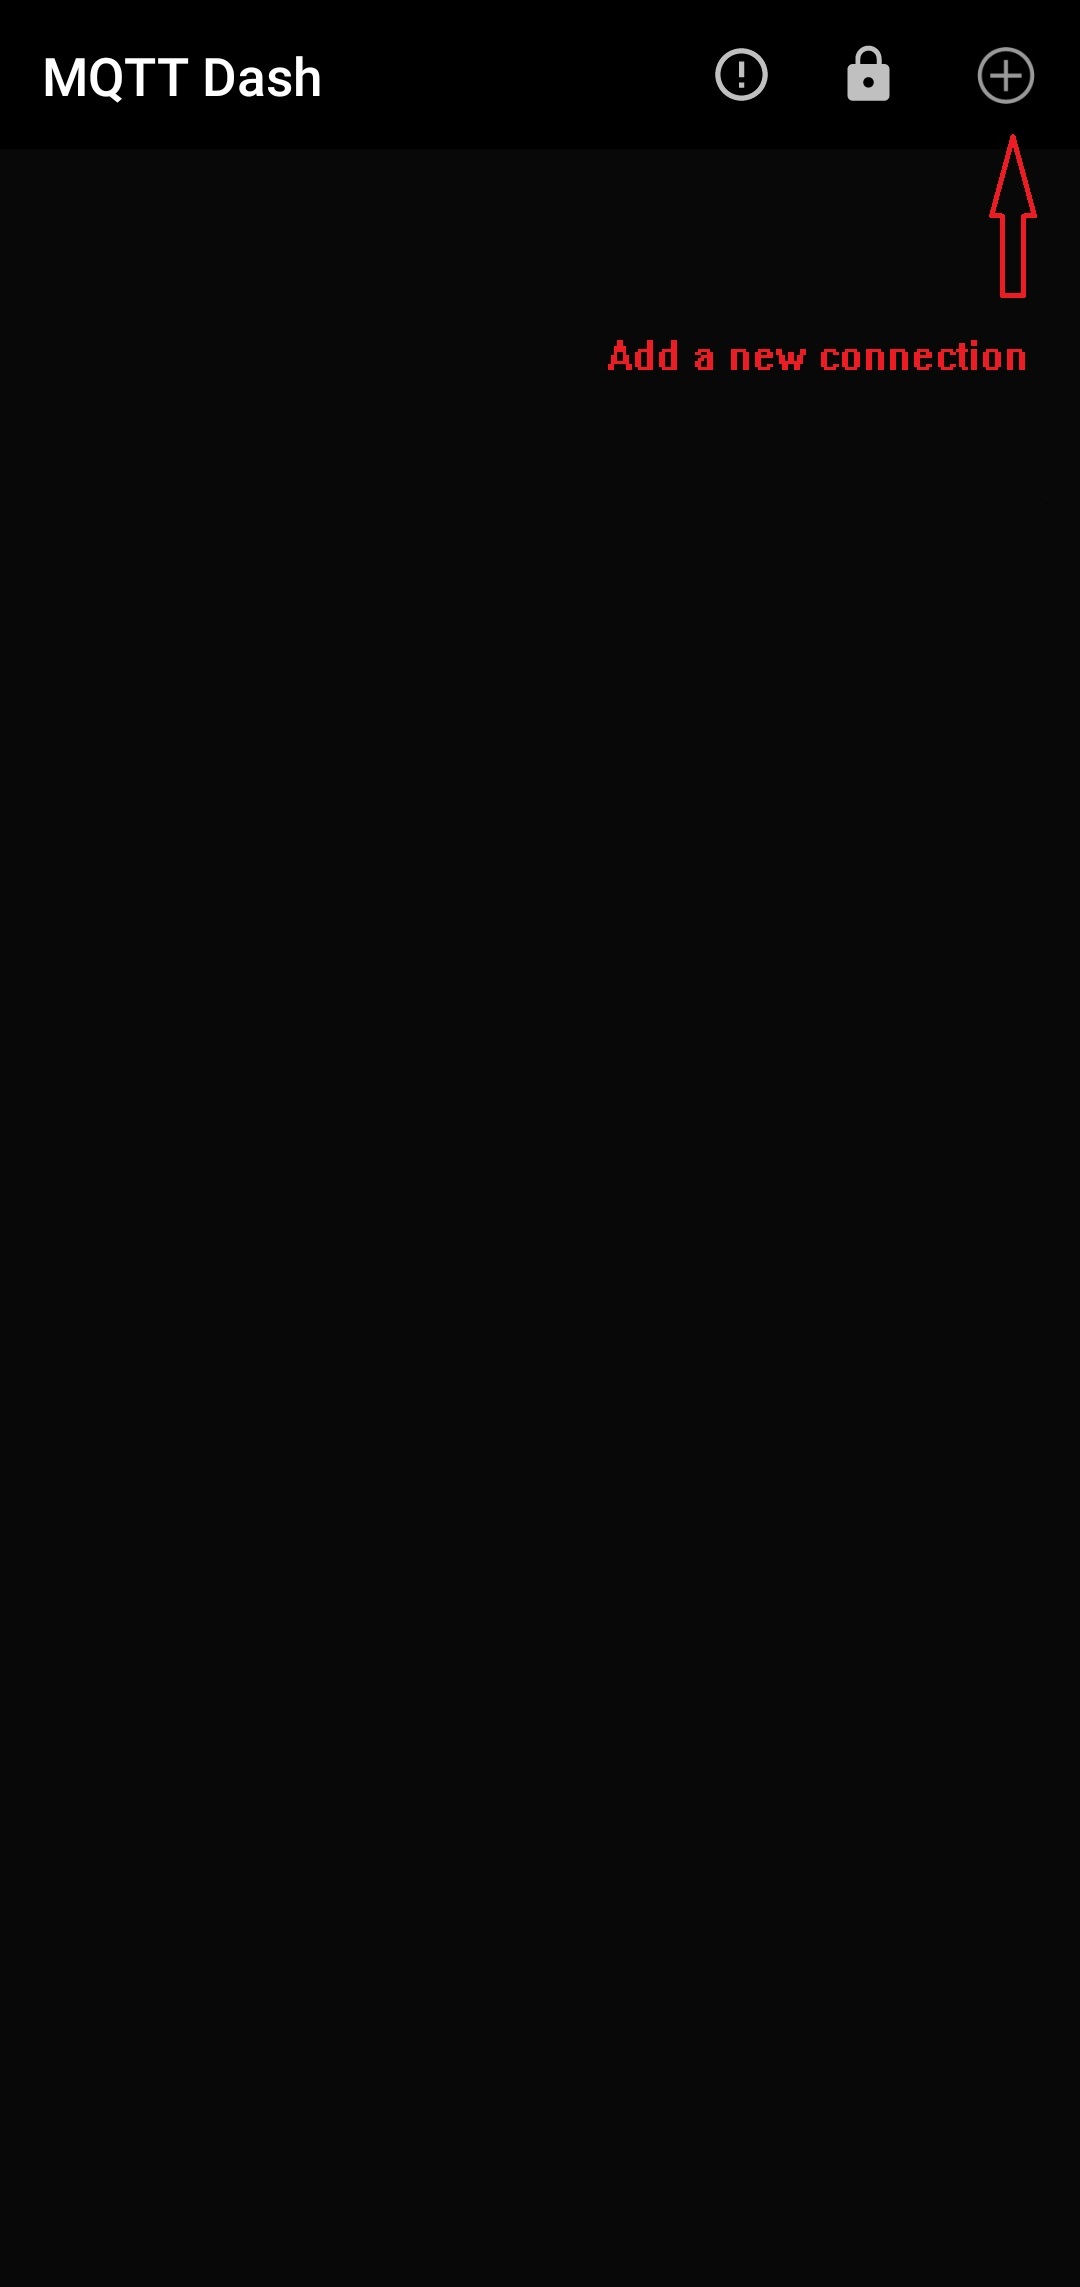
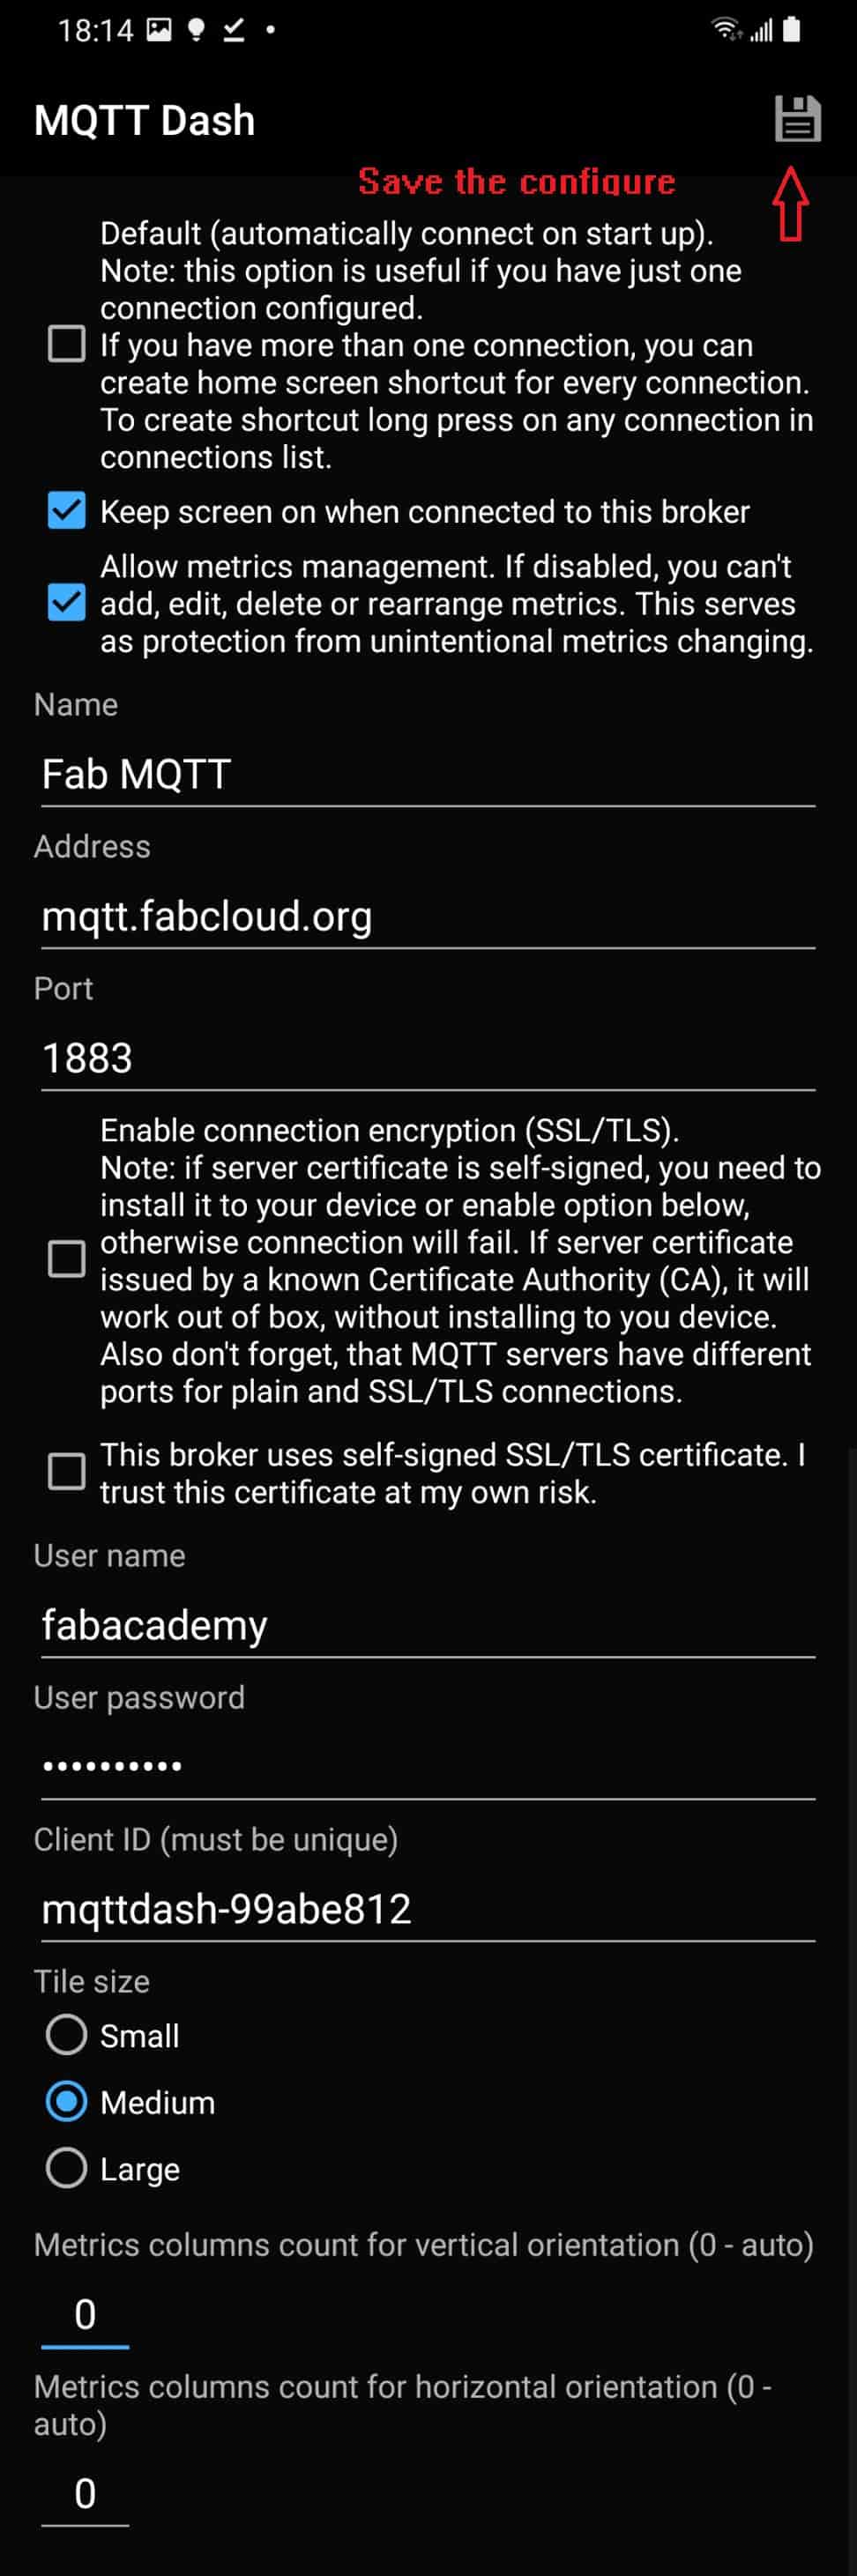
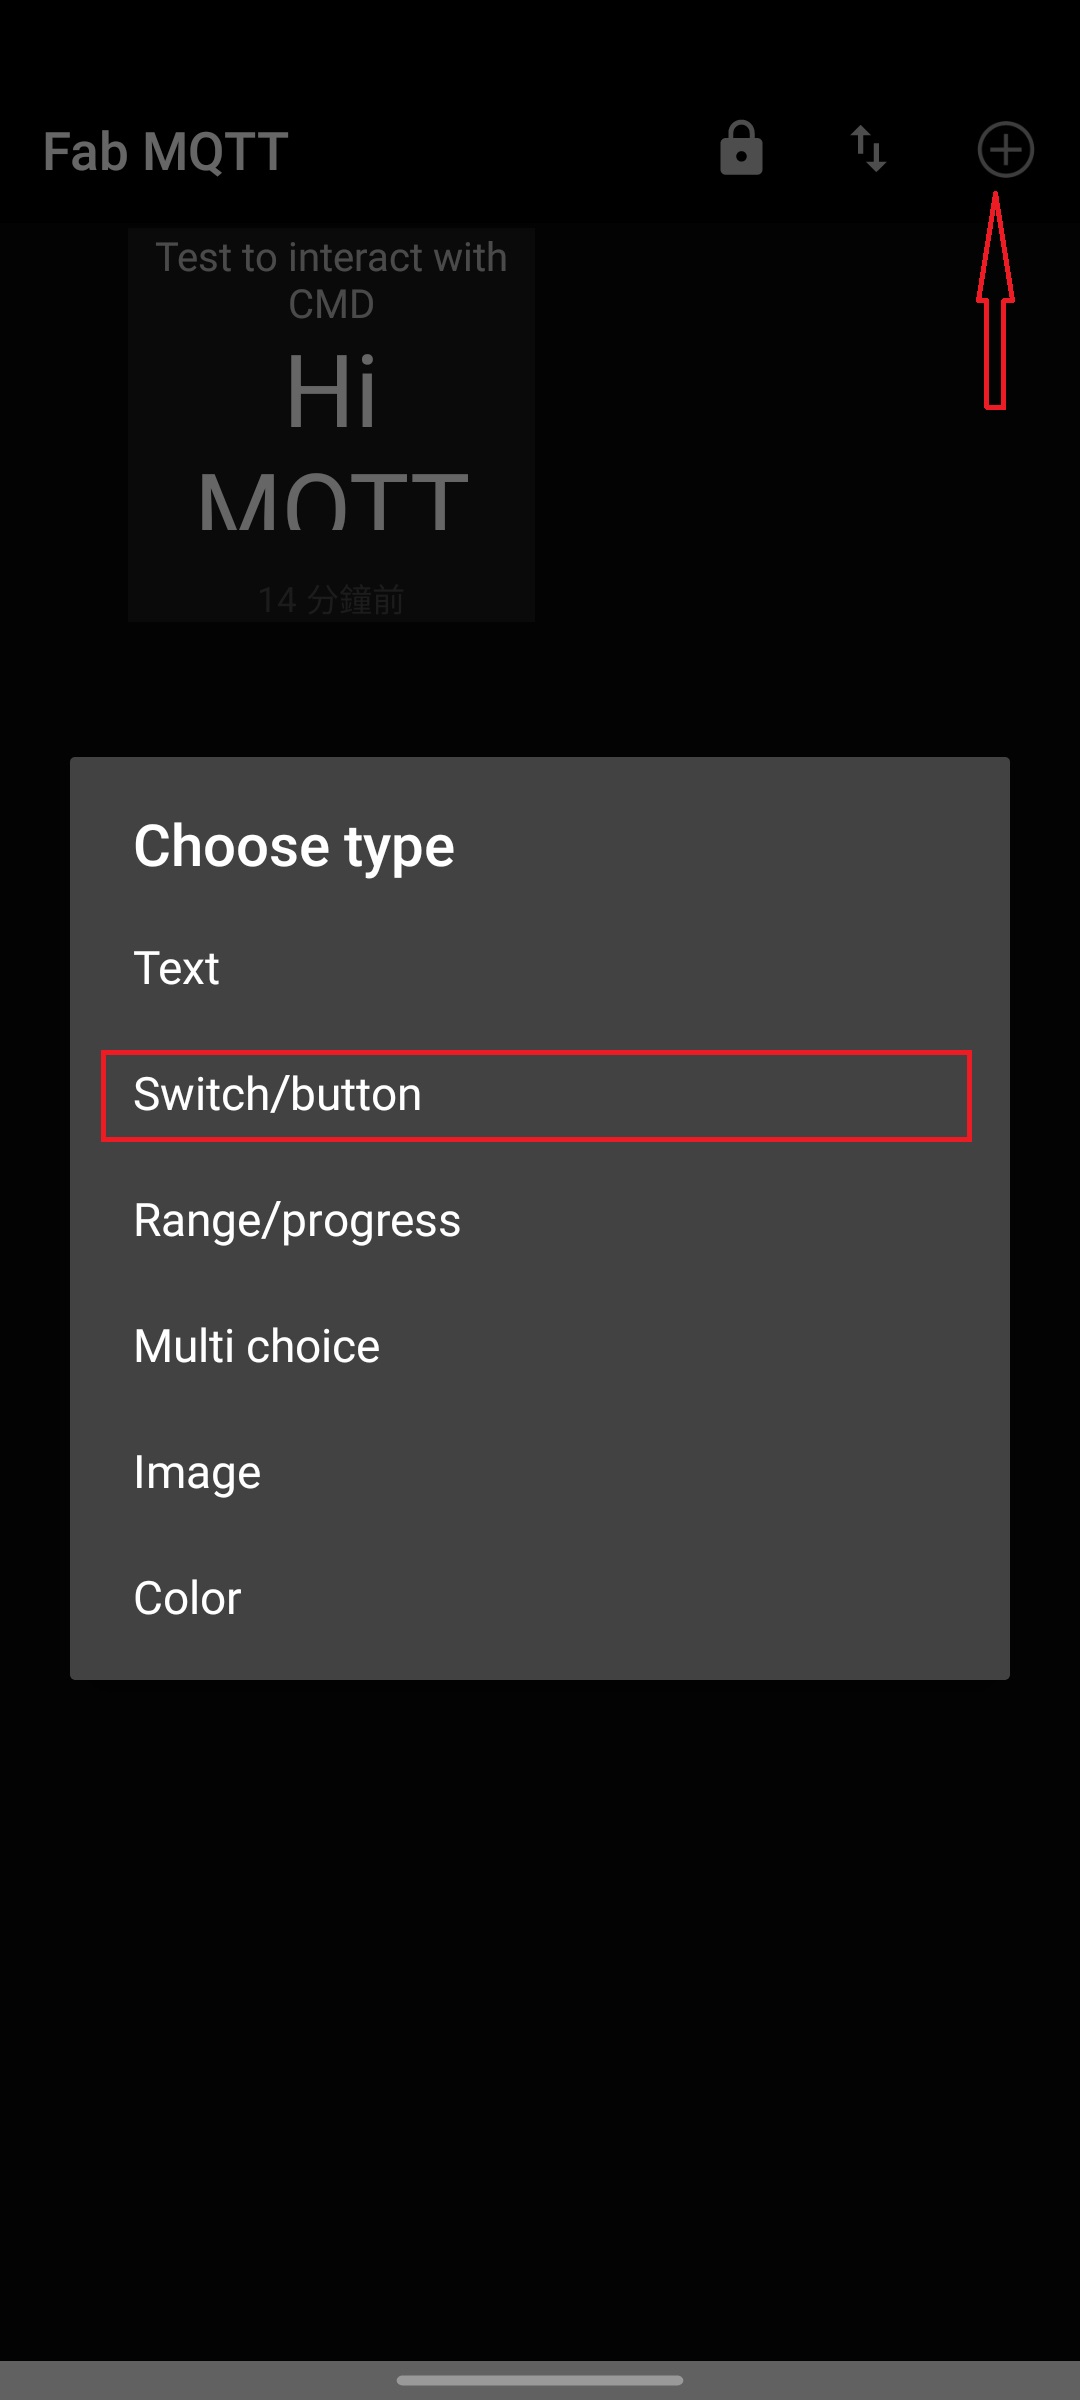
First, setup up a new connection by pressing "+".
The following information will be entered:
- Name
- Address
- Port
- User Name
- User Password
In my tiral this time, I need to use the information that MQTT broker provided by Pro. Neil Gershenfeld.
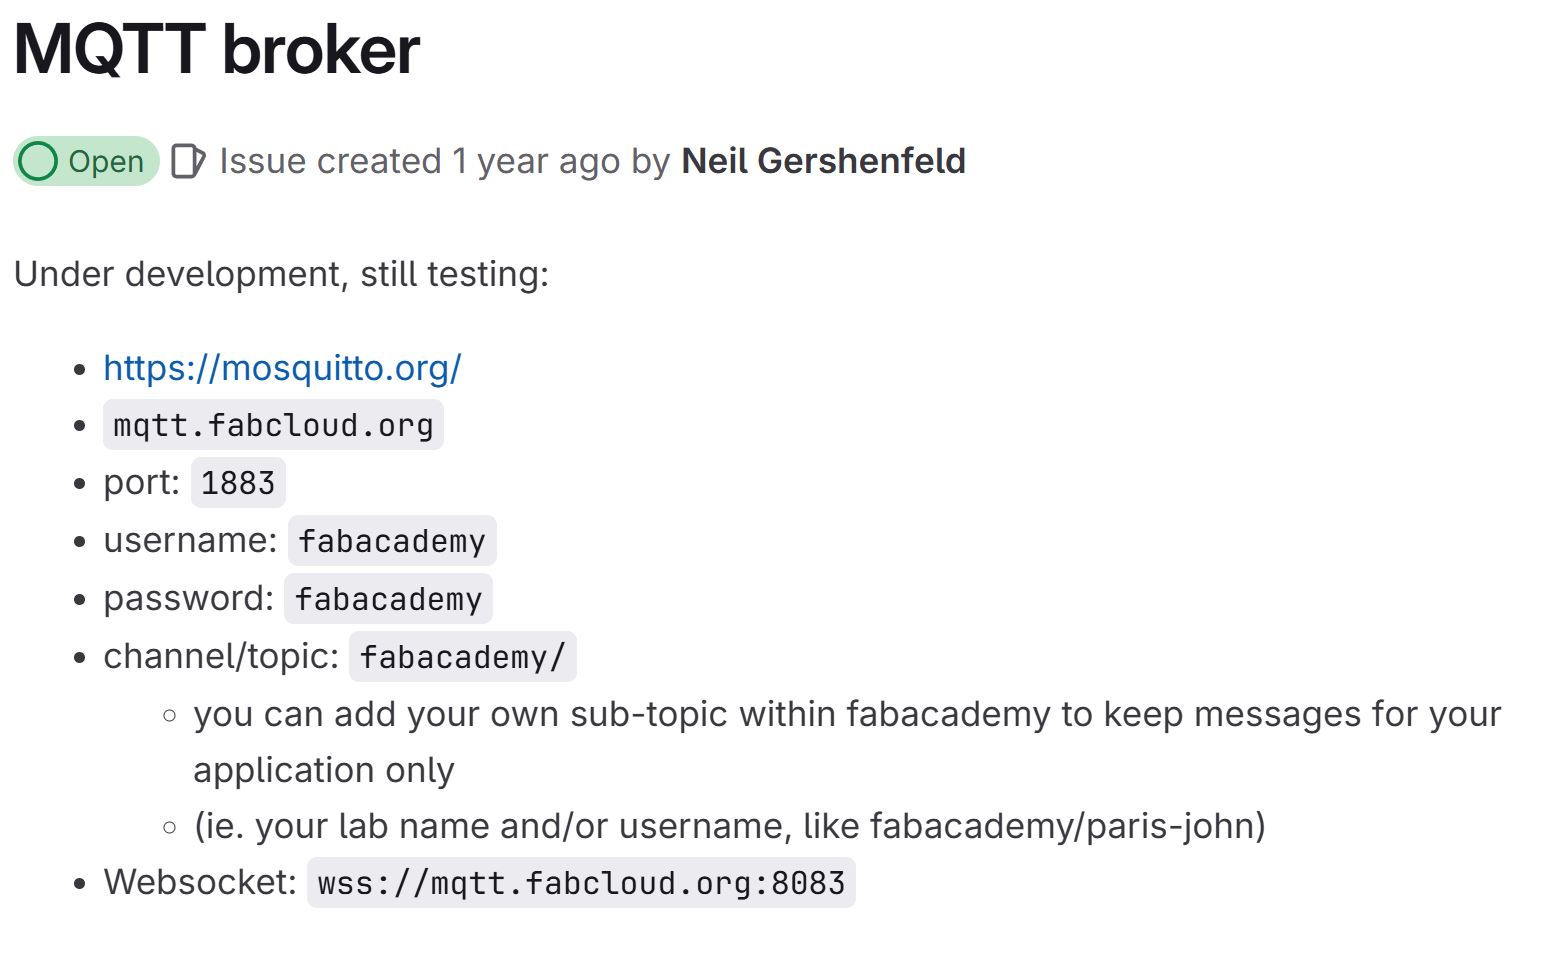
Input the setting and save the configure.
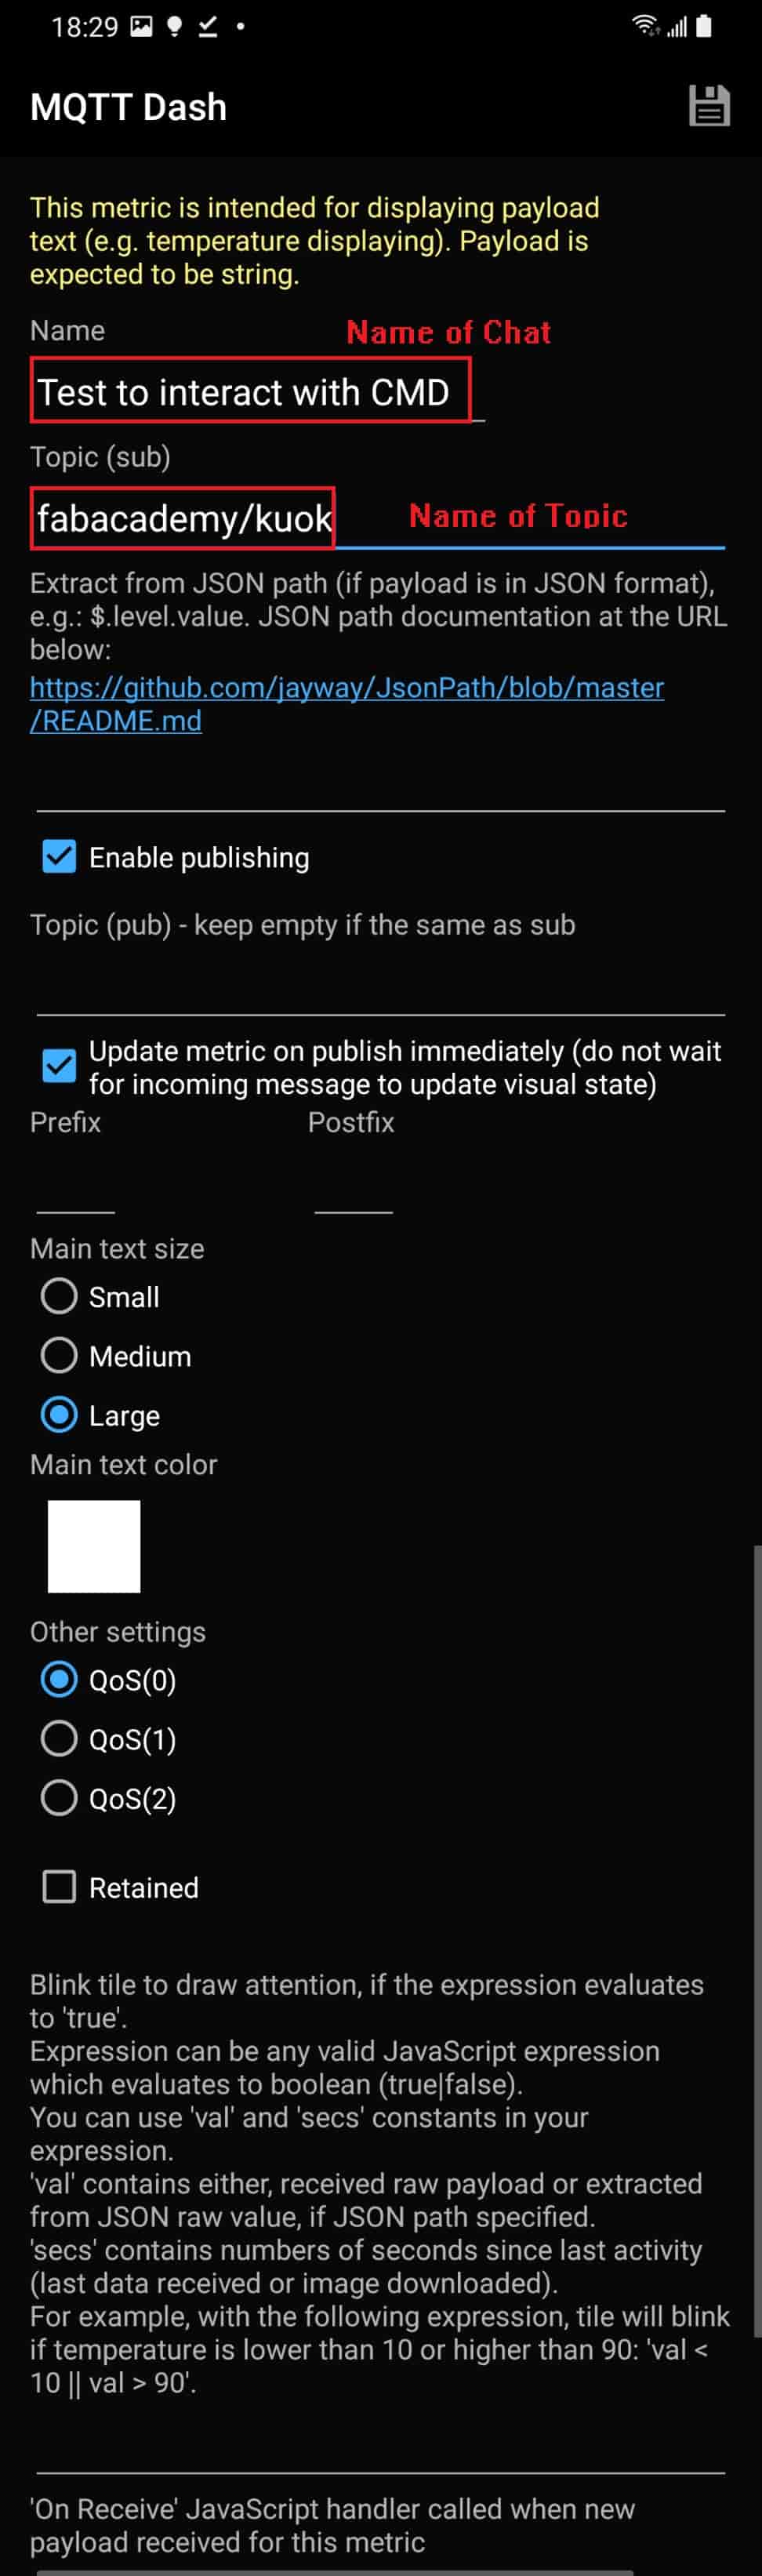
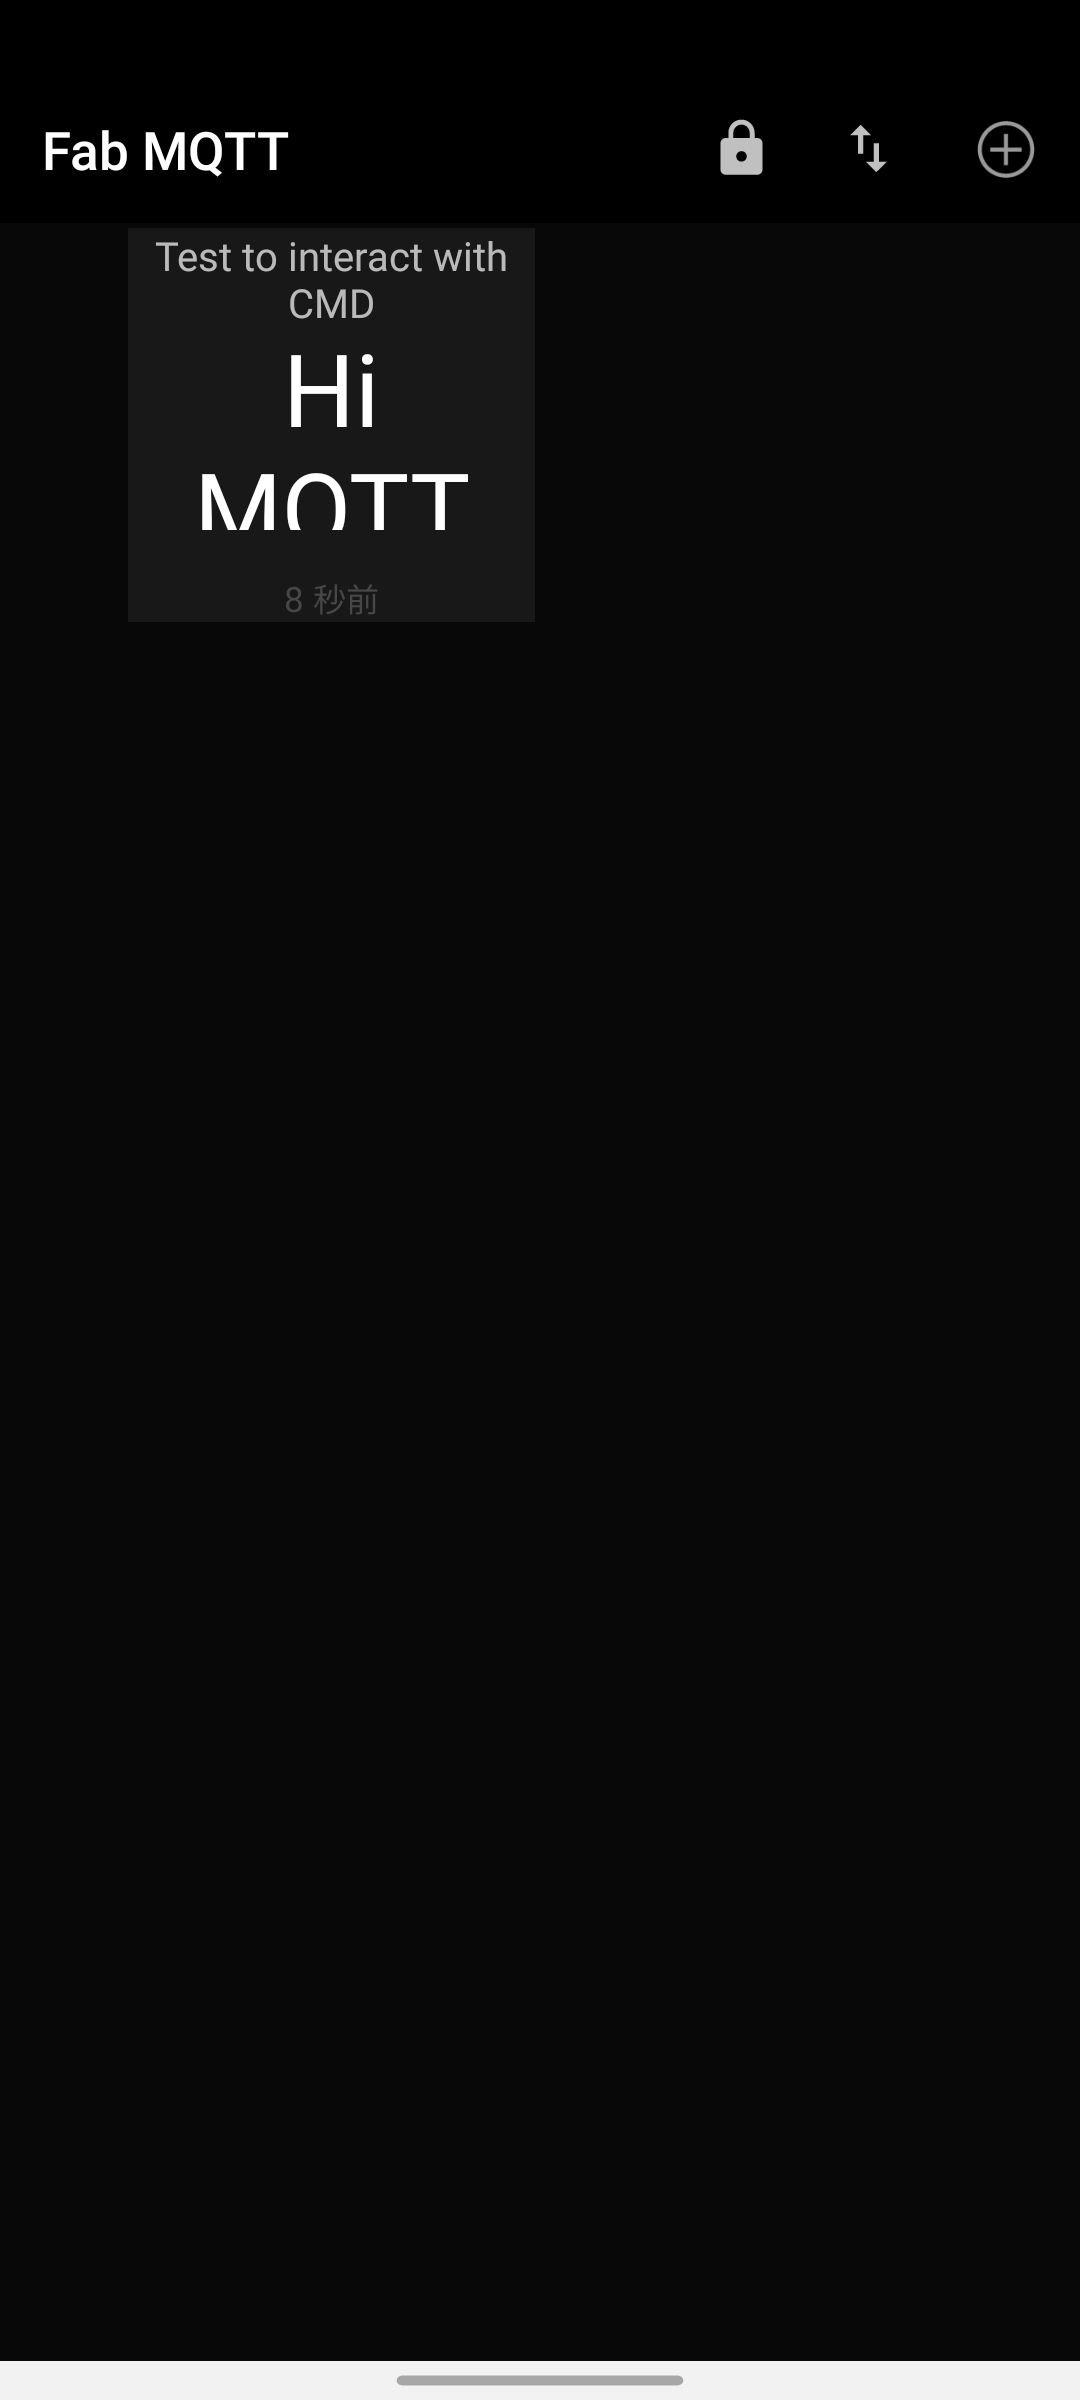
Sending text through CMD to MQTT Dash App
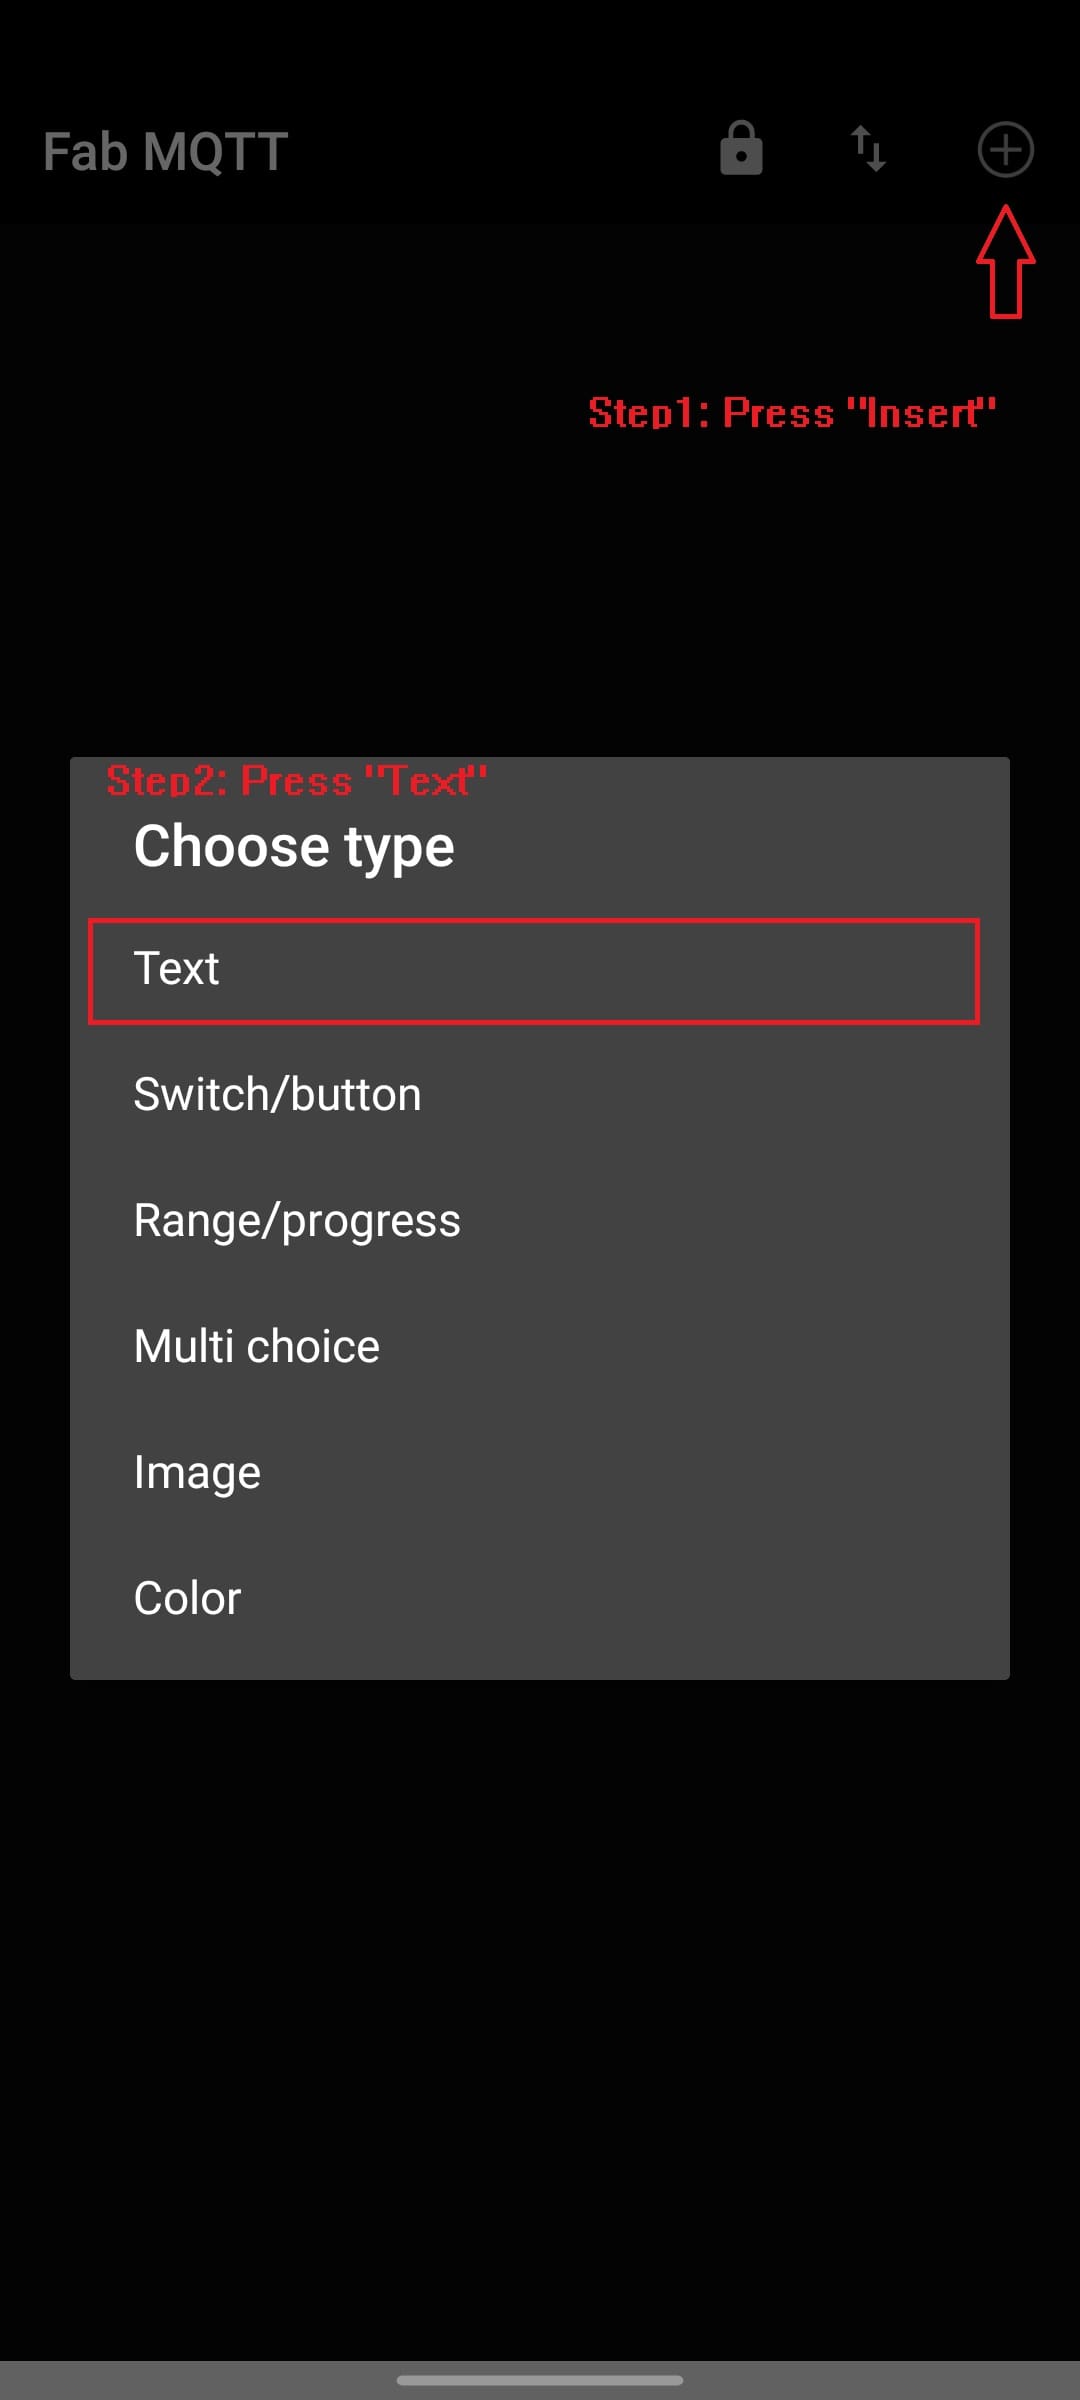
Now, we will test the MQTT connection between computer and MQTT Dash app. Open the created connection. Insert "Text".
Configuration:
On Desktop, mosquitto project have to be installed. The advanced setting can be refer to here.
Open terminal and input the following command.
mosquitto_pub -h mqtt.fabcloud.org -u fabacademy -P fabacademy -t fabacademy/kuok -m "Hi MQTT Dash!
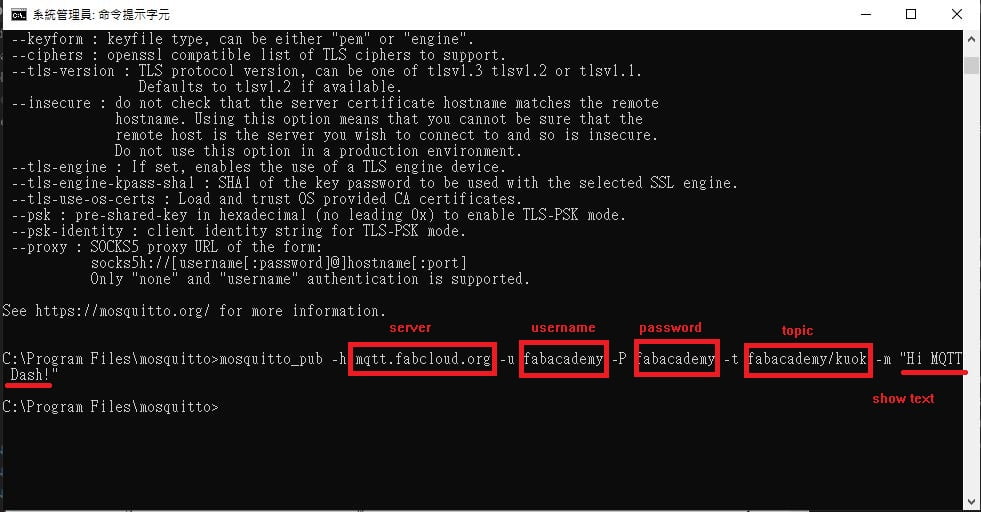
The text will be shown on the icon I just created!! Message is received!!
Control the LED through MQTT Dash App
Insert a switch/button to remotely control a Led strip on & off through MQTT.
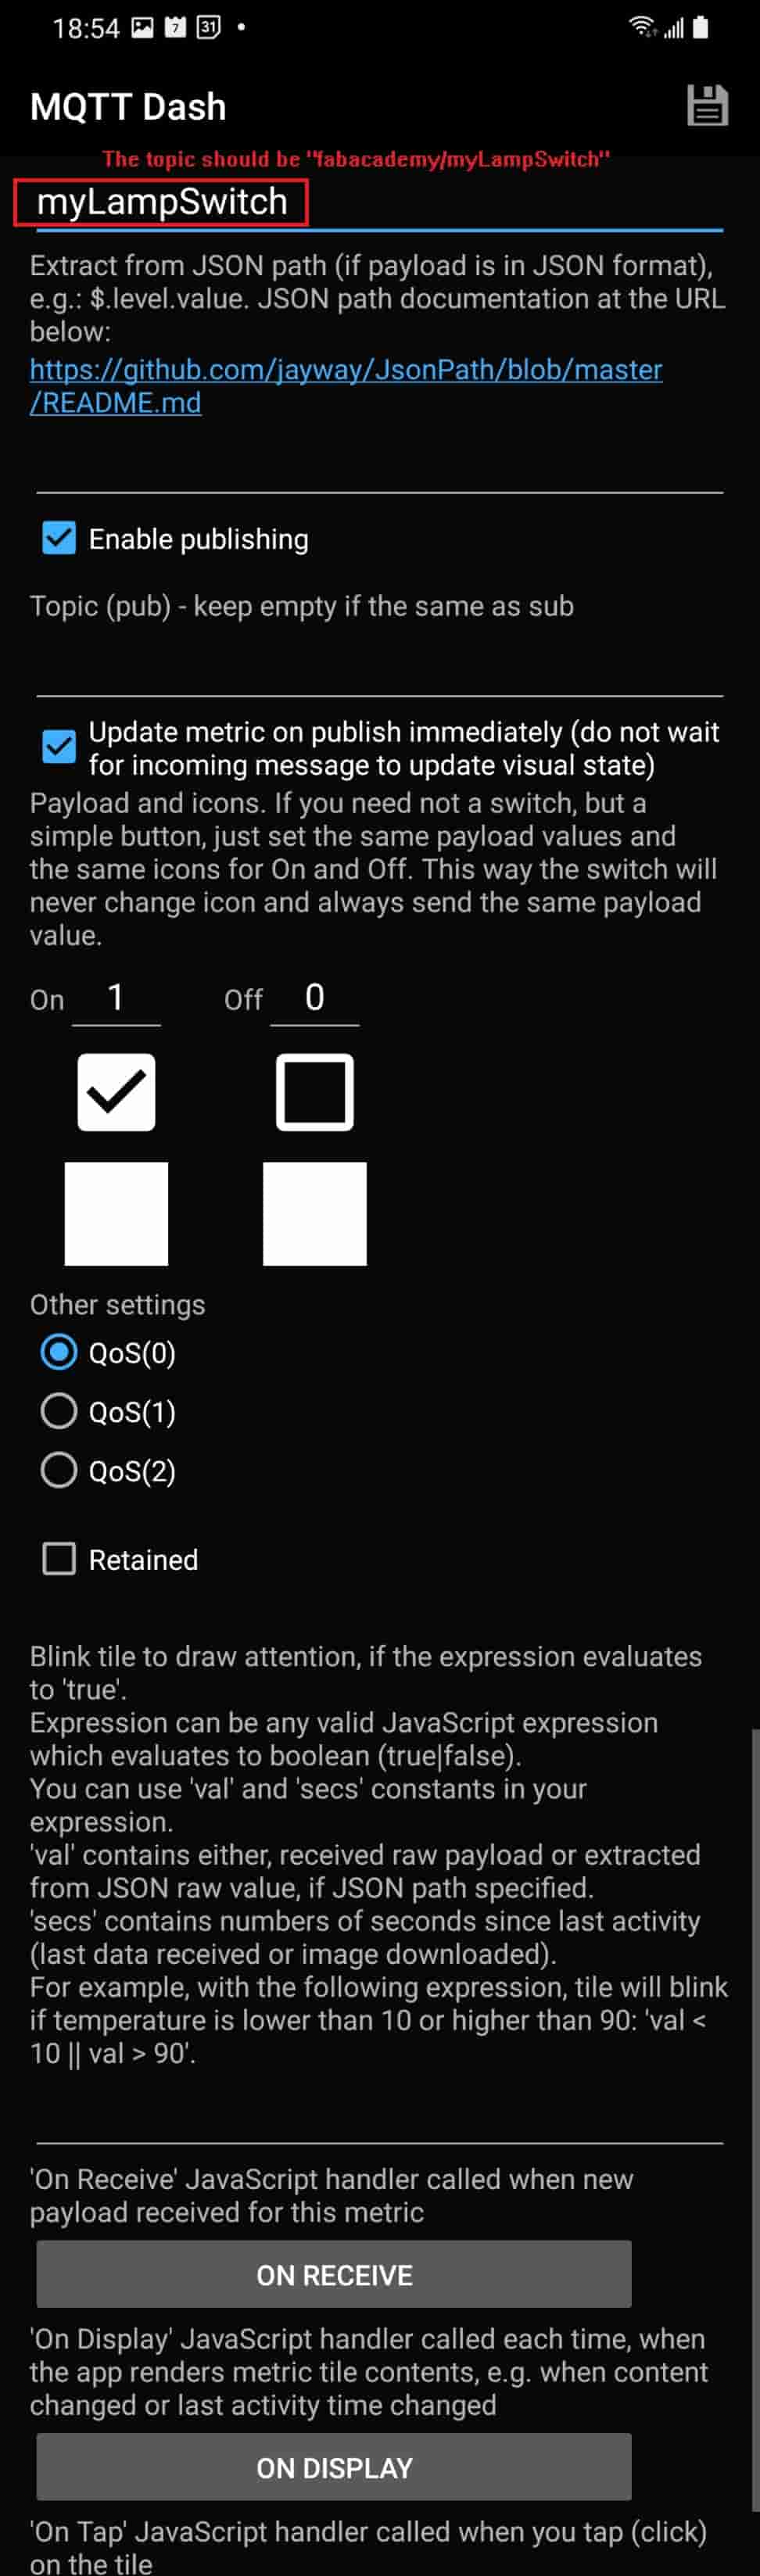
Configuration
WS2812b led lamp will be used for testing remote control by MQTT Dash App through smartphone.
Here's the connection diagram.
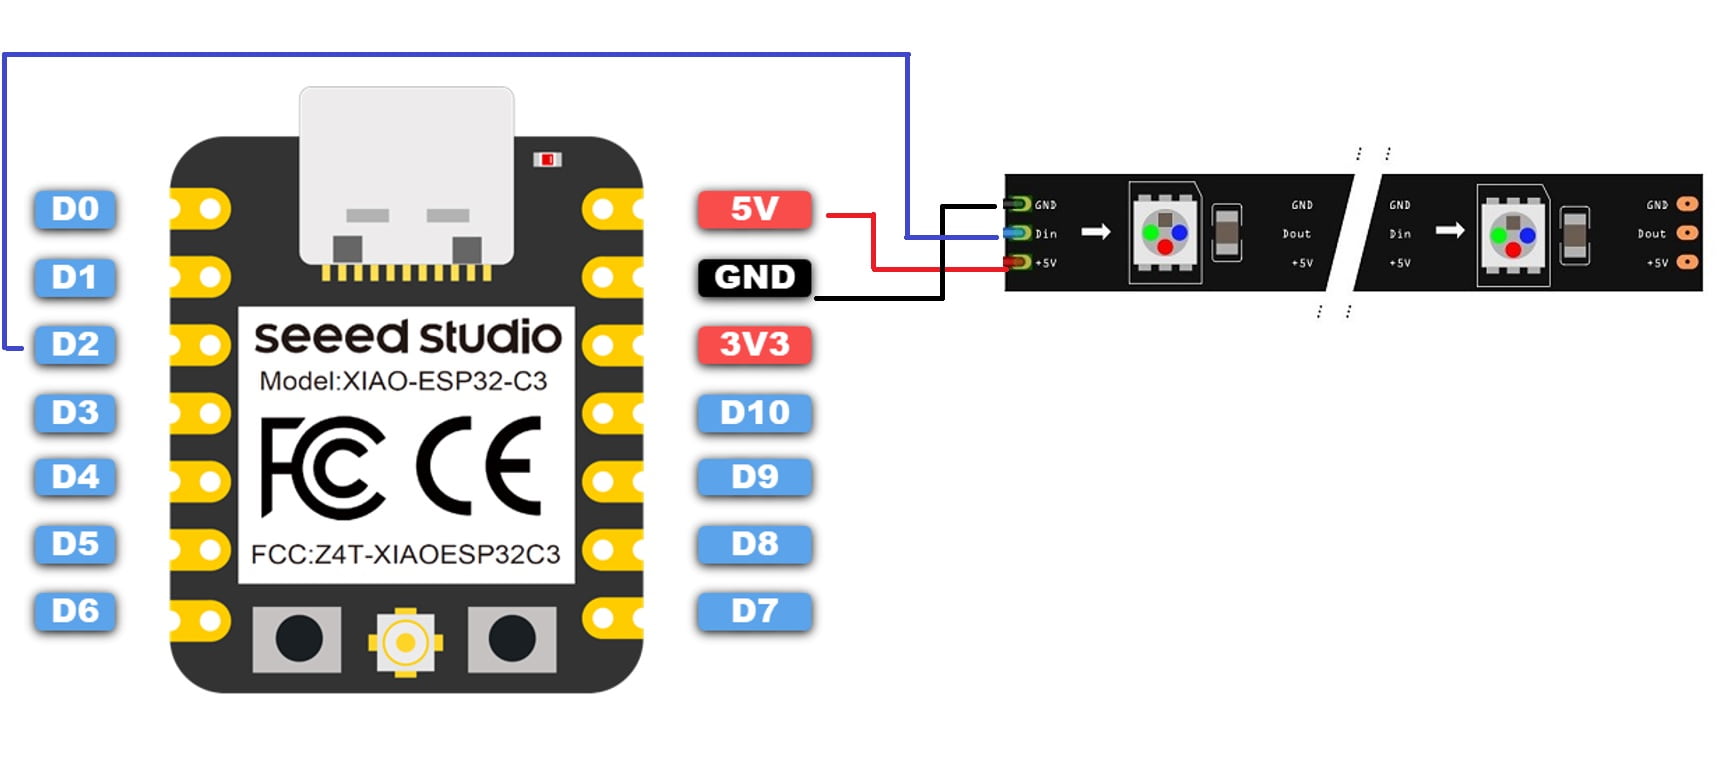
Upload the following code to XIAO ESP32C3 development board, whcih is modified by Salman Faris
MQTT client code for esp32c3
/*
Originally from MQTT ESP8266 Example
Basic XIAO-ESP32 MQTTS example
 Before starting , You should have
 - MQTT Broker Name
 - MQTT Broker Username
 - MQTT Borker Password

  Modified by Salman Faris - Added MQTTS Implimenation as per ESP32 and MQTTS.
*/

#include <WiFi.h>
#include <PubSubClient.h>

#include <Adafruit_NeoPixel.h>
#ifdef __AVR__
 #include <avr/power.h> // Required for 16 MHz Adafruit Trinket
#endif

#define DHTPIN D2
#define NUMPIXELS 60 // Popular NeoPixel ring size
#define PIN D1

Adafruit_NeoPixel pixels(NUMPIXELS, PIN, NEO_GRB + NEO_KHZ800);
#define DELAYVAL 20 // Time (in milliseconds) to pause between pixels

// Update these with values suitable for your network.

const char* ssid = "yourssid";             // WiFi Name
const char* password = "password";              // WiFi Password
const char* mqtt_server = "mqtt.fabcloud.org";  //MQTT Broker Name


WiFiClient espClient;
PubSubClient client(espClient);
unsigned long lastMsg = 0;
#define MSG_BUFFER_SIZE (50)
char msg[MSG_BUFFER_SIZE];
int value = 0;

void setup_wifi() {

  delay(10);
  // We start by connecting to a WiFi networka
  Serial.println();
  Serial.print("Connecting to ");
  Serial.println(ssid);

  WiFi.mode(WIFI_STA);
  WiFi.begin(ssid, password);

  while (WiFi.status() != WL_CONNECTED) {
    delay(500);
    Serial.print(".");
  }

  randomSeed(micros());

  Serial.println("");
  Serial.println("WiFi connected");
  Serial.println("IP address: ");
  Serial.println(WiFi.localIP());
}

void callback(char* topic, byte* payload, unsigned int length) {
  Serial.print("Message arrived [");
  Serial.print(topic);
  Serial.print("] ");
  for (int i = 0; i < length; i++) {
    Serial.print((char)payload[i]);
    Serial.println();
    Serial.print("\n This is length: "+char(length));
  }
  Serial.println();

  //For Switch:
  // Switch on the LED if an 1 was received as first character
  if ((char)payload[0] == '1') {

    pixels.clear(); // Set all pixel colors to 'off'
    // The first NeoPixel in a strand is #0, second is 1, all the way up
    // to the count of pixels minus one.
    for(int i=0; i<NUMPIXELS; i++) { // For each pixel...
      // pixels.Color() takes RGB values, from 0,0,0 up to 255,255,255
      // Here we're using a moderately bright green color:
      pixels.setPixelColor(i, pixels.Color(255, 0, 0));
      pixels.show();   // Send the updated pixel colors to the hardware.
      delay(DELAYVAL); // Pause before next pass through loop
    }

  } else {

    pixels.clear(); // Set all pixel colors to 'off'
    // The first NeoPixel in a strand is #0, second is 1, all the way up
    // to the count of pixels minus one.
    for(int i=0; i<NUMPIXELS; i++) { // For each pixel...
      // pixels.Color() takes RGB values, from 0,0,0 up to 255,255,255
      // Here we're using a moderately bright green color:
      pixels.setPixelColor(i, pixels.Color(0, 0, 0));
      pixels.show();   // Send the updated pixel colors to the hardware.
      delay(DELAYVAL); // Pause before next pass through loop
    }

  }

}

void reconnect() {
  // Loop until we're reconnected
  while (!client.connected()) {
    Serial.print("Attempting MQTT connection...");
    // Create a random client ID
    String clientId = "XIAO-ESP32-Client-";
    clientId += String(random(0xffff), HEX);
    // Attempt to connect
    // if (client.connect(clientId.c_str())) {
    if (client.connect(clientId.c_str(), "fabacademy", "fabacademy")) {
      Serial.println("connected");
      // Once connected, publish an announcement...
      //client.publish("fabacademy/dionTest/Temperature", "hello world");

      // ... and resubscribe
      client.subscribe("fabacademy/myLampSwitch");  //subscribe topic
    } else {
      Serial.print("failed, rc=");
      Serial.print(client.state());
      Serial.println(" try again in 5 seconds");
      // Wait 5 seconds before retrying
      delay(5000);
    }
  }
}

void setup() {
  // pinMode(PIN, OUTPUT);  // Initialize the BUILTIN_LED pin as an output
  Serial.begin(115200);
  setup_wifi();
  client.setServer(mqtt_server, 1883);
  client.setCallback(callback);

  #if defined(__AVR_ATtiny85__) && (F_CPU == 16000000)
    clock_prescale_set(clock_div_1);
  #endif
    // END of Trinket-specific code.

    pixels.begin(); // INITIALIZE NeoPixel strip object (REQUIRED)

}

void loop() {

  if (!client.connected()) {
    reconnect();
  }
  client.loop();


}
Here's the demo video:
Enable Docusaurus page connecting MQTT Broker(Mosquitto)
Refer to Matthew's assignment, I tried to integrate MQTT to my webpage.
Environment setting
The first step is that I should setup right the environment for both sides(reComputer and XIAO ESP32C3)
For the XIAO ESP32C3 module part, there are not so much that need to do. The noticable thing is the code about confiduring Wi-Fi info(local service) and MQTT info:
WIFI_SSID = "my_wifi_name"
WIFI_PASSWORD = "my_wifi_password"
MQTT_SERVER = "192.168.66.184"  # Where host the MQTT broker. My reComputer.
MQTT_PORT = 1883  # normaly 1883
For the reComputer device part:
I need to install MQTT.js for Docusaurus pages.
npm install mqtt
or
yarn add mqtt
To communicate directly with the MQTT service from the web pages, I should set up a proxy - WebSocket Secure to MQTT. And the nice thing is the "Mosquitto" is supporting WebSocket Secure.
Setup Mosquitto Environment and testing
On Desktop, mosquitto project have to be installed. The advanced setting can be refer to here.
Then, open CMD and cd to the link of the mosquitto foler.
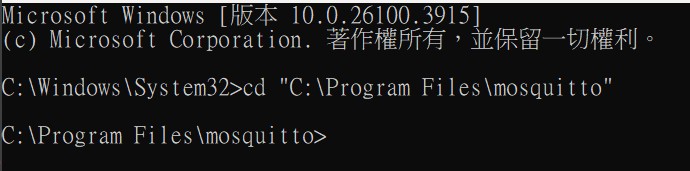
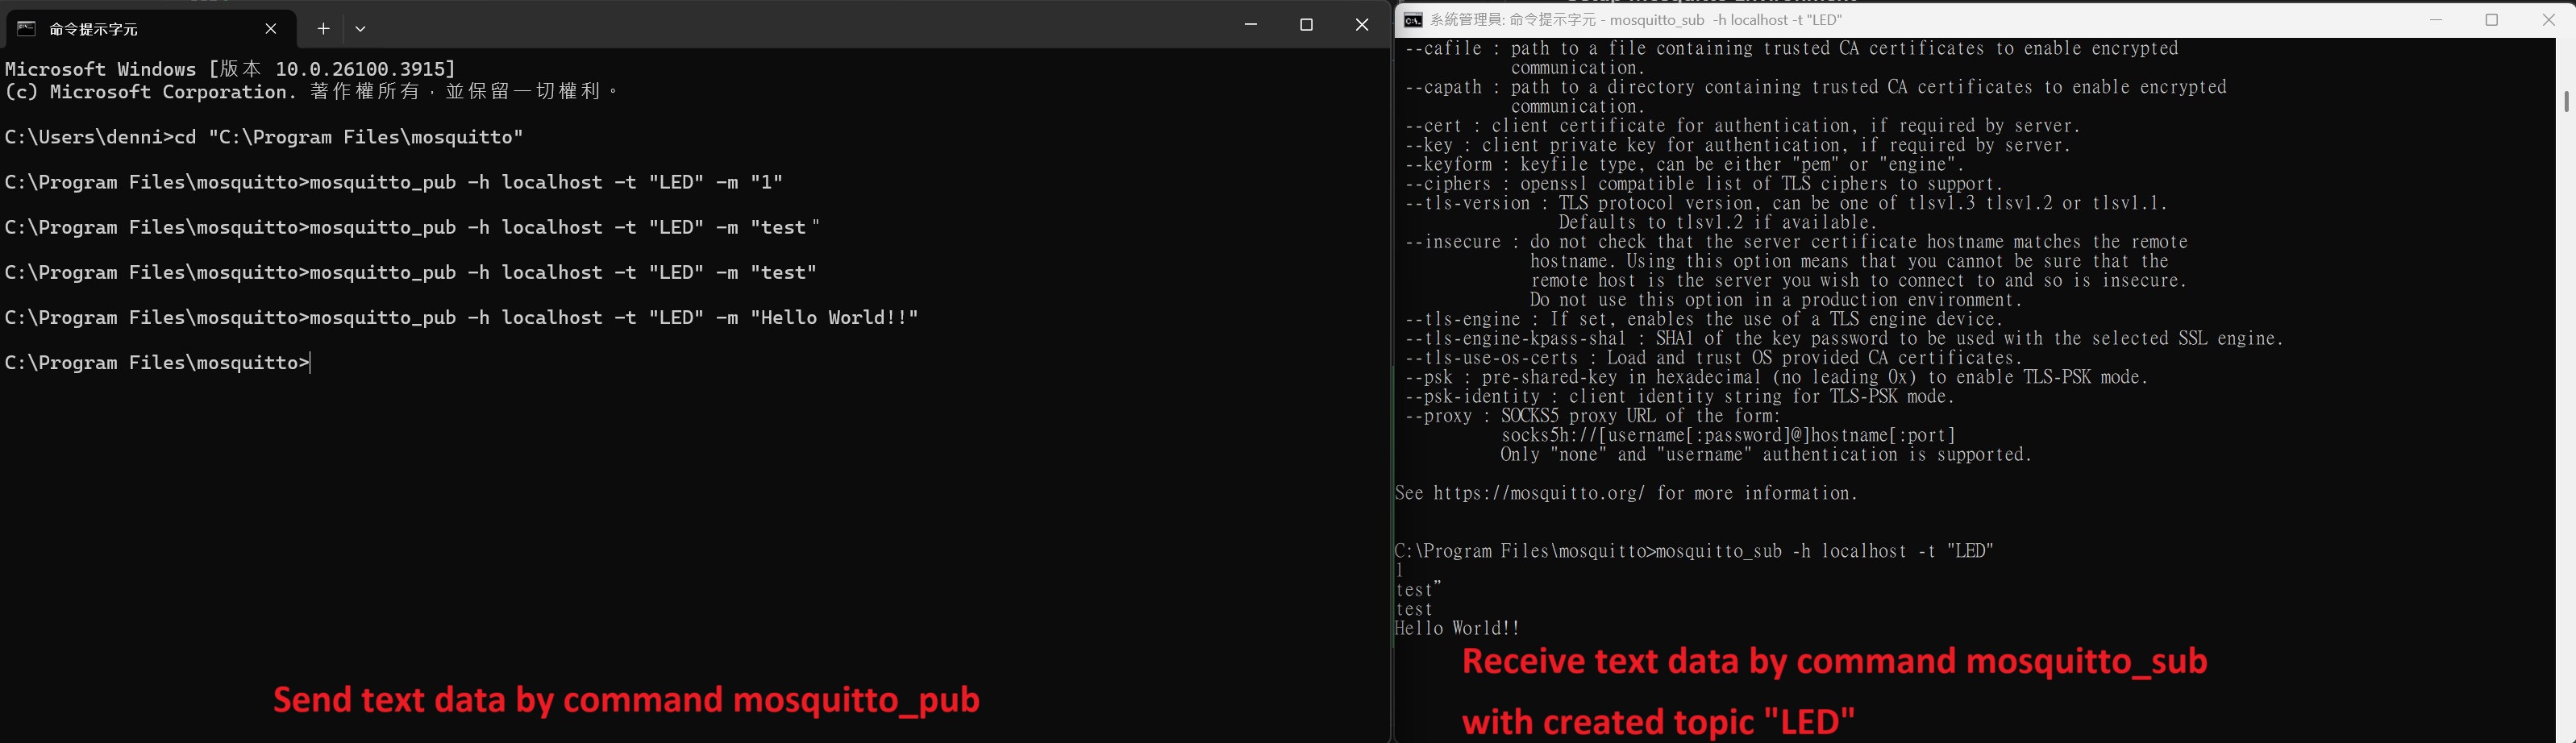
I use 2 terminals and check whether the MQTT broker is working:
For creating/subcribing a topic called "LED":
mosquitto_sub -h localhost -t "LED"
For sending/publishing some text data:
mosquitto_pub -h localhost -t "LED" -m "1"
mosquitto_pub -h localhost -t "LED" -m "test"
I got the results that the data is sent successfully.
Setup MQTT to Docusaurus page
Then I need to setup the MQTT Client under the relative path of "src/page/" and I name it as "mqtt_control.js".
I use a public MQTT server EMQ, here's the setting.
Based on neil's example, I asked Deepseek and made the initial js code:
import clsx from 'clsx';
import React, { useEffect, useState } from 'react';
import mqtt from 'mqtt';
import Layout from '@theme/Layout';
import styles from './index.module.css'; // Ensure you have this CSS module, or adjust accordingly

const MQTTBroker = 'ws://broker.emqx.io:8084/mqtt';
const topicBase = 'fablab/chaihuo/machine'; // Example sub-topic
const clientId = `mqtt_${Math.random().toString(16).slice(3)}`


const HomepageHeader = ({ connectionStatus , handleLedToggle, ledStatus }) => {
  return (
    <header className={clsx('hero hero--primary', styles.heroBanner)}>
      <div className="container">
        <h1>Control LED</h1>
        <p>MQTT Connection Status: {connectionStatus}</p>
        <p>LED Status: {ledStatus}</p>
        <button onClick={() => handleLedToggle(1)} disabled={connectionStatus !== 'Connected'}>
          Toggle LED
        </button>
      </div>
    </header>
  );
};

const ControlLED = () => {
  const [mqttClient, setMqttClient] = useState(null);
  const [connectionStatus, setConnectionStatus] = useState('Disconnected');
  const [ledStatus, setLedStatus] = useState('Off');

  useEffect(() => {
    // Connection options with credentials
    const options = {
      reconnectPeriod: 1000, // Try to reconnect every 1000 ms
      username: '',
      password: '',
      will: {
        topic: `${topicBase}/LED`, // Last will topic
        payload: '0', // Ensures LED is off if connection is lost unexpectedly
        qos: 0,
        retain: false,
      },
    };

    const client = mqtt.connect(MQTTBroker, options);

    client.on('connect', () => {
      console.log('Connected to MQTT Broker');
      setConnectionStatus('Connected');
      client.subscribe(`${topicBase}/LED`);
    });

    client.on('message', (topic, message) => {
      if (topic === `${topicBase}/LED`) {
        const status = message.toString() === '1' ? 'On' : 'Off';
        setLedStatus(status);
      }
    });

    client.on('close', () => {
      console.log('Connection to MQTT Broker closed');
      setConnectionStatus('Disconnected');
    });

    client.on('error', (error) => {
      console.error('MQTT Error:', error);
      setConnectionStatus('Error - Check Console');
    });

    setMqttClient(client);

    return () => {
      if (client) {
        client.end();
      }
    };
  }, []);

  const handleLedToggle = () => {
    if (mqttClient && connectionStatus === 'Connected') {
      const message = ledStatus === 'On' ? '0' : '1';
      mqttClient.publish(`${topicBase}/LED`, message);
    }
  };

  return (
    <Layout title="Control LED">
      <HomepageHeader
        connectionStatus={connectionStatus}
        handleLedToggle={handleLedToggle}
        ledStatus={ledStatus} />
      <main>
        {/* Additional content or components can be added here */}
      </main>
    </Layout>
  );
};

export default ControlLED;
I do the test with a public server broker.emqx.io in websocket.
The essential Information:
Name: mqtt_other
Host: wss://broker.emqx.io
Port: 8084
Path: /mqtt
In this test, I built another topic as fablab/chaihuo/machine/LED.
And the relative url is "/mqtt_control" just like the name of the file. Then I want to put it in my top nav bar. So in the "docusaurus.config.js" file I put the code like below:
          {
            to: '/mqtt_control_led',
            label: 'MQTT Control',
            position: 'right',
            className: 'circle-link',  // custom css
          },
And I circle it, for these memorable time. The css in the "custom.css" is:
.circle-link {
	border: 2px solid #000;
	border-radius: 50%;
	padding: 5px;
  }
By the way, there's a link appeared at the right-top of the page.

Then, I tested the page whether the button is working or not.
In order to verify the published message and received message through MQTT server, I installed MQTTX to observe the communication.
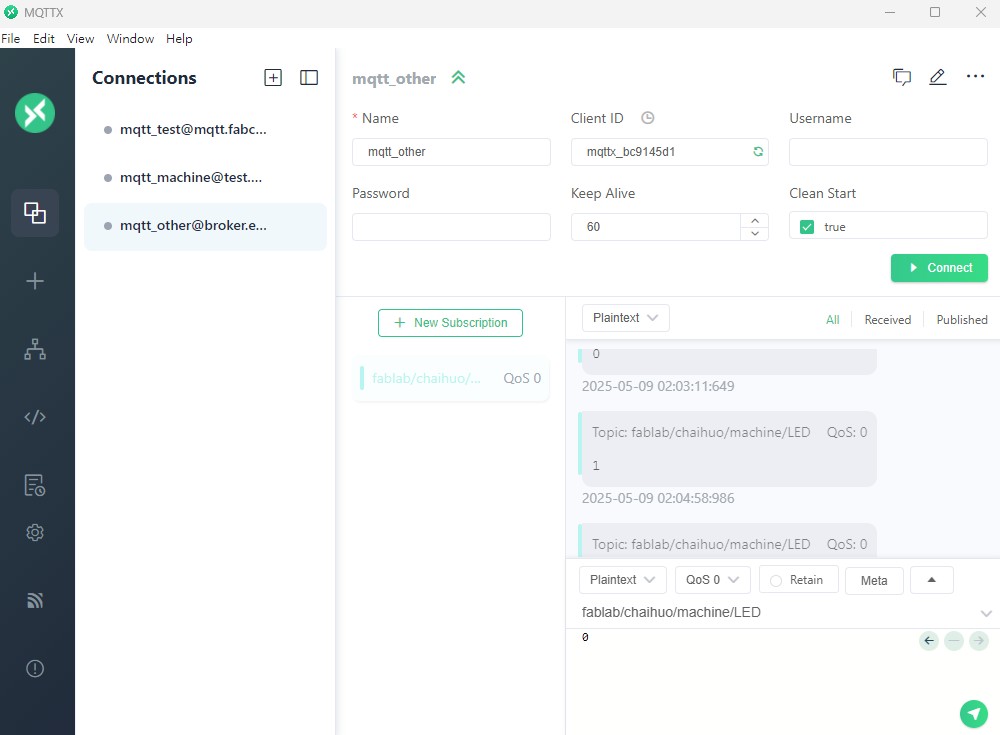
Press '+' to add a connection and configure the setting as below:
Name: mqtt_other
Host: wss://broker.emqx.io
Port: 8084
Path: /mqtt
I do the test with a public server broker.emqx.io in websocket.
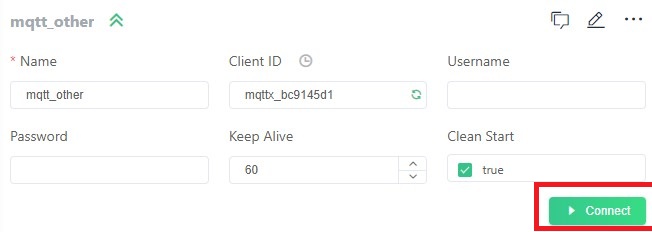
Press Connect button to connect the mqtt server.
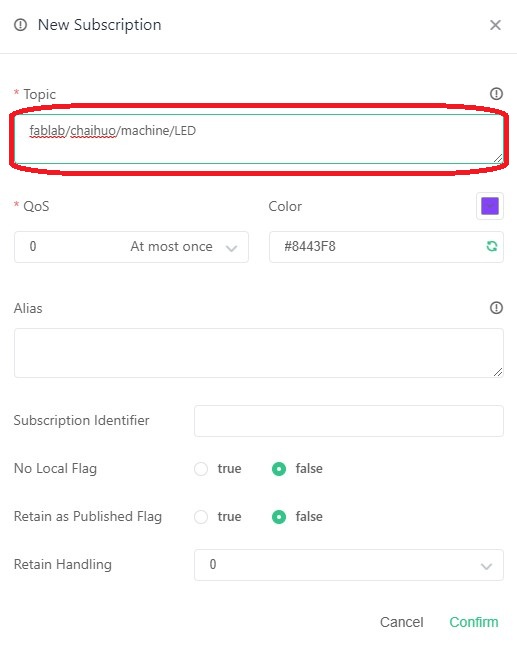
Press + New Subscription to setup the topic.
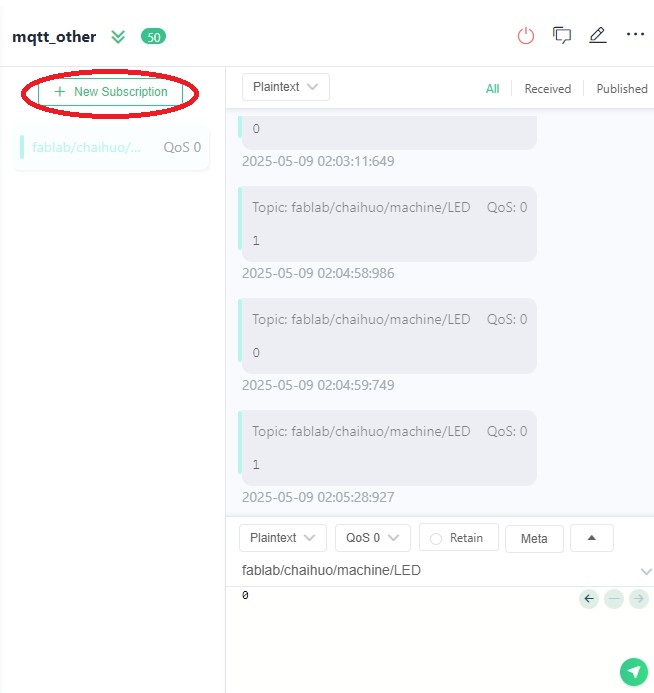
I set up the topic as fablab/chaihuo/machine/LED, the topic setting in mqtt_control.js must equal to fablab/chaihuo/machine/LED, the communication will be established.
Turn to the page of the MQTT Control, the button 'Toggle LED` will be enabled when the MQTT connection is connected.
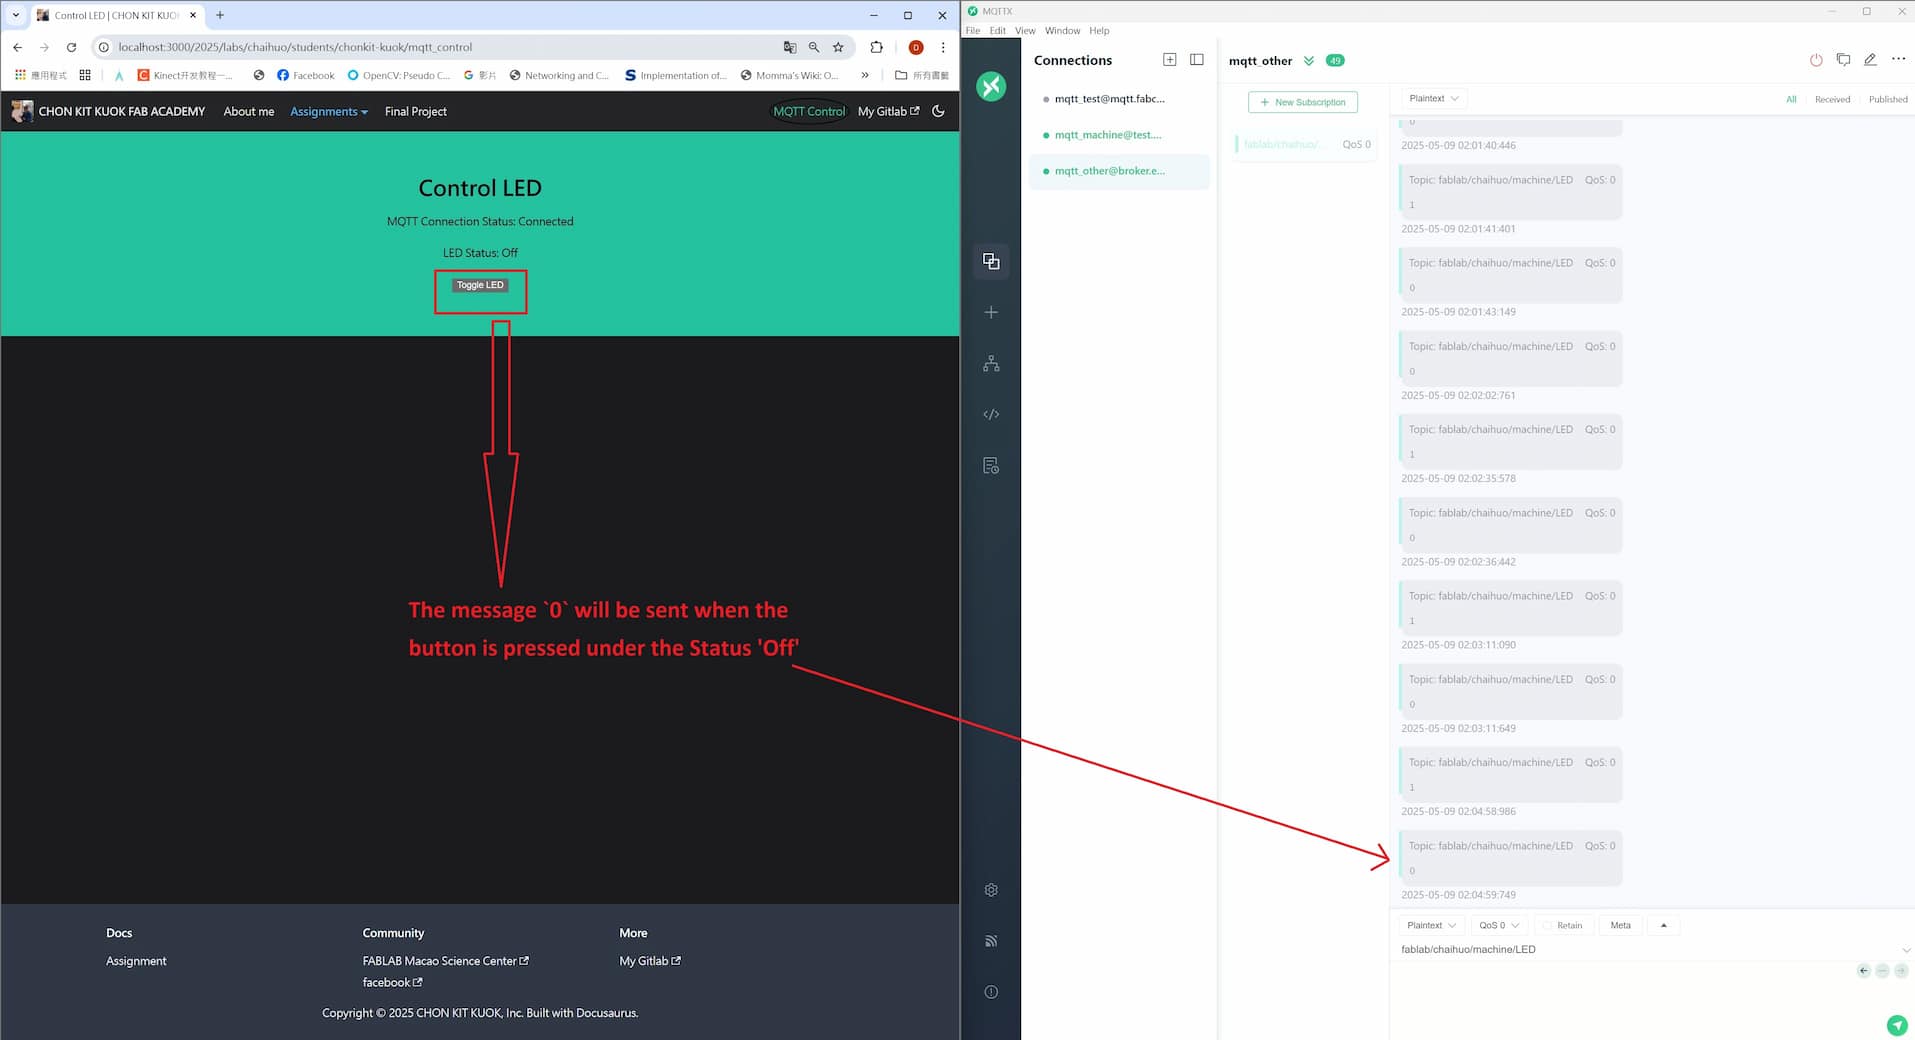
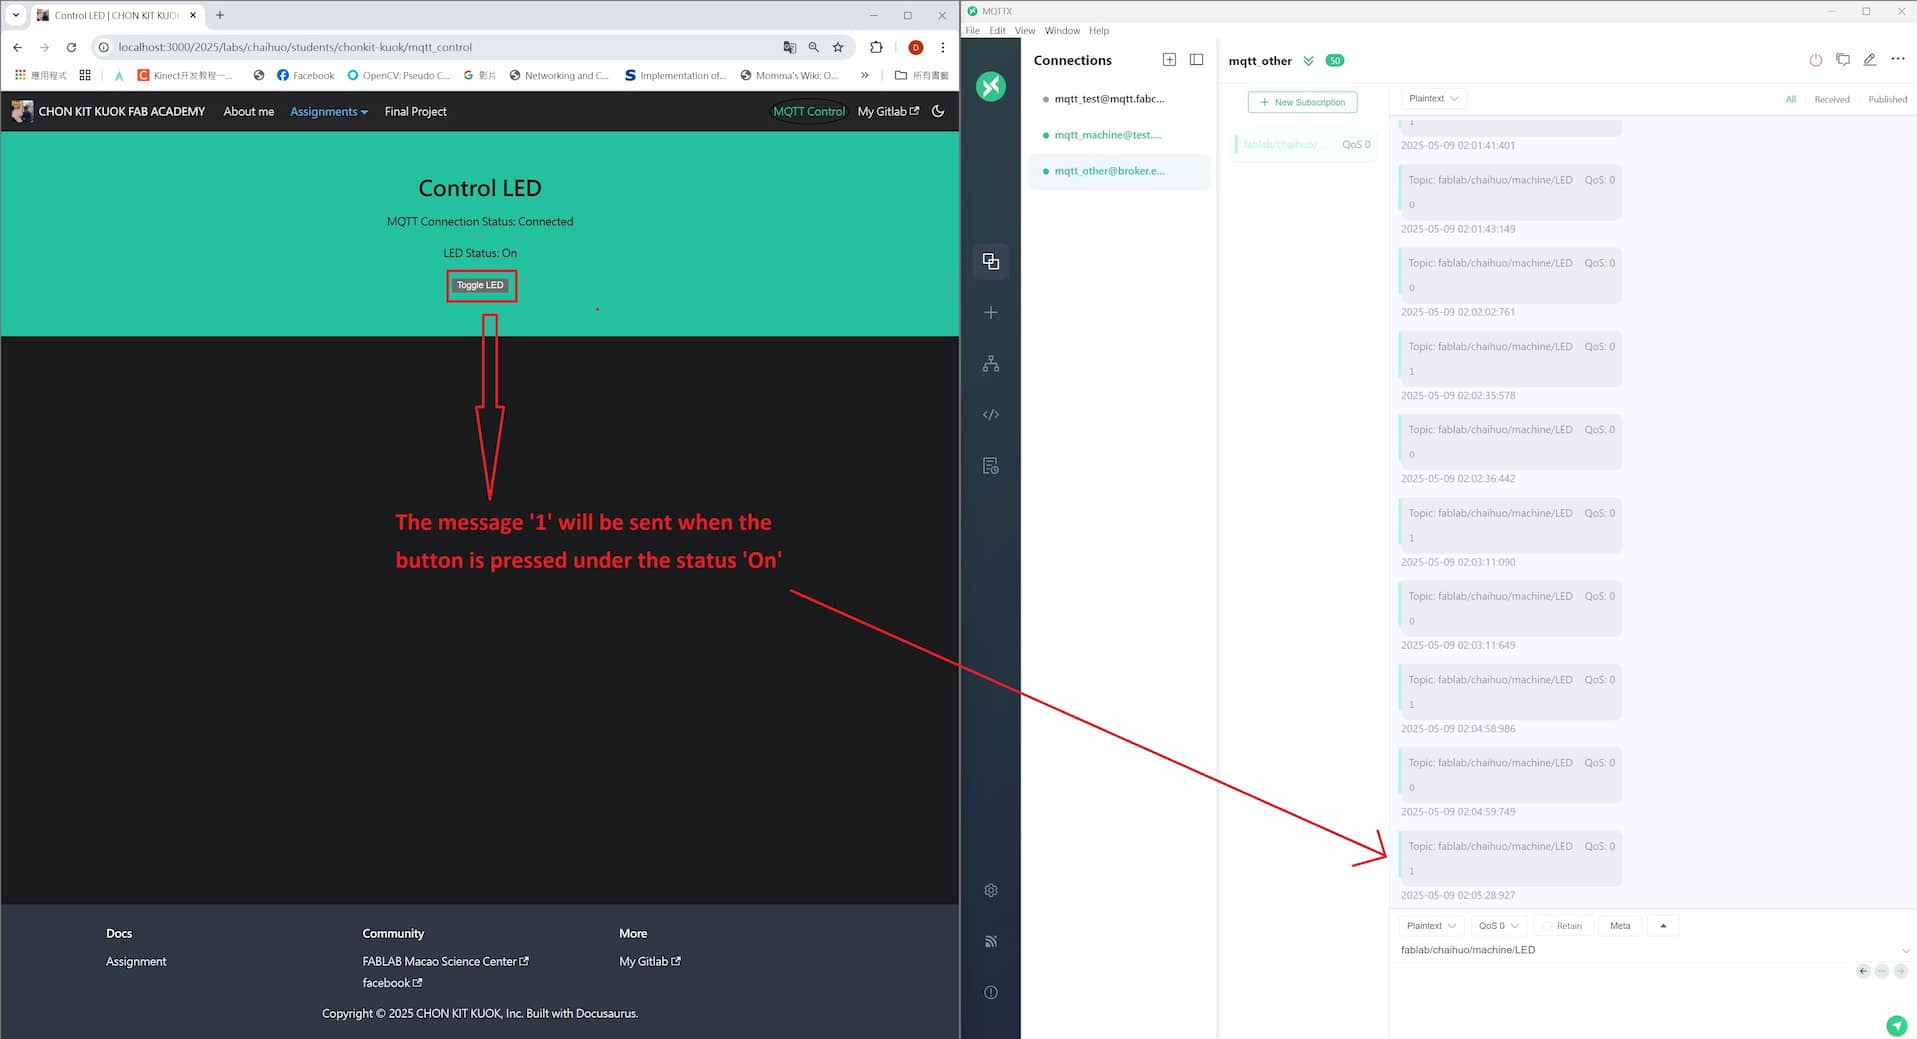
There is a communication between the website and HQTT server, the message '0' will be received in MQTTX when the LED status which is shown in webpage is 'Off', the message '1' will be received in MQTTX when the LED status which is shown in webpage is 'On'. These messages are used for controlling the microcontroller.
I also applied the circuit and code in part - Control the LED through MQTT Dash App and modify the topic as fablab/chaihuo/machine/LED, such as the following code:
MQTT client code for esp32c3
#include <WiFi.h>
#include <PubSubClient.h>

#include <Adafruit_NeoPixel.h>
#ifdef __AVR__
 #include <avr/power.h> // Required for 16 MHz Adafruit Trinket
#endif

#define DHTPIN D2
#define NUMPIXELS 60 // Popular NeoPixel ring size
#define PIN D1

Adafruit_NeoPixel pixels(NUMPIXELS, PIN, NEO_GRB + NEO_KHZ800);
#define DELAYVAL 20 // Time (in milliseconds) to pause between pixels

// Update these with values suitable for your network.

const char* ssid = "yourssid";             // WiFi Name
const char* password = "password";              // WiFi Password
const char* mqtt_server = "broker.emqx.io";  //MQTT Broker Name


WiFiClient espClient;
PubSubClient client(espClient);
unsigned long lastMsg = 0;
#define MSG_BUFFER_SIZE (50)
char msg[MSG_BUFFER_SIZE];
int value = 0;

void setup_wifi() {

  delay(10);
  // We start by connecting to a WiFi networka
  Serial.println();
  Serial.print("Connecting to ");
  Serial.println(ssid);

  WiFi.mode(WIFI_STA);
  WiFi.begin(ssid, password);

  while (WiFi.status() != WL_CONNECTED) {
    delay(500);
    Serial.print(".");
  }

  randomSeed(micros());

  Serial.println("");
  Serial.println("WiFi connected");
  Serial.println("IP address: ");
  Serial.println(WiFi.localIP());
}

void callback(char* topic, byte* payload, unsigned int length) {
  Serial.print("Message arrived [");
  Serial.print(topic);
  Serial.print("] ");
  for (int i = 0; i < length; i++) {
    Serial.print((char)payload[i]);
    Serial.println();
    Serial.print("\n This is length: "+char(length));
  }
  Serial.println();

  //For Switch:
  // Switch on the LED if an 1 was received as first character
  if ((char)payload[0] == '1') {

    pixels.clear(); // Set all pixel colors to 'off'
    // The first NeoPixel in a strand is #0, second is 1, all the way up
    // to the count of pixels minus one.
    for(int i=0; i<NUMPIXELS; i++) { // For each pixel...
      // pixels.Color() takes RGB values, from 0,0,0 up to 255,255,255
      // Here we're using a moderately bright green color:
      pixels.setPixelColor(i, pixels.Color(255, 0, 0));
      pixels.show();   // Send the updated pixel colors to the hardware.
      delay(DELAYVAL); // Pause before next pass through loop
    }

  } else {

    pixels.clear(); // Set all pixel colors to 'off'
    // The first NeoPixel in a strand is #0, second is 1, all the way up
    // to the count of pixels minus one.
    for(int i=0; i<NUMPIXELS; i++) { // For each pixel...
      // pixels.Color() takes RGB values, from 0,0,0 up to 255,255,255
      // Here we're using a moderately bright green color:
      pixels.setPixelColor(i, pixels.Color(0, 0, 0));
      pixels.show();   // Send the updated pixel colors to the hardware.
      delay(DELAYVAL); // Pause before next pass through loop
    }

  }

}

void reconnect() {
  // Loop until we're reconnected
  while (!client.connected()) {
    Serial.print("Attempting MQTT connection...");
    // Create a random client ID
    String clientId = "XIAO-ESP32-Client-";
    clientId += String(random(0xffff), HEX);
    // Attempt to connect
    // if (client.connect(clientId.c_str())) {
    if (client.connect(clientId.c_str(), "", "")) {
      Serial.println("connected");
      // Once connected, publish an announcement...
      //client.publish("fabacademy/dionTest/Temperature", "hello world");

      // ... and resubscribe
      client.subscribe("fablab/chaihuo/machine/LED");  //subscribe topic
    } else {
      Serial.print("failed, rc=");
      Serial.print(client.state());
      Serial.println(" try again in 5 seconds");
      // Wait 5 seconds before retrying
      delay(5000);
    }
  }
}

void setup() {
  // pinMode(PIN, OUTPUT);  // Initialize the BUILTIN_LED pin as an output
  Serial.begin(115200);
  setup_wifi();
  client.setServer(mqtt_server, 1883);
  client.setCallback(callback);

  #if defined(__AVR_ATtiny85__) && (F_CPU == 16000000)
    clock_prescale_set(clock_div_1);
  #endif
    // END of Trinket-specific code.

    pixels.begin(); // INITIALIZE NeoPixel strip object (REQUIRED)

}

void loop() {

  if (!client.connected()) {
    reconnect();
  }
  client.loop();


}
Finally, I can control the WS2812B through MQTT which embedded into my website.