Week11 - Networking and Communications
File Sharing
The task of the assignment
- Design, build, and connect wired or wireless node(s) with network or bus addresses and local input &/or output device(s)
Hardware will be used
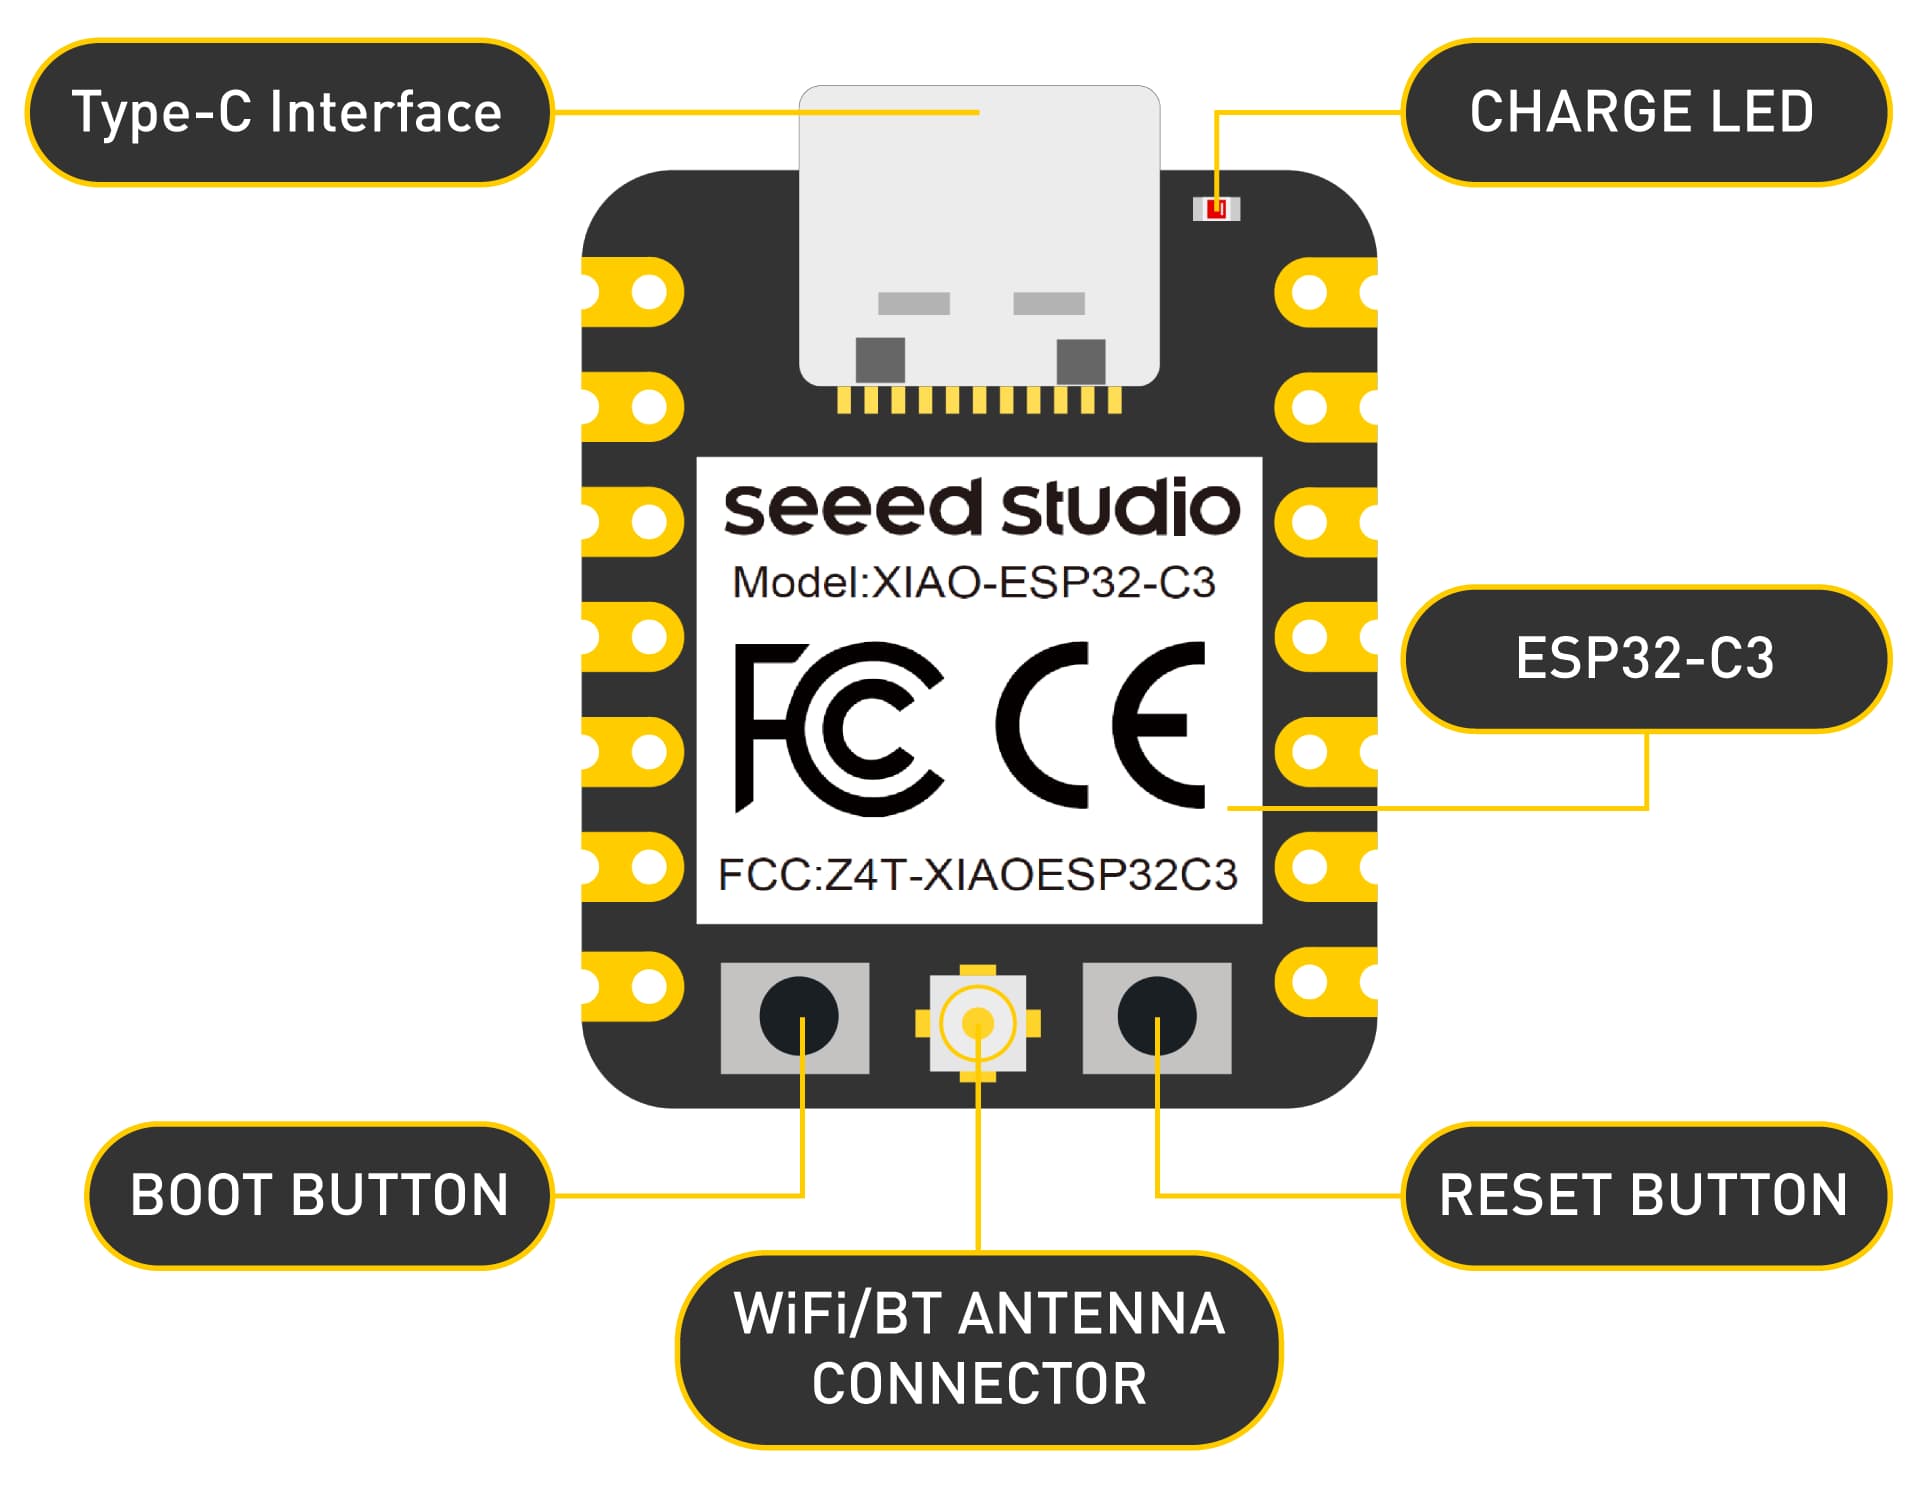
Microcontroller
In this assignment, XIAO ESP32C3 will be used. Seeed Studio XIAO ESP32C3 is an IoT mini development board based on the Espressif ESP32-C3 WiFi/Bluetooth dual-mode chip, featuring a 32-bit RISC-V CPU that delivers powerful computing performance with its efficient architecture. It has excellent radio frequency performance, supporting IEEE 802.11 b/g/n WiFi, and Bluetooth 5 (BLE) protocols.
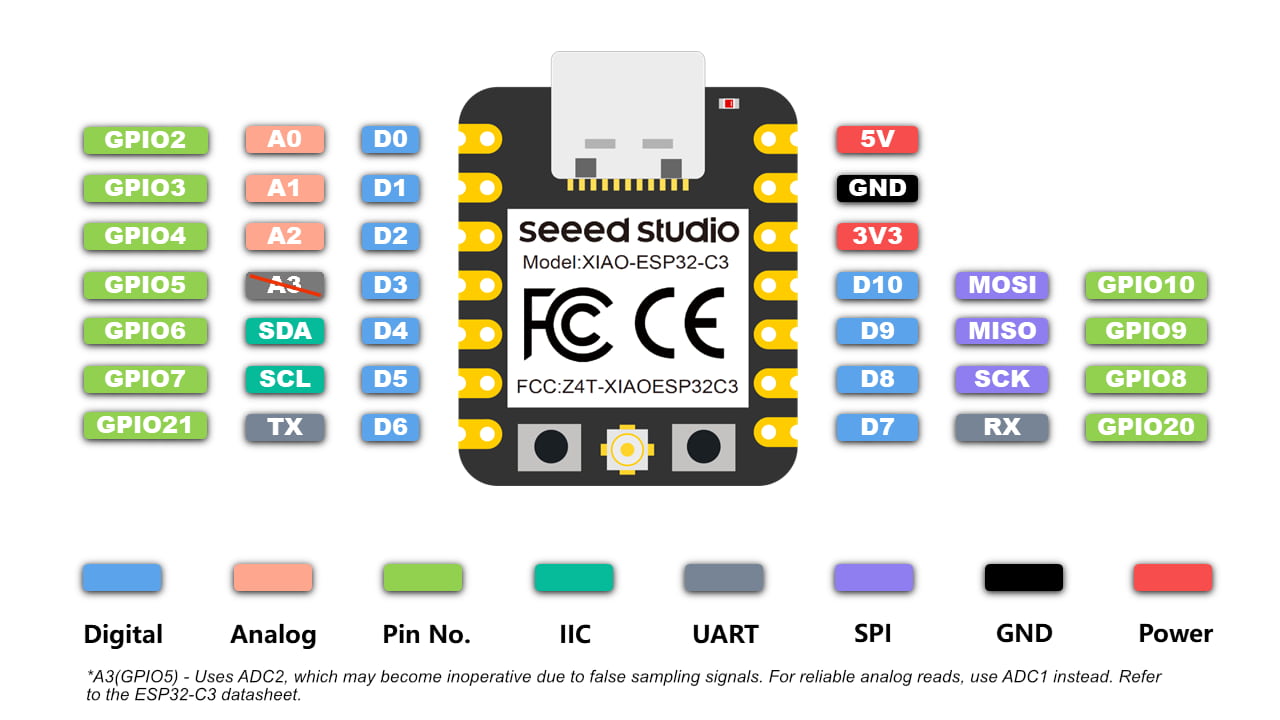
ESP32C3 provides network functions, such as WiFi or bluetooth. A antennia can be connected to the development board.
WiFi Function
WiFi-Function Testing
Refer to Liang's assignment, I will test for the wifi function of the XIAO-ESP32C3. This testing code is used for scanning and display the nearby WiFi networks.
WiFi searching code
#include "WiFi.h"

// The setup function is called once when the microcontroller starts up
void setup()
{
      // Initialize the serial communication at a baud rate of 115200
      Serial.begin(115200);

      // Set the WiFi mode to station mode and disconnect from any previously connected access point
      WiFi.mode(WIFI_STA);
      WiFi.disconnect();
      delay(100);

      // Print a message indicating that the setup is completed
      Serial.println("Setup done");
}

// The loop function is called repeatedly after the setup function
void loop()
{
      // Print a message indicating that the WiFi scan is starting
      Serial.println("scan start");

      // Call the scanNetworks function of the WiFi library to scan for available networks
      // It will return the number of networks found
      int n = WiFi.scanNetworks();
      // Print a message indicating that the scan is completed
      Serial.println("scan done");
      // If no networks were found
      if (n == 0) {
            // Print a message indicating that no networks were found
            Serial.println("no networks found");
      // If one or more networks were found
      } else {
            // Print the number of networks found
            Serial.print(n);
            Serial.println(" networks found");
            // Loop through each network found
            for (int i = 0; i < n; ++i) {
                // Print the index of the current network
                Serial.print(i + 1);
                Serial.print(": ");
                // Print the SSID (Service Set Identifier) of the current network
                Serial.print(WiFi.SSID(i));
                Serial.print(" (");
                // Print the RSSI (Received Signal Strength Indication) of the current network
                Serial.print(WiFi.RSSI(i));
                Serial.print(")");
                // Print an asterisk if the network is encrypted, otherwise print a space
                Serial.println((WiFi.encryptionType(i) == WIFI_AUTH_OPEN)?" ":"*");
                delay(10);
            }
      }
      // Print a blank line for better formatting
      Serial.println("");

      // Wait for 5 seconds before scanning again
      delay(5000);
}
The station mode is set in the setup function to ensure any previous connections are terminated to avoid interference.
The result of wifi scanning will be shown if the WiFi function is available.
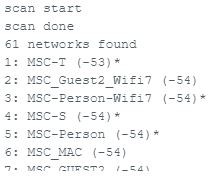
It show that there are 61 WiFi networks found with the RSSI(Received Signal Strength Indication). It mean the WiFi function of ESP32C3 is work! Let us going the next step.
Simple Web Server
Refer to Liang's assignment and tutorial of Last Minute Engineers, I would like to build a simple web server to display some sensing data.
A web server is a place where web pages are stored, processed, and served to web clients. A web client is just a web browser that we use on our computers and phones. A web client and a web server communicate using a special protocol known as Hypertext Transfer Protocol (HTTP).

In this protocol, a client starts a conversation by sending an HTTP request for a specific web page. The server then sends back the content of that web page or an error message if it can’t find it (like the famous 404 Error).
Station Mode is used for my assignment, ESP32C3 connects to an existing WiFi network.
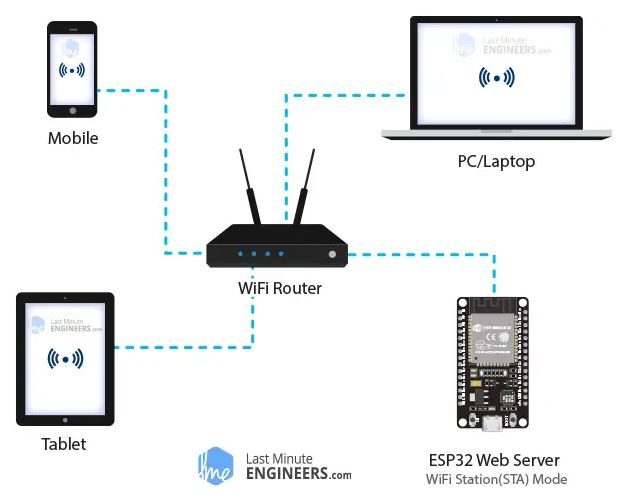
In STA mode, the ESP32 obtains an IP address from the wireless router to which it is connected. With this IP address, it can set up a web server and serve web pages to all connected devices on the existing WiFi network.
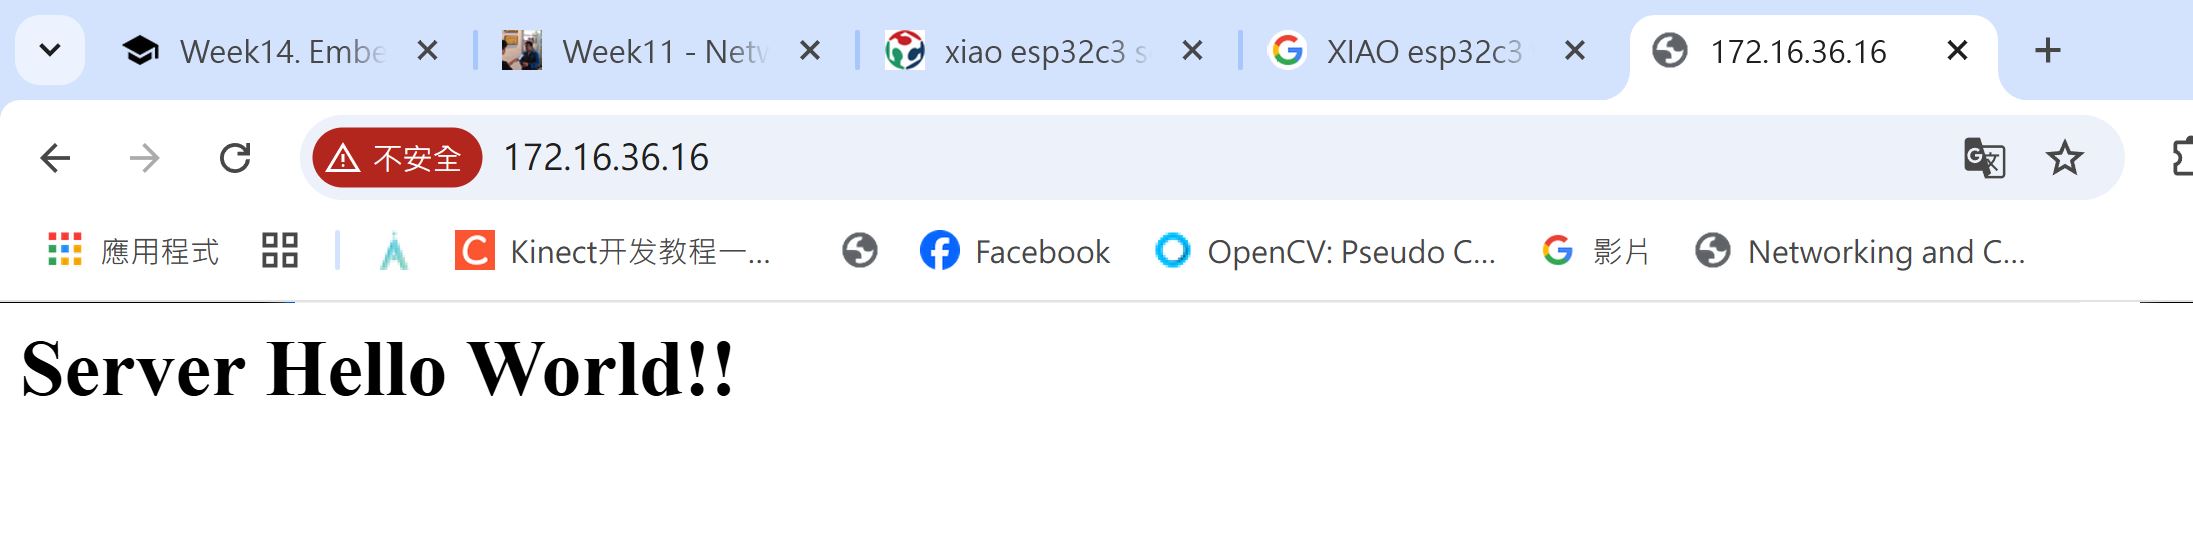
First, I built up a web server which connect to my WiFi network and show "Server Hello World!!" in a website.
Web server code
#include <WiFi.h>
#include <WebServer.h>

// Replace with your network credentials
const char* ssid = "yourssid";
const char* password = "password";

WebServer server(80); // Create a web server on port 80

void setup() {
  // Initialize serial communication
  Serial.begin(9600);
  while (!Serial); // Wait for Serial Monitor to open

  // Initialize WiFi
  WiFi.begin(ssid, password);
  Serial.println("Connecting to WiFi...");
  while (WiFi.status() != WL_CONNECTED) {
    delay(500);
    Serial.print(".");
  }
  Serial.println();
  Serial.println("Connected to WiFi");
  Serial.print("IP address: ");
  Serial.println(WiFi.localIP());

  // Define the web server route
  server.on("/", handleRoot);

  // Start the web server
  server.begin();
  Serial.println("HTTP server started");
}

void loop() {
  // Handle client requests
  server.handleClient();
}

void handleRoot() {

  // Print sensor data to Serial Monitor
  Serial.print("Server Hello World!!");


  String html = "<html><body>";
  html += "<h1>Server Hello World!!</h1>";
  html += "</body></html>";

  // Send the response to the client
  server.send(200, "text/html", html);
}
There's a function handleRoot() which is used for loading the raw html code. A text "Server Hello World!!" is shown in a website.

An IP address is generated after the web server is built. In this case, the IP address is 172.16.36.16. Input the IP address to the browser and the text "Server Hello World!!" is shown in the website.
In week 9, I learnt how to use the sensors to sense the enviroment. It's not general that observing the sensing data through the serial monitor.
It means a interface is needed for indicate the sensing data. Website is one of the general interface to show the sensing data more intuitive.
Refer to my week9 assignment, I built a BDS antennia to receive the position data.
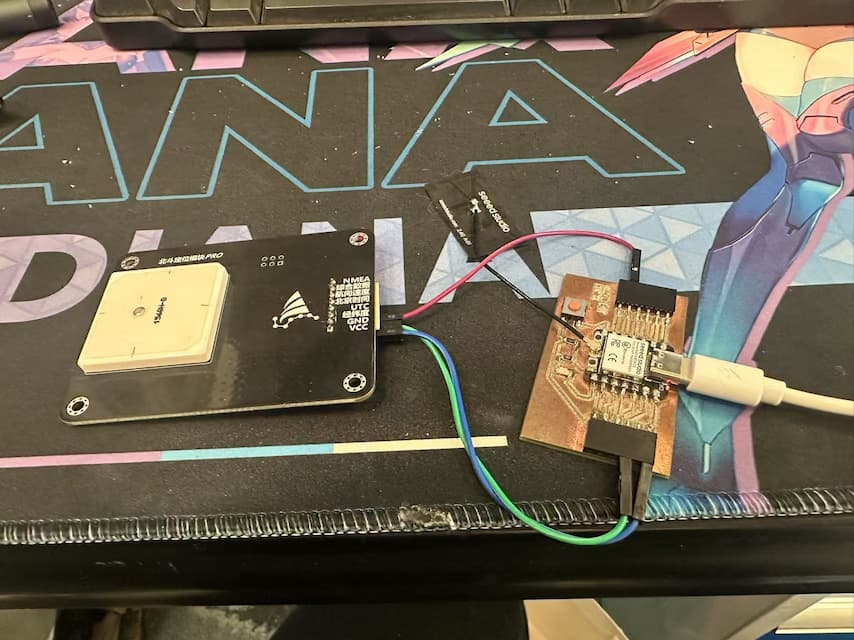
Then, I mix the sensing program to the web server and show the position data to the website through the following code.
Web server code with BDS positioning data
#include <WiFi.h>
#include <WebServer.h>
#include <SoftwareSerial.h>
SoftwareSerial MySerial(D4, D3);

// Replace with your network credentials
const char* ssid = "yourssid";
const char* password = "password";

WebServer server(80); // Create a web server on port 80

void setup() {
  // Initialize serial communication
  Serial.begin(115200);
  MySerial.begin(9600); //Set 9600 baud rate to get the latitude/longitude information only.
  while (!Serial); // Wait for Serial Monitor to open

  // Initialize WiFi
  WiFi.begin(ssid, password);
  Serial.println("Connecting to WiFi...");
  while (WiFi.status() != WL_CONNECTED) {
    delay(500);
    Serial.print(".");
  }
  Serial.println();
  Serial.println("Connected to WiFi");
  Serial.print("IP address: ");
  Serial.println(WiFi.localIP());

  // Define the web server route
  server.on("/", handleRoot);

  // Start the web server
  server.begin();
  Serial.println("HTTP server started");
}

void loop() {
  // Handle client requests
  server.handleClient();
}

void handleRoot() {
  // Get position data from the Beidou Antennia
  // Get & Print BDS data to Serial Monitor
  String long_BD = "";
  String lat_BD = "";
  if(MySerial.available()!=0){
      long_BD = String(MySerial.readStringUntil(','));
      lat_BD = String(MySerial.readStringUntil('\r\n'));
      Serial.print(lat_BD);
      Serial.print(",");
      Serial.println(long_BD);
  }else{
    Serial.println("Nothing Read!!");
  }

  // Server Update hints
  Serial.println("Server Update Hint");

  /// HTML structure
  String html = "<html><body>";
  html += "<h1>Positioning data in current time:</h1>";
  html += "<p>Latitude: " + String(lat_BD) + "</p>" ;
  html += "<p>Longitude: " + String(long_BD) + "</p>" ;
  html += "</body></html>";

  // Send the response to the client
  server.send(200, "text/html", html);
}
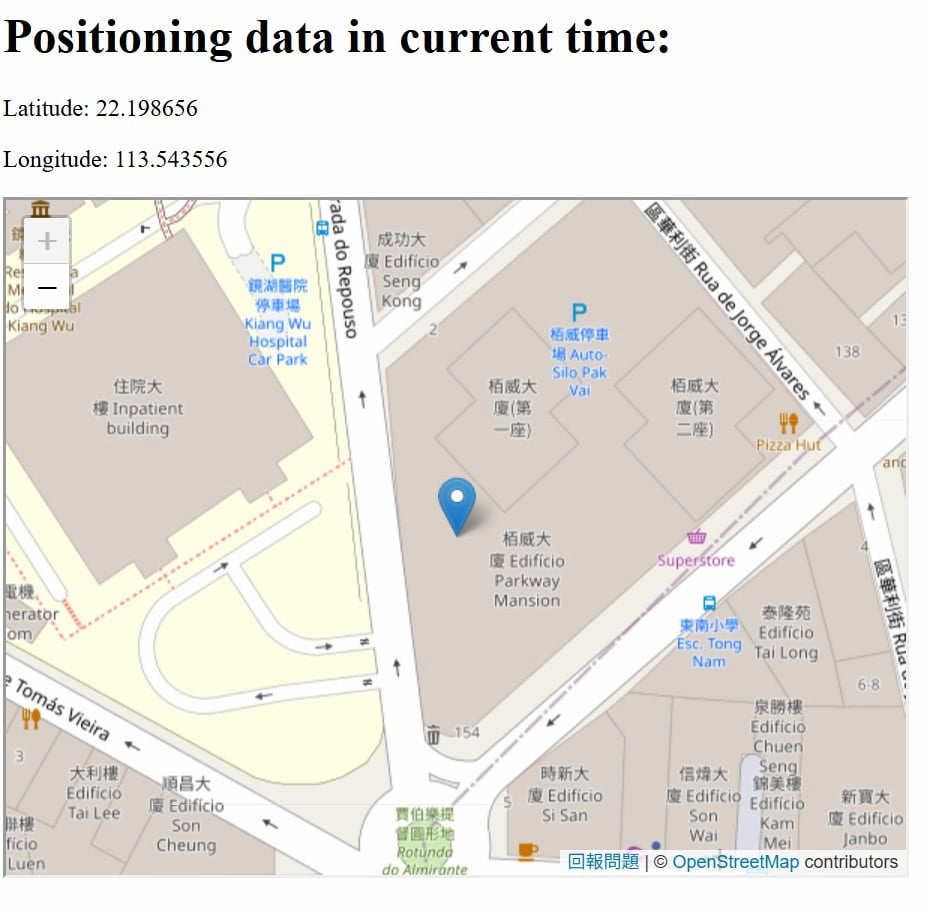
Then, I can see the position data in the website.
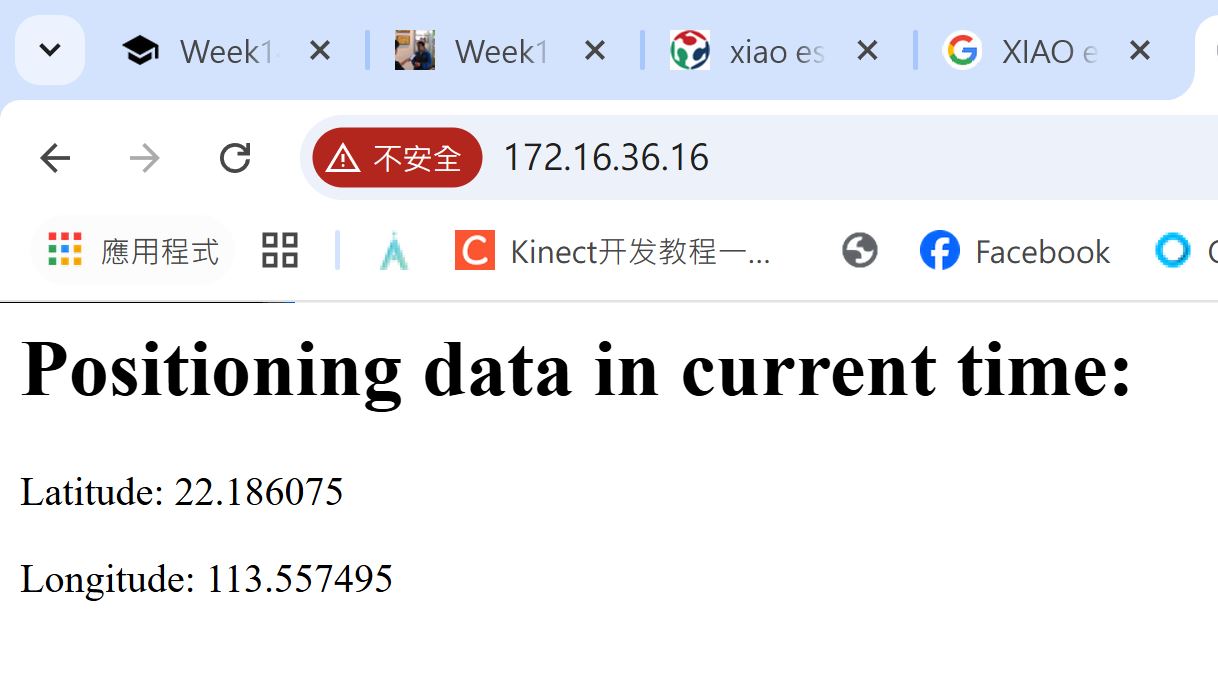
The latitude, longitude information is shown in the website.
Then, I embed the openstreetmap to the web server and the position data can be shown on the map!!
Here's the code which updated for embedding openstreetmap.
Web server code with openstreetmap
#include <WiFi.h>
#include <WebServer.h>
#include <SoftwareSerial.h>
SoftwareSerial MySerial(D4, D3);

// Replace with your network credentials
const char* ssid = "yourssid";
const char* password = "password";

WebServer server(80); // Create a web server on port 80

void setup() {
  // Initialize serial communication
  Serial.begin(115200);
  MySerial.begin(9600); //Set 9600 baud rate to get the latitude/longitude information only.
  while (!Serial); // Wait for Serial Monitor to open

  // Initialize WiFi
  WiFi.begin(ssid, password);
  Serial.println("Connecting to WiFi...");
  while (WiFi.status() != WL_CONNECTED) {
    delay(500);
    Serial.print(".");
  }
  Serial.println();
  Serial.println("Connected to WiFi");
  Serial.print("IP address: ");
  Serial.println(WiFi.localIP());

  // Define the web server route
  server.on("/", handleRoot);

  // Start the web server
  server.begin();
  Serial.println("HTTP server started");
}

void loop() {
  // Handle client requests
  server.handleClient();
}

void handleRoot() {
  // Get position data from the Beidou Antennia
  // Get & Print BDS data to Serial Monitor
  String long_BD = "";
  String lat_BD = "";
  if(MySerial.available()!=0){
      long_BD = String(MySerial.readStringUntil(','));
      lat_BD = String(MySerial.readStringUntil('\r\n'));
      Serial.print(lat_BD);
      Serial.print(",");
      Serial.println(long_BD);
  }else{
    Serial.println("Nothing Read!!");
  }

  // Server Update hints
  Serial.println("Server Update Hint");

  // Size of the map
  String size_length1_map = String(long_BD.toDouble() - 0.00025, 6);
  String size_length2_map = String(long_BD.toDouble() + 0.00025, 6);
  String size_height1_map = String(lat_BD.toDouble() - 0.00025, 6);
  String size_height2_map = String(lat_BD.toDouble() + 0.00025, 6);

  /// HTML structure
  String html = "<html><body>";
  String url_map = "https://www.openstreetmap.org/export/embed.html?bbox="+ size_length1_map +"%2C" + size_height1_map + "%2C"+ size_length2_map +"%2C" + size_height2_map + "&layer=mapnik&marker="+ String(lat_BD.toDouble(),6) +"%2C" + String(long_BD.toDouble(),6);
  Serial.println(url_map);
  html += "<h1>Positioning data in current time:</h1>";
  html += "<p>Latitude: " + String(lat_BD) + "</p>" ;
  html += "<p>Longitude: " + String(long_BD) + "</p>" ;
  html += "<iframe src=" + url_map + " width=" + String(600) + " height=" + String(450) + "></iframe>";
  html += "</body></html>";

  // Send the response to the client
  server.send(200, "text/html", html);
}
ESP-NOW Protocol
I learnt the ESP-NOW Protocol through the tutorials of randomnerdtutorials.com.
ESP-NOW is a connectionless communication protocol developed by Espressif that features short packet transmission. This protocol enables multiple devices to talk to each other in an easy way.
ESP-NOW supports the following features:
- Encrypted and unencrypted unicast communication;
- Mixed encrypted and unencrypted peer devices;
- Up to 250-byte payload can be carried;
- Sending callback function that can be set to inform the application layer of transmission success or failure.
ESP-NOW contains:
-
One-Way Communication
The "master/sender" ESP32 can send the same or different commands to different ESP32 boards. It can also have several ESP32 boards around the house that are controlled by one main ESP32 board, or as a ESP32 can be a web server to display data from all the other boards.
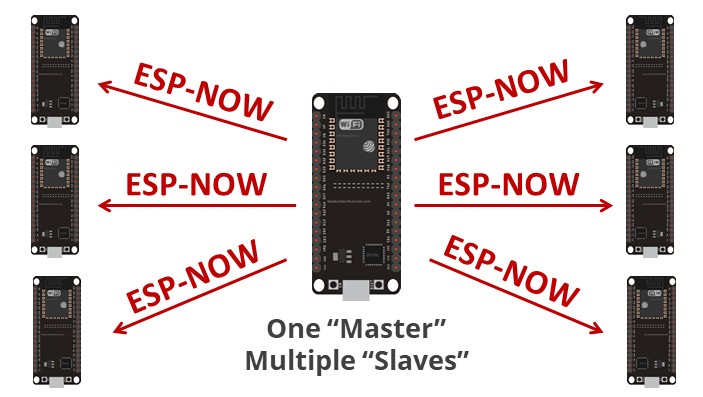
Somtimes there's 1 master and many slaves.
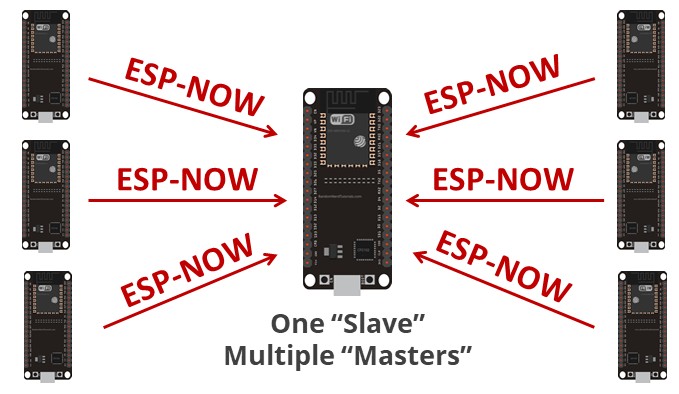
Sometimes there's 1 slave and many masters.
-
Two-Way Communication
Each board can be a sender and a receiver at the same time.

In this assignment, I will try one-way communication by 2 ESP32C3 boards.
Getting MAC address
To communicate via ESP-NOW, I have to get the MAC address of a ESP32C3 board as receiver/slave.
Each ESP32C3 has a unique MAC Address which like our unique ID card number.
I get my receiver's MAC address by the following code.
getting MAC address Code
#include <WiFi.h>
#include <esp_wifi.h>

void readMacAddress(){
  uint8_t baseMac[6];
  esp_err_t ret = esp_wifi_get_mac(WIFI_IF_STA, baseMac);
  if (ret == ESP_OK) {
    Serial.printf("%02x:%02x:%02x:%02x:%02x:%02x\n",
                  baseMac[0], baseMac[1], baseMac[2],
                  baseMac[3], baseMac[4], baseMac[5]);
  } else {
    Serial.println("Failed to read MAC address");
  }
}

void setup(){
  Serial.begin(115200);

  WiFi.mode(WIFI_STA);
  WiFi.begin();

  Serial.print("[DEFAULT] ESP32 Board MAC Address: ");
  readMacAddress();
}

void loop(){

}
After uploading the code, open the Serial Monitor to check the MAC address. The result is shown as below.
![]()
This MAC address should be recorded for modifying the code of receiver.
Sender/Master
Refer to the tutorials, I will upload the following code for the sender board.
Sender Code
#include <esp_now.h>
#include <WiFi.h>

// REPLACE WITH YOUR RECEIVER MAC Address
uint8_t broadcastAddress[] = {0x18, 0x8B, 0x0E, 0x93, 0x51, 0x54};

// Structure example to send data
// Must match the receiver structure
typedef struct struct_message {
  char a[32];
  int b;
  float c;
  bool d;
} struct_message;

// Create a struct_message called myData
struct_message myData;

esp_now_peer_info_t peerInfo;

// callback when data is sent
void OnDataSent(const uint8_t *mac_addr, esp_now_send_status_t status) {
  Serial.print("\r\nLast Packet Send Status:\t");
  Serial.println(status == ESP_NOW_SEND_SUCCESS ? "Delivery Success" : "Delivery Fail");
}

void setup() {
  // Init Serial Monitor
  Serial.begin(115200);

  // Set device as a Wi-Fi Station
  WiFi.mode(WIFI_STA);

  // Init ESP-NOW
  if (esp_now_init() != ESP_OK) {
    Serial.println("Error initializing ESP-NOW");
    return;
  }

  // Once ESPNow is successfully Init, we will register for Send CB to
  // get the status of Trasnmitted packet
  esp_now_register_send_cb(OnDataSent);

  // Register peer
  memcpy(peerInfo.peer_addr, broadcastAddress, 6);
  peerInfo.channel = 0;
  peerInfo.encrypt = false;

  // Add peer
  if (esp_now_add_peer(&peerInfo) != ESP_OK){
    Serial.println("Failed to add peer");
    return;
  }
}

void loop() {
  // Set values to send
  strcpy(myData.a, "THIS IS A CHAR");
  myData.b = random(1,20);
  myData.c = 1.2;
  myData.d = false;

  // Send message via ESP-NOW
  esp_err_t result = esp_now_send(broadcastAddress, (uint8_t *) &myData, sizeof(myData));

  if (result == ESP_OK) {
    Serial.println("Sent with success");
  }
  else {
    Serial.println("Error sending the data");
  }
  delay(2000);
}
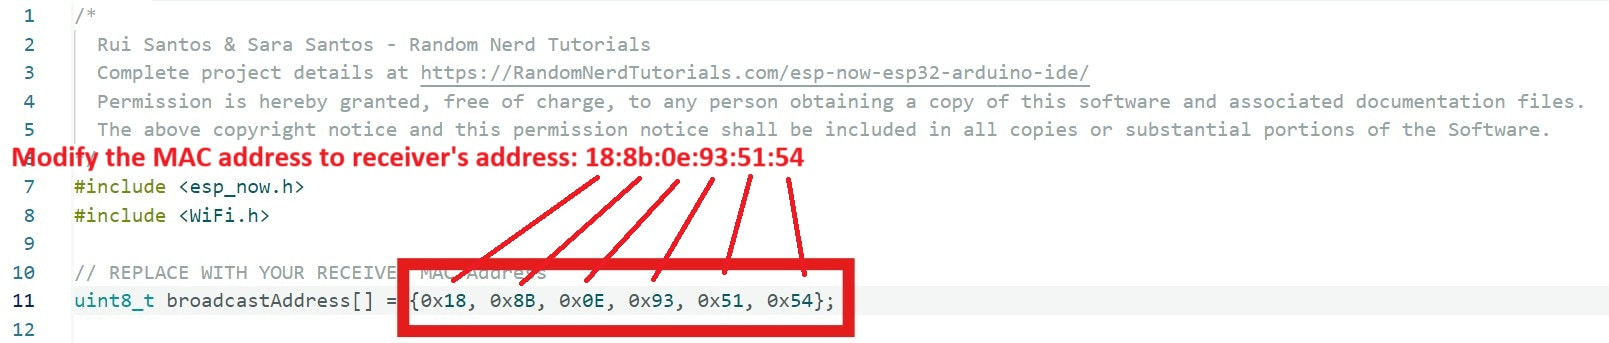
There's something should be modified. There's a unsigned interger variable broadcastAddress[] in line 11 of the code.
The default MAC address is :
{0xFF, 0xFF, 0xFF, 0xFF, 0xFF, 0xFF}. Modify it as below:
After uploading the code, the following data will be sent to the receiver:
strcpy(myData.a, "THIS IS A CHAR"); //Sending char
myData.b = random(1,20); //Sending 1-20 random interger
myData.c = 1.2; //Sending 1.2 float
myData.d = false; //Sending a false Boolean
I can check the sending status, but there' no receiver in this step. It will indicate "Delivery Fail" to show me the receiver cannot recevier the sending data.
![]()
Receiver/Slave
Refer to the tutorials, I will upload the following code for the receiver board.
Receiver Code
#include <esp_now.h>
#include <WiFi.h>

// Structure example to receive data
// Must match the sender structure
typedef struct struct_message {
    char a[32];
    int b;
    float c;
    bool d;
} struct_message;

// Create a struct_message called myData
struct_message myData;

// callback function that will be executed when data is received
void OnDataRecv(const uint8_t * mac, const uint8_t *incomingData, int len) {
  memcpy(&myData, incomingData, sizeof(myData));
  Serial.print("Bytes received: ");
  Serial.println(len);
  Serial.print("Char: ");
  Serial.println(myData.a);
  Serial.print("Int: ");
  Serial.println(myData.b);
  Serial.print("Float: ");
  Serial.println(myData.c);
  Serial.print("Bool: ");
  Serial.println(myData.d);
  Serial.println();
}

void setup() {
  // Initialize Serial Monitor
  Serial.begin(115200);

  // Set device as a Wi-Fi Station
  WiFi.mode(WIFI_STA);

  // Init ESP-NOW
  if (esp_now_init() != ESP_OK) {
    Serial.println("Error initializing ESP-NOW");
    return;
  }

  // Once ESPNow is successfully Init, we will register for recv CB to
  // get recv packer info
  esp_now_register_recv_cb(esp_now_recv_cb_t(OnDataRecv));
}

void loop() {

}
The esp_now_recv_cb_t() function is used for receiving the sending data from the master board.
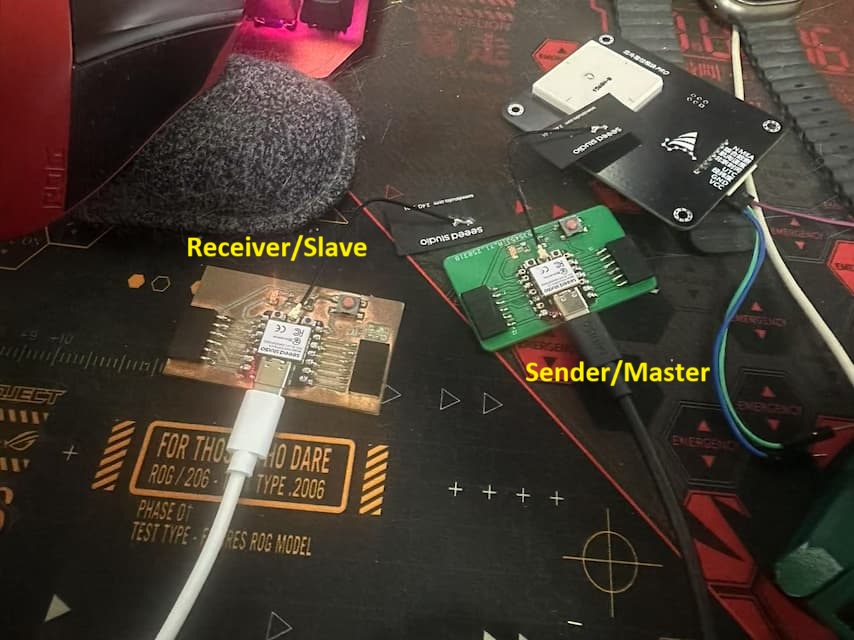
Testing ESP-NOW Communication
Now, open two Arduino IDE windows. One for the receiver, and another for the sender. Open the Serial Monitor for each board. It should be a different COM port for each board.
![]()
I can get a char, 1-20 random integer, 1.2 float and a 0 boolean number through the receiver. And I tested the communication range between two boards, it's able to get a stable communication up to 220 meters in open field.
Testing for getting Beidou Satellite data
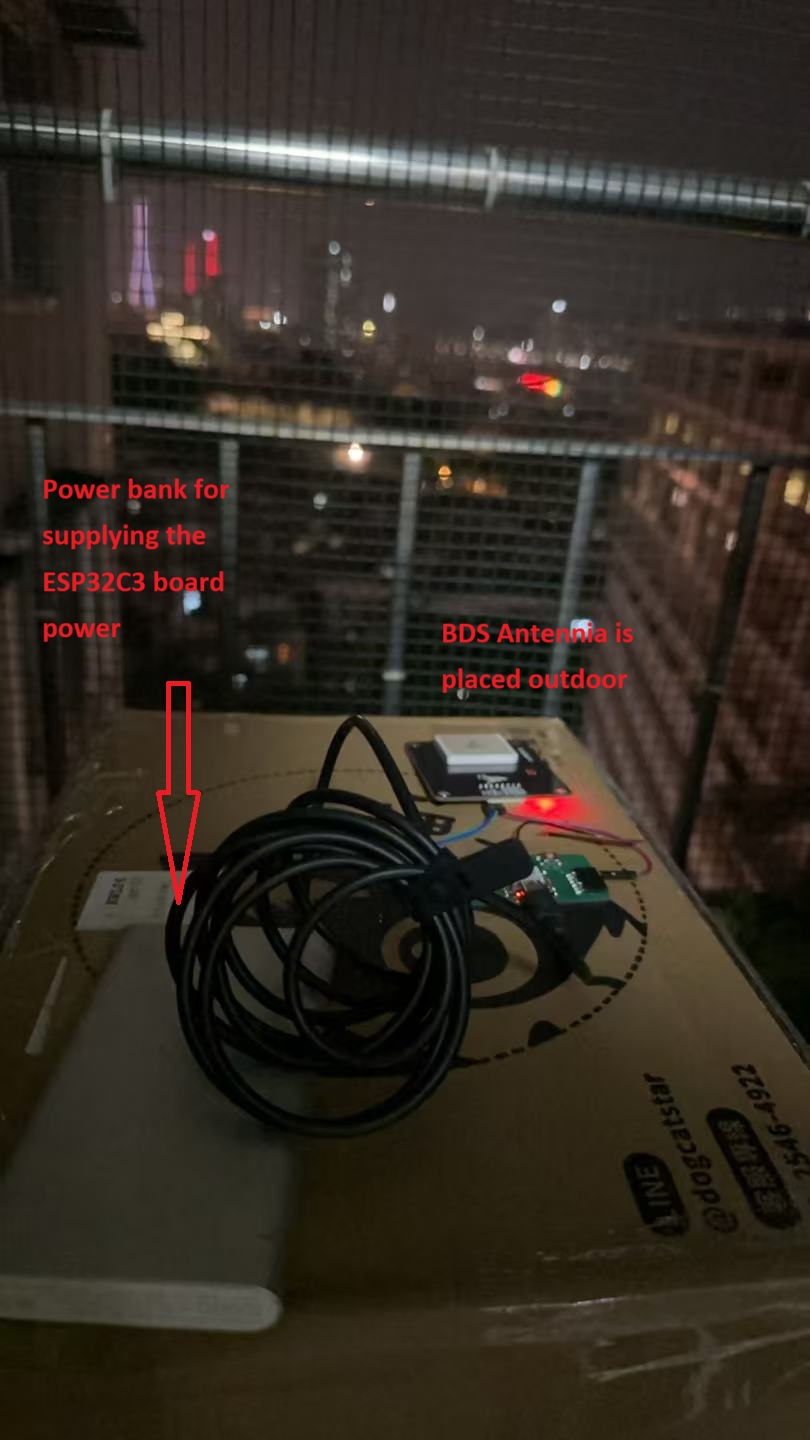
Either GPS or BDS, the positioning data cannot be received in indoor environment. The antennia should be placed outdoor to get the BDS signal.
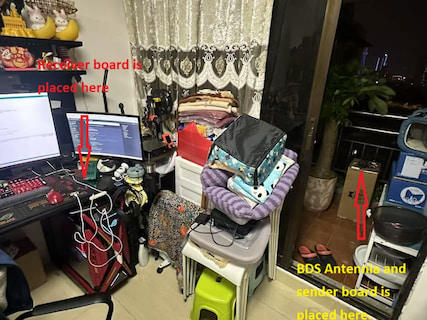
I designed a method that: placing the antennia in outdoor and sending back the position data through ESP-NOW. There's a receiver which placed in indoor.
I modify the testing code as below:
Sender Code for BDS
#include <esp_now.h>
#include <WiFi.h>
#include <SoftwareSerial.h>

SoftwareSerial MySerial(D4, D3);

String DATA_BD = "";

// REPLACE WITH YOUR RECEIVER MAC Address
uint8_t broadcastAddress[] = {0x88, 0x13, 0xBF, 0x24, 0xAD, 0xF4};
//88:13:bf:24:ad:f4

// Structure example to send data
// Must match the receiver structure
typedef struct struct_message {
  char a[100];
} struct_message;

// Create a struct_message called myData
struct_message myData;

esp_now_peer_info_t peerInfo;

// callback when data is sent
void OnDataSent(const uint8_t *mac_addr, esp_now_send_status_t status) {
  Serial.print("\r\nLast Packet Send Status:\t");
  Serial.println(status == ESP_NOW_SEND_SUCCESS ? "Delivery Success" : "Delivery Fail");
}

void setup() {
  // Init Serial Monitor
  Serial.begin(115200);
  MySerial.begin(9600); //Set 9600 baud rate to get the latitude/longitude information only.
  // Set device as a Wi-Fi Station
  WiFi.mode(WIFI_STA);

  // Init ESP-NOW
  if (esp_now_init() != ESP_OK) {
    Serial.println("Error initializing ESP-NOW");
    return;
  }

  // Once ESPNow is successfully Init, we will register for Send CB to
  // get the status of Trasnmitted packet
  esp_now_register_send_cb(OnDataSent);

  // Register peer
  memcpy(peerInfo.peer_addr, broadcastAddress, 6);
  peerInfo.channel = 0;
  peerInfo.encrypt = false;

  // Add peer
  if (esp_now_add_peer(&peerInfo) != ESP_OK){
    Serial.println("Failed to add peer");
    return;
  }
}

void loop() {
  // Set values to send
  if(MySerial.available()!=0){
      DATA_BD = String(MySerial.readStringUntil('\n'));
      Serial.println(DATA_BD);
      delay(1000);
  }else{
    Serial.println("Nothing Read!!");
    delay(100);
  }


  //strcpy(myData.a, "THIS IS A CHAR");
  strcpy(myData.a, DATA_BD.c_str());

  // Send message via ESP-NOW
  esp_err_t result = esp_now_send(broadcastAddress, (uint8_t *) &myData, sizeof(myData));

  if (result == ESP_OK) {
    Serial.println("Sent with success");
  }
  else {
    Serial.println("Error sending the data");
  }
  delay(2000);
}
Receiver Code for BDS
#include <esp_now.h>
#include <WiFi.h>

// Structure example to receive data
// Must match the sender structure
typedef struct struct_message {
    char a[100];
    int b;
    float c;
    bool d;
} struct_message;

// Create a struct_message called myData
struct_message myData;

// callback function that will be executed when data is received
void OnDataRecv(const uint8_t * mac, const uint8_t *incomingData, int len) {
  memcpy(&myData, incomingData, sizeof(myData));
  //Serial.print("Bytes received: ");
  //Serial.println(len);
  //Serial.print("Char: ");
  Serial.println(myData.a);
  Serial.println();
}

void setup() {
  // Initialize Serial Monitor
  Serial.begin(115200);

  // Set device as a Wi-Fi Station
  WiFi.mode(WIFI_STA);

  // Init ESP-NOW
  if (esp_now_init() != ESP_OK) {
    Serial.println("Error initializing ESP-NOW");
    return;
  }

  // Once ESPNow is successfully Init, we will register for recv CB to
  // get recv packer info
  esp_now_register_recv_cb(esp_now_recv_cb_t(OnDataRecv));
}

void loop() {

}
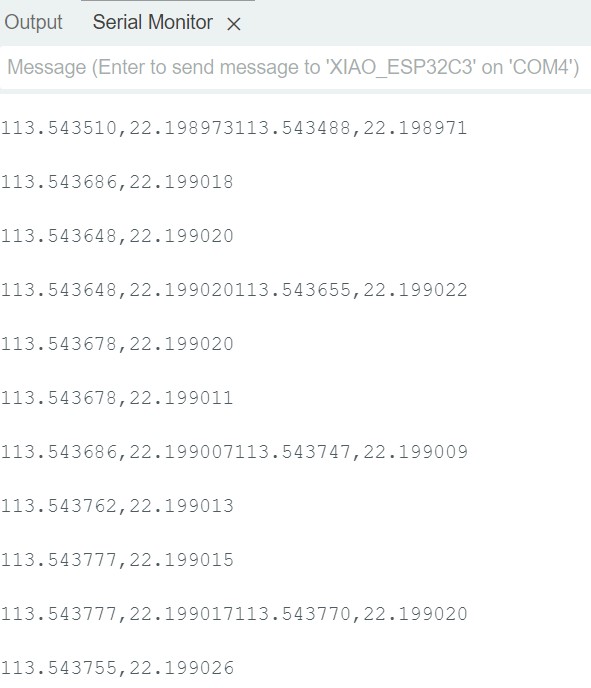
Finally, the positioning data is received in the serial monitor of receiver.