Results: System Integration
Since the beginning of the program, Fab&Plant -my final project- has constantly evolved. This week, I made a concerted effort to finalize these iterations and reach a completed version of the project.
Fab&Plant final version
Fab&Plant is a product designed with an organized system: an exterior enclosure that is the most visible part, and an interior framework that distributes the electronic components necessary for its operation.
Next, let's review each subsystem that enables the product to exist and function according to its intended purpose.
Design: Fab&Plant End-to-End Insights
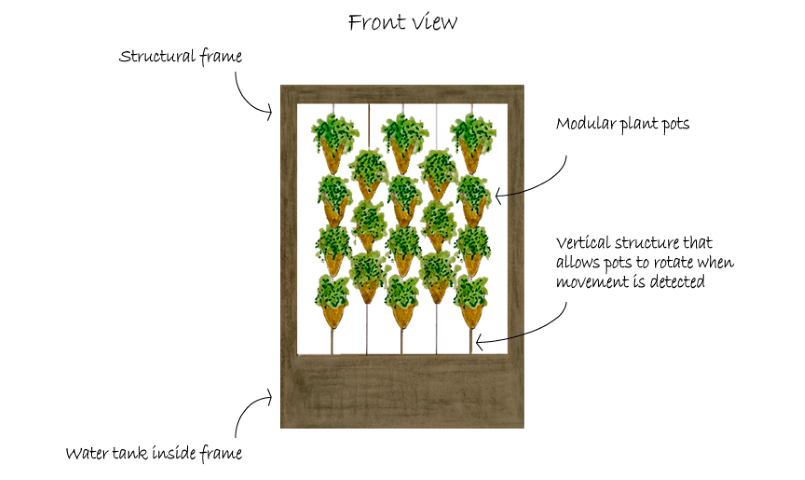
The origin of Fab&Plant lies in the idea of creating vertical gardens that could be easy to care for and interactive with users. After months of various iterations, the product has evolved into an innovative plant framework, combining ecological design and interactive technology to create a living, vibrant, and responsive work of art. This design reconnects urban dwellers with nature in an accessible and sustainable way.
Concept
Fab&Plant is an interactive living frame designed to reconnect urban dwellers with nature. This innovative green artwork senses your presence, lights up icons to indicate watering needs, and moves in gratitude when plants are well-cared for. Its efficient water use and modular design make it both eco-friendly and versatile, enhancing your living space with vibrant, responsive greenery.
Design Evolution
Initially, I focused on the concept of a vertical garden. The product evolved to find a shape that could adapt to different walls and environments, both indoors and outdoors. This led me to the hexagonal shape, creating a living painting that operates autonomously.
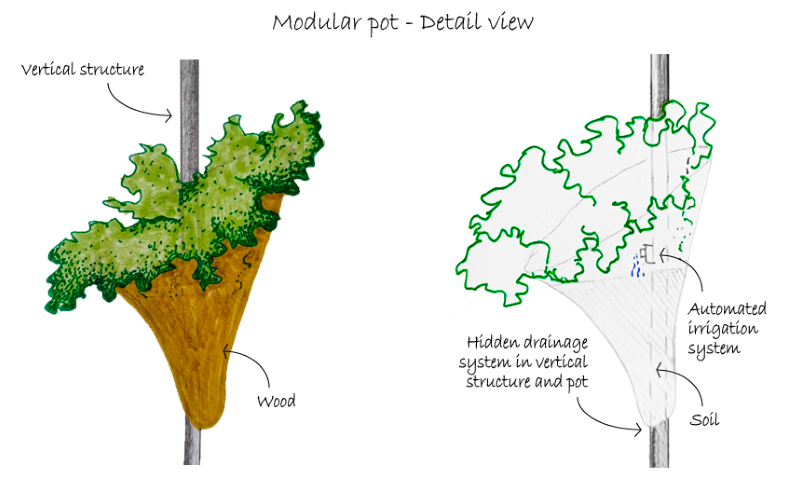
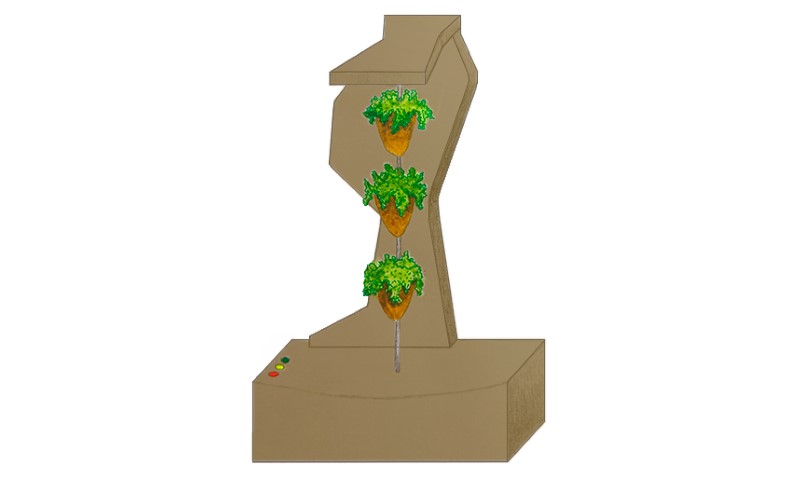
Design evolution
Final Version
The goal of Fab&Plant is to enable users to reconnect with a natural environment by caring for their plants, with a product that interacts through lights and movement, thereby enhancing their quality of life. After different iterations, the final version of my Fab Academy project is the following:
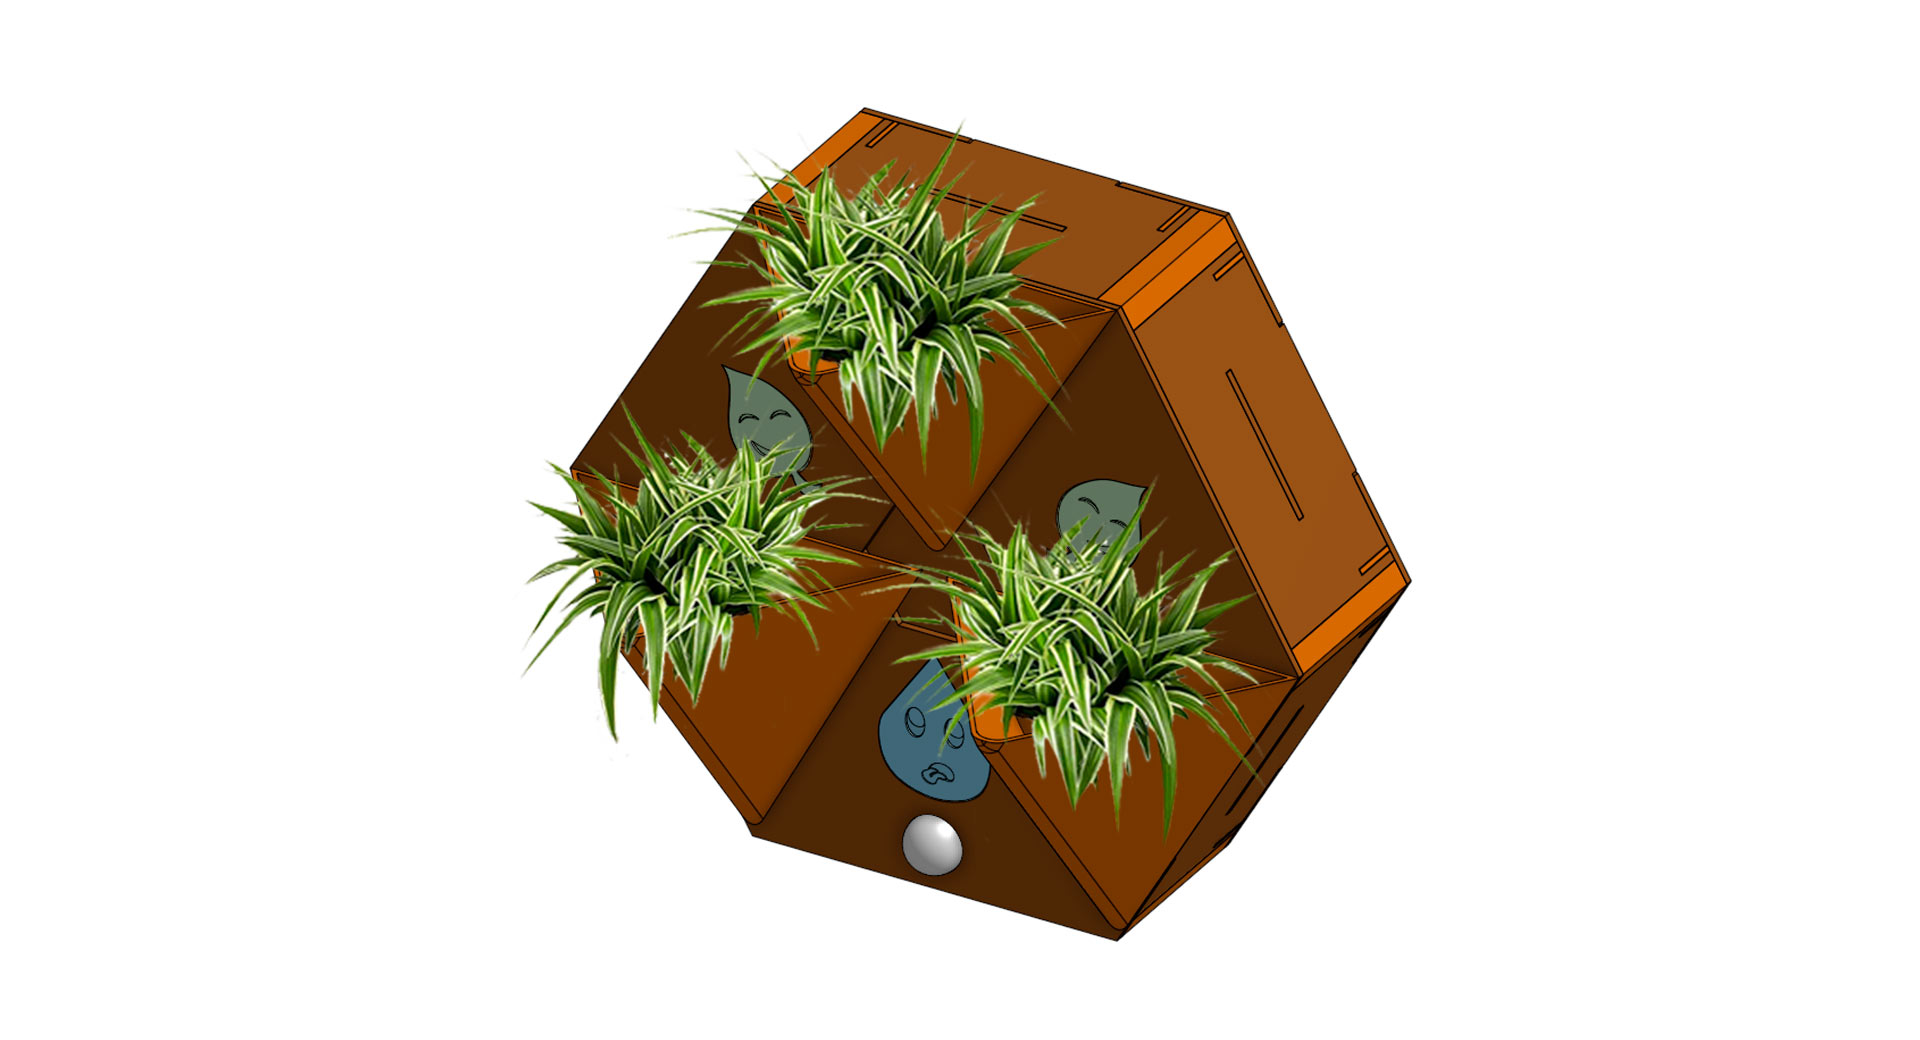
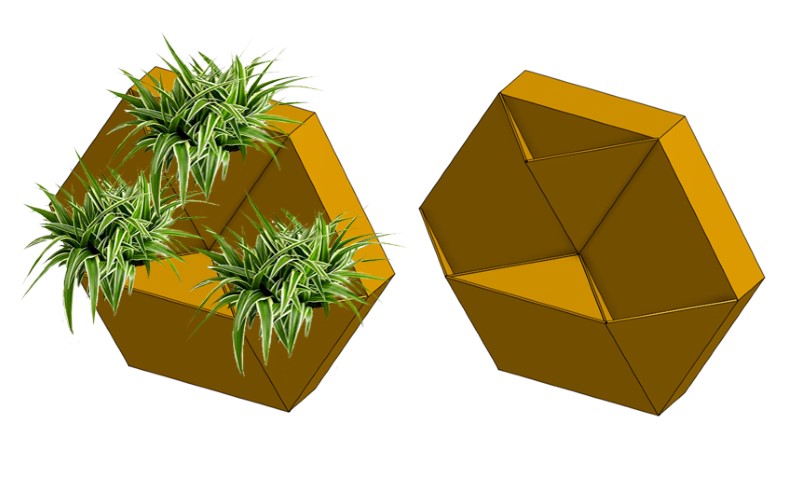
Design and structure: Fab&Plant features a hexagonal shape inscribed in a 30 cm diameter circle, constructed from three layers of 3 mm laser-cut plywood assembled with press-fit. The outer layers (front and back) form the enclosure, while the inner layer houses the technological core and structure. This design allows the system to function independently or as part of a larger vertical garden by combining multiple living frames. The front outer layer includes three planters and icons that illuminate based on the system's moisture detection. The power cable is located at the back of the living frame for easy access and minimal visual intrusion. Inside, the PCB and electronic components are housed, including a moisture sensor and PIR sensor as inputs, and LED strips and a servo motor as outputs.
Fab&Plant final version
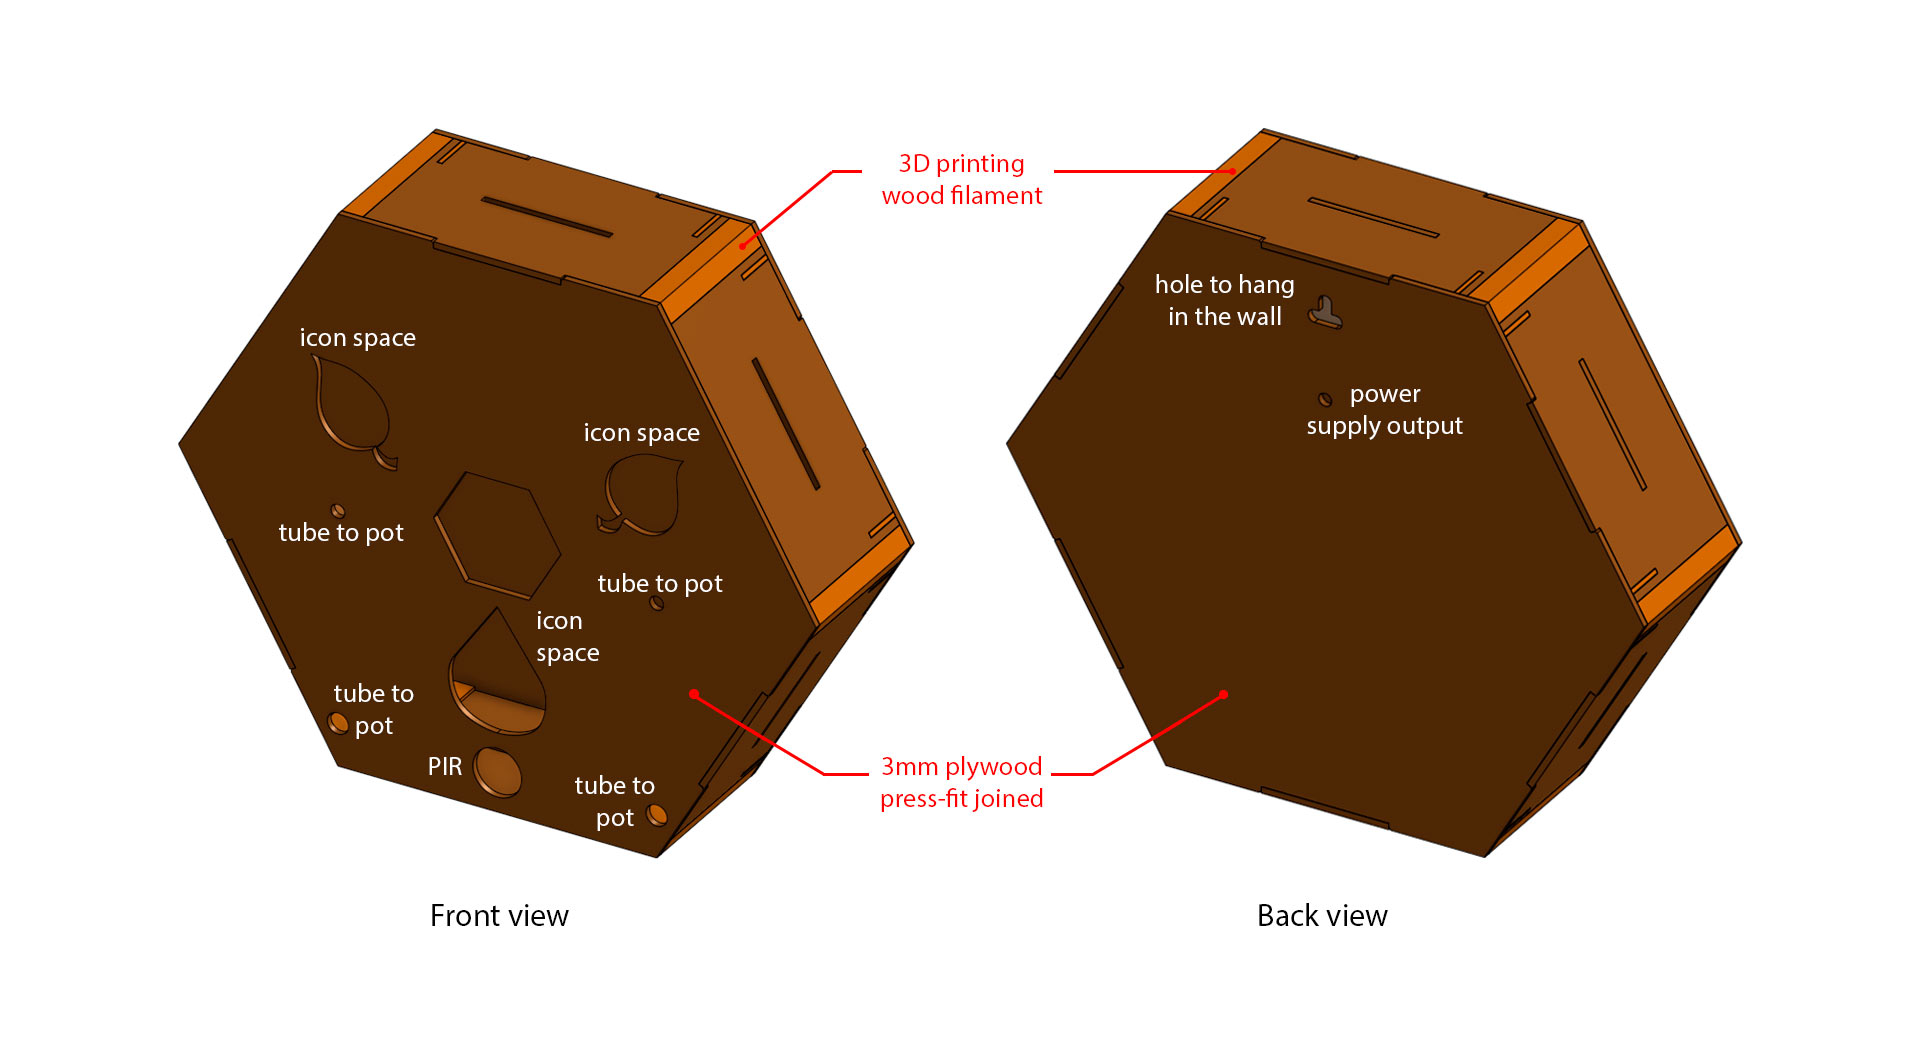
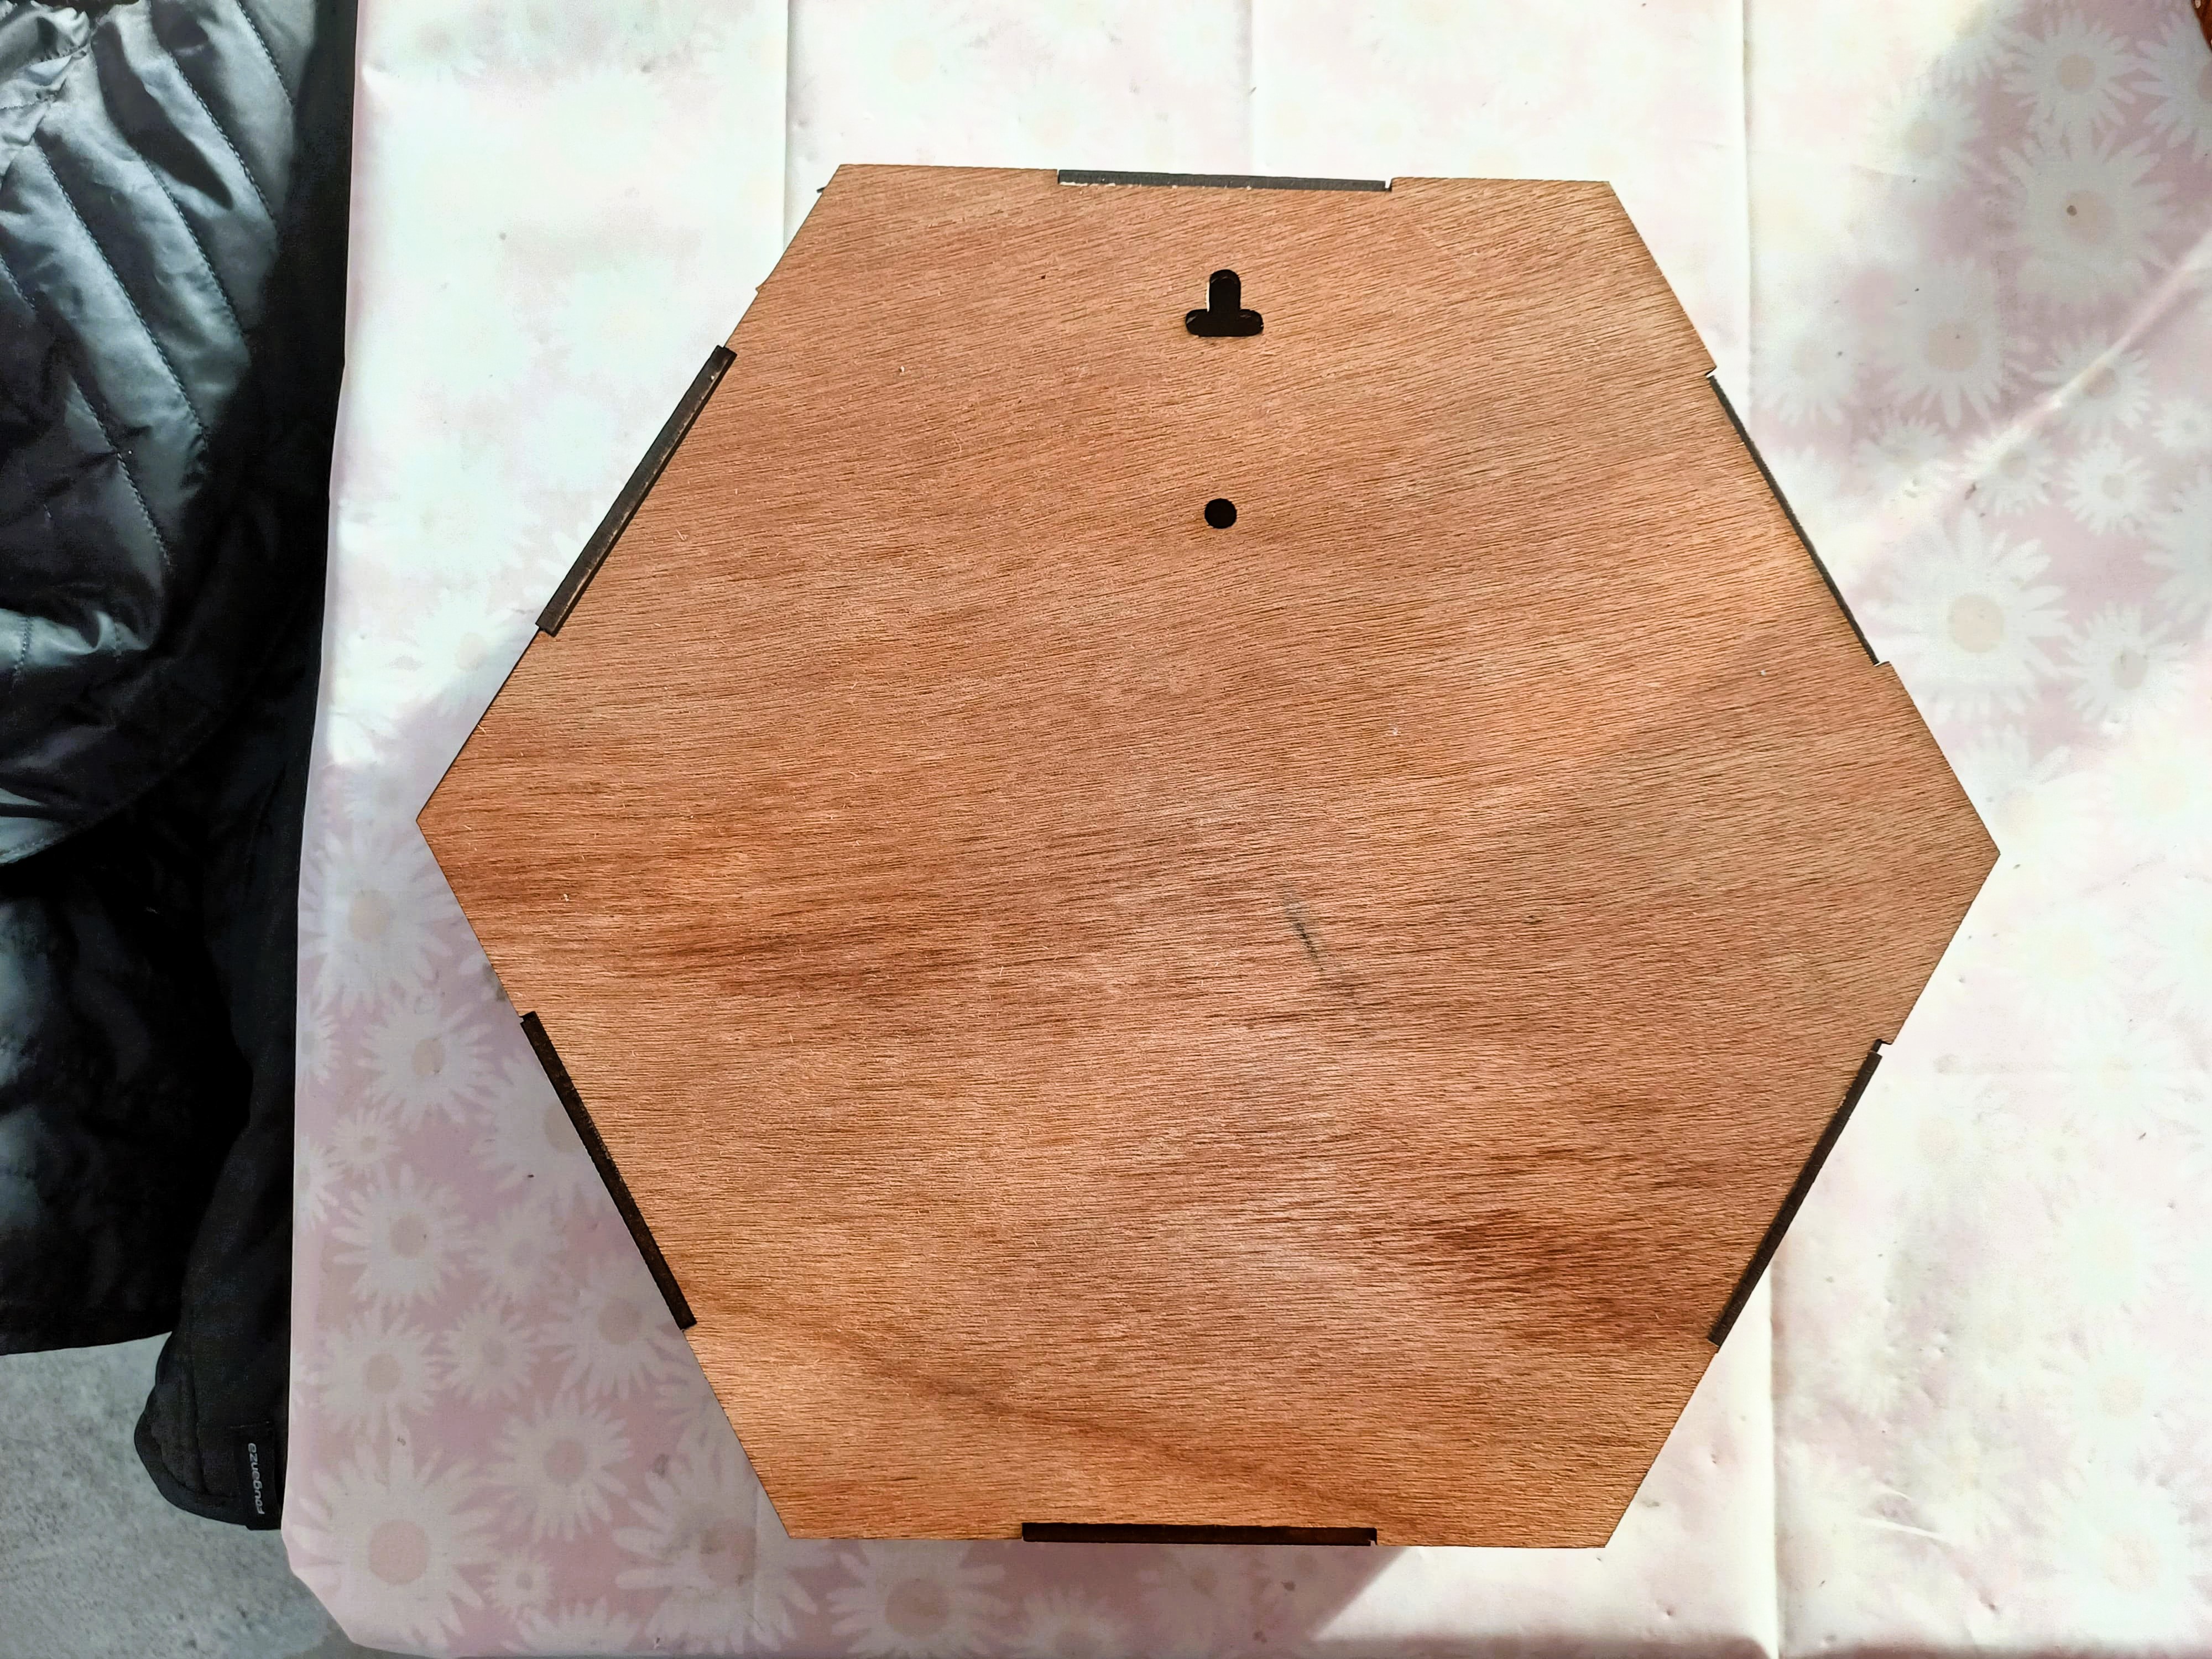
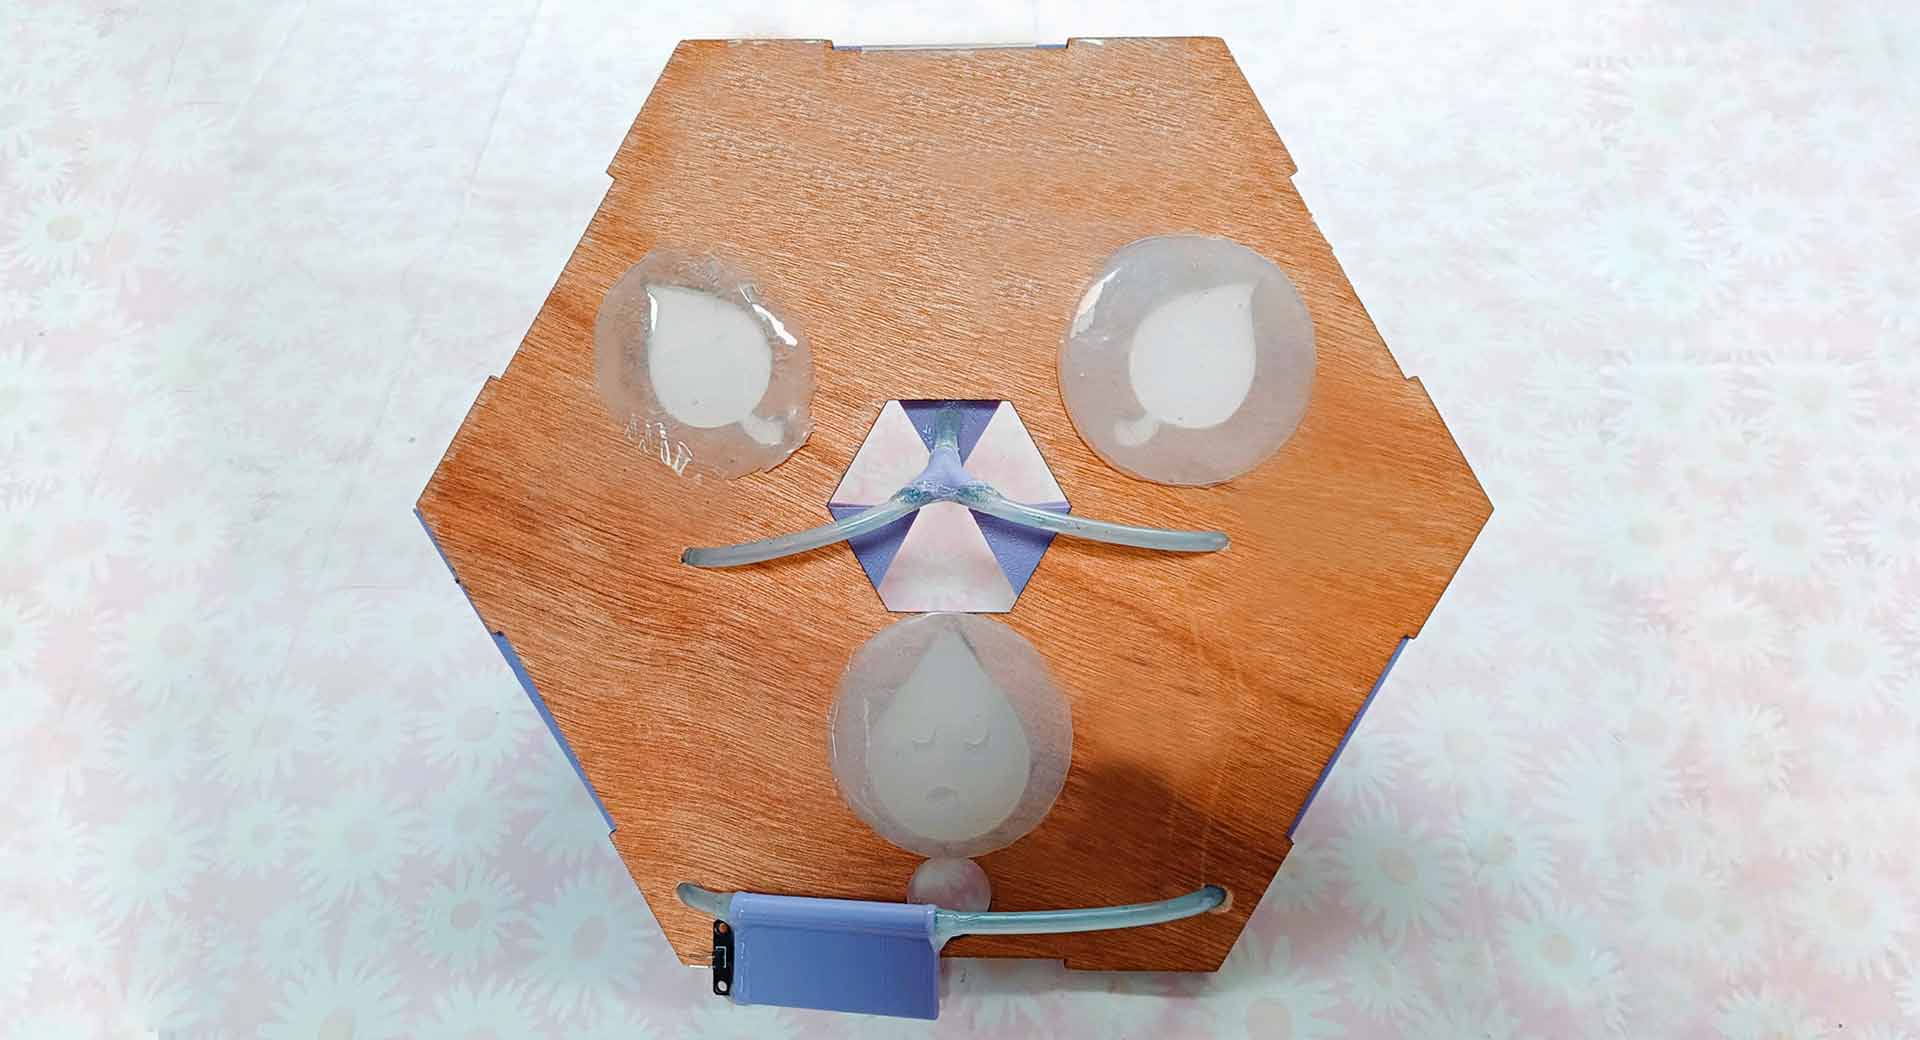
Fab&Plant exterior design
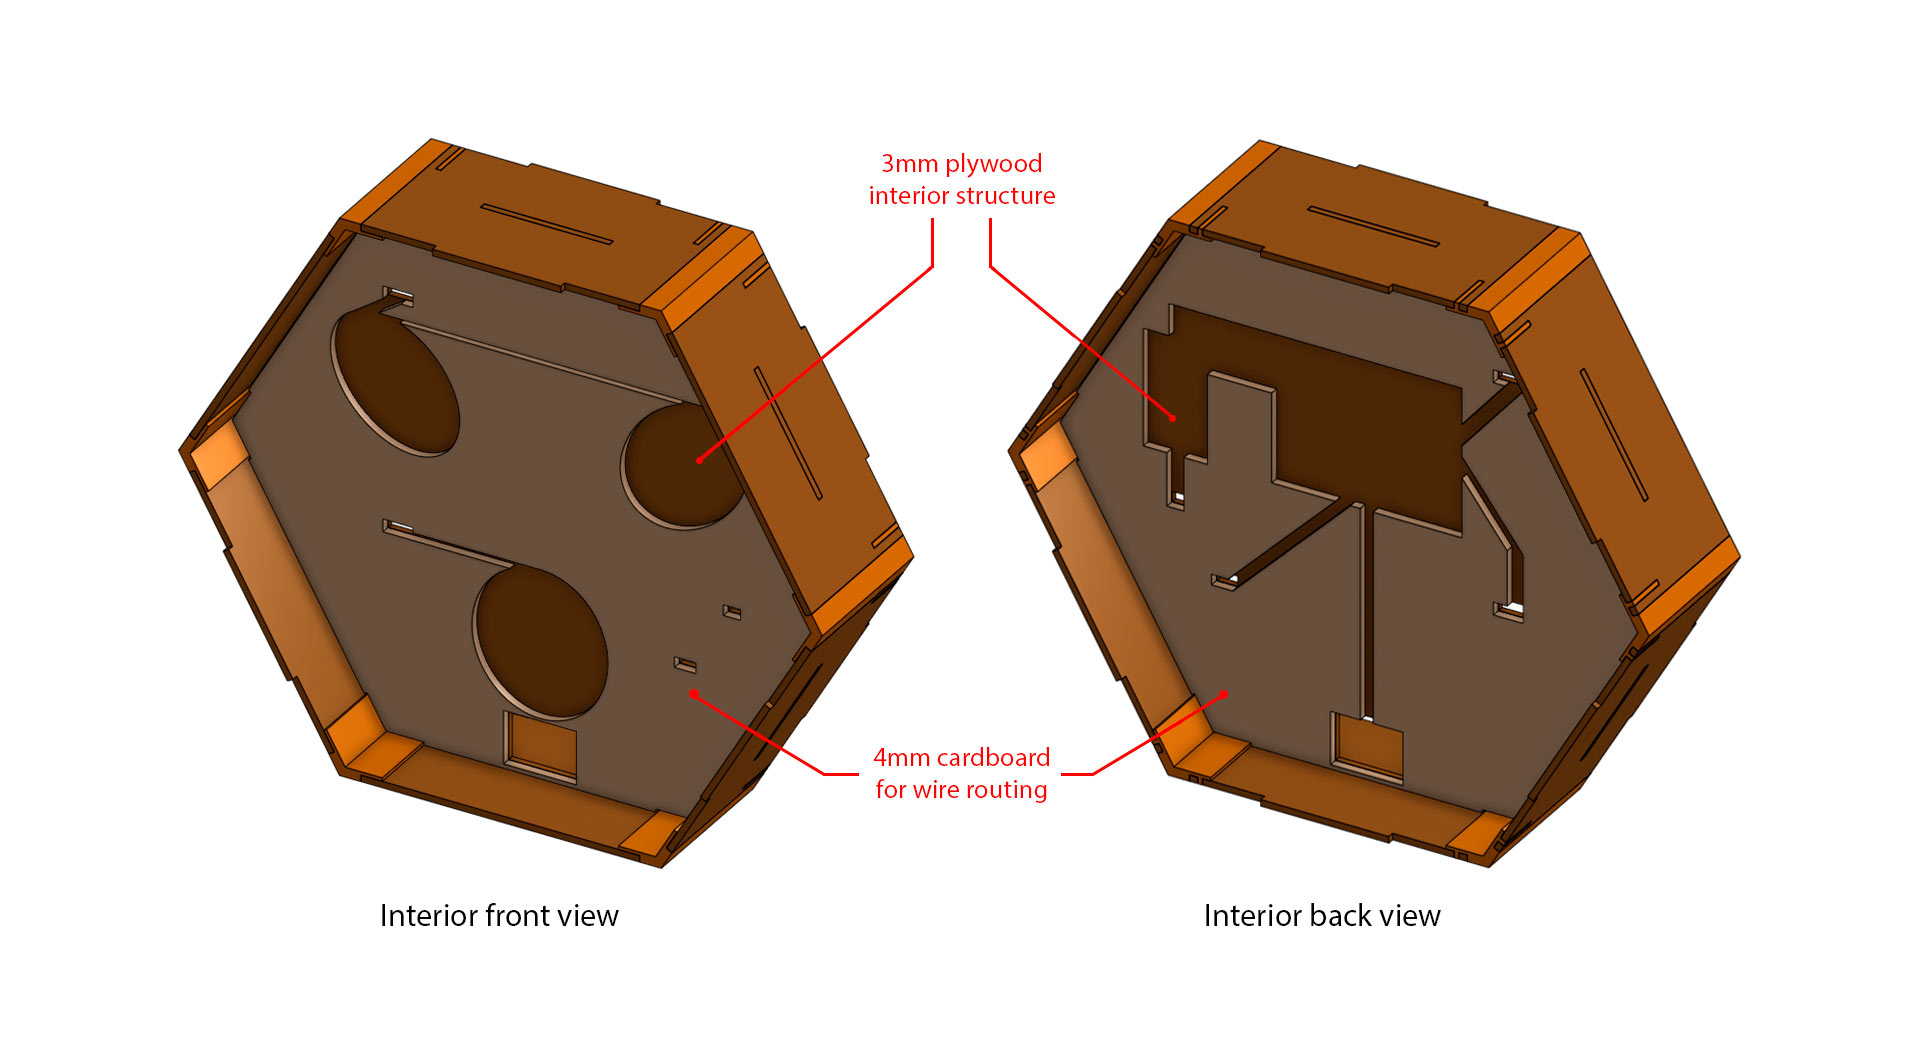
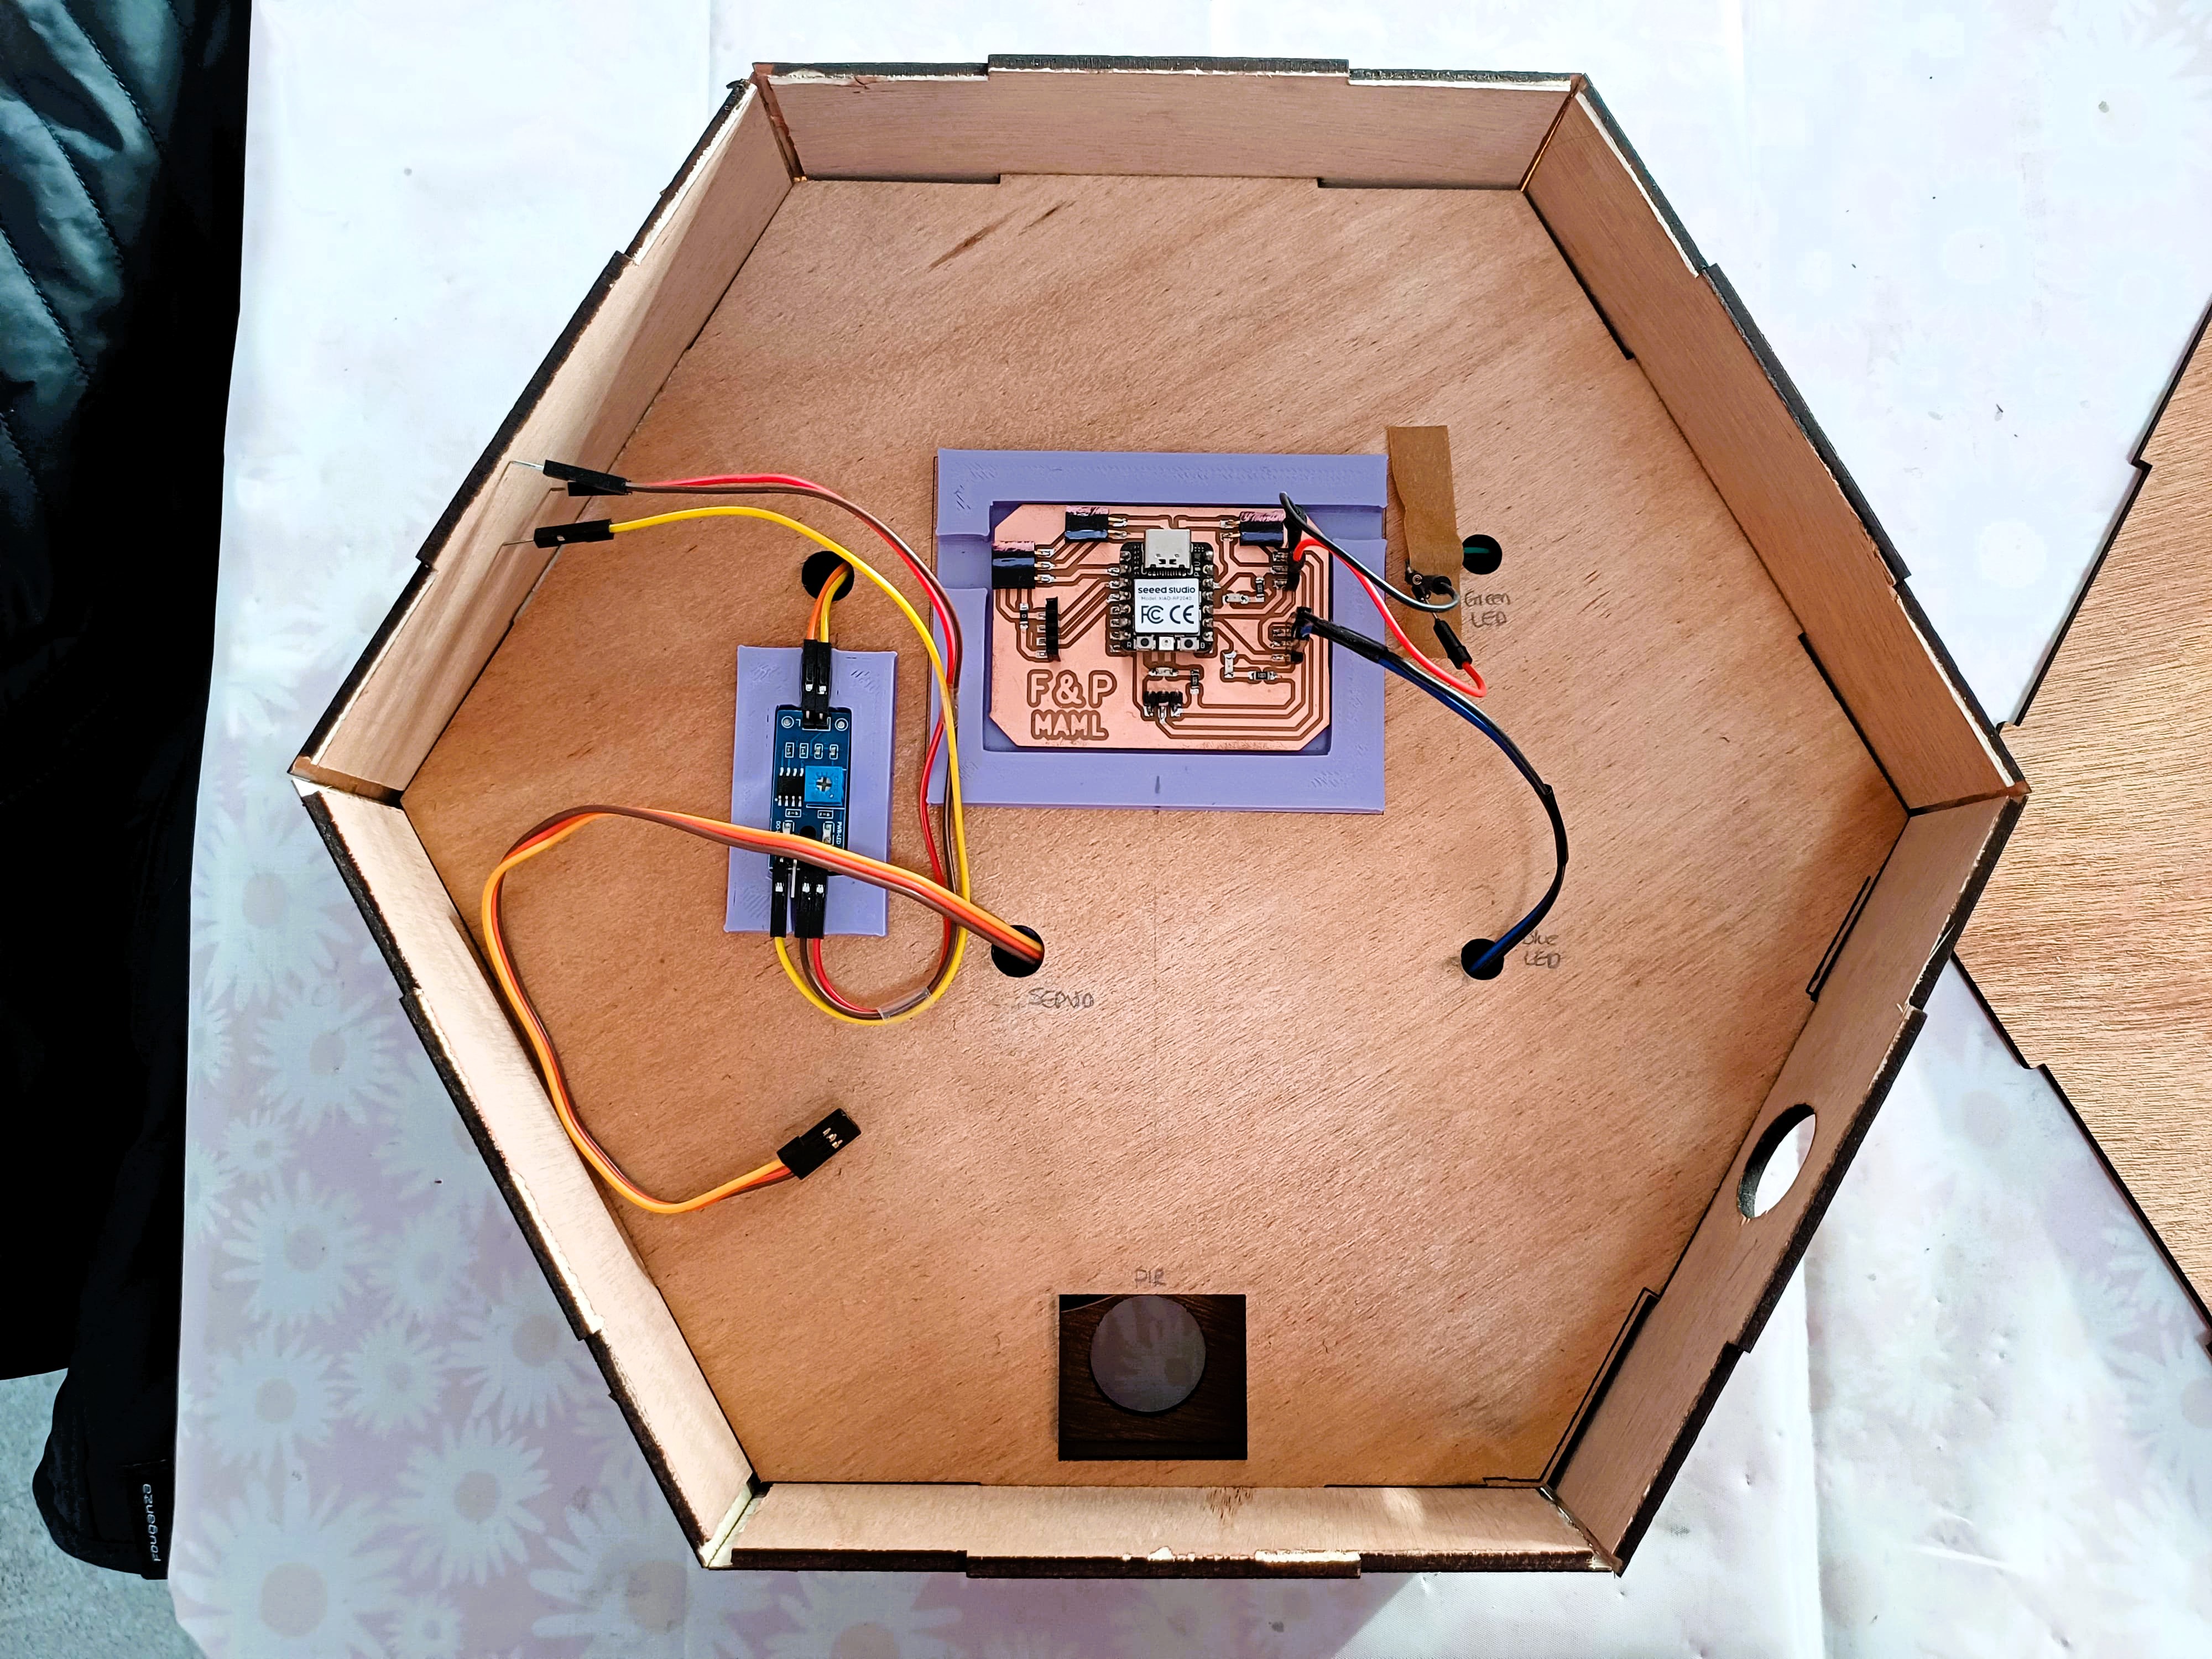
Fab&Plant interior design
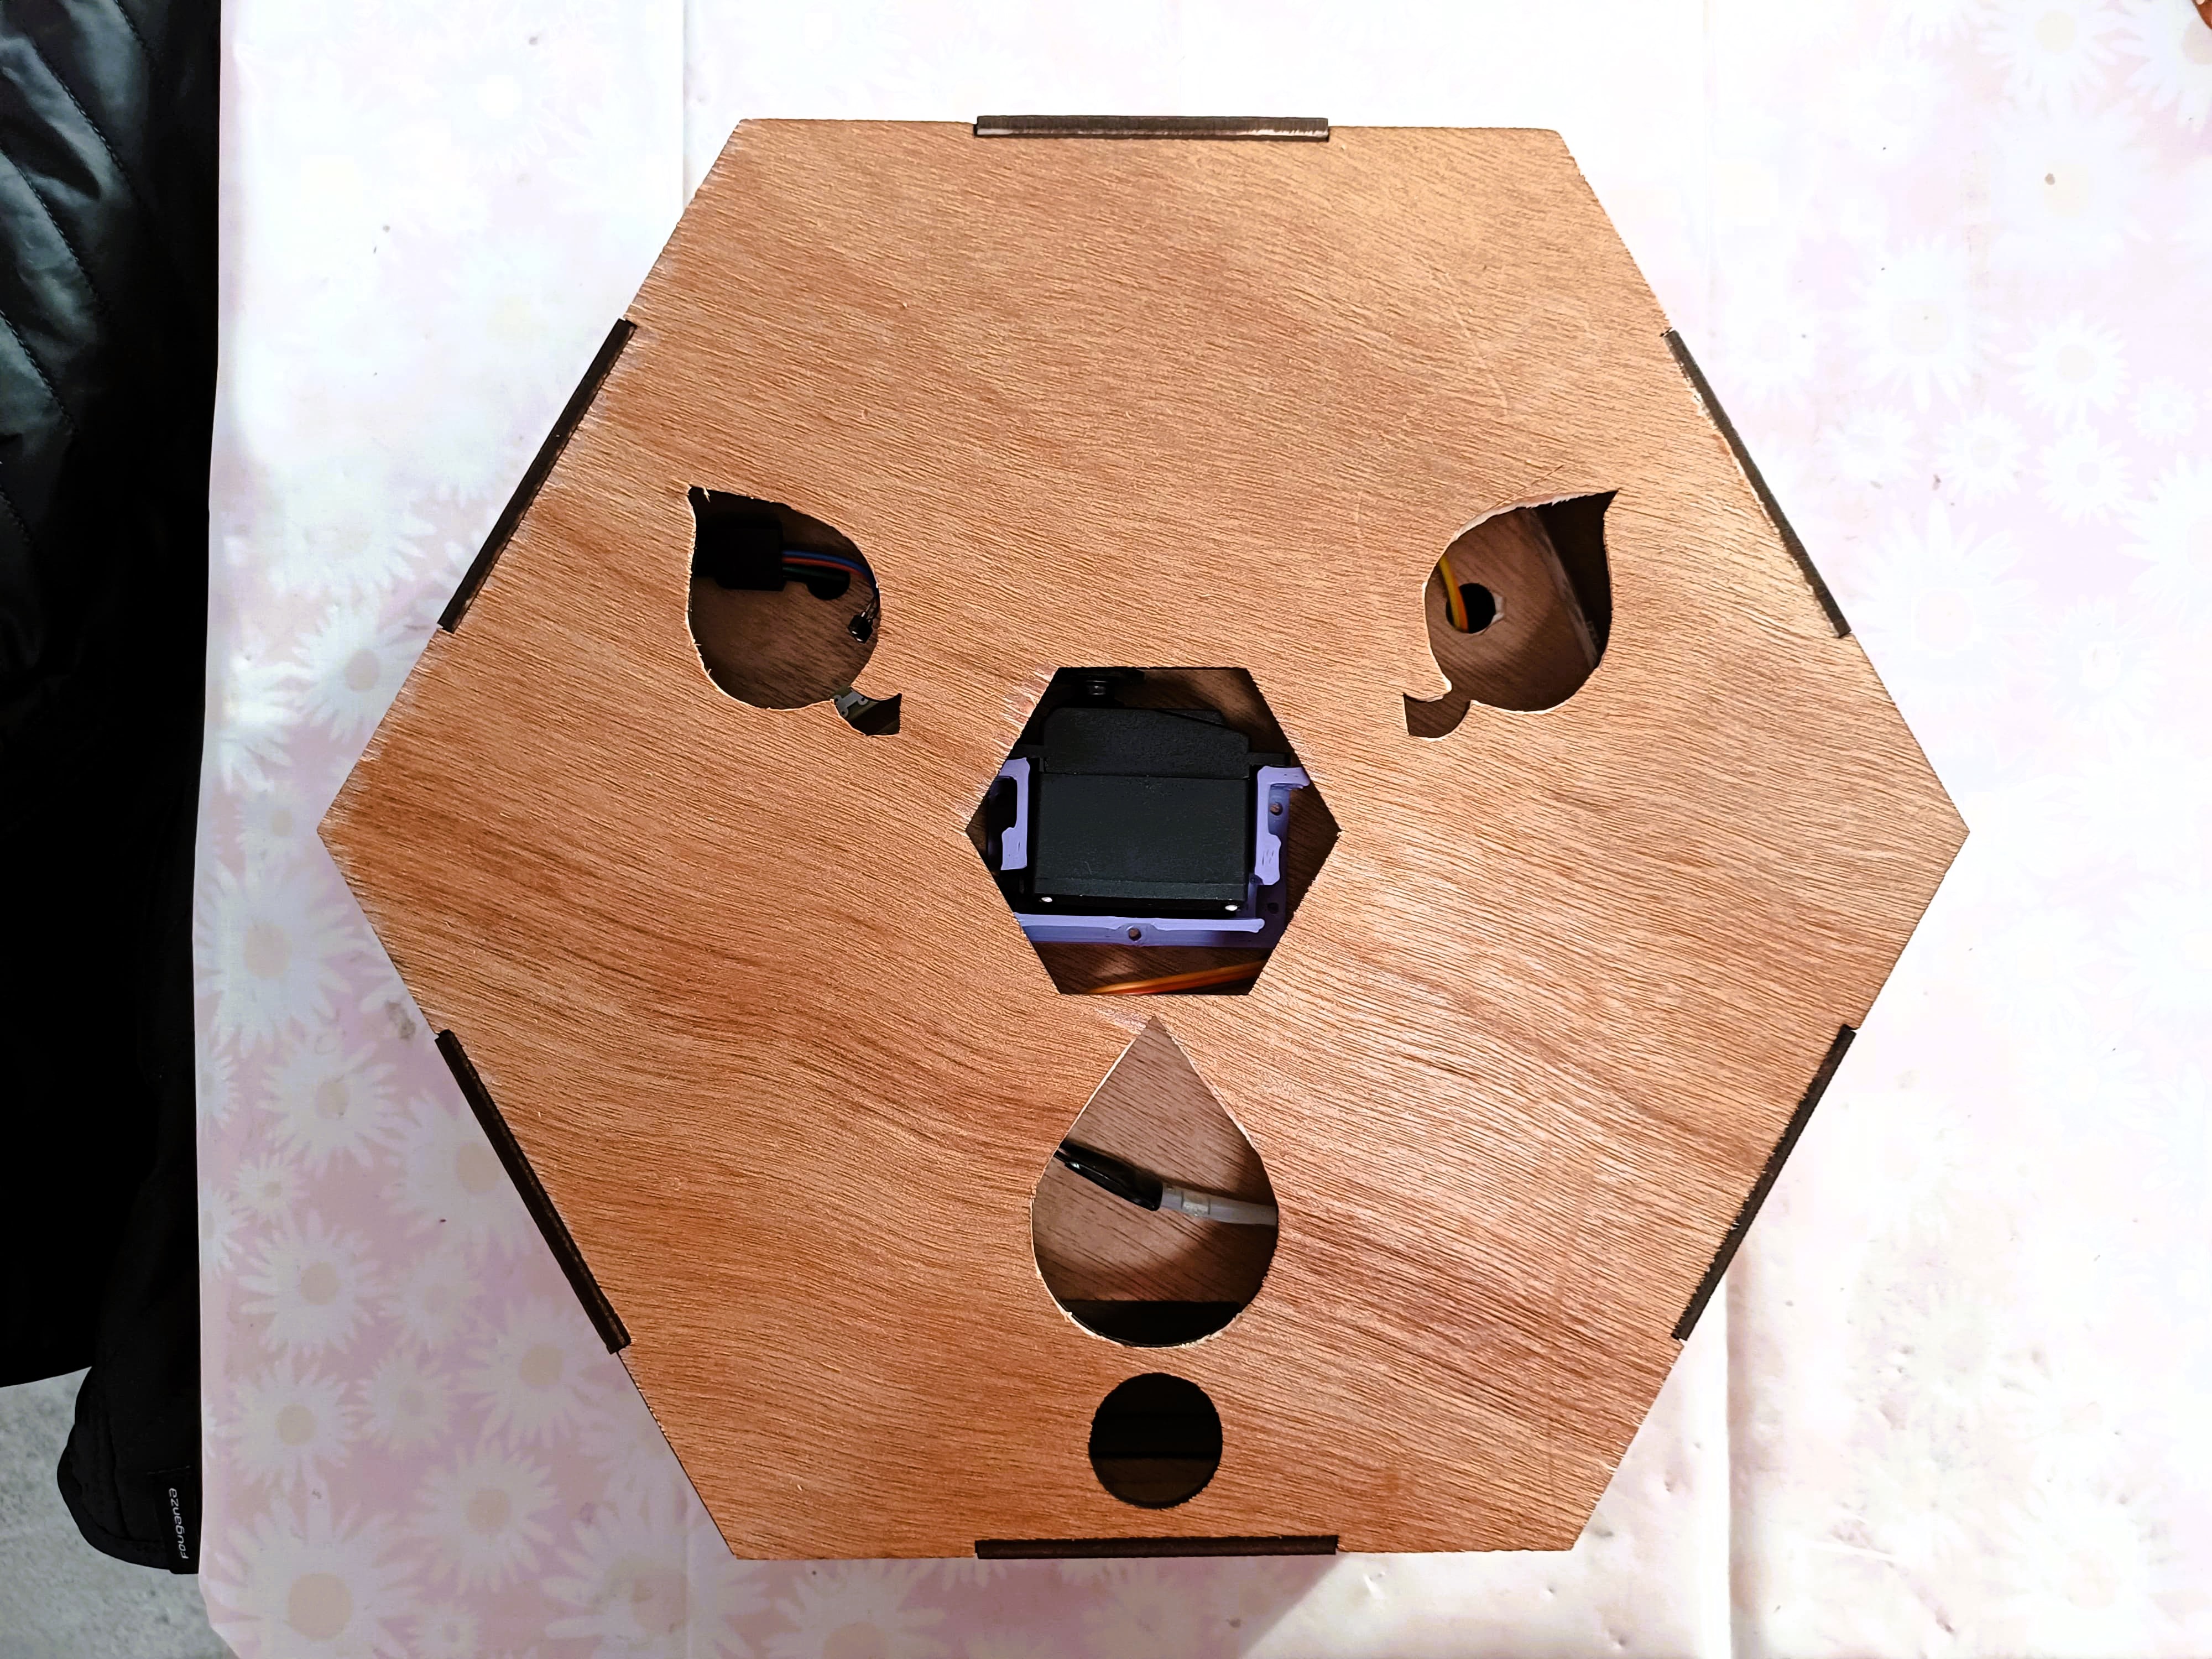
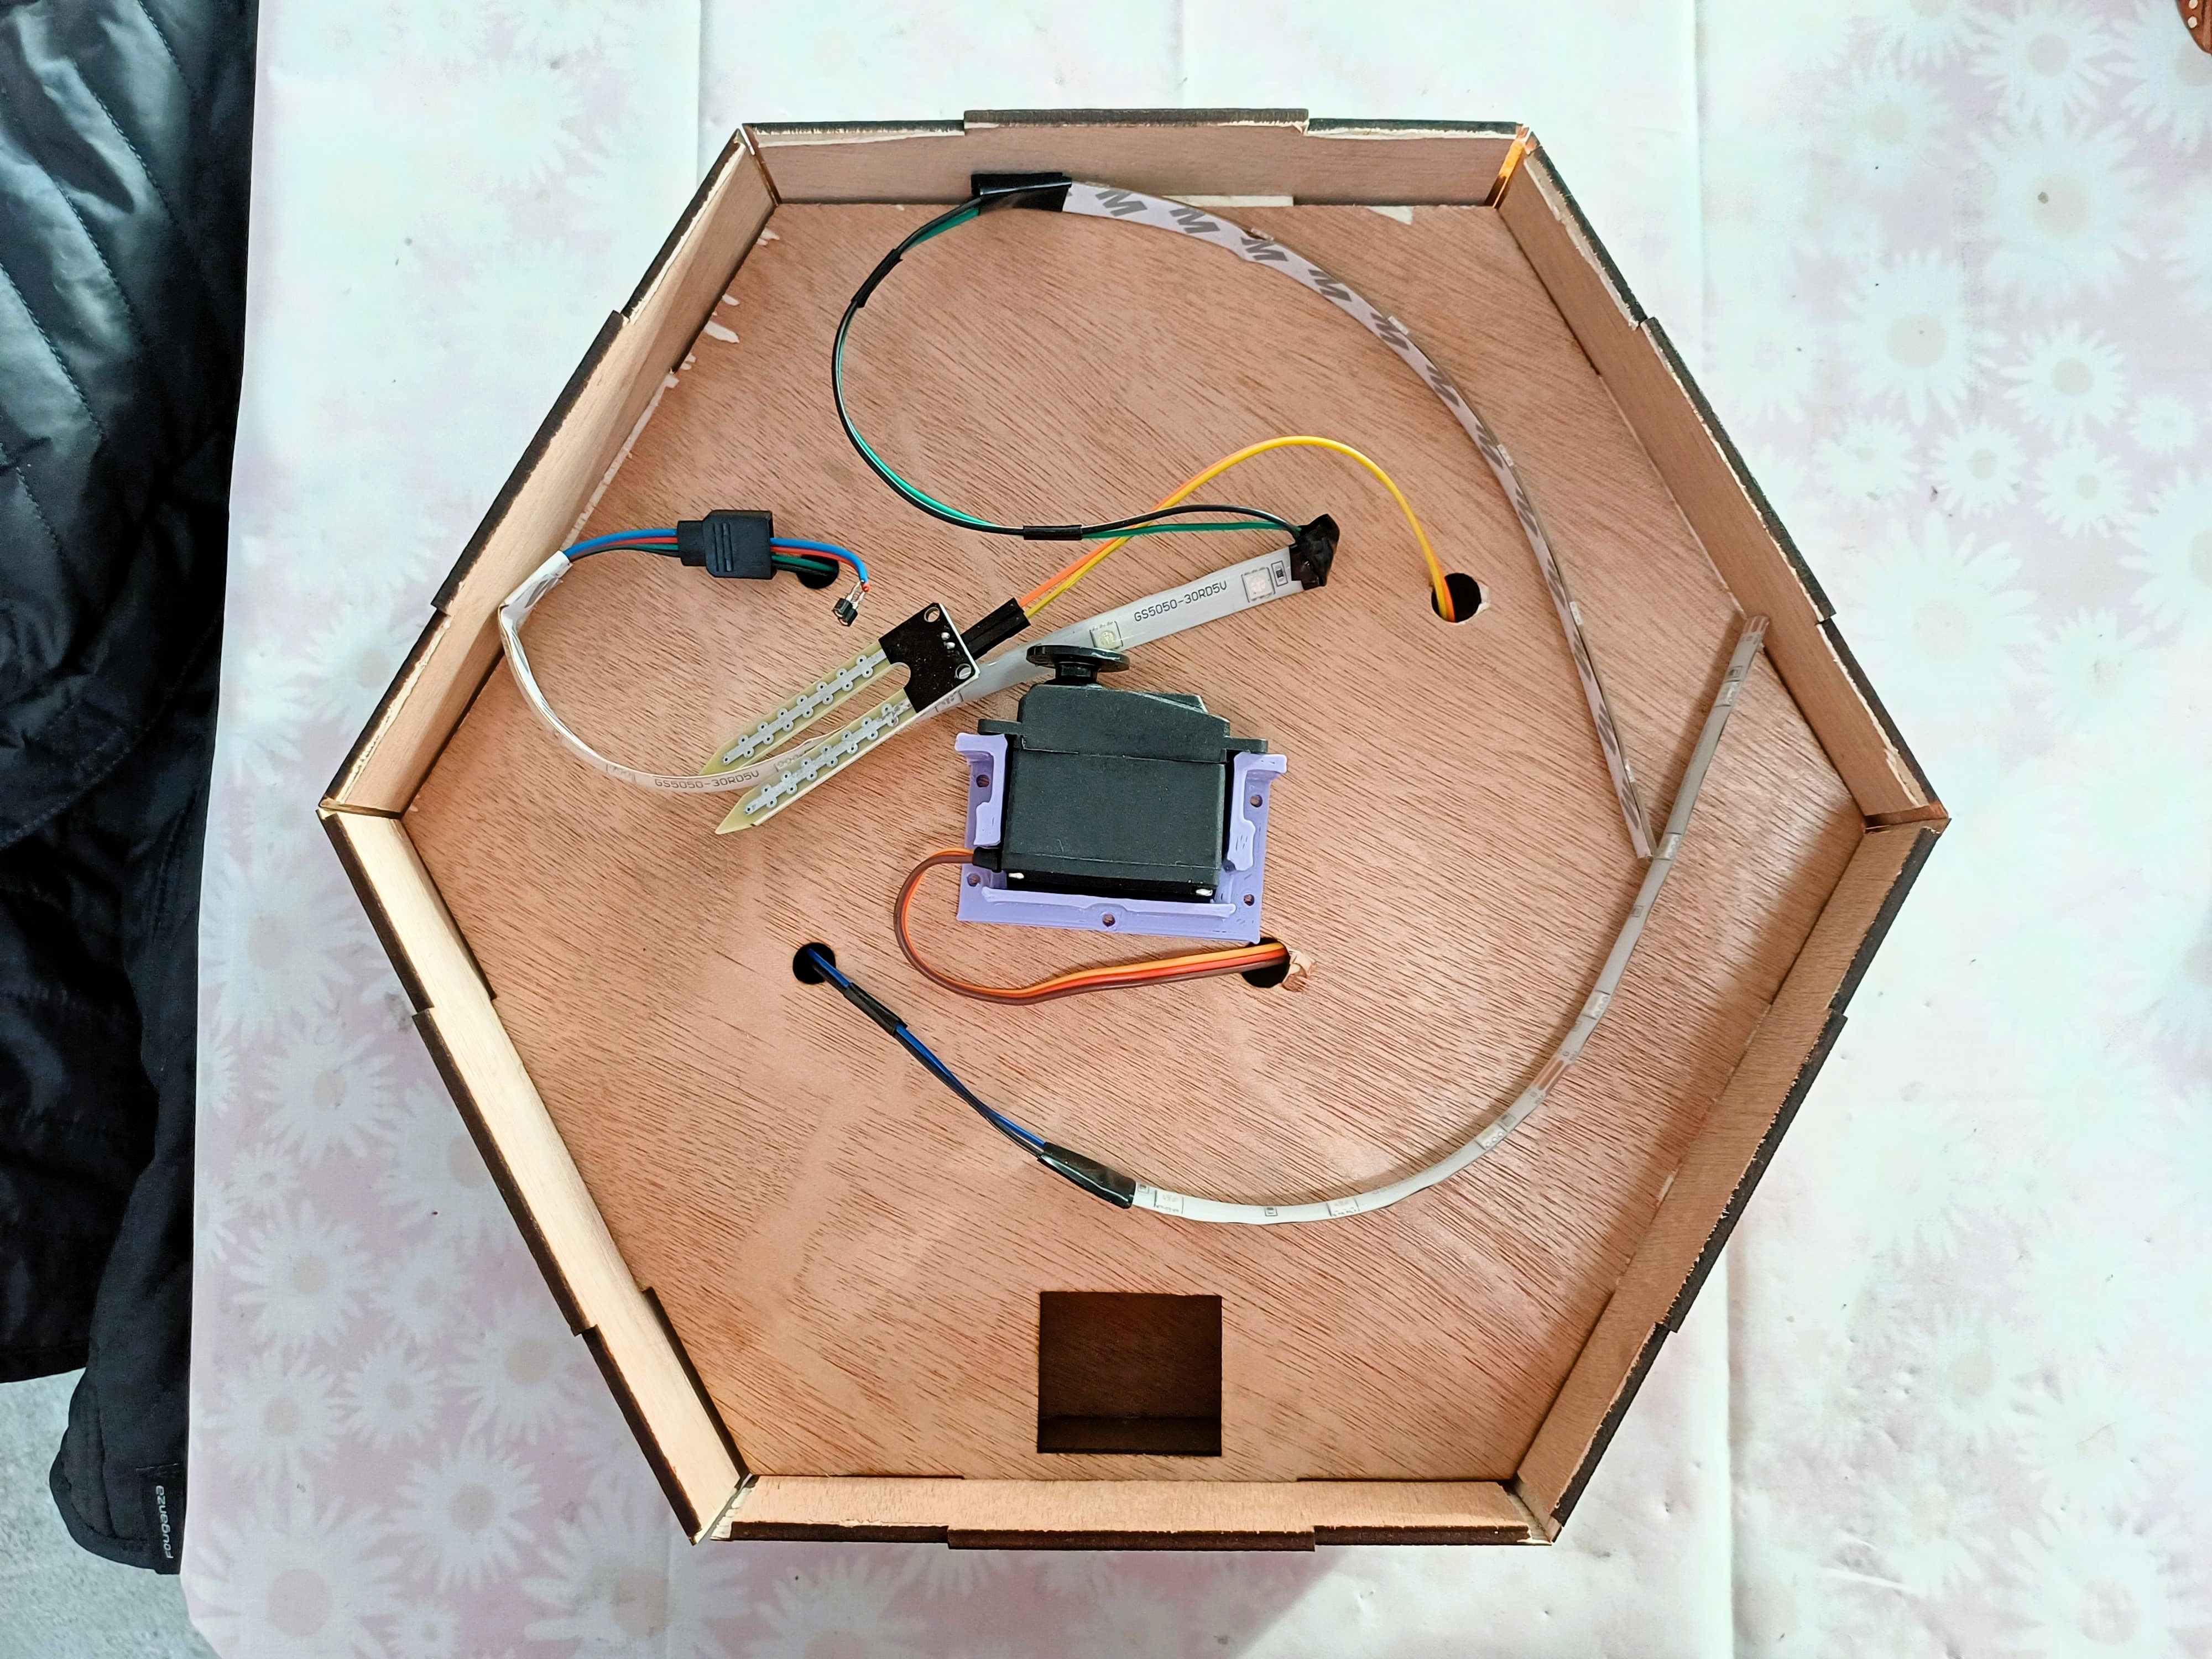
First integration
How it works: Fab&Plant operates by sensing the user's presence and communicating the plants' watering needs through illuminated icons. When the plants require watering, a thirsty droplet icon lights up, signaling the user to manually water the top planter. Conversely, when the plants are sufficiently watered, happy leaf icons glow, and the planters move in gratitude to the user.
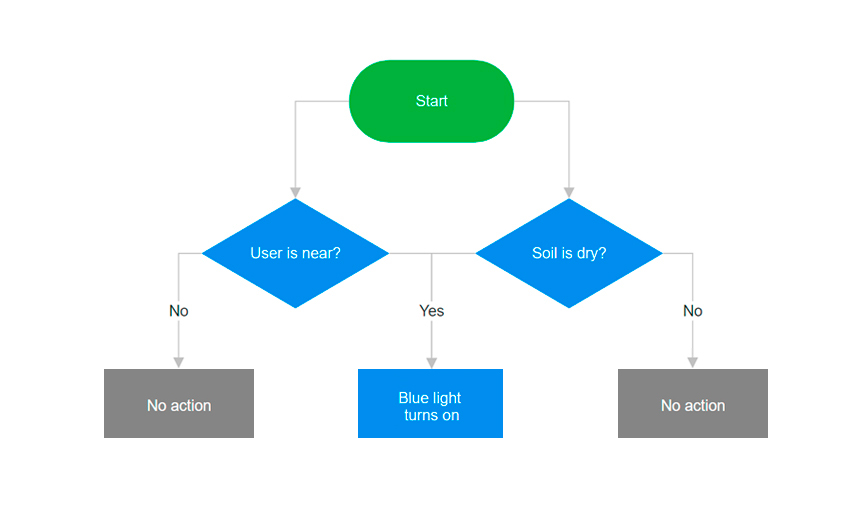
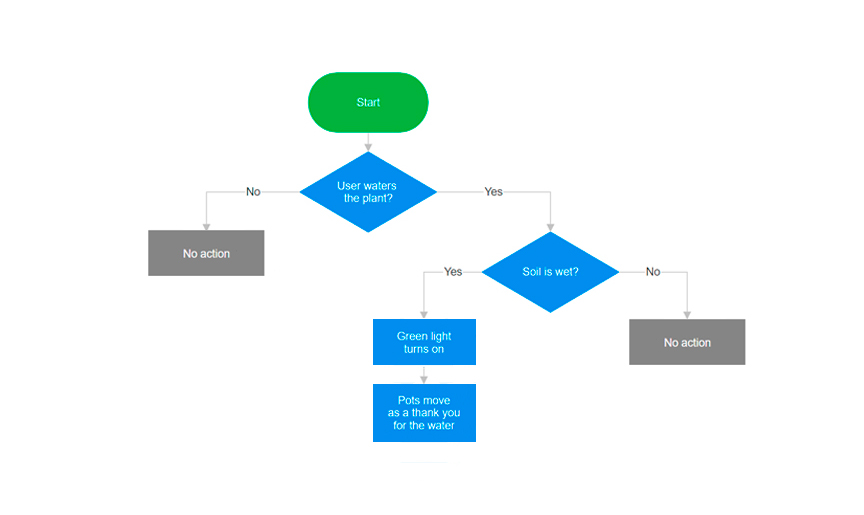
Flowcharts of actions Fab&Plant does
Efficient water use: Fab&Plant maximizes water efficiency through an internal network of hoses that channels drained water from the top planter to the lower planters, ensuring all water entering the system is utilized effectively.
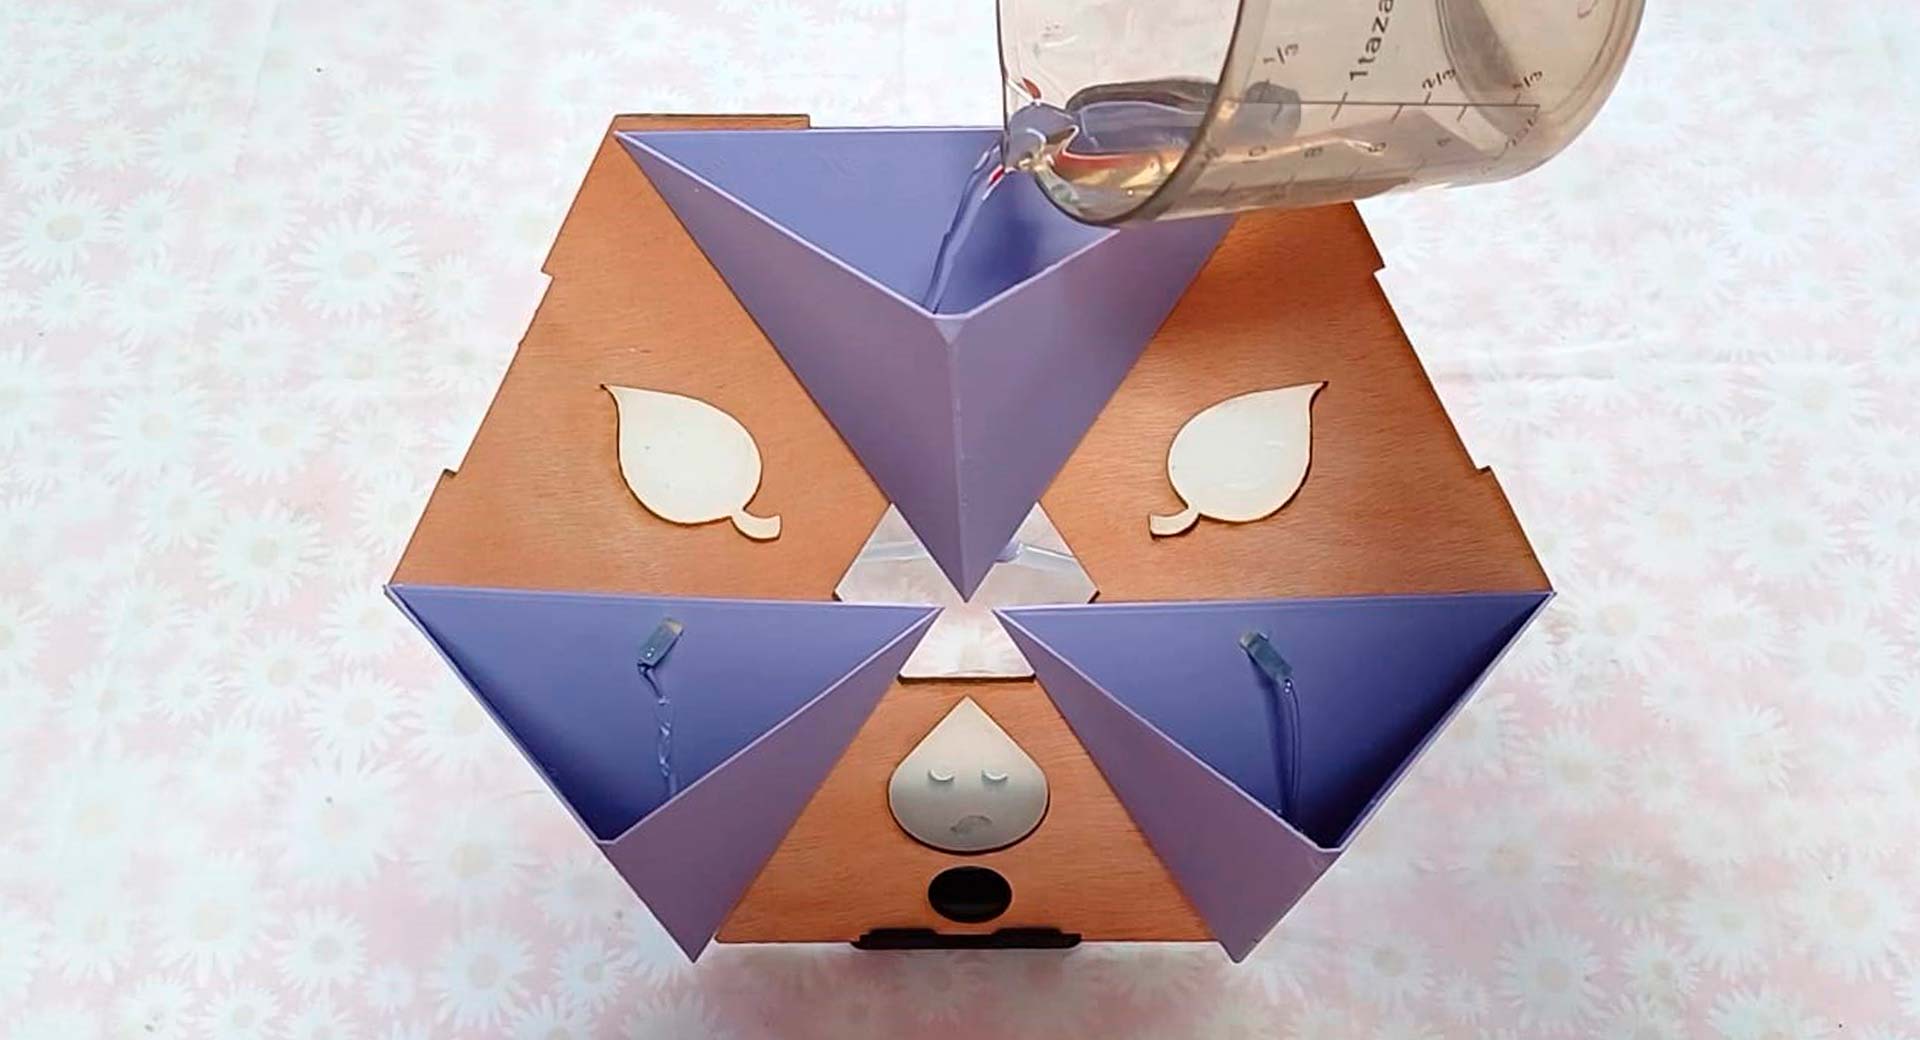
Fab&Plant internal water system
Testing: Fab&Plant Comprehensive Validation and Verification
The testing phase is a crucial step in ensuring the reliability and functionality of Fab&Plant. Comprehensive testing covers all aspects of the product, from individual components to the fully integrated system, ensuring that Fab&Plant meets all performance requirements and user expectations.
Unit Testing
Unit testing focuses on verifying the functionality of individual components and subsystems:
- Electronic components: Testing the PCB, microcontroller, sensors, and actuators to ensure they operate correctly and meet specified performance parameters.
- Wiring and connections: Ensuring all electrical connections are secure, and data/signals flow correctly between components.
- Water and electronics: Testing the isolation between water systems and electronic components to prevent water ingress and ensure safety.
- Mechanical movement: Verifying that the servomotor operates smoothly and reliably without causing undue stress on the structure.
- Short Circuits:Ensuring proper insulation and protection against accidental contact or moisture ingress.
- Wear and Tear: Designing wiring routes to minimize friction and wear over time, especially in moving parts.
- Water Ingress: Protecting electronic components from water exposure to avoid short circuits and corrosion.
- Long-term Durability: Using waterproof materials and seals that withstand continuous exposure to moisture.
- Seal Integrity: Ensuring seals and barriers remain effective over the product's lifecycle.
- Mechanical Fatigue: Components experiencing wear or deformation from repetitive movement.
- Load Distribution: Ensuring structural components can withstand the weight and movement dynamics of the pots.
- Stability: Preventing instability or tilting of Fab&Plant due to uneven weight distribution or mechanical wear.
- Repairability: Facilitating easy access to replaceable components and providing repair manuals to support maintenance.
- Disassembly: Designing Fab&Plant for easy disassembly at the end of its lifecycle to facilitate recycling and component reuse.
- Reuse: Promoting the reuse of components and materials wherever feasible to minimize waste.
- Recycling: Designing Fab&Plant with recyclable materials and ensuring proper recycling processes are in place at end-of-life.
- Disposal and Recycling: Providing guidance on responsible disposal practices and partnering with recycling facilities to ensure proper recycling of materials.
- Environmental Impact: Conducting assessments to mitigate any environmental impacts associated with Fab&Plant's disposal.
- Transition Planning: Supporting users with clear instructions and incentives for proper disposal practices.
- Energy Efficiency: Designing for efficient use of energy in indoor lighting and water systems to support plant growth.
- Circular Economy: Emphasizing reuse, remanufacturing, and recycling to minimize waste and extend product lifecycle.
- Urban Greenery Enhancement: Contributing to urban green spaces and improving indoor air quality with natural plant filtration.
- Fab&Plant demonstrates effective system integration through the seamless incorporation of its various components. The internal wiring and enclosed PCB ensure a clean and organized appearance, protecting sensitive electronics while maintaining a sleek aesthetic. This integration not only simplifies the assembly process but also enhances the overall user experience by providing a tidy and efficient design.
- Fab&Plant's design prioritizes sustainability through the use of eco-friendly materials like 3mm plywood. This sustainable approach is seamlessly integrated with the product's aesthetic appeal, featuring a natural wood finish and customizable lighting. The integration of these elements supports both environmental responsibility and visual harmony, enhancing the product's appeal in urban living spaces.
- The integration of laser-cut components and press fit joints facilitates efficient production and easy assembly. This method ensures precision and consistency in manufacturing, while also allowing users to assemble and disassemble the product with minimal tools. Additionally, the thoughtful design enables straightforward maintenance, ensuring long-term usability and satisfaction.
- The integration of smart technology, including PIR and humidity sensor, RGB LED strips, and a servomotor, showcases the advanced functionality of Fab&Plant. These components work together harmoniously, providing automated monitoring and dynamic features that enhance plant care and user interaction. The 5V/3A power supply ensures reliable operation of all integrated components, underscoring the importance of robust system integration for seamless performance.
- To finish this task I thank my fellow students and tutors, especially Roberto Delgado and Vaneza Caycho for their guidance.

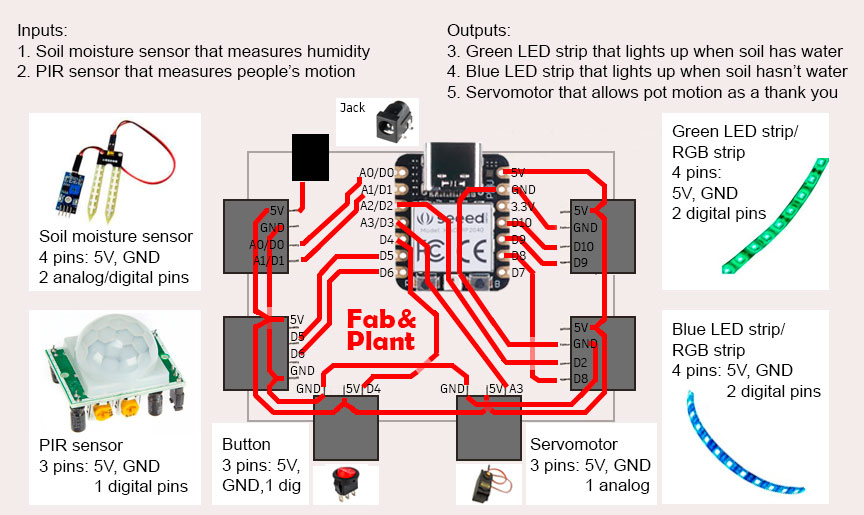
Input/output scheme
Fab&Plant PCB diagram
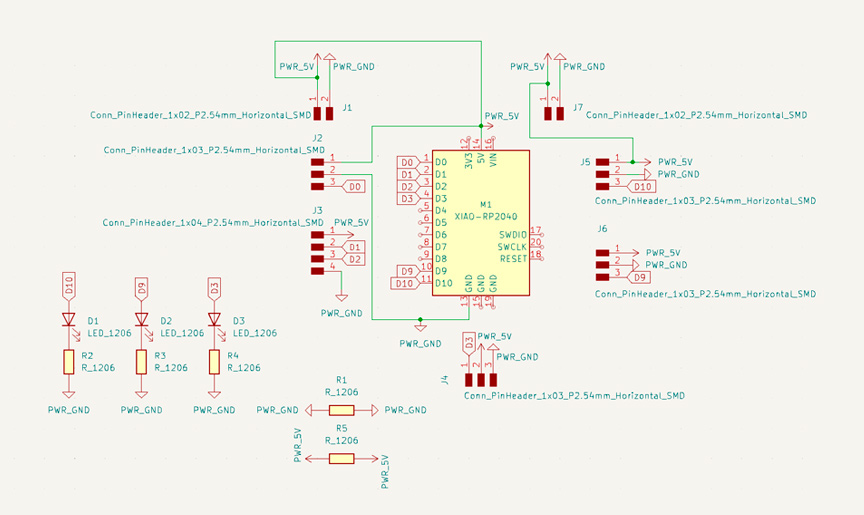
Fab&Plant PCB schematics
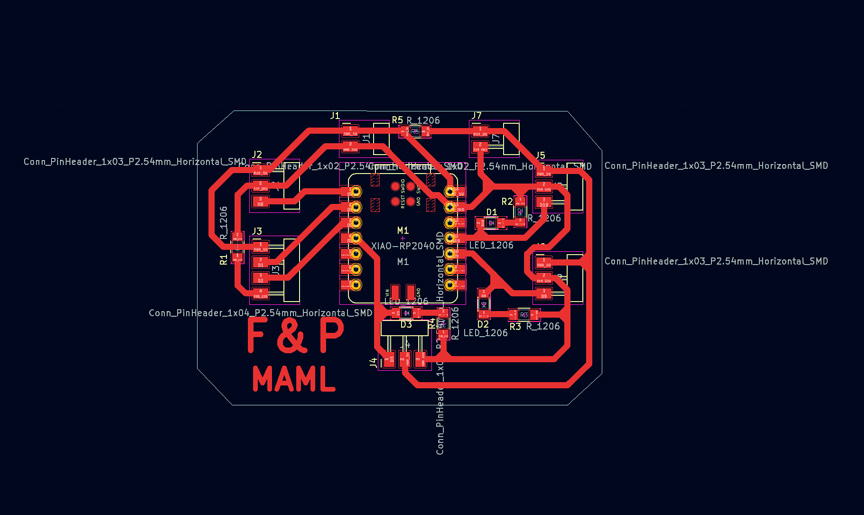
Fab&Plant PCB traces
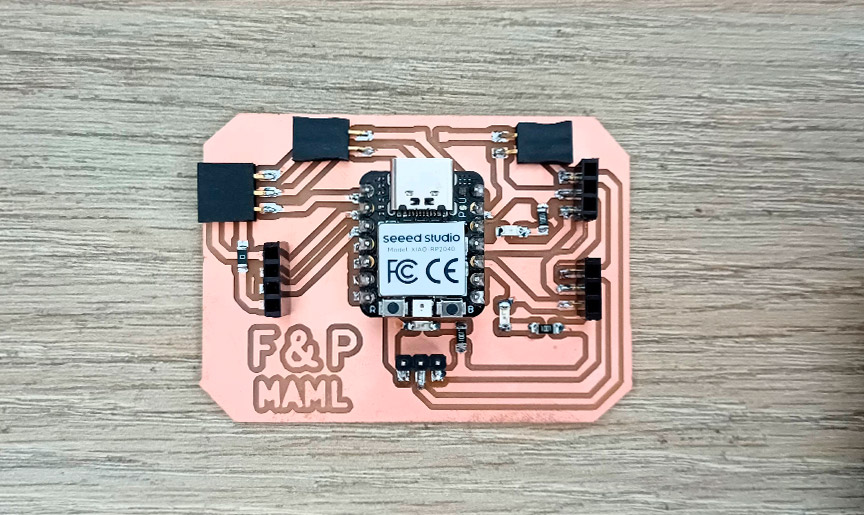
Fab&Plant PCB
PCB Testing
//Fab Academy 2024 - Fab Lab Peru - Maria Angela Mejia
//Code for blink LEDs and test the output pins in Fab&Plant PCB with XIAO RP2040

// Define the pins for the LEDs
const int ledPin1 = D3;              // pin connected to servomotor
const int ledPin2 = D9;              // pin connected to blue LED
const int ledPin3 = D10;             // pin connected to green LED

// The setup function runs once board is power
void setup() {
  // Initialize digital pins ledPin1, ledPin2, and ledPin3 as outputs
  pinMode(ledPin1, OUTPUT);
  pinMode(ledPin2, OUTPUT);
  pinMode(ledPin3, OUTPUT);
}

// The loop function runs over and over again forever
void loop() {
  {
  digitalWrite(ledPin1, HIGH);       // turn the LED on (HIGH is the voltage level)
  delay(1000);                       // wait for a second
  digitalWrite(ledPin1, LOW);        // turn the LED off by making the voltage LOW
  delay(1000);                       // wait for a second
  } {
  digitalWrite(ledPin2, HIGH);       // turn the LED on (HIGH is the voltage level)
  delay(1000);                       // wait for a second
  digitalWrite(ledPin2, LOW);        // turn the LED off by making the voltage LOW
  delay(1000);                       // wait for a second
  } {
  digitalWrite(ledPin3, HIGH);       // turn the LED on (HIGH is the voltage level)
  delay(1000);                       // wait for a second
  digitalWrite(ledPin3, LOW);        // turn the LED off by making the voltage LOW
  delay(1000);                       // wait for a second
  }
}
Code in Arduino IDE for test the LEDs in Fab&Plant PCB
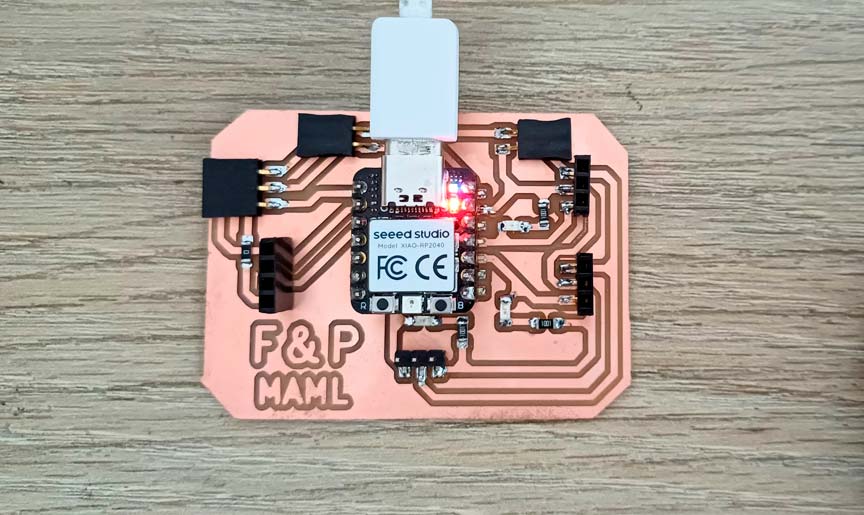
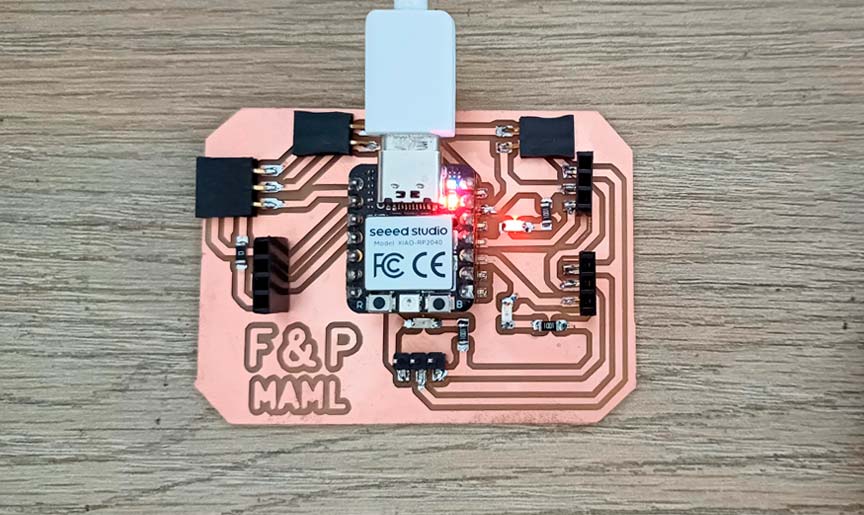
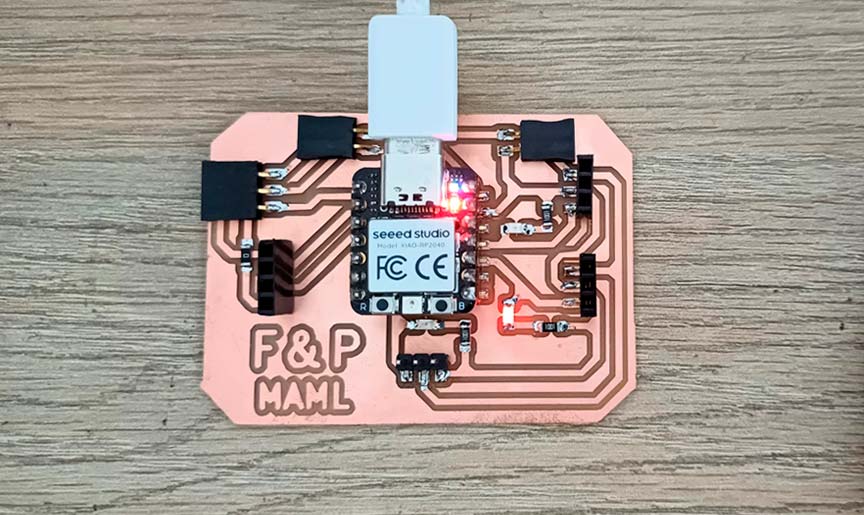
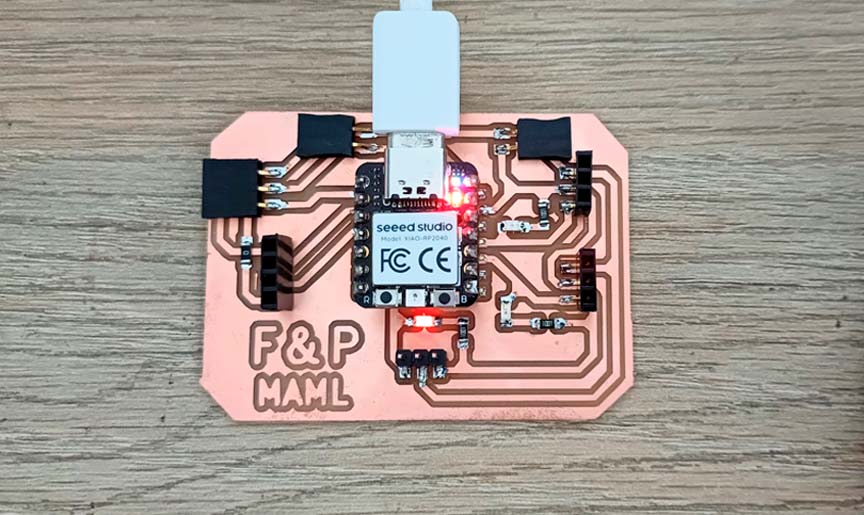
Testing Fab&Plant PCB
Inputs Testing
//Fab Academy 2024 - Fab Lab Peru - Maria Angela Mejia
//Code for humidity sensor (analog pin) in Fab&Plant PCB with XIAO RP 2040

// constants
const int Humidity_signal = A0;         // pin connected to humidity sensor
// variables
int value;

void setup(){
	Serial.begin(9600);             // Start the serial communication
}

void loop(){
  // when the plant is watered well the sensor will read a value 380∼400

  value = analogRead(Humidity_signal);  // read analog value
  value = constrain(value,400,1023);    // keep the ranges
  value = map(value,400,1023,100,0);    // map value: 400 will be 100 and 1023 will be 0
  Serial.print("Humidity: ");
  Serial.print(value);
  Serial.println("%");
  delay(5000);                          // read every 5 seconds
}
Code in Arduino IDE for test the humidity sensor in Fab&Plant PCB
//Fab Academy 2024 - Fab Lab Peru - Maria Angela Mejia
//Code for blink LED in Fab&Plant PCB when motion is detected by PIR sensor connected to XIAO RP2040

int pirPin = D1;
int ledPin = D3;
int pirValue;

void setup() {
  // put your setup code here, to run once:
  pinMode(ledPin, OUTPUT);
  pinMode(pirPin, INPUT);
  digitalWrite(ledPin, LOW);
}

void loop() {
  // put your main code here, to run repeatedly:
  pirValue = digitalRead(pirPin);
  digitalWrite(ledPin, pirValue);
}
Code in Arduino IDE for test the PIR sensor with LED in Fab&Plant PCB
//Fab Academy 2024 - Fab Lab Peru - Maria Angela Mejia
//Code for PIR sensor (HC-SR501) connected to XIAO RP2040

const int pinPIR = D1;
int pirValue;

void setup() {
  // Start serial communication
  Serial.begin(115200);
  // Configure the PIR sensor pin as input
  pinMode(pinPIR, INPUT);
}

void loop() {
  // Read the state of the PIR sensor
  int pirState = digitalRead(pinPIR);

  // If motion is detected
  if (pirState == HIGH) {
	// Print "movement" message on the serial port
	Serial.println("Movement detected");
  } else {
	// Print "off" message on the serial port
	Serial.println("No movement detected");
  }

  // Wait for a brief period before reading again
delay(1000);
}
Code in Arduino IDE for test the PIR sensor in Fab&Plant PCB with serial monitor
Outputs Testing
//Fab Academy 2024 - Fab Lab Peru - Maria Angela Mejia
//Code for servomotor connected to XIAO RP2040

#include < Servo.h>

#define SERVO_PIN A3

Servo servoMotor;  // Create a servo object to control a servo

void setup() {
  servoMotor.attach(SERVO_PIN);  // Attaches the servo on pin A3 to the servo object
}

void loop() {
  // Move the servo to different positions
  servoMotor.write(0);    // Move the servo to 0 degrees
  delay(1000);            // Wait for 1 second
  servoMotor.write(90);   // Move the servo to 90 degrees
  delay(1000);            // Wait for 1 second
  servoMotor.write(180);  // Move the servo to 180 degrees
  delay(1000);            // Wait for 1 second
}
Code in Arduino IDE for test servomotor in Fab&Plant PCB
//Fab Academy 2024 - Fab Lab Peru - Maria Angela Mejia
//Code for smooth transition of LED strips using PWM with XIAO RP2040

// Define the pin for the LED strips
const int ledPin1 = D9;   // Define the pin for blue LED strip
const int ledPin2 = D10;  // Define the pin for green LED strip

// The setup function runs once when you press reset or power the board
void setup() {
  // Initialize digital pins ledPin1 and ledPin2 as outputs
  pinMode(ledPin1, OUTPUT);
  pinMode(ledPin2, OUTPUT);
}

// The loop function runs over and over again forever
void loop() {
  // Gradually increase brightness
  for (int brightness = 0; brightness <= 255; brightness++) {
	analogWrite(ledPin1, brightness);
	analogWrite(ledPin2, brightness);
	delay(15); // Adjust delay for desired transition speed
  }

  // Gradually decrease brightness
  for (int brightness = 255; brightness >= 0; brightness--) {
	analogWrite(ledPin1, brightness);
	analogWrite(ledPin2, brightness);
	delay(15); // Adjust delay for desired transition speed
  }
}
Code in Arduino IDE for test LED strips in Fab&Plant PCB
Integration Testing
Integration testing examines the interactions between various subsystems in Fab&Plant to ensure they work together seamlessly:
//Fab Academy 2024 - Fab Lab Peru - Maria Angela Mejia
//Code for Fab&Plant PCB with a XIAO RP2040

#include < Servo.h>

#define HUMIDITY_SENSOR A0
#define PIR_SENSOR D1
#define BLUE_LED D9
#define GREEN_LED D10
#define SERVO_PIN A3

Servo servoMotor;

void setup() {
  pinMode(HUMIDITY_SENSOR, INPUT);
  pinMode(PIR_SENSOR, INPUT);
  pinMode(BLUE_LED, OUTPUT);
  pinMode(GREEN_LED, OUTPUT);

  servoMotor.attach(SERVO_PIN);

  //LED strips are initially turned off
  digitalWrite(BLUE_LED, HIGH);
  digitalWrite(GREEN_LED, HIGH);
}

void loop() {
  // Read sensors
  int humidityValue = analogRead(HUMIDITY_SENSOR);
  int pirState = digitalRead(PIR_SENSOR);

  // Map humidity value to percentage
  int humidityPercentage = map(humidityValue, 1023, 0, 0, 100);

  // If humidity is less than 40% and motion is detected, turn on blue LED
  if (humidityPercentage < 40 && pirState == HIGH) {
	digitalWrite(BLUE_LED, LOW);
	digitalWrite(GREEN_LED, HIGH);
	// Ensure servo motor is off
	servoMotor.write(0);
  }
  // If humidity is 40% or higher and motion is detected, turn on green LED
  else if (humidityPercentage >= 40 && pirState == HIGH) {
	digitalWrite(BLUE_LED, HIGH);
	digitalWrite(GREEN_LED, LOW);
	// Rotate servo motor if humidity is 40% or higher
	servoMotor.write(0);   // Move the servo to 0 degrees
	delay(1000);           // Wait for 1 second
	servoMotor.write(90);  // Move the servo to 90 degrees
	delay(1000);           // Wait for 1 second
	servoMotor.write(180); // Move the servo to 180 degrees
	delay(1000);           // Wait for 1 second
	servoMotor.write(90);  // Move the servo back to 90 degrees
	delay(1000);           // Wait for 1 second
  }
  // If no motion is detected, turn off both LEDs and servo motor
  else {
	digitalWrite(BLUE_LED, HIGH);
	digitalWrite(GREEN_LED, HIGH);
	servoMotor.write(0);
  }
}
Fab&Plant PCB code in Arduino IDE
Failure Modes: Identifying Critical Points in Fab&Plant
Failure modes analysis is crucial for identifying potential risks and implementing mitigation strategies to ensure the reliability and durability of Fab&Plant, a minivertical garden designed for interiors in urban environments. By assessing critical points like wiring integrity, water isolation for electronics, and servomotor movement, Fab&Plant can be designed to operate effectively over its lifecycle.
Wiring plays a critical role in Fab&Plant's electrical systems. Potential failure modes include:
Mitigation Strategies: Use high-quality, insulated wires and connectors rated for indoor use, implement strain relief mechanisms, and conduct regular inspections and maintenance.
Given the presence of water in Fab&Plant for plant irrigation, ensuring electronics are adequately isolated is critical to prevent damage:
Mitigation Strategies: Utilize waterproof enclosures and connectors, apply conformal coating or potting to circuit boards, and perform water ingress testing during development and periodic checks.
The movement of pots via servomotors introduces mechanical stress and potential structural issues:
Mitigation Strategies: Engineer robust mechanical structures and supports, conduct load-bearing tests during prototyping, and implement regular lubrication and maintenance of moving parts.
Lifecycle: Considerations and Environmental Impact of Fab&Plant
Fab&Plant is designed with sustainability in mind, incorporating repair, disassembly, reuse, and recycling strategies:
Planning for the end-of-life phase is essential for minimizing environmental impact of Fab&Plant:
Throughout its lifecycle, Fab&Plant upholds sustainable practices tailored for urban indoor environments:
Thanks to this week's assignment, I feel that my final project now has greater coherence in its conceptual aspect, formal design, and the unification of its electronic components.