Interface and Application Programming
Assignments
All the important links are Here
Learning outcomes
Vocabulary
Interface
An interface generally refers to a point of interaction or communication between different entities, systems, or components. In computing, an interface often refers to a boundary or connection point between different software components, hardware devices, or systems that allows them to communicate or interact with each other.
There are several types of interfaces in computing:
- User Interface (UI): This is the interface through which users interact with software applications or systems. It includes elements such as graphical user interfaces (GUIs), command-line interfaces (CLIs), and voice-based interfaces.
- Application Programming Interface (API): An API defines the methods and protocols through which software components or systems can interact with each other. It specifies how software modules should interact and exposes functionalities that other software can use.
- Hardware Interface: This refers to the connection point between hardware devices and the software or systems that control them. It includes physical connectors, communication protocols, and drivers that allow software to communicate with hardware devices.
- Network Interface: This refers to the connection point between a computer or device and a network. It includes network cards, Ethernet ports, and wireless adapters that enable communication between devices on a network.
- User Interface (UI): This is the interface through which users interact with software applications or systems. It includes elements such as graphical user interfaces (GUIs), command-line interfaces (CLIs), and voice-based interfaces.
GUI(Graphical User Interface)
GUI stands for Graphical User Interface. It's a type of interface that allows users to interact with electronic devices through graphical icons and visual indicators, as opposed to text-based interfaces, typed command labels, or text navigation. GUIs utilize visual elements such as windows, buttons, menus, and icons to represent information and actions available to the user. GUIs are commonly used in software applications, operating systems, and embedded systems to provide an intuitive and user-friendly interface for performing tasks and accessing functionalities. Examples of GUI-based operating systems include Windows, macOS, and various Linux distributions.
Group Assignment
This week, our group worked on creating ways for computers to talk to our microcontroller board (think of it like the brain of a small electronic device) using different tools.
Website Control
One tool we used was making a website that we could open on our phones or computers. This website could control things connected to our microcontroller board.
MIT App Inventor
Another tool we explored was MIT App Inventor. It's like a simple online tool that helps you build apps for Android phones. We learned how to use it to design an app that could control our microcontroller board. It was pretty cool because we could see how the app would work in real-time on our phones while we were building it.
Individual Assignment
I thank Ms.Zina and my friend Ngawang Pemo whose documentation guided me through the process
My friend Ngawang found Ms.Zina's documentation very helpful and easy to comprehend, so I refered to both of their documentations and also decided to create a GUI with Tkinter as my framework to control my LED on my board from embedded programming week.
Tkinter
What is Tkinter?
Tkinter is a standard Python library for creating graphical user interfaces (GUIs). It provides a set of tools and widgets to create windows, buttons, labels, textboxes, menus, and more. Tkinter is based on the Tk GUI toolkit, which originated as the GUI extension for the Tcl scripting language.
Key Points about Tkinter:
- Cross-platform: Tkinter is included with most Python installations on various platforms like Windows, macOS, and Linux, making it a cross-platform solution for GUI development.
- Simple and Easy to Use: Tkinter's API is straightforward and relatively easy to learn, making it accessible for beginners to create basic GUI applications.
- Extensible: While Tkinter provides a set of basic widgets, it can be extended with additional third-party packages like ttk (Themed Tkinter), which offers modern-looking widgets, and other libraries for more advanced functionality.
- Integration with Python: Since Tkinter is part of the Python standard library, it integrates seamlessly with Python code, allowing developers to leverage Python's extensive libraries and tools for GUI development.
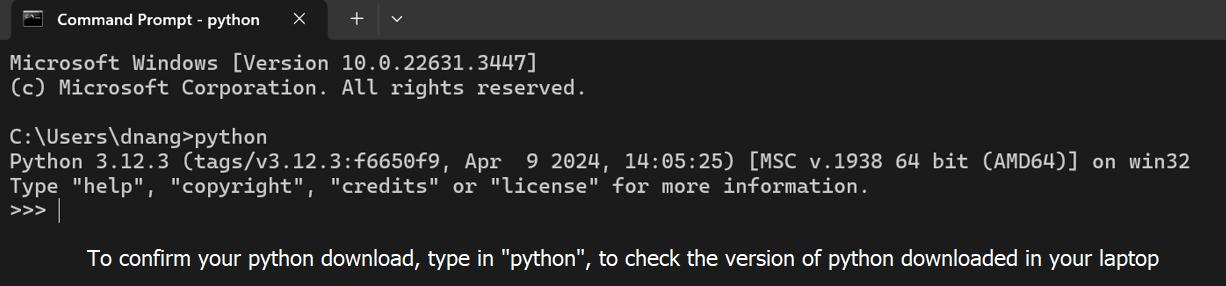
To begin,download python with your prefered settings.


To check whether python was successfully installed on your device, open "command prompt" on your device.
Use the command below and get the information on the version of python installed on your device.
python
Getting strted with Tkinter
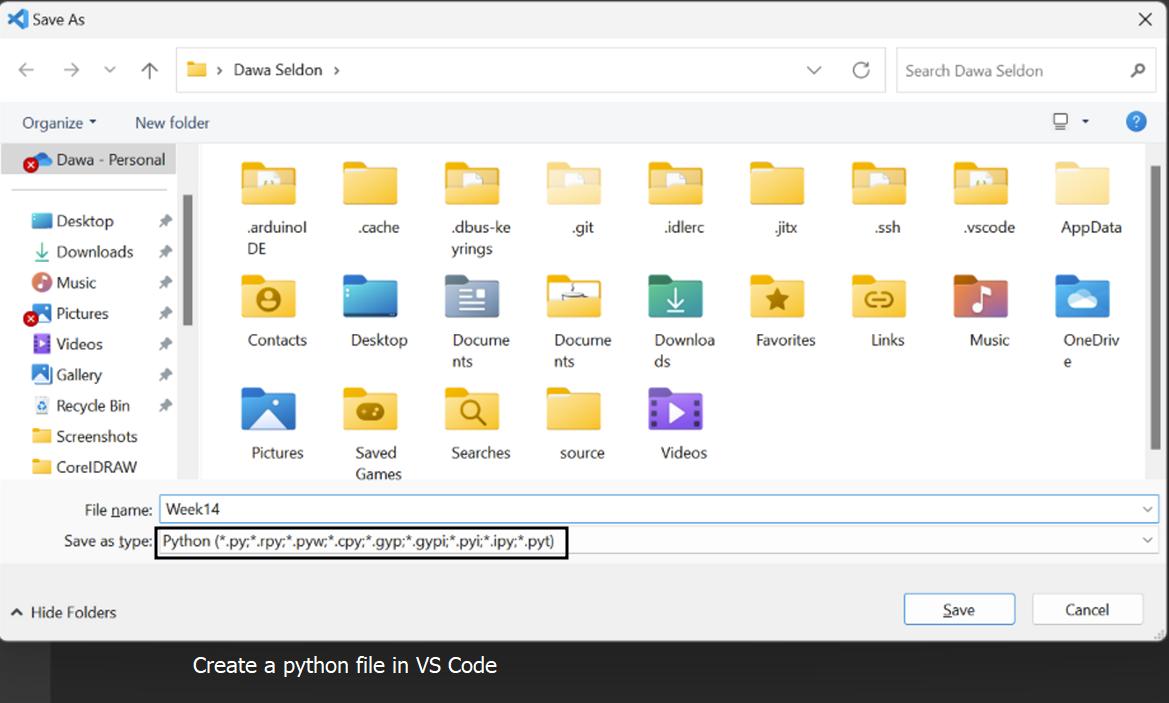
Start with creating a python file in VS Code To do that, start by opening VS Code, and then click "ctrl+s" and an option of saving it will pop out. Set the name as whatever you want to call it, then choose python as your file type.
Sources I refered to learn basic Tkinter python concepts
Since, this was my first time getting to know Tkinter I watched a beginner's course on python GUI development
Also please refer to realpython.com This has a detailed information on getting started on Tkinter and as a beginner it helped me get an idea of how it works.
And refer to python.com For a detailed information on the TK boolean datatypes amd others. It explains everything very well and is recommended for beginners.
Some fundamental codes I learned from the tutorial would be:
Importing Tkinter:
import tkinter as tk
Creating a main window:
root = tk.Tk()
Adding widgets:
label = tk.Label(root, text="Hello, Tkinter!")

        button = tk.Button(root, text="Click me!")
Organizing widgets using geometry managers:
Pack manager:
label.pack()

        button.pack()
Grid manager:
label.grid(row=0, column=0)

        button.grid(row=1, column=0)
Configuring widget properties:
label.config(font=("Arial", 12), fg="blue")

        button.config(bg="green", command=some_function)
Defining event handlers:
def some_function():

            print("Button clicked!")
Running the main event loop:
root.mainloop()
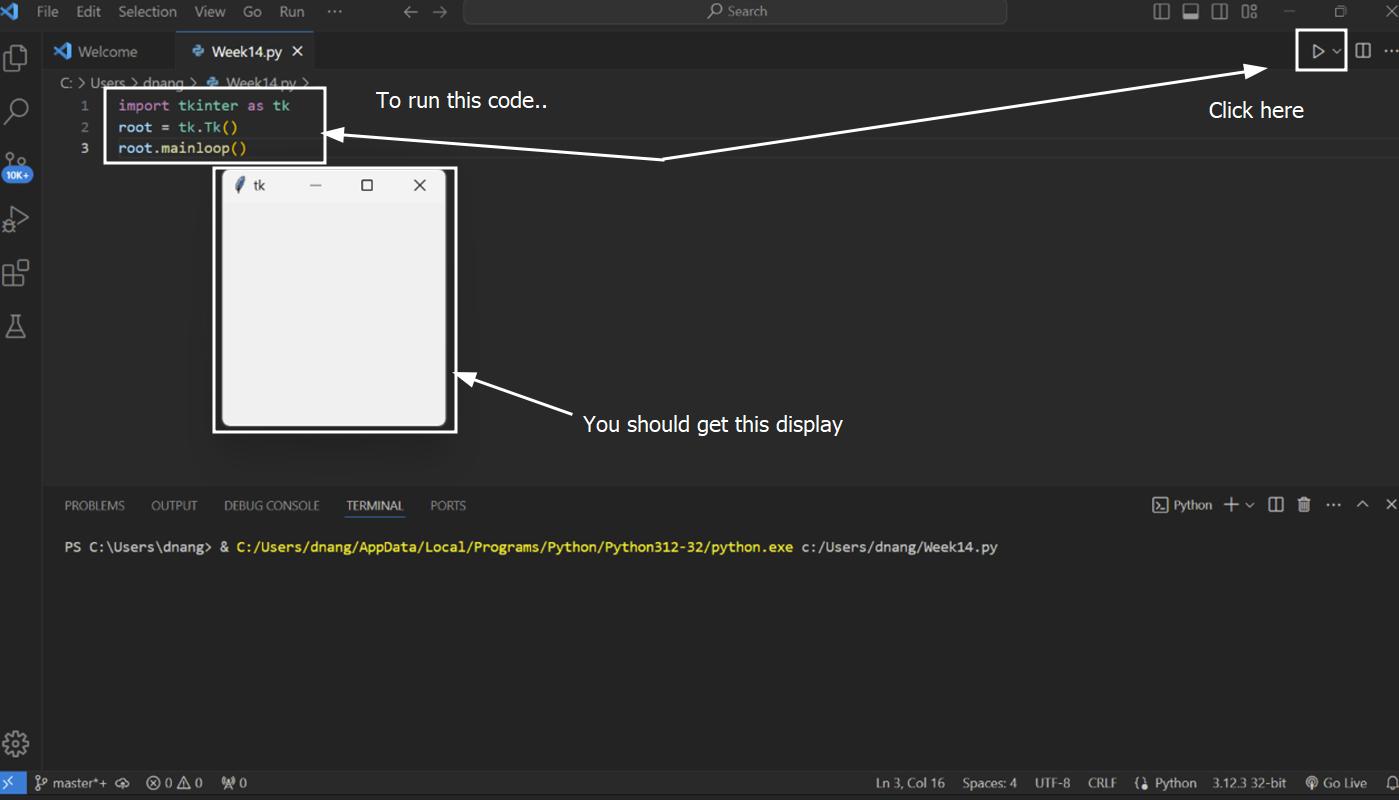
To run a Tkinter code for a basic application, you need a python extention that can be downloaded in VS Code.
The code below ran successfully and the basic application showed up.
import tkinter as tk
root = tk.Tk()
root.mainloop()
Now, I would like to try designing my own GUI before continuing with the LED switch
Getting to know GUI
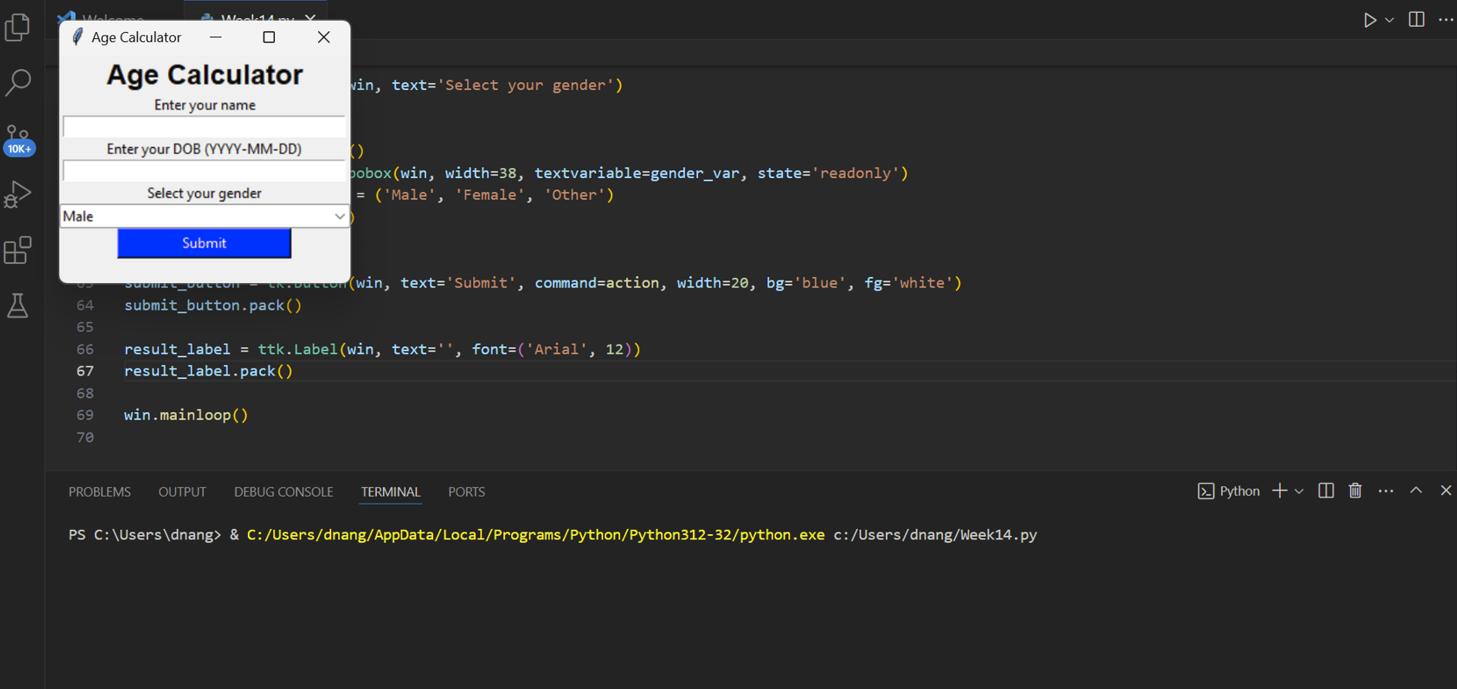
So, to get to know GUI better, I decided to make a GUI where it receives the DOB of a person and displays their age.
Run the Tkinter python code below
The following code is chatgpt generated, and the prompt I used is as follows:
        import tkinter as tk
        from tkinter import ttk
        from datetime import datetime

        def calculate_age(dob):
            today = datetime.today()
            age = today.year - dob.year - ((today.month, today.day) < (dob.month, dob.day))
            return age

        def action():
            username = name_var.get()
            user_dob_str = dob_var.get()
            user_gender = gender_var.get()

            # Calculate age based on DOB
            try:
                dob = datetime.strptime(user_dob_str, "%Y-%m-%d")
                age = calculate_age(dob)
                age_text = f"{age} years old"
            except ValueError:
                age_text = "Invalid DOB"

            result_text = f"Name: {username}\nDOB: {user_dob_str}\nGender: {user_gender}\nAge: {age_text}"
            result_label.config(text=result_text)

            with open('file.txt', 'a') as f:
                f.write(f'{username},{user_dob_str},{user_gender},{age_text}\n')

            name_entrybox.delete(0, tk.END)
            dob_entrybox.delete(0, tk.END)
            name_label.configure(foreground='#991E1E')
            submit_button.configure(foreground='Blue')

        win = tk.Tk()
        win.title('Age Calculator')

        header_label = ttk.Label(win, text='Age Calculator', font=('Arial', 18, 'bold'))
        header_label.pack()

        name_label = ttk.Label(win, text='Enter your name')
        name_label.pack()

        name_var = tk.StringVar()
        name_entrybox = tk.Entry(win, width=40, textvariable=name_var)
        name_entrybox.pack()

        dob_label = ttk.Label(win, text='Enter your DOB (YYYY-MM-DD)')
        dob_label.pack()

        dob_var = tk.StringVar()
        dob_entrybox = tk.Entry(win, width=40, textvariable=dob_var)
        dob_entrybox.pack()

        gender_label = ttk.Label(win, text='Select your gender')
        gender_label.pack()

        gender_var = tk.StringVar()
        gender_combobox = ttk.Combobox(win, width=38, textvariable=gender_var, state='readonly')
        gender_combobox['values'] = ('Male', 'Female', 'Other')
        gender_combobox.current(0)
        gender_combobox.pack()

        submit_button = tk.Button(win, text='Submit', command=action, width=20, bg='blue', fg='white')
        submit_button.pack()

        result_label = ttk.Label(win, text='', font=('Arial', 12))
        result_label.pack()

        win.mainloop()
Code Explanation: Age Calculator
Importing Libraries
    import tkinter as tk
    from tkinter import ttk
    from datetime import datetime
- import tkinter as tk: This imports the tkinter library under the alias 'tk', which is used for creating the graphical user interface (GUI).
- from tkinter import ttk: This imports specific widgets and styling elements from tkinter for use in the GUI.
- from datetime import datetime: This imports the datetime class from the datetime module, which is used for working with dates and times.
Defining Functions
    def calculate_age(dob):
        today = datetime.today()
        age = today.year - dob.year - ((today.month, today.day) < (dob.month, dob.day))
        return age

    def action():
        username = name_var.get()
        user_dob_str = dob_var.get()
        user_gender = gender_var.get()

        # Calculate age based on DOB
        try:
            dob = datetime.strptime(user_dob_str, "%Y-%m-%d")
            age = calculate_age(dob)
            age_text = f"{age} years old"
        except ValueError:
            age_text = "Invalid DOB"

        result_text = f"Name: {username}\nDOB: {user_dob_str}\nGender: {user_gender}\nAge: {age_text}"
        result_label.config(text=result_text)

        with open('file.txt', 'a') as f:
            f.write(f'{username},{user_dob_str},{user_gender},{age_text}\n')

        name_entrybox.delete(0, tk.END)
        dob_entrybox.delete(0, tk.END)
        name_label.configure(foreground='#991E1E')
        submit_button.configure(foreground='Blue')
- def calculate_age(dob): This function calculates the age based on the date of birth (dob) using today's date.
- def action(): This function retrieves user input for name, date of birth (DOB), and gender. It calculates the age and updates the result label accordingly. It also writes the user data to a file.
Creating the Main Window
    win = tk.Tk()
    win.title('Age Calculator')
- win = tk.Tk(): This creates the main window for the GUI.
- win.title('Age Calculator'): This sets the title of the window to "Age Calculator".
Adding Labels, Entry Boxes, Combobox, and Buttons to the Window
    header_label = ttk.Label(win, text='Age Calculator', font=('Arial', 18, 'bold'))
    header_label.pack()

    name_label = ttk.Label(win, text='Enter your name')
    name_label.pack()

    name_var = tk.StringVar()
    name_entrybox = tk.Entry(win, width=40, textvariable=name_var)
    name_entrybox.pack()

    dob_label = ttk.Label(win, text='Enter your DOB (YYYY-MM-DD)')
    dob_label.pack()

    dob_var = tk.StringVar()
    dob_entrybox = tk.Entry(win, width=40, textvariable=dob_var)
    dob_entrybox.pack()

    gender_label = ttk.Label(win, text='Select your gender')
    gender_label.pack()

    gender_var = tk.StringVar()
    gender_combobox = ttk.Combobox(win, width=38, textvariable=gender_var, state='readonly')
    gender_combobox['values'] = ('Male', 'Female', 'Other')
    gender_combobox.current(0)
    gender_combobox.pack()

    submit_button = tk.Button(win, text='Submit', command=action, width=20, bg='blue', fg='white')
    submit_button.pack()

    result_label = ttk.Label(win, text='', font=('Arial', 12))
    result_label.pack()
- ttk.Label(win, text='Age Calculator', font=('Arial', 18, 'bold')): This creates a labeled header for the window with the specified text and font.
- ttk.Label(win, text='Enter your name'): This creates a label prompting the user to enter their name.
- tk.StringVar() and tk.Entry(win, width=40, textvariable=name_var): This creates an entry box for the user to input their name.
- ttk.Label(win, text='Enter your DOB (YYYY-MM-DD)'): This creates a label prompting the user to enter their date of birth.
- tk.StringVar() and tk.Entry(win, width=40, textvariable=dob_var): This creates an entry box for the user to input their date of birth.
- ttk.Label(win, text='Select your gender'): This creates a label prompting the user to select their gender.
- tk.StringVar() and ttk.Combobox(win, width=38, textvariable=gender_var, state='readonly'): This creates a dropdown menu (combobox) for the user to select their gender.
- tk.Button(win, text='Submit', command=action, width=20, bg='blue', fg='white'): This creates a button labeled "Submit" that calls the action function when clicked.
- ttk.Label(win, text='', font=('Arial', 12)): This creates an empty label where the result of the age calculation will be displayed.
Running the Main Loop
win.mainloop()
- win.mainloop(): This starts the Tkinter event loop, which waits for user interactions and updates the GUI accordingly.
Here is how, I got an idea of how GUI works
I got a little carried away, and I tried my friend's trial GUI code and combined it with mine
Here is my friend Ngawang Pemo's Documentation
Here is her code(to make a GUI where it receives the DOB of a person and displays their zodiac sign)
        import tkinter as tk
        from tkinter import ttk
        from datetime import datetime

        def calculate_zodiac_sign(dob):
            month, day = dob.month, dob.day
            if (month == 3 and day >= 21) or (month == 4 and day <= 19):
                return "Aries"
            elif (month == 4 and day >= 20) or (month == 5 and day <= 20):
                return "Taurus"
            elif (month == 5 and day >= 21) or (month == 6 and day <= 20):
                return "Gemini"
            elif (month == 6 and day >= 21) or (month == 7 and day <= 22):
                return "Cancer"
            elif (month == 7 and day >= 23) or (month == 8 and day <= 22):
                return "Leo"
            elif (month == 8 and day >= 23) or (month == 9 and day <= 22):
                return "Virgo"
            elif (month == 9 and day >= 23) or (month == 10 and day <= 22):
                return "Libra"
            elif (month == 10 and day >= 23) or (month == 11 and day <= 21):
                return "Scorpio"
            elif (month == 11 and day >= 22) or (month == 12 and day <= 21):
                return "Sagittarius"
            elif (month == 12 and day >= 22) or (month == 1 and day <= 19):
                return "Capricorn"
            elif (month == 1 and day >= 20) or (month == 2 and day <= 18):
                return "Aquarius"
            else:
                return "Pisces"

        def action():
            username = name_var.get()
            user_dob_str = dob_var.get()
            user_gender = gender_var.get()

            # Calculate zodiac sign based on DOB
            try:
                dob = datetime.strptime(user_dob_str, "%Y-%m-%d")
                zodiac_sign = calculate_zodiac_sign(dob)
            except ValueError:
                zodiac_sign = "Invalid DOB"

            result_text = f"Name: {username}\nDOB: {user_dob_str}\nGender: {user_gender}\nZodiac Sign: {zodiac_sign}"
            result_label.config(text=result_text)

            with open('file.txt', 'a') as f:
                f.write(f'{username},{user_dob_str},{user_gender},{zodiac_sign}\n')

            name_entrybox.delete(0, tk.END)
            dob_entrybox.delete(0, tk.END)
            name_label.configure(foreground='#991E1E')
            submit_button.configure(foreground='Blue')

        win = tk.Tk()
        win.title('Zodiac Sign Calculator')

        header_label = ttk.Label(win, text='Zodiac Sign Calculator', font=('Arial', 18, 'bold'))
        header_label.pack()

        name_label = ttk.Label(win, text='Enter your name')
        name_label.pack()

        name_var = tk.StringVar()
        name_entrybox = tk.Entry(win, width=40, textvariable=name_var)
        name_entrybox.pack()

        dob_label = ttk.Label(win, text='Enter your DOB (YYYY-MM-DD)')
        dob_label.pack()

        dob_var = tk.StringVar()
        dob_entrybox = tk.Entry(win, width=40, textvariable=dob_var)
        dob_entrybox.pack()

        gender_label = ttk.Label(win, text='Select your gender')
        gender_label.pack()

        gender_var = tk.StringVar()
        gender_combobox = ttk.Combobox(win, width=38, textvariable=gender_var, state='readonly')
        gender_combobox['values'] = ('Male', 'Female', 'Other')
        gender_combobox.current(0)
        gender_combobox.pack()

        submit_button = tk.Button(win, text='Submit', command=action, width=20, bg='blue', fg='white')
        submit_button.pack()

        result_label = ttk.Label(win, text='', font=('Arial', 12))
        result_label.pack()

        win.mainloop()
Here is the combined code(to make a GUI where it recieves the DOB of a persona and displays their age and zodiac sign)
The following code is chatgpt generated, and the prompt I used is as follows:
        import tkinter as tk
        from tkinter import ttk
        from datetime import datetime

        def calculate_age(dob):
            today = datetime.today()
            age = today.year - dob.year - ((today.month, today.day) < (dob.month, dob.day))
            return age

        def calculate_zodiac_sign(dob):
            month, day = dob.month, dob.day
            if (month == 3 and day >= 21) or (month == 4 and day <= 19):
                return "Aries"
            elif (month == 4 and day >= 20) or (month == 5 and day <= 20):
                return "Taurus"
            elif (month == 5 and day >= 21) or (month == 6 and day <= 20):
                return "Gemini"
            elif (month == 6 and day >= 21) or (month == 7 and day <= 22):
                return "Cancer"
            elif (month == 7 and day >= 23) or (month == 8 and day <= 22):
                return "Leo"
            elif (month == 8 and day >= 23) or (month == 9 and day <= 22):
                return "Virgo"
            elif (month == 9 and day >= 23) or (month == 10 and day <= 22):
                return "Libra"
            elif (month == 10 and day >= 23) or (month == 11 and day <= 21):
                return "Scorpio"
            elif (month == 11 and day >= 22) or (month == 12 and day <= 21):
                return "Sagittarius"
            elif (month == 12 and day >= 22) or (month == 1 and day <= 19):
                return "Capricorn"
            elif (month == 1 and day >= 20) or (month == 2 and day <= 18):
                return "Aquarius"
            else:
                return "Pisces"

        def action():
            username = name_var.get()
            user_dob_str = dob_var.get()
            user_gender = gender_var.get()

            # Calculate age based on DOB
            try:
                dob = datetime.strptime(user_dob_str, "%Y-%m-%d")
                age = calculate_age(dob)
                age_text = f"{age} years old"
            except ValueError:
                age_text = "Invalid DOB"

            # Calculate zodiac sign based on DOB
            try:
                zodiac_sign = calculate_zodiac_sign(dob)
            except ValueError:
                zodiac_sign = "Invalid DOB"

            result_text = f"Name: {username}\nDOB: {user_dob_str}\nGender: {user_gender}\nAge: {age_text}\nZodiac Sign: {zodiac_sign}"
            result_label.config(text=result_text)

            with open('file.txt', 'a') as f:
                f.write(f'{username},{user_dob_str},{user_gender},{age_text},{zodiac_sign}\n')

            name_entrybox.delete(0, tk.END)
            dob_entrybox.delete(0, tk.END)
            name_label.configure(foreground='#991E1E')

        win = tk.Tk()
        win.title('Age and Zodiac Sign Calculator')

        header_label = ttk.Label(win, text='Age and Zodiac Sign Calculator', font=('Arial', 18, 'bold'))
        header_label.pack()

        name_label = ttk.Label(win, text='Enter your name')
        name_label.pack()

        name_var = tk.StringVar()
        name_entrybox = tk.Entry(win, width=40, textvariable=name_var)
        name_entrybox.pack()

        dob_label = ttk.Label(win, text='Enter your DOB (YYYY-MM-DD)')
        dob_label.pack()

        dob_var = tk.StringVar()
        dob_entrybox = tk.Entry(win, width=40, textvariable=dob_var)
        dob_entrybox.pack()

        gender_label = ttk.Label(win, text='Select your gender')
        gender_label.pack()

        gender_var = tk.StringVar()
        gender_combobox = ttk.Combobox(win, width=38, textvariable=gender_var, state='readonly')
        gender_combobox['values'] = ('Male', 'Female', 'Other')
        gender_combobox.current(0)
        gender_combobox.pack()

        submit_button = tk.Button(win, text='Submit', command=action, width=20, bg='blue', fg='white')
        submit_button.pack()

        result_label = ttk.Label(win, text='', font=('Arial', 12))
        result_label.pack()

        win.mainloop()
Python Tkinter Code Explanation for the combined code
Setting Up the GUI
win = tk.Tk()
win.title('Zodiac Sign Calculator')
win = tk.Tk(): This creates the main window for the application.
win.title('Zodiac Sign Calculator'): This sets the title of the window to "Zodiac Sign Calculator".
Adding a Header Label
header_label = ttk.Label(win, text='Zodiac Sign Calculator', font=('Arial', 18, 'bold'))
header_label.pack()
header_label = ttk.Label(win, text='Zodiac Sign Calculator', font=('Arial', 18, 'bold')): This creates a label widget with the text "Zodiac Sign Calculator" in bold Arial font, size 18. ttk.Label is a part of the Tkinter library that gives a modern look to the label.
header_label.pack(): This places the label into the window using the default packing (placing) method.
Adding a Name Label and Entry Box
name_label = ttk.Label(win, text='Enter your name')
name_label.pack()

name_var = tk.StringVar()
name_entrybox = tk.Entry(win, width=40, textvariable=name_var)
name_entrybox.pack()
name_label = ttk.Label(win, text='Enter your name'): This creates a label with the text "Enter your name".
name_label.pack(): This places the label in the window.
name_var = tk.StringVar(): This creates a variable to store the text entered by the user.
name_entrybox = tk.Entry(win, width=40, textvariable=name_var): This creates an entry box where the user can type their name. The width of the box is set to 40 characters.
name_entrybox.pack(): This places the entry box in the window.
Adding a DOB Label and Entry Box
dob_label = ttk.Label(win, text='Enter your DOB (YYYY-MM-DD)')
dob_label.pack()

dob_var = tk.StringVar()
dob_entrybox = tk.Entry(win, width=40, textvariable=dob_var)
dob_entrybox.pack()
dob_label = ttk.Label(win, text='Enter your DOB (YYYY-MM-DD)'): This creates a label with the text "Enter your DOB (YYYY-MM-DD)".
dob_label.pack(): This places the label in the window.
dob_var = tk.StringVar(): This creates a variable to store the date of birth entered by the user.
dob_entrybox = tk.Entry(win, width=40, textvariable=dob_var): This creates an entry box where the user can type their date of birth. The width of the box is set to 40 characters.
dob_entrybox.pack(): This places the entry box in the window.
Adding a Gender Label and Combo Box
gender_label = ttk.Label(win, text='Select your gender')
gender_label.pack()

gender_var = tk.StringVar()
gender_combobox = ttk.Combobox(win, width=38, textvariable=gender_var, state='readonly')
gender_combobox['values'] = ('Male', 'Female', 'Other')
gender_combobox.current(0)
gender_combobox.pack()
gender_label = ttk.Label(win, text='Select your gender'): This creates a label with the text "Select your gender".
gender_label.pack(): This places the label in the window.
gender_var = tk.StringVar(): This creates a variable to store the selected gender.
gender_combobox = ttk.Combobox(win, width=38, textvariable=gender_var, state='readonly'): This creates a combo box (drop-down list) where the user can select their gender. The combo box is set to be read-only, meaning the user can only select from the given options and not type in it.
gender_combobox['values'] = ('Male', 'Female', 'Other'): This sets the options available in the combo box.
gender_combobox.current(0): This sets the default selected option to the first one ("Male").
gender_combobox.pack(): This places the combo box in the window.
Adding a Submit Button
submit_button = tk.Button(win, text='Submit', command=action, width=20, bg='blue', fg='white')
submit_button.pack()
submit_button = tk.Button(win, text='Submit', command=action, width=20, bg='blue', fg='white'): This creates a button with the text "Submit". When clicked, it will call the action function. The button is set to have a width of 20 characters, a blue background, and white text.
submit_button.pack(): This places the button in the window.
Adding a Result Label
result_label = ttk.Label(win, text='', font=('Arial', 12))
result_label.pack()
result_label = ttk.Label(win, text='', font=('Arial', 12)): This creates an empty label where the result will be displayed. The text will be in Arial font, size 12.
result_label.pack(): This places the label in the window.
Starting the Main Loop
win.mainloop()
win.mainloop(): This starts the main event loop of the application. It waits for user actions (like button clicks) and updates the GUI accordingly.
I fed my inner childness, hehe.
Moving to the LED switch
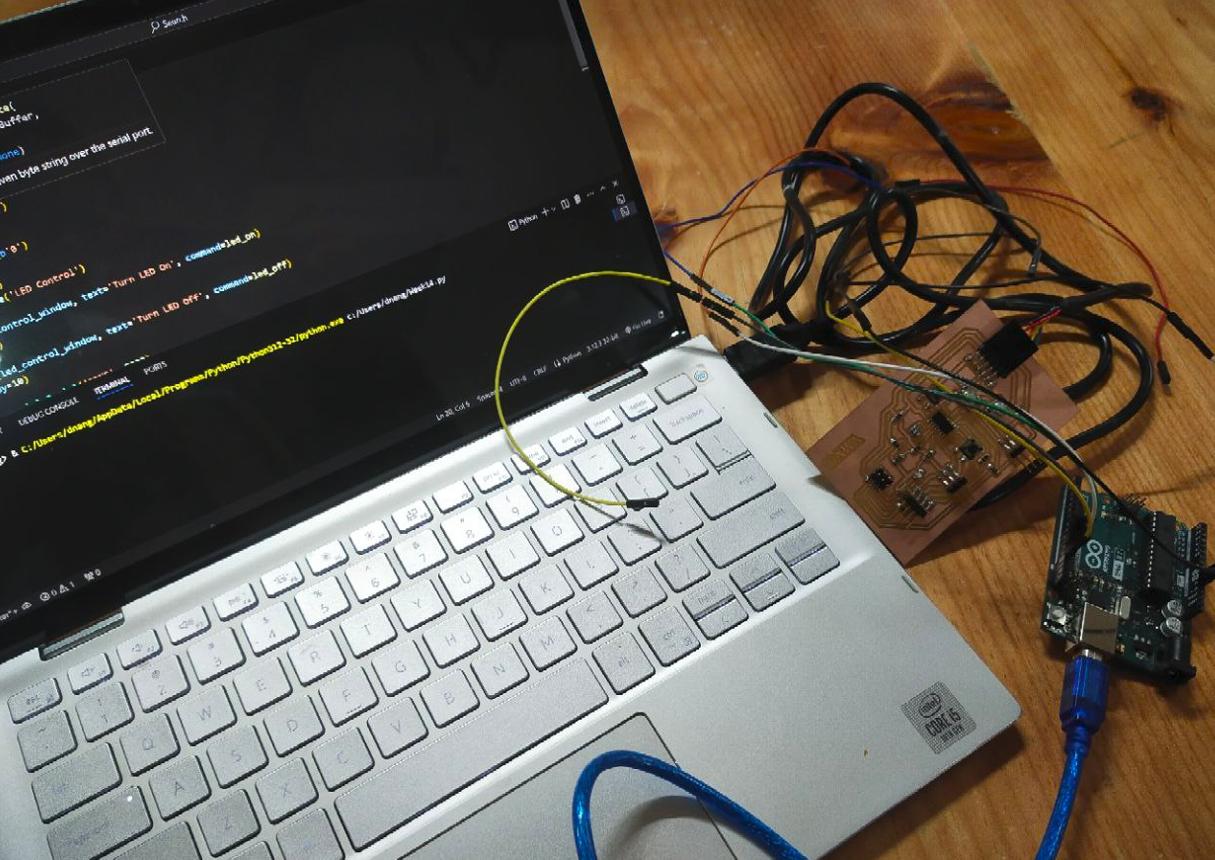
For this assignment, I used the board I redesigned during week 9 and was initially designed in week 8
After being able to code for the age calculator, I tried making a interface to control my LED on my embedded programming week's board.
Firstly upload the following code on Arduino IDE using a programmer, I uploaded the below to my board using Arduino as ISP.
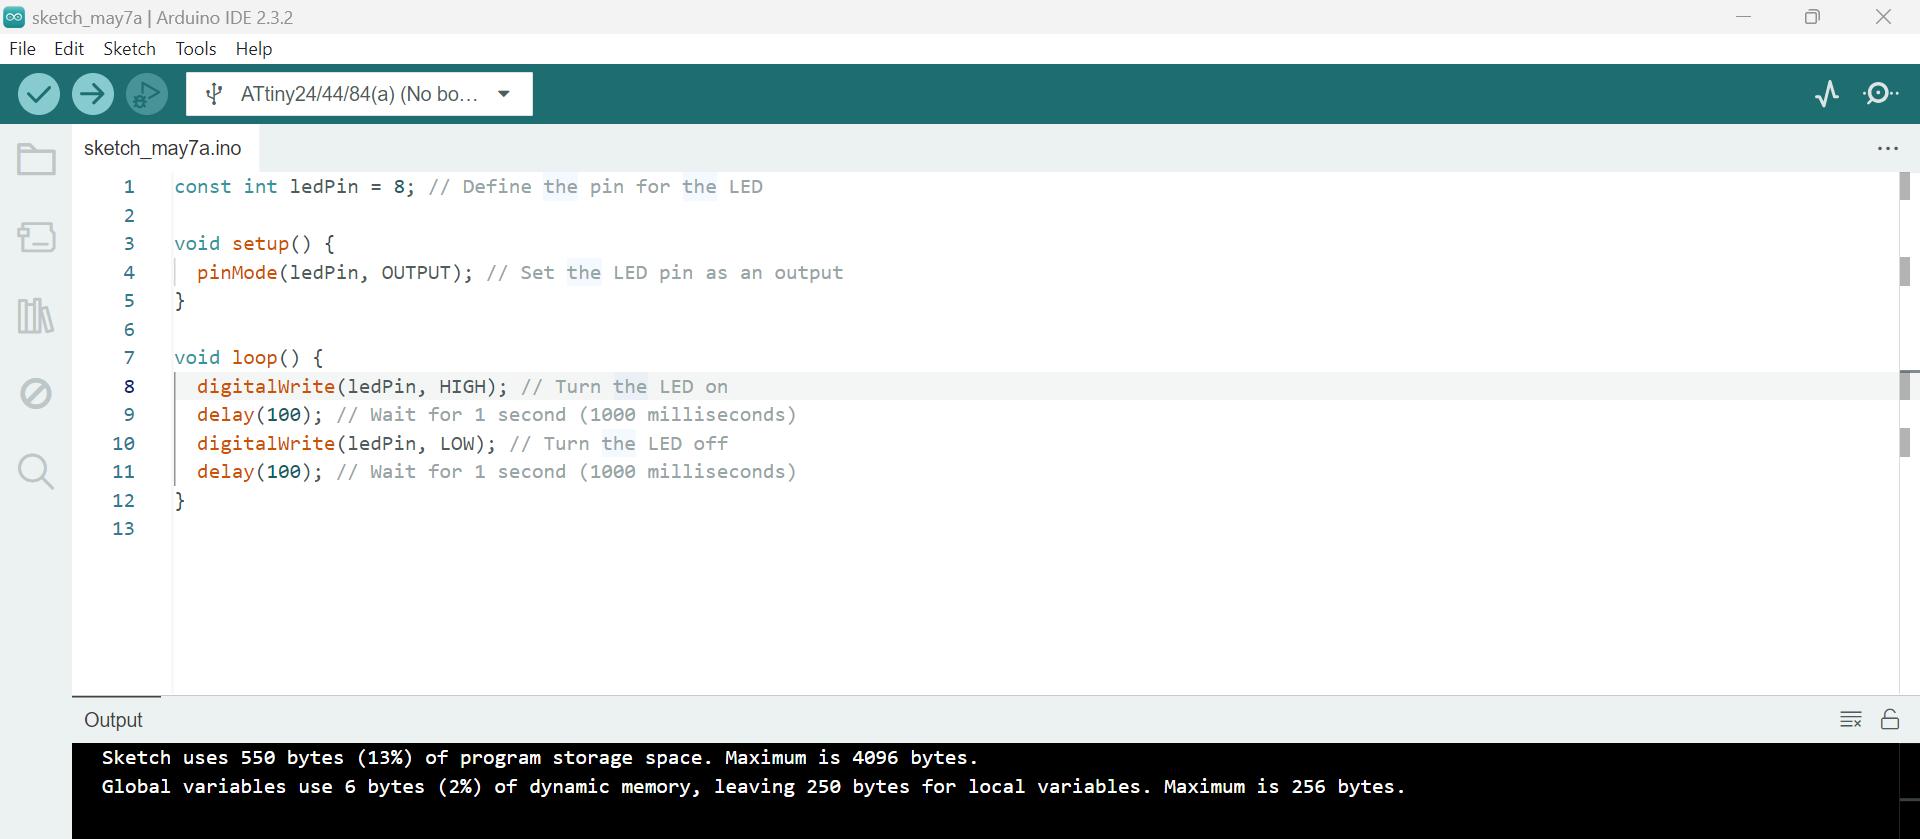
        int led = 2;
        char mydata = 0;

        // the setup routine runs once when you press reset:
        void setup() {
          // initialize the digital pin as an output.
          pinMode(led, OUTPUT);
          Serial.begin(9600);
        }

        // the loop routine runs over and over again forever:
        void loop() {
          mydata = int(Serial.read());

          if (mydata == '1')
            digitalWrite(led, HIGH);   // turn the LED on (HIGH is the voltage level)

          if (mydata == '0')
            digitalWrite(led, LOW);    // turn the LED off by making the voltage LOW
        }
change the line,
int led = 2;accordingly to which pin your LED is connected to.
Then connected your board to the laptop with FTDI cable.
And run this code the code below like before in VS Code for the GUI
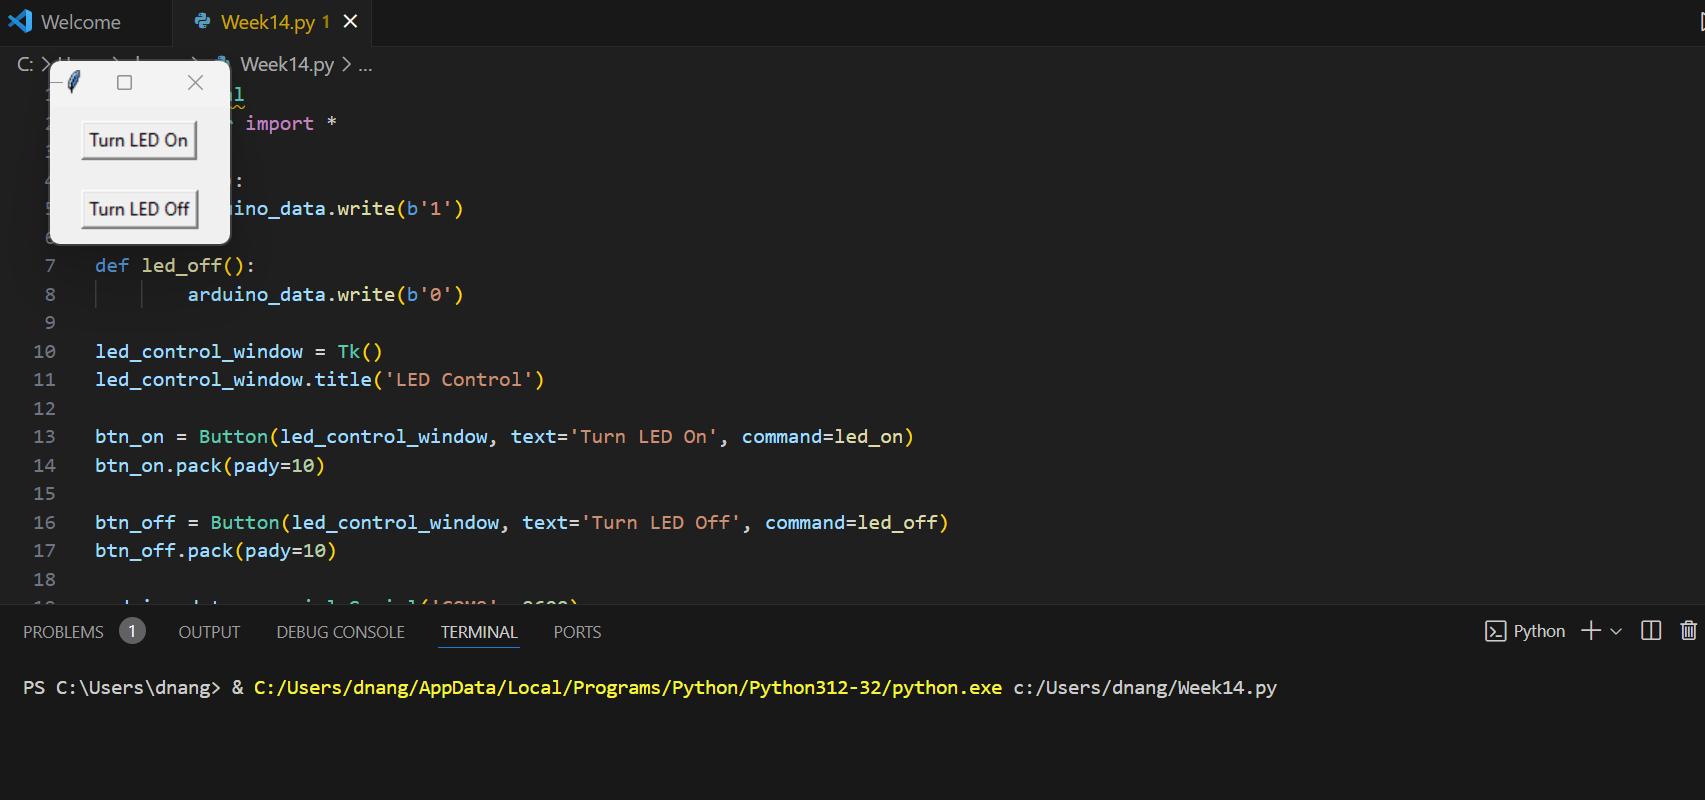
The code below is chatgpt and below is the prompt I gave.
    import serial
    from tkinter import *

    def led_on():
        arduino_data.write(b'1')

    def led_off():
        arduino_data.write(b'0')

    led_control_window = Tk()
    led_control_window.title('LED Control')

    btn_on = Button(led_control_window, text='Turn LED On', command=led_on)
    btn_on.pack(pady=10)

    btn_off = Button(led_control_window, text='Turn LED Off', command=led_off)
    btn_off.pack(pady=10)

    arduino_data = serial.Serial('COM18', 9600)

    led_control_window.mainloop()
Code Explanation: LED Control with Tkinter and Serial Communication
Importing Libraries
import serial
from tkinter import *
- import serial: This imports the serial library, which allows us to communicate with the Arduino via serial port.
- from tkinter import *: This imports all functions and classes from the tkinter library, which is used to create the GUI.
Defining Functions to Control the LED
def led_on():
    arduino_data.write(b'1')

def led_off():
    arduino_data.write(b'0')
- def led_on(): This function sends the command '1' to the Arduino, telling it to turn the LED on.
- def led_off(): This function sends the command '0' to the Arduino, telling it to turn the LED off.
- arduino_data.write(b'1') and arduino_data.write(b'0'): These lines send a byte (1 or 0) to the Arduino through the serial connection.
Creating the Main Window
led_control_window = Tk()
led_control_window.title('LED Control')
- led_control_window = Tk(): This creates the main window for the GUI.
- led_control_window.title('LED Control'): This sets the title of the window to "LED Control".
Adding Buttons to the Window
btn_on = Button(led_control_window, text='Turn LED On', command=led_on)
btn_on.pack(pady=10)

btn_off = Button(led_control_window, text='Turn LED Off', command=led_off)
btn_off.pack(pady=10)
- btn_on = Button(led_control_window, text='Turn LED On', command=led_on'): This creates a button labeled "Turn LED On" that calls the led_on function when clicked.
- btn_on.pack(pady=10): This adds the "Turn LED On" button to the window and adds padding around it.
- btn_off = Button(led_control_window, text='Turn LED Off', command=led_off'): This creates a button labeled "Turn LED Off" that calls the led_off function when clicked.
- btn_off.pack(pady=10): This adds the "Turn LED Off" button to the window and adds padding around it.
Setting Up Serial Communication
arduino_data = serial.Serial('COM18', 9600)
- arduino_data = serial.Serial('COM18', 9600'): This sets up the serial communication with the Arduino on port 'COM18' at a baud rate of 9600.
Running the Main Loop
led_control_window.mainloop()
- led_control_window.mainloop(): This starts the Tkinter event loop, which waits for user interactions and updates the GUI accordingly.
change the line,
arduino_data = serial.Serial('COM18', 9600)accordingly to which COM Port FTDI is connected
The results
Reflection
When I first started the assignment on integrating an age calculator into friend's existing GUI project, the challenge seemed daunting, and rather very puzzling to look at. The codes appeared complex, like encountering larvae on someone's hand, intriguing yet unfamiliar. It felt as if I had stepped into a new world for the first time.
With the invaluable guidance of ChatGPT and the comprehensive documentation from my friend Ngawang, adn Ms. Zina. I began to undersatnd bit by bit how they made their GUI project. Their explanations provided clarity, yet I acknowledge that I haven't fully understood everything and has lots of room for exploration and curiosity.In my journey with Tkinter, I've enjoyed creating user-friendly interfaces for Python applications, integrating features like age calculation and Zodiac signs. Arduino IDE has been equally exciting, allowing me to explore physical computing by controlling LEDs and learning about serial communication.
Additionally, the websites I referred to served as invaluable resources, offering insights and solutions that further enriched my understanding. Therefore, as I reflect on this week, it has been an exciting week of OMGs(Oh my Gods) for the experiences and things I never knew I could do with Tkinter let alone even know what TKinter is and Yippies everytime the age calculator and zodiac calculator worked.