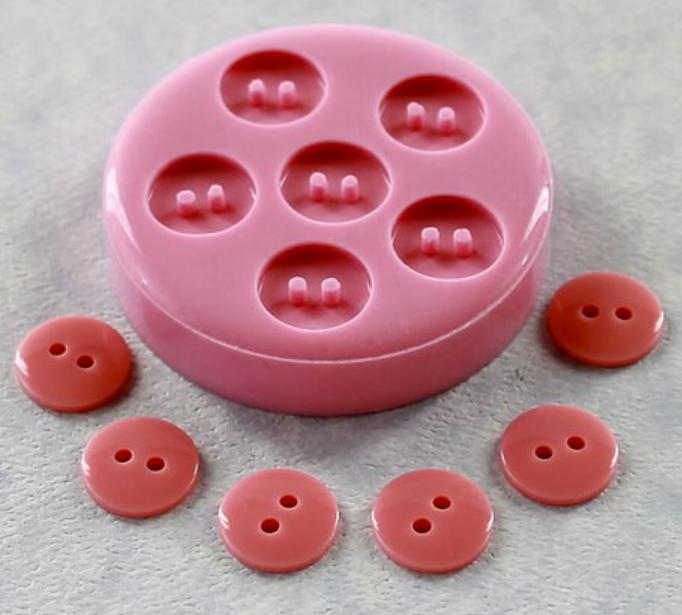
Moulding and Casting
Assignments
All the important links are Here
Learning outcomes
Group Assignment
For further information, please check our Group AssignmentGroup Assignment:
What is Molding and Casting
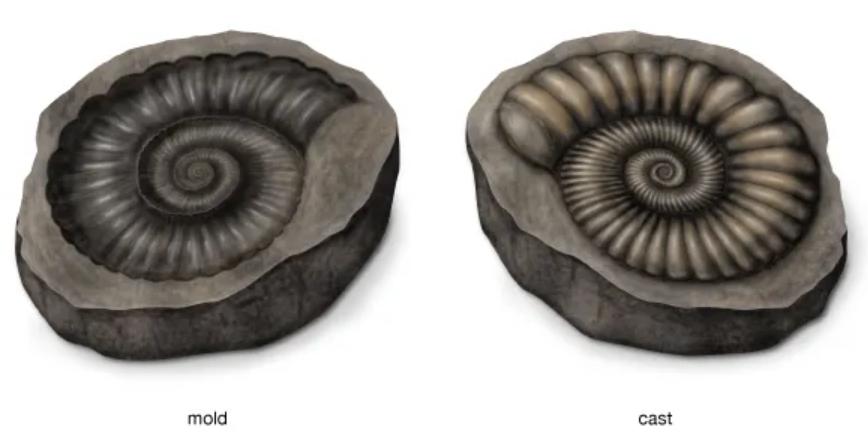
Molding involves creating a hollow cavity (a mold) that matches the shape of the desired object. This mold is then filled with a material that can take its shape, such as liquid plastic or molten metal. Once the material inside the mold hardens or sets, it takes on the shape of the mold.
Casting:Casting is the process of pouring a material, usually a liquid or molten substance, into a mold to create a copy of the original object. The material fills the mold and takes its shape, then solidifies or cools down to form the final product. This technique allows for the creation of multiple identical copies of the same object.
Molding creates the shape of the object's cavity (negative space), while casting fills that shape to create the final object (positive space).
Vocabulary
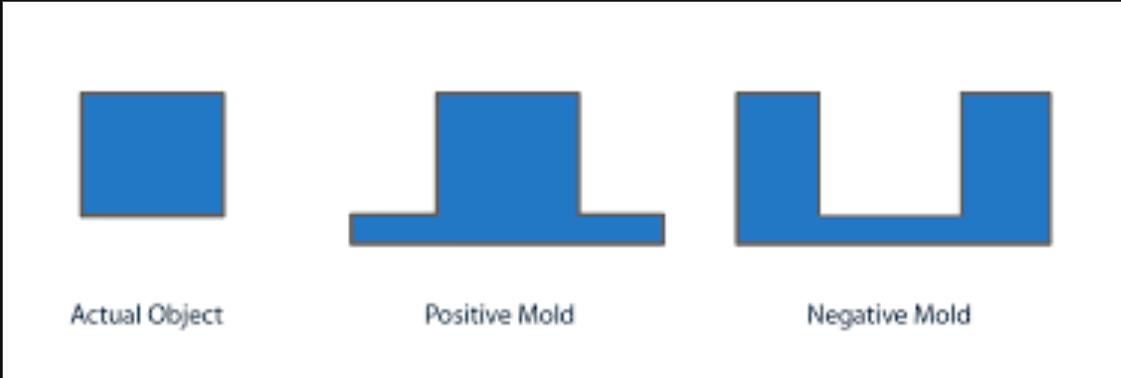
- Positive Mold A positive mold is a mold that replicates the shape and details of the original object. It's used to create exact copies of the object.
- Negative Mold A negative mold is a mold created as the inverse of the original object. It represents the space the original object occupied and can be used to create replicas.
- Pot lifePot life, also known as working time, is a term often used in the context of casting, molding, and other fabrication processes. It refers to the period during which a mixed material, such as resin or plaster, remains in a liquid state and is workable. After this time, the material begins to harden or cure, making it difficult or impossible to manipulate. The length of the pot life can vary depending on the specific material and environmental conditions such as temperature and humidity.
- Cure timeCure time refers to the period required for a material, such as resin or plaster, to fully harden or set after it has been mixed and applied. The length of the cure time can vary widely depending on the specific material, its formulation, the volume used, and environmental conditions such as temperature and humidity.
- Injection Molding: Heating up material until it's liquid, then shooting it into a mold at high pressure to shape it into things like plastic toys or parts for machines.
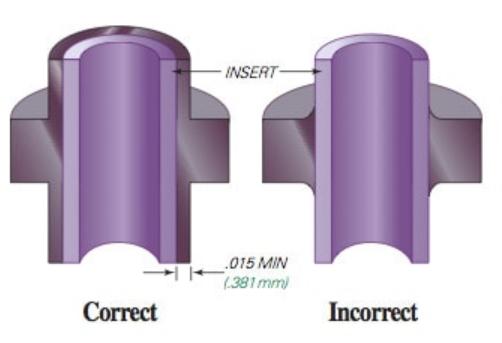
- Insert Molding: Placing metal or other materials into the mold before injecting the plastic, so they become part of the finished product.
- Overmolding: Adding another layer of material onto an existing part to give it extra features or protection.
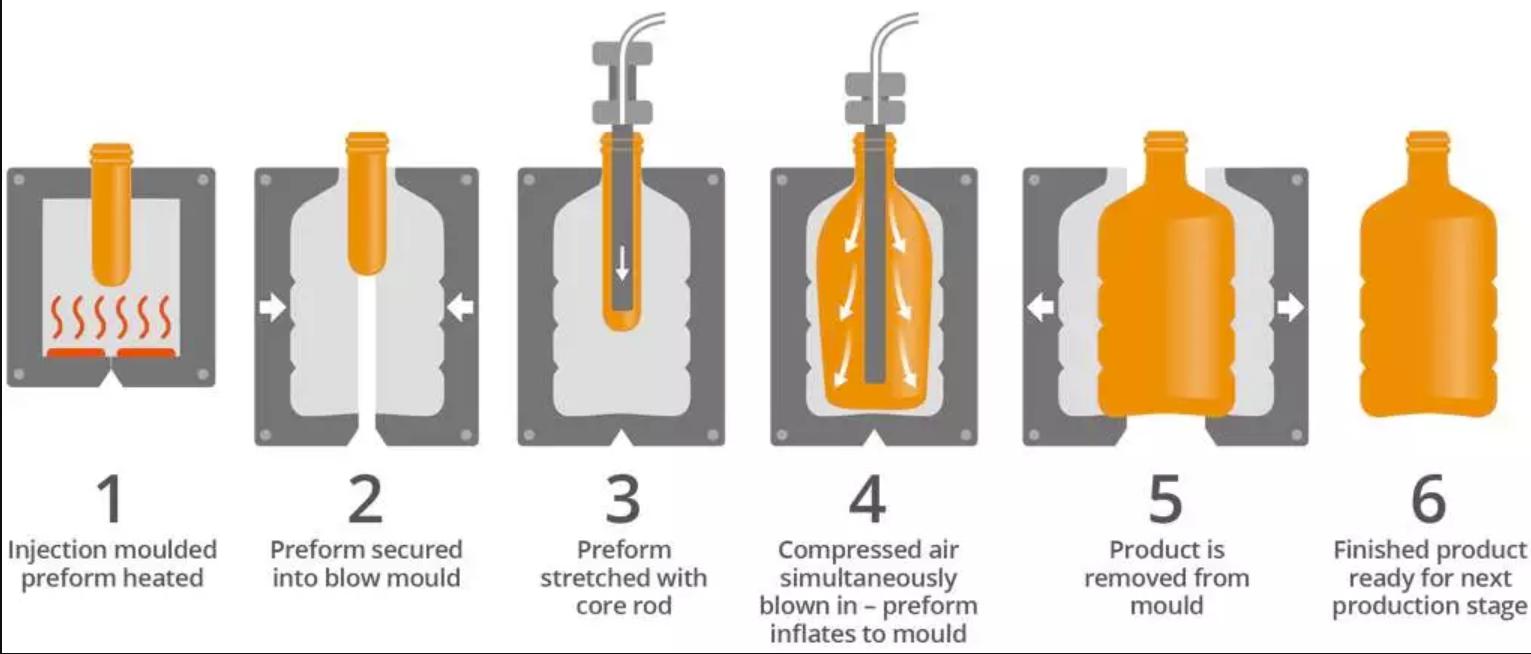
- Blow Molding: Inflating a heated plastic tube inside a mold, like blowing up a balloon, to create hollow objects such as bottles or containers.
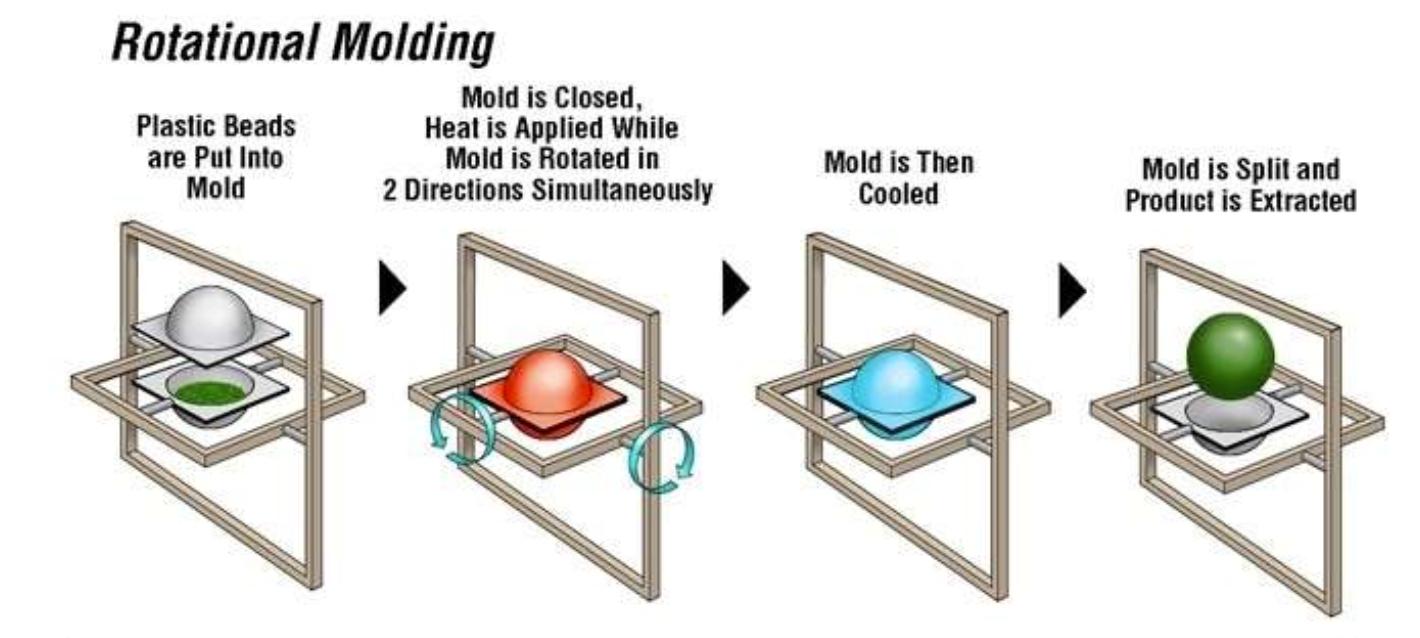
- Rotational Molding: Rotating the mold while heating it, allowing the material to evenly coat the inside and form hollow or large parts with consistent thickness.
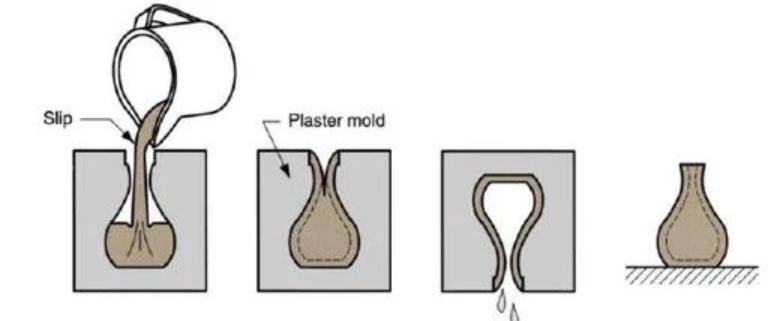
- Slip Casting: Pouring a slurry of liquid material (like clay) into a porous mold, where water is absorbed, leaving behind a solid object.
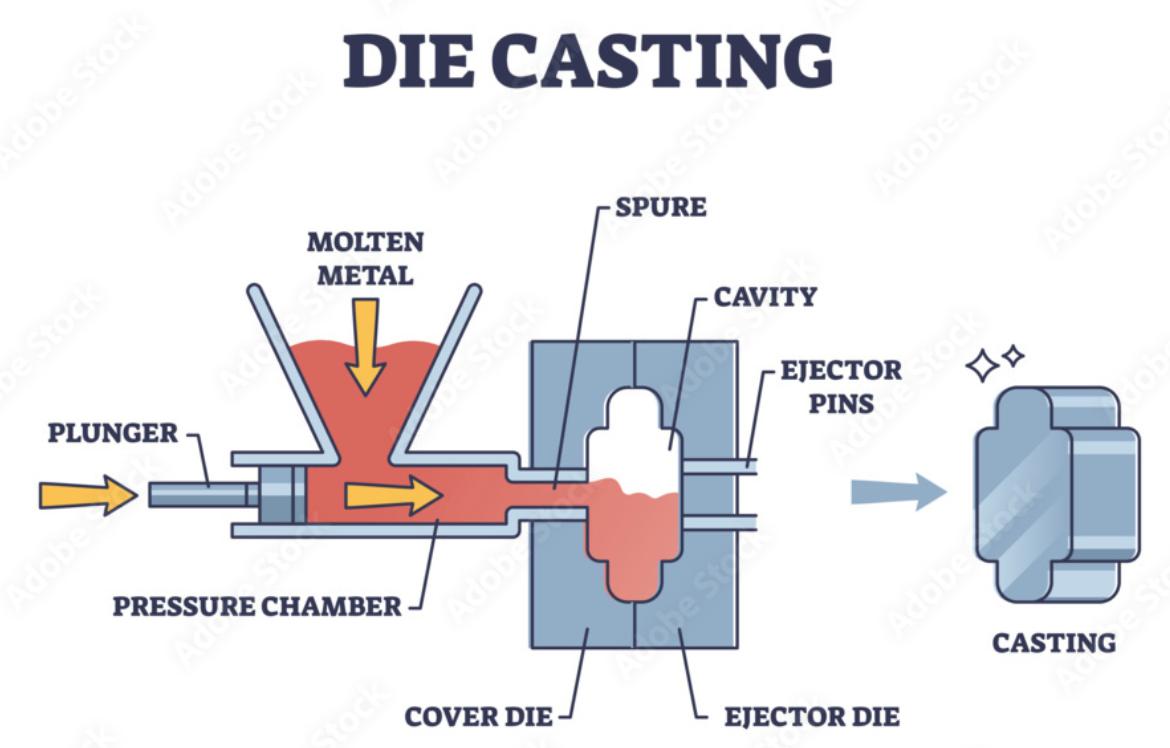
- Die Casting: Forcing molten metal into a mold cavity under high pressure, producing precise metal parts with fine details.
- Flexible Molds: Making molds from materials that can bend or stretch, allowing for easier removal of the casted object without damaging it.
- Materials: Various substances like foam, rubber, plastic, metal, or clay used as raw materials for casting different objects.
- Additives: Substances added to the base material to alter its properties, such as making it stronger, more flexible, or resistant to heat.
- Safety: Ensuring proper handling of materials, ventilation to avoid inhaling fumes, using protective gear, and disposing of waste responsibly.
- Machining: Using tools and machines to shape, cut, or smooth materials to achieve desired shapes and surface finishes.
- Software: Computer programs used for designing molds, simulating casting processes, and generating toolpaths for CNC machining, aiding in the manufacturing process.
- Pot Life: 15 minutes
- Cure Time: 75 minutes
- Mixing Time: 3 minutes
- Outcome: When used for 3D printing molds, OOMOO 25 leaves filament marks on both the negative and positive molds, resulting in a textured finish. However, milling molds with OOMOO 25 produces smoother outcomes with faint lines from the drilling bit.
- Pot Life: 25 minutes
- Cure Time: 4 hours
- Mixing Time: 3 minutes
- Outcome: 3D printing molds with SORTA CLEAR 37 captures intricate and detailed patterns effectively due to its translucent properties. Conversely, milling molds with SORTA CLEAR 37 yields smoother outcomes but may exhibit slight textures from the milling process.
- Pot Life: 7 minutes
- Cure Time: 30 minutes
- Mixing Time: 3 minutes
- Outcome: Both 3D printing and milling molds with Smooth-Cast™ 305 produce bright white castings with minimal bubble formation. However, milling molds may offer slightly smoother finishes compared to 3D printing.
- Pot Life: 25 minutes
- Cure Time: 4 hours
- Mixing Time: 3 minutes
- Outcome: 3D printing molds with LSR 225 capture intricate and detailed patterns effectively due to its low viscosity. Milling molds with LSR 225 yield smooth outcomes but may exhibit slight textures from the milling process.
- Mix Ratio: 18-20 parts water to 100 parts powder by weight
- Mixing Time: 2-4 minutes until a lump-free slurry is achieved
- Drying: Dry casts as quickly and safely as possible to achieve optimal physical properties
- Finishing: Trim immediately after demolding; allow air to circulate around the cast. Products can be decorated approximately 2-4 hours after setting.
- Keep product container or label accessible for medical advice.
- Store out of reach of children.
- Read and understand label instructions before use.
- Obtain special instructions before use.
- Ensure all safety precautions are understood before handling.
- Avoid breathing dust, fumes, gases, or vapors.
- Wash skin thoroughly after handling.
- Use only outdoors or in a well-ventilated area.
- Contaminated work clothing should not leave the workplace.
- Wear protective gloves, clothing, eye, and face protection.
- Use respiratory protection if ventilation is inadequate.
- If on skin, wash with plenty of soap and water.
- If inhaled, move to fresh air and keep comfortable for breathing.
- If in eyes, rinse cautiously with water for several minutes; remove contact lenses if present and continue rinsing.
- If exposed or concerned, call a poison center or physician.
- Seek medical advice if feeling unwell or if skin irritation or rash occurs.
- If eye irritation persists, seek medical attention.
- Remove contaminated clothing and wash before reuse.
- Store in a well-ventilated place and keep containers tightly closed.
- Store locked up and away from heat, direct sunlight, and strong oxidizers.
- Follow local standards and fire codes for indoor storage.
- Carefully reseal opened containers to prevent leakage.
- Avoid water contamination of product.
- Dispose of according to local, state, and federal laws.
- Do not attempt to refill or clean containers for reuse.
- Do not burn or cut open empty containers due to potential toxic fumes.
- Keep container tightly closed when not in use.
- Store in a cool, dry place away from direct sunlight and heat sources.
- Keep out of reach of children and pets.
- Use only in well-ventilated areas.
- Avoid breathing vapors or mists.
- Wear protective gloves, eye protection, and clothing to prevent skin and eye contact.
- Wash hands thoroughly after handling.
- Use with adequate ventilation or respiratory protection if ventilation is inadequate.
- Do not eat, drink, or smoke while using this product.
- Avoid release to the environment.
- In case of skin contact, wash with soap and plenty of water. Remove contaminated clothing and wash before reuse.
- If in eyes, rinse cautiously with water for several minutes. Remove contact lenses if present and continue rinsing.
- If swallowed, rinse mouth. Do not induce vomiting. Seek medical attention immediately and show this container or label.
- Store in original tightly closed containers away from incompatible materials.
- Store away from food and beverages.
- Store in a well-ventilated place.
- Keep containers tightly closed and upright to prevent leakage.
- Dispose of according to local, state, and federal regulations.
- Do not allow runoff from fire-fighting to enter drains or water courses.
- Empty containers retain product residue and can be hazardous. Follow all label warnings even after container is empty.
- Store in a cool, dry place away from direct sunlight and heat sources.
- Keep container tightly closed when not in use.
- Keep out of reach of children and pets.
- Use only in well-ventilated areas.
- Avoid prolonged or repeated contact with skin.
- Wear protective gloves, eye protection, and clothing to prevent skin and eye contact.
- Wash hands thoroughly after handling.
- Use with adequate ventilation or respiratory protection if ventilation is inadequate.
- Do not eat, drink, or smoke while using this product.
- Avoid release to the environment.
- In case of skin contact, wash with soap and plenty of water. Remove contaminated clothing and wash before reuse.
- If in eyes, rinse cautiously with water for several minutes. Remove contact lenses if present and continue rinsing.
- If swallowed, rinse mouth. Do not induce vomiting. Seek medical attention immediately and show this container or label.
- Store in original tightly closed containers away from incompatible materials.
- Store away from food and beverages.
- Store in a well-ventilated place.
- Keep containers tightly closed and upright to prevent leakage.
- Dispose of according to local, state, and federal regulations.
- Do not allow runoff from fire-fighting to enter drains or water courses.
- Empty containers retain product residue and can be hazardous. Follow all label warnings even after container is empty.
- Design a mold around the process you'll be using, produce it with a smooth surface finish, and use it to cast parts.
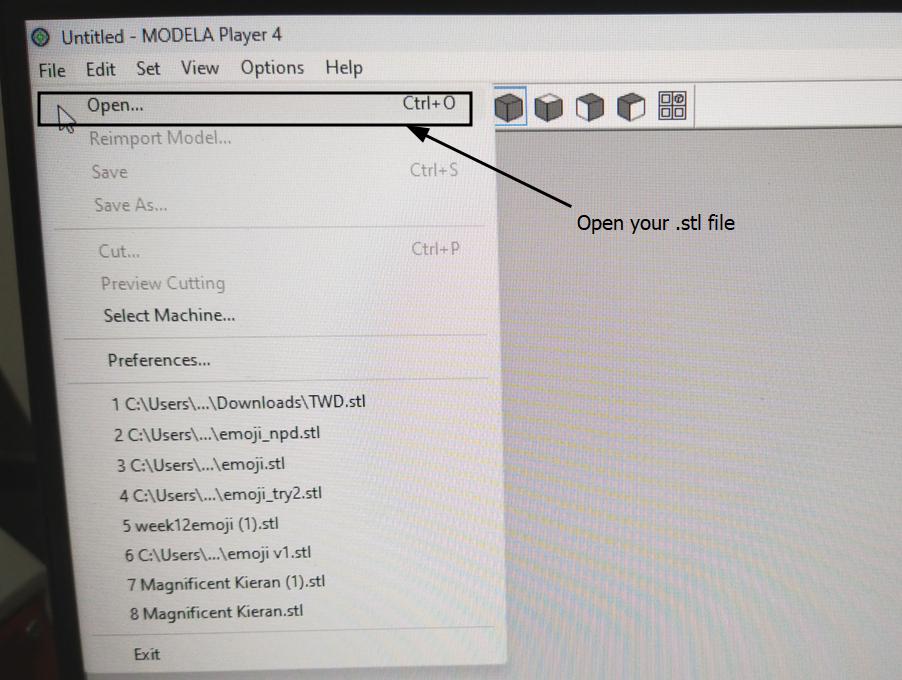
- Import the STL file you designed.
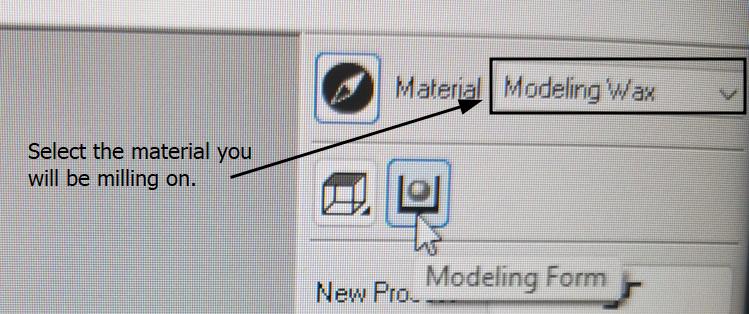
- Choose the material from the dropdown menu (select modeling wax).
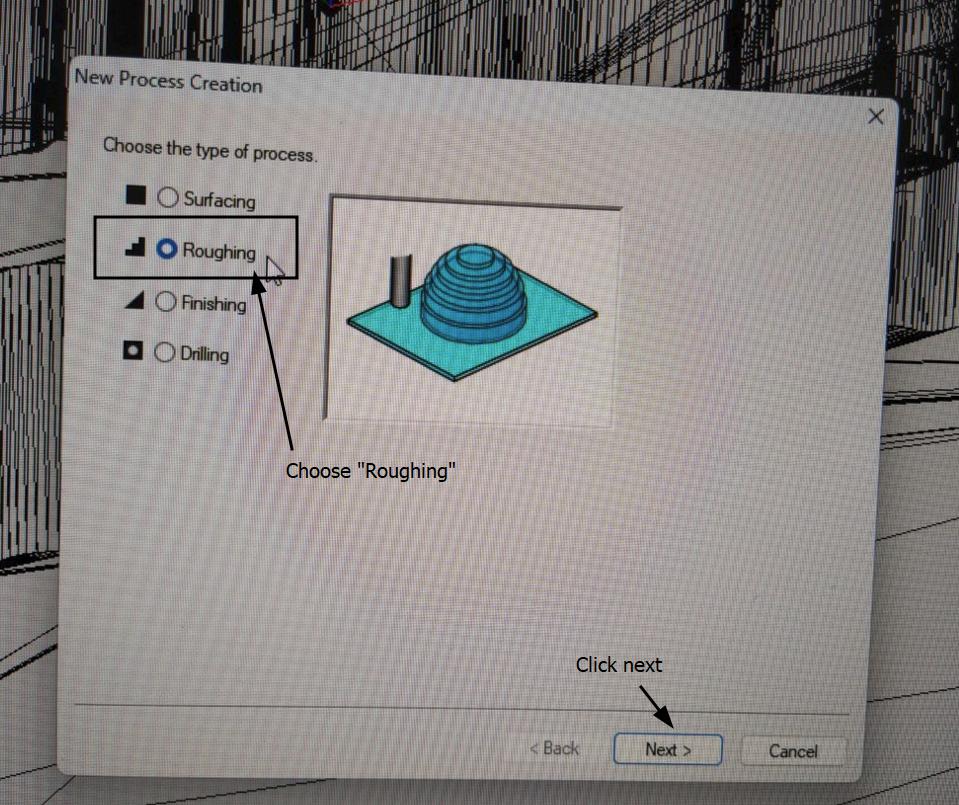
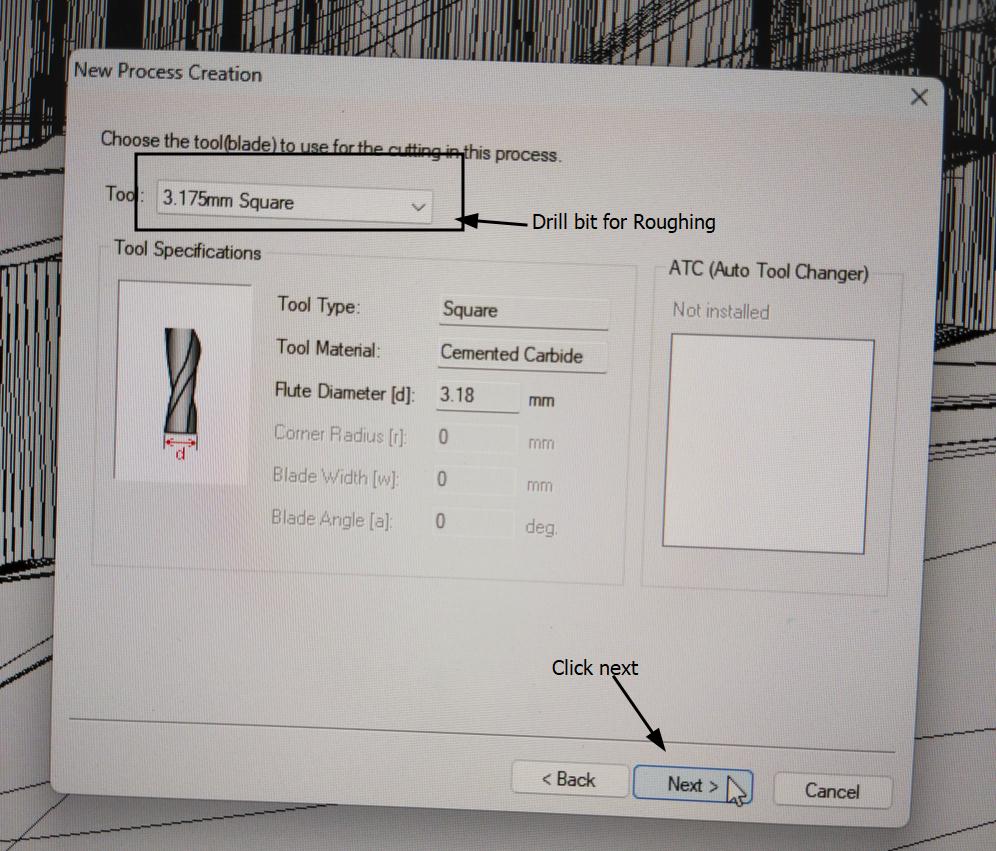
- Select "New Process" and choose "Roughing" type, then click next.
- Choose the cutting surface as "Top" and proceed to the next step.
- Select the 3.175mm Square tool for Roughing from the dropdown menu and press next.
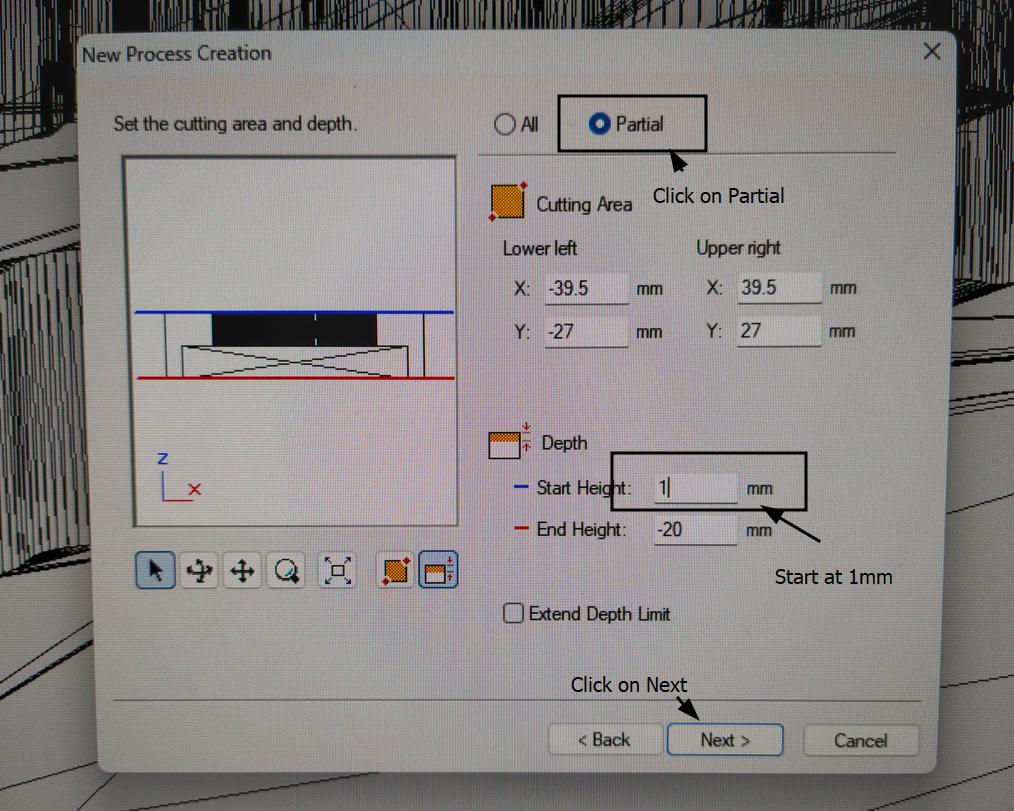
- Select "Partial" and manually adjust the cutting area.
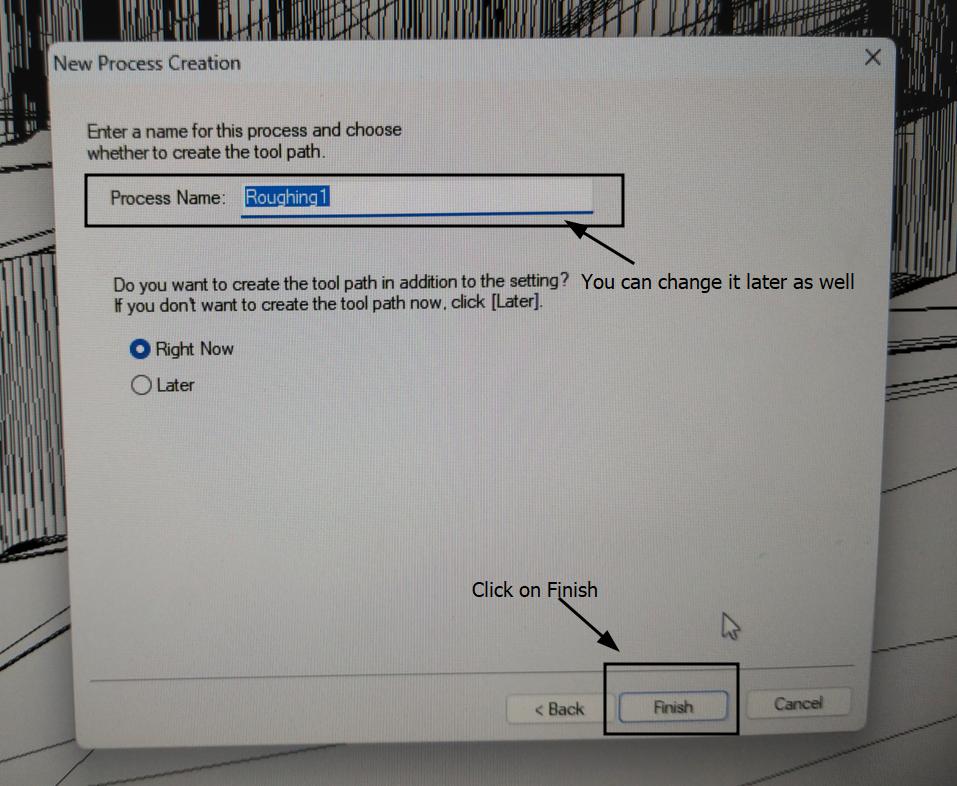
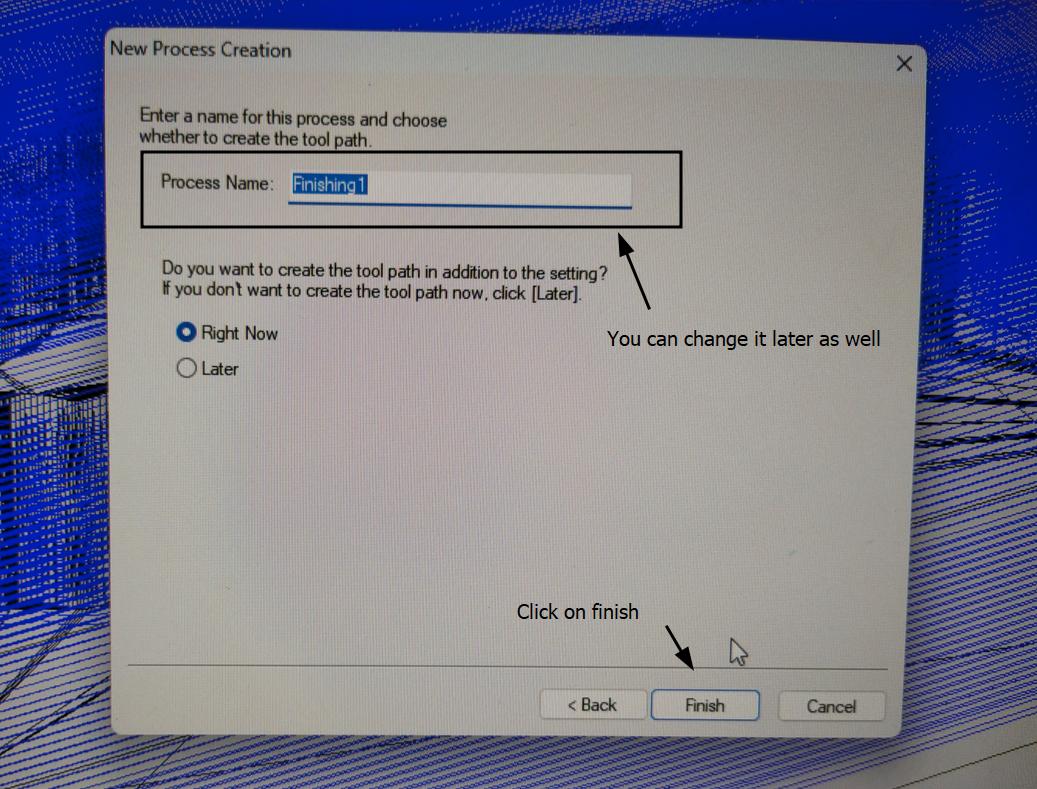
- Then finish the new process creation
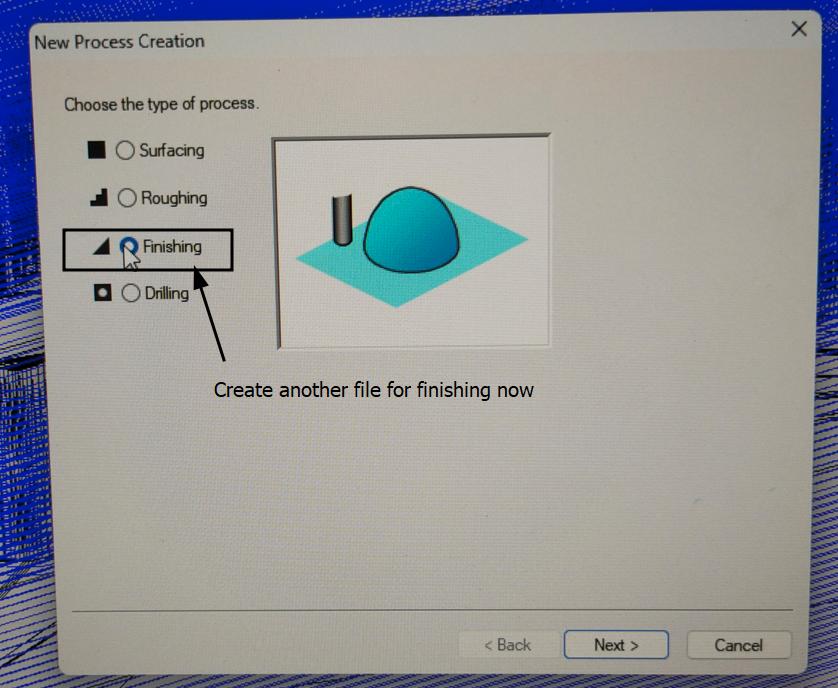
- Move to the "Finishing" process, select the same bit as in Roughing, and minimize the cutting area manually.
- Choose the tool path type and set cutting parameters accordingly.
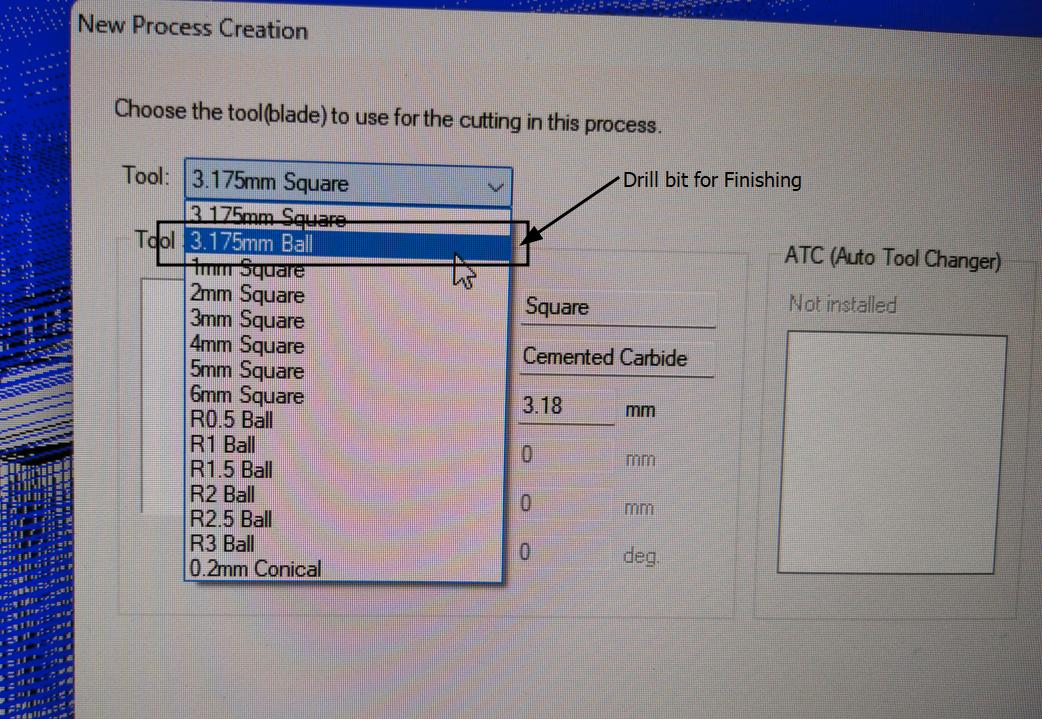
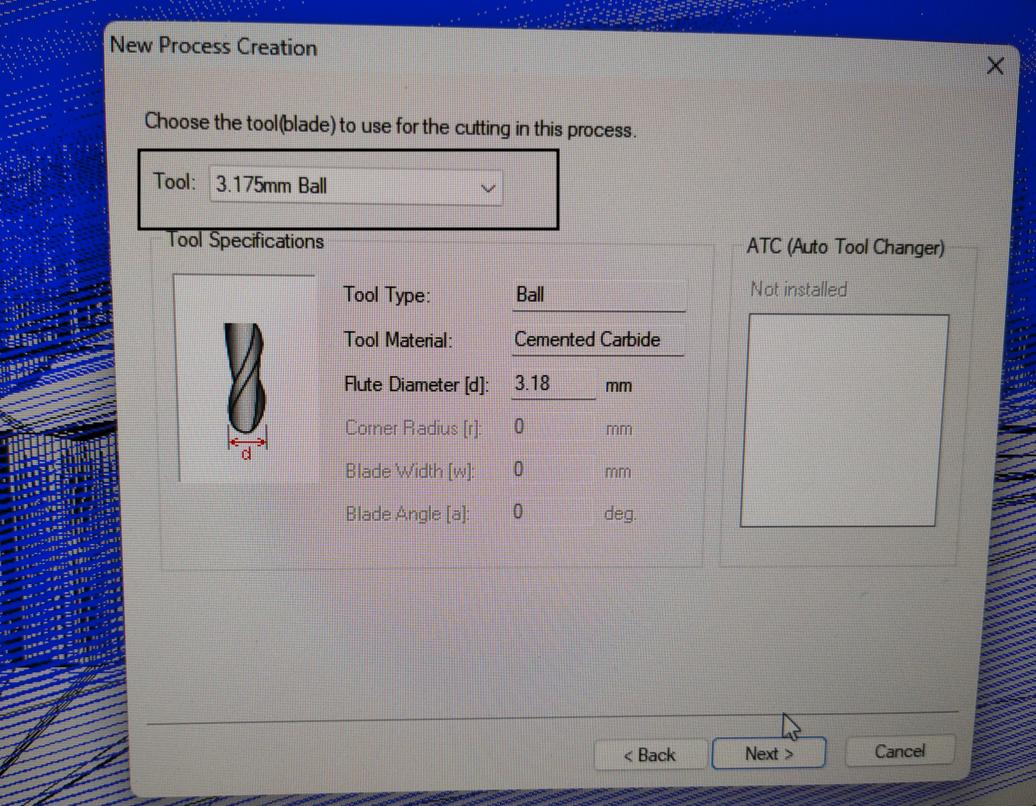
- Select the 3.175mm ball tool for Finishing from the dropdown menu and press next.
- Then finish the new process creation
Group Assignment
For the materials of Smooth-On please visit the Official Site for the vast datasheets available
Product Information, Technical Bulletin, Safety Datasheet
Product Information, Technical Bulletin, Safety Datasheet
Product information, Technical Bulletin, Safety Datasheet
Product Information, Datasheet
When comparing 3D printing versus milling molds, it's essential to consider the specific characteristics of each material and method. While 3D printing excels in capturing intricate details, milling may offer smoother finishes but is limited by the size of the drill bit. Ultimately, the choice depends on the project's requirements and desired level of detail in the final product.
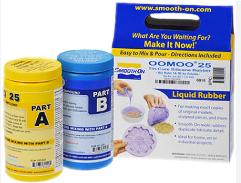
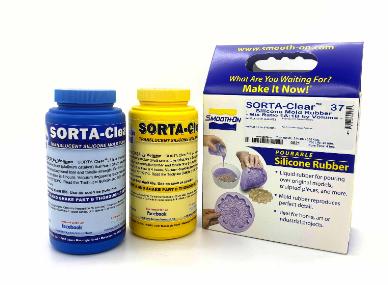
In our lab, we have a comprehensive array of molding materials, each tailored to specific applications. Among these are Smooth On OOMOO 25 SILICONE RUBBER COMPOUND, SORTA CLEAR 37 TRANSLUCENT SILICONE RUBBER, BLUE WAX BLOCK, and AMACO FLEXWAX
Safety Precautions for Silicone Products
All the information below are from their official safety datasheets, which are all linked above
Smooth-Cast 305
Sorta Clear 37 Translucent Silicone Rubber
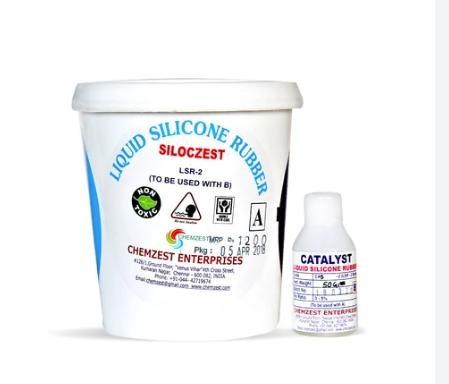
Siloczest Liquid Silicone Rubber-LSR 225 (Fast)
Individual Assignment
The design I chose for my mold is a dog paw (I wanted a paw shaped chocolate mold)
I looked at Mr.Anith's documentation for a basic knowledge when designing the mold Mr.Anith Ghalley
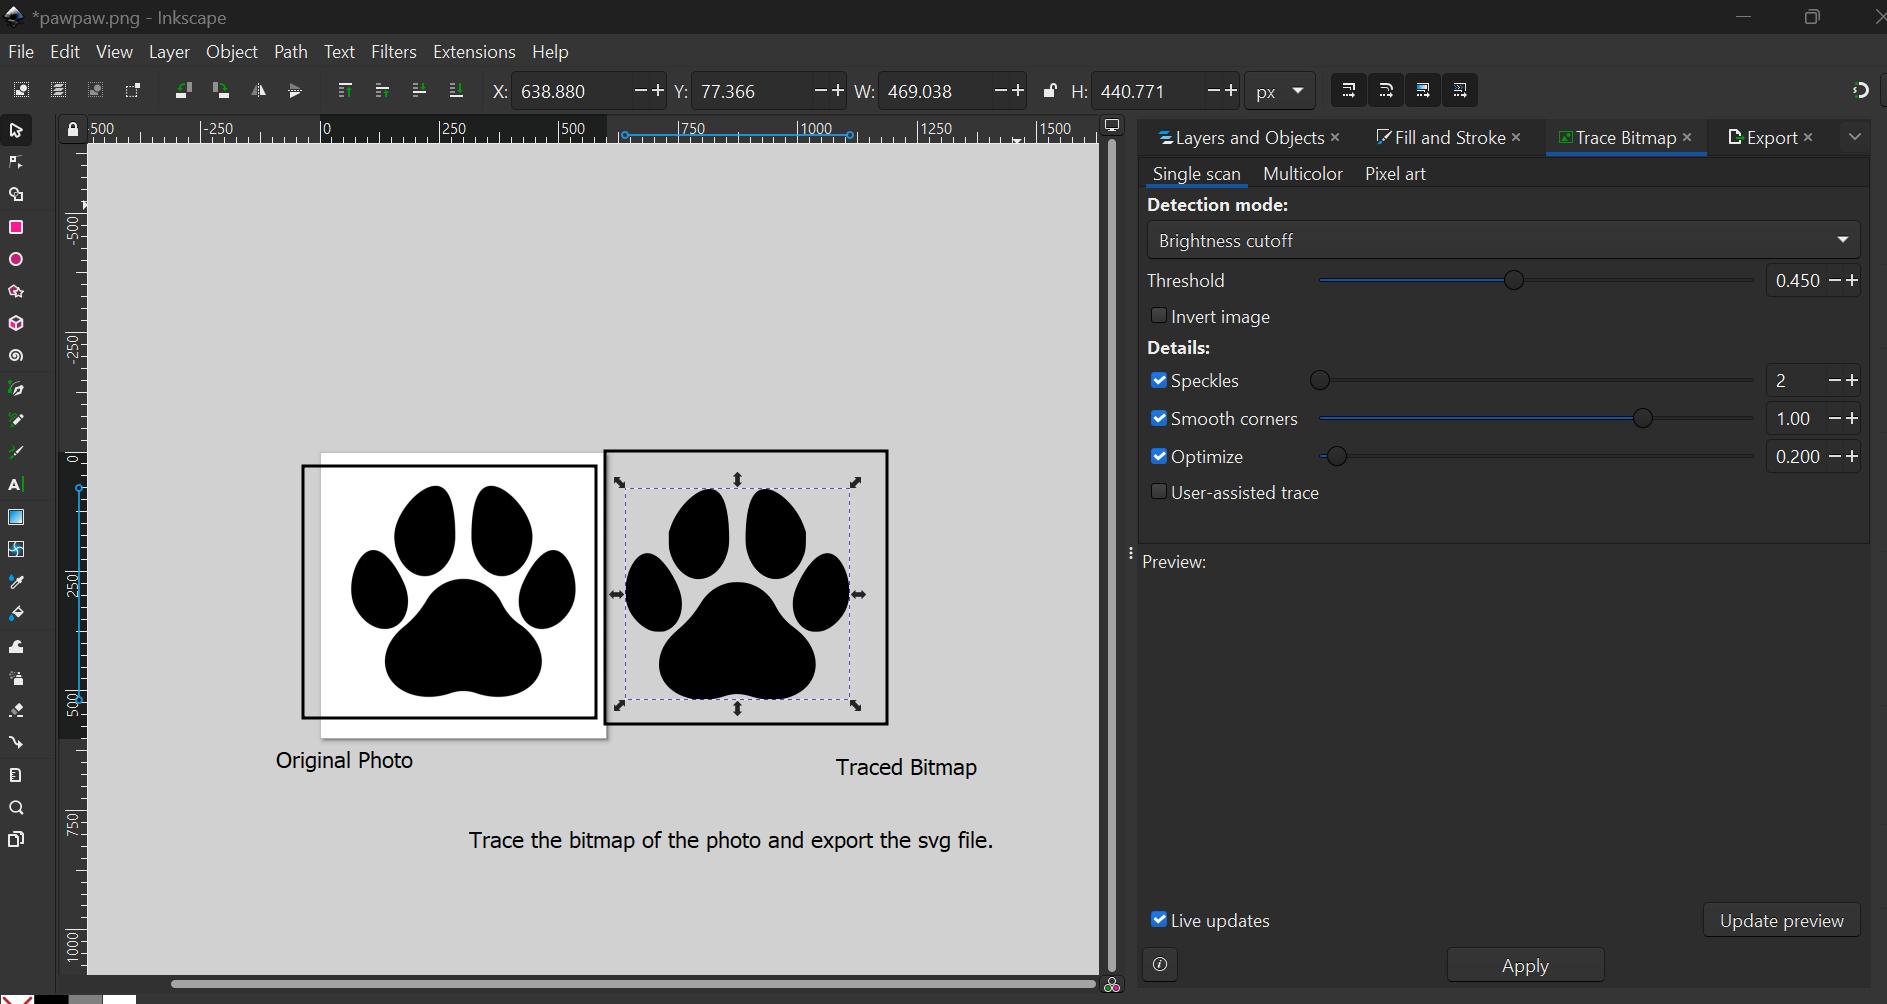
Firstly the paw design
As simple as it sounds, Use inkscape to trace the bitmap of the design and export it in .svg file.
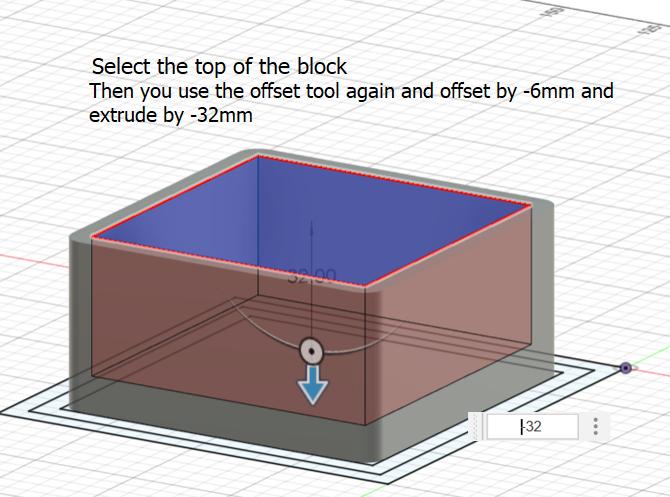
Now, the mold design itself with the paw print in the middle. You will have to first create a square sketch with the sizes 150mm by 150mm. And then use the "Offset" tool to create two offset sketches. Offset 1 for the Outer edge for the mold wall. And Offset 2 for the Inner edge for the mold wall.
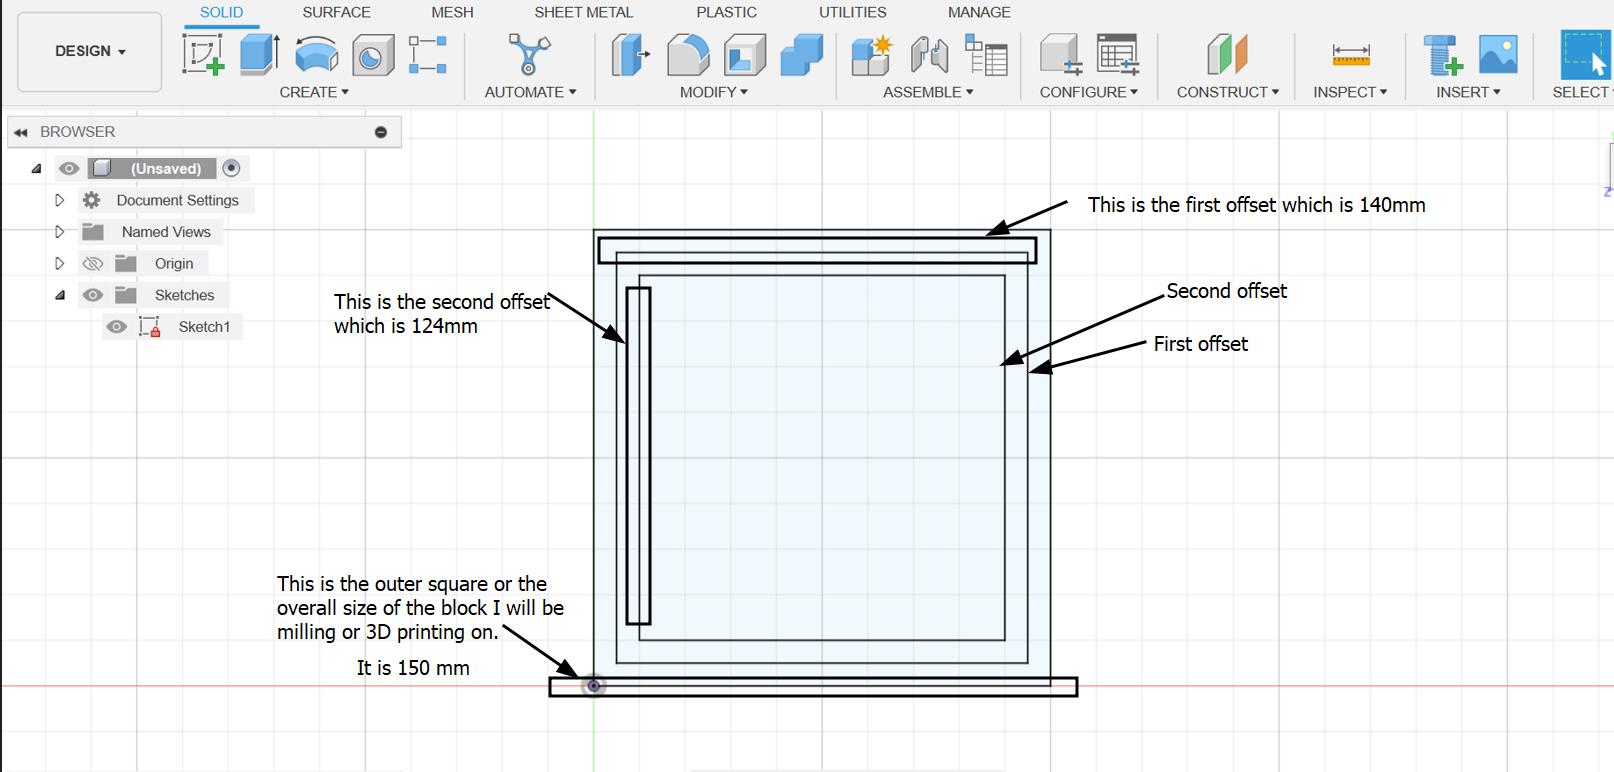
For the Offset tool
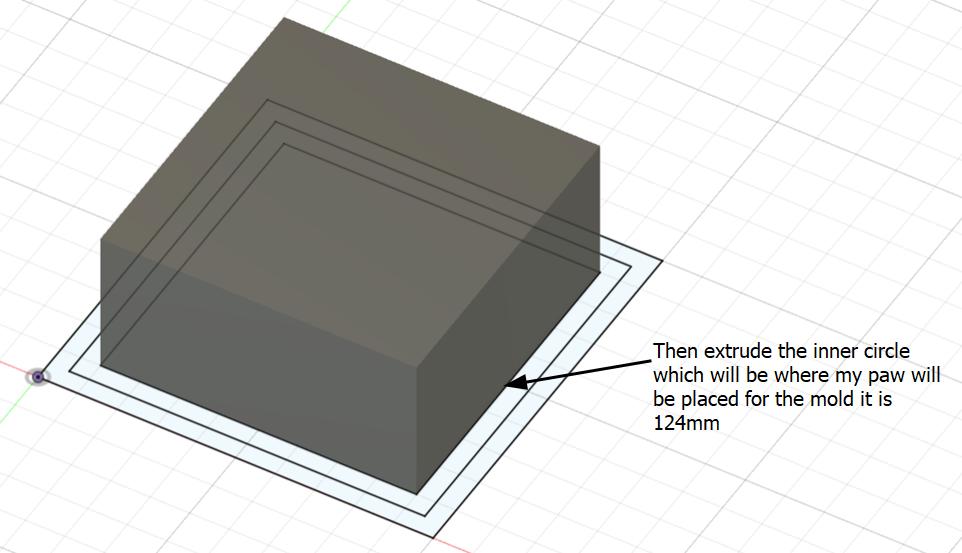
Then extrude the innermost square by 39mm which is a little but smaller than the thickness of the material I am using to mill/
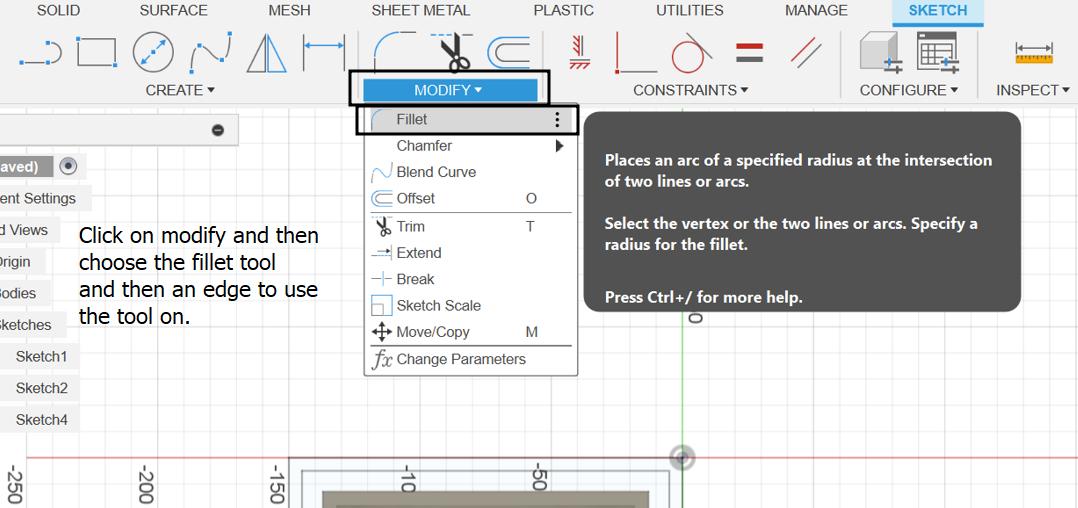
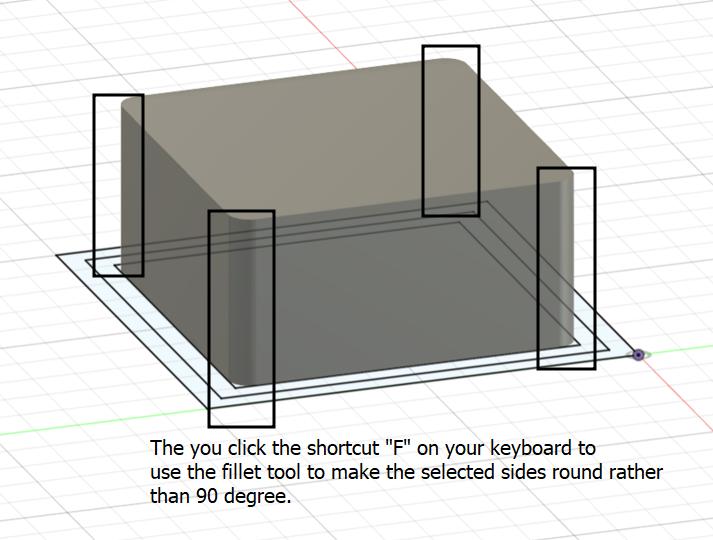
Now after extruding since the drilling bits are circular it is not advised to make 90 degree anges in your design. So, I used the fillet tool to make the outer square with smooth edges.
Next you would want to create another offset for the outer side of your mold so that your paw design is in the middle to pour the cast over it.
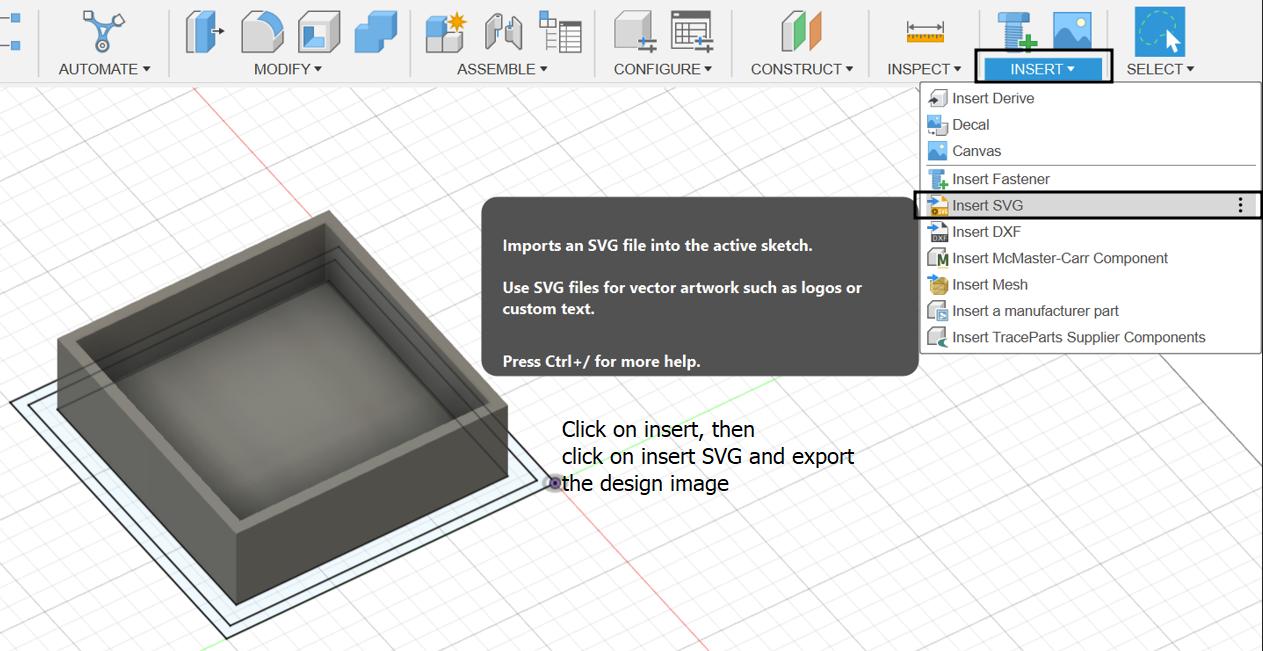
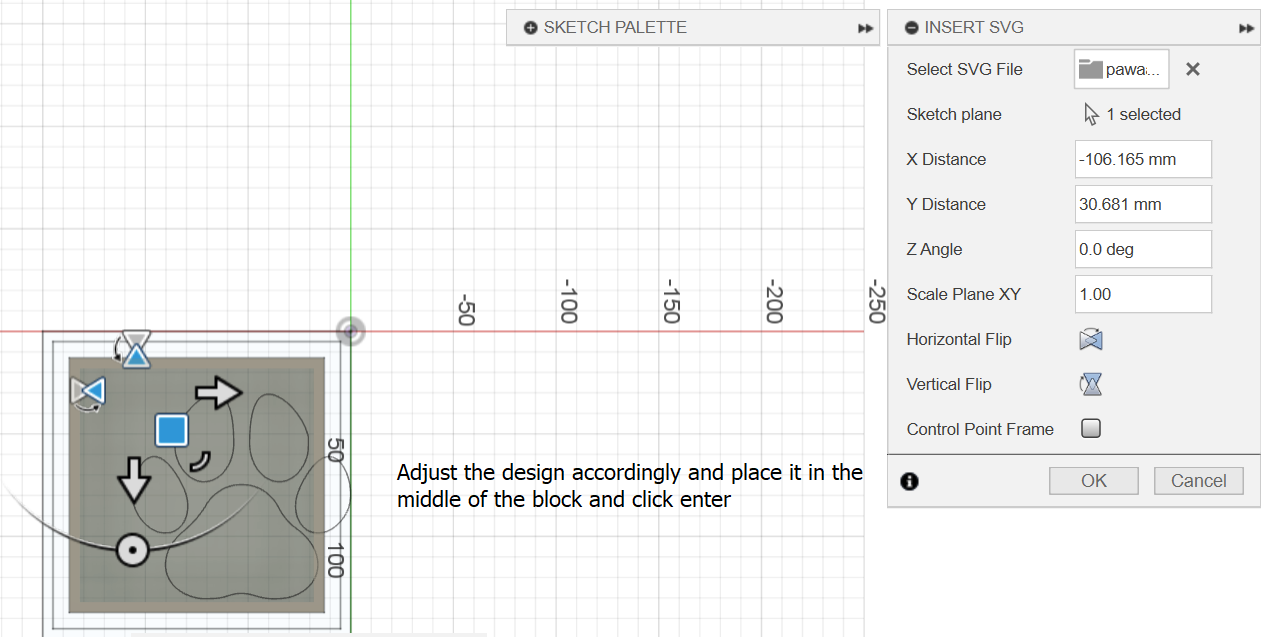
Now insert the .svg file you created earlier of the traced bitmap of the paw design
Adjust the file accordingly
Extrude the design after adjusting your design but not till the edge of the mold, leave a bit of space

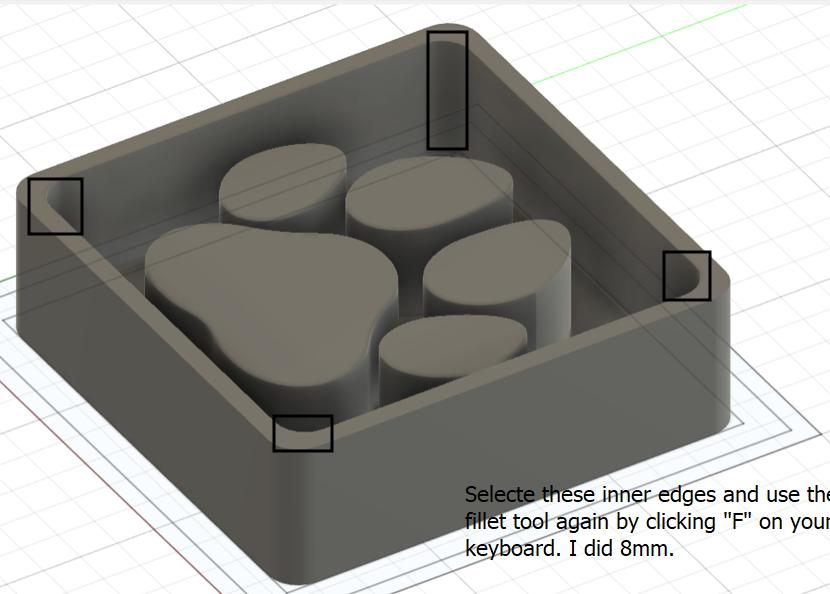
Lastly use the fillet for the inner edges
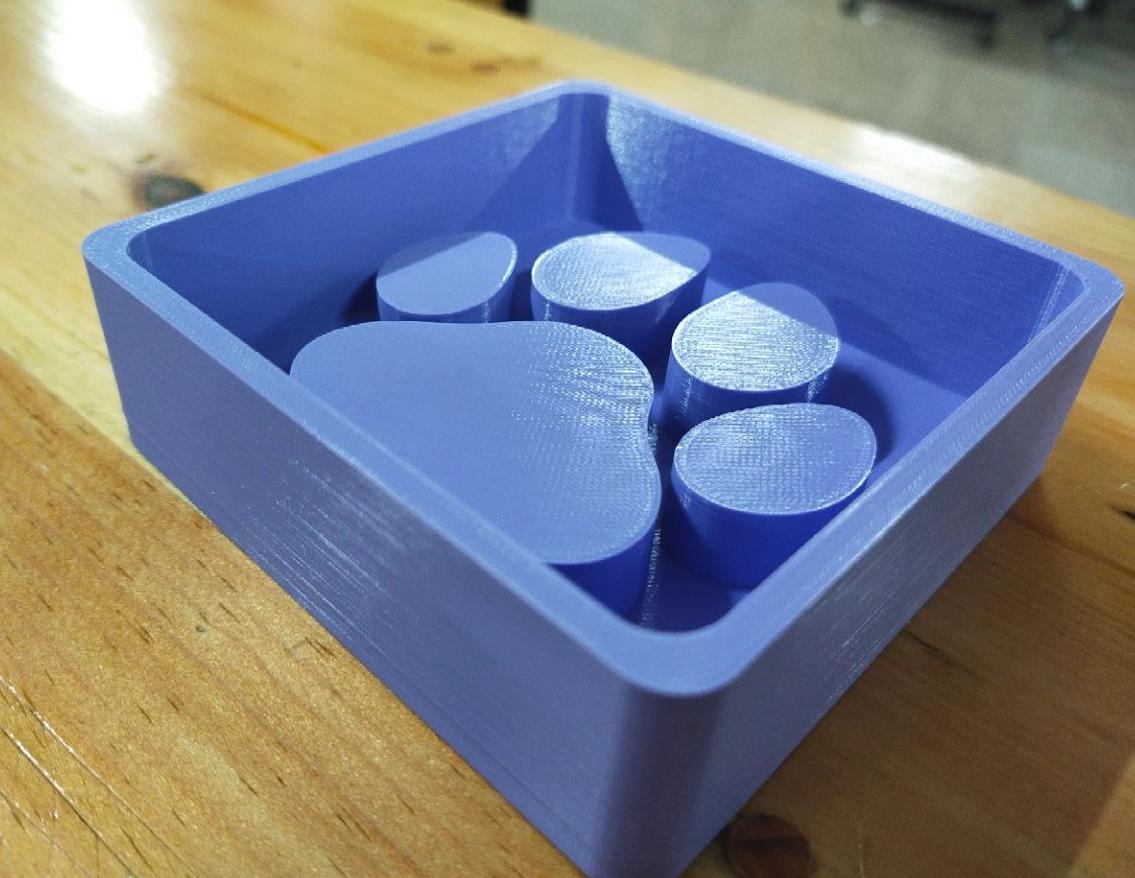
3D printed Result
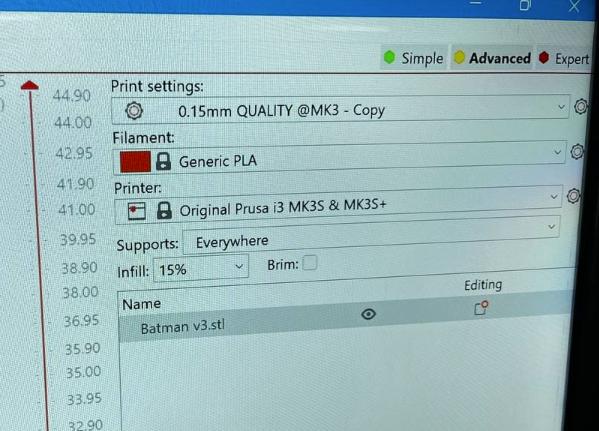
And then generate the g-Code
Making the mold
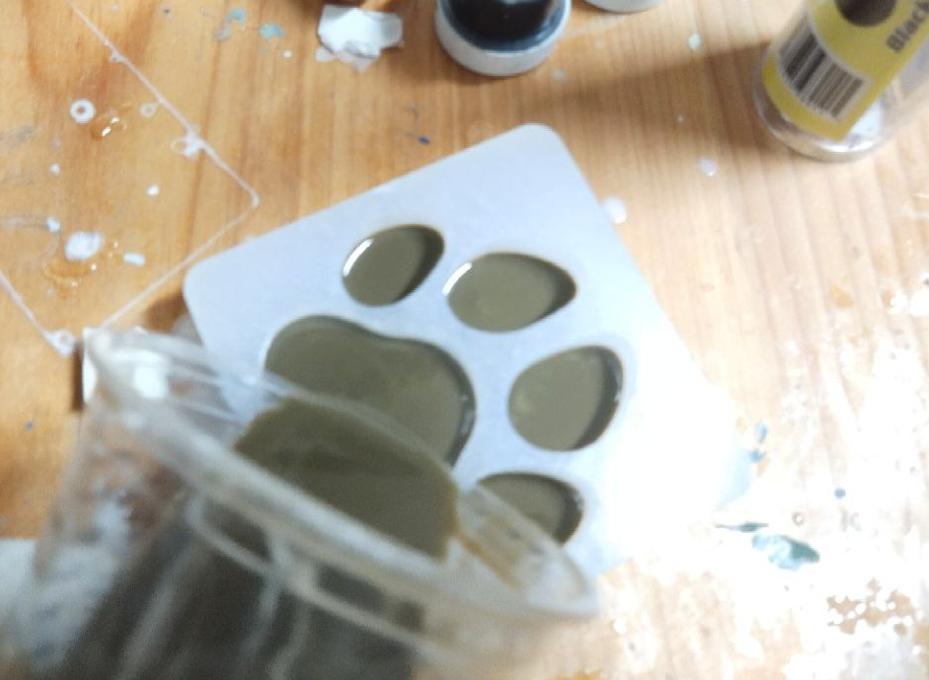
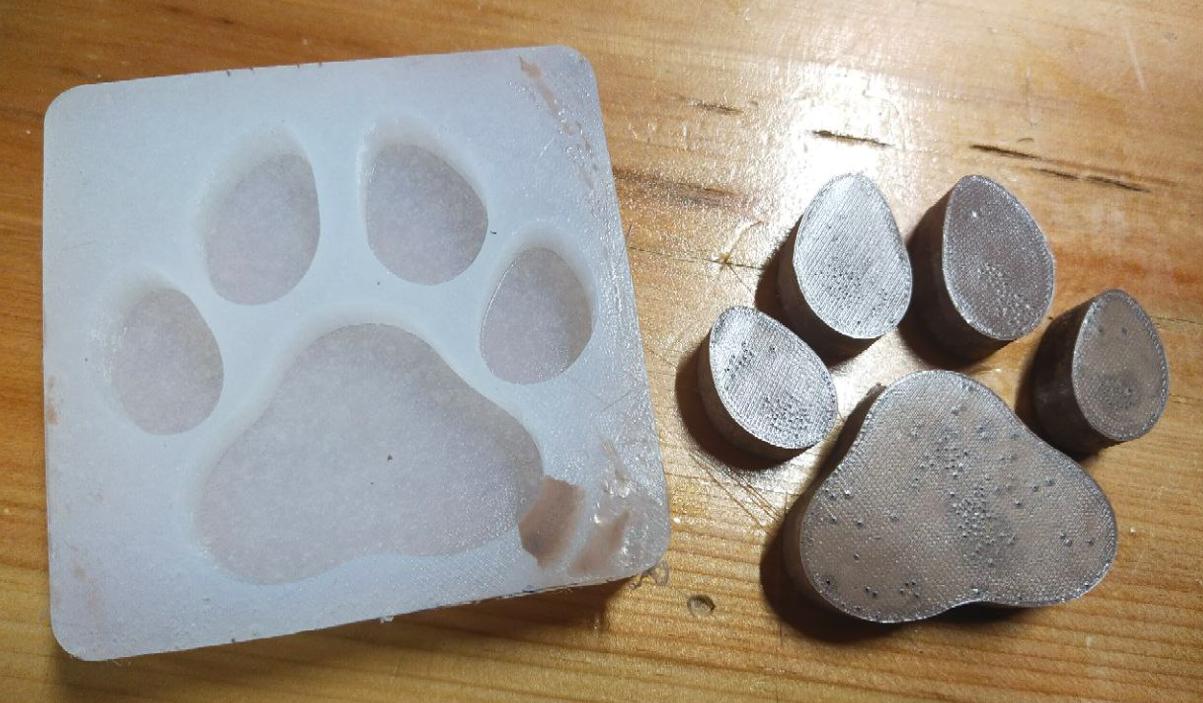
For the mold I used the Smooth-On Sorta Clear 37
Product Information, Technical Bulletin, Safety Datasheet
Remember to Pre-mix both the parts before mixing measuring them and mixing them
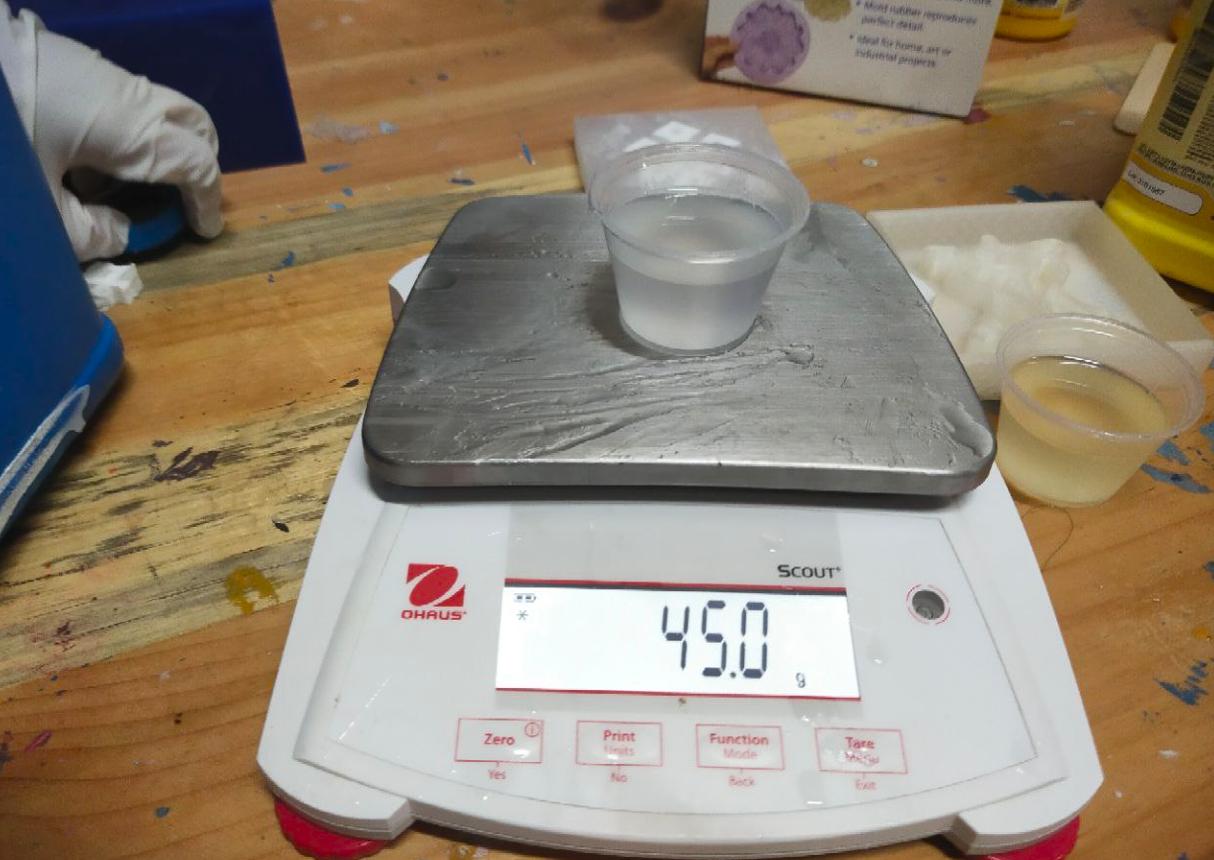
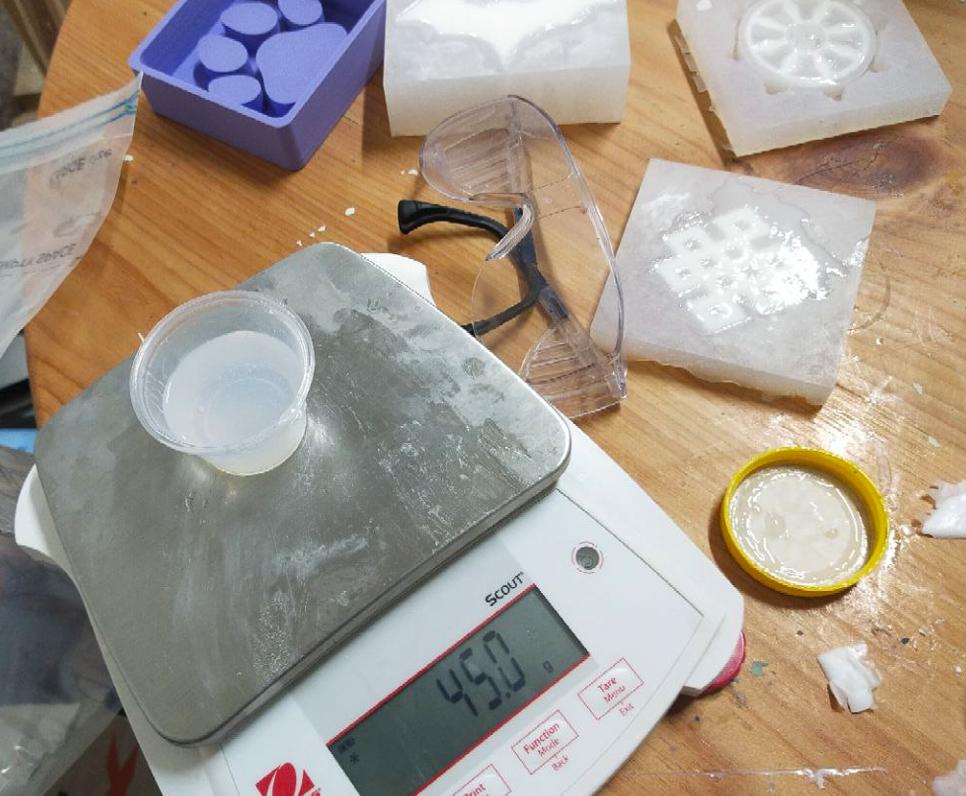
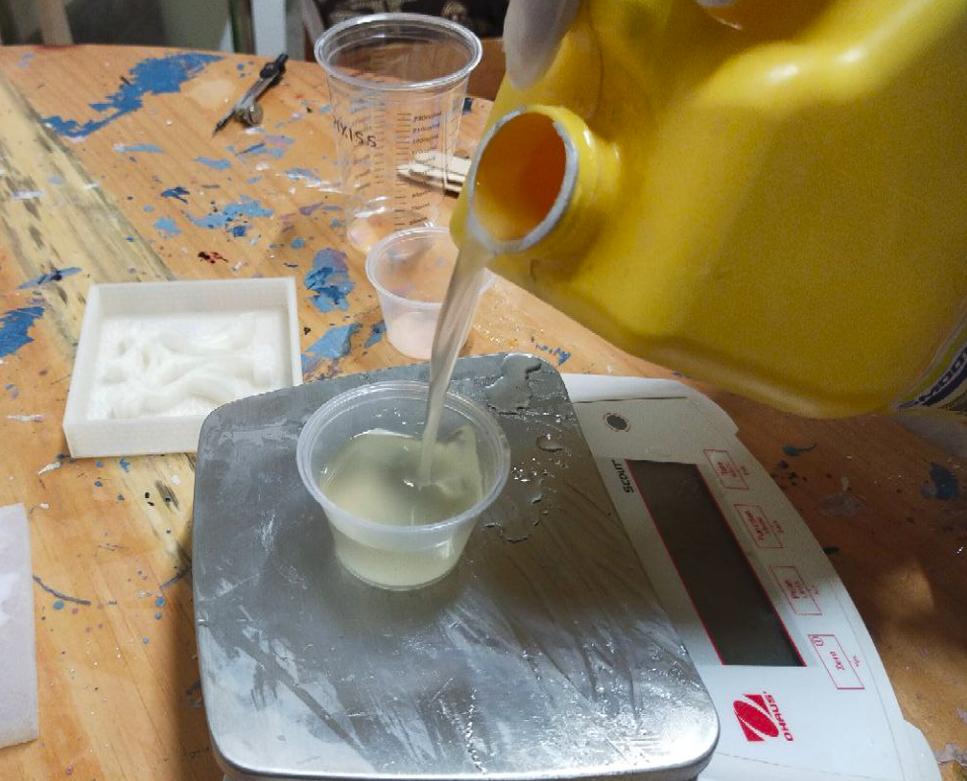
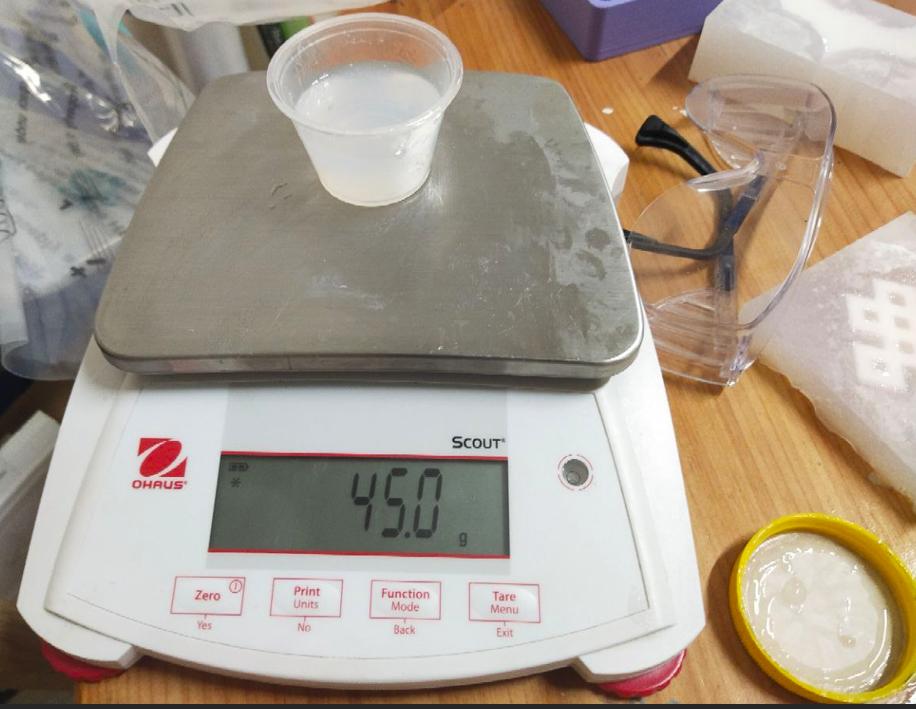
Measure the part A and part B equally.(I used more than whats shown in the image, I used 110gof both parts for my mold )
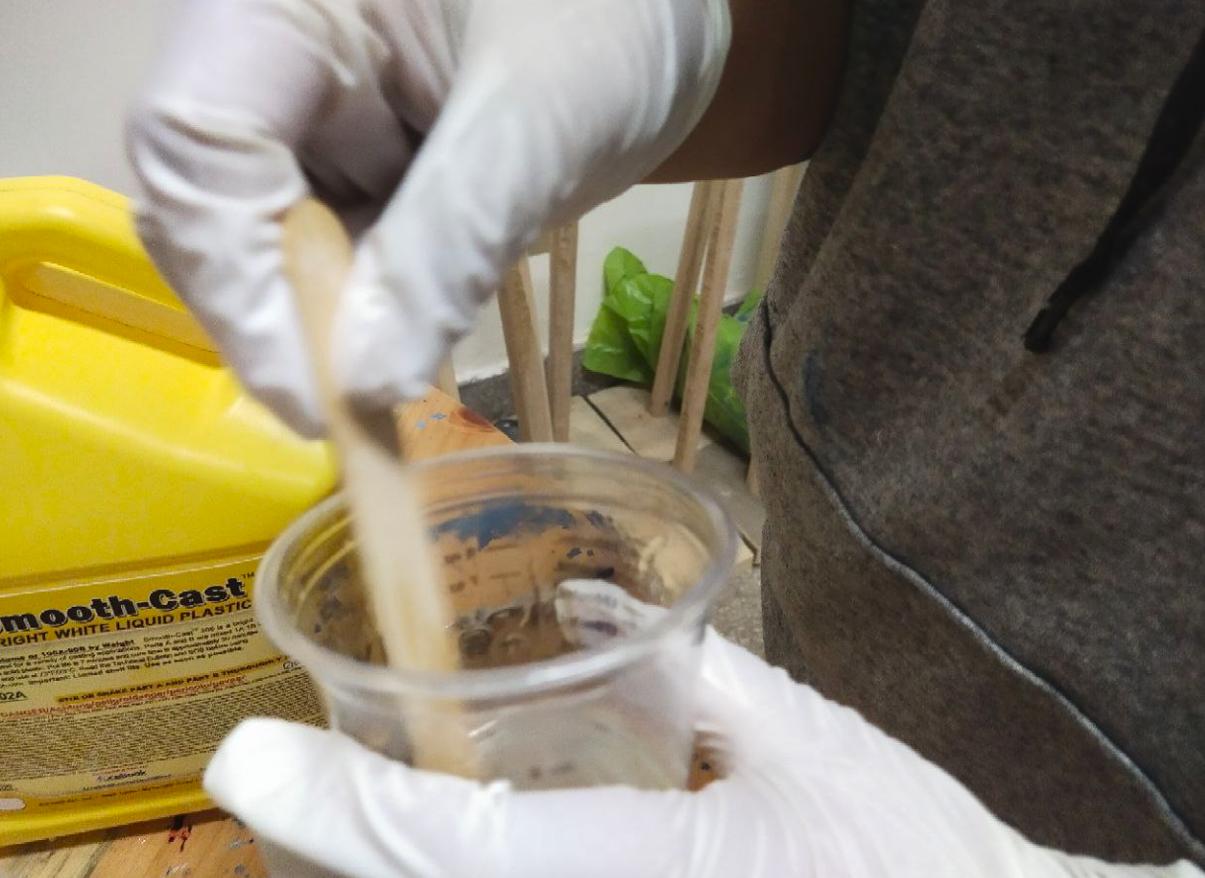
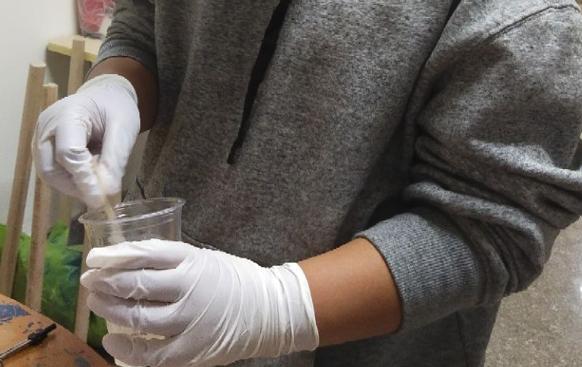
Then mix it thoroughly for 3 minutes.
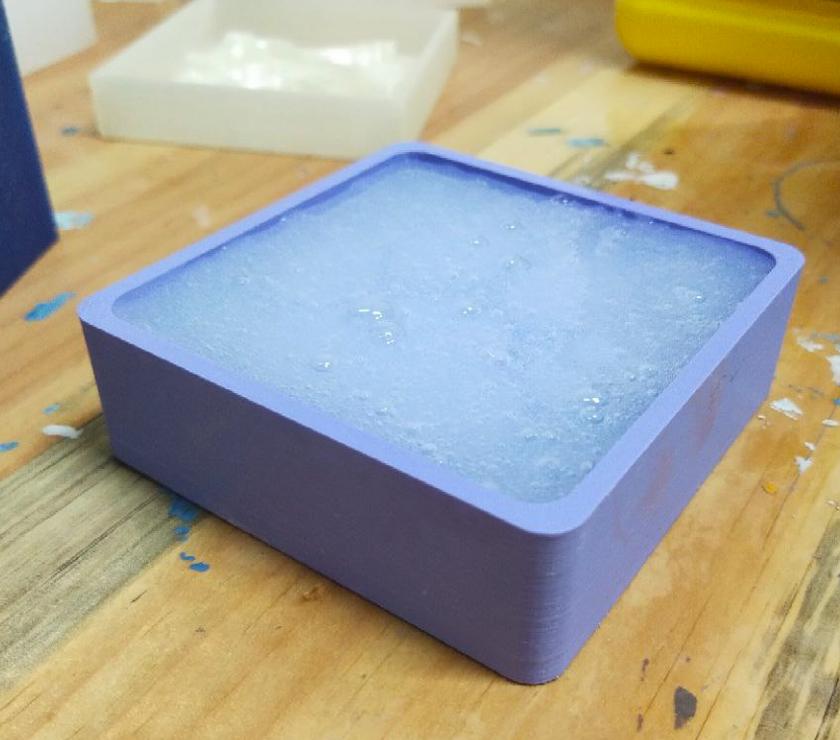
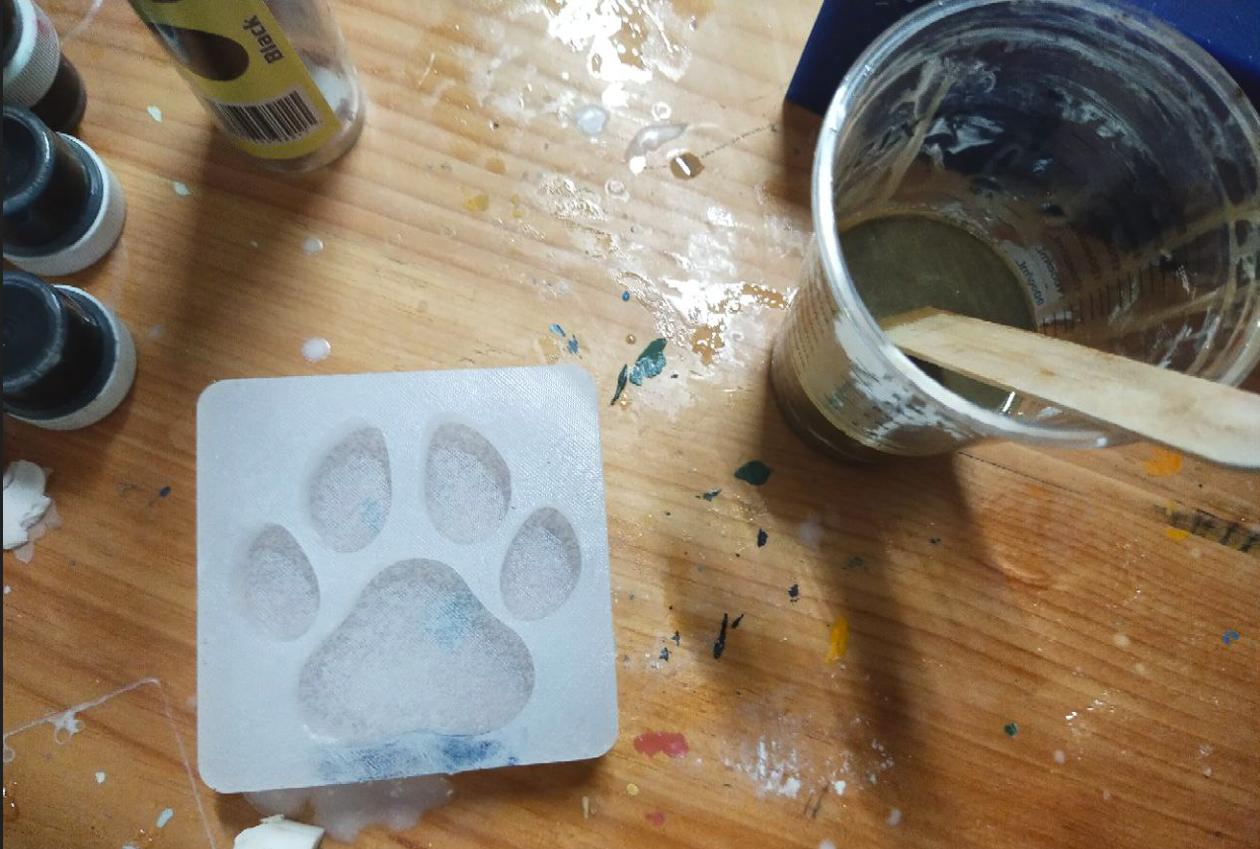
Then pour the mixture in your mold and let it set.
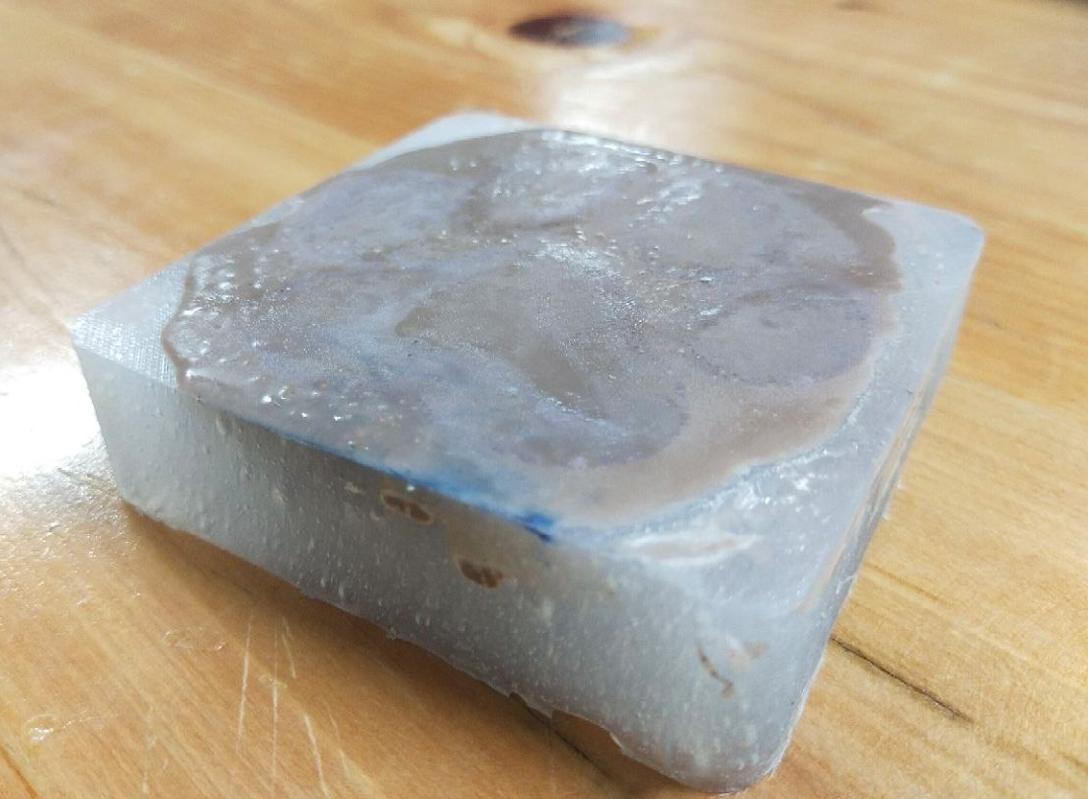
Result
The silicone mold had air bubbles because I poured the silicone too fast and used too much at once. Next time, I will pour the silicone slowly and in smaller amounts to prevent bubbles from forming.
Making the cast
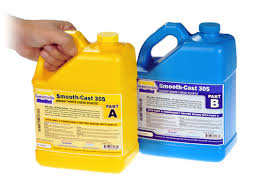
I used the Smooth-Cast 305
Product information, Technical Bulletin, Safety Datasheet
Remember to Pre-mix both the parts before mixing measuring them and mixing them
Just like for the Mold, measure equal amounts of part A and B
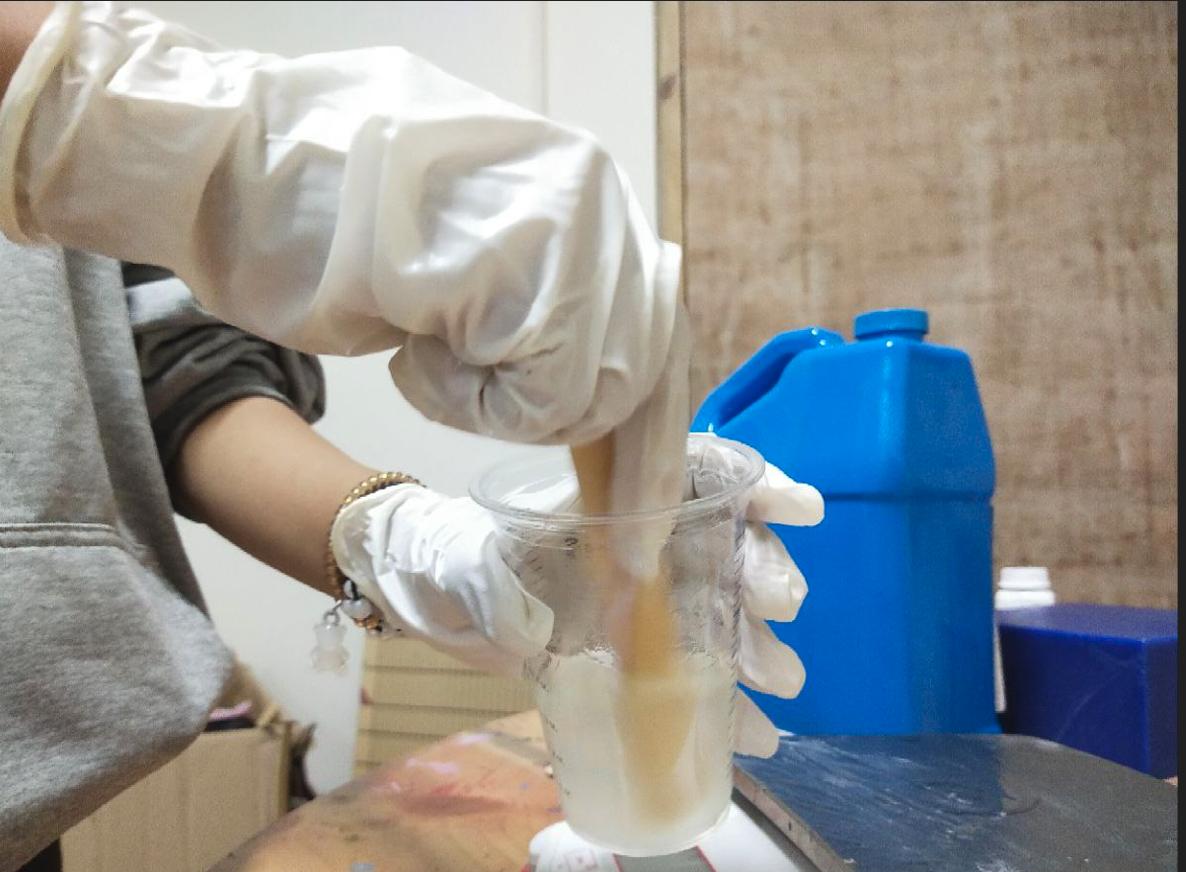
Then combine the parts and mix it thoroughly for 3 minutes
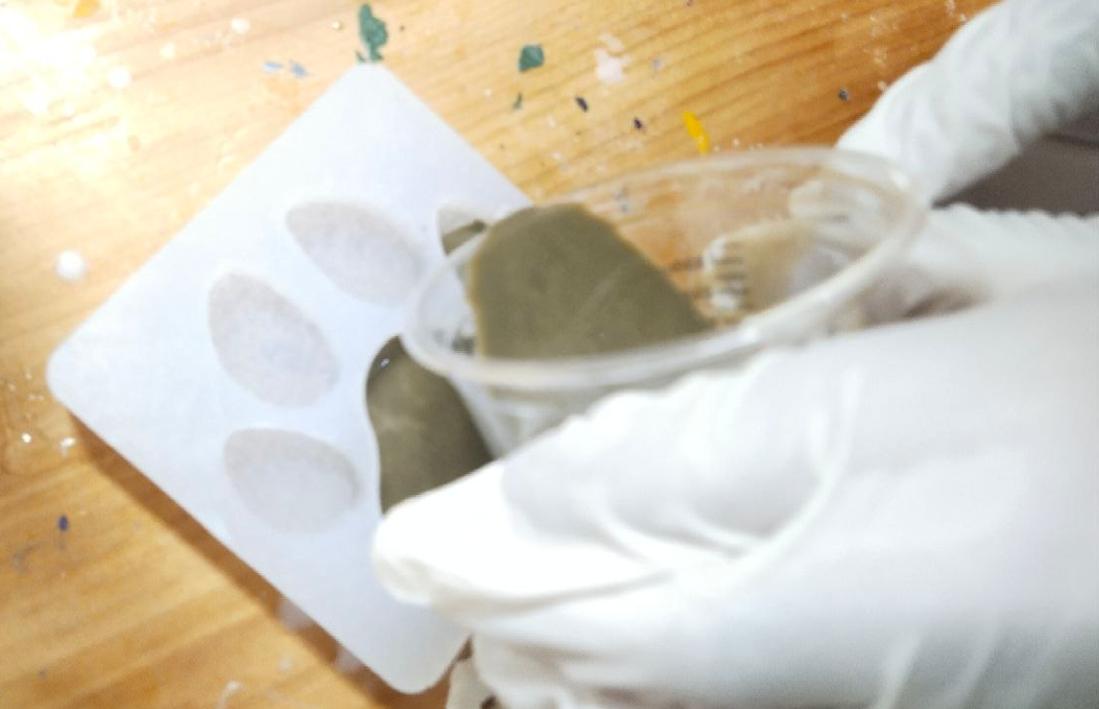
Then add color if you like and then pour it in your positive mold.
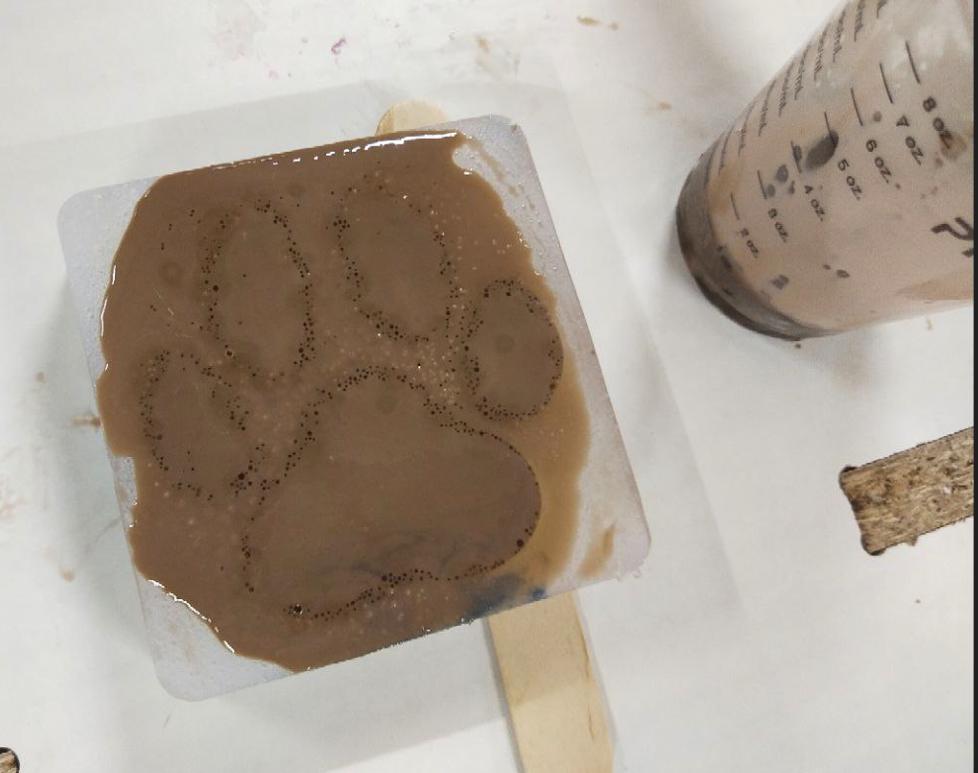
Then let it set
I kept it overnight
The Smooth-Cast 305 casting showed air bubbles due to incomplete mixing. To prevent this in the future, I will ensure the components are thoroughly mixed.
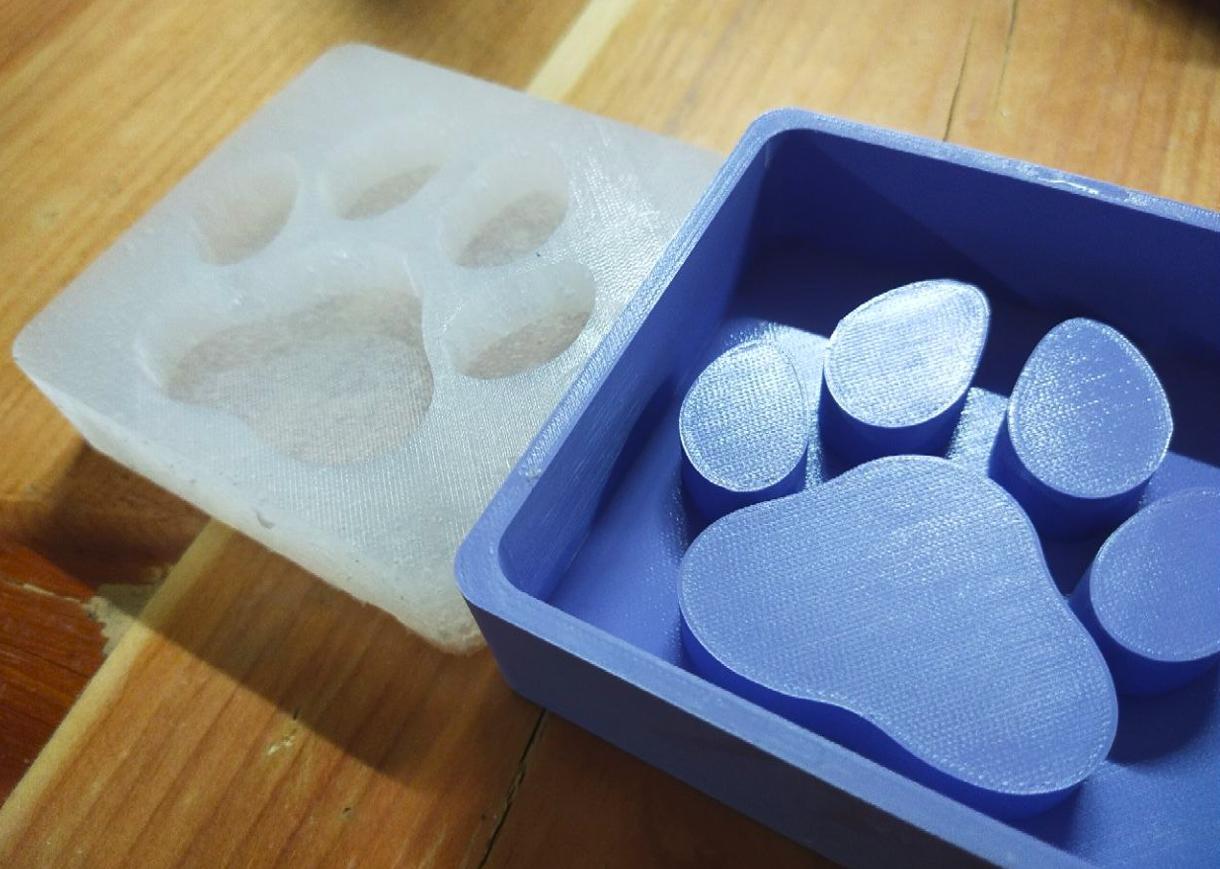
Now comes the flaw in my design
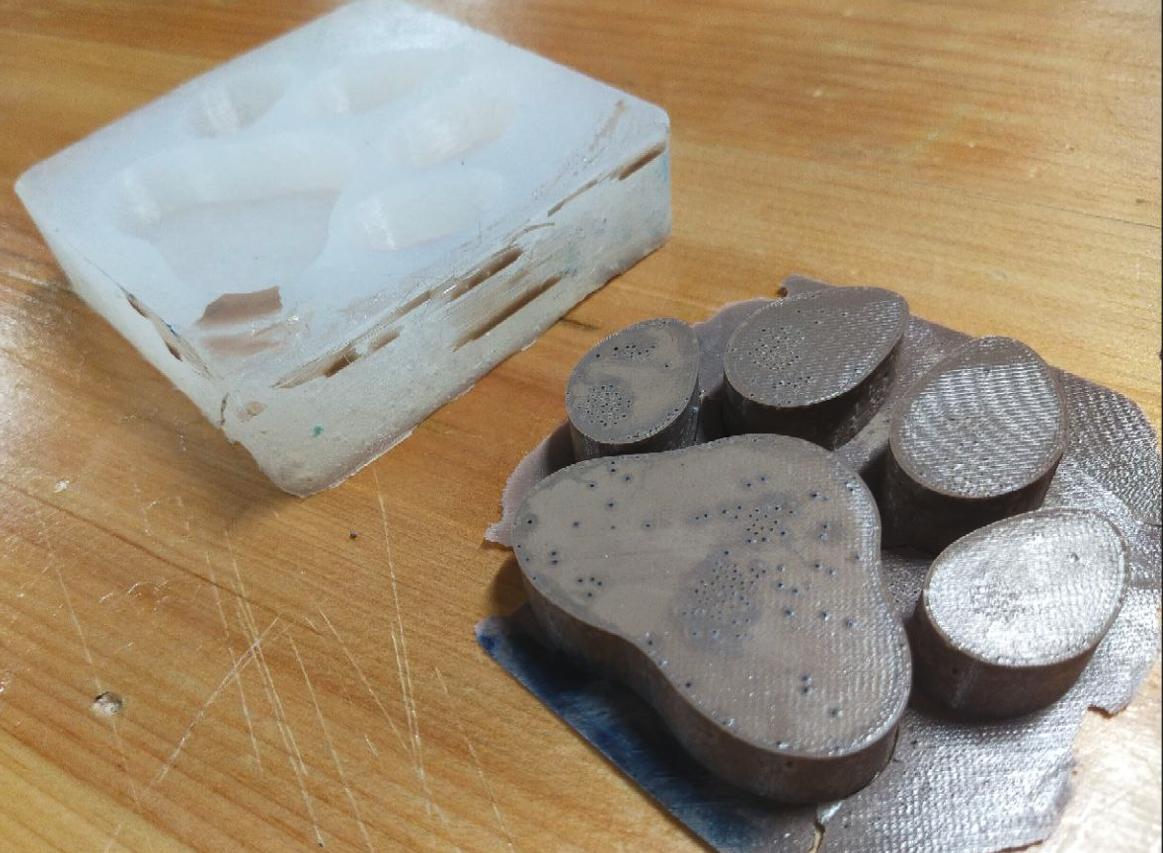
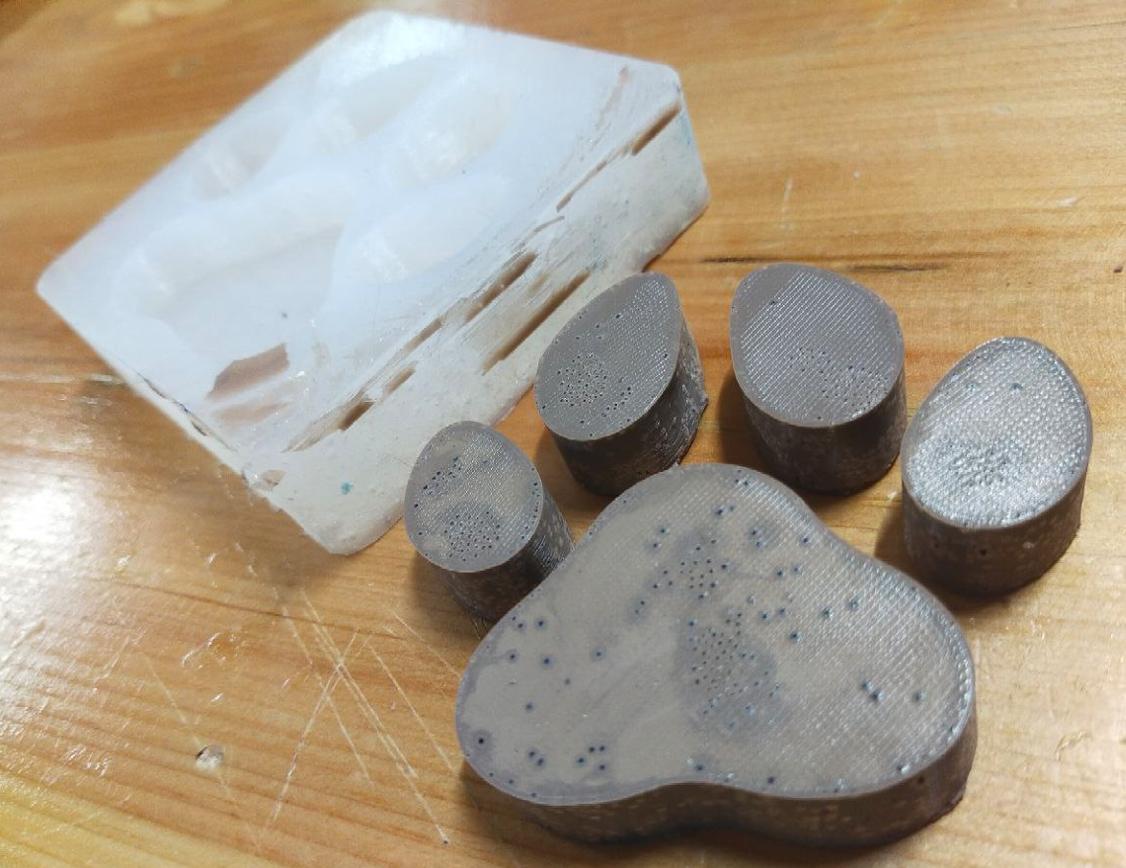
Since I didn't have anything that was connecting the paws together, though the result was very good, it came out as separate pieces.
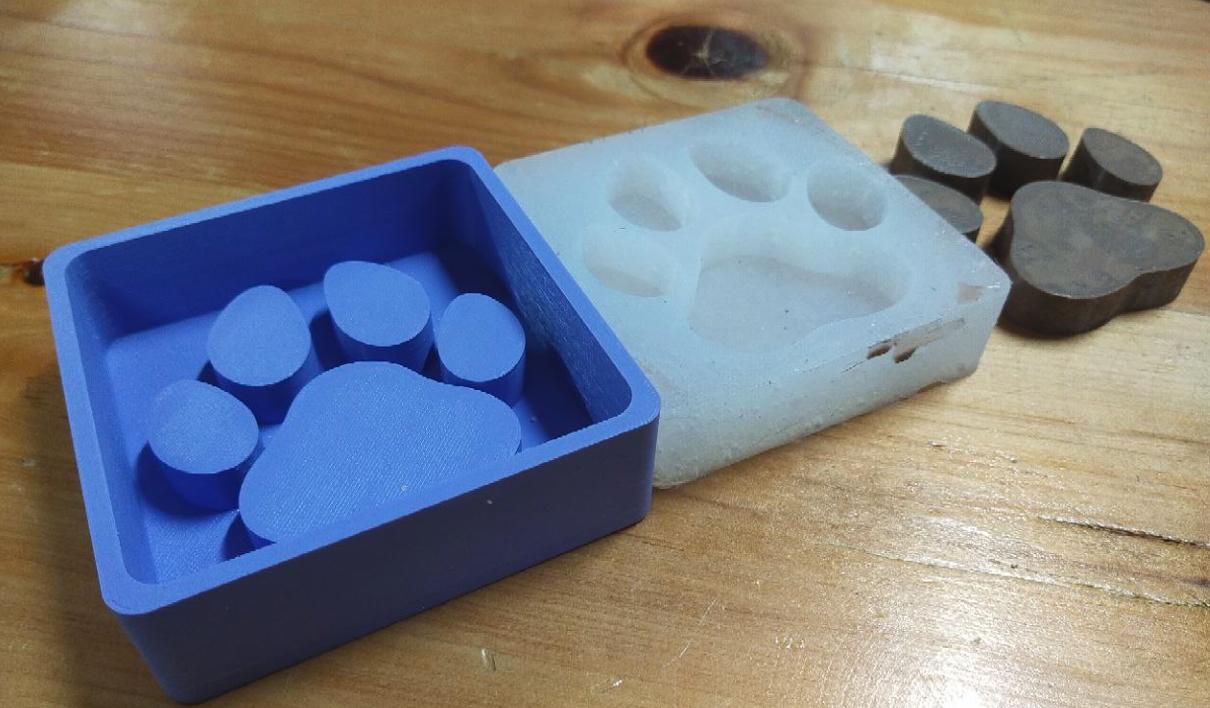
All the coutcomes of "the Paw Design"
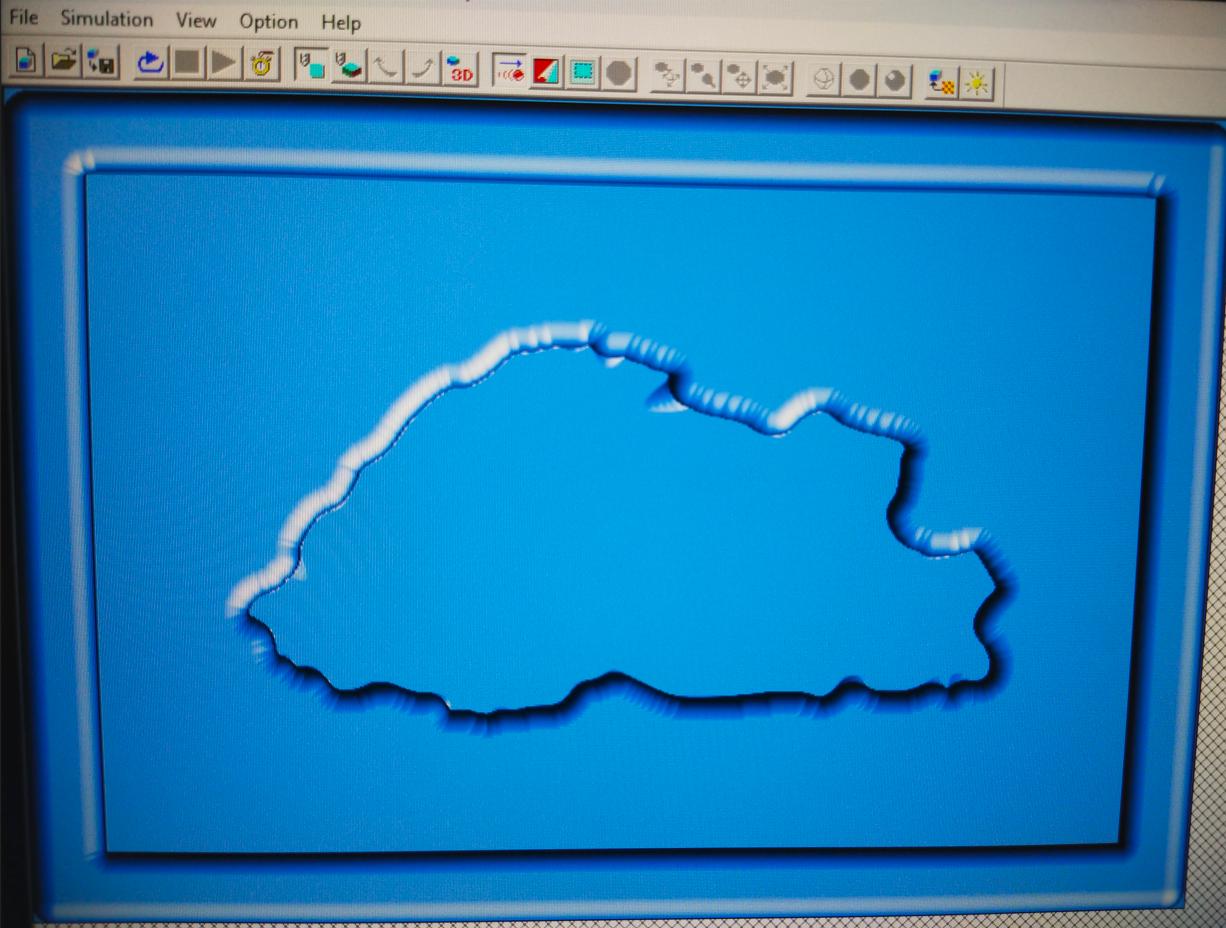
The other design I chose is a mold of a Bhutan Map outline(For milling)
I traced the bitmap of the bhutan map outline like I did for the paw design.
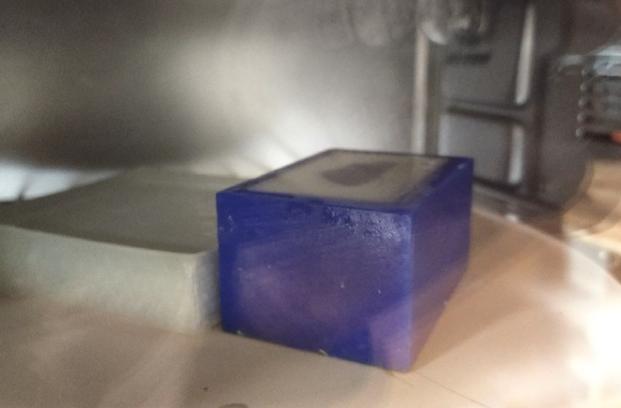
So firstly I took the dimensions of the molding wax I was planning on milling on and created this sketch. One sketch of the exact dimensions and the other a offset of 3mm.
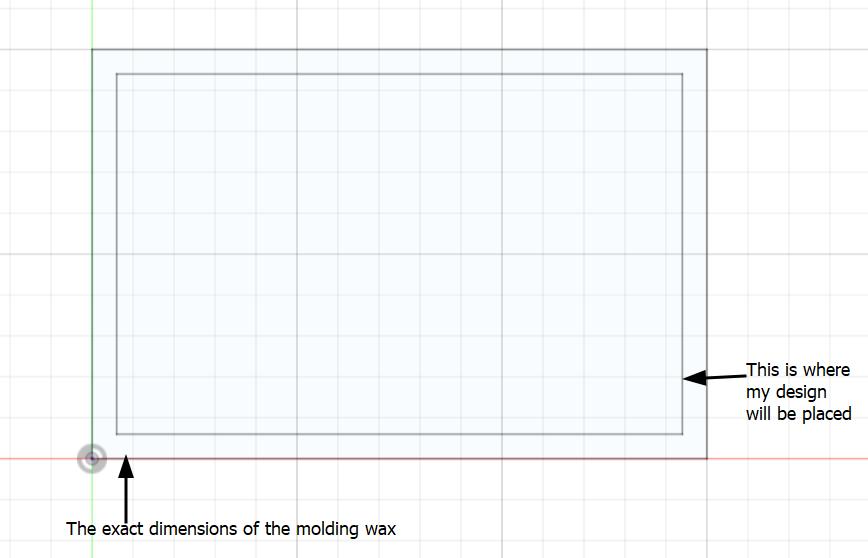
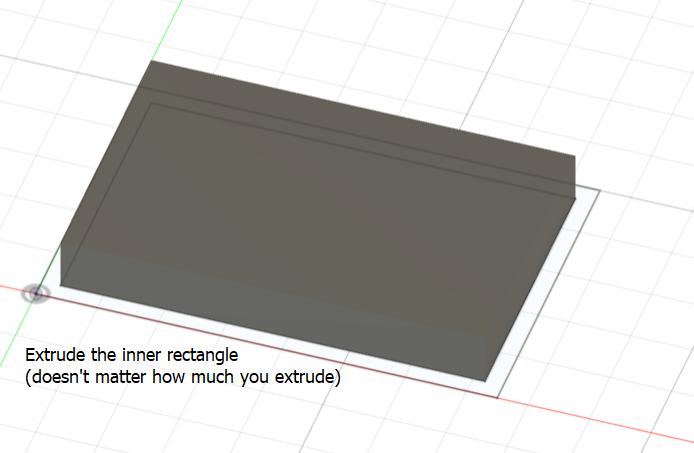
Then I extruded the inner rectangle that is the offset of the actual dimensions to 1cm since I needed it to be smaller than the actual block and the overall height of the design came to 2.2cm and the actual height of the mold wax is 3.9cm.
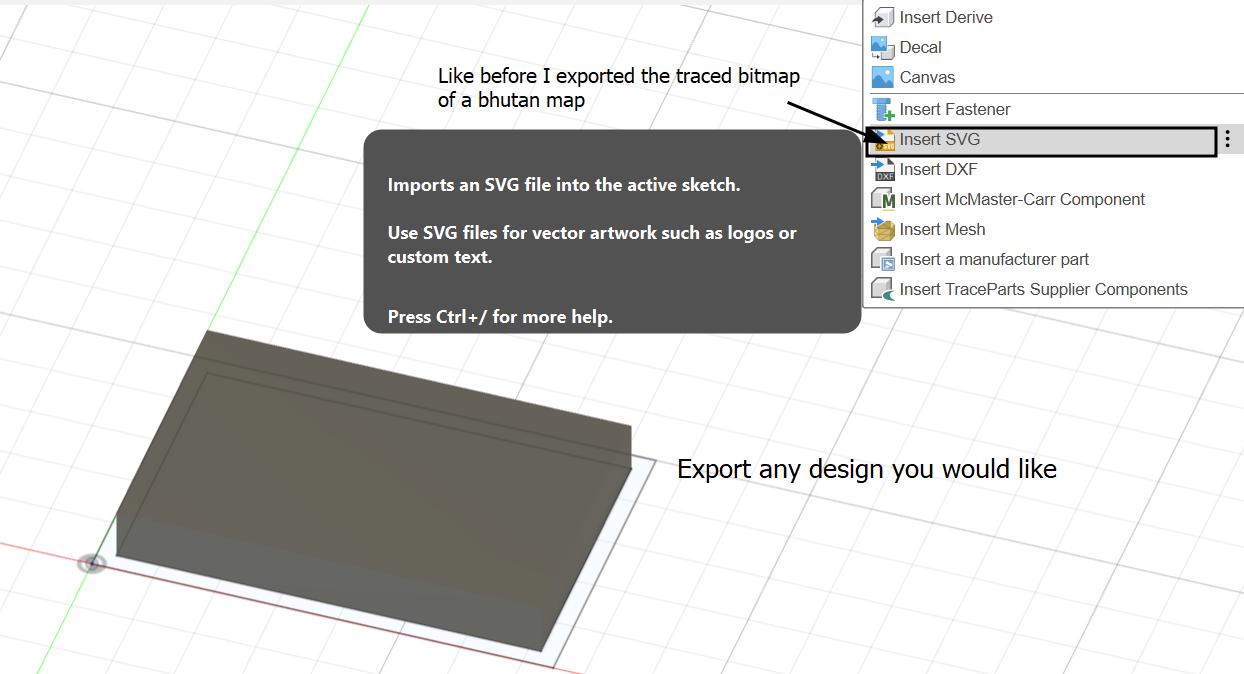
Then I added the traced bitmap of the Bhutan Map to my design by going to insert-insert svg-insert from my computer
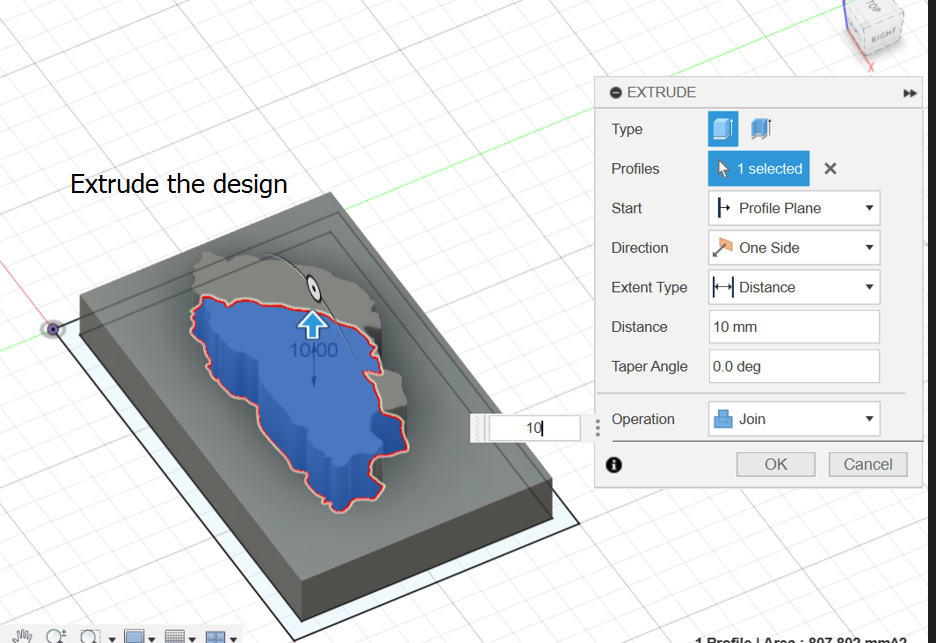
Then you extrude the inserted svg file
And you are done.
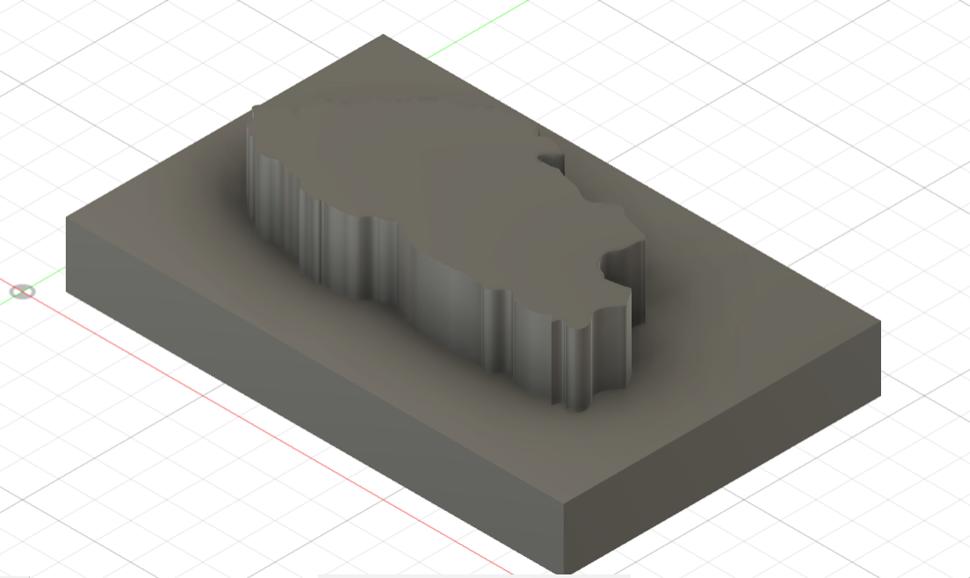
I printed the mold and the output was evident that my design was too big.
Redesigning
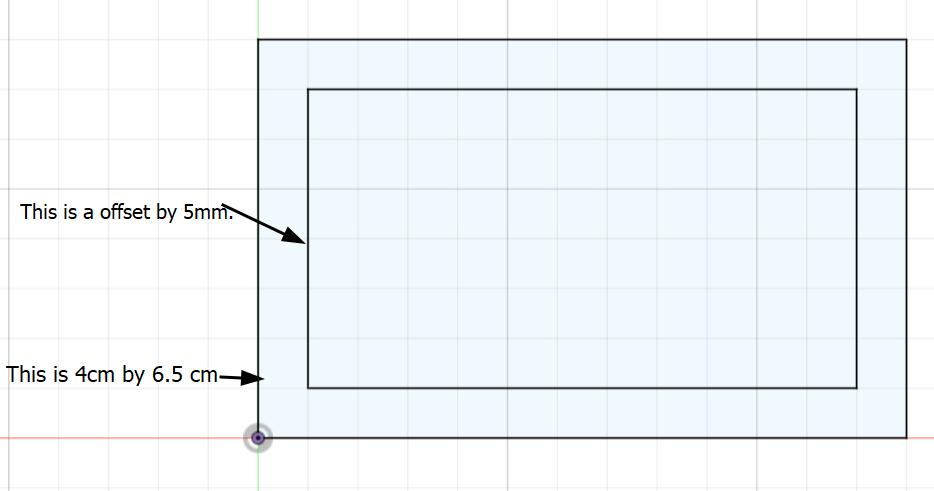
This time I started by creating 1cm smaller than the original block I am going to mill on. And set anf offset of 5mm.
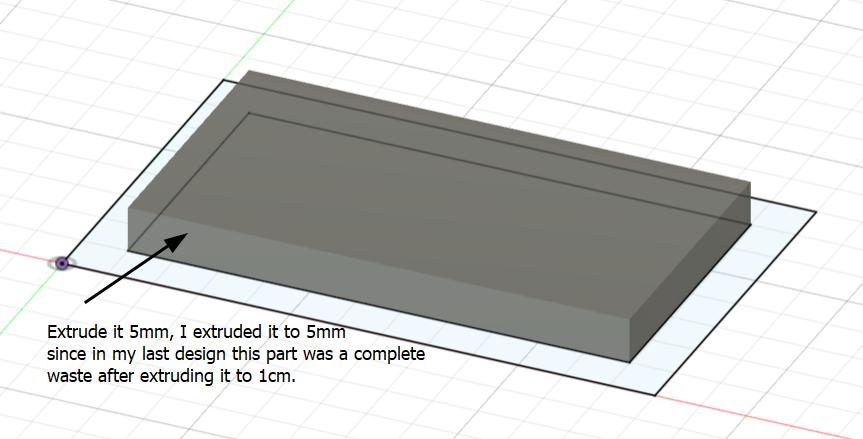
I extruded the base only to 5mm since in the last design when the output came, that part of the block I extruded to 1cm was a complete waste and unnecessary.
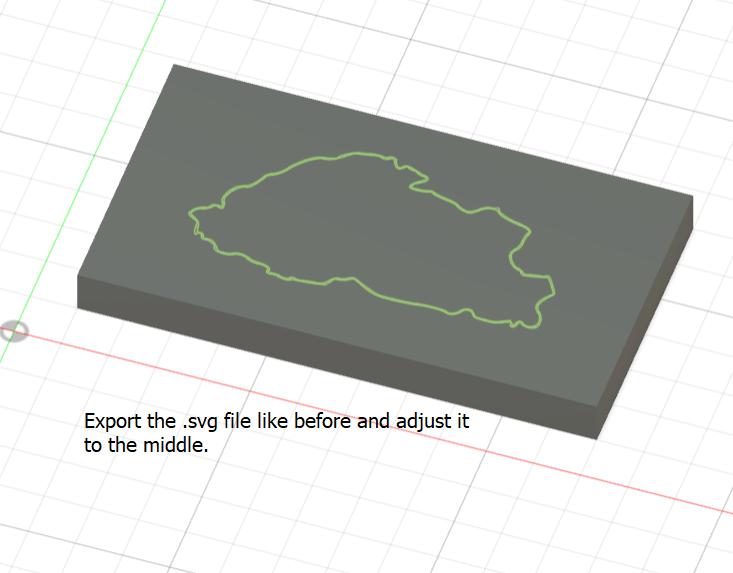
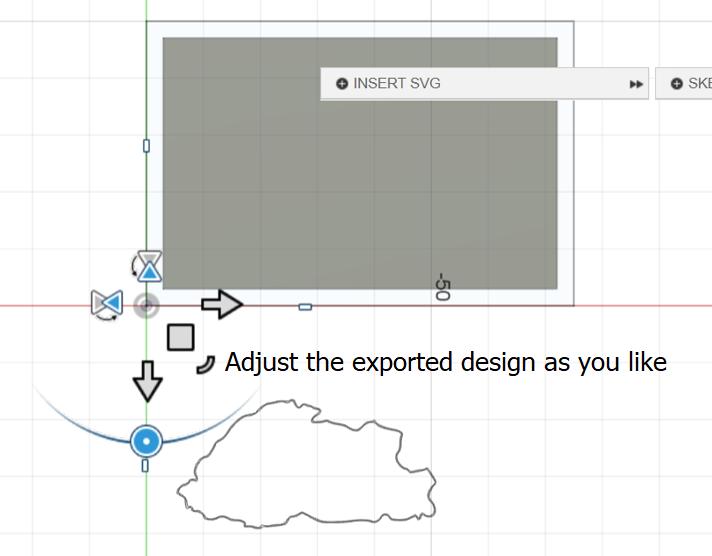
Export the map outline again and adjust it to the middle
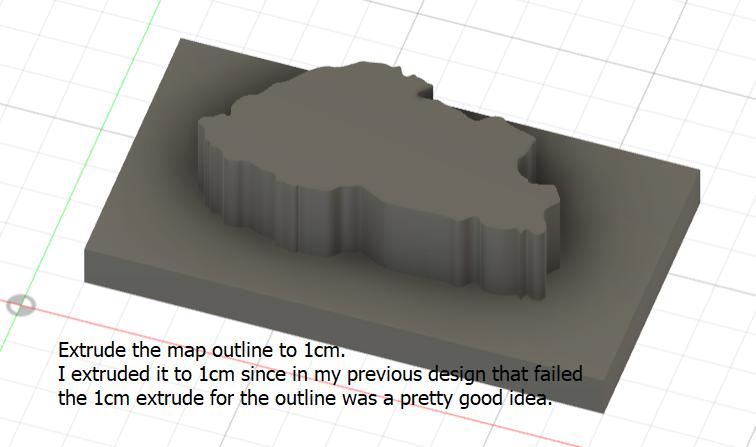
Then I extruded it to 1cm since in the last design the output had 1 cm and It was a decent height.
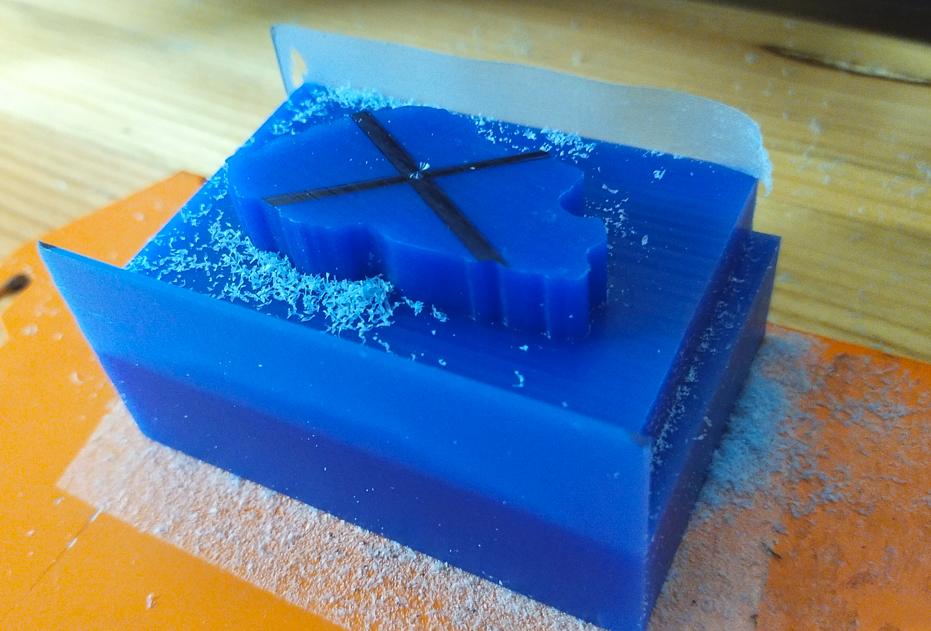
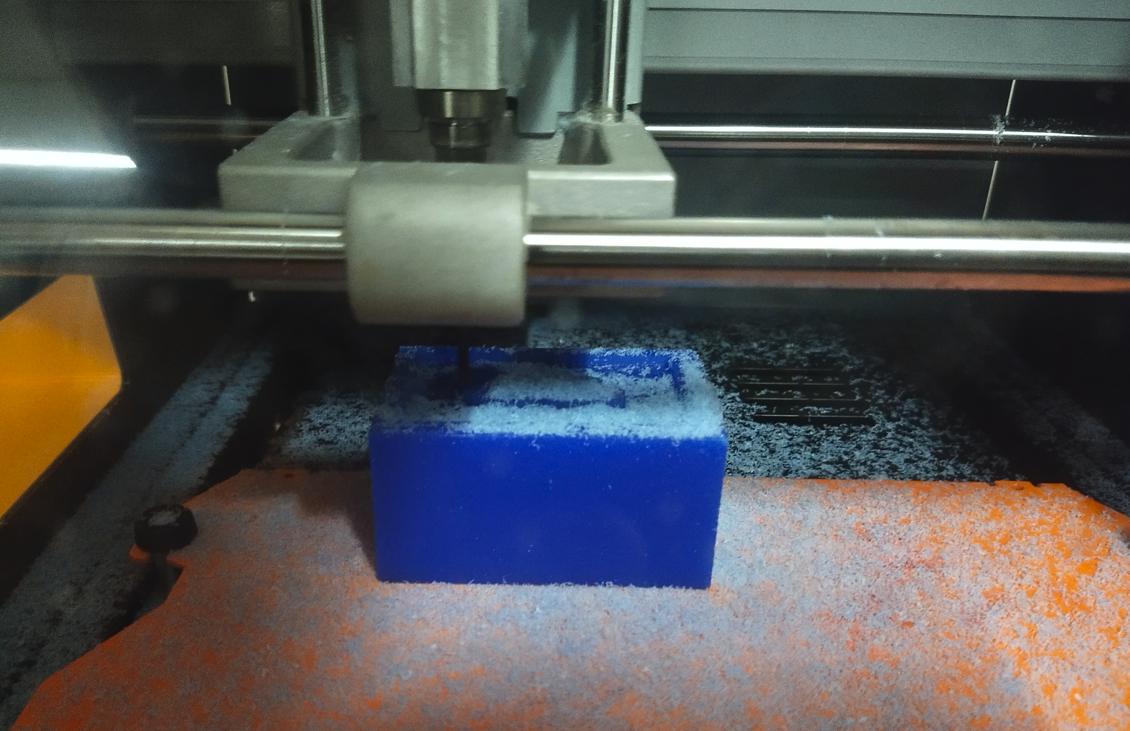
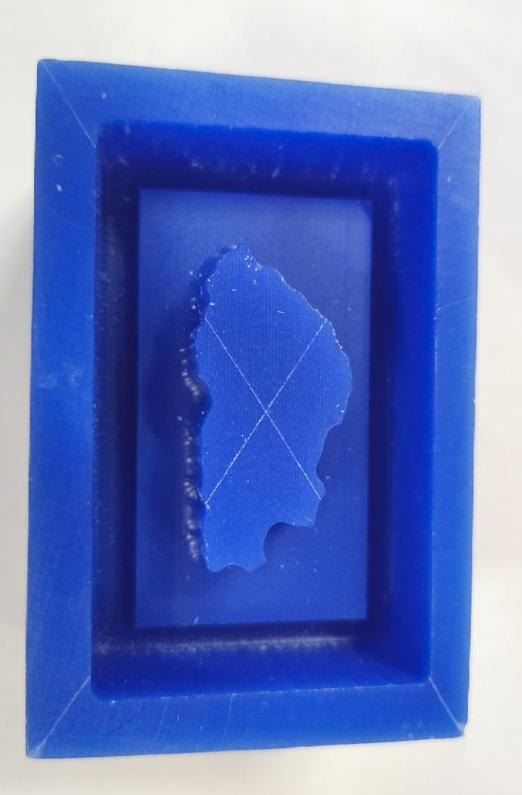
After that, I began setting up the milling machine. To ensure I could find the center of the wax, I marked an "X" on it, as the origin point for the tool path created by Modella Player is in the center.
Since we're milling, we need to select the appropriate mill bit. Milling a block of wax requires a more durable and efficient bit, so using a 1/64 or 1/32 mill bit isn't practical; they either aren't durable enough or would take too long.
Therefore, I'll be using a 1/8 mill bit. For this task, I'll use two types of 1/8 mill bits: the two-flute 1/8 mill bit for the initial milling job.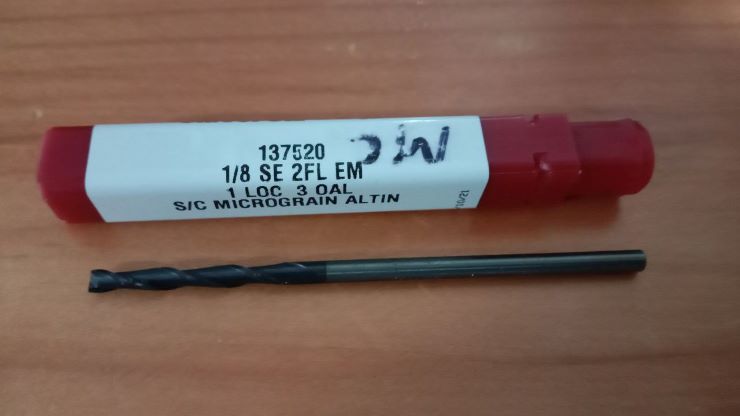
Image Source Thank you Yangtshel for the images, since I forgot to take pictures of this process
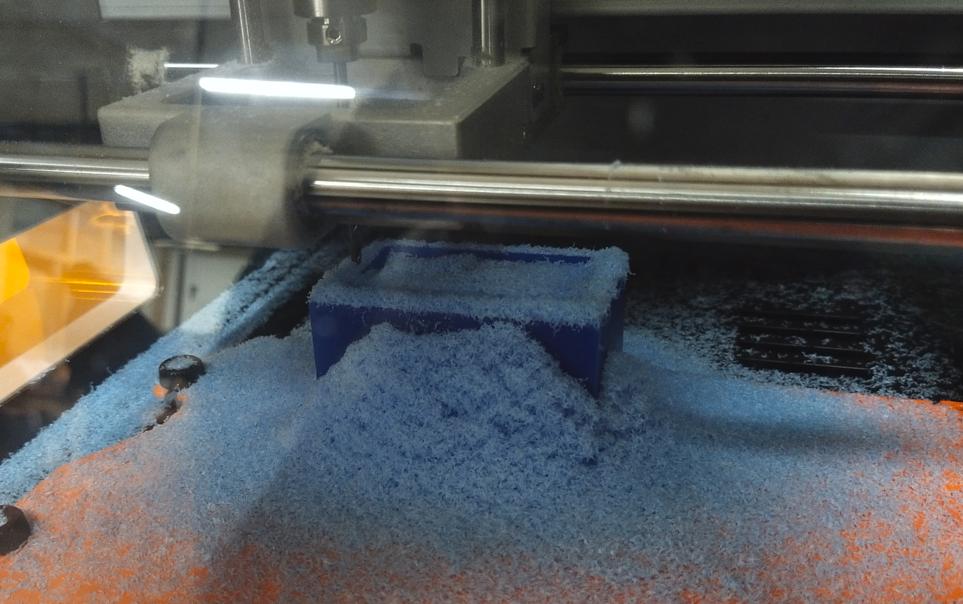
Next, to smooth out our design, we'll need to switch to a different type of mill bit: the round 1/8 mill bit.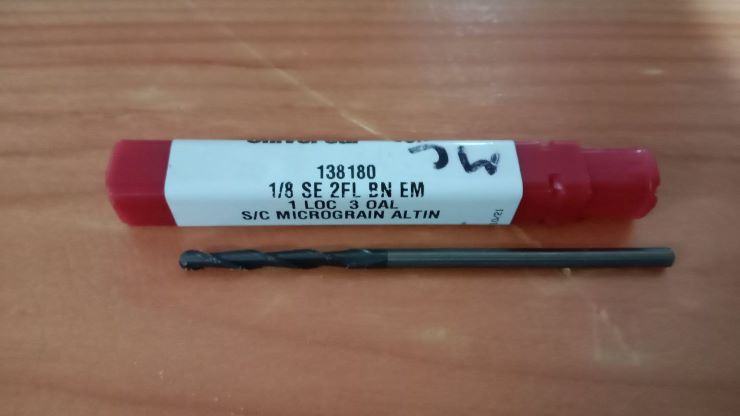
Image Source Thank you Yangtshel for the images, since I forgot to take pictures of this process
Next, let's get started with Modela Player to create the toolpath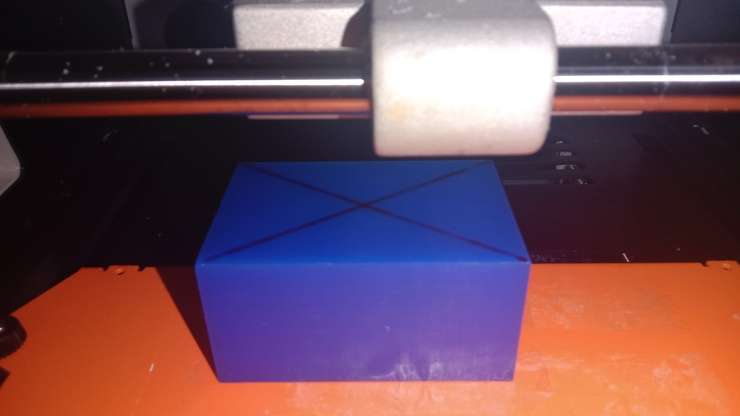
Image Source Thank you Yangtshel for the images, since I forgot to take pictures of this process
Creating Toolpath and files
For the wax milling, we need the Modela software to make the roughing and finishing files.
Follow the steps below:

After all the above steps, it would look like this
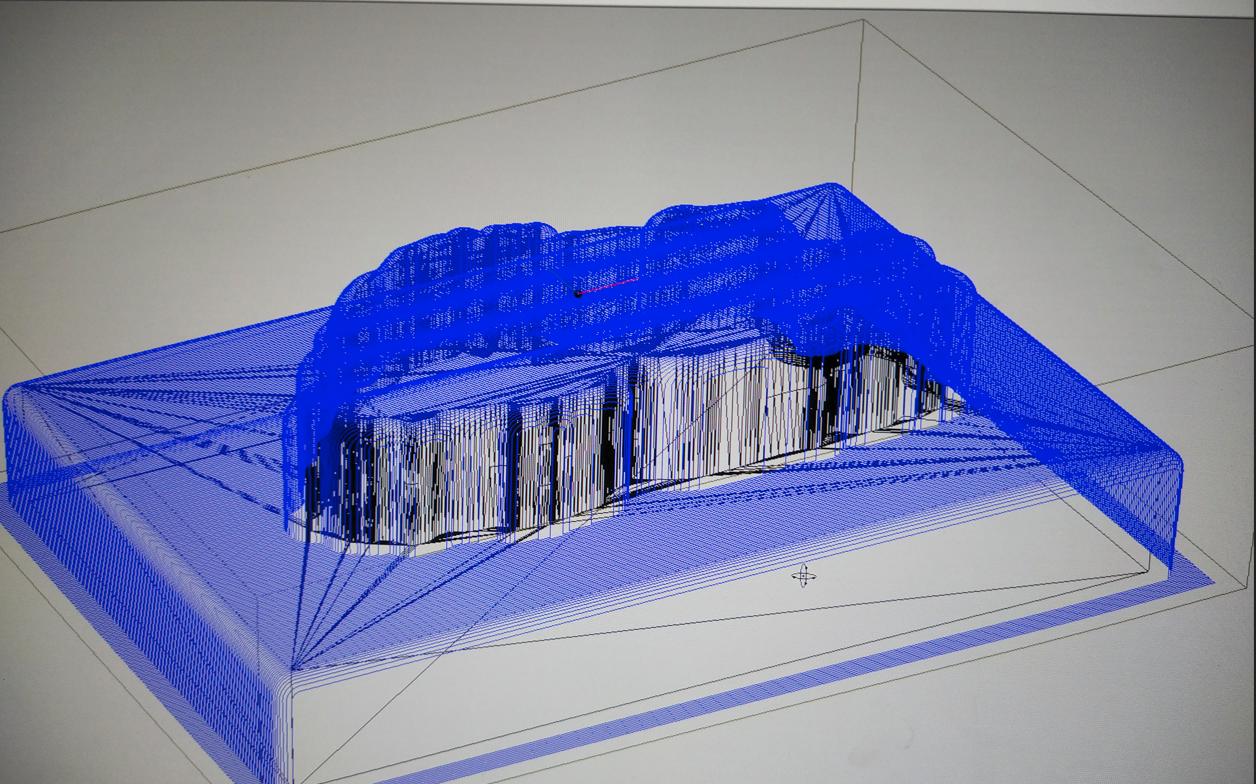
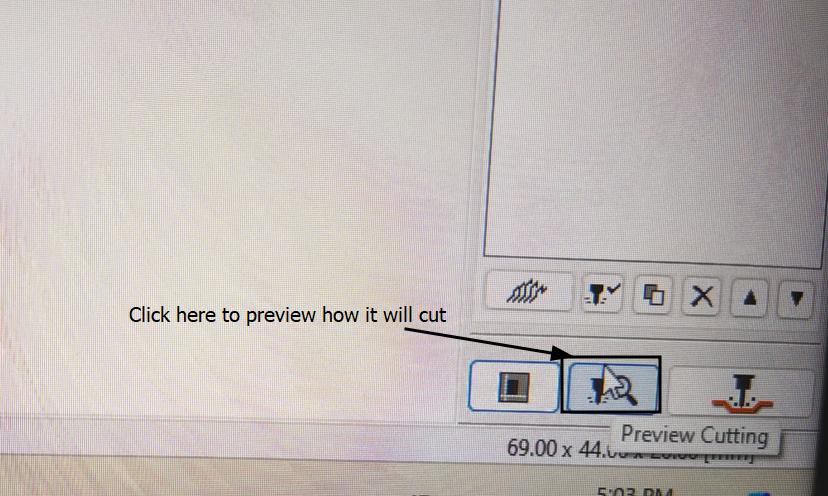
Previewing
Using the milling machine
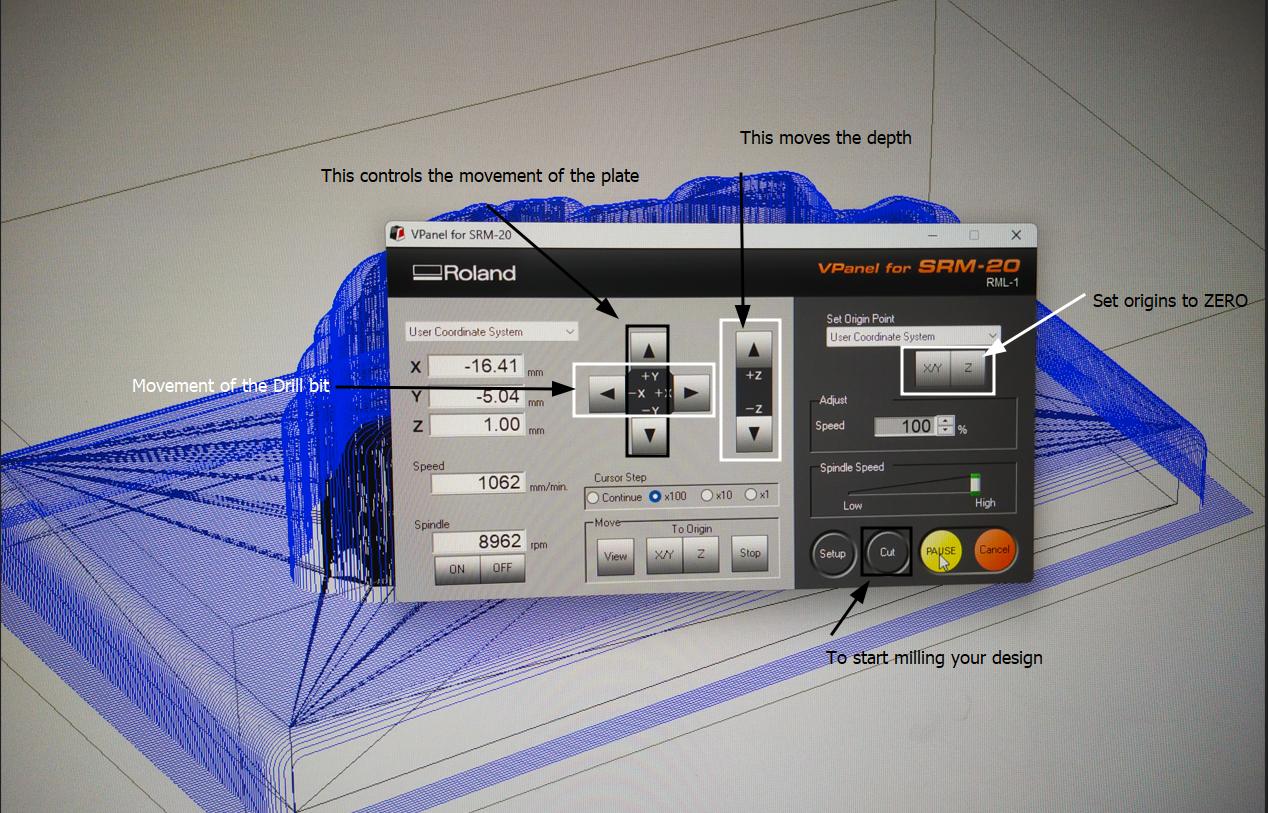
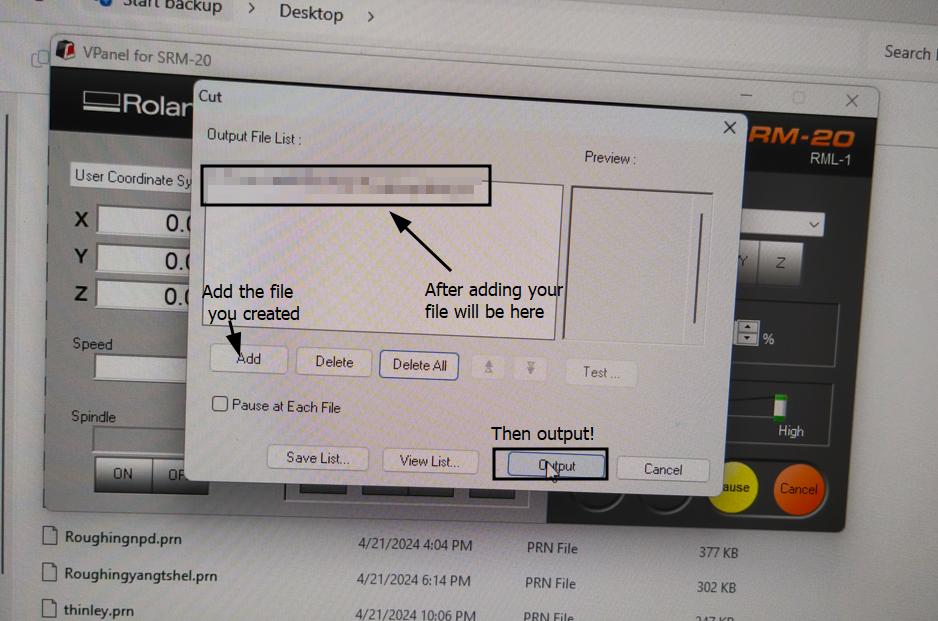
Millling
The Positive Mold

Making the Negative Mold
I used the Siloczest Liquid Silicone Rubber-LSR 225 (Fast)
Product Information, Datasheet
Begin by pre-mixing equal parts of Siloczest Liquid Silicone Rubber-LSR 225 (Fast) thoroughly to ensure consistency.
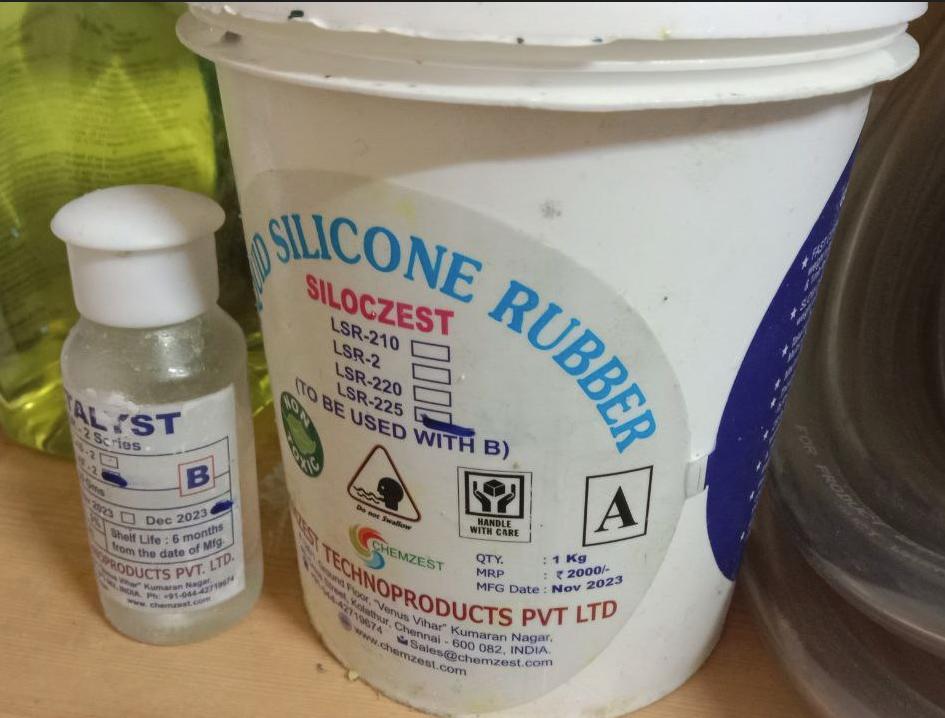
Measure and mix part A and part B of LSR 225 precisely according to your mold's requirements, ensuring to use the correct ratio for optimal results.
Mix the combined components vigorously for three minutes to achieve a uniform consistency and to activate the curing process effectively.
After thorough mixing, pour the prepared silicone mixture into your mold swiftly but carefully to prevent air bubbles and ensure complete coverage of intricate details.
Allow the mold to set undisturbed according to the recommended curing time of approximately four hours, ensuring proper ventilation and stable temperature conditions for optimal curing.
The Negative mold
I let the negative mold set for 4 hours since it is Siloczest Liquid Silicone Rubber-LSR 225(Fast)'s Cure Time.
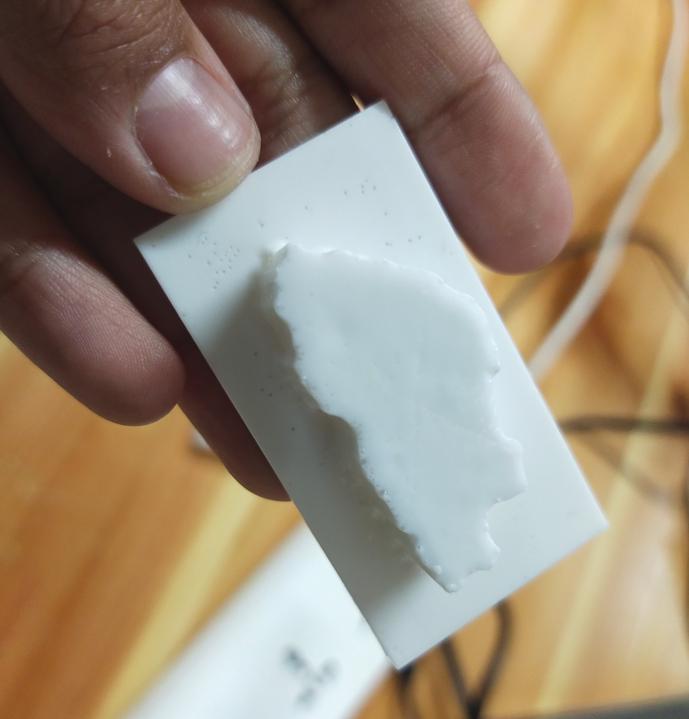
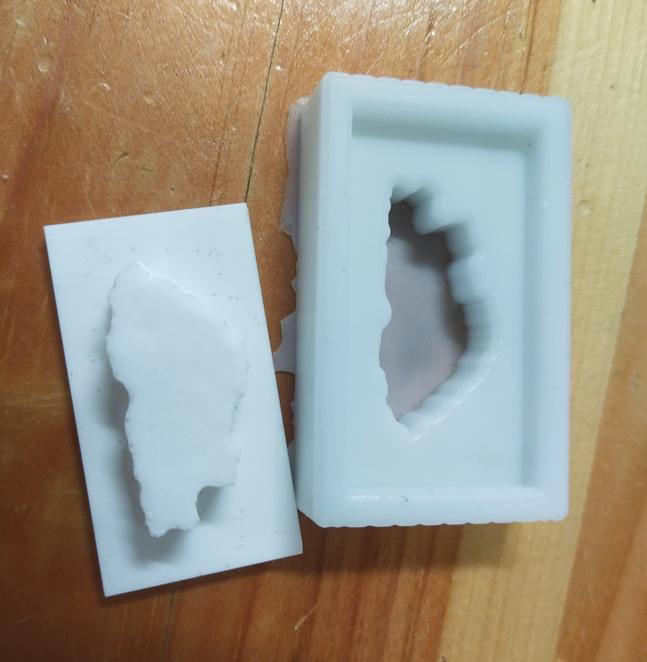
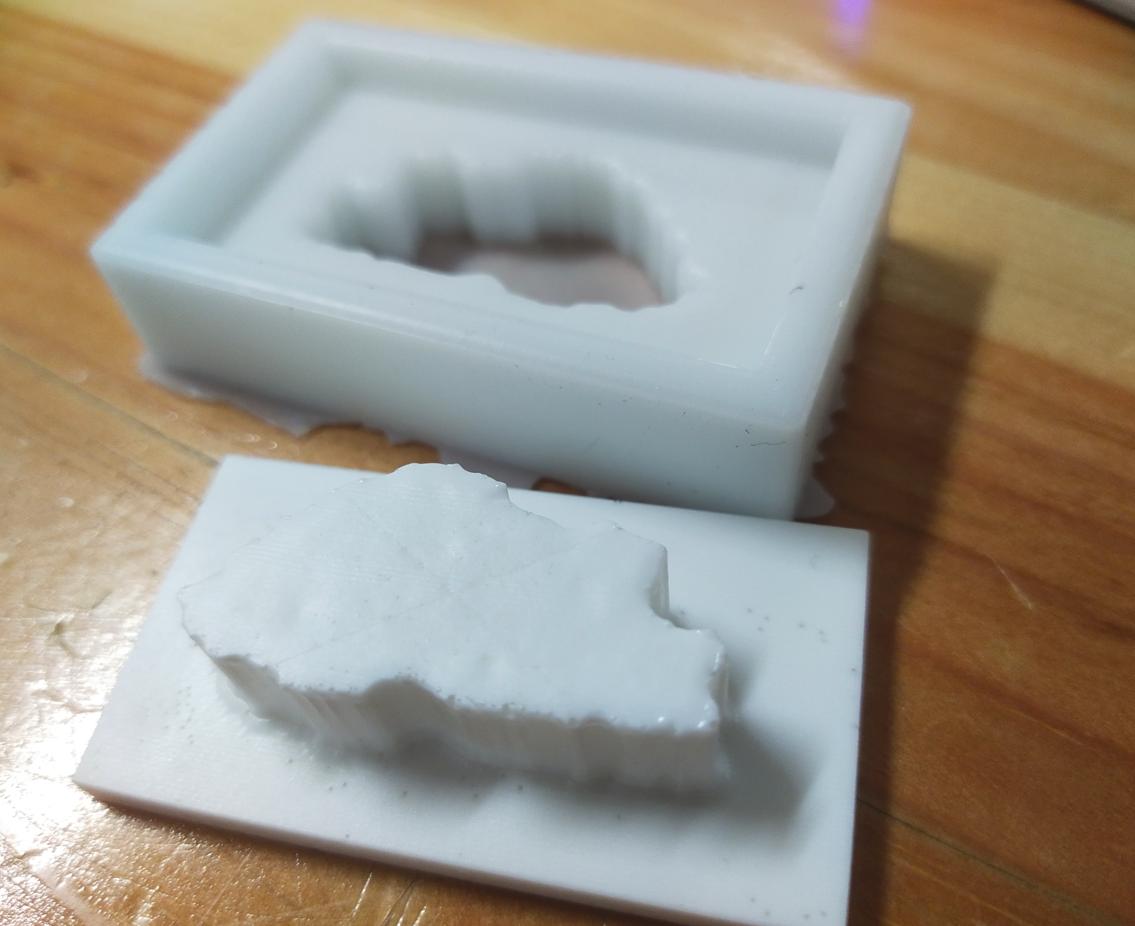
The negative mold is rigid and came out very nice with a smooth and bold texture, unlike the Smooth-On Sorta Clear 37 which came out squishy but also had a smooth texture. I used the Smooth-Cast 305 Just like before, Just like for the Mold, measure equal amounts of part A and B Then combine the parts and mix it thoroughly for 3 minutes Then pour in your mold and let it set for 4 hours which is the cure time for the Smooth-Cast 305 This is the outcome but the cast shown in the image exhibits numerous bubbles due to not mixing well and pouring too fast. Improper mixing and rapid pouring can cause the silicone rubber to trap air bubbles. To prevent this, I will be ensuring thorough mixing and pouring slowly to help reduce bubbles in future casts. This the the negative mold and cast The negative mold, carefully made with the Siloczest Liquid Silicone Rubber-LSR 225 (Fast), shows the clear shape and borders of Bhutan's map.
I explored moulding and casting, diving into materials like OOMOO 25 and SORTA CLEAR 37, and comparing 3D printing with milling for creating molds.
The group assignment focused on safety sheets and practical casting comparisons, enhancing our understanding of pot life and cure times. Individually, designing molds—like a dog paw and Bhutan outline—made me have a lot of fun in creating such cast.
Using the Modela milling machine for the first time for the Wax Block was a satisfying activity of selecting mill bits and witnessing the milling process. Casting with Smooth-Cast 305 was very enjoyable and seeing the outcomes made me create more and more of it.
Overall, this week expanded my skills and deepened my appreciation for digital fabrication.

Casting Process
Product information, Technical Bulletin, Safety Datasheet

Making the cast
Remember to Pre-mix both the parts before mixing measuring them and mixing them


Cast
Negative Mold and Cast
The cast, made from Smooth-Cast 305, gives a solid look at Bhutan's map outline. Even though it has a lot of bubbles.
Reflection for Week 12 - Moulding and Casting
Design Files