Week 4 - Electronics production: Kabir, Collin, Angelina
Assignment
For the group assignment this week, we characterized the design rules for the PCB production process, assessing the feeds, speeds, plunge rate, depth of cut (traces and outline), tooling, and trace thickness. You can access all files [here]
Conceptualizing Milling Parameters
| Term | Link | |
|---|---|---|
| Feed rate | The velocity at which the cutter moves against the workpiece in the x and y axes; it is in | Source |
| Spindle speeds | The number of revolutions the milling bit on the spindle per unit time (in RPM) | Source |
| Plunge rate | The speed at which the bit is driven down into a material during a job. It depends on the bit used and the type of material being cut. | Source |
| Cut depth | The depth at which the tool pushes into the workspiece (in the z-axis). Typically varies between 0.1 to 1.0 mm | Source |
| Tooling | Encompasses fixtures (what holds workpiece in place while milling), tool holders in the spindle (what holds the bit in the machine), cutting tools, etc.; general arrangement of tools during the milling production process. | Source |
Characterizing the Bit Used
Tool: 1/16” flat end mill
-
Feed rate: 59 in/min (1500 mm/min)
-
Plunge rate: 15 in/min (381 mm/min)
-
Spindle speed: 16,400 RPM
-
Max pass depth: 0.006” (0.15 mm)
Tool: 1/32” flat end mill
-
Feed rate: 59 in/min (1500 mm/min)
-
Plunge rate: 15 in/min (381 mm/min)
-
Spindle speed: 16,400 RPM
-
Max pass depth: 0.006” (0.15 mm)
Tool: 1/64” flat end mill
-
Feed rate: 15 in/min (381 mm/min)
-
Plunge rate: 15 in/min (381 mm/min)
-
Spindle speed: 16,400 RPM
-
Max pass depth: 0.006” (0.05 mm)
CNC PCB Workflow
-
Download the Eagle/Gerber/BRD file
-
Remove current bit by aligning the wrenches to the spindle and turning them outwards until they’re loose enough to remove.
-
Clean the bed with the vacuum before wiping it down with alcohol
-
Select the correct bit in Bantam.
-
Insert your bit into the collet using the same process as step 1; leave around 1 inch of extra space between the bottom of the bit and the bottom of the spindle
-
Under
Material setup, set Z offset to 0.01 -
Configure the material size x and y (measure your material with calipers)
-
Place the side metal prong on top of the plate; You must flip the electron-conducting switch in order for the next step to work!
-
Homethe tool under thejogmenu -
Click material probe and Z-Stock only probe
-
Jog the spindle to be on top of the material.
-
Click start; it will automatically go down to touch the material
-
Under
File Setup, import the design file -
Click generate g-code and ensure no red marks
-
Set trace depth = 0.15 mm and trace Clearance = 1.5 mm
-
Under Summary > Run Job, click
Mill Single File -
After it has finished milling, remove the acrylic screen
-
Under the
jogmenu, selectloading -
Turn on the vacuum and remove all excess debris from the bed
-
Use a scraping tool to carefully remove the board away from the bed
Testing the Trace Threshold with 1/64” Bit
To find the tolerance of our milling machine when creating traces, we took a file that gradually makes traces smaller and cut it out. After the milling, we looked and checked the connectivity of the trace using a multimeter. Below shows the original file used.

After uploading the file, we cut it out to get the test board in the picture below.

We tested the board by using a multimeter and by whether the trace stuck to the board or not.
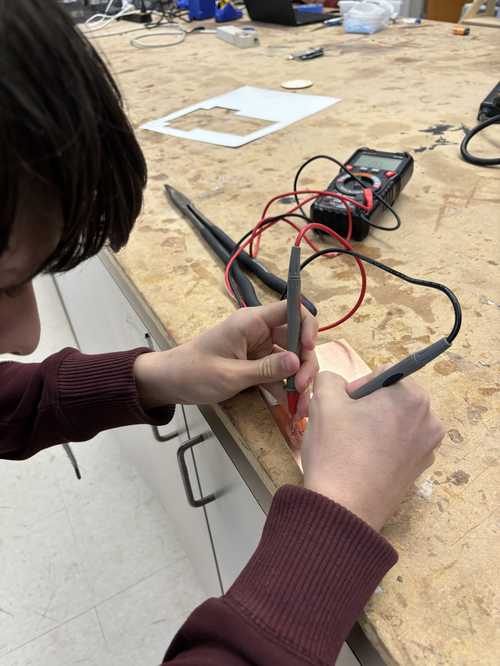
In conclusion to our testing, only traces larger than around 0.008 in. wide should be used for PCB milling as any lower risks the integrity of the trace.
Sending to PCB to Board House
-
In an electronics design software (i.e. KiCad), design a circuit board
-
Mill and test the board in-house to ensure that the board works as intended
-
Locate a PCB house on the internet
-
Explore its fees, procedures, accepted files etc.
-
If the board house accepts the format of your schematic (note that they typically accept Gerber), export/upload the file and place an order