Final Project
First Draft
For my final project I want to design and build a kinetic sculpture that breathes like a pair of lungs, with the speed depending on the air quality sensors throughout the city, in this particular case, Puebla.
There are 4 sensors in my city which upload their readings on real time with an online API, so the data is quite reachable.
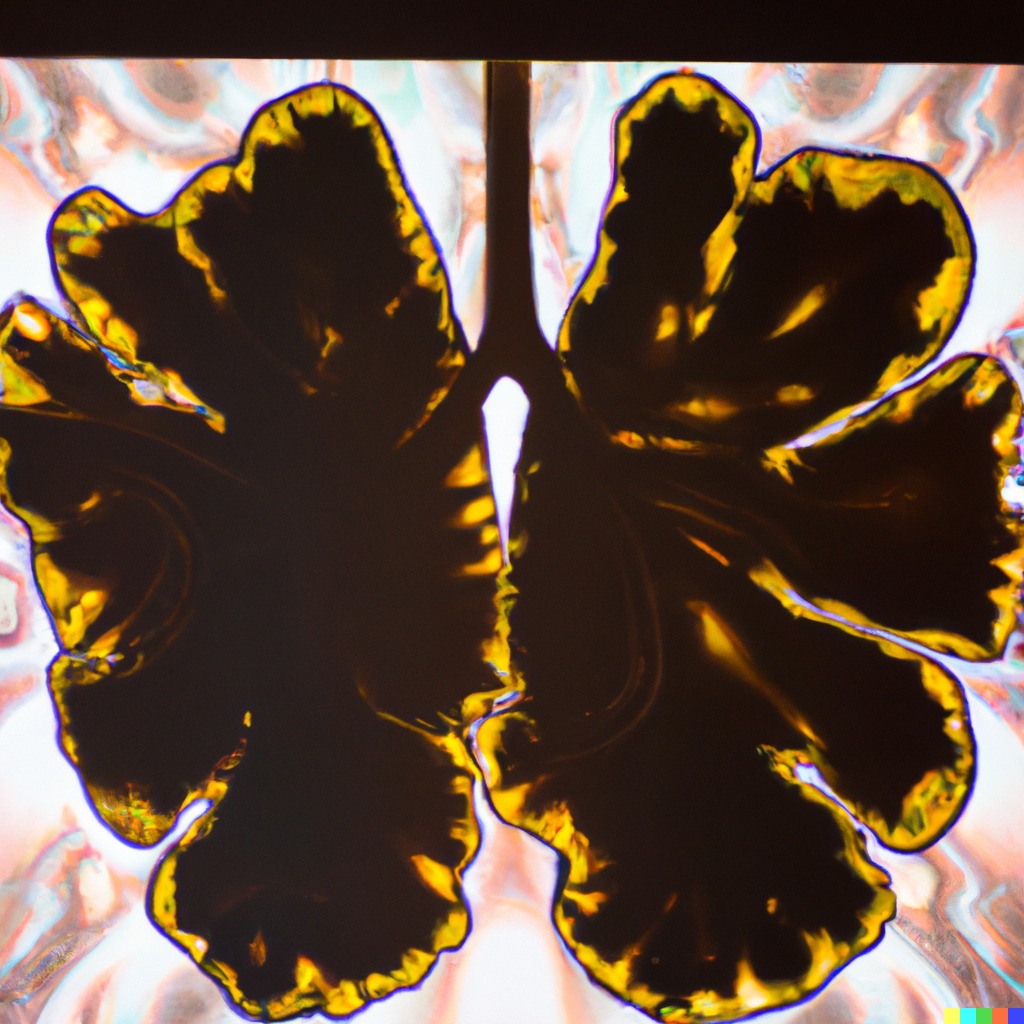
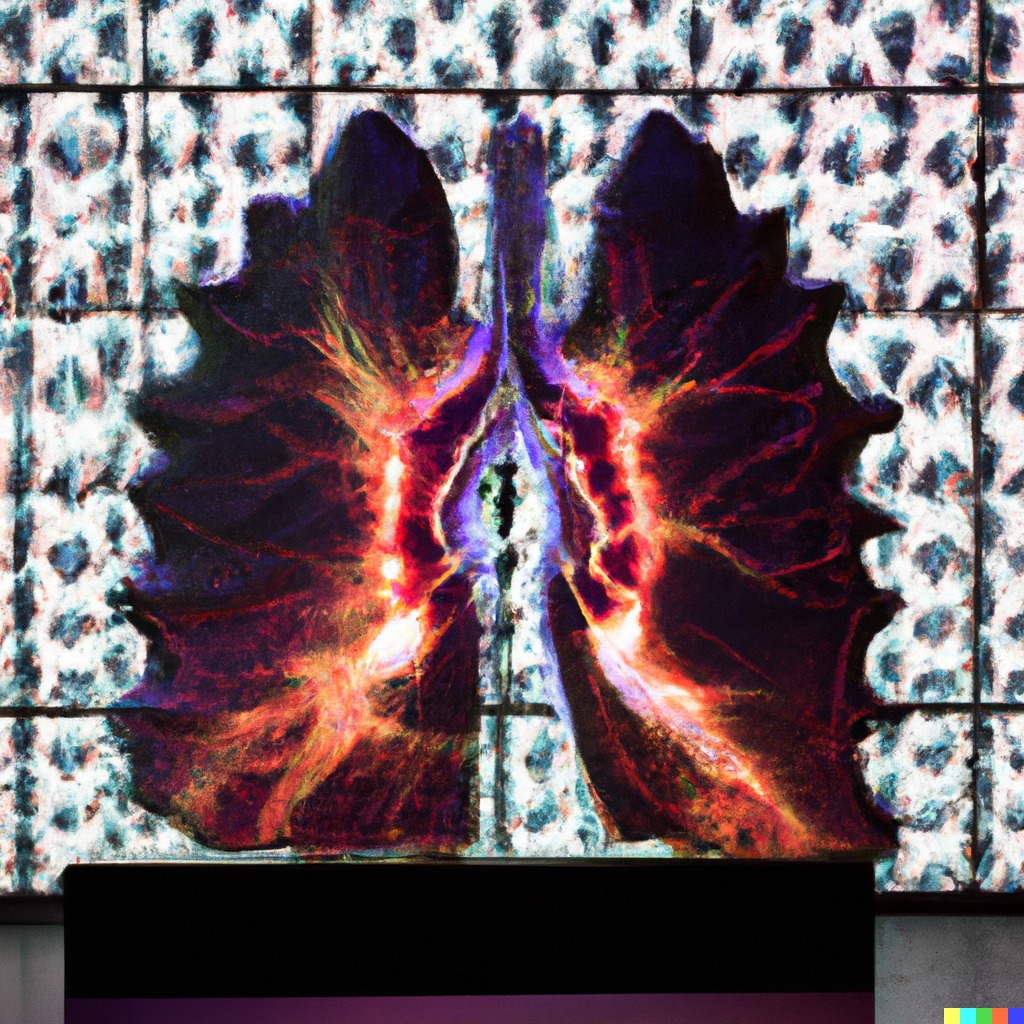
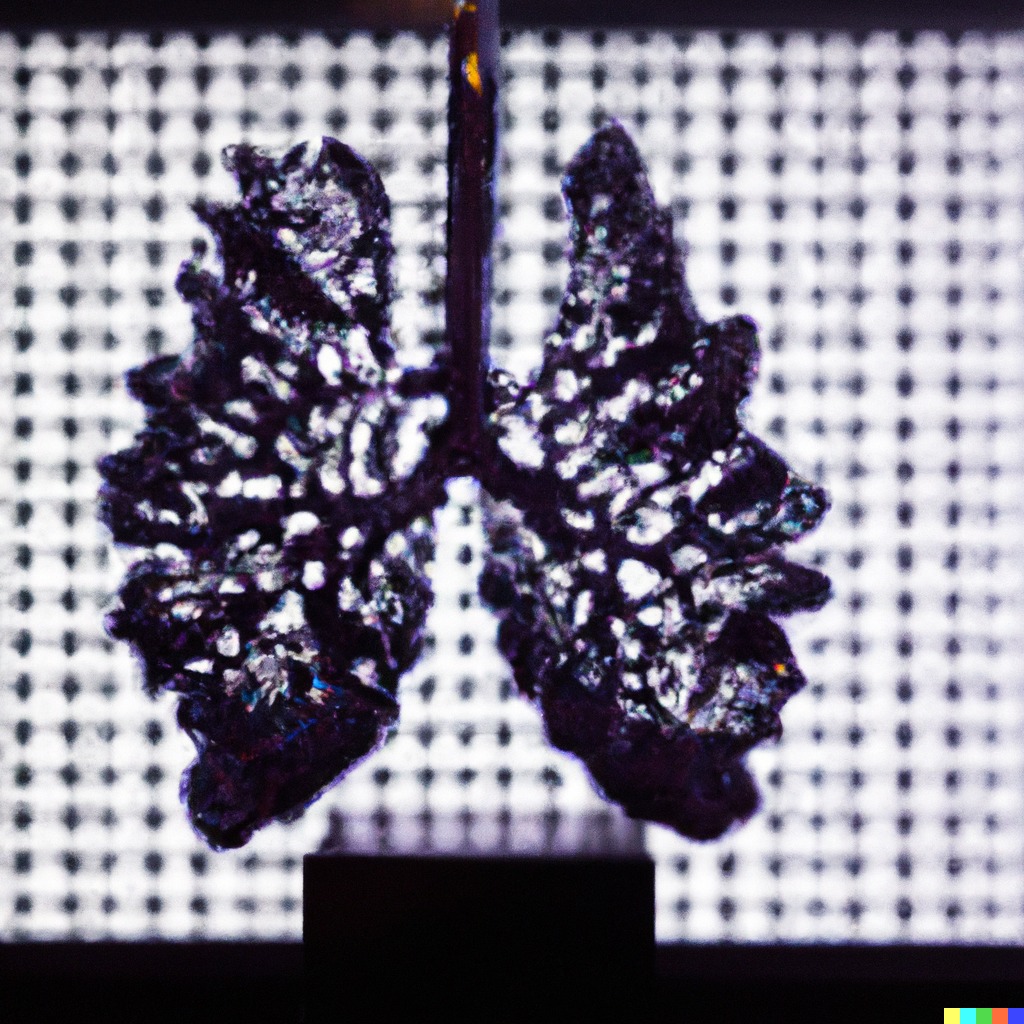
I want the design to be as grotesque and unsettling as possible, because I want to highlight the fact that air quality can be terrible and show it in a way that makes people feel something.
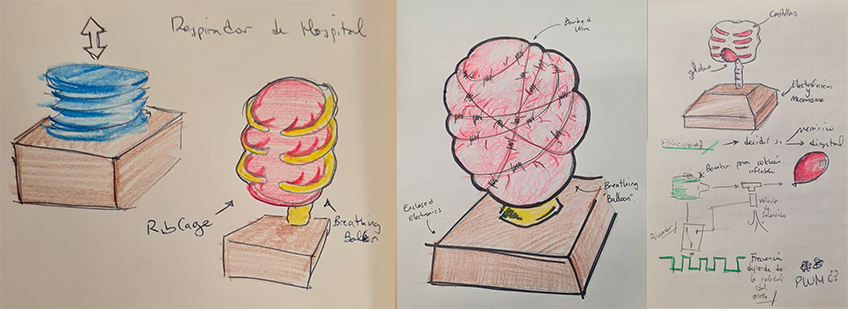
Let's start from the beginning. After 15 weeks of learning a lot about all this processes, I changed the project from an inflatable "lung" to a Ferrofluid display.
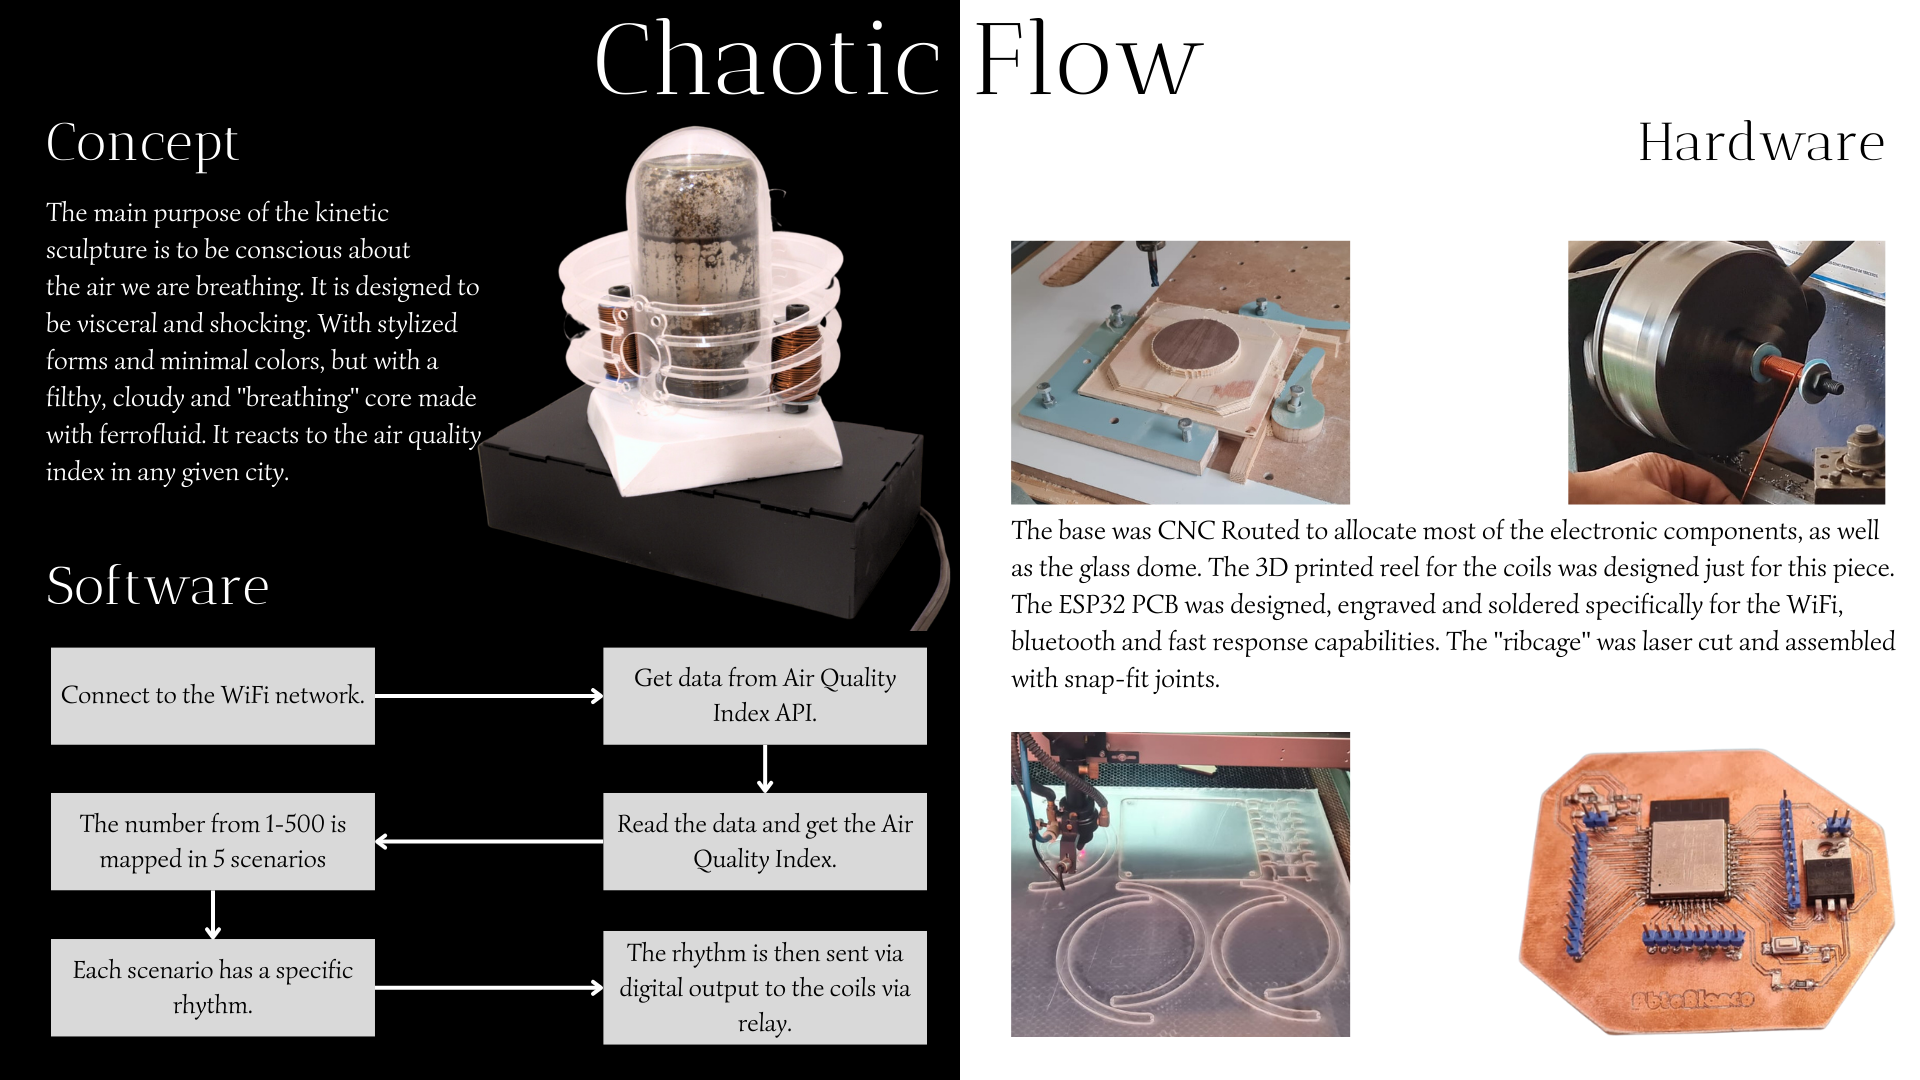
This project is a kinetic sculpture which serves as a visceral and upsetting way of showing the air quality in any given city, based on real-time information gathered from different sensors all around the world by the project World's Air Quality Index.
The very point of this project is to be more conscious of the air we are breathing daily, to make people feel something. I’m dividing this process in 3 parts: The Concept, The Hardware and The Code.
The Concept
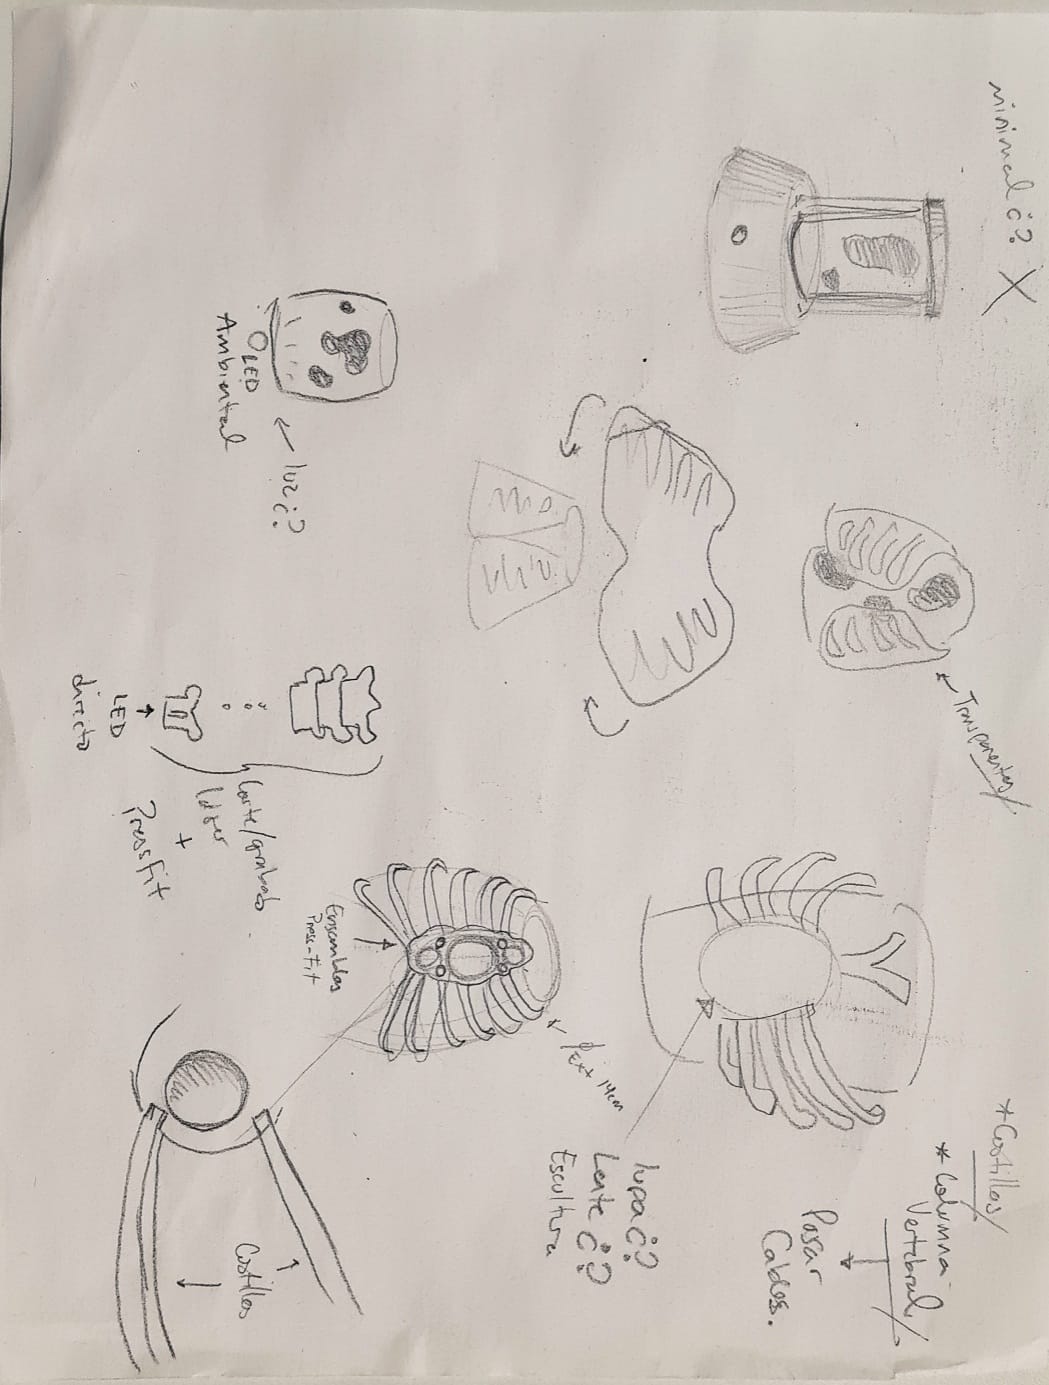
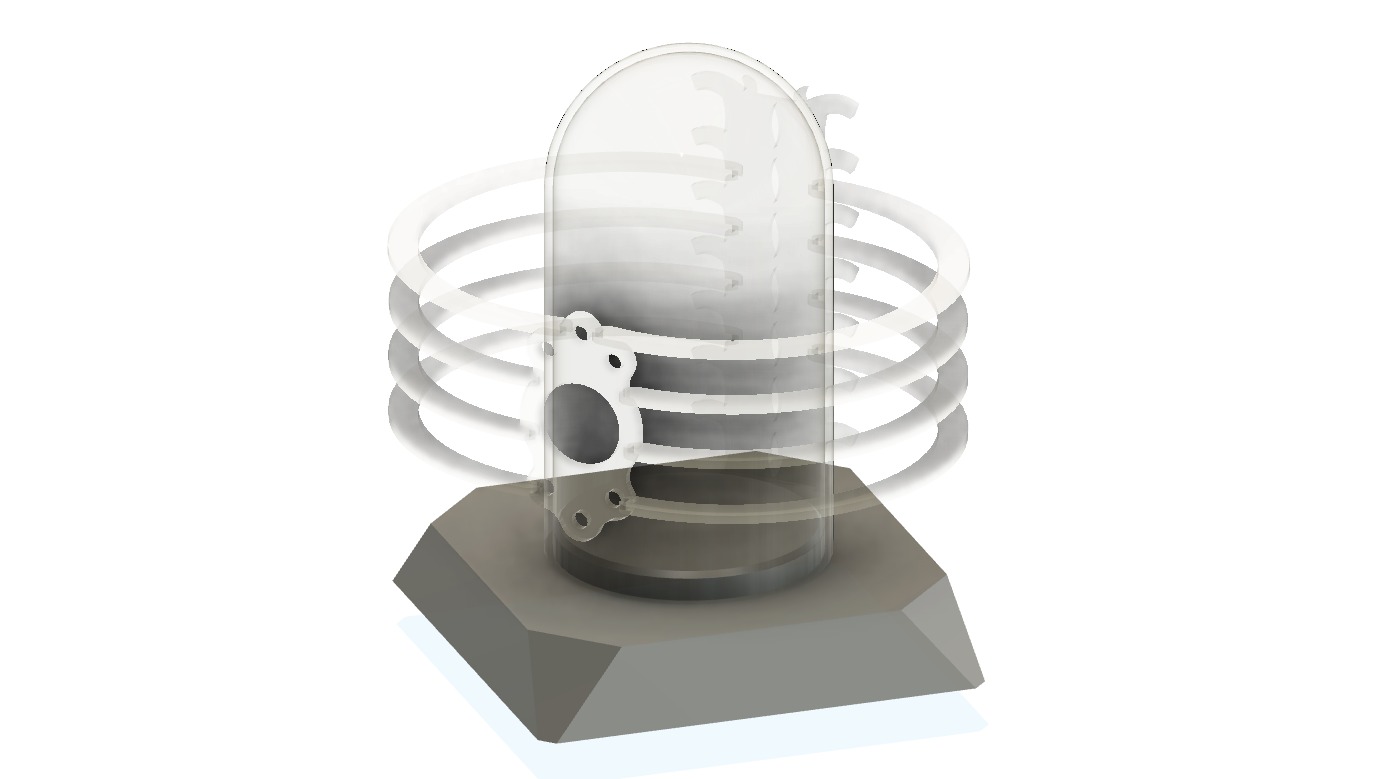
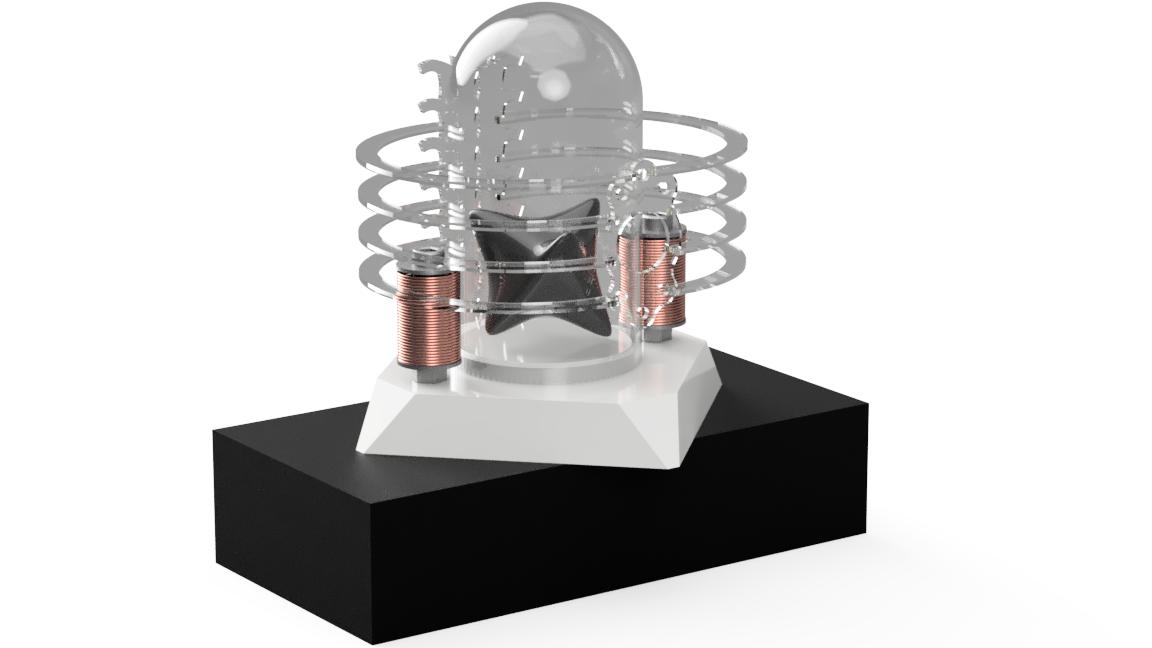
The basic principle of the design is Lungs encased in a ribcage. As you may have seen in previous previous weeks I asked for help from a couple of AI platforms to come up with an idea of the final outcome, just for inspiration though.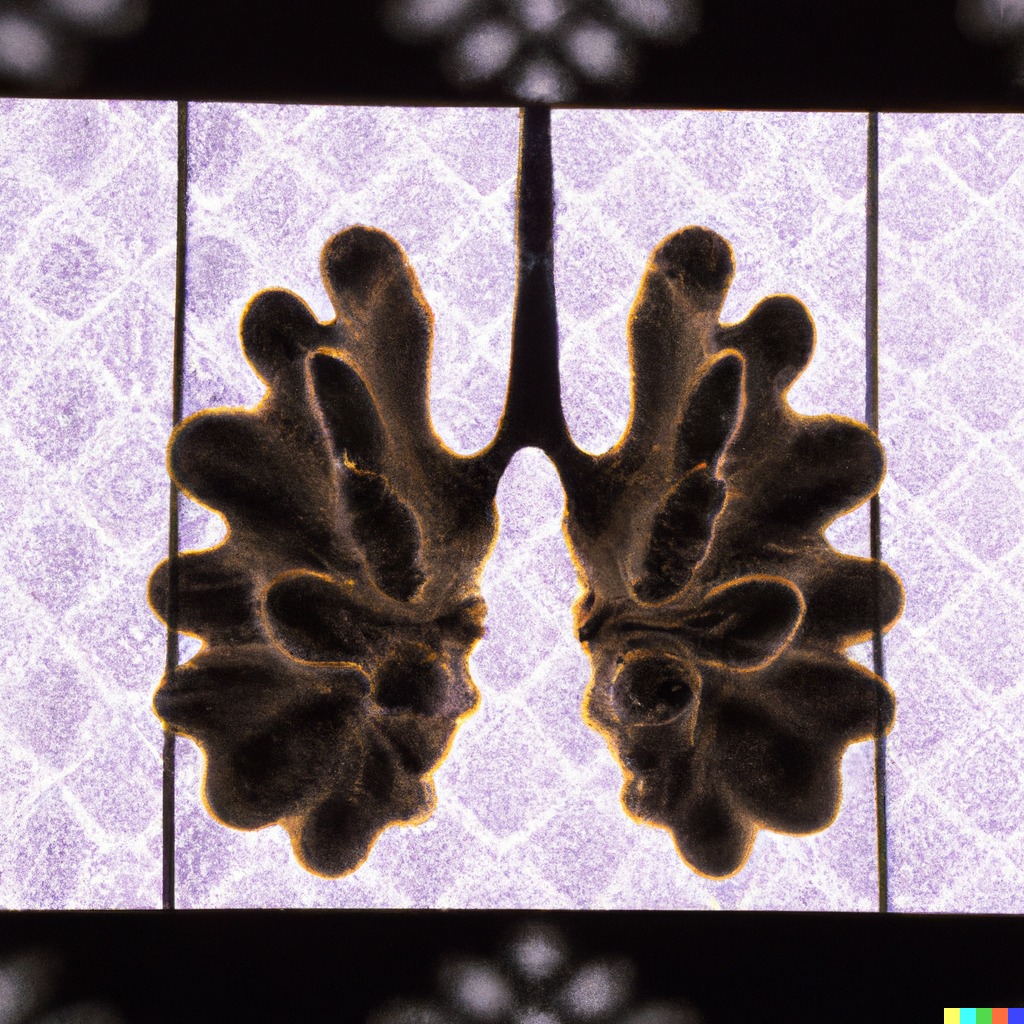
I started sketching the idea based on the input by the AI, and came up with the final product, which only needed a couple of tweaks.
The Hardware
The brains of the project is a ESP32 board that I designed and built specifically for this project, you may check the week XX for more information, but the process was something like this:- Find the ESP32 datasheet and circuit diagram to find useful parts for the project.
- Design a custom board to embed the microcontroller and the different parts necessary for the sculpture.
- Try and carve the paths and connectors for the whole circuit (19 times) until you get it right and working.
- Solder the components and test the product.
- Week_09: Output Devices
- Week_11: Input Devices
- Week_13: Networking and Communications
- Week_14: Interface and application programming
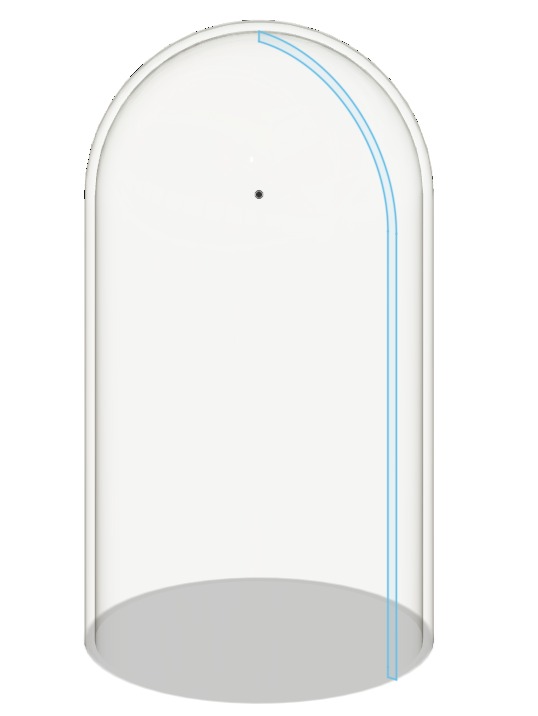
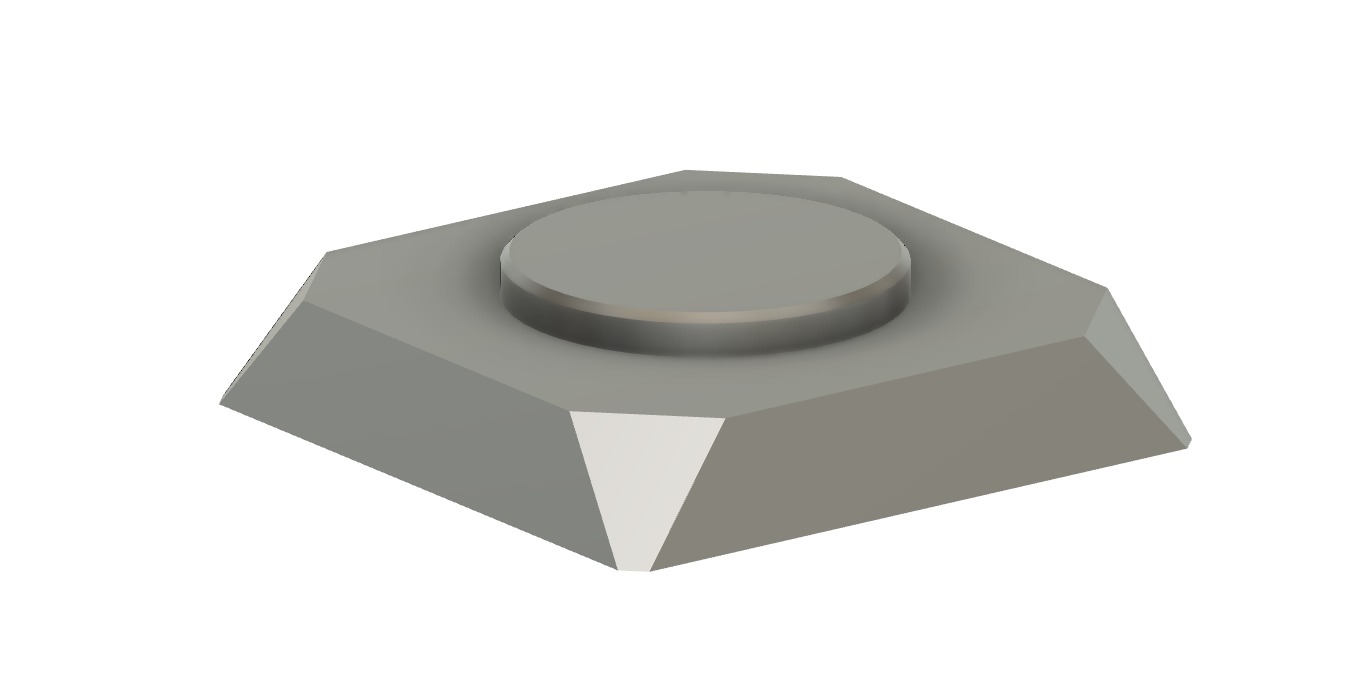
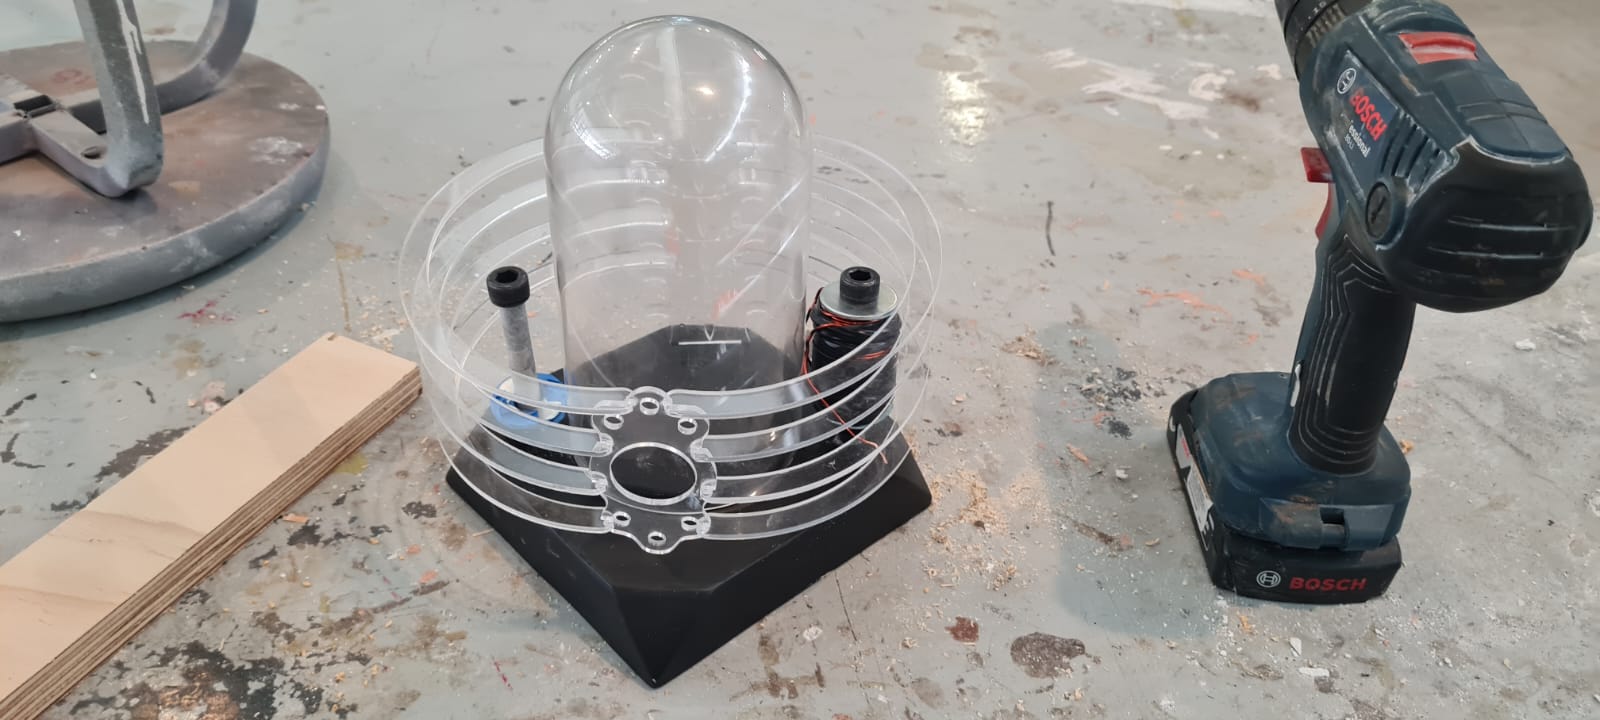
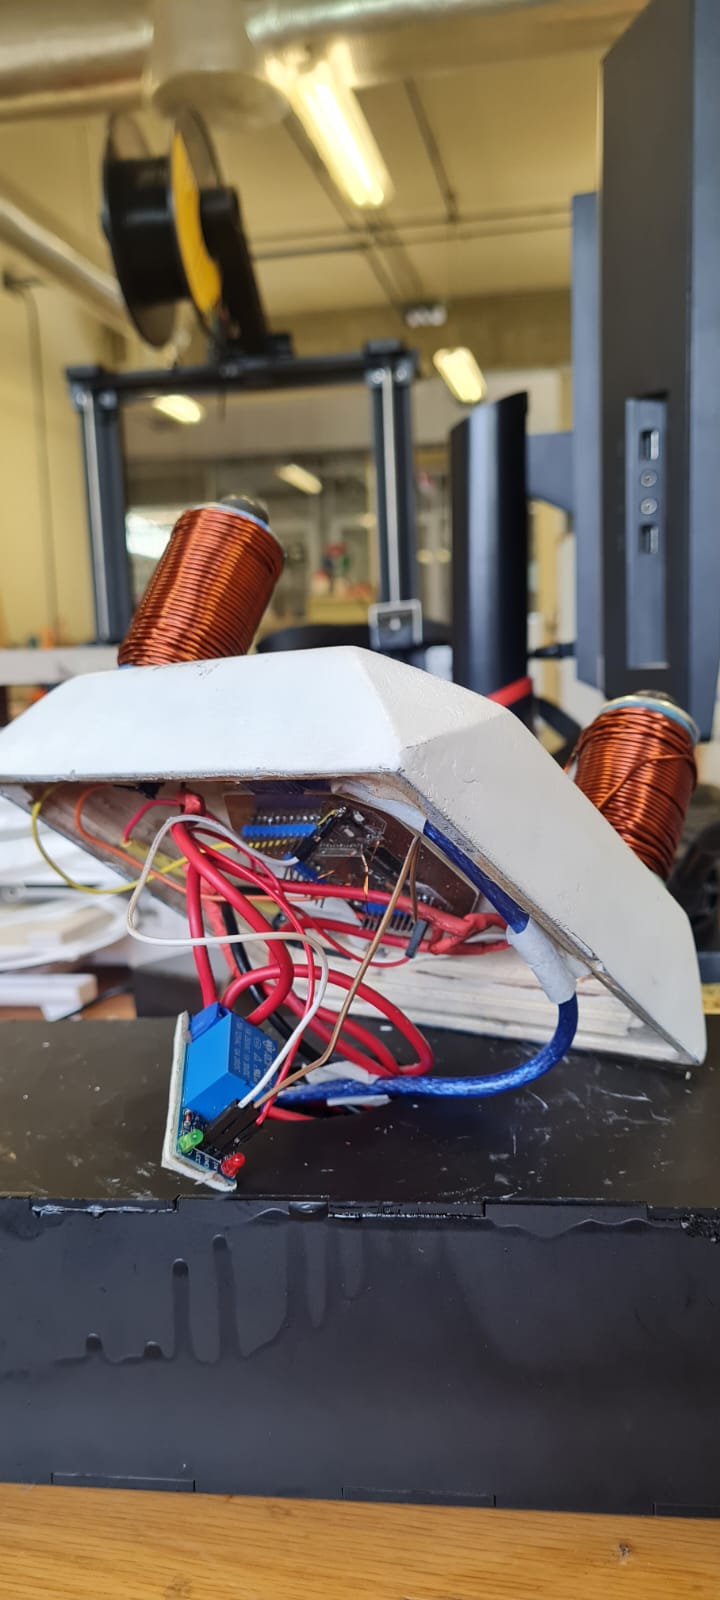
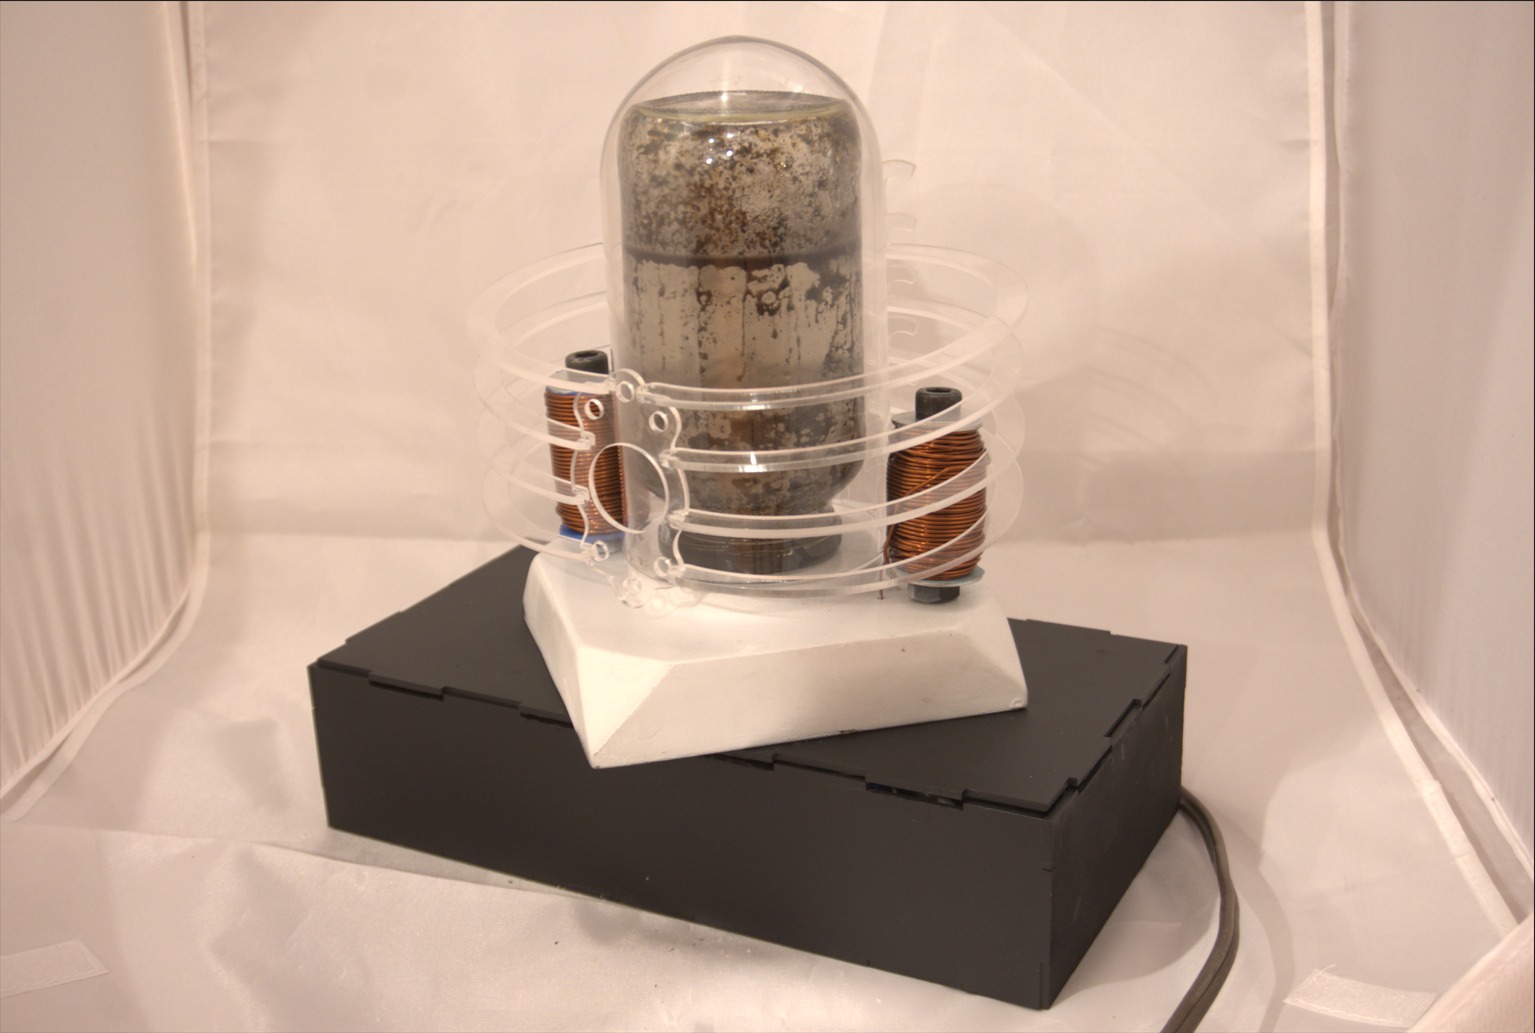
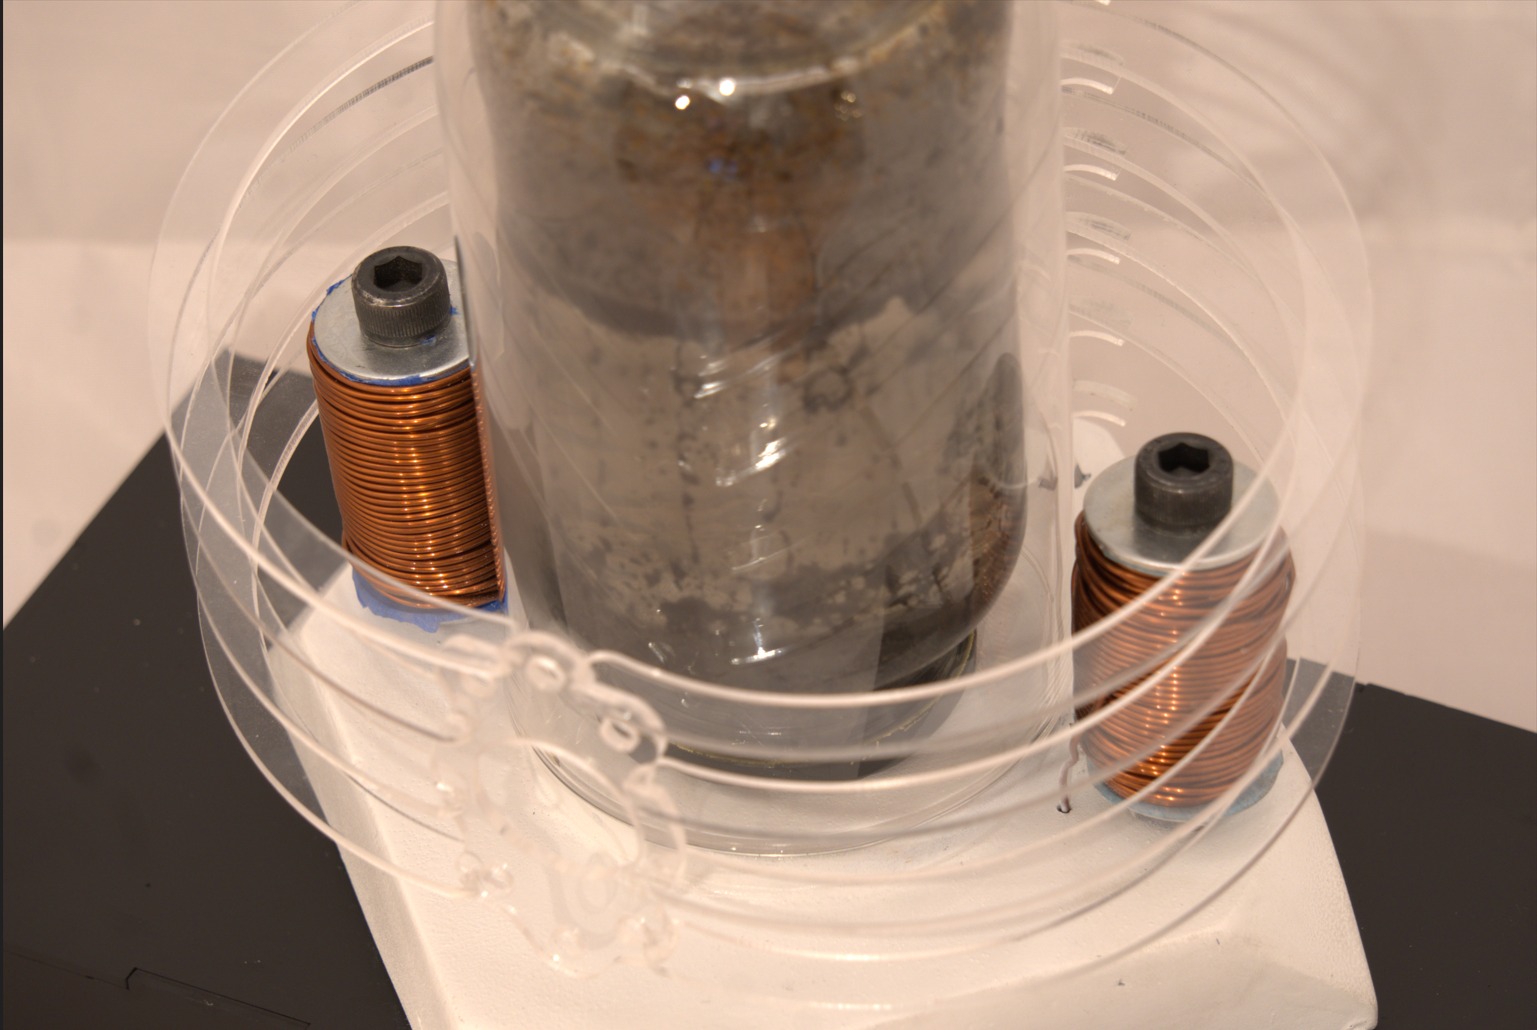
The next part was to design the power supply circuit, and I connected the power source to the AC current, along with a plug with 2 USB connectors for the LEDs and the ESP32. The power source gives current to the electromagnets that get activated with the use of a Relay module. The main sculptural piece is made with a glass hood I found in IKEA, a custom CNC routed base I designed in Fusion360, and a laser-cut transparent acrylic ribcage, that was designed with the previous conceptualization with the following process.
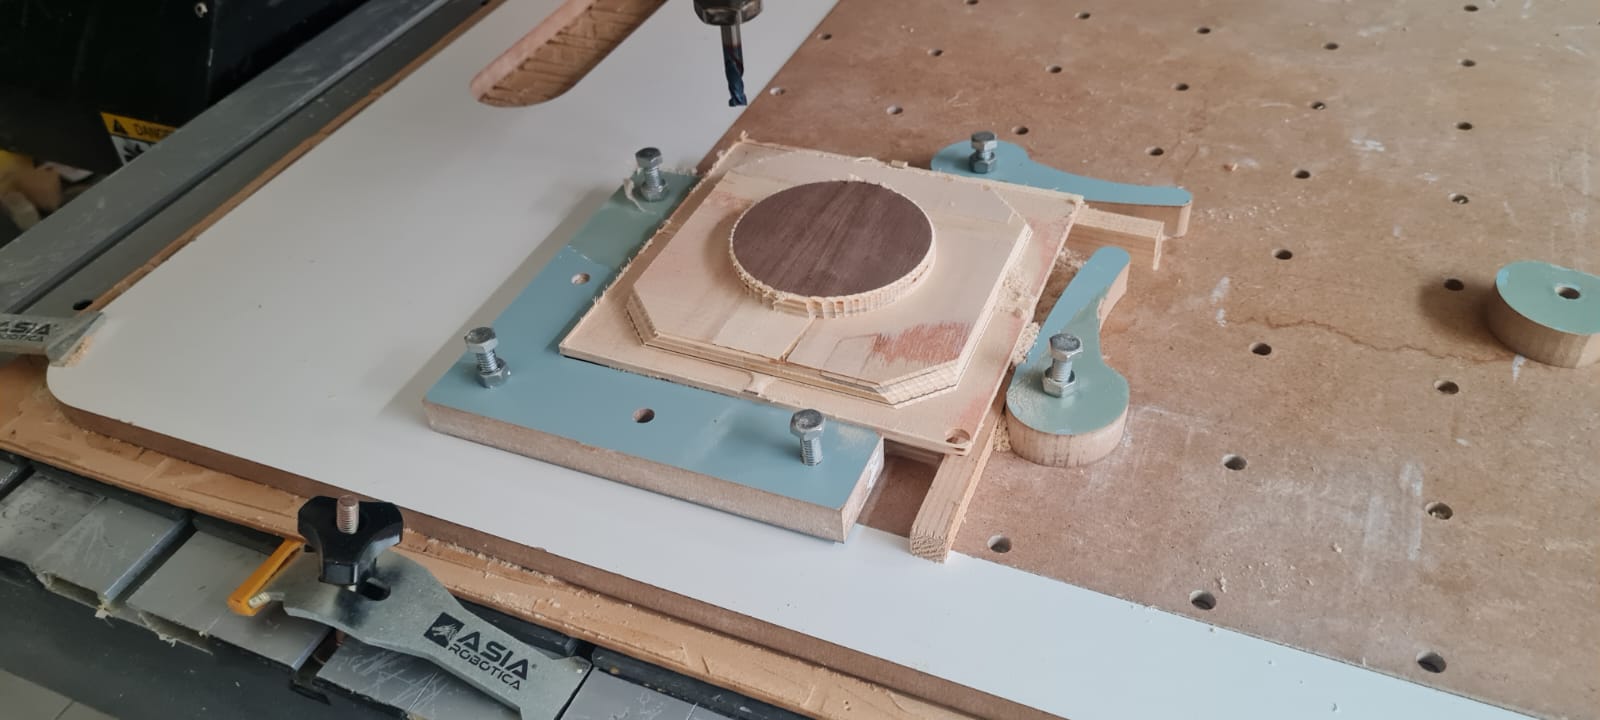
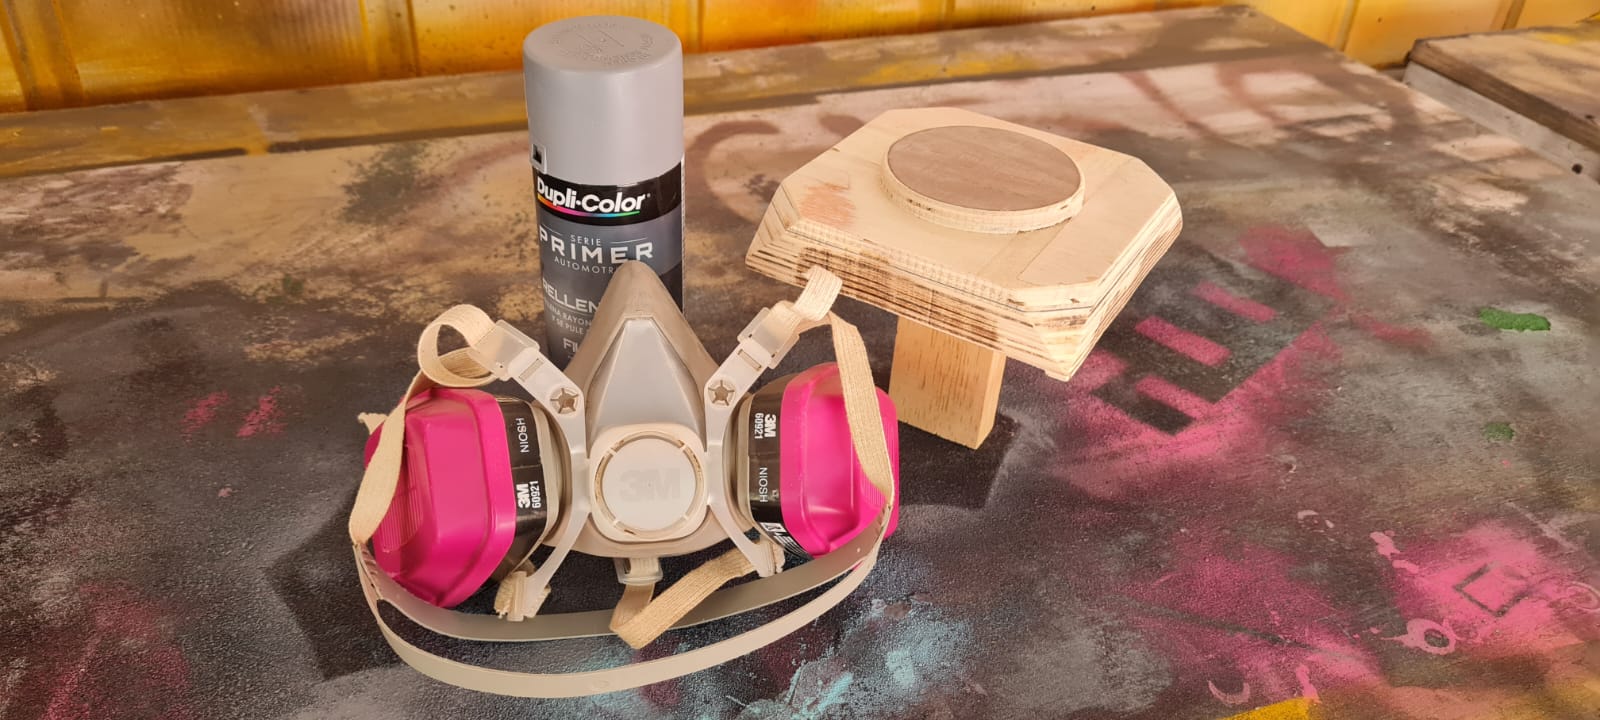
The base was designed using geometrical patterns that chamfer on the edges so it looks brutalistic but smooth at the same time, and the size of it is based on the glass hood. Then I passed the model through Vectric Vcarve in order to process it in the CNC router. I used some scrap 18mm plywood from the workshop, sanded it to have better adherence and pasted it with wood glue. Then I used a jig to keep my piece centered and fixed for the two-sided machining, and started the CNC Router. After finishing the piece on the sander and band saw, I detailed the cylinder for the hood and gave it three coats of plastic paint and sanding to prevent the liquid from being absorbed by the plywood. The next challenge is to allocate all of the electronics inside of the base, which are the ESP32, the LEDs and one Electromagnet.
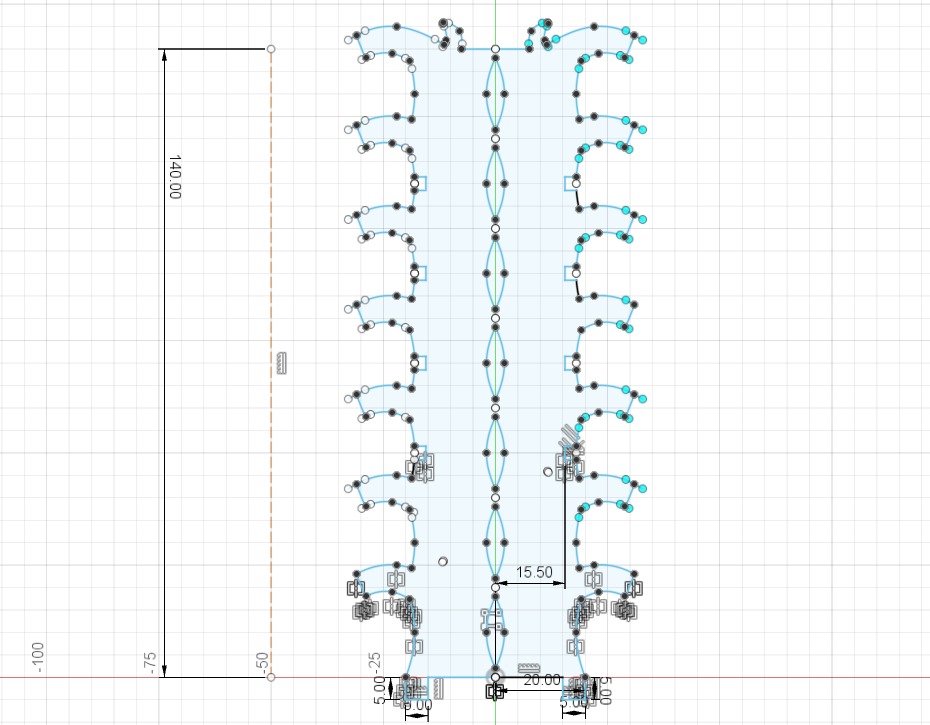
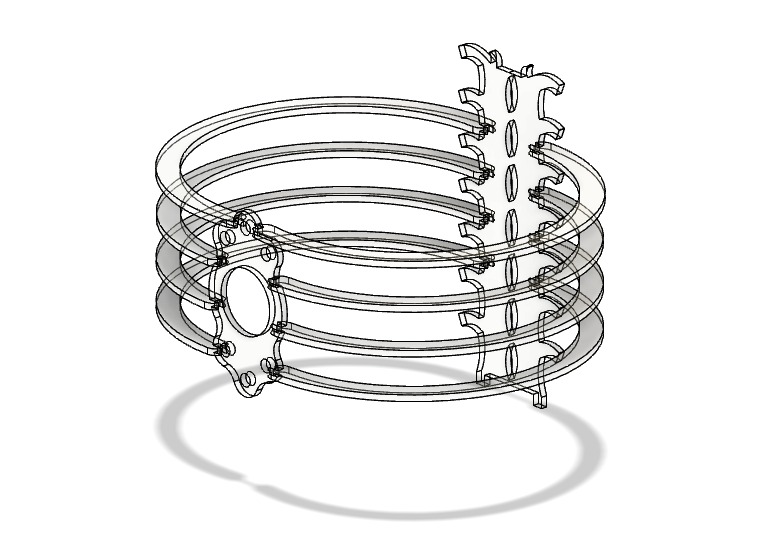
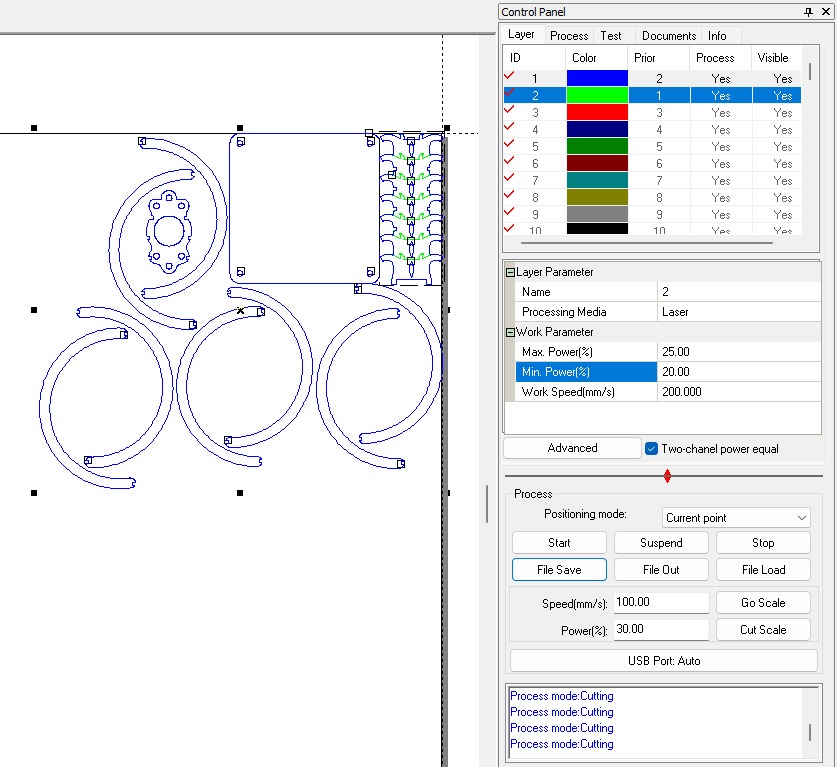
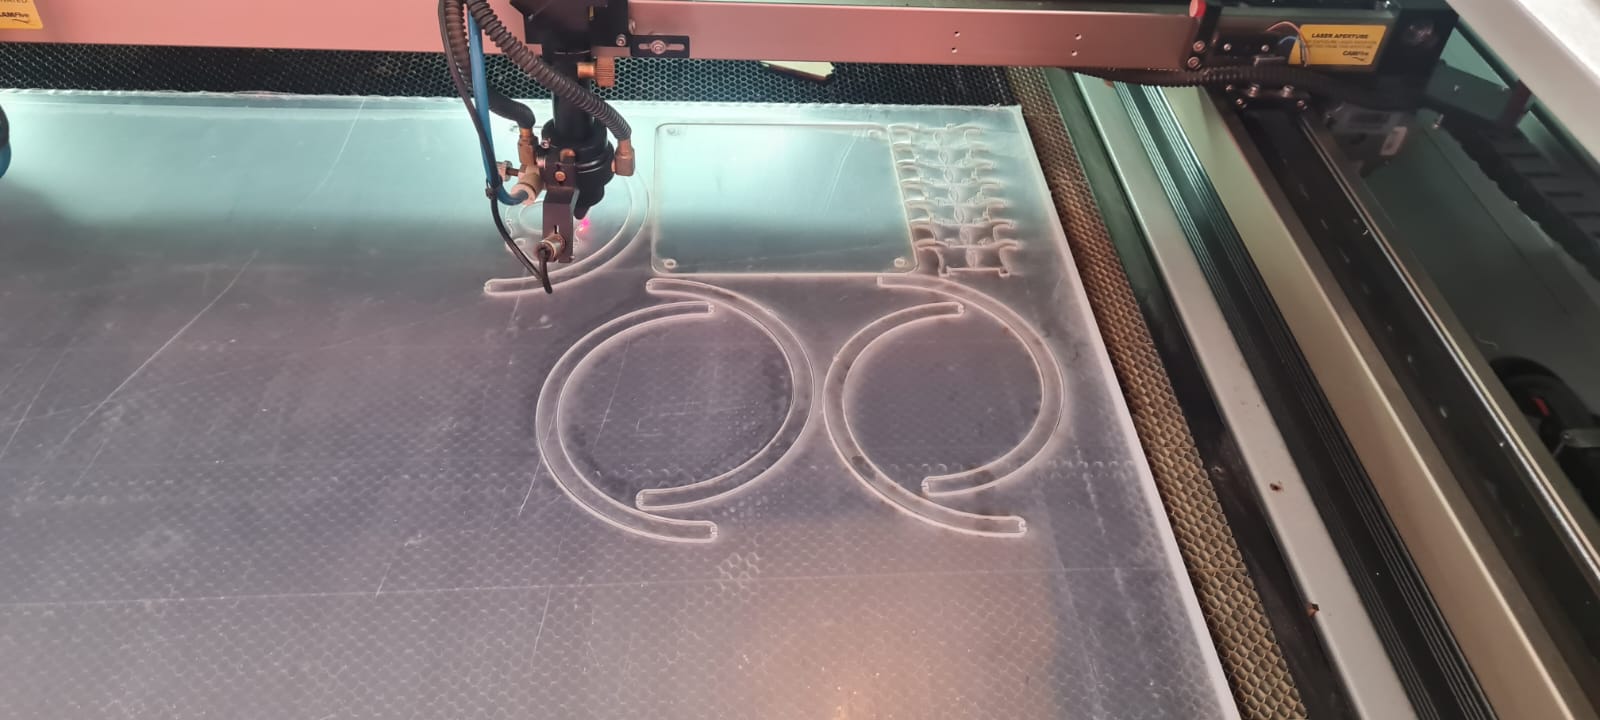
The Ribcage was challenging because of the sternum piece, which has different width for the snapfit assembly, so the first part was designing the sternum and measuring the distance from the center to the joints. Then by using a diagram I calculated each of the radii for them to connect both to the Spine and the sternum in a harmonic and precise manner. The Spine has constant distances so it would be easier to fit. Most of the measurements were made based on the glass hood since it is the centerpiece and everything revolves around it. The design was converted to a *.dxf* file so it was laser-cut. I used 2 different parameters for the piece, as some of it needed engraving with low power and high speed, and the rest was to be cut with high power and low speed. The final product came ready for assembly straight from the machine, as I only had to remove the protection film from the material. I used industrial instant glue for it to have a better structure as the sternum piece is floating and the snap fit joints weren’t strong enough.
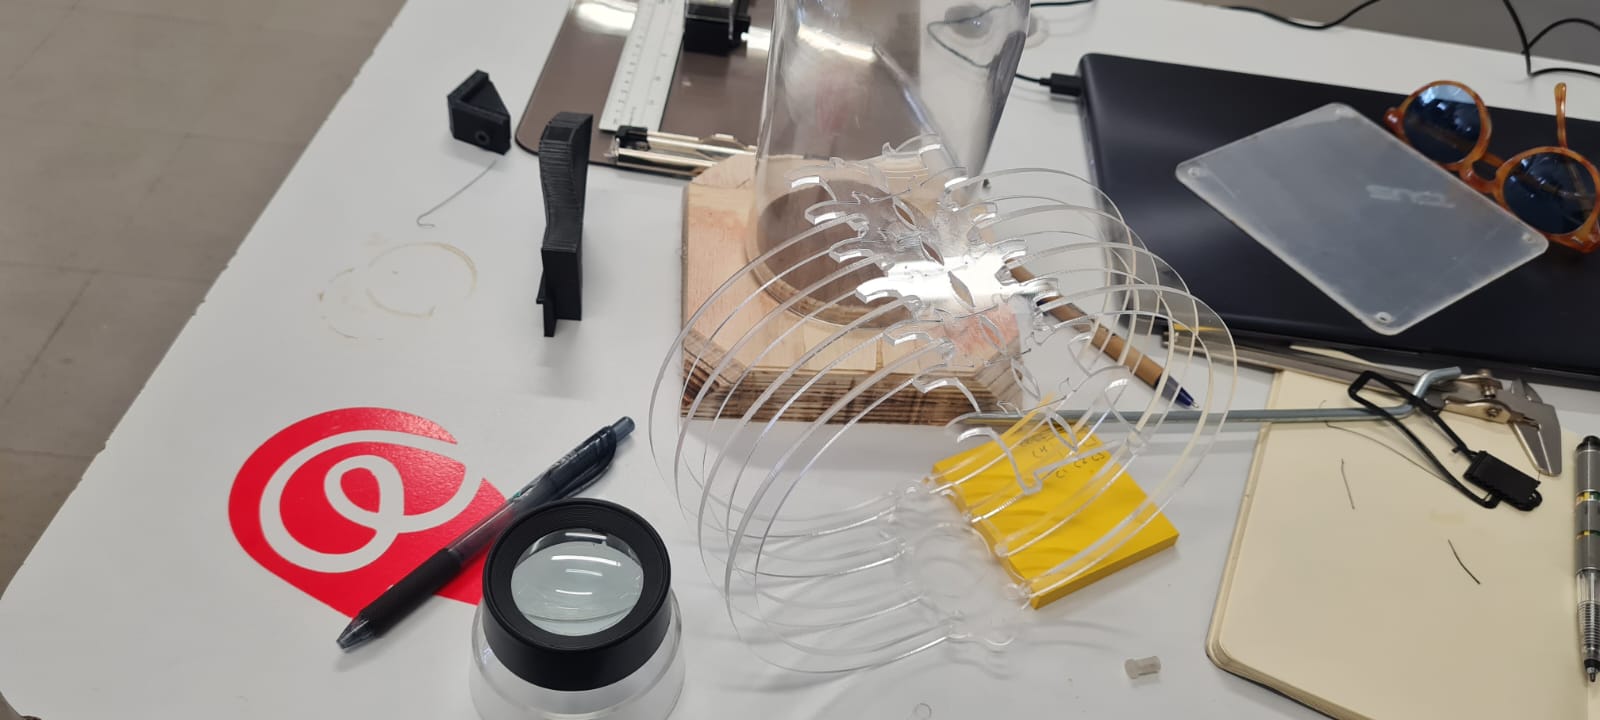
After tweaking the composition and measures, the project started to look the way I intended.
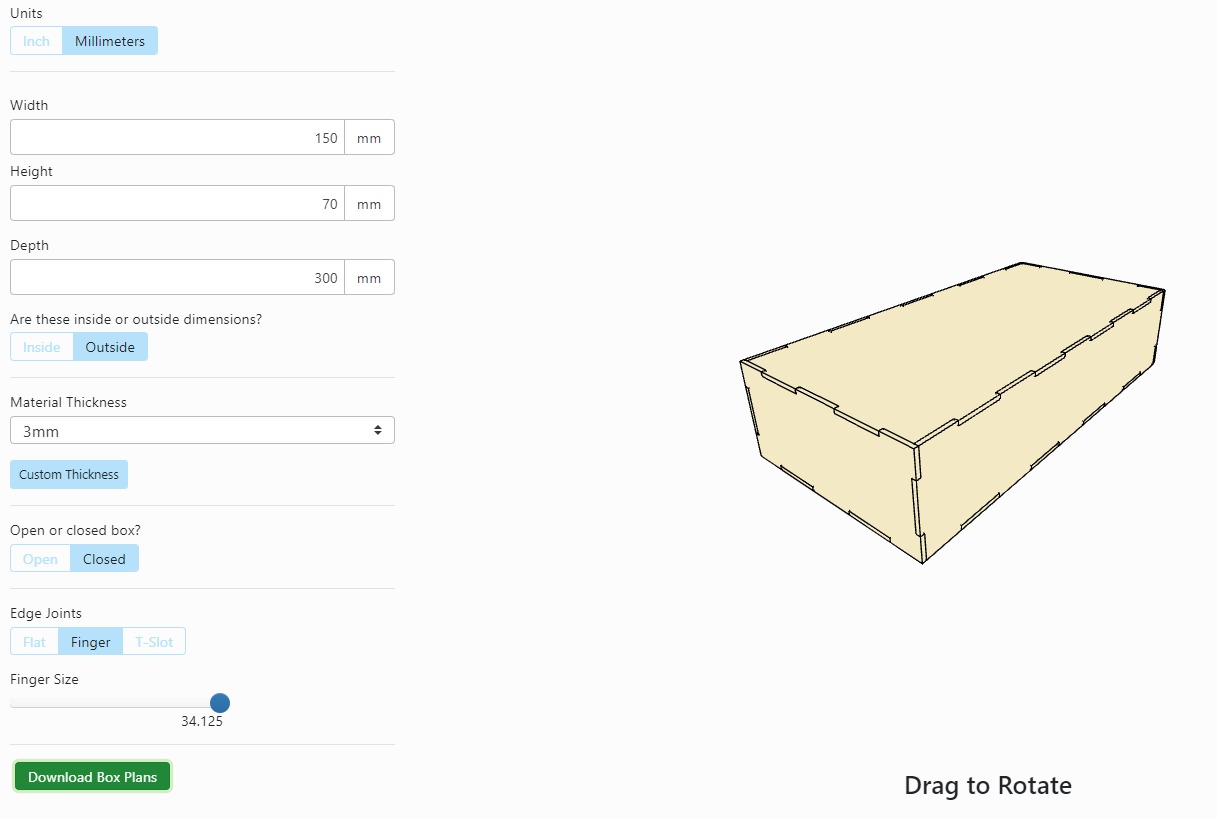
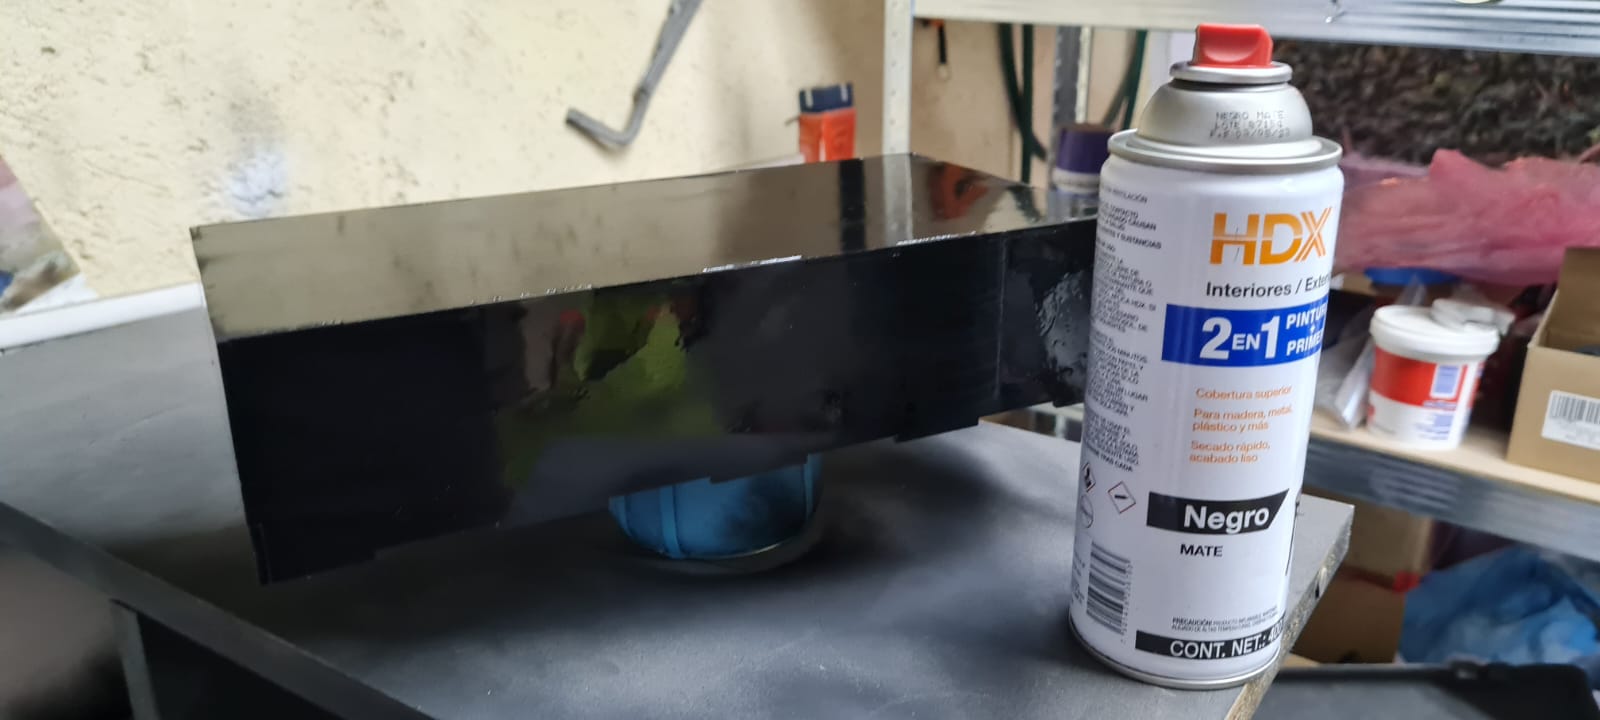
I then designed a box with finger joints throught he platform MakerCase which is a fantastic solution for designing quick boxes for laser or CNC cut. This box is for allocating the power supply, the relay, and most of the wire so it looks sleek and clean.
The Code
Right now as I’m writing this I have really no idea how this project is going to work but basically what I intend to do first is this:- connect the ESP32 to my wifi network. To get this information, I use the API (Application Programming Interface) that the project offers. First we need to get a personal token to connect and download the data so the API knows I’m “trustworthy”, and that process is done through their website.and they ask for a valid e-mail address The token is added to the URL one is accessing to get the JSON package. like this:
https://api.waqi.info/feed/puebla/?token=XXXX974cc1e907fXXXXee4843cc8bfd14d9aXXXX Over here, this URL is specific to the air quality readings in Puebla, México, my hometown, but it is possible to change it to a specific sensor or city around the world. This URL gives me the next data string:
	{
		"status": "ok",
		"data": {
			"aqi": 97,
			"idx": 11798,
			"attributions": [
				{
					"url": "http://sinaica.inecc.gob.mx/",
					"name": "INECC - Instituto Nacional de Ecología y Cambio Climático",
					"logo": "Mexico-INECC.png"
				},
				{
					"url": "https://waqi.info/",
					"name": "World Air Quality Index Project"
				}
			],
			"city": {
				"geo": [
					19.115858055556,
					-98.277487222222
				],
				"name": "Velódromo, Puebla, Mexico",
				"url": "https://aqicn.org/city/mexico/puebla/velodromo",
				"location": ""
			},
			"dominentpol": "pm25",
			"iaqi": {
				"co": {
					"v": 5.5
				},
				"dew": {
					"v": 13
				},
				"h": {
					"v": 68
				},
				"no2": {
					"v": 12.1
				},
				"o3": {
					"v": 26.6
				},
				"p": {
					"v": 1028.4
				},
				"pm10": {
					"v": 36
				},
				"pm25": {
					"v": 97
				},
				"so2": {
					"v": 6.6
				},
				"t": {
					"v": 19
				},
				"w": {
					"v": 0.7
				},
				"wg": {
					"v": 10.2
				}
			},
			"time": {
				"s": "2023-05-23 10:00:00",
				"tz": "-05:00",
				"v": 1684836000,
				"iso": "2023-05-23T10:00:00-05:00"
			},
			"forecast": {
				"daily": {
					"o3": [
						{
							"avg": 11,
							"day": "2023-05-21",
							"max": 23,
							"min": 4
						},
						{
							"avg": 8,
							"day": "2023-05-22",
							"max": 21,
							"min": 1
						},
						{
							"avg": 8,
							"day": "2023-05-23",
							"max": 27,
							"min": 1
						},
						{
							"avg": 5,
							"day": "2023-05-24",
							"max": 16,
							"min": 1
						},
						{
							"avg": 9,
							"day": "2023-05-25",
							"max": 30,
							"min": 1
						},
						{
							"avg": 7,
							"day": "2023-05-26",
							"max": 26,
							"min": 1
						},
						{
							"avg": 10,
							"day": "2023-05-27",
							"max": 36,
							"min": 1
						}
					],
					"pm10": [
						{
							"avg": 8,
							"day": "2023-05-21",
							"max": 18,
							"min": 2
						},
						{
							"avg": 20,
							"day": "2023-05-22",
							"max": 32,
							"min": 10
						},
						{
							"avg": 30,
							"day": "2023-05-23",
							"max": 49,
							"min": 14
						},
						{
							"avg": 32,
							"day": "2023-05-24",
							"max": 52,
							"min": 12
						},
						{
							"avg": 28,
							"day": "2023-05-25",
							"max": 56,
							"min": 15
						},
						{
							"avg": 23,
							"day": "2023-05-26",
							"max": 47,
							"min": 9
						},
						{
							"avg": 32,
							"day": "2023-05-27",
							"max": 56,
							"min": 7
						}
					],
					"pm25": [
						{
							"avg": 23,
							"day": "2023-05-21",
							"max": 54,
							"min": 5
						},
						{
							"avg": 59,
							"day": "2023-05-22",
							"max": 77,
							"min": 40
						},
						{
							"avg": 81,
							"day": "2023-05-23",
							"max": 119,
							"min": 51
						},
						{
							"avg": 84,
							"day": "2023-05-24",
							"max": 129,
							"min": 45
						},
						{
							"avg": 76,
							"day": "2023-05-25",
							"max": 143,
							"min": 53
						},
						{
							"avg": 62,
							"day": "2023-05-26",
							"max": 110,
							"min": 36
						},
						{
							"avg": 86,
							"day": "2023-05-27",
							"max": 151,
							"min": 24
						}
					]
				}
			},
			"debug": {
				"sync": "2023-05-24T01:17:16+09:00"
			}
		}
	}
The first part is the wifi connection which goes something like this:
void initWiFi() {
	WiFi.mode(WIFI_STA);
	WiFi.begin(ssid, password);
	Serial.print("Connecting to WiFi ..");
	while (WiFi.status() != WL_CONNECTED) {
	  Serial.print('.');
	  delay(1000);
}
	Serial.println(WiFi.localIP());
}
Now connected to the Wifi network it can start to request data from the specific API. This is done through the command GET. The ESP32 (Client) will submit a request to the server, which is the waqi.org API. The server then will send a response to the client. At last the response is received by the client, this response has all the requested data, which will be the precise information I need for this project. Having analyzed the whole JSON file that arrives when requested from the API, I came to the realization that there is only so much info needed for the sculpture to react, and that is called the Air Quality Index, or “aqi” and it is located on the third line of the data. Supposedly this should be a bit easier having the “aqi” value. I tried to look into a process called Parsing in which one can filter certain parts of the JSON package, however I couldn’t understand anything about it and got pretty frustrated, but luckily I found another elegant solution consisting in looking for the specific character number, which is between the 29th and the 31st of the string, and that gave me the results I needed. On the start of the code what will happen is the next:
- The LED ambient lights will turn on through the MOSFET.
- The device will look for the Wifi signal and connect, using the password.
- The device will then send a request for the data from the API, receive it and take away the Air Quality Index value, and store it in the AQI variable.
- The AQI variable is mapped or converted from 0-500 to 1-5.
- There is a case for each number in which the interval between the activation and deactivation of the electromagnets.
The code looks like this:
	#include
		#include
		#include
		int IMAN = 23;
		int LED = 4; //MOSFET
		const char* ssid = "XXXXX";
		const char* password =  "XXXXXX";
		int AQI;


		void setup() {
		  pinMode(IMAN, OUTPUT); //Relé para electroimanes
		  pinMode (LED, OUTPUT); //LED ambiental
		  digitalWrite(LED, HIGH);
		  Serial.begin(115200);
		  delay(4000);
		  WiFi.begin(ssid, password);

		  while (WiFi.status() != WL_CONNECTED) {
			delay(1000);
			Serial.println("Connecting to WiFi..");
		  }

		  Serial.println("Connected to the WiFi network");
		   if ((WiFi.status() == WL_CONNECTED)) { //Check the current connection status

			HTTPClient http;

			http.begin("https://api.waqi.info/feed/puebla/?token=76ff974cc1e907f427cee4843cc8bfd14XXXXXX"); //Specify the URL
			int httpCode = http.GET();                                        //Make the request

			if (httpCode > 0) { //Check for the returning code

				String payload = http.getString();
				String jsonString = payload;
				String digits = jsonString.substring(29, 32);
				AQI = digits.toInt();
				Serial.println(AQI);
				  AQI = map(AQI, 0, 500, 1, 5); //Mapeo
			  }

			else {
			  Serial.println("Error on HTTP request");
			}

			http.end(); //Free the resources
		  }
		}

		void loop() {
		  switch (AQI) {
			case 1: //Calidad buena 60 bpm
			digitalWrite(IMAN, HIGH);
			delay(1000);
			digitalWrite(IMAN, LOW);
			delay(1000);
			break;
			case 2: //Calidad regular 105 bpm
			digitalWrite(IMAN, HIGH);
			delay(571);
			digitalWrite(IMAN, LOW);
			delay(571);
			break;
			case 3: //Calidad mala 155 bpm
			digitalWrite(IMAN, HIGH);
			delay(387);
			digitalWrite(IMAN, LOW);
			delay(387);
			break;
			case 4: //Calidad terrible 205 bpm
			digitalWrite(IMAN, HIGH);
			delay(292);
			digitalWrite(IMAN, LOW);
			delay(292);
			break;
			case 5: //Calidad peligrosa 250 bpm
			digitalWrite(IMAN, HIGH);
			delay(240);
			digitalWrite(IMAN, LOW);
			delay(240);
			break;
		  }


		//  delay(100);

		}
The pins 11 and 12 are the outputs for this part. I could get signals to be used by a relay module, which are essentially switches that activate different circuits, isolated from the main ESP32 circuit with different voltages and currents. The signal is sent by the ESP32 to a small electromagnet, and then it closes the circuit, sending current to the electromagnet. I got both electromagnets connected to the same relay as one is turned on, the other is turned off, and alternating. On the next video we can see how the data is downloaded from the API, then converted to the latency of turning on and off, by printing the ON and OFF on the serial monitor. The first video shows a city with Air Quality Index of 151 which is a bit dangerous, an the second one shows a AQI of 55 which is moderate.
Parts list
The list of parts and cost is broken down here:- Capelo IKEA $299MXN (Supplier's website)
- Ferrofluid (this one was free as the one I bought didn't react as much, and it was done with steel shavings i got from the workshop and mineral oil)
- White vinegar $50MXN (Supplier's website)
- Free plywood for the base
- Primer and paint $299MXN from the Home Depot (Supplier's Website=)
- Old airtight jar I found lying around $0MXN
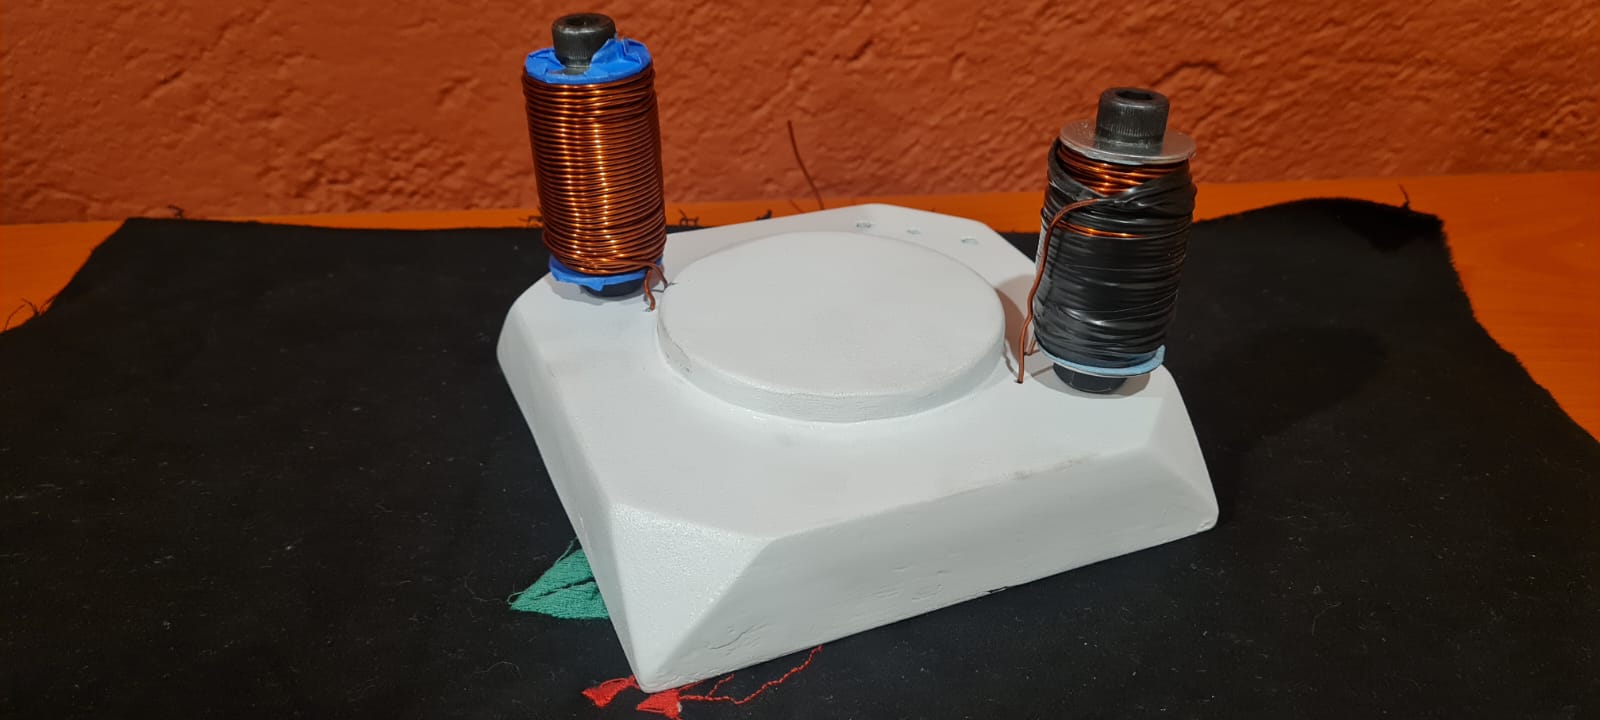
- Custom made electromagnets $200MXN (From a very nice local coil maker)
- ESP32 and the (19 times iterated) custom built board was provided by the university.
- 3 ultrabright white LEDs also provided by the university (Supplier's website)
- Relay module $35MXN from Mercado Libre (Supplier's website)
- 5V 10A power supply also provided from the university (Supplier's website)
- 1m of red and 1m of black wire for the connections for $115MXN from Home Depot (Supplier's website)
And the end result was this marvelous project.