6. 3D Scanning and printing
This week I worked on defining my final project idea and started to getting used to the documentation process.
3D Printing
3D printing is a process of creating physical objects from digital designs using a machine called a 3D printer. The 3D printer builds the object layer by layer, following the instructions of the digital design.
Large industrial 3D printers, using the same additive approach can print with a broad range of metals and alloys, even titanium, however some of the more common materials are:
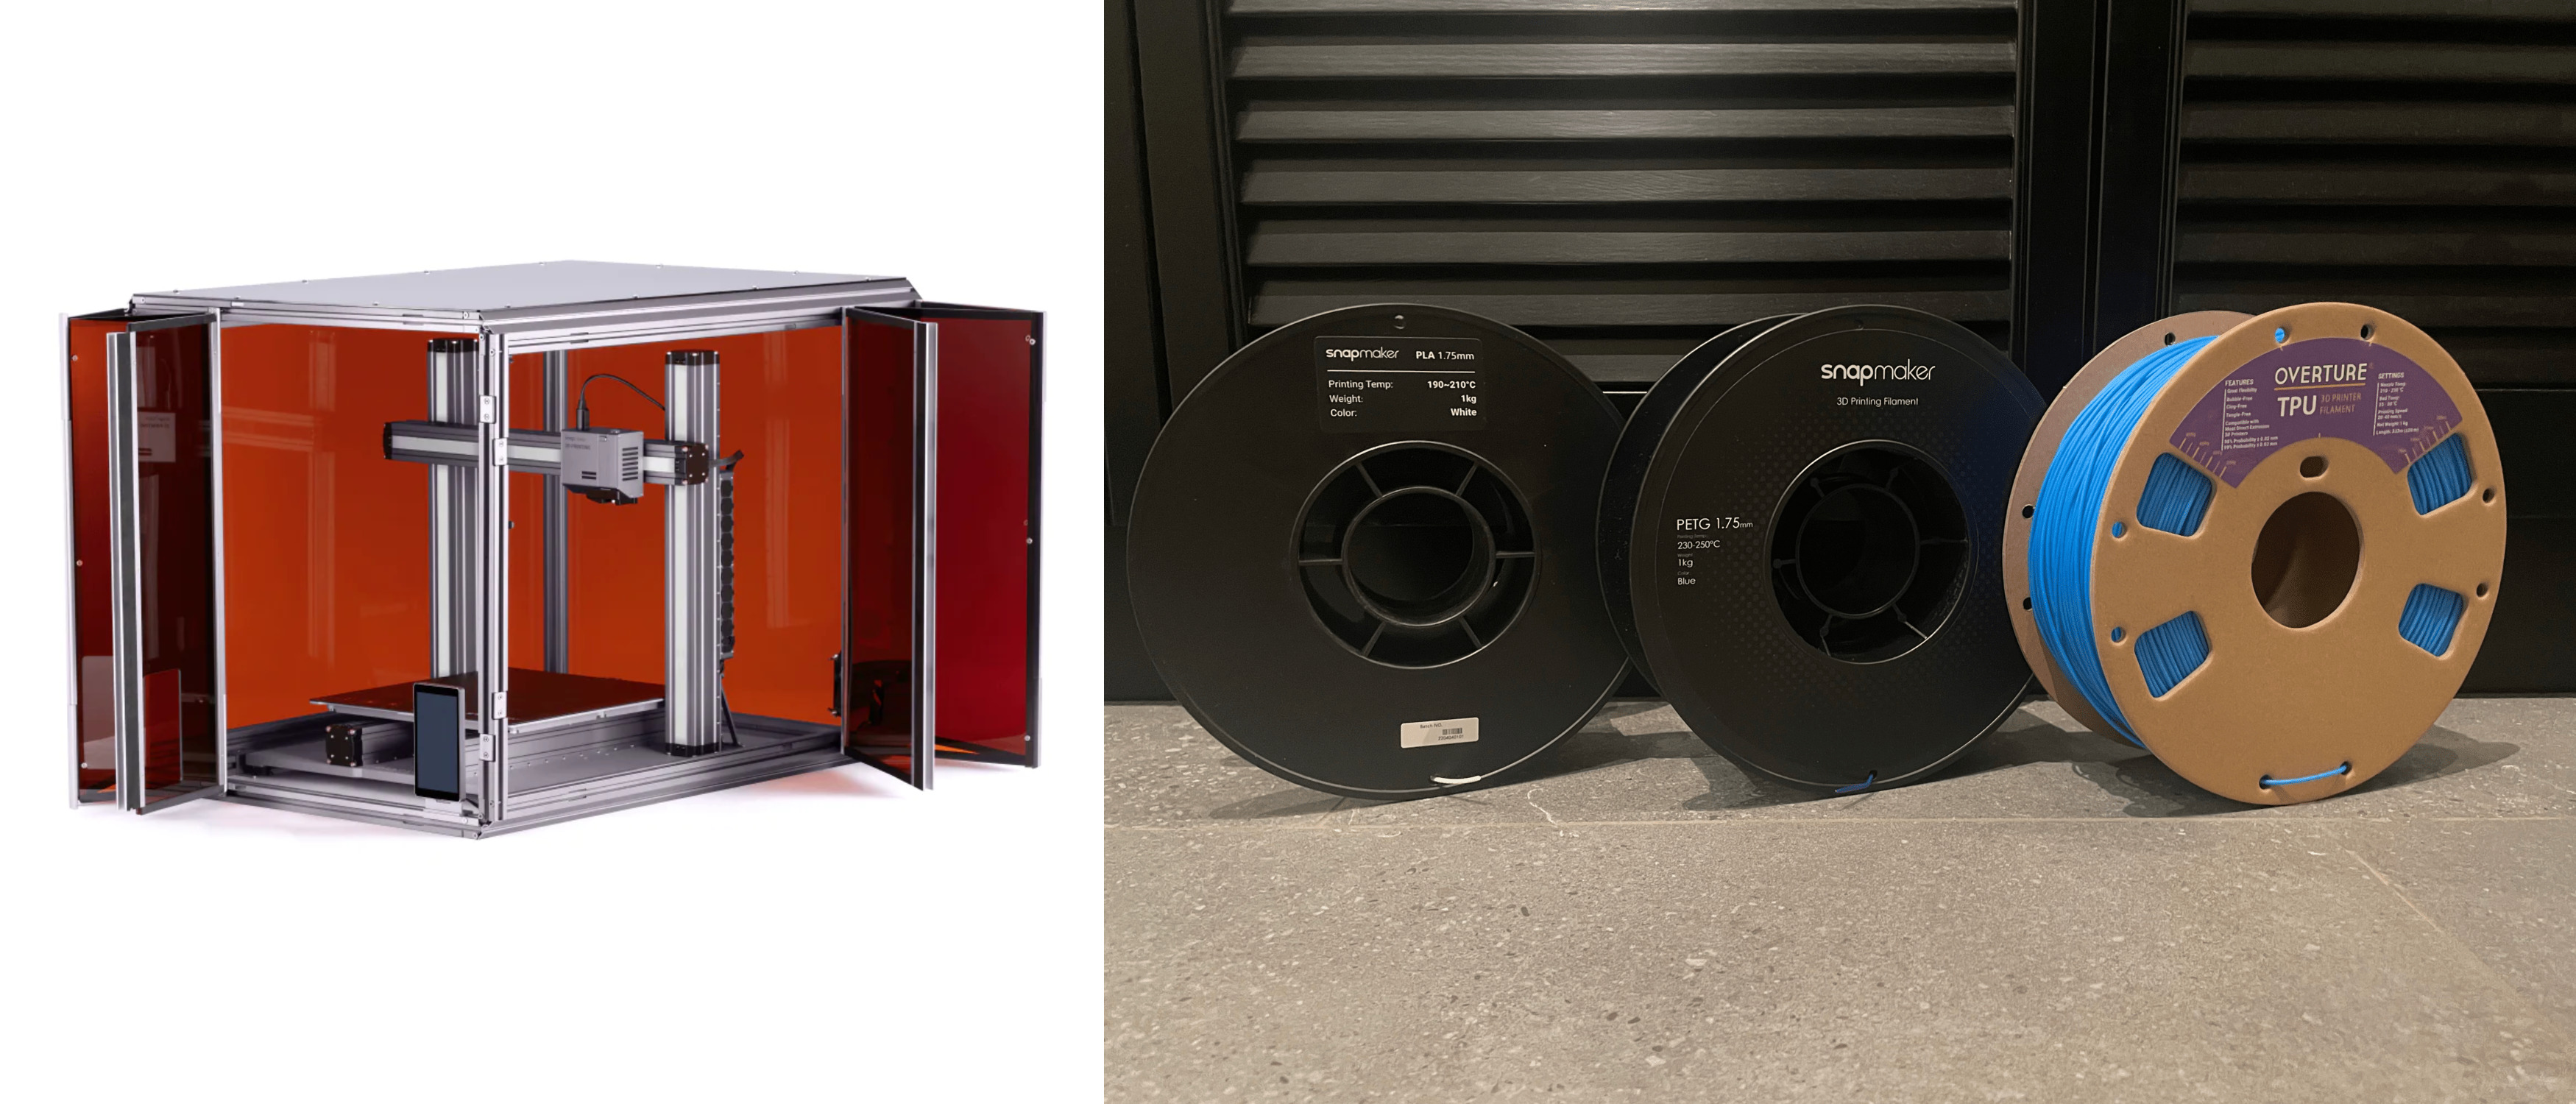
- PLA (Polylactic Acid): PLA is one of the most popular materials used for 3D printing. It’s a biodegradable and renewable material that’s easy to work with and produces high-quality prints. It’s also available in a wide range of colors.
- ABS (Acrylonitrile Butadiene Styrene): ABS is a strong, durable plastic that’s commonly used for LEGO bricks and other household items. It can be difficult to work with due to its tendency to warp during printing.
- PETG (Polyethylene Terephthalate Glycol): PETG is a durable, flexible material that’s easy to print and produces high-quality prints. It’s commonly used for food containers and water bottles.
- TPU (Thermoplastic Polyurethane): TPU is a flexible, rubber-like material that’s commonly used for phone cases and other protective items. It can be difficult to print due to its tendency to stretch and deform during printing. Ive personally found TPU difficult to print with as it does have a habit of absorbing any mositure in the air, leading it to be be very sticky like at the extruder hot end. I’m careful when storing it ans also use a filament dryer before use.
From Design To Print
- Prepare your 3D model in STL format. You can create your own model using 3D modeling software or download a pre-made model from an online repository ie Thingiverse - Click to View.
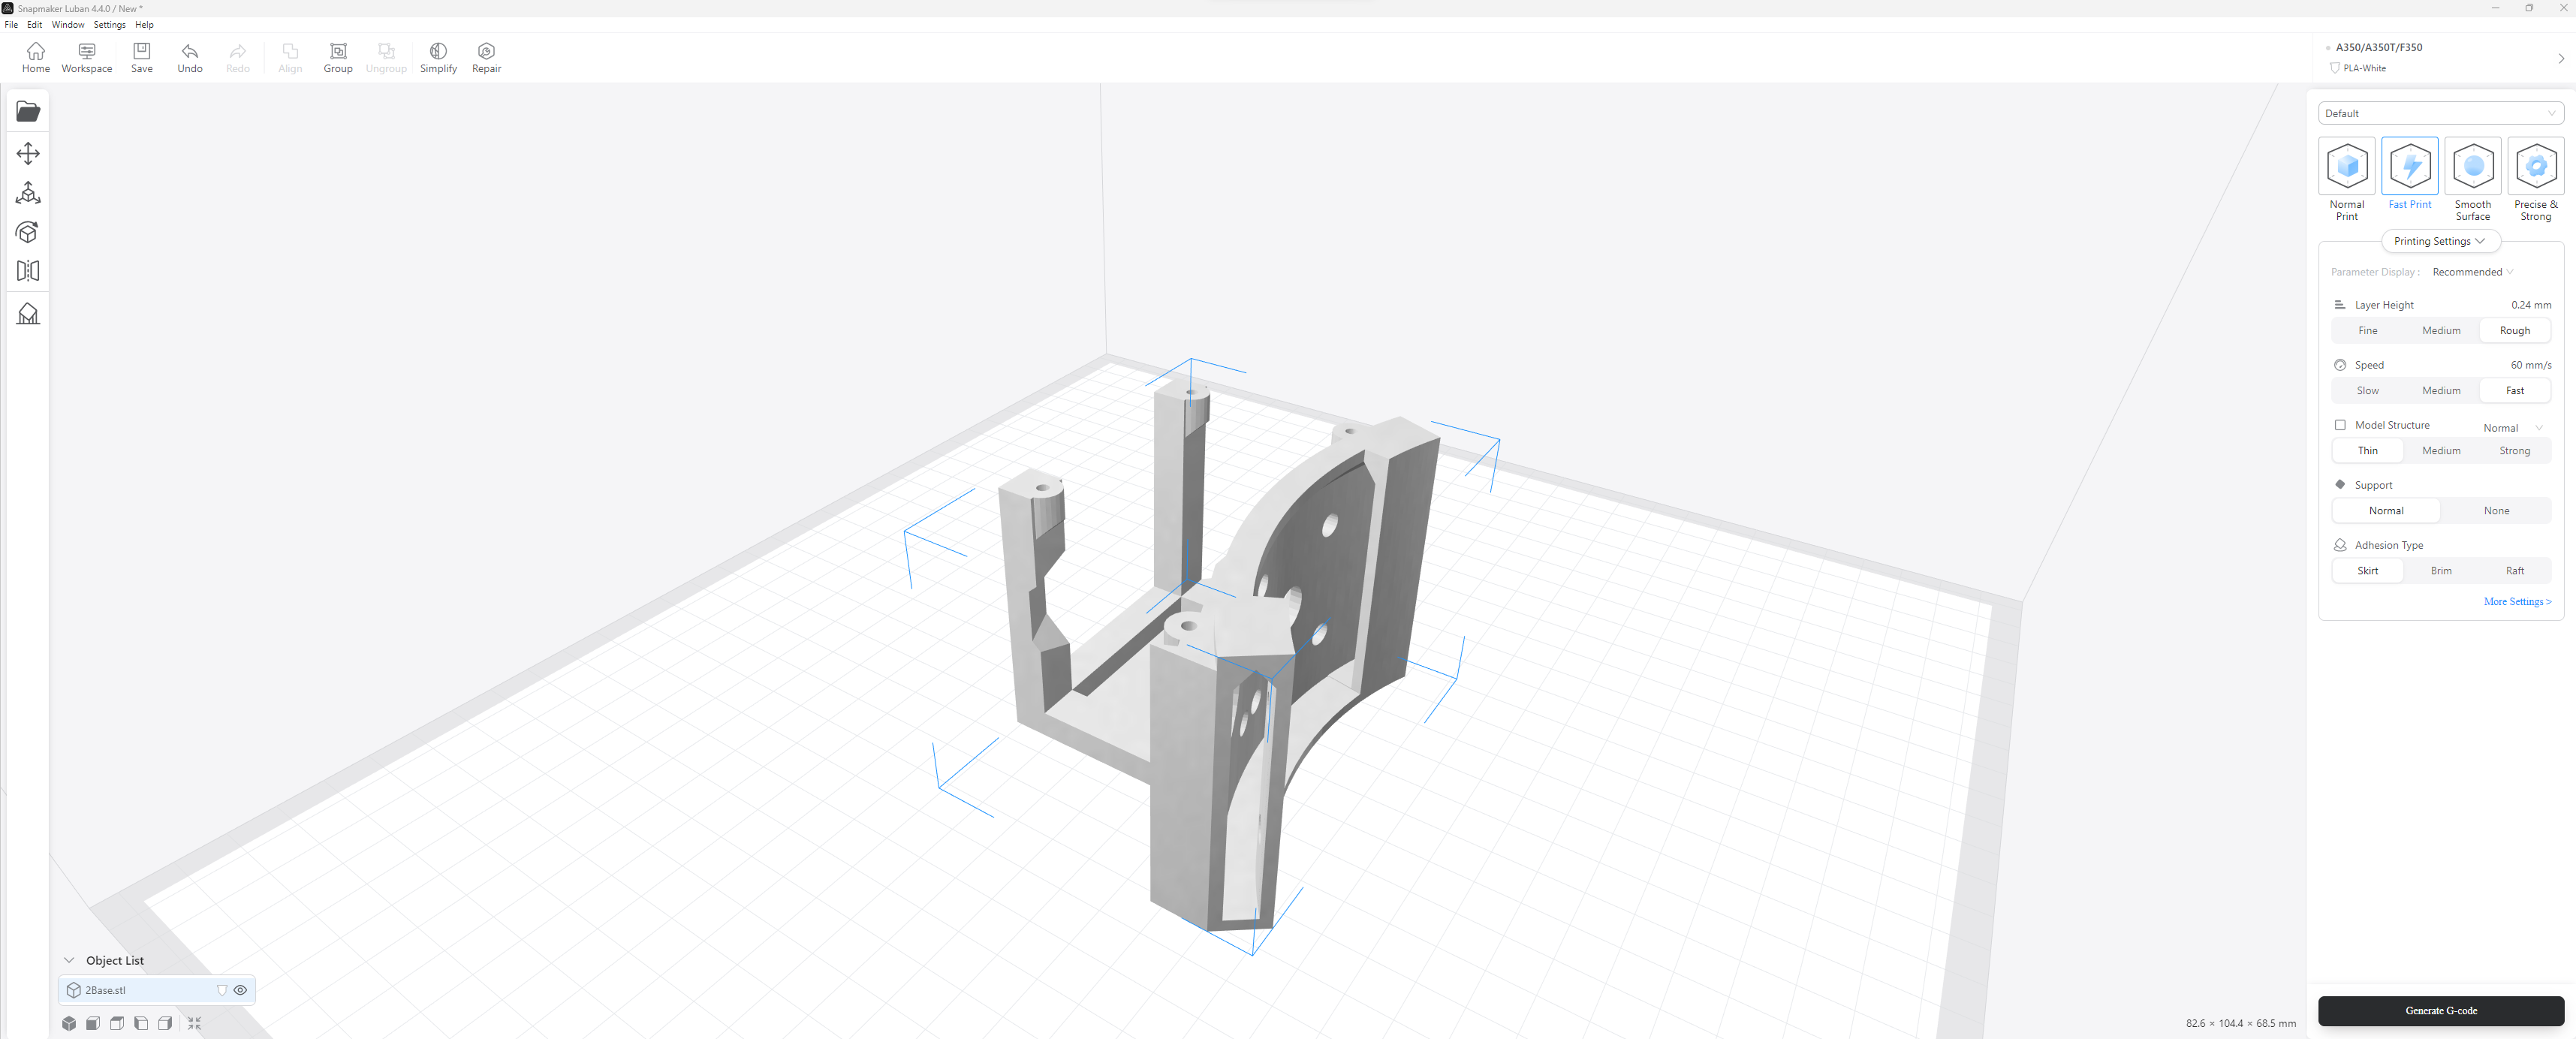
- Open your slicing software which in my case is Luban shown above. This is the software that will convert my STL file into G-code that the 3D printer can read. There are many free and paid slicing software options available, including Cura, Slic3r, and Simplify3D. I choose to use Luban as its a plug and play type option that came with my Snapmaker 3.0T 3D printer.
- Load STL file into the slicing software. You can do this by either dragging and dropping the file into the software or navigating to the file location through the software’s file explorer.
- Choose your print settings. In the slicing software, you can adjust various settings such as layer height, print speed, infill percentage, and more. These settings will affect the final quality and speed of your print.
- Preview your print. Most slicing software will give you a preview of your print in the software’s interface. This can help you identify potential issues with your model and make any necessary adjustments before printing. It will also indicate the predicted print time, this is very helpful if you happen to be printing on a shared 3D printer in the lab.
- Once you’re satisfied with your print settings, you can slice your model. This process will convert your STL file into G-code that the 3D printer can understand.
- After slicing, the software will give you the option to save your G-code file to your computer. Save it in a location that you can easily access when you’re readyto print.
- Load your G-code file onto the 3D printer. This process will vary depending on the specific 3D printer you’re using. Some printers will allow you to load the G-code file onto an SD card, while others will require you to connect your computer to the printer through a USB cable or Wifi connection.
Preparing 3D Printer For Print
- Power on the machine and ensure that it is properly calibrated. This includes ensuring that the print bed is level and that the nozzle is at the correct height for printing. With it being time intensive to abort and restart a print, I prefer to manually calibrate the z-axis level manually rather than use the auto calibrate function.
- Load your chosen filament into the printer. My Snapmaker 3D printer supports a variety of filaments such as PLA, ABS, TPU etc.
- If necessary, recheck the printing settings such as temperature, speed, and layer height to ensure the best print quality. Most filaments come listed with temperature setting ranges for an optimum print, and there can be large variances in these temperature settings, so its best to double check.
- Start the print job and monitor it closely. If any issues arise, such as filament jams or print bed adhesion problems, address them promptly to ensure a successful print.
Print Quality vs Print Time
- The layer height refers to the thickness of each layer of material that is printed. A smaller layer height will generally produce a higher-quality print, but will also increase the print time.
- The speed at which the printer moves can affect both the print quality and the print time. Slower print speeds will generally produce higher quality prints, but will take longer to complete.
- The infill density refers to the amount of material used to fill in the interior of the print. A higher infill density will generally produce a stronger, higher-quality print, but will also increase the print time.
- Different materials may require different settings to produce high-quality prints. Some materials may require a slower print speed or a higher temperature to achieve optimal results, which can increase print time.
- Other printer settings, such as the temperature of the print bed and the nozzle, can also affect print quality and print time.
Support Structures & Overhang
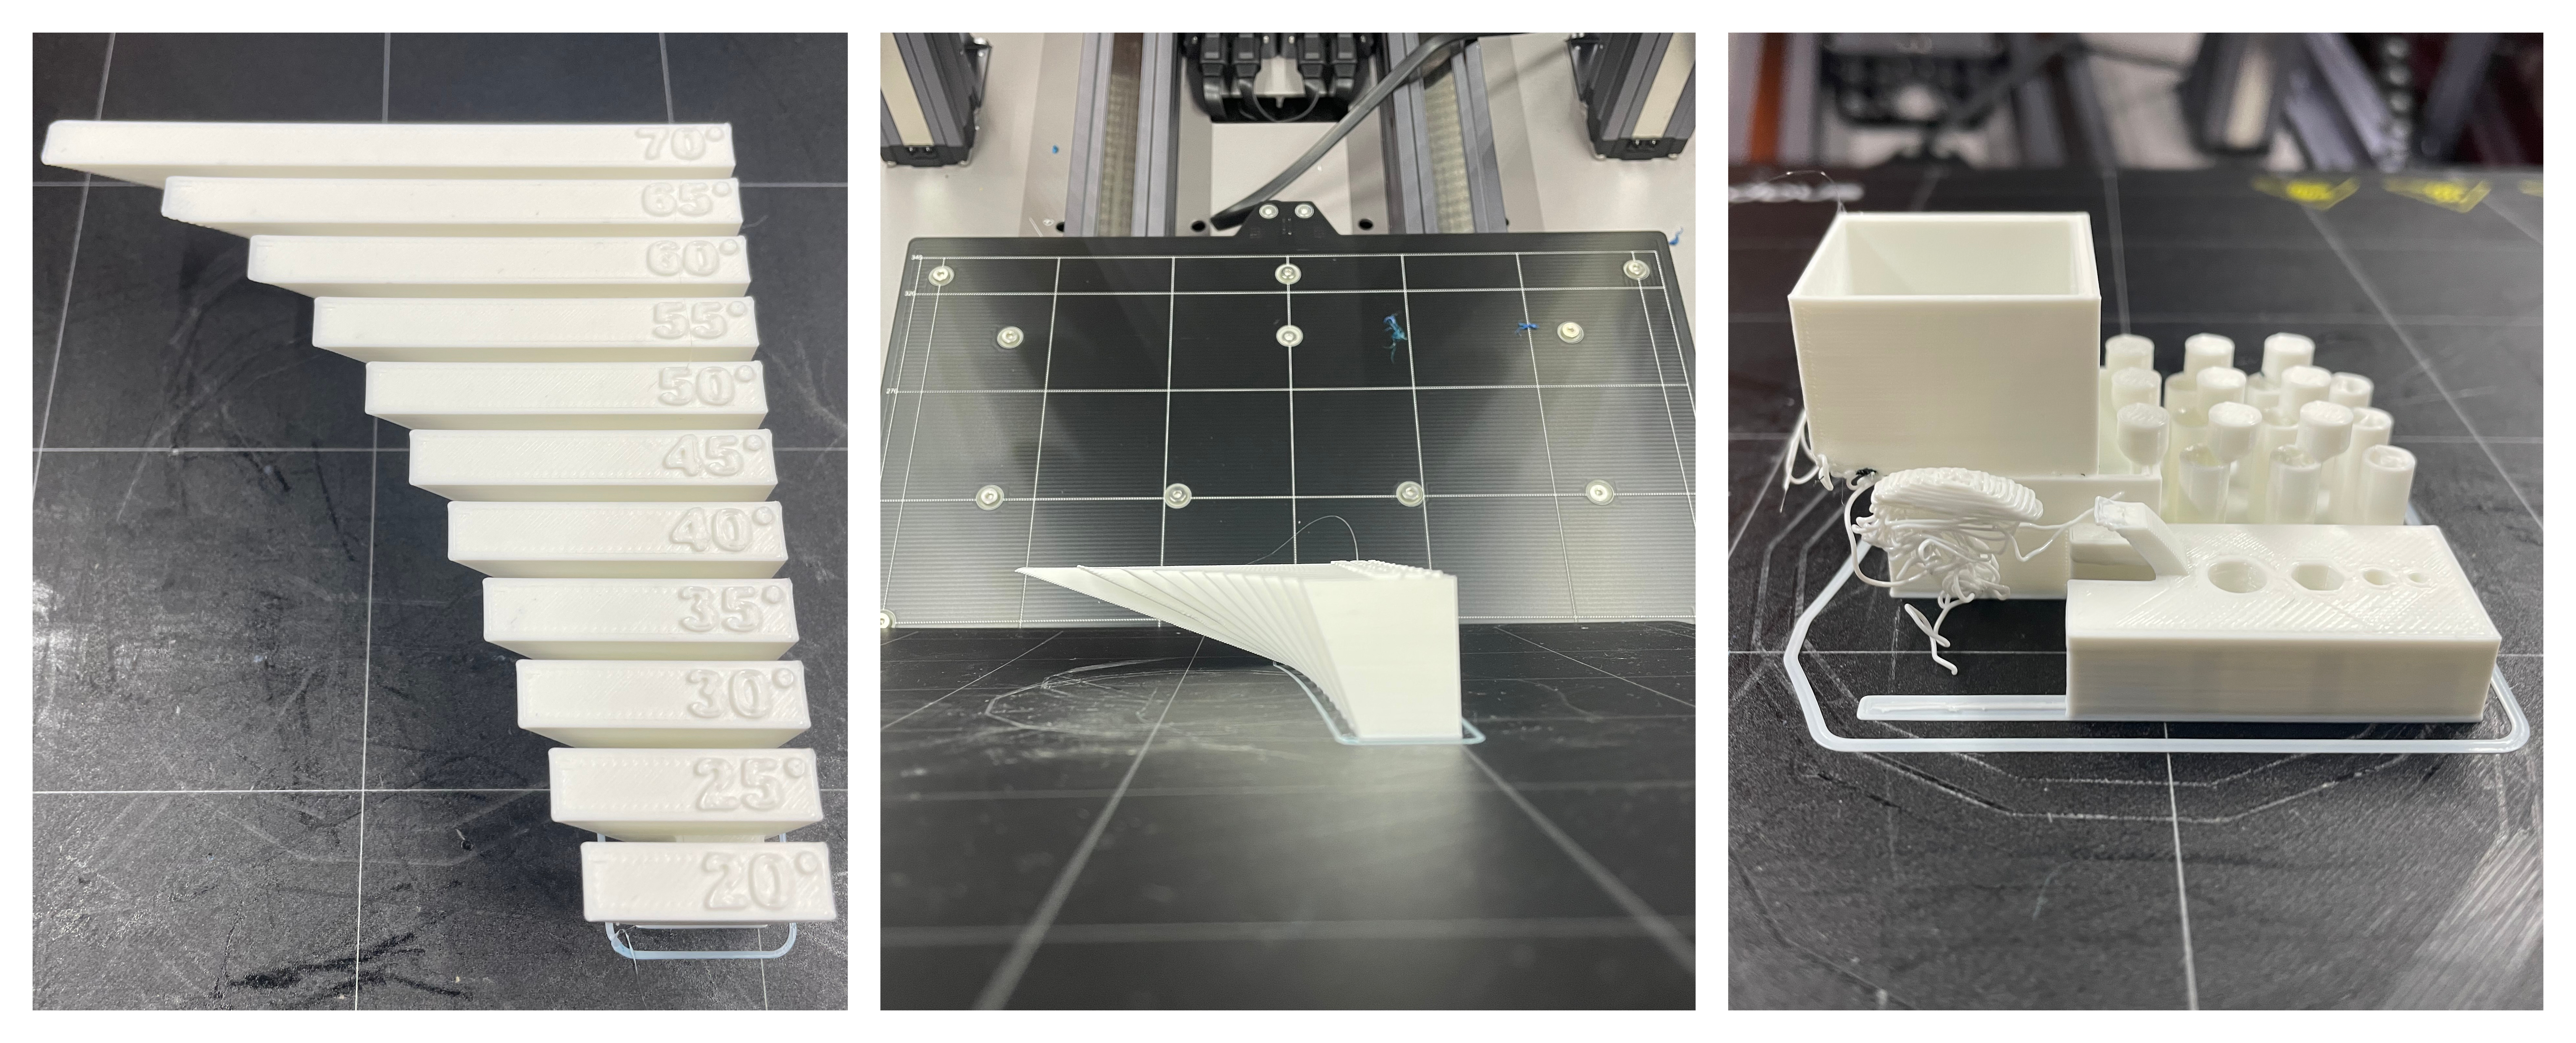
The overhang capabilities of a 3D printer refer to its ability to print objects that have horizontal or angled features that extend outwards without the need for support structures. In general, the overhang capabilities of a 3D printer depend on several factors, including the printer’s design, the print settings used, and the material being used.
- If your printer struggles to print overhangs without support structures, you may need to include them in your design. This will help to prevent the printed object from collapsing or drooping as it is being printed.
- The printing speed can affect the quality of the overhangs. Slower printing speeds can help to improve the overhangs as they allow the layers to cool more gradually and minimize the drooping of the material.
- Adjust the temperature: The temperature of the printer can also affect the overhangs. Lower temperatures are usually recommended for better overhangs, as they allow the material to cool more quickly.
- Use a cooling fan: Most 3D printers have a built-in fan that can be used to cool the printed object as it is being printed. Using a cooling fan can help to improve the overhangs by minimizing drooping and improving the overall quality of the print.
The image above on the right was a print design used to test the capabilities of your 3D printer. I choose a fast print option, resulting in what should be an overhang / bridge section of the print to fail, resembling string cheese. This is a reminder that not all prints are successful, so understanding your 3D printers’ capabilities can help prevent wasting hours on a print before a fail point.
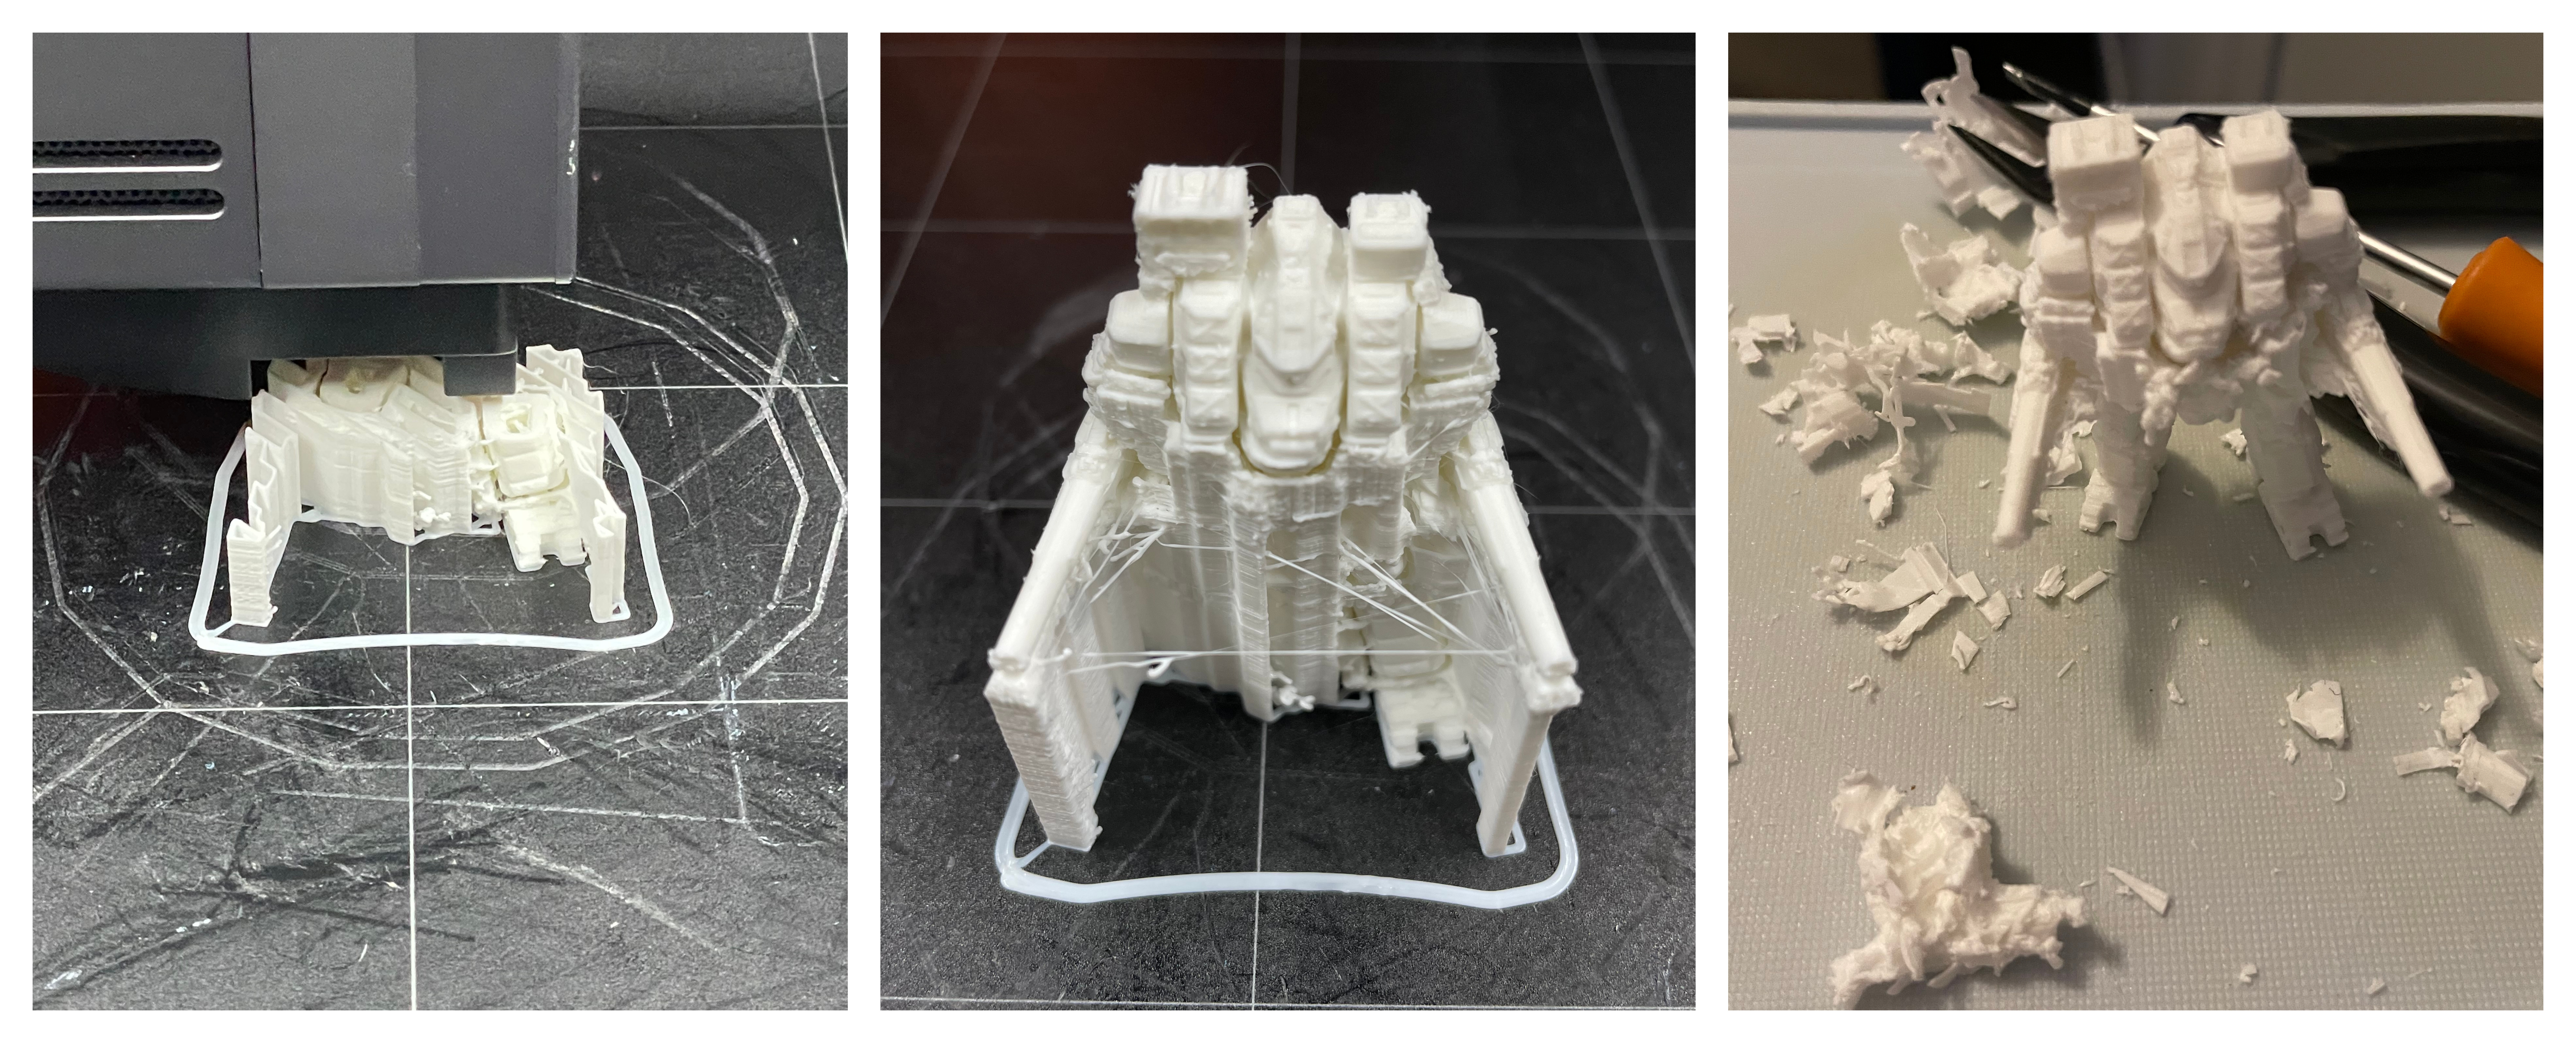
As seen above, the image on the left shows the build-up of the print supports to enable the printing of the miniature weapons on an upper level, with the centre image showing the final print with print supports ready for removal.
I have learnt the importance of correct print supports settings / volume, especially with small, detailed prints. Although many print supports can be easily snapped off, the image on the right shows a very difficult example I’ve had removing them, having to work very hard not to destroy the print in the process.
My First Kool Baby Testing Prototype
Although not one of my greatest designs, with it looking very crude, I thought I’d highlight my first Kool Baby (an idea for my final project) 3D print. I wanted to quickly design and print out a testing unit to see if my concept of developing a personal cooling device was even worth exploring further. Secondly, I also choose to highlight this print as with its multiple parts both printed and sourced needing to fit together, it’s the one single print in which I felt I’ve learnt the absolute most from (through mistakes), both from a design and printing standpoint.
For this print I was using Aalto Fablab’s Ultimaker 2+ Connect 3D printer, and Ultimaker Cura software for the slicing.
Ultimaker 2+ Connect - Click to View & Ultimaker Cura - Click to View
The image above is showing one of the handful false starts I had with my print, with the base of my print not adhering to the print bed. Some of the main reasons for this result can be:
- Incorrect bed leveling: If the printer’s bed is not level, then the nozzle may be too far from the bed or too close to it, leading to adhesion issues.
- Sometimes, the print bed surface may not provide enough adhesion for the material being printed. In such cases, it’s advisable to use a different print bed surface or apply an adhesive, such as glue or hairspray, to the surface.
- The surface of the print bed may have scratches, dents, or other imperfections that can lead to poor adhesion. It’s important to keep the print bed clean and in good condition.
- The temperature of the print bed is crucial for proper adhesion. If the temperature is too low, the material may not stick to the bed. Conversely, if the temperature is too high, the material may melt too much and lose its shape.
- If the print speed is too fast, the material may not have enough time to adhere properly to the print bed.
My first thoughts were that I had not cleaned the printer bed before printing, so after doing so I restarted the print but with it ending in the same result. I had got to the lab in the evening with the plan of successfully printing out one segment of my design, however in my rush I had increased the print speed to 140%. After adjusting this, I realised this was my initial mistake and the reason for the print failures as seen above.
I also realised that unless I have a very good feel for a 3D printers capabilities, and the blend of the right filament, printer bed temperature and brim / raft, its best to play it safe rather than rush the print job. That evening I had wasted hours with print restarts.
The images above show the components after successful prints, showing the print supports intact and ready for removal. The two large pieces formed the body which will contain the metallic straws and freezer gel for testing, printed in two pieces due to size restrictions on the 3D printer.
The next lesson learnt is that correct offsets are crucial in a 3D printing design, offsets being the amount of space between different parts of a 3D model. As shown in the images above, in my case the offsets in my design were not large enough, so it was very hard to assembly the testing unit, with my “clip on/off” fan component piece fitting so tight, I was lucky there were woodworking tools on site just to get the thing off again.
Once again, although this was just a simple design for some quick testing, a little extra care going into the design could have saved a lot more time in the long run.
As shown in the centre image above, when assembled along with the metallic straws inserted (extending beyond the testing units body as I did not want to cut the ends off) and filled with freezer pack gel, you can see where the air flows through the centre of the unit from one end to another.
After the unit was placed in the freezer overnight, I attached a small fan to test if the unit did in fact produce a cool breeze of air, which it did.
3D Scanning
Artec Leo 3D Handheld Scanner
Artec Leo is a professional-grade handheld 3D scanner designed for capturing 3D models of objects and environments. It is a portable, easy-to-use, and high-precision device that can be used for a variety of applications, such as industrial design, quality control, reverse engineering, and 3D printing.
The Artec Leo scanner uses structured light technology to capture high-resolution 3D scans with accuracy of up to 0.1mm. It can scan a wide range of objects, from small parts to large objects and even entire rooms. The scanner is equipped with a built-in screen that displays the captured 3D data in real-time, which allows users to see and adjust the scanning process as they go.
Artec Leo 3D In Use
-
Turn on the Artec Leo scanner by pressing the power button on the side of the device. The scanner will start up and display a welcome screen.
-
Create a new project by selecting “New project” on the home screen. Enter a name for the project and choose the desired scan settings (resolution, texture quality, etc.). You can also choose to scan in either handheld mode or on a tripod, depending on your needs.
-
Calibrate the scanner by following the on-screen instructions. This involves placing the scanner on a flat surface and scanning a calibration board. The scanner will automatically calibrate itself based on the data collected.
-
We started by pointing the scanner at the object we wanted to scan, in our case a wooden chair. The scanner displayed the scan data in real-time on the built-in screen, allowing us to see the progress of the scan.
-
We moved the scanner around the wooden chair, capturing data from all angles; as seen in the images above, we placed the wooden chair in multiple positions to ensure this. We also had the option to adjust the scan settings and view the data in different modes (e.g. wireframe, shaded, etc.).
-
Once our scanning was complete we uploaded the data file to the lab computer which was running Artec Studio, which is designed to work with Artec’s range of 3D scanners. The software provides a range of tools for processing 3D scan data, including automatic and manual alignment, mesh editing, texture mapping, and measurement tools. It also includes advanced features such as real-time fusion of multiple scans and automatic target recognition. Click to View
-
After we imported the scanned data, we needed to align it to ensure that all the individual scans of the wooden chair were correctly positioned relative to each other, which as seen in the middle image above, this was not initially the case. Artec Studio 15 provides both automatic and manual alignment tools.
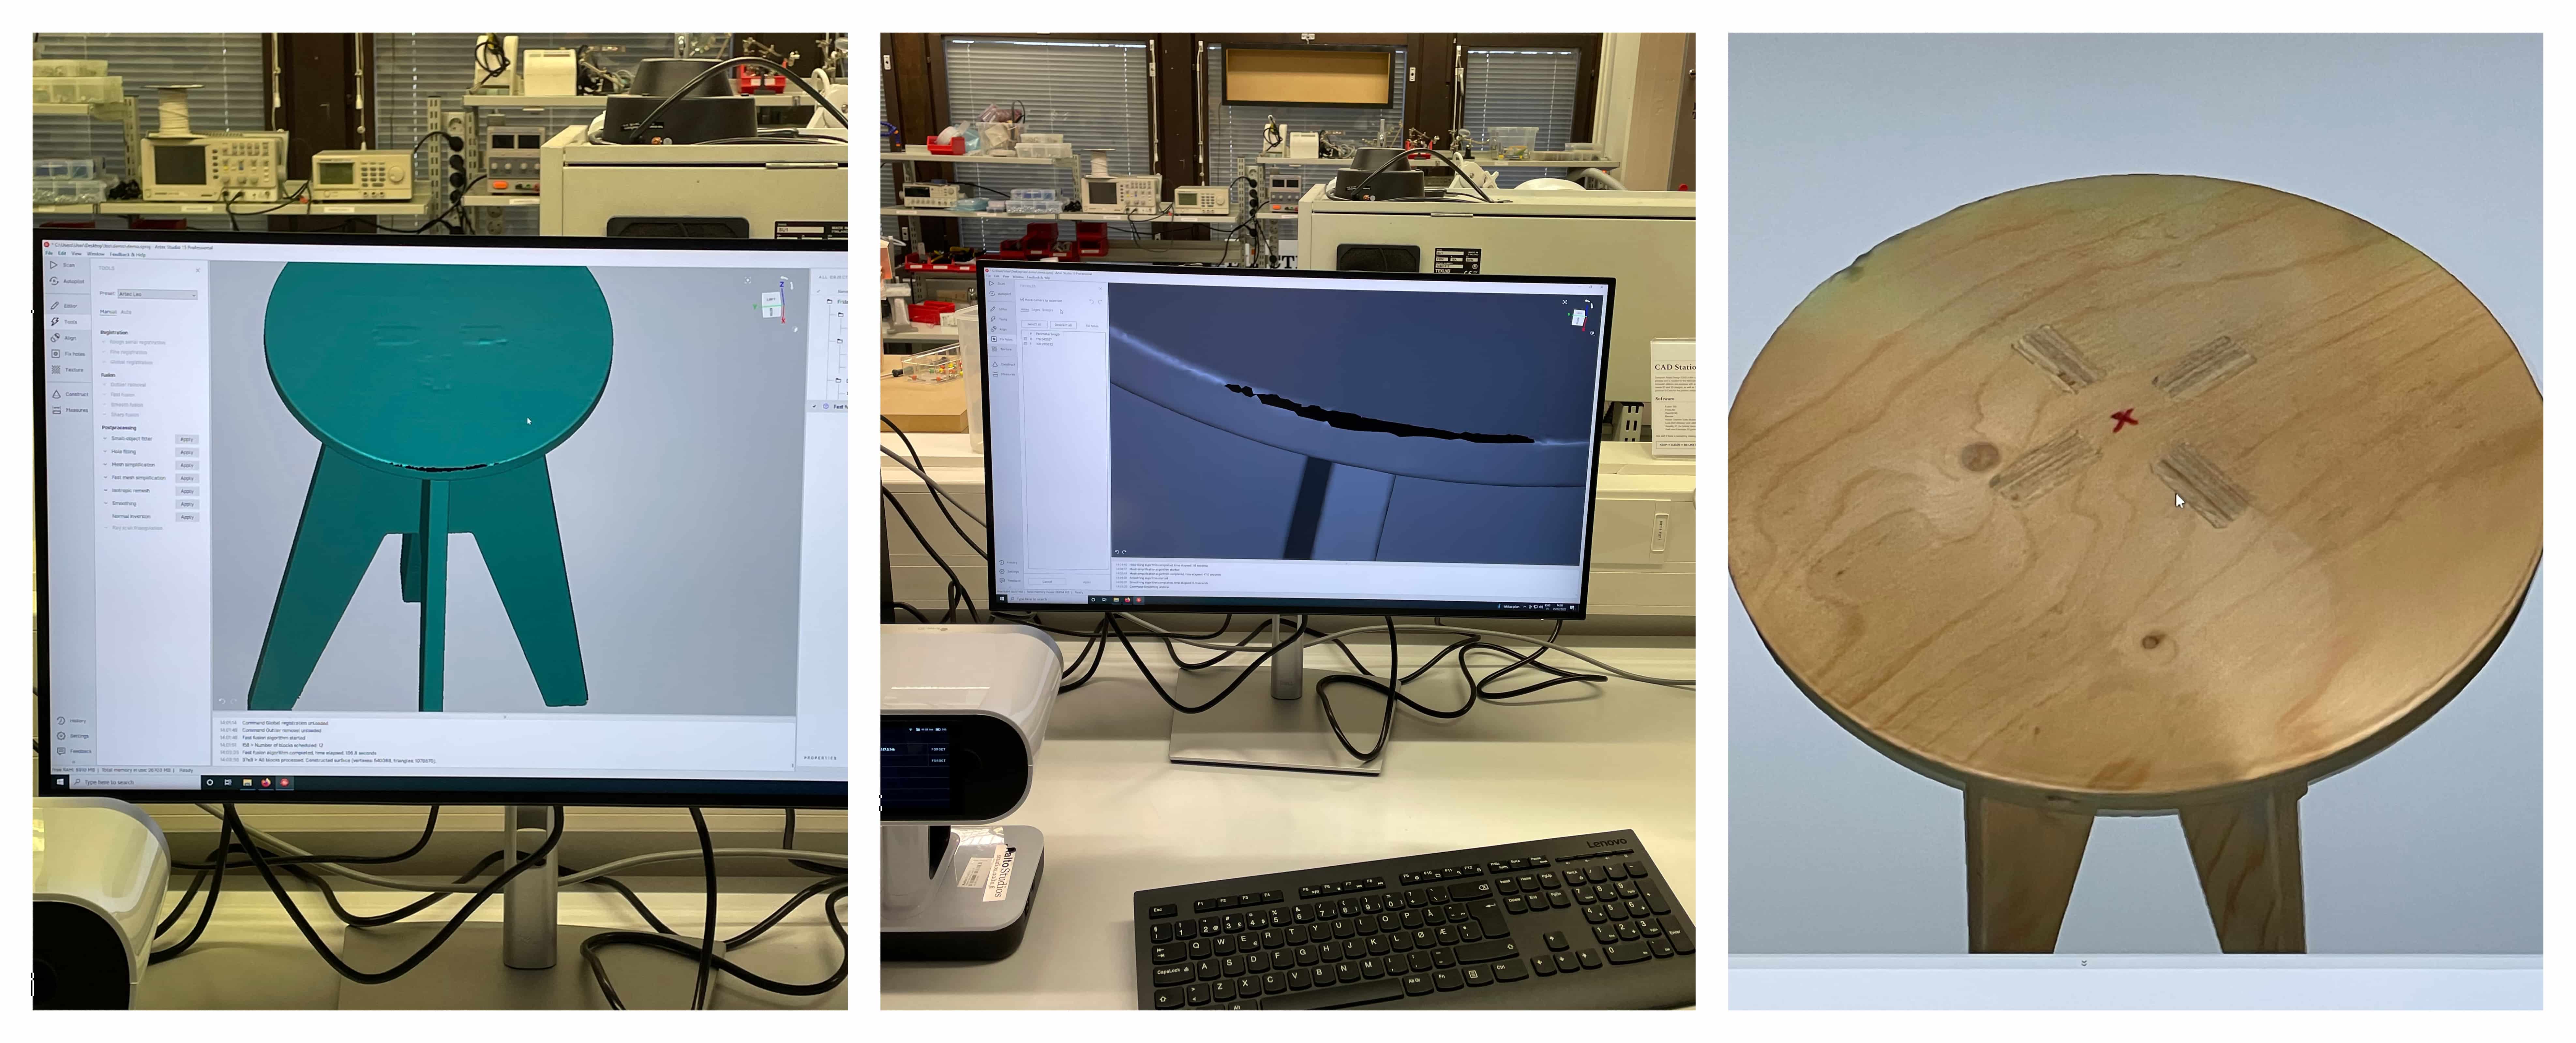
Once the 3D model is aligned, you can use Artec Studio’s editing tools to refine the model. This may involve removing unwanted data and as evident in the first image above, the need sometimes to fill in holes and smooth the mesh; the area of concern is the black on green section along the top edge of the chair, further highlighted in the centre image (taken at the start of the filling in process).
Directions - In the “Fill Holes” window that appears, select the hole size you want to fill in by adjusting the “Maximum Hole Size” slider, the slider ranges from 1mm to 50mm. Click on the “Fill Holes” button to begin the hole-filling process. This may take some time depending on the complexity of the model and the size of the holes. Click on the “Fill Holes” button to begin the hole-filling process.
We were lucky that our Artec Leo 3D scanner supports texture capture, and you can see its results in the righthand image above, in that it has produced a highly refined 3D model capturing even the grain in the wooden chair, a great result.
Meshroom
Meshroom is a free and open-source 3D reconstruction software that allows you to create 3D models from a set of photographs. It uses computer vision algorithms to automatically process the photos and reconstruct a 3D model of the object or scene.
Meshroom uses a technique called photogrammetry, which involves taking multiple photographs of an object or scene from different angles and using those photos to reconstruct a 3D model. Meshroom can process photos taken with any camera, including smartphones, DSLRs, and drones.
The software is based on a pipeline of various steps, including feature detection, image matching, camera calibration, and dense 3D reconstruction. The output of the software is a 3D model in various formats, such as OBJ, PLY, and FBX.
Meshroom is widely used in industries such as architecture, film, and video game production, as well as in scientific research and education. It is available for Windows, Linux, and macOS platforms, and can be downloaded for free from the official website.