8. Embedded programming
- [ ] Linked to the group assignment page
- [ ] Documented what you learned from reading a microcontroller datasheet.
- [ ] Programmed your board
- [ ] Described the programming process/es you used
- [ ] Included your source code
- [ ] Included a short ‘hero video’ of your board
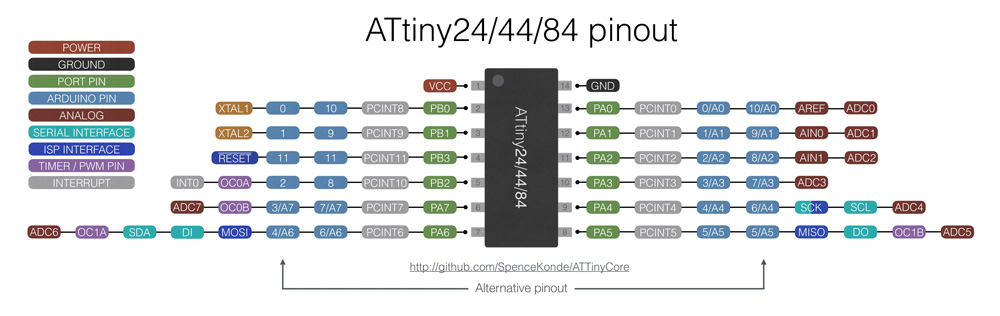
Datasheet

AT tiny 44 Pin Descriptions
- VCC: Supply voltage.
- GND: Ground.
- Port B (PB3:PB0): The Port B output buffers have symmetrical drive characteristics with both high sink and source capability except PB3 which has the - RESET capability.
- RESET: Reset input. Tells AVR to enter programming mode. The reset pin can also be used as a (weak) I/O pin.
- Port A (PA7:PA0): Port A is a 8-bit bi-directional I/O port with internal pull-up resistors (selected for each bit). Port A has alternate functions as analog inputs for the ADC, analog comparator, timer/counter, SPI and pin change interrupt as described in “Alternate Port Functions”
- SCK - Serial Clock
- MISO - Master-in, Slave-output
- MOSI - Master-out, Slave-in
Hello Board
- AVR, avr-gcc and avrdude
- AVR is a single chip microcontroller which is designed based on Harvard architecture.
-
AVR microcontrollers is running on C code. It needs to be compiled with avr-gcc. And it also needs avrdude to communicate.
-
make and Makefile
-
use make command on Mac to configure and compile software.
-
working on making the hello board
- save the source code and change the file name of make file name into “Makefile”
-
When I was trying to make the hello board in terminal, it returned error 1, which is strange. So I use arduino IDE to program this board.


-
Test hello board set up the board type and processor to ATtiny44. clock: External 20MHz Programmer:USBtinyISP Then click the burn bootloader

- After the window return “Done” burning bootloader, try to test with blink sample code presaved in arduino.
- Check the arduino pin number which should be 3 or 7.

Problem
Although the hello board works, there still remain unsolved problems.
- The function doesn’t work normally. For some time it does blink but some times it doesn’t.
- The hello board Led only flashed for a short period of time.
Trouble-Shooting
Savario shows us how to check the board with electric meter. So I start to learn how to test and find the weak point.
After check the board many times I find that the led works if I connect the RES with a spear part at my hand.
This phenomenon should not happen because the led should be completely detached from any trace.
And this is strange because the RES is connect to the pin #4 which should not receive power.
Further Action:
I think the problem is still related to bad soldering. So I will resolder each point to reconnect each component.
Programming
I am still trying to fix the hello board, at the mean time I tried to code some program for further testing.
// Morse code in Flash: my initial name C
int buttonPin = 3;
int ledPin = 7 ;
int buttonState = 0;

void setup() {
  pinMode(ledPin, OUTPUT);
  pinMode(buttonPin, INPUT);
}

void loop() {
  buttonState = digitalRead(buttonPin);

  if (buttonState == HIGH){

     digitalWrite(ledPin, HIGH);
    delay(500);

    digitalWrite(ledPin, low);
    delay(100);

    digitalWrite(ledPin, HIGH);
    delay(100);

    digitalWrite(ledPin, low);
    delay(100);

    digitalWrite(ledPin, HIGH);
    delay(500);

    digitalWrite(ledPin, low);
    delay(100);

    digitalWrite(ledPin, HIGH);
    delay(100);

    digitalWrite(ledPin, low);
    delay(100);
    // theses stands for letter "C"

  }

  else{
        digitalWrite(ledPin, LOW);

  }
}
Reference file:

Group assignment:
Compare the performance and development workflows for different microcontroller families