Group
1. Review the safety data sheets for each of your molding and casting materials,
then make and compare test casts with each of them
Individual
1. Design a mold around the stock and tooling that you'll be using,
mill it (rough cut + (at least) three-axis finish cut),
and use it to cast parts
Plan for the week
This week we will be exploring molding and casting. This process is widely used in mass production. sand molding and casting is used to make engines and plastic injection molding is the process used currently to produce many plastic parts that we see on the market. Most of the product that we see ranging from the smartphone to rockets, there lies parts made from injection molding.
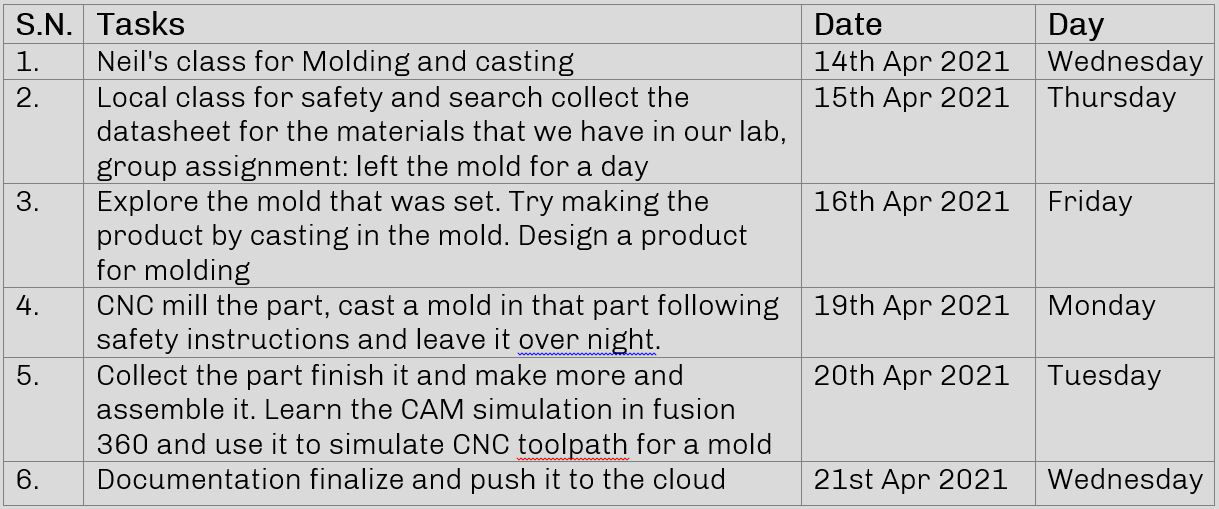
Molding
It is process of making mold which is the hollow or negative part of the product which we want to generate. Mold is a cavity where the casting material like plastics, metals, resins are poured or injected into it which will cure after certain time to form a product. Mold can be of different type ranging from plastic, silicons, sand, to metals as well. Metal molds are used in case of injection molding. In some process, direct mold is made from CNC and in some, a positive part is pressed or placed inside the mold to create the negative of the character shapes of the product to be made or copied. The bricks that we use in our house is also made using molds.
(source: www.instructables.com)
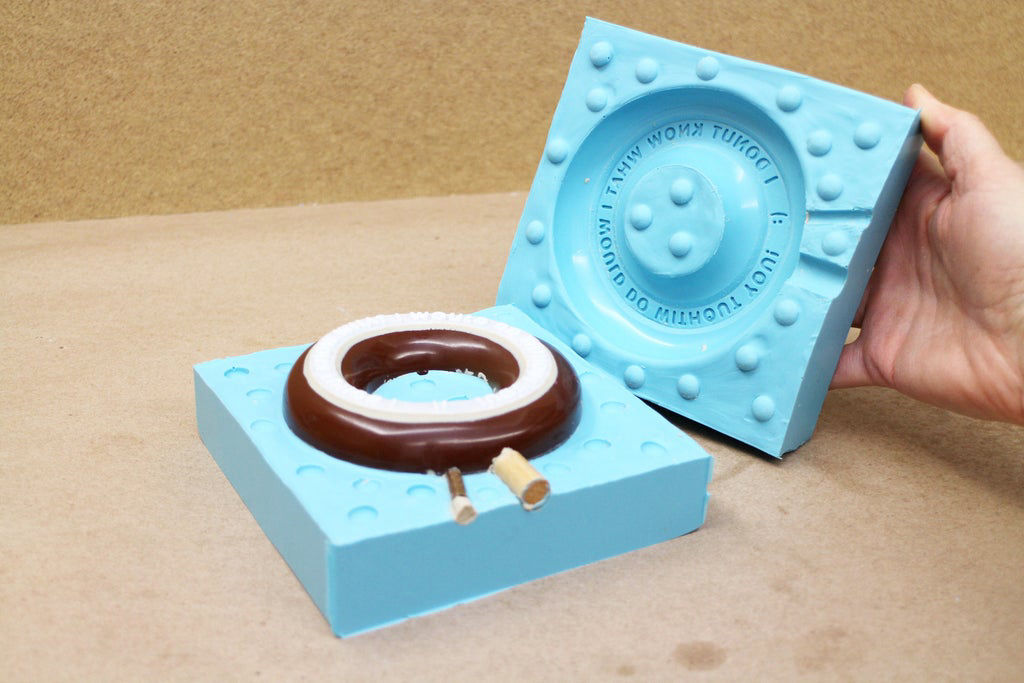
Injection molding
Injection molding is a manufacturing process for producing parts by injecting molten material into a mold. In simple terms, injection molding is a
manufacturing procedure for creating identical parts by injecting hot plastic material directly into a mold, by means of a reciprocating screw conveyor. The mold is called an injection mold because the material injected into the mold or die and is formed inside the machine during the manufacturing process. Generally, injection molding is done with several materials mainly composed of metals, glasses, fiberglass, and most commonly thermoplastics and thermoset plastics. Thermoplastic materials include polyurethane, polystyrene, poly-carbonate, polyester, and polyvinyl chloride. Injection molding is a way to manufacture and produce parts in large quantities
(source: www.pcbway.com)
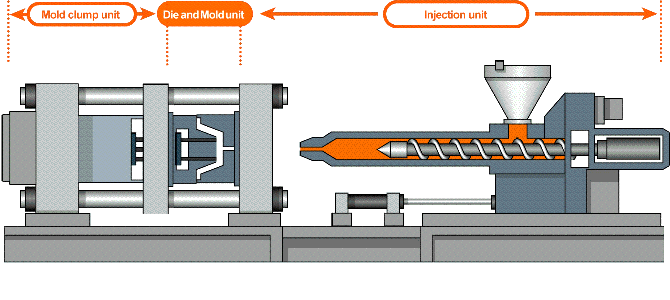
Casting
Casting is a manufacturing process in which a liquid material is usually poured into a mold, which contains a hollow cavity of the desired shape, and then allowed to solidify. The solidified part is also known as a casting, which is ejected or broken out of the mold to complete the process. Casting materials are usually metals or various time setting materials that cure after mixing two or more components together; examples are epoxy, concrete, plaster and clay. Casting is most often used for making complex shapes that would be otherwise difficult or uneconomical to make by other methods.
This process had been used since very old civilization to cast tools, weapons as well as silver coin in ancient times. In Nepal also, most of the sculptures are made by casting metal into the mold.
In our day to day use, The ice tray is an example of mold and water frozen to ice cube is a casting.
Time to make a mold
We had two main materials for the mold in our lab for the silcone mold. One was oomoo and another was aditya. Aditya was from the local vendor which only mentioned the ratio of the mixture but not the pot pot time and the setting time. so we decided to use both to know about them and then use it to make a mold.
Following were some details about what we got from the datasheet.
SortA-Clear 37
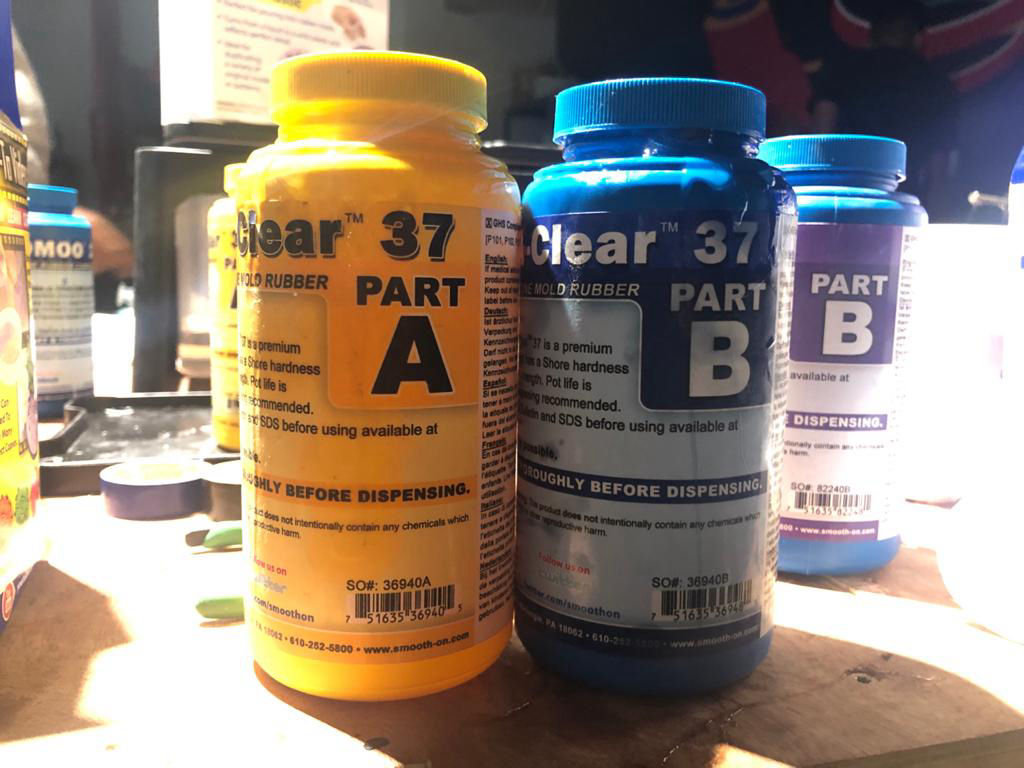
SORTA-Clear 37 is a premium water white translucent silicone rubbers (platinum catalyst) which cure at room temperature with negligible shrinkage. These rubbers feature high tensile and tear strength. They offer the convenience of a 1A:1B by volume mix ratio. They are ideal for making prototype, jewelry or other molds of any configuration where model visibility is
important (i.e. extracting a model from the mold via cutting). Materials such as urethane, epoxy or polyester resins can then be cast into these silicone without application of a release agent. Other materials such as wax and low melt metal alloys can also be cast into the mold made out from this rubber. These can be pigmented with SILC Pig™ silicone pigments. They are also FOOD SAFE and can be used for culinary applications including casting chocolate and other confections.
Casting Agent
Smooth Cast 305
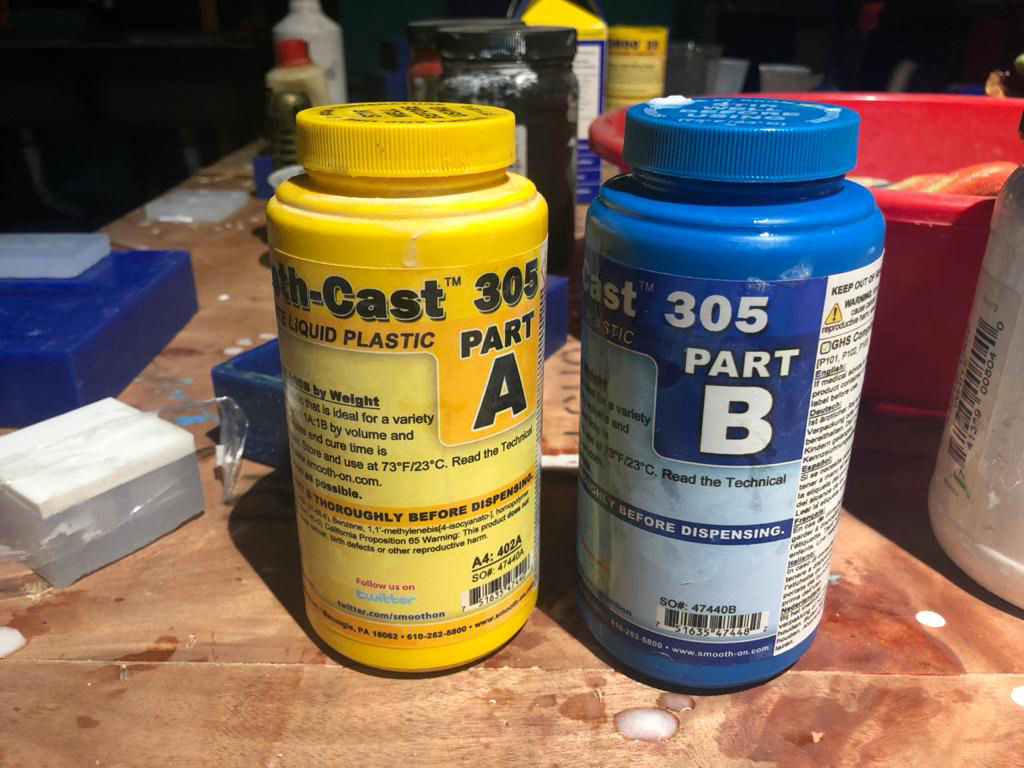
The Smooth-Cast 305 is an ultra-low viscosity casting resins that yield castings that are bright white and virtually bubble free. Vacuum degassing is not necessary. They offer the convenience of a 1A:1B by volume or 100A:90B by weight mix ratio. These resins readily accept fillers (such as URE-FIL™ 3 from Smooth-On) and can be colored with SO-Strong™, UVO™ or Ignite™ color tints.
Fully cured castings are tough, durable, machinable and paintable. They resist moisture and mild solvents. Applications includes reproducing small to medium size sculptures, making prototype models, special effect props and decorative jewelry.
Testing
Since the SortA-Clear 37 which we had been using was old, there were bubbles already in the rubber before mixing. First we decided to save time for understanding the process safety and the quality of the mold so used the old milled was for molding.
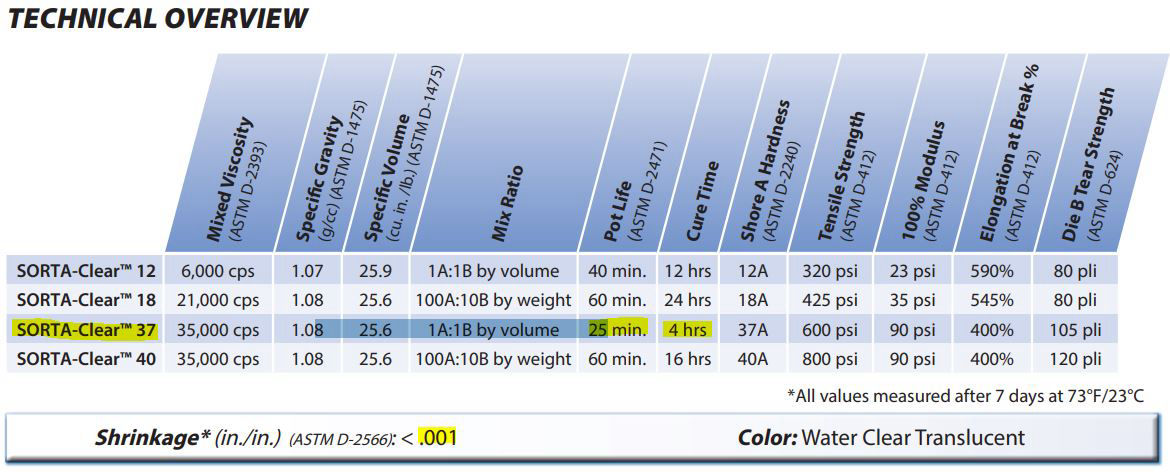
Main thing first, since the mix has a pot life of 25 min, keep everything ready on the table so that the process goes uninterrupted, wear your safety gears like gloves, masks, and glasses.
First trying the SortA-Clear 37, it had the ratio of 1:1 by volume and also 1:1 by weight for part A : Part B. There are 3 ways three ways to mix Part A and Part B.
1. Pour a volume of Part A and same volume of Part B and mix it
2. Pour a weight of Part A and pour same weight of Part B
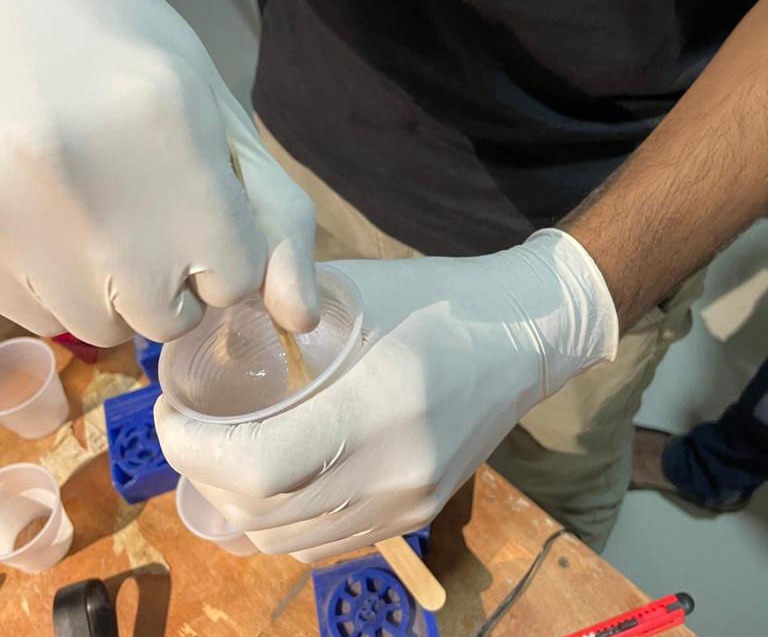
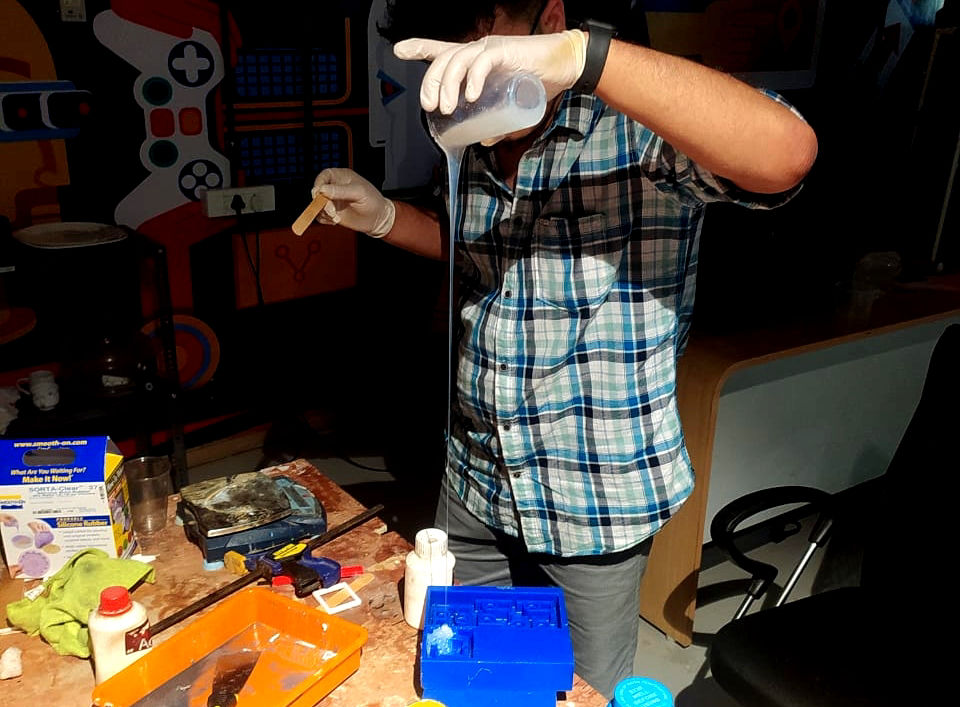
In our case, we used the second one, mix by weight, but took reference of amount of material by volume. To estimate the amount we should be mixing, the volume of the mix has to be known so as to prepare it so take a cup, translucent or transparent, pour water into the milled part , pour the water into the cup, mark the total volume and mark half the volume. Now put the cup on the weighing scale set the weight to zero with the cup (In case you cant set zero the weight with cut, please consider the weight of the cup and use the difference for calculation). Pour Part A up till half mark we made on the cup or a little bit more for being safe of amount of mix. Weigh it and add Part B of same weight.
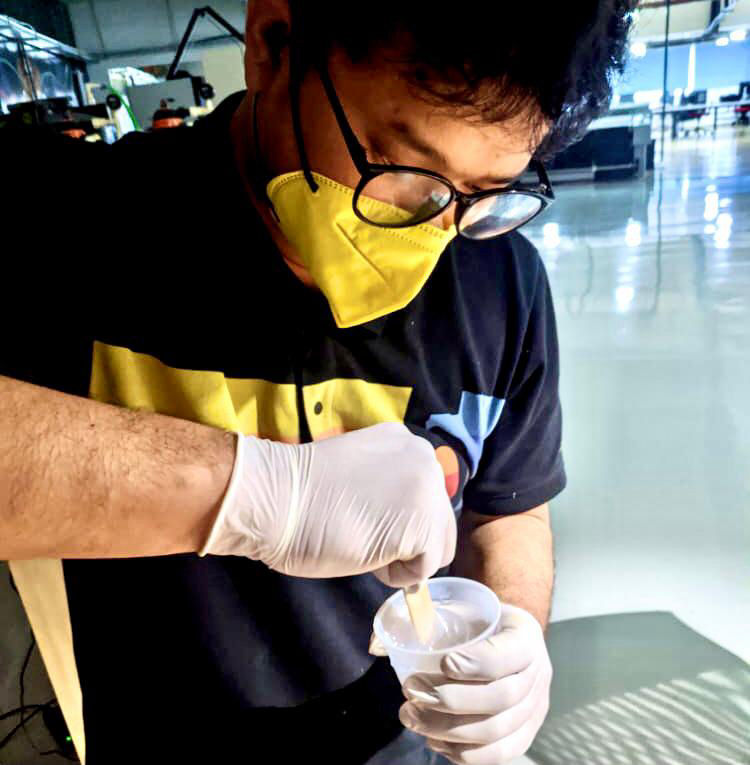
Then mix it with only horizontal strokes, not vertical strokes or it might add the air bubbles into the mix. Less the air bubble, better your mold will be.slow mix has to be done so that the air bubble do not form. You might use vacuum chamber to remove the air bubbles if you have it in your lab. We did not have it in our lab so we were unable to use it. If the bubble comes in the surface where the material is cased, you might have defect in your mold and the part which will be cast out of that mold. You can follow this link to know other ways to eliminate bubbles. Remember that the pot life of the mix is just 25 minute of do not let the mix stay for more than that. It might be different for your material which should be mentioned in the datasheet.
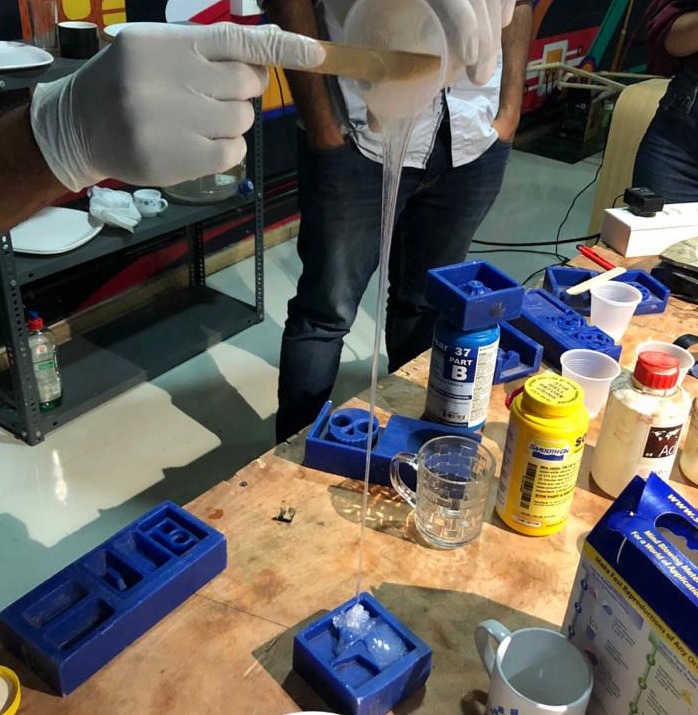
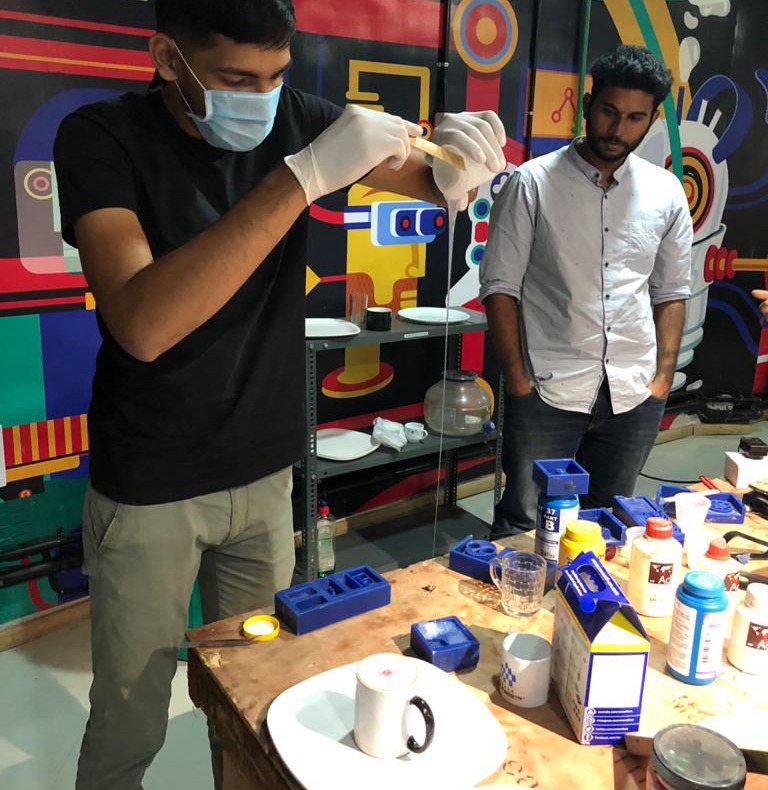
After the mixing was done, pour it slowly from one end of the mold letting it flow smoothly. The trick according to our instructor was to pour it slowly stretching the flow so that if there is any bubble in the mix, it will go out during the stretch. After the mix was poured onto the wax, we shook it and vibrated it so that the mix gets into all corners and if in case if there is any bubble trapped, it might come up to the surface. The mix has the cure time of 4 hrs, so at least leave it for 4 hrs untouched. For us we left it overnight as we did it in the evening.
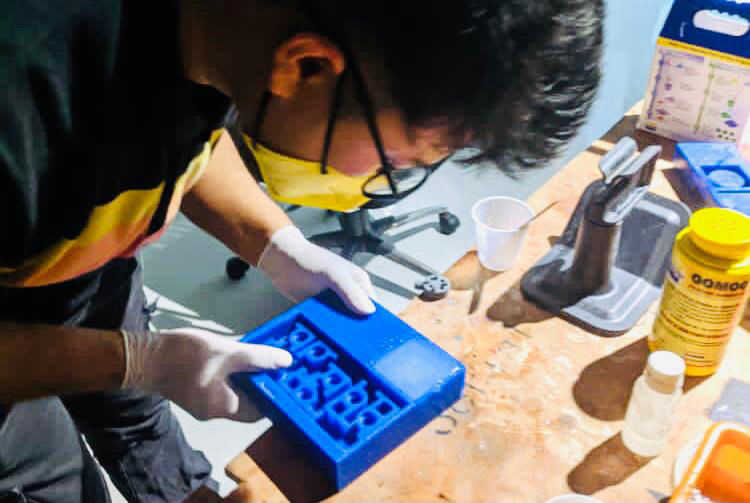
After it is cured, the mold can be ejected easily as it is rubber and can stretch.
Same was done from the aditya silicon with the ratio of 30-14gm hardner per 1Kg rubber. It was poured into another mold but did not cure even it was left for one and half day. so we rejected that.
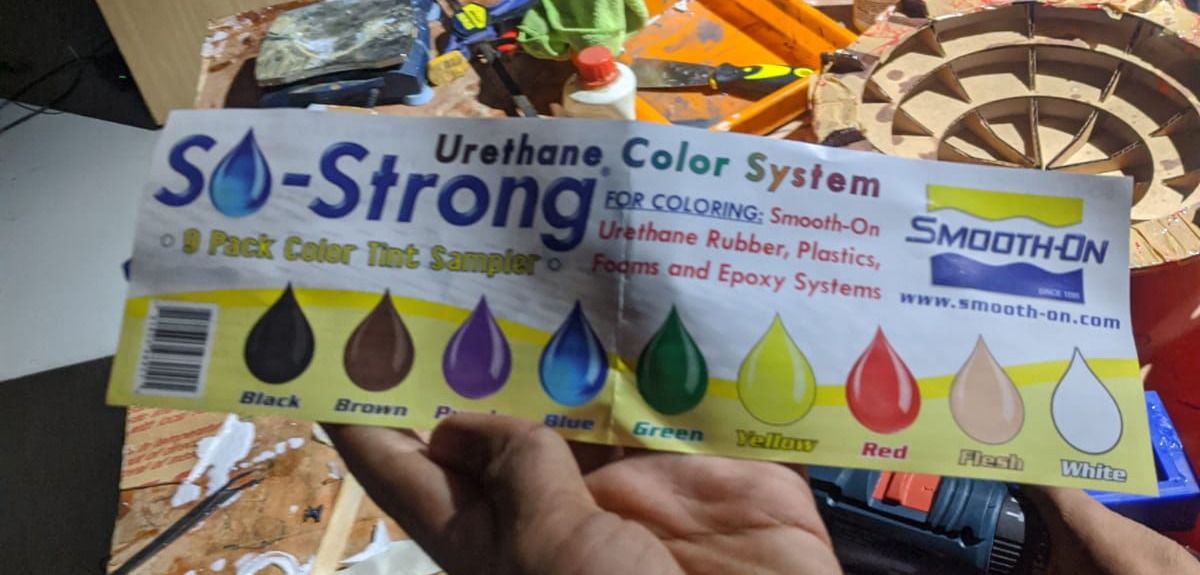
Then similar to the mold, mix was made for the casting from the ration mentioned in the specification i.e. 1A:1 and cast it in the mold. We tried to use color pigment from So-Strong from smooth on
Individual Assignment
For individual assignment, I tries two things, One simple, one mold type and another, with complex shape with two molds.
I tried to make an easy one sided mold first as it will take less time to finish and there are less complexity on the process as one side will be open while making mold as well as casting the model.
First, the design has to be done for the product that i have to make. I tried to think about the product that can be used in work and where I can learn about the molding as well and test some features of the material as well.Now before starting the designing we have to know about the resources we have and what are our limitations.
First thing was tools that is used to mill. The smaller tool you use, more is the time taken for milling so decide carefully according to the priority. For me, we had minimum size of 2.3 mm diameter bit with cutting depth of 10 mm but I decided to use 3 mm flat end mill for rough cutting and 3 mm flat end mill for finishing.
Second important thing was the distance between the walls. The distance between the walls should not be so minimum that the material cannot get inside while making a mold as well as casting.
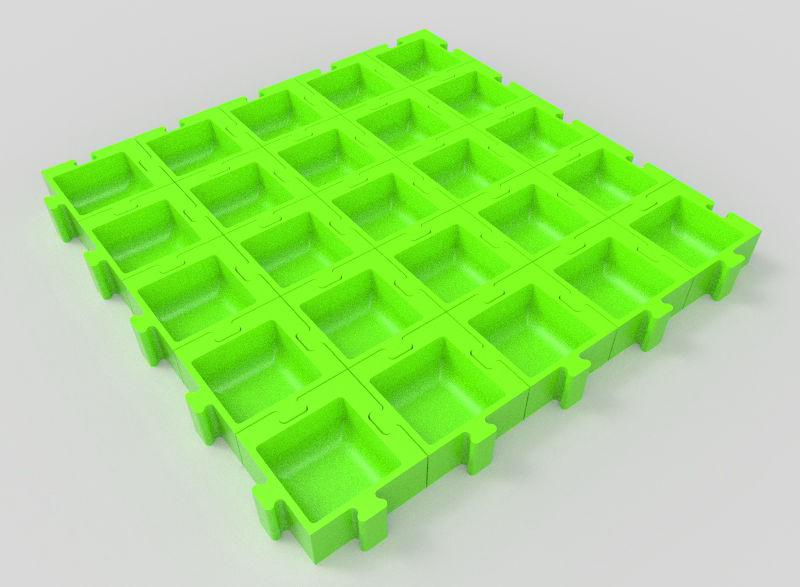
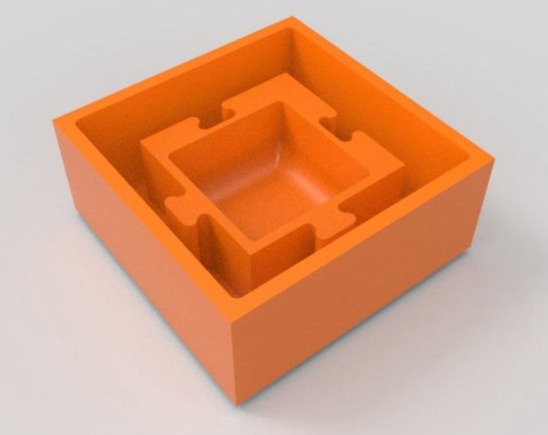
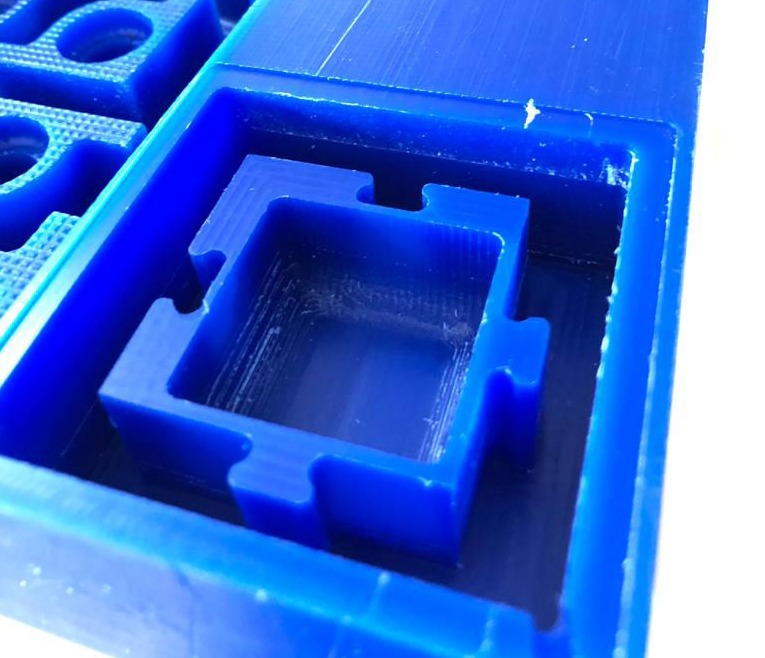
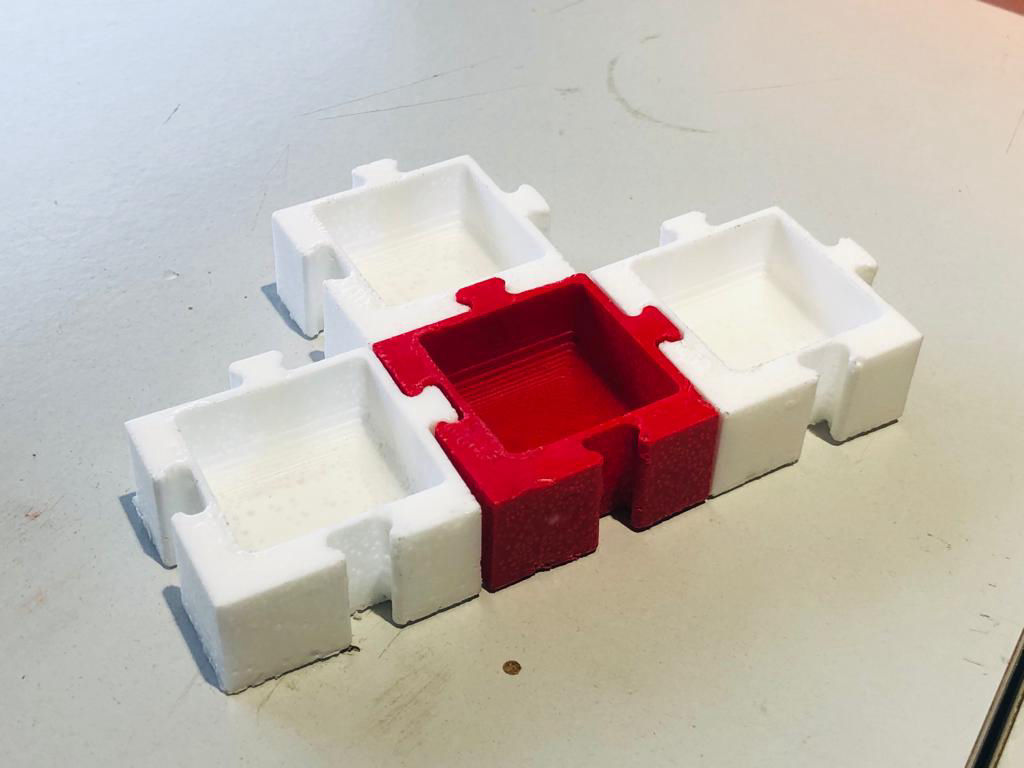
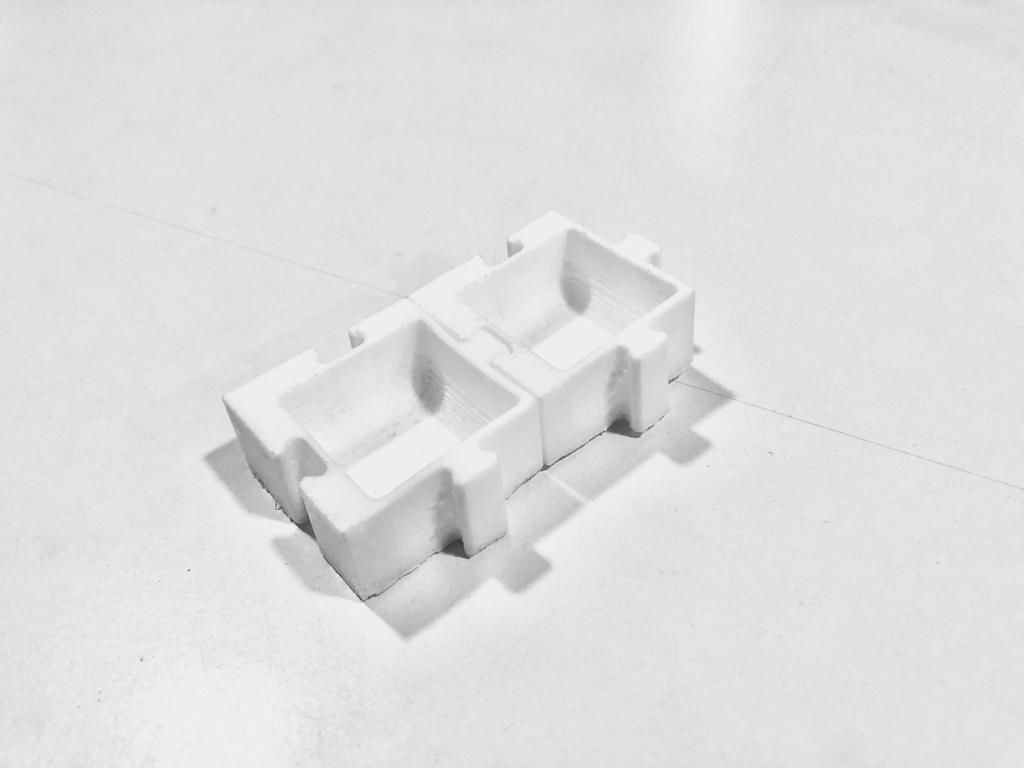
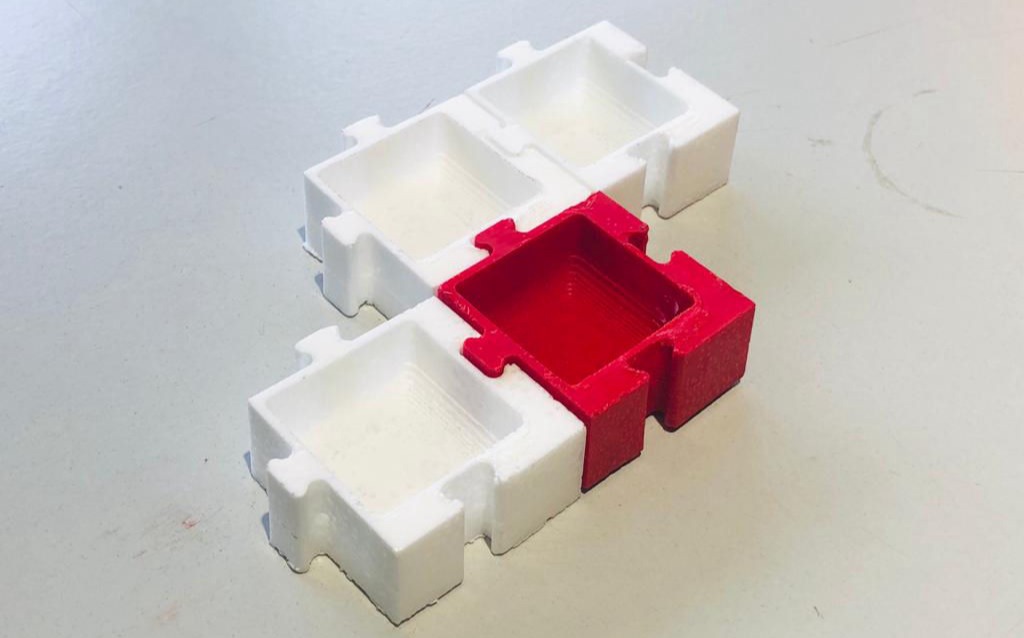
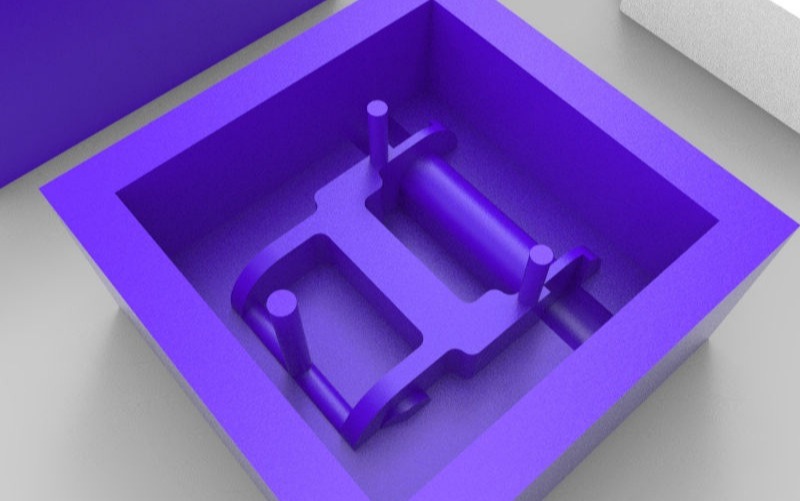
I came up with an Idea of the modular box which can be used to sort electronic components so I began designing on the CAD software
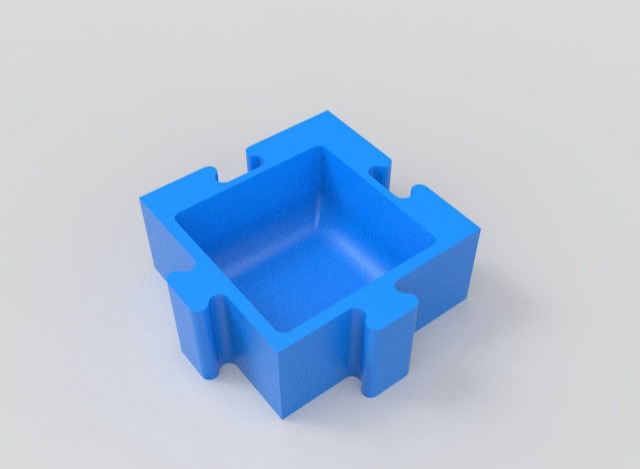
The assembled part should look like below
After the 3D of the product was made, an enclosed container should be made so as to contain the mix during casting the mold.
Then I used Boolean function in CAD to find out whether my shape and process is correct. The way to check is make a block of the size of the part to be CNC'd and subtract the mold, you will be able to get the shape of how your silicon mold will come out. Then make of block of size of the silicon mold and subtract that from where you sill get the shape of your final product.
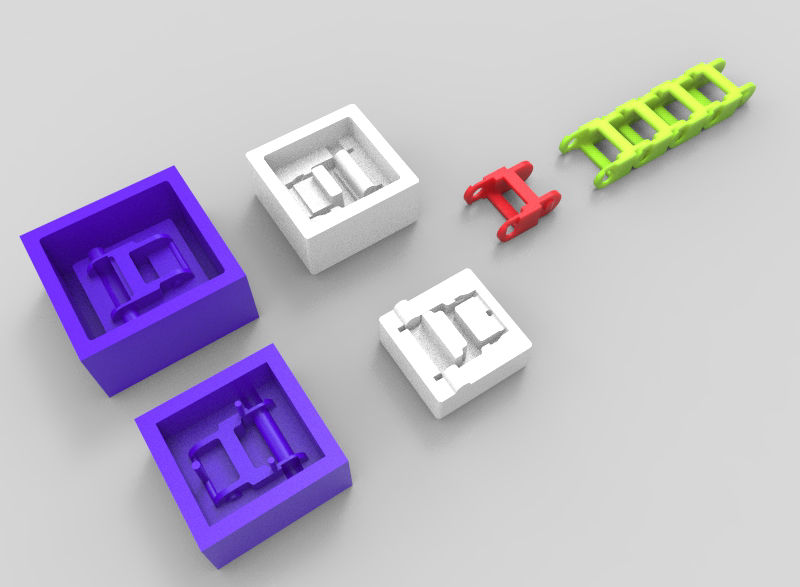
Following is the flow from Wax Mold >> Silicon Mold >> Product >> Assembled product
Time to Mill the wax
After design the part to be CNC milled you can use different software to generate the G-code based on which your milling machine works to mill the wax. If you are going to use Fusion 360 you can refer this link for getting resources to know how to generate G-code to for milling operation.
If you are using V-carve pro or aspire, first export the part to STL and follow this link to know about how to generate the G-code.
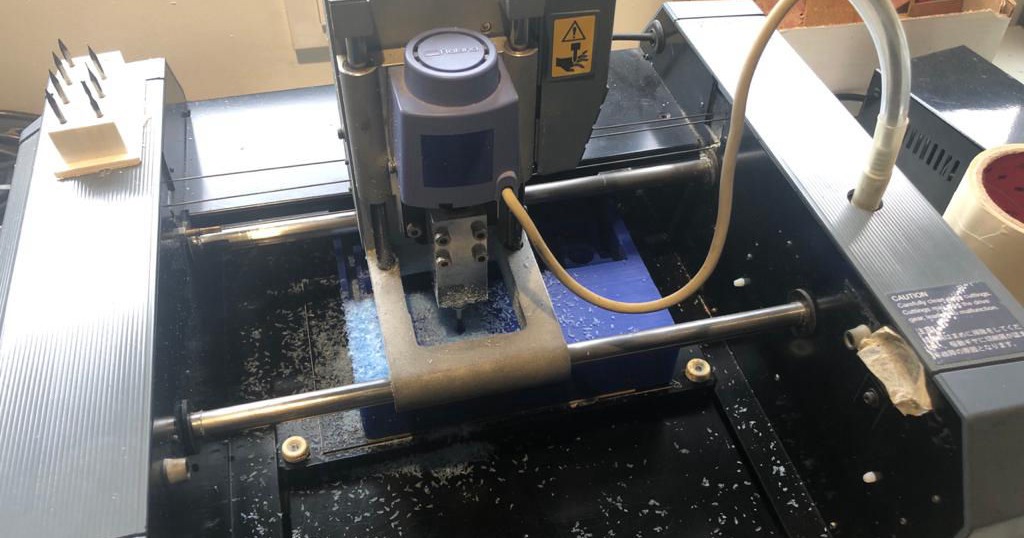
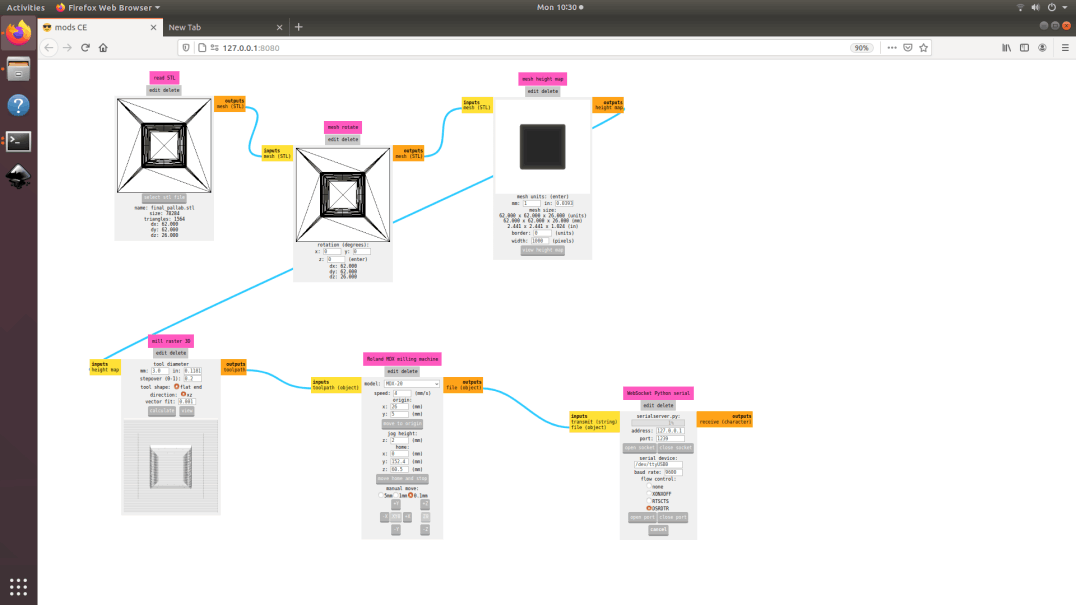
For me I will be using Mods to create mill it from Modela MDX-20 milling machine with operation area of 203.2 mm (X) x 152.4 mm (Y) x 60.5 mm (Z). You can download the user guide from this link. You can also know about the machine from electronic production week. First, from the size from the CAD, the wax block to be milled was collected.
The base of the was was cleaned so that there is no dust or any protrusions. Then a double sided tape was applied and the block was securely placed on one corner of the worktable of MDX-20 milling machine.
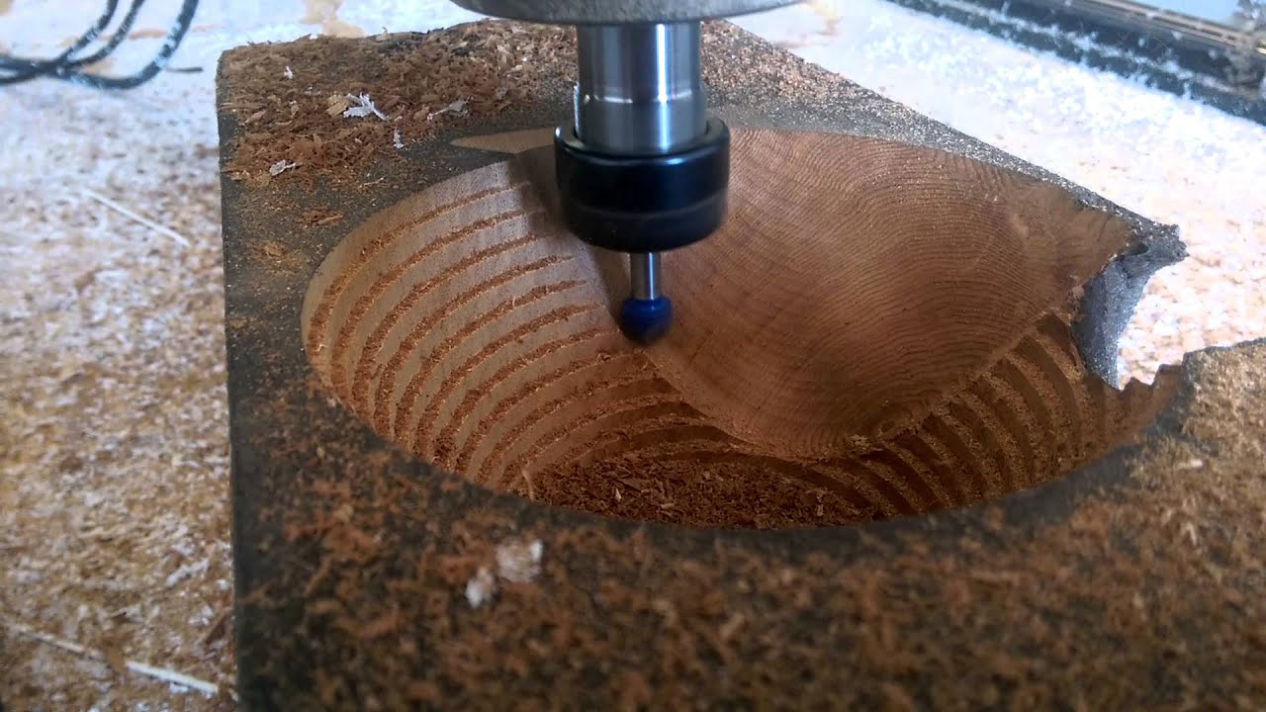
There is two process that you have to do for milling neat shapes. first is a rough cut where there is very less overlap between the tool paths which removes the material fast layer by layer. Another is finishing cut where there is more overlap and the finishing is very fine. I will be using the same tool of flat end mill of 3mm diameter for both rough cut and finishing cut.
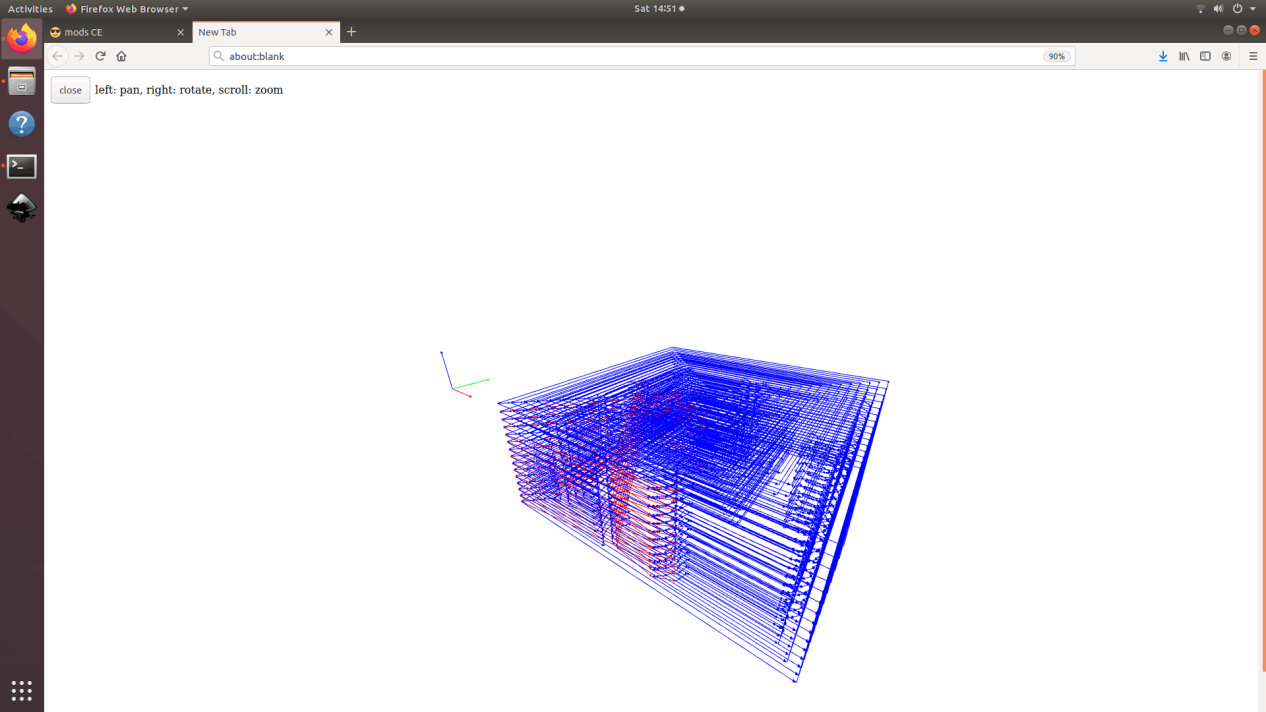
First for the rough cut, 3mm Flat End mill was set on the tool head. Open mods, go to programs and click on 2.5D mill inside Mdx-20.
(Imp: Do not use milling tool with more flutes on wax. If more fluted tool is used, there might be a problem for material removal and may start melting of the wax and finally stopping the rotation of the bit. This might also break the bit if thin bit is used.
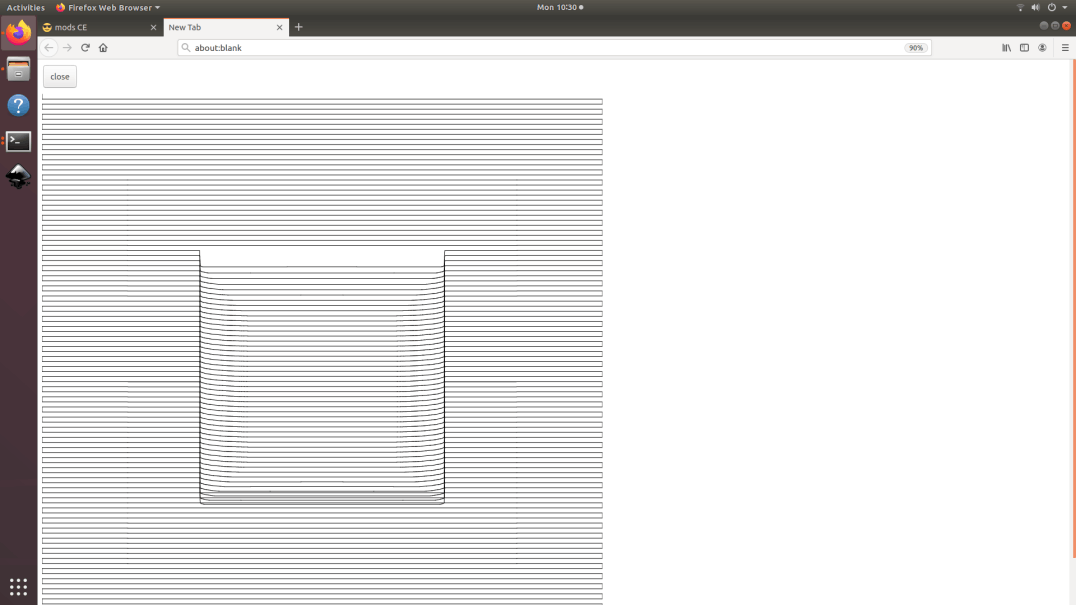
Then the X, Y and Z axis. Load the STL file in the mods. Make sure that the tool size is correct. Check the feed, speed, and hit calculate. For me the speed was 10mm/s, feed was 1.5mm. You can see the toolpath in the preview and confirm the shape you are making. after everything is OK send the file which should start the milling operation
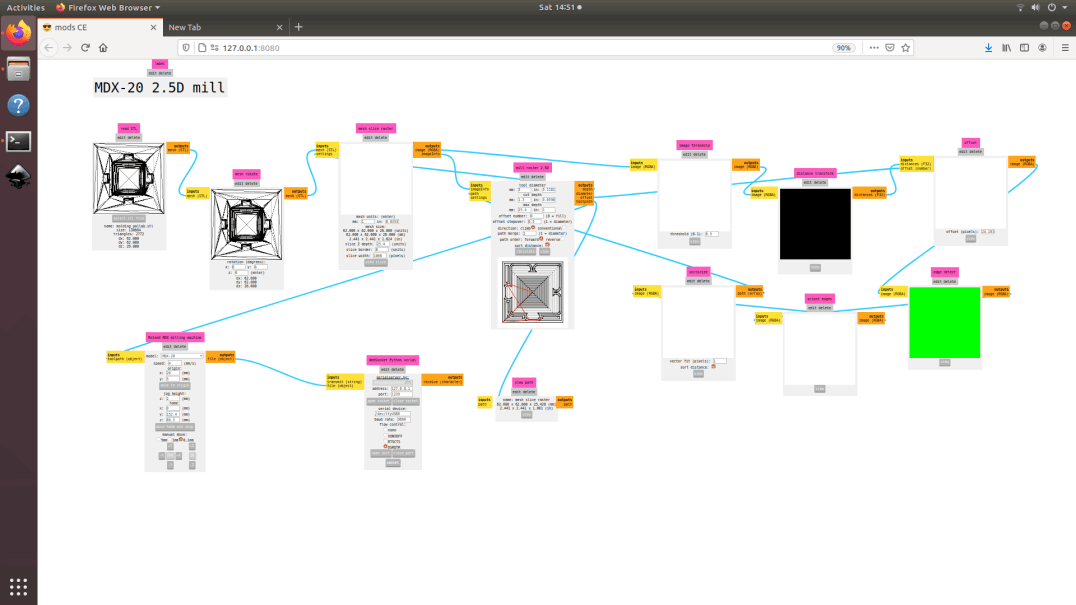
After the rough cut, since my part has only one shape where the finishing has to be done, I had created another tmodel which can be use to do the finishing cut. The exported STL will be used for the rough cut. Then open the 3D mill inside the MDX 20 in mods, load the STL file, check the step over, tool diameter i.e. 3mm flat end for my product and hit calculate.
If you are using the different tool, note the X and Y positions of previous rough tool pass and then use it to locate the same X and Y position, adjust the Z position and hit calculate.
Time to mix and make the mold
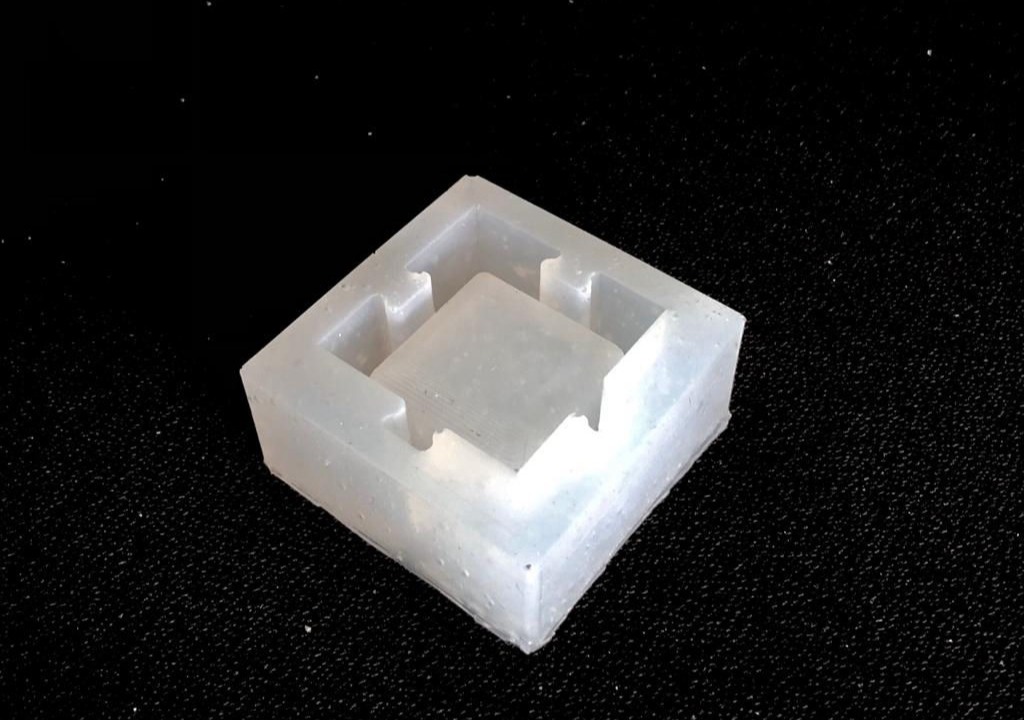
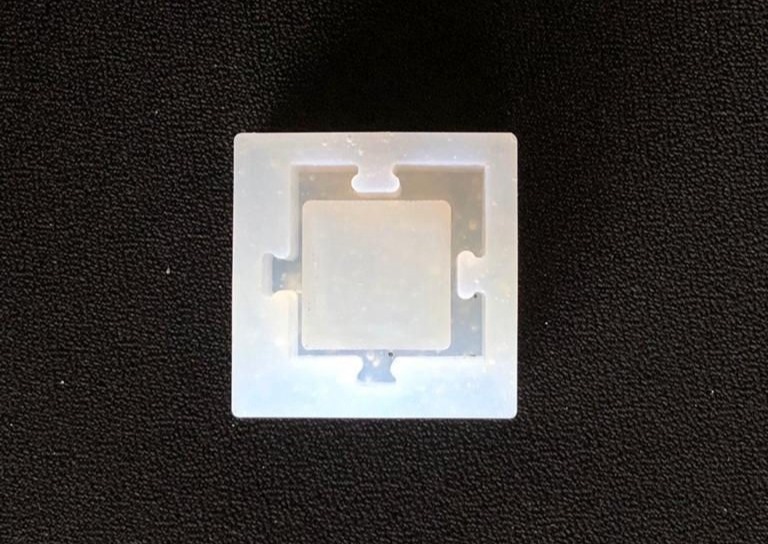
I will be using SortA-Clear 37 for making the silicon mold. Follow the following process to cast a mold in the machined wax.
STEP 1: Clean the machine wax and pour water in it until the water fills to estimate the volume of mix that we want to make.
STEP 2: Pour the water inside the milled wax into a mixing cup. A transparent or a translucent cut is recommended. Mark half of the cup, throw the water and dry both machined wax and the cut. You can use compressed air to dry it.
STEP 3: Now take SortA-Clear 37 Part A and pour it gently in the cup with the mark. Try to stretch the flow while pouring which will decrease the air bubble while pouring. Pour it a little above the mark to be safe.
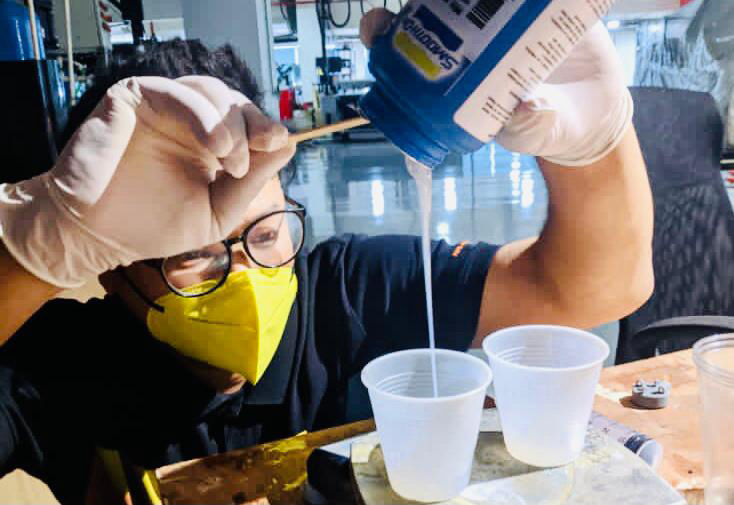
STEP 4: Then similarly pour part B into the same cup either by estimating the volume by seeing the level from outside or follow the process above the be more accurate.
STEP 5: Please mix it as mentioned above to minimize bubbles. I used the wooden stick but if you want to reduce the bubble use PP stick if available which will decrease the amount of bubbles while mixing as per this reference. While mixing please mix slow and note that the Pot life is 25 min and should be poured in the milled wax before that time.
STEP 6: After mixing, pour it slowly stretching the flow smoothly into the milled wax from one side which is at maximum depth and slowly the mix will rise up to the top level. mold release is not used here because this mix can easily get out of the wax and mold release in not needed. You can also use dilute dish soap, vaseline, talc etc as a mold release of you are using the material which is hard to take it out of the mold.
STEP 7: Vibrate the milled wax where the mix is poured so that the bubbles if trapped in between can get out and the mix can get into all corners. Then let it settle for 4 hrs or more in room temperature (73°F / 23°C) before demolding. Do not cure rubber where temperature is less than 65°F / 18°C. Rest it for 15 min more than 4 hrs as the curing time starts after pot life time.
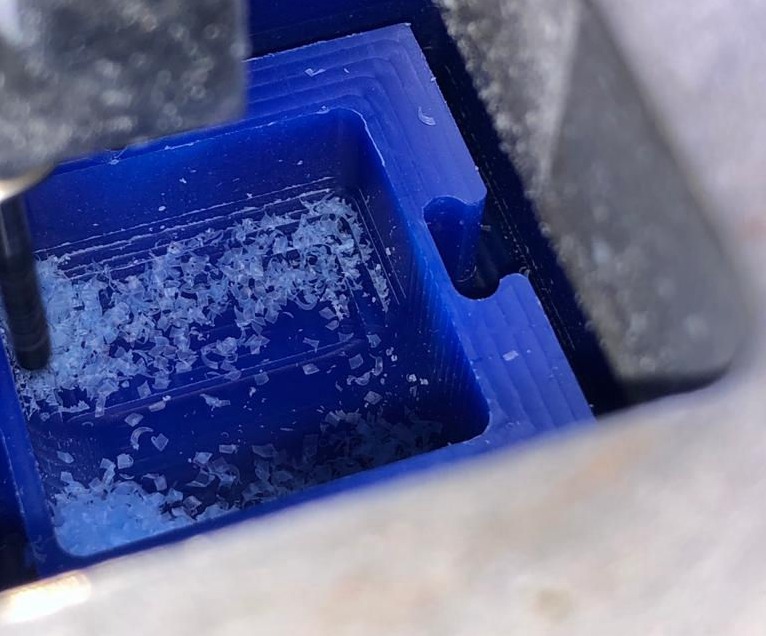
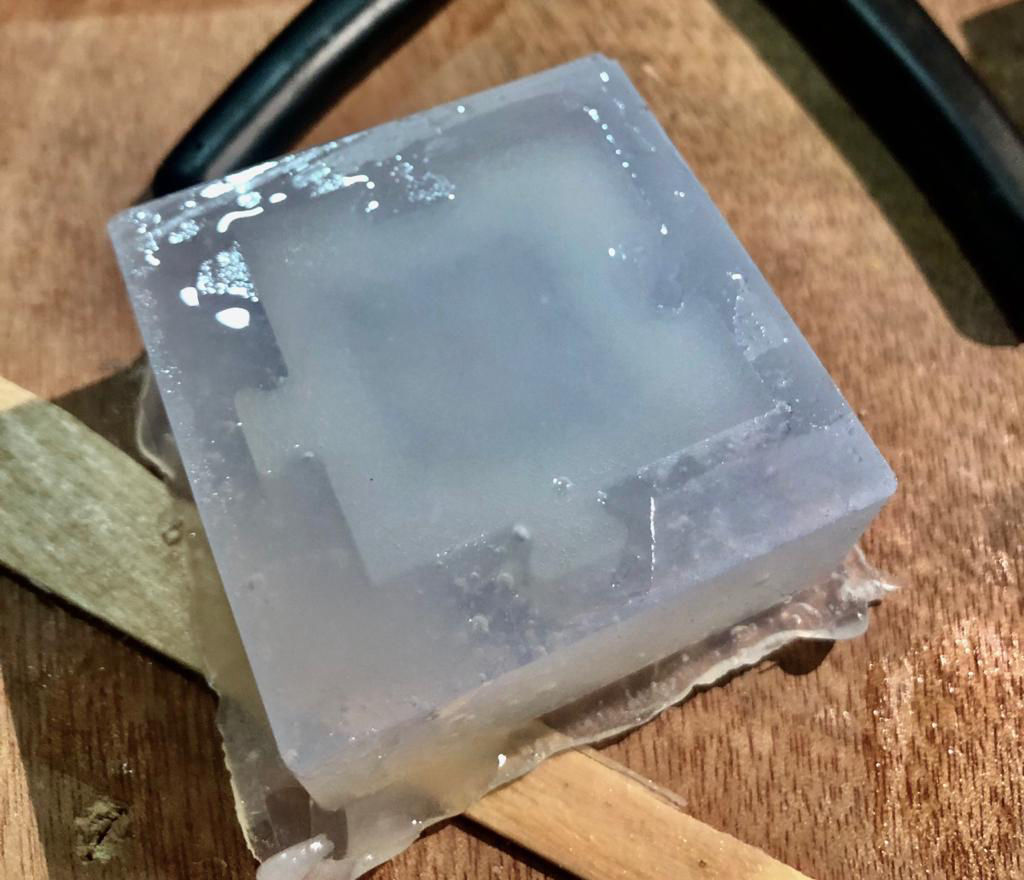
STEP 8: Gently pull the material out. Here I noticed that if the vertical depth of the mold is high it is relatively hard as there will be vacuum between the mold and the wax. Also it is always recommended to give draft angles wherever possible which will ease while releasing the cast from the mold. It is recommended that after curing, expose the rubber to 176° F / 80° C for 2 hours and 212° F / 100° C for one hour. Allow mold to cool to room temperature before using.
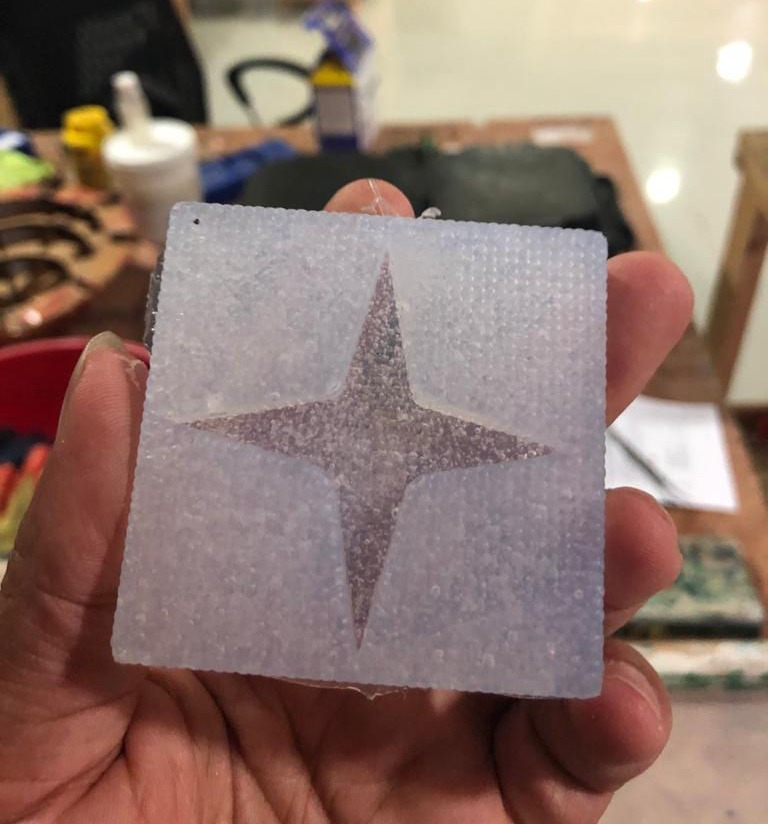
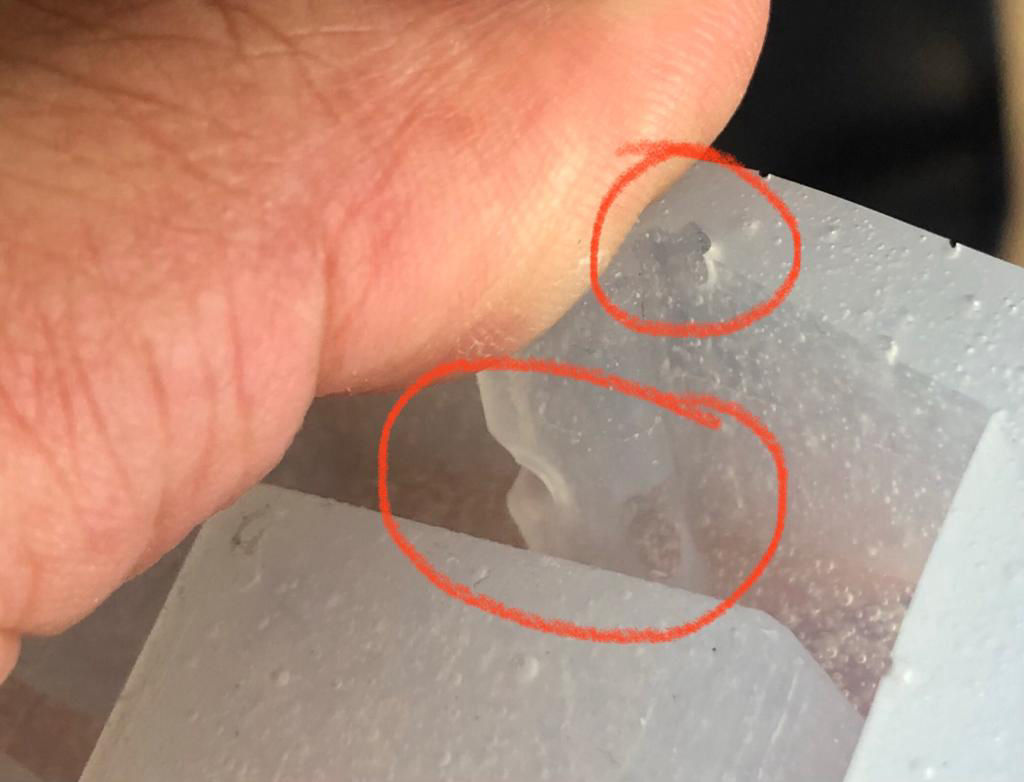
If you have lot of air bubbles, you are going to get the problems as shown below. To mitigate it, I painted the silicon mix inside the sharp corners and cavities and the mold came out good at least on the surfaces when wax touches the silicon rubber mix.
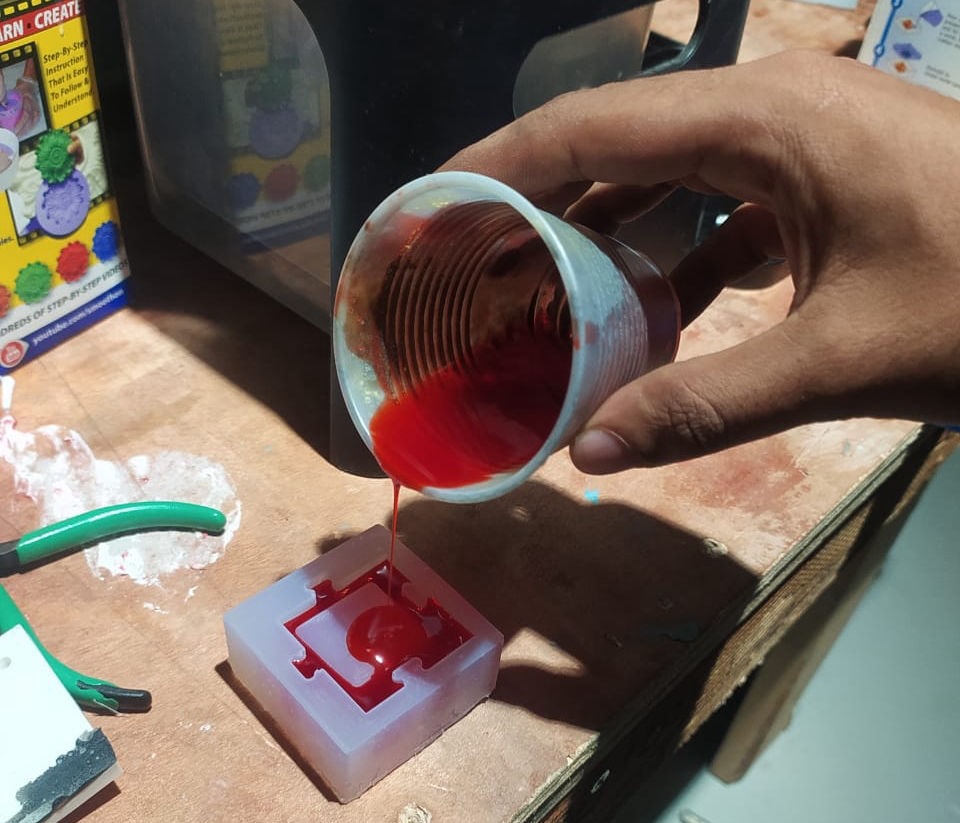
STEP 9: After the silicon mold is ready, it's time to cast our product into the mold. So collect the cast material from the inventory. For me, I used Smooth Cast 305 for casting my product. There are two parts of this as well Part A and Part B which you have to mix.
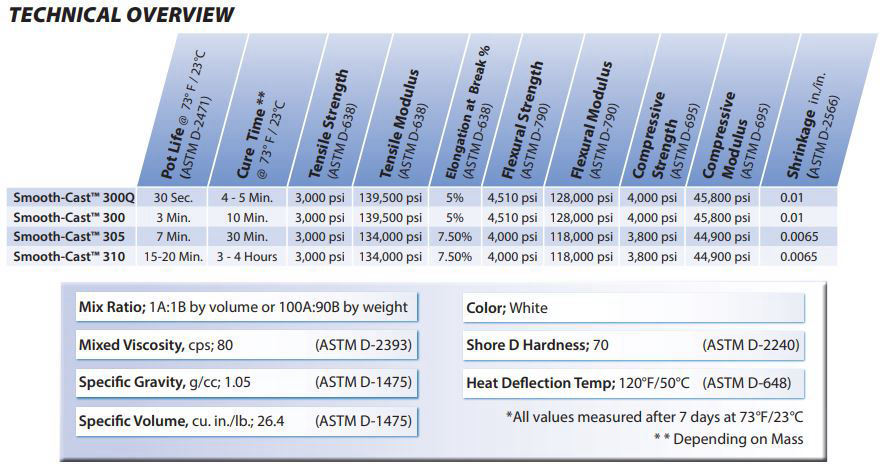
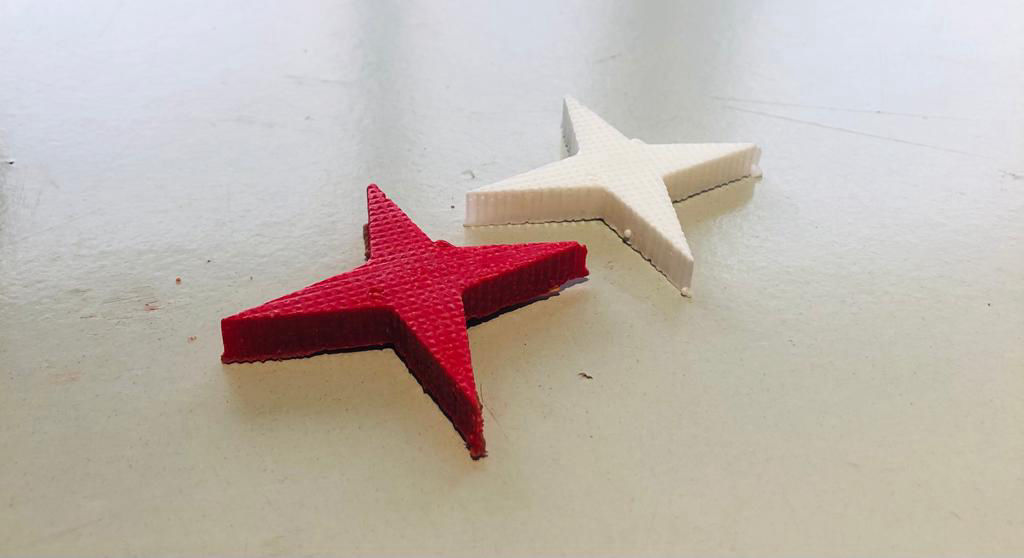
STEP 10: First we have to estimate the amount of the mix we need so like step two fill water in the mold full and pour the water in the translucent cup where you are going to mix, mark half of it and pour part A of Smooth Cast 305 up to the mark. and pour the same volume or pour it by weight ratio of part B into the same cup and mix it. Follow the same procedure as early while making the mold. This mix is less viscous so are easy to pour. Please keep in mind that the pot time is only 7 minutes so pour it in the mold within that time. I tried with other color(red) from as well.
STEP 11: Since its curing time is 30 min, let is rest untouched for 30 min plus 5 minute to make sure that the pot time is also considered.
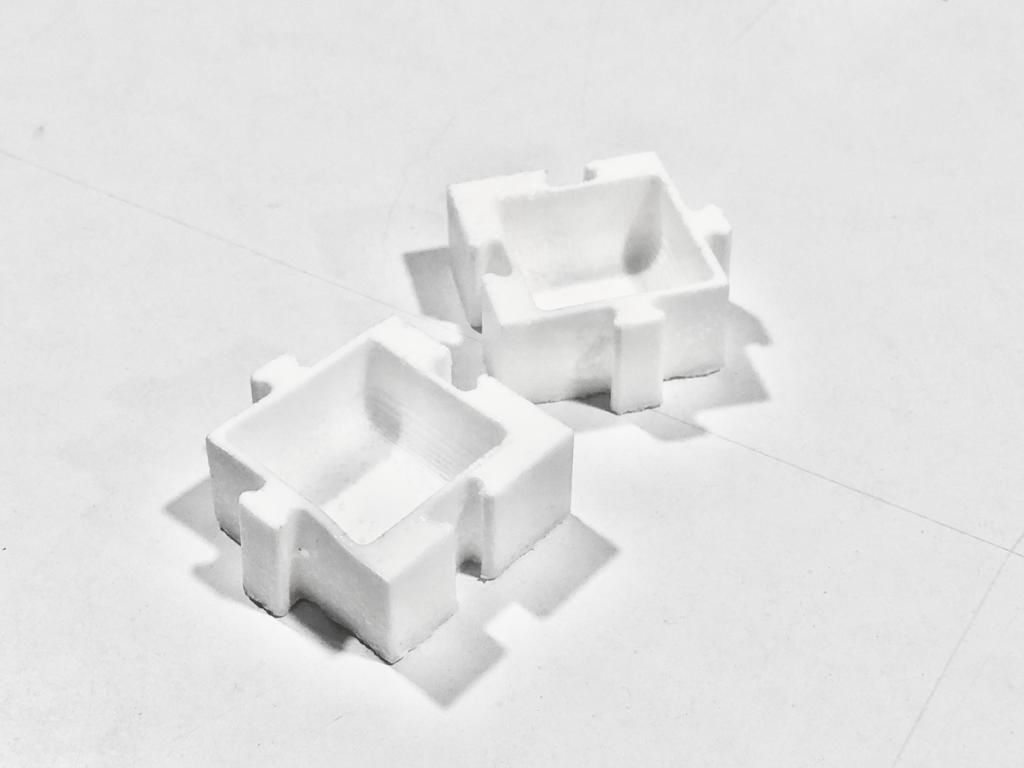
STEP 12: Now after the cast is cured slowly remove it and post process if needed like cutting the flash, injection point and vent shape if present and the product is ready. You can machine it if you want it or paint over it.
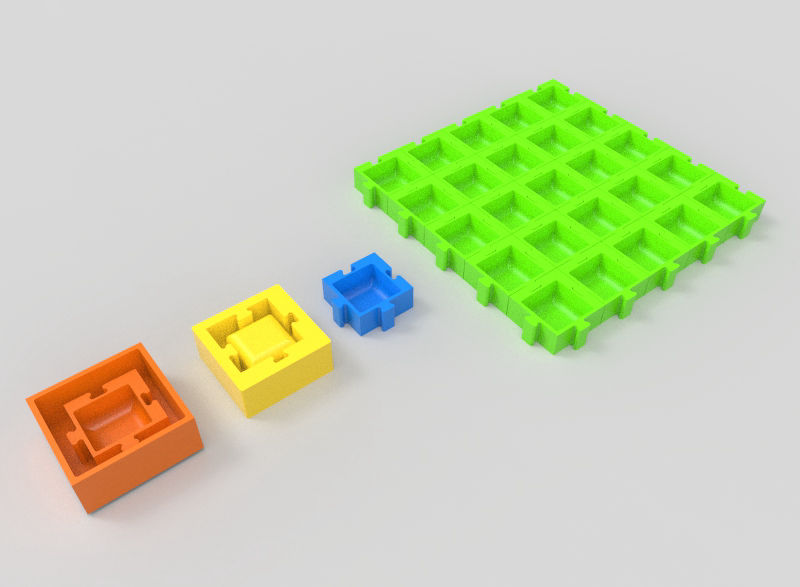
STEP 13: For me it was a modular shape so I casted more using color as well to make an lego structure out of it.
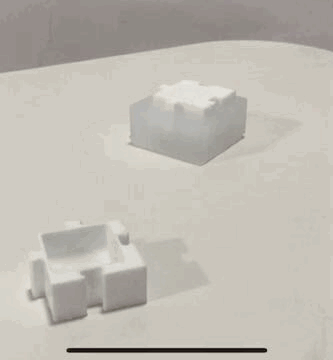
Here is the stop motion video for the fun
Other thing that i tried
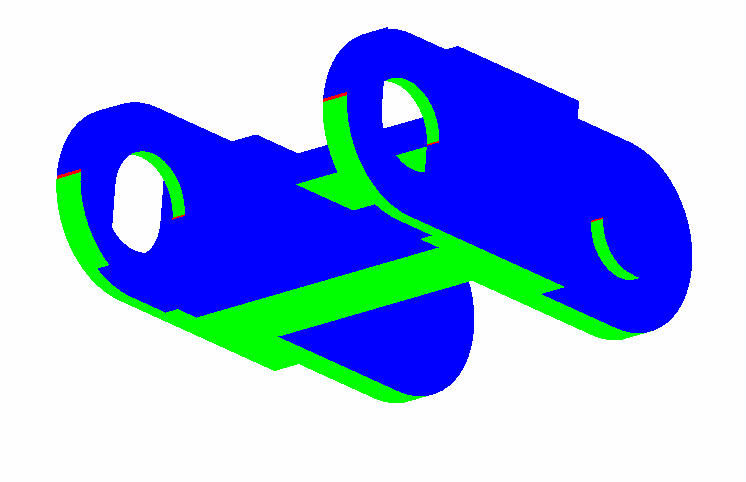
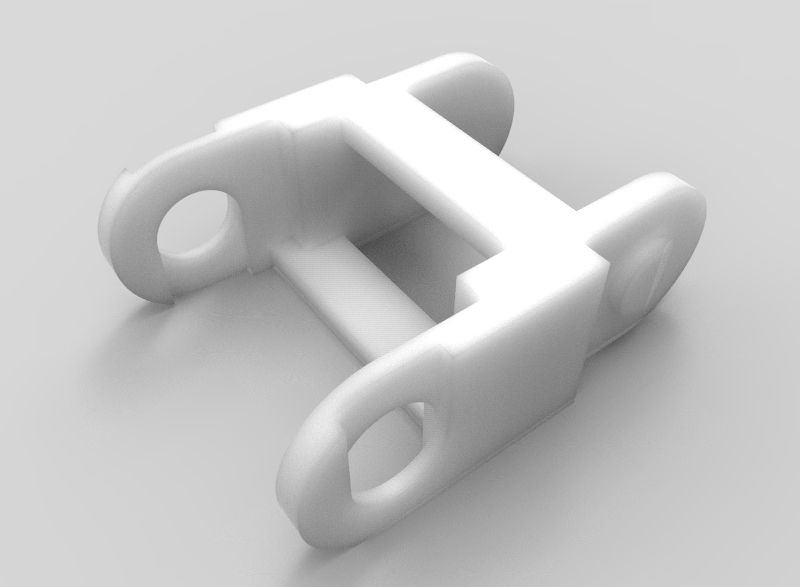
Another thing i wanted to try was a complex double sided mold. So I tried designing a router cable protector.

The flow from Wax mold for mold >> Silicon Mold >> Actual Product >> Assembly looks like below
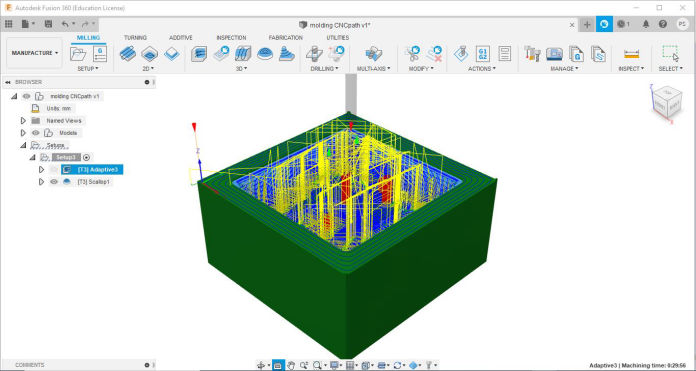
Injection point and air vent was also added there as shown below and also did draft analysis. and also learned to create a tool path in Fusion 360.
The final product should look like
This website was designed with Mobirise themes