Group
1. Do your lab's safety training
2.Test runout, alignment, speeds, feeds, materials, and toolpaths for your machine
Individual
1. Make (design + mill + assemble) something big (~meter-scale)
Plan for the week
Computer controlled Machining, as a word suggests is the is machining process like milling, drilling, finishing, engraving etc by controlled motion of the tool over the workpiece. The motion is controlled by the code which is called G-code and is generated by the CAM software or manually and is pushed through to machine via CNC software in the computer.
CNC machine and the process for fabrication
CNC stands for Computer Numeric Control. As mentioned earlier, Computer is the key part of this type of machining involving different softwares at different steps to design, process the data and finally operate the CNC in controlled way. There are different types of CNC depending upon its axis. It can range from 2 axis to 5 axis. The one we are using is 3 axis CNC. The general process from designing to cutting is explained below.
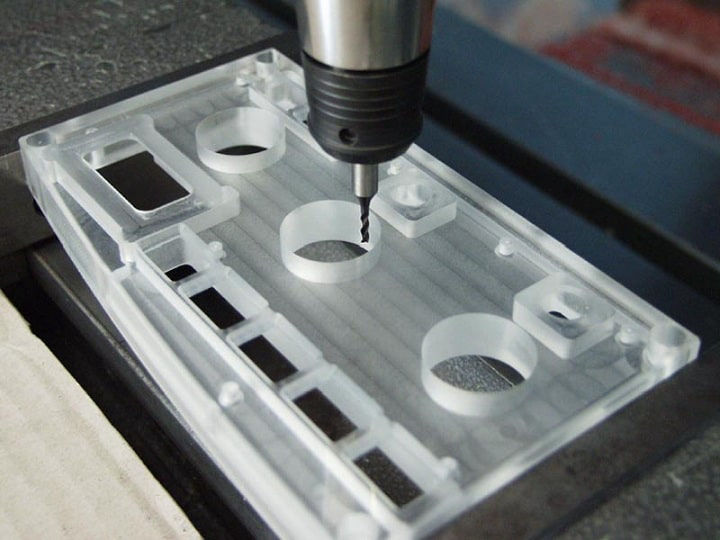
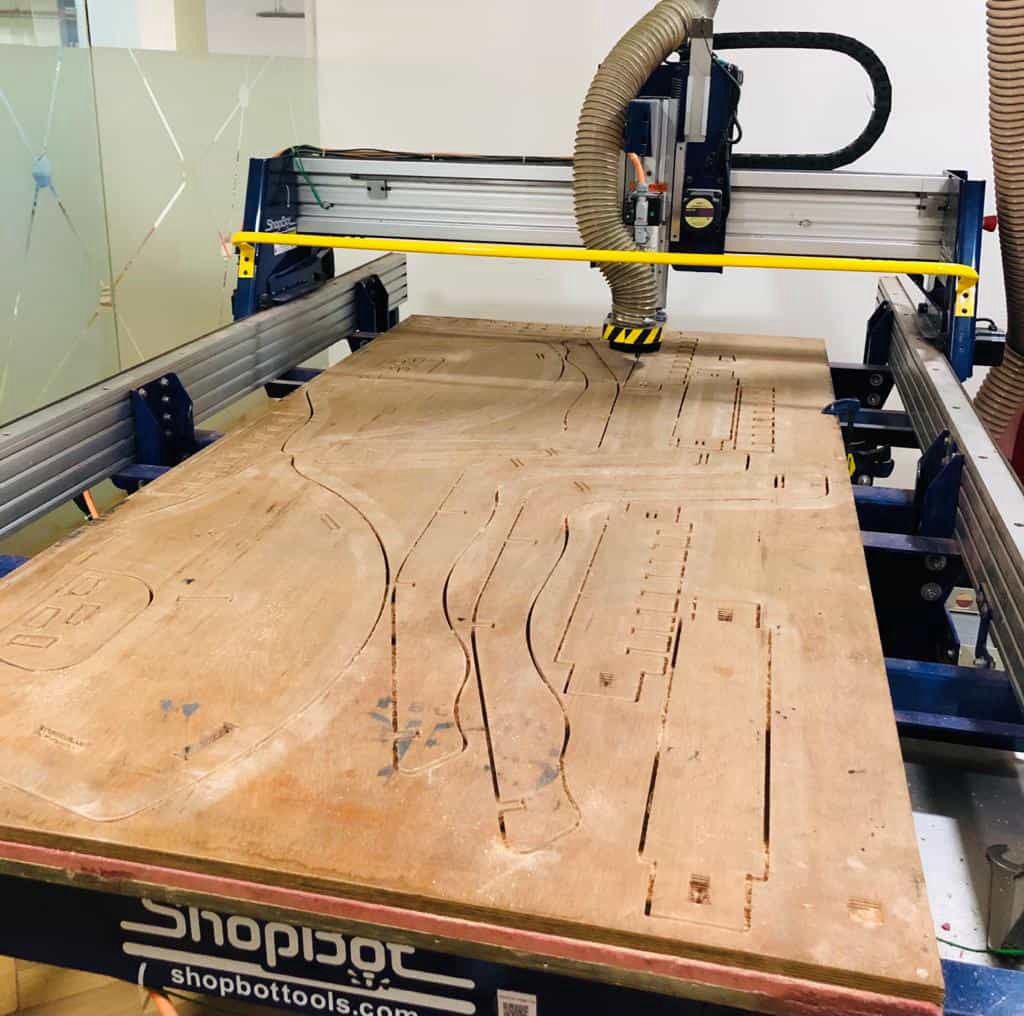
SHOPBOT PRSalpha 96 CNC Router
(Source: http://www.pilatross.com/)
The basic difference between the CNC milling and CNC router is the material that it can machine. CNC router are cheaper and do not have heavy body as CNC mill and can process wood, composites and soft metals at most, like aluminium. The machine that we are going to use is a CNC router from shopbot with bed size of 105"x 49"x 8". The machine is mainly divided in two, one is the control panel with X,Y and Z movement and another is the main spindle which is controlled by the Variable Frequency Drive(VFD). We can see the sacrificial layer on the top of the bed when we are going to use it. the workpiece here can be clamped with hand clamps or the nails. There are other ways as well like wedge or vacuum suction but we will be using nails and clamps only here. We must make sure that the VFD is connected and is in control of the software when we start using it. you can know about the machine and have look at the quick start guide from this document.
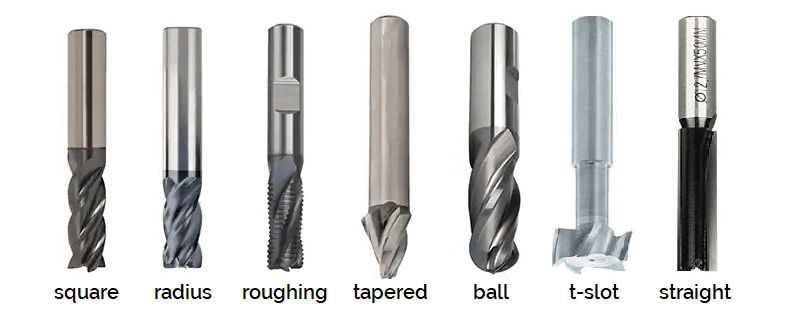
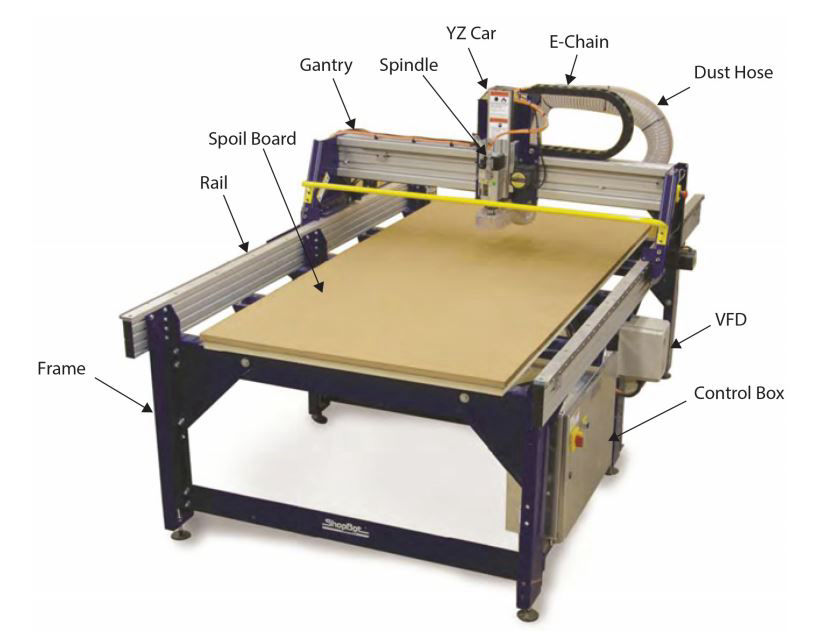
Chip removal in different shaped mills
As your CNC router spins the cutter clockwise, the helical direction of the flutes determines if chips are ejected towards the top or bottom of the workpiece. Upcut end mills are the most conventional ones, pulling the chips away from the material, which is a very important feature for most milling operations on many different materials. It has a downside if you want to cut laminated materials since it leaves a poorer surface finish on the top of the workpiece. A downcut end mill has the advantage to push chips down, leaving a cleaner cut on top, but then it will also fray the bottom edge.
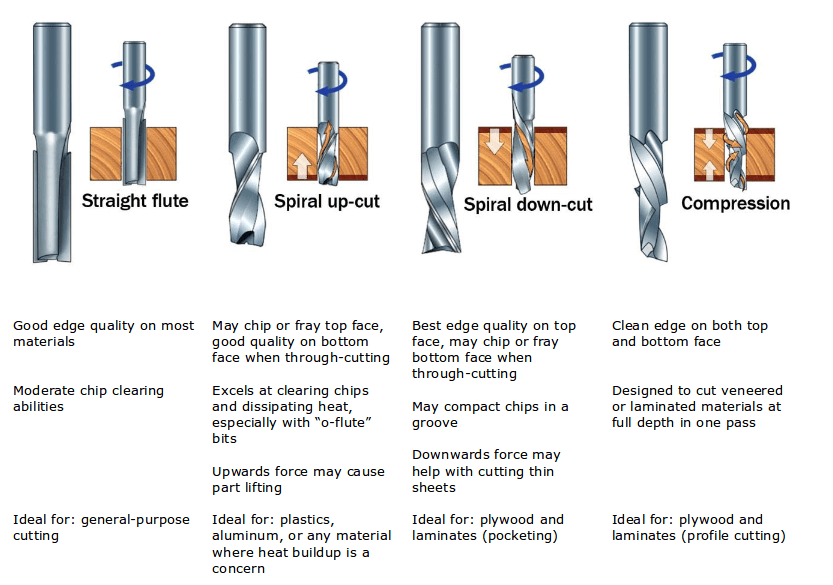
Combine an upcut and a downcut and you have a compression cutter, where the flutes are carved one way for the bottom half of the flute length and the other way at the top. That feature makes them a very good candidate to cut plywood, composites, and laminates. Try to use one to cut a sheet of plywood in one pass, and you should obtain cleaner edges on both sides.
Feed rate is indeed directly linked to the number of flutes of your end mill: if you add flutes, you will have to increase the feed rate, or decrease the rotational speed of your spindle, to keep a constant chip load. So depending on the speed capabilities of your CNC machine and of your spindle, you might have to choose an end mill with less/more flutes. Secondly, having more flutes on a tool creates smoother cuts, but it also leaves less space for chips to evacuate. Hence as a summary, we can say that fewer flutes are best at chip clearing, while more flutes create a smoother surface finish.
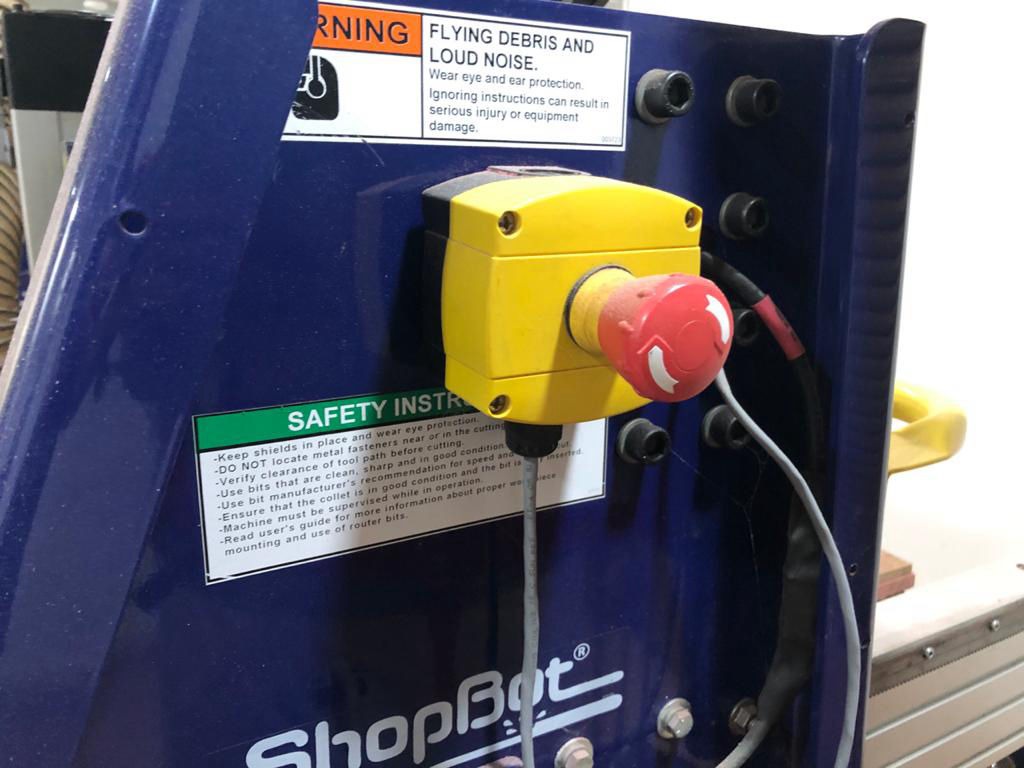
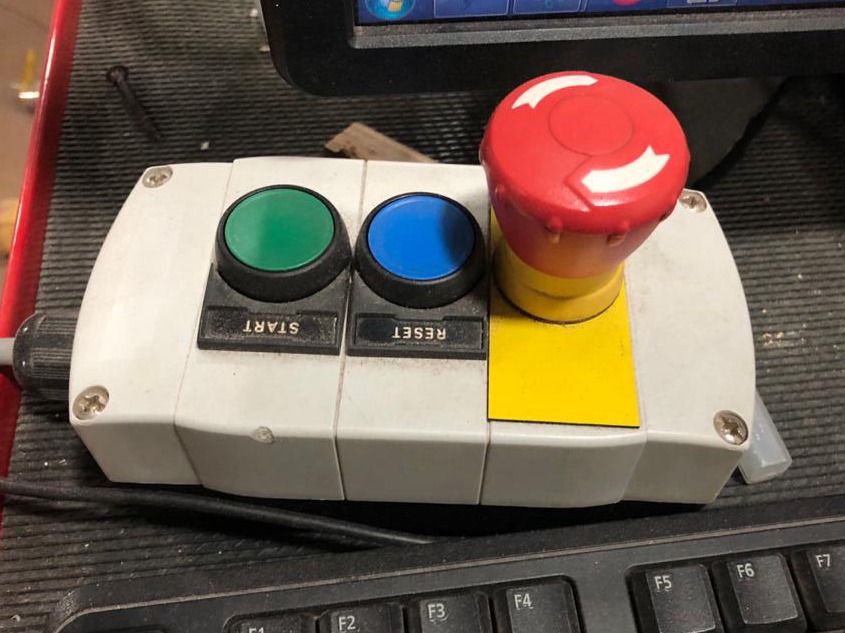
Safety
While working with the power tools or the machines, safety is the first thing that you need to follow. If you cannot follow the safety rules, you are not eligible to use any machines or power tools. It may sound boring and you might not think that it might not be important but, you only know when something bad happens, so in order to avoid those, you must comply all the safety rules.

Above parameters should be chosen wisely. If the paramters are not properly chosen, the sound the tools makes while going though can be noted. In worst condition, the chips might catch fire which when passes through the duct collector cannot be controlled.
Climb and Conventional milling
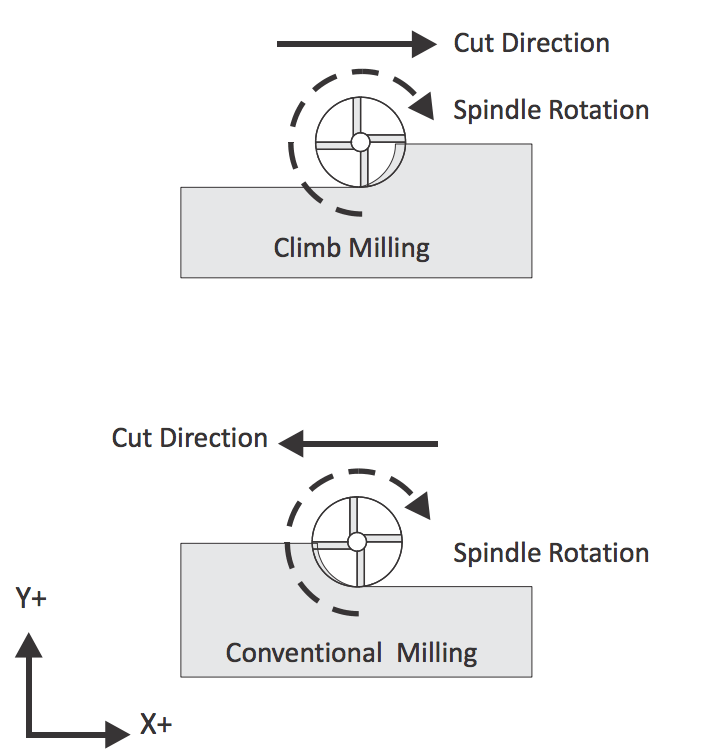
Conventional milling is traditionally used on manual machines, where keeping backlash to a minimum is important. In this cutting direction, the tool cuts from a small amount of material up to a larger thickness, rubbing against the material through the cut.CNC machines, which have higher rigidity and are significantly less prone to the backlash, will use a Climb Milling process where the tool advances through material from maximum to minimum thickness. This cutting process allows the heat to leave the cut with the chip, reducing heat generation and tool wear while producing a better surface finish than conventional milling.
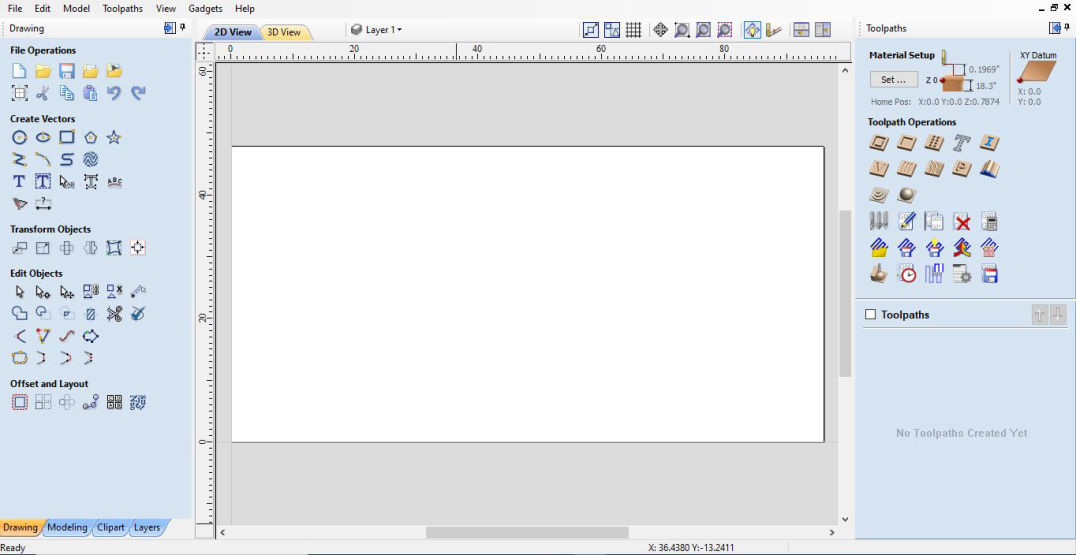
VCarve Pro
V-carve pro is a CAM software where the software generated the Gocode that can be understood by the CNC and operate accordingly. Different cutting parameters like type of tool, tool diameter, pass depth, stepover, spindle speed (i.e Rpm of the tool), feed rate, plunge rate are set in this software. Similarly, operations like profile toolpath, pocket, engraving, rough cutting, finishing etc along with the type of movement of the tool are also set in this software. This acts as a mediator or a communication device between CAD and machine and allow to operate the machine according to our requirement. You can find the about the software in detail in this manual. There is different operations that can be selected according to the requirement from the right toolbar shown in the figure below.

Group assignment
In group assignment, we learned about safety protocols which was mentioned above. Specifically about Shopbots and emergency stops were shown. Also fire possibilities were explained with the tools and how to use them.
After knowing about the safety protocols and we designed a CAD file to test cuts and fitting of 12mm ply
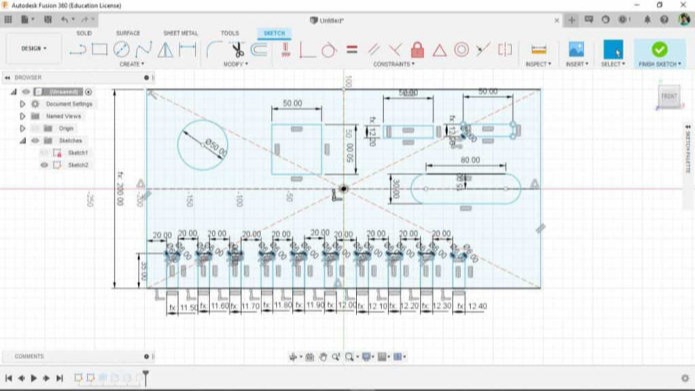
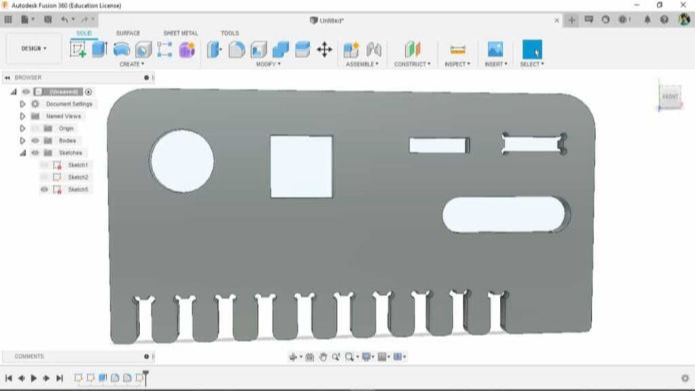
Tools were adjusted and table was cleaned ad clamping was done. The detail process is explained int he individual assignment. Then the cutting was started after zeroing X, Y and Z axes.The part was removed and filing was done follwed by testing. Dimensions were checked. Fitting was done for interlocking. We tested on 12 mm ply and the it had a tight fit on the 11.9mm gap.
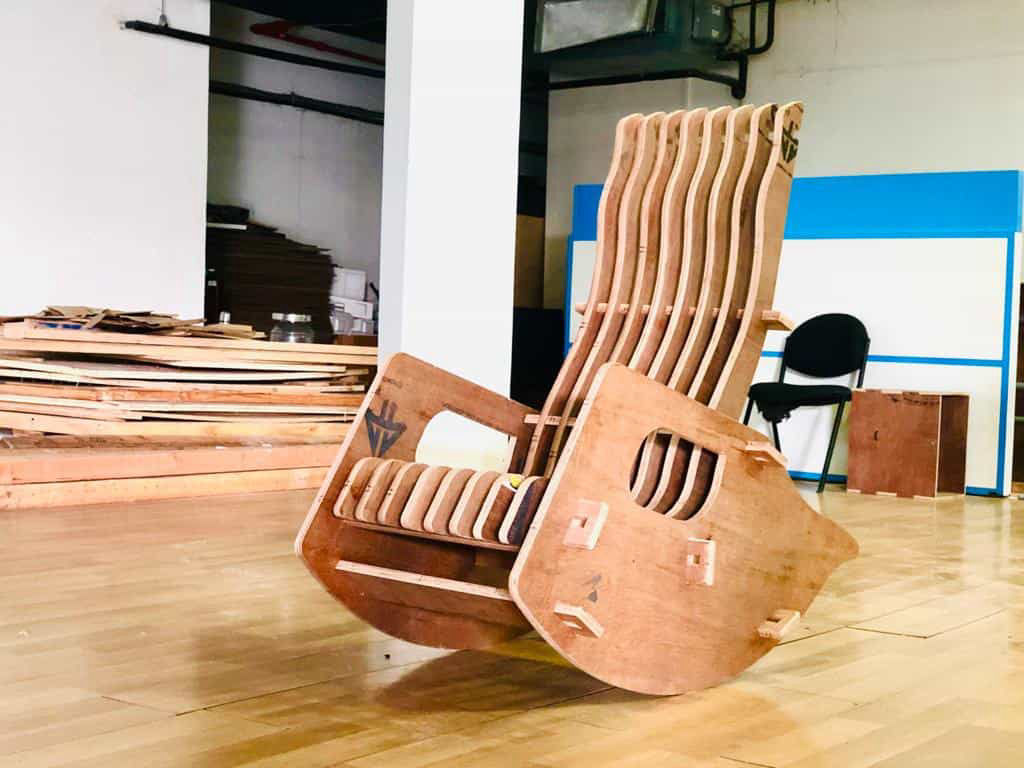
Individual Assignment: Designing a big thing
I am a lazy person. Sometimes i just love to sit back and chill. I always wanted to have a rocking chair to relax. This was the perfect chance to make one for me. So I followed following process to make it:
CAD
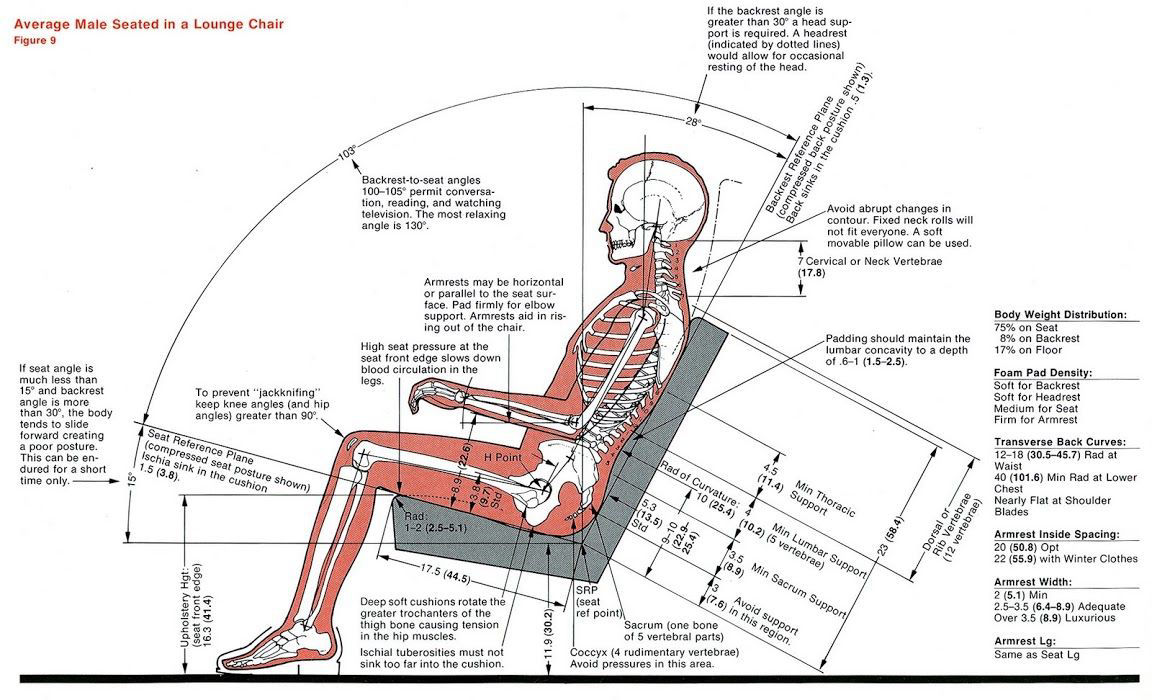
STEP 1: Made a sketch of how it would be made. I wanted to make it ergonomically good so referred to some drawings as listed below.
STEP 2: Made a parametric design so as to test it on the laser and then also to make it easy to change if the ply that we are using have differnt thickness.
Scale down prototype by laser cutter, and feedback
STEP 3: Made a scale down prototype and 2D file, dxf was exported and cut in the Laser cutter, assembled and feedbacks were collected.

CAD modification and export DXF
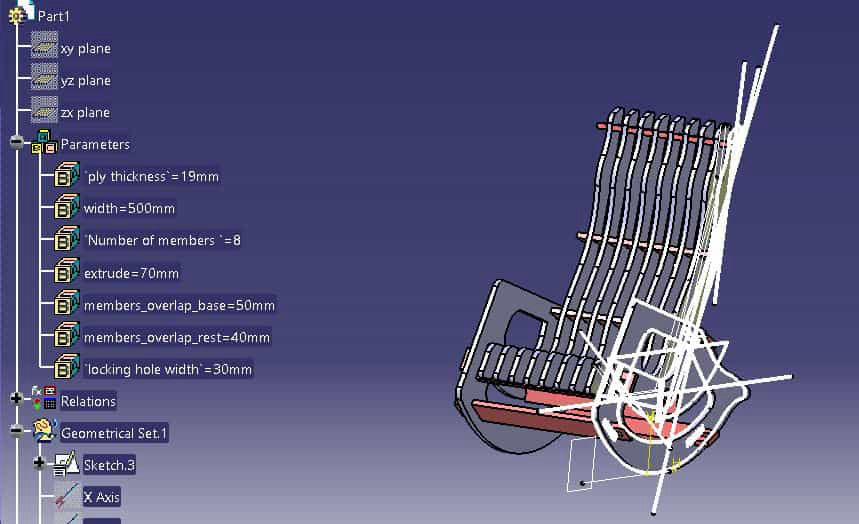
STEP 4: Added portions like stopper, added fillets on the sharp edges, moved the sitting area forward by 60mm comparing the CG of the chair.
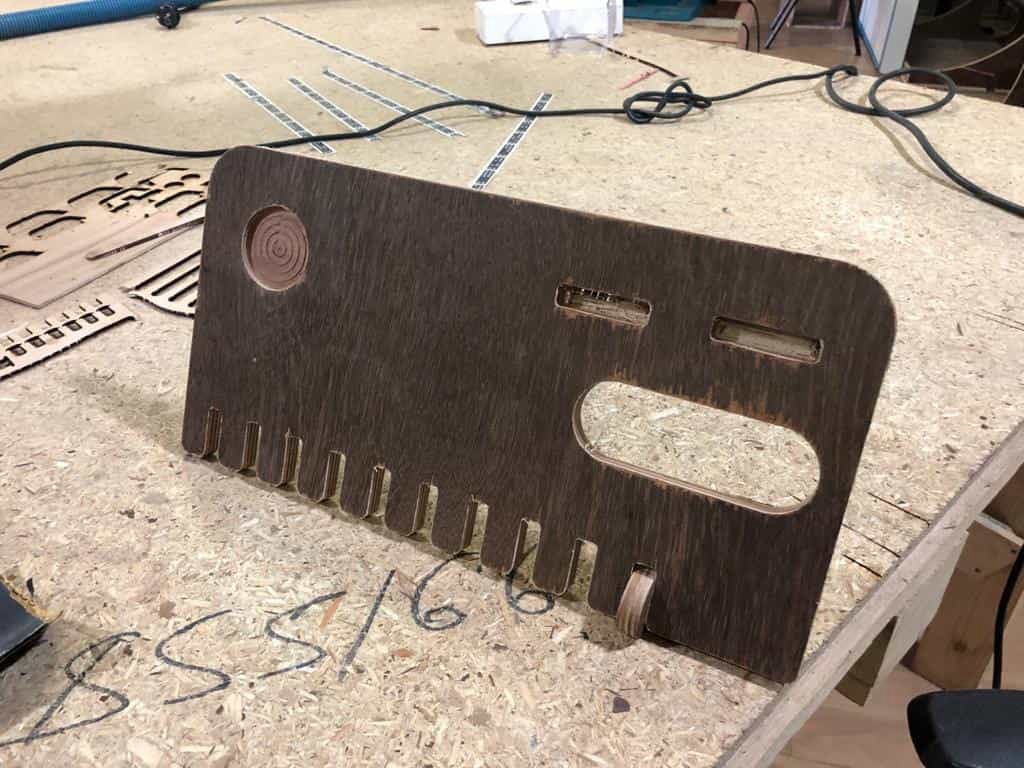
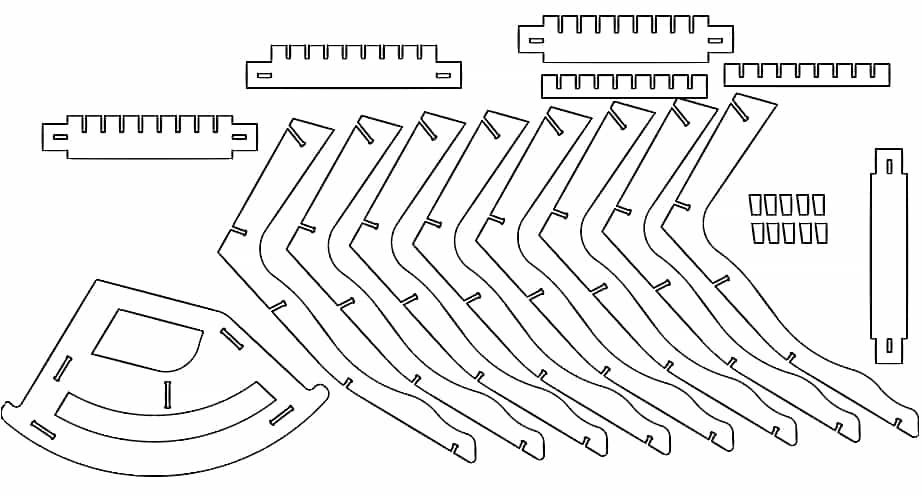
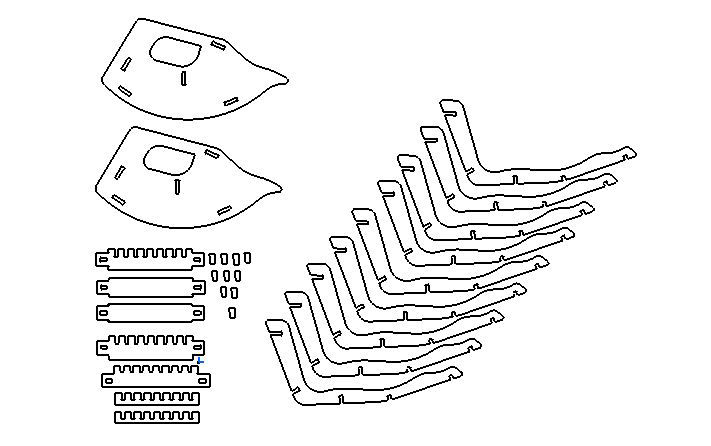
STEP 5: Ply thickness was measured and the data was modified according to the average thickness. T-bones were added and 2D were exported. T-bones are the tedious thing to add, so I created a powercopy (a function/tool)to add T-bones in the CAD file.
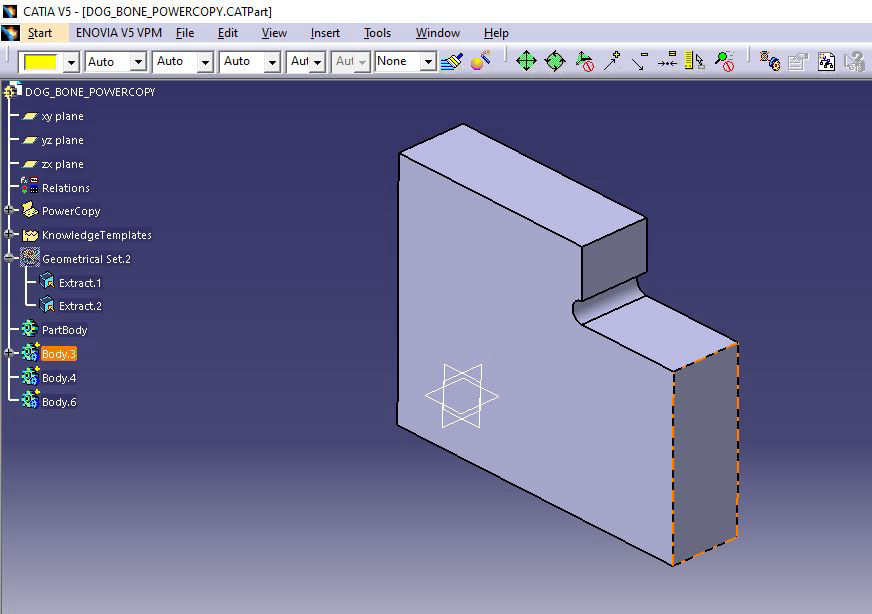
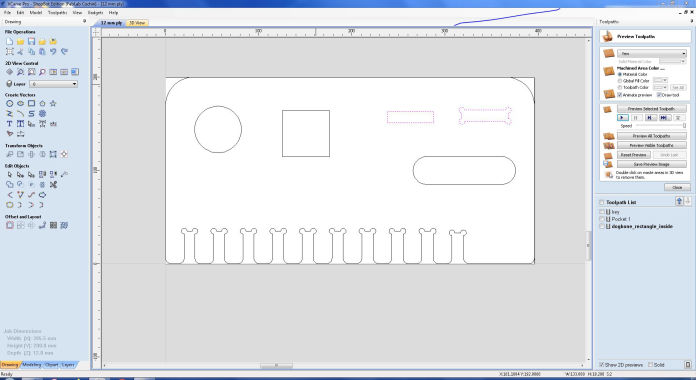
T-bones and dogbones are needed in the assembly area to overcome the limitation of CNC that it cannot cut a sharp corner while cutting inside path due to the radius of the tool. While assembly, if the inserting part has sharp corner and the hollow part has the radius in the corner, there cannot be a perfect and tight fit. SO in order to avoid that, either the edges of the inserting shape has to be filleted or chamfered which might take a lot of time, hence, an overcut in the hollow side is done so that the edge of the mating part doesnot overlap with the corner radius.
STEP 6: After all the 3D modifications, 2D was generated and the dxf file was exported.
CAM software, Vcarve pro
STEP 6: V-Carve pro is opened, first material was selected. We had 2440 x 1220 mm ply with thickness of 19mm though it was said as 18mm.
(Always measure your stock before cutting and modify the design according to it or there might not be proper fit and you may end up in loose fit or sanding a lot.)
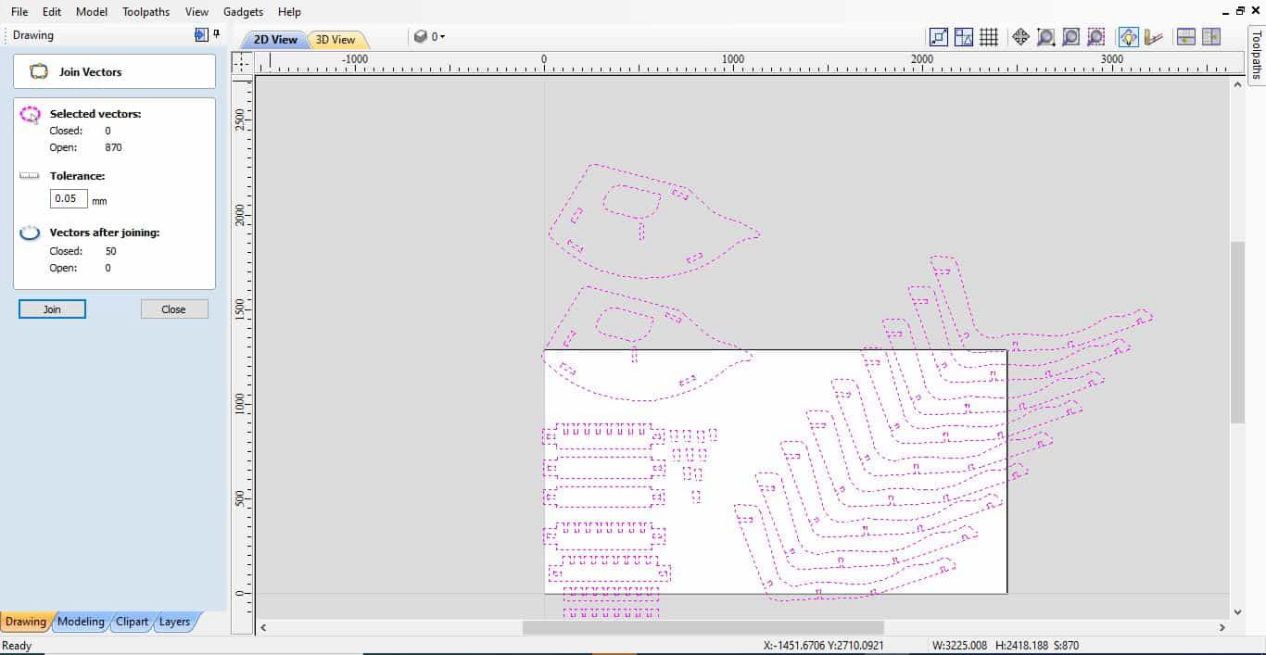
STEP 7: Then import the dxf file by clicking on import vectors inside File. All parts are first selected and then click on the Join vectors inside edit objects keeping tolerance 0.5mm and hit ok. This will join the broken curves is they are nearer than 0.5mm.
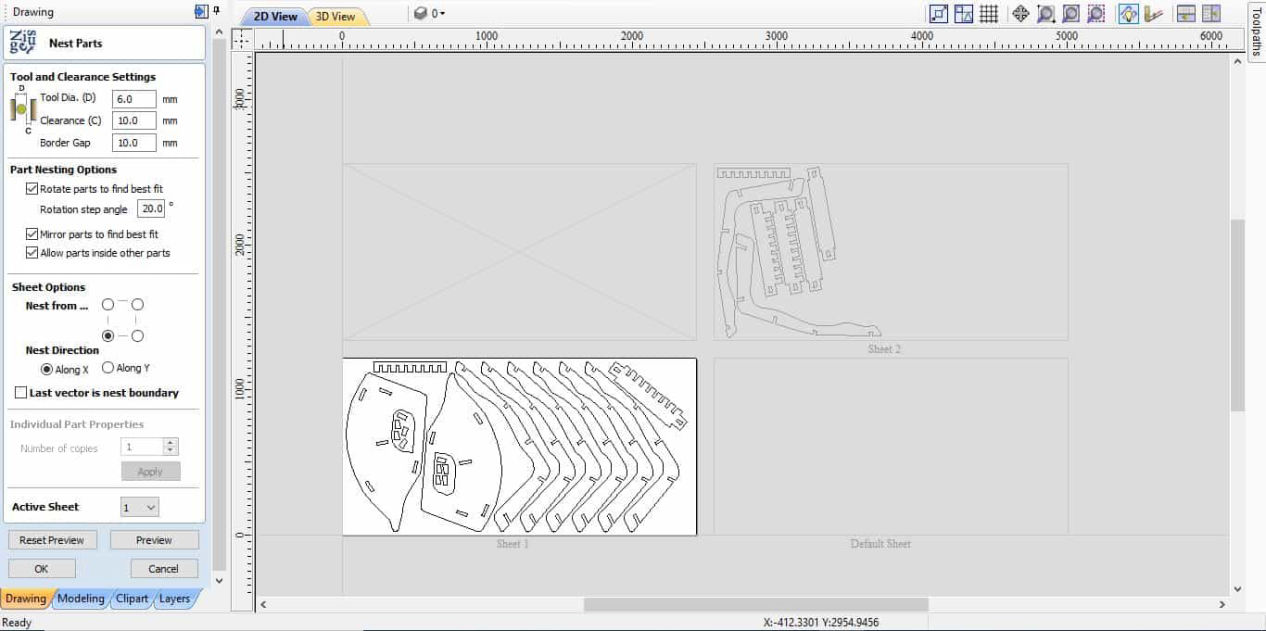
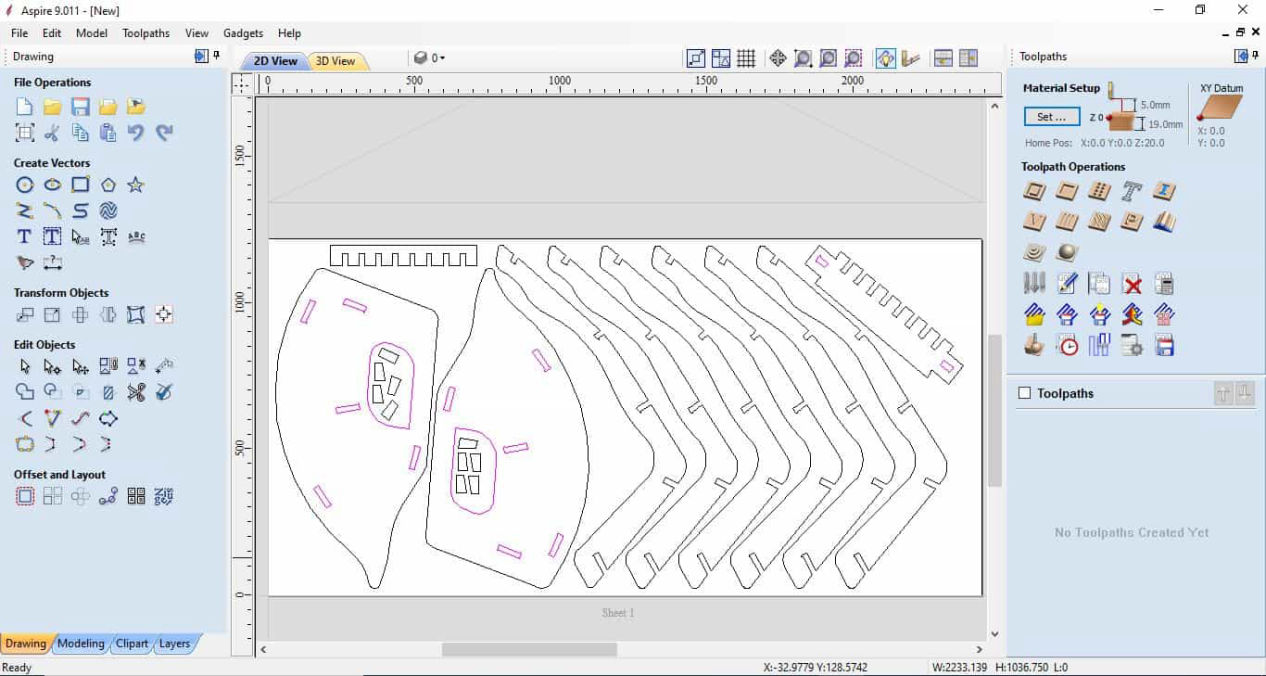
STEP 8: After joining, its time for Nesting. We can find the nesting option in the Offset and Layout in the left side of the window. Click it and set the parameters as tool dia= 6mm, clearance= 10mm and border gap= 10mm. If you have free space you can increase the clearance and border gap to 20mm. Now, you can check the boxes like rotate parts for best fit, mirror parts and allow parts inside other according to your requirement. If your ply is not same on both side and want to use one side only, then uncheck the mirror parts. or if side doesnot matter you can check it which can give you optimized result. Similarly, if the grain direction doesnot matter you can put rotation check as low as 1 or in decimal places. If the grain directions matters you should keep it 180 or 90 depending upon your material. But remember, the lower value you keep, greater the time it will take to process as it has to check all the iterations shifting shape in steps you have entered. Allow parts inside another allows the parts to be inserted where there large amount of material to be removed and that space can be utilized to cut smaller parts. In my case, i have checked it all and kept the step angle at 20 degrees which gave the optimum result.
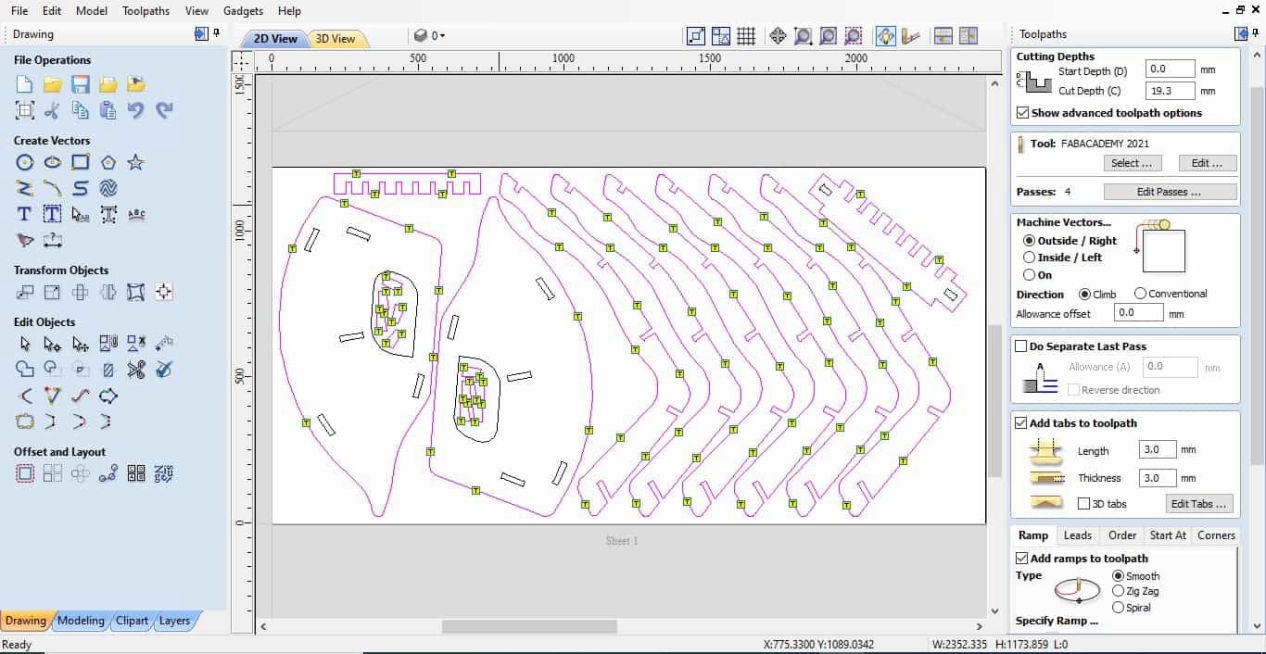
STEP 9: Now it is easy to group the vectors together which have common cutting parameters like inside cut and outside cut in our case. Hence group the geometries with inside cut in one and outside cutin another group. grouping is done by selecting the components pressing shift and after all are selected right click and group.
STEP 10: As we are doing profile tool path click on that option inside toolpaths which should be on the right side of the window.
STEP 11: Now select the cut depth. You can increase the cut depth to 0.2-0.3 mm more than the board thickness to make sure the tool cuts throught the material. For now we have kept it 19.3mm.
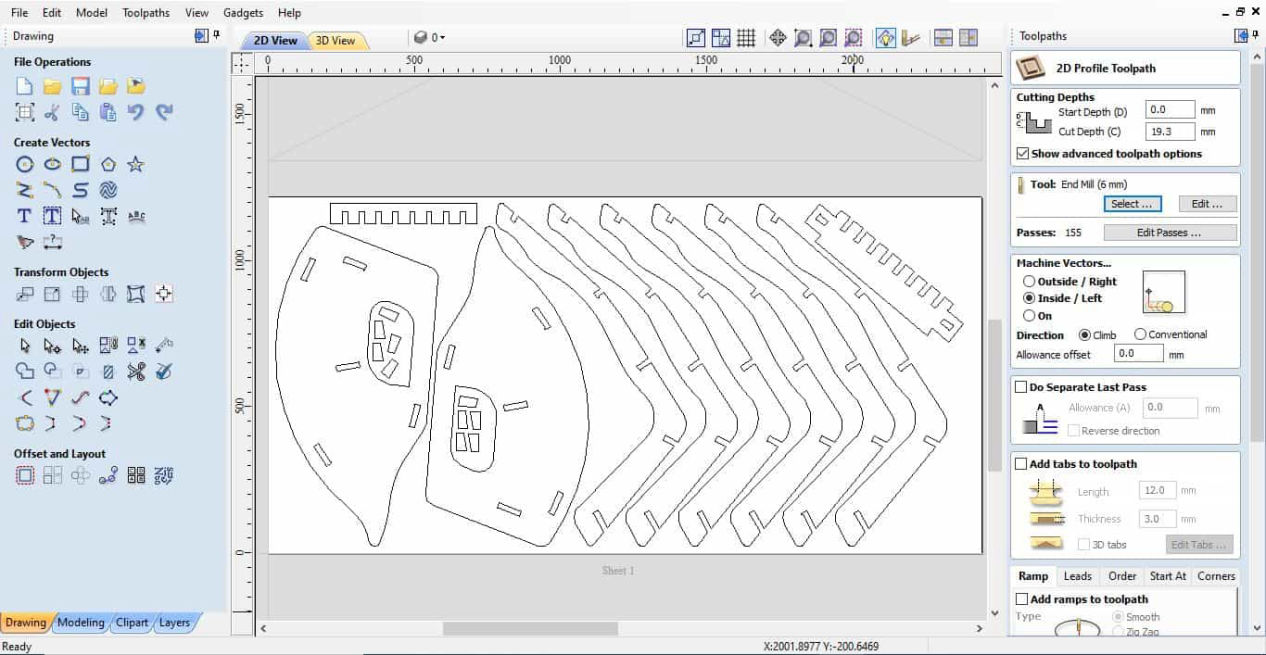
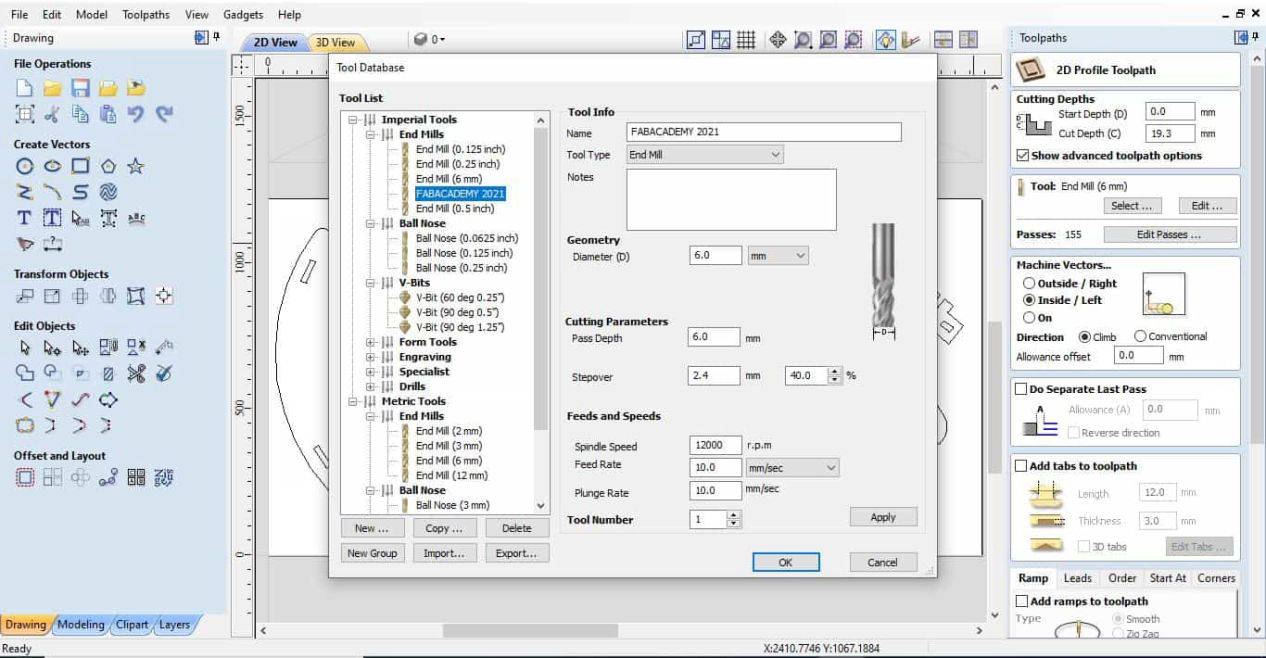
STEP 12: Select the tool. Here I have created a new tool of flat end mill of 6 mm diameter with single flute. Inside cutting paramtere, the pass depth which is deth of cut in one pass should not exceed the diameter of the tool. hence kept maximum of 6mm which shows 4 passes to cut the workpiece through. Step over is explained above and here since we dont have parallel ofset paths, any value is OK. Spindle speed is kept 12000 calculate from the chipload, and flutes. Feed rate us kept as less as 10mm/s to have a smooth cut and also since it is a single flute. and plunge rate is also kept 10mm/s.
STEP 12: Type of cut like inside of outside is selected. The part alike cavities and holes are inside cut and the parts where trimline is to be maintained are the outside cut. Curently, since we are selecting the cavities, inside cut is selected. Also climb is selected. Detail about climb and conventional is explained above.
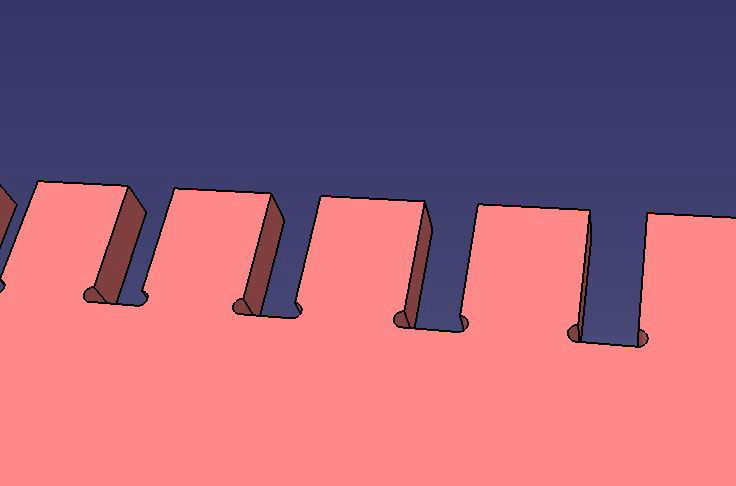
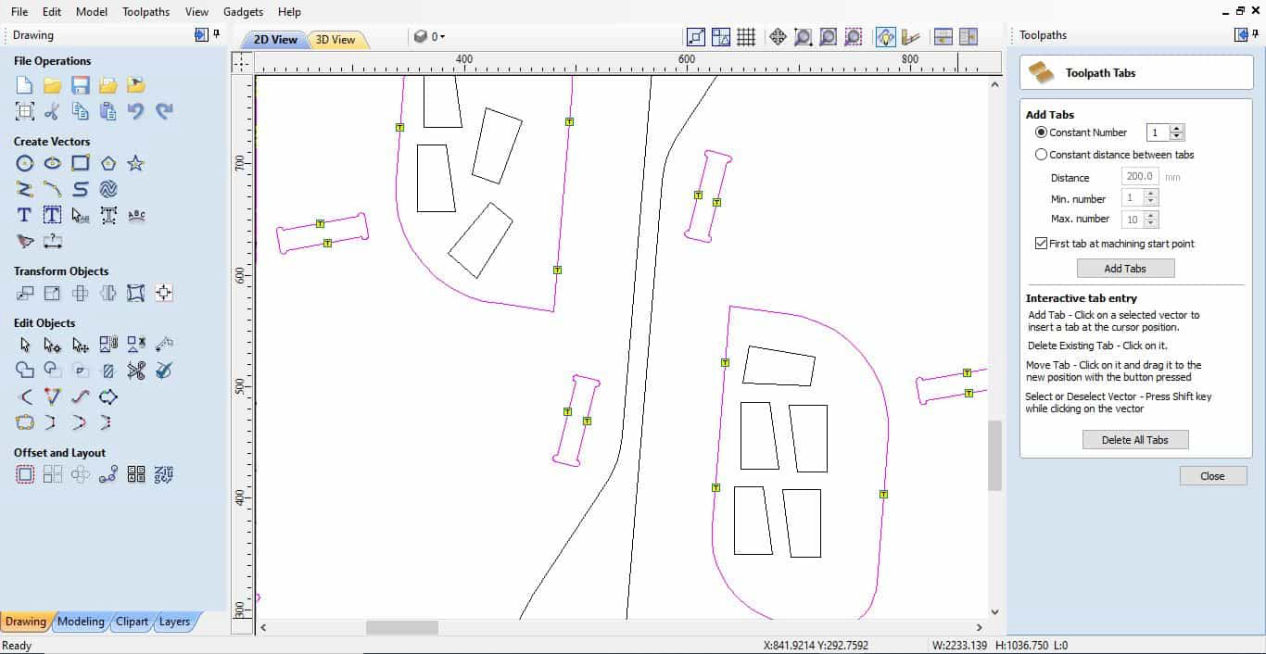
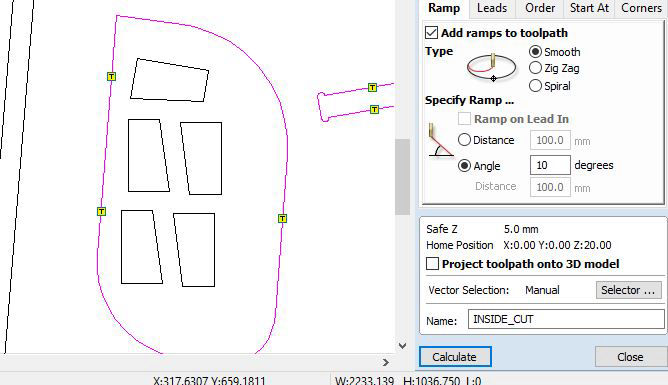
STEP 13: Tabs are added by pressing add tabs to tool path, Mention tab length and thickness and press edit tabs. Then either you can do it automatically by entering required tabs per cutout or mannually adding. Tabs are the connections between the material to be cut out and the main workpiece so as to maintain the position and prevent moving around and hitting tool or eject out after the cut is done. These are small in size and can be easily taken out one the cut is done. Place the tabs in the flat areas where you can easily sand. Normally in automatic adiition of tabs, the software might add it in corners as well so I prefer adding it manaully in the flat areas.
STEP 14: Add ramps with 10 degrees which will reduce load in the tool reducing the risk of brekage when plunged in. Rename the toolpath by name which is easier to understand like "INSIDE_CUT" and hit Calculate.
STEP 15: Do similar process for the outside cut and save it as "OUTSIDE_CUT."
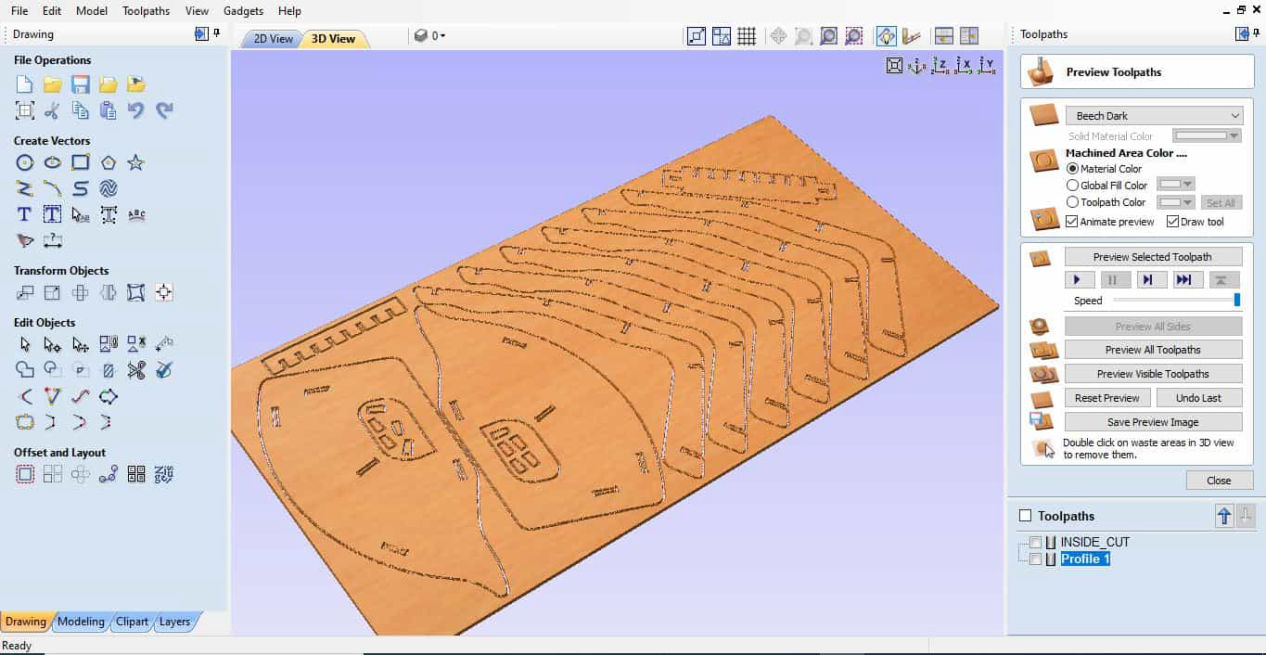
STEP 16: Animate the toolpath by clicking the preview toolpath in the toolpath menu to view the simulation how it cuts.
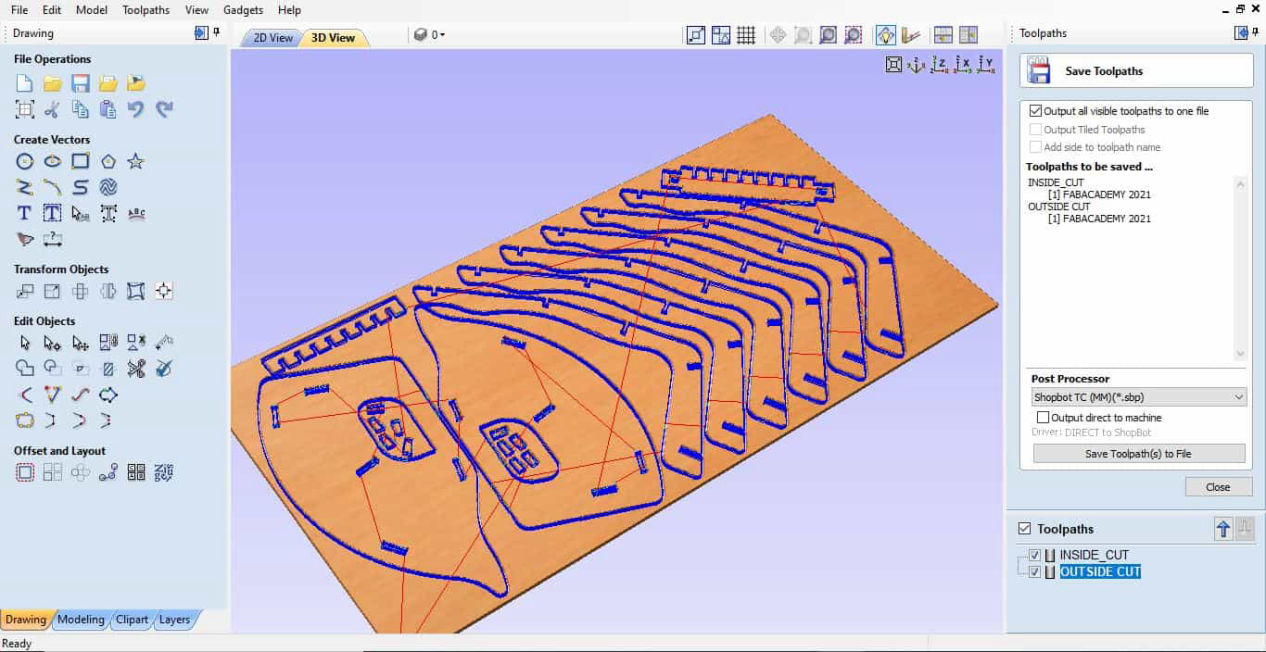
STEP 17: Close the preview toolpath and hit on save toolpath in the toolpath menu, check on output all visible toolpaths to one file. and save it in Shopbot TC(MM)(*.sbp) format.
Shopbot
STEP 18: First you have to load the material in place on the bed over the sacrificial layer. You might try to force slide the gantry, but it is NOT recommended as the rotation of the motor will generate the current which might not be good for the board when pushed fast. So, Open the shopbot software and turn on the machine as well.
STEP 19: Use the position controls by clicking on the yellow move button on the shopbot software and move the gantry at the back.
STEP 20: Clean the table so that there is no material over the sacrificial layer which may create uneven surface in the work-piece and load the material by sliding from one end. Make sure that it aligns with the edges.
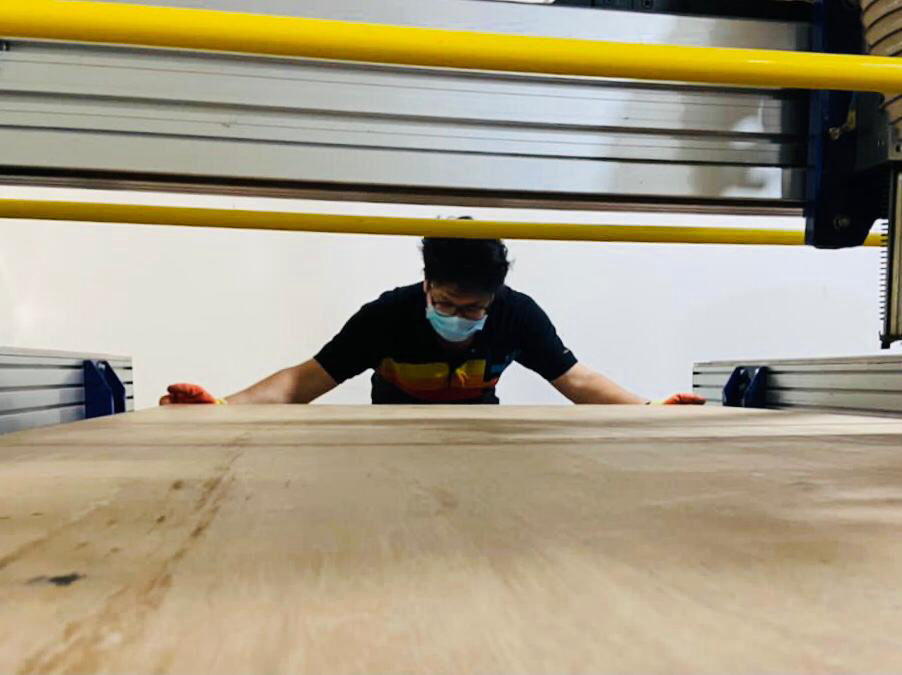
STEP 21: Clamping should be done by differnt processes but will be using clamps and screws in here. Nails can be added mannually as well and if there is very small area shopbot is used to mark the position of nail. You can use the process which will be explained later to mark the holes for screws. If you have plenty of area, you can use temporary clamps.
STEP 22: After everthing is in place, check the tool whether the tool is the one you want to cut with. In my case, since I was the first to cut in te group, I had to change it. Procedure for changing to tool is explained in the quickstart manual in the shobot section above. In brief, Take the collet spanner in left hand, and spindle spanner in right. Slide the collet spanner in the collet from below and lock the spindle with normal spanner. Push it away from you with left hand in clockwise and right in anticlockwise direction. which should release the tool. If you want to change the collet put a new collect in the nut until it snaps in the nut. Put it back to the spindle motor and apply opposite rotation towards you to stick the collect and nut to the spindle motor. Then put the tool inside the collet such that the shank is inside and the cutting baldes are out of the collet. First tighten it by hand so that the tool can self hold in the collet and then apply the key and spanner to tighten it firmly.
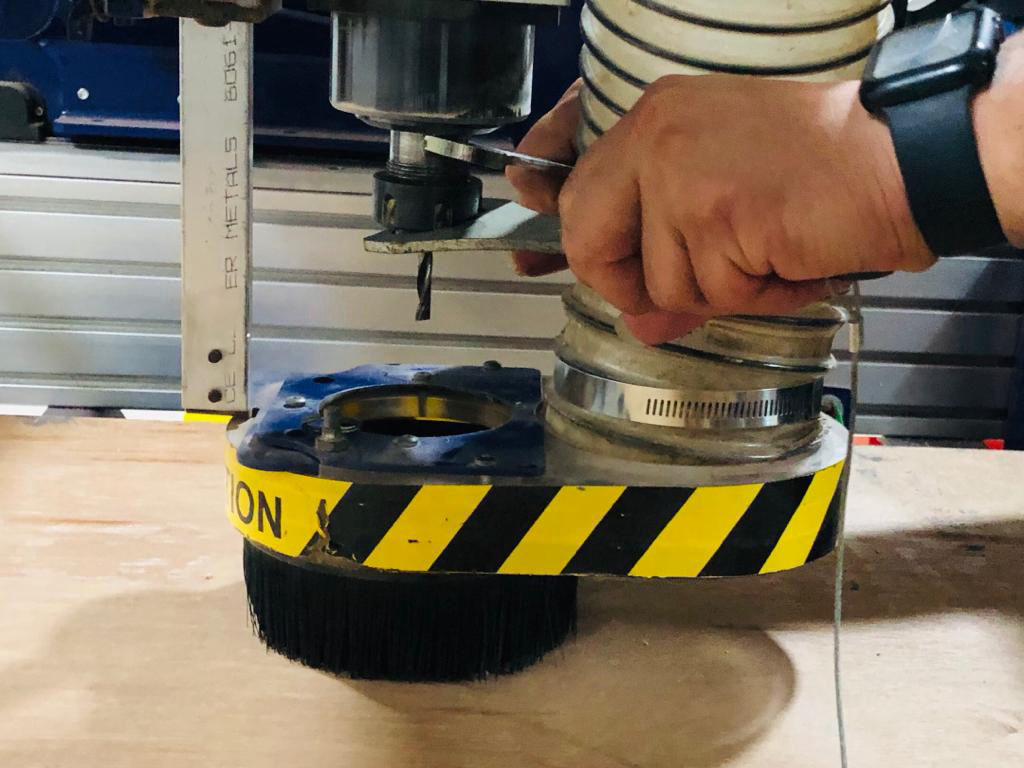
STEP 23: Now time to adjust Z axis. Take out the Z-Plate, clamp the aligator clip on the out side of spindle or on place where outer is connected. touch the plate to tool and check if green light glows up in the software. Then put the z-plate directly below the tool and press z-zero button. It should set z to zero.
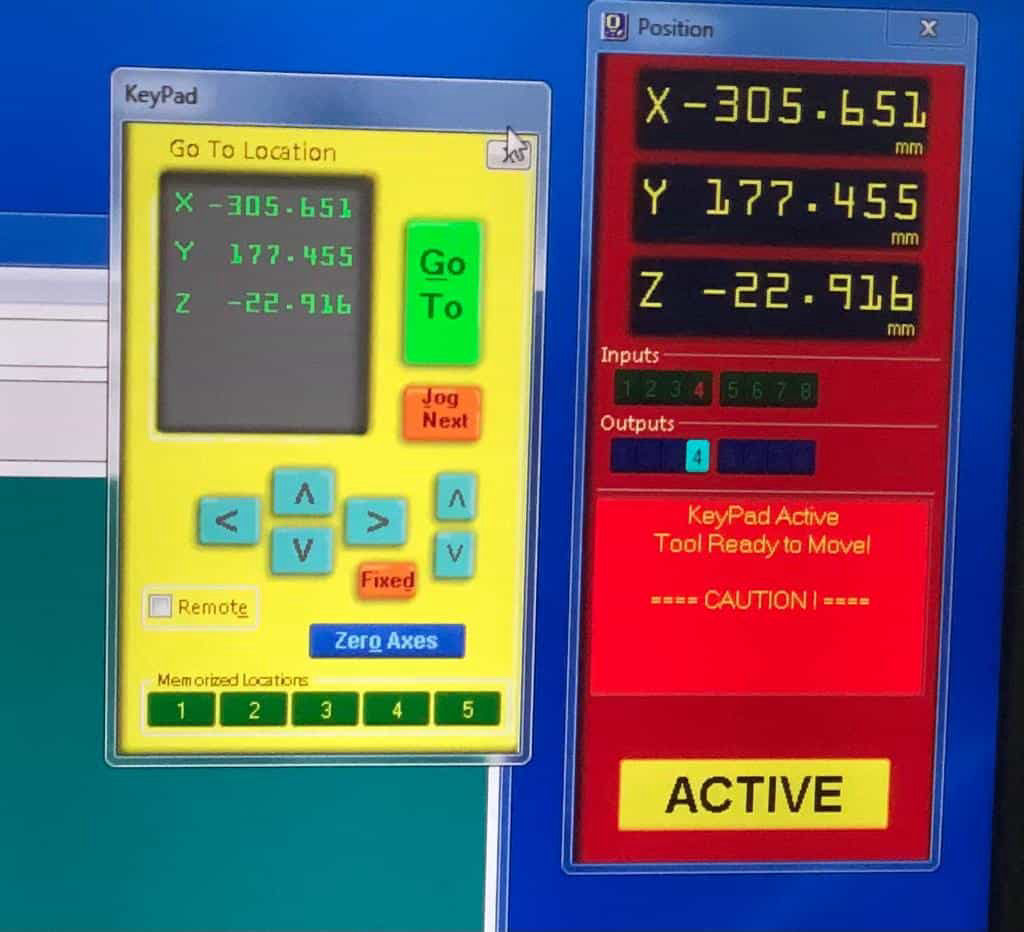
STEP 24: For setting up X and Y axis, use the arrow keys to move the gantry and position it on your desired location where you want to start your work from. It is the point where V-carve has the x and y axis. For now I have set it to the edge of the board so that i can use full material. After moving the gantry, click on zero axes, click on zero x and y axis but dont touch z axis as it has already bed zeroed.
STEP 25: Now press cut part, select the file you have exported from V-carve pro, start the process. There will be a message to start the spindle.
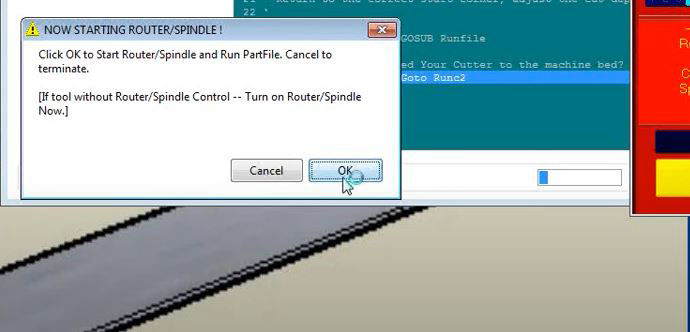
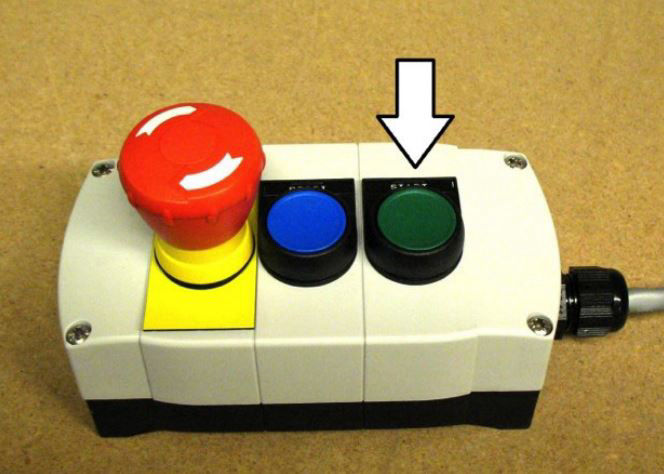
STEP 26: Then first press green hardware switch which should start the spindle, check the spindle speed if it matches in the VFD control box, leave it for 1-2 miniutes, if it is the first cut for motor to warm up. Turn on the Dust collector and press OK on the computer which should start the cutting.
YOU MUST ALWAYS BE NEAR TO THE SHOPBOT WHEN IT IS OPERATING..
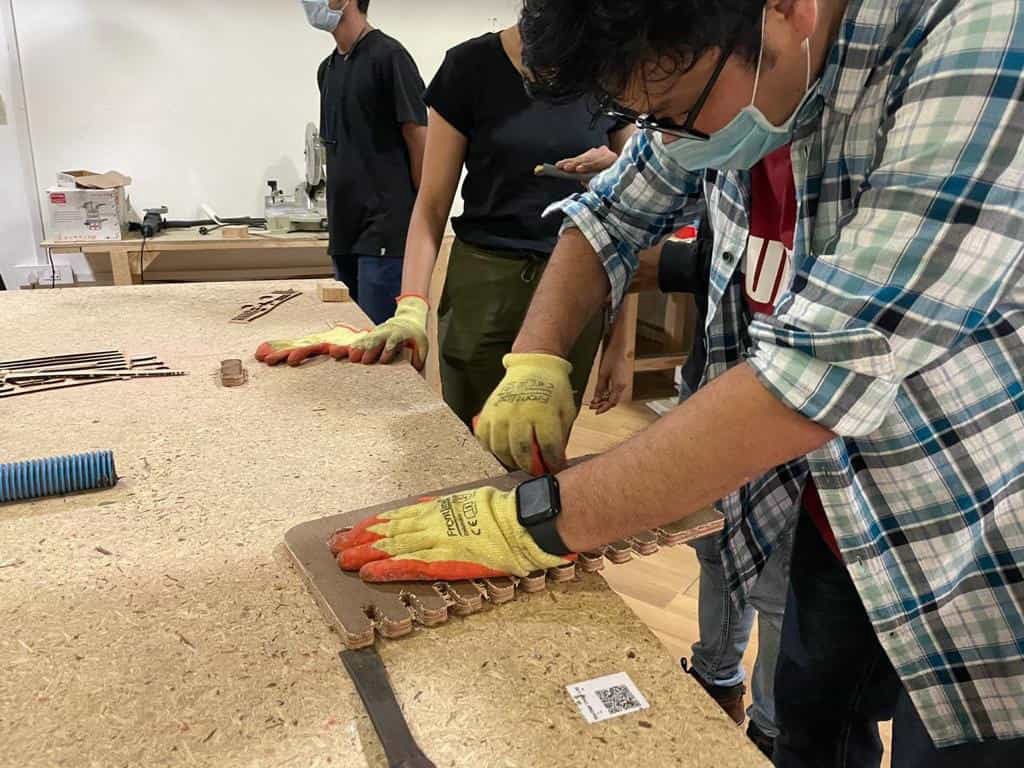
STEP 27: Remove the tabs by Chisel, remove the clamps and material from the bed and clean the bed for next use.
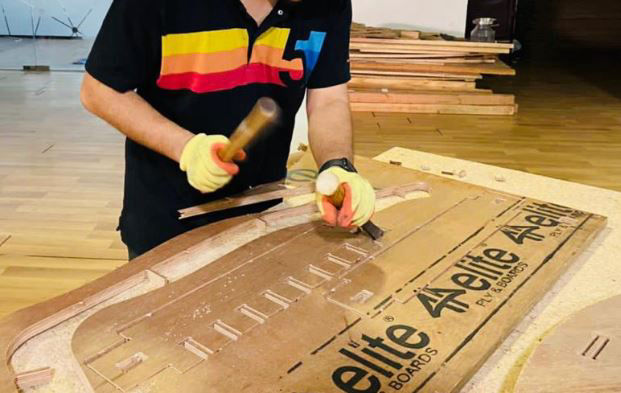
STEP 28: Sand the edges. tabs and start assembly.

Mobirise web builder - See here