Final project
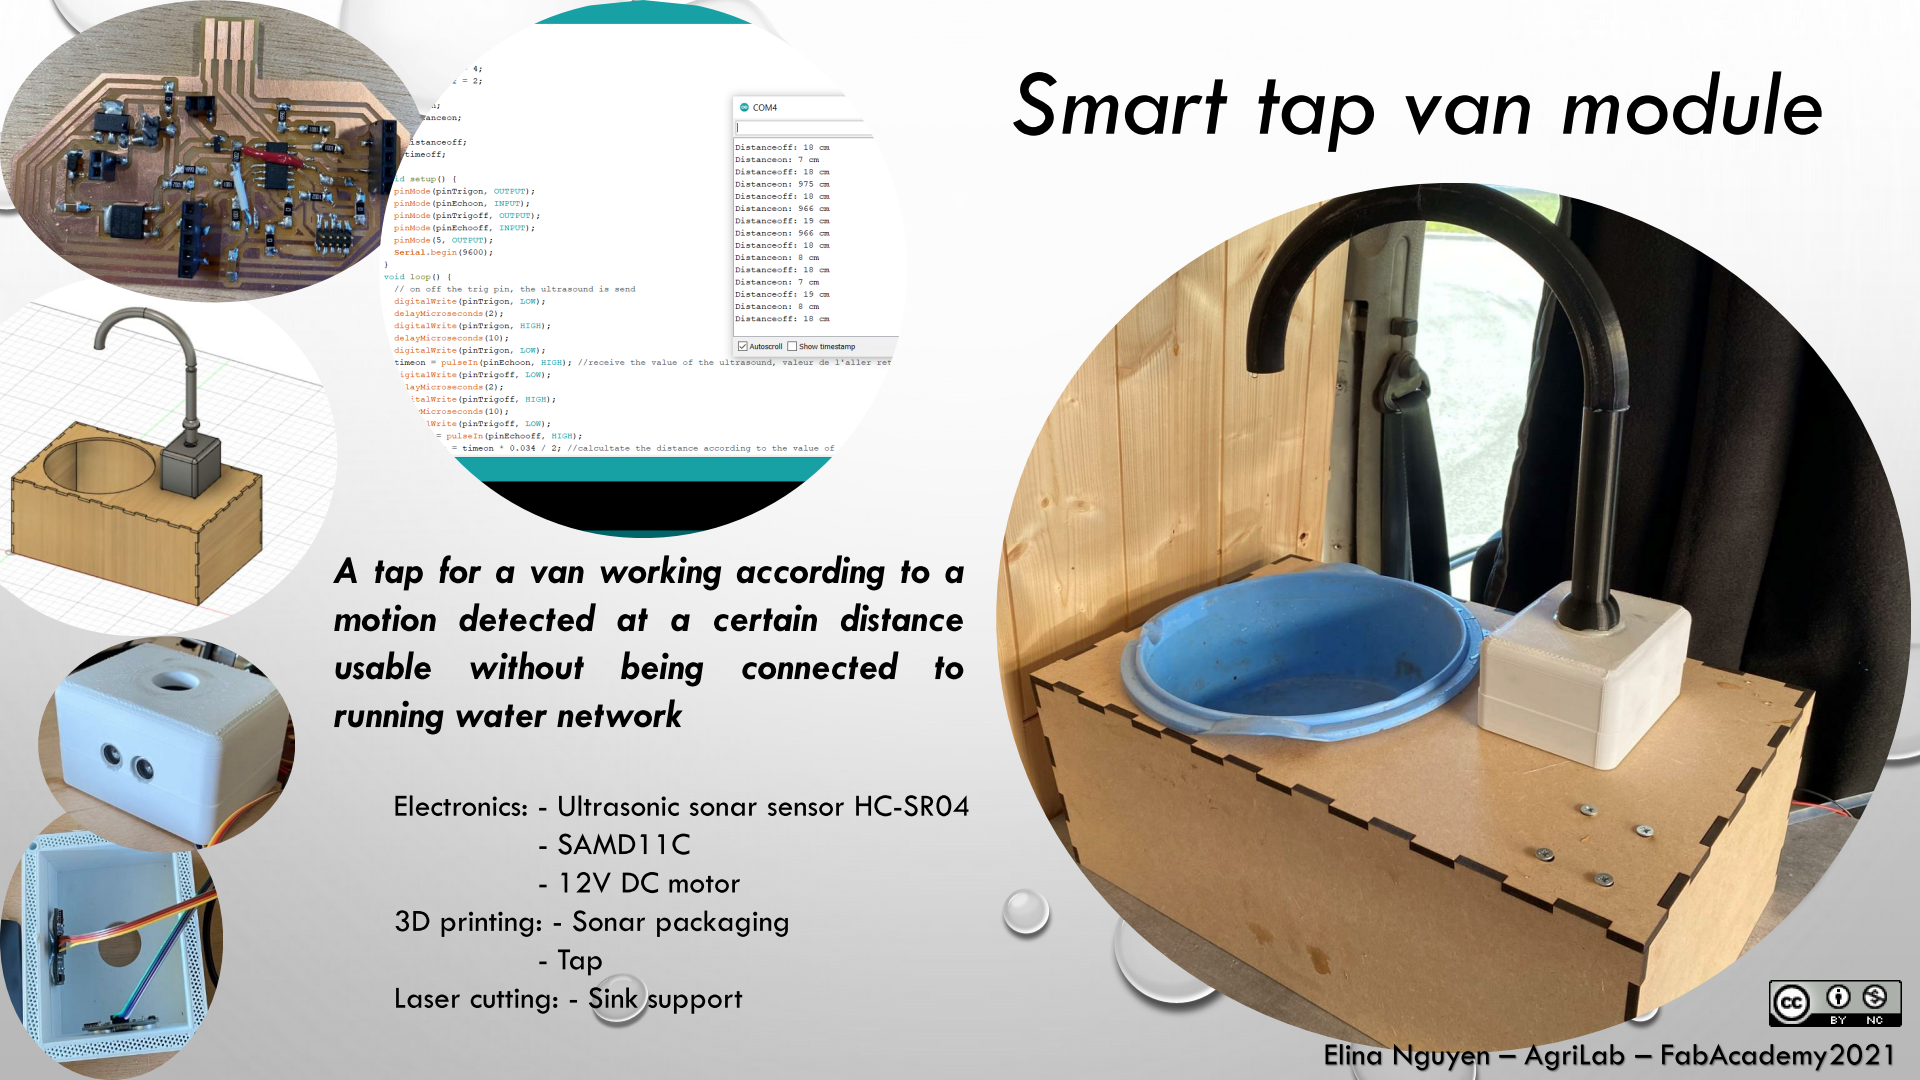
My final project is a smart tap van module. I build this tap to be usable without being connected to water running network because my van is a car, and I travel in it everywhere, that’s why I need something to be independant to water network. I choose this license for my work: Attribution-NonCommercial 4.0 International (CC BY-NC 4.0)

The idea
I finally decided to change my project idea. During the week 8 where I used the CNC, I have built a furniture for my van. It gaves me the idea of building a sink for my van. I am livng in my van but I dont have any water source inside. My first idea was to have a jerrycan with tap and a basin, but thanks to the FabAcademy program I am able to build something more efficient.
Some equipment exist already but they are pretty expensive like on this website. A sink and tap is around 300 euros for a converted van.
My idea is to add a furniture for sink on the workplan, and put two jerrycans inside the cabinet above, one for clean water, and one for dirty water.

I skectched my idea on Autodesk Fusion 360. And that is what it looks like in rendering.

The furniture for the sink will be in wood cutting with the CNC. For the sink I will use a bowl from ikea and make a hole.

For the pump I am inspiring by a peristaltic pump with pipe. The pipes will be in silicon so it will be food safe and I can drink the water.

I would like for the tap to be working according to movement sensor, to be able to turn on the tap with movement, when the hands are dirty or full of stuff. I will learn more about that during the input week.
Research
One student from the FabAcademy made a water dispenser for cat, which I found very interesting because he designed is own peristaltic pump.

Materials and components
Materials:
| Material | Quantity | Unit price | Link |
|---|---|---|---|
| jerrycan 10 L | 2 | 9.71€ | Amazon |
| pipe in silicon, foodsafe - recuperation from AgriLab storage | 1 | around 5€ per meter | Amazon |
| basin - recuperation from garden | 1 | around 6 euros new | Amazon |
| wood to make the support for the basin that will make the sink | 1 backboard | 7.20€ | Brico depot |
| filament for 3D printing | 1 coil (600 g of PLA + support) | 39€ the coil of 750g | Makershop |
| peristaltic pump 12V DC | 1 | 40€ | Amazon |
Electronics components:
| Component | Quantity | Unit price | Link |
|---|---|---|---|
| microcontroller ATSAMD11C14A-SSUT | 1 | 1.09€ | digkey |
| 0 Ohm resistor SMD | 4 | 0.08€ | digkey |
| 499 Ohm resistor SMD | 2 | 0.08€ | digkey |
| 1k Ohm resistor SMD | 4 | 0.08€ | digkey |
| 10k Ohm resistor SMD | 2 | 0.08€ | digkey |
| 0.1 µF capacitor | 1 | 0.29€ | digkey |
| 1 µF capacitor | 2 | 0.23€ | digkey |
| Diode Schottky 100V 1A | 1 | 0.35€ | digkey |
| MOSFET N-CH 50V 16A | 1 | 0.93€ | digkey |
| IC REG LINEAR 3.3V 100MA | 1 | 0.86€ | digkey |
| IC REG LINEAR 5V 1A | 1 | 0.46€ | digkey |
| Connector Male Header 2x5 1.27mm SMD | 1 | 0.23€ | digkey |
| Connector Female Header 1x5 2.54mm | 2 | 0.70€ | digkey |
| Connector Female Header 1x2 2.54mm | 2 | 0.58€ | digkey |
| Connector Male Header 1x2 2.54mm | 1 | 2.93€/20 = 0.15€ | digkey |
| Ultrasonic Sonar Sensor HC-SR04 | 2 | 10€/5 = 2€ | amazon |
Total cost: around 135€
Design

For the design of my final project, I design on Autodesk Fusion 360. I learned how to use this software during my CAD week.
To design my furniture for my sink I first draw the shape of the furniture, with each part in separate body. In that way, I will clearly see each body separately to be able to make the notches after.

Then I draw on each side the notches.

And here is the final furniture in wood done.

Now for the tap, I first draw a box with fillet. I will 3D print this part.

Then the tap with some extrusion and revolution with the help of a sketches to have an axe to revolve my shape.

And here is what the final shape looks like. I will add a bassin in the hole.

To be able to 3D print my shape easier, I split it in different bodies to fit in the 3D printer, and also have a good layering, to not be too brittle.

Finally on each side of the furniture that I will do in wood, I project the side and save as a dxf file to able to laser cut it.
Electronics design - Output - Input
Here is my schematic.

In 1 and 2, there is the 2 sonars plugged. The Sonar HC-SR04 is an input I used during the input week. The sonar needs 5V to work, but to send the information, the microcontroller handle only 3.3V. I add a voltage divider system, with 2 1k Ohm resistors and 1 500 Ohm resistor (5/3.3 is nearly equal to 1500/1000).
The number 3 is the motor system. There is a MOSFET transistor, it is a component I used during my output week. The motor is plugged to the female connector, it needs 12V to work, the MOSFET manage the crossing of current, with a signal given by a microcontroller’s pin.
The number 4 is the 5V regulator, to be able to give the power to the ultrasonic sensors.
The microcontroler SAMD11C is in 5. I discover this microcontroller during my programmation week.
There is a USB connector to flash my board. The 3.3V regulator is for powering the microcontroller, and there is also the system with all the condensator I have already used during my electronic weeks. There is also a JTAG connector to flash the board.

And here is my board when all the soldering is done.

Programming
The code I wrote for my board, the explanations are in the comments:
int pinEchoon = 15; //sonar to on the peristaltic pin echo
int pinTrigon = 14; // sonar to on the peristaltic pin trig

int pinEchooff = 4; // sonar to off the pump pin echo
int pinTrigoff = 2; // sonar to off the pump pin trig

int timeon; // integer to receive the value of the pin trig on
int distanceon; // integer to calculate the distance

int distanceoff; // integer to calculate the distance
int timeoff; // integer to receive the value of pin trig off

void setup() {
  pinMode(pinTrigon, OUTPUT); // set the pin trig as an output
  pinMode(pinEchoon, INPUT); // set the pin echo as an input
  pinMode(pinTrigoff, OUTPUT); // set the pin trig as an output
  pinMode(pinEchooff, INPUT); // set the pin echo as an input
  pinMode(5, OUTPUT); // the pin 5 is the pin for the gate for the MOSFET, set the pin 5 as an OUTPUT
  Serial.begin(9600); //initialize the baudrate at 9600 for the serial communication
}
void loop() {
  // on off the trig pin, the ultrasound is send
  digitalWrite(pinTrigon, LOW);
  delayMicroseconds(2);
  digitalWrite(pinTrigon, HIGH);
  delayMicroseconds(10);
  digitalWrite(pinTrigon, LOW);
  timeon = pulseIn(pinEchoon, HIGH); //receive the value of the ultrasound, valeur de l'aller retour
  digitalWrite(pinTrigoff, LOW); // on and off the pin trig to send the ultrasound
  delayMicroseconds(2);
  digitalWrite(pinTrigoff, HIGH);
  delayMicroseconds(10);
  digitalWrite(pinTrigoff, LOW);
  timeoff = pulseIn(pinEchooff, HIGH); // receive the value of the second sonar
  distanceon = timeon * 0.034 / 2; //calcultate the distance according to the value of sound
  distanceoff = timeoff * 0.034 / 2;
  Serial.print("Distanceon: "); // print the value receive, to make a check
  Serial.print(distanceon);
  Serial.println(" cm");
  Serial.print("Distanceoff: ");
  Serial.print(distanceoff);
  Serial.println(" cm");
  if (distanceon < 10){ // if the distance that the on sonar receive is less than 10 centimeter, then switch on the motor of the pump
    digitalWrite(5, HIGH);
    Serial.println("1");
  }
  else if (distanceoff < 10){ //if the disntance of the off sonar is less than 10 centimeter, then switch off the motor of the pump
    digitalWrite(5, LOW);
    Serial.println("0");
  }
  delay(500); // delay to not have the loop too quick
}
And here is the value printed on the screen when I put my hand in front of the sonar.

And I test the board with a small motor.
The motor working according to the sonar detection:
Laser cutting
The support for the sink is laser cut. I used the laser cutter during the computer controlled week. To have my .dxf files, I create the sketch of the part I want on fusion 360.
I project the whole body I want to cut.
And then do a right clic on the sketch and save as .dxf.
Here is the part laser cutting assembled.

3D printing
For 3D printing I use the software Cura. I discover this method during the 3D printing week. To import files in Cura I use .stl files. In Fusion 360, I select the body I want to print, do a right clic on it and save as .stl.
Then in Cura I drag and drop the file. Here is the settings I used for the printing, I use PLA filament:

- wall thickness of 2 millimeters
- infill density at 50 %
- print temperature at 210°C
- support when it touching plate
And the side of printing I choose is this one.

The parts of the tap are printed like this to be able to have the inner cylinder printed without support.
And here is the result once printed.

The inside of the box with the sonar.

The assemblage
To assemble all the part, I plugged the two sonar to the electronic board, the peristaltic pump and the power source.

For the power source source I use a battery 12V.

I plugged the pipe from the jerrycan with water to the peristaltic pump.

I screw the pump under the sink support.

And here is the result from a top view.

And the sink and tap module inside my van.

Second spiral and some improving
So all the presentation above is my final project. I am already working on second version with my own peristaltic. You can ee more on my final project page for improvement
One improvement of the project could be to have a whole electric system inside my van, with for example solar pannel to refill the battery.
All the files
- File .f3d for the sink and the tap
- Files .stl for part of the tap for 3D printing
- Files .dxf for sink support for laser cutting
- File for the code for programmation
- Files for the design of the electronic board on KiCad