14. Networking and communications
assignment individual assignment: design, build, and connect wired or wireless node(s) with network or bus addresses group assignment: send a message between two projects
Areas of interest
parallelism & modularity: Parallel processes in different processors, rather than one master board that runs everything. Modularity is Systems Design of the components for achieving high level tasks independently yet coordinated in design and function.
SPI and SD cards
According to Neil good reason to use SPI is memory cards. For my final project I would basically like to read data (in my case audio files) i.e. from an SD card.
From Neil’s lecture it seems that SPI is something you implemented in software instead of hardware - you can customize pins. Downside is that the processor has to be doing this task - so for versatility and portability but not so good for performance. SPI can be used to talk to memory chip. (this probably explains why SD card programming took way longer time than usual)
Neil has an example of writing and reading a file from an SD card with a library. As storage is crucial to my Final Project, I tried to use an SD card with the At Tiny 1614. However, there were multiple issues - primarily the Amplifier, speakers, SD card were all on a single sided board. As a result, the SD card performance was inconsistent - there were times when read/write would work and other times when it would show I/O error.
However he also presented an example of SD card without a library with an ATtiny44. In this one Neil programmed it from scratch minus a library, “under the hood” programming. (SD card is a very messy standard), partially due to microsoft’s approach to memory standards called FAT.
SD cards are slow to write. however, one can get GB of storage on – very easy to talk to them over SPI. One can use the RAM for faster access memory for example a temperature logger, video profiles etc. - key thing is with SPI its very easy to add SD cards.
Opening up the SD card
According to this link, the secure digital card (SD) is a low cost, non-volatile memory card format developed by the SD Card Association. Since its inception back at the start of the century, the demand for this medium-sized, energy and space-efficient, the memory storage device has been growing at a fast rate. Therefore, to meet the market requirements, the SDA was set up as a non-profit organization to promote and create SD Card standards.
There are various topics related to the SD card such as the different device families, speed classes, smart cards, card security and so on and it is used in various markets like digital cameras, personal computers, and embedded systems. Some of the standard variations include SD, SDHC, SDXC, SD-ultra high speed etc.
The microSD is the miniaturized SD memory card format with a small form factor and is widely used in various electronic devices.
Apparently most microcontrollers use the SPI communication protocol to interface with the SD cards. Initially I started out with an initial circuit diagram that was reverse engineering some hobby projects that used a micro SD card. Especially the one seen in this example, that uses a CD jewel case as the housing and drives music frmo an SD card with an AtTiny85 and its two internal timers. I took a look at this schematic for reference. However my main referece was the datasheet for the MicroSD card as specified in the FabLab inventory.
Now one has to remember the DataSheet can look greek to many people leapfrogging into hard core SMDs from the basics of electronics. Because of this reason, it should be kept in mind that
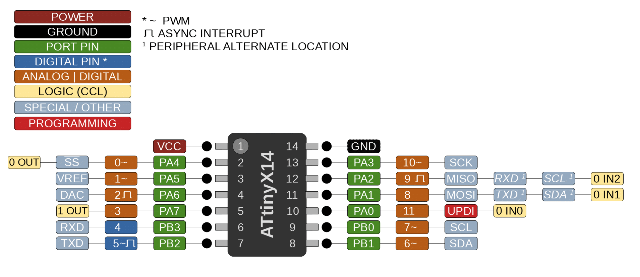
Once the microcontroller is in the SPI mode (SPI = Serial Peripheral Interface used for communication between ICs), communication between the master and the slave is done via 4 pins viz. clock, chip select, data in and data out.
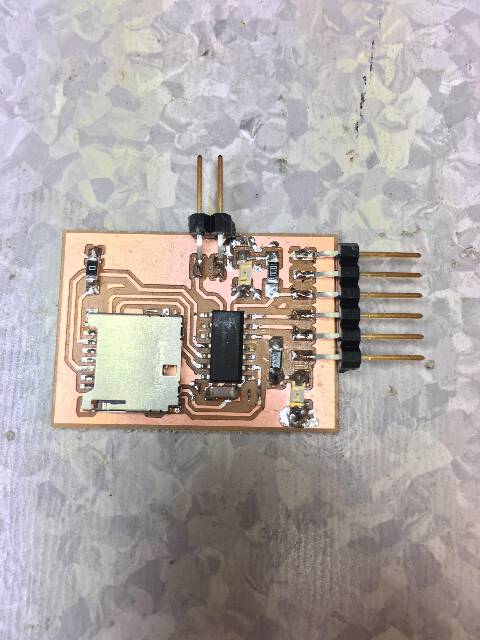
ATtiny1614 BASED double sided board with amp-speaker and SD card slot

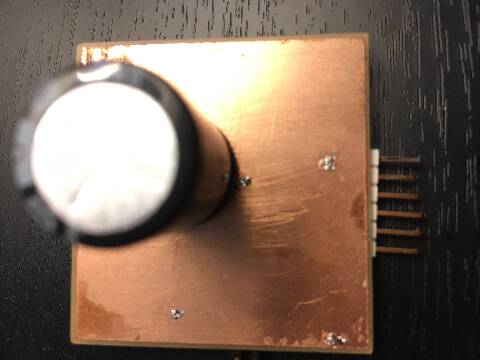
In order to block the DC component going to the speaker (and thus preventing a reverse kickback that could harm the speaker), a 220 microFarad THT capacitor was soldered onboard. Ideally it would be good to have a SMD component instead.
developments
First blinked the 1614 chip with HelloWorld code.
    #include <avr/io.h>

      #define LED_AVR PIN5_bm


      void setup() {
        PORTA.DIRSET = LED_AVR;
      }

      void loop() {


        PORTA.OUT |= LED_AVR;
          delay(200);
          PORTA.OUT &= ~LED_AVR;
  delay(200);

}
Next I tried combining blink with SD card detect code, however there was no response.
Upon deeper investigation, it was found out by the FabLab teacher Krisjanis that the pin configuration for SD compatibility with the 1614 had to be reset at the library level.
pin configurations for the AtTiny 1614
Testing SD card file read
Also for testing the Files.ino from the SD library was modified.
===============
#include <SD.h>
const int chipSelect = 0;
File myFile;
void setup() {
// Open serial communications and wait for port to open:
Serial.begin(9600);
// wait for Serial Monitor to connect. Needed for native USB port boards only:
while (!Serial);
Serial.print("Initializing SD card...");
if (!SD.begin(chipSelect)) {
Serial.println("initialization failed!");
while (1);
}
Serial.println("initialization done.");
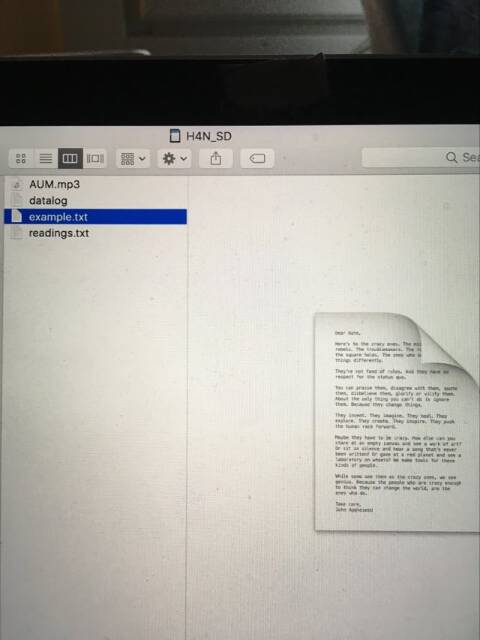
if (SD.exists("example.txt")) {
Serial.println("example.txt exists.");
} else {
Serial.println("example.txt doesn't exist.");
}
// open a new file and immediately close it:
Serial.println("Creating example.txt...");
myFile = SD.open("example.txt", FILE_WRITE);
myFile.close();
// Check to see if the file exists:
if (SD.exists("example.txt")) {
Serial.println("example.txt exists.");
} else {
Serial.println("example.txt doesn't exist.");
}
// delete the file:
Serial.println("Removing example.txt...");
SD.remove("example.txt");
if (SD.exists("example.txt")) {
Serial.println("example.txt exists.");
} else {
Serial.println("example.txt doesn't exist.");
}
}
void loop() {
// nothing happens after setup finishes.
}
===============
The Old board with LM368 worked fine w above code and SD card was detected - and the contents I had stored to the card were listed.
but is that an easter egg?
However it was not possible to write and read music mp3 files from the SD card. Also the SD module start behaving erratically and was not getting detected now and then.
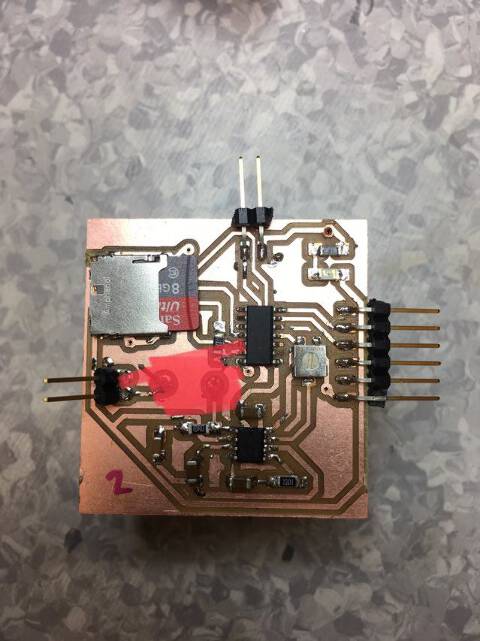
So the next step was to create an SD card module only with 1614 to make it as a modular stand-alone board - that can be then connected with another amplifier-speaker board separately to avoid electromagnetic interference.
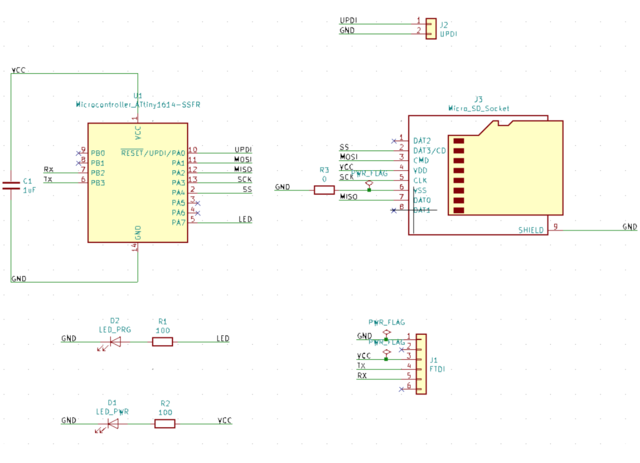
Making the ATtiny1614-SD card module board
BOM for the SD card - 1614 only board (minus amplifier-speaker circuit)
| Ref | Name | Value | Package | Count |
|---|---|---|---|---|
| R1, R2 | Resistor | 100 OHM | 1206 | 2 |
| D1, D2 | LED | Any color | 1206 | 2 |
| R3 | Resistor | 0 OHHM | 1206 | 1 |
| C1 | Capacitor | 1 uF | 1206 | 1 |
| U1 | Microcontroller | ATtiny1614 | SOIC-14 | 1 |
| J3 | SD Card Socket | Micro SD | Amphenol | 1 |
| J2 | Pin Header | 2 pos UPDI | SMD | 1 |
| J1 | Pin Header | 6 pos FTDI | SMD | 1 |
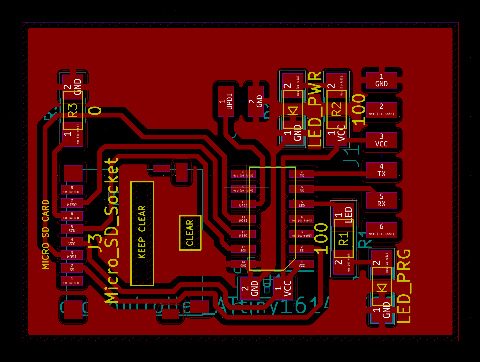
Design of the SD card - 1614 only board

p.s. it is noted that the vocabulary of MISO/MOSI (slavery reference) has evolved onto CIPO/COPI (CONTROLLER / PERIPHERAL) these days and as the datasheet sticks to MISO/MOSI I stick to it by lack of choice
Before running the code it was essential to FORMAT the SD card using a SD card formatter - this was highly recommended online for many people who faced issues with SD card reader.
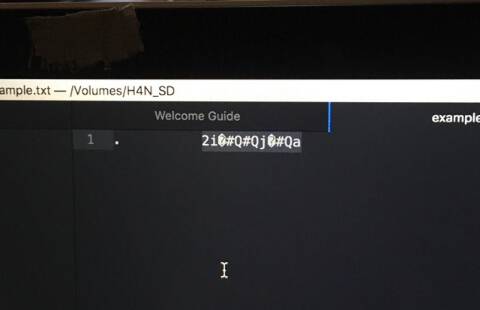
Again the code for detecting files on board the SD card was run for the new board - and it was able to list all the files that had been loaded onto the SD card.

challenges
SD card slots were a challenge to implement because of a number of reasons. The libraries were designed for the older At Tiny versions and some deep hacking had to be done to get it up to date with the newer At Tiny series such as the 1614 I was using.
All I know from the Arduino level is that the DAC pin needed to be defined as 2. And the chipSelect had to be set to 0 instead of 4 that came with the library.
The SD card - 1614 holder behaves quite inconsistently till date - and needs modification and further exploration - and also if possible add a ATTINY3216 instead. This might mean a new library and pin modification.
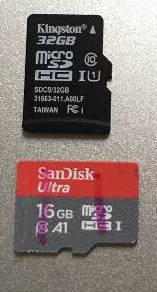
There seems to be different behaviours of different SD cards due to standard variations. Likewise, it was recommended during a weekend recitation last year, that a smaller size (1-2 GB SD card) was recommended for projects such as mine, as lesser sectors lead to lesser problems.
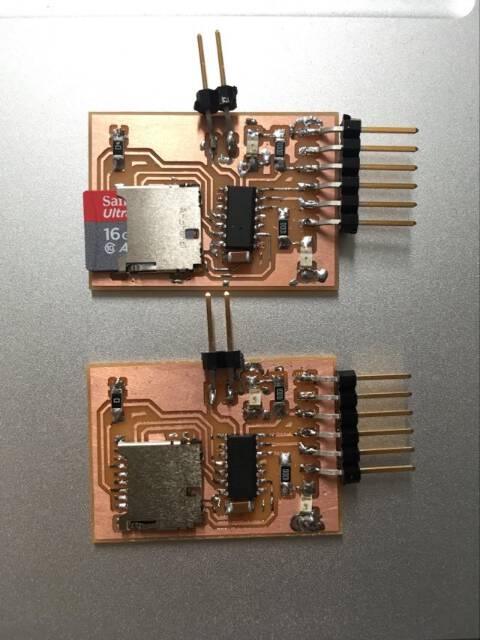
Kingston 32 Gb micro SD HC 1 was far more consistent and reliable than the San Disk Ultra 16GB MicroSD Hc 1 - both were brand new, so why?
Interstingly after these trials, a colleague of mine showed me the Adafruit MP3 player - which features an SD card strategically placed on the underside of the board.
I would like to create further iterations of the above design using a schematic closer to AdaFruit design and investigate if SD card is the memory of choice for my project that requires robustness and reliability over anything else.
// rock bottom - extra notes
“matter tech library is very inefficient. short term band aid is to move up to a bigger processor - like the 21.
interference: the motors might make high powered transients but radios need clean power for low noise.
a network has typology/routes and bus is just a line with things hanging off it.
bit banging*: “