Networking and Communications
The individual assignment for this week is to design, build, and connect wired or wireless node(s) with network or bus addresses.
And the group assignment is to send a message between two projects.
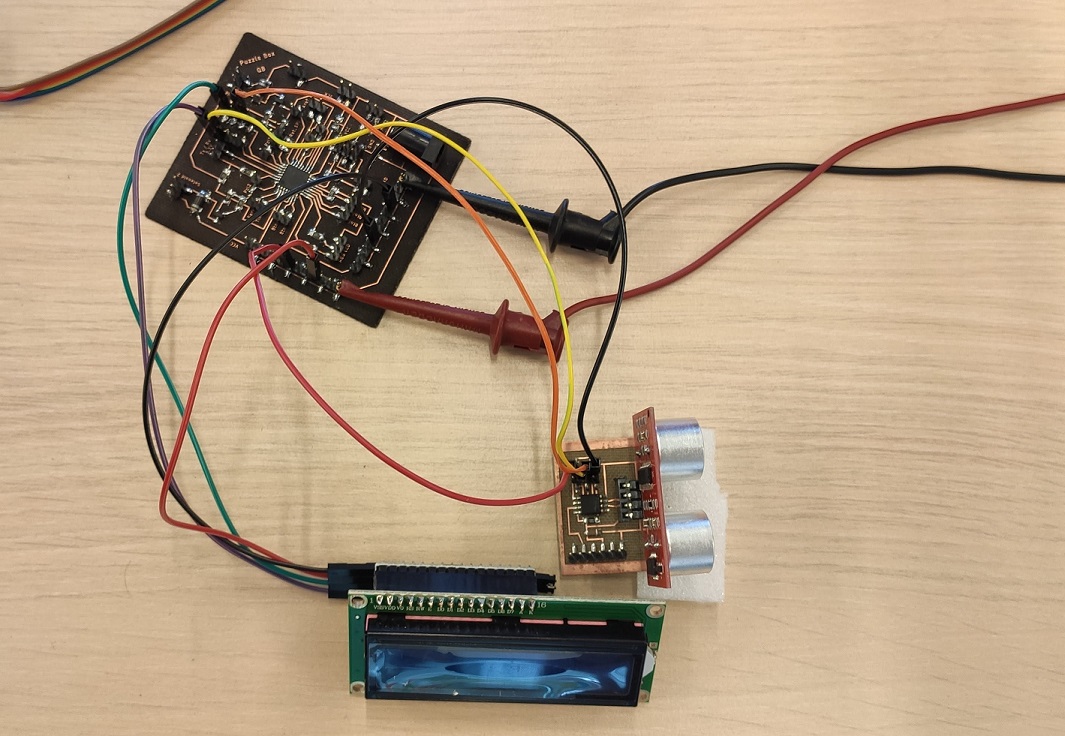
The ATtiny85 board is designed to connect with a HC-SR04 ultrasonic sensor to measure a distance.
The boards are communicating thru I2C communication. Quentin's board is the Master board and it requests the inputs from secondary board (ATtiny85) which returns the measured distance.
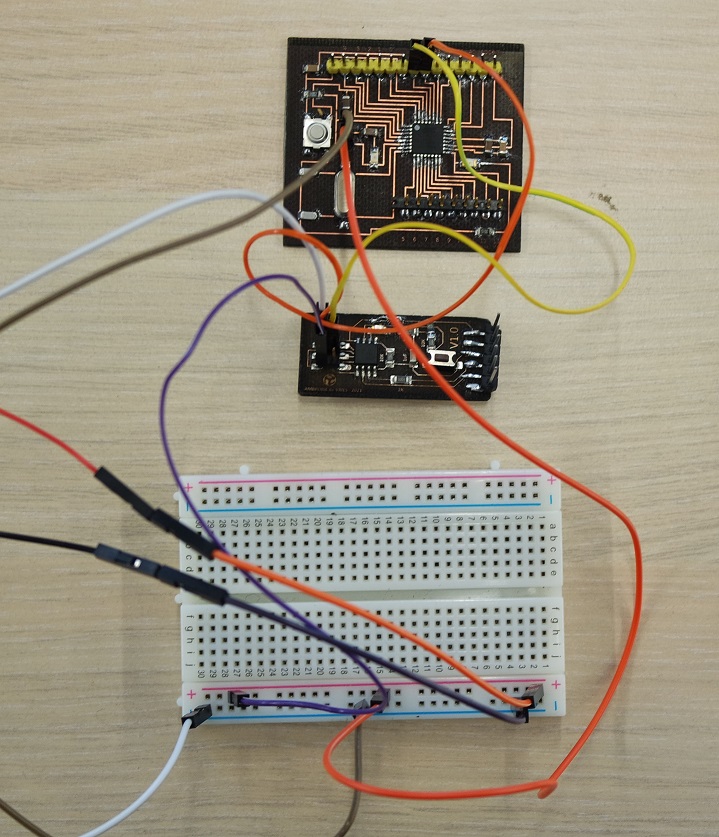
Here is a photo showing how they are connected and a video showing our result:
I started this week by finishing my Satshakit board I had started on my previous week.
The details for the making of my Satshakit board can be seen on my Ouput devices week page:
I started by testing I²C synchronous serial protocol to communicate between the boards because it seemed to be the simplest at first.
The boards I will be using for this test are the Satshakit I just finished and a Arduino Uno board.
In order to make this work, I will need to connect the SDA pin of the 1st board (Master) to the SDA pin of the 2nd one (Secondary), and the SCL pin of the 1st one to the SCL pin of the 2nd one.
On the Arduino and on the Satshakit, SCL is on pin A4 and SDA is on pin A5.
A USB-to-Serial converter cable will be used to connect the Secondary board to the PC.
But before connecting our 2 boards and test, I first need to load a dedicated sketch on each board.
Here are the sketches I used for the Master and the Secondary boards:
Master board's sketch:
Secondary board's sketch:
For my test, the Master board is the Arduino Uno and the Secondary board is the Satshakit.
The Master sketch is uploaded on the Arduino thru a USB cable while the Secondary sketch is uploaded on the Satshakit thru a FTDI cable:
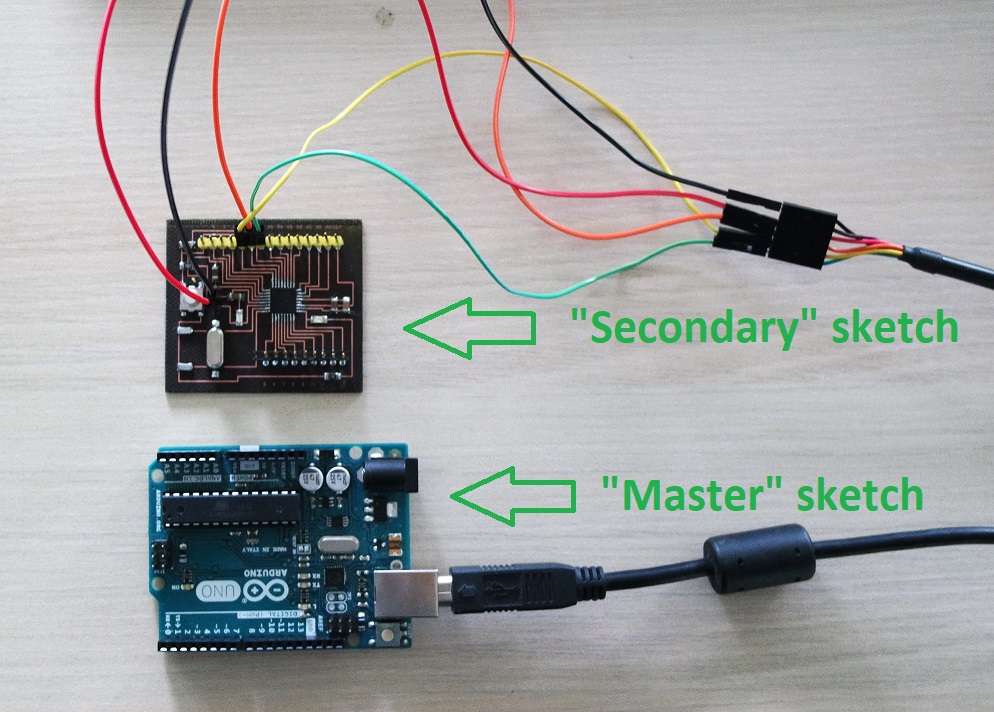
Once both boards have been programmed they can be connected for testing.
Here is how to connect the Master board to the Secondary board and to the PC:
Once these connections are made I can check in my Arduino IDE serial monitor that the 2 boards are communicating as intended:
The serial monitor displays the character sent by the Master board to the Secondary one. Pressing the reset button on the Master makes the character count restarts from zero.
Here is the FC-113 I2C module I have:
But first I need to know what my FC-113 device address is.
So I connected it to a Arduino Uno and used this "I²C scanner" sketch to figure out:
And here is the result of this scan on my serial monitor where I can see that the address for my device is 0x27:
Knowing that, I can then adapt my code and upload my sketch on the Satshakit board.
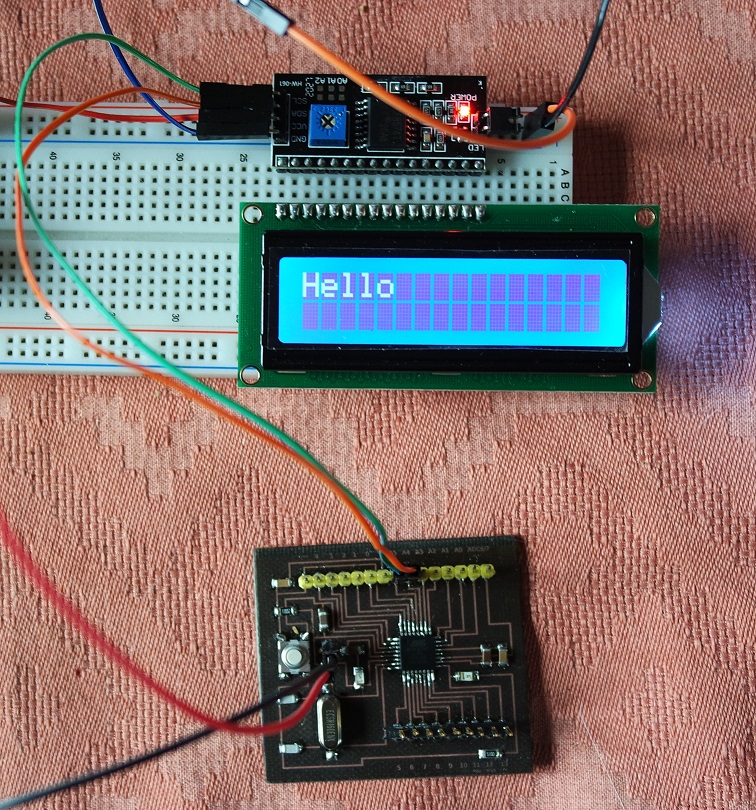
I started by connecting everything on a breadboard (see connections below) and sent a simple "Hello" word to be diplayed on the LCD.
Here is the sketch I used for this simple test:
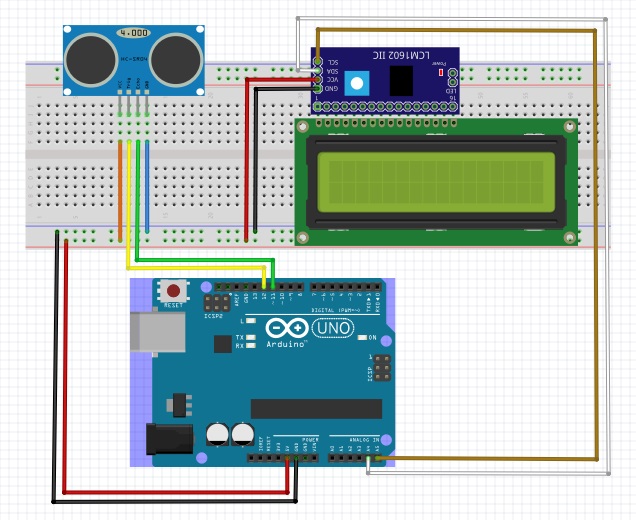
And here is how things are connected.
This image shows the connections for an Arduino Uno but they are exactly the same for a Satshakit board.
Ignore the device connected on the top left for now. It's a sonar and I will use it later on:
It worked fine and here is the result displayed on the LCD:
Now that I have my I²C communication working fine, I'd like to add the sonar distance sensor I used during my "Input devices" week, and display the measured distance on the LCD via the FC-113 I2C serial interface adapter module.
So I added the HC-SR04 sonar device on the breadboard and connected the "Trigger" to the Satshakit "pin 12" and "Echo" to "pin 11" (please refer to the image above).
And here is the sketch I used:
It worked fine and here is a small video showing the result:
Until now I had only one Arduino Uno and had to constantly turn it into an ISP programmer to program other boards, and then to turn it back to a regular Arduino to use it in my tests.
Now that I have my Satshakit I have turned the Arduino Uno into an ISP programmer and will only use it for that purpose. And I will use the Satshakit for my tests.
For this test I want to use I²C to communicate between my Satshakit and the ATtiny45 board I made during week 6 (Electronics design).
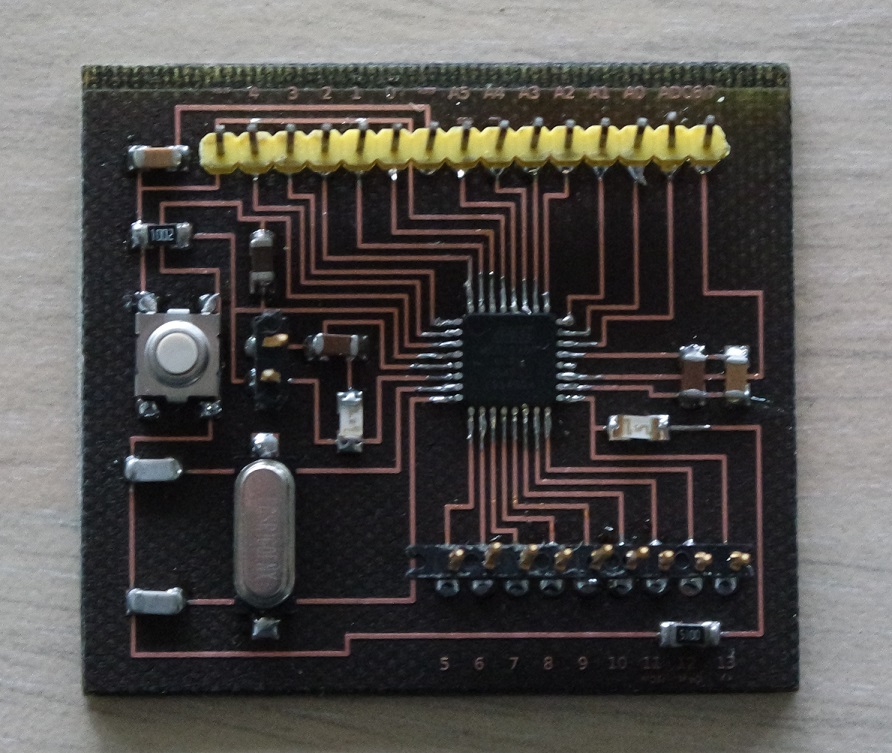
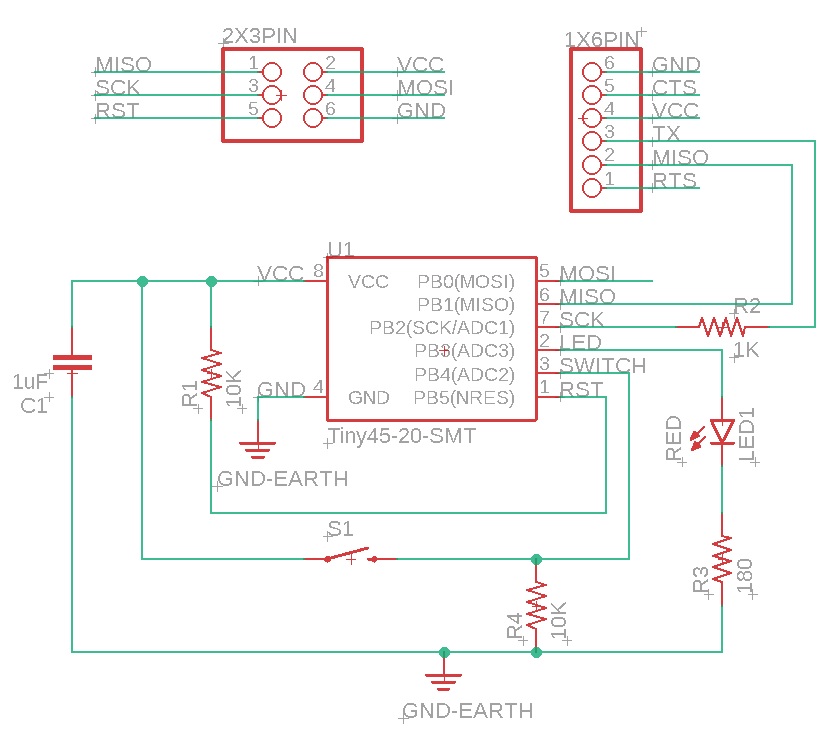
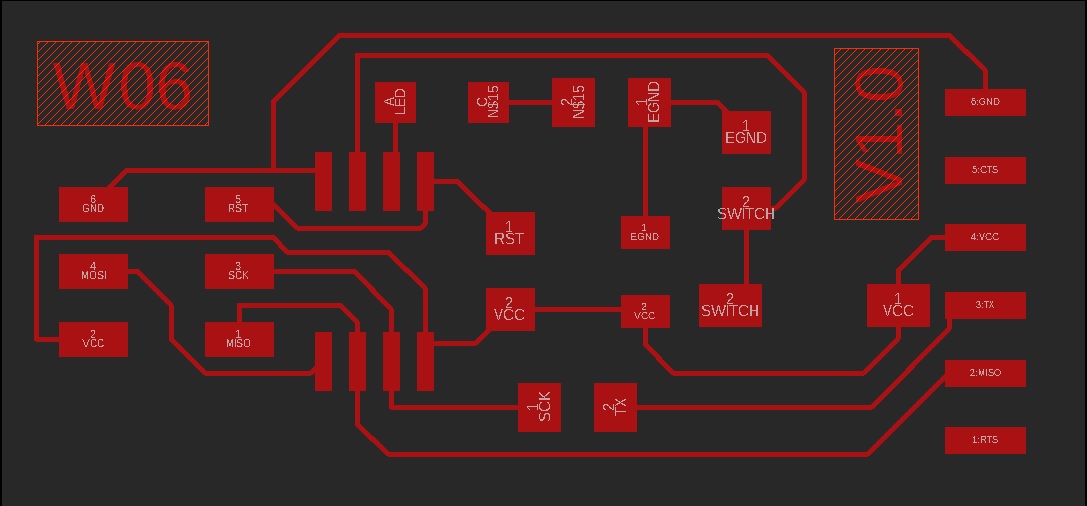
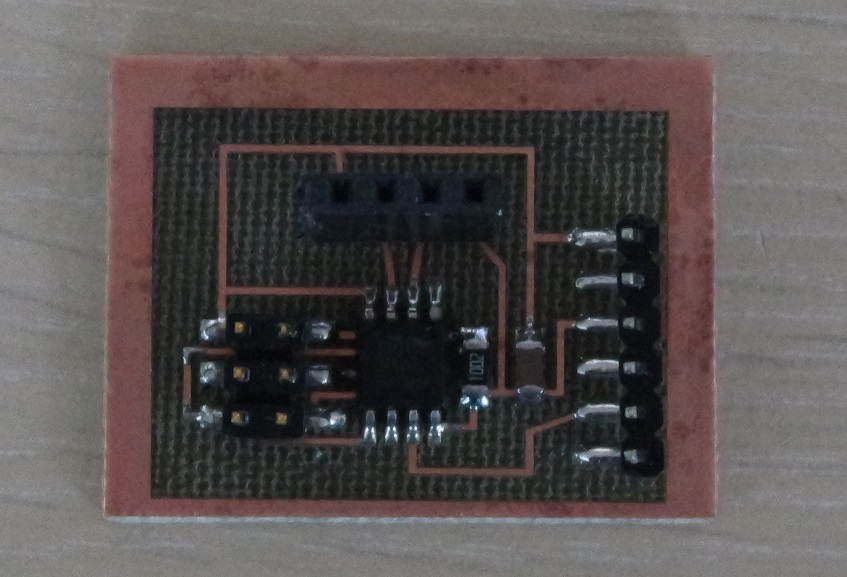
It's a very simple board with just an ATtiny45, a push button and a led:
The idea is to use the Satshakit as the master board that will send data to the ATtiny45 secondary board which will then blink the led.
I searched for examples to follow and found this tutorial (in french) that helped me start.
I started by installing the I2C Library for Attiny: TinyWireS Arduino library.
Then I uploaded a Master sketch on my Satshakit and a Secondary sketch on my ATtiny45 board.
Here are the sketches I used.
Master sketch (on Satshakit):
Secondary sketch (on ATtiny45 board):
Here is how my boards are connected according to the ATmega328 and the ATtiny45 pinout diagrams:
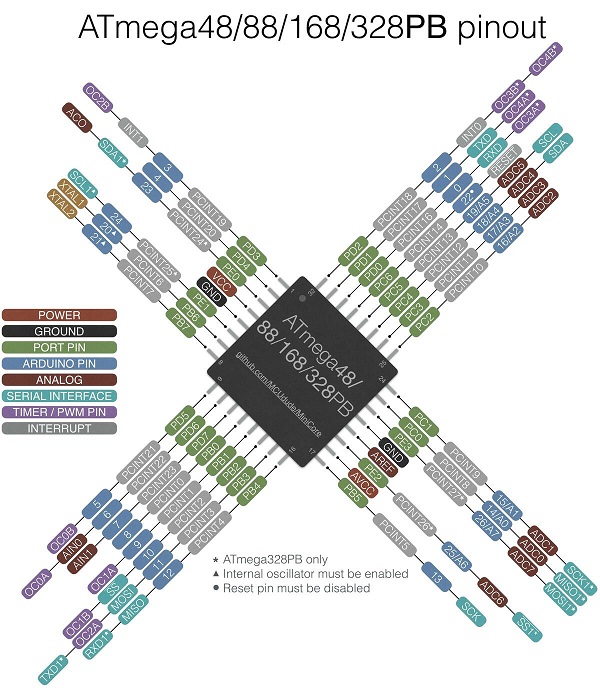

ATtiny45 SCL (PB2) is connected to Satshakit A5, and ATtiny45 SDA (PB0) is connected to Satshakit A4.
And here is a small video showing that the I²C communication between the ATtiny45 and the Satshakit works as intended (the led is blinking on request from the Satshakit board):
This time I want to try I²C communication between my Satshakit board, the ATtiny85 board I made for week 10 (Input devices) and the FC-113 I2C device.
The ATtiny85 board was designed to be used with a HC-SR04 ultrasonic distance sensor.
It will be the secondary board while the Satshakit will be the master board.
The ATtiny will "measure" the distance and will send the result to the Satshakit which will then display it on the LCD by communicating with the FC-113.
Here are the master and secondary sketches I used.
Master sketch (on Satshakit board):
w13_satshakit_master.ino
Secondary sketch (on ATtiny85 board):
w13_ATtiny85_slave.ino
After connecting the boards thru SCL and SDA I could test that it's working as intended.
Here is a video showing the result:
And the group assignment is to send a message between two projects.
Group assignment
For our group assignment we decided to use the small ATtiny85 board I made during the "Input devices" week along with Quentin's ATmega328 board.The ATtiny85 board is designed to connect with a HC-SR04 ultrasonic sensor to measure a distance.
The boards are communicating thru I2C communication. Quentin's board is the Master board and it requests the inputs from secondary board (ATtiny85) which returns the measured distance.
Here is a photo showing how they are connected and a video showing our result:
Individual assignment
The first thing I want to test is to communicate via I²C between my Satshakit board and a Arduino Uno board.I started this week by finishing my Satshakit board I had started on my previous week.
The details for the making of my Satshakit board can be seen on my Ouput devices week page:
I²C communication
As networking is completely new for me, I started by reading documentation and especially this page that was very useful.I started by testing I²C synchronous serial protocol to communicate between the boards because it seemed to be the simplest at first.
The boards I will be using for this test are the Satshakit I just finished and a Arduino Uno board.
In order to make this work, I will need to connect the SDA pin of the 1st board (Master) to the SDA pin of the 2nd one (Secondary), and the SCL pin of the 1st one to the SCL pin of the 2nd one.
On the Arduino and on the Satshakit, SCL is on pin A4 and SDA is on pin A5.
A USB-to-Serial converter cable will be used to connect the Secondary board to the PC.
But before connecting our 2 boards and test, I first need to load a dedicated sketch on each board.
Here are the sketches I used for the Master and the Secondary boards:
Master board's sketch:
#include <Wire.h>

void setup()
{
	Wire.begin(); // join i2c bus (address is optional for the master)
}

byte x = 0;

void loop()
{
	Wire.beginTransmission(4); // transmit to device #4
	Wire.write("x is ");        // send text
	Wire.write(x);              // send x value
	Wire.endTransmission();    // stop transmition

	x++;
	delay(500);
}
w13_Master.ino
Secondary board's sketch:
#include <Wire.h>

void setup()
{
	Wire.begin(4);                // join i2c bus with address #4
	Wire.onReceive(receiveEvent); // receive event
	Serial.begin(9600);           // start serial for output
}

void loop()
{
	delay(100);
}

// function that executes whenever data is received from master
void receiveEvent(int howMany)
{
	while (1 < Wire.available()) // loop through all but the last
	{
		char c = Wire.read(); // receive byte as a character
		Serial.print(c);      // print received character
	}
	int x = Wire.read();    // receive byte as an integer
	Serial.println(x);      // print received integer
}
w13_Slave.ino
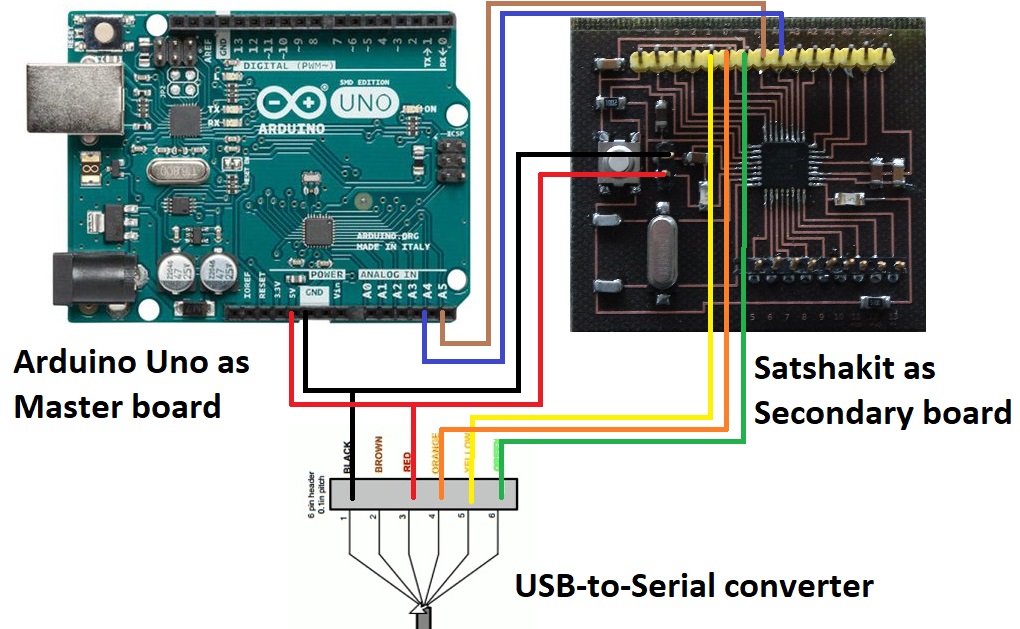
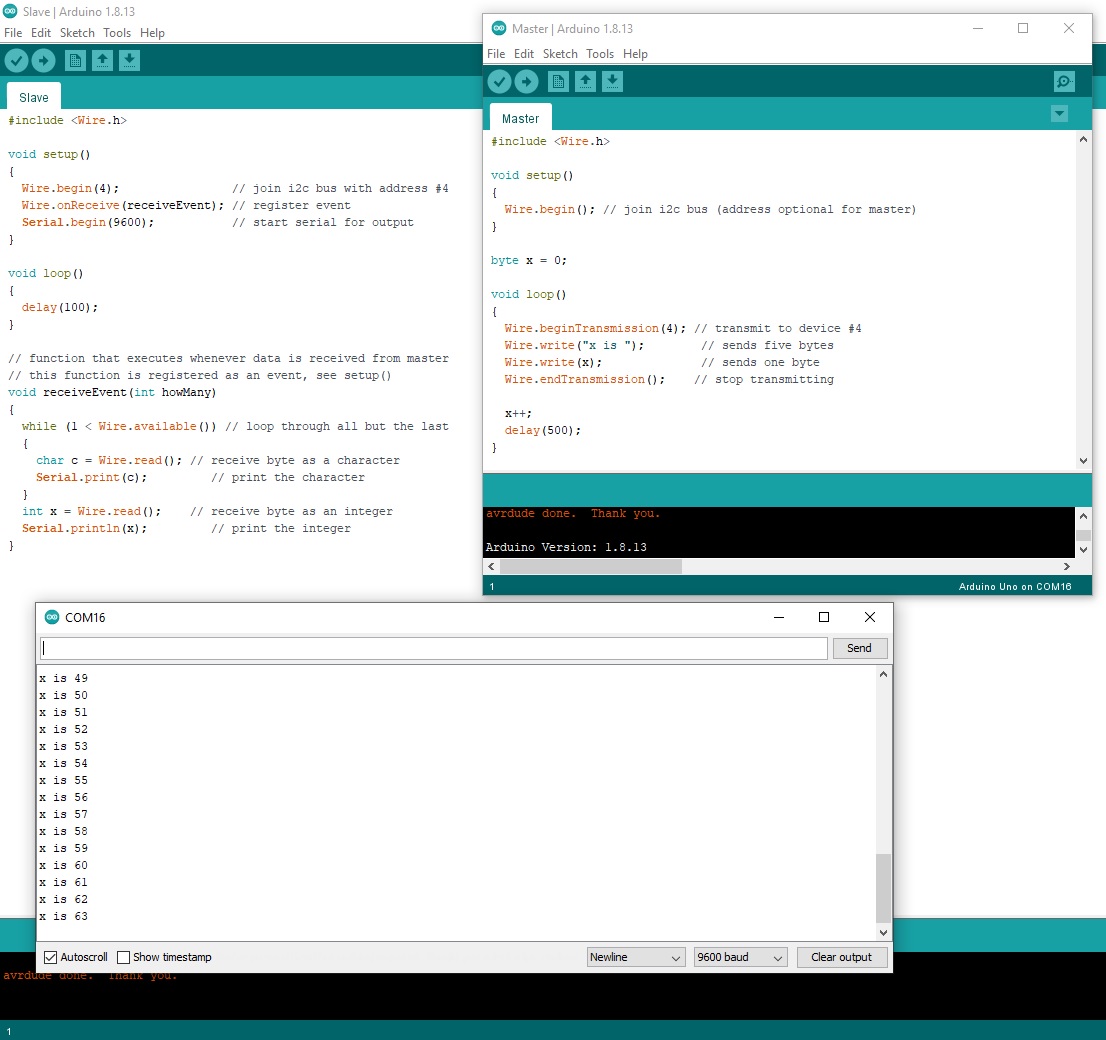
For my test, the Master board is the Arduino Uno and the Secondary board is the Satshakit.
The Master sketch is uploaded on the Arduino thru a USB cable while the Secondary sketch is uploaded on the Satshakit thru a FTDI cable:
Once both boards have been programmed they can be connected for testing.
Here is how to connect the Master board to the Secondary board and to the PC:
Once these connections are made I can check in my Arduino IDE serial monitor that the 2 boards are communicating as intended:
The serial monitor displays the character sent by the Master board to the Secondary one. Pressing the reset button on the Master makes the character count restarts from zero.
LCD display via I²C communication
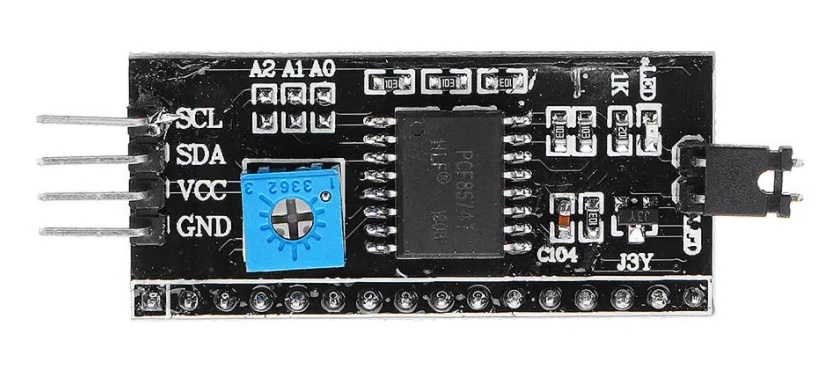
For my next test I want to communicate via I²C between my Satshakit and a FC-113 I2C serial interface adapter module connected to an LCD display.Here is the FC-113 I2C module I have:
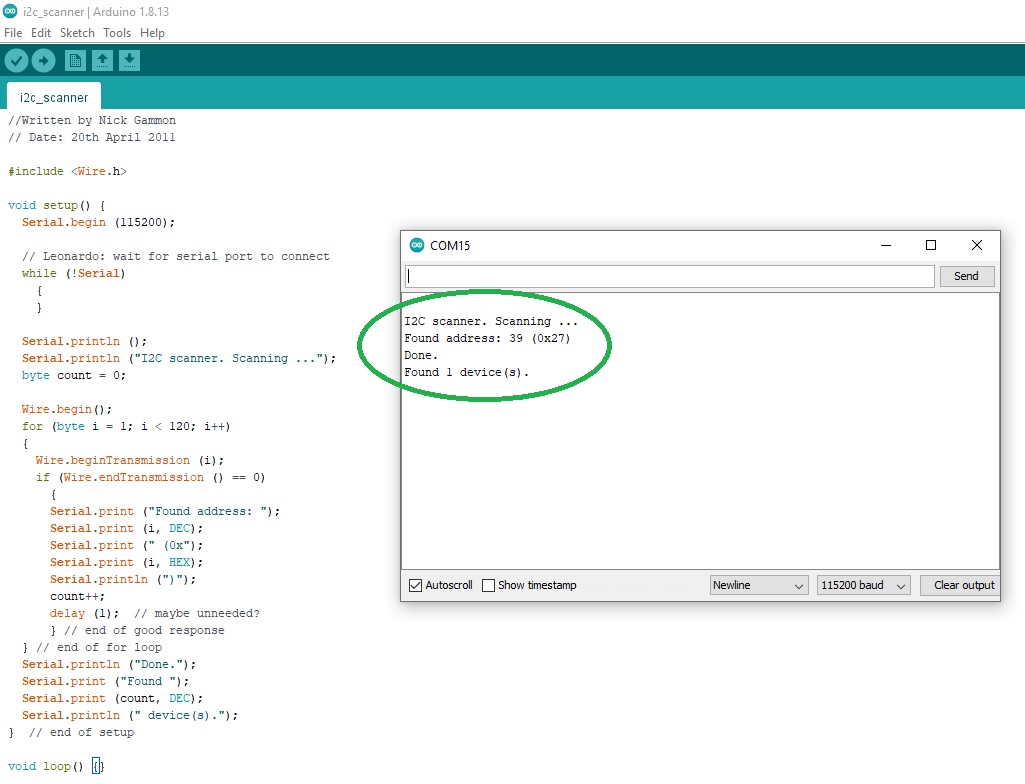
But first I need to know what my FC-113 device address is.
So I connected it to a Arduino Uno and used this "I²C scanner" sketch to figure out:
//Written by Nick Gammon
// Date: 20th April 2011

#include <Wire.h>

void setup() {
	Serial.begin (115200);

	// Leonardo: wait for serial port to connect
	while (!Serial)
	{
	}

	Serial.println ();
	Serial.println ("I2C scanner. Scanning ...");
	byte count = 0;

	Wire.begin();
	for (byte i = 1; i < 120; i++)
	{
		Wire.beginTransmission (i);
		if (Wire.endTransmission () == 0)
		{
			Serial.print ("Found address: ");
			Serial.print (i, DEC);
			Serial.print (" (0x");
			Serial.print (i, HEX);
			Serial.println (")");
			count++;
			delay (1);  // maybe unneeded?
		} // end of good response
	} // end of for loop
	Serial.println ("Done.");
	Serial.print ("Found ");
	Serial.print (count, DEC);
	Serial.println (" device(s).");
}  // end of setup

void loop() {}
i2c_scanner.ino
And here is the result of this scan on my serial monitor where I can see that the address for my device is 0x27:
Knowing that, I can then adapt my code and upload my sketch on the Satshakit board.
I started by connecting everything on a breadboard (see connections below) and sent a simple "Hello" word to be diplayed on the LCD.
Here is the sketch I used for this simple test:
/* LCD 16x2 display */
/* LCD 16x2 with I2C interface */

#include <Wire.h>
#include <LiquidCrystal_I2C.h>
LiquidCrystal_I2C lcd(0x27,16,2);

void setup()
{
	lcd.init();
	lcd.backlight();
	lcd.clear();
}

void loop()
{
	lcd.setCursor(0,0);
	lcd.print("Hello");
}
lcd_test.ino
And here is how things are connected.
This image shows the connections for an Arduino Uno but they are exactly the same for a Satshakit board.
Ignore the device connected on the top left for now. It's a sonar and I will use it later on:
It worked fine and here is the result displayed on the LCD:
Now that I have my I²C communication working fine, I'd like to add the sonar distance sensor I used during my "Input devices" week, and display the measured distance on the LCD via the FC-113 I2C serial interface adapter module.
So I added the HC-SR04 sonar device on the breadboard and connected the "Trigger" to the Satshakit "pin 12" and "Echo" to "pin 11" (please refer to the image above).
And here is the sketch I used:
/* Ultrasonic HC-SR04 + LCD 16x2 display */

/* Used pins  */
int echoPin = 11;
int triggerPin = 12;

long tps_echo;
float distance;

/* LCD 16x2 with I2C interface */
#include <Wire.h>
#include <LiquidCrystal_I2C.h>
LiquidCrystal_I2C lcd(0x27,16,2);

void setup()
{
	pinMode(triggerPin, OUTPUT);
	digitalWrite(triggerPin, LOW);
	pinMode(echoPin, INPUT);
	/* LCD 16x2 init */
	lcd.init();
	lcd.backlight();
	lcd.clear();
}

void loop()
{
	/* measure for 10 micro seconds */
	digitalWrite(triggerPin, HIGH);
	delayMicroseconds(10);
	digitalWrite(triggerPin, LOW);

	/* measure time for the echo */
	tps_echo = pulseIn(echoPin, HIGH);

	/* distance calculation */
	distance = tps_echo*0.034/2;

	/* display on LCD */
	if (distance > 20) //if measured distance is more than 20cm
	{
		lcd.setCursor(0,0);
		lcd.print("                "); // erase line
		lcd.setCursor(0,0);
		lcd.print("Too far away!");
		delay(300);
	}
	else
	{
		lcd.setCursor(0,0);
		lcd.print("                "); // erase line
		lcd.setCursor(0,0);
		lcd.print("Distance:");
		lcd.print(distance,1);
		lcd.print("cm");
		delay(300);
	}
}
w13_lcd_sonar.ino
It worked fine and here is a small video showing the result:
I²C communication between ATtiny45 and Satshakit
The Satshakit I made during last week is very useful and made my life easier!Until now I had only one Arduino Uno and had to constantly turn it into an ISP programmer to program other boards, and then to turn it back to a regular Arduino to use it in my tests.
Now that I have my Satshakit I have turned the Arduino Uno into an ISP programmer and will only use it for that purpose. And I will use the Satshakit for my tests.
For this test I want to use I²C to communicate between my Satshakit and the ATtiny45 board I made during week 6 (Electronics design).
It's a very simple board with just an ATtiny45, a push button and a led:
The idea is to use the Satshakit as the master board that will send data to the ATtiny45 secondary board which will then blink the led.
I searched for examples to follow and found this tutorial (in french) that helped me start.
I started by installing the I2C Library for Attiny: TinyWireS Arduino library.
Then I uploaded a Master sketch on my Satshakit and a Secondary sketch on my ATtiny45 board.
Here are the sketches I used.
Master sketch (on Satshakit):
#include <Wire.h>

#define SLAVE_ADDR 0x26

void setup(){
  Wire.begin();                            // join bus as master
  Serial.begin(38400);
  Serial.println("I2C Test Application");
}

void loop(){
  Serial.println("Send command");

  Wire.beginTransmission(SLAVE_ADDR);      // slave adress that will receive data
  Wire.write(0xDE);                        // send data
  Wire.endTransmission();                  // stop transmission

  delay(5000);                            // wait
}
Arduino_as_master.ino
Secondary sketch (on ATtiny45 board):
#include <TinyWireS.h>

#define I2C_SLAVE_ADDR  0x26              // I2C adress
const int ledPin = 3;                     // LED pin n°

byte byteRcvd;

void setup(){
  pinMode(ledPin, OUTPUT);              // LED as output
  digitalWrite(ledPin, LOW);            // set initial LED state

  TinyWireS.begin(I2C_SLAVE_ADDR);      // initialize I2C lib & setup slave's address
  byteRcvd = 0;
}

void loop(){
  digitalWrite(ledPin, LOW);
  if (TinyWireS.available()){           // if receiving from I2C bus
    byteRcvd = TinyWireS.receive();     // store it
    if (byteRcvd != 0) {
//    Blink LED
      digitalWrite(ledPin, HIGH);
      delay(1000);
      digitalWrite(ledPin, LOW);
      delay(1000);
      byteRcvd = 0;
    }
  }
}
Tiny85_as_slave.ino
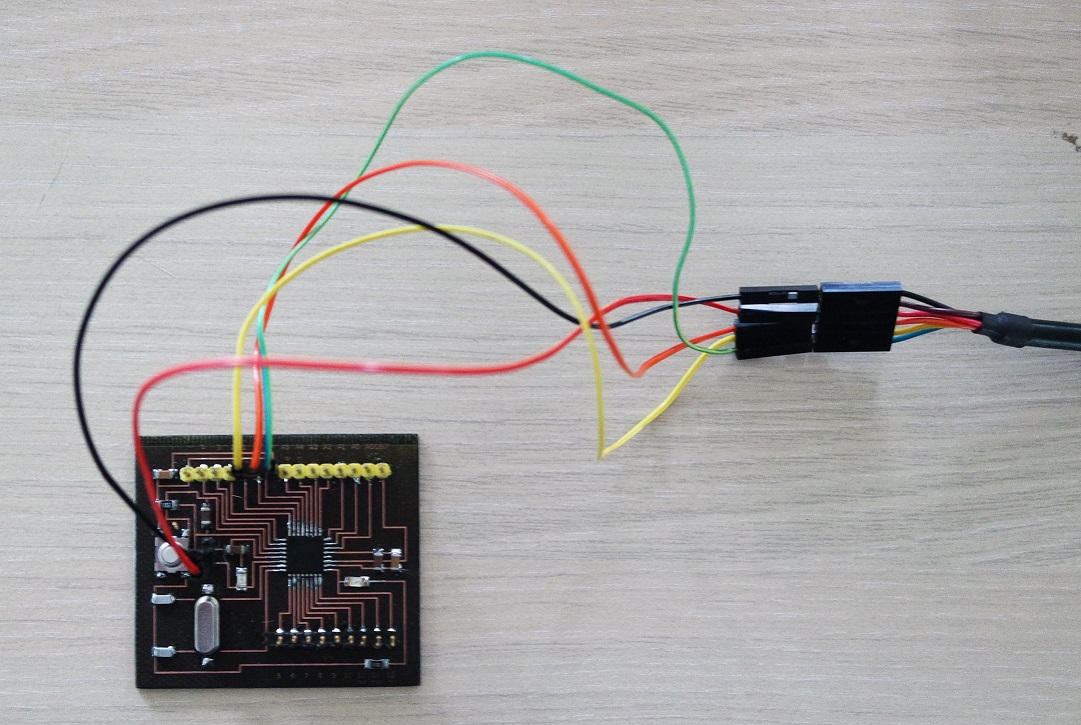
Here is how my boards are connected according to the ATmega328 and the ATtiny45 pinout diagrams:
ATtiny45 SCL (PB2) is connected to Satshakit A5, and ATtiny45 SDA (PB0) is connected to Satshakit A4.
And here is a small video showing that the I²C communication between the ATtiny45 and the Satshakit works as intended (the led is blinking on request from the Satshakit board):
I²C communication between ATtiny85, Satshakit and FC-113 I2C + LCD display
Now that I know how to communicate between my Satshakit and an ATtiny microcontroler, let's see if I can reuse the board I designed on week 10.This time I want to try I²C communication between my Satshakit board, the ATtiny85 board I made for week 10 (Input devices) and the FC-113 I2C device.
The ATtiny85 board was designed to be used with a HC-SR04 ultrasonic distance sensor.
It will be the secondary board while the Satshakit will be the master board.
The ATtiny will "measure" the distance and will send the result to the Satshakit which will then display it on the LCD by communicating with the FC-113.
Here are the master and secondary sketches I used.
Master sketch (on Satshakit board):
/*
This sketch runs on an Arduino connected to an ATtiny85 running w13_ATtiny85_slave.ino
The data received is from a HC-SR04 sensor
 */

#include <Wire.h>
#include <LiquidCrystal_I2C.h>
LiquidCrystal_I2C lcd(0x27,16,2);

byte distance;                              // Where the Distance is stored (8 bit unsigned)


void setup()
{
  Wire.begin();
  Serial.begin(9600);
//  Serial.println("Setup");

    /* LCD 16x2 */
  lcd.init();
  lcd.backlight();
  lcd.clear();
}


void loop()
{
  Wire.requestFrom(7, 1);                  // The TinyWire library only allows for one byte to be requested at a time
  while (Wire.available() == 0)  ;         // Wait until there is data in the I2C buffer

  distance = Wire.read();                  // Read the first (and hopefully only) byte in the I2C buffer
//  Serial.println(distance);

  lcd.setCursor(0,0);
  lcd.print("                "); // erase line
  lcd.setCursor(0,0);
  lcd.print("Distance:");
  lcd.print(distance,1);
  lcd.print("cm");
  delay(300);                   // The sensor only updates every 30 ms. Asking for new data quicker than that is useless
}
The Satshakit master board requests data (a distance) from the ATtiny85 secondary board and sends it to the FC-113 via I²C to be displayed on the LCD.w13_satshakit_master.ino
Secondary sketch (on ATtiny85 board):
/*
This sketch runs on an ATtiny85 connected to an Arduino running w13_satshakit_master.ino
The data received is from a HC-SR04 sensor
 */

#include <SoftwareSerial.h>
#include <TinyWireS.h>             // Requires library fork by Rambo with onRequest support

const int I2CSlaveAddress = 7;

const int RX = 1; // NO RX for Sonar application
const int TX = 2; // TX (data sent by the ATTiny85)

SoftwareSerial serial(RX, TX);//rx pin of ftdi header as receiver and mosi as tx
const int trigPin = A3;  // defines pins numbers
const int echoPin = A2;  // defines pins numbers

long duration;  // defines variables
int distance;   // defines variables

#define MAX_DISTANCE 200 // Maximum distance we want to ping for (in centimeters). Maximum sensor distance is rated at 400-500cm.

void setup()
{

  pinMode(trigPin, OUTPUT); // Sets the trigPin as an Output
  pinMode(echoPin, INPUT);  // Sets the echoPin as an Input
  pinMode(TX,OUTPUT);       // TX
  serial.begin(9600);       // Starts the serial communication

  delay(100);

  TinyWireS.begin(I2CSlaveAddress);      // Begin I2C Communication
  TinyWireS.onRequest(transmit);         // When requested, call function transmit()
}

void loop()
{
//  serial.println("Hello");
  digitalWrite(trigPin, 0);// Clears the trigPin
  delayMicroseconds(2000);
  digitalWrite(trigPin, 1);
  delayMicroseconds(5); // Sets the trigPin on HIGH state for 5 micro seconds
  digitalWrite(trigPin, 0);
  duration = pulseIn(echoPin, 1); // Reads the echoPin, returns the sound wave travel time in microseconds
  distance = duration * 0.034 / 2; // Calculating the distance

  if (distance > MAX_DISTANCE) {
    serial.println("out of range");
  }
  else {
    serial.print("Distance: "); // Prints the distance on the Serial Monitor
    serial.print(distance);// Prints the distance on the Serial Monitor
    serial.println(" Cm");// Prints the distance on the Serial Monitor
  }
  delay(2000);
 }

 void transmit()
{
  TinyWireS.send(distance);                 // Send last recorded distance for current sensor
}
The ATtiny85 secondary board is responsible for collecting datas from the ultrasonic sensor, calculate the corresponding distance and transmit it to the Satshakit master board on request.w13_ATtiny85_slave.ino
After connecting the boards thru SCL and SDA I could test that it's working as intended.
Here is a video showing the result: