Molding & Casting
Page Summary
- Reviewing data sheets for each molding and casting materials
- Designing a 3D mold
- Creating Toolpaths
- Milling
- Casting parts
- The Cast
- Comparing casts
- References
- Design Files
1. Reviewing data sheets for each molding and casting materials
Materials are available in the lab:
Smooth-on Sorta Clear 37
Smooth Cast 300 and 305
EasyMold Silicon Rubber
EasyMold Silicon Putty
* Smooth-on mold release agent
This series of rubbers by Smooth-on are white translucent silicone rubbers that cure at room temperature with negligible shrinkage. They are very versatile because they offer a lot of easy features like:
- 1A:1B by volume mix ratio.
- can be stored and used at room temperatures
- Materials such as urethane, epoxy or polyester resins can be cast into this silicone without applying a release agent.
- Wax and low melt metal alloys can also be cast into it.
- can be pigmented (SILC Pig™ silicone pigments)
- Is food safe so can be used for culinary applications like casting chocolate and other confections.
All these properties make it ideal for making prototypes, jewellery or other moulds where model visibility is important.
The webpage for Sorta Clear 37 gives details about every step of using including videos and detailed instructions. Here is a short version of the important ones:
- Safety - use in a ventilated room, wear vinyl gloves
- Storage - at room temperature, and use as soon as possible as it has a limited shelf life.
- Measuring - 1:1 of parts A and B by volume. The webpage also serves a material calculator for custom quantities.
- Mixing - mix parts thoroughly for 3 minutes, scraping all surfaces of container
- Vacuuming - pull vacuum at 1bar until it rises, breaks and falls and then 1 minute after.
- Testing - some materials might inhibit curing and some materials like clay will not work for molding. so small tests are recommended
- Pouring - pour mixture in the same spot at the lowest point of the containment field uniformly to avoid entrapped air and let it rise till level is atleast 1/2” (1.3 cm) over the highest point of the model surface
- Curing - cure at room temperature for atleast 4 hours
- Demolding - release agent makes demolding easier but is not always necessary
- Mold performance - abrasive materials like concrete erode mold details quicker than non-abrasive materials like wax
- Mold Storage - wash with soap solution and dry, assempble parts and store on a level surface in a cool, dry environment
Understanding and following this is important to avoid accidents.
Link to Safety Data Sheet
Smooth Cast 300 and Smooth Cast 305
This series of liquid plastics by Smooth-on are ultra-low viscosity casting resins that yield bright white and virtually bubble free castings. Some important features they offer are:
- 1:1 mix ratio by volume
- Low viscosity captures excellent detail - no degassing necessary
- Fully cured castings are tough, durable, machinable and paintable
- These resins readily accept fillers, can be coloured with tints and pigments
- They resist moisture and mild solvents.
Therefore they work very good for reproducing small to medium sized sculptures, making prototype models, special effect props and decorative jewellery. The difference between 300 and 305 is in the curing times and the shelf life.
The webpage for Smooth Cast 300 and Smooth Cast 305 give details about every step of using including videos and detailed instructions. Here is a short version of the important ones:
- Safety - use and mix in a ventilated room, wear rubber gloves and safety glasses
- Storage - at room temperature, and use as soon as possible as it reacts with moisture.
- Measuring - 1:1 of parts A and B by volume or 100A:90B by weight in a clean dry glass/plastic/metal container. The webpage also serves a material calculator for custom quantities.
- Mixing - mix parts thoroughly for 3 minutes, scraping all surfaces of container
- Vacuuming - not required
- Pouring - pour mixture in the same spot at the lowest point of the containment field uniformly to avoid entrapped air. Best results are obtained using a pressure casting technique.
- Curing - 7 - 10 minutes for smooth cast 300 and 30 – 40 minutes for soomth cast 305.
- Demolding - specified release agents are necessary to facilitate demolding when casting into or over most surfaces
- Mold performance - Cured castings are rigid and durable. They resist moisture, moderate heat, solvents, dilute acids and can be machined, primed/painted or bonded to other surfaces (any release agent must be removed)
Unpainted castings will yellow over time - more quickly when exposed to ultra-violet light.
Link to Safety Data Sheet for 300 and 305.
EasyMold Silicon Rubber
This product by ETI-USA is an easy to use, odor free, non-toxic, two component silicone liquid rubber that cures easily and can create blanket, glove or block molds. It is also FDA food-grade. Some basic features are:
- Brushable/Pourable
- 45 Minute to 1 hour working time, 24 hour cure. Cure rate can be adjusted by applying heat.
- Produces extremely fine detail from original, no shrinkage.
- Self releasing, no mold release agent required for most applications.
- High heat range, up to 400º F.
- Strong flexible re-useable molds.
- No vacuum equipment required.
Link to Safety Data Sheet The webpage for EasyMold Silicon Rubber also shares its technical data sheet and working instructions.
EasyMold Silicon Putty
This product by ETI-USA is odorless, non-toxic and FDA food-grade. It can easily create molds for small impression type objects. Some basic features are:
- Easy to use, 3 Minute working time, 25 minute cure.
- Ideal for small molds, excellent detail from original.
- Strong, flexible, reuseable molds.
- High Heat range, up to 400º F.
- No Shrinkage.
- Self releasing, no mold release agent required for most applications.
Link to Safety Data Sheet The webpage for EasyMold Silicon Rubber also shares its technical data sheet and working instructions.
Smooth-on Universal Mold Release
This product comes in both liquid form and aerosol. It can be sprayed onto a mold to help release casts from properly prepared models.
Link to Safety Data Sheet
The process of molding and casting goes like this:
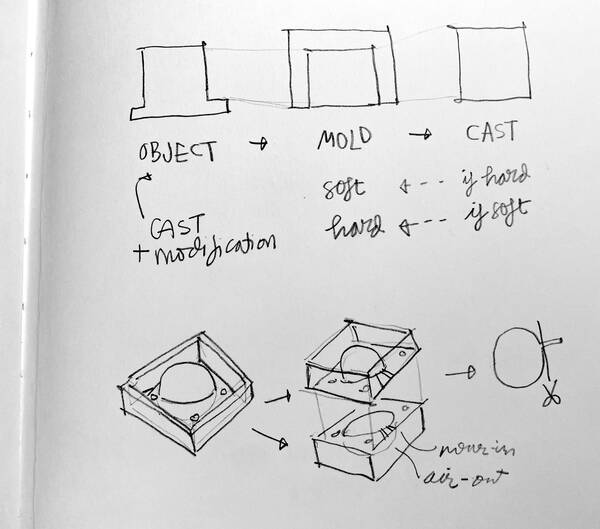
So the first task is to design a mold around the object to be cast. The mold design can be in 1, 2 ore more parts depending on the geometry of the object.
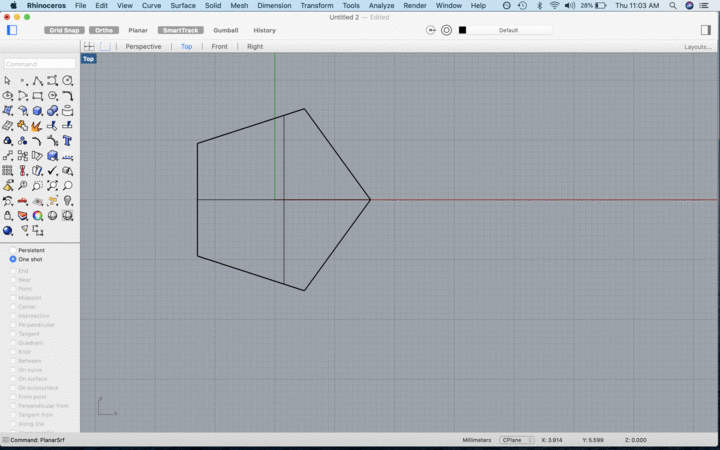
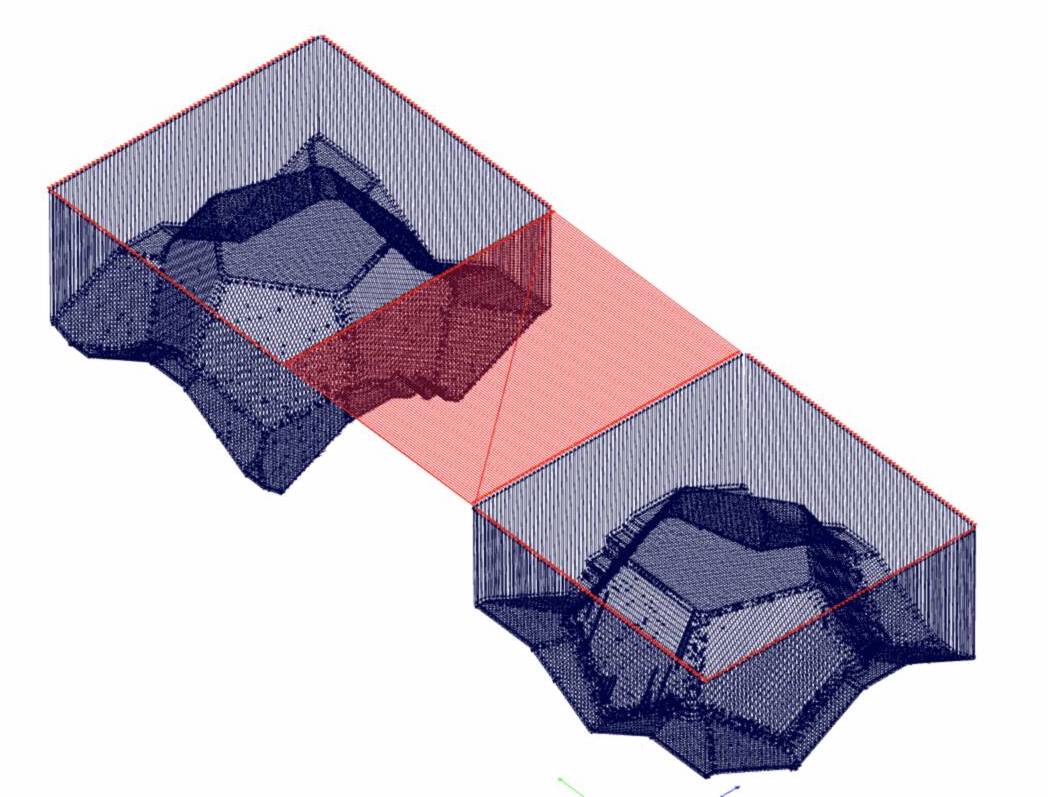
2. Designing a 3D mold
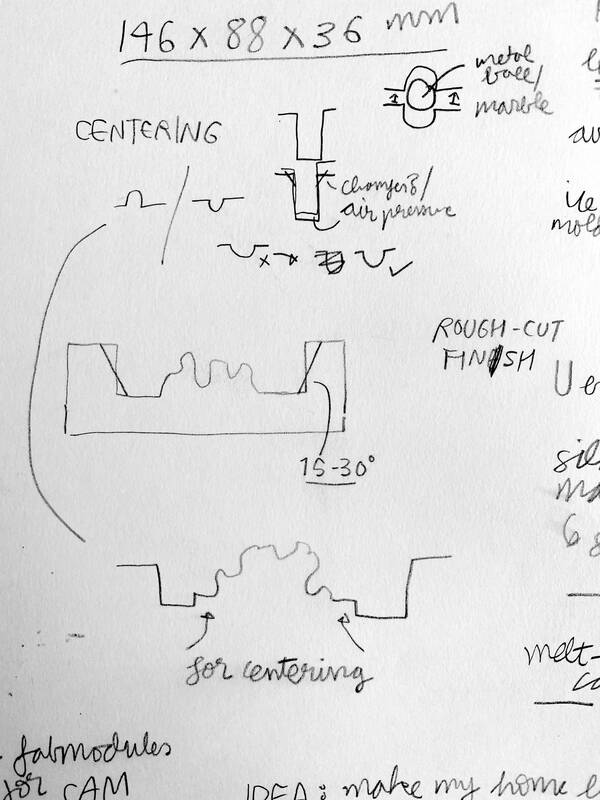
First made a pentagon, then rotated it along its side at an angle of 116.565. Polar array on all 5 sides. Mirrored horizontally. Oriented both pieces to match. Put it in a bounding box. Extended the middle curves to cut the box into two. I also sweeped a square along the edges for finishing, added on one part of mold and subtracted from the other. Added pipes for pouring in and vent. Made another box of 146x88x36mm, and boolean differenced the previous ones.
3. Creating Toolpaths
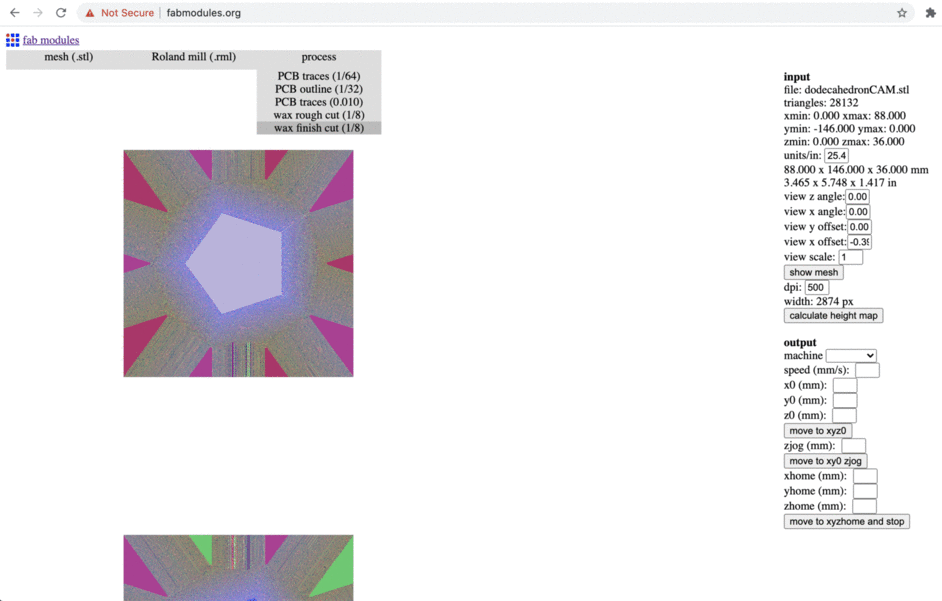
I used FabModules to make the roughing and finishing toolpaths.
First I saved the mold as .stl and then in FabModules…
- Input stl file
- Set units/in as 25.4
- Dpi 500
- Calculate height map
- Output rml (to use Roland)
- Machine MDX-20
- Speed 20 mm/s
- x0, y0, z0 = 0,0,0
- z jog = 12 mm
- xhome, yhome, zhome = 0,0,0
- Process wax rough cut 1/8 for roughing, wax finish cut 1/8 for finishing
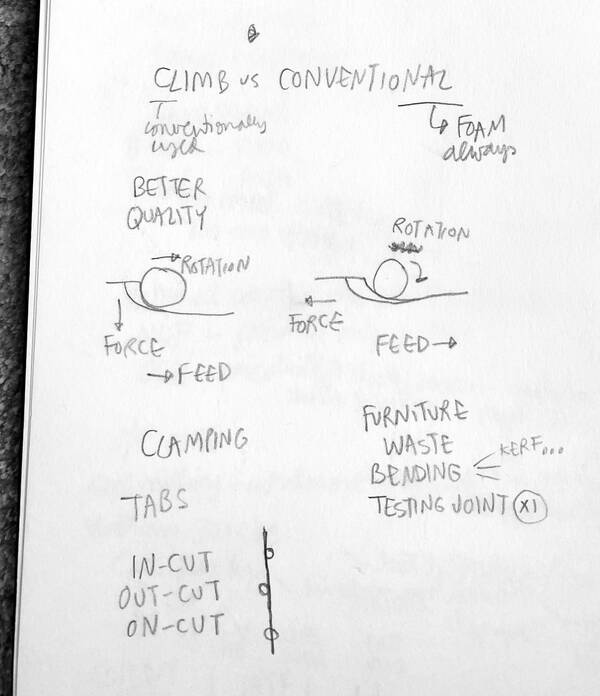
- Direction climb for roughing, conventional for finishing
- Offset overlap 50% for roughing, 90% for finishing
- Tool diameter 3.175
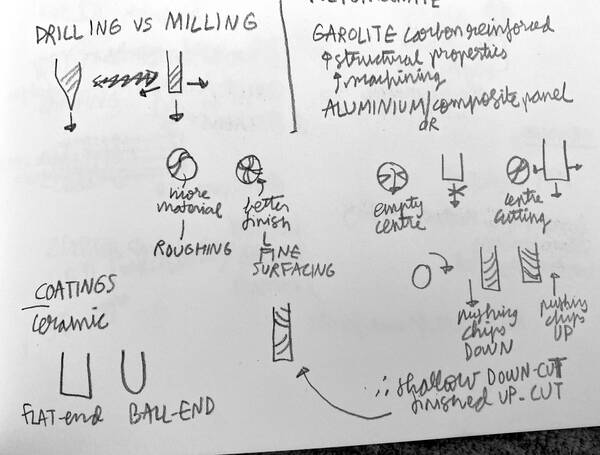
- Type flat end for roughing, ball end for finishing
- Calculate roughing and save
- Calculate finishing with above settings and save
Here is a gif that shows process for roughing toolpath calculation

This is how the final roughing toolpaths look:
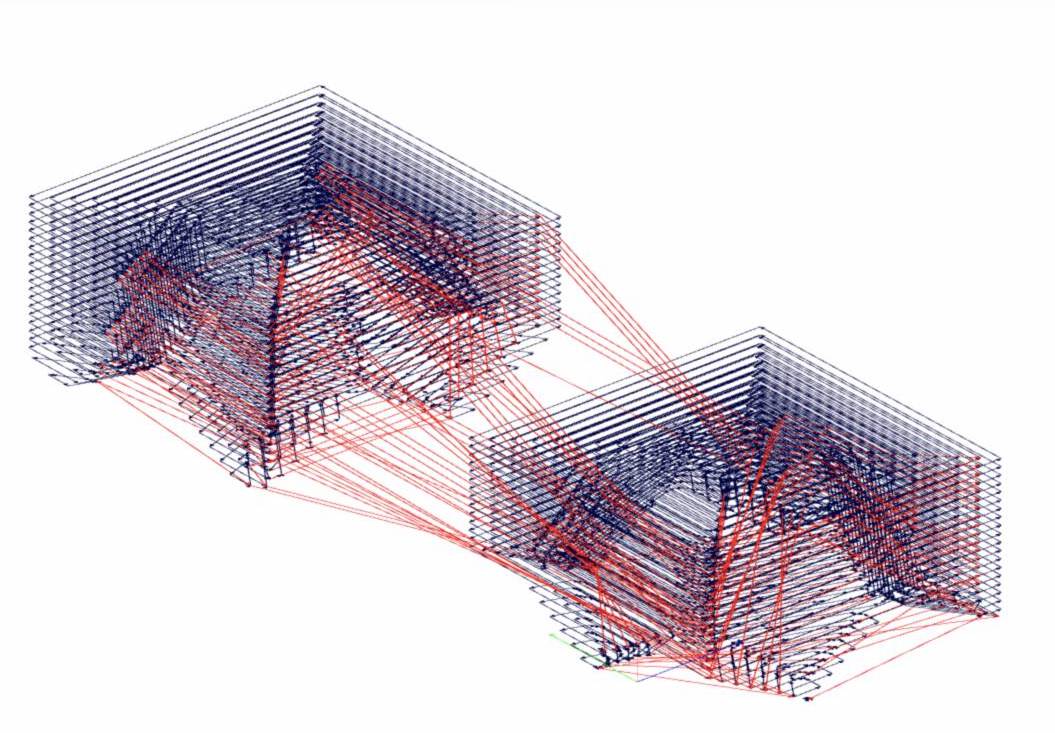
Here is a gif that shows the difference for finishing toolpath
calculation
This is how the final finishing toolpaths look like:
4. Milling
I did this part when I had access to FabLab SP. The lab uses blue common extruded poly-foam board for milling the mould on a Stepcraft D420 Desktop CNC system. It has a Rotary Tool attached to a frame. So the tool path generating software (UCCNC) can’t control the power of the spindle, it has to be done manually with the switch on the tool itself.
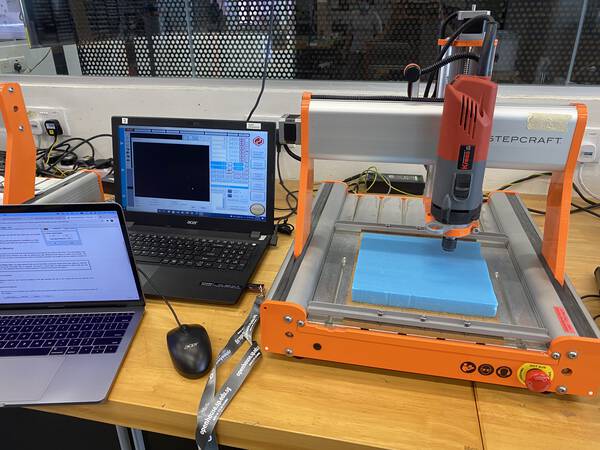
The machine has a limitation of 34mm depth for cutting, since the endmill length is that. So I had to scale down my model of the dodecahedron to be able to cut it on the Stepcraft. You can find the Rhino file on the end of the page.
Milling Workflow:
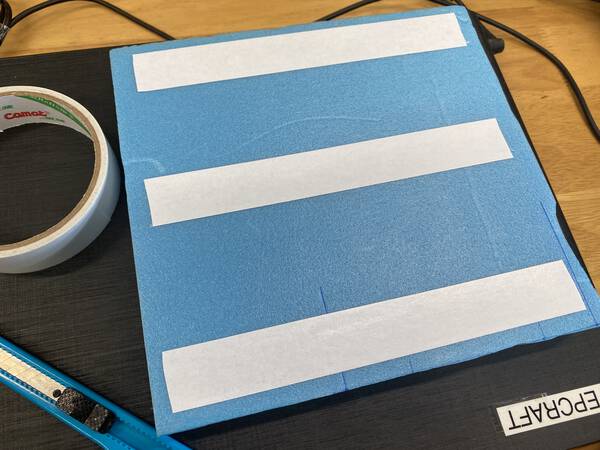
The first step is to load the material onto the base board of the machine. Here is more detail about the material - Datasheet. I picked a small block of the blue foam of 94 x 56 x 23 mm. Using double sided tape I stuck that on the flat part of the mounted base.
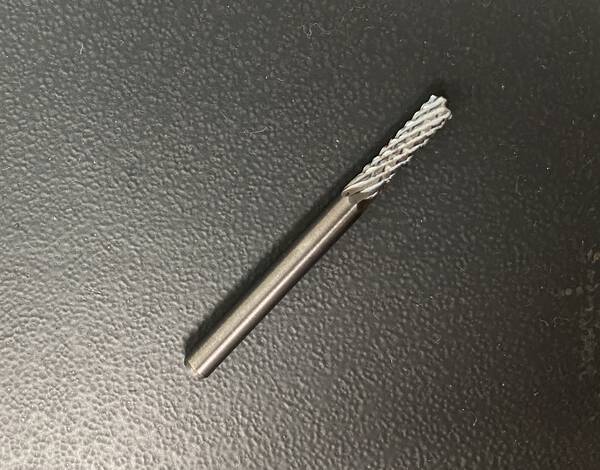
Fix the milling bit. I used a multi-flute 3mm flatend bit available in the lab.
Then using the UCCNC software, first move the tool using the arrows in continuous or step motion to define the X and Y origin. Press the blue target symbol button to define the position of both co-ordinates respectively. For Z-axis a levelling sensor is available, but because it is a soft blue foam, I manually define it using steps.

Next, load the carve file using ‘Load file’ button. And then ‘start cycle’ to start cutting.
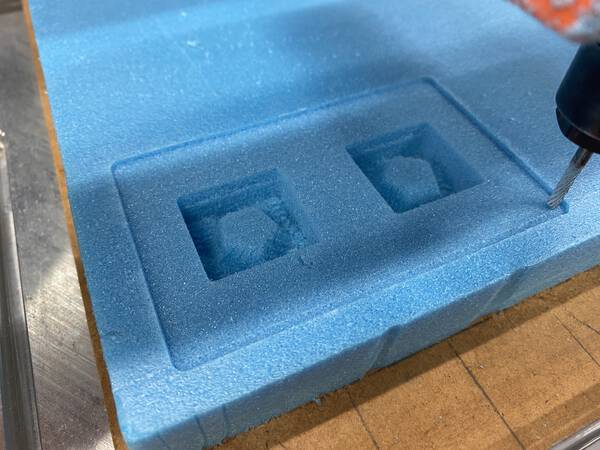
The blue foam is not very homogenous and has a porous texture, so running a finishing toolpath is of not required.
Here is how the finished part is:
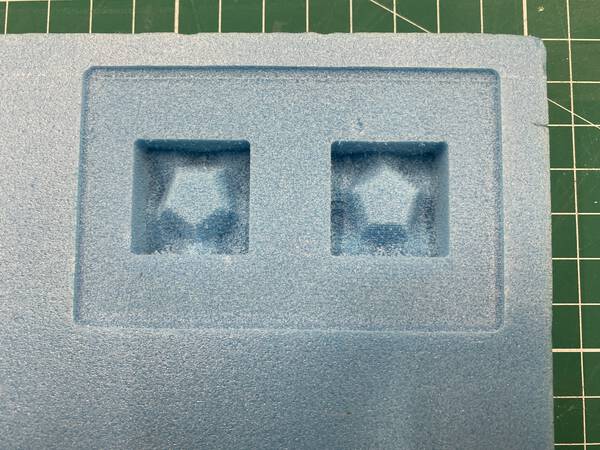
5. The Mold
The blue foam doesn’t has very good surface definition. So the mold won’t be very smooth. I use the Silicon Rubber RTV-620 to make the mold.
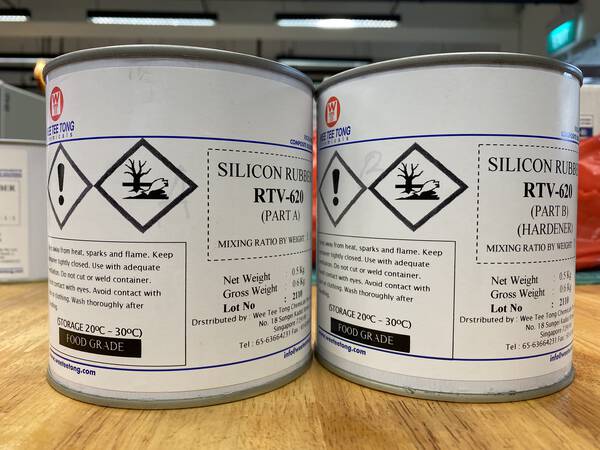
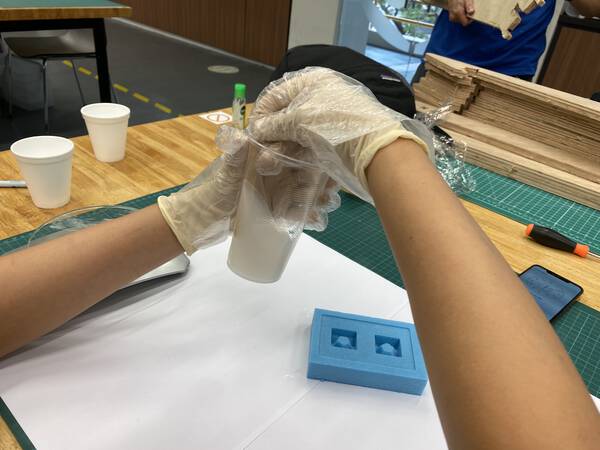
Here is the setup to make the mold: On a waste sheet, I ready the silicon rubber part A and part B, plastic cups for mixing, stirring wooden sticks, a weighing scale and the blue cut foam. I do this wearing rubber gloves in a well ventilated area.
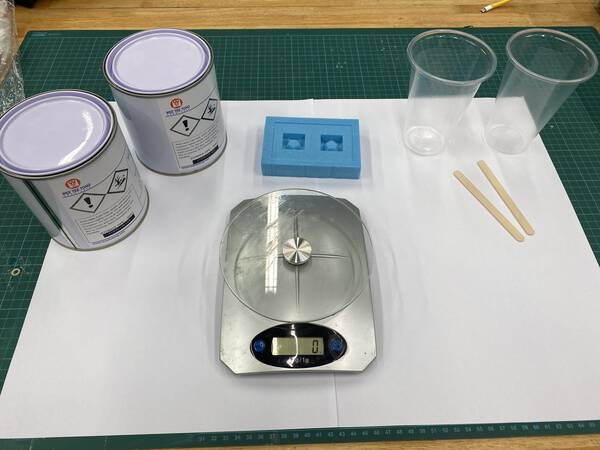
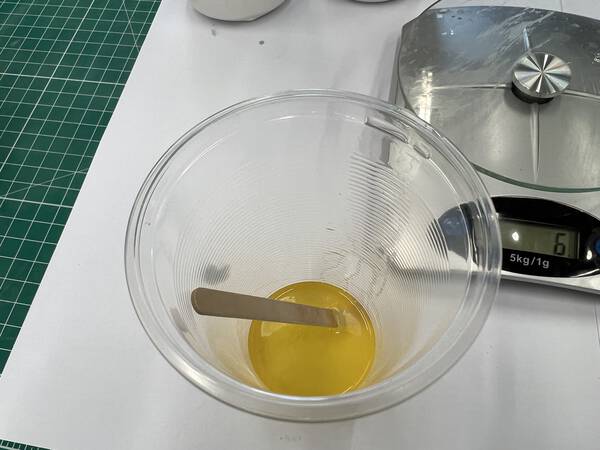
Tear the scale with the cup on to 0, set units to gm. Pour in about 50g of Part A rubber.

Immediately pour in the Part B of the rubber.

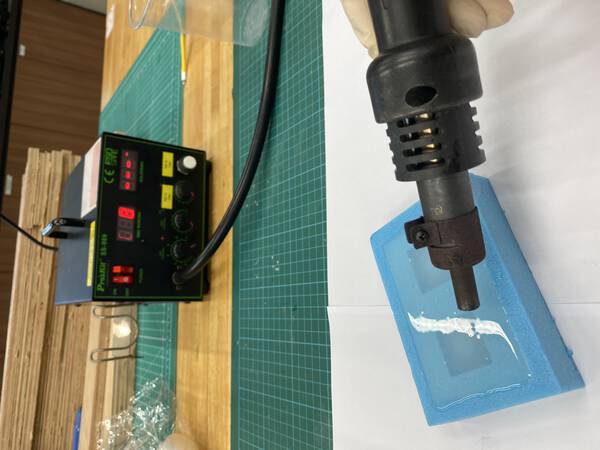
Working time is about 15mm according to the datasheet. So using the stirring sticks, mix both parts well, scraping the bottom and the sides of the cup. Do this slowly in a continuous motion to prevent air bubbles in the mix.
After about 2/3 minutes of mixing, if the mixture is homogenous, pour it into the blue cut foam in the deepest spot slowly. It will start filling and levelling on its own.

Use a heat gun in case there are air bubbles. They will rise t the top and pop on heating. Temperature around 90deg.
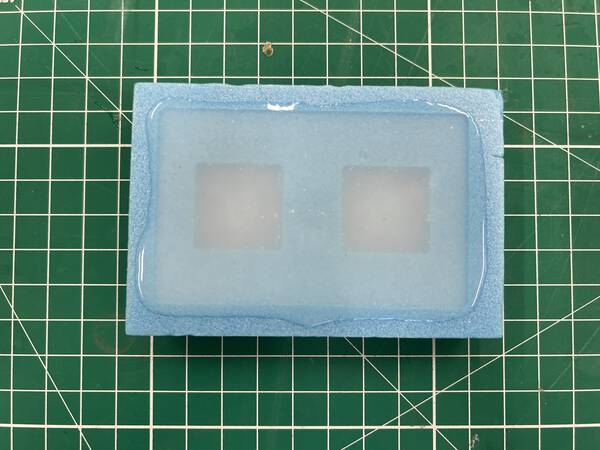
Let it rest in a non-dusty corner for 24 hours to cure fully.
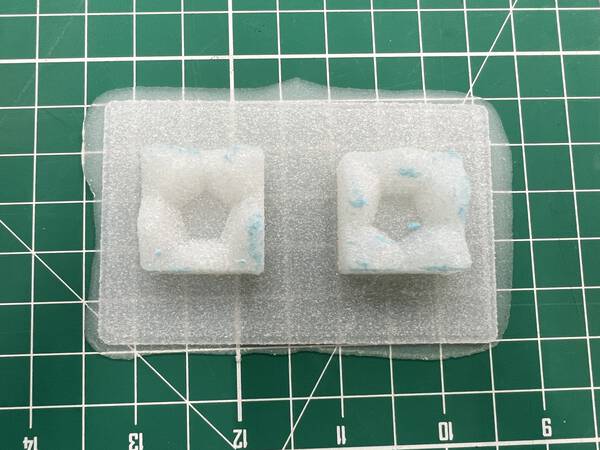
Next day, I broke it open using a scraper.
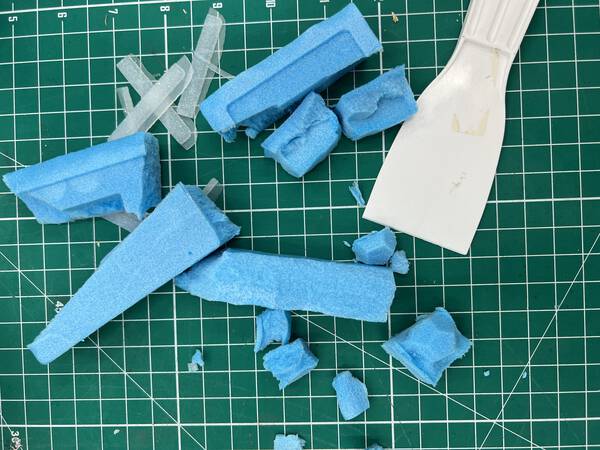
Remove all the tiny blur stuck parts.
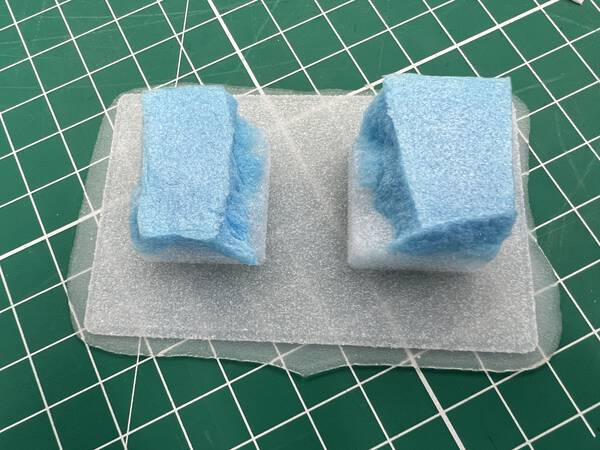
The mold is ready. This rubber mold is a little flexible, and a little rough because of the foam texture.
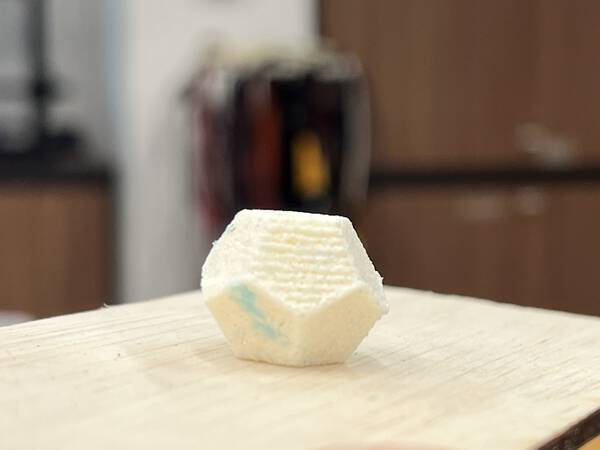
6. The Cast
I used Polytek EasyFlo 90 Liquid plastic EZFLO90 to cast the dodecahedron.
I fixed the mold on a vice between two sheets of soft wood to hold it in place. Because it is flexible, it might squeeze, so don’t tighten it too much.
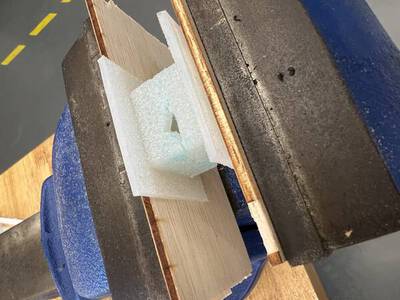
Similar to the process above, I mixed 10gm of part A and 9gm of part B in a plastic cup.
I poured the mix slowly into the tiny hole.
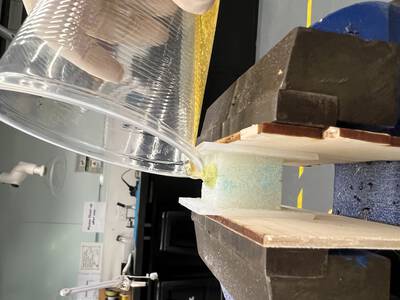
Till it overflowed out…
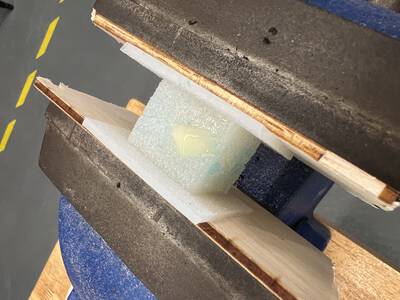
Let it dry for about 2 hours.
Open the 2 part mold:
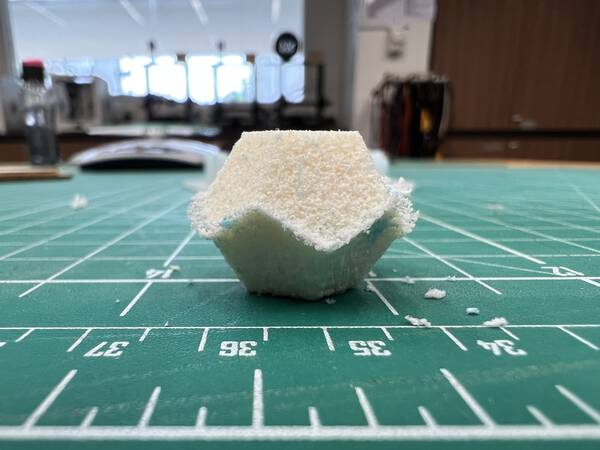
The edge isn’t super neat because of the rough surface texture. But it is thin enough to be trimmed using a knife.
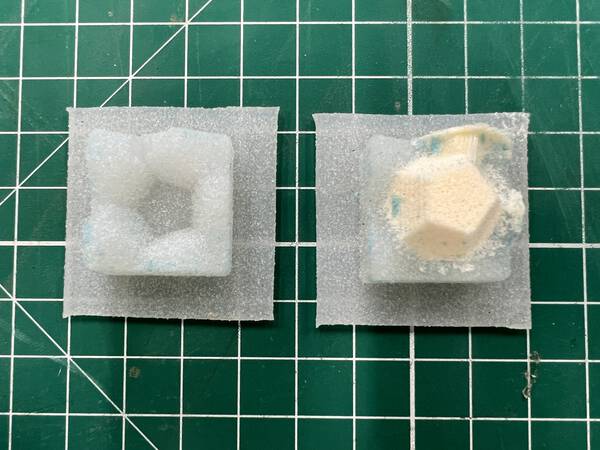
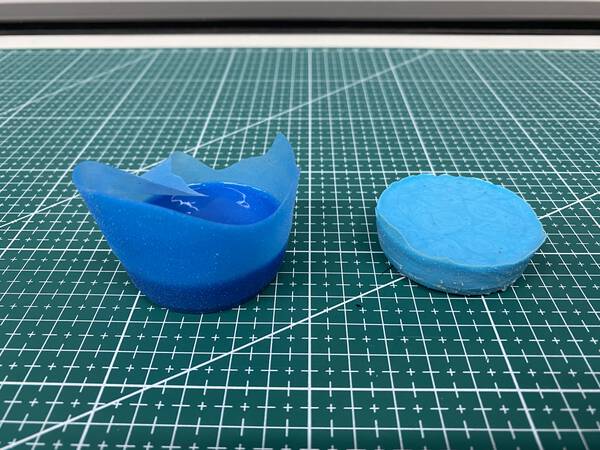
7. Comparing casts
Polytek EasyFlo 90 Liquid plastic and Silicon Rubber RTV-620 casts in a cup.
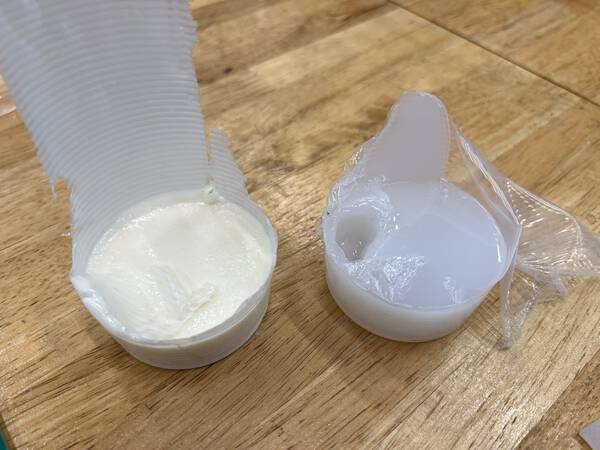
EasyMold Silicon Rubber and Smooth Cast casts in a cup.
8. References
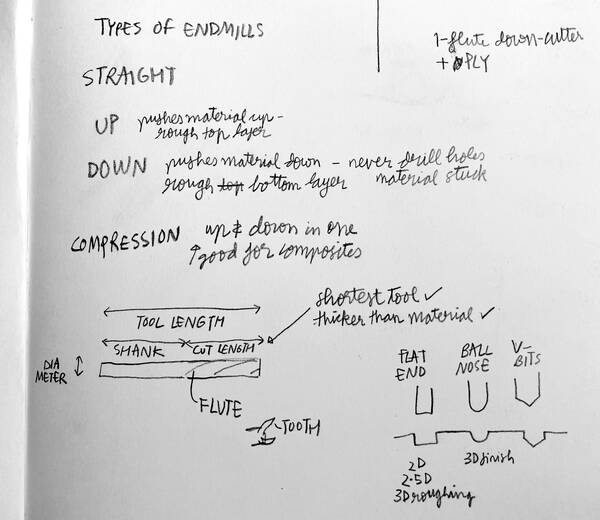
Types of endmills:
Climb vs Conventional cutting:
Drilling vs Milling:
Centering:
9. Design Files
Dodecahedron 3D model
Scaled version - 3D model
STL file
roughing.rml
finishing.rml
Vcarve file
roughing tap format