
This week Neil has reviewed many of the tools we may need during the training.
Assignments
- Work through a git tutorial
- Build a personal site in the class archive describing you and your final project
Build my website
Before the Fab Academy I had already played a bit with Wordpress, but creating a website was something very mysterious for me. Using GitLab, MkDocs and Atom to document the work done during the FabAcademy, allows me to understand how a website is organized.
Below are the steps I went through to create my site.
SSH key generation and adding to GitLab
To edit, add and remove files of my repository directly from my computers without using GitLab I needed to create SSH key for each of my computers. I found a helpful link to know how to do. The SSH key allows to established a connection between my GitLab repository and my computers.
1: First, check if there is already an SSH public key:
Bens-MacBook-Pro:~ls -al ~/.ssh
2: If not, create one with the CL:
Bens-MacBook-Pro:~ ben$ ssh-keygen
3: Read the key with the CL:
Bens-MacBook-Pro:~ cat .ssh/id_rsa.pub
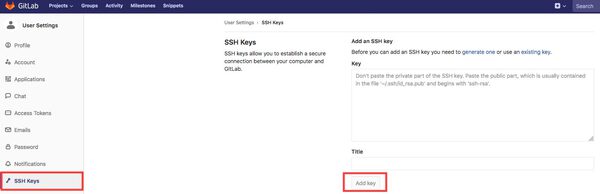
4: Copy it in GitLab SSH key menu
| Click on the profile picture to find the settings menu | Add the SSH key in the SSH tab menu |
|---|---|
 |
 |
Note
It is necessary to create an ssh key for each computer having access to the contents of the repository
Clone the repository
1: Create a folder in which to put the clone of the repository
Bens-MacBook-Pro:~ ben$ mkdir fabacademy
2: Copy the URL of The GitLab repository
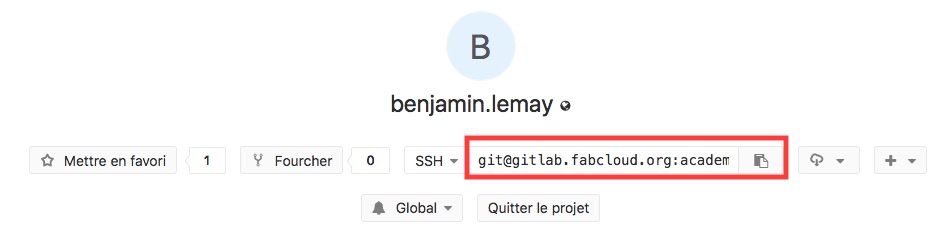
3: Point this new folder and clone the repository using the URL of the repository
Bens-MacBook-Pro:fabacademy ben$ git clone git@gitlab.fabcloud.org:academany/fabacademy/2019/labs/lamachinerie/students/benjamin-lemay.git
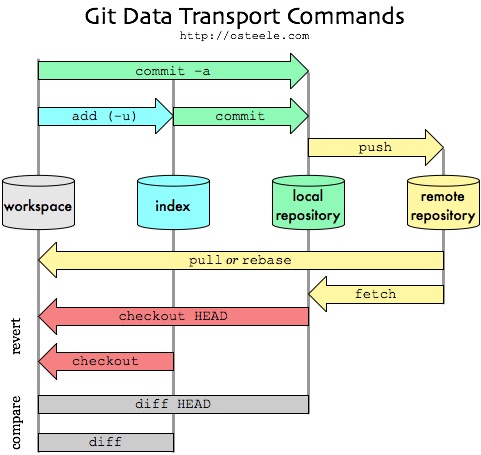
Git commands: add, commit, push, pull…
GitLab allows you to store a set of files and keeping the chronology of all the modifications that have been made to it. The git commands are used to manage and synchronize changes made to the files from the local repository and the remote repository. There are several git commands, but I use mostly:
- add : to add all modified files to the index
git add -a - commit : to record changes to the local repository with a commit message
git commit -m "message" - push : to send all the committed changes to the remote repository
git push - pull : to grabs any changes from the GitLab repository and merges them into the local repository
git pull
Git commands
start a working area (see also: git help tutorial)
   clone      Clone a repository into a new directory
   init       Create an empty Git repository or reinitialize an existing one

work on the current change (see also: git help everyday)
   add        Add file contents to the index
   mv         Move or rename a file, a directory, or a symlink
   reset      Reset current HEAD to the specified state
   rm         Remove files from the working tree and from the index

examine the history and state (see also: git help revisions)
   bisect     Use binary search to find the commit that introduced a bug
   grep       Print lines matching a pattern
   log        Show commit logs
   show       Show various types of objects
   status     Show the working tree status

grow, mark and tweak your common history
   branch     List, create, or delete branches
   checkout   Switch branches or restore working tree files
   commit     Record changes to the repository
   diff       Show changes between commits, commit and working tree, etc
   merge      Join two or more development histories together
   rebase     Reapply commits on top of another base tip
   tag        Create, list, delete or verify a tag object signed with GPG

collaborate (see also: git help workflows)
   fetch      Download objects and refs from another repository
   pull       Fetch from and integrate with another repository or a local branch
   push       Update remote refs along with associated objects
Atom
Neil told us about Atom which is “a free text editor for macOS, GNU / Linux and Windows developed by GitHub, it supports plug-ins written in Node.js and implements Git Control. Most extensions are published under free license and are maintained by the community. Atom is based on Chromium and Electron and is written in CoffeeScript5 and is also used as a development environment (IDE). “
To edit my website I use Atom. To do this:
1: Download and install Atom
2: Open the root directory of your local repository in the file menu
3: You can open and edit all the files of your project (left side windows). The opened files are visible in the tabs listed on the top. (When you make changes to the files or folder, its name takes on a new color)
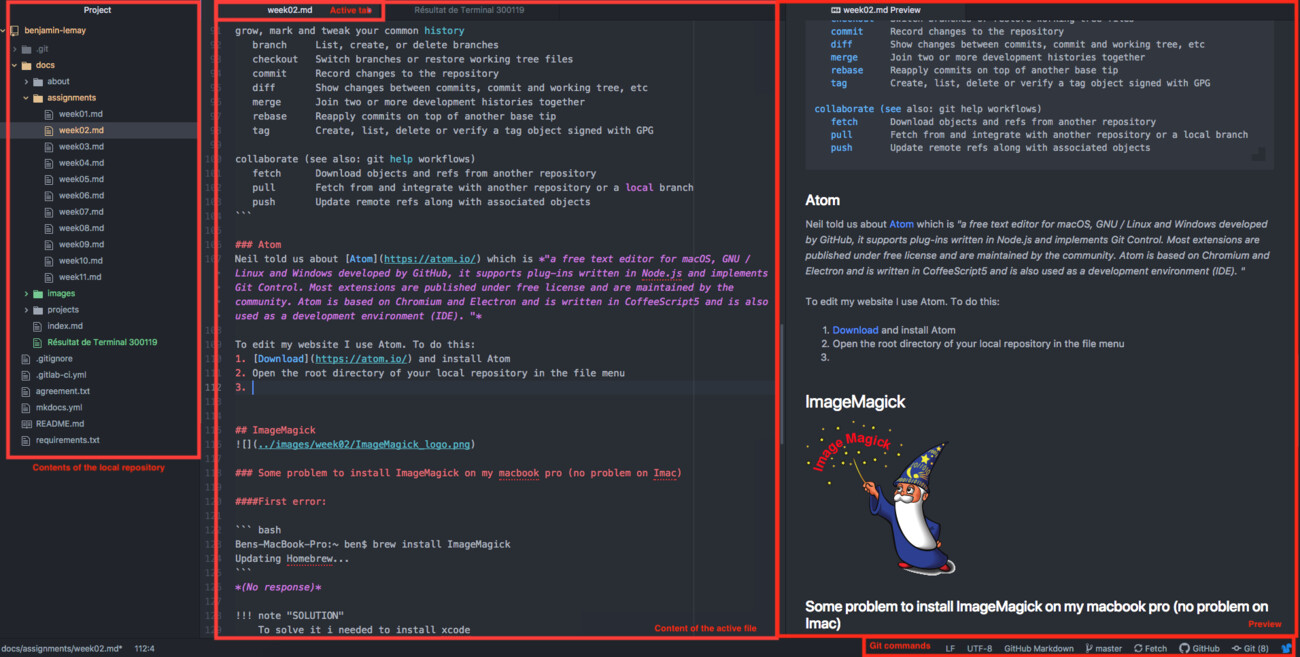
4: Open the preview window of the active file in the packages menu>markdown preview>toggle preview
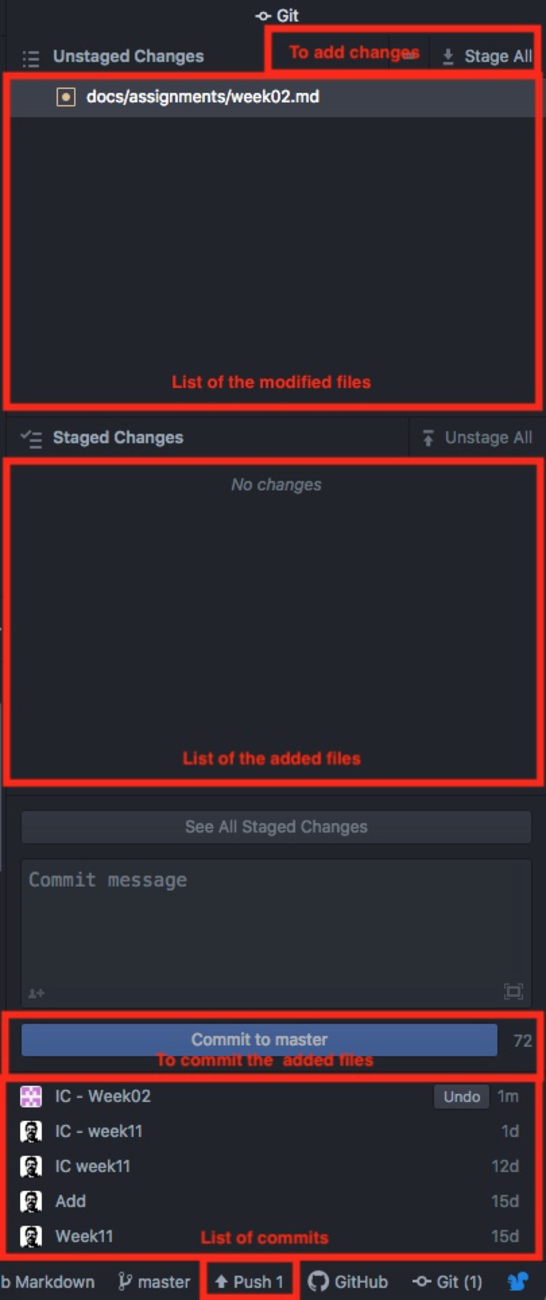
5: Use the git tab to add, commit, push and pull
Personalize my website
Extensions
-
PyMdown Extensions is a collection of markdown extensions to add features of the standard markdown library. For instance you can make task-list, highlight text, use emojis and many other things…
-
mkdocs-bootswatch is collection of themes for mkdocs.
To install extensions:
1: Open the .gitlab-ci.yml file and add this line:
before_script:
  - pip install -r requirements.txt
This will execute all the commands written in the requirements.txt file
2: Add this lines in the requirements.txt file
pymdown-extensions
mkdocs-bootswatch
This will execute pip install pymdown-extensions and pip install mkdocs-bootswatch to install them on the server.
3: Activate the extensions you want to use in your MkDocs site by adding their names in the mkdocs.yml file, for me:
markdown_extensions:
- pymdownx.emoji:
    emoji_generator: !!python/name:pymdownx.emoji.to_svg
- pymdownx.tasklist:
    custom_checkbox: true
Theme
With MkDocs it’s possible to personalize the website. To do this you have to edit the mkdocs.yml file. Here you can change colors, fonts and the theme of your MkDocs website. After installing mkdocs-bootswatch extensions I’ve changed the theme of my website:
theme:
  name: slate
I found it in the bootswatch theme
Build my website locally
To check if there is no error on my website after adding content I build it locally before to push it.
To built site locally
1: Install mkdocs on your computer: pip install mkdocs
2: Install the used extensions for your website on your computers, for me:
- pip install pymdown-extensions
- pip install mkdocs-bootswatch
- pip install mkdocs-material
3: Add this line to the .gigignore file :
- _site
NOTE
When you build your site in your local repository this adding avoid to send the _site folder into your remote repository.
4: To build your website point your repository cd "your repo/ and execute mkdocs build (maybe you need to use sudo mkdocs build command).
ImageMagick
![]()
ImageMagick is an helpful command line software to modify raster images. I mostly used it to convert PNG to JPG or to resize or compress image files.
Some problem to install ImageMagick on my macbook pro (no problem on Imac)
First error:
Bens-MacBook-Pro:~ ben$ brew install ImageMagick
Updating Homebrew...
(No response)
SOLUTION
To solve it i needed to install xcode
Bens-MacBook-Pro:~ ben$ xcode-select --install
Second error:
Error: No such file or directory @ dir_chdir - /usr/local/Cellar
SOLUTION
To know how to fix it i used brew doctor
Bens-MacBook-Pro:~ ben$ brew doctor
The solution gived by the “doctor”: Create the folders “include” “lib” “opt” “sbin” “Cellar” in /usr/local/
sudo mkdir -p /usr/local/include /usr/local/lib /usr/local/opt /usr/local/sbin /usr/local/Cellar
Then
sudo chown -R $(whoami) /usr/local/include /usr/local/lib /usr/local/opt /usr/local/sbin /usr/local/Cellar
Use of ImageMagick
To looked for the ImageMagick tools and command lines.
Currently i just used the convert tool to resize and compress photo with this command lines:
magick convert pelmel.png -resize 20% -quality 30 pelmel3.jpg
To Convert PNG to JPG and set transparent background to white
| PNG | JPG |
|---|---|
 |
 |
magick convert logoink.png -background white -flatten -alpha off logoinkwhite.png