Project Development
ASSIGNMENT
complete your final project, tracking your progress
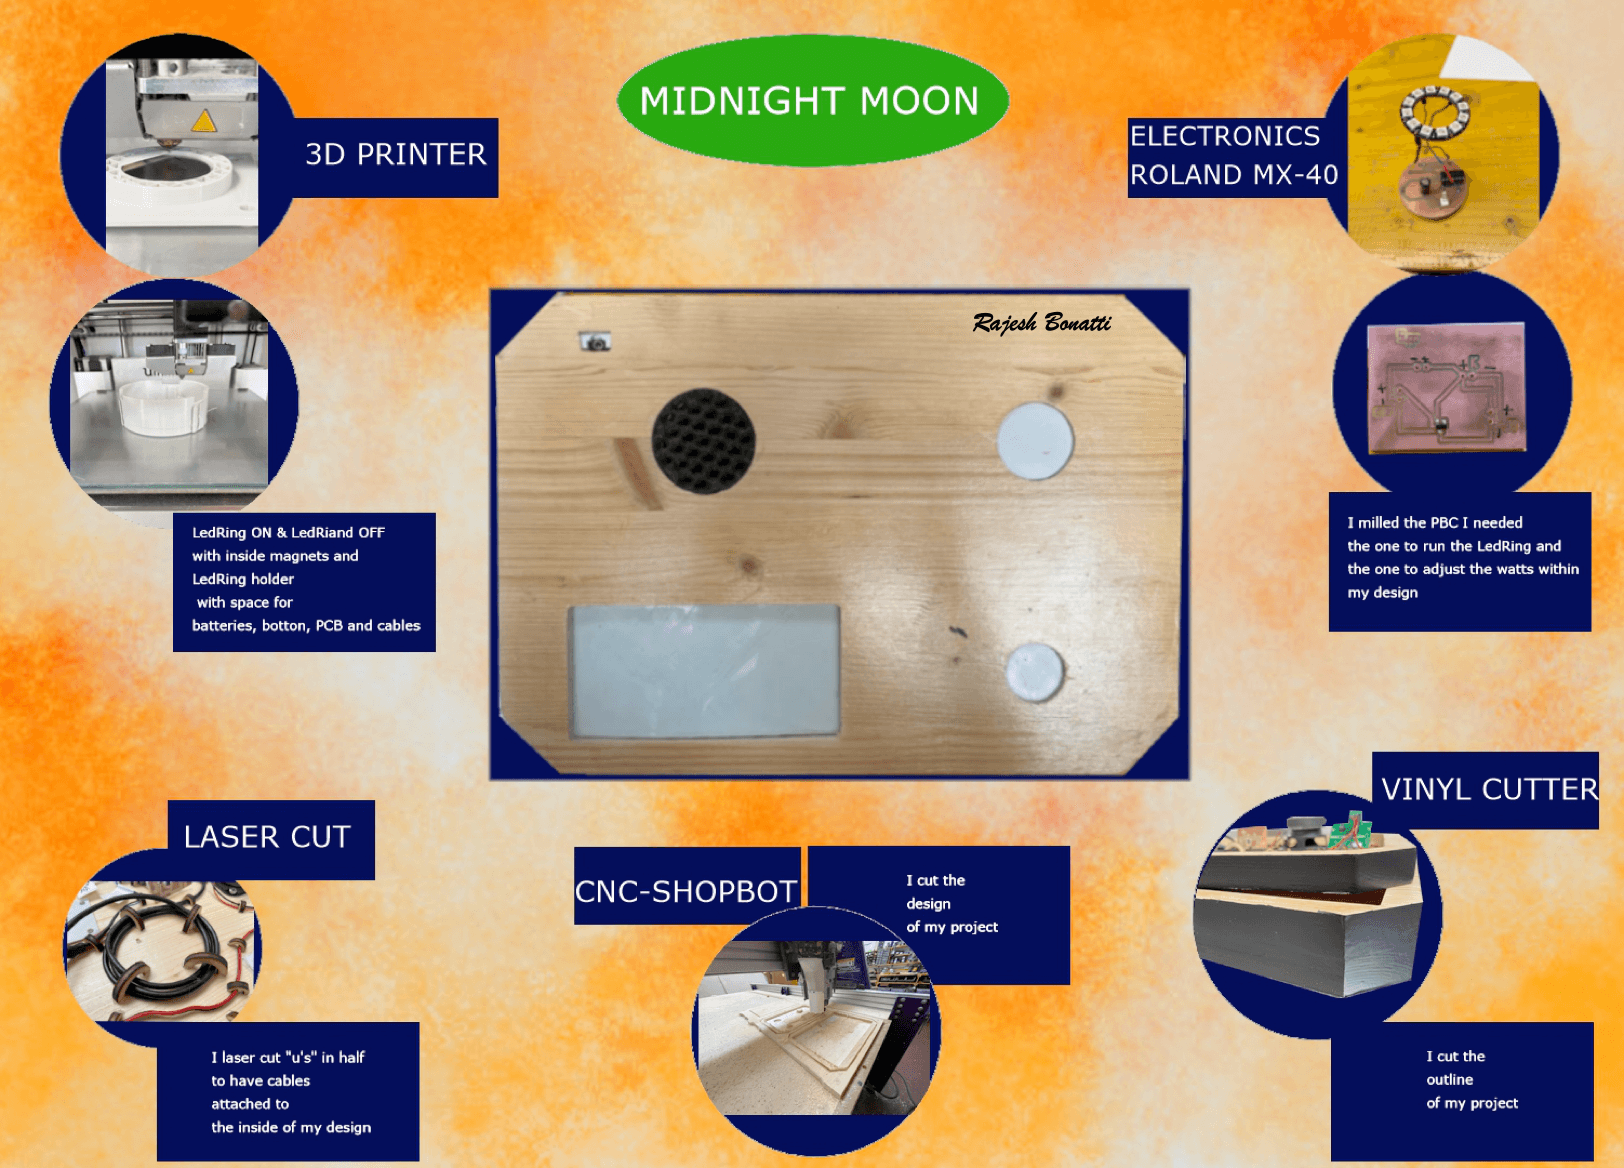
THIS IS MY PROJECT'S PRESENTATION
Which activities have been completed and which remain?
I made all the elements for the structure of the projects: wooden structure, 3D printer supports, vinyl perimeter cover, finishing elements and small completion. I have also milled and soldered the PCBs so I can start testing them.
What remains for me to do is to program the two boards (one for the LedRing and the other for the Voltage Regulator (soldered on is the Voltage Regulator and there are drilled PINs for soldering wires to it).
What worked? What didn't?
For now I had trouble with the Led Ring program because I couldn't get it to change colour and before that I couldn't understand why it didn't work: then doing some research on the internet about the Adafruit Led Ring x12 I saw that a 400ohm res was too much, so I put in a 0ohm one and bridged it. This solved the problems so that everything works properly.
What questions need to be resolved?
The questions I was able to answer were about the LedRing (i.e. the code), the milling of the board, which components should be soldered to the board, how many pins and what I needed them for, and what functions the LedRing should have.
What will happen when?
These days I'm trying to make improvements to my project by fixing some parts much more accurately and making it as professional as possible. I've scheduled my days so I know what and when to do best, so barring any unforeseen circumstances my "roadmap" should be:
Wednesday 9 June → varnishing of wooden case
Thursday, June 10 → final printing of the Led Ring support and verification
Friday, June 11 → assembly of all components
Monday, June 14 → analysis of internal and external parts (wire/vinyl stops)
Tuesday 15 June → check up of the whole project
Wednesday 16 June → PRESENTATION
What did you learn?
I have learnt many things, but one thing that I consider fundamental is that of "putting yourself on the line". I say this especially for the electronics topics I had to deal with in this course because before it I had never studied them, I was never interested in them, and I saw how useful they actually are when applied to design to complete a project.
Beyond that, I noticed that the budget for a project, even if it is low, does not determine the realisation of a project. Many projects have been realised with a low budget and this is due to the fact that you have been able to integrate everything very effectively.
Before joining the Fab world I had no idea how many things could be done with very little budget and/or resources and I realised that what counts most is our creativity in doing and designing endless things with what we have and our only limit is our mind.
MY PROJECT
WHEN DID MY PROJECT START?
I started thinking about WHAT I would like to do one of the first weeks at the beginning of Fab.
Shortly afterwards I started sketching shapes that would fit the project idea.
Exam commitments affected the continuation of the project, which I shelved with the intention of resuming it later.
In March 2020, however, I took the old drawings in hand again and they went from being sketches on paper to actual projects: with Fusion 360 I defined the elements for a clearer idea of what I was doing at the time and what I should do next. I also did several tests to define different shapes that I hadn't even considered or tackled initially.
Various experiments convinced me that the initial shape was the best (both in terms of functionality and aesthetics).
As previously mentioned, commitments held back the progress of the work on the Final Project: fortunately one day I had the opportunity to mill the first test form and in this way I was able to "touch with my hands" the dimensions, weight and everything that could help me later on for the final result.
Once the scheduled exams were over, I was able to devote myself to my final project including the electronic part to be integrated.
So, in order, here is the list of the process for the Final Project I designed:
- Drawings with fusion 360 and exporting the project to ShopBot;
- Milling the external part of my project;
- Searching for all the components I need (speaker-wireless charging);
- 3D printing with the insertion of a magnet;
- Roland milling of the PCB of the Led Ring;
- Soldering components on the Led Ring board;
- Batteries arranged in series to have the V supported by my Led Ring;
- Programming the Led Ring;
- Wiring battery and button connection cables to the PCB using PINs;
- 3D printing of the support (with a magnet embedded in the base) with all the parts connected to the PCB (button-batteries) inside;
- Roland milling for the PCB with the Voltage Regulator;
- Soldering the Voltage Regulator and PINs for the cables on the PCB;
- Wiring the cables connected to the various elements in my project;
- Internal fixing of all my integrated elements;
- Cable connection of each element to the PCB with the Voltage Regulator;
- Drawings of the semicircles that will fix the cables inside the project;
- Laser cutting of the cable fixing semicircles;
- Fixing cables with laser-cut semicircles;
- Vinyl Cutter moulding of the perimeter coating of the project to make it look more professional;
- Screw closure of the box with all elements already fixed inside;
For the sake of clarity, I have made a table of what I did and when
