10. Molding and casting
-
Group assignment: Review the safety data sheets for each of your molding and casting materials. Make and compare test casts with each of them.
-
Individual assignment: Design a 3D mold around the stock and tooling that you’ll be using, mill it (rough cut + (at least) three-axis finish cut), and use it to cast parts.
Characterization of molding and casting materials
Machinable wax
Features
-
Non-Abrasive: will not cause significant wear on tools.
-
User-Friendly: produces chips instead of dust.
-
Self-Lubricating: eliminates the need for coolants or cutting fluids.
-
Able To Be Glued: produce large or irregular pieces with 3M Nro90 Hi-Strength Spray Adhesive.
-
Wide Variety of Sizes: find the appropriate size for your project
-
Self-Releasing/Self-Sealing pour liquid tooling plastics without using sealers or release agents.
Applications of machinable wax
-
Education as a Training Aid Material
-
CNC Systems Set-up and Demonstrations
-
Proofing CNC Machining Programs
-
Producing Accurate Molds and Prototypes
Silicone Rubber RTV (Room-Temperature-Vulcanizing silicone) and Catalyzer.
Two-component RTV silicone rubber compounds for mold making are suitable for mold masters for molding with polyester resin, epoxy resin, urethane foam, wax, plaster, and low-melt-point metal alloys. These RTV silicone rubber compounds allow accurate reproduction of the shape of the original. They are easy to use and are thus used widely in industrial applications, as well as by hobbyists looking to create the perfect replica.
Features
-
Workability: The base compound and curing agent are mixed and then poured into the mold to create a silicone rubber mold quickly. Workable time and cure time can be adjusted.
-
Mold-releasability: The cured rubber releases easily from the mold, so mold-release agents (soapy water, wax, etc.) are unnecessary.
-
Dimensional stability: These rubbers offer good dimensional stability, with little shrinkage.
-
Flowability: They have excellent flowability, so the original form is reproduced accurately. This includes even intricate shapes and details such as fingerprints and wood grain.
-
Non-exothermic: No heat is generated during curing, meaning no adverse effects to the original.
Applications of Silicone Rubber RTV and Catalyzer
- General purpose
Working for the model we want to cast
There are many ways to do this:
-
Molding the physic object that we want to cast.
-
Modeling the object from scratch.
-
Or using an existent digital model.
I choose the last option. The model I used was this: Model.
Preparing the model MeshMixer and Fusion 360
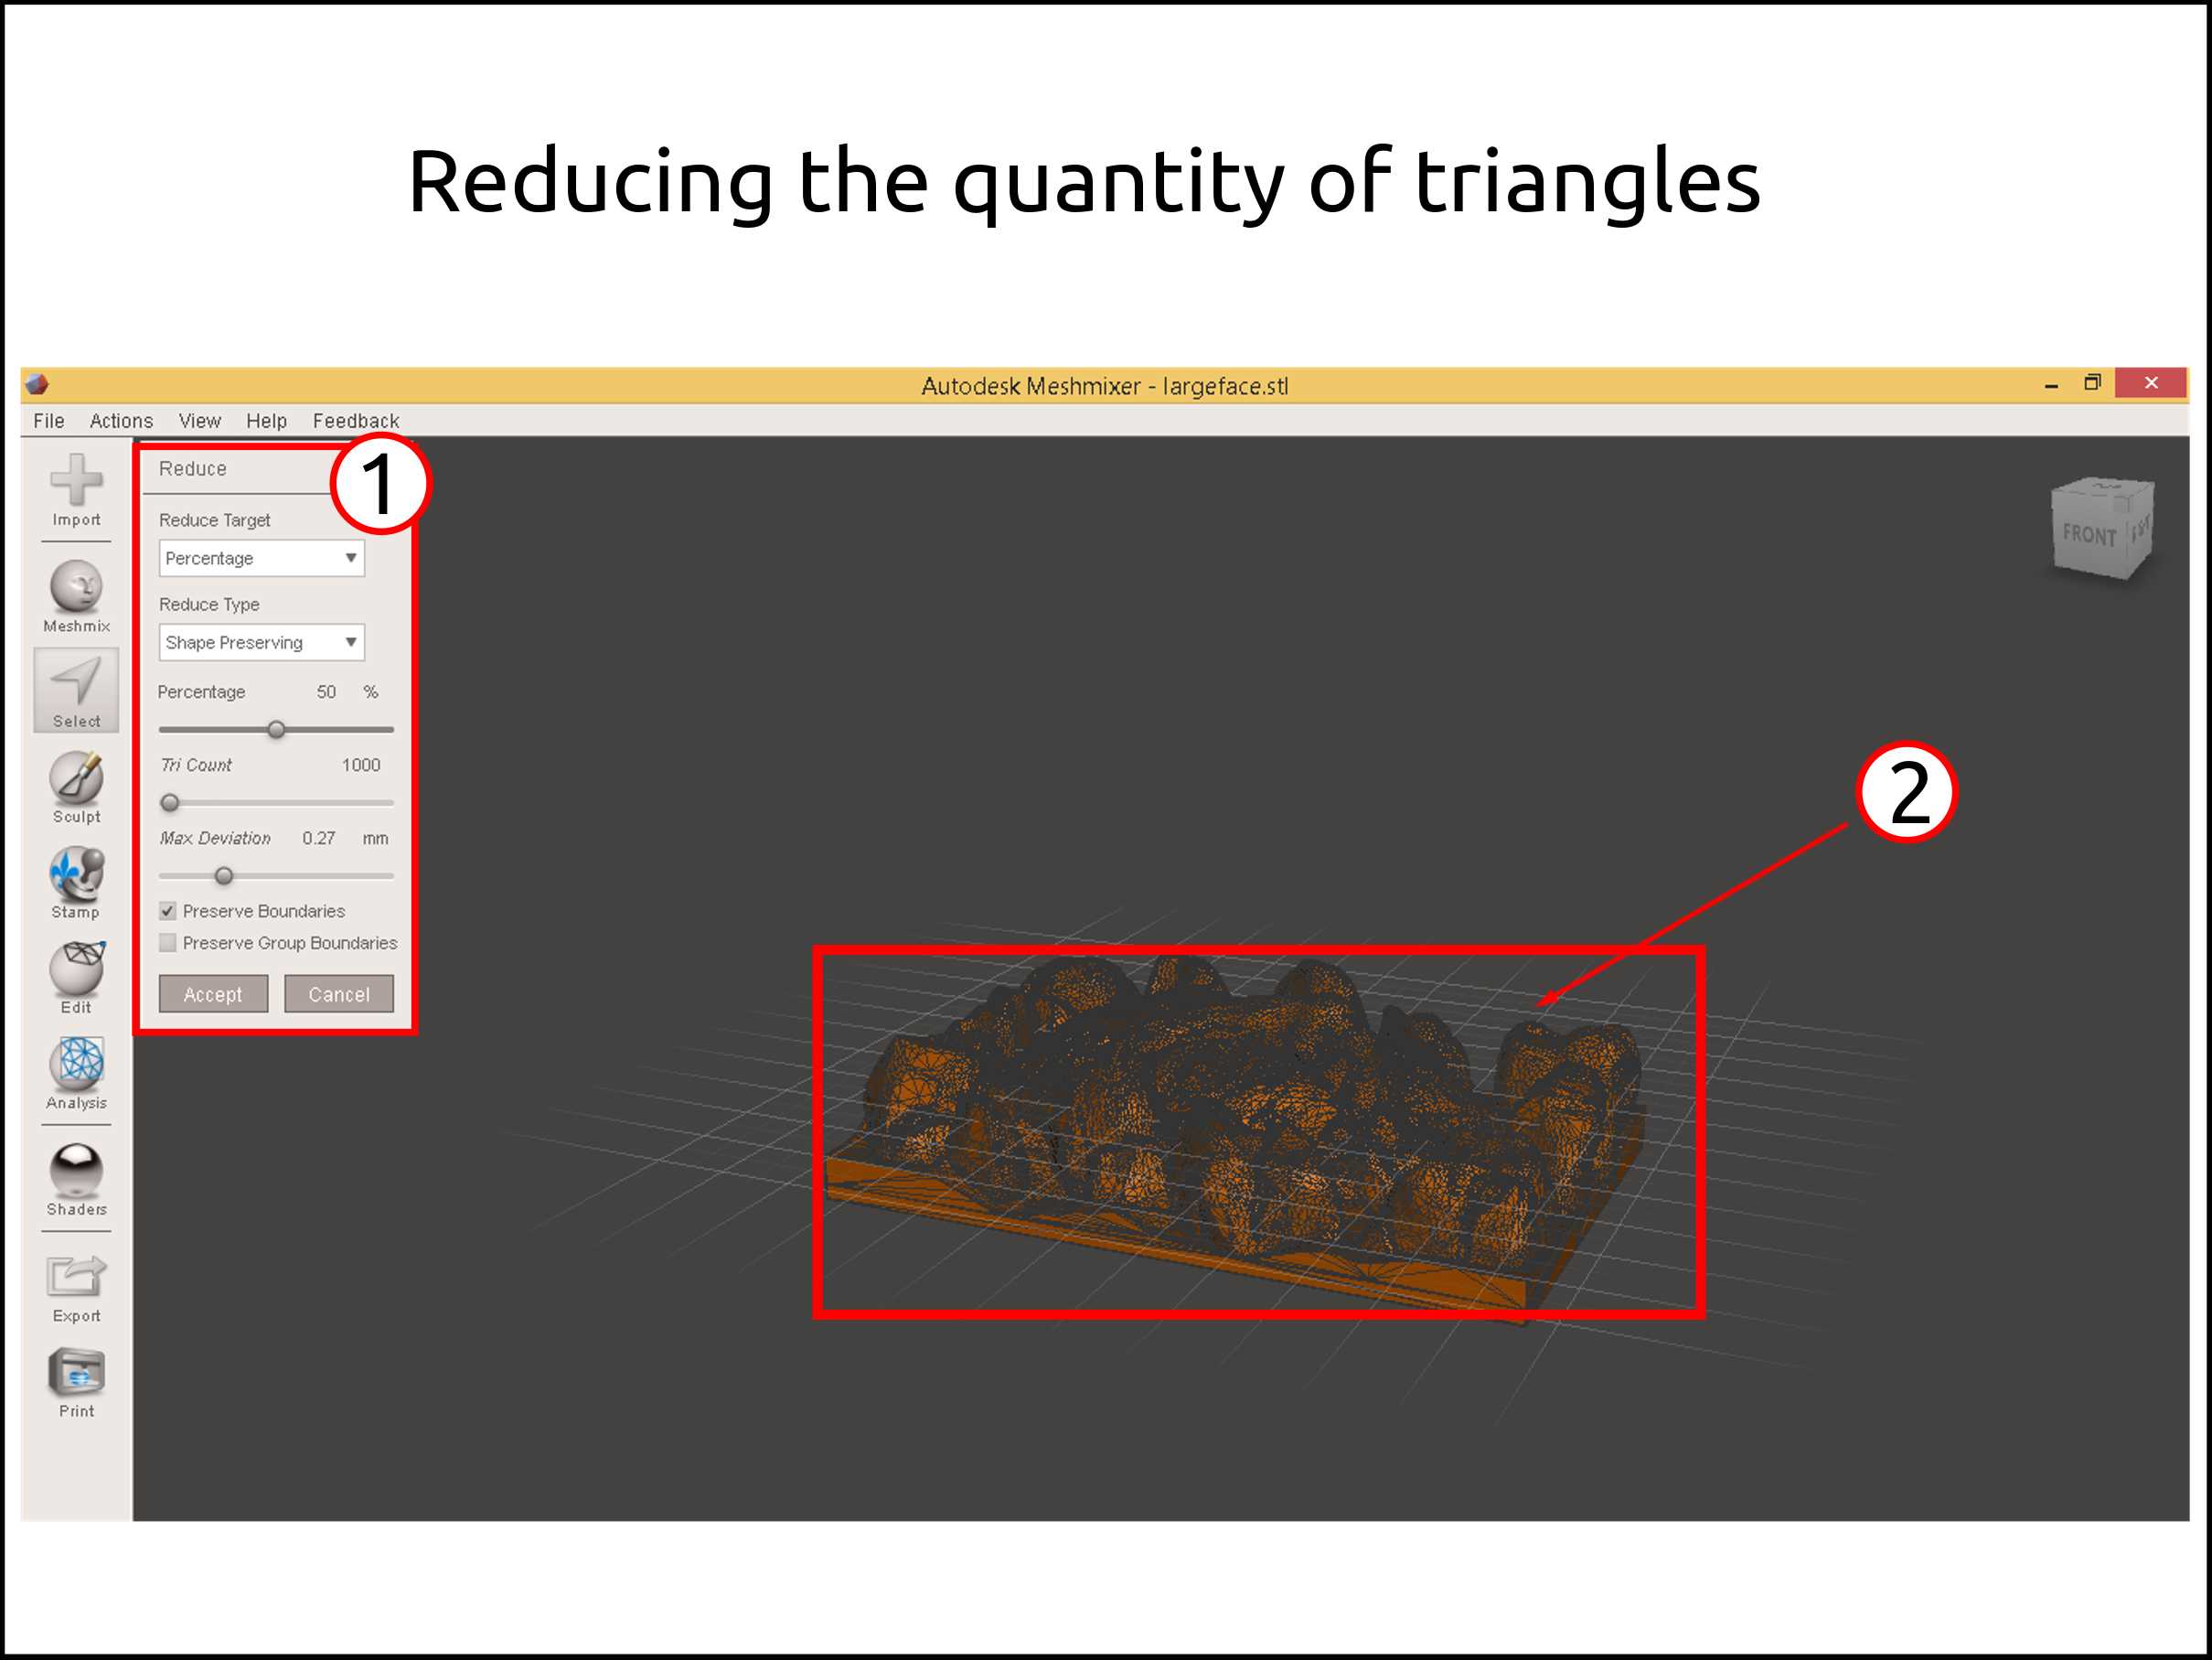
The first step was to reduce the number of triangles using the software called MeshMixer using its tool called Reduce.
-
Here choosing the option Triangle budget you can put specifically the triangles amount. In my case is 10000 triangles, because with that value of triangles I can convert to solid.
-
This is the visualization of the imported mesh, that could be OBJ or STL.
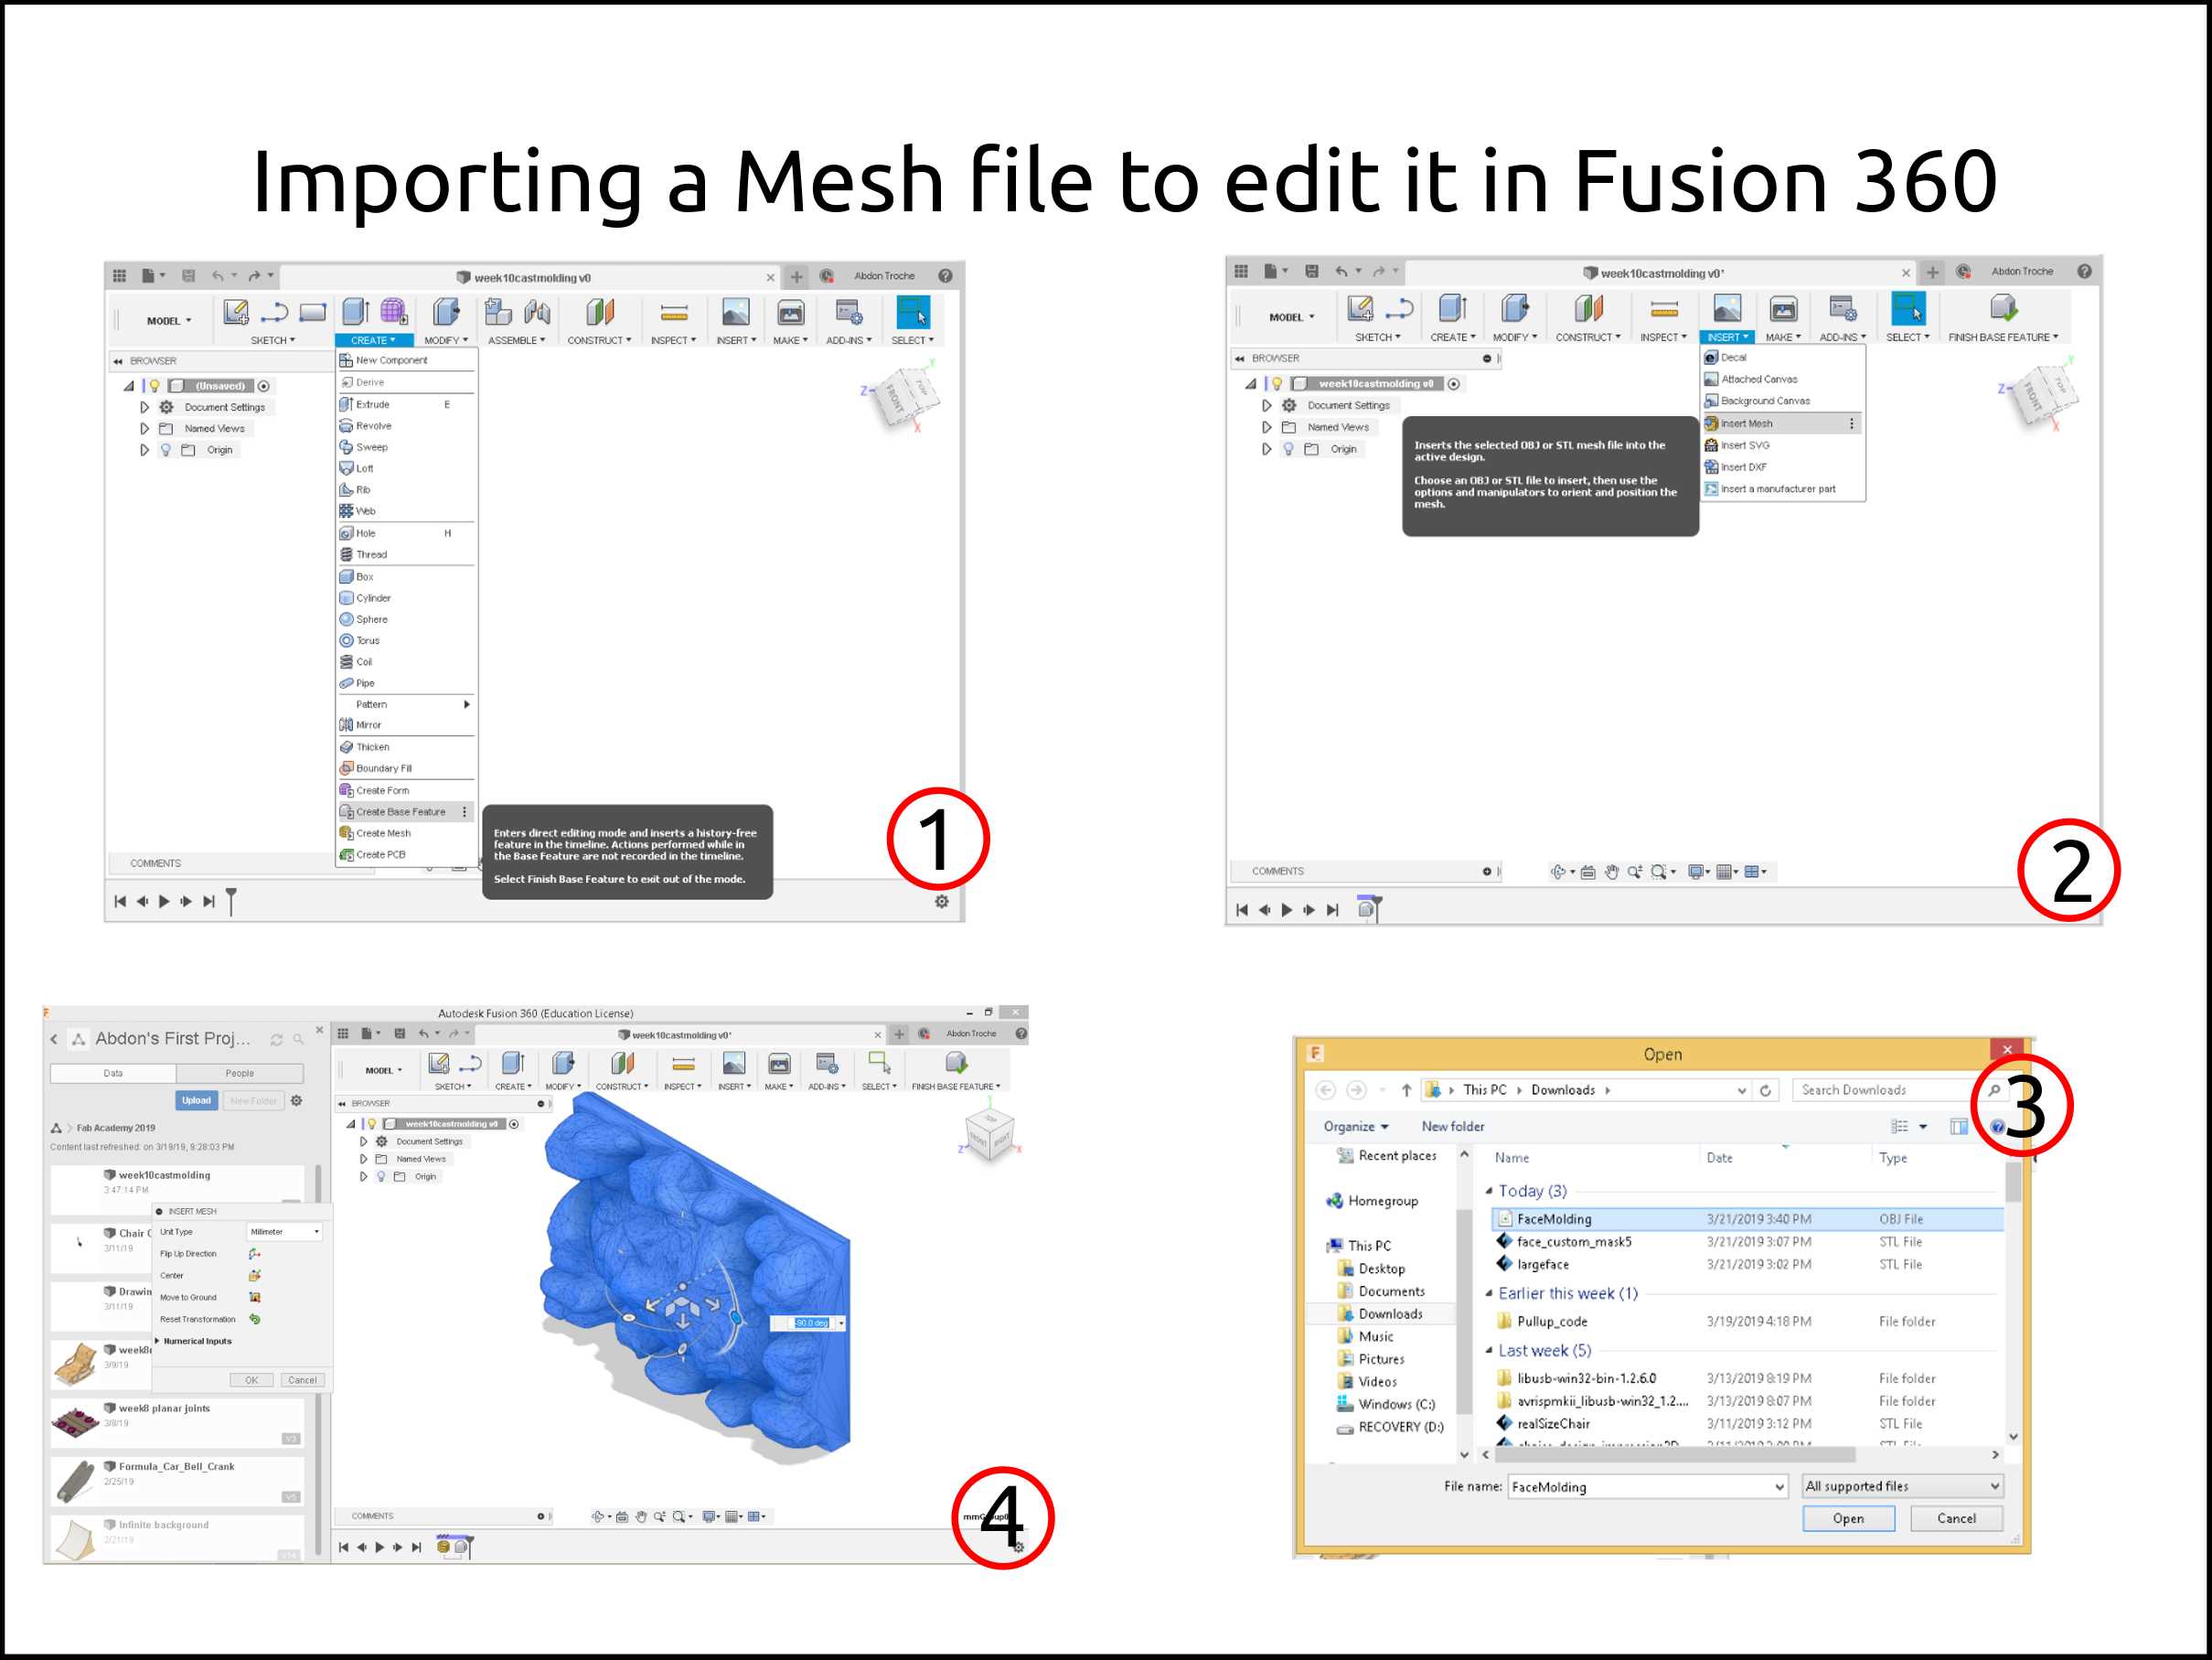
The next step is to convert the mesh object an editable solid in Fusion 360.
-
New file > Create > Create Base feature
-
Insert > Insert mesh
-
Select the model and press Open
-
Scale, orient or move the object as you need it
-
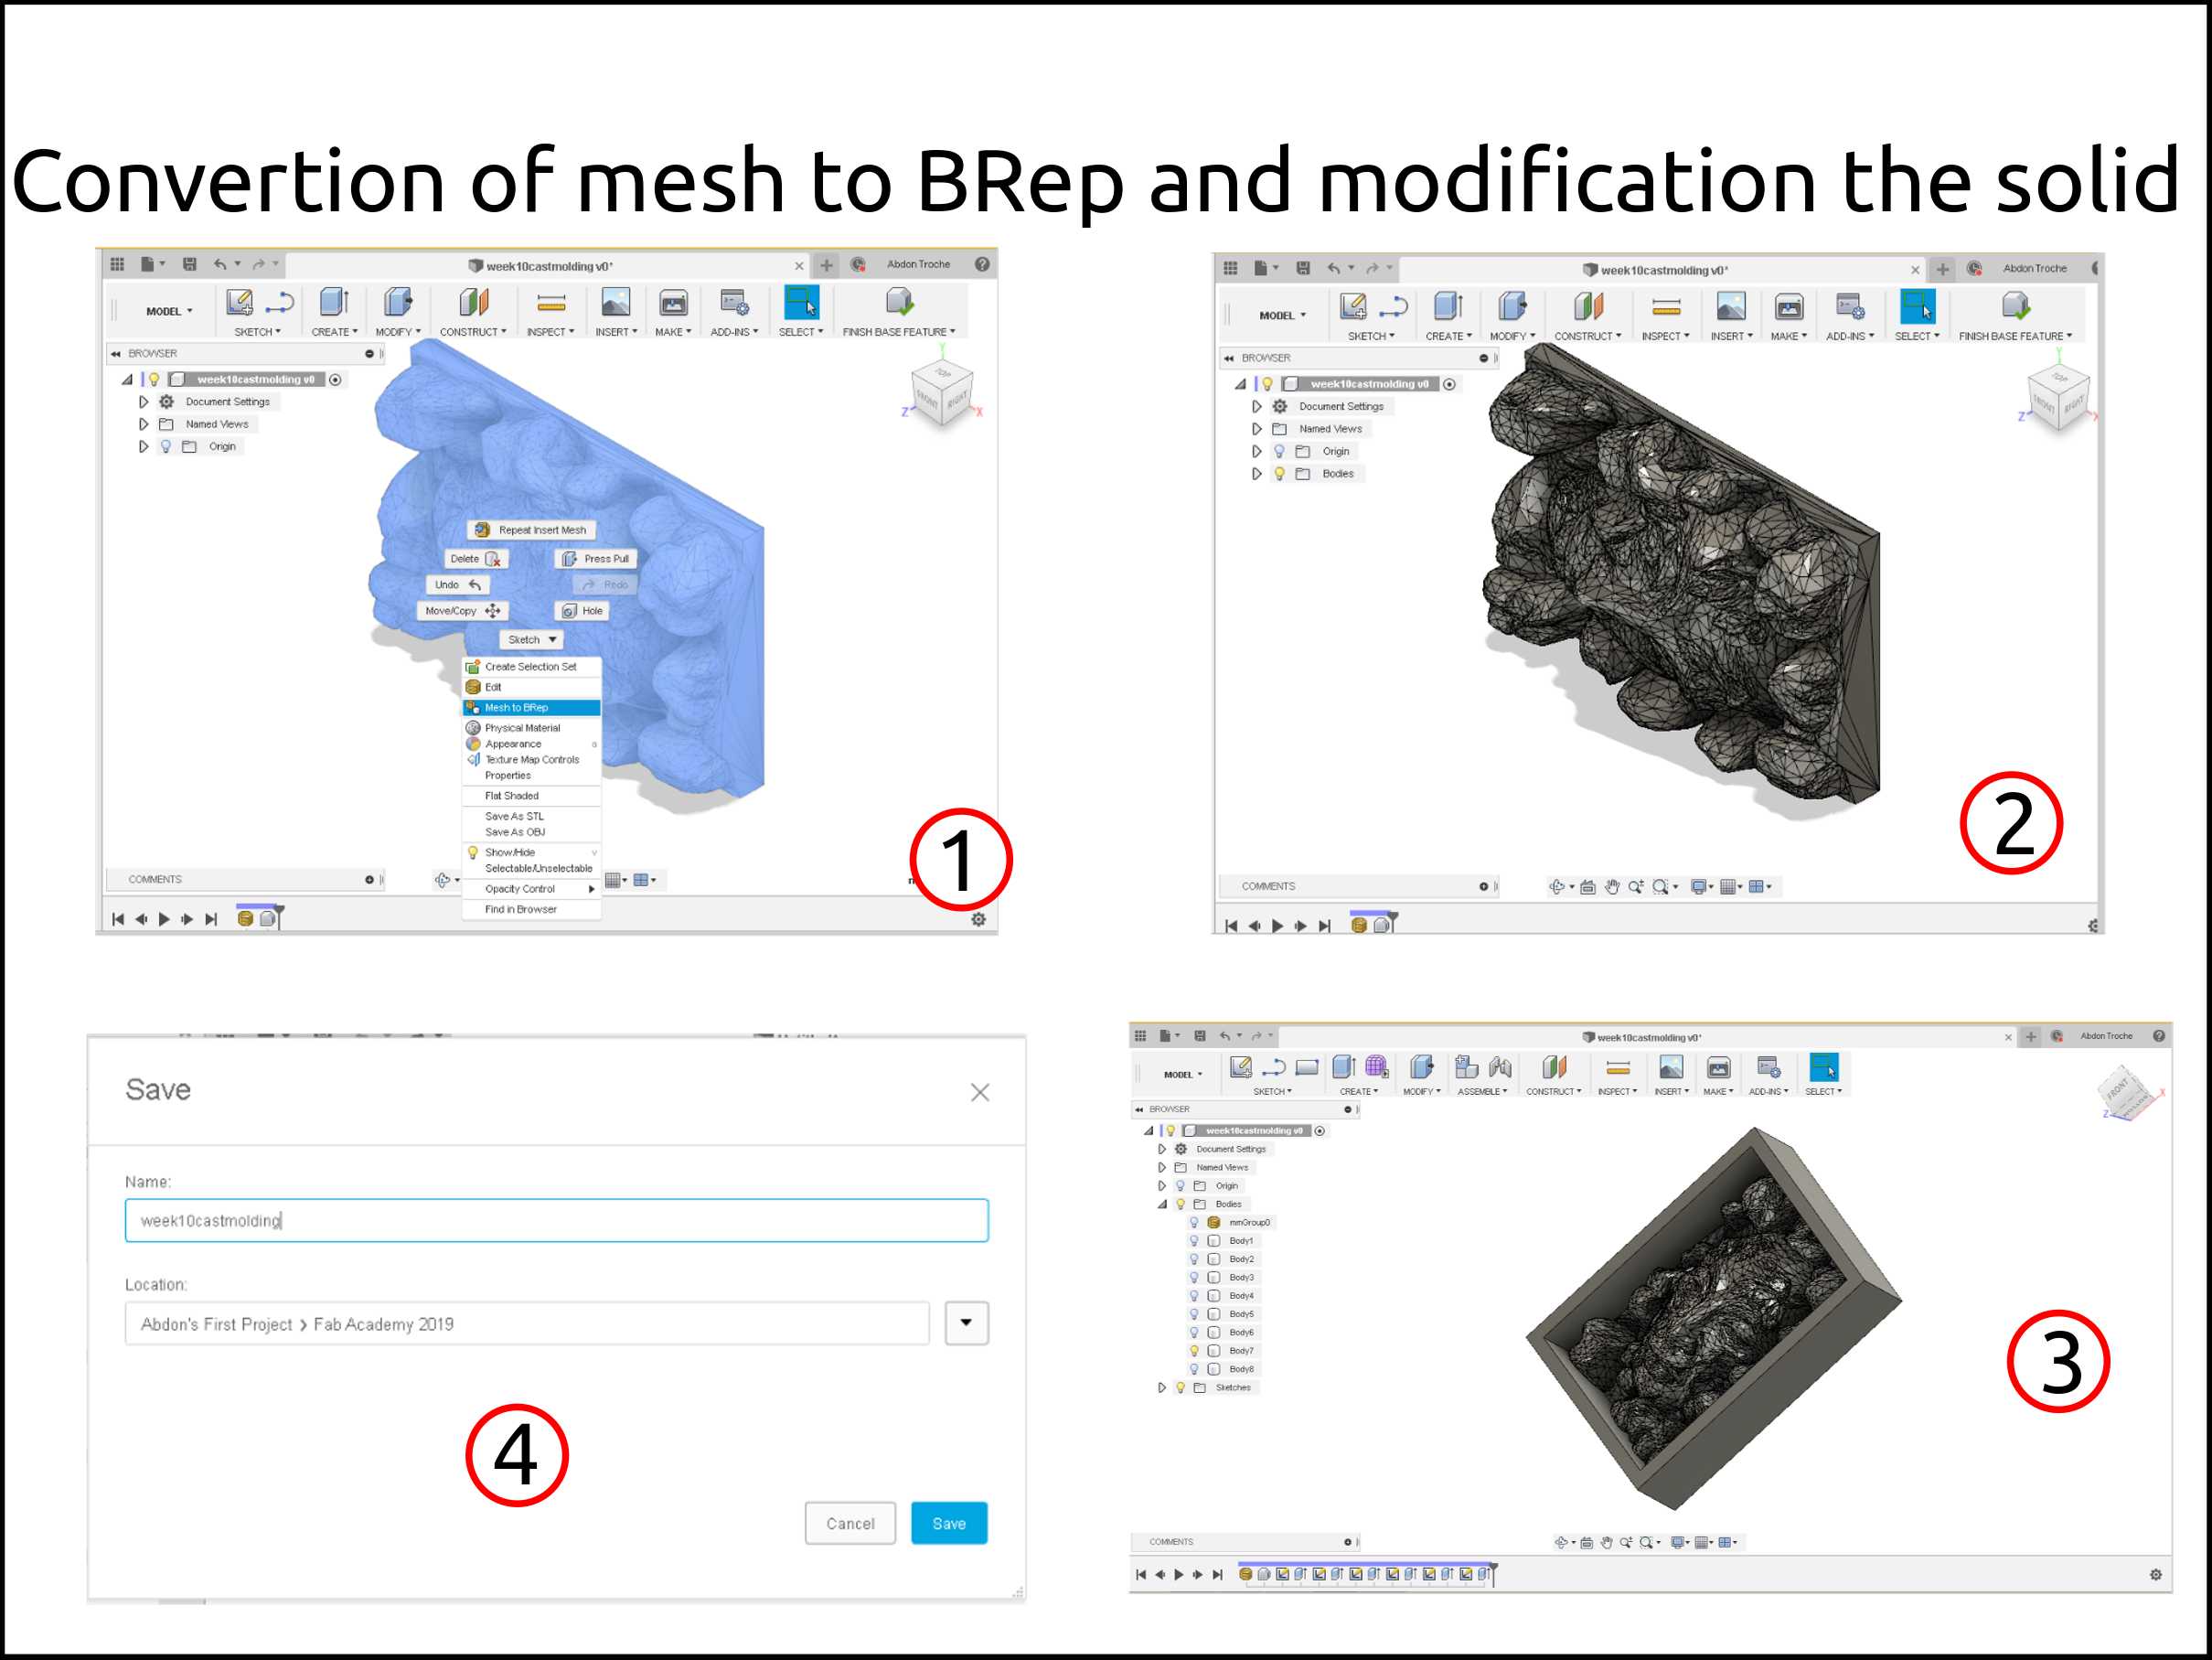
Right click on the imported mesh and select Mesh to BRep
-
Then Finish base feature
-
Add the modifications to your model. I my case was the wall around the mesh.
-
And then save your model. This step is very important
Files from Fusion 360
Generating the toolpath using SRP Player
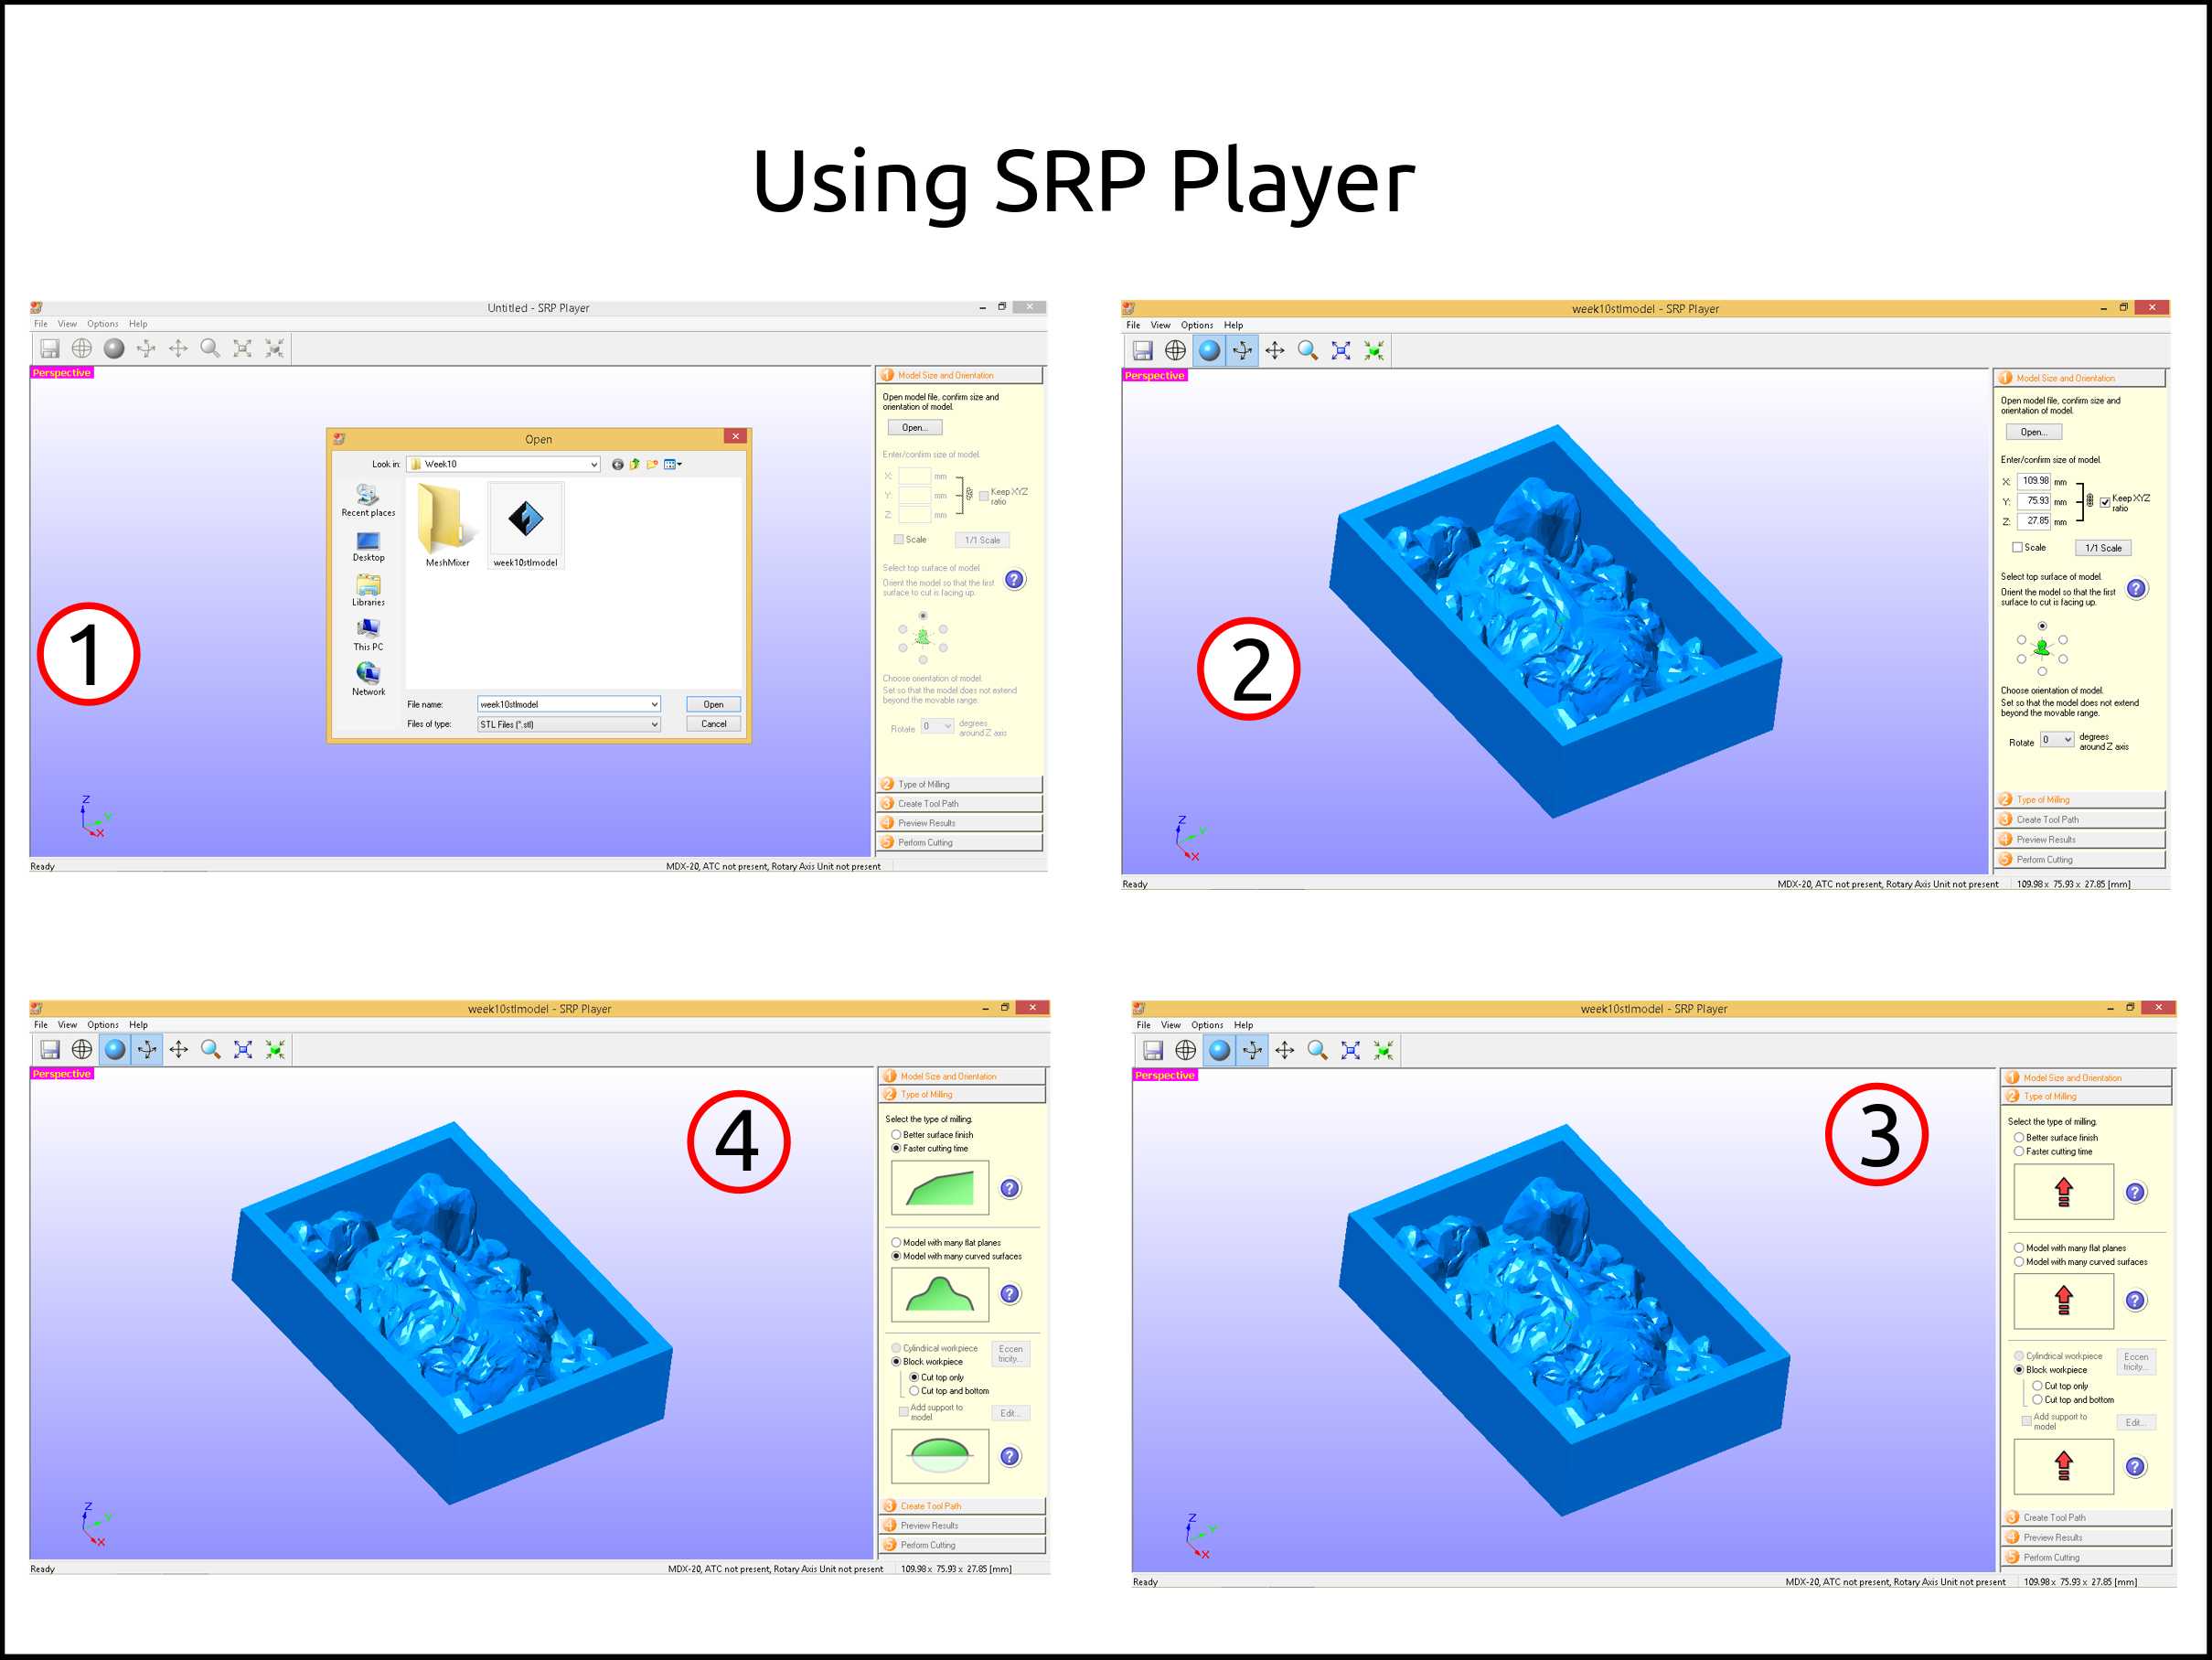
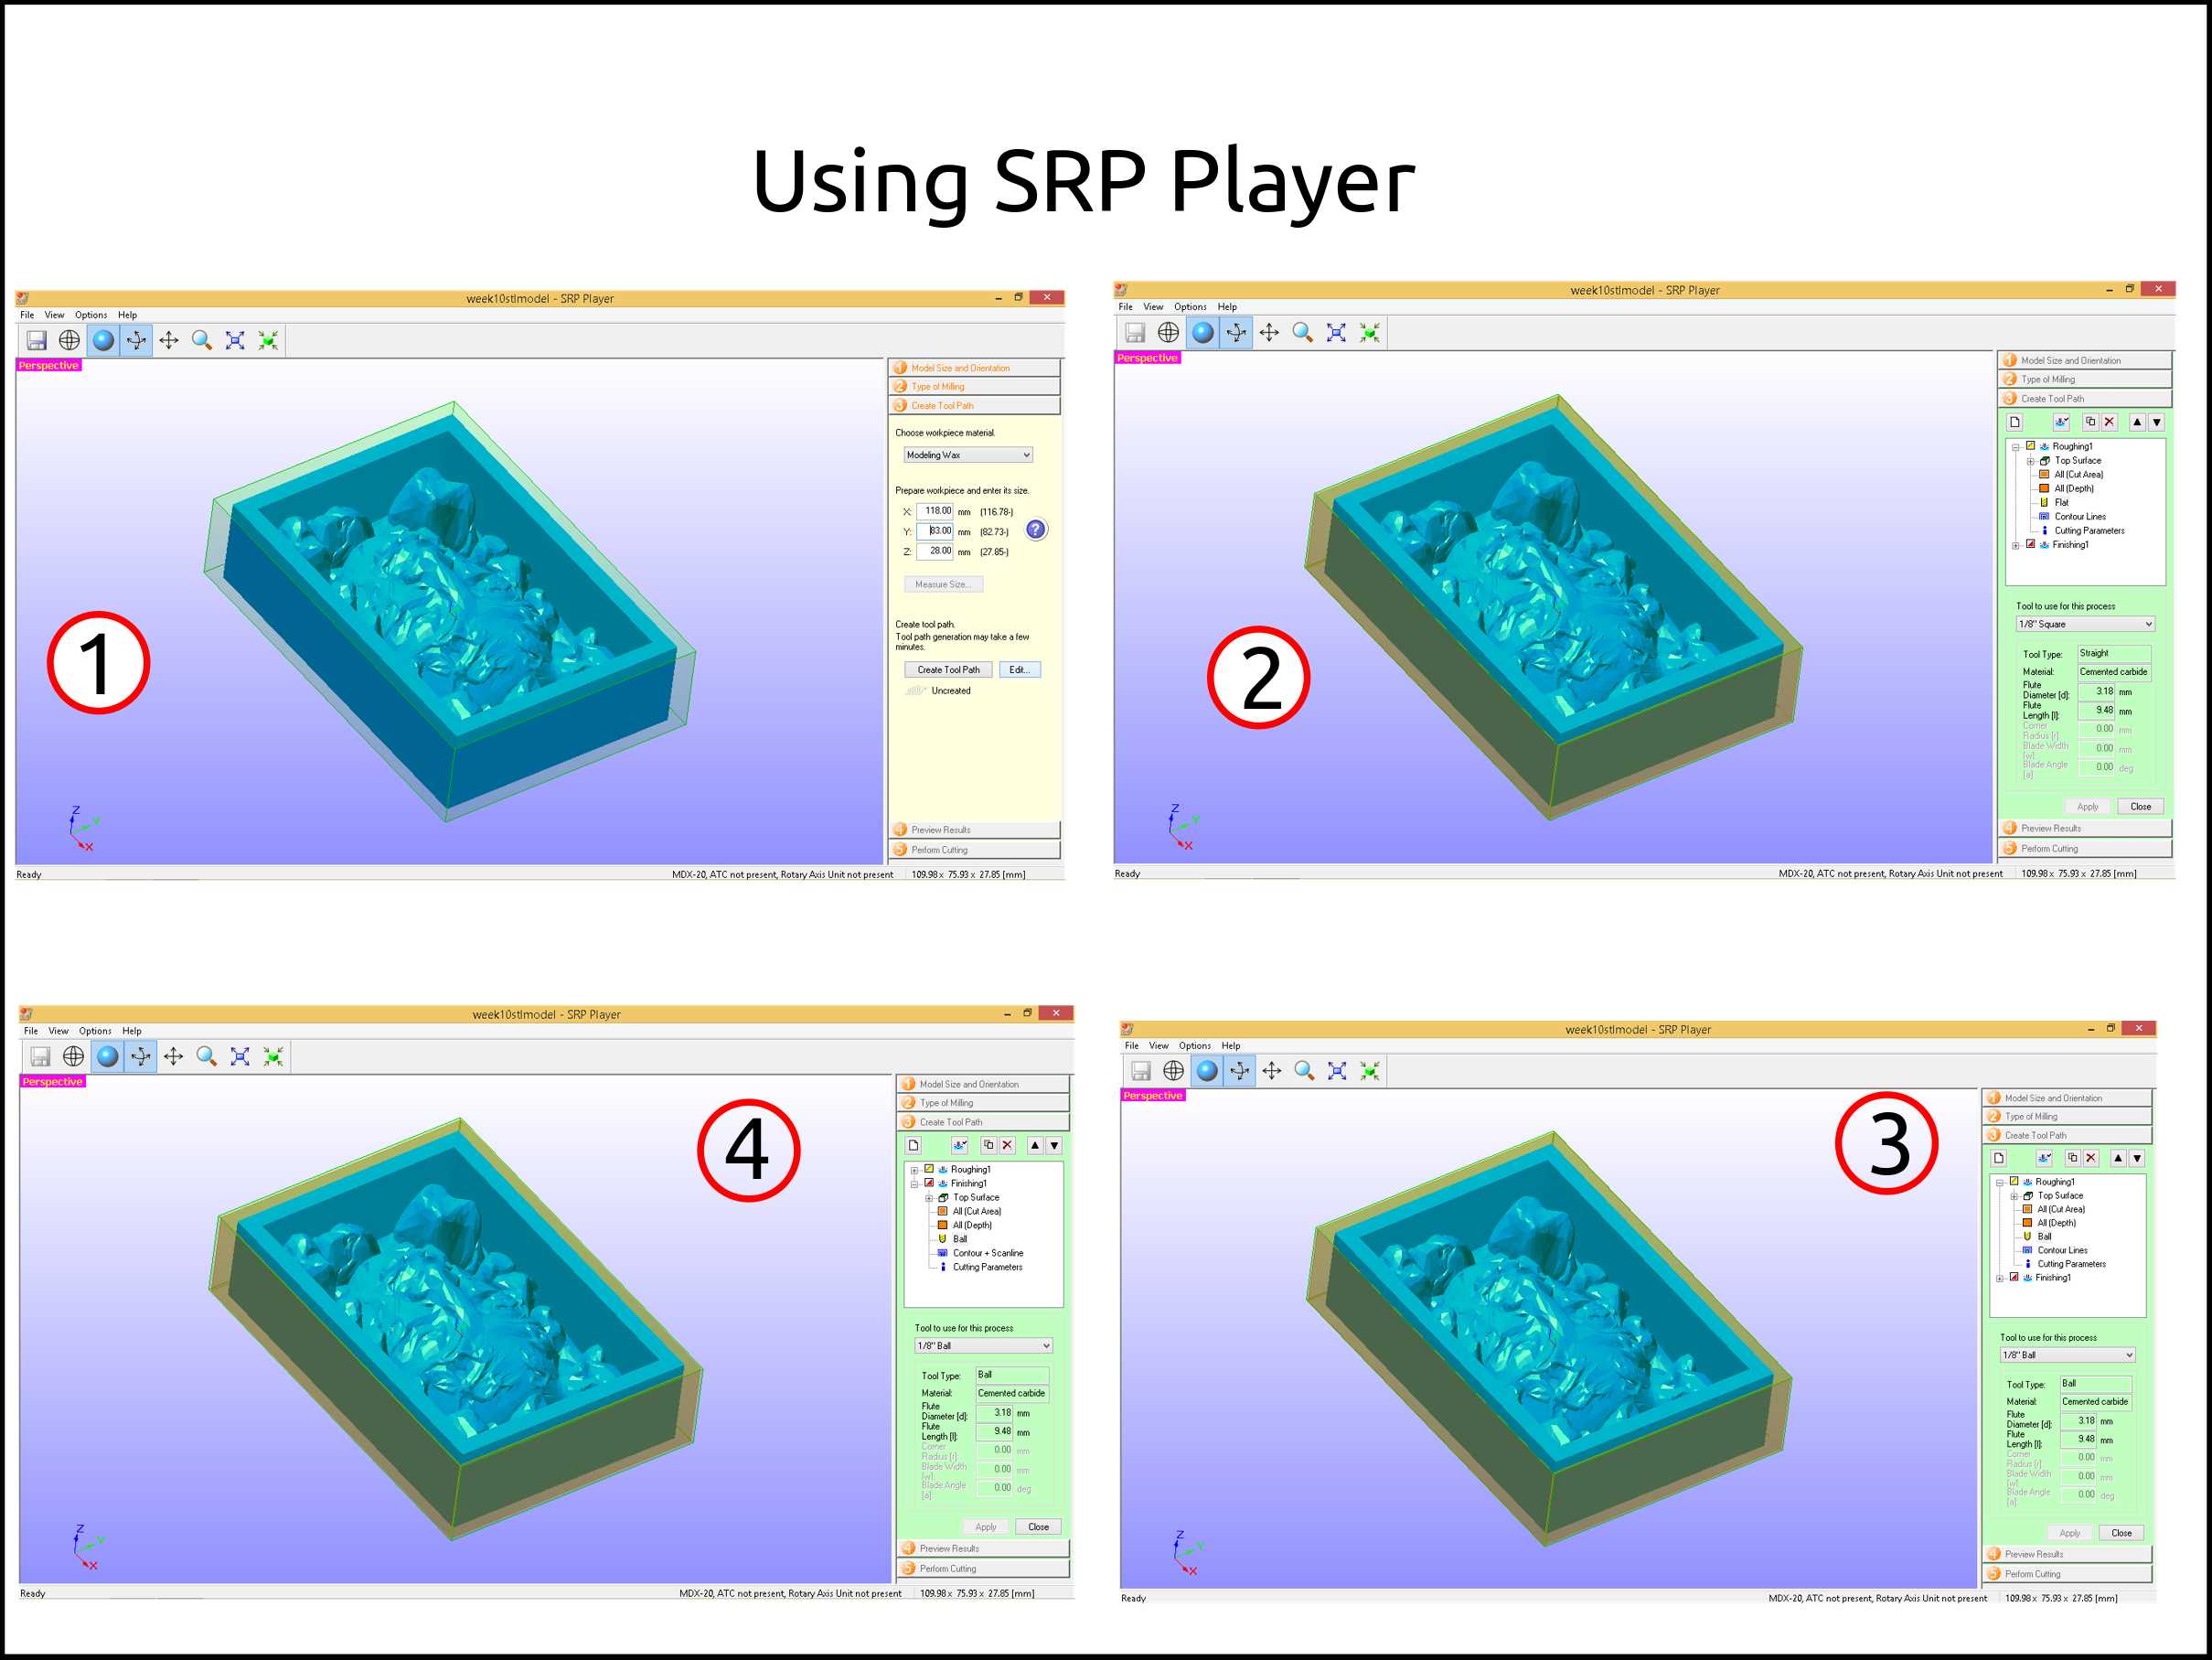
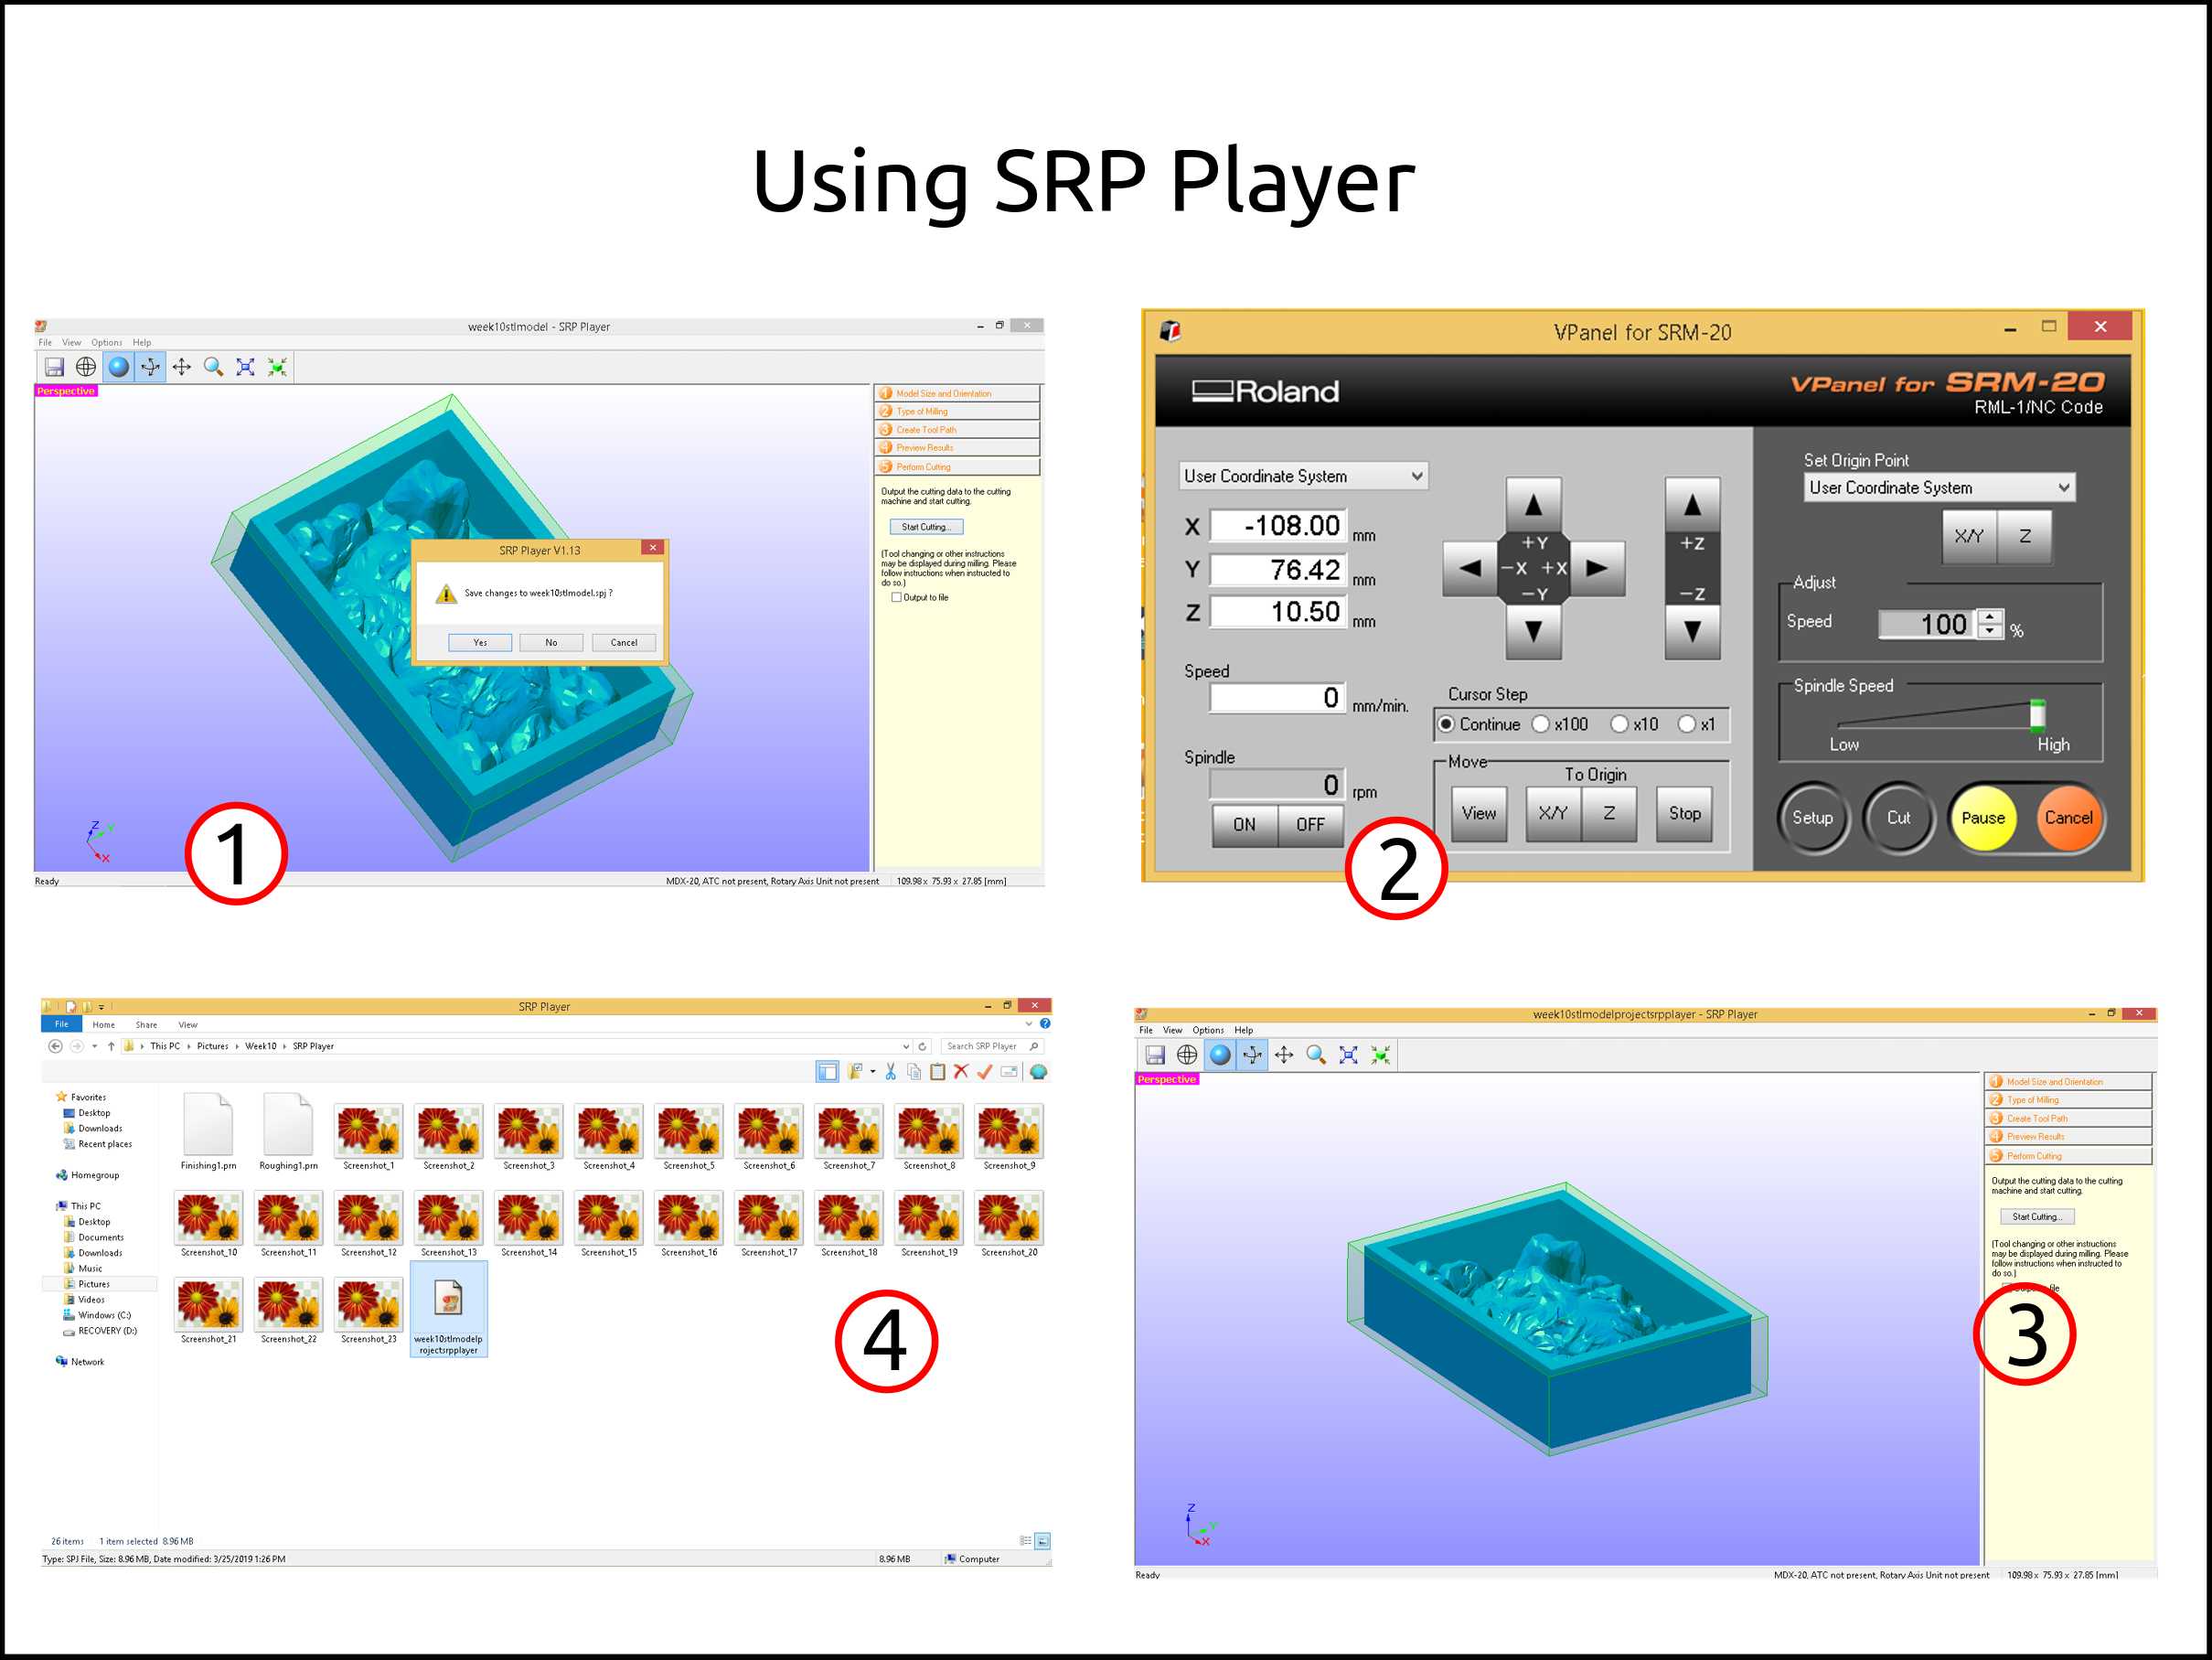
After finishing with the model the next step is to generate the toolpath using the software called SRP Player from Roland. This software we used with the MonoFab CNC and the Modela MDX-20.
-
Open the file you want to machine
-
Verify the dimensions of your model, also the right orientation.
-
Select the type of machining you want to do and if it is one or two sides.
-
The images show you how your piece is going to look after the selected type of job.
-
Here you have had to select the material you want to machine, the dimensions of the stock and then you can create the toolpath.
-
Next, you have to select the type of tool you want to work with. Here we see the two parts of the machining process the Roughing and Finishing.
-
I used 1/8” ball endmill for both processes.
-
I selected the right endmill and they apply and close.
-
Here we see the toolpath creation process.
-
We verify the estimate finishing time and press preview.
-
Here the software is creating the preview.
-
The software first creates the roughing operation preview the finishing operation.
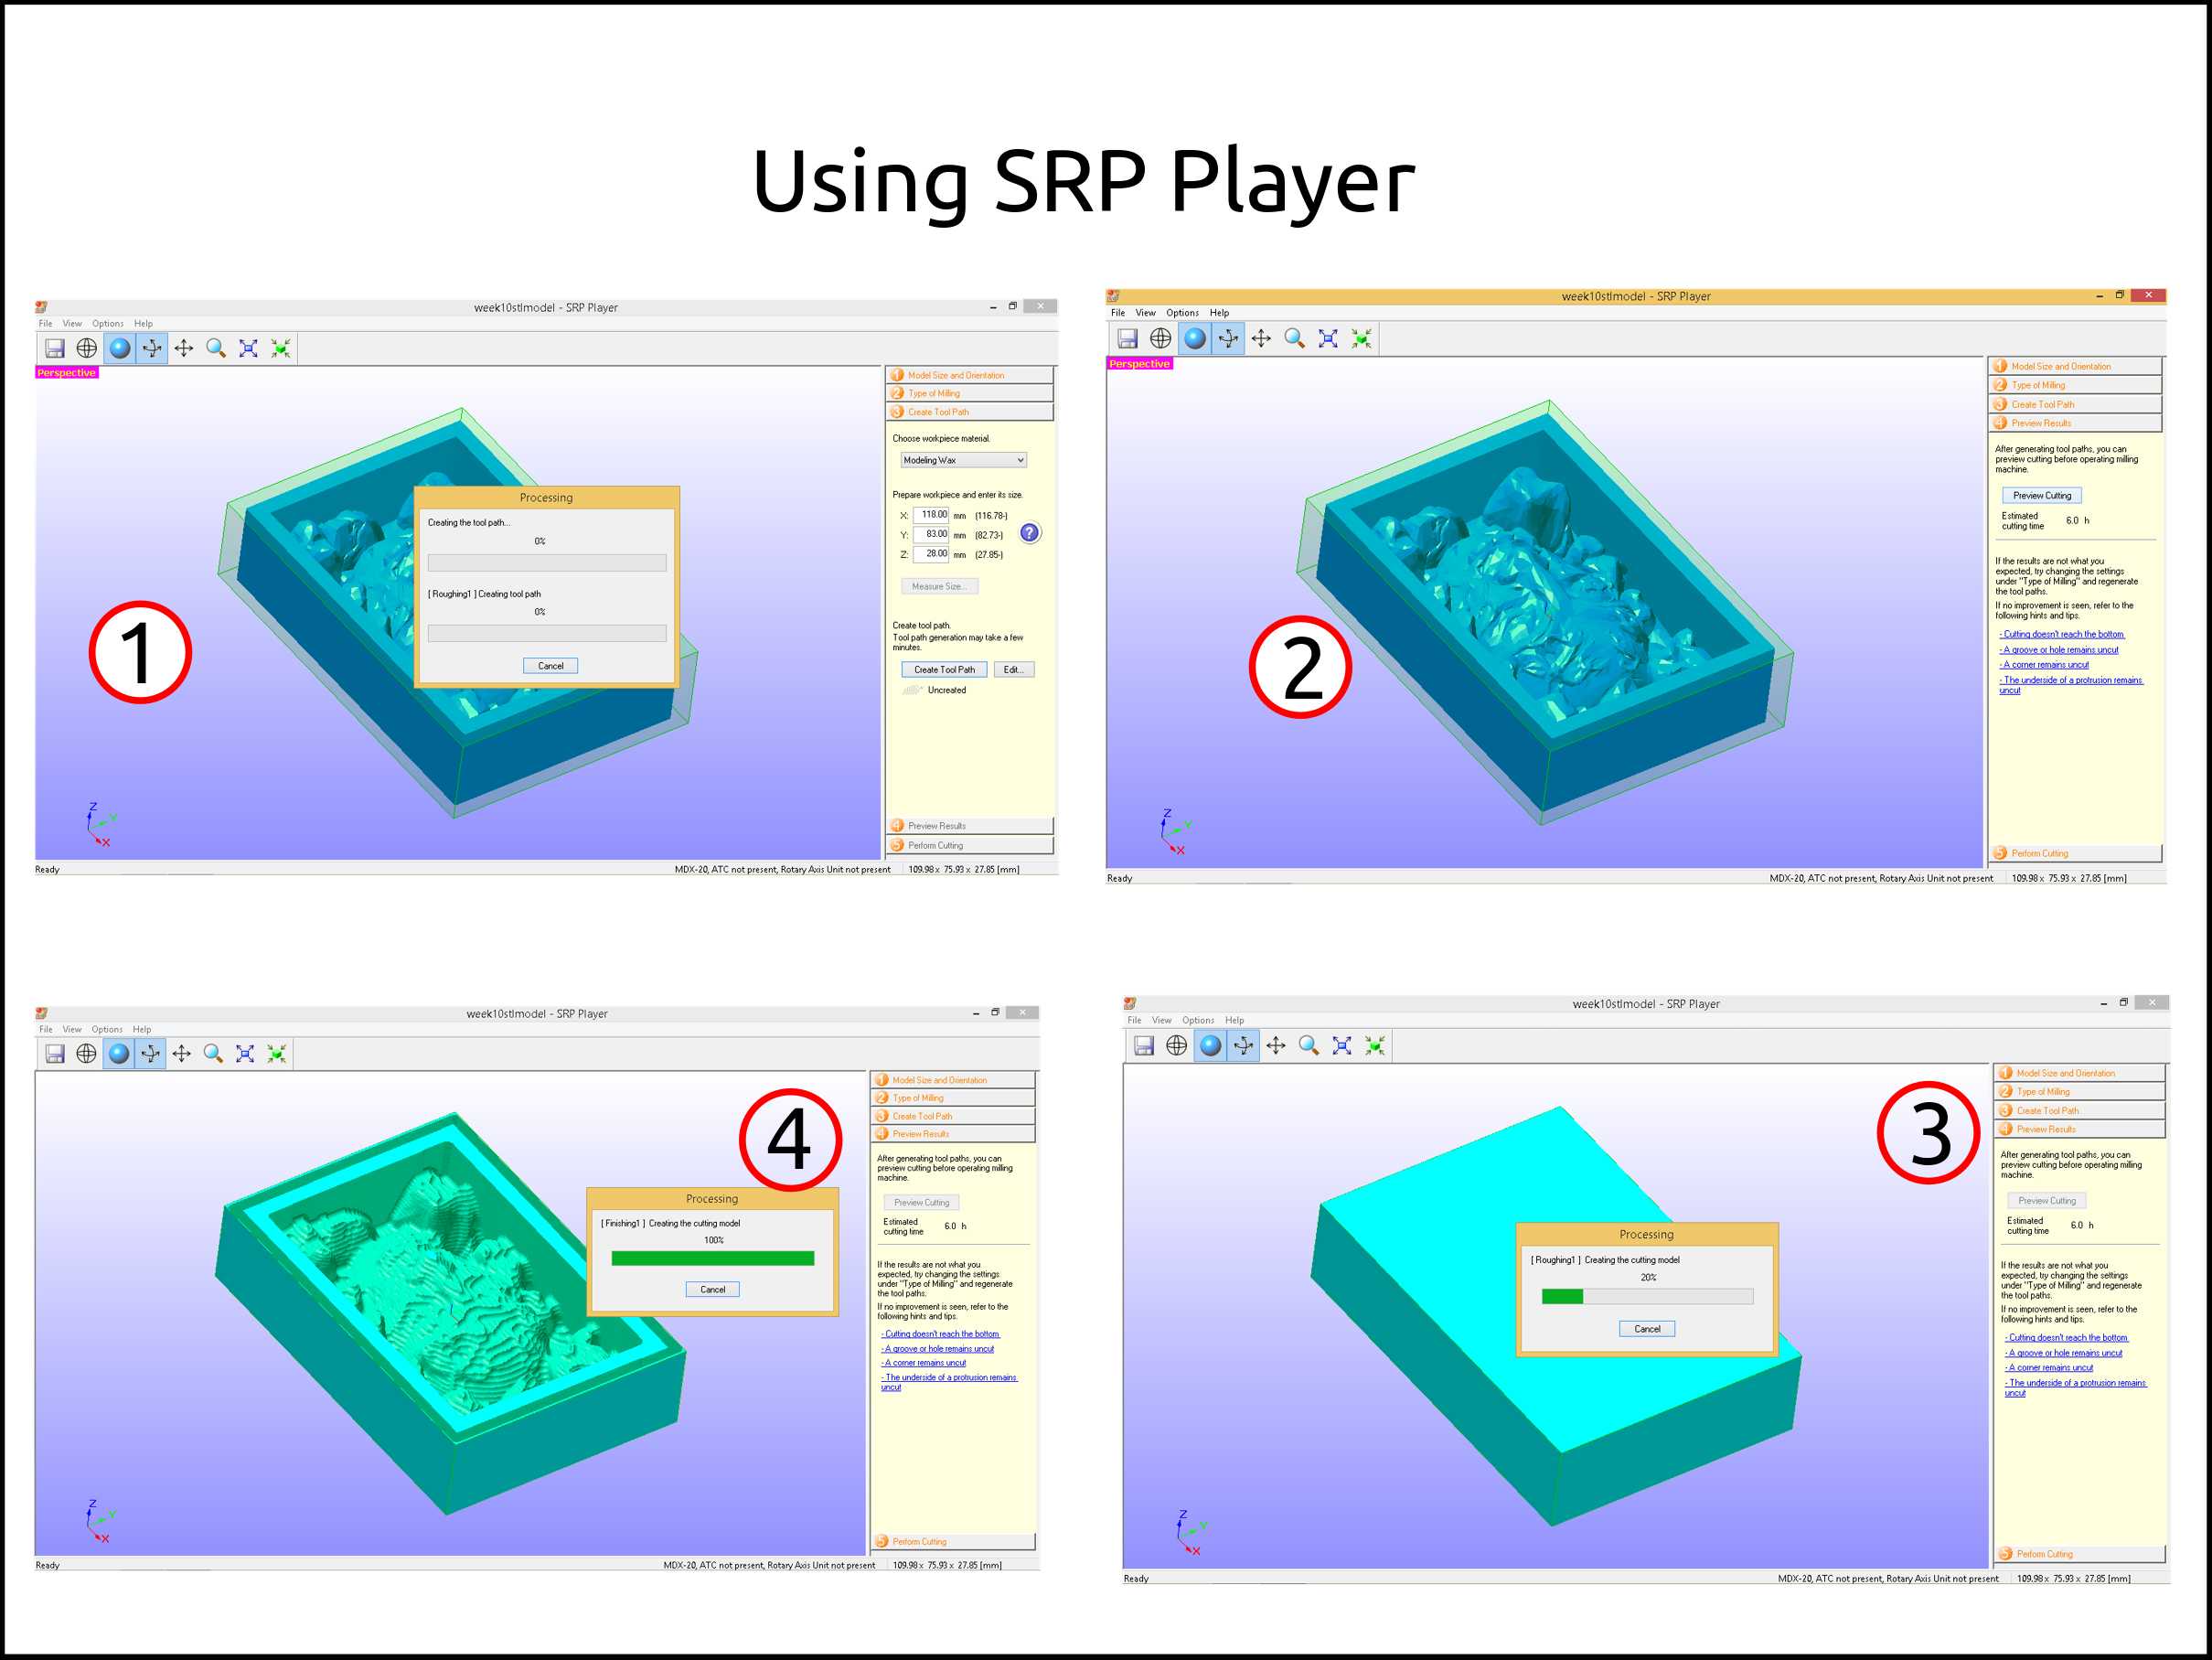
-
This is the preview with both processes.
-
After verifying the output quantity the next step is to start the cutting process.
-
Here the software is asking you to install the right endmill.
-
Here is asking you the location of the endmill tip location.
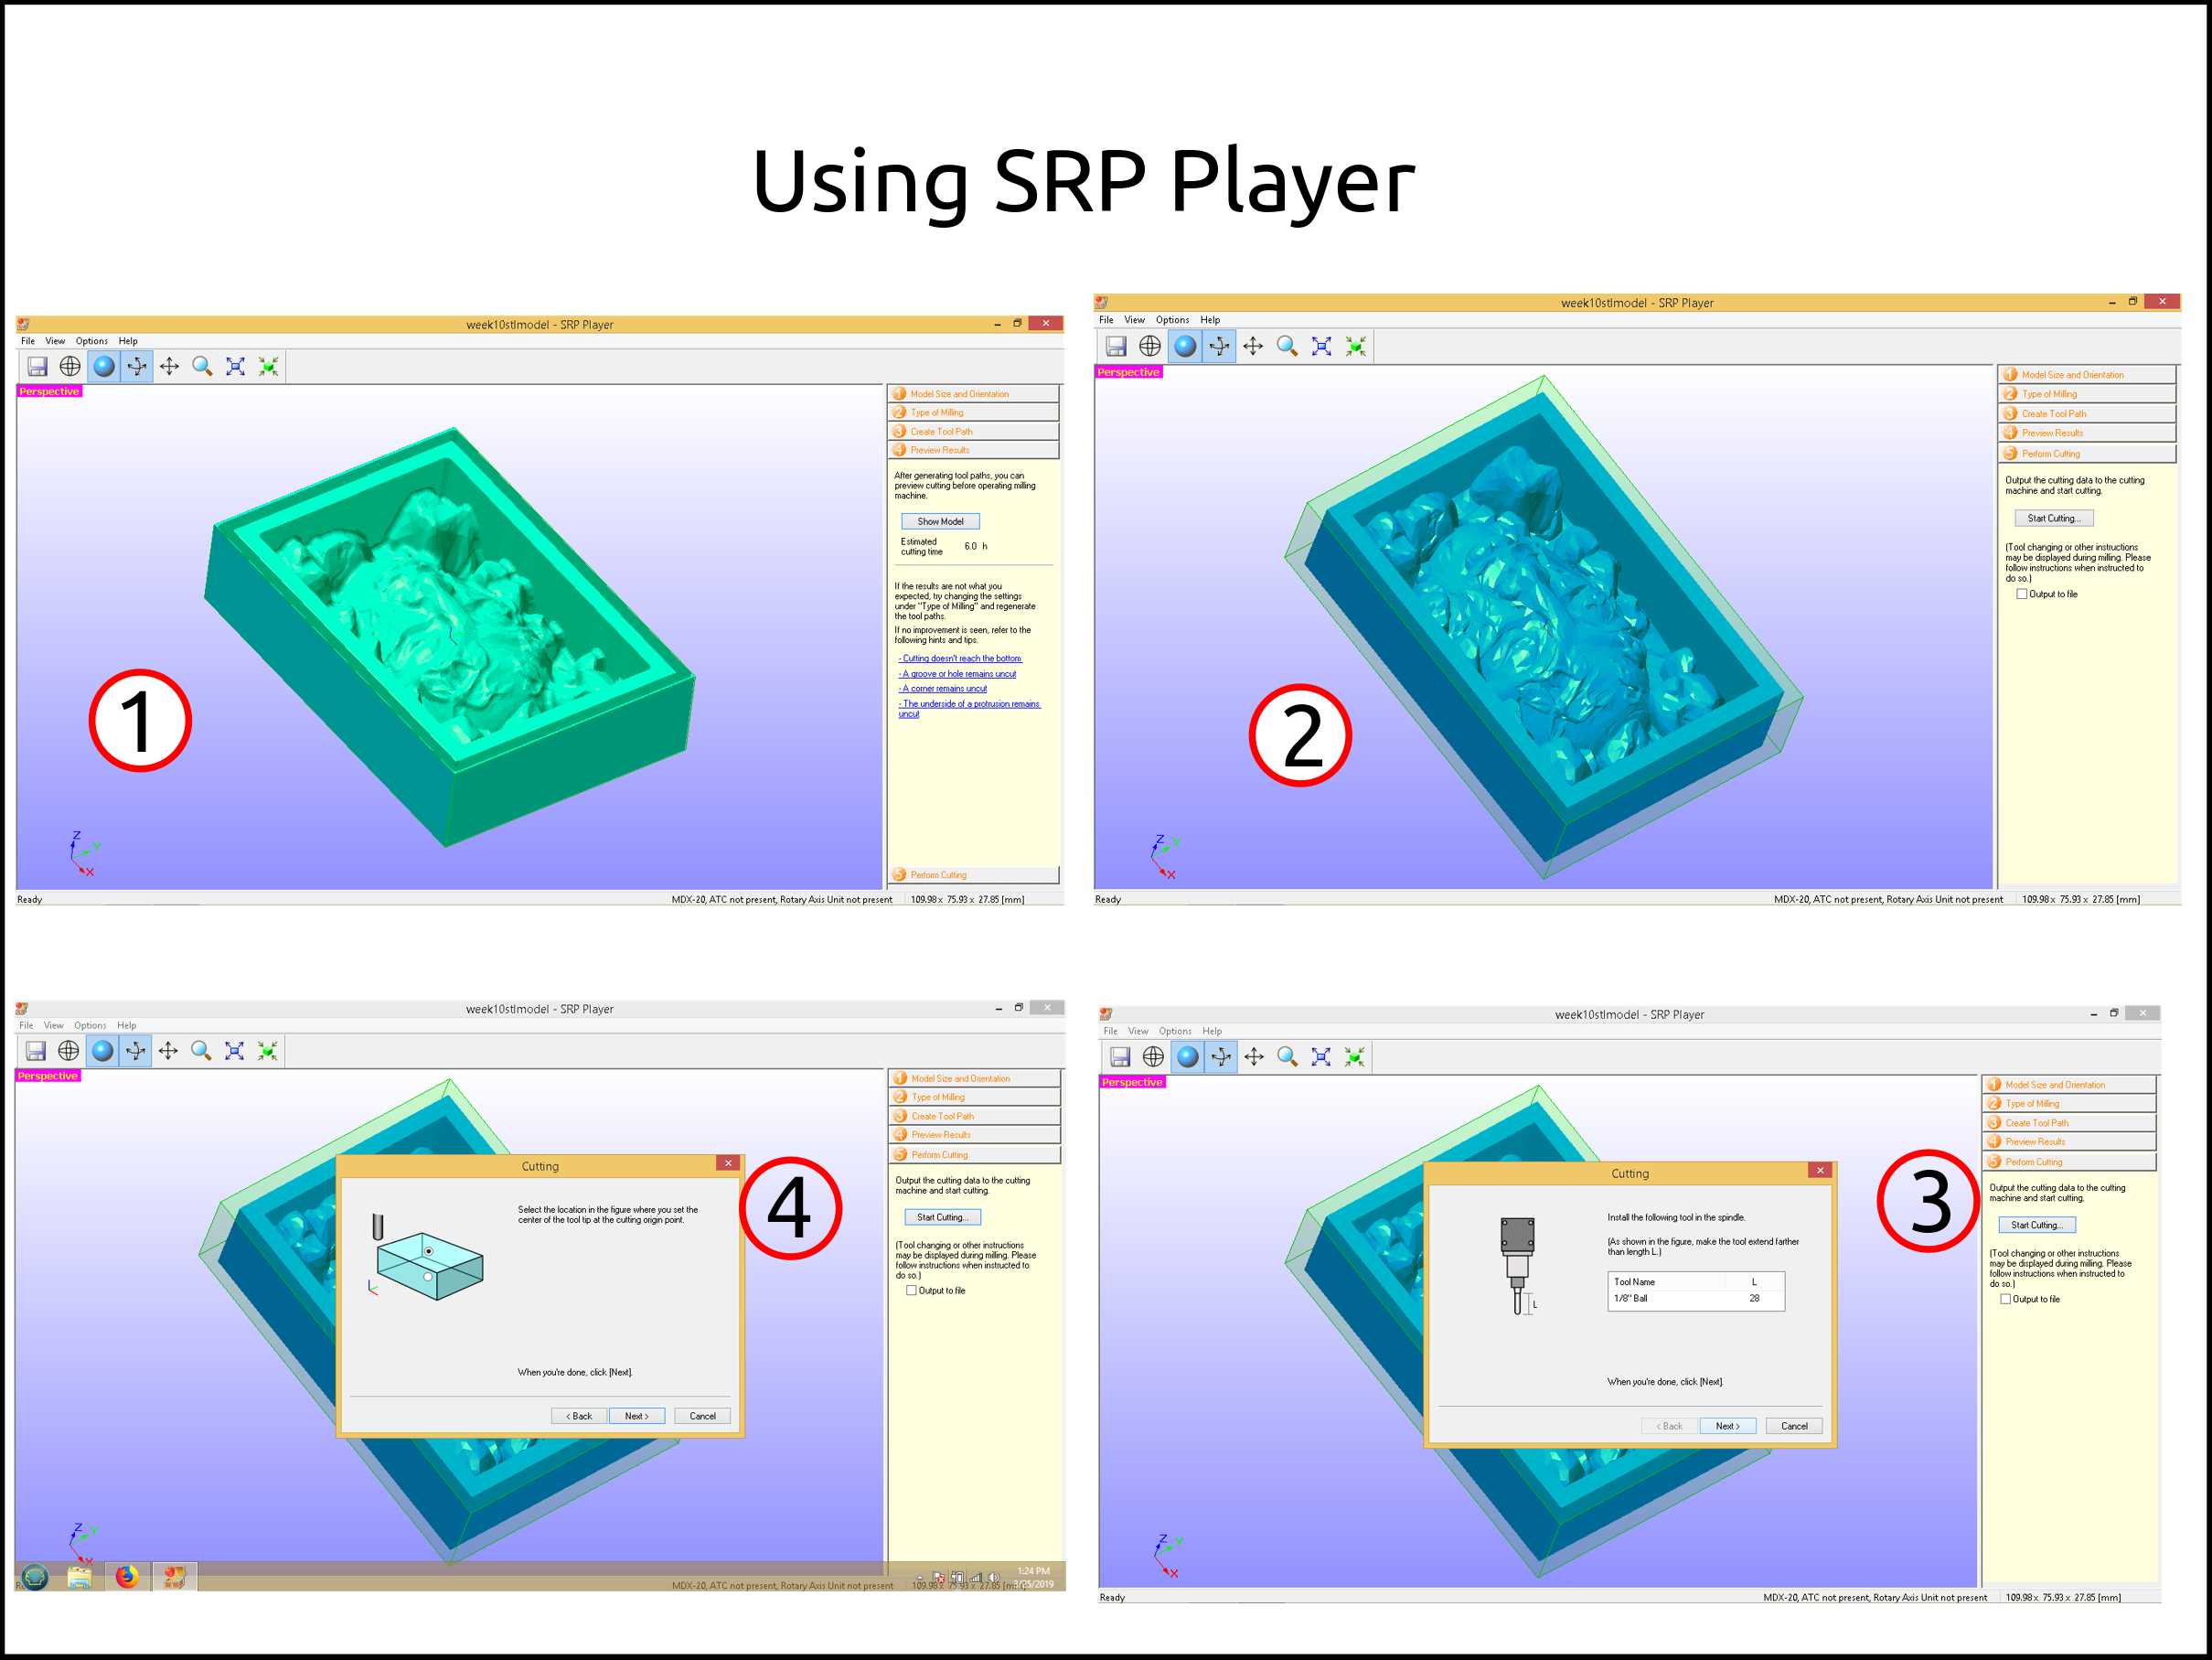
-
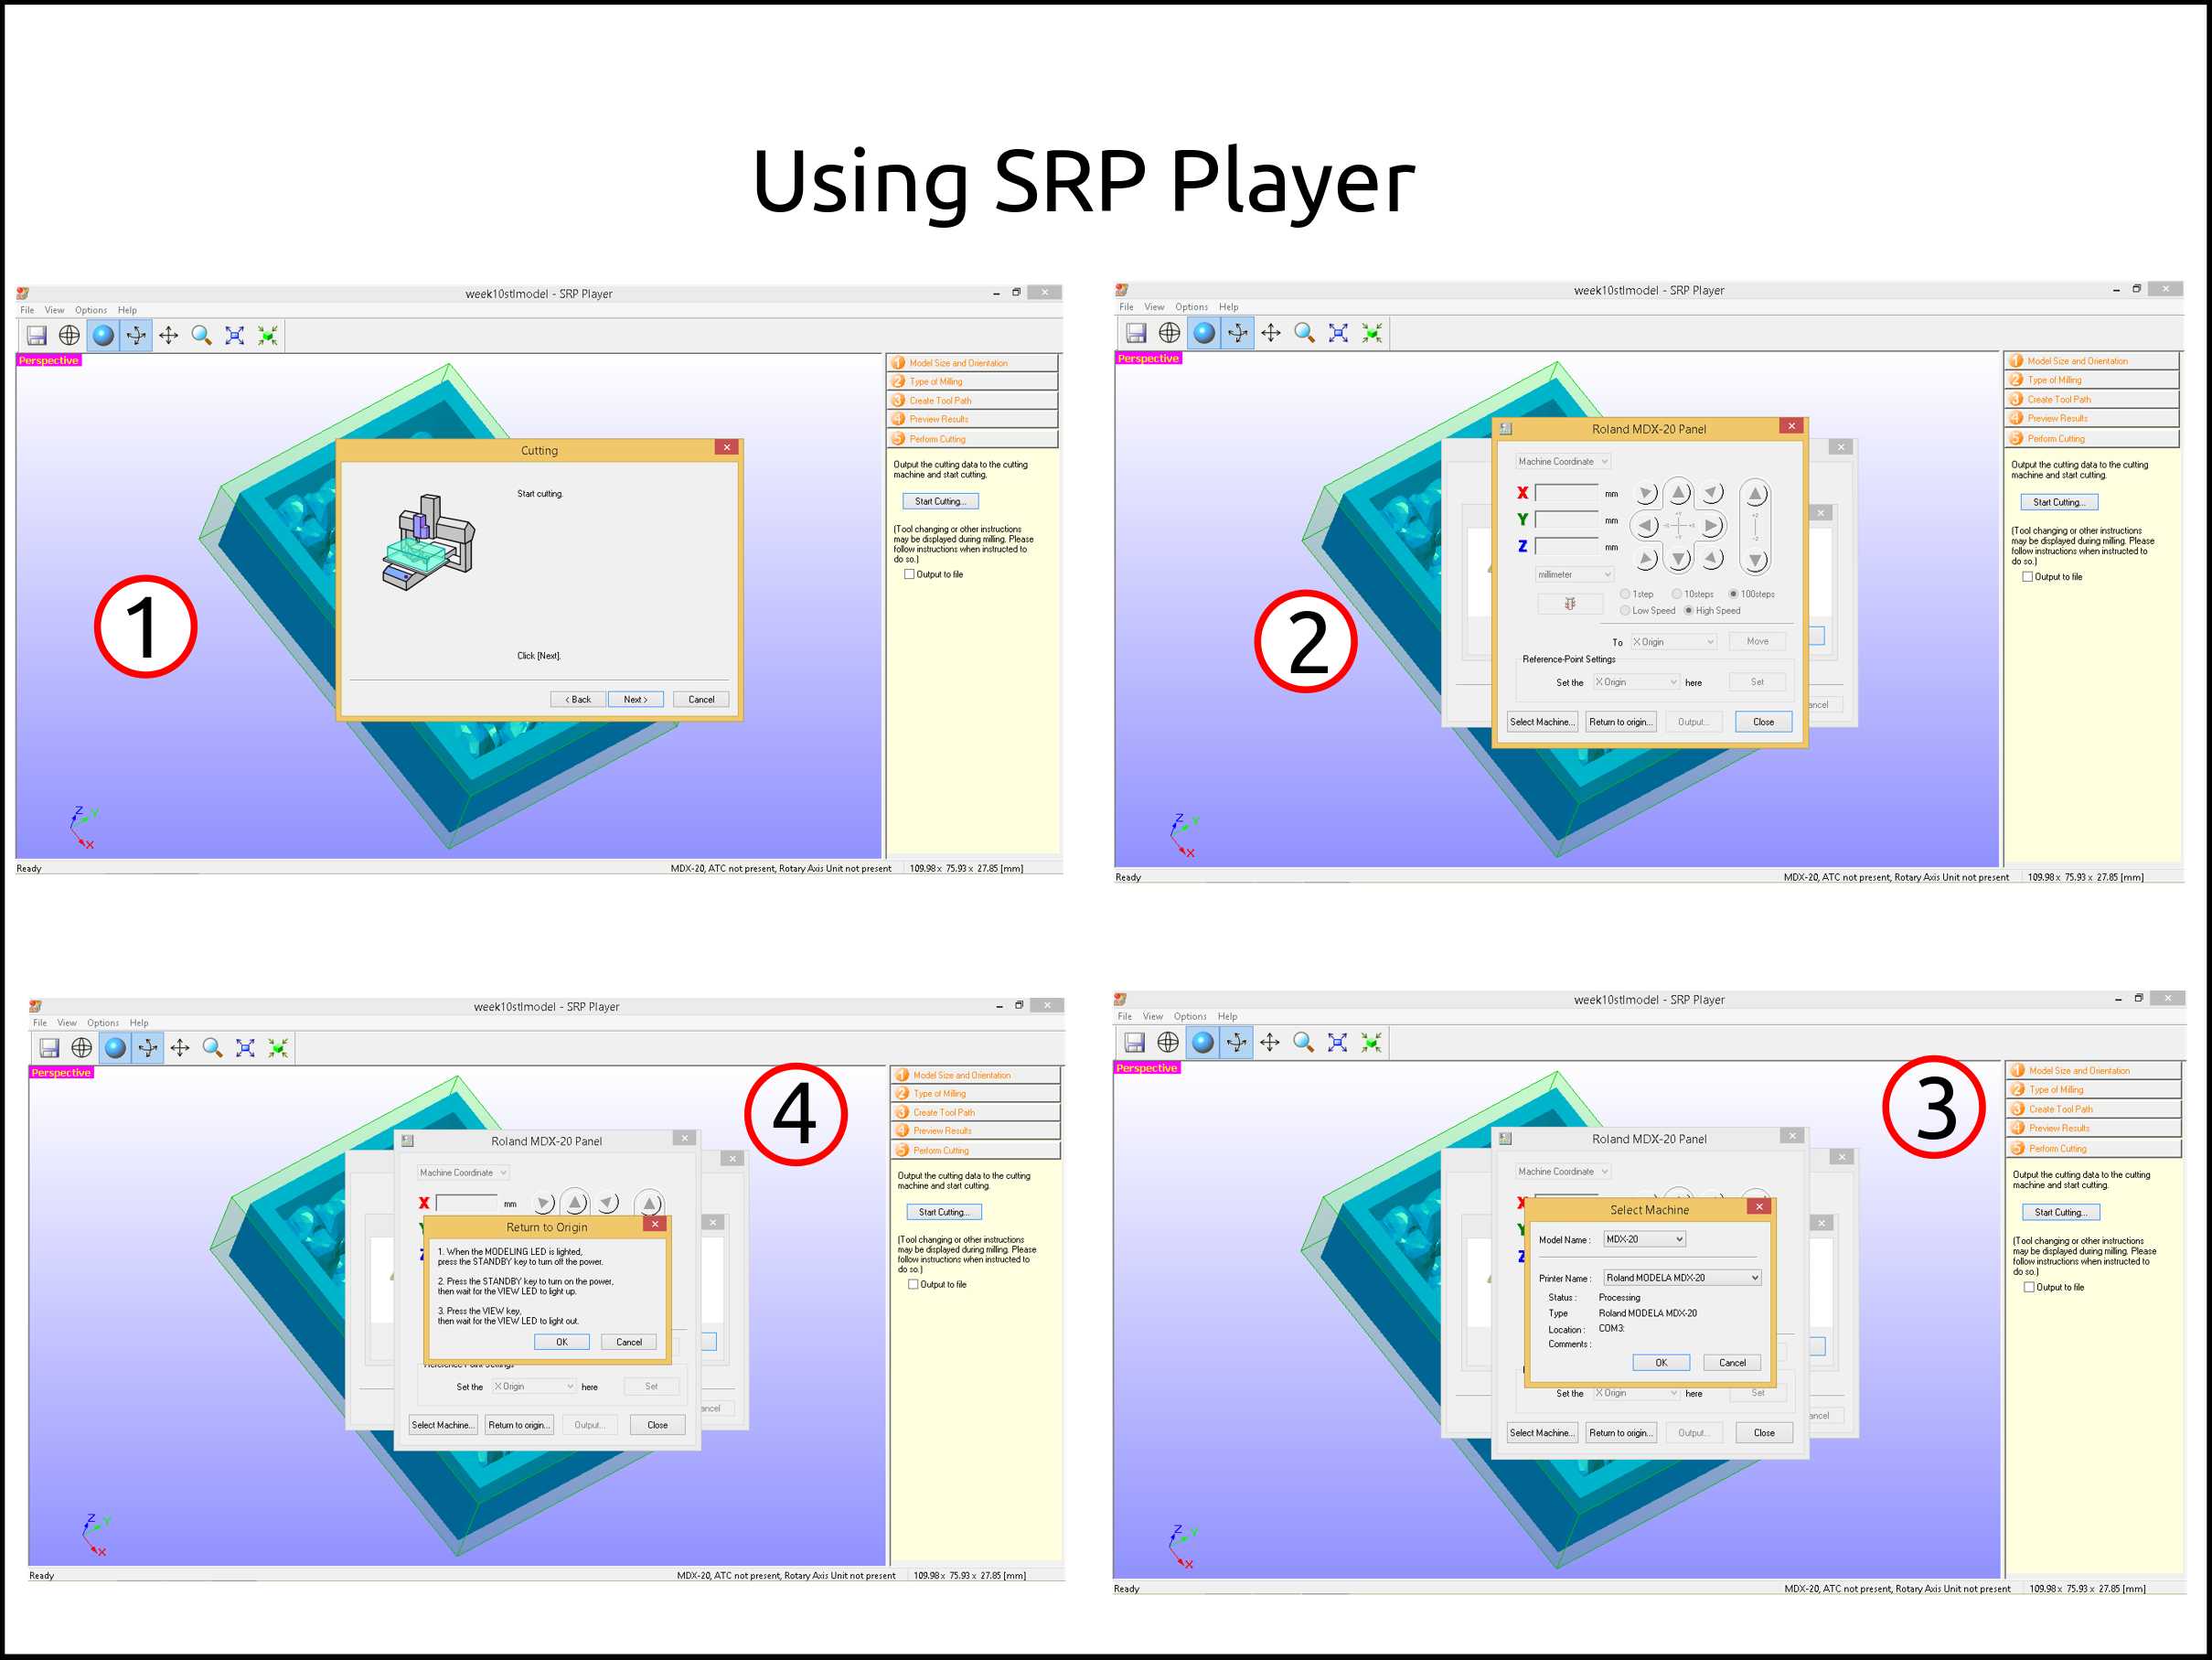
Finally, we can start cutting the wax.
-
Pop-up the window of the software Roland MDX-20 panel. This software change depending on your CNC machine.
-
Next, we select the machine and connect the machine to right COM port.
-
After pressing Return to origin Follow the instruction an press OK. The last step was if you wanted to machine using the Roland MDX-20.
-
Here we can save the project of the SRP Player.
-
This is the VPanel for SRM-20. This is what we going to use if we want to cut using the MonoFab.
-
The difference is we have to check the box of Outup File and press start cutting.
-
Here we can see the files generated. Finishing1 and Roughing1, they are the toolpath that we have to send to the CNC, and also we see the project file.
Output files from SRP Player
RML files for Roland CNC machines
Preparing the machinable wax
If you can buy a machinable wax is great but if you can recycle is better, here I show how we did it.
-
This an electric stove, that heat up the cooking pot.
-
Here we have the cooking pot and used machinable wax that we will melt in order to make new blocks.
-
Here we see how slowly the wax is melting.
-
Once all the wax is melted we have to pour into a mold, we used MDF molds, and worked perfectly. To avoid bubbles we used a stick to spread the liquid.
-
Once in the mold, we have to wait until it cold down the block.
-
This is the finished part. After that, we faced once to clean the irregular part of the block.
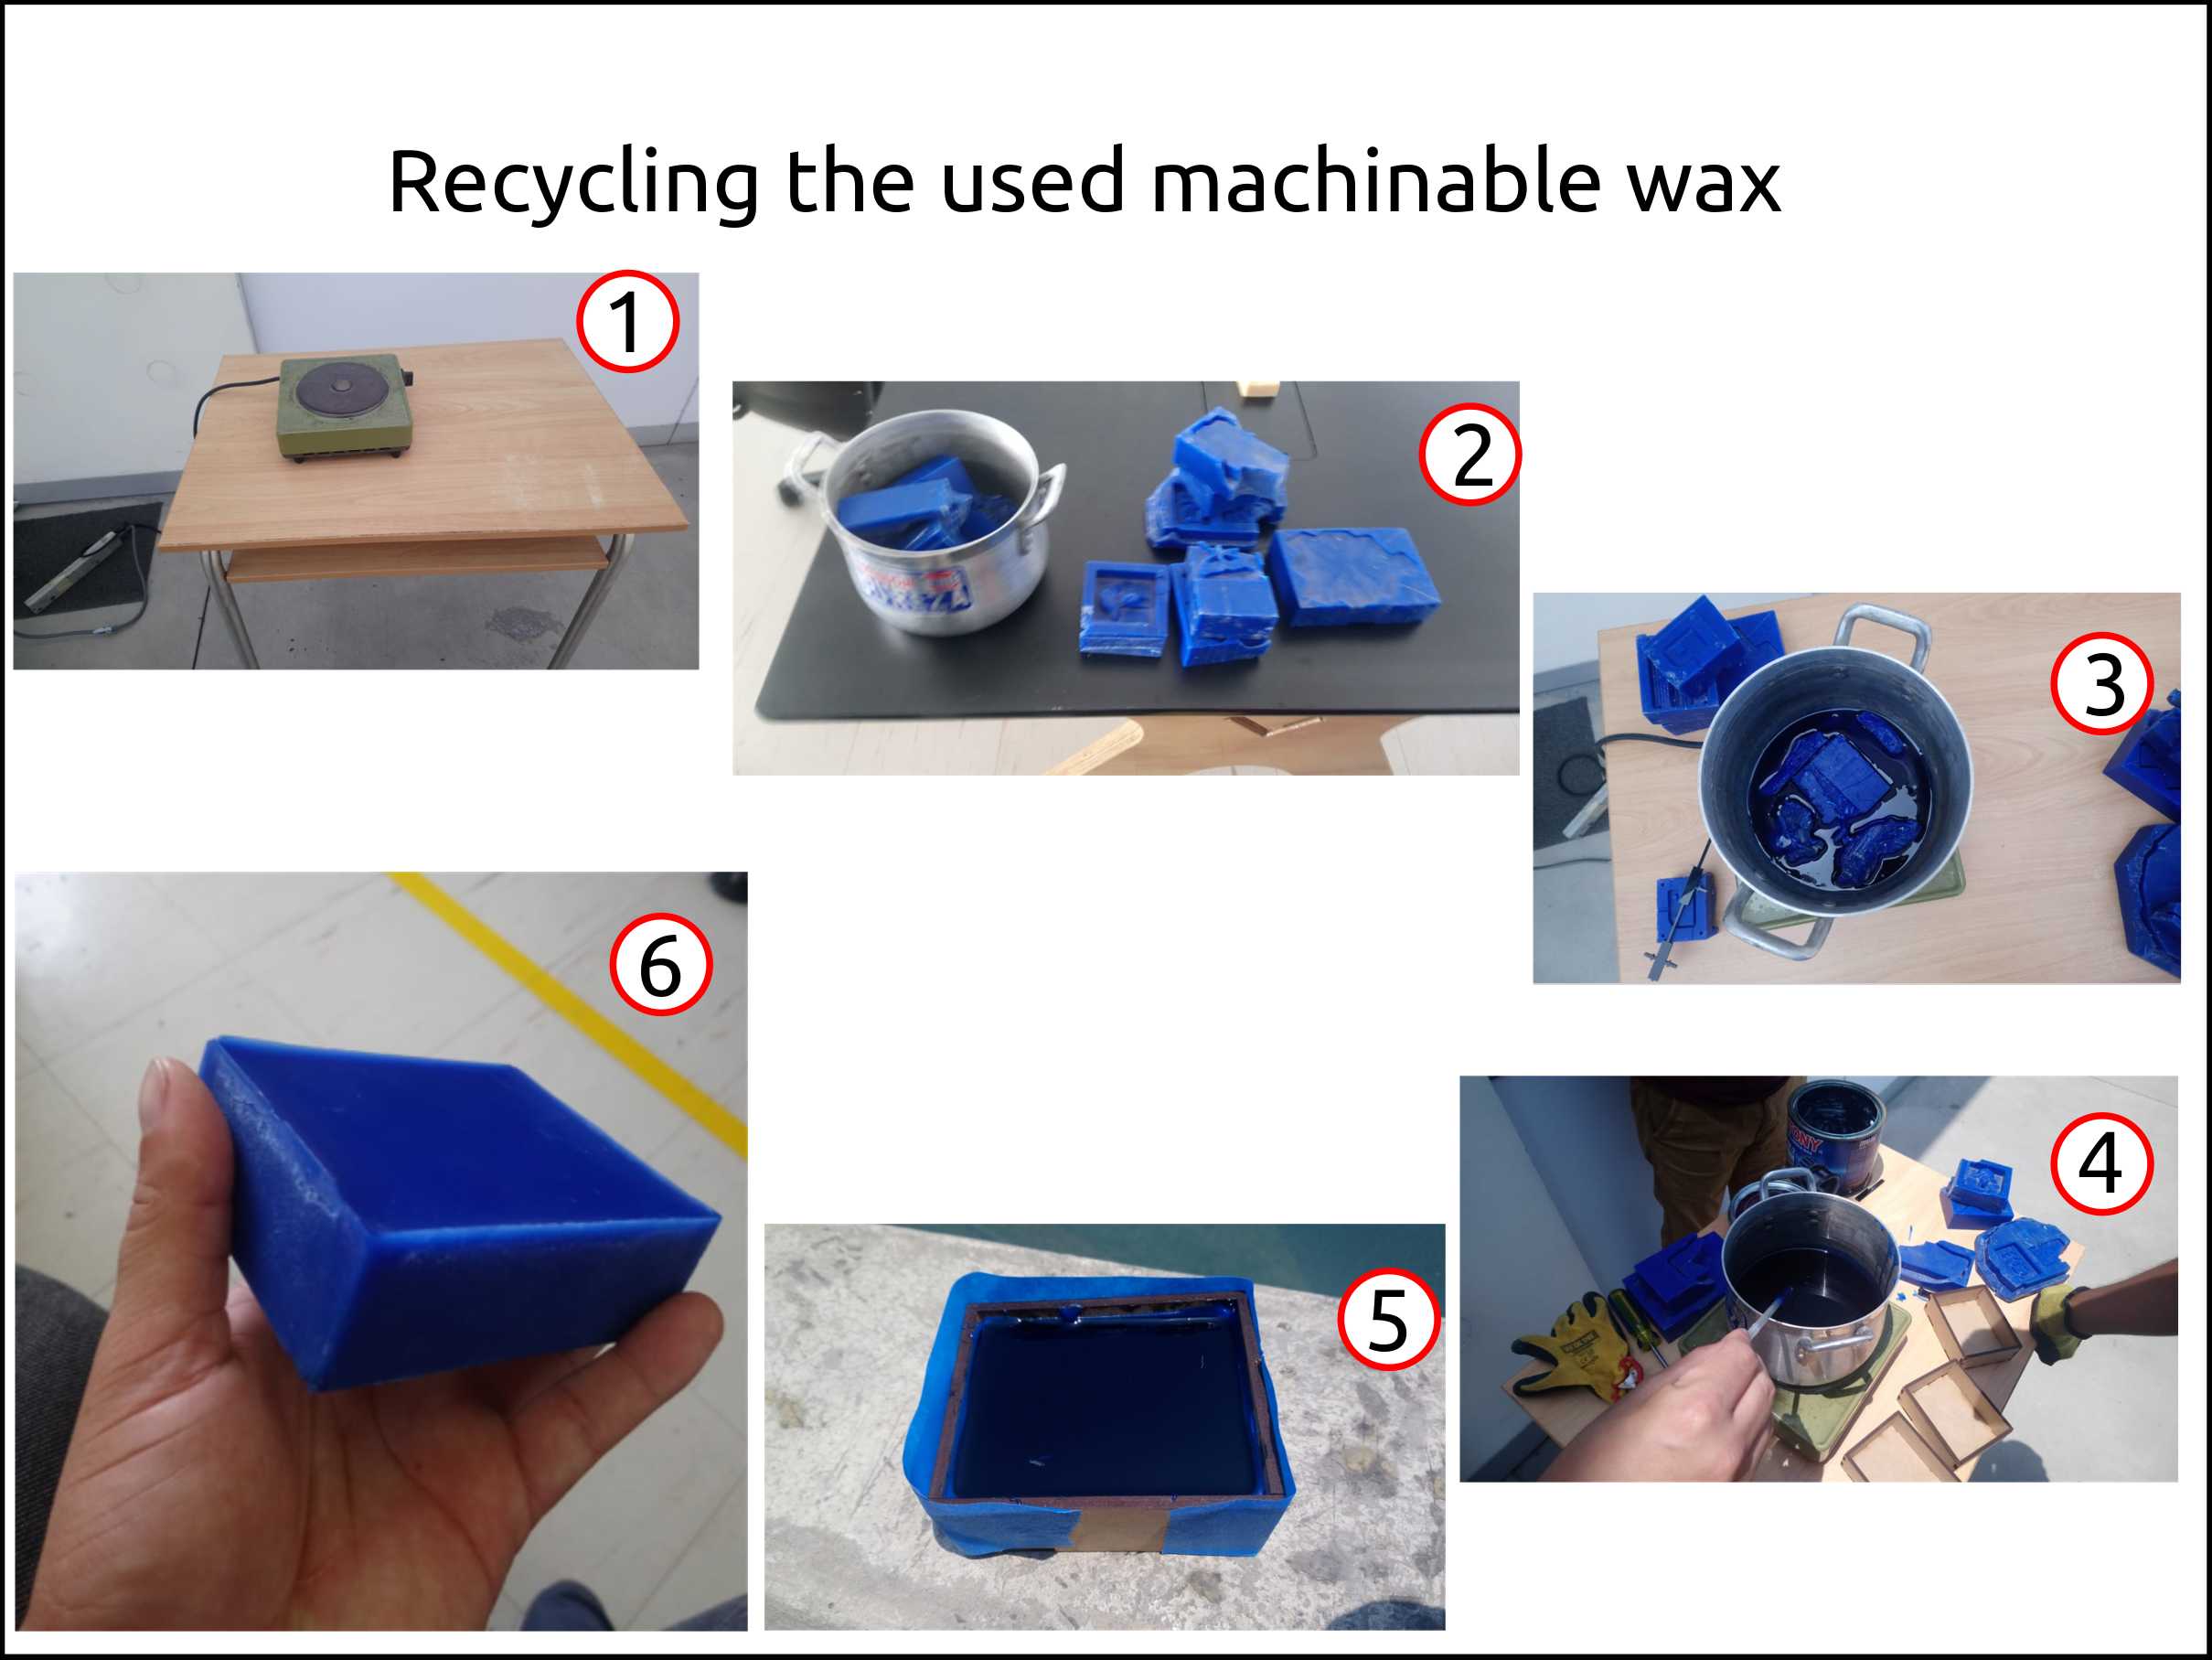
Faced problems and solutions recycling the wax
Problem
- We put lubricant on the MDF mold to release the wax. The problem was that the lubricant reacts with the paraffin doing bubbles.
Solution
- We stop doing it.
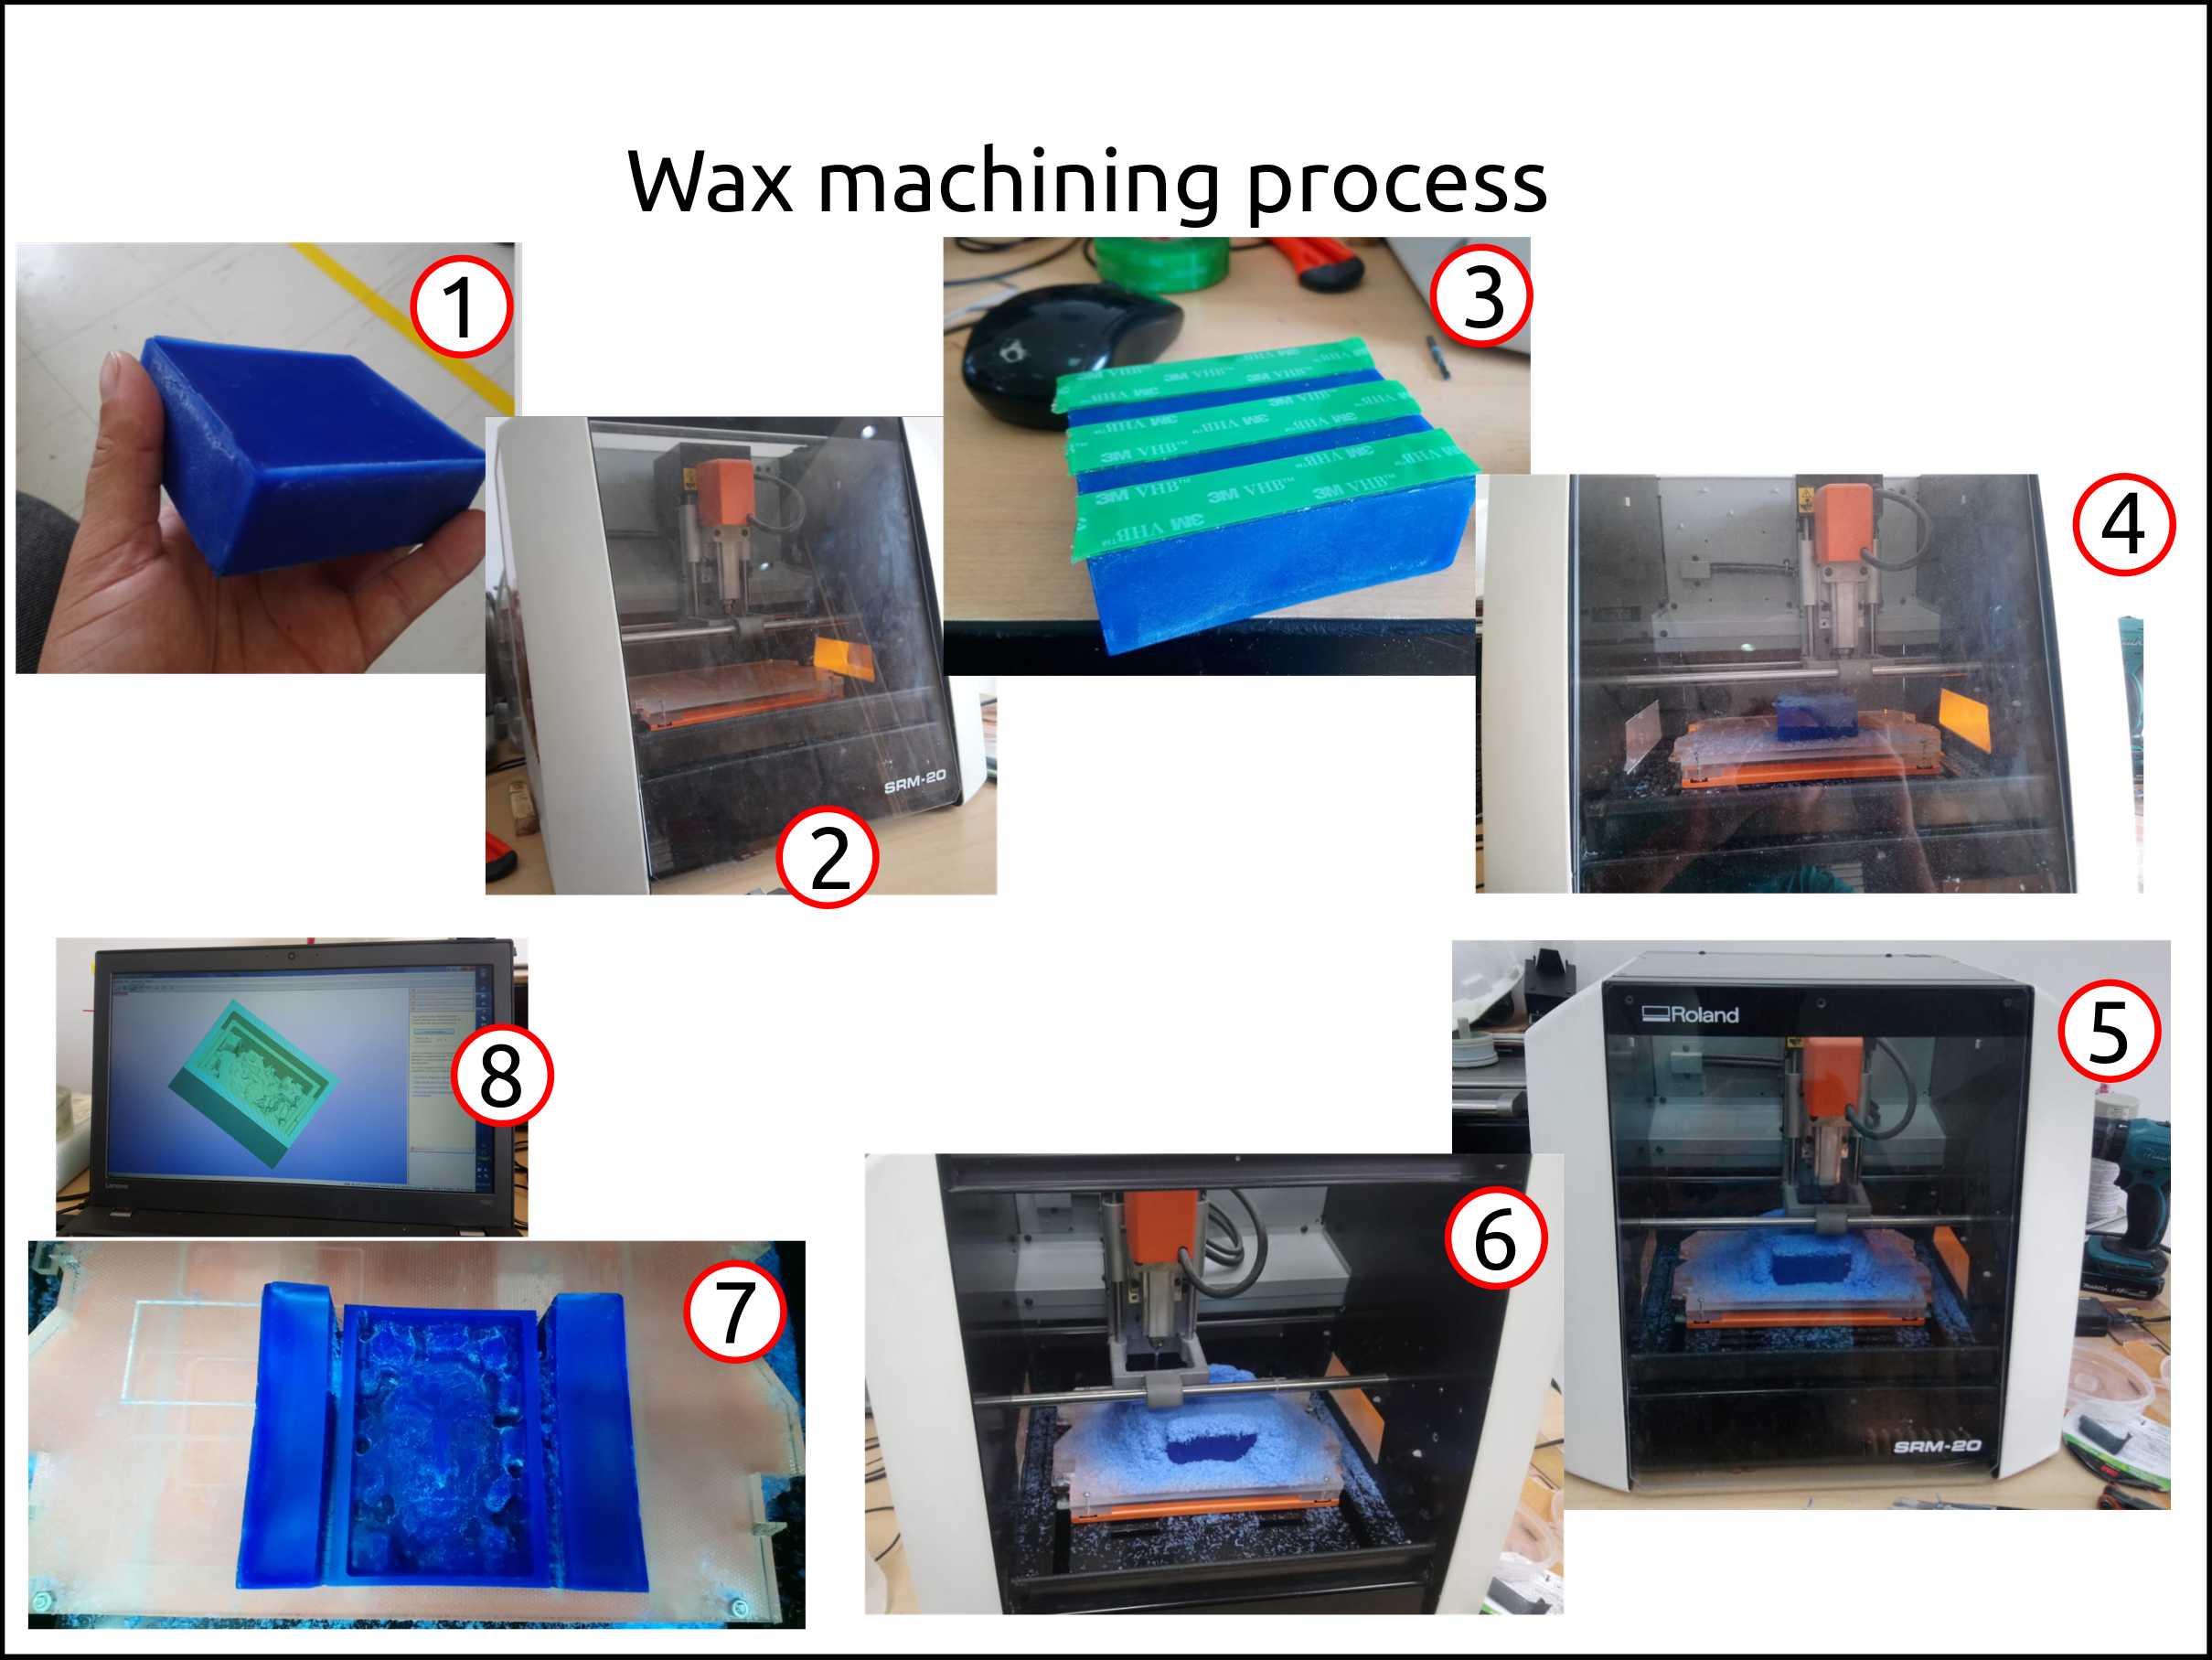
Machining the mold’s mold.
My mold I machined in the MonoFab Roland SRM-20.
-
Check the block for irregularities and the measure it.
-
Install the endmill on the CNC machine.
-
Use double-sided tape to attach the wax on the CNC table.
-
Send the files and start machining.
-
Time to time we have to check the machining status.
-
Open the door and start cleaning the piece. My suggestion is to gather the chips in a way that you can recycle after.
-
Clean the machined part and remove from it all the dust.
-
Compare the digital and the physical part to know how well your piece was done.
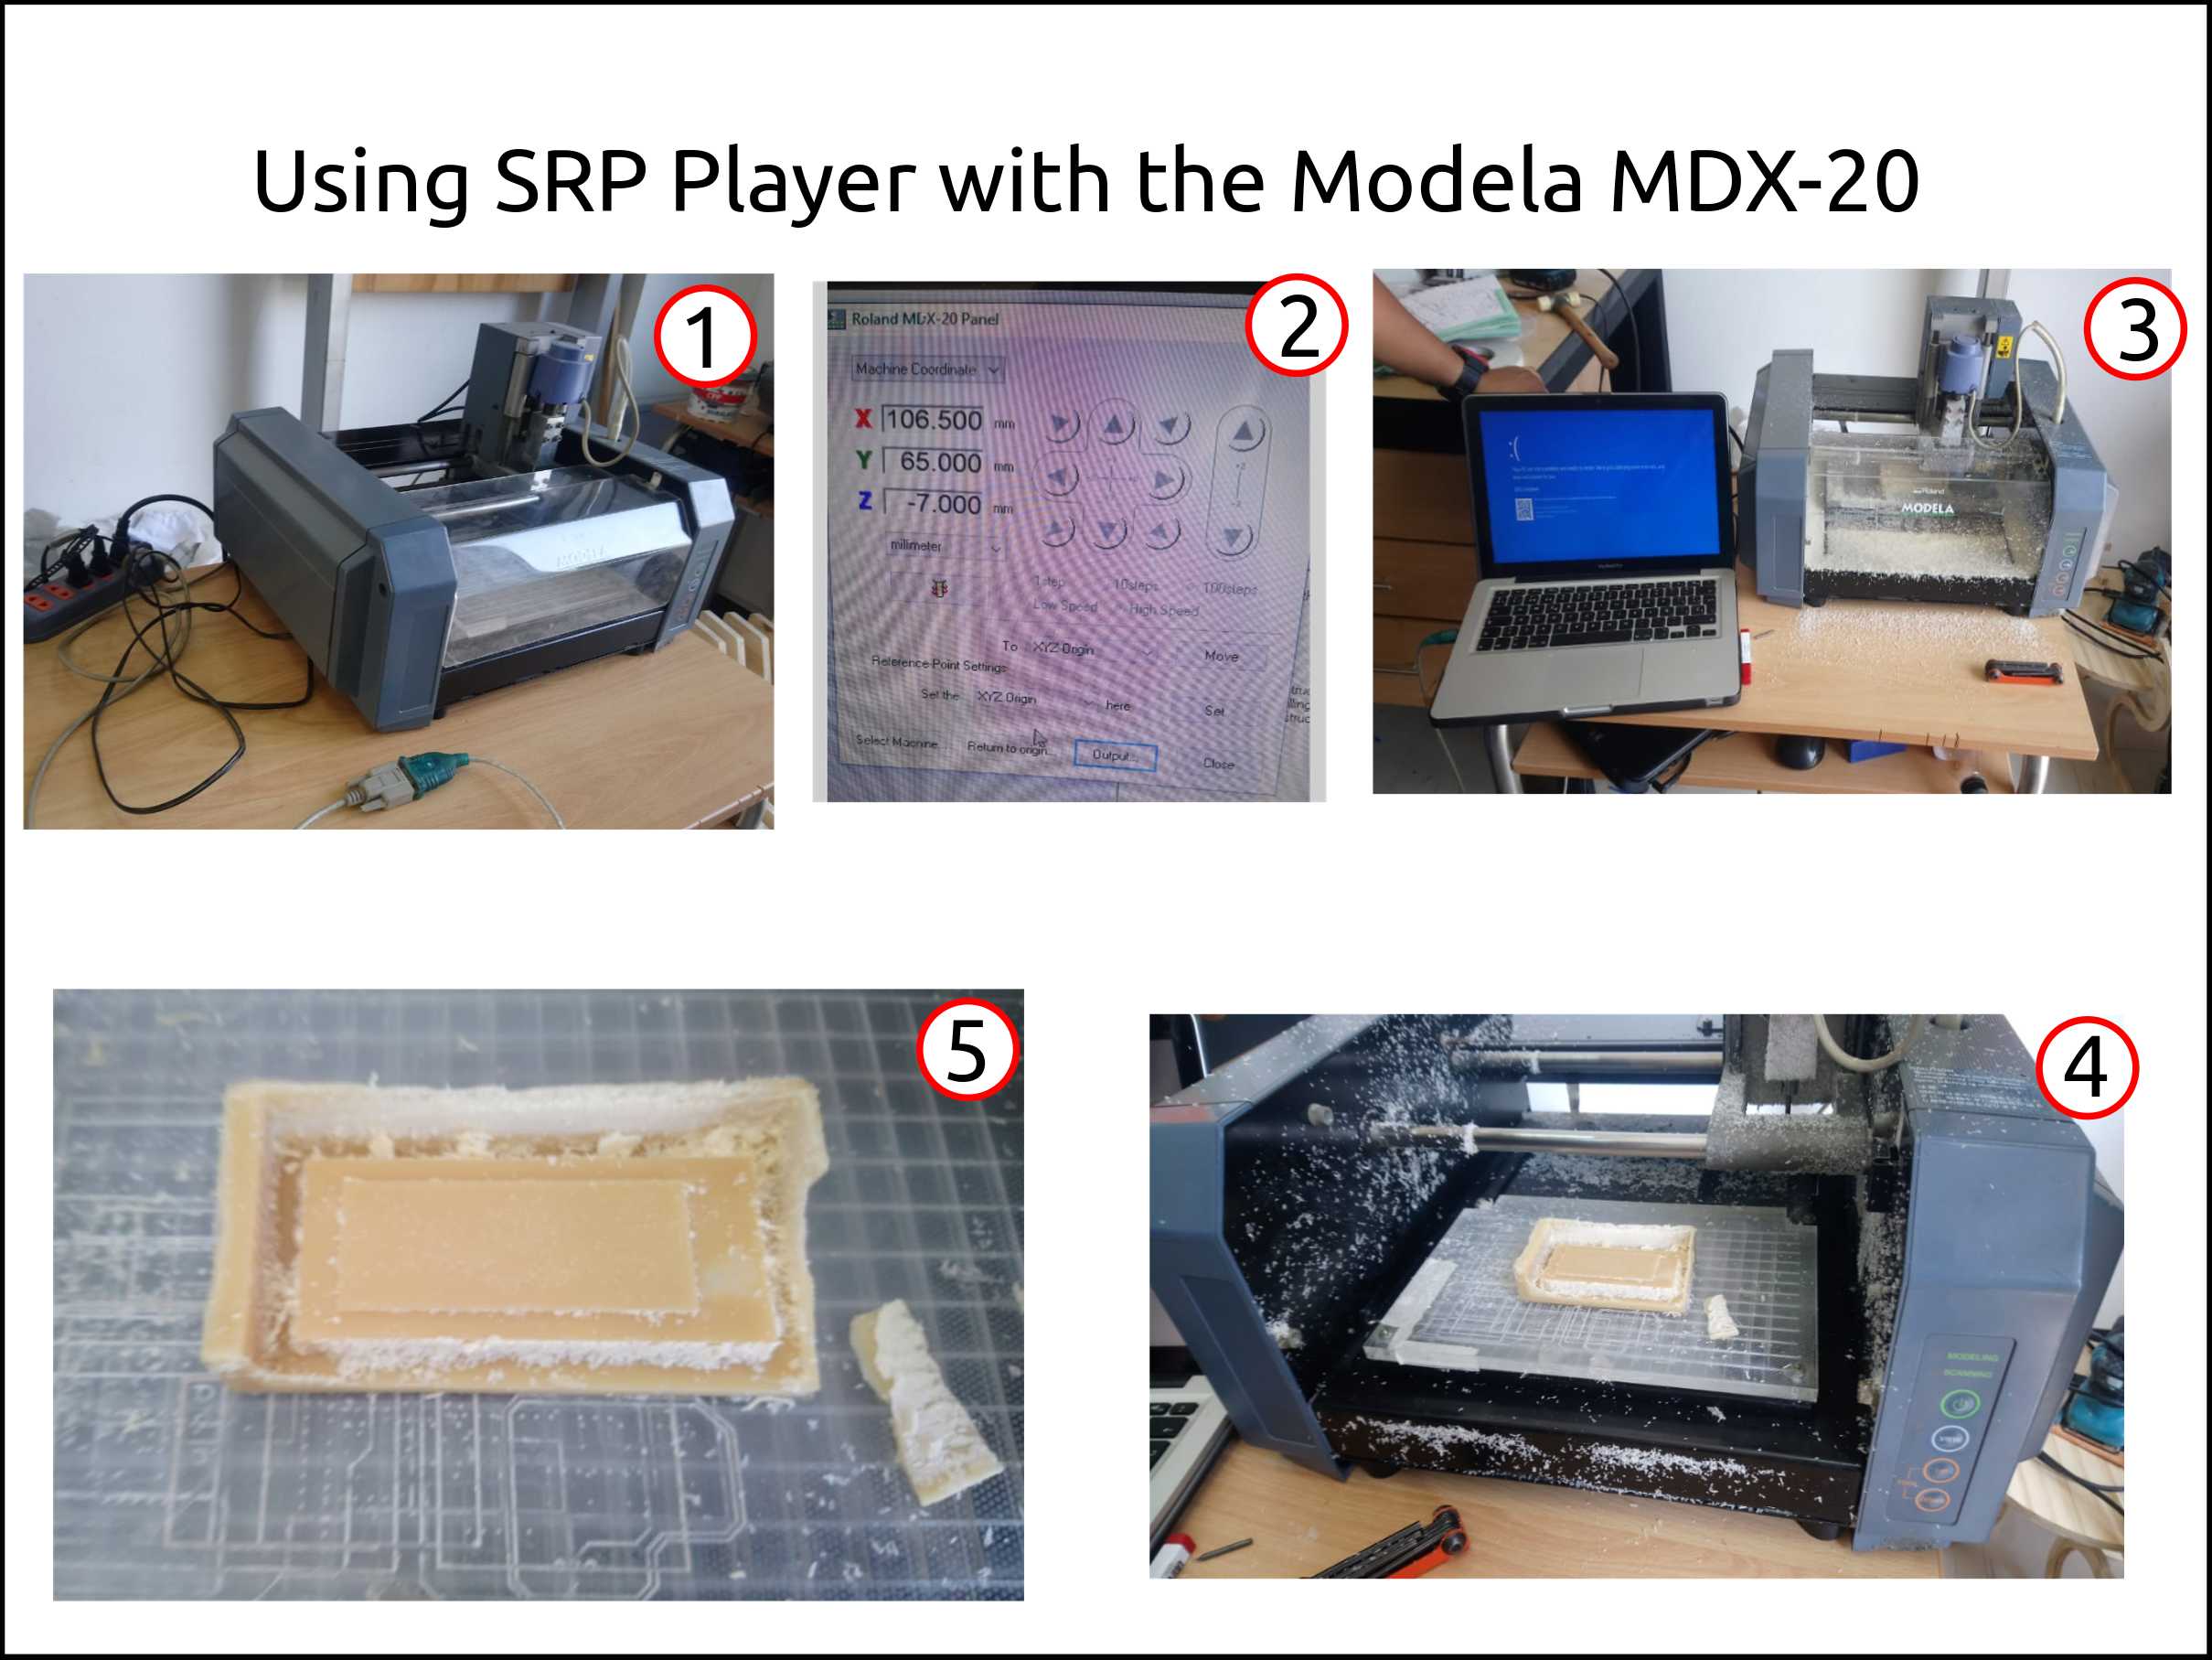
Working with the Modela MDX-20 using SRP Player.
The software below is needed for using the Modela MDX-20 with the SRP Player or even generate the toolpath using, for example, Fusion 360 CAM and then send to the machine using the Roland MDX-20 Panel.
-
Chinese RS-232 to USB converter with a Prolific Chipset Driver
-
SRP Player.
-
This is the Roland MDX-20 with the RS-232 to USB adapter.
-
Roland MDX-20 Panel. The location of the Roland MDX-20 is C:/Program Files (x86)/SRP Player/Program/.
-
First, try using the SRP Player with the Modela MDX-20. We fail!
-
Then we succeeded.
-
This is the first piece with the SRP Player + Modela MDX-20.
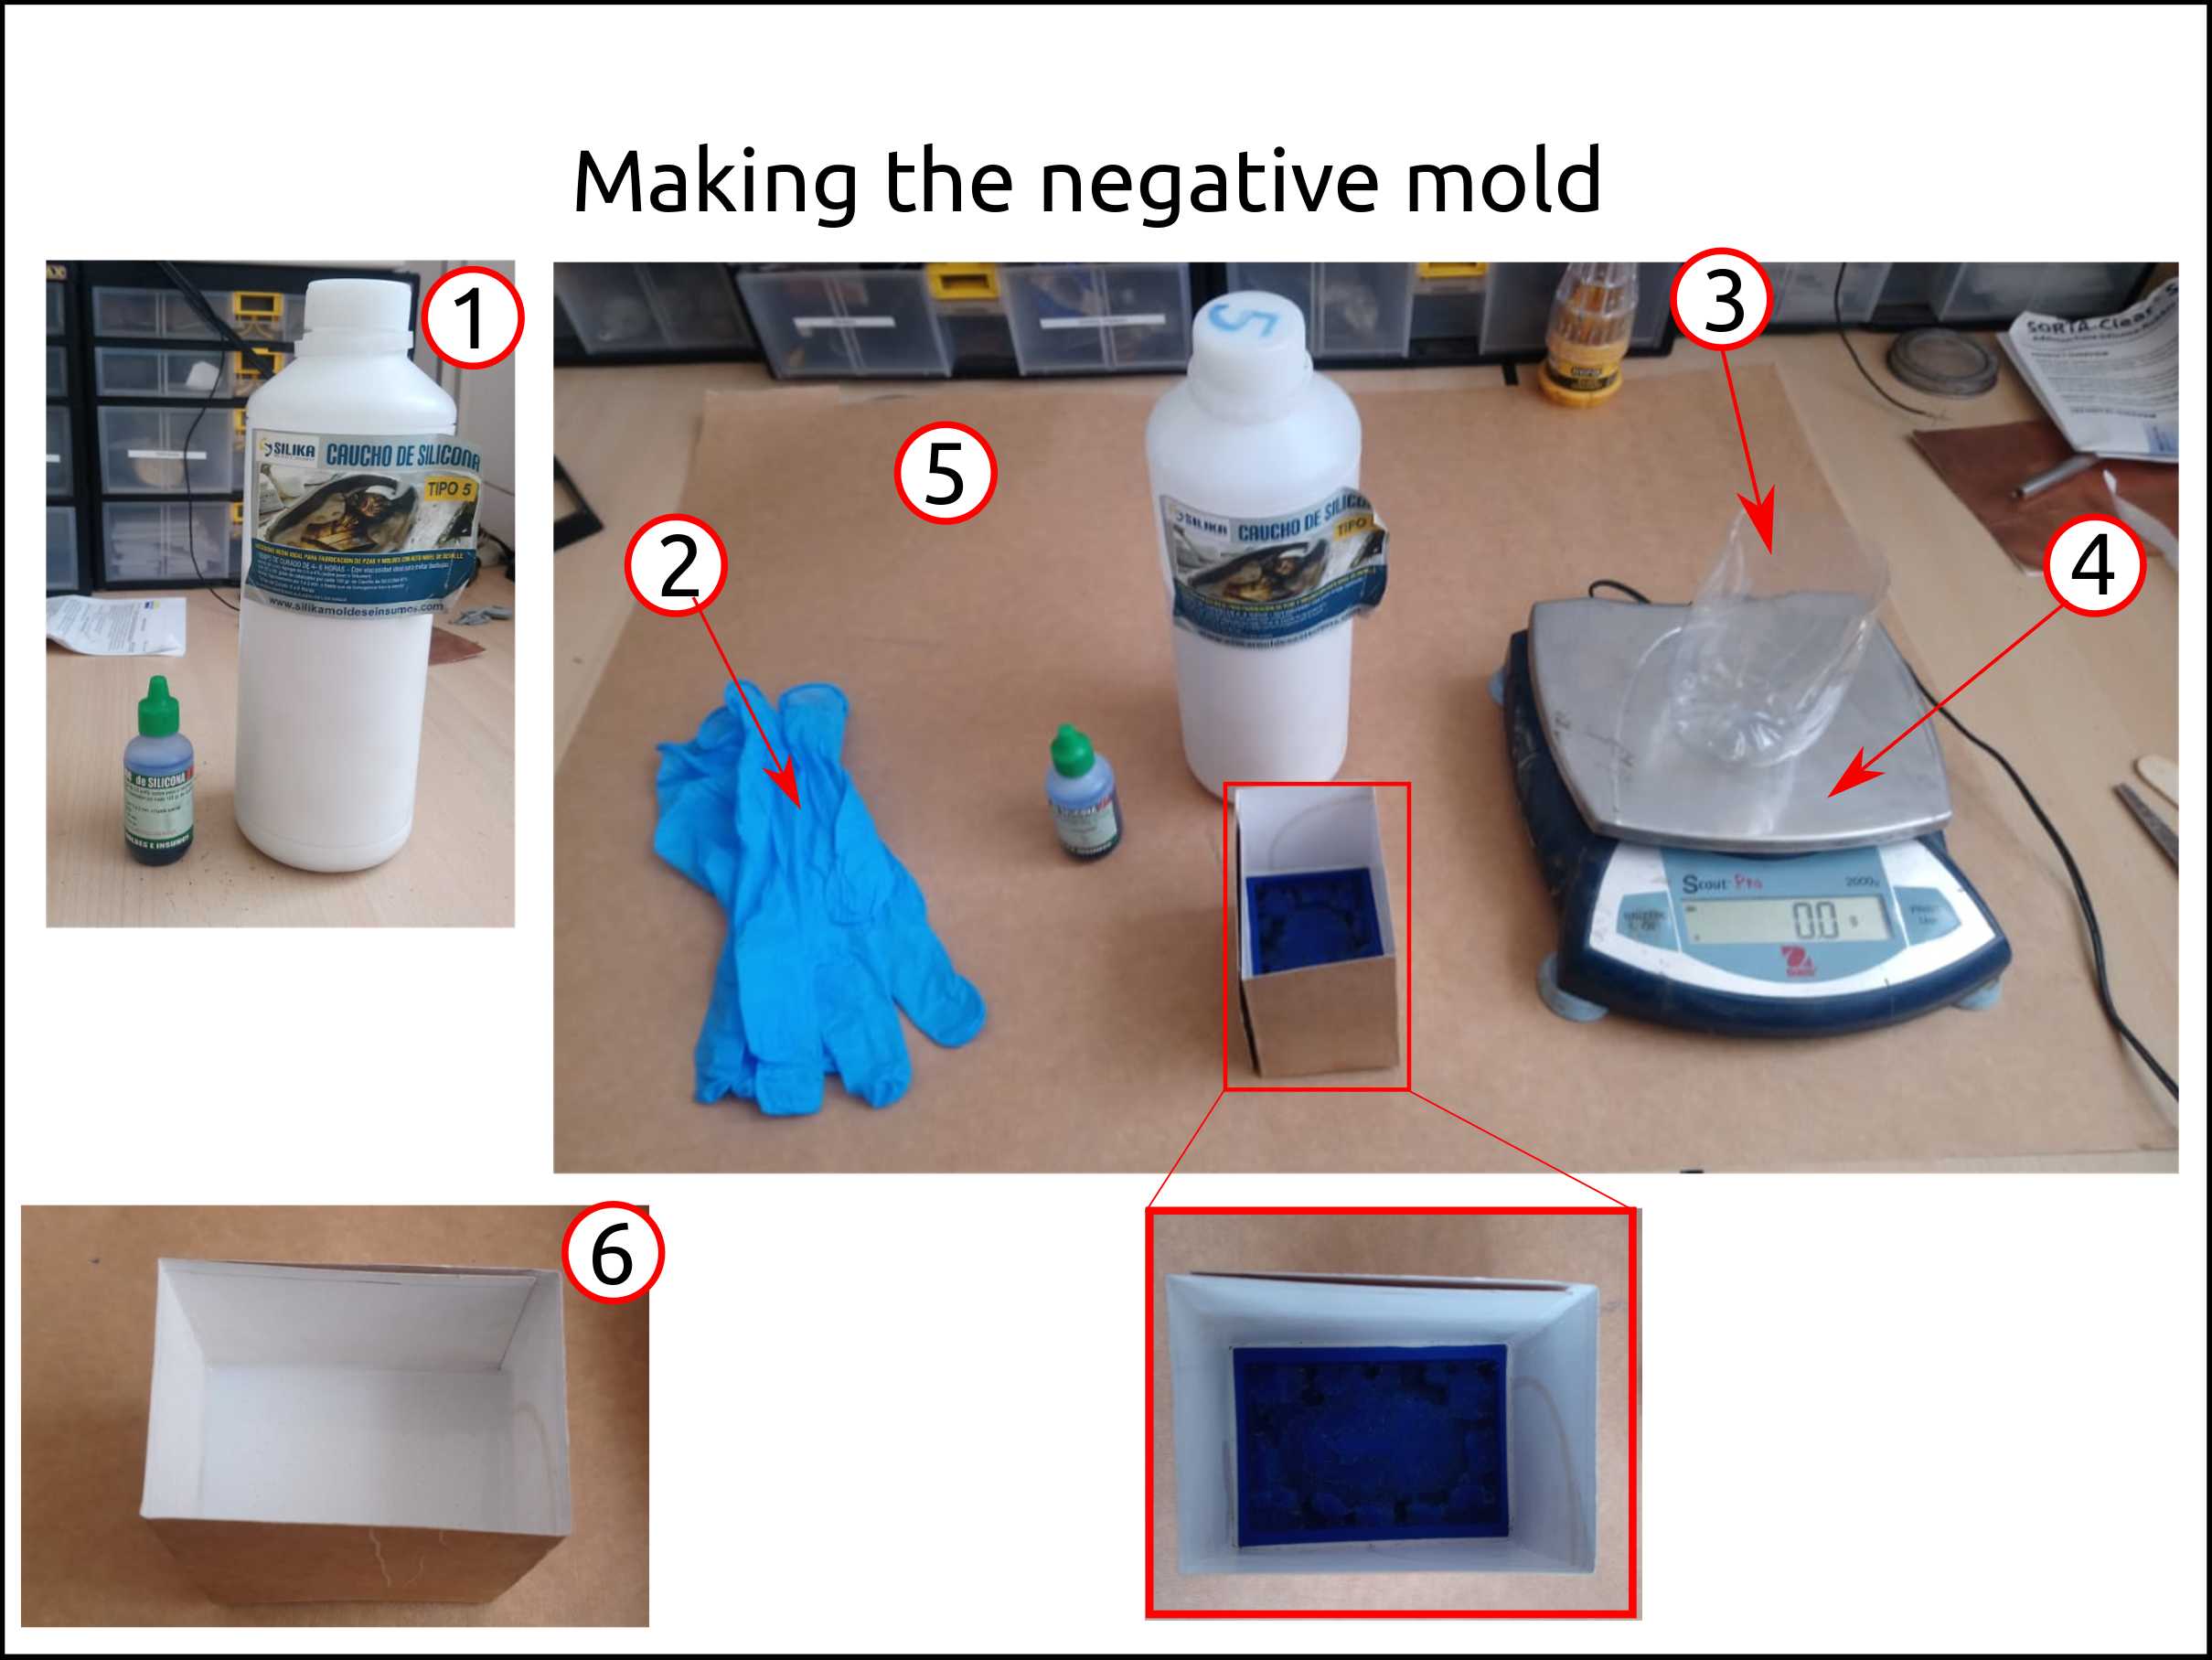
Casting the silicone mold
-
I used rubber silicone RTV and Catalyzer.
-
Latex gloves.
-
A pot to mix the silicone and the catalyzer.
-
A scale.
-
A piece of paper to cover the table.
-
This is the result. In order to reduce the bubbles in the silicone, I hit against the table.
-
After 24 hours of waiting for the resin cure it did not cure properly. So, I decided to put some drops of catalyzer on top to see what happen, but nothing happened because of that I did a new mixture adding more catalyzer to reduce the curing time.
-
Here we can see my mold after I remove the not cured resin, we see the white parts that are uncured resin.
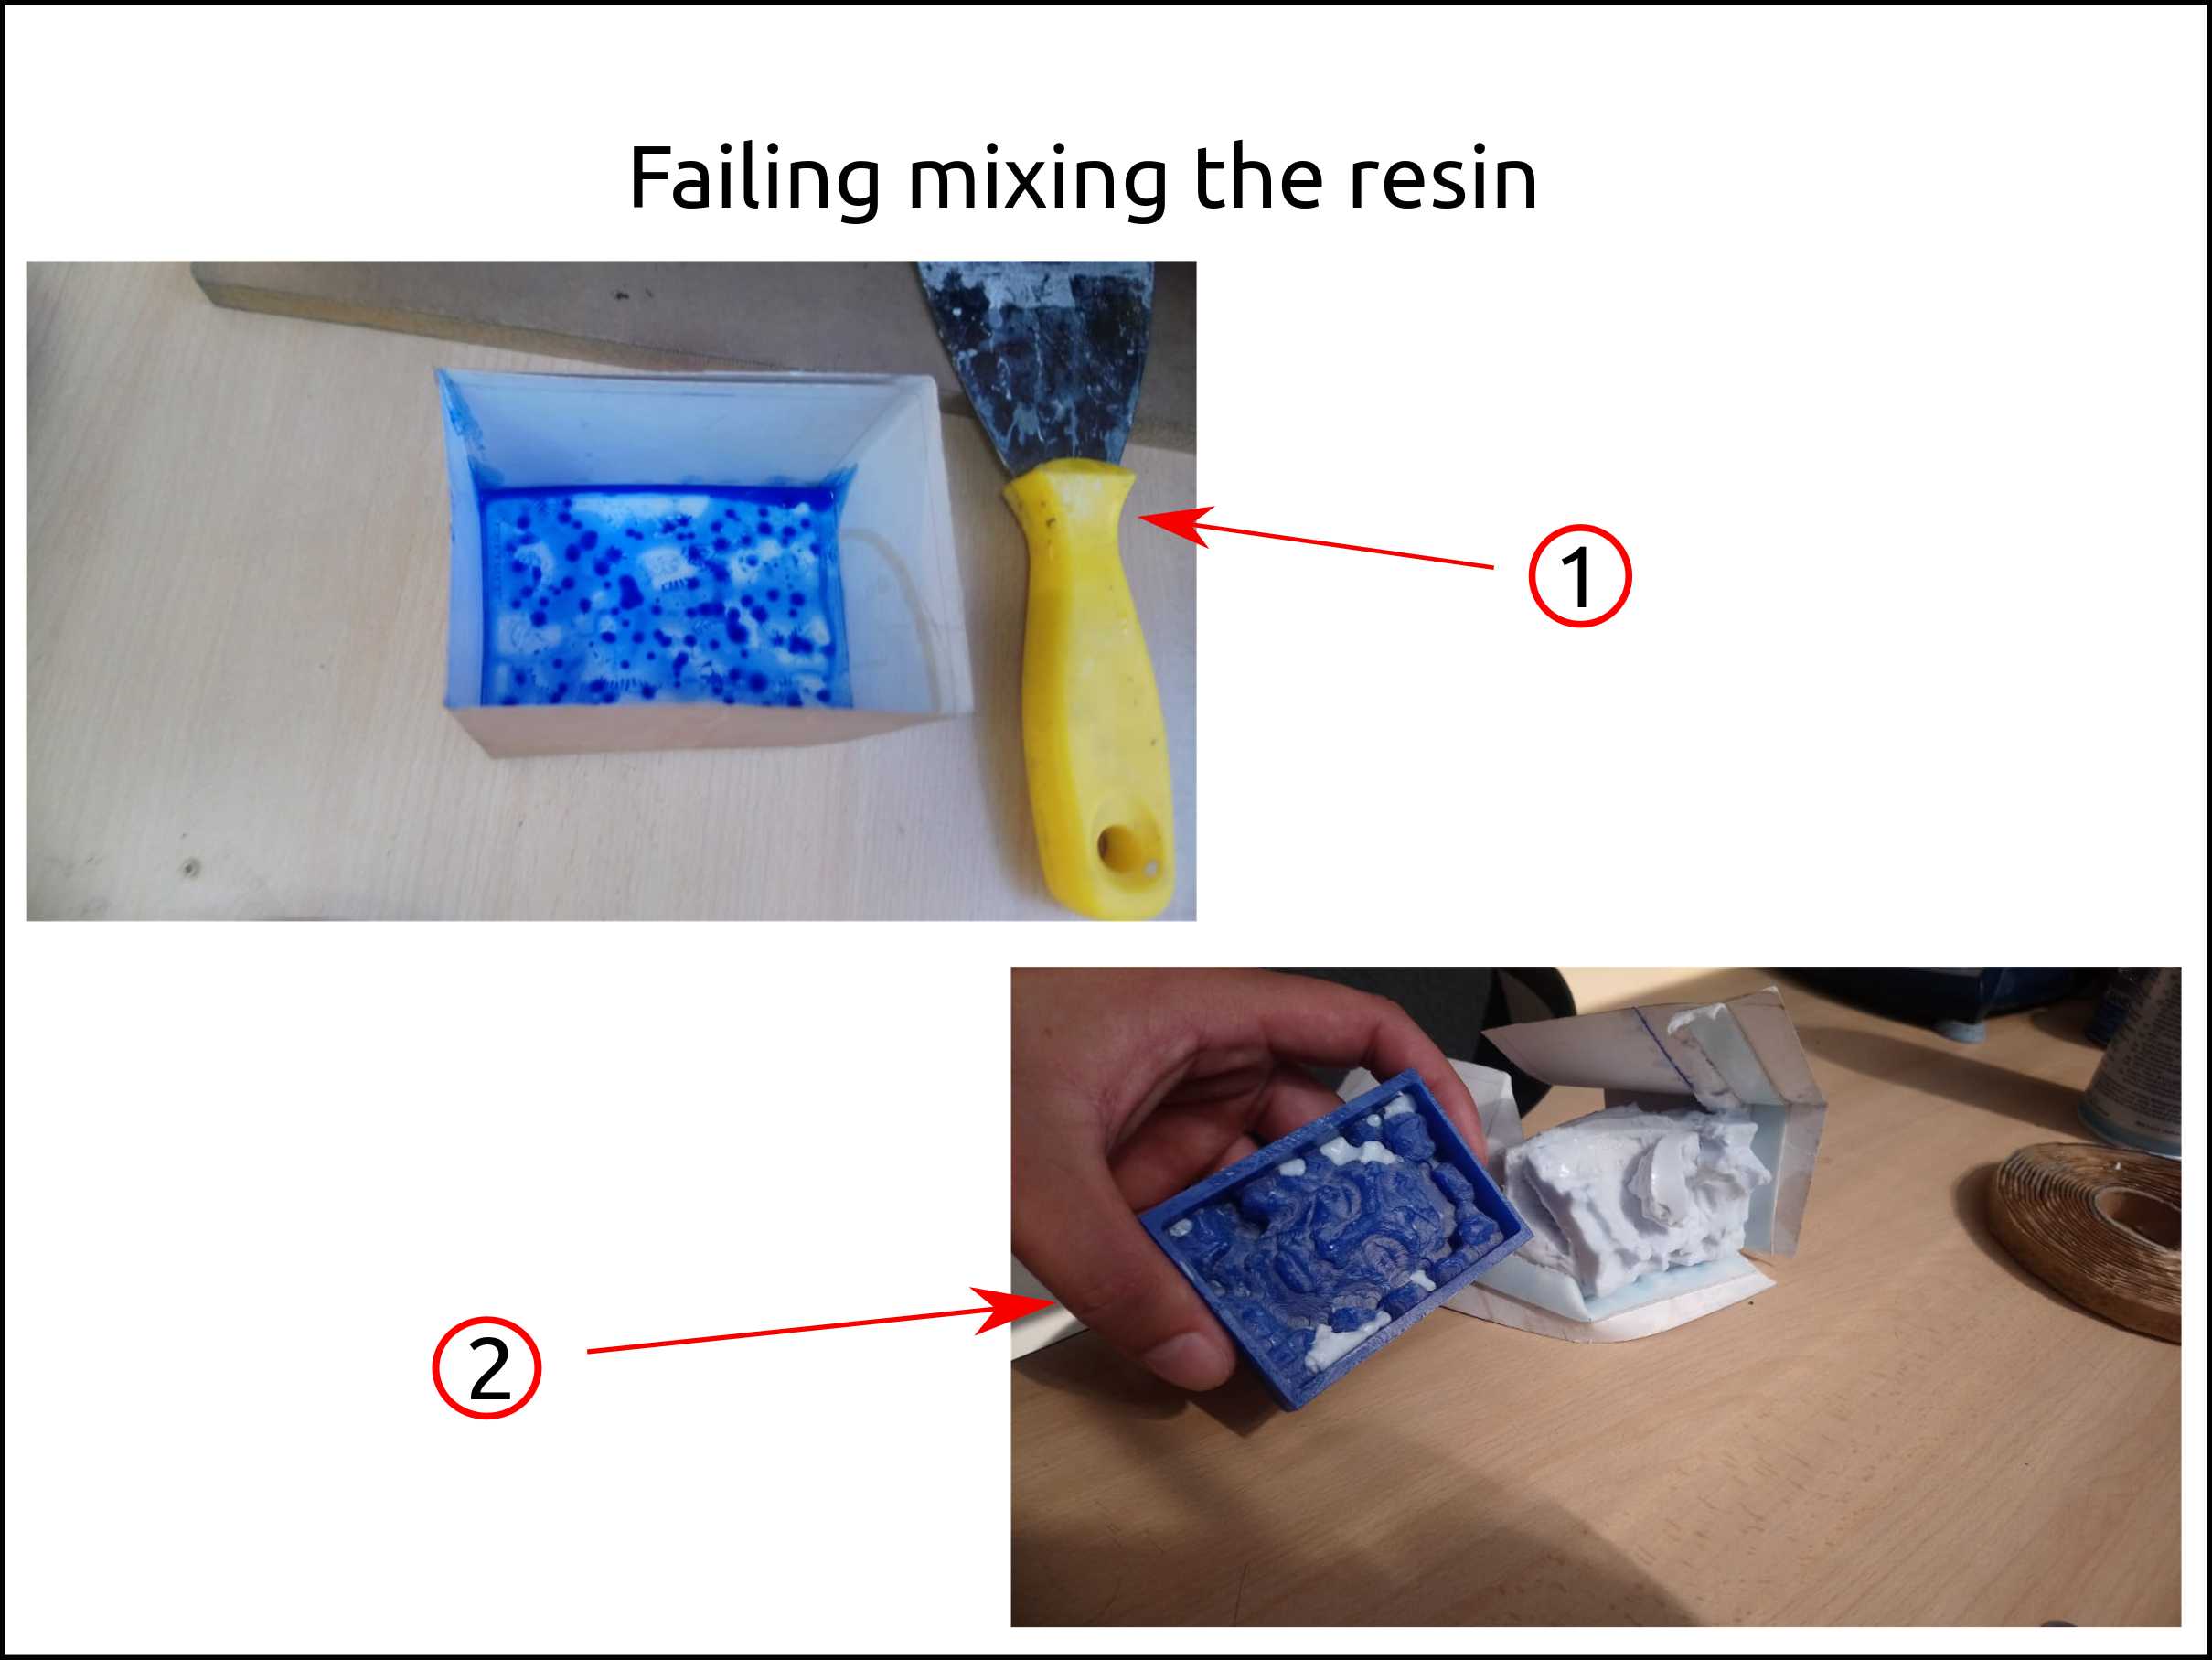
-
Once I repeated the mixture I got a better result and the resin was cured in 3 hours. We see that the negative mold was great and it was ready to continue with the process.
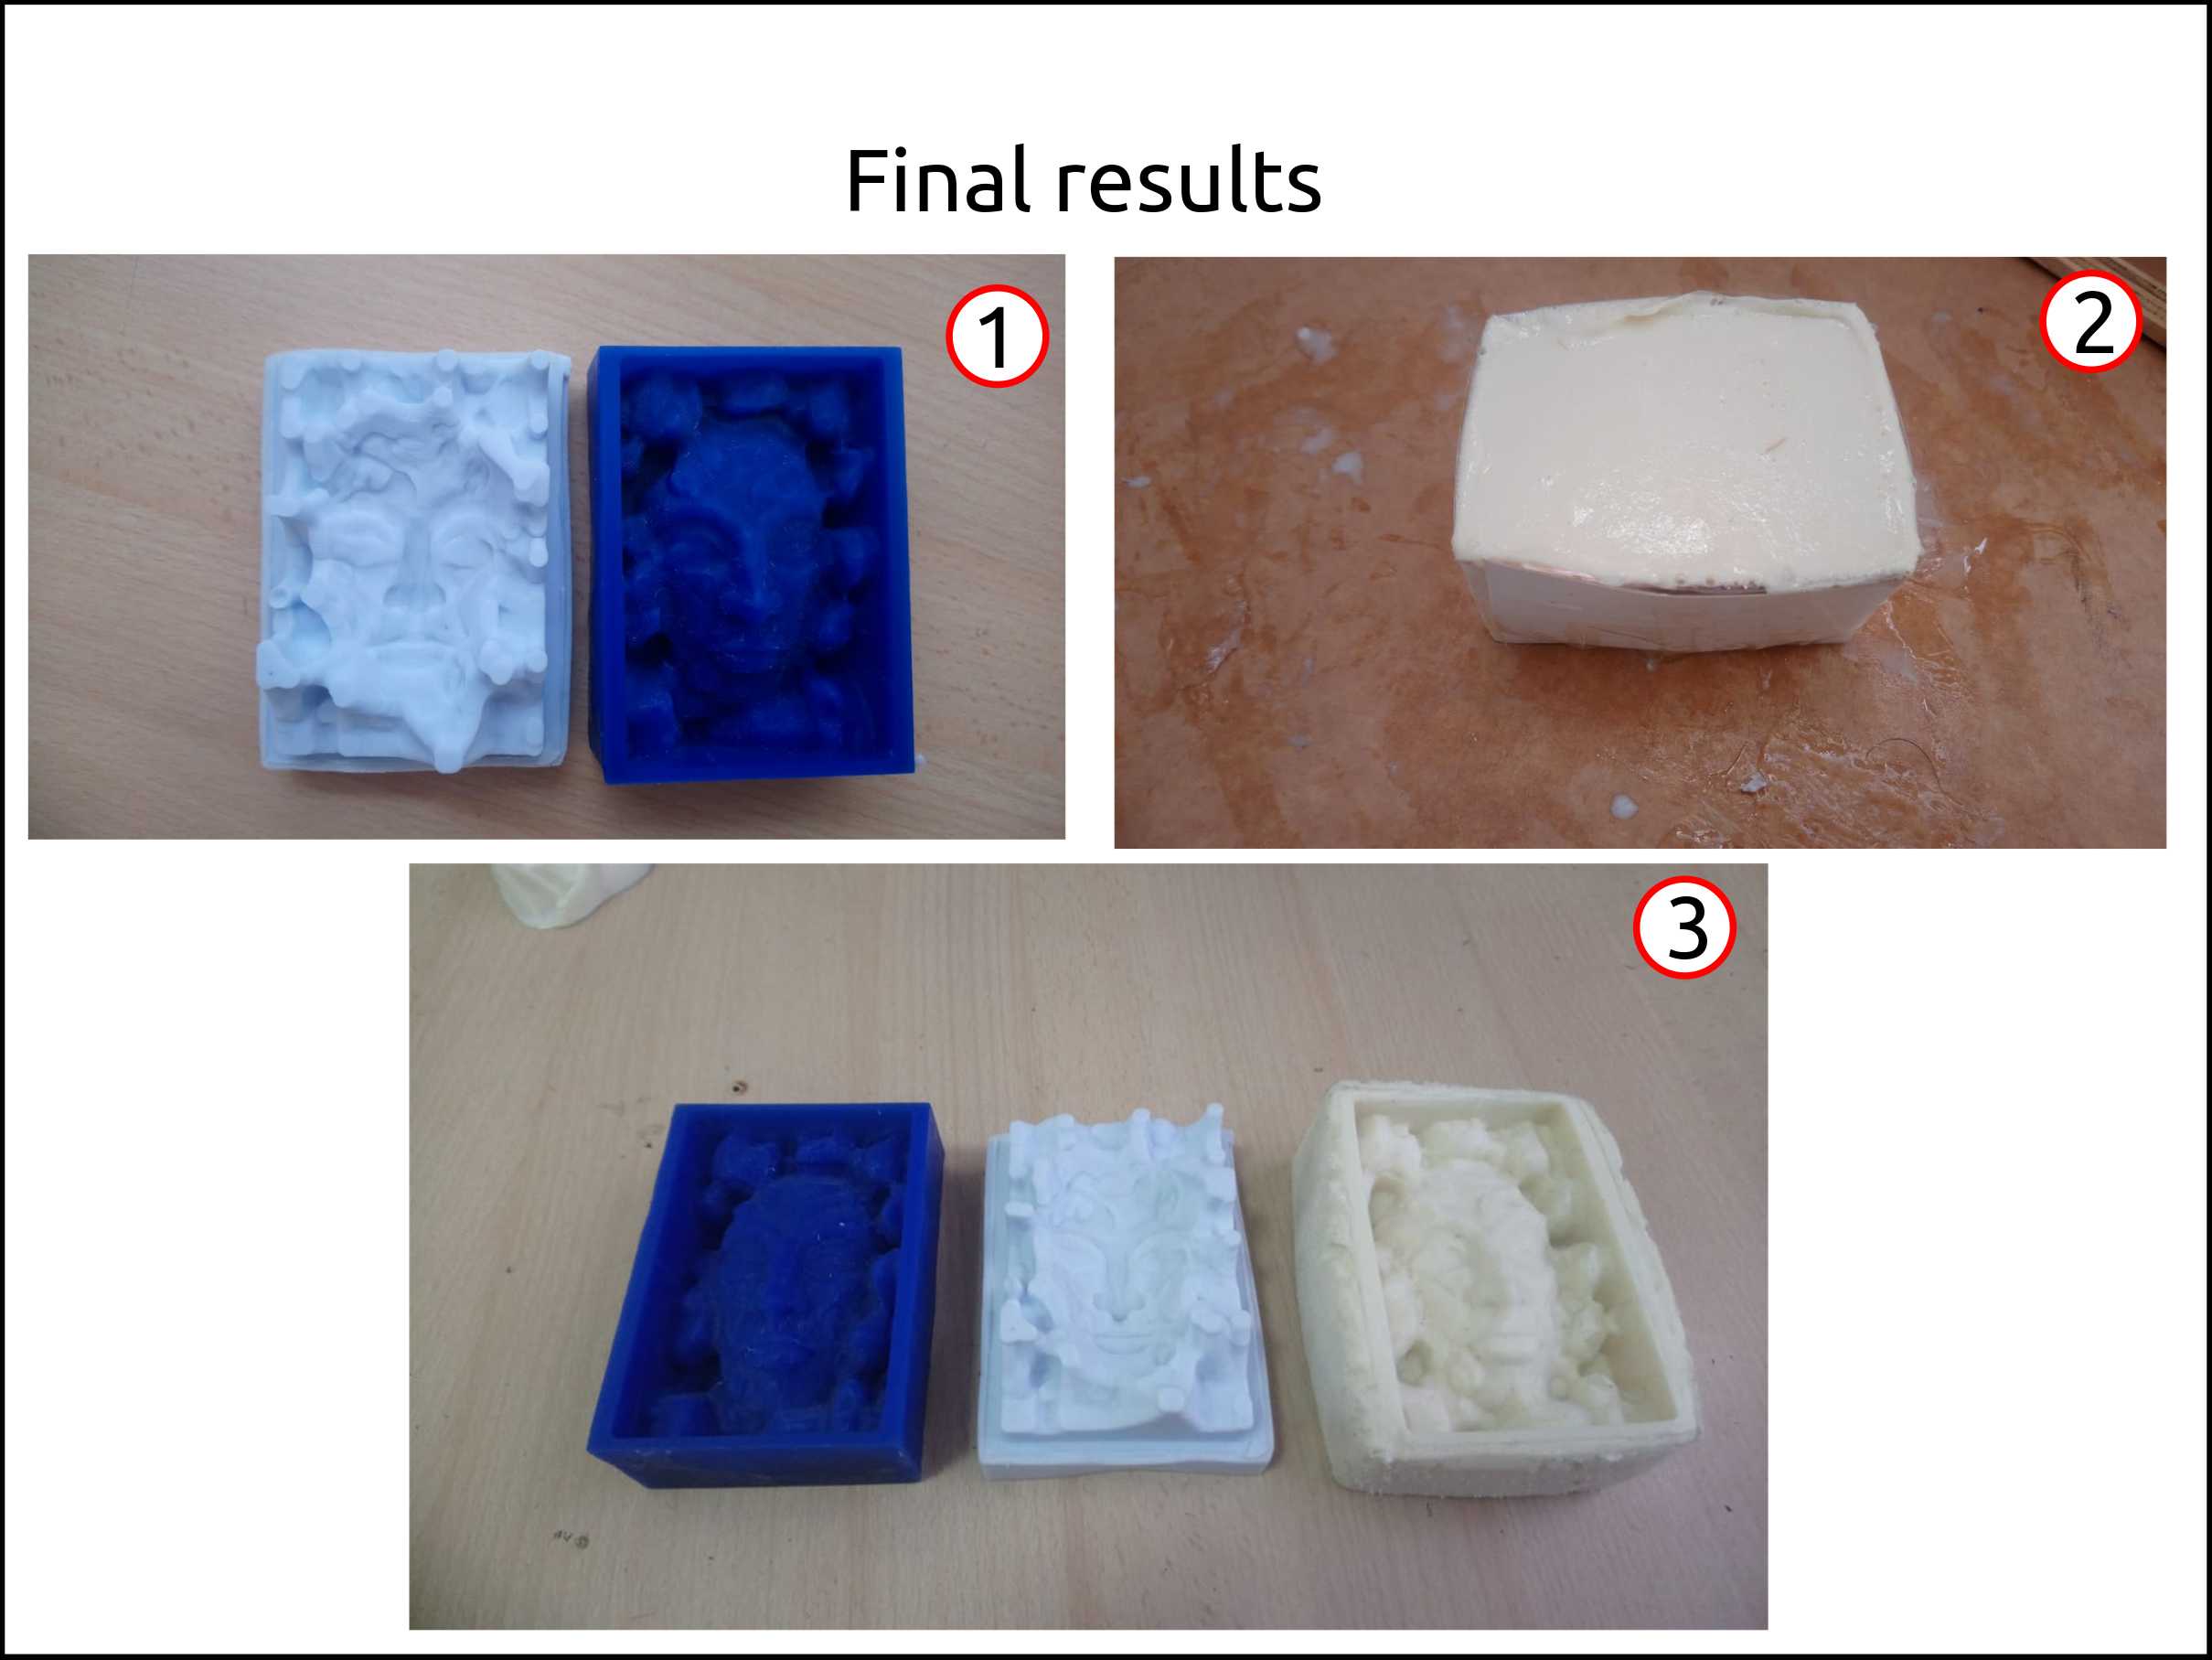
-
Here we can see the last process of doing the final product of epoxy. In the step, I realized that my negative mold has to have integrated a kind of wall that helps to the epoxy be cured with the right shape. I did the wall with thin cardboard, that was not a good idea but it helps a lot. The epoxy had two parts one named A and the other B and the rate ratio was 50% each.
-
Finally, here we see all of the three stages of doing the molding and casting apart by 3D modeling the thing you want, machining it then doing the negative with rubber and then use epoxy, candle wax concrete or whatever you want.
Faced problems and solutions doing the casting.
Problems
-
I mixed up 30 drops of catalyzer with 100g of rubber silicone and after more than 24 hours it did not finish the curing at all.
-
We are many doing the Fab Academy so we had to search how to work with the Modela MDX-20 without using FABMODULS.
-
Using the Roland MDX-20 Panel the problem was to stop the machine if we see some error.
Solutions
-
I put more drops on top of the silicon. (I am still waiting for the silicone to cure)
-
We used the ShopBot CNC to a machine with it.
-
To stop the MDX-20 we have to use the command with administrator privileges the command net stop spooler and then erase the content of the files in the directory called C:/Windows/System32/spool/PRINTERS/ finally run this command net start spooler
What I learned this week?
I learn that Plunge and feed rate are very important, and we have to check carefully to avoid break the endmill.
I mandatory try to cure a bit of silicone or whatever we will use to cast before use it because the “recipes” change depending on how old is your material.
The ideal cable for converting the Modela MDX-20 to USB is the TRENDNET TU-S9.
I learned that I can make my own machinable wax mixing Parapffin wax and LDPE