Molding and Casting:
This weeks assignment is to create a mold, and to cast parts from it.
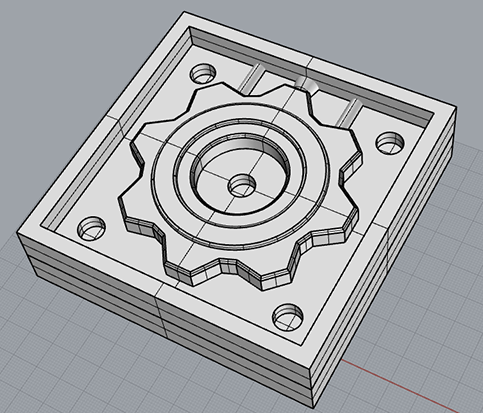
I started by creating a model in Rhino. I opted to do a cog shape for the assignment. I had a 2D illustrator file of a cog that I made in an earlier project, and imported it into Rhino.
I extruded the shape and then added some chamfered edges to it. This all sounds easy to do, but since I have zero experience with Rhino, the learning curve was very steep, and it was quite difficult to get it to do what I wanted. After 2-3 hours I finally had a model that I was happy with.
I then added a box to surround the whole model, and used a BooleanDifference to extract the shape from the box. I then added another box around that box, and did another BooleanDifference, leaving me with a positive shape embedded in the box.
I then added a few pegs that would help guide two halve of a mold together. My shape is symmetrical (hopefully!) and I decided to use the same mold for both halves. I'll elaborate on this more later.
To create the mold, we'll have to mill out the 3D model out of a block of wax. This will leave us with a positive mold. To do this we need to export the file as a .STL. This file can be read by PartWorks, which is connected to the ShopBot, the large milling machine.
In PartWorks, there's still a list of settings to run through before you can send it off to the ShopBot. You enter the size of the material you're milling on, and how deep you intend to start milling, as well as what milling bit you'll be using. First you'll calculate a Roughing Toolpath, this is usually done in a few layers as it just roughly mills out your shape, the next step, the Finishing Toolpath will finely mill your model. To be even more precise, you can add another toolpath at 90 degrees to the original finishing toolpath, but this will take double the time.
To save time we installed PartWorks on a few of the PC's at the lab, so people could prepare their files while the mill was being used. Unfortunately not all the settings were the same on these, and my file was calculated to take about 4 hours and 47 minutes. That's much longer than I had hoped. My thought was to only use the roughing path in this case, but I also decided to run the file through PartWorks again on the PC connected to the ShopBot. This showed me that there was clearly something not set correctly in the program we installed on the other computers, as it now showed me a Finishing Toolpath of only 18 minutes. Much better!
After setting the X, Y and Z zero point on the ShopBot, and checking the milling bit to see if it would be able to go deep enough, we sent through the order and spun up the milling bit. This being wax, we also decided to not have the fan going as we milled, so we could save the shavings to re-use them at another point in time.
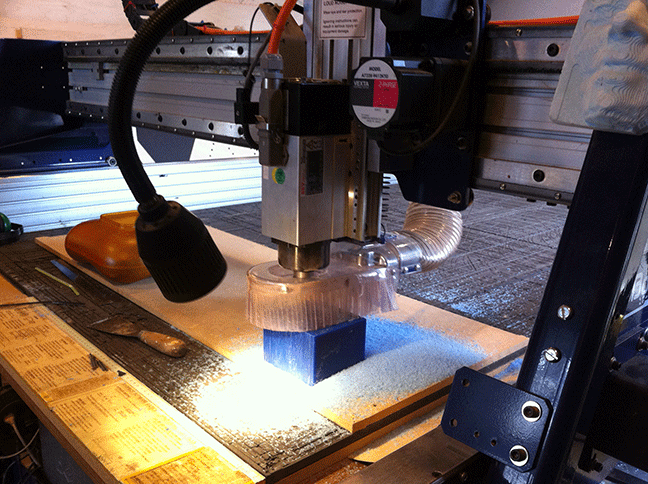
The estimated milling time is never very accurate, it actually turns out that usually it's quite a bit longer. I think it took about an hour, maybe more for the ShopBot to finish milling. I was quite happy with the result though:

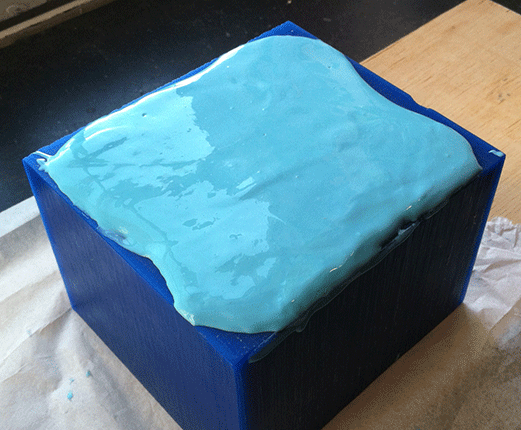
With the milling done, we've got a 'positive' of our model. To actually cast these, we need a negative. We're making this negative out of Oomoo, a silicone type that gives you a very nice rubbery mold that you can cast with. To find out the volume, we actually poured water into the wax mold, and calculated the difference in weight. This difference is the volume of the mold, and the amount of Oomoo you'll need. We used water, since millilitres are equal to grams.
I put a large cup on the scale and poured water in until I had half of the volume of the model, and used a marker to mark that spot. I then poured more water until I had the full amount, and marked it off again. Now I had a clear indicator of how much of Part A and how much of Part B I needed to pour into the cup.
I poured the Parts and then used a stick to mix it together carefully. If you stir too fast you'll catch a lot of air into the mix, which is something you want to avoid. After a few minutes, when your mix is no longer streaked with two colours, but is one colour, you're ready to pour it onto your mold.
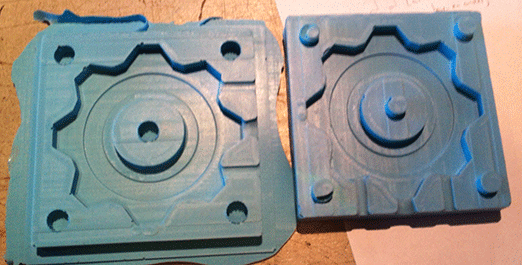
The Oomoo we used was said to dry and cure in about 75 minutes, but in reality this seemed to take much longer unfortunately, up to 2,5 or 3 hours. I pulled it out of the mold when it was done, and was very happy with the result.

There were very little bubbles in the mold. The pegs weren't fully filled, but since those are only guides it's not such a big deal.
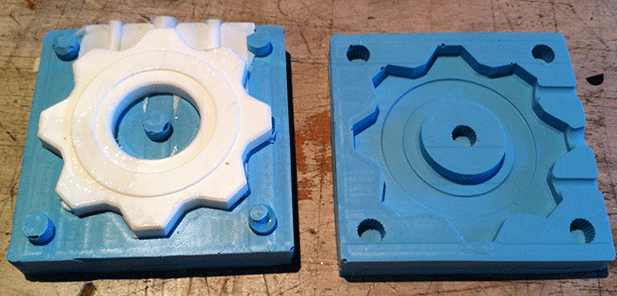
Since I'm using the one wax mold for both sides of this casting mold, I then inserted wooden pegs into the holes on the wax mold, and poured on another layer of Oomoo.

Having both sides, I checked if they fit together, and it seemed to do just that! So now I had a (hopefully) fully functional two-part casting mold!
I slapped it between two pieces of wood and some tape to keep it all tightly together, and got ready to do my first casting pour. My first try was with Smooth-On's SmoothCast 325. It's a clear resin that is made to be mixed with pigments. I was also a little impatient (after waiting or the Oomoo mold to cure over the course of 3 hours), and SmoothCast 325 promised to be cured in about 15 minutes! Unfortunately, I didn't have any pigments so I just went with the clear stuff. The problem here was, I didn't actually have enough of parts A and B to do a proper mix. Plus, the stuff had been out for a long time, and might not work properly because I don't know how long the shelf life is.
I still poured happily though!

Well, that turned out partly okay. The shape was there! As I feared, the Parts A and B were improperly mixed, so part of the cast was still kind of mushy when I took it out. There was also a lot of air trapped in the cast, which in this case I could luckily attribute to the stuff just being so old and reacting poorly. Over the course of a few days, the soft squeezy part never really went away; it did however bulge up as the air inside expanded a little.
Next I grabbed another SmoothCast type. This time I went with SmoothCast 310. This one is a white resin and takes a few hours to set and cure. This time I also made a slightly tighter box that I designed in Illustrator and quickly cut out with the laser cutter.
Look at that! Looking good. I did run into one more issue here. I kind of overdid it on the mold release here, and I didn't properly brush that out all over the model. It ended up clumping a little on certain parts of the cast, which impaired the curing process a bit. After some extra time it did cure, but kept having a slight spring to it.
I cast one more time, again with SmoothCast 310, and this times there were no issues that I ran into, hurray!

From left to right in chronological order, Old SmoothCast 325, SmoothCast 310 with too much mold release and the pristine and perfect final pour with SmoothCast 310.