 |
Fab Academy 2013 |
Interface and Application Programming:For this assignment, we were required to write an application to interface with an input or output device.I decided to use the temperature sensor I made during the Input Devices class (and its accompanying code) as a base. If you want to read about how I made this temperature sensor, please refer to this page. I hooked up the temperature sensor to my computer and ran the original code, as a quick refresher to see what the interface looked like. Neil's original design is a simple white box with a red increasing bar inside a blue bar, with a text indicator as well.

I then opened up the Python file that came with the temperature sensor, and I started rooting around inside.
In the code I also noticed that it pulled from a library called Tkinter for certain graphic displays (such as the canvas that creates the bars). I looked up what kinds of commands you can apply to these, and found a few useful resources.
Most of the changes I then made were applied to the Canvas, as I understood that that was the window being drawn. root.title('hello.temp.45.py (q to exit)')root.title('What temperature is it? (Press Q to exit)')In the canvas I then found a line creating a rectangle. On the effbot resource page I found that you could also use different geometric shapes. I decided to change the blue bar to an ellipse, and keep the red bar as red. This basically has the red bar squishing a blue ball as the temperature rises.
I also added a line of text above the bar using the create.text canvas command.

I then tried to change the bars to images, or even to just add an image to the window. Unfortunately, this is something I couldn't figure out well enough. I tried adding the images to the code using the PhotoImage definitions provided for Tkinter, but I kept getting syntax errors with whatever code I put in. Checkboxes!
Tkinter has a references to checkboxes, so I added a few. After adding the code, the checkboxes actually showed up in another window. I noticed a definition called 'master' in the code I had added that was defined as Tk(). The canvas window had a similar definition, but as 'root'.
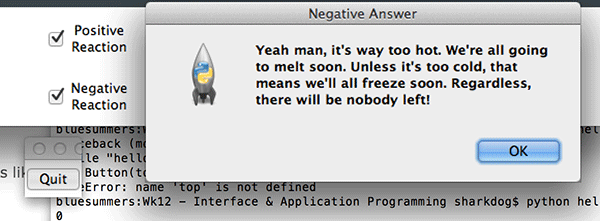
Checking and unchecking the boxes is fun, but I wanted something to happen. Luckily, I figured out you can add a 'command' to the checkbox that is executed as you click on it. I combined the command with another one called tkMessageBox, which pops up a small dialog with some text.
  I cut my losses and continued on. There was already a command to shut down the application (by pressing Q), but I figured I could add a button to the interface that would do the same. The idea behind it is that it's easier to figure out if you have a visual cue.
I was able to add a button to the program, but if I tried to add it to the 'root' window, Python would crash. I tried a few different things, but I ended up having the button show up in a different window. I basically made a new definition attached to Tk(), and added a line of code to it: Button(quittles, text='Quit', command=quit).grid(row=3, sticky=W, pady=4)
 If you're interested, the modified code for this assignment can be found on the Assignment Files page! |