Fab Academy 2013 |
Planning the final project.After all these months of learning all the different techniques and such, there's a lot more concrete information available to think about the final project. My original idea (a toy robot) was incredibly vague. After the first few programming classes, it quickly became clear to me that it was definitely not my strong point. The design aspects of other classes (inluding molding and casting) suited my interests and skills much more. After the class on Input Devices, I was intrigued by the light sensor, and started thinking of how it would be fun if you'd make a device that chased after a dot of light, sort of like a cat. This idea stuck with me, and I started searching the internet for examples, hoping to incorporate it into my final project.
Soon I found a page in German (found here, where someone had made the exact thing that I wanted to make. Even better, source code was provided, along with the message that he loves to share it with the world so people can recreate and improve on his design. What do I need to make this? The schematic provided on the page provides me with most components to make the board:
The board will be designed in Eagle and then milled out on the modela, after which it'll be all soldered together.
One of the other pitfalls is that while the code is provided, it is provided in German. If the code doesn't work at once, and needs to be modified (which is likely) the code will need to be translated back to English. It might take some time to find all the correct commands for this, without breaking the code.
With just a board and motors the little bug won't move very far though, so we need to make some more things. Time permitting, if all this works there might still be a chance to design an enclosure for the little bug. This would have to be designed and produced from a fairly light material, so the motors don't give out. I think the best would be some sort of acrylic, laser cut into shape. As it's already kind of buglike, I intend to design something like an insect-like shell. The LDR's could even become stalk-like eyes (either wrapped in tape or running through some small tubing). Given that I'm not starting from scratch with this project, but building with/on somebody elses project, I should be able to finish this in the two weeks left for working on the final project. First I've started to design and lay out the board, since that'll be the core of the entire thing. After a few pitfalls I ended up with a schematic that looked like it worked. The problems I originally ran into were fairly small. I ended up changing the design to accommodate a 9V battery, as that's what I had available. I still intend to change it back to a lower voltage LiPo if I have time. With the higher voltage battery, comes a regulator and a capacitor which I added to the board. After roughly laying out the pins, I noticed that the layout wasn't going to work. I had it layed out using the pins closest to where I wanted the parts, but then noticed that some of those pins didn't have the functions that I needed. For instance, the 'eyes' (phototransistors) had to be moved to a pin that had Analog to Digital Controller functionality, as I'll be converting the input to the transistor to a digital signal to drive the motors. A change suggested by my guru (Bas Withagen) was to lead the motors directly to the battery, instead of drawing power from the VCC signal. Both would technically work, but having the motors draw from the battery would increase their power a little.
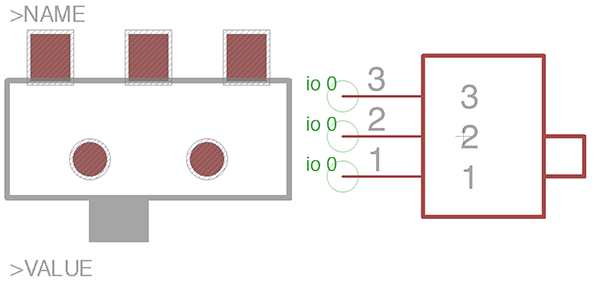
I opted to add a slide switch to the board so I could turn it on and off. Unfortunately, I discovered that the slide switch we have in the Fab inventory did not exist in the Fab Eagle library. Luckily, the datasheet (which I've added here) wasn't that hard to find and I created the layout for the part in Eagle, and added it to the library.
 I then added the switch to the schematic, and connected it directly to the battery. There are three pins on the switch, and depending on the position of the switch, two of the pins are always connected. I made sure one pin wasn't connected to anything, hoping it will break the loop and as such function as an On/Off switch.
 Jumping from the schematic to the board added a few more problems. It turned out to be practically impossible to route all the wires to eachother without crossing another wire or two. After spending way too much time on this, I caved and started adding 0 oHm resistors to the design to bridge the gaps. It was a bit tricky adding them to the right lines in the schematic, but I pulled it off.
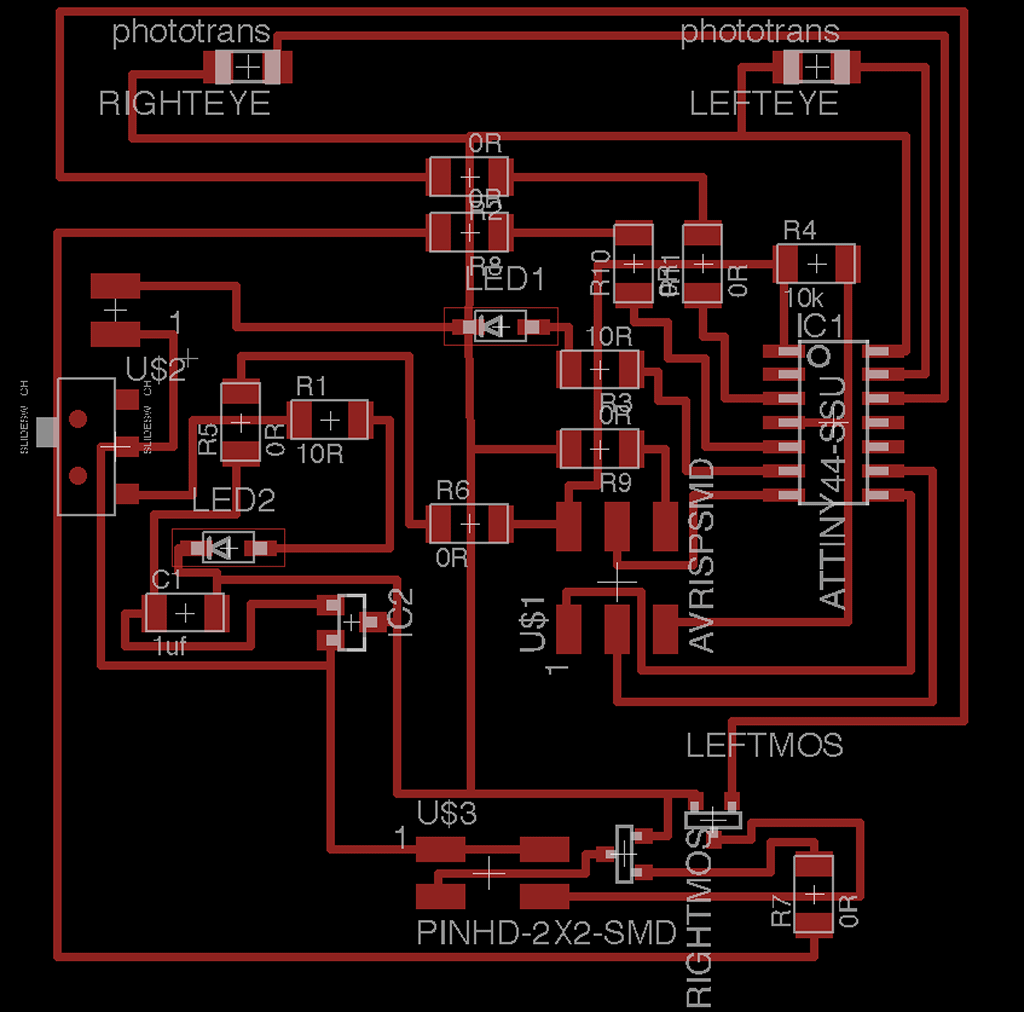 Finishing up with the board, I milled it out on the Roland Modela without any problems, and started soldering the parts on. For some parts (like the phototransistors) I had to look up the datasheets to figure out if I was putting them on correctly, but I think it's all in the correct places. I also added the battery wires and hooked up the DC motors that I want to drive the whole thing.

From here on, I need to go over the code, translate and adapt it to fit my board, and then load it onto the actual board.
Why not start there! I jumped into Rhino and after a little while I had a wheel that I was pretty happy with.
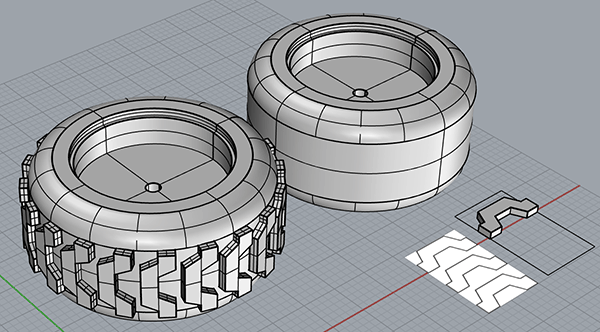
I started with an extruded circle of the desired diameter, which I then filleted around the edges a bit, until I had a shape that I was happy with. For the thickness of the tire I ended up with 15 mm. I found the smooth wheel to be a little bland, so I decided to add some tracks to it. I ended up making a quick track design in Illustrator, and then imported the bitmap into Rhino. I couldn't actually figure out how to automatically trace the lines, so I did it manually and extruded it by 2 mm. I then added an extra curve in the diameter of the wheel around the center, and used an Array Curve on Surface command to duplicate the track and wrap it around the surface of the wheel. It took some tweaking, but I was pretty happy with the result. I exported the wheel as an STL and then sliced it up in Cura. The 3D print was fairly quick and I was pretty happy with the results. Unfortunately, the hole I modeled in the middle was a bit on the small side, but I was able to fit it snugly onto the DC motor, by heating the rod and then pushing the wheel on, widening the hole a slight bit. After that I had an excellent snug fit (although in the picture below you can see that I pushed a bit too hard and broke one of the wheels a slight bit. The 3D model for the rear wheels can be found here.  Having the rear wheels done, I decided to tackle a front wheel as well. I wanted to try something different with this one. Knowing what you can do with 3D printing, I resolved to model a front wheel with seperate parts printed together. Basically, I'd have the wheel and frame printed in one go, and hopefully it would still be able to move. I again jumped into Rhino, and after a few hours I had a model that I thought would work:
 
As you can see, it's vaguely reminiscent of a wheel you'd find on a shopping cart. I sliced up the 3D model in Cura, and threw it at the Ultimaker. After a fairly short print I had my tiny little front wheel.

Breaking the support structure was a cinch, but I was still reluctant to start rotating the wheel. After taking the plunge, and a lot of crackly sounds (more support!) it turned out my devious plan had worked. The wheel spun , and the parts were solid! Since this one was particularly small, I decided to scale it up a bit and print it again. I actually scaled it up a bit too much, but I was happy with the larger size. Unfortunately, I still ended up with the same problem. The top part still doesn't budge. I reckon on the model I just need to create more clearance between the rod and the hole to the cavity.

Turning back to the board I made, two things became apparent to me. The slideswitch wasn't actually working. Regardless of the position of the switch, the board would have power, it did however turn the green LED on and off. The second thing I noticed is that the green LED wasn't actually green, but orange. It was pointed out to me that I should have a look at the datasheet for the LED and figure out how much voltage an LED can take, and at how much mAh it operates. This can then be used to calculate the resistance it needs, and you can then use that value to pick a resistor that matches that closely (always going higher if the exact value isn't available!). To calculate the resistance, I came across Ohm's Law, which dictates: E = IR
E = Voltage (In Volts)
The operating specs for the LED were: The battery I'm using it of course, 9V, so the resistor needs to be able to drop at least 7.2V.
Now we have all the values to calculate the resistance:
R = E / I So the resistor in front of the LED needs to be at least 360 Ohm. The closest I could find was a 470R resistor, so I used that (and of course replaced the LED. I did the same calculation for the other LED on the board, however since this one is behind a regulator, the value for voltage is actually 5V. And for current I used the value of what the ATTiny44 can send out (which is 210mA). Having a nice and bright green LED again, I decided to throw some code at the board. I connected it to my computer through my FabISP and loaded the original code I found onto the board. As I kind of expected, it did nothing at all. I was expecting this particularly because I used different parts and a different ATTiny from the original creator. I then took a while to translate the whole file into English. Translating the comments luckily wasn't going to impact the code at all, and most of the definitions were also easy to change to English for an easier overview (as long as they were consistent across the file). I then went through the code and re-organised the pin references to fit the ATTiny44. With help from the datasheet I also figured out which Analog to Digital Converter channels were in use on the pins I had the phototransistors on. Easily enough, Pin 0 was ADC0 and Pin 1 was ADC1. I had a lot of trouble understanding how to use ADC, but we'll cross that bridge later. With the pin changes, there was still no response from the board, so I paced back a little. I looked up an easy piece of Hello World and adapted it to the board. This Hello World code adresses an LED and has it send out morse code. The morse code would of course be 'Hello World'. All had to do was change the pin set for the LED to the correct one on my board, in this case, Port A pin 7 (PA7). Success! I now had a blinking LED flashing it's lovely light at me in a greeting. This proved to me that the board works and the LED is fine. I then started modifying the code a little bit to start adressing the motors. I added definitions for the motors and tied them to the morse code. The left motor was tied to the Dot and the right motor to a Dash. This also worked, we're making progress! I then took out the morse code and had the code adress the motors exclusively. I programmed it to go through a loop where it runs the Left Motor first, then the Right Motor and then both (to go straight). More success. The motors spun as instructed, and I wanted to see this thing run. I grabbed a few bits of acrylic and double sided tape and put everything together.
Now I was really getting somewhere. Unfortunately the ADC wasn't as easy to figure out for me. The code adressing the ADC was a bit much for me, and I needed to sit down with our local guru to walk through it. It took me a while to understand that outside of the bits in Port A and Port B all the other functions on an ATTiny all have their own registries with bits, and you're addressing that instead of the bits associated with the pins. Another thing we ran into was that nowhere in the code the clock was set for the ATTiny. It can run at 8MHz but has that divided by default. So we set it to divide by 1 and run at 8MHz. Another error we found was actually a silly little mistake that I could've easily spotted. The pins that had the phototransistors attached were never actually activated. So on Port A we set the right bits. Unfortunately at this point I messed up some of the traces on the board, and I ended up having to mill an entirely new one. I was changed some of the parts to be soldered to wires instead of directly onto the board so that I could wire them to the locations I had thought out for them in the enclosure that I'd designed (more on that later). Having a fresh new board, I loaded up the new code, and I immediately had a response. Having the clock set correctly means the code could run properly, so the it went through a short init phase. Programmed in this phase is one phototransistor taking 9 readings as a DC motor spins it a slight bit 9 times, and then using that value to sort of calibrate the device. From there, it starts taking average values in both phototransistors and comparing them to eachother. The motor should steer the device towards brighter light. So if you shine a flashlight into one eye, it should go there. While I did get a positive reaction out of it, it still isn't responding as well as I had hoped. I personally think that might be related to the phototransistors not being strong enough to catch a lot of light, or maybe I just need a brighter flashlight. I also tested in a fairly low light situation, so maybe more light will help. I had even better results by covering the phototransistors with my hand, but of course the effect is kind of backwards.
Having a the code running, I decided to design an enclosure for my board and motors. Since I already have a few wheels, I incorporated those into the design. I've got three wheels, so I started designing with a sort of tricycle buggy in mind.
I did the designing in Illustrator and designed it as a snap fit kit. I then used the laser cutter. Having designed it all for 3mm thick acrylic, as that's what I had on hand, taking into account the offset of the laser to make sure to get a snug fit. I did a couple of test cuts so I was pretty confident everything would fit. Another problem I ended up with, was that the whole enclosure ended up being too heavy for the motors, so it doesn't actually budge. Oh bully!

   
And here are the files that I've created throughout this project. |