Week 14 – [Molding and casting]
Dates worked: [April 22 - 28, 2026]
Time invested: ≈ 49 hours (spread over 7 days)
Quick summary of my week
We began with the group experiments: comparing Smooth-Cast plastics, rubbery silicones, and our own bio-silicone/gelatine. I then moved to a personal food-safe spiral: milling a smiley-face positive in machineable wax on the ShopBot, casting a flexible Agar negative mold, and finally pouring tempered chocolate.
In good tradition, my week was hands-on and occasionally chaotic (wax blocks coming loose, chocolate burning in the microwave, Agar sides cracking) and I actually liked to see how material behaves, the use of a release agent, the whole process.
In the end I had shiny, detailed chocolate smileys and molds that were in between "completely deteriorated - almost ok". But I really liked the subject but promised to keep it simple to spend also time on my final project.
Remark: Although I have added links to subpages .. I have added tabs below to also directly access them
Requirements & objectives
This week's assignment was described on the Fab Academy 2026 NUEVAL page.
Group assignment
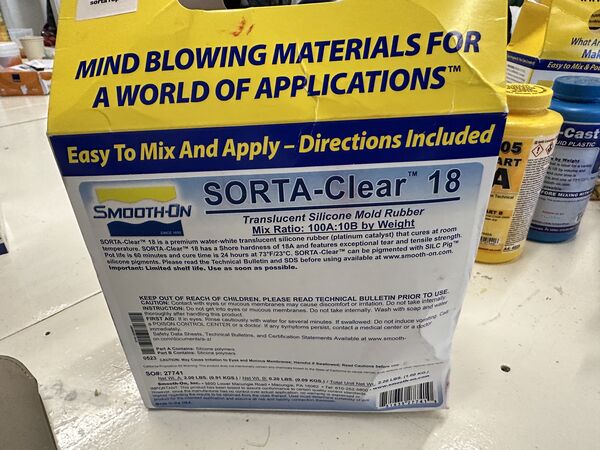
- [x] Reviewed safety data sheet (SDS) for each material (Smooth-Cast 300/305, Mold Star, Sorta-Clear 18)
- [x] Made and compared test casts
- [x] Compared processes (milling wax vs. 3D-printing mold; I used both wax and Agar)
Individual assignment
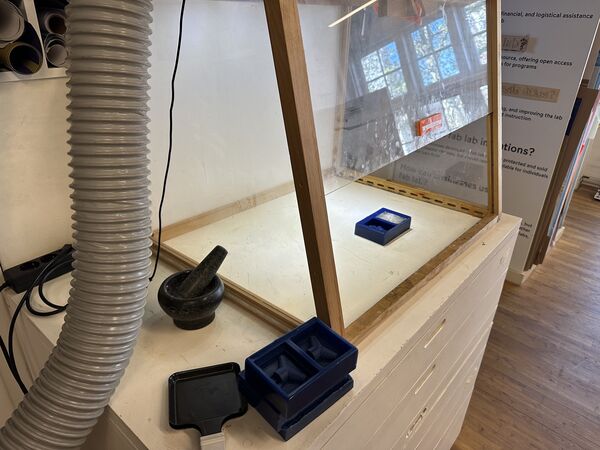
- [x] Designed a 3D mold (Smiley in SolveSpace)
- [x] Produced it with smooth surface (ShopBot + VCarve roughing/finishing + post-processing with wax & sanding)
- [x] Cast parts (chocolate in Agar negative mold)
- [x] Demonstrated full workflow (design, cam, milling, mold, cast)
I'm pretty sure we met all the requirements & objective as a group. My personal input/ reflections are described here.
Learning outcomes demonstrated
Again, as we don't have a group page our work has been described here and on our personal websites:
To help myself and whoever is reviewing me, here is how I addressed the official learning outcomes:
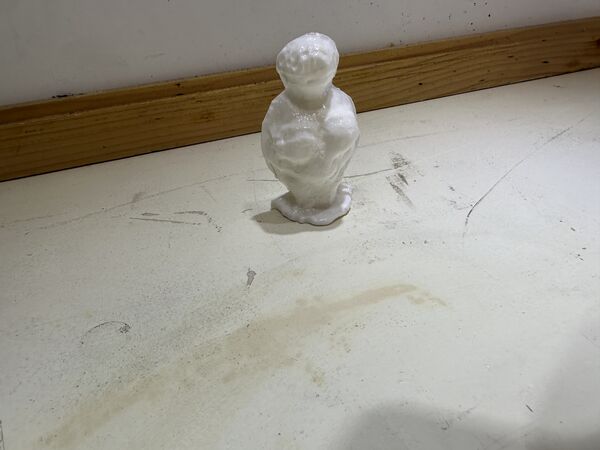
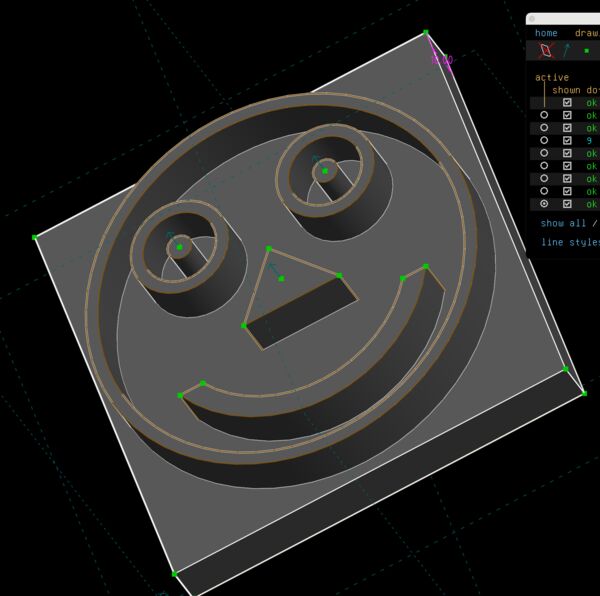
- I choose a simple, positive-relief smiley face in SolveSpace. I deliberately kept the design 2.5D-scale to focus on the process of molding and casting and not go all in on 3D design.
- Choose materials that were safe to produce food/chocolate outcome
- Demonstrated workflows used in mold design, construction and casting:
- CAD (SolveSpace); STL export
- CAM (VCarve Pro: roughing 20 % step-over, finishing 10 % step-over, 5 mm flat end mill)
- CNC milling on ShopBot (wax block)
- Post-processing & repair
- Mold creation (Agar gel)
- Casting (tempered chocolate with release agent)
- Getting the chocolate out of the mold
- Also explored bio-based alternatives (gelatine/silicone) and compared them to industrial Smooth-On materials during the group work.
Based on the midterm review I've written a seperate page. It's like my personal cheat sheet/ check list related to VCarve Pro and the ShopBot to create a 3D design from material
My week – how it actually unfolded
Day 1 - [Wednesday - Regional / Global session]
Started around 07:30.
In the morning I basically updated my documentation.
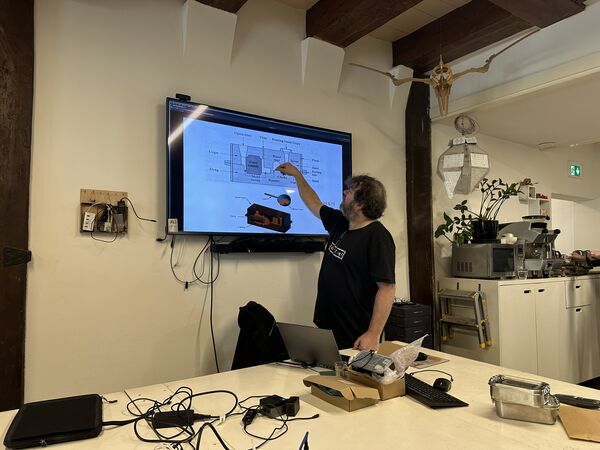
At the FabLab Henk talked briefly with us about the upcoming Molding & Casting week.
Regional session
I didn't wrote down everything that was said but made a short summary of stuff that suprised / stood out to me
Summary
Main topic was status of the midterm reviews.
Henk mentioned that time can be found in the coming week by keeping it simple; time can also be found in interfacing week. Wilcard week has to be something that was not done in other weeks before. So for me that will be making the hull for the RoboDuck using epoxy. As far as my final project, Henk also mentions that working on 3D skills is not the goal; keep spiral design in mind.
Hrach Barseghyan: Worked with his group on a bouncing robot -> his page. He also told us that they have a built-in camera to recognize faces. Hmmm sounds worth looking into.
Global review
Neil goes through all the projects
Some of my take aways (can be used as tips for final project)...
- Very cool ideas
- Good question of Neil: "what does it do?", "are you happy?"
- Neil mentions: "good finish", "wiring", "Beautiful executed" (StringArt machine from Peru)
- There are prizes for: using costumes, most edits p/min
- In the video almost everybody uses labels like
assembly,automation, ... - Teams also show the parts of which the machine was made
Kris from Aalto FabLab mentions "PicoNC is a hackable motor controller board with 4 stepper, 2 level shifted servo outputs and three limit switch inputs. It is good for learning as you can use Arduino or MicroPython libraries to stitch together your firmware and get a better understanding how NC works. https://gitlab.com/kriwkrow/pico-nc"
Global class
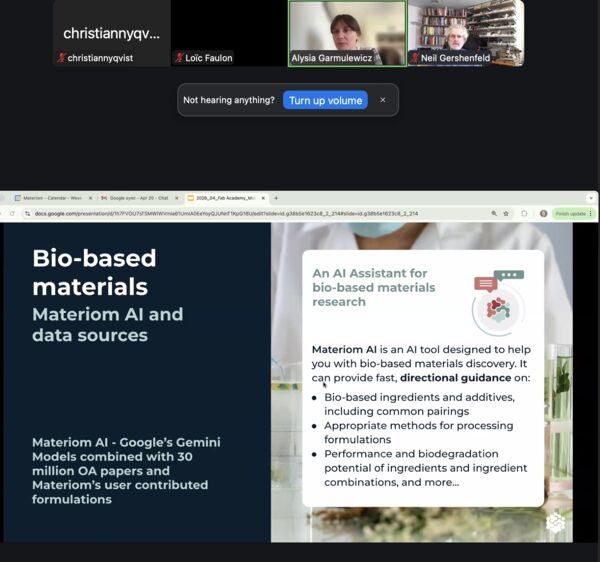
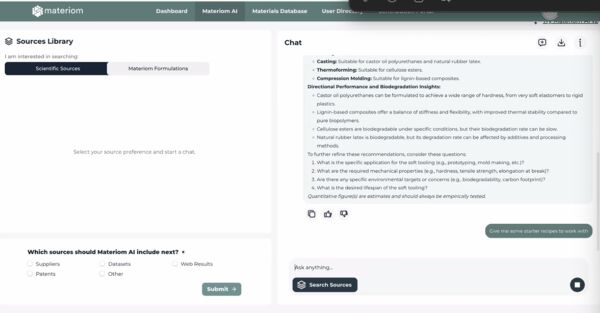
Presenters/ luctors besides Neil there was Alysia Garmulewizc from materiom.org; Pilar Bolumburu (also from materiom.org) was mentioned in the slides.
Take aways:
- Materiom AI is an AI tool designed to help with bio-based material discovery
- Companies are embrasing this more to come up with bio-based packaging
- Soft cast usually means rigid mold; rigid cast a flexible mold
- Bio-based for Alysia is the equivalent of 100% but commercially it can get this label when it's just above 30%
- Mycelium is the root of mushroom; it will grow into the mold and then you can bake it
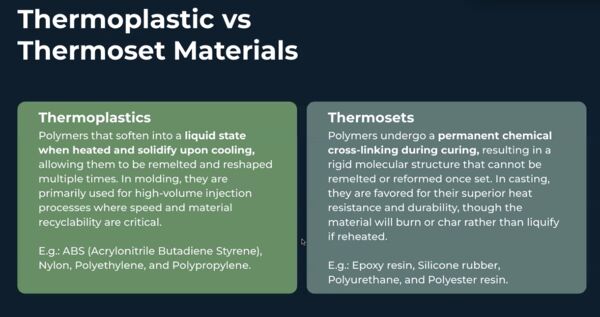
- Thermoplastic: gelatone is a good example
From Neil: https://fabacademy.org/2026/classes/molding_casting/2026_Fab_Academy_Molding_Casting.pdf
Next Alysia gives a short demo of the website materiom.org and the fact that you can ask questions to the AI agent; that's on top of Gemini but looking into their database.
Neil asks for an example "What is a good bio-based mateial for soft tooling". She adds "give me some starter recipies.".
Next up is Saverio Silli. He tells us about the upcoming week.
- a lot of different approaches, materials, ..
- a lot of fun and shows his own final project which was a rotational mold
Neil mentions a screenshot that summarizes nicely what we will do this week!!!
- Foam is cheap and you can use it to make big molds
- Shows website smooth-on.com with a video
- Silicone does not stick to any other material so it's perfect for making molds
- Shows video were 2 components are mixed together first and poured in a corner. Then uses a brush to at least put the cast over the important part of the mold to make sure that its covered; also air bubbles are then gone
- Most of the casting material is exothermic which produces heat. He mixes this in smaller batches because if you mix to much material at the same time it can get super hot and it can't be shaped anymore
- Watch shelf life: how long can you keep your cast material on the shelf?
- READ the datasheet of the material; Safety Datasheet (SDS)
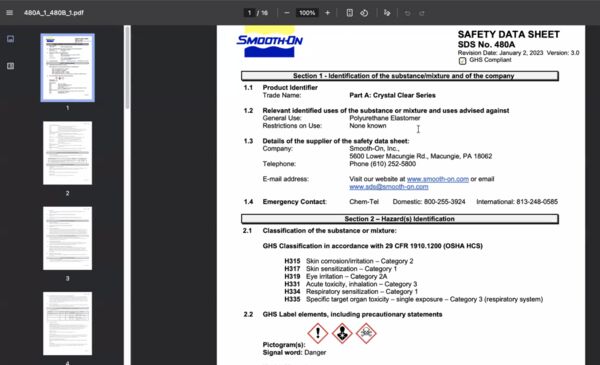
example of a SDS
Adrian Torres takes over.
Note
Neil you can mill or print but we don't want to see the toolpath; so you have to post-process it.
- Shows examples of types of finish; see the link
- With flat end mill you can make a roof structure
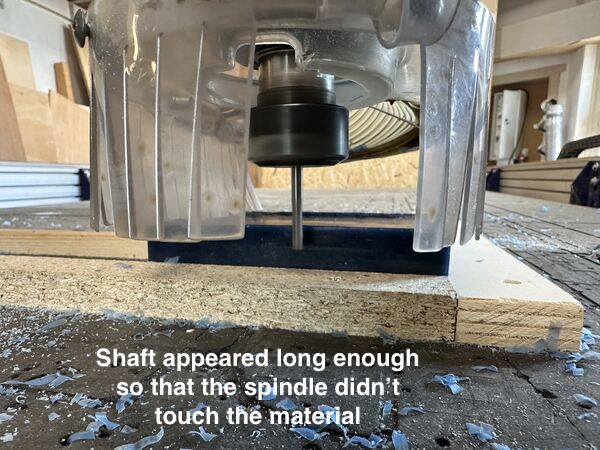
- Warning: watch the height; so your spindle can touch the corners on top

Adrian explains that you have to take the height of your shaft into account with a milling bit. Otherwise the spindle can touch the side of the material where you are milling. SO what you can do is drill a bit, move a bit to the side and mill a bit etc..
- FreeCad there is a part of CAM; video's can be found in the class page
- MODS has a flow as well
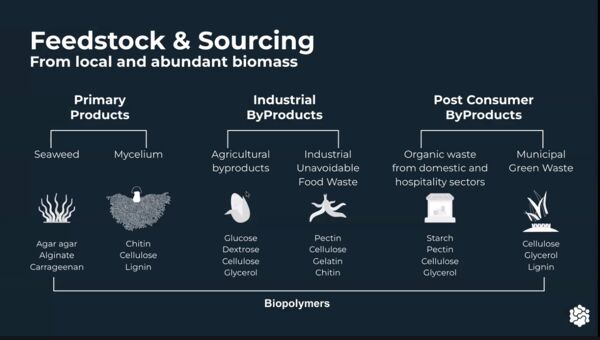
extra credit: make your material from local sources
Neil: once you have the mold you can make many parts
End of day 18:10
In the evening I update documentation based on feedback from Henk
Invested time aroud 10 hours
Day 2 - [Thursday]
Started at home around 0730 and updated documentation from yeserday's class.
Local lecture
Henk prepare a few slides to over yesterday's global lecture
The basic idea is this ...
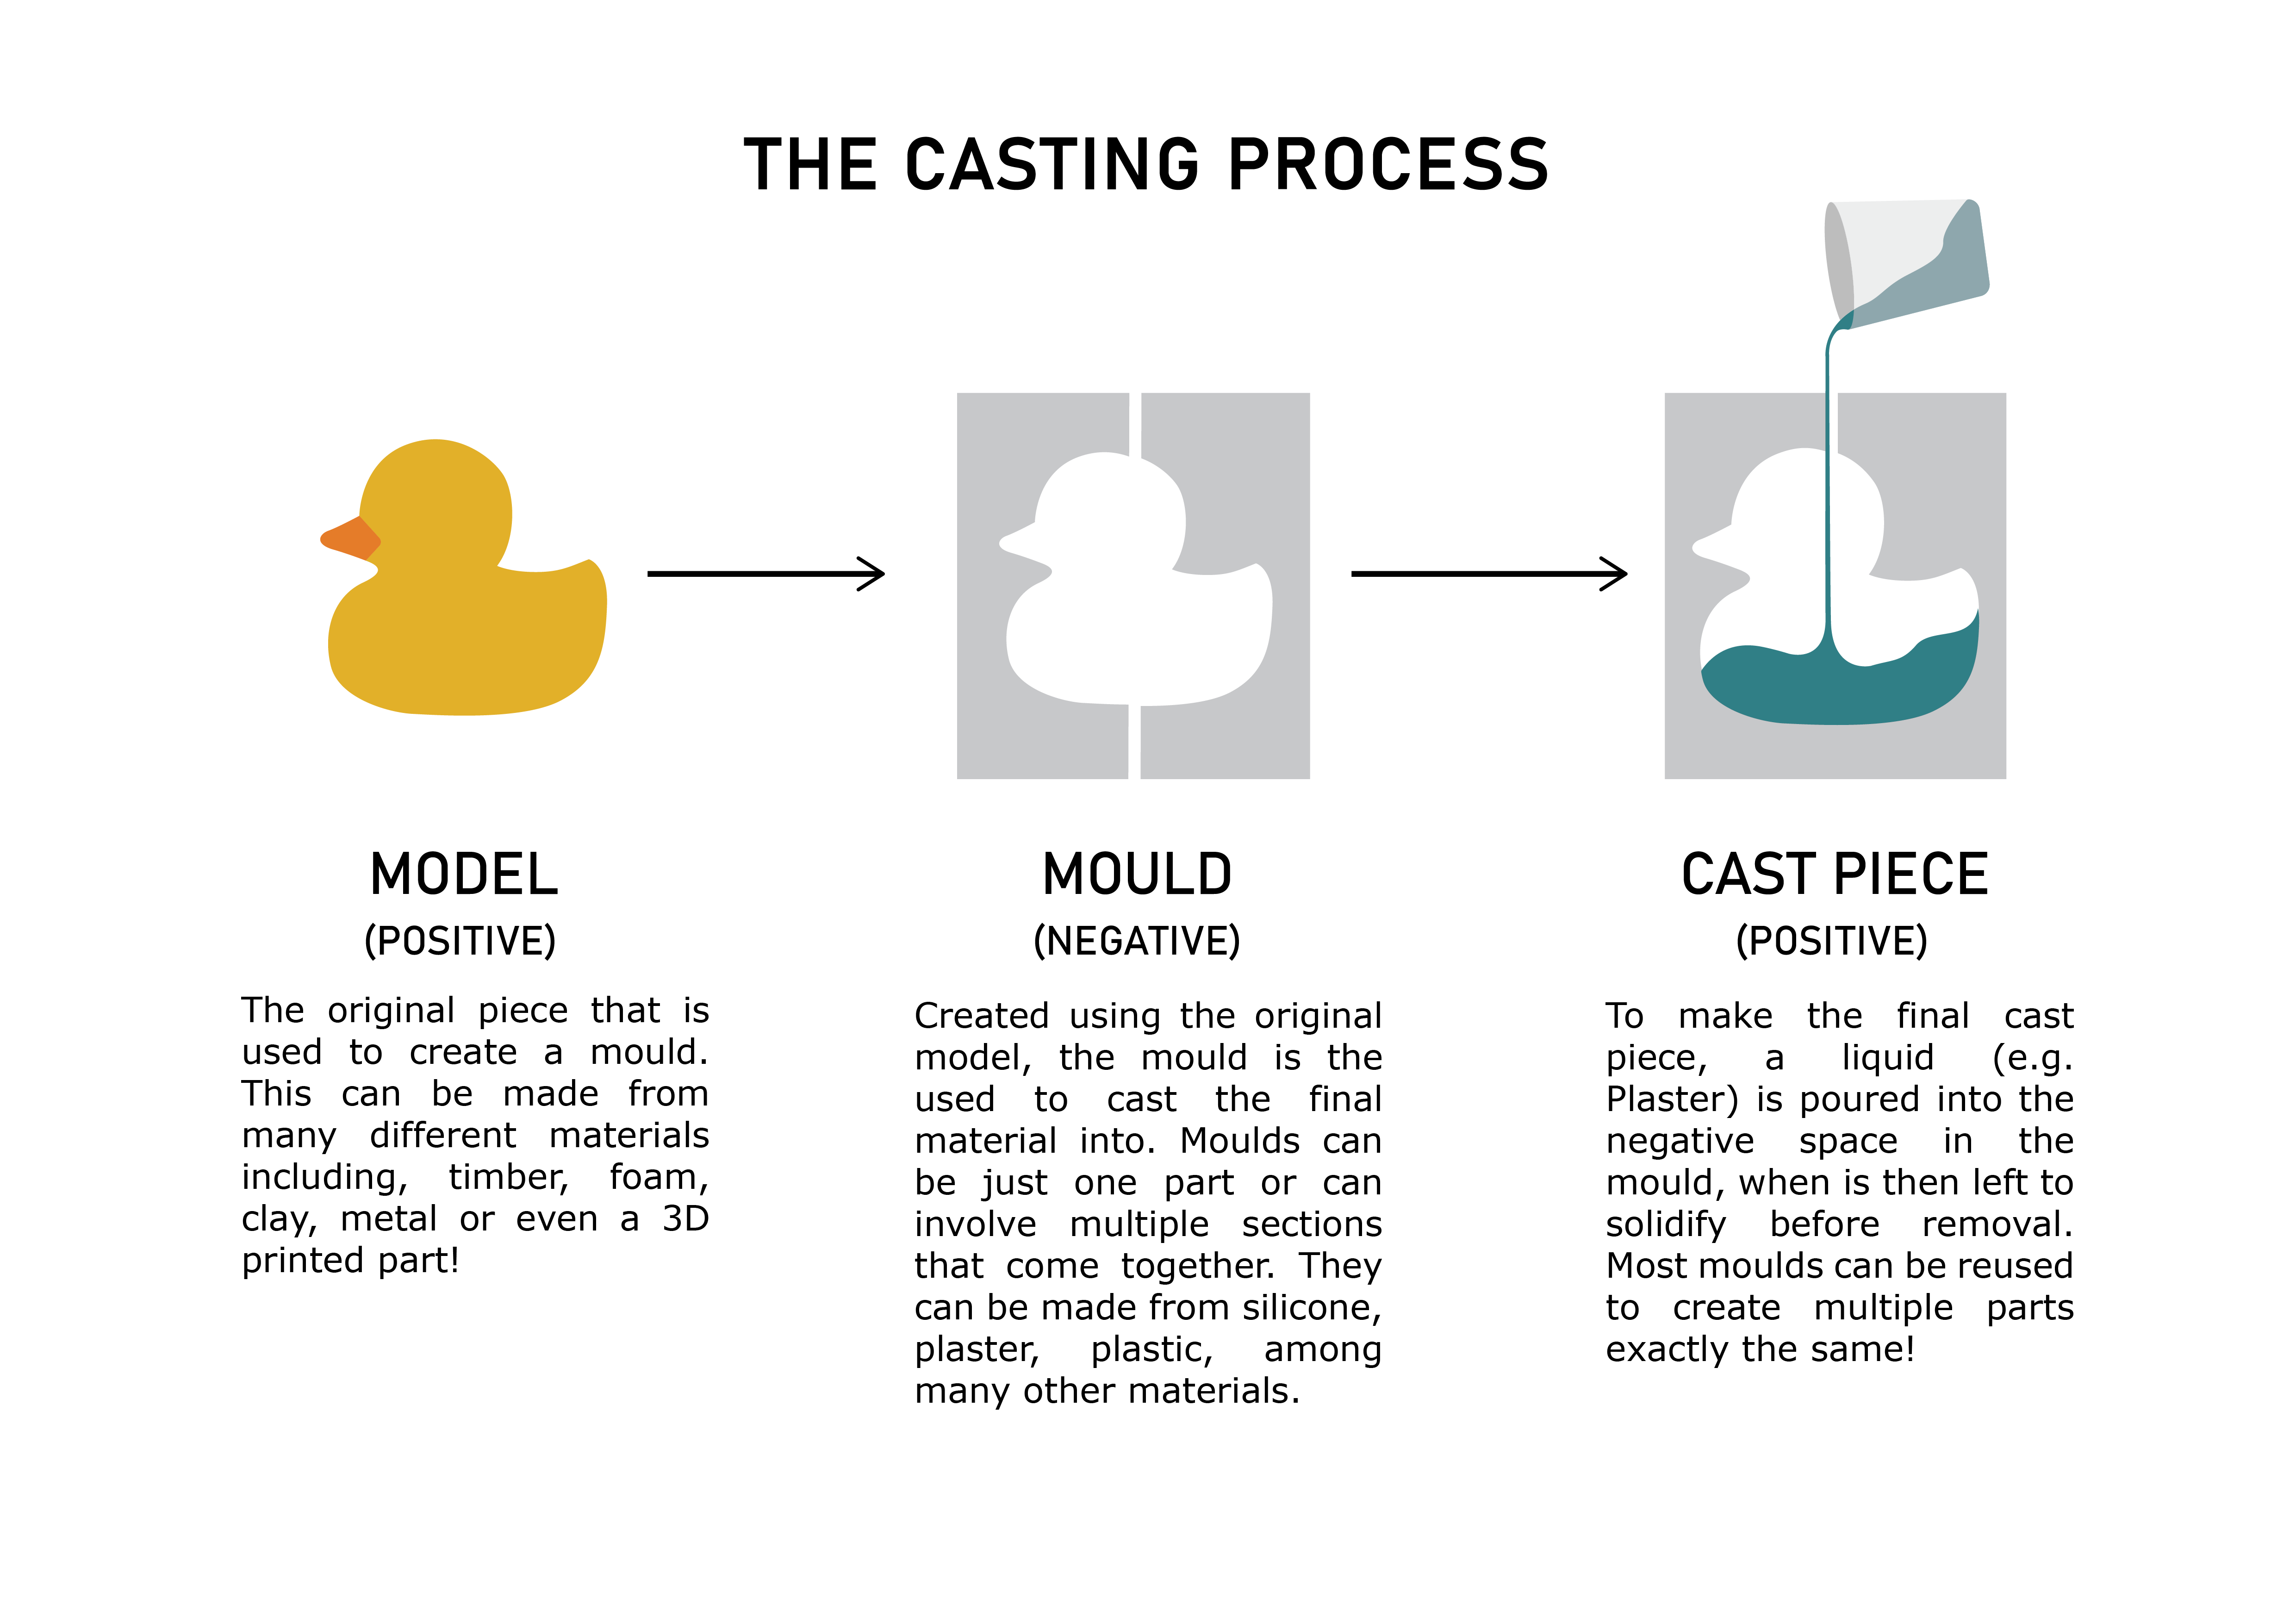
src: https://www.making.unsw.edu.au/learn/casting_moulding_basics/
Which can lead to
src: https://www.making.unsw.edu.au/learn/casting_moulding_basics/
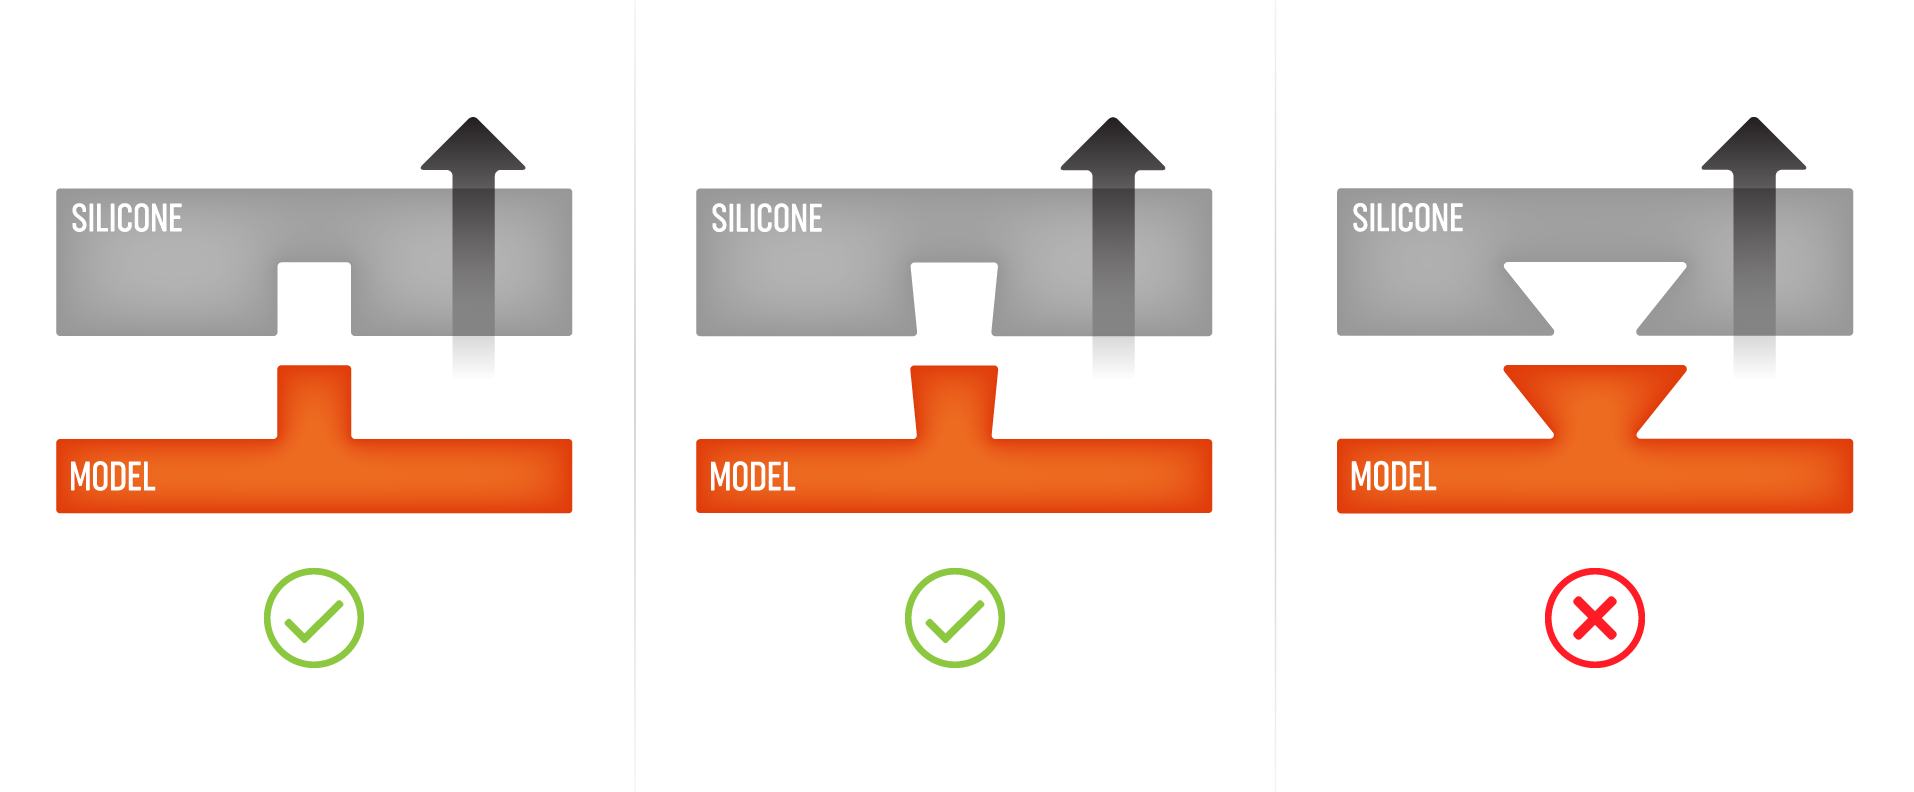
Well in our case, for this week, we have to design an object not use one that already exists
Watch out for undercuts
Important take away is the combination of hard mold - soft casting and vice versa. Why? Well in the end you need to get you object out of the mold without braking it. So flexibility would be nice. This is especially important when you have undercut and/or edged surfaces. I found a nice website that a picture that shows this nicely.
Note
Looking around I found this Youtube video that shows how you can turn a picture into a 3D object and create the mold for it with injection simulation
Get rid of air bubbles
Also beware of ventilation once you have poured in the casting. Henk referred to Dylan's dice. In the picture you see a top part is missing because this was an air bubble that couldn't get out.
Mold registers
picture shows the registers; so the 2 pieces nicely fit on top of eachother
Materials
A mold can be made of many materials and you can combine it with a lot of materials. Choices, choices.
At our FabLab Henk showed a box that contained a lot of options from SmoothOn. A Dutch Amsterdam equivalent supplier is FormX.
example: 2 components that can be mixed by weight or volume create a material.
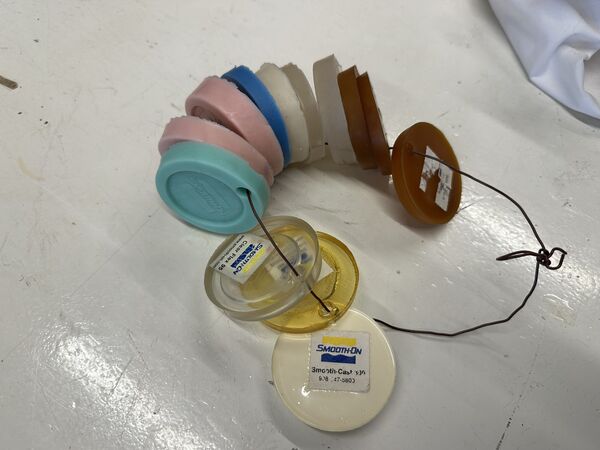
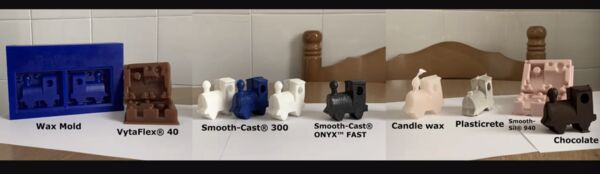
samples of the materials that can be created using Smooth-On
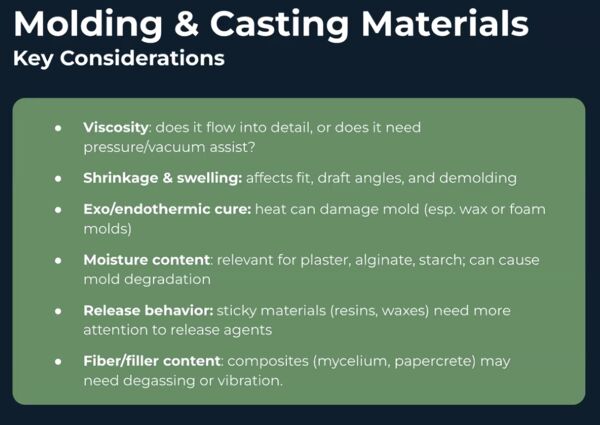
Shore Hardness
As you can see in the figures below, silicone can be used as material to create the mold. Silicone is flexible which helps out with undercuts and it's durable which means it can be used to make thousands of the same thing!
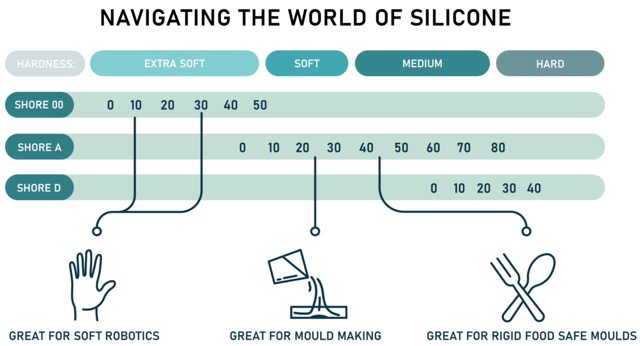
src: https://www.making.unsw.edu.au/learn/casting_moulding_basics/. So it's not an absolute value but relative within it's group.
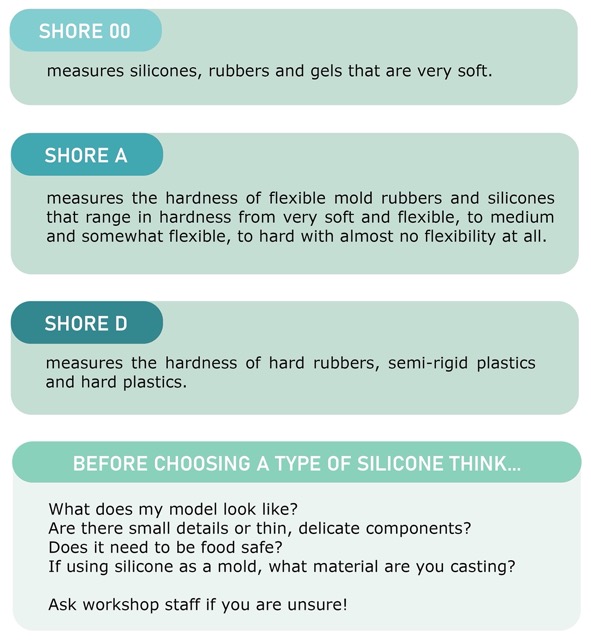
Shore hardness is a measure of resistance a material has to identation
So each material has it's own shore hardness which can be found in the datasheet
Pot life and cure time
Pot life is the limited time a mix of components remains usable before it thickens. This depends on the materials used. Some can be a couple of minutes others can be an hour. After you put the mix into a mold it's take time for the material to reach full mechanical strength; this is called cure time
Safety
Yes please.
In global class Neil referred to SDS which basically means Safety Data Sheet.
A safety data sheet (SDS) is an important document that the US Occupational Safety and Health Administration (OSHA) requires employers to make available to employees for any potentially harmful substances that may be handled in the workplace...
So always read the datashet of the components you are working with. As Heleen found out; it can even be that one component is safe but in California it can cause cancer  . It also mentions if the mixed components can get hot or not. Etc..
Can I eat it?
I would like to make a mold to produce chocolate figures; for instance. The general rule is that the whole process, from creating the materials to create the mold, to create the cast that is used to create the mold from the mold needs to be food safe/ contamination free. Neil also mentioned this is in his global lecture.
Disposal
At first I couldn't find info about what do you do with it AFTERWARDS. But actually the info is somewhat in the datasheet. The distinction is made between still in the cure time phase and once the process is finished. The materials we used can be disposed of as normal waster afterwards. But the components itself, before mixing, it's better to ask the local authority. I would just treet it as chemical waste.
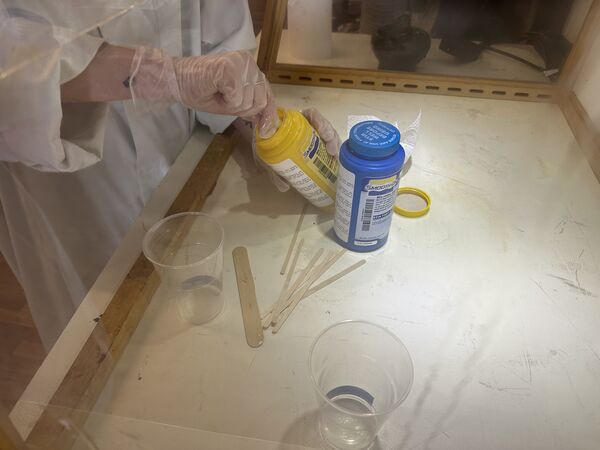
Group assignment (kickoff)
Henk laid out the assignment ... in short Try out different stuff. More detail:
- go through the smooth-on box
- go through the pots with material and interpret the datasheet
- we are not using the one with the
red stickeras this is for pro's only - as a mold use a paper cup of plastic cup
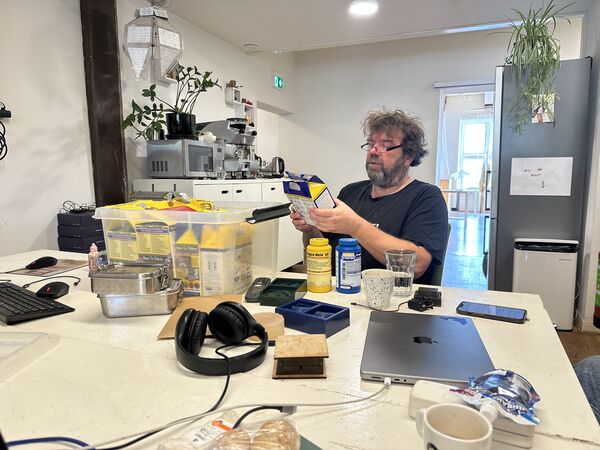
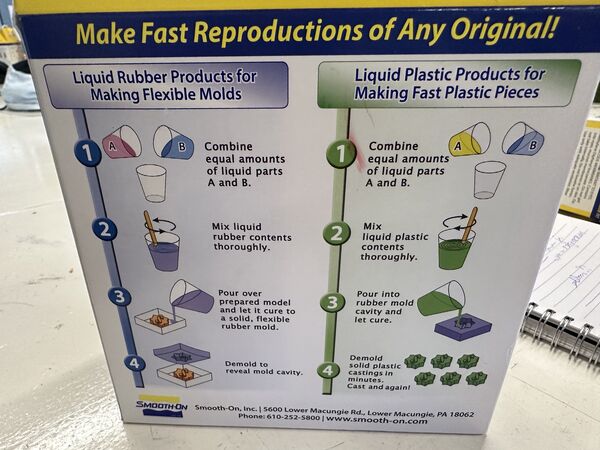
We decide to each took a box and examined it.
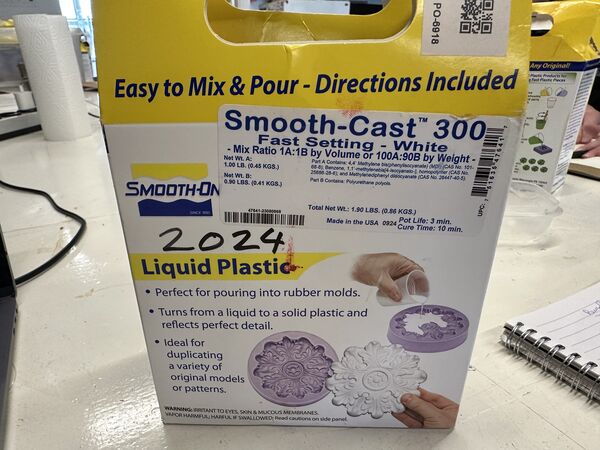
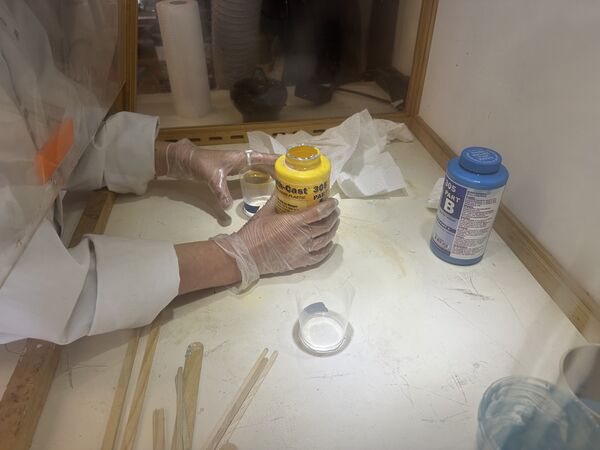
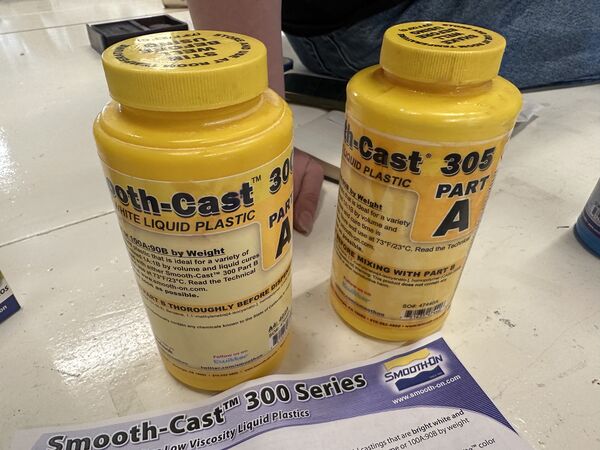
Liquid plastic - SmoothCast 300
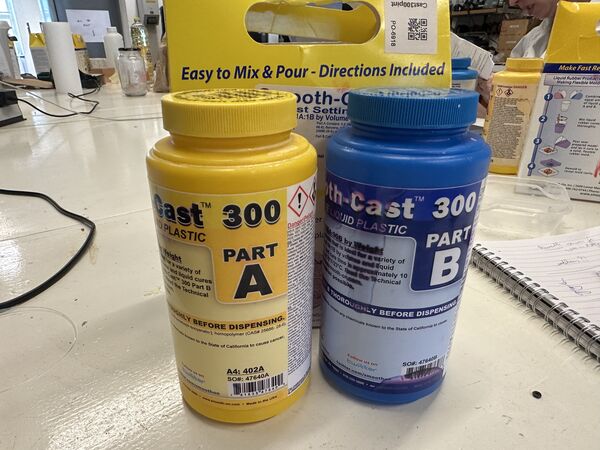
I picked up Liquid plastic
The Smooth-Cast™ 300 Series of liquid plastics are ultra-low viscosity casting resins that yield castings that are bright white and virtually bubble free.
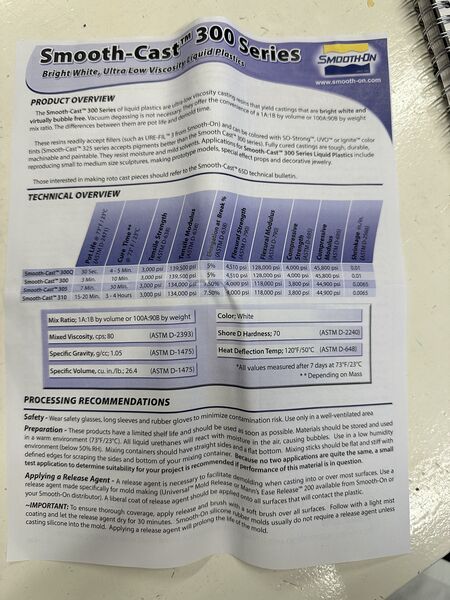
one-page datasheet
some visual instructions on the back on how to process it
What I found/read:
- pot life: 3 min
- cure time: 10 minutes (that's pretty quick)
- mix ratio can be by volume (1-1) or by weight (100A: 90B)
- perfect for pouring into rubber molds
- turns liquid into solid plastic
- for good details
- Heat Deflection Temp (HDT) is 50 degrees Celsius (temperature at which a material begins to soften and deform under a specific load)
- Shore Hardness: 70 D
- IMPORTANT when mixed it heats up around 100 degrees Celsius
- DANGER: contact with skin can cause burns
- DANGER: don't get it in your eyes
- DANGER: can cause alergic reaction in my lungs; so don't breath the fumes
- DANGER: wear eye protection; use in ventilated area
So the full SDS can be found here.
Safety check
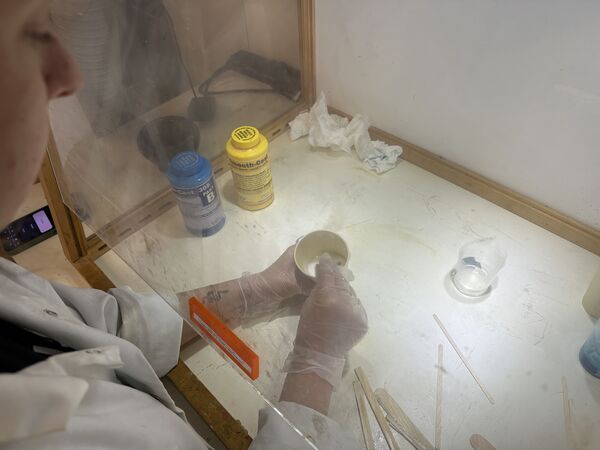
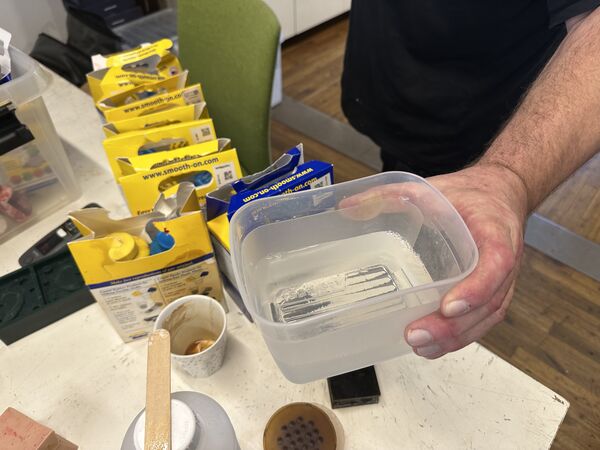
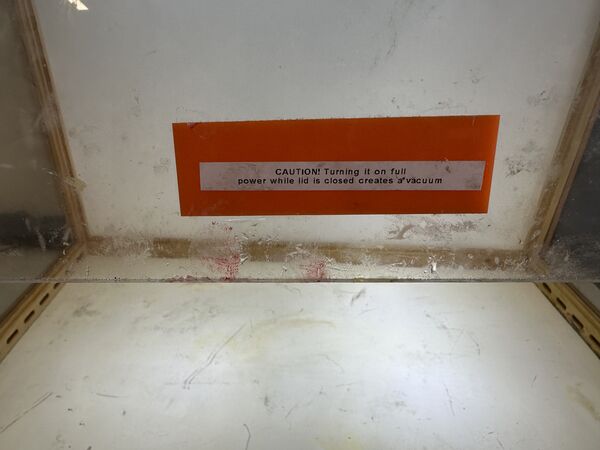
But before we started we did a quick test with the plastic cup (as we will use this as our mold). As mixed materials can get hot can it withstand 100 degrees Celsius?
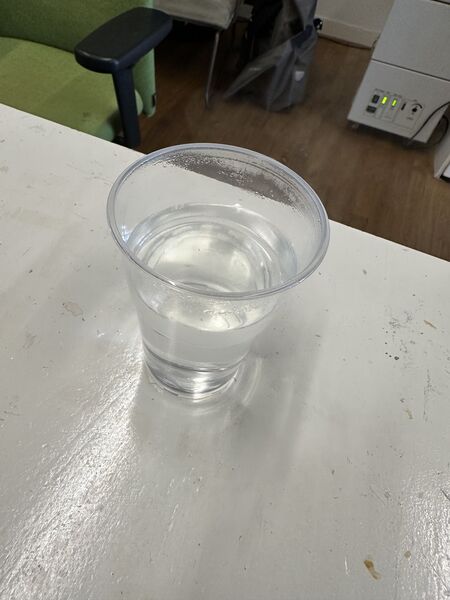
cup with water that was boiled to 100 degrees; so yes it will hold
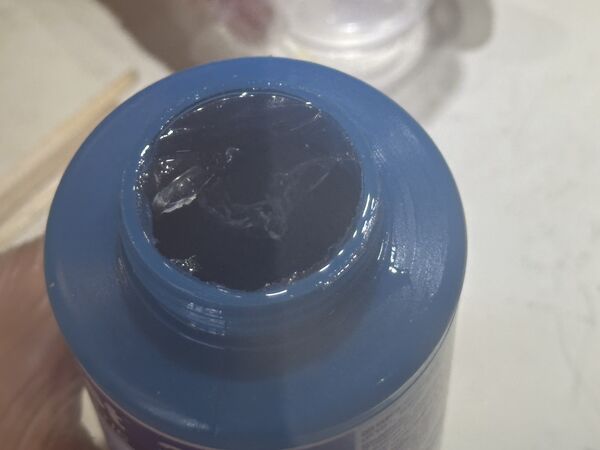
Remco's material
Remco took out a material from the Mold Star series.
Please see Remco's website for more info. While Remco and Heleen were working with the materials I shot the videos.
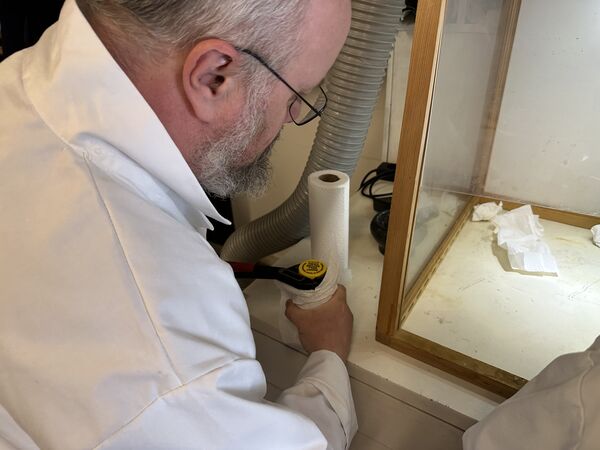
like my material it can cause irritation to the eyes so we processed everything in the extraction unit
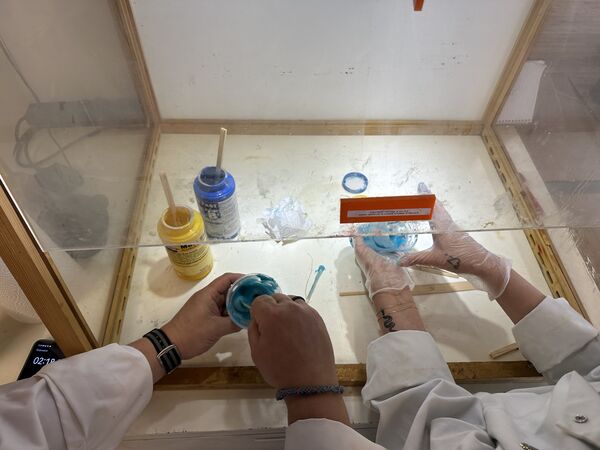
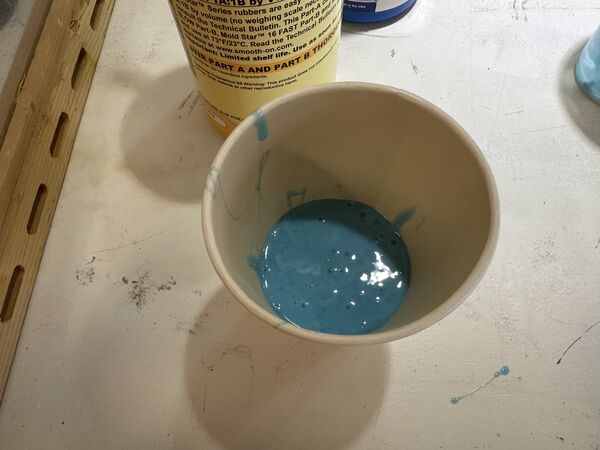
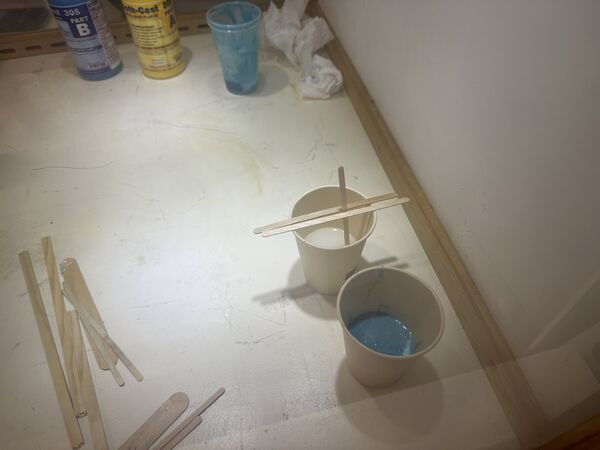
component A
mixing it with component B
pouring the mix into the mold
Remco's material in the mold
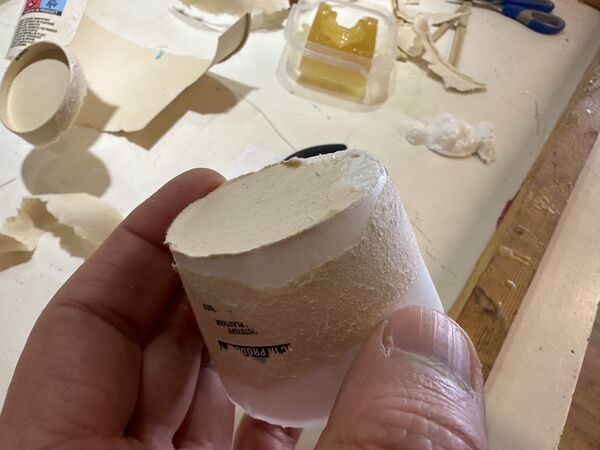
Once the cure time was over ...
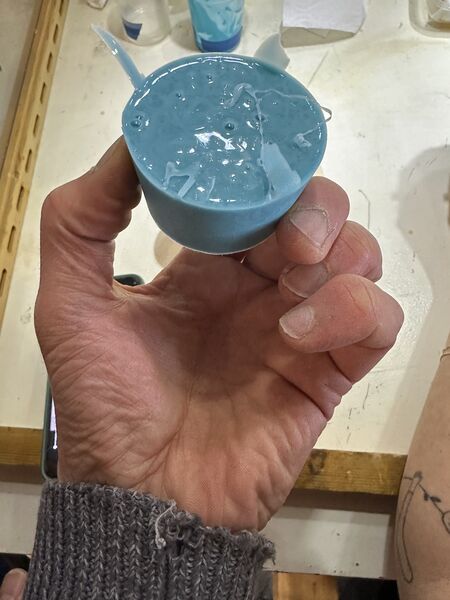
it came out easy
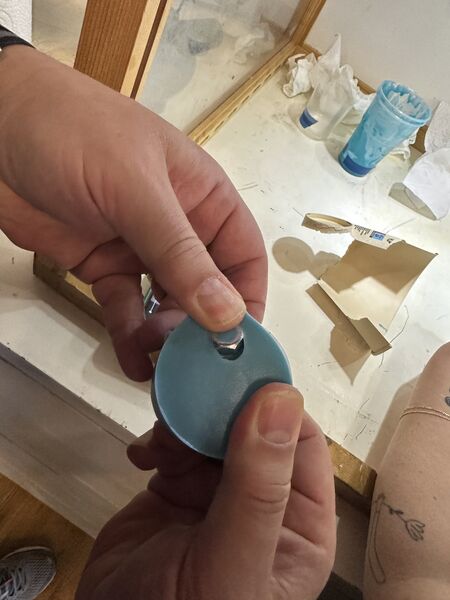
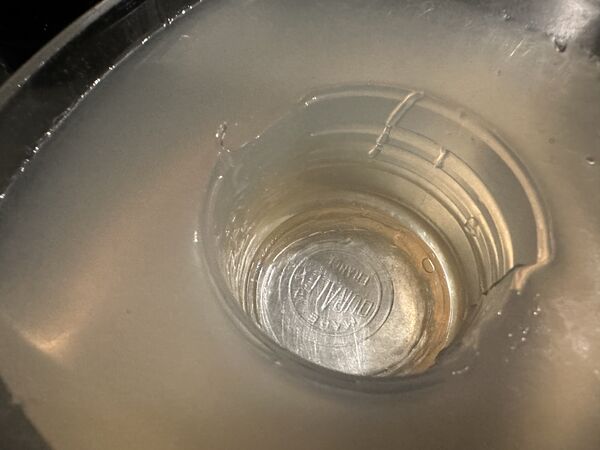
Remco hid a bolt on the bottom of the cup
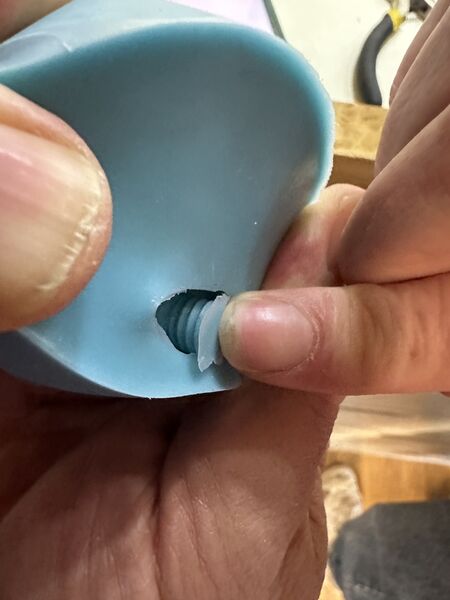
after removing the bolt; yes there are threads!
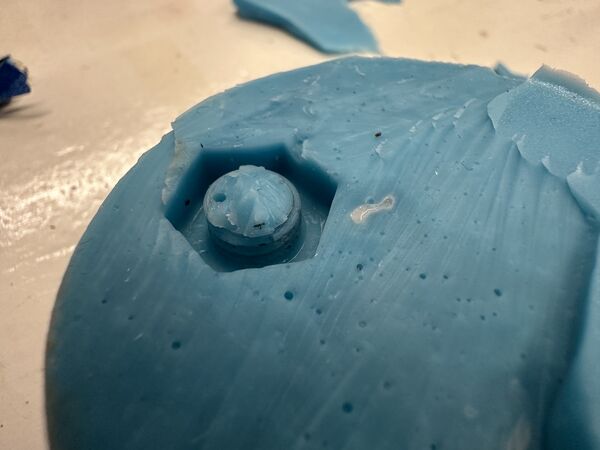
more importantly; it was possible to remove the cast without destroying the threads; nice rubber
it sounds like rubber, is a bit bounsy/ flexible and does not desintegrate when hit
Heleen's material
After we individual inspected our materials it appeared that Heleen also picked up Liquid plastic only she had the 305 version.
Please see Heleen's website for more info. But while we used it for our group assignment I took some pictures and shot some video's.
one of the components had not been used for a while
a small membrame showing after opening
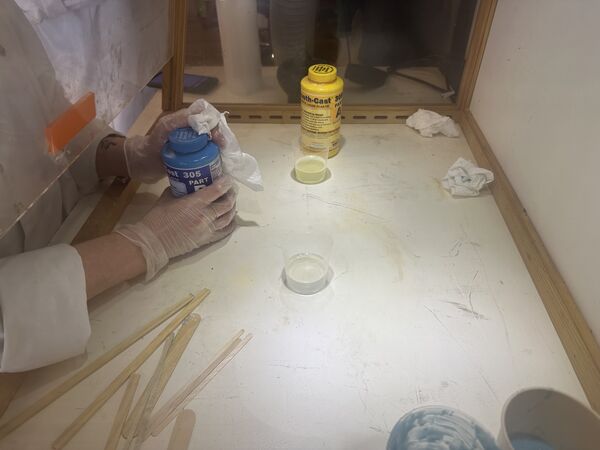
post processing = clean it up before it goes into the box again
yes it's getting white already
a stick with scaffolding to see if it would stick
yes the stick is firmly fixated

hmmm the paper cup is not getting of that easy; means the material inside has interacted with the liquid plastic
result after some trials
very hard and noisy and white indeed
Christian's material
So then mine. But we compared the Smoot-Cast of Heleen with the one I had picked. Her's mentioned almost the same charactwerristiscs as mine; mine had a shorter pot life (3min); her's see datasheet So we decied not to do mine as it would result in the same thing; hard piece of plastc (they shared the same code D 70)
Self-made bio-silicone
General recipe is mix components by VOLUME.
2 parts water
1 part gelatine powder; Then heat it up (for instance in microwave) near boiling point and then add the glycerine.

add glycerine; not shaken but stirred!
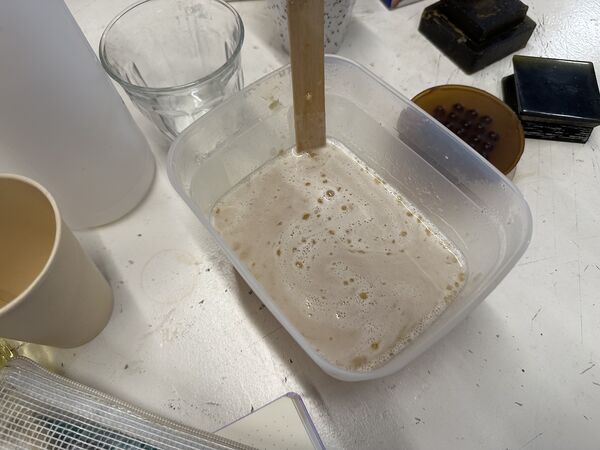
smells a bit funny but it's 100% bio
That's it.
After pouring it into the mold
Just let the silicone cool-off.
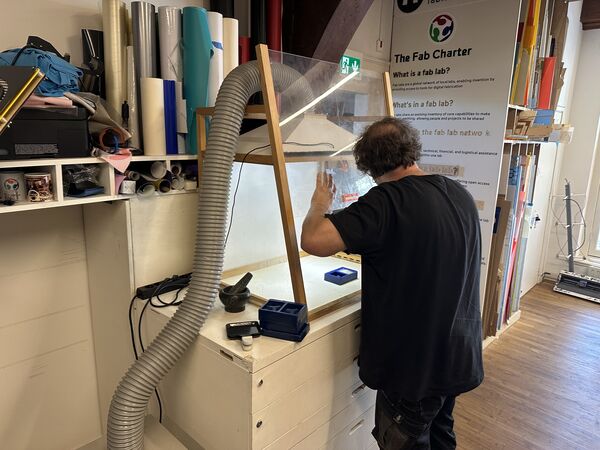
the ventilation/ extraction unit is custom build; window can be set in different positions
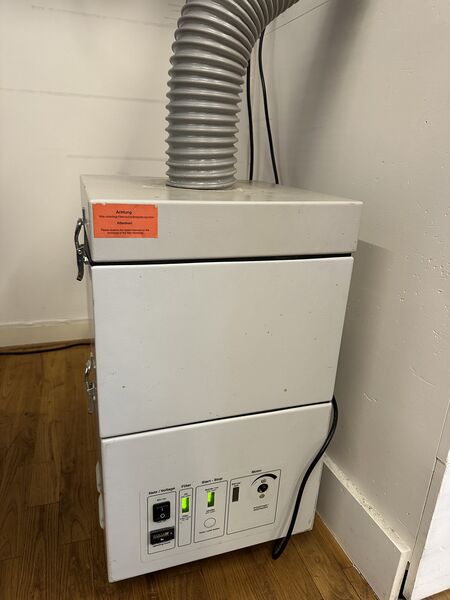
the vented air is puried by this machine that has a HEPA/coal filter
but with this bio-silicone you can also just put in the freezer
we didn't try this
Afterwards Henk showed us how to remove it from the mold

unfortunately it broke of at the bottom; near the feet
but nice thing about bio-silicone is that you can always reuse it; just heat it up and mix it again
Second try. We decided to use sunflower oil as release agent.
And after cooling it came out very nicely
Time to put this mold to good use.
Note
The video shows Heleen pouring in the casting material she had been preparing personally. This is described on her own website. But in short it's a hard white plastic. We had some leftovers and decided to pour that as a cast into the bio-silicone.
before it hardened the white plastic looks like this after pouring
it came out very nicely AND it shows the detail of the bio-silicone mold
As can be read above, we wanted to work with my material but saw no use in duplicating an experiment with the same liquid plastic as Heleen's only to work faster and see it hardening faster. Waste of material. So we decided to use something else from the box as casting material
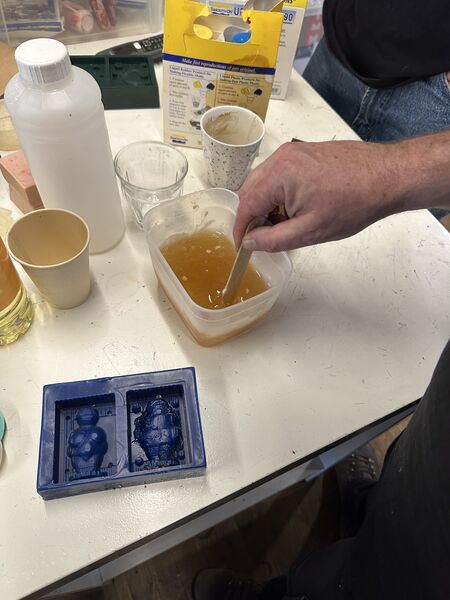
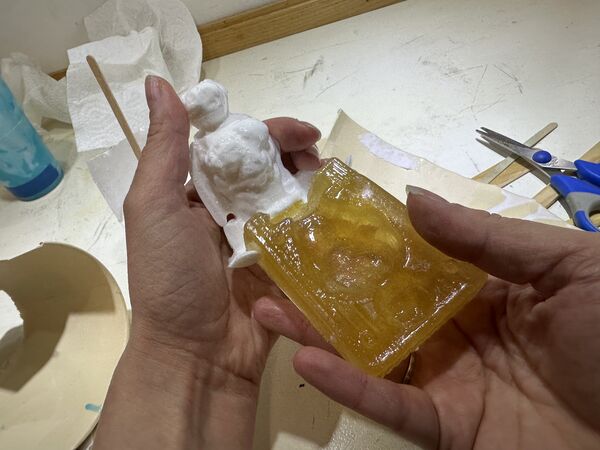
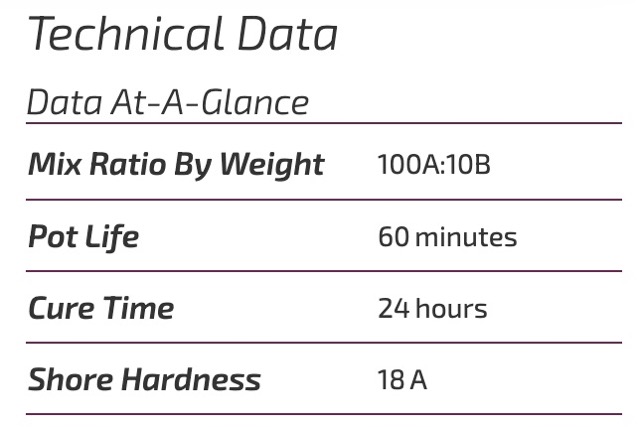
Final experiment ... using a non-bio-based silicone called Sorta-Clear. According to the datasheet:
- pot life: 60 minutes
- cure time: 24 hours
- shore hardness 18A (so different category than the liquid plastics)
- ratio is 100A and 10B !!!!! so not 1 on 1 BY WEIGHT!!!
According to their website SORTA Clear™ 18 silicone rubber is FOOD SAFE and can be used for culinary applications including casting chocolate and other confections. SORTA-Clear™ 18 is also skin safe and certified by an independent laboratory.
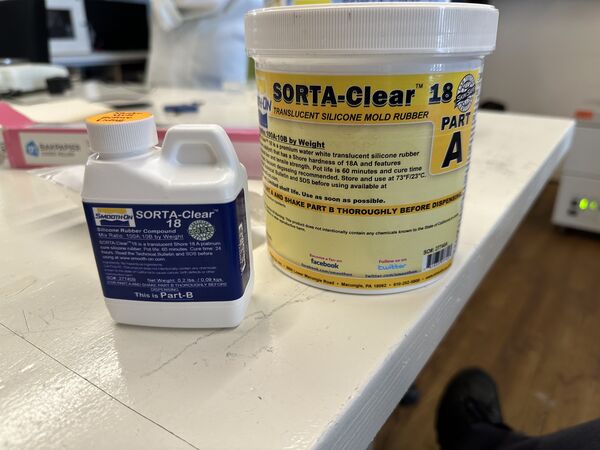
2 components to be mixed by WEIGHT (nice ). The smaller bottle is very liquid and is called part B.
So checking the datasheet we found that we should use 1 unit of weight for component B and 10 times that for component A. For example 3 grams of component B (small bottle) would have to be mixed with 30 grams of component A. Also rechecked that it was safe to work with. No big alarm bells here.
Other info about MEASURING & MIXING ...
Before you begin, pre-mix Part B thoroughly. After dispensing the required amounts of Parts A and B into mixing container, mix thoroughly for 3 minutes making sure that you scrape the sides and bottom of the mixing container several times. After mixing parts A and B, vacuum degassing is recommended to eliminate any entrapped air in liquid rubber. Your vacuum pump must pull a minimum of 29 inches of mercury (or 1 Bar / 100 KPa). Leave enough room in container for material expansion. Vacuum material until it rises, breaks and falls. Vacuum for 1 minute after material falls.
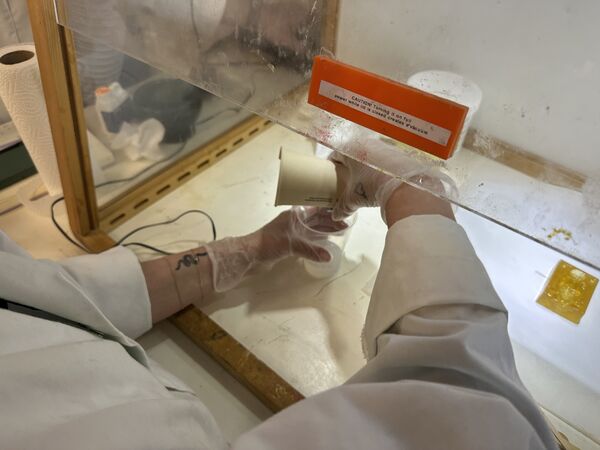
And what about safety? Well both components A and B should not swallowed or dropped into your eyes. But nothing about getting burned or getting blind. It can all be washed away with water. It can even be handled without special ventilation but of course we'll process it inside the extraction unit.
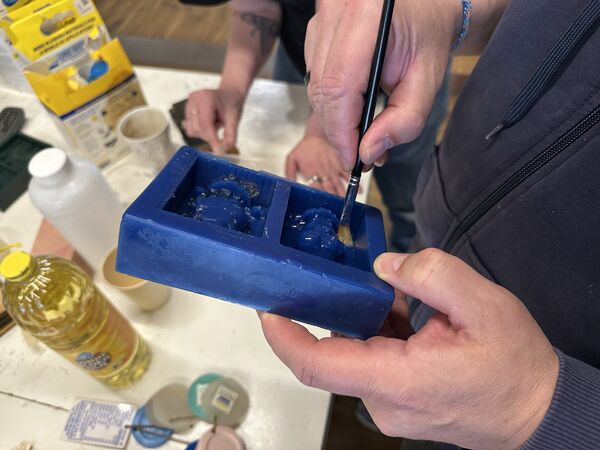
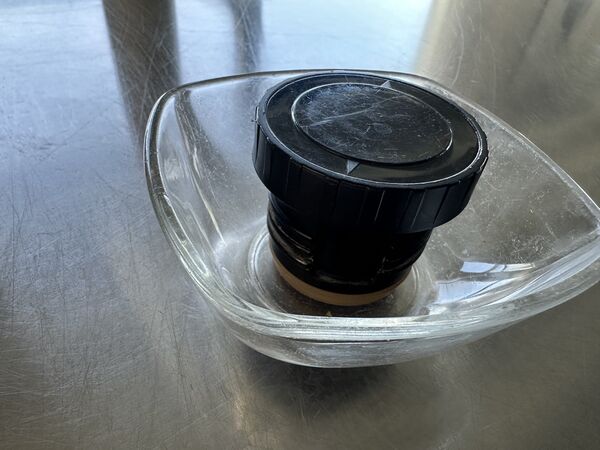
But first we need a new mold ...
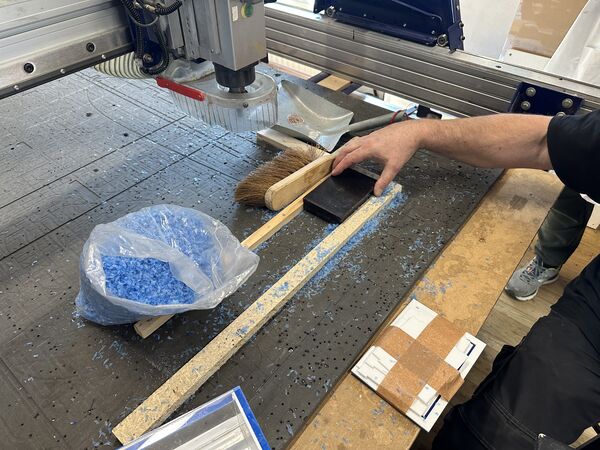
Remco heats it up in the microwave. We used short pulses of 30 seconds and checked in between if it was getting liquid again. Overall that took around max 1 minute.
less oil this time
getting it out
nice; not that shiny as the 2nd try
Let's go
Henk gave us a micro-scale
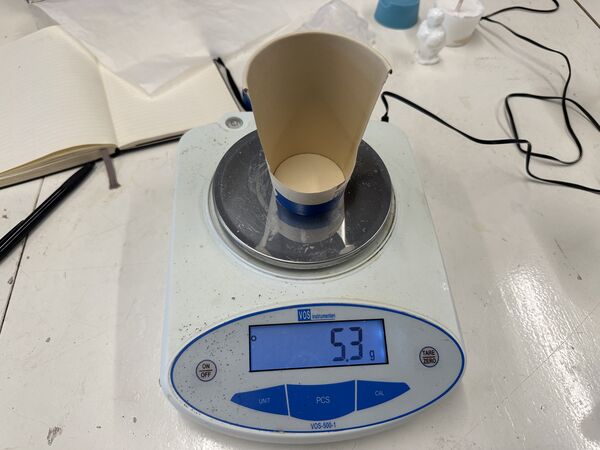
the cup weighs 5.3 grams; we then zero-ed = tare-ed the scale
so we poured in 4.7 grams of component B. This time we are not going to use that much and this way it's easier to get the component out of the cup
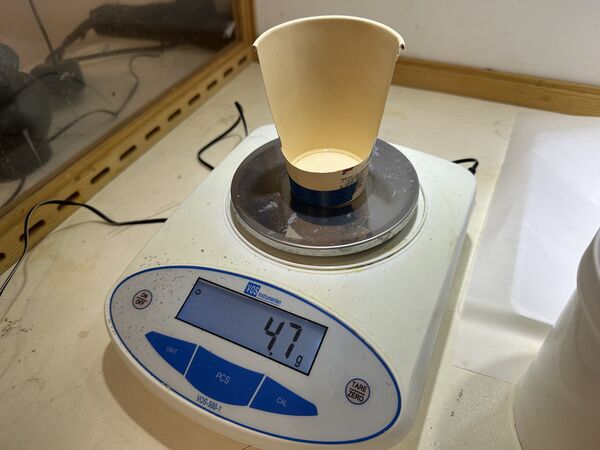
we put aounnd 47 grams of component A in another plastic cup and added the component B
See the video's for the process
getting around 47 grams of component A
pouring it into the mold
Ok so we had some time to weigh and mix and pour (60 minutes) because of the characteristics of this material
Now we have to wait at least 24 hours before we can see the result.
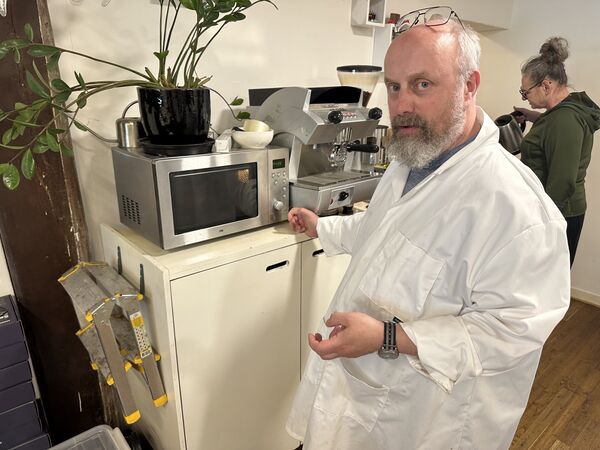
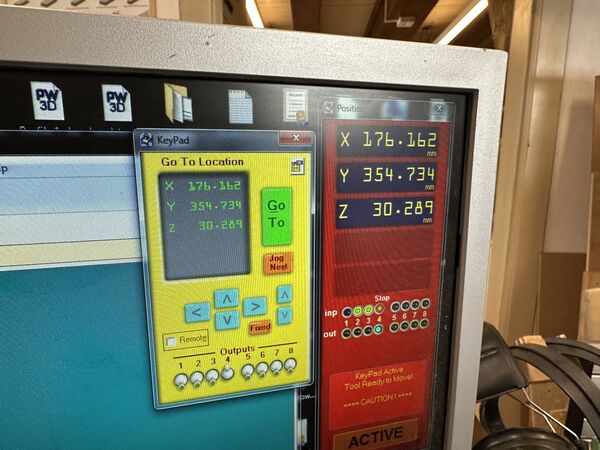
Demo VCARVE PRO - 3D
Henks explains how to mill a 3D design on the Shopbot. Henk created blocks of machineable wax for us. Big plus of this material is that it can complete be reused.
size/volume of the blocks differ, but it should be possible to fixate them inside the wooden structure.
I/we did not try this ourselves yet, the procedure below is based on notes
The process for importing and milling a 3D STL file involves the following steps:
Physically on the bed
- Measure the block
- Make sure the flattest part is up (that's where you want to mill to get the best results)
- Fixate the block on the bed
Start-up
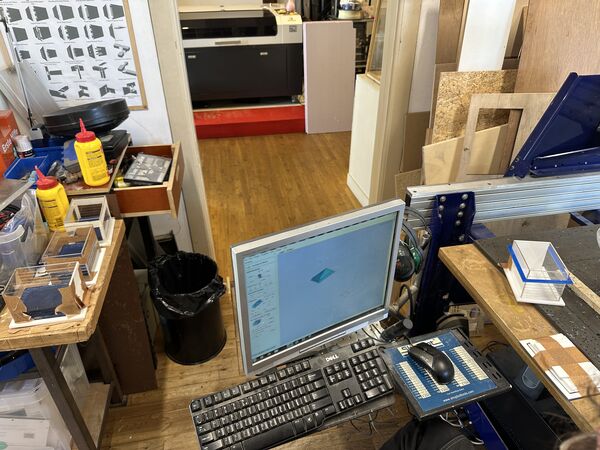
- Open VCarve Pro
- Start a new project
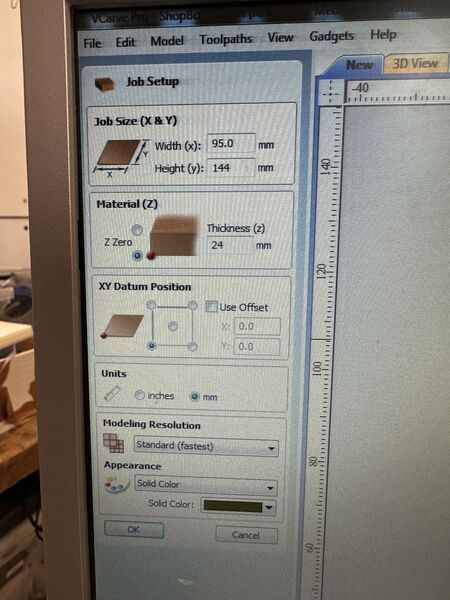
- Set the XY-size and height of the workspace (based on the block of course) in mm
- Import your 3D/STL file into VCarve Pro
- (Optional) Rotate the model to ensure it has the correct orientation relative to the material
- Scale the model to fit the material (represented as the red border in the software)
- Center the model within the workspace.
- Position the model's depth within the material. It is recommended to lift the model slightly so that the machine does not spend time milling off the entire top surface of the material, which saves significant time.
Creating 3D toolpaths
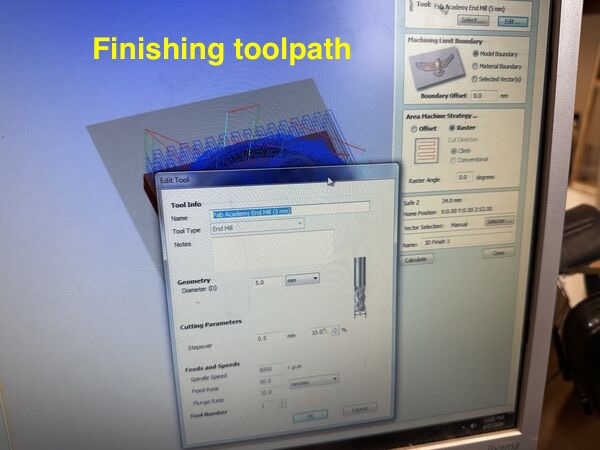
Milling the 3D object is typically done in two distinct stages. First you roughly mill to remove the bulk of the material as quickly as possible. Then create the final detailed surface. For this there are two different toolpaths in the list of toolpaths: roughing toolpath and finishing toolpath.
For the roughing toolpath:
- Set the machining limit boundaries to "Model Boundary". And use
- Use a large step-over (20%) to clear material fast.
For the finishing toolpath:
- Select the bit. While ball-nose bits are common for 3D work, a flat-end mill may be preferred for models with flat areas to avoid the "lines" or ridges that a ball-nose bit leaves behind.
- Use a much smaller step-over (10%) for a smooth finish.
- Set the strategy: choose between "Offset" or "Raster" to determine the path the bit takes.
Finally:
- Calculate what the machine has to do
- Do a 3D dry-run first
Machine calibration and setup
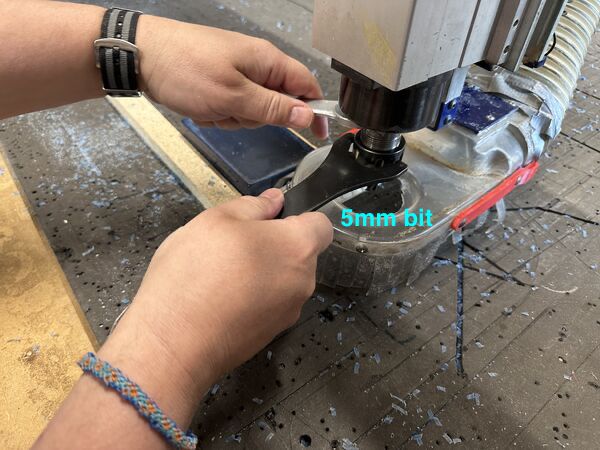
- Check the milling bit. Yes we use the 5mm but always measure how far the bit sticks out from the collet to ensure the machine head won't crash through the material/ into the sacrifical layer when milling at the model's deepest point.
- Turn the ShopBot on
- Set the home position (0,0) to the right below corner (so facing the bed it's on your lower right). Make sure the center of the diameter of the milling bit is on that (0,0) position
- Don't forget to make a photo!
- Zero the Z-axis on the bed = sacrifical layer using the steel plate that sits beside the spindle
- Turn on the spindle
- Don't forget adjust the spindle speed manually; lower than milling wood
Execution and monitoring
- DO NOT TURN ON THE EXTRACTION/VENTILATION as you want to collect the chips for reuse later (and you don't want to mix wood with wax). After it's finished you collect the chips
- Run the roughing toolpath first, followed by the finishing toolpath.
- Never leave the machine while it is running. Again keep your hand near the space bar for the first few minutes to pause the job if anything looks unexpected.
Day ended around 16:00
Time invested: 7 hours
Day 3 - [Friday]
Started around 13:15 ... documenting yesterday. That took until dinner and still not finished.
Time invested around 5 hours
Day 4 - [Saturday]
Started again around 13:15 and finished documenting the last part of Thursday.
My personal assignment
My idea is still to end up with chocolate that was used as casting material. Chocolate is yummy and I think it's going to be fun to make foodie like stuff. And I promised myself (and Henk) that I will keep it really simple as I want to work on my final project as well. Don't get me wrong, I like this subject more than I thought I would, but I'll keep it to 2D.
I all goes well I'll end up with a mold to create smiley face(s) using melted chocolate
But remembering it's about food I need a mold in which I can pour melted chocolate and that does not interact with the chocolate or at least it's not dangerous for me as a human being. I think that directly pouring the chocolate into the machineable wax is not a good idea.
Henk posted pictures on MatterMost and refered to it as machineable wax (I'm assuming it's no bio-based material)
So I could make a mold in 2D that I use to make a mold of a bio-based material which I then use to pour in melted chocolate?
Materiom.org
I signed up and asked Materiom.org a couple of questions
I started with I have a block of machineable wax that I want to use to make a mold, to use that to make a mold of bio-based material that I can then use to pour in melted chocolate to end up with chocolate figures.
This let to some ideas using PLA but I'm going to mill, not print. Then it switched to using Agar as the material to pour in the machined wax to create my mold. A bit further it suggested biodegradable materials like lipids, proteins, polysaccharides, agricultural waste, and polyesters. I then asked it how I could make it myself but honsestly .. one source I looked into was, for me, a bit compllex to comprehend. Well it contained a lot of info but nowhere a recipe was found.
Maybe Agar is an option? Sounds like stuff I can buy somewhere?
On Wikipedia I found that
Agar (/ˈeɪɡɑːr/ or /ˈɑːɡər/), or agar-agar, is a jelly-like substance consisting of polysaccharides obtained from the cell walls of some species of red algae, primarily from the Gracilaria genus (Irish moss, ogonori) and the Gelidiaceae family (tengusa). Agar has been used as an ingredient in desserts throughout Asia and also as a solid substrate to contain culture media for microbiological work. Agar can be used as a laxative; an appetite suppressant; a vegan substitute for gelatin; a thickener for soups; in fruit preserves, ice cream, and other desserts; as a clarifying agent in brewing; and for sizing paper and fabrics. Agar exhibits a phenomenon known as hysteresis whereby, when mixed with water, it solidifies and forms a gel below about 32–42 °C (305–315 K; 90–108 °F), which is called the gel point, and melts above 85 °C (358 K; 185 °F), which is the melting point. Hysteresis is the property of having a difference between the gel point and melting point temperatures. This property lends a suitable balance between easy melting and good gel stability at relatively high temperatures
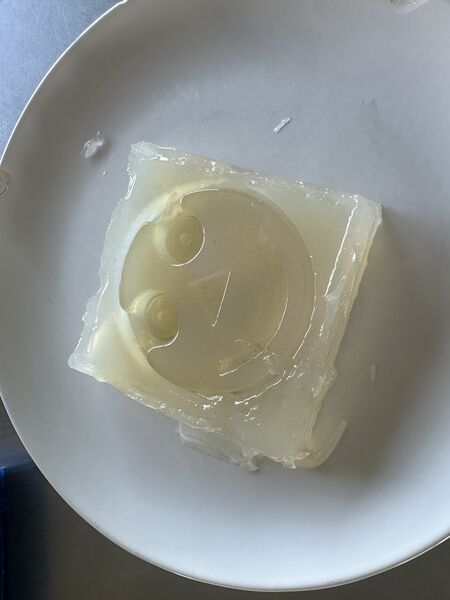
Ok now I understand why it came up with Agar for my mold. It is will not fall apart when I pour in chocolate of around 30 degrees Celsius.
But it's also used a substitute for gelatine; which is confirmed by another foodie website; but they also say that Agar has a far greater binding force than gelating.
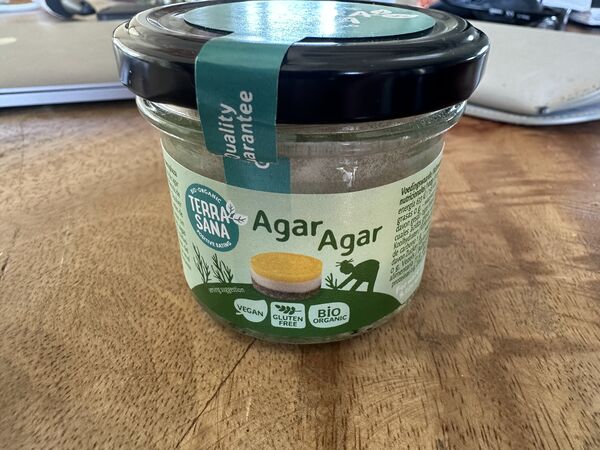
As we have gelatine in stock I bought some AgarAgar at a local nature shop.
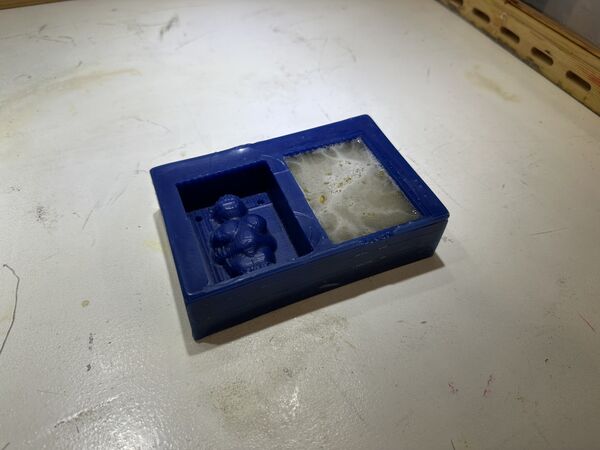
So tonight I'll try it out with some other material to create a sample mold and throw in some melted chocolate. For now let's design a 3D smiley.
the website also warns that in time the binding force will decrease; after a few days it will become waterly(?). And acid ingredients are not it's friend; they brake the sugar chains which cause it to fall apart.
For now I can live with a few days.
Creating a smiley
As always start with paper first (or digital paper).
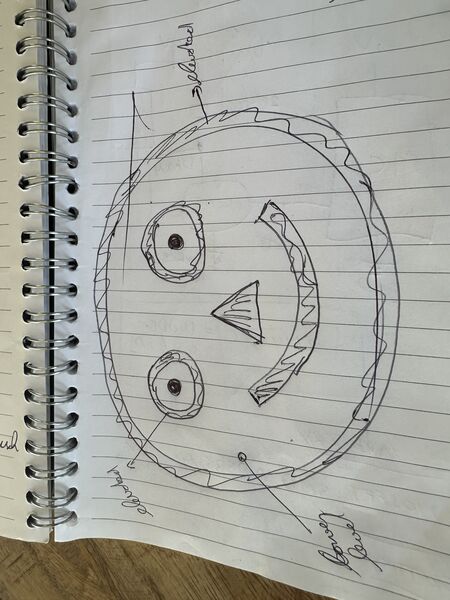
Fiddling around in SolveSpace
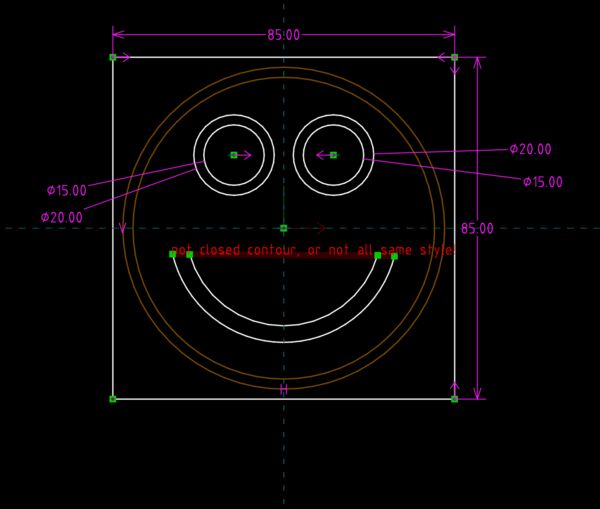
I then discovered some minor mistakes and after fixing this is the smiley I want
Ok sanity check ...
As this is a positive 3D design (the face sticks up), my final chocolate face will also be positive:
- I mill the wax just like that from top to bottomm; the face will be raised.
- Then I'll use that to create a mold from Agar that will be negative (the face will be "carved out" (indented) into the block)
- The chocolate will then fill the "carved out" parts, resulting in a raised smiley face that looks exactly like my 3D model.
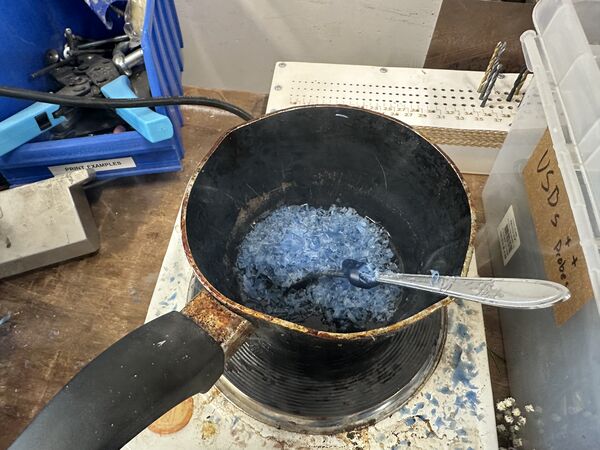
Agar, agar, agar
Time to create a mold from Agar
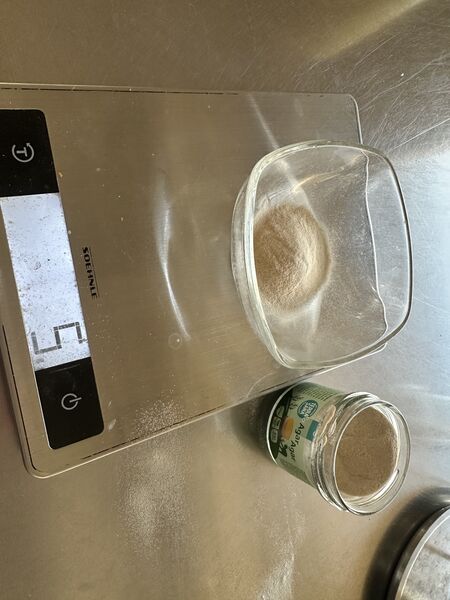
according to the recipe 1 - 4 grams is enhough; I want a stiffer mold
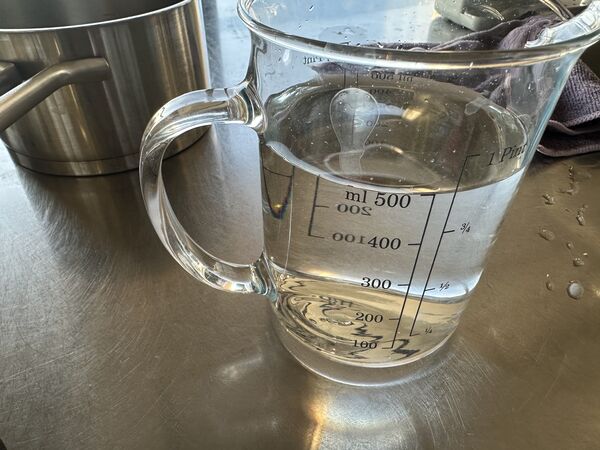
mix it with 500ml water
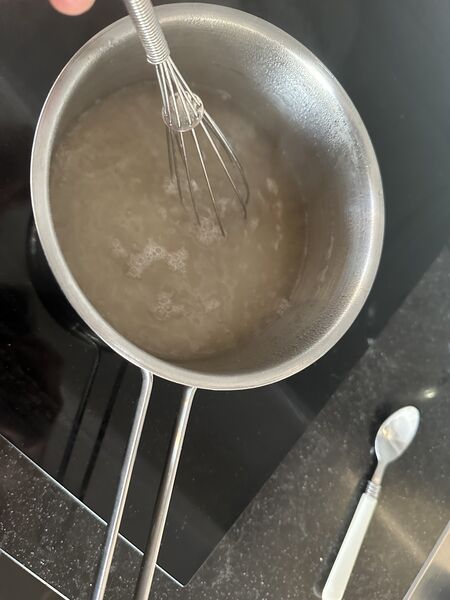
heat it up until it boils and keep that for 1 minute
use a screw from a thermos
as it floats I put some weight on it; I also used a cup and a glass
soon after it was alread hardening; just like the other 2
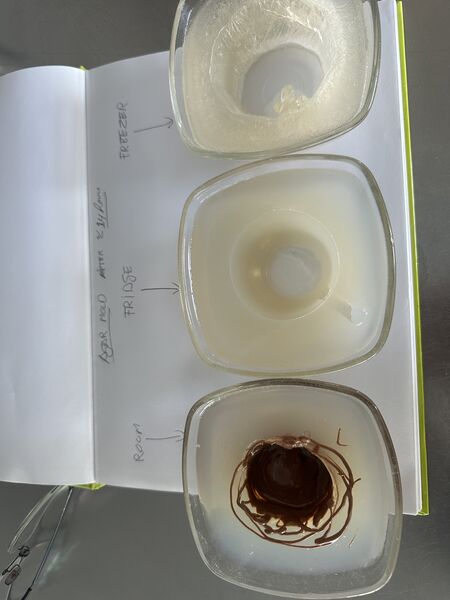
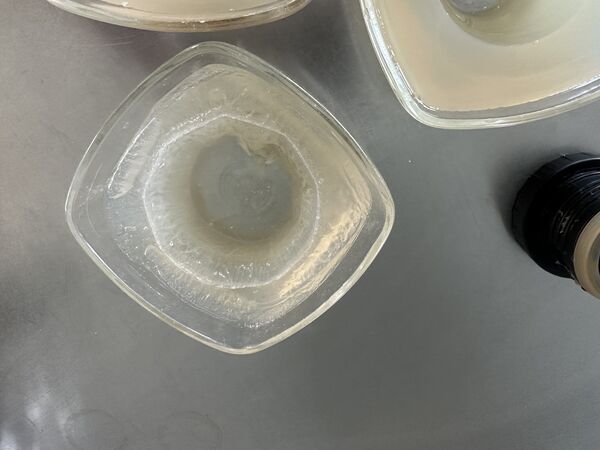
Ok so that was actually very easy. After a few hours cooling at room temperature
I put one in the freezer and another one in the refrigerator. The other one was left at room temperatur.
Time invested around 6 hours
Day 5 - [Sunday]
Started around 08
Comparing molds
I started with inspecting/ comparing the different Agar molds
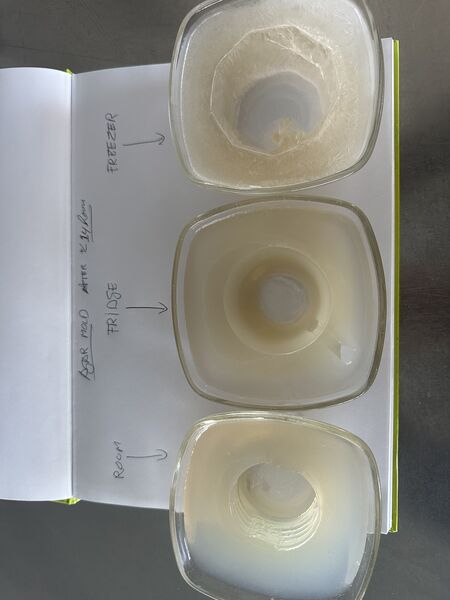
my conclusion was that the version that just stayed at room temperatur was actually still very good (structure was strong and it was rubbery). The freezer version was of course very hard but also looked like it's structure was affected by the cold. The refridgerator was in between
Yes! Finally chocolate time
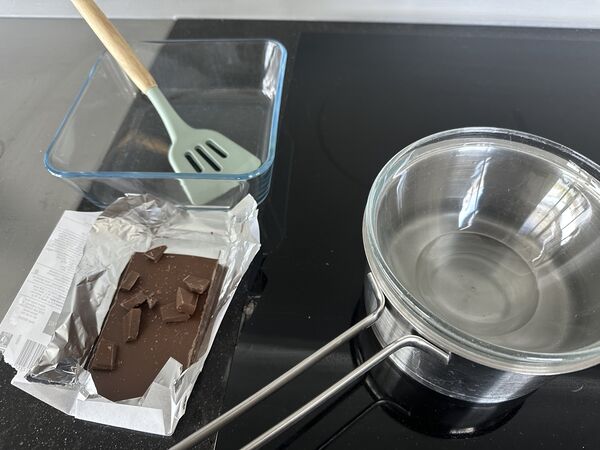
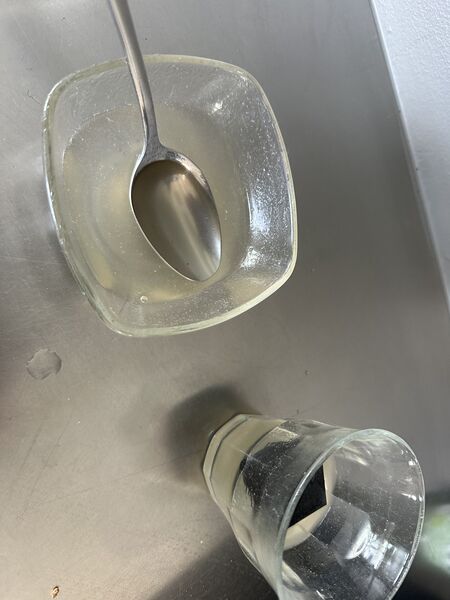
using the eau bain de Marie technique
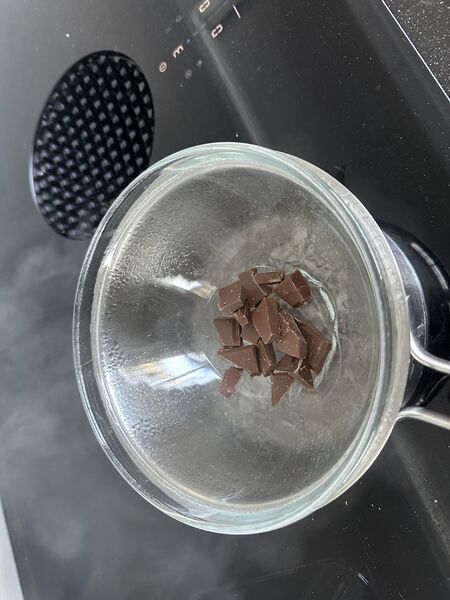
once the water boils just turn it down a bit and very soon all chocolate was melted
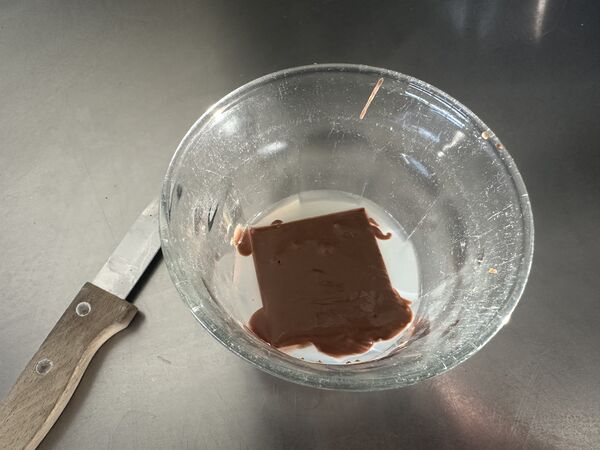
no sunflower oil but does a good job as well as release agent
stirring it, making sure it's not too hot
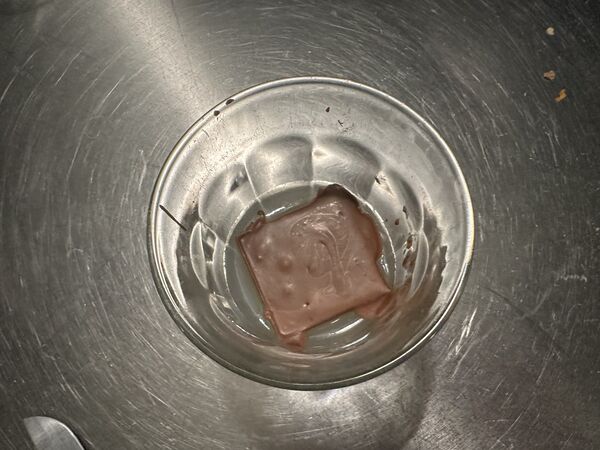
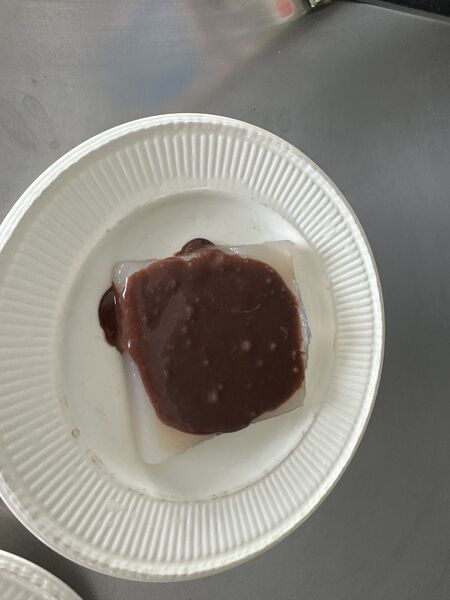
pouring the chocolate in the mold; the mold did not melt/ deintegrate.
now wait a bit
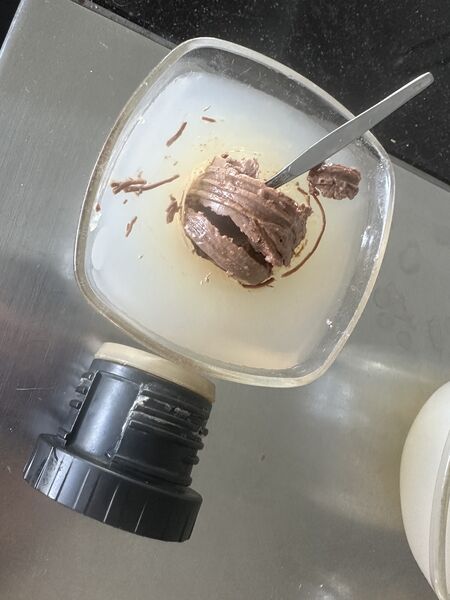
I worked on my final project in between and after a hour it was time to eat it.
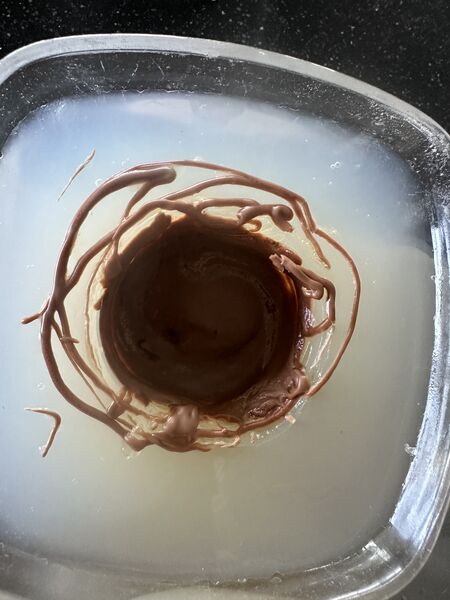
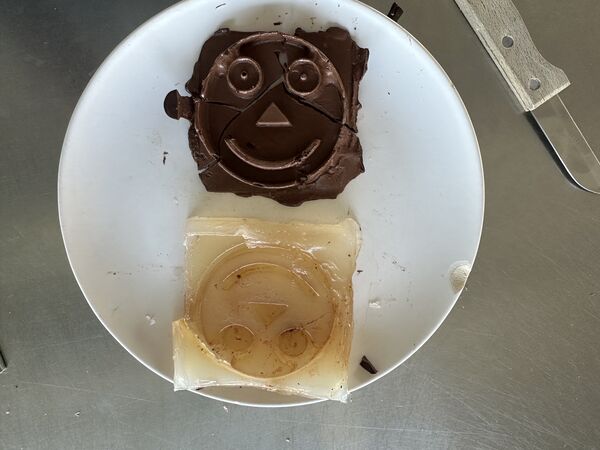
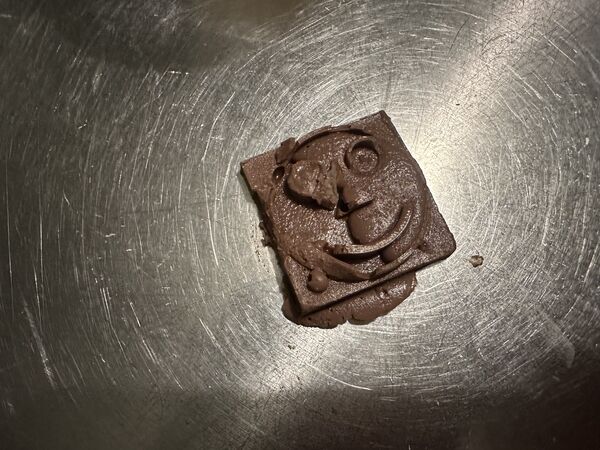
result of hardened chocolate; well it could have been a bit harder but it was ok
on purpose I dropped chocolate on the side to see if it would melt the mold; it didn't
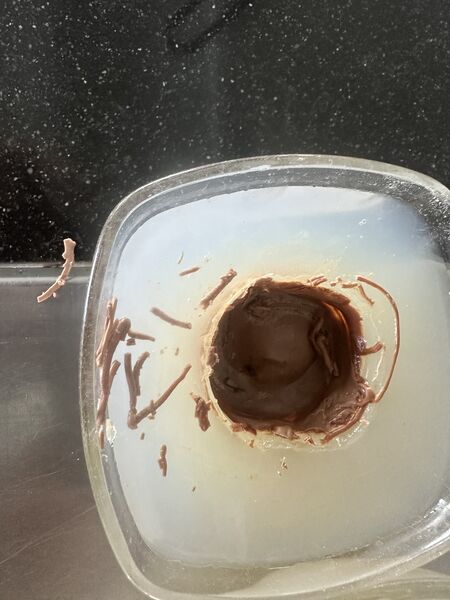
ok so you can see the threads and because the mold is soft it was easy to take out the chocolate casting
and it didn't destroy the mold that much
So does this work tomorrow?
Trying out my smiley
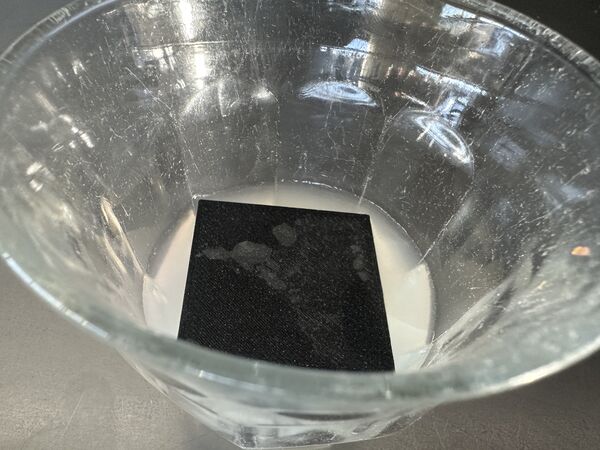
YES! I bought myself a PRUSA CORE ONE. Well what else could I choose ... Reason is simply that I want to try out stuff in the weekend as well for my final project, practice more and use it later for hobby projects so why not get it now; spring sale. After printing the standard keychain holder and the shaper for remove 3D prints from the plate it was time to create my smiley.
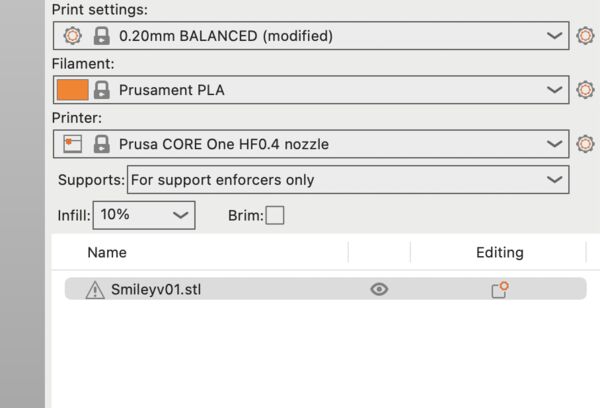
used PrusaSlice with these settings
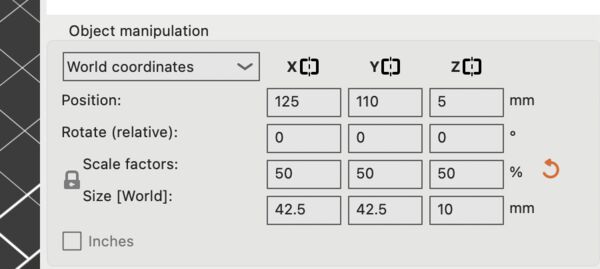
reduced the size by 50%
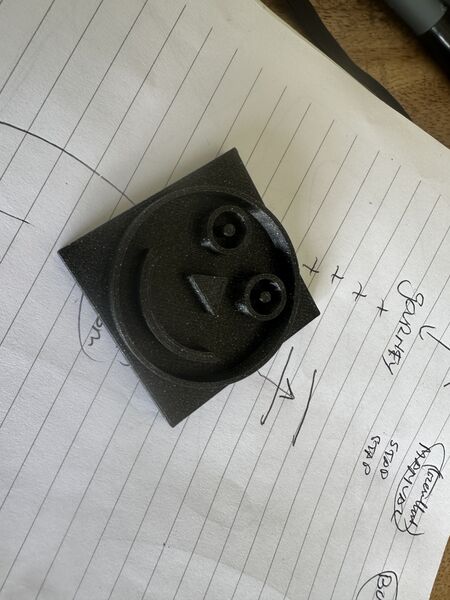
and there it is
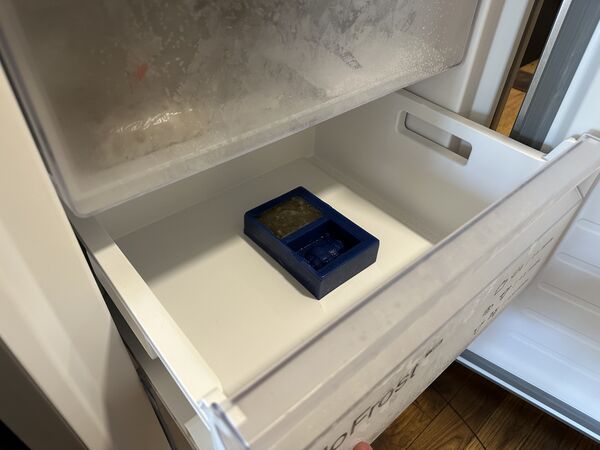
I used the mold that I put in the refridgerator last night and just micro-waved it until it was a liquid again.
Of course tomorrow the milling will be from the top down so the face will be up; but in the glass it would ascent. So that's why I put it face down for now. Same idea at the end.
I waited until beginning of the evening to take it out
hardened Agar again
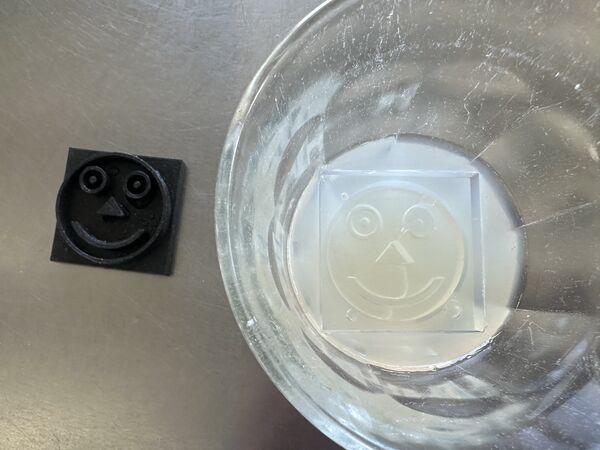
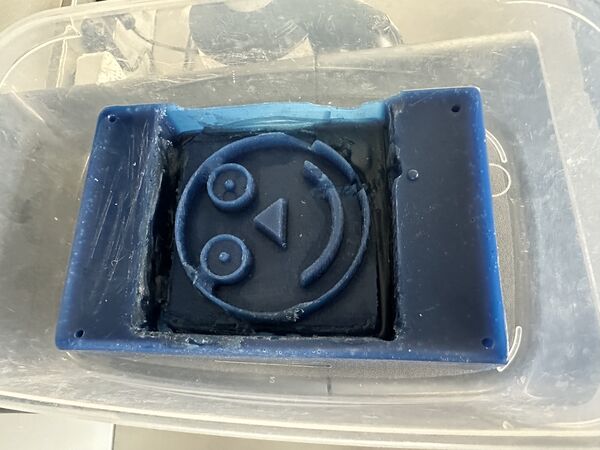
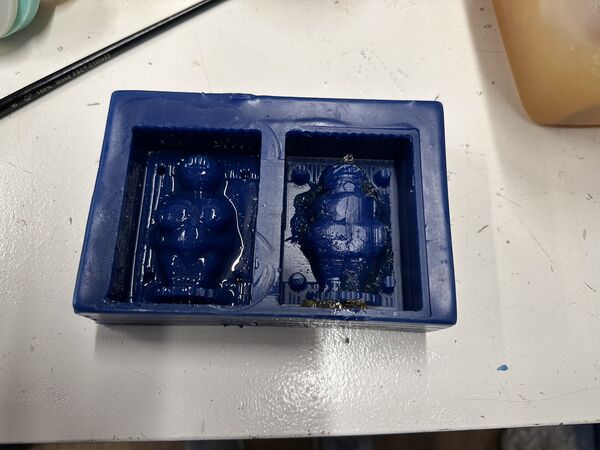
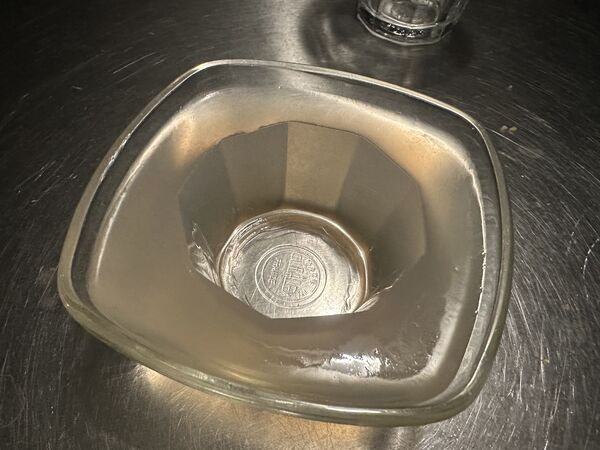
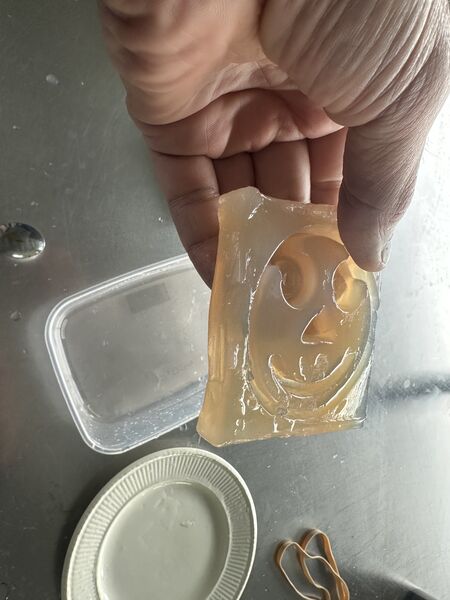
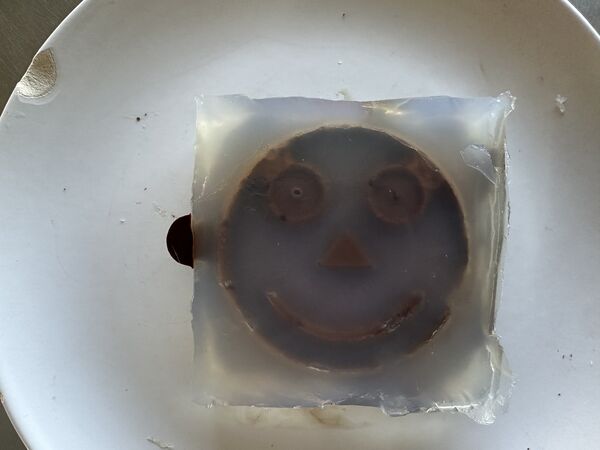
So that will be my mold; good detail
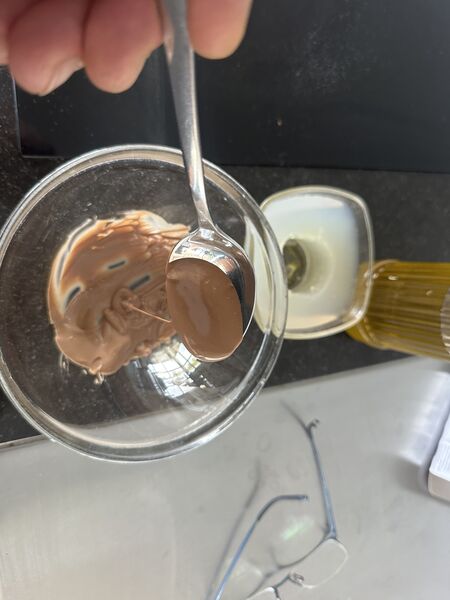
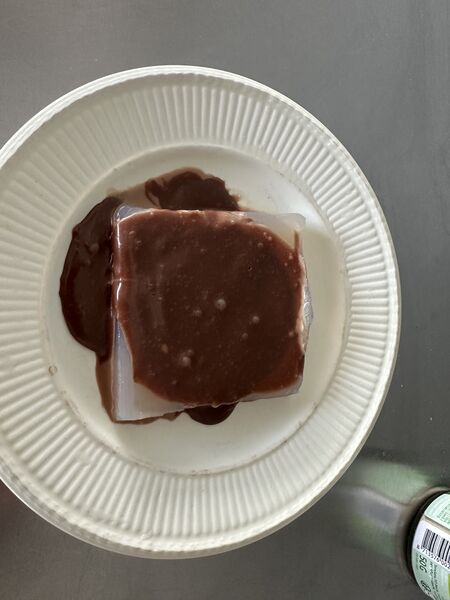
Melted some new chocolate
after pouring it in
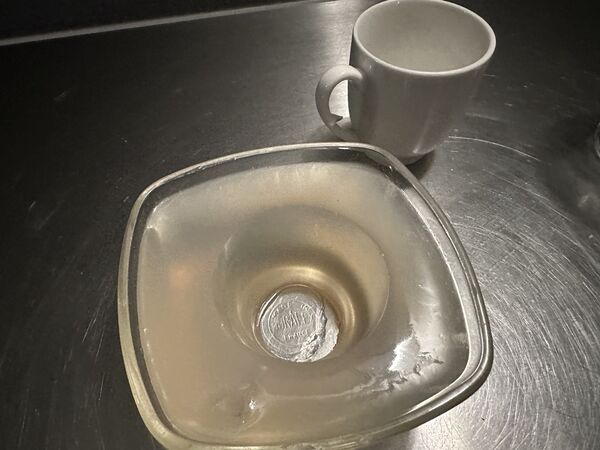
much later that evening
The end result ...
So got an idea how to improve:
- make sure the chocolate is more liquid when I pour it in (It was a bit hardened so that could explain the side not being in good shape)
- use some release agent (I thought it wasn't necessary because of melk chocolate having more fat in it)
Time invested around 8 hours
Day 6 - [Monday]
Started at the FabLab around 0930.
It's Kings Day so why not spend it making my mold  . Henk gave us all a piece of
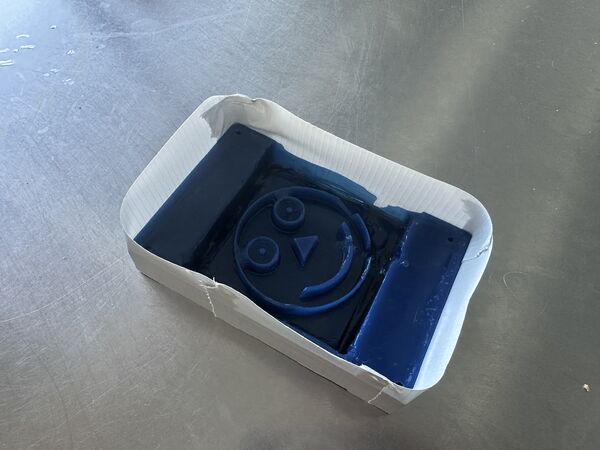
 machineable wax; today I'll use my 3D design of the smiley and mill it using the ShopBot. As showed before I'll do a 2D version = I'll use the 3D design to make a negative flat 3D mold with Agar; then I'll fill that one with melted chocolate.
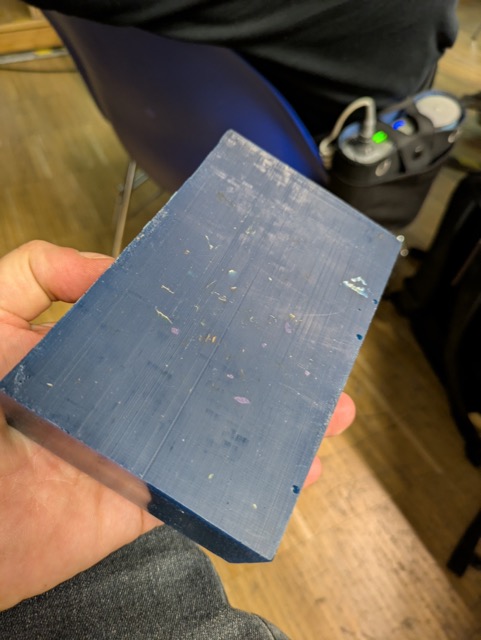
my piece of wax
Shopbot (hello again)
As Remco already started I joined him to learn and share the fun.
fixate the block to the bed
technique used is to squeeze it between three latches
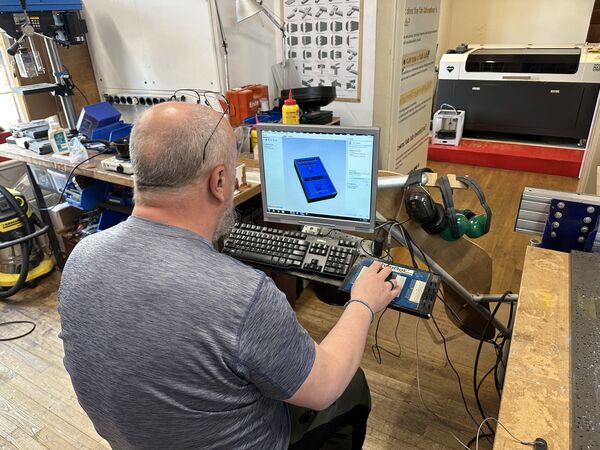
start a new project, set dimensions and import the STL file
we checked the bit and found it to be a level bit that Henk used to destroy other wax blocks to make ours
replaced it with a 5mm flat end bit (2 edges/ 2 flutes) using a METRIC collet
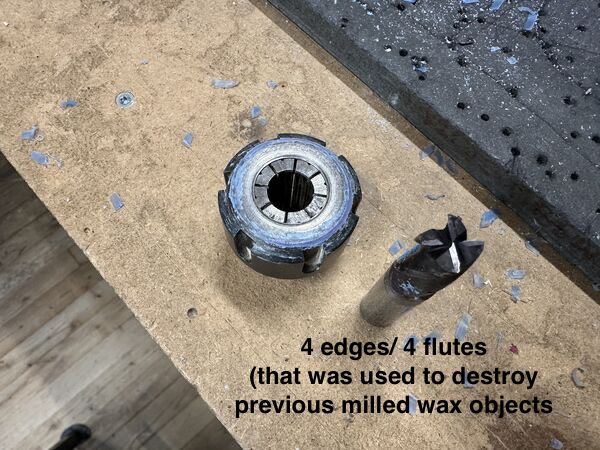
the bit we replaced
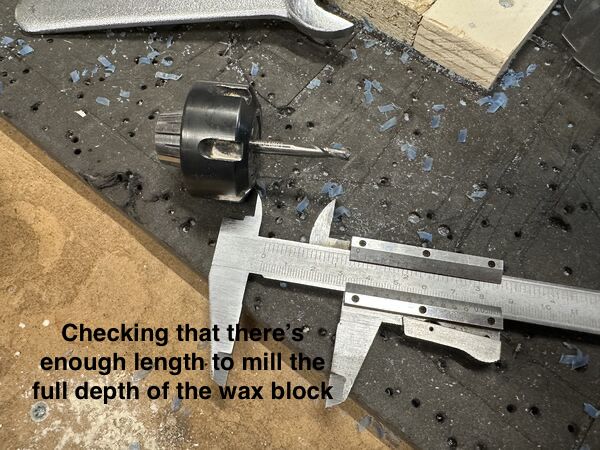
remembered from global class that you have to check whether the bit has enough length to NOT destroy your object with it's spindle
after it reached it's deepest point we were confident the bit was long enough
Remco's block being milled
ShopBot (smiley time)
Ok my turn.
fixating my block; the most flat side on the floor/ bed/ sacrificial layer. The top layer is somewhat indented
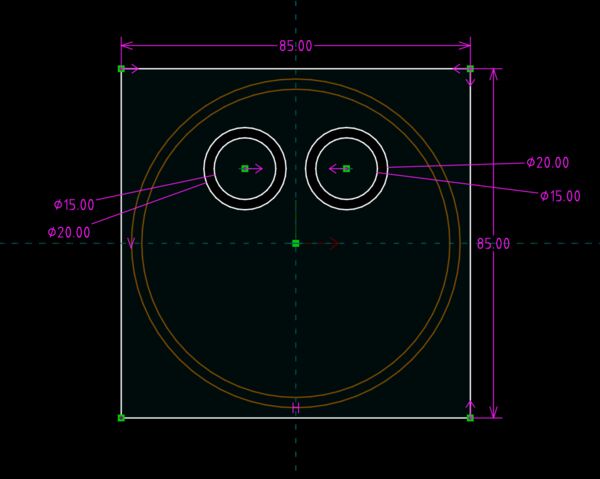
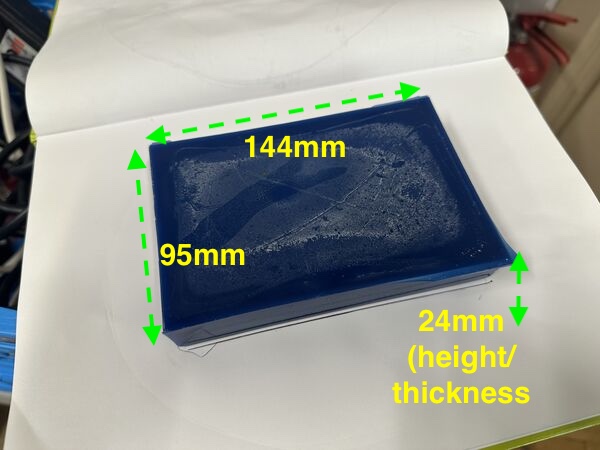
setting dimensions; so the maximum height on the side of the blokc is 24mm
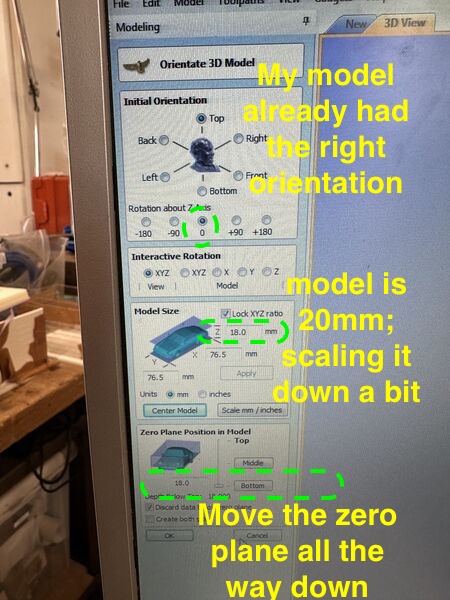
I reduced the scale of my object by setting it's height to 18mm; just to be sure the mill would not mill the sacrifical layer/bed as my block had some indentations on the inside. Taking of 6mm also reduced the size in XY-axis with the same % amount
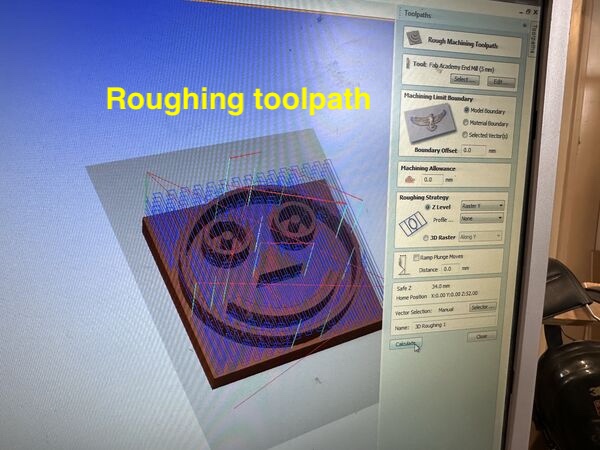
First the roughing toolpath
finishing toolpath
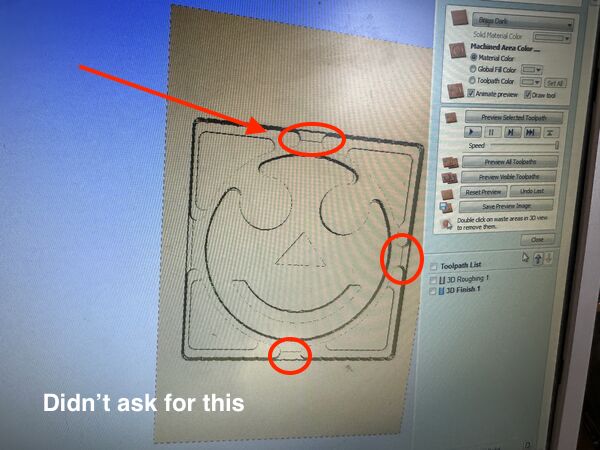
appearantly VCarve adds tabs but why. Maybe because it thinks there is no material around it anymore? Can I adjust something without restarting again or changing my design?
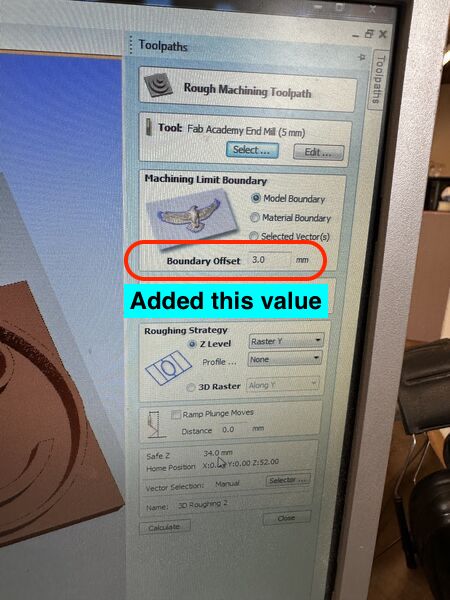
by adding this value I tell VCarve it can also extend 3mm outwards
and yes, after recalculating, the tabs are gone
Ok let's mill. I exported the roughing and finishing toolpaths seperately. Remco and I found that with his milling it appeared that the combined G-CODE started with the finishing toolpath first. So just to be sure ...
position XY and leveling Z
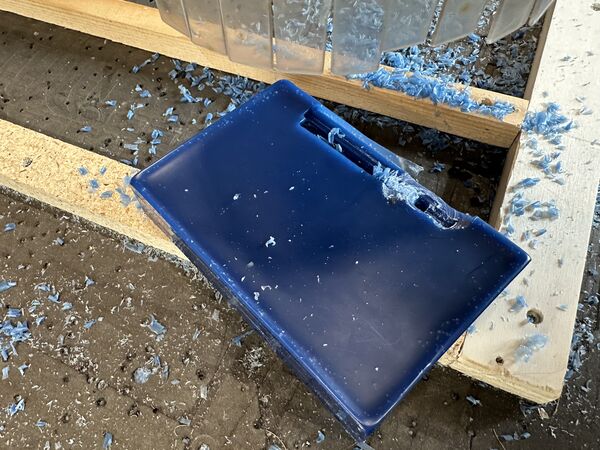
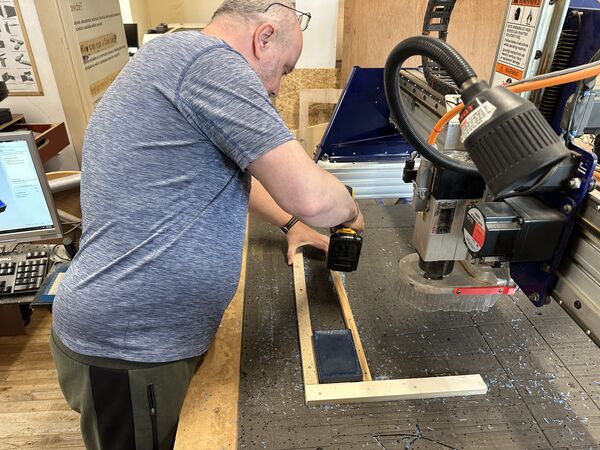
Soon after it started the block came off the bed; making holes in my block
Note
Hmmm I thought I fixated it pretty good so I asked Remco to help me out for the 2nd try. My idea was to first see how the final milling would end up and then maybe fix stuff later. Remco helped out but even with the second run it came off ... ???
Ok so it seems that the side is skewed what could mean the wooden structure does not apply enough force on the side. As we already set the speed of the bit lower we asked Henk for input.

Henk suggested to use the sides of the block if no milling would take place there. Yes, good idea. But I doubted what would happen if the bit would move over the block on the right side
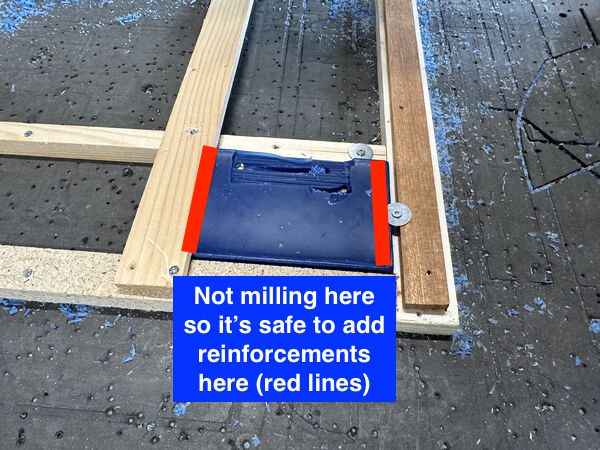
So to minimize risk Remco and I added a screw with a on the right to keep it down. It would be just a few mm.
Mesmorizing
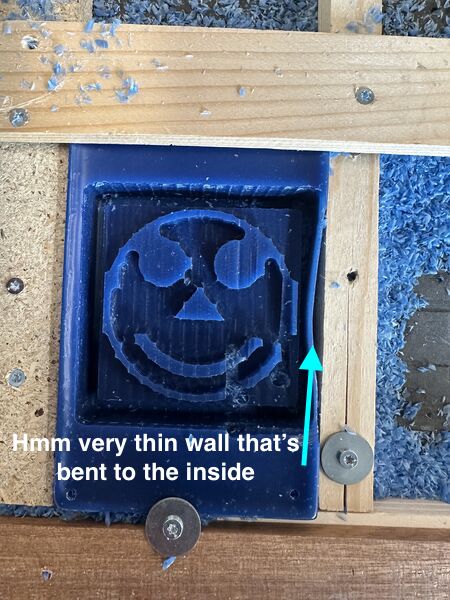
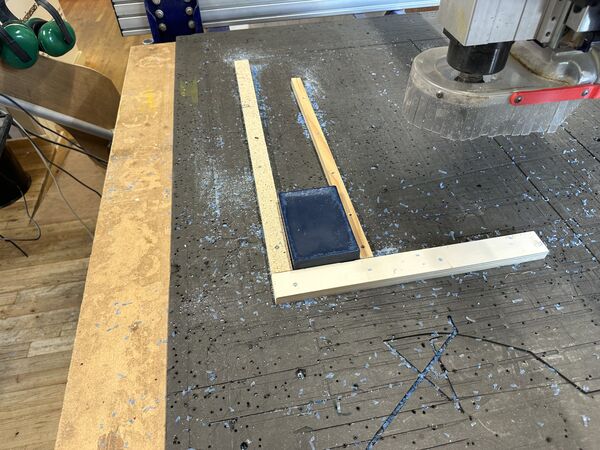
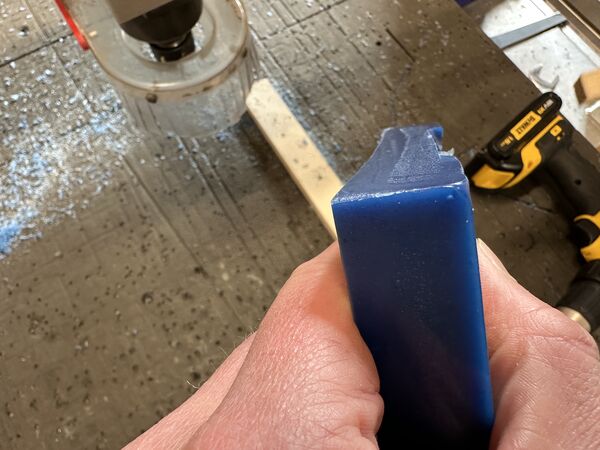
Long story short, the roughing toolpath ended up without any further problems; besides the very thin wall segment on the right
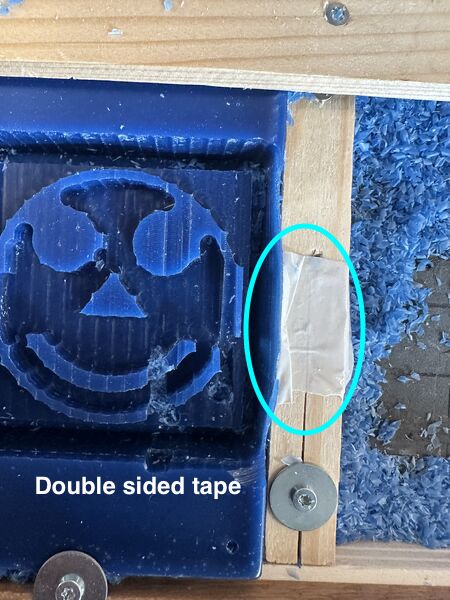
So before executing the finishing toolpath I attached the wall using double sided tape (I was afraid it would not survive at all)
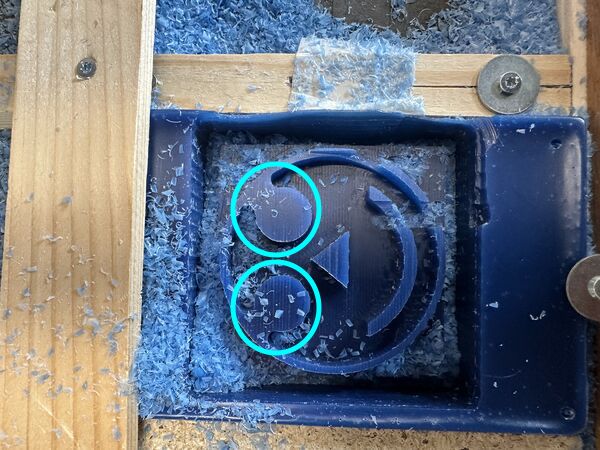
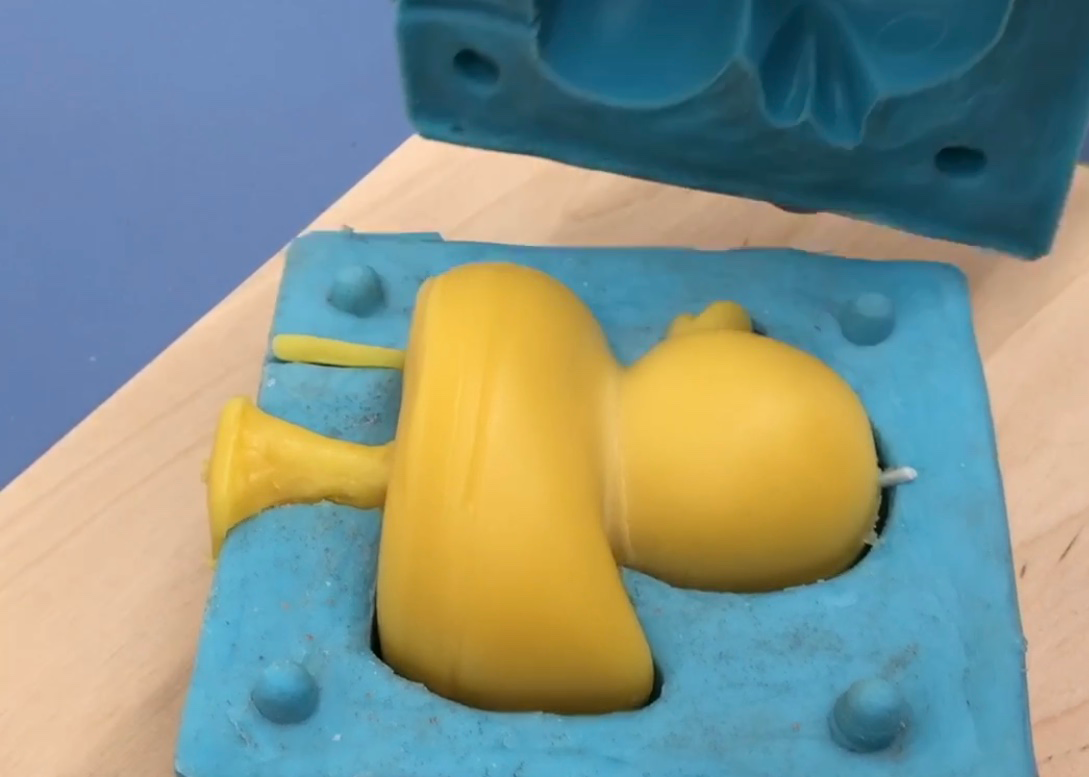
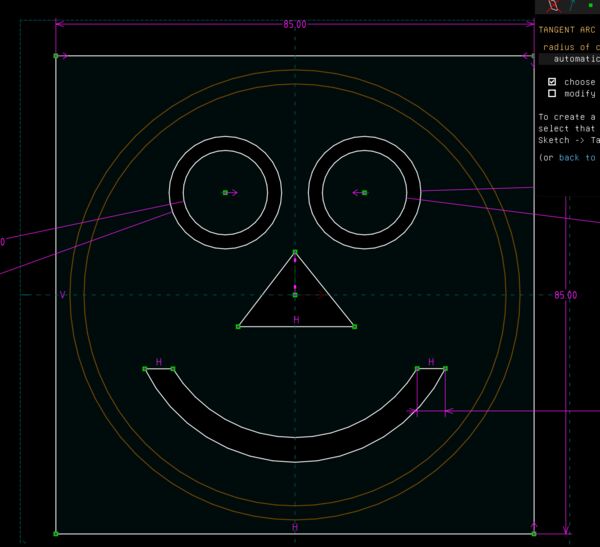
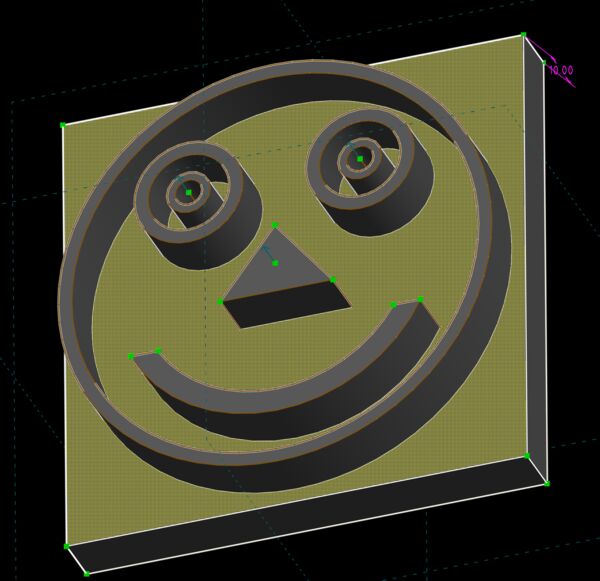
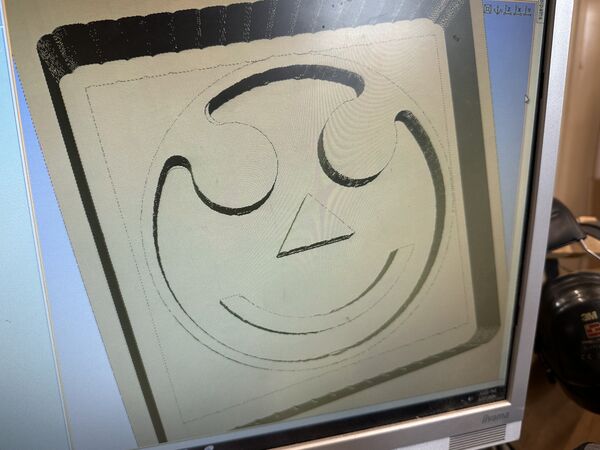
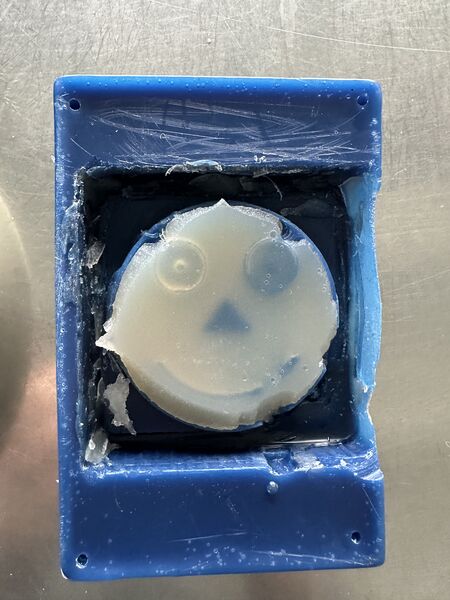
Ended up with this. Not bad at all. But were are the pupils?
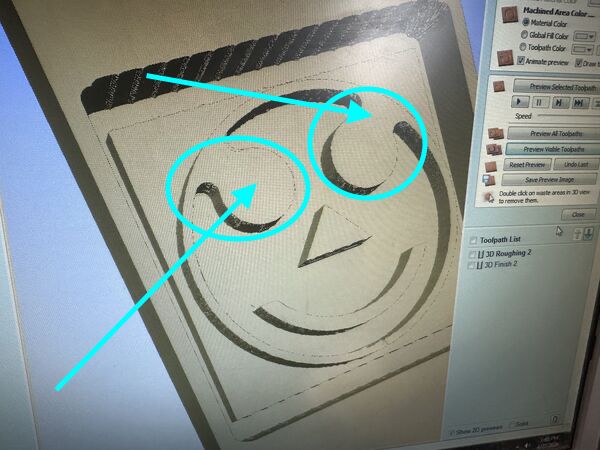
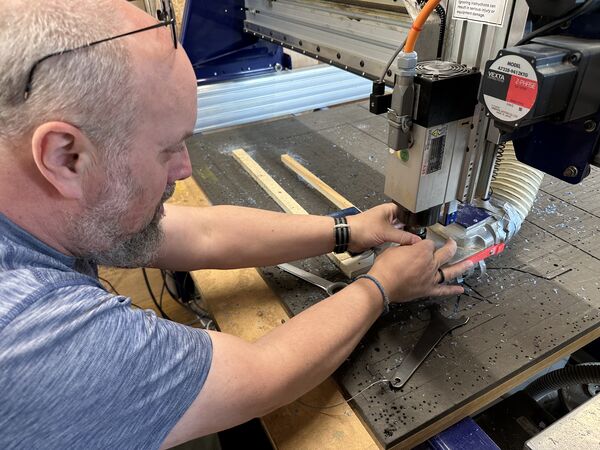
Must have missed it completely because they are not in the toolpaths. However they are in the design; what happened to them?
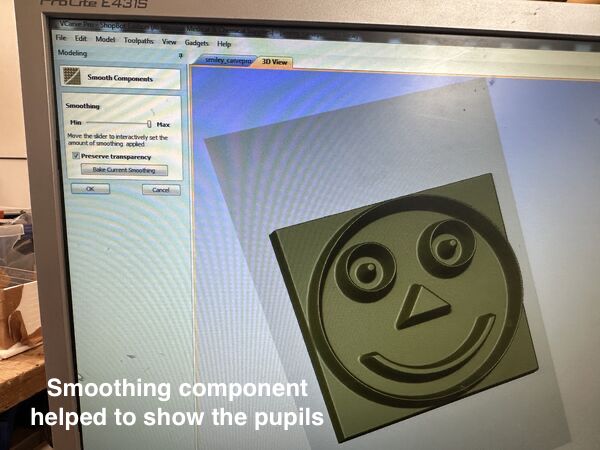
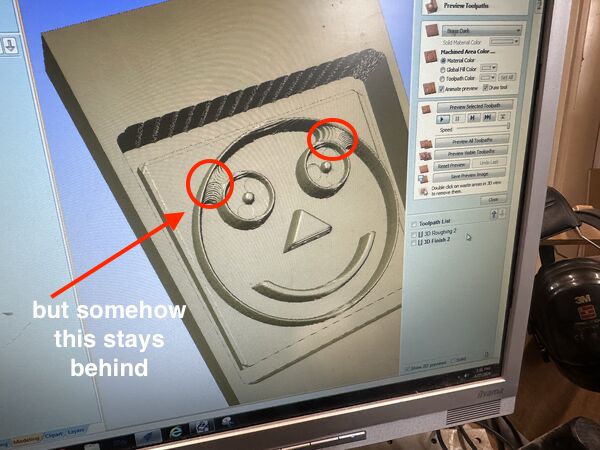
Went back to VCarve and found a tool called smoothing component and applied this to the max. There they are.
And yes, after recalculating the finishing toolpath they were still there. So I decided to execute this toolpath again
Houston, we have pupils
that worked ...
.. except for some holes
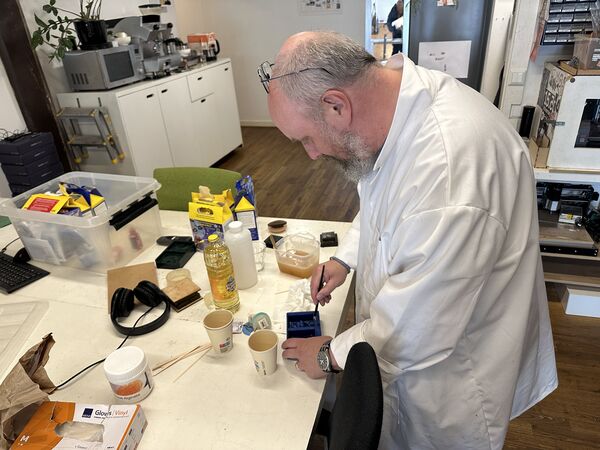
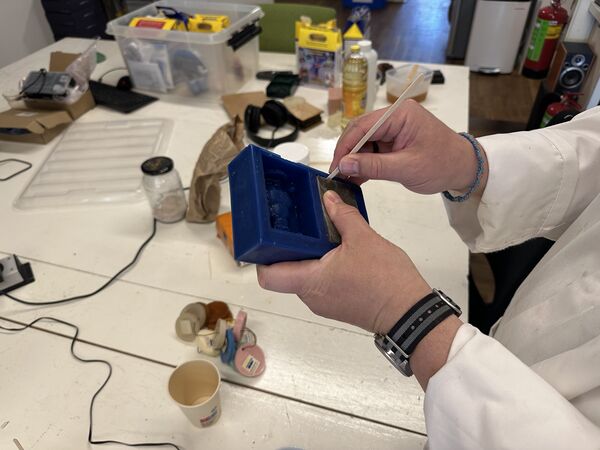
Henk asked me to fix it with wax. This was fun. Used some waste wax, give it some heat until it melts
taped it to make sure it would not come out

tried to protect parts that did NOT need wax anymore
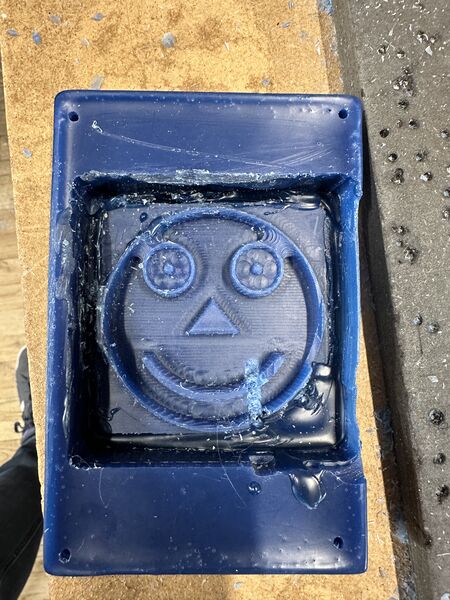
And I somehow managed that ... not
I did some careful sanding but found that the 2nd times I used a finishing toolpath already made it smoother compared to the 1st run. Careful not to make things worse I left it the wat it was.

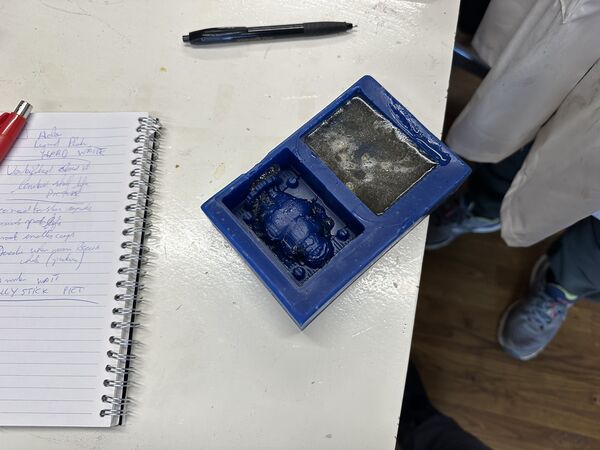
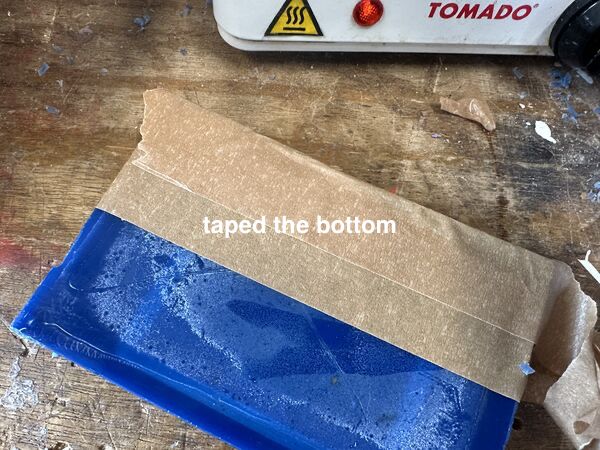
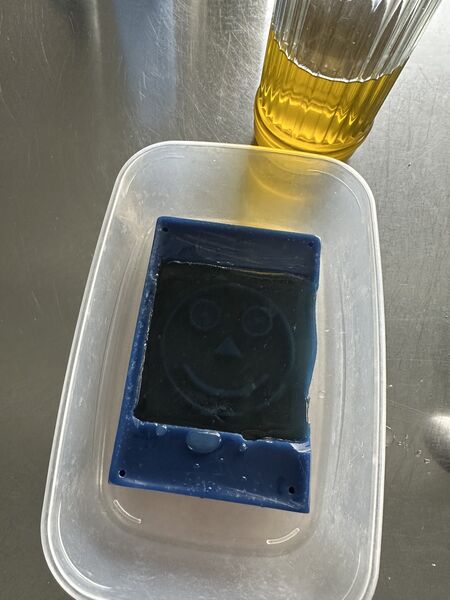
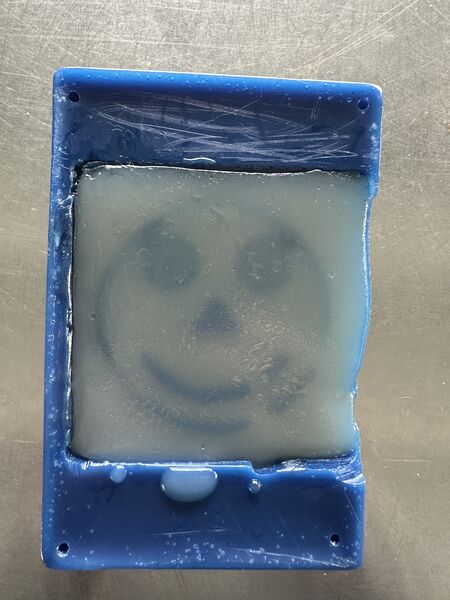
At home I prepared the Agar
I leveled the block
hmm pours a bit of one side
Time invested around 8 hours
Day 7 - [Tuesday]
Started around 0730 ... let's pour chocolate into my mould.
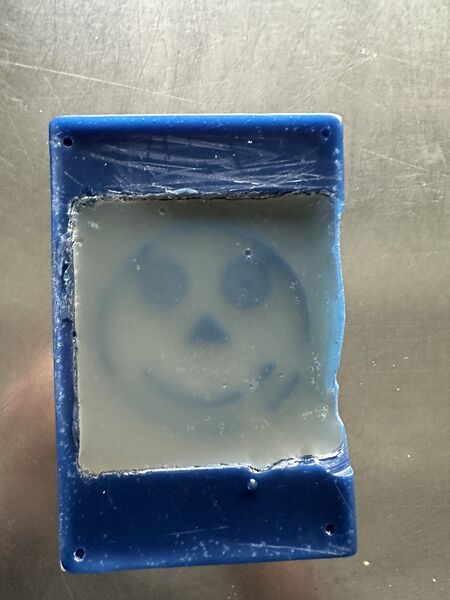
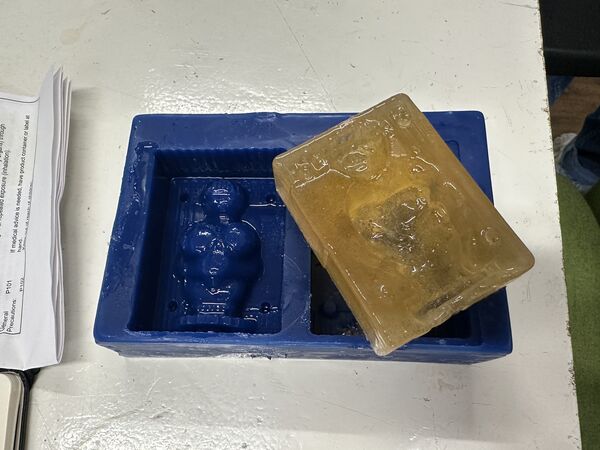
starting point; still looks ok
But getting it out was a bit of problem.
So I made a new one; maybe I should take it out as soon as cure time is over?
used a bit of olive oil as release agent
it took 30 minutes and it was already good to take out
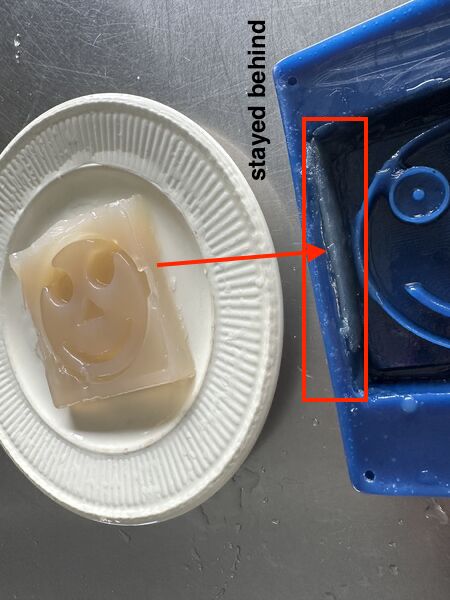
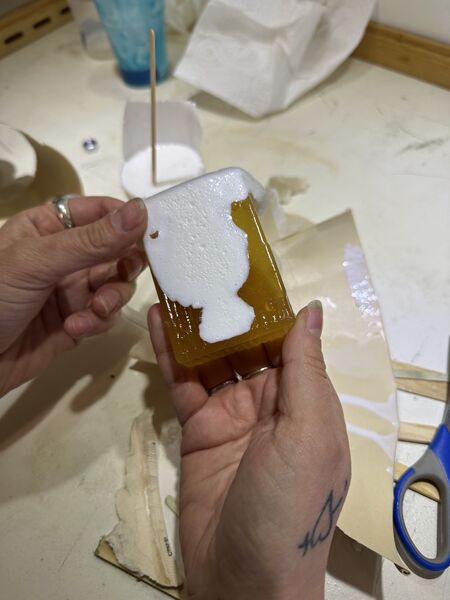
small part on the side got left behind
it's flexible but does not brake
Chocolate time

tried to do the same as last weekend but somehow I ended up with this. I couldn't get it to melt properly. I put it into the microwave ... and it got BURNED ... don't do this every again!!
new batch ... looking good ... but I had to add a bit of milk to make it smooth
cooling it
ok some bubbles that won't come out (even when bumping the plate)
after putting it in the freezer for 5 minutes
I did not trust it yet to take it out because it looks a bit soft. So put everything in the freezer for an hour.
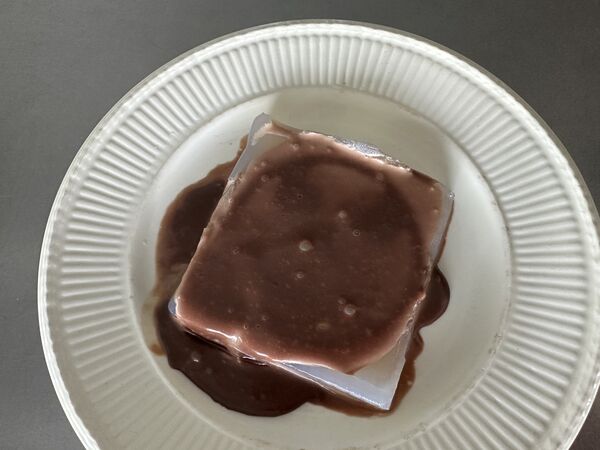
chocolate still looks a bit soft, but I can't leave the mold in theree for longer; based on my experience in the weekend it will desintegratie
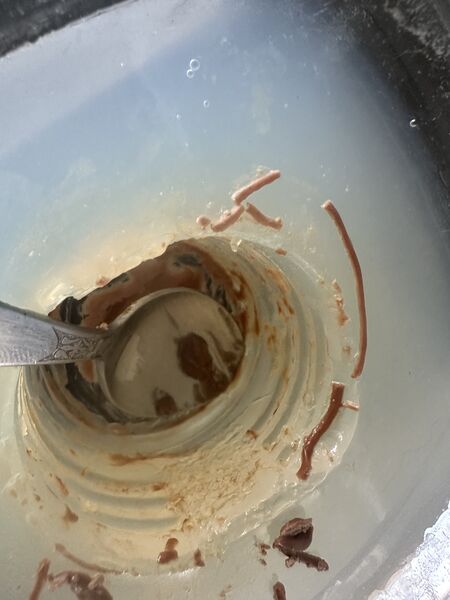
but after taking it out very carefully parts of the outside broke off
No use anymore ... I was about to give up but decided to give it another go a bit later.
I extended the mold a bit hoping the side would be a bit thicker; duck tape is my best friend
I filled it all the way but appearantly the cornerd were still open and/or somewhere else

after adding a new batch of Agar and it came to rest
ok i can work with this
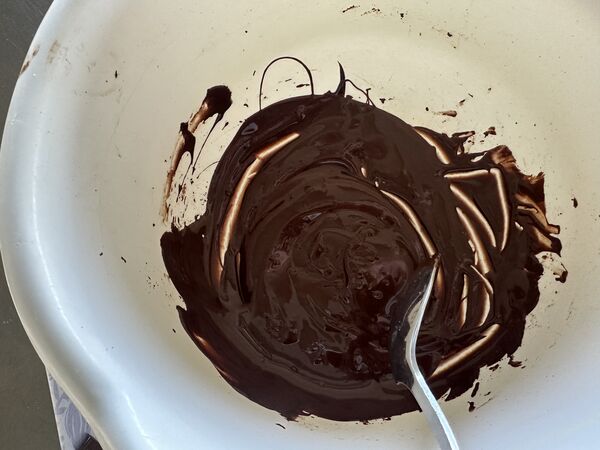
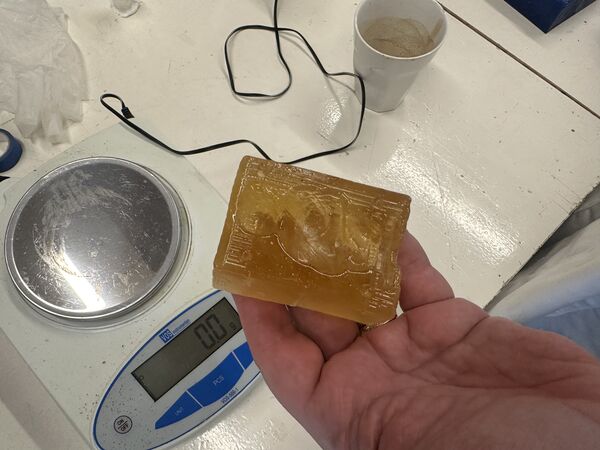
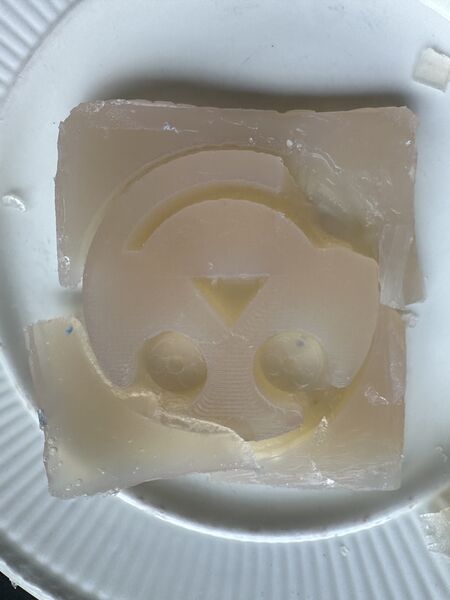
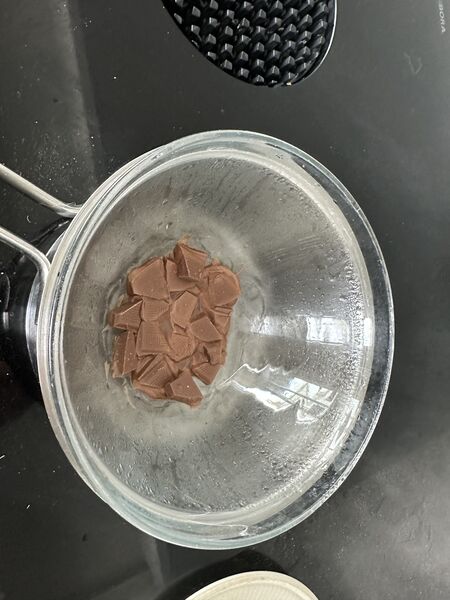
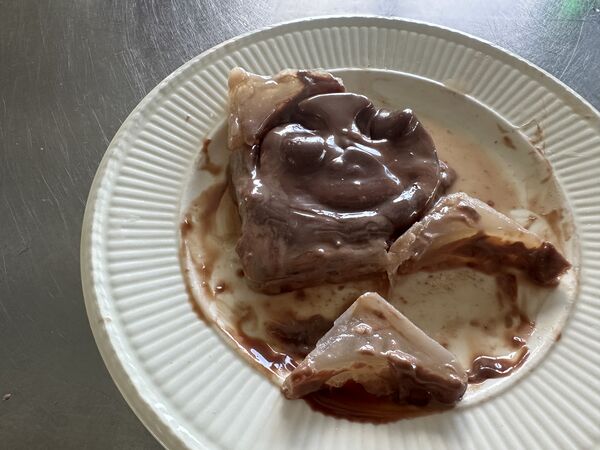
went to the shop to buy 75% chocolate; the dark one and I found a recipe to use the microwave to temper it. Apperantly by mixing heating and cooling crystals are formed that make the chocolate shiny and stiff when it cools of.
Indeed .. this looks more like it
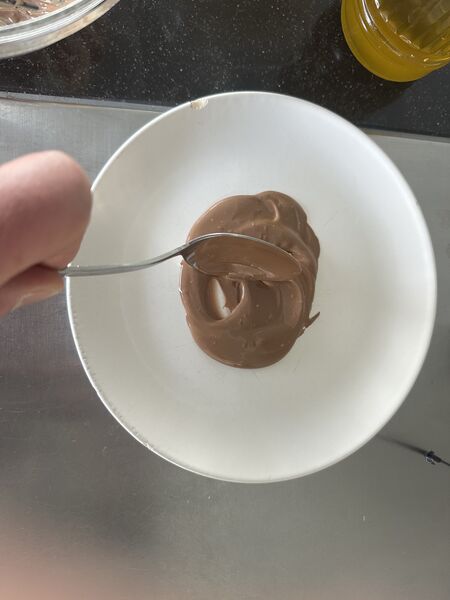
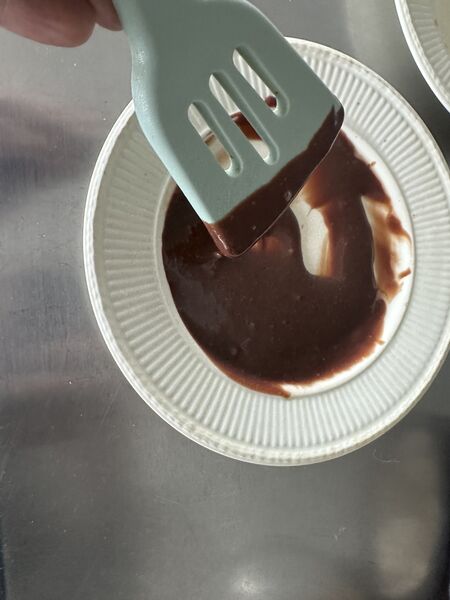
to compare, i mixed the remaining chocolate with nuts; this was very hard indeed
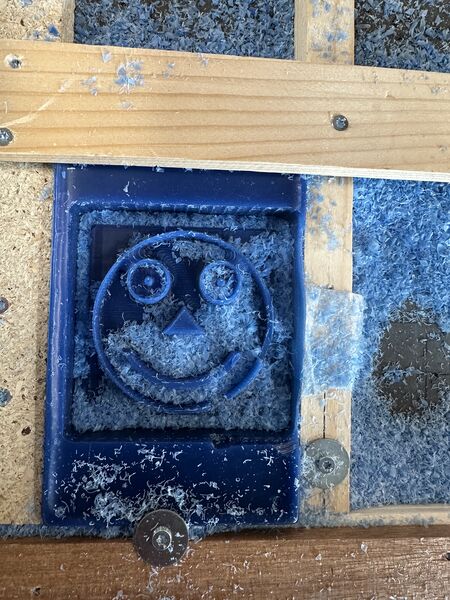
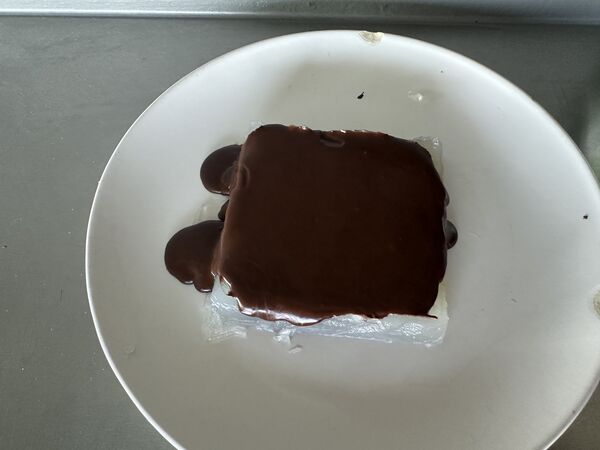
the back of the mold; looks good; let's take it out
hmmm in myy attempt to make a small hole in the face to let in some air it broke. The mold is pretty much ok but the side broke of again.
Ok what does this tell me.
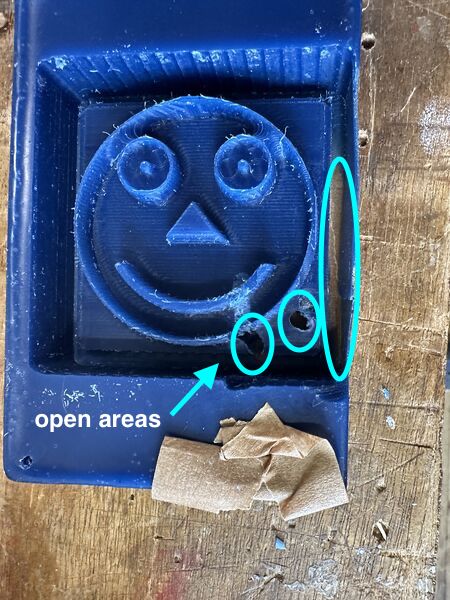
I think Agar can work as a mold, but because of problems with the milling parts of the wax had an effect on the mold and therefore on the effort to take out the chocolate. For instance one side was too thin and therfore the mold broke at that point almost every time I took out the cast/ chocolate; the other side stayed in tact.
What also didn't help was the broken tooth. Every time I took out the chocolate there some of the mold came with it; I think if it would have been just as smooth as the remaining part of the lips this would not have been een problem.
Also fixing with wax afterwards didn't help. Yes it filled the holes but it also create rough parts that created a rough contact between the chocolate and the mold. So I had to add a lot of release agent to make sure it would not stick; but this did not guarantee success.
Regarding the wax block ... I'm pretty sure I set the model to the middle of the block but maybe I didn't do this. That would explain the thinner side I think because in the 3D model both sides were equally thick. Another thing could be that the block of wax was just a bit different on that side. Anyway next time scale down the model a bit more.
Recipe Agar
To prepare the Agar:
- buy it
- use 3 grams
- with 200ml of water
- mix all Agar first with 50ml of water
- then mix it with the remaining water
- warm it up while stirring just a bit (to prevent to much bubbles)
- until it boils
- let it cool down a bit until you can put your finger in without burning your finger (but it's still warm)
- pour it into the mold
Recipe chocolate
To prepare chocolate as casting:
- take 100 grams of chocolote; I used 70% pure chocolate
- brake it into small pieces
- put it into a PLASTIC bowl (glass or other material takes away too much heat)
- put it into a microwave at 600W for a total of 90 seconds but:
- use 3 burst of 20 seconds each;
- after each burst take it out and stir it
- then do another 3 burst of 10 seconds; etc.
- take it out when there is still a small part of the chocolate that needs to melt; buy stirring the remainder everything will become fluid
- then pour it into the mold after a minute or so (put-life is around 5 minutes)
Final project
I also worked on my final project. At the end of the day I managed to float by 3D printed platform with a bit of thrust.
End of day 20:30
Time invested: 11 hours
Day 8 - [Wednesday]
Started around 08 to update my documentation. Then to the Waag.
Files for download / replication
Please see the zip. It contains:
- Solvespace 3D design of the smiley
- Exported STL file
- VCarve Pro project files
- Exported roughing, finishing and smoothing toolpaths (g-code) for the ShopBot
Problems & Solutions
Wax block
The wax block came loose twice during the roughing pass. The main reason was that the side of the block was not perfectly flat and the upward forces from the 5 mm flat end mill pulled it out of the side clamps. With Remco we solved this by adding wooden clamps on top on the parts were there would be no milling taking place. So next, using a soft material I have to be aware of that.
Smiley pupils
The smiley pupils disappeared in VCarve’s mesh processing. I fixed this by applying the Smoothing Component tool at maximum strength, then recalculating the finishing toolpath. The pupils reappeared perfectly. I didn't know about this tool before but next time I'm something this might be the first place to look.
Fix the mold
At the end I had several holes and gaps in the milled wax positive because the block came of twice in my trials. I repaired them by melting waste wax chips with a pan and heater, carefully filling the holes, protecting the surrounding areas with tape, and lightly sanding after cooling. Yes it's doable but perfect milling leads to a better result
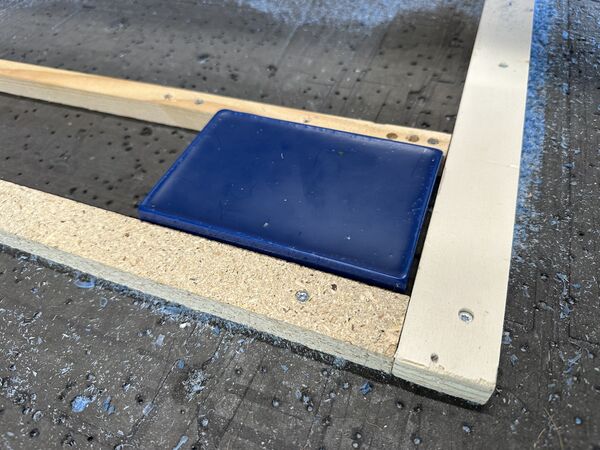
Agar mold cracked
One of the Agar mold sides turned out too thin and cracked during demolding. I think this happened because I scaled the model to 18 mm height inside a 24 mm block without leaving enough margin on that side. I tried to fix this with duct tape but that did not really work. In the future I will leave at least 8–10 mm margin or scale the model even smaller.
Chocolate's pot-life
Now I understand these cooking programs ... melting chocolate and making sure it hardens requires more of a process than I thought. I compare it a bit to combining 2 components, heat and chocolate, and then making sure I follow the process and keep within pot-life which is short. Au-bain-de-Marie worked with small portions but then I had to temper it on a flat surface. Using a microwave does the same if you use small bursts of power and stir it in between (and it's easier to reproduce).
Bubbles
Air bubbles remained trapped in some chocolate casts. I reduced this by gently tapping and vibrating the mold while the chocolate was still liquid. Looks again like making macarons were they do the same. For larger future casts I will consider vacuum degassing; but I don't know yet how to do this.
Stuck chocolate
The chocolate sometimes stuck to the Agar mold, especially on the repaired rough areas. I solved this by applying a thin layer of olive oil as release agent and by making sure the chocolate was well tempered before pouring.
Reflections & Learnings
What Went Well
- Rapid iteration with Agar: easy to prepare, reusable when melted, food-safe, and gave excellent surface detail from the milled wax.
- Creating our own bio-silicone
- Working with the ShopBot again. Although my wax block was as a bit ruined afterwards using VCarve/ Shopbot workflow was more natural; it was very ZEN
- Group collaboration was fun
- Spend time on my final project: the milling + flexible-mold mindset might be usefull for my wild card week to create an epoxy hull.
What Was Challenging
- Wax block fixation on the ShopBot (twice it came loose until we combined clamps + screws + tape).
- Chocolate temperature control and tempering (microwave burned the chocolate; bain-marie worked better but not always led to hard chocolate).
- Thin walls in the Agar mold cracked during demolding, partly due to imperfect wax repair and scaling.
What I Could Improve
- Scale the model even smaller or add a thicker base ring next time for more robust Agar walls.
- Maybe find another type of release agent before pouring Agar.
Overall lessons
More interesting subject than I thought beforehand. Molding & casting is fundamentally about understanding material physics (pot life, exotherm, shrinkage) rather than just the CAD/CAM steps. Keeping it food-safe added an extra layer of real-world constraint; it disciplined me to reallly think about the whole chain ("do I conteminate if I do this etc?")
Link to Final Project
I think I wil use molding & casting in my wild card week to create a epoxy hull. Not sure yet if Agar is the right stuff to create an epoxy layer though
Acknowledgements
Of course my usual suspects again
- Henk for being there on Kings Day and showing us how to make bio-silicone
- Remco & Heleen for the fun and safe group experiments; Remco for the alternative Kings Day spending behind the ShopBot