Computer controlled machining 3D - personal cheat sheet
Based on the midterm review I've written this page. It's like my personal cheat sheet/ check list related to VCarve Pro and the ShopBot workflow.
In week 7 I created one to explain 2D milling. All the concepts mentioned there are applicable here as well. This page is meant to explain the 3D milling process which adds 2 new toolpaths: roughing and finishing.
For the complete manual of the ShopBot use this link
For the complete manual of VCARVE Pro use this link. For specific section about 3D
Note
Before using VCarve Pro I have already created a 3D design of what I want cut-out using the ShopBot. I have used SolveSpace sofar but it can be done with OpenScad / FreeCad as well as long as they are able to export in 3D (STL for instance)
I'm assuming you will be milling machineable WAX with a 5 mm diameter, 2-flute straight end mill (this had a right-hand spiral which up-cut behaviour helps for good chip evacuation upward). The manual refers to different bits used in different parts of the process; we will only use the 5mm bit.
Also during this assignment I installed the 5mm bit together with Remco so that we knew the 5mm bit was in place in the correct way. If not, check it. As Henk mentioned before "never again assume the bit is aligned correctly just because “it worked last time”. Also "do not assume that's still a 5mm bit just because we always use it."
Important
In this process I deviate slightly from the manual regarding the position of Z Zero. See the image 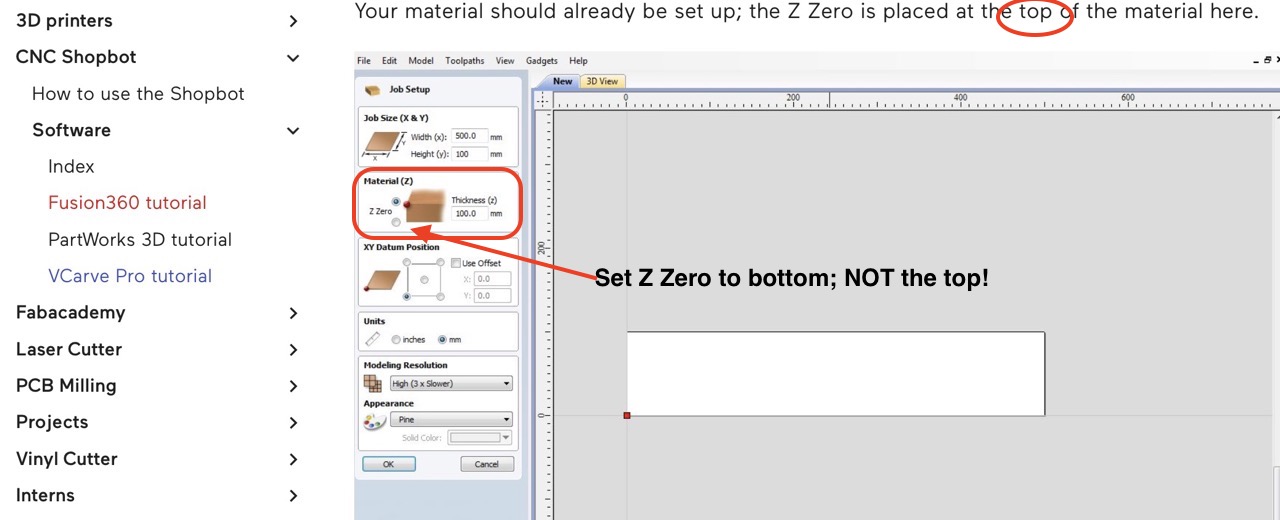
VCarve Pro
To mill 3D, 2 new toolpaths enter the arena:
- Roughing toolpath which mills larger pieces out of the material that are not important
- Finishing toolpath will carefully mill the material to produce the final 3D design; it follows after the roughing toolpath.
Both toolpaths can be found below the ones you already know. The manual has more info about it's use etc. In any case use the following parameters:
- bit diameter: 5mm
- pass depth: 2.5 mm (50% of the bit diameter =
Henk's rule) - step over: 2.5mm (50%)) for roughing/ 0.5mm (10%) for finishing
- spindle speed 5000 RPM
- feed rate: 50mm/s
- plunge rate: 10mm/s
Rotation speed of the spindle is set manual on the ShopBot.
Checklist – from design to finished cut
Design & export
- Export the 3D design as STL
VCarve Pro – Job Setup
- Start new project and enter exact material size in X/Y and measured thickness (e.g. 17.8 mm).
- Import the STL file, set the Z-zero on the bed and set the material origin (lower-left).
- Create the separate toolpaths (see parameters in previous paragraph):
- Roughing toolpath
- Finishing toolpath
- Always preview in 3D first!
- If satisfied export the toolpaths seperately (as .sbp files).
ShopBot physical setup
- Power on the machine
- THIS TIME DO NOT TURN ON THE VENTILATION as the chips will otherwise be mixed with the wood chips
- Check whether the the 5mm bit is installed
- If not install the bit you need: collet into nut first, then bit (never the other way round).
- Home machine (absolute X-Y zero button).
- Make sure you have room to secure the material onto the sacrificial layer by moving the spindle away using the arrow keys.
- Secure stock any way you see fit; make sure the bit will not hit screw/ structures when it moves around
- Set jog home: use arrows / page down to the place where the material starts = corner. Make sure the middle of the bit is positioned at (0,0).
- Take photo of coordinates!!!!
- Then choose option
Menu - Zero XY. - Z-zero with touch plate on sacrificial layer (this layer is fixed on top of the real bed and is
sacrifiedall the time) - Manually turn spindle on with the key, let it warm up.
- Set speed manually
- Do a quick visual check (white-paper shadow test at low RPM) for runout,
Execution
- Load first
.sbp(first roughing then finishing). - Be ZEN, stay present, never leave the machine running alone
- Press START. Pause only during air/travel moves if needed.
- After the job do the same for the finishing toolpath; etc (if you want to do more)
Post-processing & Learning
- Slightly sand the result to remove traces of the toolpaths
- Document everything while it’s fresh.
Safety reminders
- No loose clothing, protective shoes
- Again ZEN mindset.
- Listen for strange noise/vibration.
- If you smell burning or see sparks then stop immediately