As part of this week, our group worked together on the input devices group assignment — probing different input devices' analog levels and digital signals using a multimeter and an oscilloscope to understand how each sensor behaves, then documenting our shared findings before our individual projects. You can read the complete group assignment, including the measurements and our shared documentation, here:
Group AssignmentGroup Assignment
Project Overview
Input Device
For this week, I worked with input devices by integrating a temperature and humidity sensor into my system. The goal was to read environmental data from the sensor and display it in real time on an OLED screen.
I used the SHT31 sensor as the input device and an OLED display to show the temperature and humidity readings. Both devices communicate through the I2C protocol, which allows them to share the same data lines.
This project builds directly on previous weeks:
- Week 6: PCB design
- Week 8: PCB fabrication and soldering
- Week 9: Reading a sensor and displaying its data
The board used for this assignment is the custom PCB I designed and fabricated in the previous weeks. You can see the full board design here: Week 6 — PCB Design, and its fabrication and soldering here: Week 8 — Electronics Production.
Sensor
SHT31
The SHT31 is a digital temperature and humidity sensor that communicates using the I2C protocol. It provides accurate environmental measurements and is widely used in embedded systems.
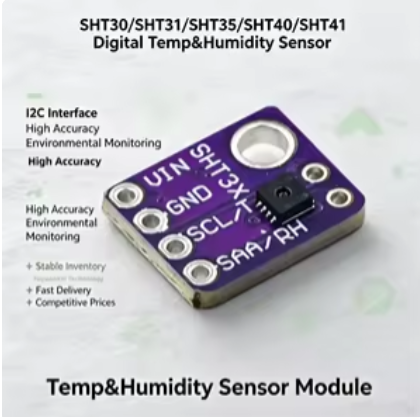
Key characteristics
- Digital communication (I2C)
- High accuracy temperature and humidity readings
- Fast response time
- Low power consumption
In this project, both the temperature and the humidity data were read from the sensor and displayed on the screen.
| Parameter | Value |
|---|---|
| Temperature range | -40°C to 125°C |
| Temperature accuracy | ±0.3°C |
| Humidity range | 0% to 100% RH |
| Communication | I2C (address 0x44) |
| Supply voltage | 2.4V – 5.5V |
Display
OLED
An OLED display was used as the visual output for the sensor readings. OLED screens are well suited for embedded projects because they have high contrast, are easy to read, and also communicate over I2C, so they can share the same bus as the SHT31 sensor.
The display continuously shows two values:
- Temperature, in degrees Celsius
- Humidity, in percentage (% RH)
Because the sensor and the display use different I2C addresses, both devices can operate on the same SDA and SCL lines without conflict.
Connections
Hardware
Both the sensor and the display were connected to the same PCB fabricated in Week 8, sharing the I2C interface.
| Component | Connection |
|---|---|
| SHT31 VCC | 3.3V |
| SHT31 GND | GND |
| SHT31 SDA | Microcontroller SDA |
| SHT31 SCL | Microcontroller SCL |
| OLED VCC | 3.3V |
| OLED GND | GND |
| OLED SDA | Microcontroller SDA (shared) |
| OLED SCL | Microcontroller SCL (shared) |
Since both devices use I2C, the SDA and SCL lines are shared between the sensor and the display.
Working Principle
Logic
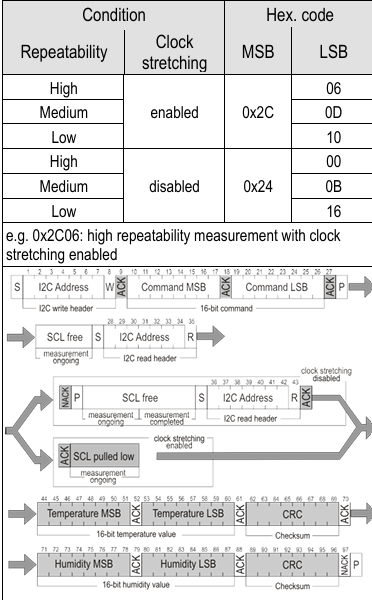
The system continuously reads temperature and humidity data from the SHT31 sensor over I2C, and then updates the OLED display with the new values.
The cycle is simple and repeats continuously:
- Request a measurement from the SHT31
- Read the temperature and humidity values
- Convert the raw data into Celsius and % RH
- Print both values on the OLED screen
This is a basic example of reading an input device and presenting its data through a display.
Arduino Libraries
Library Manager
Installing the Libraries in the Arduino IDE
To read the SHT31 temperature/humidity sensor and drive the OLED display, I did not write the low-level I2C communication from scratch — I used ready-made libraries and installed them directly from the Arduino IDE Library Manager. This is the fastest and safest way to add a library, because the IDE downloads the correct version and its dependencies for you.
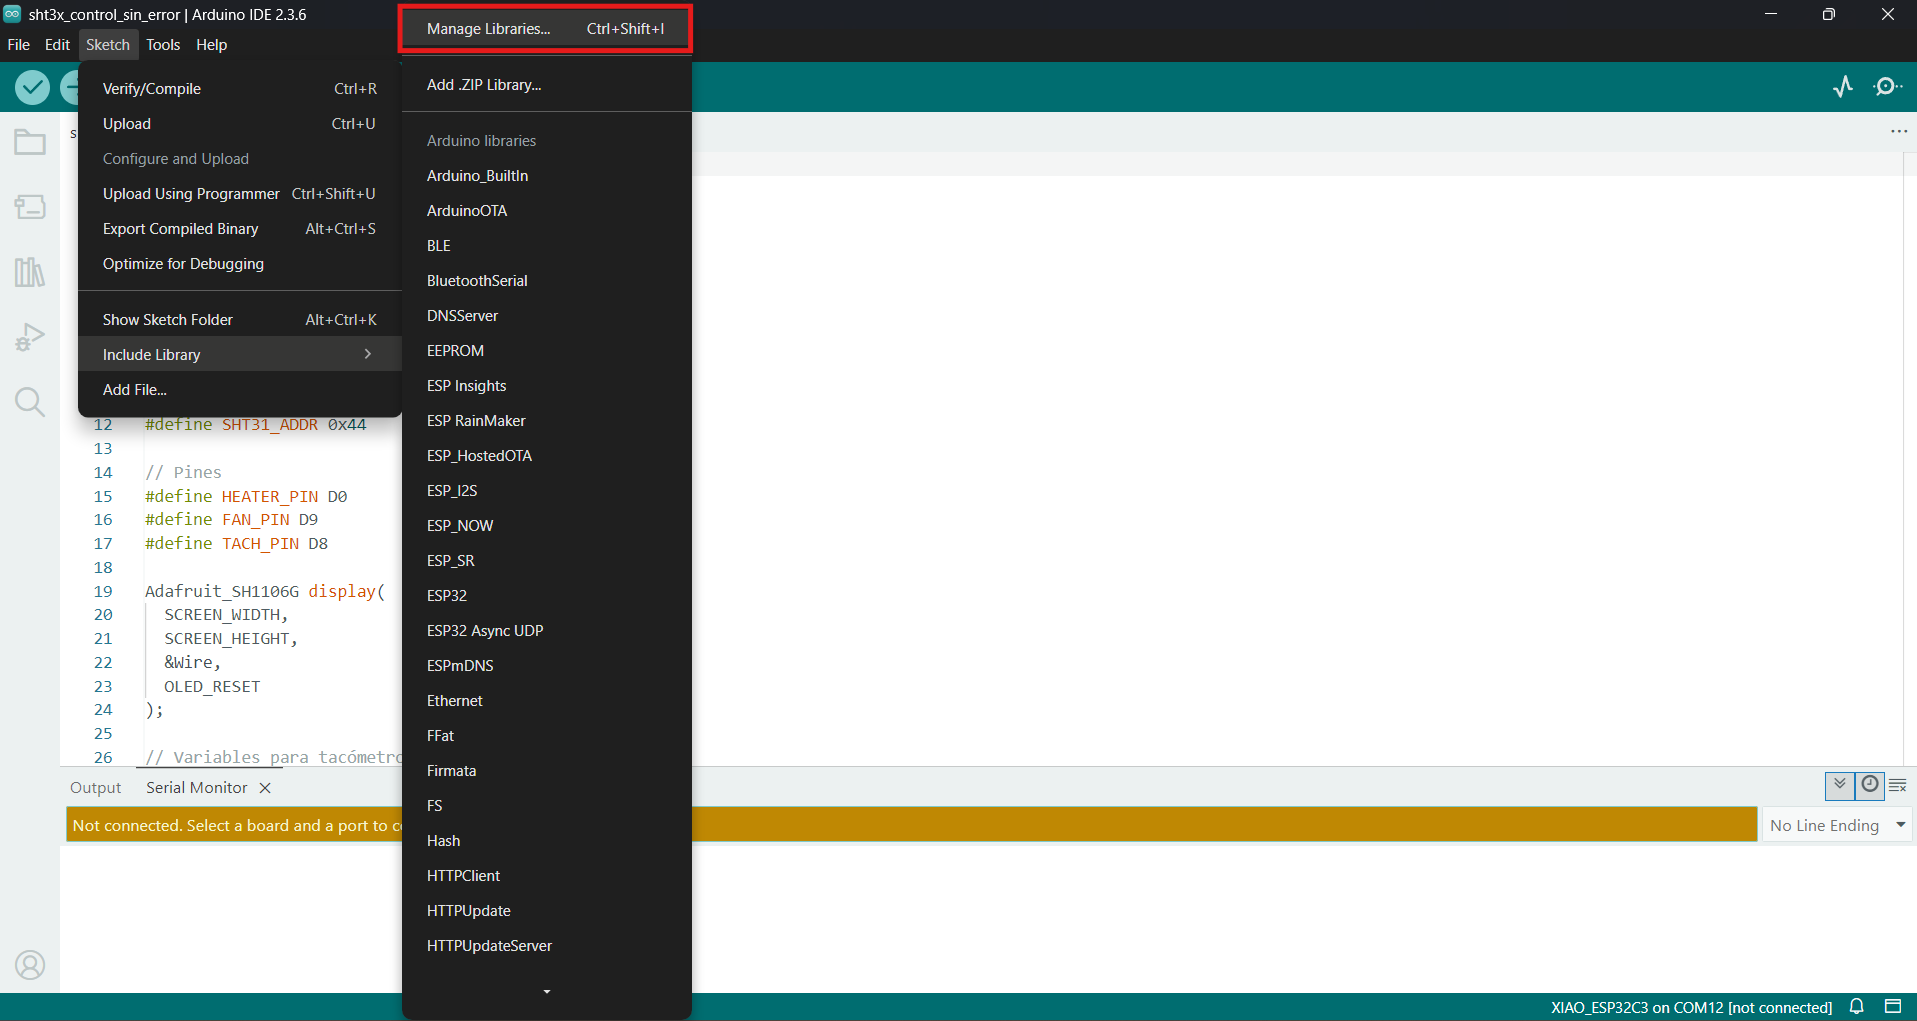
Step 1 — Open the Library Manager
In the Arduino IDE I opened the Library Manager from Sketch → Include Library → Manage Libraries… (or the books icon in the left sidebar). This opens a search panel connected to the online library index.
Step 2 — Install the SHT31 sensor library
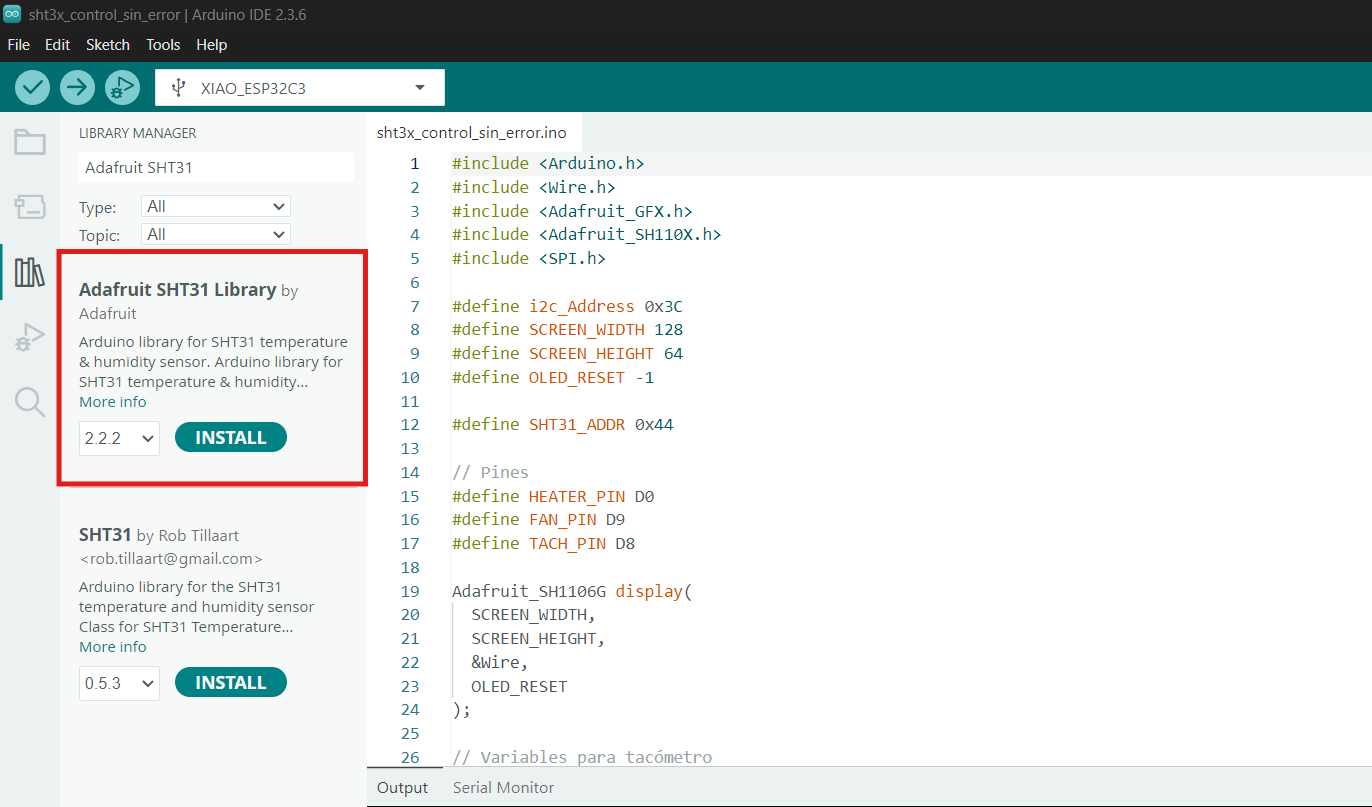
I searched for "SHT31" and installed the Adafruit SHT31 library. When it asked to also install its dependencies (the Adafruit Unified Sensor / BusIO helpers), I accepted, so everything the sensor library needs is installed together.
Step 3 — Install the OLED display library
Then I searched for "SSD1306" and installed the Adafruit SSD1306 library, accepting the Adafruit GFX dependency that it uses to draw text and graphics on the screen.
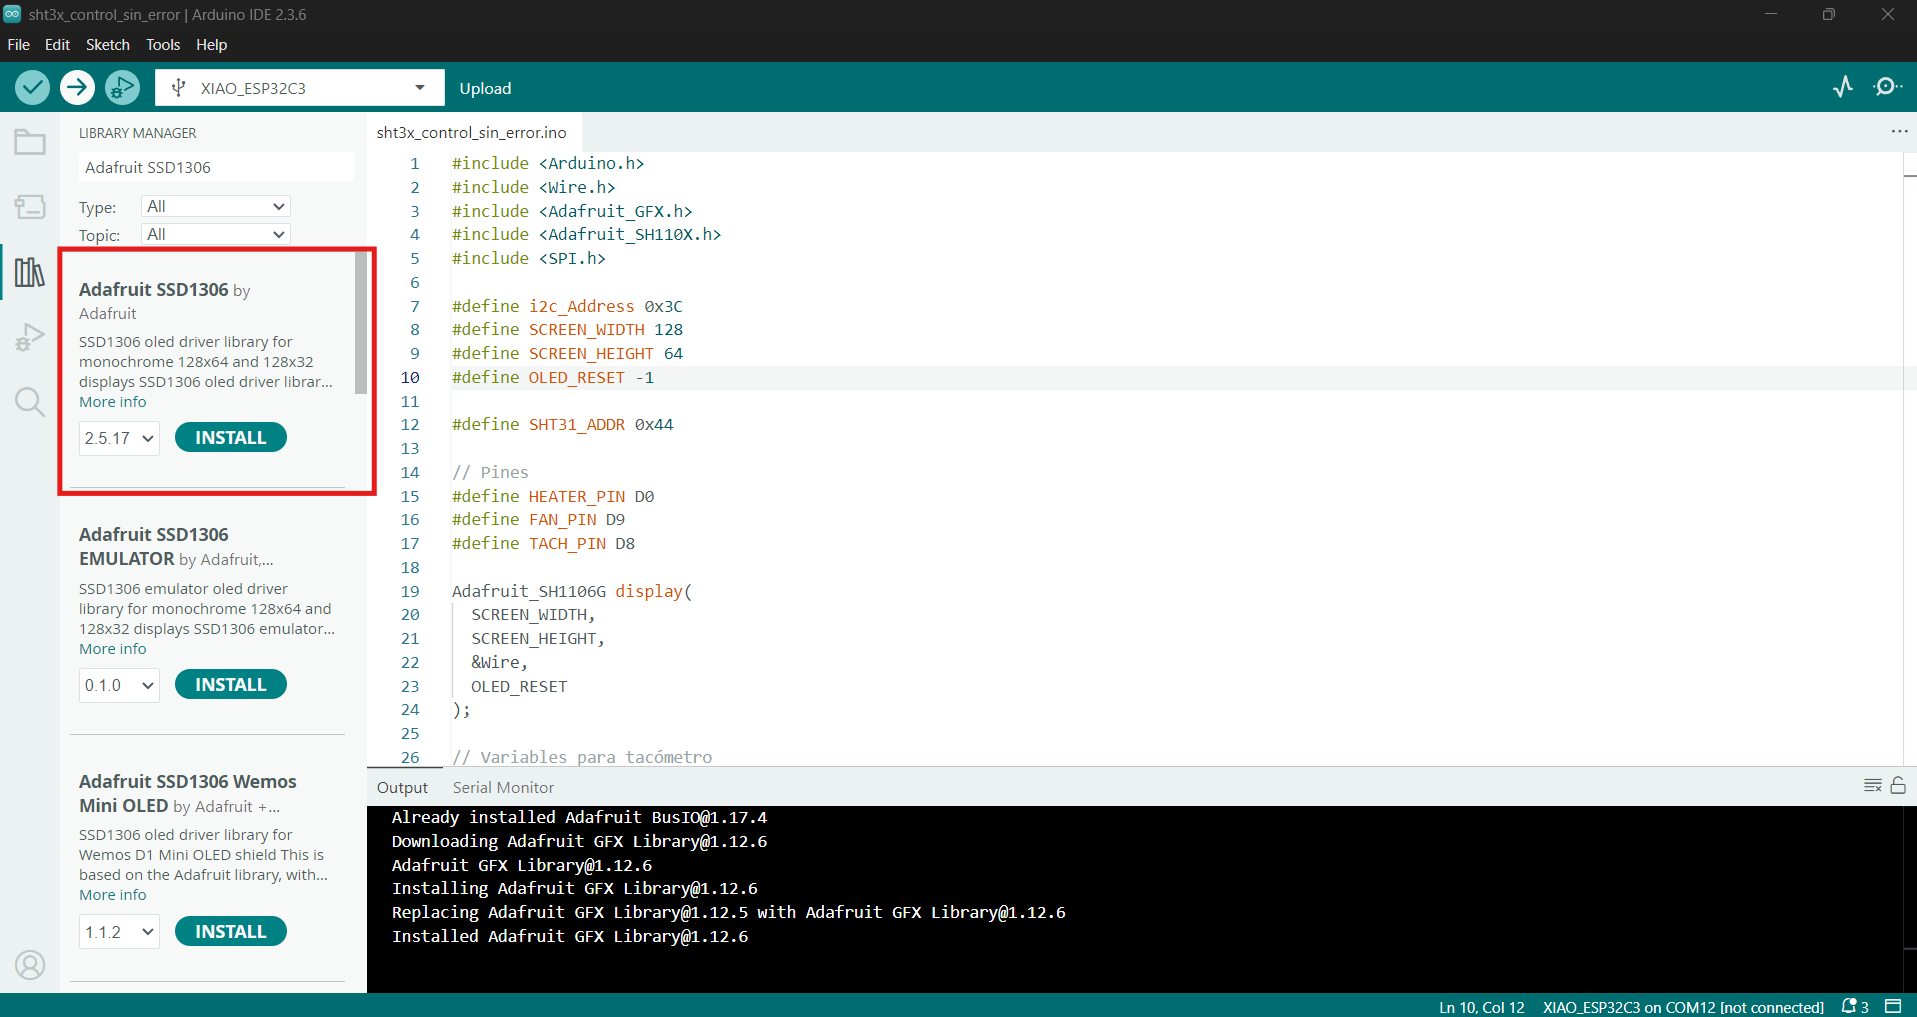
Step 4 — Include the libraries in the sketch
Once installed, the libraries are available to include at the top of the sketch with #include. From
that point I could create the sensor and display objects and use their functions directly (exactly the includes
used in the code below):
#include <Wire.h>
#include <Adafruit_GFX.h>
#include <Adafruit_SSD1306.h>
#include <Adafruit_SHT31.h>
Installing the libraries through the Library Manager (instead of downloading ZIP files manually) means the IDE keeps them updated and resolves the dependencies automatically, which avoids the typical "library not found" or missing-dependency compile errors.
Code
Arduino IDE
The code reads temperature and humidity via I2C from the SHT31 and displays both values on the OLED screen. The comments inside explain what each part does.
// ===== Libraries =====
#include <Wire.h>              // I2C communication (SDA/SCL)
#include <Adafruit_GFX.h>      // Base graphics library for the display
#include <Adafruit_SSD1306.h>  // Driver for the SSD1306 OLED
#include <Adafruit_SHT31.h>    // Driver for the SHT31 sensor

// ===== Display settings =====
#define SCREEN_WIDTH 128        // OLED width in pixels
#define SCREEN_HEIGHT 64        // OLED height in pixels
#define OLED_RESET -1           // No dedicated reset pin (shares the board reset)

// Create the display object on the I2C bus (Wire)
Adafruit_SSD1306 display(SCREEN_WIDTH, SCREEN_HEIGHT, &Wire, OLED_RESET);

// Create the sensor object
Adafruit_SHT31 sht31 = Adafruit_SHT31();

void setup() {
  Wire.begin();                          // Start the I2C bus

  display.begin(SSD1306_SWITCHCAPVCC, 0x3C); // Init OLED at I2C address 0x3C
  display.clearDisplay();                // Clear anything on screen

  sht31.begin(0x44);                     // Init SHT31 at I2C address 0x44
}

void loop() {
  float t = sht31.readTemperature();     // Read temperature in °C
  float h = sht31.readHumidity();        // Read relative humidity in %

  display.clearDisplay();                // Wipe the previous frame
  display.setTextColor(SSD1306_WHITE);   // White text

  // --- Title ---
  display.setTextSize(1);                // Small font
  display.setCursor(0, 0);               // Top-left corner
  display.println("Sensor SHT31");

  // --- Temperature ---
  display.setTextSize(2);                // Larger font for the value
  display.setCursor(0, 20);              // Move down
  display.print(t, 1);                   // Print temperature, 1 decimal
  display.println(" C");

  // --- Humidity ---
  display.setCursor(0, 45);              // Move further down
  display.print(h, 1);                   // Print humidity, 1 decimal
  display.println(" %");

  display.display();                     // Push the buffer to the screen

  delay(1000);                           // Wait 1 second before repeating
}
Code Explanation
Analysis
Libraries
The code uses Wire.h for I2C communication, Adafruit_SHT31.h to read the sensor, and
Adafruit_GFX.h with Adafruit_SSD1306.h to control the OLED display.
Initialization
In setup(), the I2C bus is started, the OLED is initialized at address 0x3C, and the
SHT31 sensor is initialized at address 0x44.
Reading the Sensor
In the loop, sht31.readTemperature() and sht31.readHumidity() return the temperature in
Celsius and the relative humidity in percentage.
Displaying the Data
The values are printed on the OLED using different text sizes and positions, and display.display()
updates the screen. The cycle repeats every second.
Result
System Behavior
The final system successfully reads temperature and humidity from the sensor and shows both values in real time on the OLED display.
- Stable readings from the sensor
- Temperature shown in °C
- Humidity shown in % RH
- Display updated every second
Reflection
This week demonstrated how input devices can be integrated into embedded systems and how their data can be presented to the user through a display.
Reading the SHT31 and showing its values on the OLED reinforced how the I2C protocol allows multiple devices to share the same bus. It also showed the continuity of the design process, from PCB design to real-world functionality.
Understanding how to read sensors and display their data is a key step toward building more complex systems, such as smart enclosures and environmental monitoring.