Week 14. Interface and Application Programming
Summary
This week we focused on learning how to create our own user interface with all the needs that each one requires according to their project. For this week I designed a system thta uses a web application hosted on a Xiao ESP32 C6, which allows remote control via a local network (my phone's hotspot); it uses WebSockets, allowing an immediate response (low latency) without needing to reload the page, making the response of sensors, camera and servomotors fluid and synchronized with touch commands from an iPhone/iOS.
Group assignment
Here is the group assignment to check more information about the topic embedded programming.
1. Basic concepts
1.1 What is communication via WebSockets?
They establish a permanent bidirectional communication channel that allows movement commands to reach the ESP32 with minimal, almost instantaneous latency.
1.2 What is GUI?
Graphical User Interface, is the set of visual elements (buttons, joysticks, indicators) that allow the user to interact with the system without writing code.
1.3 What is responsive Ddesign?
A web design technique that allows the interface to automatically adapt to the device's screen size. This ensures that the robot's controls are easy to press on both a computer and a mobile device, optimizing available space.
1.4 What is low latency?
This refers to the minimum delay between the user's action (pressing the "forward" button) and the robot's execution (the movement of its legs). In robotics interfaces, low latency is essential for safety and control accuracy.
1.4 What is event-driven programming?
Programming in which the program flow does not follow a fixed linear sequence, but is determined by the events that occur in the system: user actions, messages from other programs, or sensor signals.
1.4.1 How it works?
This type of prhramming consist of 3 functions:
The listener
Unlike a traditional program that runs from top to bottom and then terminates, a web control interface lives in a "listening" state. The code is inactive until the user interacts with the screen. In my case, the browser is constantly monitoring the elements of the control buttons.
The triggers
An event is the trigger, in a mobile interface for robotics, the most important events aren't mouse clicks, but rather Touch Events:
- Touchstart: Triggered when you touch the button. This event sends the move signal to the robot.
- Touchend: Triggered when you lift your finger. This is vital for safety, as it sends the stop instruction.
The event handle
This is the specific function that executes when the event occurs. Here is an example applied to my code that will be explained later:
- Event: The user presses the "Forward" button on their iPhone.
- Detection: The browser detects a touch start.
- Handler: A JavaScript function executes, wrapping a message (e.g., {"cmd": "forward"}) and sending it via the WebSocket.
- Hardware Action: The ESP32 receives the message and changes the position of the servos to initiate movement.
1.5 What is the Client-Server model?
It's a type of client-server architecture that functions like a conversation between a client and a server. Same architecture as I akready used in week 11
1.5.1 What is a client?
The client is the one who asks through a device where the user interacts with directly. In my case, it's my iPhone. Its function is to display a user-friendly interface and "translate" gestures (touching the screen) into data that a machine can understand. This part of the system that consumes visual resources and graphics processing power.
1.5.2 What is a server?
The server is the device that stores the information and executes the physical actions. In my case the server is the ESP32. Despite being a small chip, it acts as a "host." Its function is to listen for requests coming from the client. So when the client tells it to "move the leg," the server processes that logic and generates the electrical response on the motor pins.
1.5.3 How can the client and server talk?
For the client and server to understand each other, they need to speak the same language. This is where WebSockets (which I mentioned earlier) come in. They are the invisible cable that connects what you see on the screen frontend with what the processor does backend.
1.6 Software development concepts
To put the concepts explained above into practice in software development, these two areas (client and server) are formally defined as Frontend and Backend.
1.6.1 What is Frontend?
The frontend is everything the customer sees, touches, and experiences. It's the aesthetic and functional part that's user-facing. Is devided in 3 parts:
- HTML This is the structure. It tells you what options are available (Walk? Turn? Dance?). Without the interface, the user wouldn't know what the object can do.
- CSS: This is the atmosphere of the interface. This is wherethe style colors come in. It's what makes the experience pleasant, professional, and visually appealing.
- JavaScript: This is the active element. The JavaScript is attentive to gestures. When you point to something on the interface (tap a button on your iPhone), the JavaScript takes note of what you are trying to do and and tells to the backend to let them know your instruction.
1.6.2 What is a backend?
The backend is the internal part, the part the user never sees, but it's where the action is actually happening. It is devided in 3 parts:
- The ESP32 Processor: This is the brain. The brain doesn't know what the user looks like, nor does it care if the menu has pretty colors; it only receives an order (a command) and knows exactly which component to use and what steps to follow to execute the instruction.
- Logic in C++/Arduino: This is the code that tells the brain what to do. If the order is "Walk," the recipe indicates exactly the order and angle at which each of the servomotors should move.
- The Pins: These are the physical tools the brain uses to transform the order into something real (the robot's physical movement).
1.7 How all of this is applied in the task and project?
The frontend will be a webpage with red and blue gradients that appears on my phone. Its purpose is to allow you to give commands easily and visually allowing to control de servomotors knowing when the sensots are near an object and to stream video using a Xiao ESP32 S3.
The backend is the code that the ESP32 that receives the "Move Forward" command or send to the phone that the sensors are near an object, generates the electrical pulses that make the Spiderbot's legs move in sync.
For it to work, the frontend and backend need a system to communicate quickly, using WebSockets. This communication is immediate and always open. Therefore, when you move a finger, the backend is already executing the instruction from the frontend.
2. PCB used
2.1 Networking and communications PCB
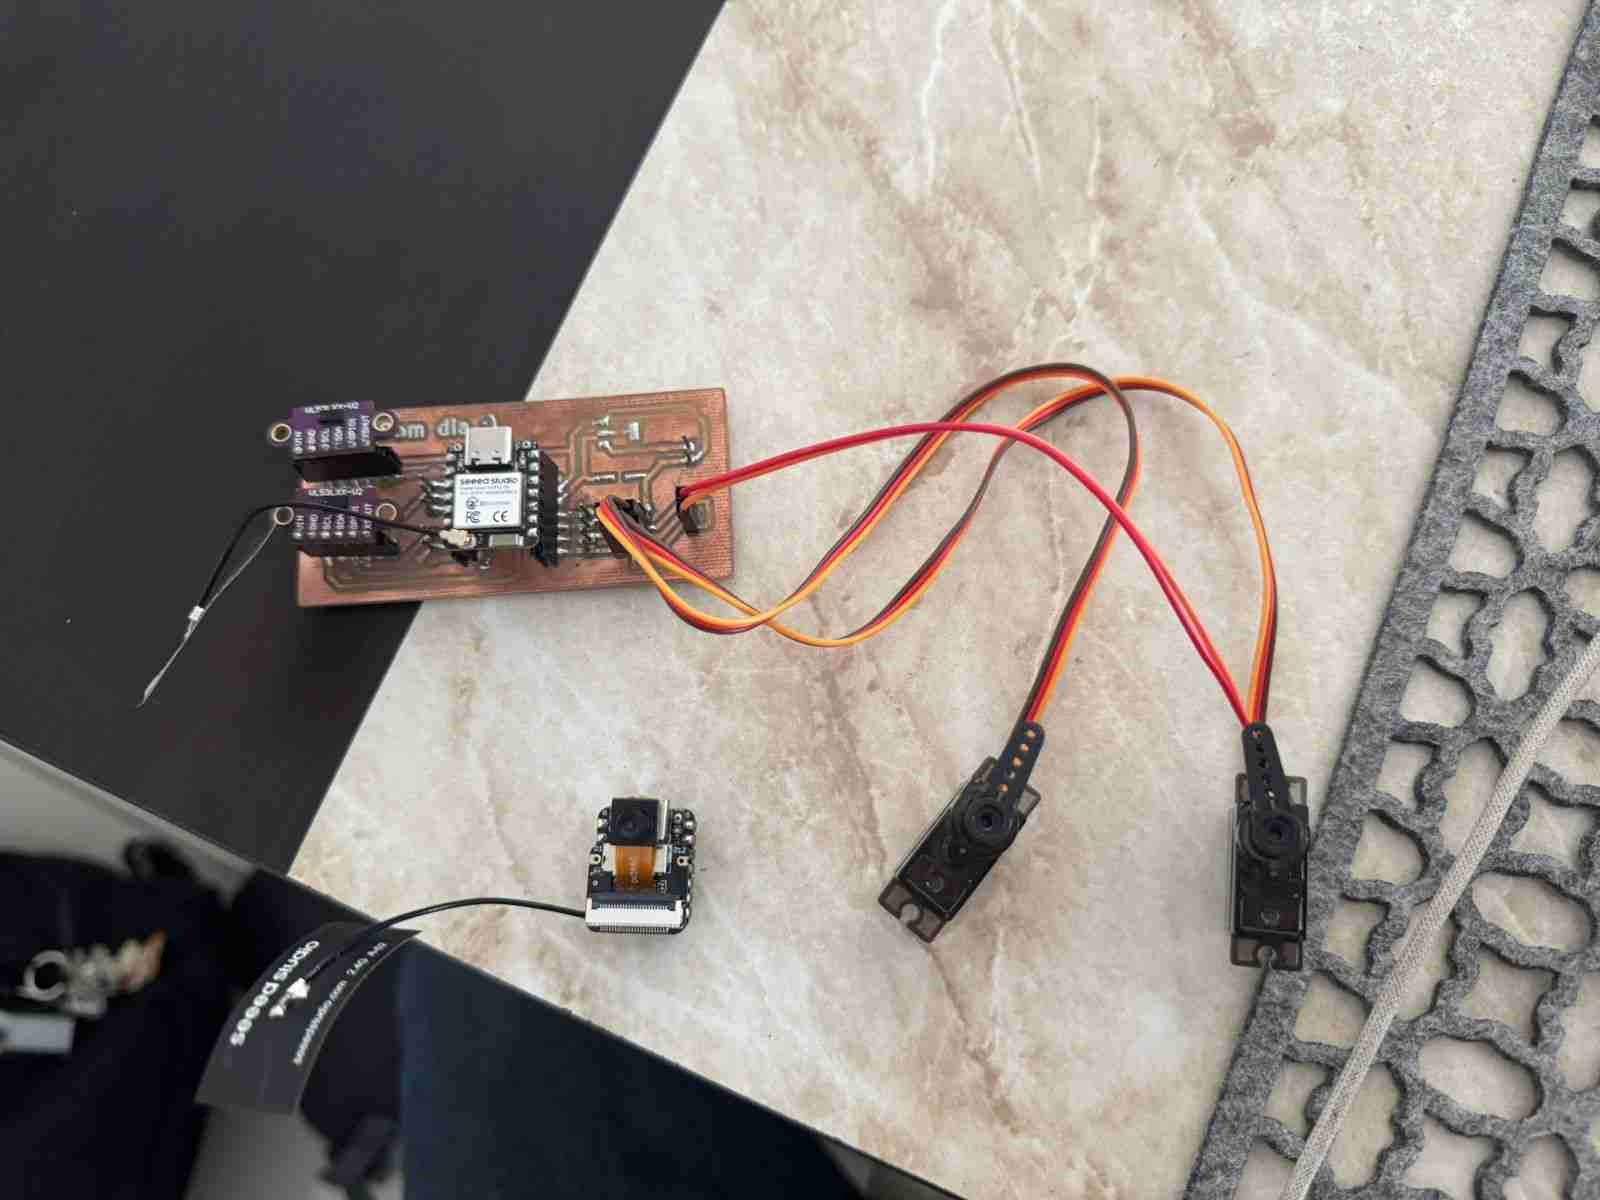
I used the pcb that I made during week 11 which has the flight sensors and pins for servomotors so I can test the functionality in my app. You can check this week assignment if you would like to know more about this PCB. The most important is that the Xshut pins from the flight sensors are conected to the pins of the Xiao and sorced with the 3.3V out of the same Xiao.
2.2 Stream video
For streaming video I will use a Xiao esp32 S3, which will stream the video through the same network of the 1st PCB, since the xiao itself generates a lot of heat when transmitting video, it will only be used for transmitting video.
If you would like to know how to use this microcontroller you can check the page from Seed studio where they teach you the first steps and example codes to use the camera. In my case I will use the stream video code to stream video in my interface, this will be better explained in the coding part.
3. User Interface (Frontend)
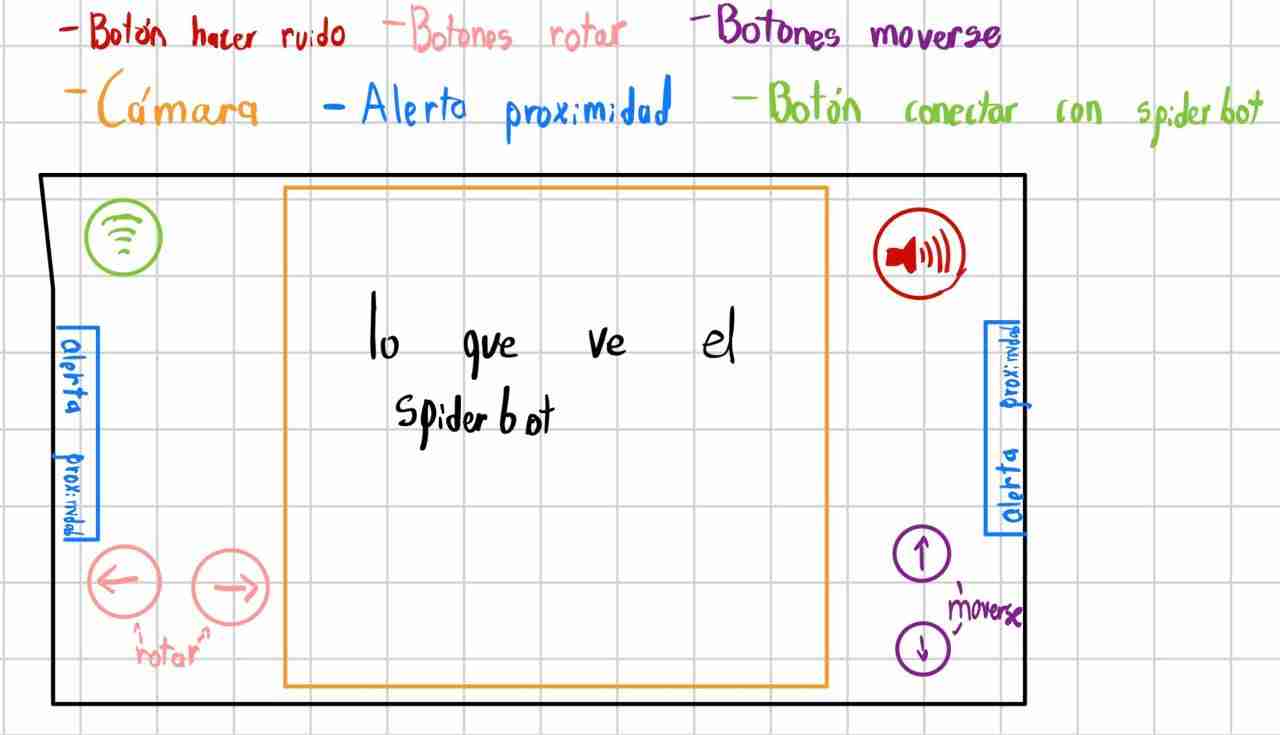
Since I want to control my spiderbot using my phone, I designed the user interface with mobile ergonomics in mind, placing the movement buttons in easily accessible areas for thumbs. I also made sure to make proximity alerts visible and that the camera uses as much of the screen as possible so the user can see in detail what the spiderbot will see in front of them.
Is important to say that I tried to use GitHub pages to have my webpage there but didn't work because of the iOS device; iOS itself doesn't allow sending or receiving data through unverified HTTPS pages, so when I tried to connect it was practically impossible. Therefore, I decided to implement my page directly on the microcontroller. That way, by simply typing the IP address into the browser, and without it being an HTTPS page, I can send and receive data using my iPhone. This is the easiest way to implement an interface in a iOS device with low latency.
3.1 Visual Identity
I decided to apply a custom aesthetic based on my "Spidey" preference for my documentation, which consists of a linear gradient from blue to red with white text and translucent backgrounds (rgba(255, 255, 255, 0.1)). Maintaining consistency with my documentation site, I integrated Twenty One Pilots color palettes (Bandito Yellow and Bishop Red) and visual concepts from the "Clancy" era into the borders.
3.2 Technical Implementation
- Layout (HTML5): HTML was used to define the interface structure, creating specific containers for the live video feed and the Spiderbot control panels.
- Styles (CSS): I implemented the styles using a stylesheet that utilizes Media Queries to ensure the interface is responsive, specifically adapting to the dimensions of an iPhone.
- Interactivity (JavaScript): The logic was programmed to capture touch events (touchstart and touchend), sending immediate commands via WebSockets to avoid any delay in the robot's movement.
For the code implementation, I used AI (Gemini) as a programming assistant. Starting from my initial sketches and technical requirements (visual style, use of WebSockets, and control of servos), we worked giving feedback each other to refine the frontend code, ensuring that the communication logic was compatible with the ESP32 backend.
4. Logic and Communication (Backend)
It functions as a server that processes information in real time in the Xiao esp32 C6, It is devided in 3 main parts.
- Web Server and File Management: The first task of the backend is to serve the interface to the client, using local hosting with the ESP32. This was configured in Access Point (AP) mode or connected to a local network to host the HTML, CSS, and JS files. Then, when I access the robot's IP address from my iPhone, the backend delivers the frontend I designed, allowing the interface to appear in the browser.
- The communication engine WebSockets: To achieve smooth control of a hexapod, standard HTTP communication was insufficient due to its slowness as I needed persistent connection I implemented a WebSocket server that maintains a permanently open channel between the phone and the robot. So The C++ code is programmed to "listen" for text strings or JSON packets (such as "FORWARD", "STOP", or specific angles). Upon receiving a message, the ESP32 immediately translates it into an instruction for the servos.
- Control of the servomotors: I used specific libraries to handle PWM signals simultaneously, ensuring that each MG90s receives the exact position. Due to the need for precise control, the code includes instantaneous braking logic. The motors are only activated while the touchstart event is active; as soon as the touchend signal is received from the frontend, the backend stops all movement sequences to prevent collisions or damage.
For the creation and refinement of both the frontend and backend code, I used Gemini as a technical assistant. My process consisted of first defining the system architecture and physical requirements (control of servos and sensors, use of ESP32, and communication via WebSockets). From there, we worked iteratively: I provided the movement logic and the desired visual design (Spidey and Clancy style), and the AI helped structure the JavaScript functions and server management in C++. This allowed me to ensure robust communication and that the responsive interface worked perfectly on iOS.
5. Making the code
5.1 SpiderBot Control Backend
5.1.1 Defining libraries, credentials and objects
| Command | Function |
|---|---|
#include <WiFi.h> |
Libraries for managing WiFi connectivity and hosting the HTTP server on the ESP32. |
#include <WebSocketsServer.h> |
Enables real-time, low-latency communication between the ESP32 and the frontend. |
#include <Wire.h> |
Libraries for I2C communication and reading the Time-of-Flight (ToF) distance sensors. |
#include <ESP32Servo.h> |
Specific library to control servomotors using ESP32 hardware timers. |
WebServer server(80); |
Initializes the HTTP server on Port 80 and the WebSocket server on Port 81. |
VL53L0X sensor1; |
Creates the objects for the physical actuators (Servos) and proximity sensors. |
const char interfaz_html[] PROGMEM = R"rawliteral(...)"; |
Stores the entire HTML/CSS/JS frontend code in the ESP32's flash memory (PROGMEM) to save RAM. |
5.1.2 Additional Functions (Event Handlers)
| Command | Function |
|---|---|
void handleRoot() |
Function that sends the interfaz_html string to the client when they access the ESP32's IP address. |
void webSocketEvent(...) |
Callback function that triggers whenever a new WebSocket message is received. |
if(type == WStype_TEXT) |
Checks if the incoming WebSocket payload is a text message. |
if(cmd == "F") { sIzquierdo.write(180); ... } |
Translates incoming text commands from the iPhone interface into specific servo angles for movement. |
else if(cmd == "B") { digitalWrite(PIN_BUZZER, HIGH); } |
Activates the buzzer when the specific command is received. |
5.1.3 void setup
| Command | Function |
|---|---|
Serial.begin(115200); |
Starts serial communication for debugging purposes. |
sIzquierdo.attach(17); |
Links the servo objects to their specific GPIO pins on the ESP32. |
Wire.begin(22, 23); |
Initializes the I2C bus defining custom SDA (22) and SCL (23) pins. |
sensor1.setAddress(0x30); |
Changes the default I2C address of the first sensor to avoid conflicts with the second one. |
WiFi.begin(ssid, password); |
Starts the connection process to the specified wireless network. |
server.on("/", handleRoot); |
Routes the root URL ("/") to the handler function and starts the HTTP server. |
webSocket.begin(); |
Starts the WebSocket server and links it to the event handler function defined earlier. |
5.1.4 void loop
| Command | Function |
|---|---|
server.handleClient(); |
Listens for incoming HTTP requests to load the webpage interface. |
webSocket.loop(); |
Keeps the WebSocket connection alive and processes incoming/outgoing packets. |
if (millis() - lastCheck > 100) |
Creates a non-blocking delay to check the distance sensors every 100 milliseconds. |
uint16_t d1 = sensor1.readRangeSingleMillimeters(); |
Reads the distance measured by the ToF sensor in millimeters. |
if(d1 > 150) webSocket.broadcastTXT("L_CERCA"); |
Sends a text alert to the connected frontend if an object is closer than 150mm. |
Here is the backend part:
#include <WiFi.h>
#include <WebSocketsServer.h>
#include <WebServer.h>
#include <Wire.h>
#include <VL53L0X.h>
#include <ESP32Servo.h>
const char* ssid = "Joseph";
const char* password = "abcdefgq";
// --- Hardware ---
WebServer server(80);
WebSocketsServer webSocket = WebSocketsServer(81);
VL53L0X sensor1;
VL53L0X sensor2;
Servo sIzquierdo;
Servo sDerecho;
const int PIN_SHT1 = 0;
const int PIN_SHT2 = 1;
const int PIN_BUZZER = 20;
void handleRoot() {
server.send(200, "text/html", interfaz_html);
}
void webSocketEvent(uint8_t num, WStype_t type, uint8_t * payload, size_t length) {
if(type == WStype_TEXT) {
String cmd = (char*)(payload);
if(cmd == "F") { sIzquierdo.write(180); sDerecho.write(0); }
else if(cmd == "L") { sIzquierdo.write(0); sDerecho.write(0); }
else if(cmd == "R") { sIzquierdo.write(180); sDerecho.write(180); }
else if(cmd == "S") { sIzquierdo.write(90); sDerecho.write(90); }
else if(cmd == "B") { digitalWrite(PIN_BUZZER, HIGH); }
else if(cmd == "Q") { digitalWrite(PIN_BUZZER, LOW); }
}
}
void setup() {
Serial.begin(115200);
pinMode(PIN_BUZZER, OUTPUT);
pinMode(PIN_SHT1, OUTPUT);
pinMode(PIN_SHT2, OUTPUT);
sIzquierdo.attach(17);
sDerecho.attach(19);
sIzquierdo.write(90);
sDerecho.write(90);
digitalWrite(PIN_SHT1, LOW); digitalWrite(PIN_SHT2, LOW);
delay(10);
Wire.begin(22, 23);
digitalWrite(PIN_SHT1, HIGH); delay(10);
sensor1.init(); sensor1.setAddress(0x30);
digitalWrite(PIN_SHT2, HIGH); delay(10);
sensor2.init(); sensor2.setAddress(0x31);
WiFi.begin(ssid, password);
while (WiFi.status() != WL_CONNECTED) { delay(500); Serial.print("."); }
// Configurar rutas del servidor
server.on("/", handleRoot);
server.begin();
webSocket.begin();
webSocket.onEvent(webSocketEvent);
Serial.println("\nSpiderBot Listo");
Serial.print("Interfaz disponible en: http://"); Serial.println(WiFi.localIP());
}
void loop() {
server.handleClient(); // Maneja las peticiones del iPhone para ver la página
webSocket.loop();
static unsigned long lastCheck = 0;
if (millis() - lastCheck > 100) {
uint16_t d1 = sensor1.readRangeSingleMillimeters();
uint16_t d2 = sensor2.readRangeSingleMillimeters();
if(d1 < 150) webSocket.broadcastTXT("L_CERCA");
else webSocket.broadcastTXT("L_LIBRE");
if(d2 < 150) webSocket.broadcastTXT("R_CERCA");
else webSocket.broadcastTXT("R_LIBRE");
lastCheck = millis();
}
}
5.2 SpiderBot Control Frontend (UI)
The frontend is stored as a raw literal string in the ESP32's memory and is sent to the browser when the user connects. It defines the visual layout and the logic for sending touch commands.
5.2.1 HTML Structure (The Layout)
| Element | Function |
|---|---|
<div id="camera-view"> |
A container designed to display the real-time video stream from the ESP32-S3 camera. |
<div class="panel-left"> |
Contains the rotation controls (Left/Right arrows) for the robot's movement. |
<div class="panel-right"> |
Contains the linear movement controls (Forward/Backward arrows). |
ontouchstart="send('F')" |
Event listener that triggers the movement command as soon as the user touches the button. |
ontouchend="send('S')" |
Critical safety event that sends the "Stop" command immediately after the user lifts their finger. |
5.2.2 CSS Styling (The "Spidey" Aesthetic)
| Property | Visual Effect |
|---|---|
linear-gradient(135deg, var(--spidey-blue), var(--spidey-red)) |
Creates the characteristic blue-to-red background gradient of the Spider-Man theme. |
backdrop-filter: blur(10px); |
Creates a "Glassmorphism" effect on the control panels, making them translucent and modern. |
@media (orientation: portrait) |
Responsive rule that shows a rotation warning if the user holds the phone vertically. |
-webkit-tap-highlight-color: transparent; |
Removes the default gray box that appears on mobile browsers when touching buttons. |
5.2.3 JavaScript Logic (Communication & UX)
| Function | Role in the Interface |
|---|---|
new WebSocket(`ws://${IP_C6}:81`) |
Establishes the persistent WebSocket tunnel for real-time control. |
socket.onmessage = (event) => { ... } |
Listens for data from the ESP32 (like proximity alerts) and updates the UI colors in real-time. |
function send(cmd) |
Sends the movement character (F, L, R, S) through the WebSocket tunnel to the robot. |
window.navigator.vibrate(40); |
Provides Haptic Feedback, making the phone vibrate slightly when a command is sent for a better feel. |
document.getElementById('stream-img').src = ... |
Links the image element to the MJPEG stream URL of the camera module. |
Here is the frontend part, this part goes after defining libraries, variables and cosntants and before the void handleRoot:
const char interfaz_html[] PROGMEM = R"rawliteral(
<!DOCTYPE html>
<html lang="es">
<head>
<meta charset="UTF-8">
<meta name="viewport" content="width=device-width, initial-scale=1.0, maximum-scale=1.0, user-scalable=no, viewport-fit=cover">
<title>SpiderBot Control</title>
<style>
:root {
--spidey-blue: #001f3f;
--spidey-red: #8b0000;
--glass: rgba(255, 255, 255, 0.1);
--vh: 1vh;
}
* {
box-sizing: border-box;
-webkit-tap-highlight-color: transparent;
user-select: none;
}
body {
margin: 0;
padding: 0;
height: calc(var(--vh, 1vh) * 100);
width: 100vw;
overflow: hidden;
font-family: 'Segoe UI', Tahoma, Geneva, Verdana, sans-serif;
background: linear-gradient(135deg, var(--spidey-blue), var(--spidey-red));
color: white;
}
#app-container {
display: grid;
grid-template-columns: 140px 1fr 140px;
grid-template-rows: 70px 1fr 70px;
height: 100%;
width: 100%;
padding: 15px 30px;
gap: 10px;
}
#camera-view {
grid-column: 1 / 4;
grid-row: 1 / 4;
border: 2px solid #ff9800;
background: #000;
border-radius: 20px;
z-index: 1;
overflow: hidden;
display: flex;
justify-content: center;
align-items: center;
}
#camera-view img {
width: 100%;
height: 100%;
object-fit: cover;
}
#connect-btn {
position: absolute;
top: 20px;
left: 50%;
transform: translateX(-50%);
z-index: 100;
padding: 10px 20px;
border-radius: 25px;
background: #28a745;
border: 2px solid white;
color: white;
font-weight: bold;
box-shadow: 0 4px 15px rgba(0,0,0,0.5);
transition: all 0.2s ease;
}
#connect-btn:active, #connect-btn:hover {
background: rgba(255, 255, 255, 0.3);
color: white;
transform: translateX(-50%) scale(0.95);
box-shadow: 0 2px 8px rgba(255,255,255,0.4);
}
.panel {
z-index: 10;
background: rgba(0, 0, 0, 0.6);
backdrop-filter: blur(10px);
border-radius: 25px;
display: flex;
flex-direction: column;
justify-content: center;
align-items: center;
gap: 20px;
border: 1px solid rgba(255,255,255,0.2);
}
.panel-left { grid-column: 1; grid-row: 2; }
.panel-right { grid-column: 3; grid-row: 2; }
.btn {
width: 65px;
height: 65px;
border-radius: 50%;
border: 2px solid white;
background: var(--glass);
display: flex;
justify-content: center;
align-items: center;
font-size: 28px;
transition: all 0.2s;
}
.btn:active {
background: white;
color: black;
transform: scale(0.9);
}
.alert {
position: absolute;
top: 25%;
bottom: 25%;
width: 35px;
border: 2px solid #007bff;
z-index: 5;
display: flex;
align-items: center;
justify-content: center;
writing-mode: vertical-rl;
font-size: 11px;
font-weight: bold;
border-radius: 8px;
background: rgba(0, 123, 255, 0.1);
transition: background 0.3s;
}
.alert-L { left: 200px; }
.alert-R { right: 200px; }
#buzzer-area {
grid-column: 3;
grid-row: 1;
display: flex;
justify-content: center;
align-items: center;
z-index: 10;
}
#rotation-overlay {
display: none;
position: fixed;
top: 0; left: 0; width: 100%; height: 100%;
background: #000;
z-index: 9999;
flex-direction: column;
justify-content: center;
align-items: center;
text-align: center;
}
@media (orientation: portrait) {
#rotation-overlay { display: flex; }
}
</style>
</head>
<body>
<div id="rotation-overlay">
<h1>🔄 ROTAR DISPOSITIVO</h1>
<p>Activa el modo horizontal para controlar el SpiderBot.</p>
</div>
<button id="connect-btn" onclick="initApp()">CONECTAR SPIDERBOT</button>
<div id="app-container">
<div id="camera-view">
<img id="stream-img" src="" alt="Esperando transmisión...">
</div>
<div id="alert-L" class="alert alert-L">PROXIMIDAD IZQ</div>
<div id="alert-R" class="alert alert-R">PROXIMIDAD DER</div>
<div class="panel panel-left">
<div class="btn" ontouchstart="send('L')" ontouchend="send('S')">←</div>
<small>ROTAR</small>
<div class="btn" ontouchstart="send('R')" ontouchend="send('S')">→</div>
</div>
<div id="buzzer-area">
<div class="btn" style="border-color: #ff4444; font-size: 22px;" ontouchstart="send('B')" ontouchend="send('Q')">🔔</div>
</div>
<div class="panel panel-right">
<div class="btn" ontouchstart="send('F')" ontouchend="send('S')">↑</div>
<small>MOVER</small>
<div class="btn" ontouchstart="send('BWD')" ontouchend="send('S')">↓</div>
</div>
</div>
<script>
let socket;
const IP_C6 = "172.20.10.3";
const IP_S3 = "172.20.10.2";
function setDocHeight() {
document.documentElement.style.setProperty('--vh', `${window.innerHeight * 0.01}px`);
}
window.addEventListener('resize', setDocHeight);
setDocHeight();
function initApp() {
document.getElementById('stream-img').src = `http://${IP_S3}:81/stream`;
socket = new WebSocket(`ws://${IP_C6}:81`);
socket.onopen = () => {
const btn = document.getElementById('connect-btn');
btn.innerText = "CONECTADO";
btn.style.background = "#007bff";
};
socket.onmessage = (event) => {
const data = event.data;
if(data === "L_CERCA") document.getElementById('alert-L').style.background = "rgba(255, 0, 0, 0.8)";
if(data === "L_LIBRE") document.getElementById('alert-L').style.background = "rgba(0, 123, 255, 0.1)";
if(data === "R_CERCA") document.getElementById('alert-R').style.background = "rgba(255, 0, 0, 0.8)";
if(data === "R_LIBRE") document.getElementById('alert-R').style.background = "rgba(0, 123, 255, 0.1)";
};
socket.onclose = () => {
document.getElementById('connect-btn').innerText = "RECONECTAR";
document.getElementById('connect-btn').style.background = "#dc3545";
};
}
function send(cmd) {
if(socket && socket.readyState === WebSocket.OPEN) {
socket.send(cmd);
}
if(window.navigator.vibrate && cmd !== 'S') {
window.navigator.vibrate(40);
}
}
</script>
</body>
</html>
)rawliteral";
5.3 SpiderBot streaming video
For this part I only changed the ssid and password to the ones of my phone's hotspot and then copy and paste the ip in the backend part. If you wants to see more information you can check the documentation of how the code works here at Camera usage in Seeed Studio XIAO ESP32S3 Sense.
In resume the code I used that is the one for streaming video example in the version 3.0x when uploaded to the Xiao it give us an IP which if you copy and paste it in your browser you can start streaming video from the camera. In my case as I already said I paste that IP in the backend of my code to stream the video in my webpage. Is also important to say that you can only stream video in 1 device, if you try to stream on a 2 device that second device won't show any video. Also that ir requieres the other 4 files to function because the main code to extract values and data from the other files, it is therefore necessary to download all the files from the GitHub repository that Seed Studio provides, it will download more files and folders but for this assignment I only used the folder CameraWebServer.
Here is the main code but if you copy and paste it alone without the other files it won't work. The complete folder will be below on the files section.
                #include "esp_camera.h"
                #include <WiFi.h>

                //
                // WARNING!!! PSRAM IC required for UXGA resolution and high JPEG quality
                //            Ensure ESP32 Wrover Module or other board with PSRAM is selected
                //            Partial images will be transmitted if image exceeds buffer size
                //
                //            You must select partition scheme from the board menu that has at least 3MB APP space.
                //            Face Recognition is DISABLED for ESP32 and ESP32-S2, because it takes up from 15
                //            seconds to process single frame. Face Detection is ENABLED if PSRAM is enabled as well

                // ===================
                // Select camera model
                // ===================
                #define CAMERA_MODEL_XIAO_ESP32S3 // Has PSRAM
                #include "camera_pins.h"

                // ===========================
                // Enter your WiFi credentials
                // ===========================
                const char *ssid = "Joseph";
                const char *password = "abcdefgq";

                void startCameraServer();
                void setupLedFlash(int pin);

                void setup() {
                Serial.begin(115200);
                Serial.setDebugOutput(true);
                Serial.println();

                camera_config_t config;
                config.ledc_channel = LEDC_CHANNEL_0;
                config.ledc_timer = LEDC_TIMER_0;
                config.pin_d0 = Y2_GPIO_NUM;
                config.pin_d1 = Y3_GPIO_NUM;
                config.pin_d2 = Y4_GPIO_NUM;
                config.pin_d3 = Y5_GPIO_NUM;
                config.pin_d4 = Y6_GPIO_NUM;
                config.pin_d5 = Y7_GPIO_NUM;
                config.pin_d6 = Y8_GPIO_NUM;
                config.pin_d7 = Y9_GPIO_NUM;
                config.pin_xclk = XCLK_GPIO_NUM;
                config.pin_pclk = PCLK_GPIO_NUM;
                config.pin_vsync = VSYNC_GPIO_NUM;
                config.pin_href = HREF_GPIO_NUM;
                config.pin_sccb_sda = SIOD_GPIO_NUM;
                config.pin_sccb_scl = SIOC_GPIO_NUM;
                config.pin_pwdn = PWDN_GPIO_NUM;
                config.pin_reset = RESET_GPIO_NUM;
                config.xclk_freq_hz = 20000000;
                config.frame_size = FRAMESIZE_UXGA;
                config.pixel_format = PIXFORMAT_JPEG;  // for streaming
                //config.pixel_format = PIXFORMAT_RGB565; // for face detection/recognition
                config.grab_mode = CAMERA_GRAB_WHEN_EMPTY;
                config.fb_location = CAMERA_FB_IN_PSRAM;
                config.jpeg_quality = 12;
                config.fb_count = 1;

                // if PSRAM IC present, init with UXGA resolution and higher JPEG quality
                //                      for larger pre-allocated frame buffer.
                if (config.pixel_format == PIXFORMAT_JPEG) {
                    if (psramFound()) {
                    config.jpeg_quality = 10;
                    config.fb_count = 2;
                    config.grab_mode = CAMERA_GRAB_LATEST;
                    } else {
                    // Limit the frame size when PSRAM is not available
                    config.frame_size = FRAMESIZE_SVGA;
                    config.fb_location = CAMERA_FB_IN_DRAM;
                    }
                } else {
                    // Best option for face detection/recognition
                    config.frame_size = FRAMESIZE_240X240;
                #if CONFIG_IDF_TARGET_ESP32S3
                    config.fb_count = 2;
                #endif
                }

                #if defined(CAMERA_MODEL_ESP_EYE)
                pinMode(13, INPUT_PULLUP);
                pinMode(14, INPUT_PULLUP);
                #endif

                // camera init
                esp_err_t err = esp_camera_init(&config);
                if (err != ESP_OK) {
                    Serial.printf("Camera init failed with error 0x%x", err);
                    return;
                }

                sensor_t *s = esp_camera_sensor_get();
                // initial sensors are flipped vertically and colors are a bit saturated
                if (s->id.PID == OV3660_PID) {
                    s->set_vflip(s, 1);        // flip it back
                    s->set_brightness(s, 1);   // up the brightness just a bit
                    s->set_saturation(s, -2);  // lower the saturation
                }
                // drop down frame size for higher initial frame rate
                if (config.pixel_format == PIXFORMAT_JPEG) {
                    s->set_framesize(s, FRAMESIZE_QVGA);
                }

                #if defined(CAMERA_MODEL_M5STACK_WIDE) || defined(CAMERA_MODEL_M5STACK_ESP32CAM)
                s->set_vflip(s, 1);
                s->set_hmirror(s, 1);
                #endif

                #if defined(CAMERA_MODEL_ESP32S3_EYE)
                s->set_vflip(s, 1);
                #endif

                // Setup LED FLash if LED pin is defined in camera_pins.h
                #if defined(LED_GPIO_NUM)
                setupLedFlash(LED_GPIO_NUM);
                #endif

                WiFi.begin(ssid, password);
                WiFi.setSleep(false);

                while (WiFi.status() != WL_CONNECTED) {
                    delay(500);
                    Serial.print(".");
                }
                Serial.println("");
                Serial.println("WiFi connected");

                startCameraServer();

                Serial.print("Camera Ready! Use 'http://");
                Serial.print(WiFi.localIP());
                Serial.println("' to connect");
                }

                void loop() {
                // Do nothing. Everything is done in another task by the web server
                delay(10000);
                }
6. Results
Here is the complete code that needs to be on the Xiao esp32 C6 with the backend and frontend linked:
#include <WiFi.h>
#include <WebSocketsServer.h>
#include <WebServer.h>
#include <Wire.h>
#include <VL53L0X.h>
#include <ESP32Servo.h>
const char* ssid = "Joseph";
const char* password = "abcdefgq";
// --- Hardware ---
WebServer server(80);
WebSocketsServer webSocket = WebSocketsServer(81);
VL53L0X sensor1;
VL53L0X sensor2;
Servo sIzquierdo;
Servo sDerecho;
const int PIN_SHT1 = 0;
const int PIN_SHT2 = 1;
const int PIN_BUZZER = 20;
const char interfaz_html[] PROGMEM = R"rawliteral(
<!DOCTYPE html>
<html lang="es">
<head>
<meta charset="UTF-8">
<meta name="viewport" content="width=device-width, initial-scale=1.0, maximum-scale=1.0, user-scalable=no, viewport-fit=cover">
<title>SpiderBot Control</title>
<style>
:root {
--spidey-blue: #001f3f;
--spidey-red: #8b0000;
--glass: rgba(255, 255, 255, 0.1);
--vh: 1vh;
}
* {
box-sizing: border-box;
-webkit-tap-highlight-color: transparent;
user-select: none;
}
body {
margin: 0;
padding: 0;
height: calc(var(--vh, 1vh) * 100);
width: 100vw;
overflow: hidden;
font-family: 'Segoe UI', Tahoma, Geneva, Verdana, sans-serif;
background: linear-gradient(135deg, var(--spidey-blue), var(--spidey-red));
color: white;
}
#app-container {
display: grid;
grid-template-columns: 140px 1fr 140px;
grid-template-rows: 70px 1fr 70px;
height: 100%;
width: 100%;
padding: 15px 30px;
gap: 10px;
}
#camera-view {
grid-column: 1 / 4;
grid-row: 1 / 4;
border: 2px solid #ff9800;
background: #000;
border-radius: 20px;
z-index: 1;
overflow: hidden;
display: flex;
justify-content: center;
align-items: center;
}
#camera-view img {
width: 100%;
height: 100%;
object-fit: cover;
}
#connect-btn {
position: absolute;
top: 20px;
left: 50%;
transform: translateX(-50%);
z-index: 100;
padding: 10px 20px;
border-radius: 25px;
background: #28a745;
border: 2px solid white;
color: white;
font-weight: bold;
box-shadow: 0 4px 15px rgba(0,0,0,0.5);
transition: all 0.2s ease;
}
#connect-btn:active, #connect-btn:hover {
background: rgba(255, 255, 255, 0.3);
color: white;
transform: translateX(-50%) scale(0.95);
box-shadow: 0 2px 8px rgba(255,255,255,0.4);
}
.panel {
z-index: 10;
background: rgba(0, 0, 0, 0.6);
backdrop-filter: blur(10px);
border-radius: 25px;
display: flex;
flex-direction: column;
justify-content: center;
align-items: center;
gap: 20px;
border: 1px solid rgba(255,255,255,0.2);
}
.panel-left { grid-column: 1; grid-row: 2; }
.panel-right { grid-column: 3; grid-row: 2; }
.btn {
width: 65px;
height: 65px;
border-radius: 50%;
border: 2px solid white;
background: var(--glass);
display: flex;
justify-content: center;
align-items: center;
font-size: 28px;
transition: all 0.2s;
}
.btn:active {
background: white;
color: black;
transform: scale(0.9);
}
.alert {
position: absolute;
top: 25%;
bottom: 25%;
width: 35px;
border: 2px solid #007bff;
z-index: 5;
display: flex;
align-items: center;
justify-content: center;
writing-mode: vertical-rl;
font-size: 11px;
font-weight: bold;
border-radius: 8px;
background: rgba(0, 123, 255, 0.1);
transition: background 0.3s;
}
.alert-L { left: 200px; }
.alert-R { right: 200px; }
#buzzer-area {
grid-column: 3;
grid-row: 1;
display: flex;
justify-content: center;
align-items: center;
z-index: 10;
}
#rotation-overlay {
display: none;
position: fixed;
top: 0; left: 0; width: 100%; height: 100%;
background: #000;
z-index: 9999;
flex-direction: column;
justify-content: center;
align-items: center;
text-align: center;
}
@media (orientation: portrait) {
#rotation-overlay { display: flex; }
}
</style>
</head>
<body>
<div id="rotation-overlay">
<h1>🔄 ROTAR DISPOSITIVO</h1>
<p>Activa el modo horizontal para controlar el SpiderBot.</p>
</div>
<button id="connect-btn" onclick="initApp()">CONECTAR SPIDERBOT</button>
<div id="app-container">
<div id="camera-view">
<img id="stream-img" src="" alt="Esperando transmisión...">
</div>
<div id="alert-L" class="alert alert-L">PROXIMIDAD IZQ</div>
<div id="alert-R" class="alert alert-R">PROXIMIDAD DER</div>
<div class="panel panel-left">
<div class="btn" ontouchstart="send('L')" ontouchend="send('S')">←</div>
<small>ROTAR</small>
<div class="btn" ontouchstart="send('R')" ontouchend="send('S')">→</div>
</div>
<div id="buzzer-area">
<div class="btn" style="border-color: #ff4444; font-size: 22px;" ontouchstart="send('B')" ontouchend="send('Q')">🔔</div>
</div>
<div class="panel panel-right">
<div class="btn" ontouchstart="send('F')" ontouchend="send('S')">↑</div>
<small>MOVER</small>
<div class="btn" ontouchstart="send('BWD')" ontouchend="send('S')">↓</div>
</div>
</div>
<script>
let socket;
const IP_C6 = "172.20.10.3";
const IP_S3 = "172.20.10.2";
function setDocHeight() {
document.documentElement.style.setProperty('--vh', `${window.innerHeight * 0.01}px`);
}
window.addEventListener('resize', setDocHeight);
setDocHeight();
function initApp() {
document.getElementById('stream-img').src = `http://${IP_S3}:81/stream`;
socket = new WebSocket(`ws://${IP_C6}:81`);
socket.onopen = () => {
const btn = document.getElementById('connect-btn');
btn.innerText = "CONECTADO";
btn.style.background = "#007bff";
};
socket.onmessage = (event) => {
const data = event.data;
if(data === "L_CERCA") document.getElementById('alert-L').style.background = "rgba(255, 0, 0, 0.8)";
if(data === "L_LIBRE") document.getElementById('alert-L').style.background = "rgba(0, 123, 255, 0.1)";
if(data === "R_CERCA") document.getElementById('alert-R').style.background = "rgba(255, 0, 0, 0.8)";
if(data === "R_LIBRE") document.getElementById('alert-R').style.background = "rgba(0, 123, 255, 0.1)";
};
socket.onclose = () => {
document.getElementById('connect-btn').innerText = "RECONECTAR";
document.getElementById('connect-btn').style.background = "#dc3545";
};
}
function send(cmd) {
if(socket && socket.readyState === WebSocket.OPEN) {
socket.send(cmd);
}
if(window.navigator.vibrate && cmd !== 'S') {
window.navigator.vibrate(40);
}
}
</script>
</body>
</html>
)rawliteral";
void handleRoot() {
server.send(200, "text/html", interfaz_html);
}
void webSocketEvent(uint8_t num, WStype_t type, uint8_t * payload, size_t length) {
if(type == WStype_TEXT) {
String cmd = (char*)(payload);
if(cmd == "F") { sIzquierdo.write(180); sDerecho.write(0); }
else if(cmd == "L") { sIzquierdo.write(0); sDerecho.write(0); }
else if(cmd == "R") { sIzquierdo.write(180); sDerecho.write(180); }
else if(cmd == "S") { sIzquierdo.write(90); sDerecho.write(90); }
else if(cmd == "B") { digitalWrite(PIN_BUZZER, HIGH); }
else if(cmd == "Q") { digitalWrite(PIN_BUZZER, LOW); }
}
}
void setup() {
Serial.begin(115200);
pinMode(PIN_BUZZER, OUTPUT);
pinMode(PIN_SHT1, OUTPUT);
pinMode(PIN_SHT2, OUTPUT);
sIzquierdo.attach(17);
sDerecho.attach(19);
sIzquierdo.write(90);
sDerecho.write(90);
digitalWrite(PIN_SHT1, LOW); digitalWrite(PIN_SHT2, LOW);
delay(10);
Wire.begin(22, 23);
digitalWrite(PIN_SHT1, HIGH); delay(10);
sensor1.init(); sensor1.setAddress(0x30);
digitalWrite(PIN_SHT2, HIGH); delay(10);
sensor2.init(); sensor2.setAddress(0x31);
WiFi.begin(ssid, password);
while (WiFi.status() != WL_CONNECTED) { delay(500); Serial.print("."); }
// Configurar rutas del servidor
server.on("/", handleRoot);
server.begin();
webSocket.begin();
webSocket.onEvent(webSocketEvent);
Serial.println("\nSpiderBot Listo");
Serial.print("Interfaz disponible en: http://"); Serial.println(WiFi.localIP());
}
void loop() {
server.handleClient(); // Maneja las peticiones del iPhone para ver la página
webSocket.loop();
static unsigned long lastCheck = 0;
if (millis() - lastCheck > 100) {
uint16_t d1 = sensor1.readRangeSingleMillimeters();
uint16_t d2 = sensor2.readRangeSingleMillimeters();
if(d1 < 150) webSocket.broadcastTXT("L_CERCA");
else webSocket.broadcastTXT("L_LIBRE");
if(d2 < 150) webSocket.broadcastTXT("R_CERCA");
else webSocket.broadcastTXT("R_LIBRE");
lastCheck = millis();
}
}
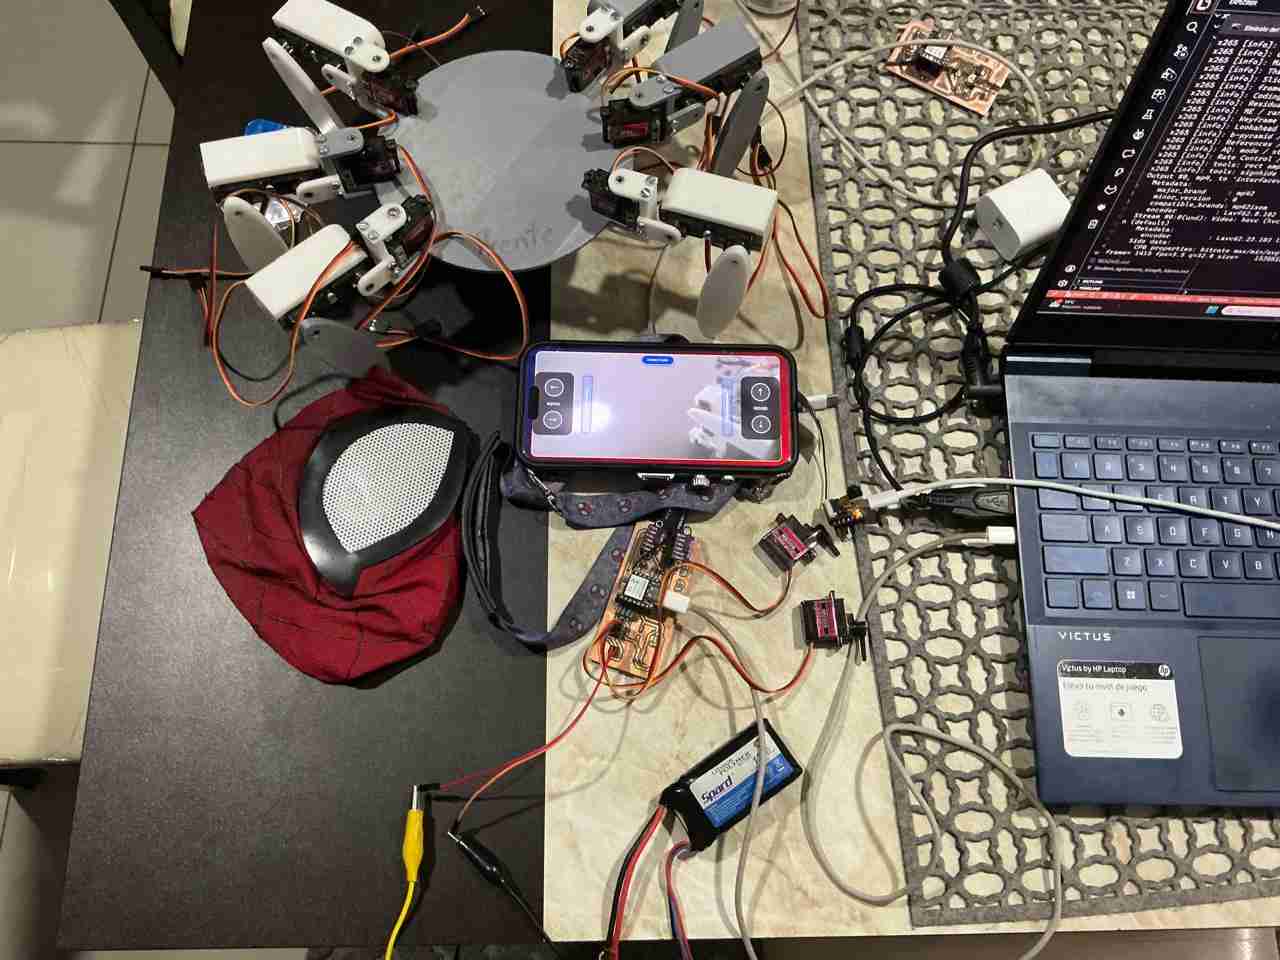
Now you hhave to run both codes on each microcontroller respectively, once you are done with that turn your hotspot on and both devices will connect automatically to your phone.
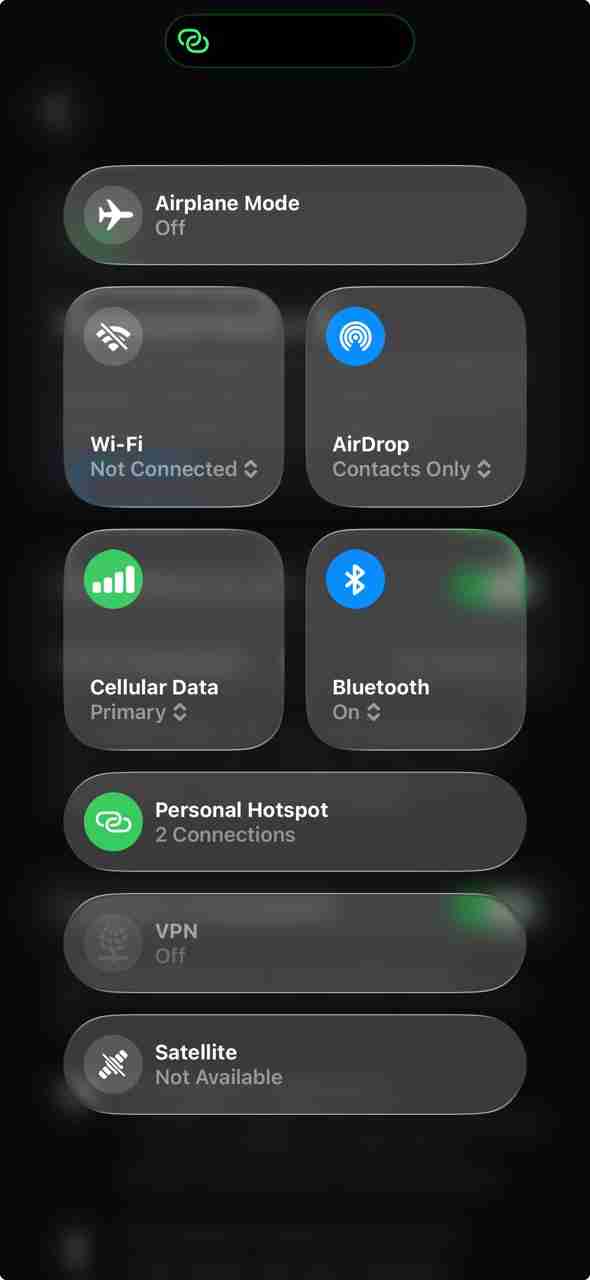
Now that both microcontrollers are connected you have to write the IP of the control.
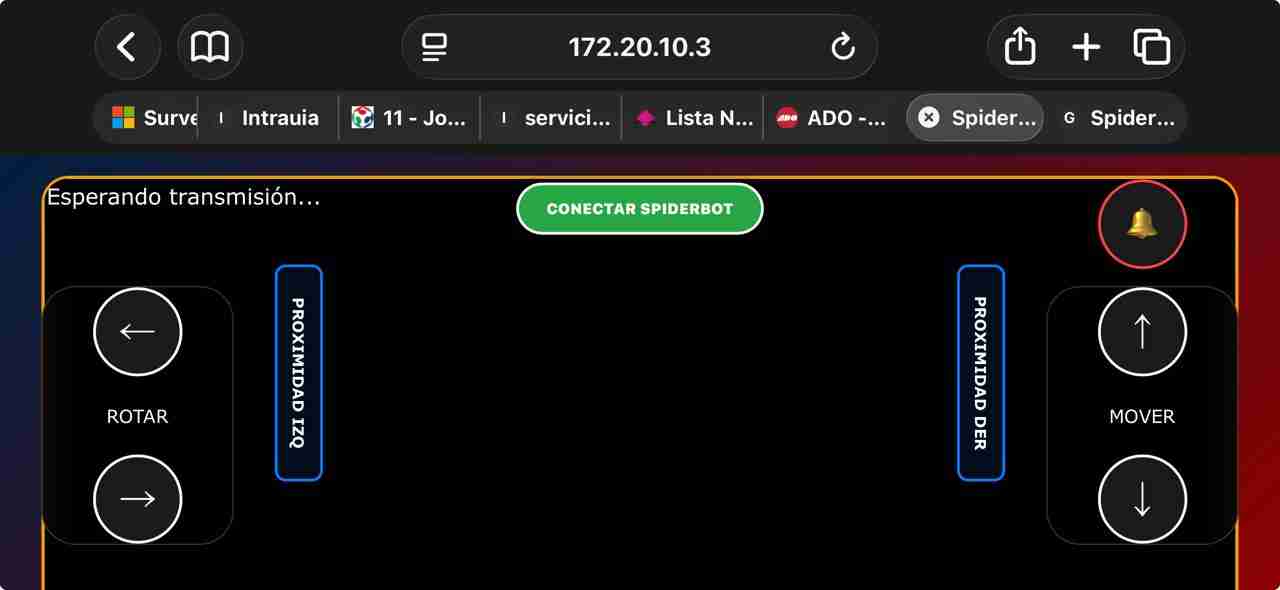
Since it's a website and you try to open it in Safari (the default browser on iOS), it won't allow full-screen mode, which is annoying. But there's a very easy solution add the page to your home screen. This will force iOS to display a full-screen mode without needing an official app.
For doing this you will have to tap on: Share, then scrolldown until you find Add to Home Screen and Add; this will add the webpage as it was an app and will enable us a full scren mode
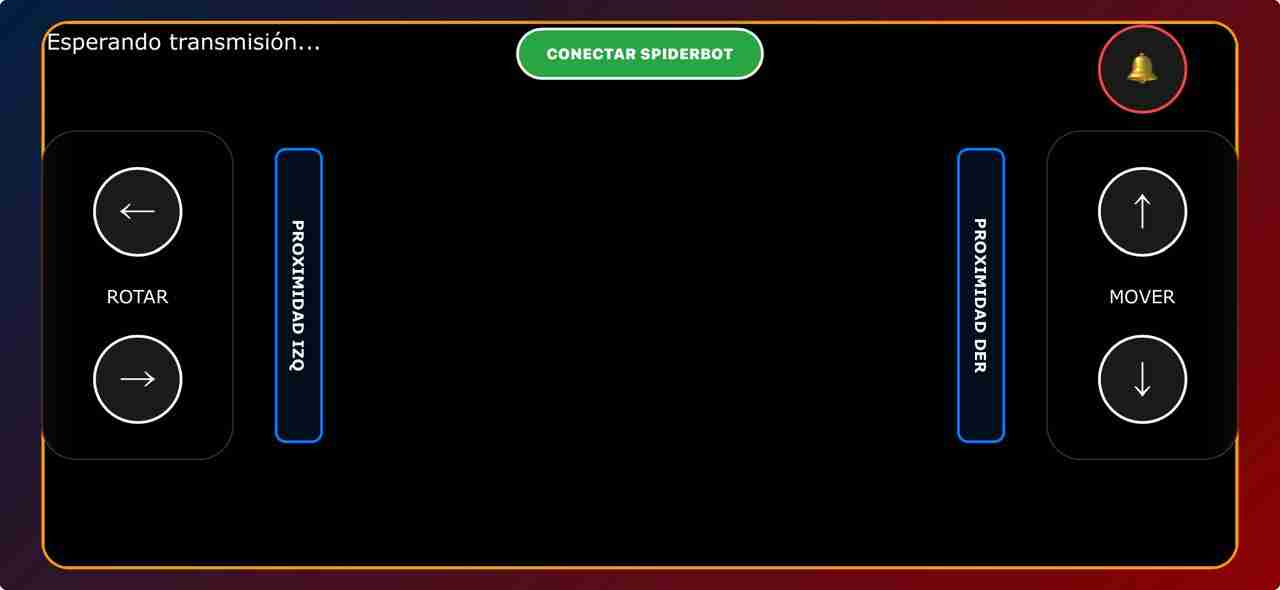
Now all you have to do is press the green button, and it will connect to both microcontrollers allowing us to test the code, communications and the interface.
7. Files created
Click on the words that are below to download all the files I made for this week assignment, the PCB files are the same from week 09.