Week 11. Networking and Communications
Summary
This week we focused on learning how to use different communications in microcontrollers. For this week I used wifi communication using the board from week 9 and a esp32 module to use wifi connection, the week 8 will be my server and my esp32 will be the client to move servomotors.
Group assignment
Here is the group assignment to check more information about the topic embedded programming.
1. Basic concepts
1.1What is communications in microcontrollers?
It is the process of exchanging data (zeros and ones) between a microcontroller and another device (whether it's another sensor, another board or a computer).
Communication can be divided into the following 3 concepts:
1.1.1 Physical Medium (Physical Layer)
- Wired: Electrical pulses through wires (like the copper in your PCB). Examples: UART, I2C, SPI.
- Wireless: Electromagnetic waves through the air. Examples: WiFi, Bluetooth, LoRa.
1.1.2 Protocol (The Language)
- Speed: How fast the bits are sent (Baud rate in UART, for example).
- Order: Who speaks first and who listens.
- Synchronization: How does the receiver know when a message started or ended?
1.1.3 Transmission Types
- Serial Communication: Bits are sent one after another over a single data wire. This is the most common because it saves pins (like Wi-Fi or UART).
- Parallel Communication: Several bits are sent simultaneously using multiple wires. This is very fast but requires many cables and pins (like older LCD screens).
1.2 Types of communications
The simplest way to classify types of communication is by their transmission medium we can classify them into wired and wireless.
1.2.1 Wire communications
Data travels through physical conductors (copper traces or cables). It is the most stable and fastest for short distances.
- UART: Universal Asynchronous Receiver-Transmitter Only two wires (TX/RX). Very simple, but only for two devices.
- I2C: Inter-Integrated Circuit Uses two wires (SDA/SCL) to connect multiple sensors to a single microcontroller. Each sensor has a unique address.
- SPI: Serial Peripheral Interface Very fast, uses four wires. Ideal for SD cards or displays.
1.2.2 Wireless communications
Data travels via radio frequency.
- WiFi: High speed, allows internet connection and supports complex protocols (HTTP, MQTT).
- Bluetooth: BLE Low power consumption, ideal for connecting to cell phones at short range.
- ESP-NOW: Espressif's exclusive low-latency protocol (no router required).
1.3 How wifi communication works more in deep
Wi-Fi uses radio waves at specific frequencies (generally 2.4 GHz or 5 GHz) these waves contains the code from the server (which is the one that generates the web page through a hot spot and sends the IP from the web page to see it) and the client (another microcontroller that can connect to the same IP adress and send requests to the server in order to some actions like moving servos or turning on/off a LED). Wi-Fi normally follows this workflow while programming and designing the nodes:
| Step | Function |
|---|---|
| Modulation | The microcontroller translates your digital data (zeros and ones) into variations of a radio wave. |
| Data Link Layer (MAC) | Each of your boards has a unique physical address (MAC address) that allows the router to know exactly who it is communicating with.. |
| TCP/IP Protocol | This is the "mail carrier." IP (Internet Protocol) handles addressing the packet (e.g., 172.20.10.2), and TCP (Transmission Control Protocol) ensures that the packet arrives complete and without errors. If a bit is lost, TCP requests that it be retransmitted. |
| Application Layer | This is the final message which is like sending a letter with the instruction written to do like publishing messages, uplaoding information, delete information or obtain/consult data. |
1.3.1 Application Layer
There are 4 main HTTP methods that are used in professional web development and advanced IoT (Internet of Things) systems; these four are commonly used:
1.3.1.1 GET (Get/Request)
- What it does: Requests data from the server.
- How it travels: The data is visible in the URL.
- Analogy: A postcard. Anyone who sees it along the way can read the message.
1.3.1.2 POST (Send/Create)
- What it does: Sends data for the server to process or save.
- How it travels: The data is hidden in the message body, not in the URL.
- Analogy: A letter in a sealed envelope. It's more private and can carry much more information (like a file or an image).
- Use in IoT: When you want to send a large configuration or update a status without cluttering the URL.
1.3.1.3 PUT (Update)
- What it does: Replaces existing information with new information.
- Difference from POST: PUT is idempotent (if you send the same command 10 times, the final result on the server is exactly the same).
- Use in Robotics: To set a fixed position for a robotic arm (e.g., "Set elbow to 45°").
1.3.1.4 DELETE (Remove)
- What it does: Requests the server to delete a resource.
- Use in IoT: To delete a sensor log entry or remove a device from a network list.
1.3.2 Pros and cons of using wifi
Pros
- Long range: It can cover tens of meters, much farther than Bluetooth or I2C.
- Standard protocols: By using HTTP or MQTT, you can control your robot from a laptop, a mobile phone, or even from the other side of the world if you open the ports.
- Speed: It's ideal for sending large amounts of data or complex web interfaces.
- Existing infrastructure: You don't need special cables; it uses the routers and antennas you already have at home.
Cons
- Power consumption: This protocol uses the most battery power.
- Code complexity: It requires managing connections, passwords, IPs, and network status (WiFi.status()).
- Latency: It's not absolute "real time." There's always a few milliseconds of delay while the router processes the packet (that's why the servos move with a slight delay after clicking).
- Saturation: If there are many Wi-Fi networks nearby, the signal can interfere with each other and cause the "connection lost" errors we saw.
1.2.2.1 Why I will use wifi communication?
- Graphical Interface (Web Server): You can create a complex control panel with sliders for each leg or buttons for "Walk," "Wave," etc., and access it on any phone without installing apps (just using the browser).
- Bandwidth: For sending complex commands (such as inverse kinematic coordinates for 6 legs), Wi-Fi handles large data packets with ease.
- Integration with ESP32: No extra hardware is needed because there's a built-in antenna.
1.4 What will I do this week?
For this week I will use Wi-Fi communication in order to create a server and a client that will be connected to the hot spot of my phone.
The server code (node a) will publish the IP adress from the webpage, in this webpage I will control the position of 2 servomotors through a slider; I will not explain much details on the interface part of the because that will be better explained on the interface week. It will work with the microcontroller Xiao esp32 C6 ans the board from week 9.
The client code (node b) will be connected to the server code in order to send instructions, this node will have a button that has pull-down configuration, so it starts with a 0 value, when the button is activated the node b will send specific angles to the servomotors to move and just do it once and not keep doing it even if the button still has the value of 1 after the sequence is finished. It will work with a Esp32 beacuse I burned the Xiao esp32 S3 that was originally planned to use, later I will talk of why I burned it. The board to use was originally the one that I made during week 8 but is the reason of why the Xiao esp32 S3 was burned so I used a breadboard, a dipswitch and a 10k resistance.
2. Library to use
2.1 Wifi.h
You don't need to download it from the internet. It comes pre-installed when you install the ESP32 "Board Package" in your Arduino IDE. The main functions are:
| Command | Function |
|---|---|
| WiFi.begin(ssid, password) | Initializes the radio hardware to search for your network. |
| WiFi.status() | Monitors whether the connection is still active or has been lost. |
| WiFi.localIP() | Retrieves the IP address assigned to your network adapter by the router. |
Here is an example using functions of the Wifi.h library.
                    #include <WiFi.h<

                    const char* ssid = "Joseph";
                    const char* password = "abcdefgq";

                    WiFiServer server(80); //Initialize the server on Port 80 (Standard HTTP)

                    void setup() {
                    Serial.begin(115200);

                    // Start WiFi connection
                    WiFi.begin(ssid, password);
                    while (WiFi.status() != WL_CONNECTED) {
                        delay(500);
                        Serial.print(".");
                    }

                    Serial.println("\n--- Server Ready ---");
                    Serial.print("Local IP Address: ");
                    Serial.println(WiFi.localIP()); //Essential function to know the target IP

                    server.begin();
                    }

                    void loop() {
                    WiFiClient client = server.available(); // Check if a client has connected
                    if (client) {
                        //Read the incoming request from the client
                        String req = client.readStringUntil('\r');
                        Serial.println("Request received: " + req);

                        // HTTP Response Header (Mandatory to complete the cycle)
                        client.println("HTTP/1.1 200 OK");
                        client.println("Content-Type: text/plain");
                        client.println("Connection: close");
                        client.println();

                        // Response Body
                        client.println("Message received by Server");

                        delay(1);
                        client.stop(); //Close the connection to free up resources
                    }
                    }
2.2 HTTPClient.h
Like the previous one, it's included in the ESP32 support package.
| Command | Function |
|---|---|
| http.begin(url) | Configures the destination (the server's IP address). |
| http.GET() | Executes the data transfer request. |
| http.POST(payload); | The data is not included in the URL, but rather in a separate variable. This is more secure and allows for sending significantly more information. |
| http.PUT(payload); | It is used when you want to "upload" a specific state or replace an existing file/value on the server. |
| http.sendRequest("DELETE"); | It is used to give the instruction to delete something, such as a log entry or a scheduled task in the robot. |
| http.errorToString() | Crucial for understanding why the connection failed. |
Here is an example using functions of the Wifi.h and HTTPClient.h libraries.
                    #include <WiFi.h<
                    #include <HTTPClient.h<

                    const char* ssid = "Joseph";
                    const char* password = "abcdefgq";
                    const String serverIP = "172.20.10.2"; //The IP assigned to the Server node

                    void setup() {
                    Serial.begin(115200);

                    WiFi.begin(ssid, password);
                    while (WiFi.status() != WL_CONNECTED) {
                        delay(500);
                        Serial.print(".");
                    }
                    Serial.println("\n--- Client Connected ---");
                    }

                    void loop() {
                    //Check if WiFi is still active before sending
                    if (WiFi.status() == WL_CONNECTED) {
                        HTTPClient http;

                        //1. Prepare the Target URL (Basic GET method)
                        String url = "http://" + serverIP + "/S1?v=180";
                        http.begin(url);

                        //2. Execute the Request
                        int httpCode = http.GET();

                        //3. Evaluate results using library functions
                        if (httpCode > 0) {
                        // Get the payload (response) from the server
                        String response = http.getString();
                        Serial.println("Server Response: " + response);
                        } else {
                        //Diagnostic function to identify issues (like "connection lost")
                        Serial.print("Request Failed: ");
                        Serial.println(http.errorToString(httpCode));
                        }

                        http.end(); //Close connection and release memory
                    }

                    delay(5000); //Wait 5 seconds before the next command
                    }
2.3 The library that didn't work WiFiESP32
This library was chosen because a library specifically for the ESP32 ecosystem was sought, assuming it would have more optimized or simpler-to-use functions. Here are the reasosn why it didn't work:
- Redundancy Conflicts: The standard library WiFi.h is already extremely optimized by Espressif (the chip's creators). Attempting to use WiFiESP32 resulted in function name conflicts (both libraries were trying to control the same hardware simultaneously).
- Architecture: Many libraries with similar names are "wrappers" (extra layers) that actually end up calling the original library, but they introduce compilation errors or consume more RAM unnecessarily.
- Core Version: Since we are using modern boards (Xiao C6 and S3), these require the latest versions of the Espressif core, and third-party libraries are sometimes not updated for the new security protocols of these boards.
3. Boards
3.1 Node a
For this week as I already said I will use the board I made during week 9 for the node a.
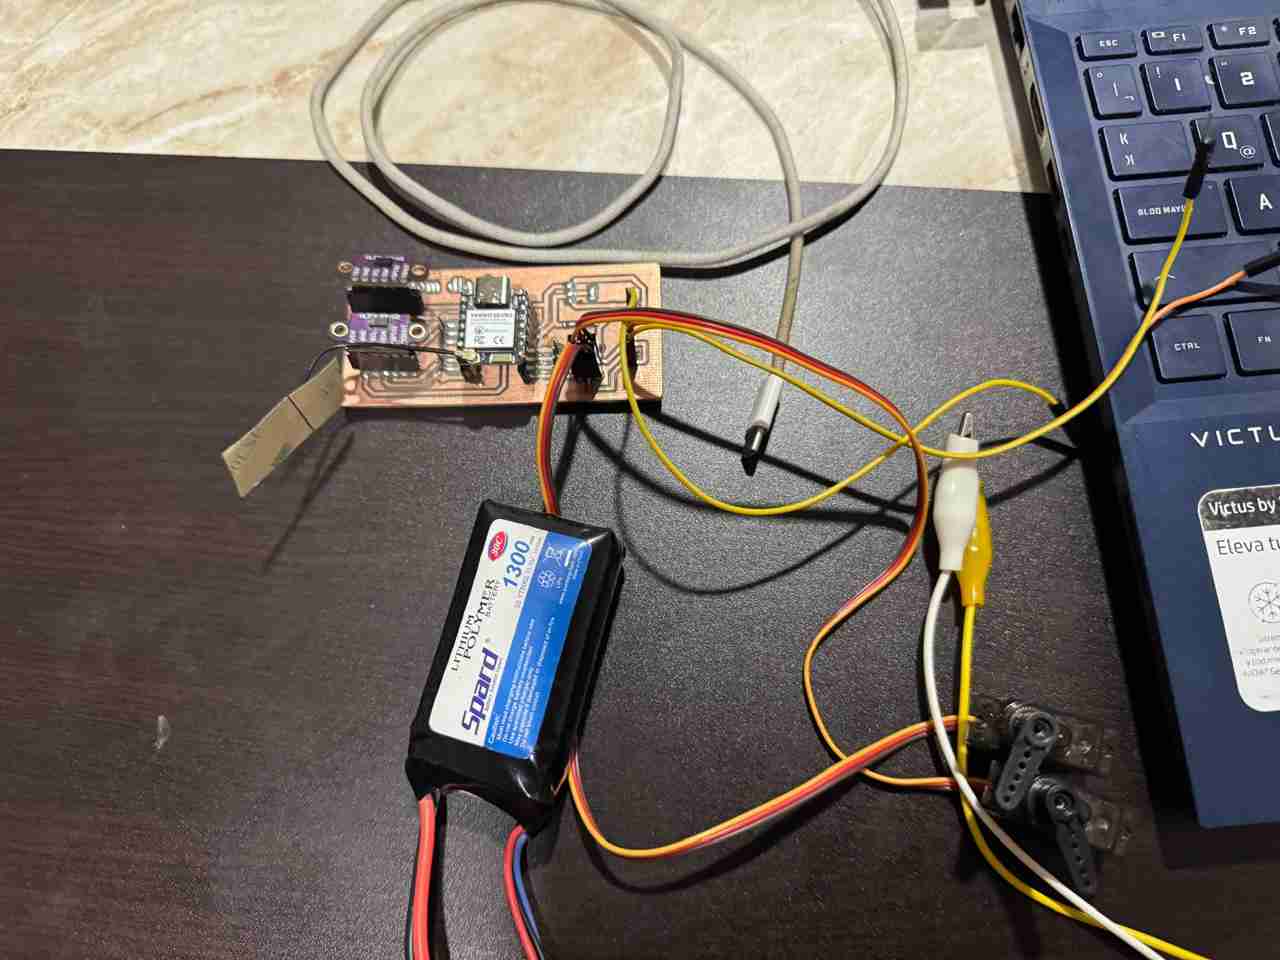
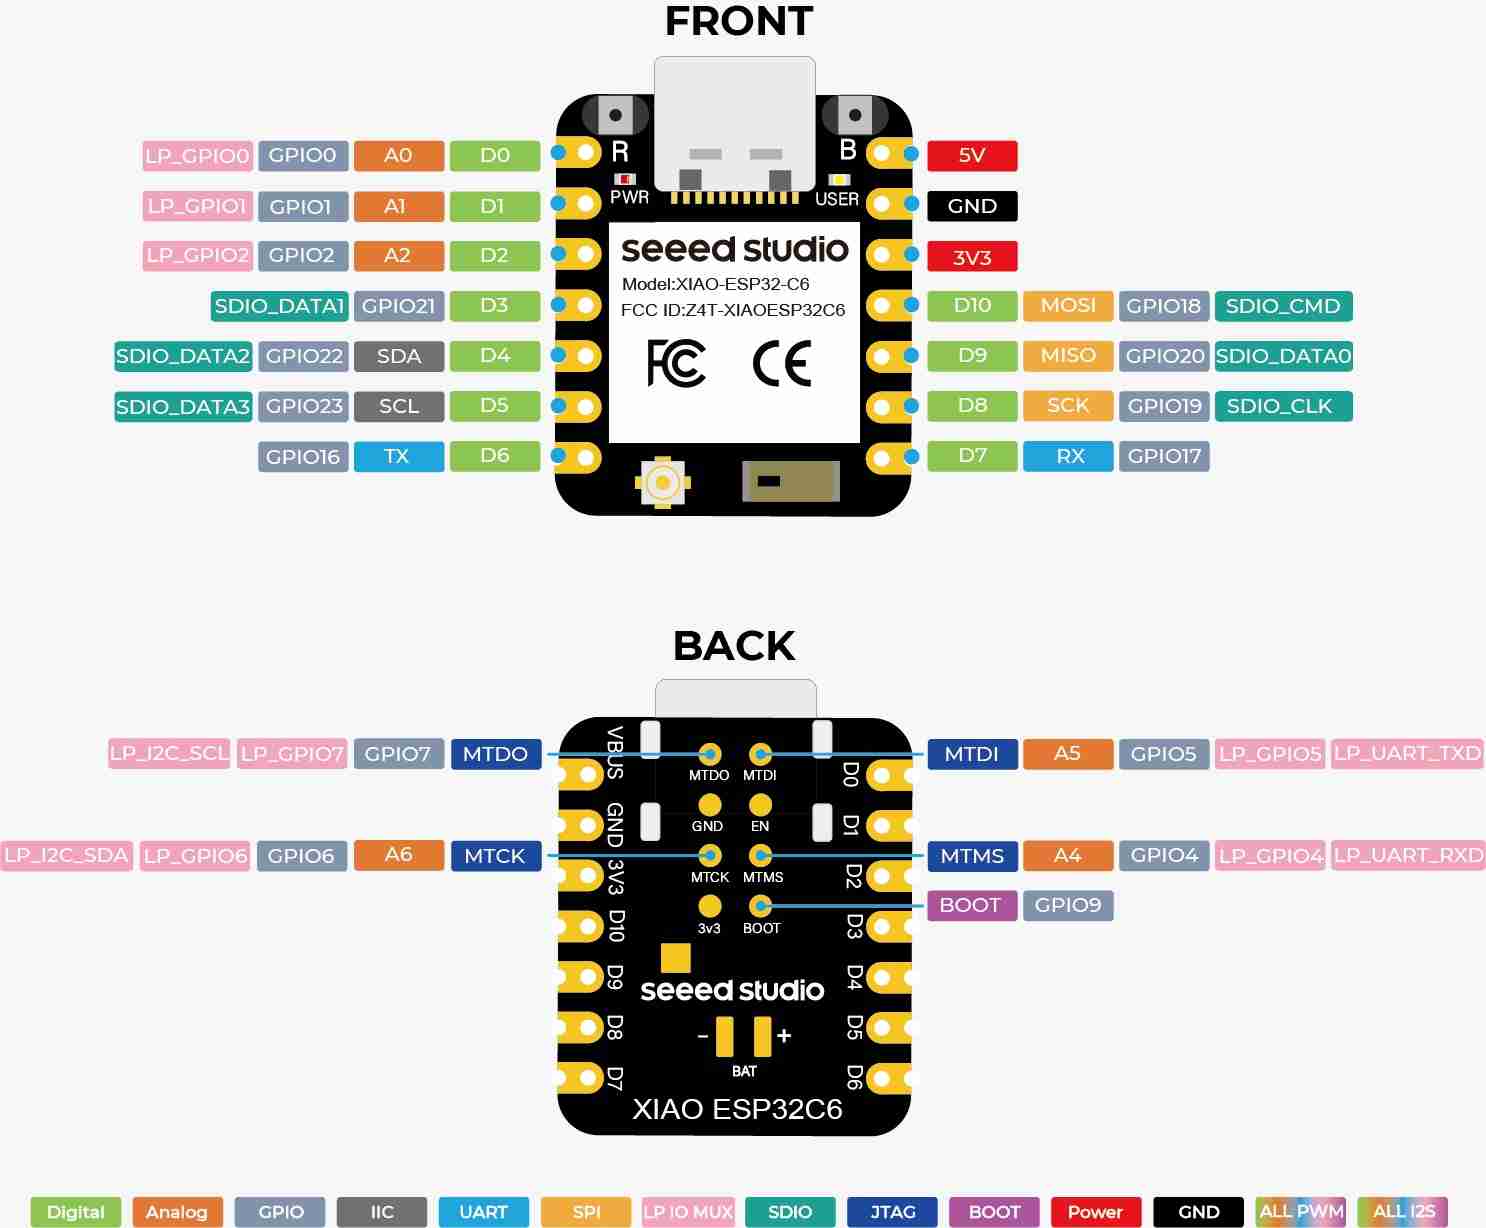
Using the Xiao esp32 C6 as the microcontroller.
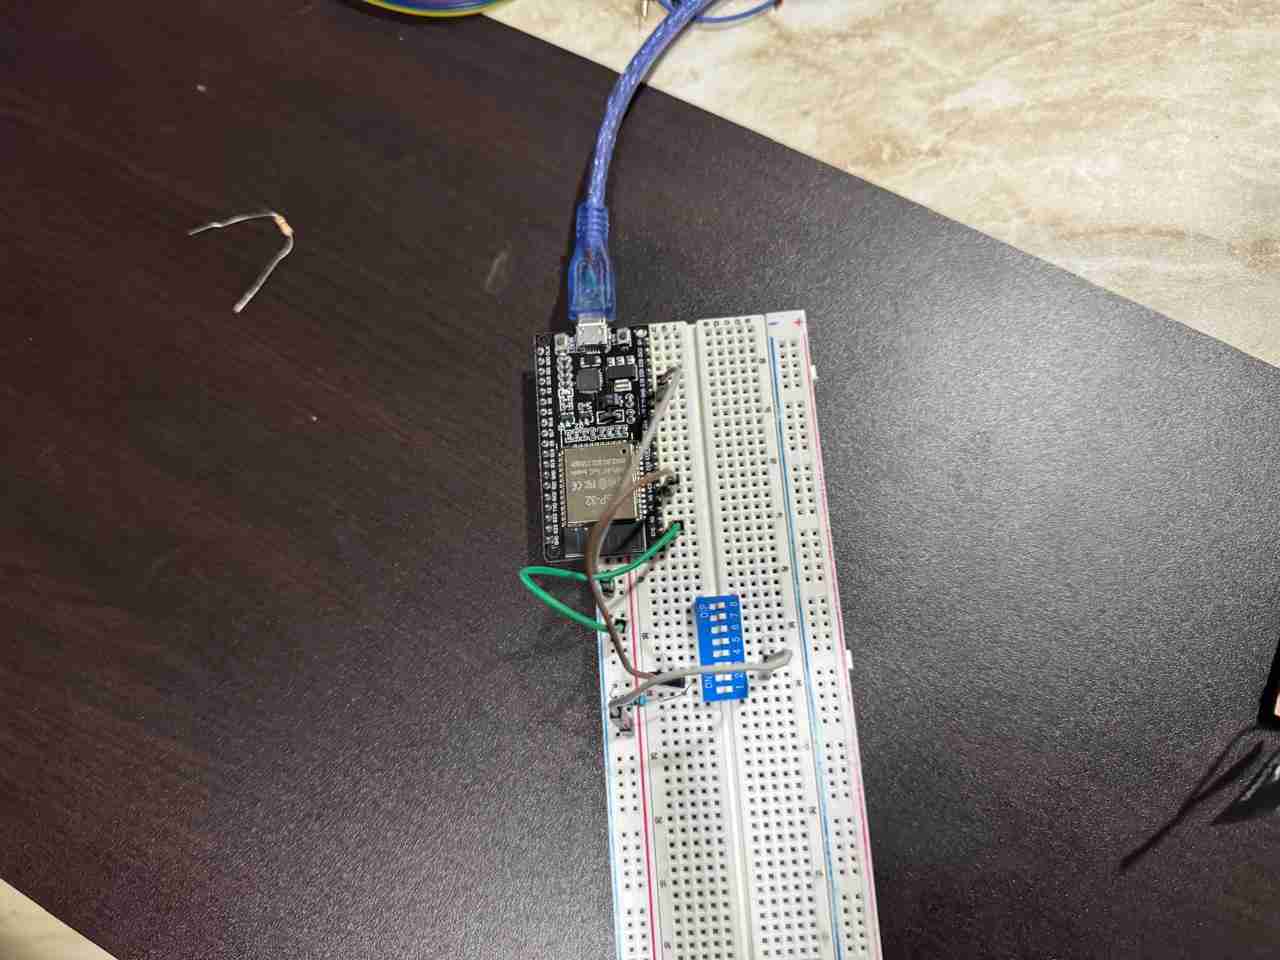
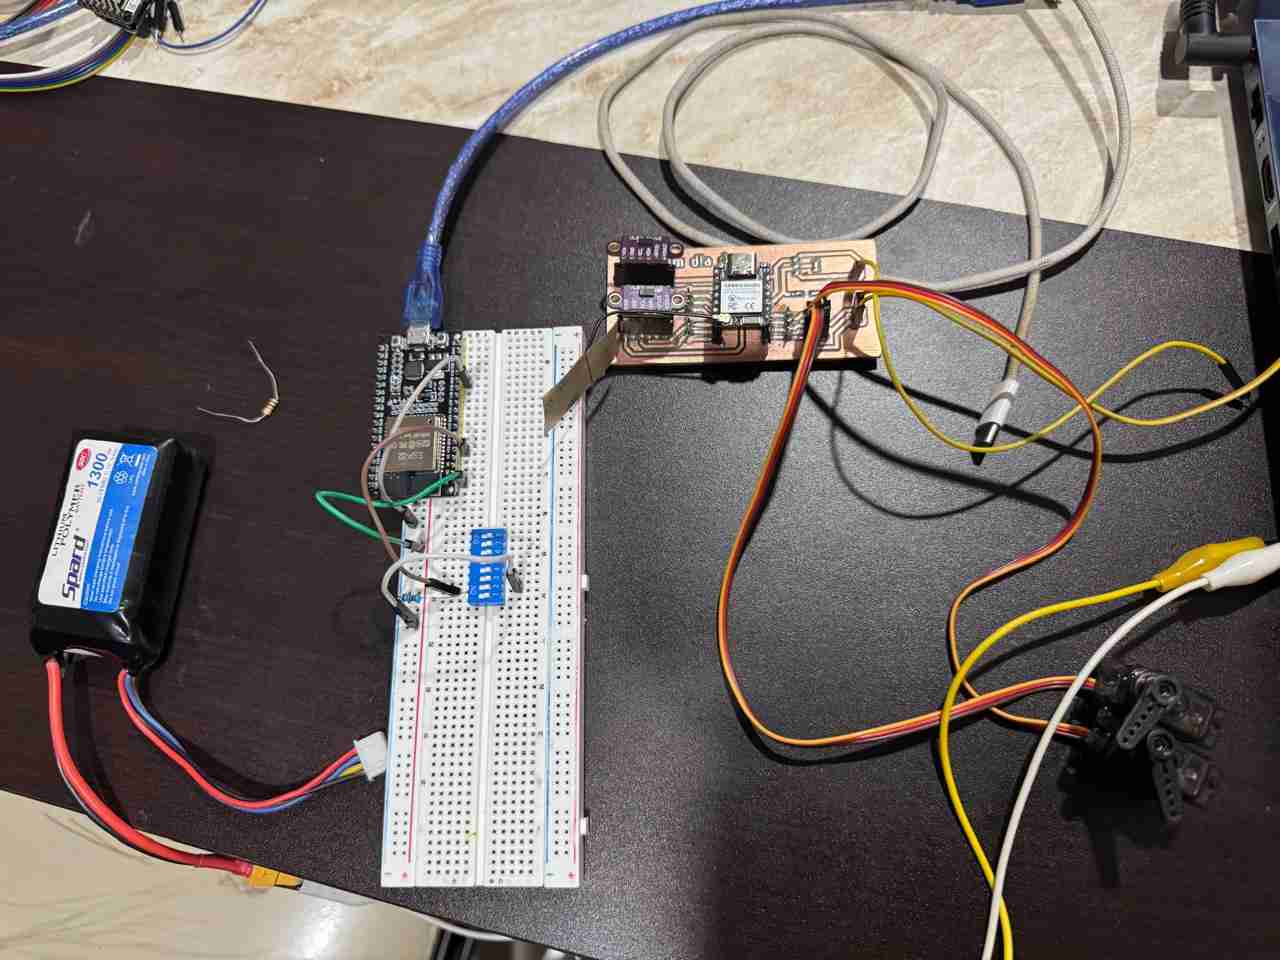
3.2 Node b
For this week I was originally planning to use the board from week 8 but when I was testing the codes and powering the board I burned the Xiao eso32 S3 beacuse the button was powered with 5V and the microcontrollers like the Xiao's can't recieve more than 3.3V (I know this beacuse I re-checked my schematic view of the PCB). The reason why the microcontroller didn't burned on the week 8 assignment was beacuse in the code from that week I programmed an internal resistance on the Xiao rp2040 (the one that I used) but normally you never do this beacuse this resistence are very small and most of the time is not the right way to make things function.
As I'm not in my univerity (I returned my home place "Tehuacán" beacuse of holy week) I used a breadboard to make the connections from the 2nd board being only one dipswitch (because I didn't have push buttons) the 10k resistance, some jumpers and the Esp32 board
4. Connections
4.1 The hot spot
This is very simple beacuse you just have to connect your computer to your hot spot zone (in case you are working) at a school or a place where the internet is private; in case the internet is not private you can stay connected with your computer to the same Wifi just in both cases the next lines will connect your microcontroller to the Wifi you are using:
                    const char* ssid = "NAME_OF_YOUR_HOT SPOT/WIFI";
                    const char* password = "PASSWORD";
In the case of the node b or a client you have to add the next line which redirects to the same IP as to talk to the server.
                    const char* ssid = "NAME_OF_YOUR_HOT SPOT/WIFI";
                    const char* password = "PASSWORD";
                    const String serverIP = "IP_ADRESS_FROM_SERVER"; //line added for the client
4.2 Servomotors
The pinout of the servomotors was explained better on the week 10. But here is little remainder.
- Orange - PWM
- Red - VCC
- Brown - GND
4.3 Button
The button will have a pull down configurations this means that it has a starting value of 0 and when you press or slide up it the value increase to 1; and when you raise your hand or slide down the value returns to 0.
To make the pull down configuration the enter value is the voltage value and the out values are the resistante that goes to ground and the juumper that goes to the pin that will send resieve the 0 and 1 values.

5. Making the code
5.1 Node a
5.1.1 Defining libraries, credentials and objects
| Command | Function |
|---|---|
#include <WiFi.h> |
Library for managing WiFi connectivity on ESP32 boards. |
#include <ESP32Servo.h> |
Specific library to control servomotors using ESP32 hardware timers. |
const char* ssid = "Joseph"; |
Defines the name of the WiFi network (SSID) to connect to. |
WiFiServer server(80); |
Initializes the server object on Port 80 (Standard HTTP). |
Servo s1, s2; |
Creates the servo objects to control the physical actuators. |
const int pin1 = 17; |
Assigns the GPIO pin for the first servo (Digital D7). |
5.2 void setup
| Command | Function |
|---|---|
pinMode(pin1, OUTPUT); |
Configures the digital pins as outputs for the PWM signal. |
ESP32PWM::allocateTimer(0); |
Allocates a hardware timer to generate precise PWM for the servos. |
s1.setPeriodHertz(50); |
Sets the standard frequency (50Hz) for analog servomotors. |
s1.attach(pin1, 500, 2400); |
Links the servo object to the pin and sets pulse width limits in microseconds. |
WiFi.begin(ssid, password); |
Starts the connection process to the specified wireless network. |
while (WiFi.status() != WL_CONNECTED) |
Loop that pauses execution until the WiFi connection is established. |
WiFi.localIP(); |
Retrieves the IP address assigned to the board by the router. |
server.begin(); |
Starts the server to begin listening for incoming client requests. |
5.3 void loop
| Command | Function |
|---|---|
WiFiClient client = server.available(); |
Checks if a client (like Node B or a phone) has connected to the server. |
String req = client.readStringUntil('\r'); |
Reads the incoming HTTP request string until a carriage return is found. |
req.indexOf("/S1") != -1 |
Searches the request string for specific servo command keywords. |
s1.write(parseV(req)); |
Updates the servo position by extracting the integer value from the request. |
sendSpideyUI(client); |
Calls the custom function to send the HTML interface to the web browser. |
client.println("HTTP/1.1 200 OK"); |
Sends the standard HTTP success header back to the client. |
client.stop(); |
Closes the connection to free up the server for the next incoming request. |
5.4 Custom Functions (Data Parsing and UI)
| Command | Function |
|---|---|
int parseV(String r) |
Logic to extract the numeric angle value from the URL query string. |
r.substring(p+2).toInt(); |
Converts the text found after "v=" into an integer for the servo command. |
void sendSpideyUI(WiFiClient& c) |
Function that stores and sends the HTML/CSS Spider-Man themed interface. |
c.print("<style>...</style>"); |
Injects the CSS code to create the visual Spider-Man background and layout. |
oninput='fetch("/S1?v="+this.value)' |
JS command in the HTML to send real-time data to the servos without reloading the page. |
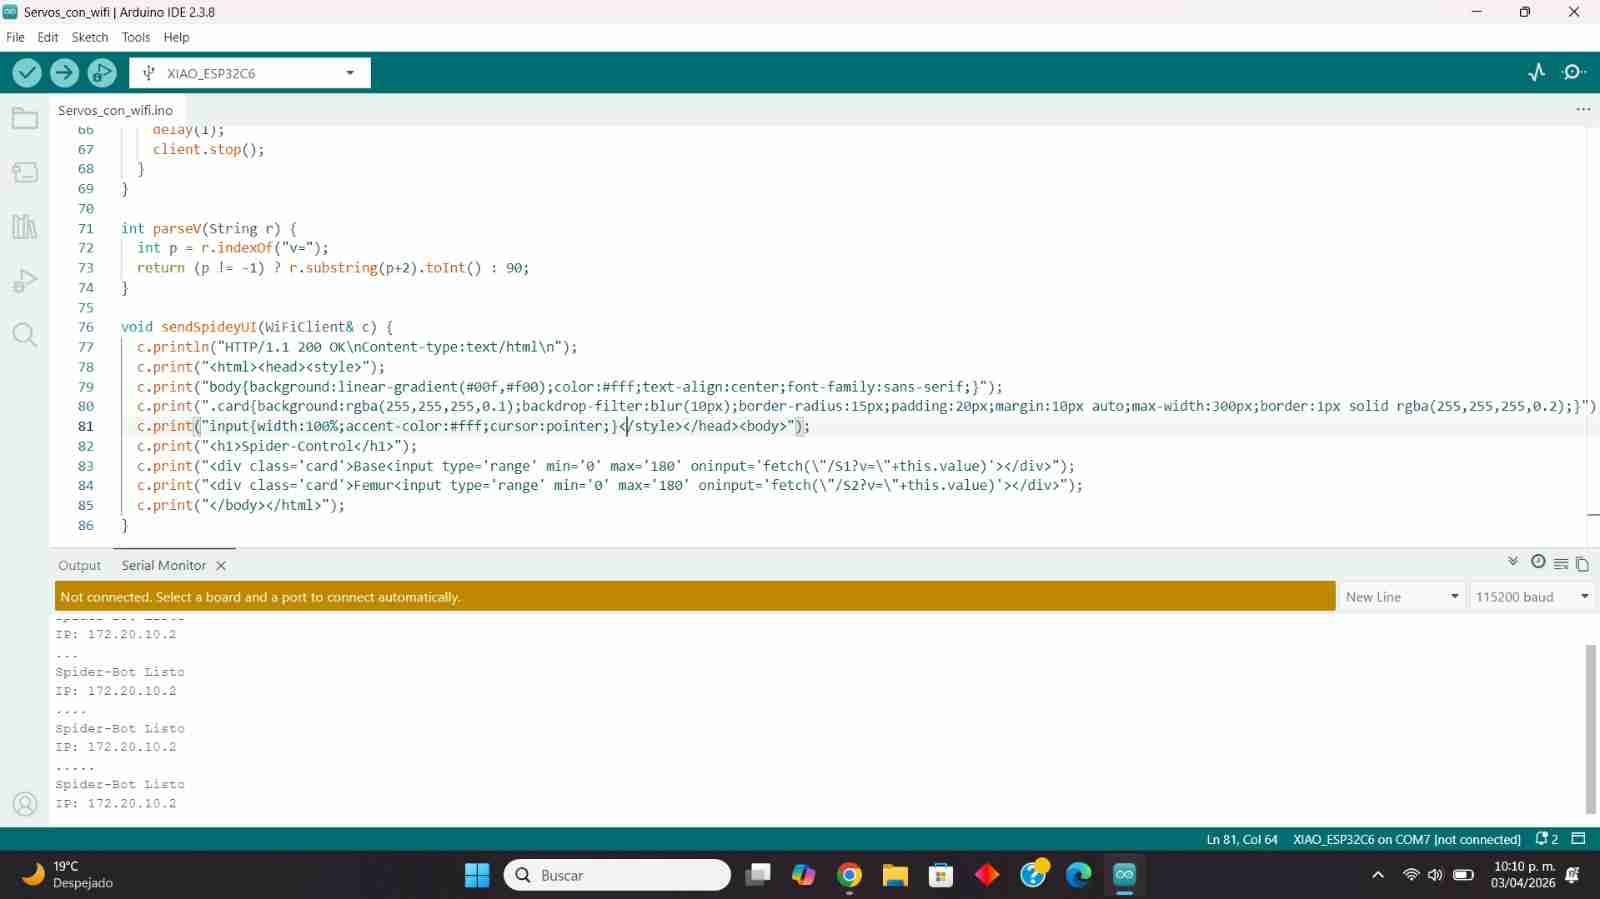
Here is the complete code:
                    #include <WiFi.h<
                    #include <ESP32Servo.h<

                    const char* ssid = "Joseph";
                    const char* password = "abcdefgq";

                    WiFiServer server(80);
                    Servo s1, s2;

                    //Defino mis pines de Xiao
                    const int pin1 = 17; // D7
                    const int pin2 = 19; // D8


                    void setup() {
                    Serial.begin(115200);

                    //Inicio pines de servos
                    pinMode(pin1, OUTPUT);
                    pinMode(pin2, OUTPUT);


                    ESP32PWM::allocateTimer(0);
                    s1.setPeriodHertz(50);
                    s2.setPeriodHertz(50);


                    s1.attach(pin1, 500, 2400);
                    s2.attach(pin2, 500, 2400);


                    WiFi.begin(ssid, password);
                    while (WiFi.status() != WL_CONNECTED) { delay(500); Serial.print("."); }

                    Serial.println("\nSpider-Bot Listo");
                    Serial.print("IP: ");
                    Serial.println(WiFi.localIP());

                    server.begin();
                    }

                    void loop() {
                    WiFiClient client = server.available();
                    if (client) {
                        String req = client.readStringUntil('\r');

                        //1. Procesar los movimientos de los servos
                        if (req.indexOf("/S1") != -1) s1.write(parseV(req));
                        if (req.indexOf("/S2") != -1) s2.write(parseV(req));

                        //2. Decidir qué responder según quién pregunta
                        if (req.indexOf("GET / ") != -1) {
                        // Si entras desde la laptop (página principal), envía la interfaz
                        sendSpideyUI(client);
                        }
                        else {
                        //Si es una petición de comando (/S1 o /S2) del Nodo B o del Slider,
                        //solo envía una respuesta técnica corta y limpia.
                        client.println("HTTP/1.1 200 OK");
                        client.println("Content-Type: text/plain");
                        client.println("Connection: close");
                        client.println();
                        client.println("OK");
                        }

                        delay(1);
                        client.stop();
                    }
                    }

                    int parseV(String r) {
                    int p = r.indexOf("v=");
                    return (p != -1) ? r.substring(p+2).toInt() : 90;
                    }

                    void sendSpideyUI(WiFiClient& c) {
                    c.println("HTTP/1.1 200 OK\nContent-type:text/html\n");
                    c.print("<html><head><style>");
                    c.print("body{background:linear-gradient(#00f,#f00);color:#fff;text-align:center;font-family:sans-serif;}");
                    c.print(".card{background:rgba(255,255,255,0.1);backdrop-filter:blur(10px);border-radius:15px;padding:20px;margin:10px auto;max-width:300px;border:1px solid rgba(255,255,255,0.2);}");
                    c.print("input{width:100%;accent-color:#fff;cursor:pointer;}</style></head><body>");
                    c.print("<h1>Spider-Control</h1>");
                    c.print("<div class='card'>Base<input type='range' min='0' max='180' oninput='fetch(\"/S1?v=\"+this.value)'></div>");
                    c.print("<div class='card'>Femur<input type='range' min='0' max='180' oninput='fetch(\"/S2?v=\"+this.value)'></div>");
                    c.print("</body></html>");
                    }
5.2 Node b
5.1.1 Defining libraries, credentials and pins
| Command | Function |
|---|---|
#include <WiFi.h> |
Standard library to handle the wireless connection to the network. |
#include <HTTPClient.h> |
Library that allows the ESP32 to act as a client and send HTTP requests. |
const String serverIP = "172.20.10.2"; |
Stores the static IP address of the Server (Node A). |
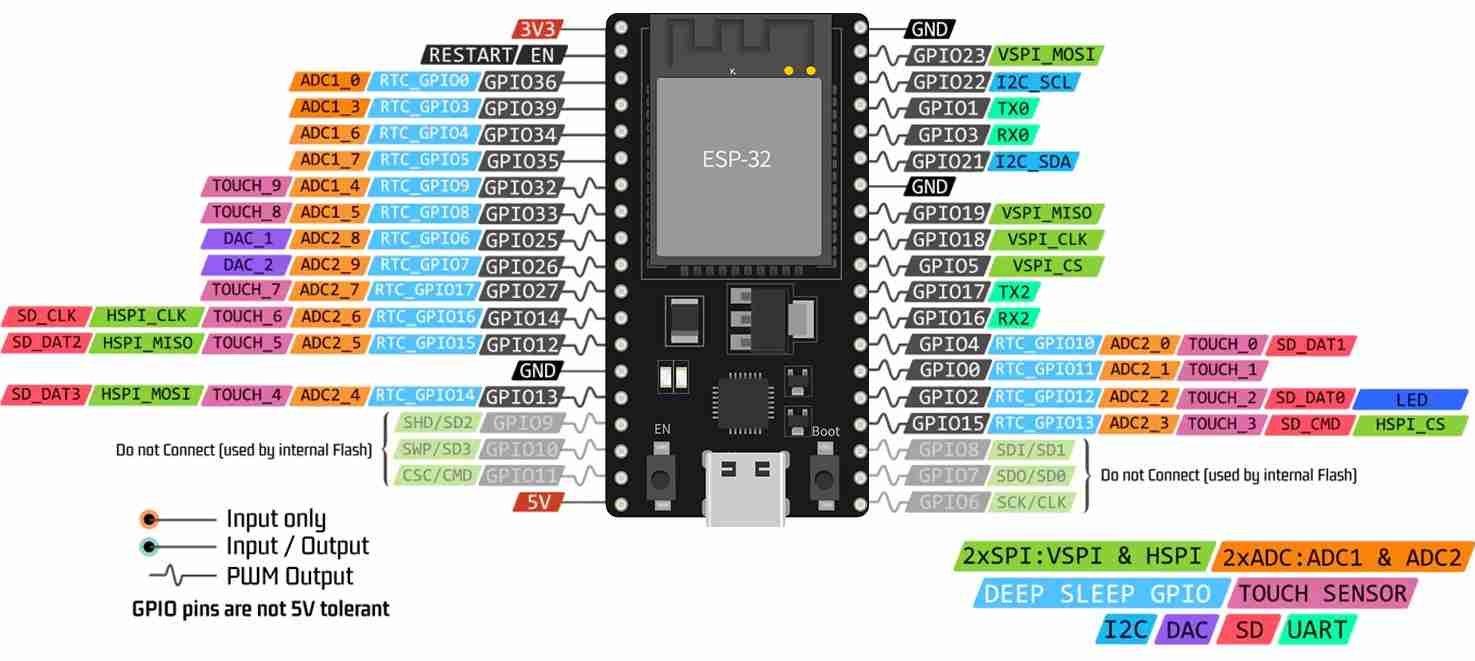
const int botonPin = 34; |
Defines the GPIO pin (Input Only) connected to the physical button. |
bool ultimoEstadoBoton = LOW; |
Variable to track the previous state for edge detection logic. |
5.2 void setup
| Command | Function |
|---|---|
Serial.begin(115200); |
Initializes serial communication for debugging purposes. |
pinMode(botonPin, INPUT); |
Sets the pin as input. GPIO 34 requires an external pull-down resistor. |
WiFi.begin(ssid, password); |
Starts the WiFi handshake process with the local Access Point. |
while (WiFi.status() != WL_CONNECTED) |
Blocking loop that ensures the network is ready before continuing. |
5.3 void loop (Logic and Debouncing)
| Command | Function |
|---|---|
digitalRead(botonPin); |
Reads the real-time voltage of the pin (High when button is pressed). |
if (estadoActual == HIGH && ultimoEstadoBoton == LOW) |
Identifies the transition from "not pressed" to "pressed" (Rising Edge). |
delay(50); // Debounce |
Hardware filtering to avoid multiple triggers from a single mechanical press. |
for (int i = 0; i < 3; i++) |
Loop used to cycle through a sequence of three predefined servo positions. |
enviarComando("S1", pasos[i]); |
Function call to transmit the servo ID and target angle to the Server. |
ultimoEstadoBoton = estadoActual; |
Updates the state memory for the next loop iteration. |
5.4 Custom Function: enviarComando
| Command | Function |
|---|---|
HTTPClient http; |
Initializes the HTTP engine to prepare a new network packet. |
http.begin(url); |
Targets the specific URL path on the Server node. |
http.setTimeout(1500); |
Prevents the code from hanging if the Server doesn't respond quickly. |
int httpCode = http.GET(); |
Sends the HTTP GET request and returns the status code. |
http.errorToString(httpCode); |
Converts numeric error codes into readable text (e.g., "Connection Lost"). |
http.end(); |
Properly closes the HTTP connection and releases WiFi resources. |
Here is the complete code:
#include <WiFi.h<
#include <HTTPClient.h<
const char* ssid = "Joseph";
const char* password = "abcdefgq";
const String serverIP = "172.20.10.2";
const int botonPin = 34; //GPIO 34
bool ultimoEstadoBoton = LOW; //En Pull-down que vale 0 estado base
void setup() {
Serial.begin(115200);
//Boton configurado como PULL_DOWN
pinMode(botonPin, INPUT);
WiFi.begin(ssid, password);
Serial.print("Conectando WiFi");
while (WiFi.status() != WL_CONNECTED) {
delay(500);
Serial.print(".");
}
Serial.println("\nNodo B (ESP32) Conectado.");
Serial.println("Esperando pulso en GPIO 34...");
}
void enviarComando(String servo, int angulo) {
if (WiFi.status() == WL_CONNECTED) {
HTTPClient http;
String url = "http://" + serverIP + "/" + servo + "?v=" + String(angulo);
http.begin(url);
http.setTimeout(1500);
int httpCode = http.GET();
if (httpCode > 0) {
Serial.printf("[%s] Enviado %d OK\n", servo.c_str(), angulo);
} else {
Serial.printf("[%s] Error: %s\n", servo.c_str(), http.errorToString(httpCode).c_str());
}
http.end();
}
}
void loop() {
//1. Leer el estado (HIGH si presionas, LOW si sueltas)
bool estadoActual = digitalRead(botonPin);
//2. Detección de cambio de estado (0 a 1)
if (estadoActual == HIGH && ultimoEstadoBoton == LOW) {
delay(50); // Antirrebote
//Confirmamos que sigue presionado
if(digitalRead(botonPin) == HIGH) {
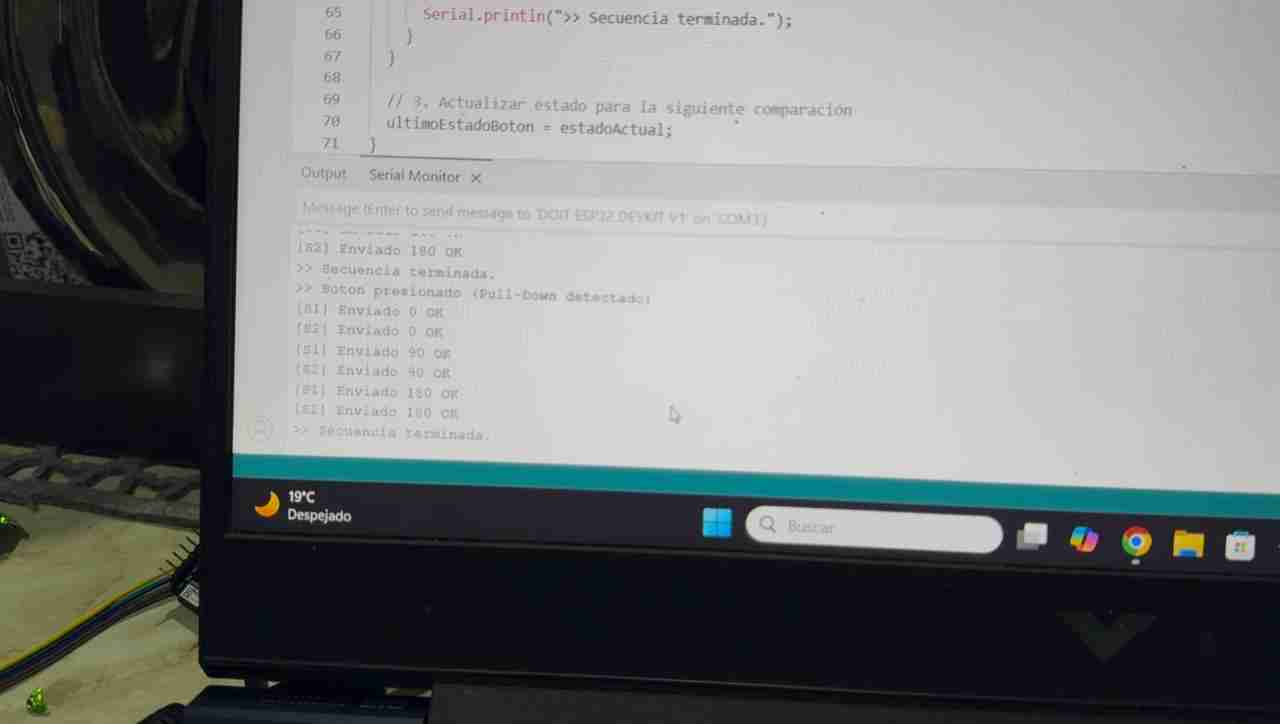
Serial.println(">> Boton presionado (Pull-Down detectado)");
int pasos[] = {0, 90, 180};
for (int i = 0; i < 3; i++) {
enviarComando("S1", pasos[i]);
delay(100); // <--- PEQUEÑA PAUSA de cortesía para la red
enviarComando("S2", pasos[i]);
delay(800); // Tiempo para el movimiento físico
}
Serial.println(">> Secuencia terminada.");
}
}
//3. Actualiza estado para la siguiente comparación
ultimoEstadoBoton = estadoActual;
}
Here is what it sends though the serial monitor.
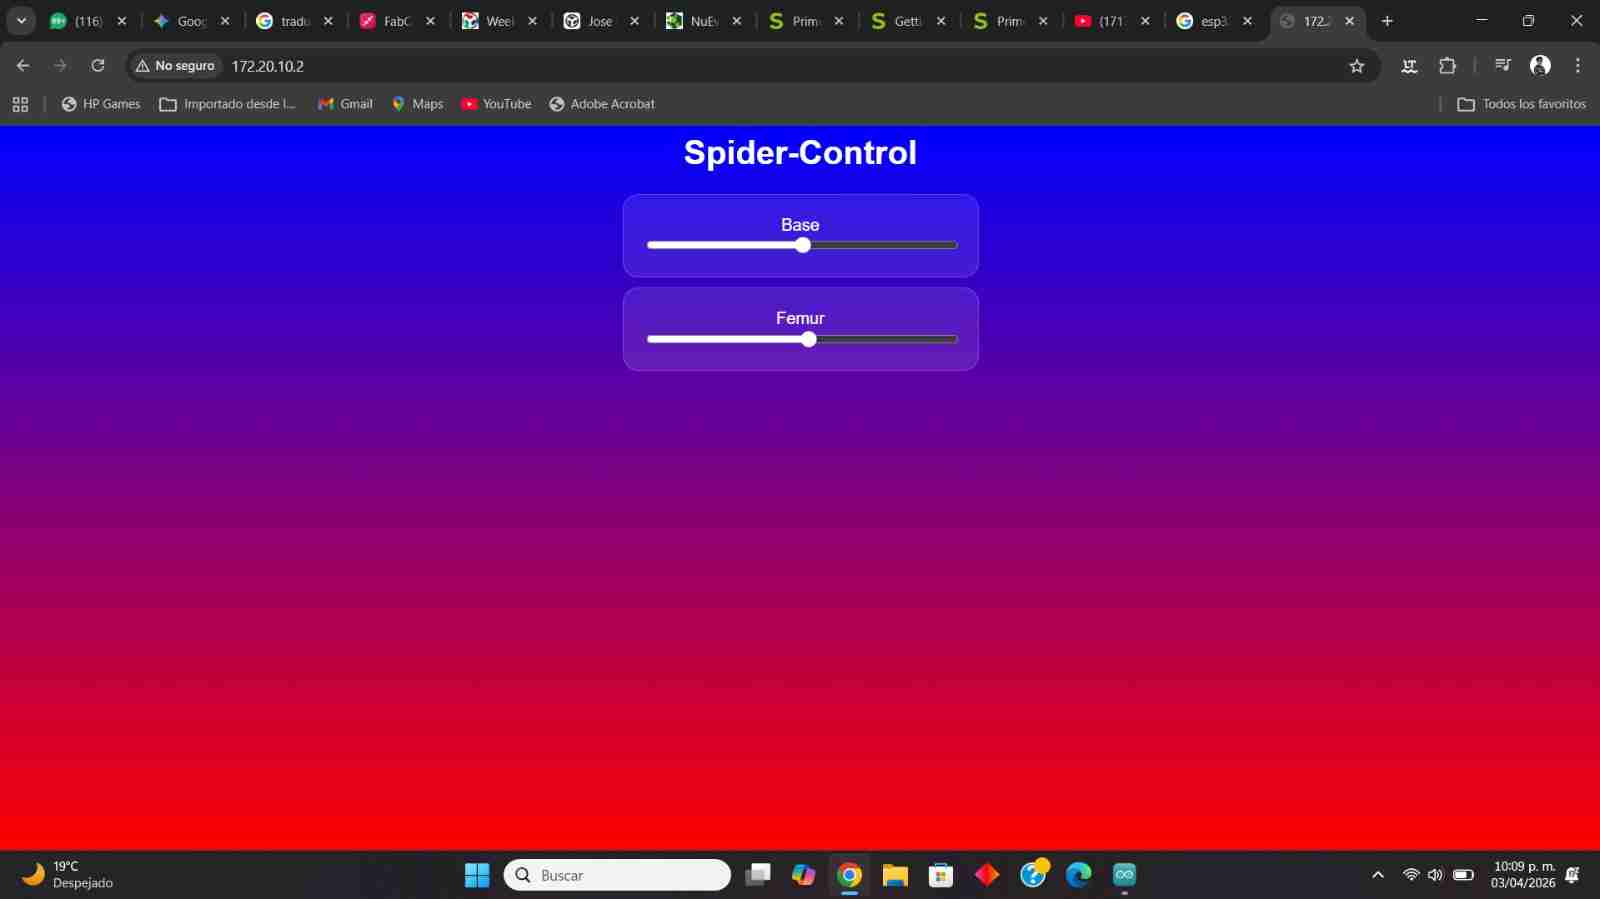
6. Results
This is the web page generated by the node a to move the servomotors with a slider.
Here is the code working moving the servomotors through the web page and the other board sending the command to move the servomotors with the button.
7. Files created
Click on the "Download ZIP" to download all the files I made for this week assignment that are the same from week 9.