
Week 18
Week 18: Applications and Implications
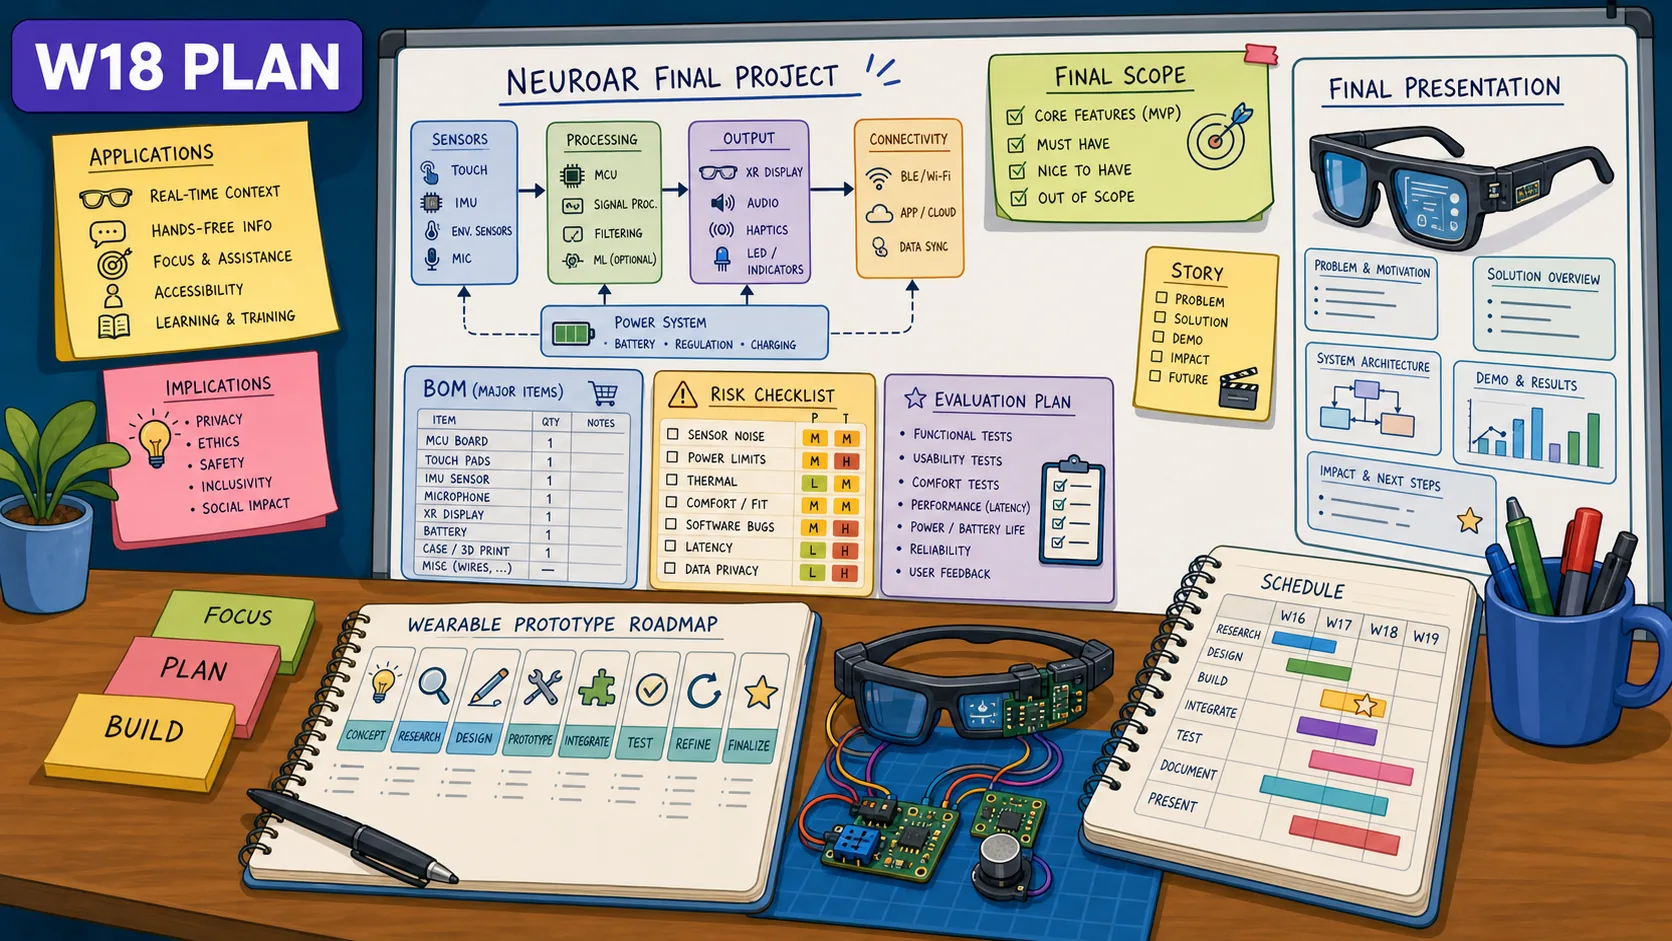
I clarified the applications and implications of NeuroAR: what it will do, who it is for, what I need to build, what it costs, and how I will evaluate it.
During this week, I primarily caught up on my documentation, did some side-quests in Japan, and fixed some issues with the project that I documented previously.
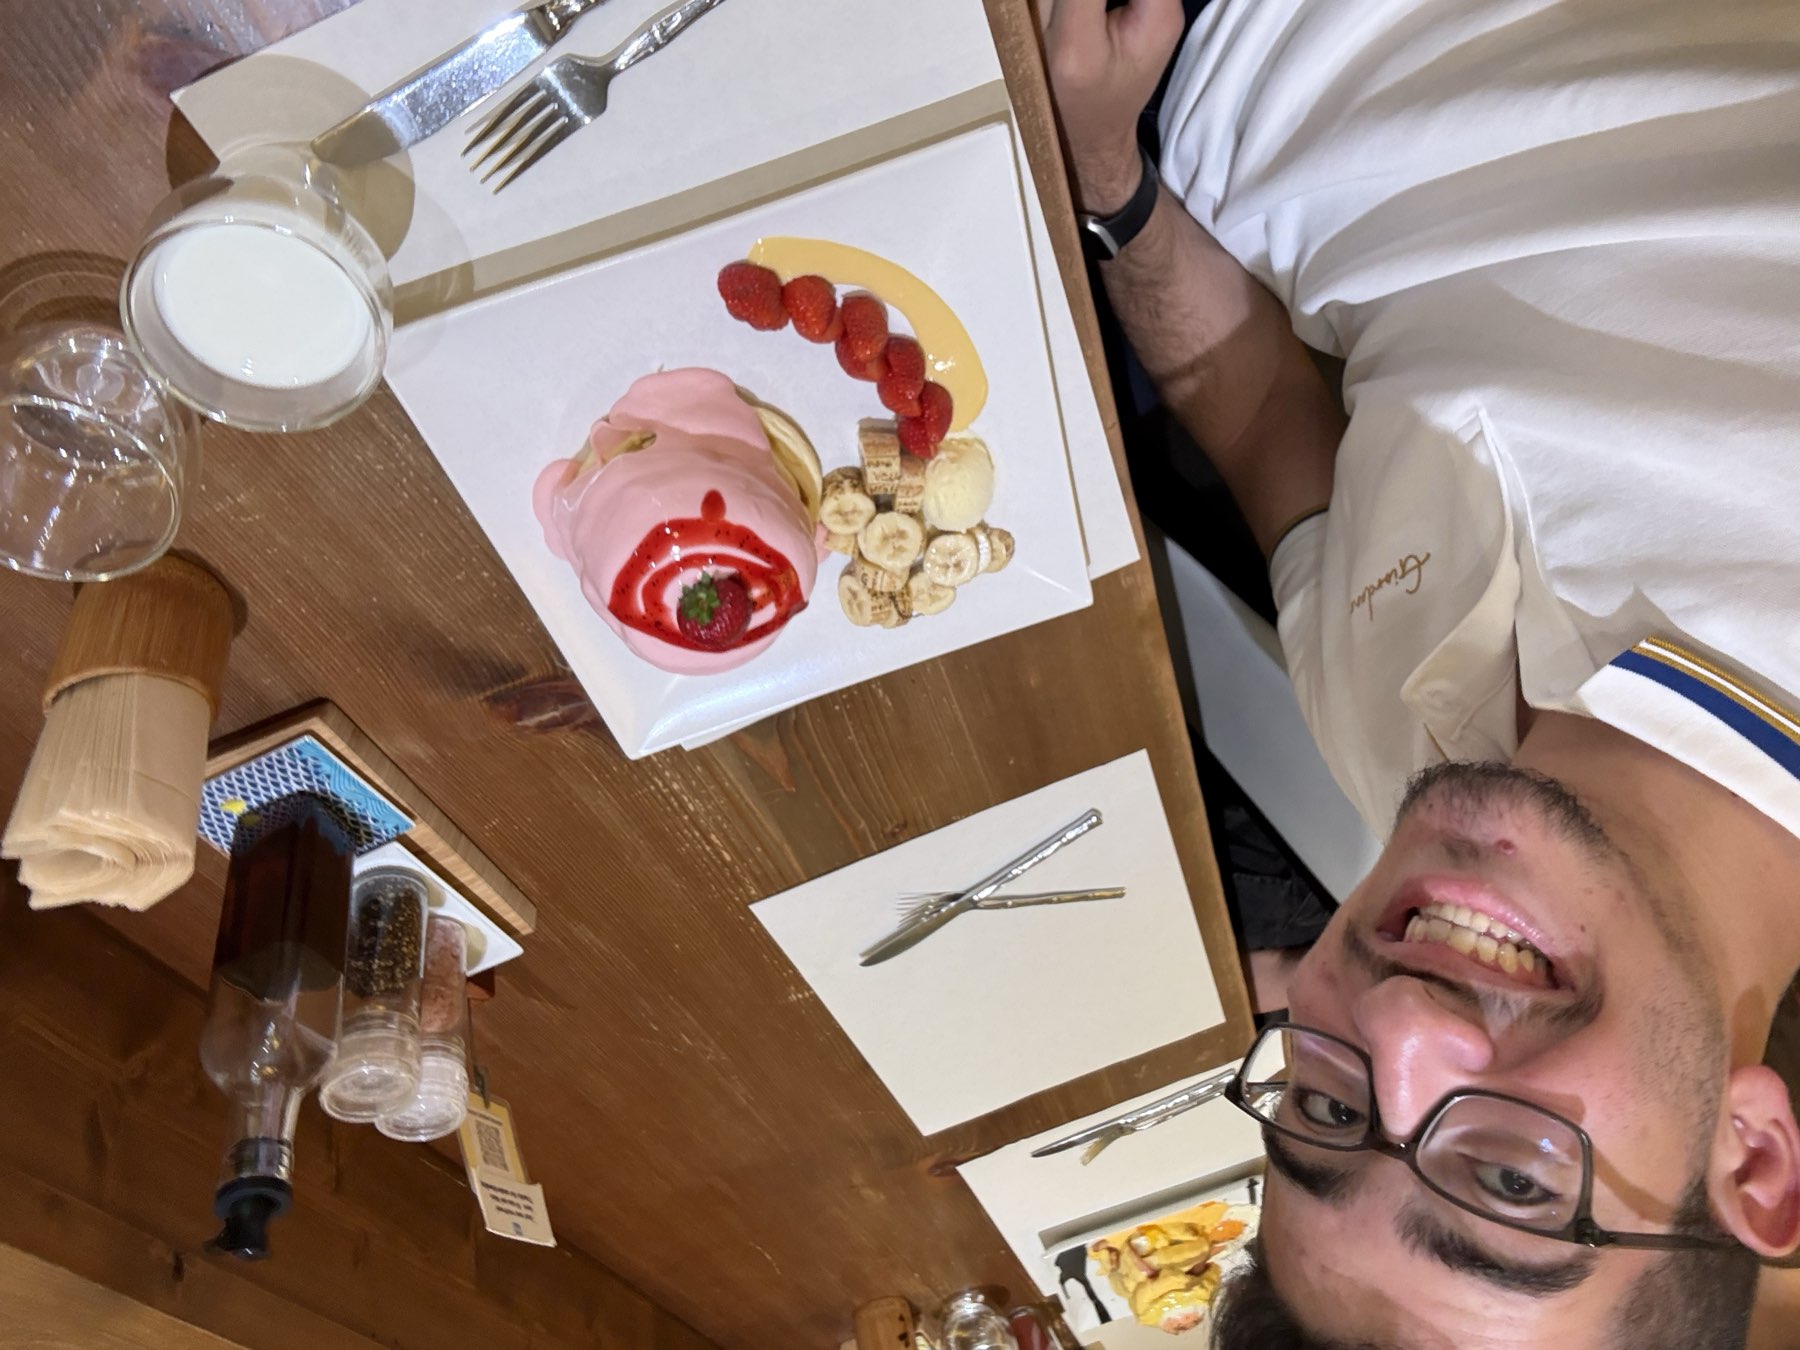
Eating at the viral pancake spot in Tokyo after getting stranded there because I missed the last train back to Yokohama.
This week’s assignment is kind of combined with the checklist. I like how it makes us sort of reflect back at our project and make it ready to be open-sources. Jump to that section.
Learnings from Global Session
This week's global session was mainly about final projects, applications, and project development. The official Applications and Implications class page shows a wide range of examples, from small electronics and test equipment to prosthetics, machines, labs, and larger community-scale systems.
My main takeaway was that the point is not only to make one object. The final project should show that I can combine the skills from the whole program into one integrated system.
For my project, that means CAD, 3D printing, electronics design, PCB production, embedded programming, inputs, outputs, interface work, system integration, packaging, and documentation all meeting in one wearable prototype.
Also, we came back to project management as we’re getting to the final sprint of our final project. I think I have managed the project quite well, especially when it comes to make a final product, but I could’ve done better in thinking ahead for more advanced spirals.
My Final Masterpiece/Checklist
This project has been quite the journey. I started clueless about electronics and a bit on parametric CAD design, but now, I feel pretty confident with my abilities that I have overcame the hardest initial learning curve.
The spiral of the final project that I’ve been talking about quite a bit doesn’t fully demonstrate the extent of what I’ve learnt in electronics especially, but it shows a decently packaged and delivered systems :D
What does it do?
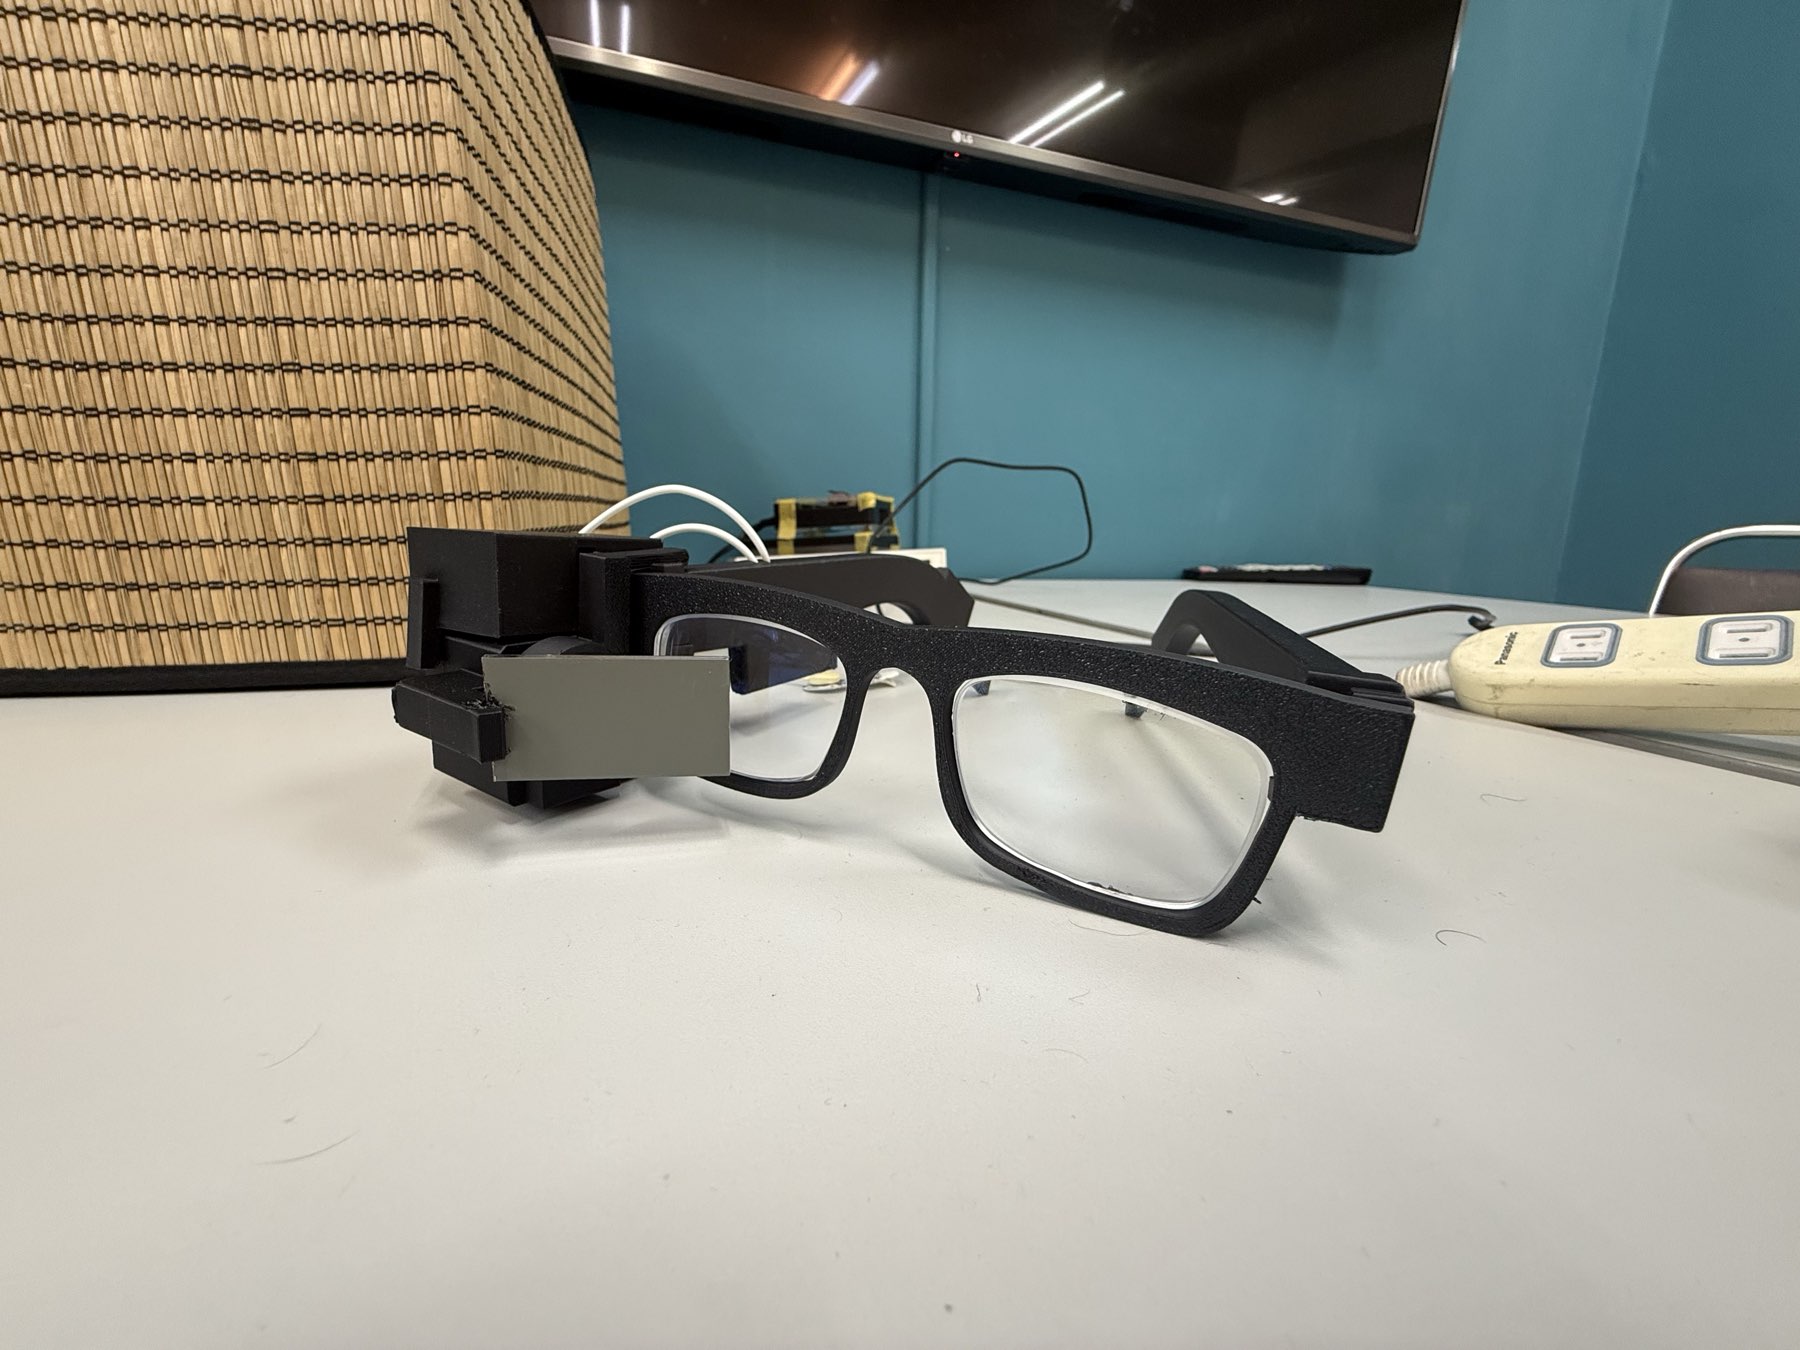
NeuroAR are AR glasses that read brain activity. It is a pair of glasses with a small OLED display reflected through a lens, prism, and mirror-acrylic optical path.
It has forehead electrodes connected to a custom board using the XIAO ESP32-S3 and ADS1292 biopotential front-end. The basic flow is body signal to custom board, custom board to XIAO, and XIAO to display feedback.
The final simple demo includes reading the brain activity, show feedback through the wearable display while being connected to an external dashboard/web app to control the screen.
More advanced spirals include processing the EEG signals using SNNs, connecting NeuroAR to Poke through MCP, mounting this technology and connecting it with Meta Rayban Glasses, and making a system that utilizes the features across what I developed and what’s on the glasses.
Who has done what beforehand and my sources?
One of the biggest inspirations for the display side was Mañolo's YouTube channel. One of the initial videos I saw while thinking about my glasses was the following. It showed a simple AR display system that I scaled up a bit for my own glasses.
I also looked at projects close to mine so I was not designing in a vacuum. Open Source Smart Glasses is useful for open smart-glasses architecture; it was a really helpful starting point for the start of my ideation process.
This project eventually became a basis of a YC company called Mentra (I’m in contact with their founders); they aare building an open-source OS for smart glasses.
Uwear was also another project I used for inspiration. While this isn’t an exhaustive list of all the projects and past work I reviewed, these are some of the projects I reviewed for building the optics of my project. A shoutout to a previous project where I attempted to build my own hardware, but ended up using commercially available glasses.
On the EEG/brain activity monitoring side, the e-Glass paper, which are EEG glasses for real-time brain electrical activity monitoring. It shows EEG built into an eyeglasses form factor, with frontotemporal electrodes, real-time monitoring, and edge-ML applications like seizure detection and cognitive workload monitoring.
Open-Source EEG: Brainwaves on a Custom PCB and OpenBCI are were good references for me while building the EEG system. Tbh, there is a ton of improvements that could happen on that end too.
I also went deeper into understanding the TI ADS1292 product page and datasheet for the EEG signal processing.
For tools, I used ChatGPT, Codex, and Claude during the project for brainstorming, code help, debugging, and documentation cleanup (only cleanup, the actual documentation was written by me, as I explain in How I used AI in Fab Academy). The actual design/build tools were KiCad, Fusion 360, Inkscape, PlatformIO, and Arduino C++ (and MicroPython for the ML processing Spiral).
What materials and components will be used, where they come from, and how much do they cost?
| Part / material | Source | Cost (USD) |
|---|---|---|
| XIAO ESP32-S3 Sense | DigiKey | $13.99 |
| ADS1292IPBSR | DigiKey | $9.84 |
| SSD1331 OLED | Akihabara/Amazon | $9.27-$12.49 |
| Plano-convex lens (22.4 Diameter) | DigiKey | $31 |
| 151515 mm Beam Splitter Cube | AliExpress | $10 |
| BITalino Electrodes/electrode alternative | BITalino (FabLab Benfica Stock)/DigiKey | ~$23/$16 |
| JST Display 7-pin Connector | DigiKey | $0.8 |
| Matte Black Bambu PLA | Amazon | $14 |
| Mirror Acrylic | FabLab Kannai stock/Amazon | 5 Pack, 12*12 in sheets: $33, the piece needed costs cents |
| Vinyl Roll | FabLab Kannai stock/Amazon | Full 12 in * 14 ft: $10, the piece needed costs cents |
| Additional Electrode Pads | Amazon | 20 piece sets: ~$8 |
| 10k 0805 resistors, R1, R2, R3, R10, R11, R12 | DigiKey | 6 x $0.10 = about $0.60 |
| 49.9k 0805 resistors, R4, R5 | DigiKey | 2 x $0.10 = about $0.20 |
| 1M 0805 resistors, R6, R7, R8, R9 | DigiKey | 4 x $0.10 = about $0.40 |
| 0 ohm 0805 jumper resistor, R13 | DigiKey | 1 x $0.10 = about $0.10 |
| 0.1 uF 0805 capacitors, C1, C3, C8, C10 | DigiKey | 4 x $0.13 = about $0.52 |
| 1 uF 0805 capacitors, C2, C4, C6, C7, C9 | DigiKey | 5 x $0.21 = about $1.05 |
| 10 uF 1206 capacitors, C5, C11 | DigiKey | 2 x $0.36 = about $0.72 |
| 6 mm SMD tactile button, SW1 | DigiKey | 1 x $0.20 = about $0.20 |
| Single-sided copper Fr4 board for PCB milling | DigiKey | one 5 x 3 inch FR4 board is about $11.09 |
| Minimum total | Lowest listed cost for each row | about $127.78 + a few cents for the mirror acrylic and vinyl pieces |
As noted above, a lot of the materials I used were already available at the lab. This is of course, in addition to the equipment we are using like the 3D printer, the Vinyl cutter, and PCB milling machine.
Those costs are excluding any additional fees and shipping costs.
I ordered quite a bit more components for different experiments like a higher quality camera and different electrodes and connector. However, I mentioned the main parts here.
What did you design, what parts and systems were made, and what processes were used?
Starting from the CAD design process: I use both 2D and 3D design from designing the project’s logo, the glasses frame, side housing, temples, display holder, lens/prism position/optics, mirror-acrylic combiner angle, cable concealment, and electrode placement.
I utilized 3D printing (additive manufacturing) to produce the main frame and enclosure of all the components, and laser & vinyl cutting for both the mirror combiner component and decorative final touches (subtractive manufacturing).
Moving to the electronics design and production: I designed all the electronics and their wiring from connecting + controlling the display, the ADS1292, the XIOA ESP32S3, and the system for reading the recorded brain activity, and interacting with the user through both software and the input devices (EEG electrodes and button), on KiCad, and produced it on a Fr4 copper board using our PCB Milling machine.
I designed the board to connect and link all these components.
Now to the software production: I designed a system to interface with my AR glasses over USB and WiFi while enabling the user to utilize the input devices (EEG electrodes and Button) to interact with the screen. I connected the screen with external services that’d give the glasses more functionality for the user including email notifications.
I also designed the full software and dashboard + ML to interact and process signals from the glasses. I do this with the help and “mentorship” of Codex and Claude, lol :D
The glasses were fully integrated ensuring everything fits/snaps in its place without any wires being visible with the display module being detachable and the electrodes sticking to the forehead. I made sure that the system can be worn to a comfortable extent with power reaching it from a customized small power bank.
What questions were answered?
The biggest one was whether this whole thing could actually live on a pair of glasses instead of staying as boards on a desk, as in whether I combine AR and EEG signal processing in one form factor. That one got answered, yay :D
The XIAO, the ADS1292 board, the wiring, and the display optics all fit into the temple and the detachable module, everything snaps in, and you don’t see any wires from the outside (the electrodes just stick to your forehead).
A question I set early was whether I could reuse the lenses from my own glasses instead of making custom ones. Cutting or ordering custom lenses is expensive and a whole separate process, so I designed the frame from the outline of my actual lenses, and they dropped straight in.
I was curious to whether I would be able to make the design all snap in together without any screws which would be convenient for this type of prototype project.
I learned how to design proper snap-fits, and the temple cover, the display module, the prism holder, and the wire concealers all click into place, which also keeps the cables hidden so nothing shows from the outside.
The hinge was very annoying too. My first idea of printing the hinge in one piece with the frame failed instantly, it snapped the moment I moved the temple. After a few iterations and a tutorial, I got a separate hinge that folds and holds in place.
Balance was something I wasn’t sure I could get right either. I wanted the glasses to sit properly instead of tipping forward or to one side. Splitting the electronics across the frame, the EEG chip near the temple electrodes and the XIAO toward the back, and routing the powerbank cable out the back, ended up balancing it well enough to wear.
I also wanted to know if I could read a real biopotential signal off a board I made myself. For strong forehead events like blinks and eye movement, yes, the ADS1292 picks them up.
The optics question got answered too. With just the screen and the prism the display had to sit way too far from my eye, but adding the convex lens roughly halved that distance, and the angled mirror-acrylic combiner only reflects the light coming from the prism into my eye while leaving my forward view mostly clear.
There was also a fabrication question: whether our PCB mill could even handle the fine-pitch ADS1292 in its 32-TQFP package with 0.2 mm traces. After ruining the first board and the chip by being impatient with the solder, it milled and came together cleanly with the right settings.
The last practical one was power. The glasses run off a small external powerbank over USB-C from the back of the right temple, and that also helps balance the weight, so I could actually wear it for a reasonable time period.
What worked? What didn't?
The integration and packaging are what worked best. I designed the frame from my own lenses, turned the right temple into the electronics enclosure, hid the cables, and snapped everything together with no screws.
The result is a prototype that actually looks like one designed object instead of parts taped together :D
I wouldn’t necessarily wanna daily drive the glasses, but it is clearly a working prototype.
Optics worked too. The OLED, lens, prism, and mirror combiner line up at a good distance making the display is readable, and it doesn’t block my normal vision when I’m not looking at it.
My milled ADS1292 board did its job. It powers up, talks over SPI, and reads strong forehead biopotential signals like blinks and eye movement.
Software held up through all the hardware changes. The small front-end feeding the XIAO, the XIAO as the hub, the browser dashboard, the recording and training pipeline, and the board-native Display Studio all worked together.
I’m still actively experimenting with the SNN side, and it’s kind of working. Trained on my own recordings, it pushes strong-event detection above a naive baseline, so it already adds something on top of raw thresholding.
It’s not a finished, reliable controller yet, mostly because my dataset is tiny. But the pipeline runs end to end and the direction looks promising, and I am actively working on it.
The advanced EEG is the part that didn’t get there. Clean, separated brainwave bands and any real mind-state reading aren’t happening yet, and that needs a fundamental change in hardware properly by adding more electrodes and getting an ADS1299, which only is possible by a board house.
The raw signal is still too noisy for that, and that points at physical things first: only two electrodes, no dedicated reference/bias electrode this spiral, plus motion, contact, and cable noise.
My earlier DIY EEG front-end didn’t really work well either. The op-amp plus SAMD11 board I built to read the signal was noisy and unreliable, and it had too many parts to sit nicely in the temple.
That’s the main reason I moved to the ADS1292, which is built for biopotential sensing, with differential inputs, gain, a higher-resolution ADC, and proper reference circuitry to handle the sensitive analog side.
A lot of the build fought me on the first try, which is kind of expected tbh. The thin temple body kept breaking until I thickened it and raised the infill, and the connector slot took a few iterations.
Capacitive touch is the other thing I had to rethink. I wanted touch pads on the temple to control the glasses, but adding them to this form factor made the temple thicker and even harder to wear comfortably.
So I left them out of this spiral and stuck with a simple button. Getting touch input in without bulking up the frame is something for a later version. This also applies to some of the additional features like the camera, microphone, and speakers.
Honestly, the color display works but is probably overkill for what the glasses currently do, so I might drop it in a later spiral.
How will it be evaluated?
It gets evaluated on two fronts: the Fab Academy requirements, and my own test for whether it actually works.
On the Fab Academy side, the final project has to pull the required skills into one integrated object that is clearly mine and runs on its own. That means 2D and 3D design, both additive and subtractive fabrication, a microcontroller board I designed and produced myself with real input and output, embedded programming, and full system integration and packaging.
NeuroAR hits each of those: the CAD frame and optics, the 3D-printed body with the laser-cut combiner and vinyl decals, my milled ADS1292 board with the electrodes as input and the display as output, the firmware, and the final packaged wearable.
I also tried to make rather than buy wherever it made sense. I made the board, the frame, the optics housing, and the combiner, and only bought the things that don’t make sense to fabricate in a lab, like the XIAO, the ADS1292 chip, the lens, and the OLED. The BOM shows that split.
The documentation is part of the evaluation: the final project page, the bill of materials, all my original design files (CAD, board, and code), credit to the people and projects I built on, and the two presentation pieces, the 1920x1080 summary slide and the one-minute video.
Then, there’s my own bar for whether it works. I want it judged as a worn comfortable (to an extent) object, not separate modules. It has to sit on my face, keep the display aligned, hold all the electronics, and survive being handled and power-cycled like a real consumer device.
The XIAO should drive the display and pass the ADS1292 checks (registers reading back, DRDY behaving, clean sample frames over SPI), and the input should reliably catch at least strong forehead events like blinks and eye movement. Clean EEG and SNN-based detection/processing stay as stretch goals.
What I am still not sure about, and what are the implications?
The main thing I’m not sure about is how far to push the EEG claim. Right now the honest version is wearable AR plus biopotential sensing, with clean EEG and SNN processing as the direction I explored, not a finished feature.
There is quite a bit of noise and instability that come with the EEG signals and perhaps using additional electrodes could help fix the signal quality. Additionally, better isolation of my traces would probably go a long way in reducing the noise coming in.
Since it’d be quite impossible for us to mill thinner traces, I didn’t explore using an ADS1299, which is a chip that is more targeted towards processing EEG signals. Ordering a ready PCB from a PCB house could be a good way for an additional spiral.
This is also a start for upcoming spirals that would add and enhance this project, including the Poke MCP spiral.
A software spiral I have already started implementing is the AI and EEG side on the same hardware. I will run a small SNN classifier in PSRAM to pull out brain-state classes like focus, attention, blink intent, and rest, and use those to drive the display with blink-to-click and alpha-gated menus.
The same brain-state can also feed my assistant endpoint as extra context next to voice or text.
Yes, those sounds like buzzwords, but it could be possible to control the interface with the brain, perhaps with some pre-defined commands. With what I have right now and without any additional electrodes, as shown in the dev logs, I was able to run a SNN classifier model that sort-of works.
A spiral on the current form factor is a hardware shrink. The electrodes and sensing move into the temples for shorter leads and less noise (that comes with its own challenges too), the external powerbank gets replaced by an in-frame LiPo, and I design proper dedicated lenses for the project.
It would include adding features useful for smart glasses like a microphone, capacitive touch on the temples, speakers, and a camera. Additionally, it would include a dedicate enclosure for the electrodes that fits arount the person head.
Since that hardware spiral is a bit too complex, I want the system to ride on top of existing smart glasses like the Meta Ray-Bans through their SDK, so the useful features work on hardware people already wear without adding additional features to my glasses.
What this project demonstrates is the ability of combining 2 increasingly adopted technology in a single form factor. This integration could enable new possibility of human-computer interactions through interfacing between the mind and mixed reality.
This could act as a platform for people to develop on top of it better more advanced applications and implementations of monitoring brain activity with AR alongside some interesting signal processing architectures.
I love thinking about the possibility of bringing our brains into the equation of the devices we interact with daily and utilize data from it to inform and guide our use of these devices. This could potentially become its own product or could be a basis for a deeper exploration of the human mind and its interaction with mixed reality.