Presentation
The slide and walkthrough I presented for the final review. Everything below documents each slide in depth — story, fabrication, electronics, integration, and what's next.
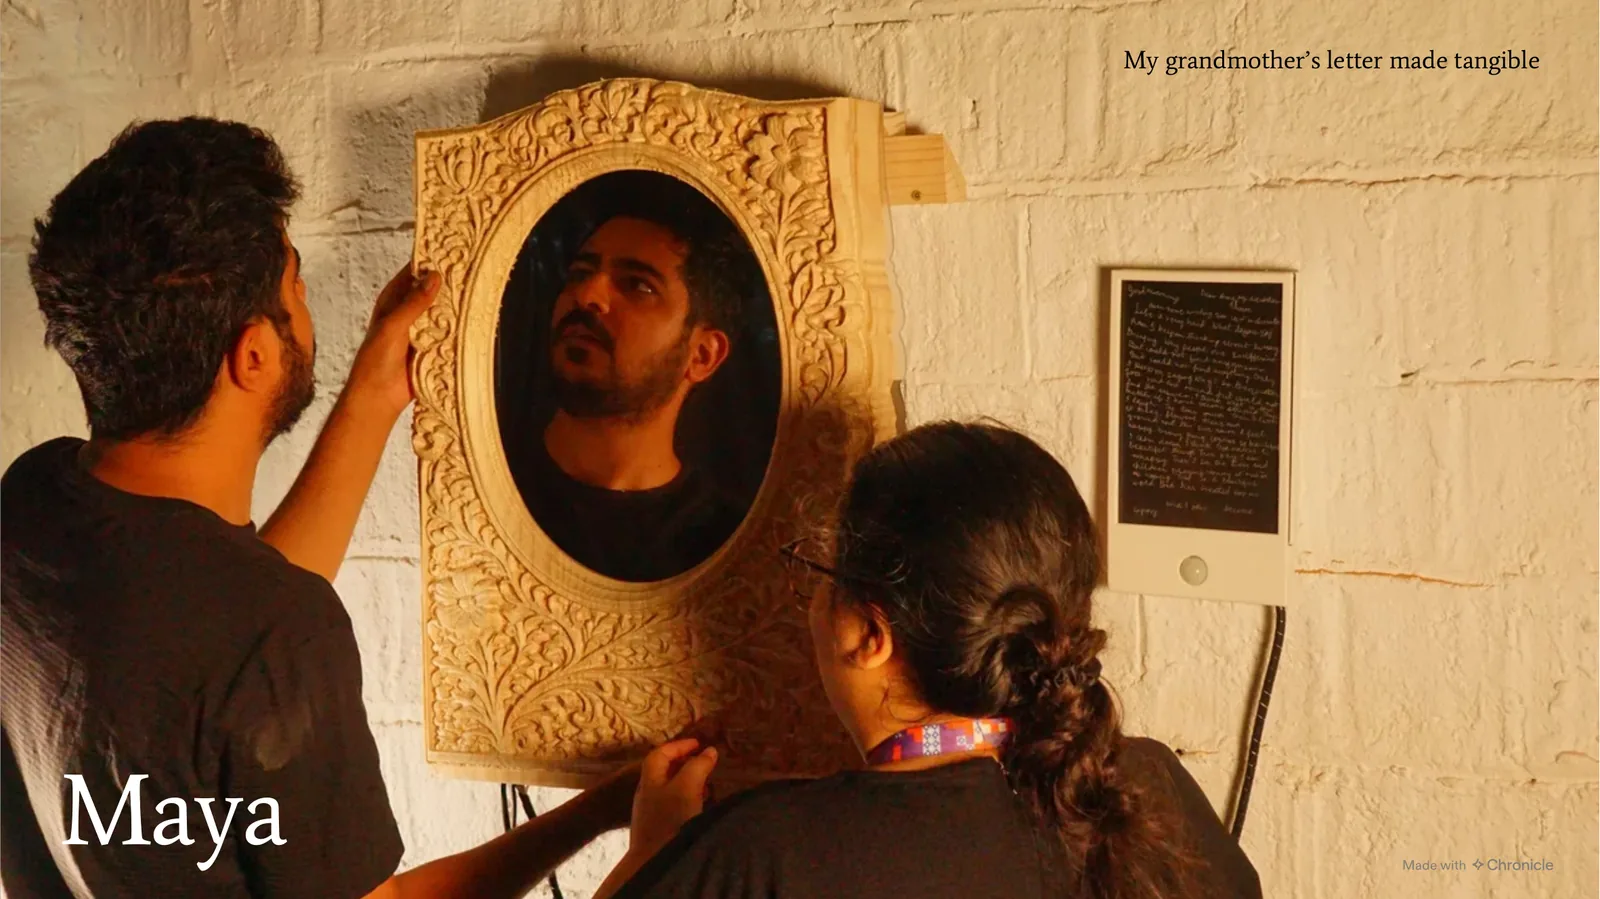
The presentation walkthrough.
What It Is
Maya is a two-piece interactive installation exploring memory, perception, and the fragile nature of reality. It is named after both my grandmother, Maya, and the Sanskrit concept of illusion — Māyā (माया), often translated as illusion: the idea that reality is fluid, layered, and not always what it seems.
My grandmother — my nani — was a writer, an artist, and a source of endless curiosity. Through her letters, her drawings, and her experience with dementia, she taught me that memory is fragile, identity is fluid, and beauty can persist even when certainty fades. The work draws from a letter she wrote and the artworks she made while living with dementia.
As memories fade and familiar worlds become uncertain, fragments of stories, emotions, and beauty remain. Through physical interaction and poetic narrative, participants navigate these fragments, reflecting on how identity shifts over time and how meaning persists despite loss. Maya is both a personal archive and a meditation on existence — asking what remains when certainty dissolves, and whether illusion itself can become a path to understanding.
"So what if I have become stupid? I look at the children playing in the fields. I see the sun, the moon, the flowers, the beauty of nature. Everything around us is gorgeous and beautiful, then why should I be upset?" — from my grandmother Maya's letter.
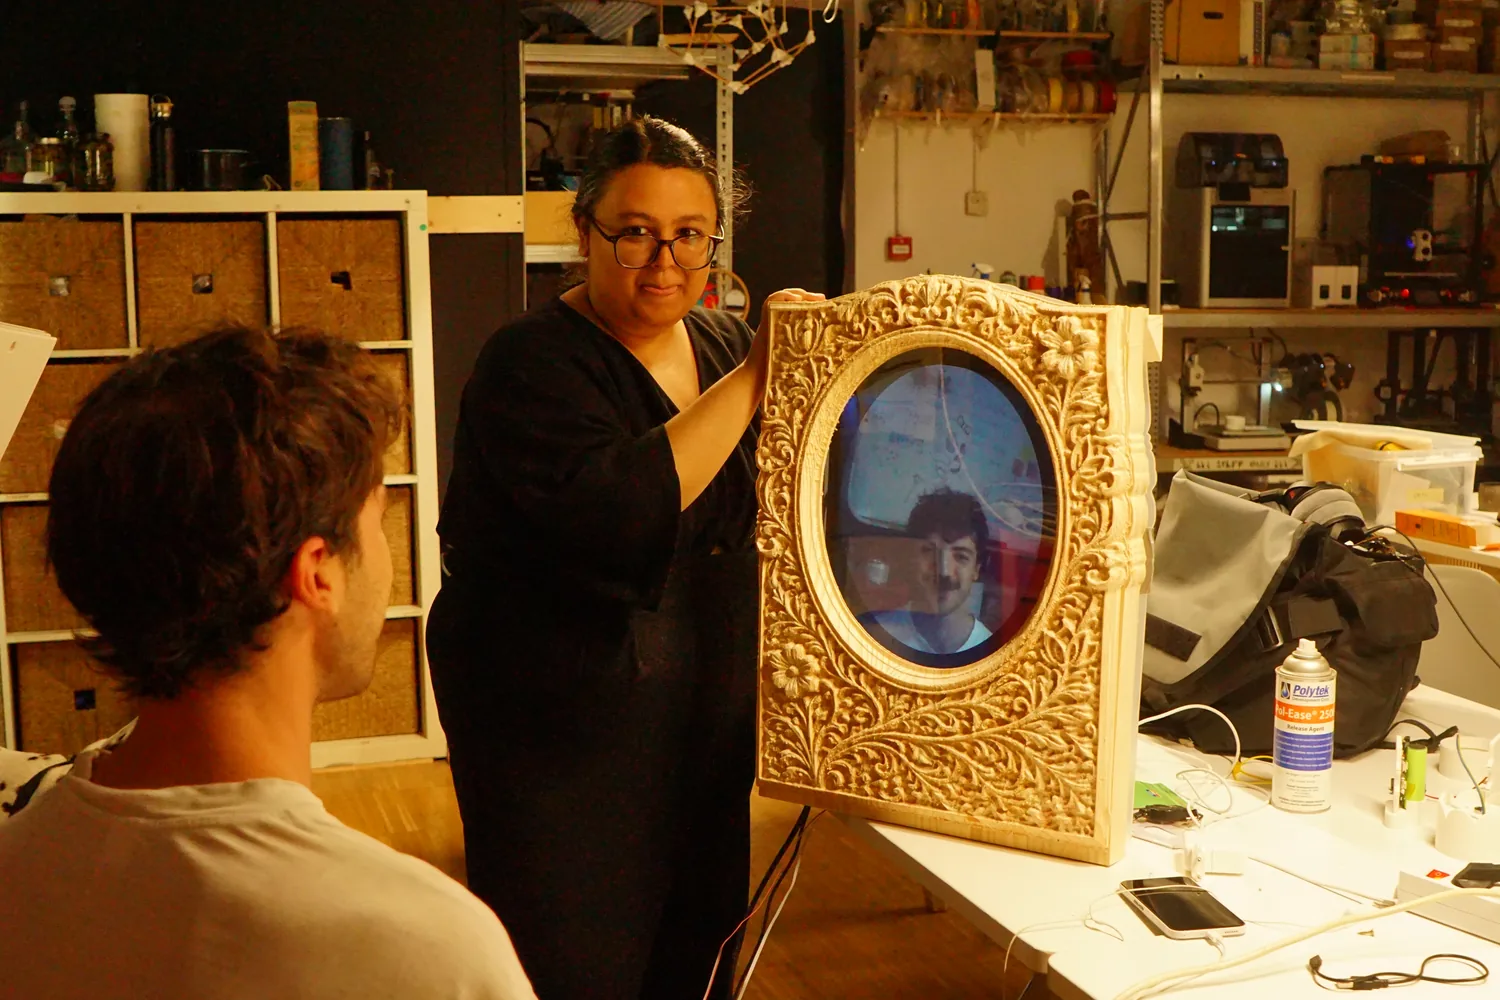
The two pieces: a mirror that tracks your face and transforms your reflection into the flowers and vines she once painted, and her letter — laser-marked into acrylic and lit beside it. The piece is built, wall-mounted, and was presented for the global review and shown publicly at IAAC in Barcelona. Physically it is a seven-layer object: a CNC-carved pine frame over a one-way mirror, a hidden monitor and mini PC running the simulation, a custom XIAO ESP32-S3 board, and the separate laser-marked letter lit by NeoPixels and triggered by a motion sensor.
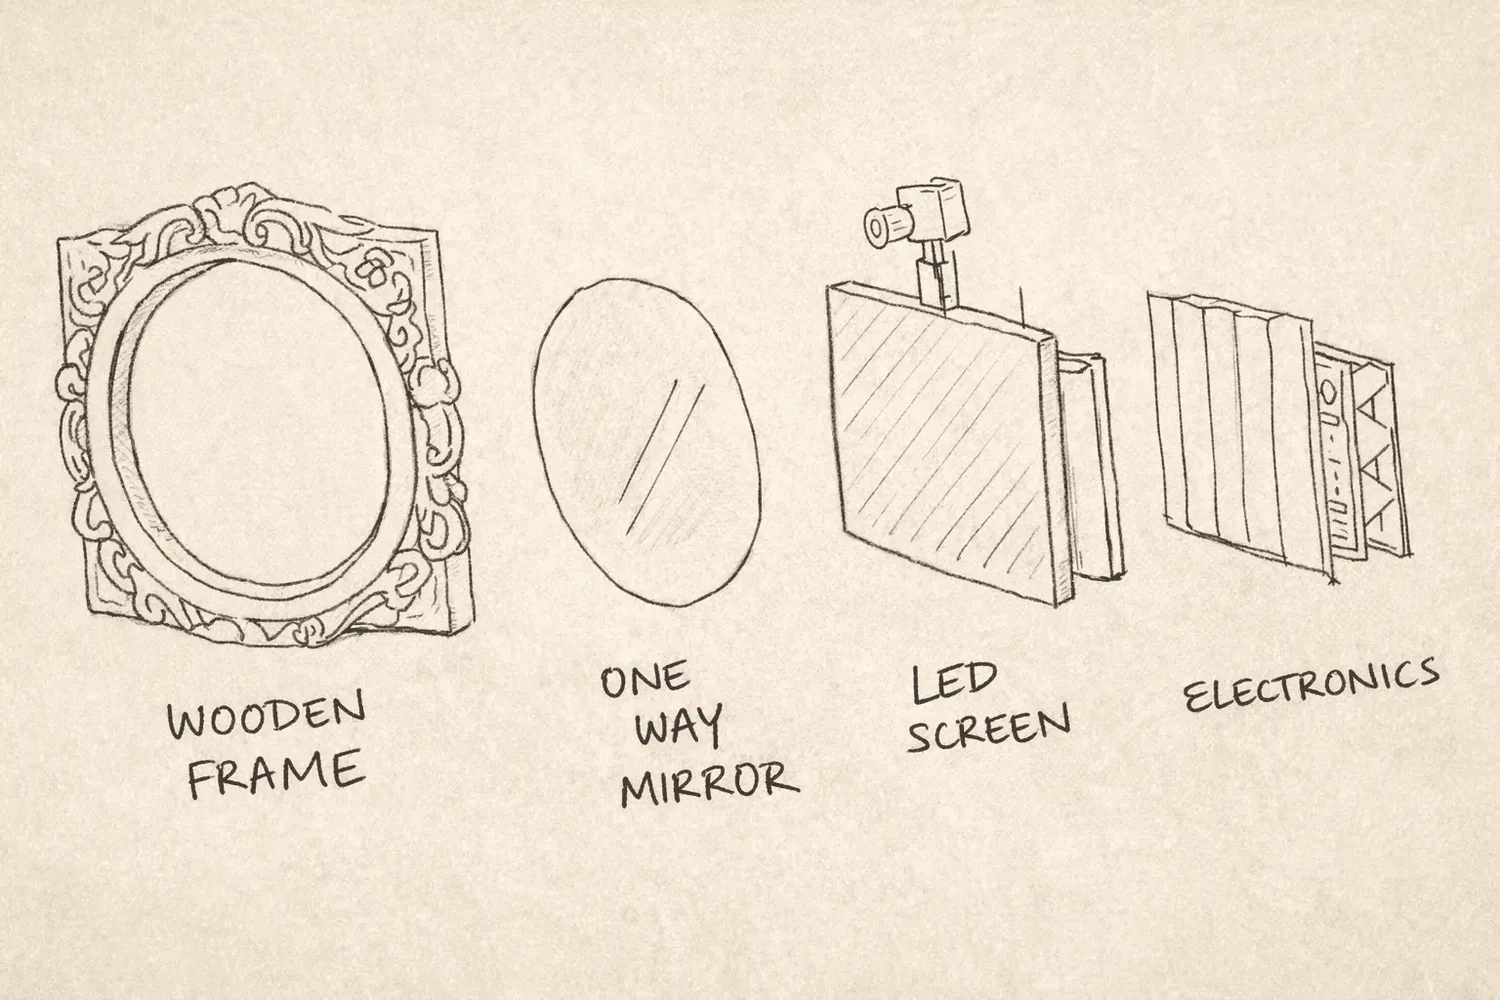
How the mirror is built: a carved wooden frame, a one-way mirror, an LED screen with a camera behind it, and the electronics. When the screen is dark you see only your reflection; when it lights up, the camera and simulation take over.
What It Does
The experience runs as a four-state arc that mirrors the letter's own emotional journey: loss of recognition → distortion → beauty → acceptance. At rest the oval is a plain mirror. On trigger, your reflection is replaced with live webcam footage and a WebGL simulation (MediaPipe FaceMesh on the mini PC) takes over — warping your face, breaking it into colour and flow, and then regrowing it as a botanical drawing in my grandmother's palette. The carved botanical surface of the frame is the destination the simulation is moving toward — it is not decoration. Each state is paired below with the line from her letter it embodies.
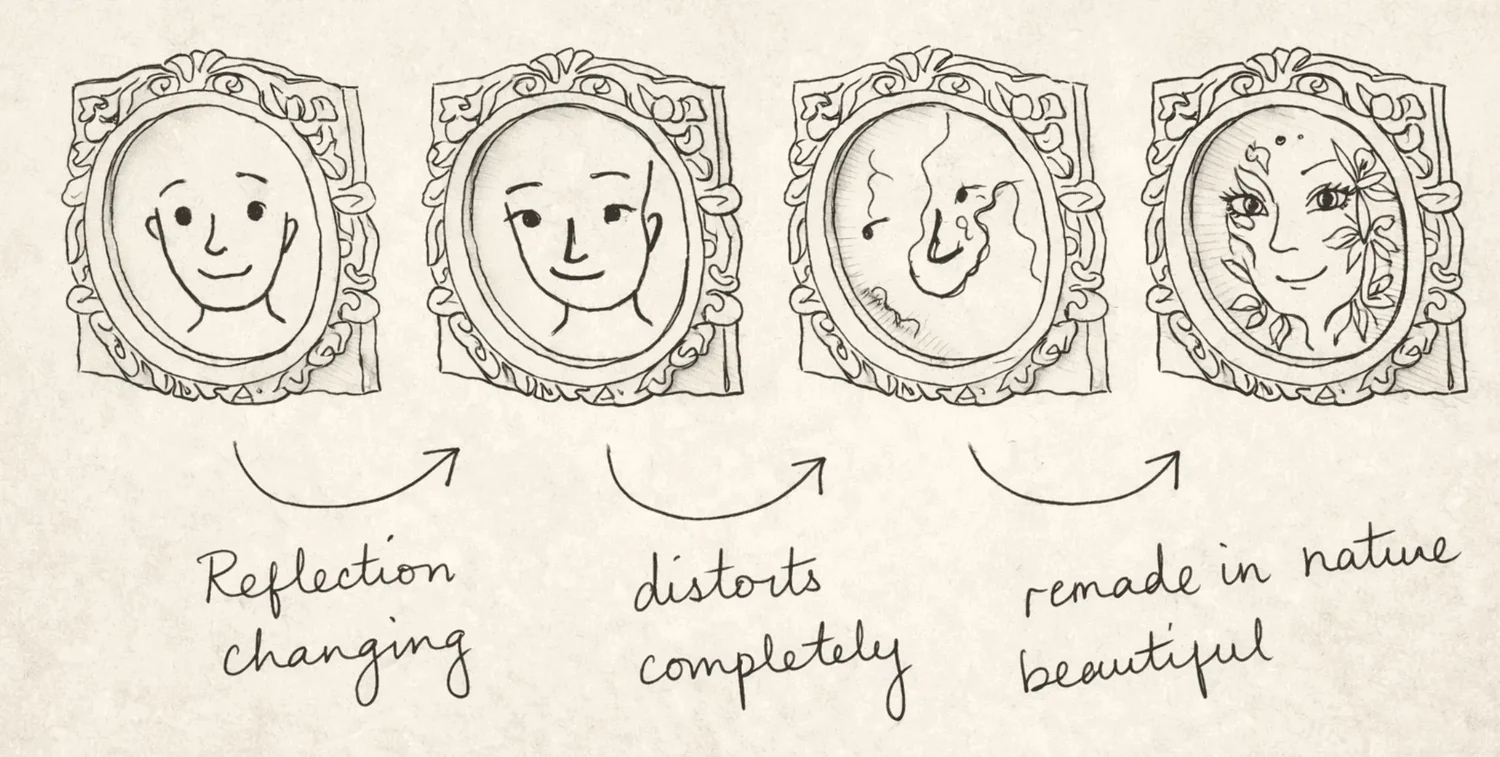
The arc, drawn: your reflection appears, begins to change, distorts completely, and is finally remade in nature — your face redrawn in her flowers.
And the real thing: you walk up to a mirror, it turns on, and your reflection slowly comes apart and is redrawn as her flowers. (The wide shot at the end shows both pieces — the mirror and her lit letter beside it.)
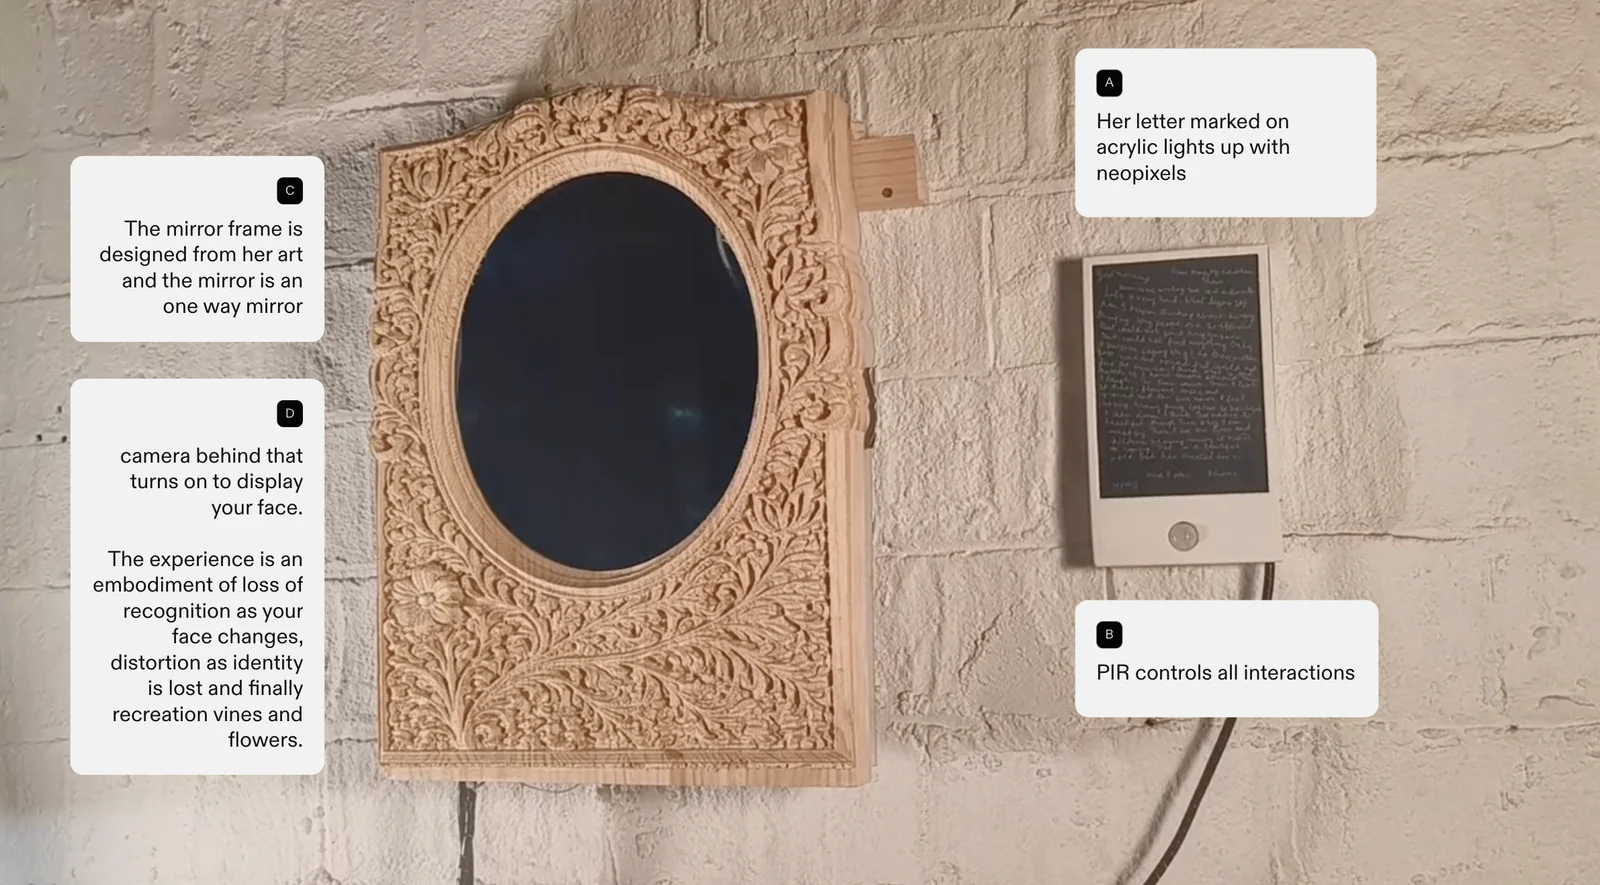
An anatomy of the two pieces. (The "PIR controls all interactions" label is the intended model — on the current build the PIR drives the letter lighting and the visual experience is advanced by a wireless keyboard; see the trigger note below.)
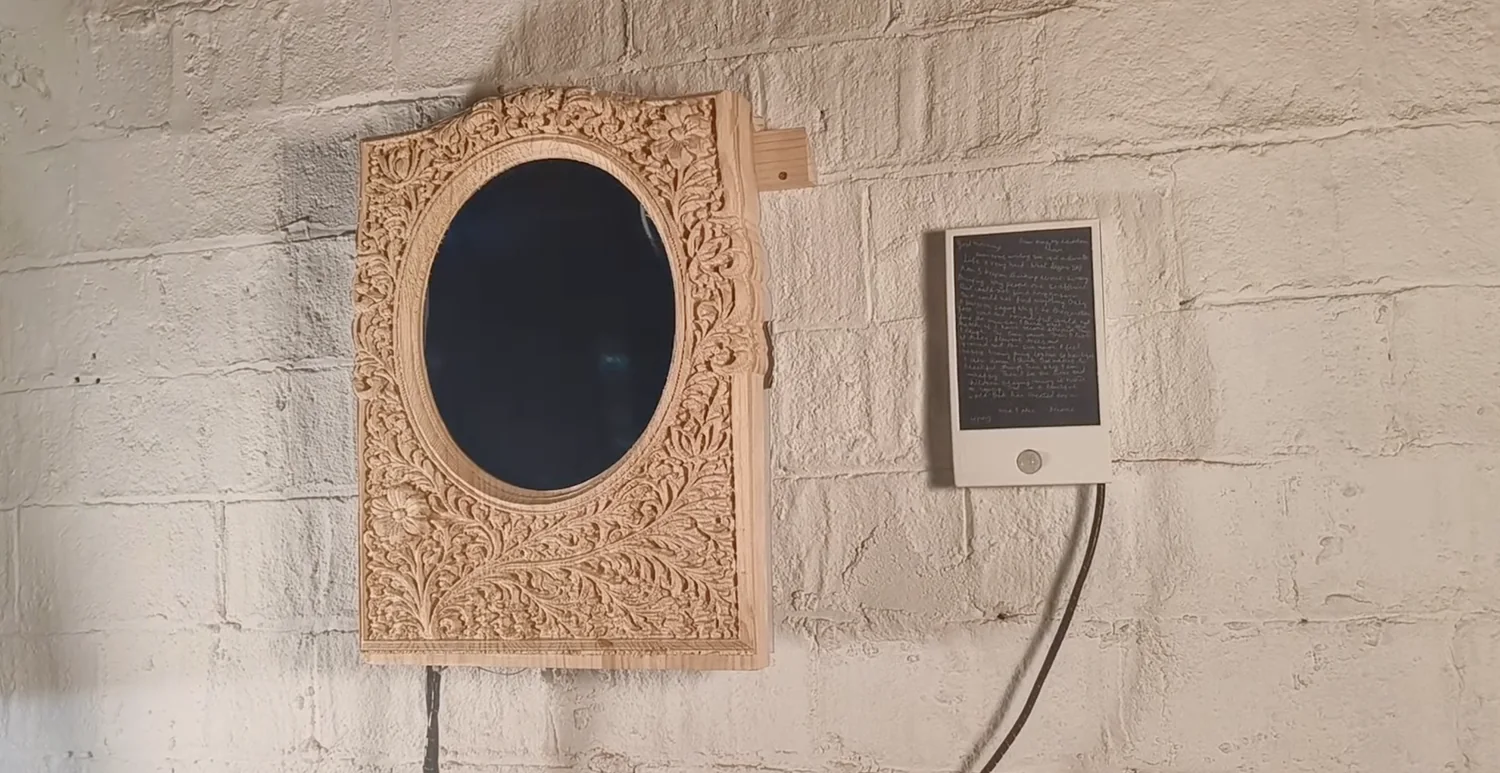
At rest — the oval reads as a plain dark mirror until someone approaches.
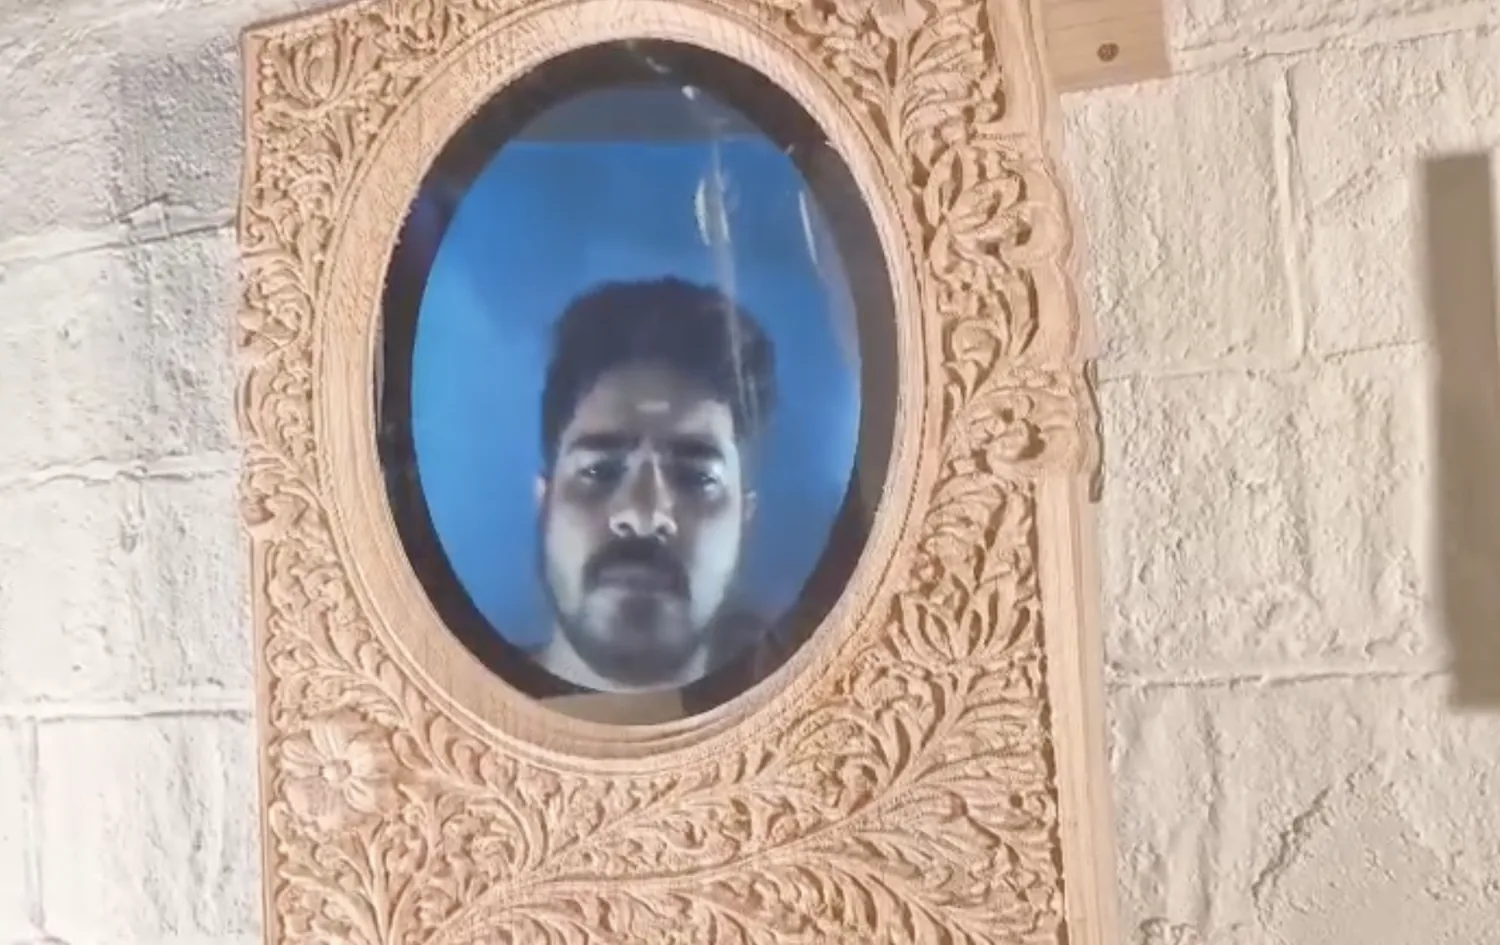
Loss of recognition — your reflection is replaced with webcam footage as your face begins to change. "Why people are so different."
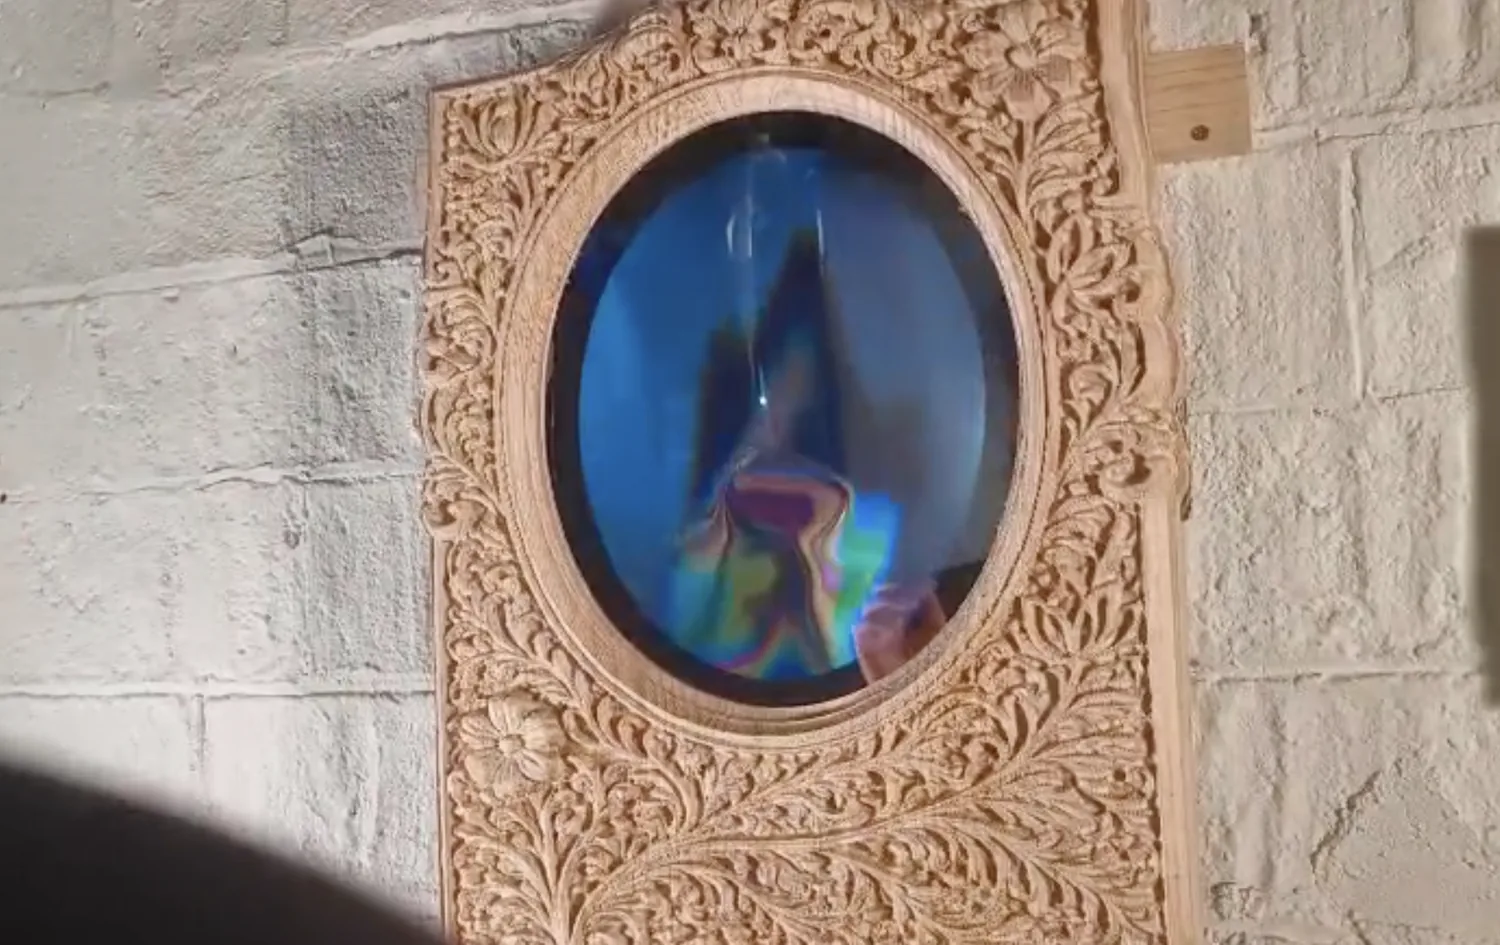
Distortion — the face completely disintegrates. "The question goes round and round."
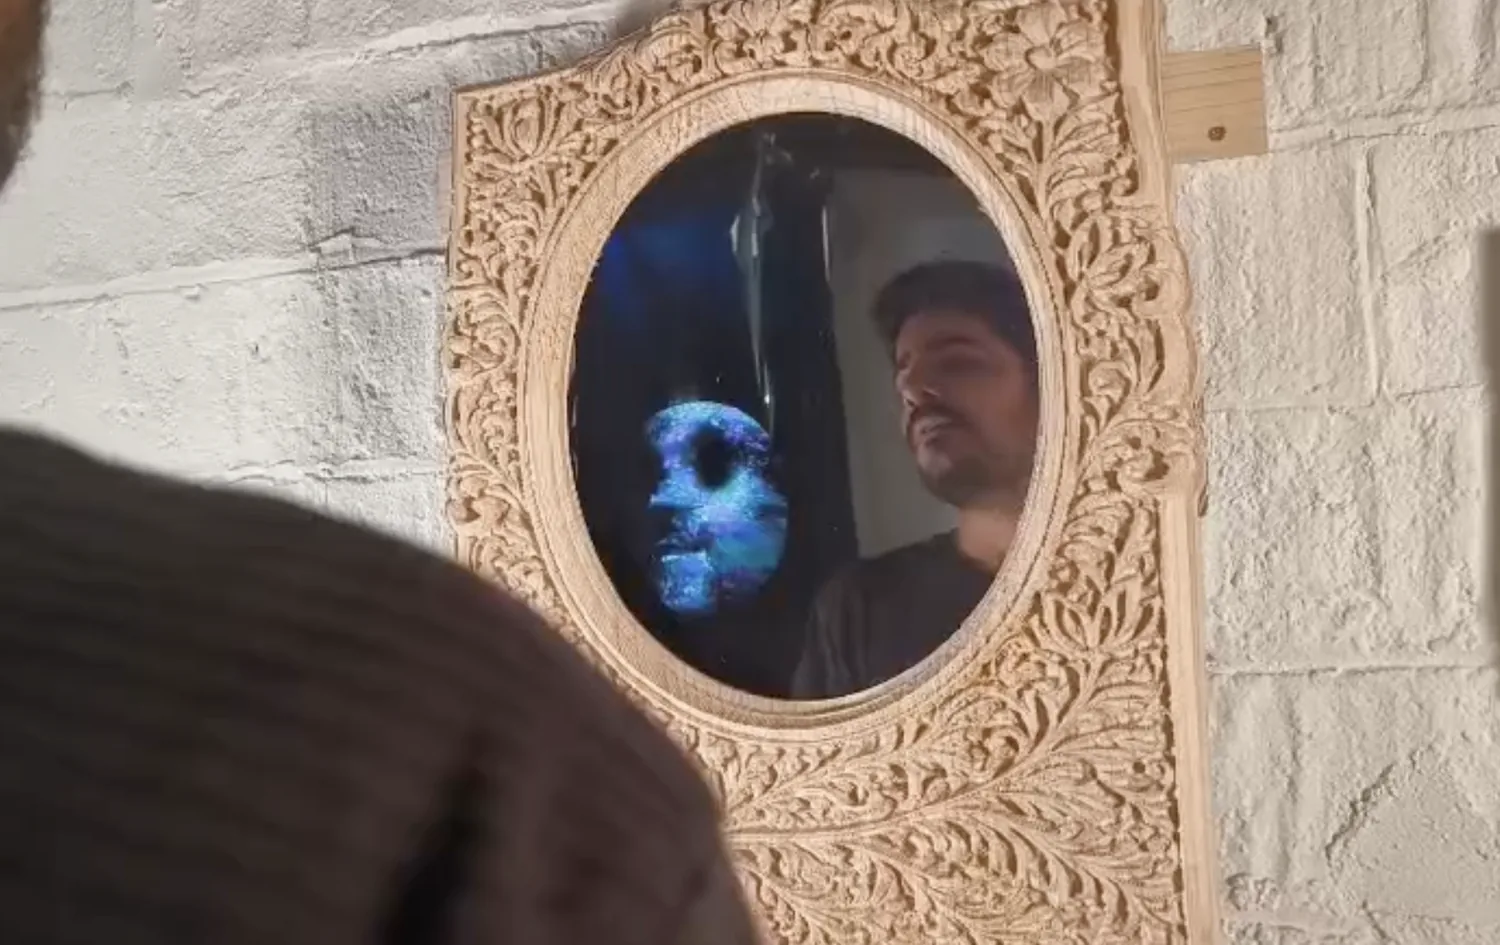
Beauty — the face is redrawn with vines and flowers by a living physarum (slime-mould) growth network. "Everything looks so beautiful — then why am I unhappy?"
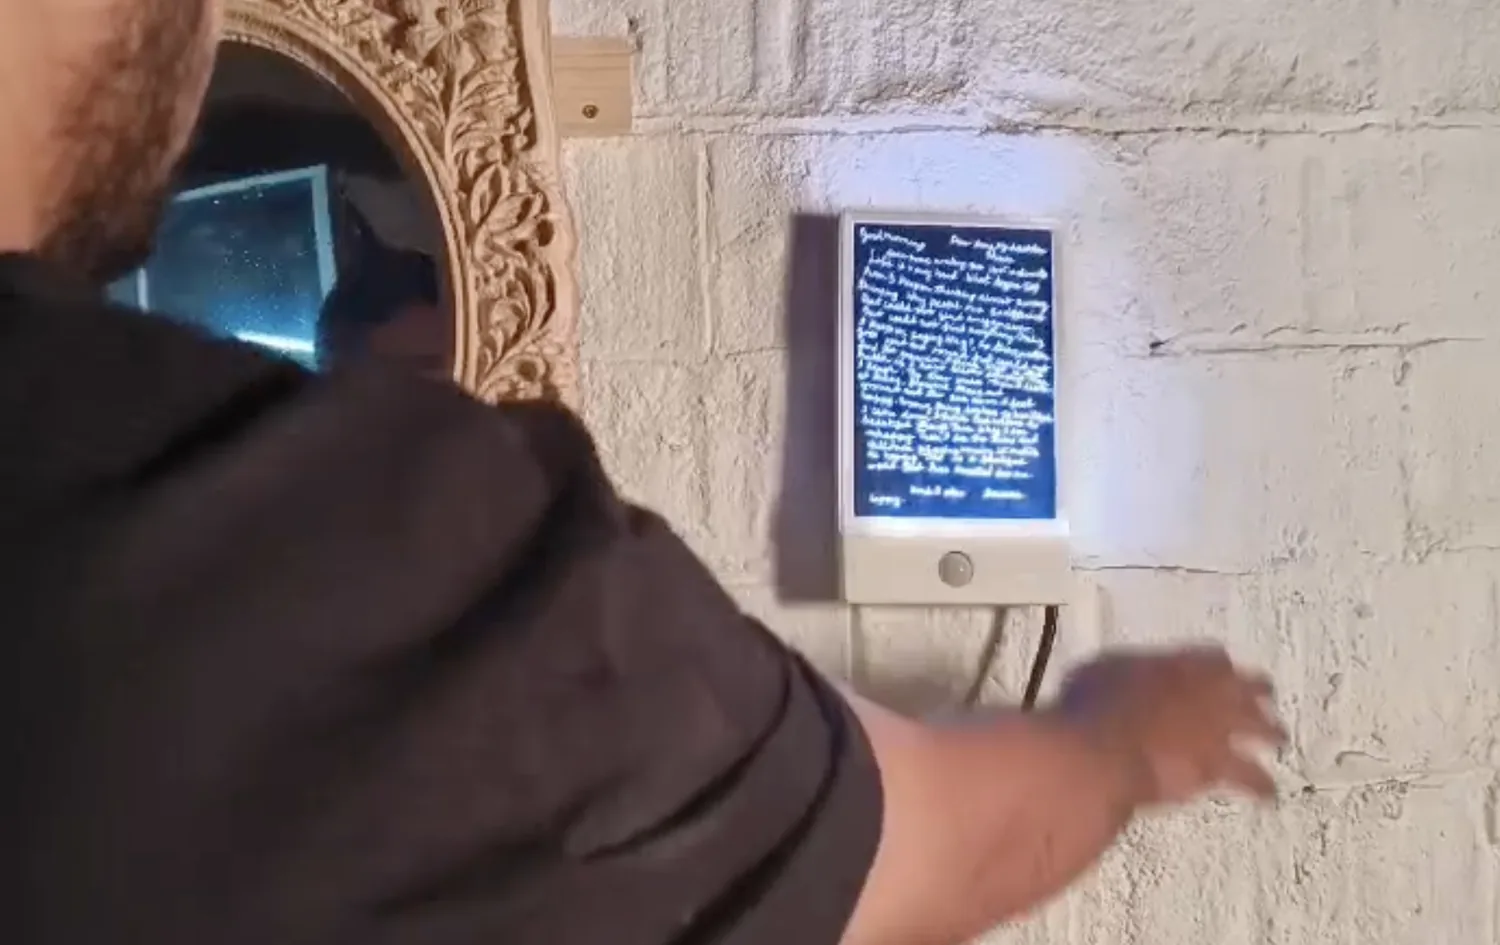
Acceptance — beside the mirror, motion over the PIR lights her laser-marked letter and her words land. "What is the matter if I have become stupid?"
The motion sensor in action — a hand passes the PIR and her letter lights up. This part runs reliably and unattended.
How it is triggered — the honest version
The ideal is that the PIR sensor handles everything — one motion to light the letter, begin the transformation, and reset. The full cycle was in fact wired and working through the PIR. The catch is the mini PC: driving the transformation off the PIR caused noticeable lagging in the kiosk-mode browser, so for now the PIR controls only the NeoPixels — motion turns the letter on and off, reliably and unattended — while the visual transformation is advanced by a wireless keyboard sending a spacebar (a USB-HID trigger). It is the stable workaround until a more capable controller replaces the mini PC, which is the first thing the next version fixes.
The Story Behind It
My grandmother Maya — my nani — passed away with Alzheimer's. She was a writer and an artist, one of the most expressive, curious people in my family.
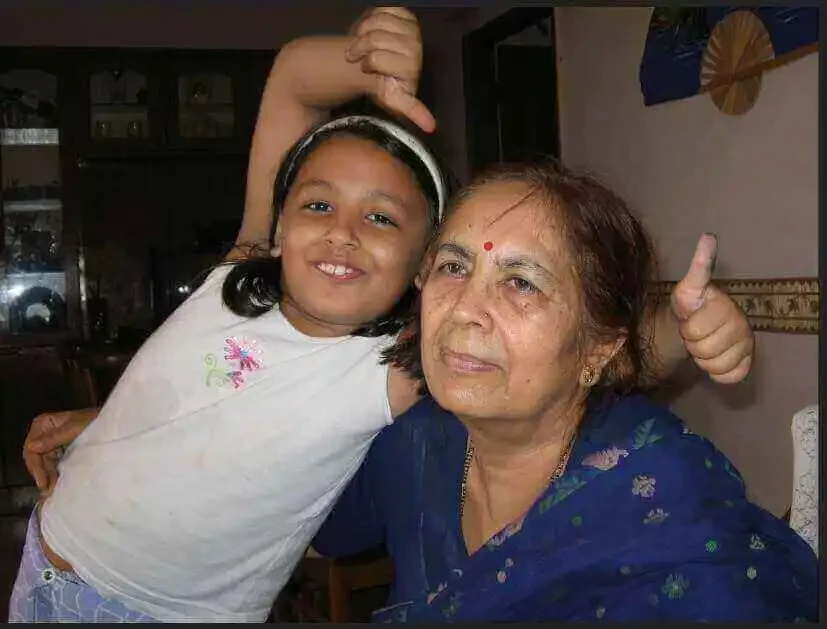
My grandmother, Maya, and me.
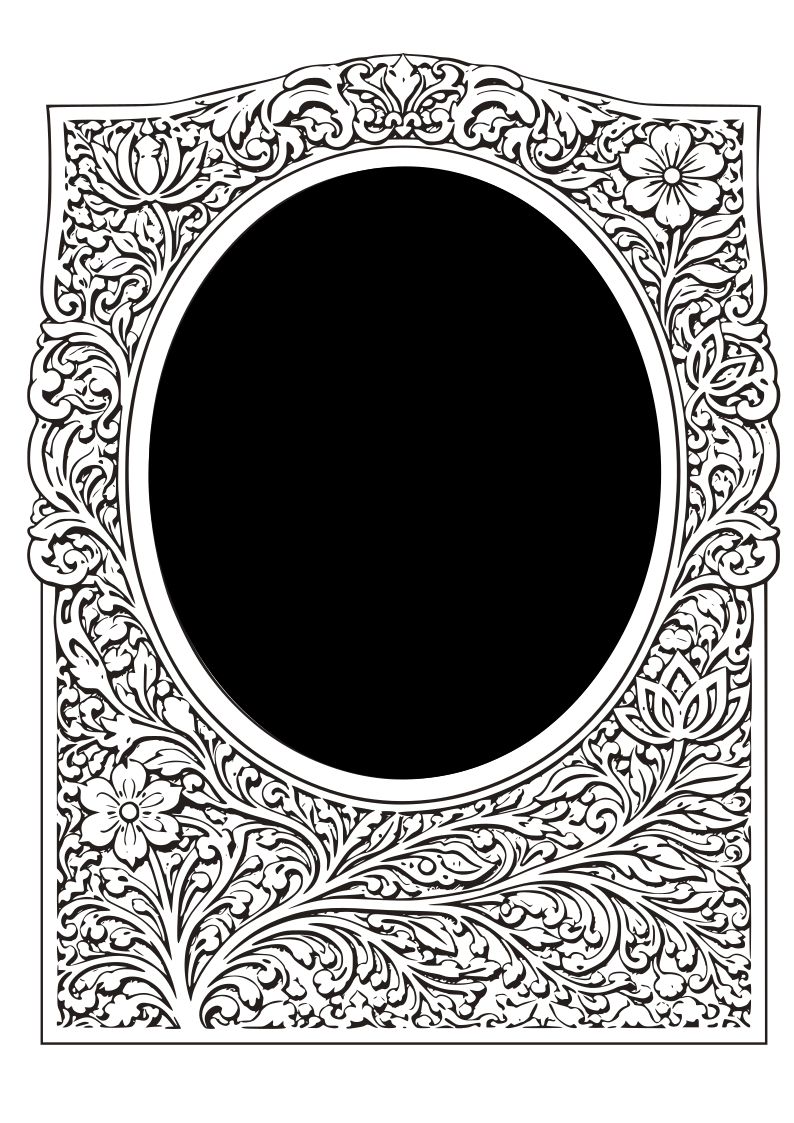
After she passed, we found her diary filled with drawings of flowers, paisleys, and vines. Those drawings are the source the whole piece is built from — the carved frame and the botanical flora the mirror redraws your face into both come from her hand.
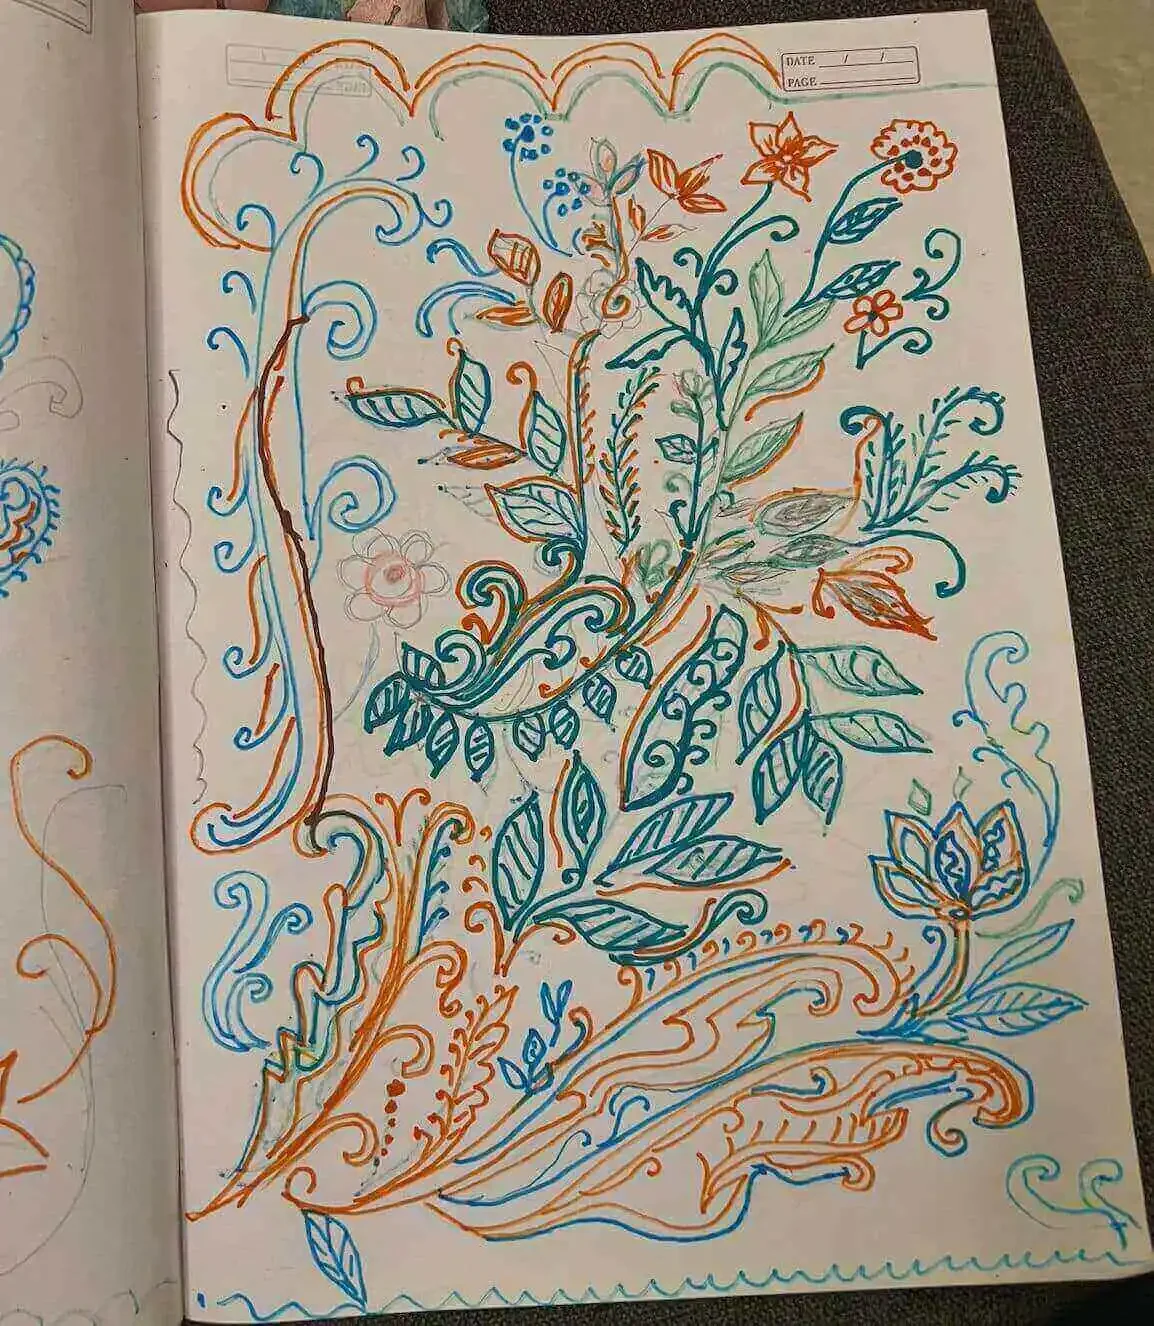
One of Maya's botanical drawings — the carved relief and the simulation's flora are both traced from work like this.
Among the pages was a letter she wrote despite losing her memory, addressed to my mother, Anna — a clear, tender reflection on beauty and acceptance written from inside the confusion.
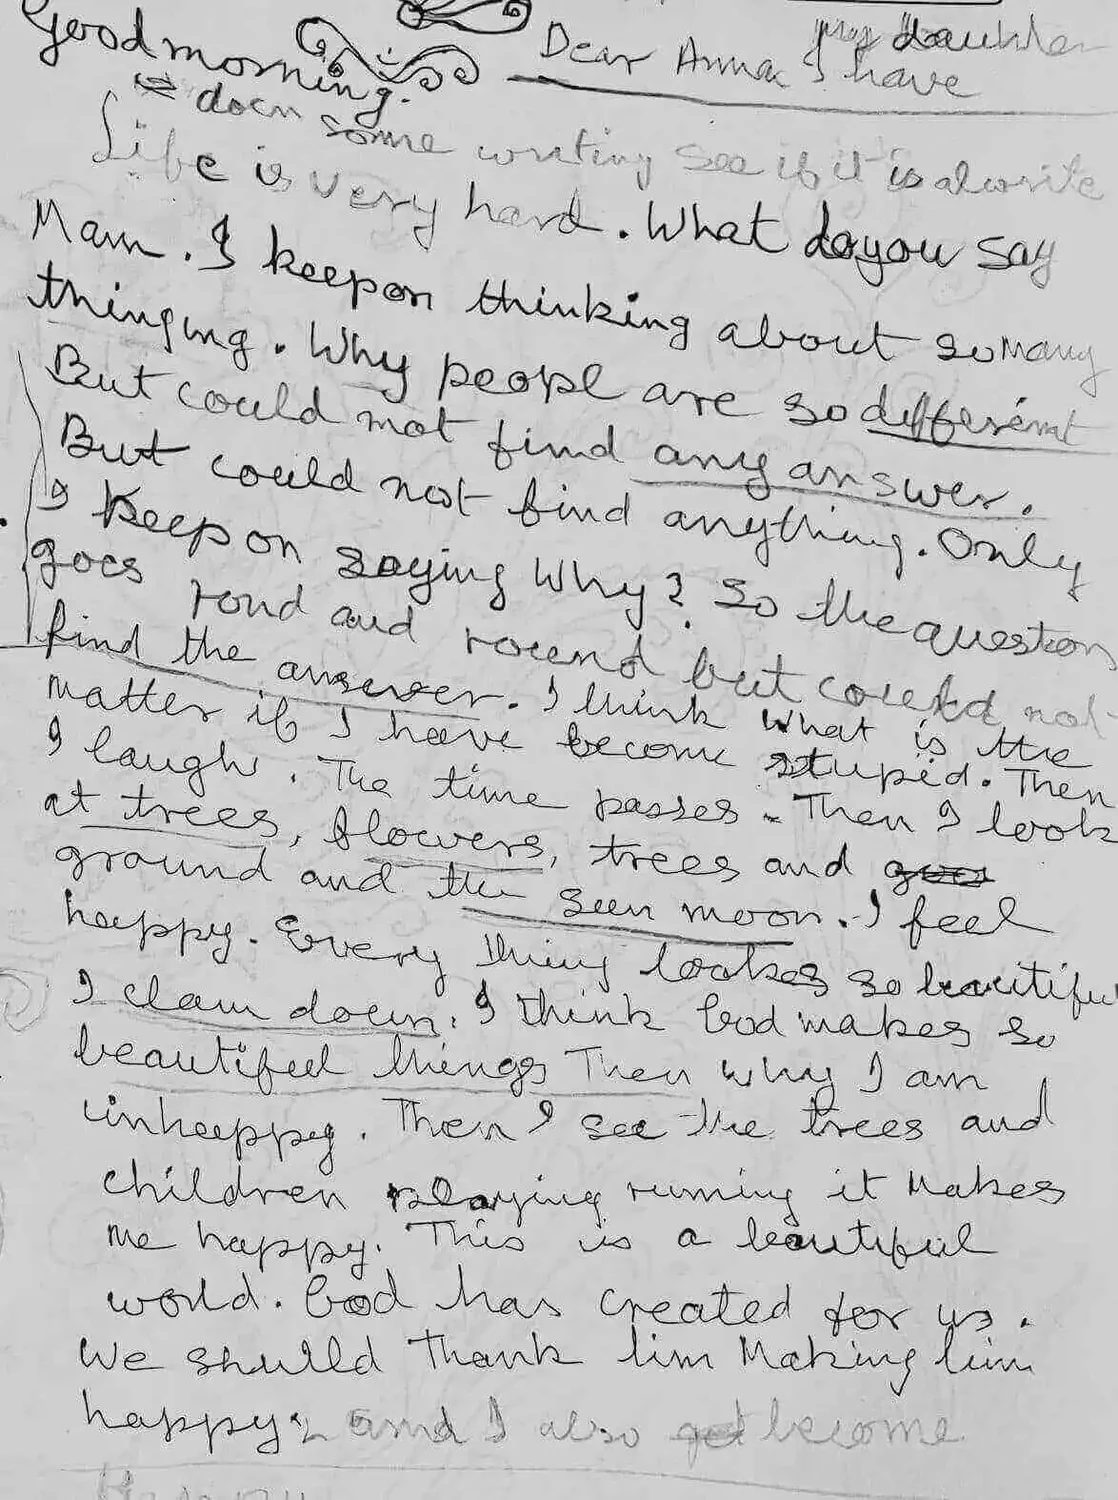
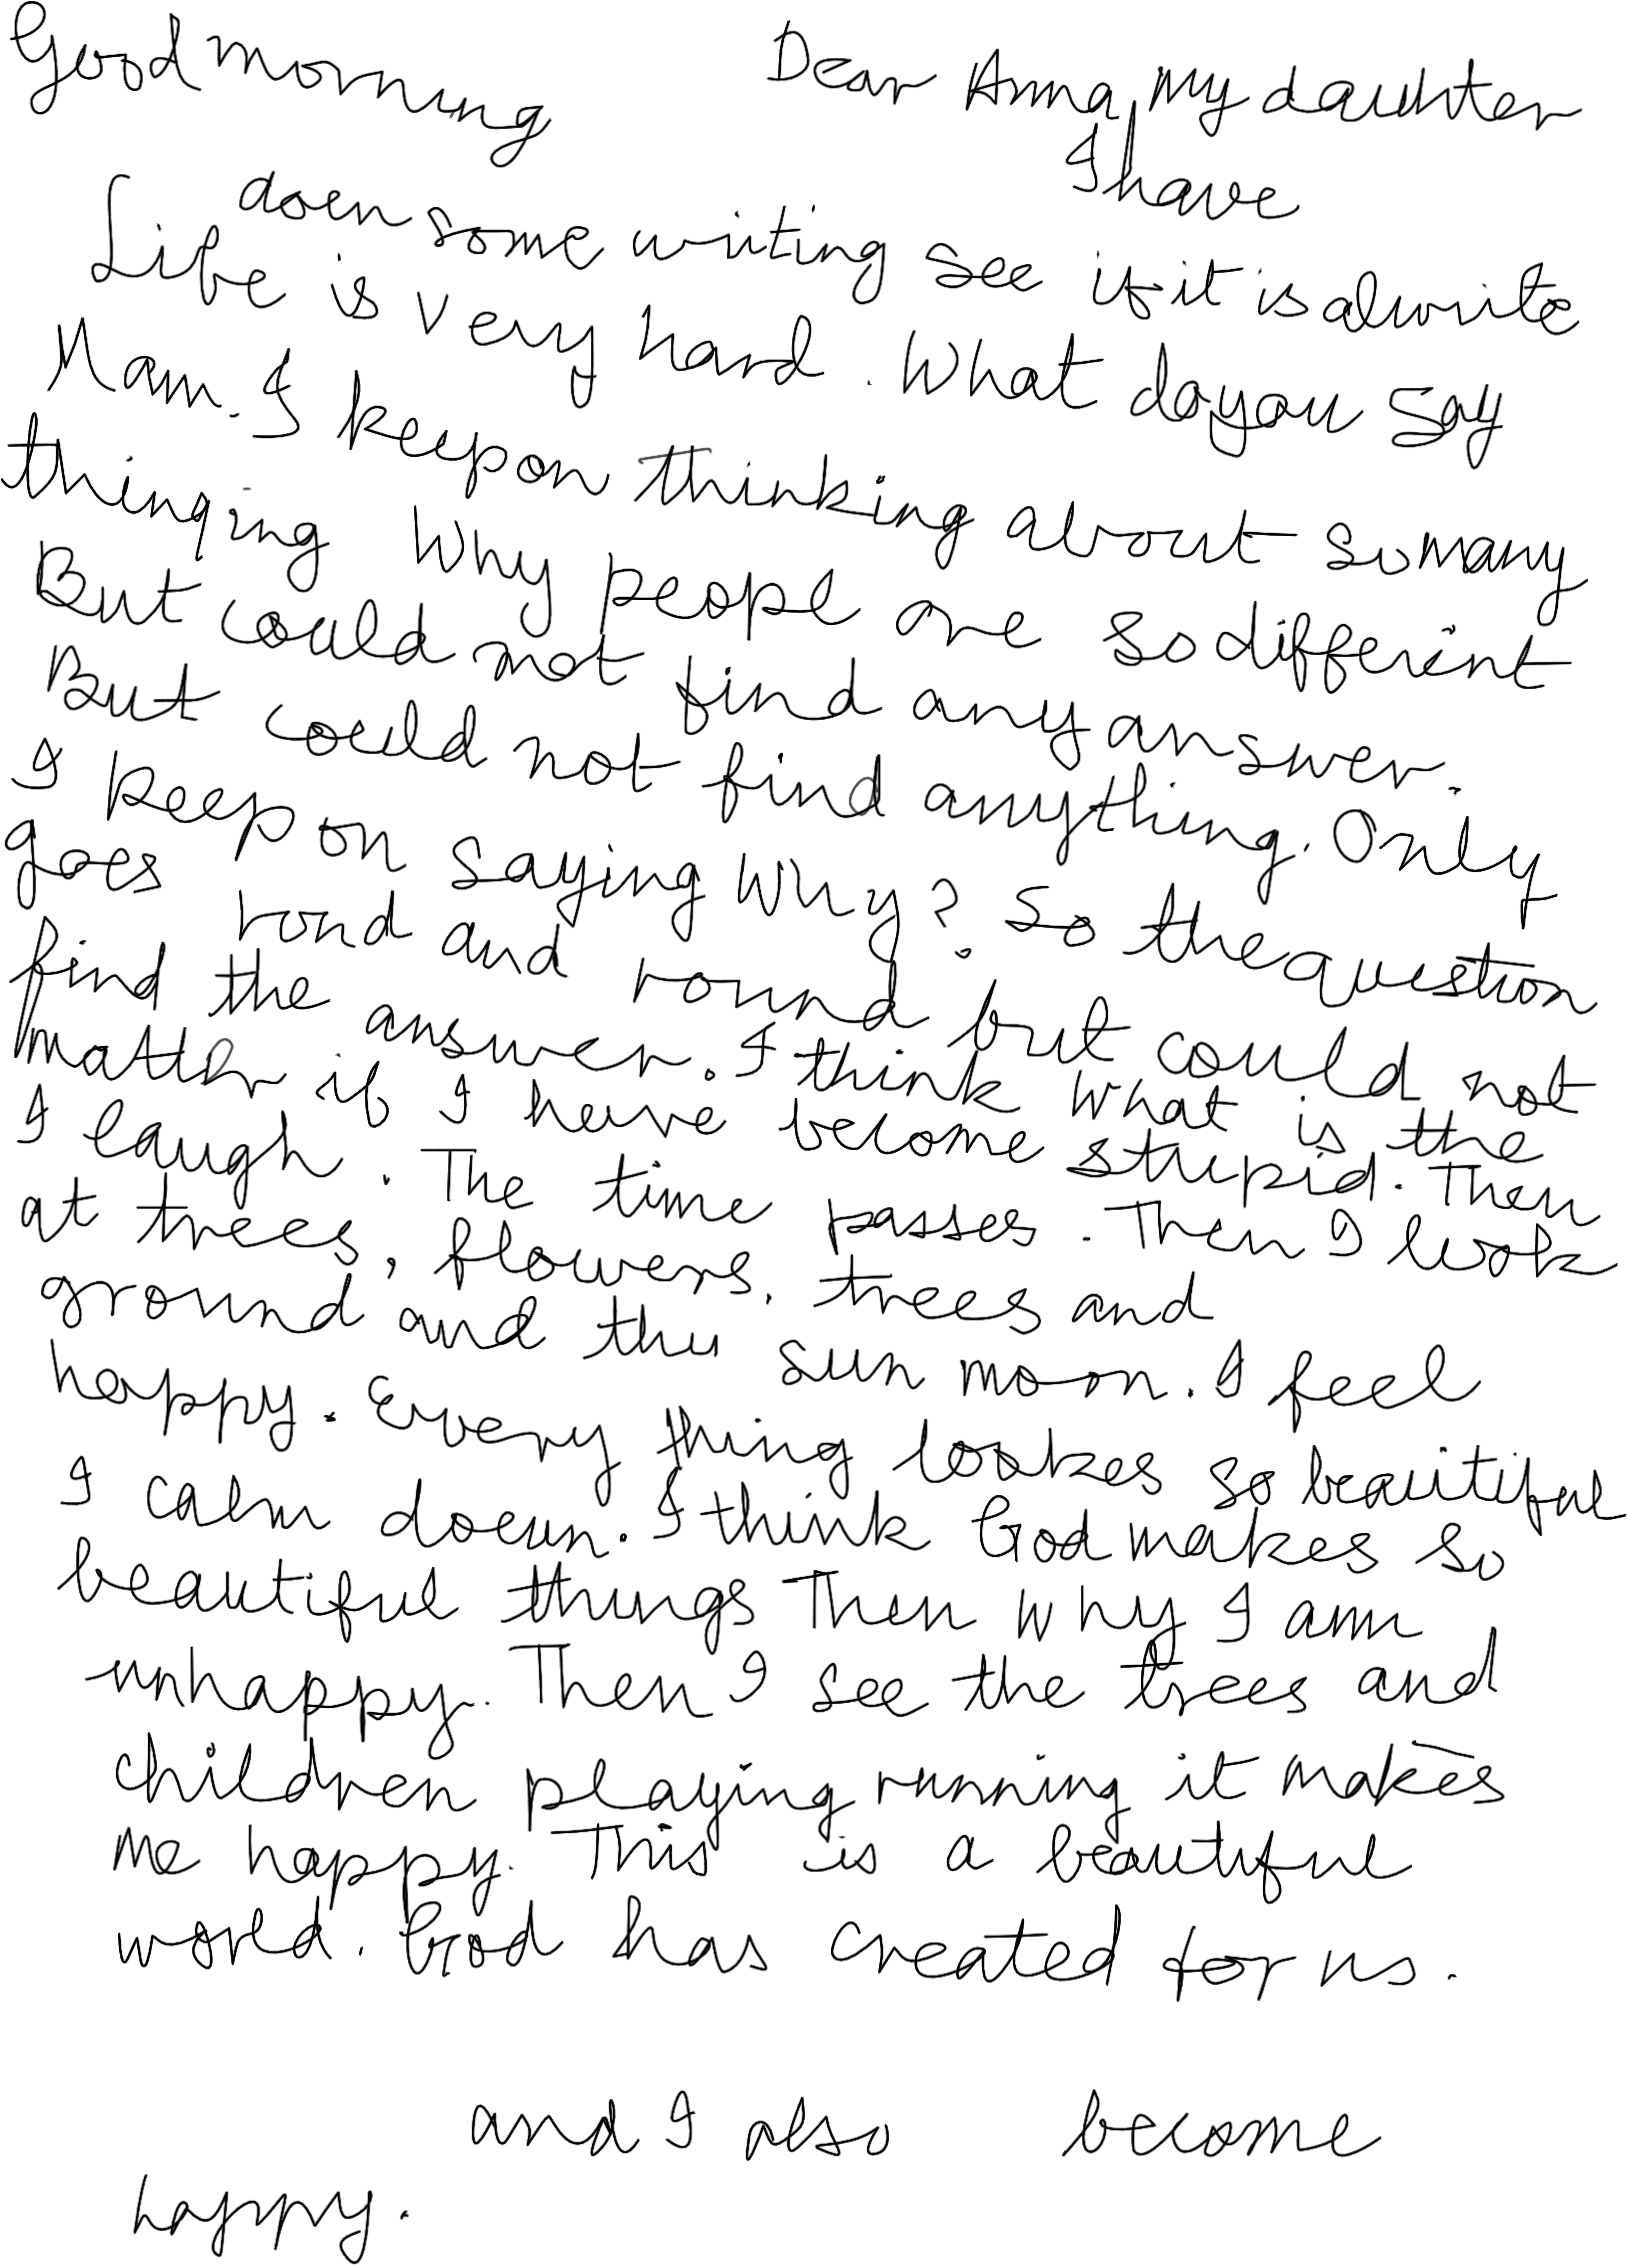
The original letter, in her hand.
"Good morning. Dear Anna my daughter, I have done some writing — see if it is alright.
Life is very hard. What do you say, Mam. I keep on thinking about so many things. Why people are so different. But could not find any answer. But could not find anything. Only I keep on saying Why? So the question goes round and round but could not find the answer. I think — what is the matter if I have become stupid. Then I laugh. The time passes. Then I look at trees, flowers, trees and ground and the sun, moon. I feel happy. Everything looks so beautiful. I calm down. I think God makes so beautiful things. Then why I am unhappy. Then I see the trees and children playing, running — it makes me happy. This is a beautiful world God has created for us. We should thank Him, making Him happy. And I also become happy."
Her full letter, transcribed. The repetition and the circling are hers — written from inside the forgetting, and arriving, anyway, at gratitude.
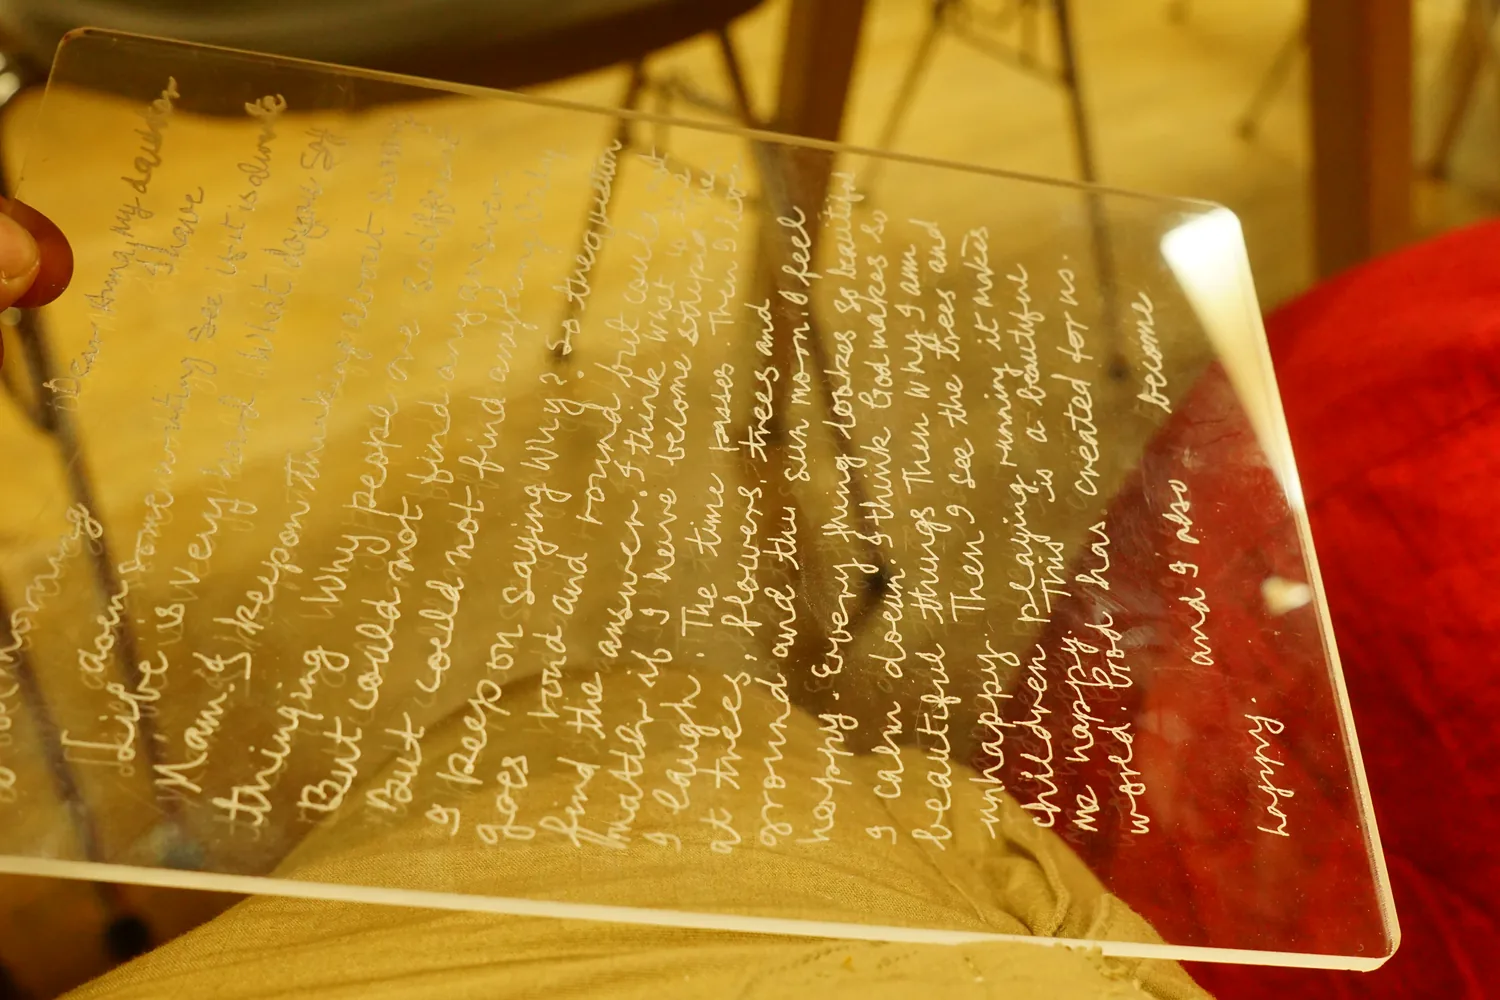
And its translation into the piece — her handwriting centerline-traced and laser-marked into acrylic so it edge-lights cleanly.
The letter is the emotional core of the piece, which is why it gets its own lit housing rather than being hidden inside the mirror. This whole work is my attempt to translate her philosophy into something you can stand in front of.
Who Has Done What Beforehand
Maya's Mirror sits at the intersection of several traditions, none of which it copies directly:
- Interactive / smart mirrors — the tradition of monitors behind one-way film. I borrow the optics but invert the intent: not information, but the dissolution of identity.
- Physarum polycephalum simulation — slime-mould growth models are well documented in generative art; I run a true agent-based physarum model directly on the viewer's face mesh.
- The Asaro head lighting model — used in an earlier iteration to drive growth density from facial light planes.
- MediaPipe FaceMesh — Google's 478-landmark in-browser face tracker.
- Face representation research — O'Toole, Bülthoff, Troje & Vetter, Face Recognition across Large Viewpoint Changes (1995), on reconstructing a face from partial, view-dependent information. It is the conceptual anchor for a mirror that dissolves a face and rebuilds an identity from fragments. (PDF in the sidebar.)
- Indian floral & paisley traditions and installation art on memory — the cultural and emotional reference points.
What I Designed & Made
Where possible I made rather than bought. The parts I designed and fabricated myself:
- CNC-carved pine frame — an ornate botanical relief modelled from scratch from my grandmother's drawings, carved on the CNC router (~5.5 hr machining).
- Custom XIAO ESP32-S3 board — designed in KiCad, milled in-house; PIR in, NeoPixel out, USB serial.
- 3D-printed webcam arch, letter box, spacers & wire organisers — hold the camera, the acrylic letter, the air gap, and the cabling.
- The generative simulation — WebGL + MediaPipe FaceMesh, eight iterations ending in a true physarum agent model.
- Embedded firmware — PIR read, NeoPixel control, serial behaviour.
- The acrylic + mirror-film optical stack, cut and laminated to the frame aperture.
- My grandmother's letter — centerline-traced from her handwriting and laser-marked (one vector score per stroke, not raster-engraved) so the NeoPixel edge light reads it cleanly; the same traced strokes drive a self-writing animation.
The self-writing animation — my grandmother's handwriting drawing itself from the traced strokes.
The Simulation — Eight Iterations
The simulation went through eight versions before arriving at the experience. Each explored a different visual approach — warping, lighting models, growth algorithms — and informed the next. The current version is a true physarum polycephalum (slime-mould) model running live on the viewer's face.
| # | Version | Technique |
|---|---|---|
| 01 | Initial Warp | UV push / radial warp on landmarks; dissolve = wave + noise + chroma split |
| 02 | Face Change | 3-stage timeline: identity slide → dissolve → white fade; botanical layer added |
| 03 | Asaro Layer | Asaro lighting drives vine density — bright planes sparse, dark planes dense |
| 04 | Full Face Flora | Uniform growth across all 478 landmarks, no lighting bias |
| 05 | Larger Vines | L-system grammar (FF[+F][-F]) from nose tip, long step — vines reach the edge |
| 06 | Nose Heavy | Same grammar, short step — dense, tangled growth around mid-face |
| 07 | Botanical Drawing | Warp dissolve → cream fade → line drawing, flowers and spirals in Maya's palette |
| 08 | Physarum ✦ current | 6,000 agents with sensor/scatter/decay behaviour, seeded at facial high points, masked to FaceMesh |
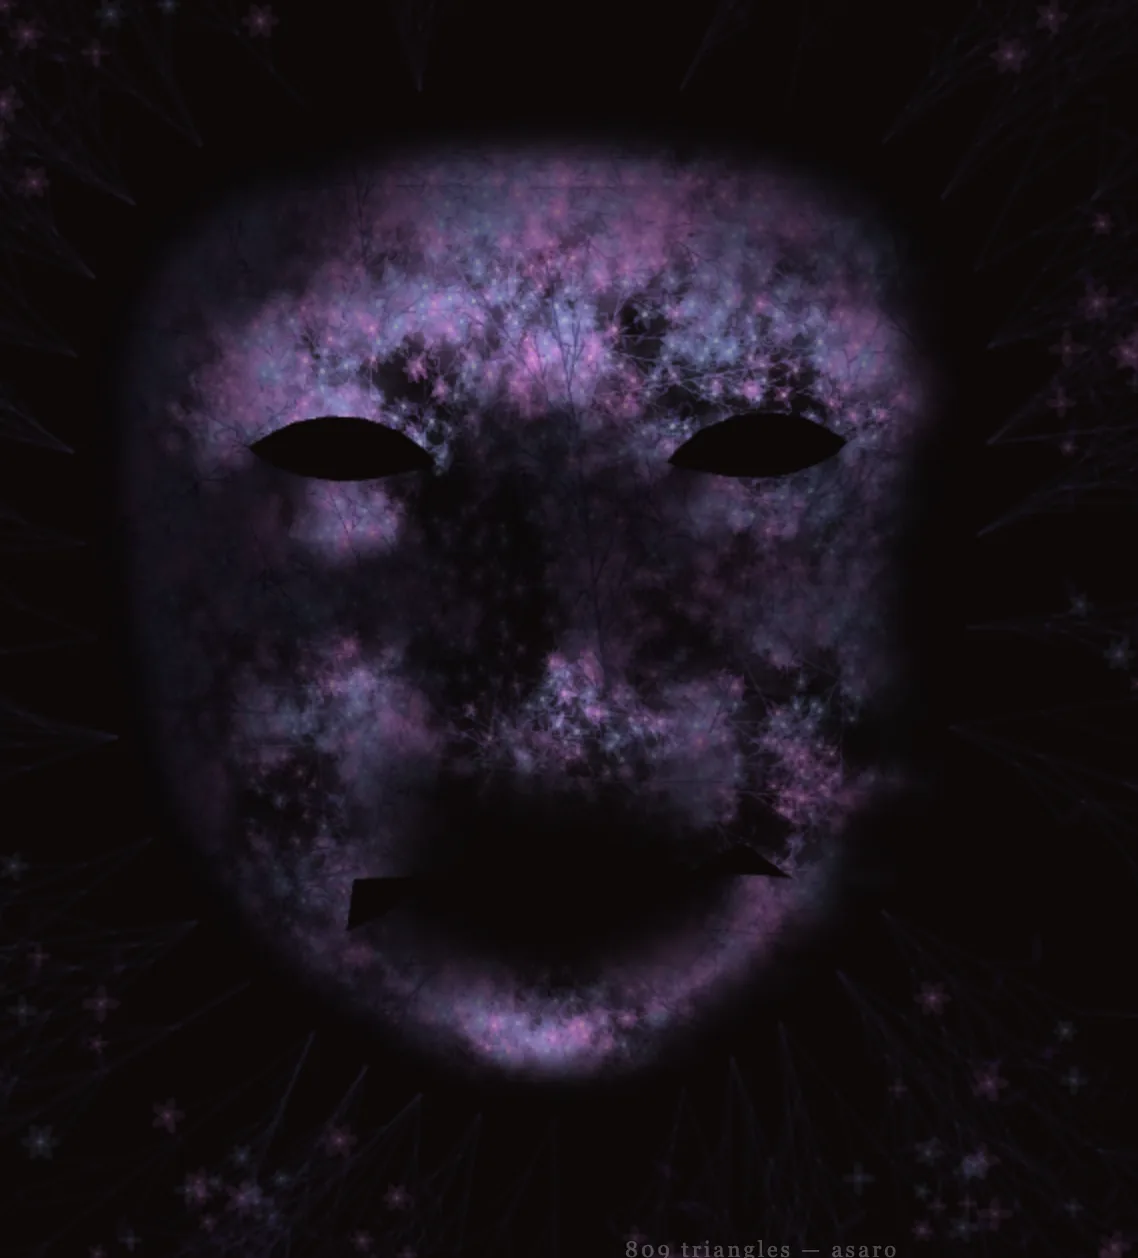
Iteration 03 — the Asaro lighting phase: beautiful, but too abstract for the emotional arc.
How the physarum works
Each of the 6,000 agents has three forward sensors (±45° and centre). At every step it sniffs the trail ahead, turns toward the strongest signal, deposits more trail, and moves on. Trails decay each frame; above a scatter threshold an agent breaks away to explore. Growth is seeded at the topographic high points of the face — nose tip (landmark 4), forehead (10), chin (152), and temples (234, 454) — and a mask built from FaceMesh triangles keeps it on the face. The result is a self-optimising network: the same algorithm physarum uses to find the shortest path between food sources, run on a human face.
Two browser apps
The experience runs as two small web apps on the mini PC. ellipse-mask.html is the rest state — the live webcam piped into the oval and mirrored like a selfie cam, with everything outside the ellipse masked to black (a single giant box-shadow), so the screen reads as a plain mirror until it's triggered. physarum.html is the transformation. Both are in the archive and run with no server.
Fabrication & Processes
Every subsystem maps to a Fab Academy process. The project integrates 2D & 3D design, additive and subtractive fabrication, custom electronics, embedded programming, and system integration.
Planning the form
Before any wood was cut I worked the enclosure out on paper — sketching the layer stack over printed CAD section views, and folding a paper mockup of the oval aperture with the four VESA mount points marked, to check proportion and the screw pattern before committing material.
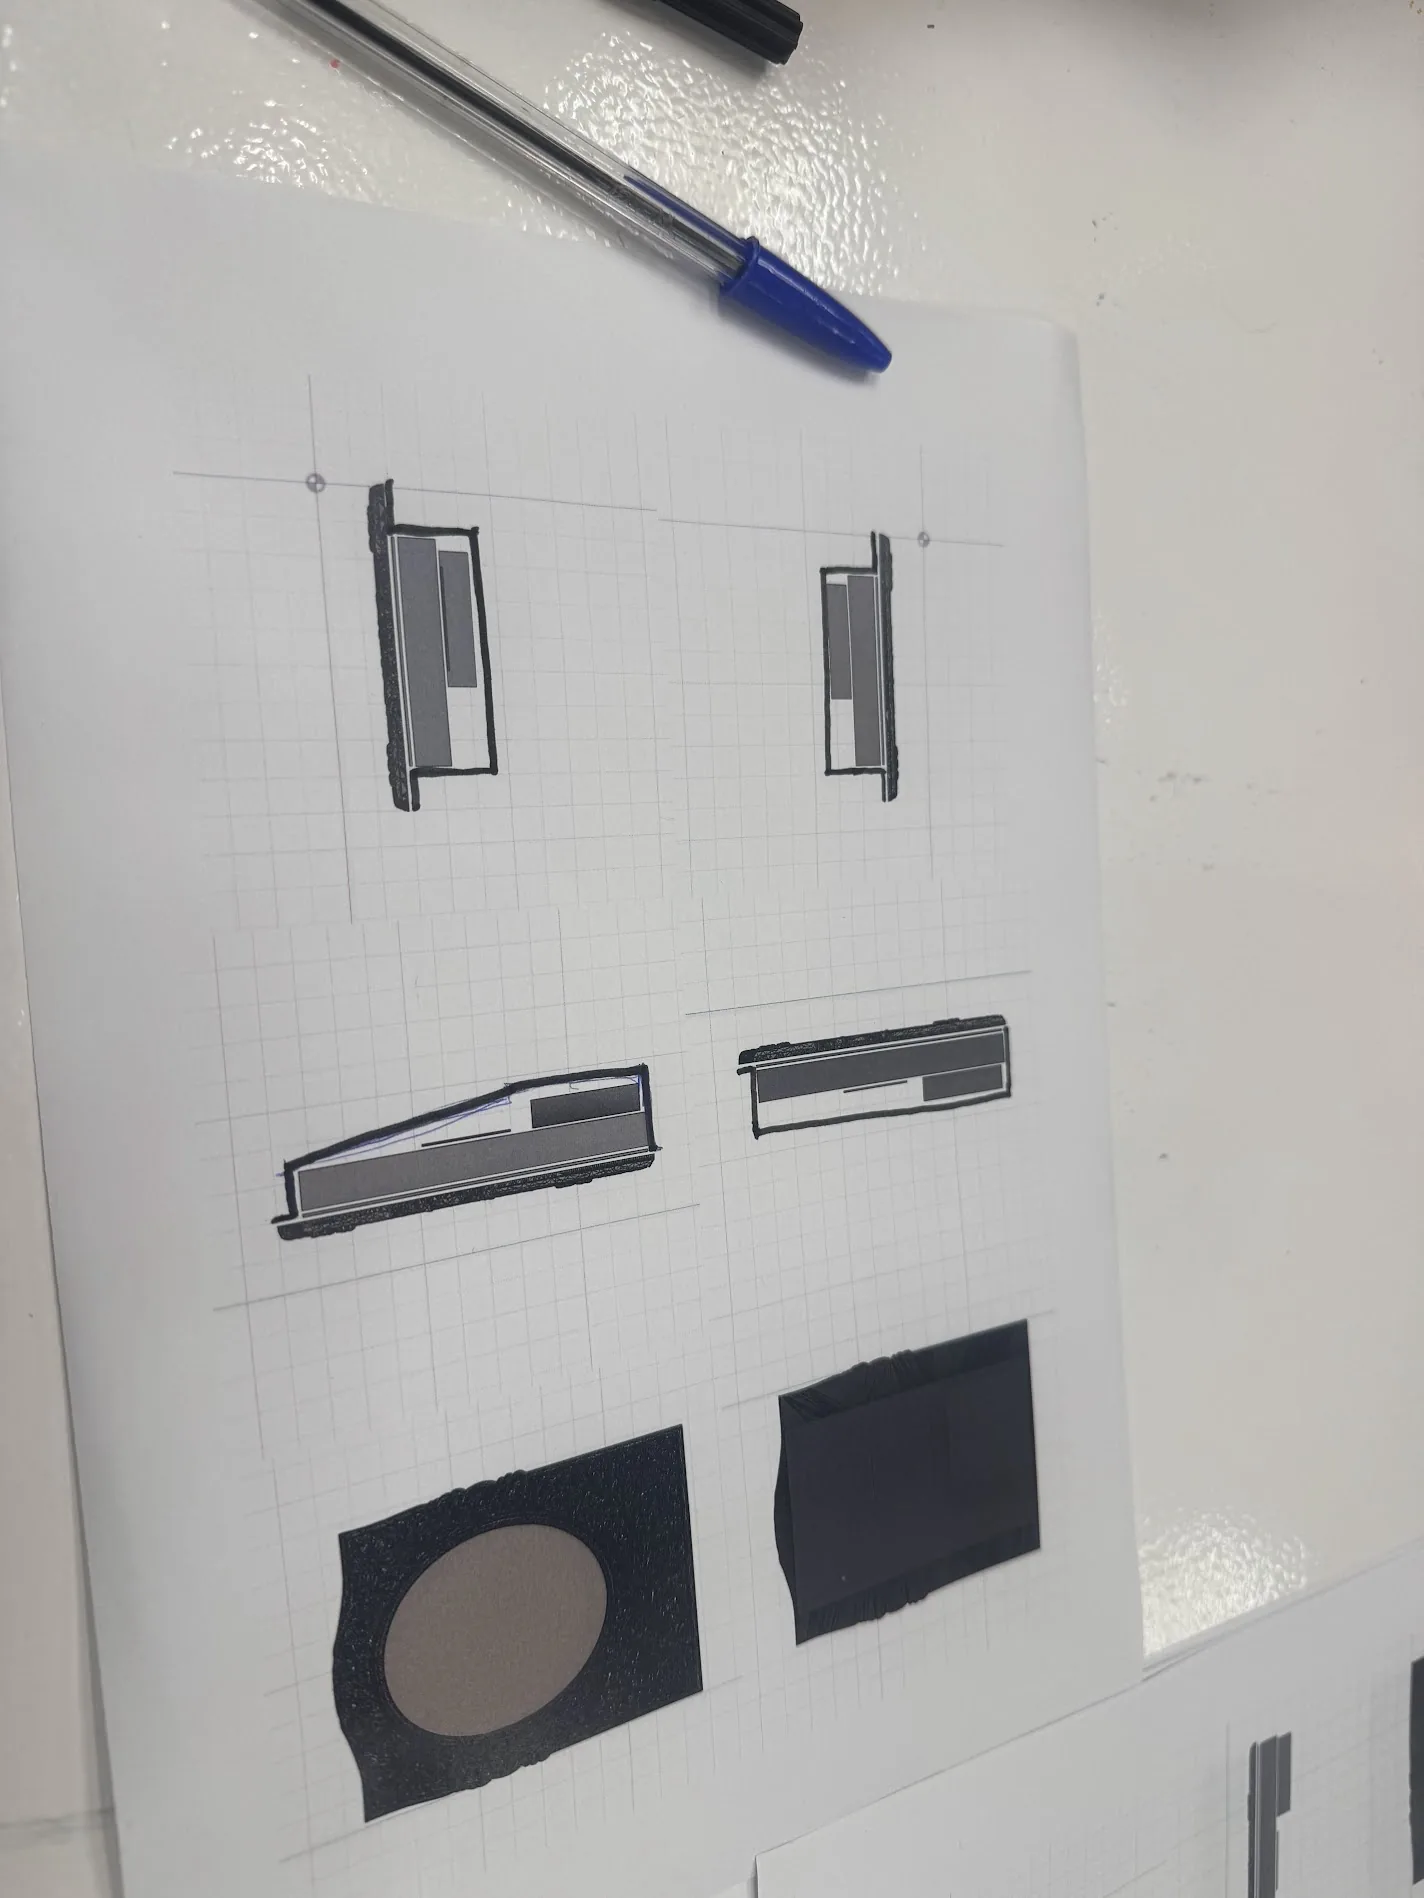
Sketching the layer stack over printed CAD.
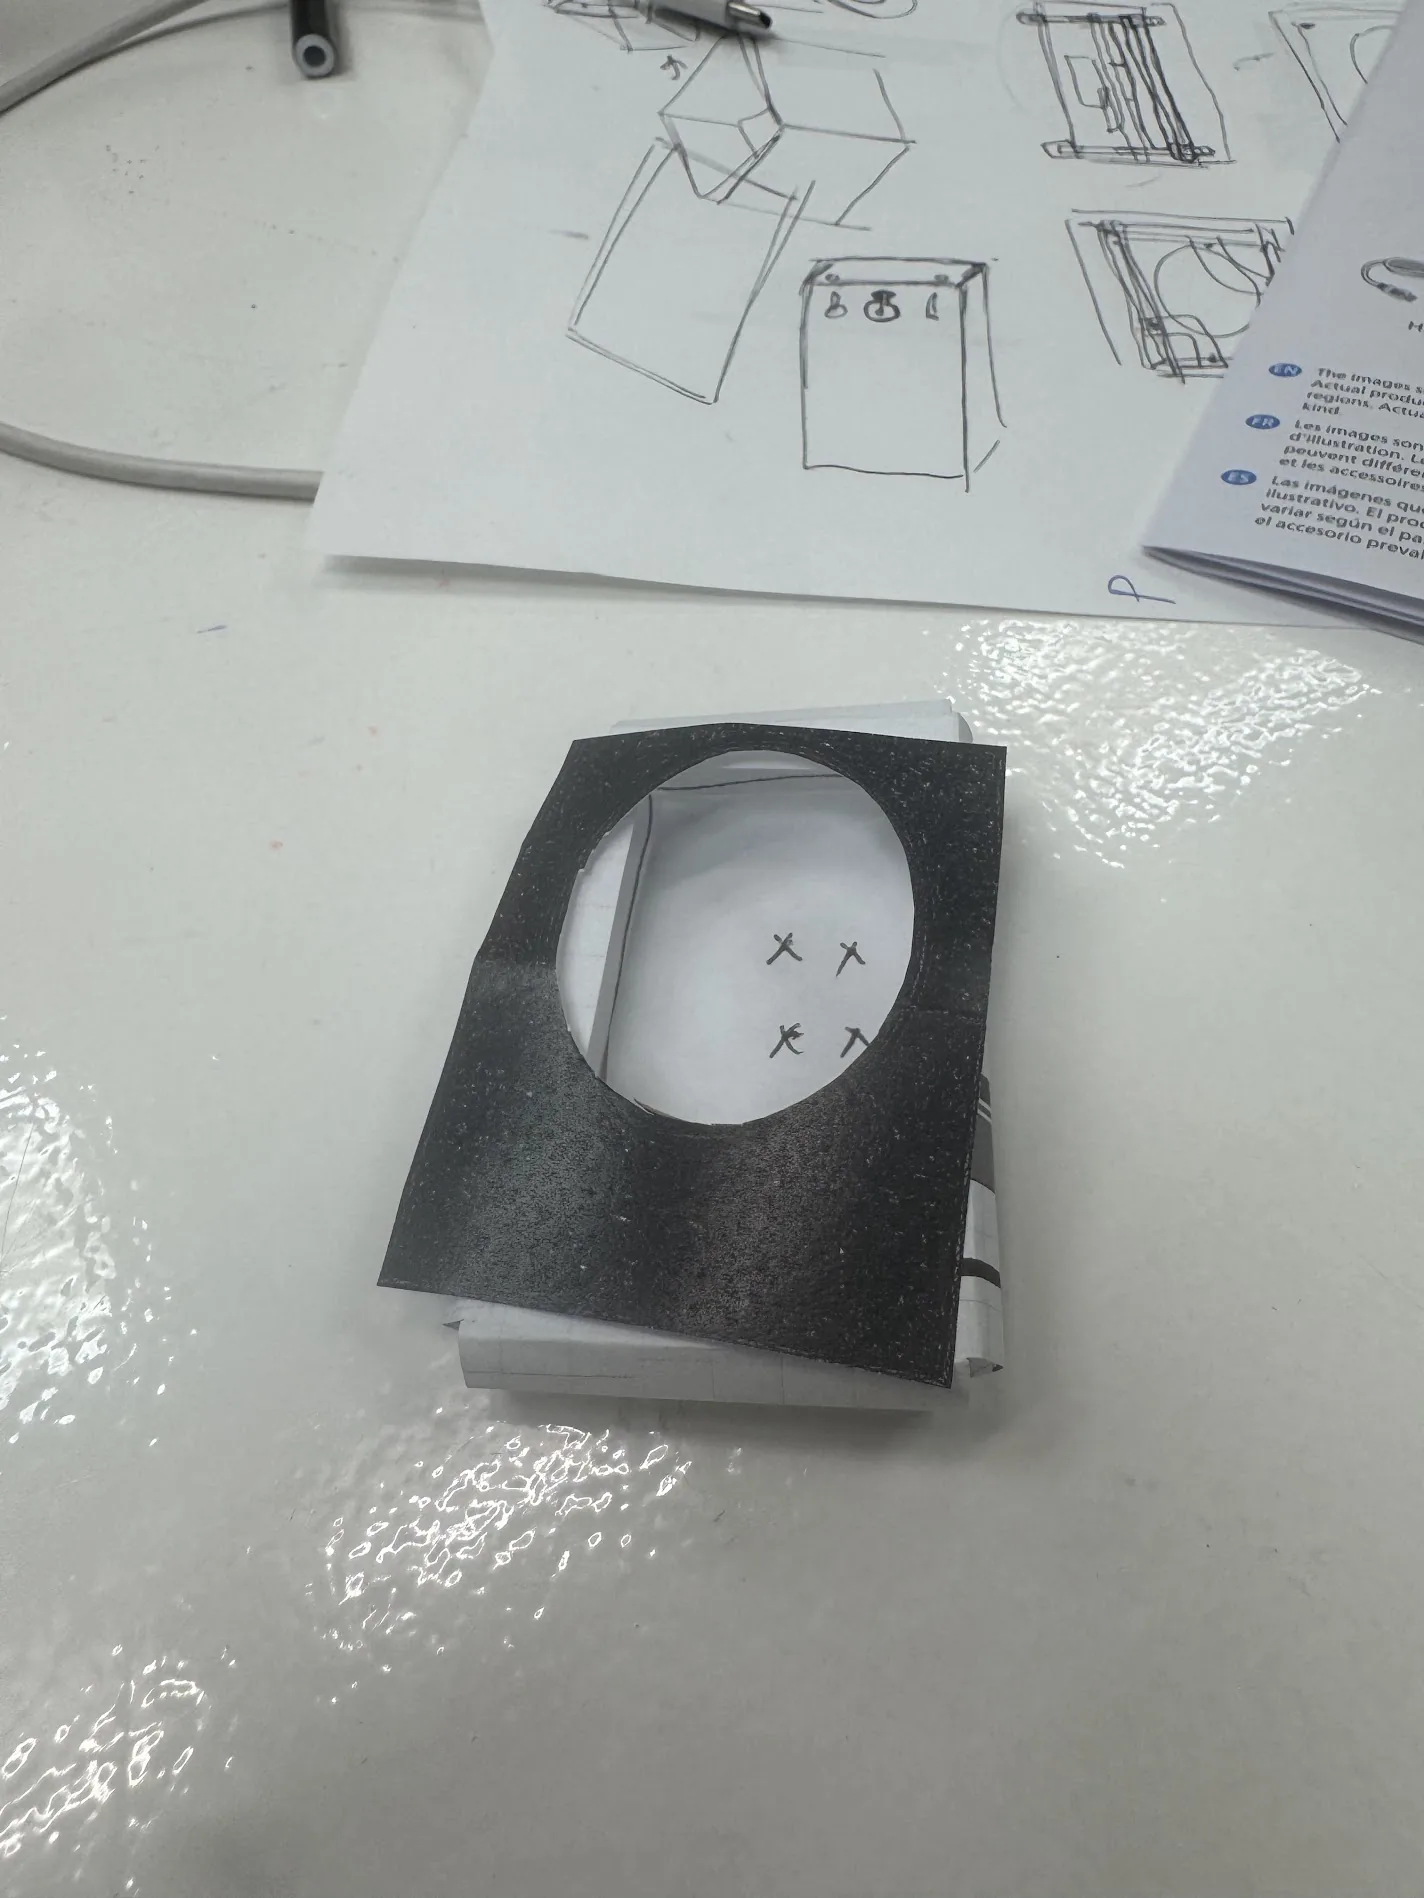
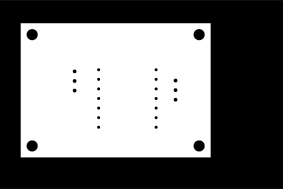
Paper mockup — oval aperture and the four VESA points (the X marks) tested before cutting.
Subtractive — CNC carved frame
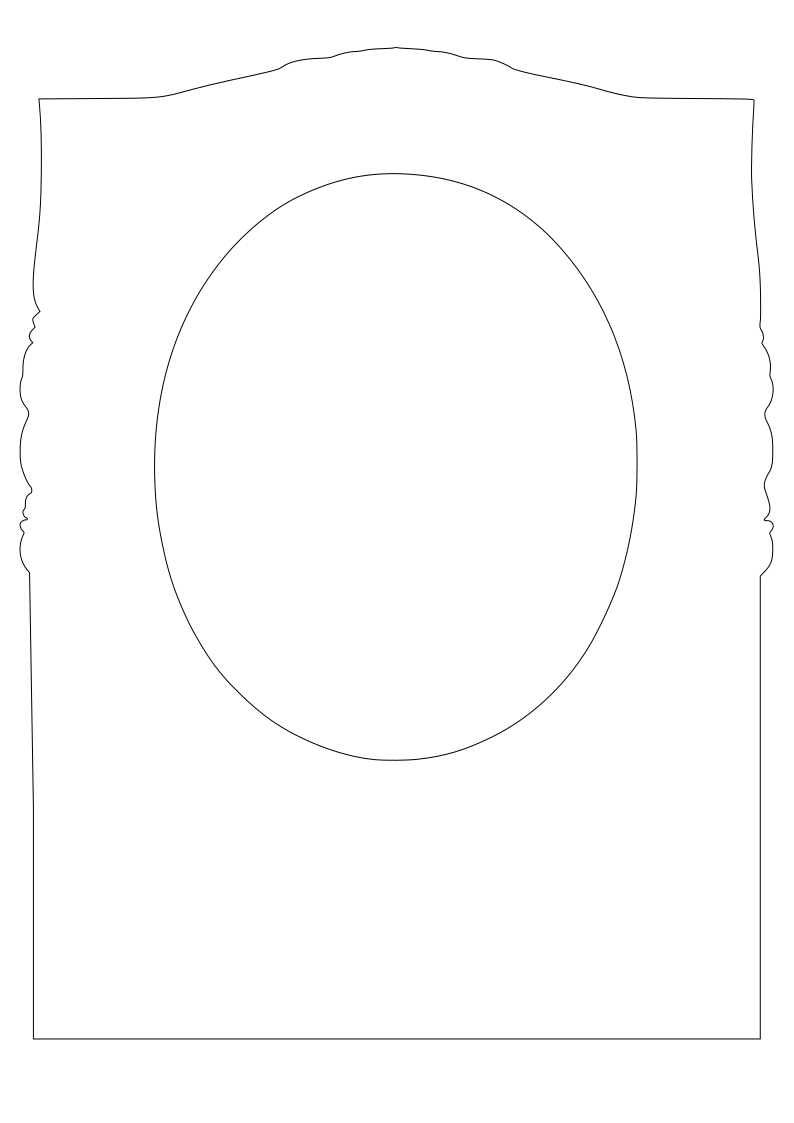
The frame was modelled in Rhino from my grandmother's botanical motifs and carved from a 610 × 590 × 40 mm pine blank on the CNC-STEP Raptor X-SL 3200/S20 (3-axis, RhinoCAM, FabLab BCN post). The oval aperture centres the viewer's face; the relief around it is the garden the simulation grows toward. The job ran as eight operations across three tools — a 12 mm flat, a 6 mm flat, and a 4 mm ball — at 18,000 RPM, ~5 hr 26 min total:
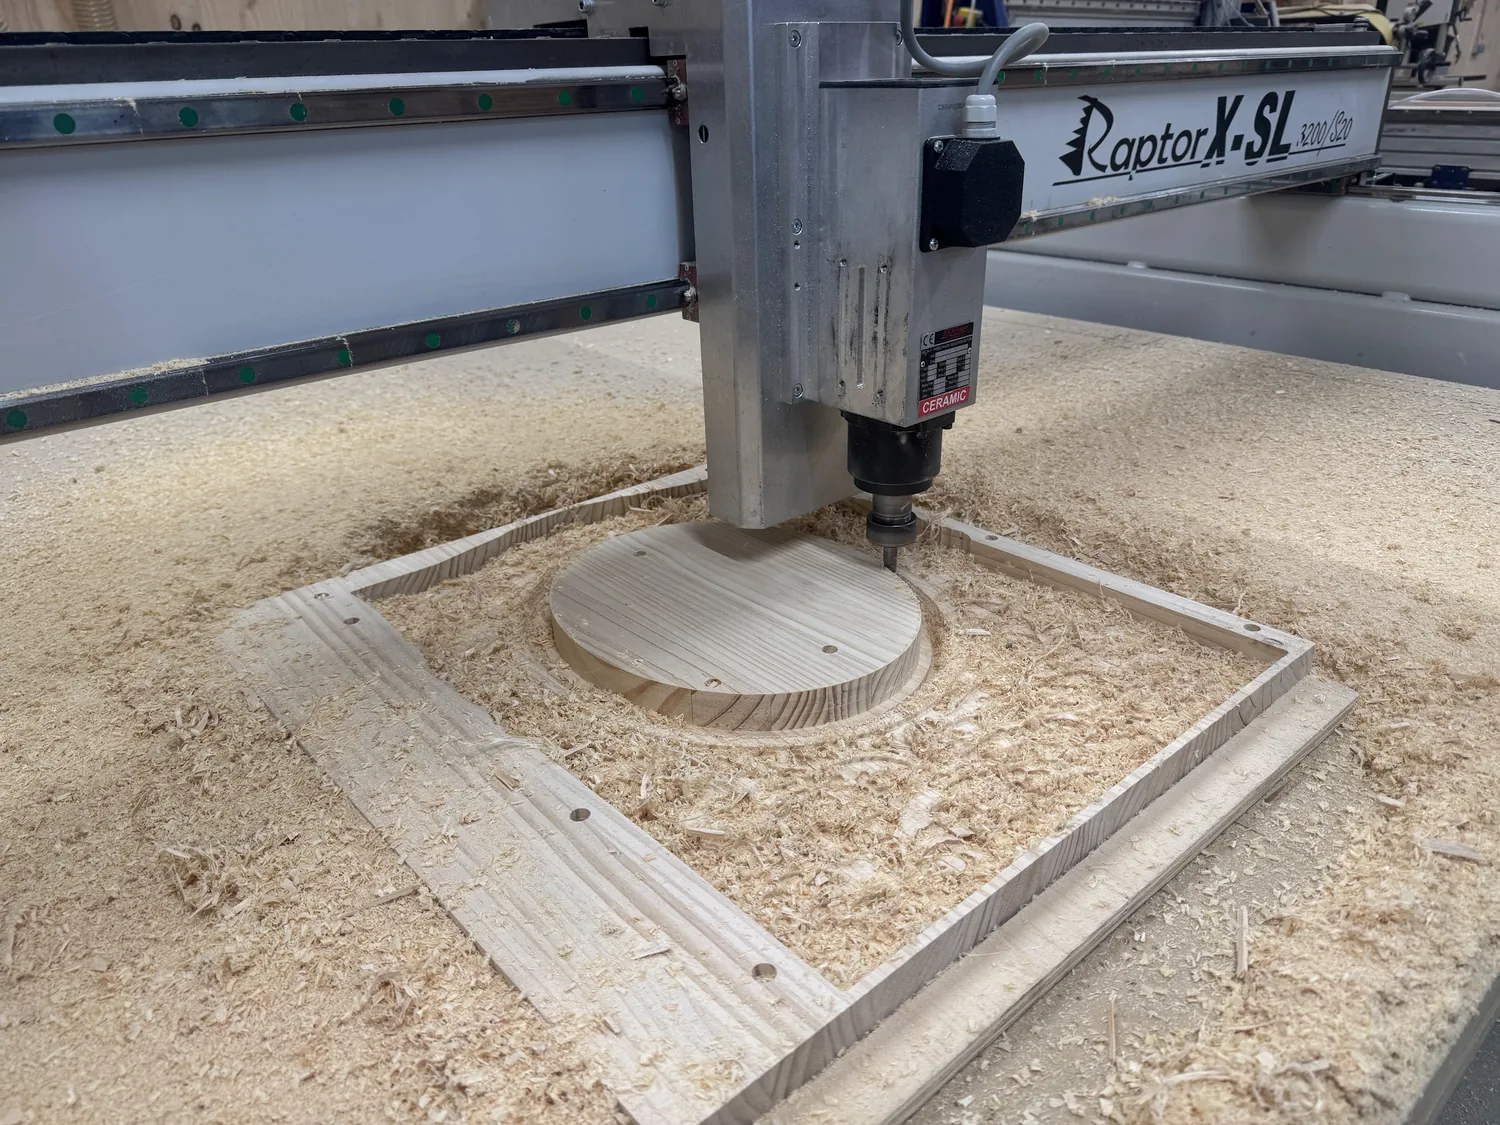
The Raptor X-SL cutting the oval pocket and frame profile into the pine.
| Operation | Tool | Feed | Time |
|---|---|---|---|
| Standard drill | 12 mm flat | 2000 | 1 h 50 m |
| 2½-axis pocketing | 12 mm flat | 2600 | 34 m |
| Horizontal roughing | 6 mm flat | 2600 | 1 h 19 m |
| Parallel finishing (relief) | 4 mm ball | 2600 | 1 h 33 m |
| Inside profiling | 12 mm flat | 2600 | 2.7 m |
| Outside profiling | 12 mm flat | 2600 | 5.6 m |
Feeds in mm·min⁻¹ · spindle 18,000 RPM · ~5 h 26 m total.
The RhinoCAM setup, operation by operation
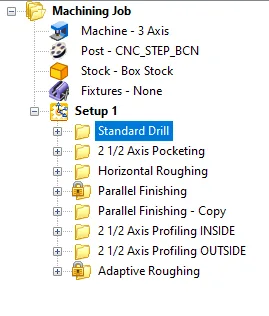
The machining job tree: 3-axis machine, CNC_STEP_BCN post, box stock, and every operation under Setup 1.
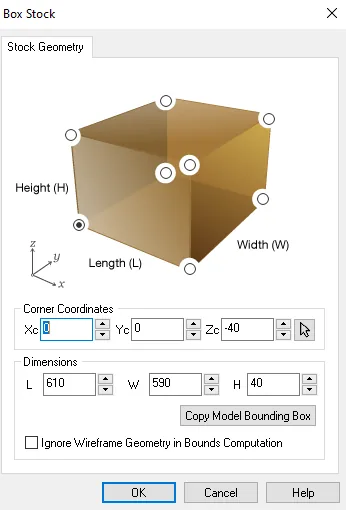
Box stock: 610 x 590 x 40 mm pine, origin at the corner.
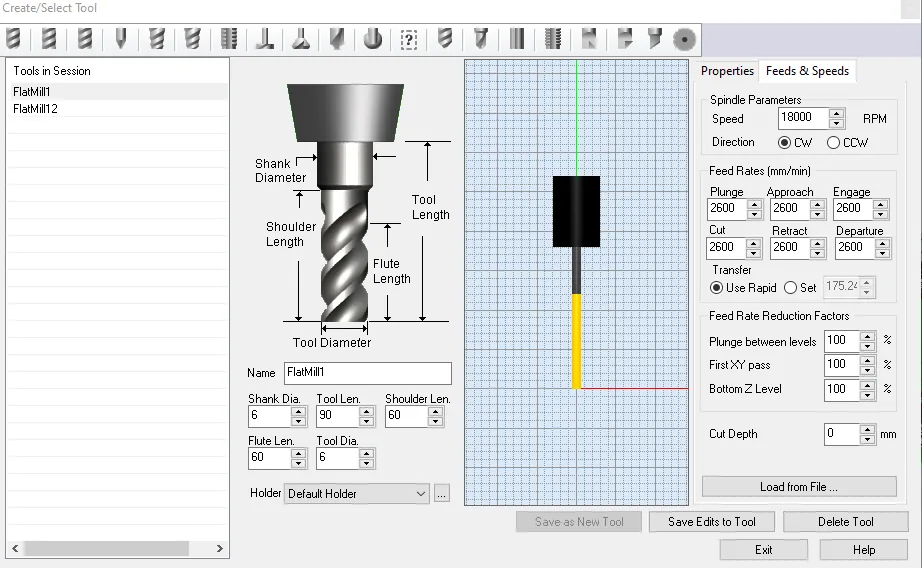
Tool library: the 6 mm flat end mill, feeds and speeds set.
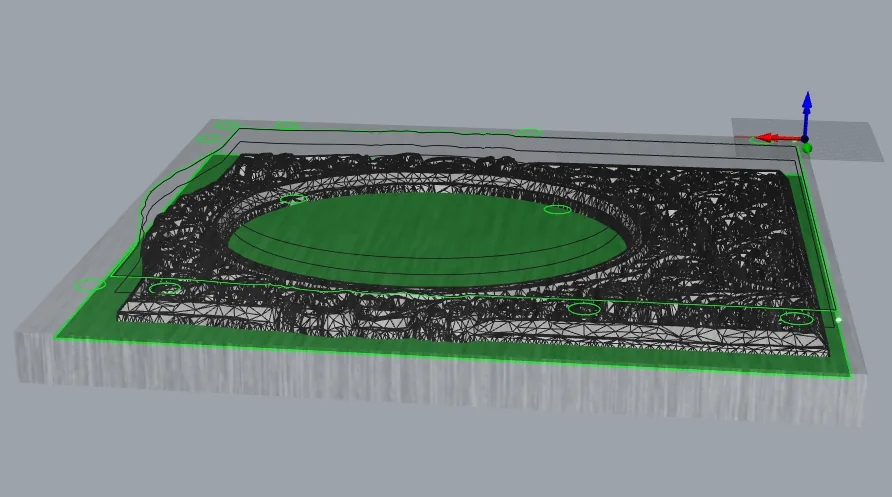
Standard drill: the first operation clearing bulk holes.
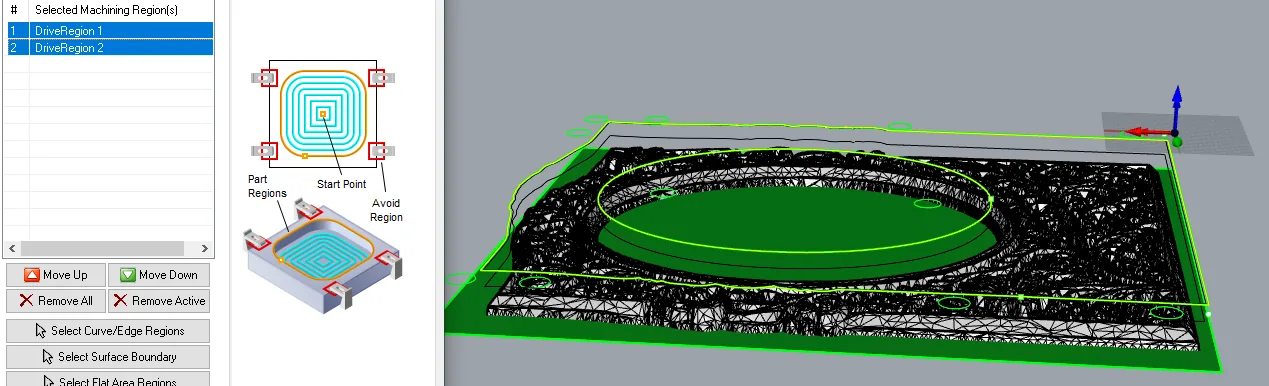
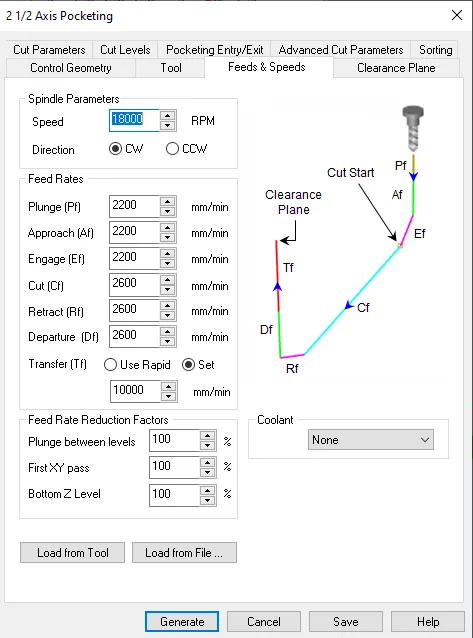
Pocketing feeds and speeds: 18000 RPM, 2600 mm/min cut.
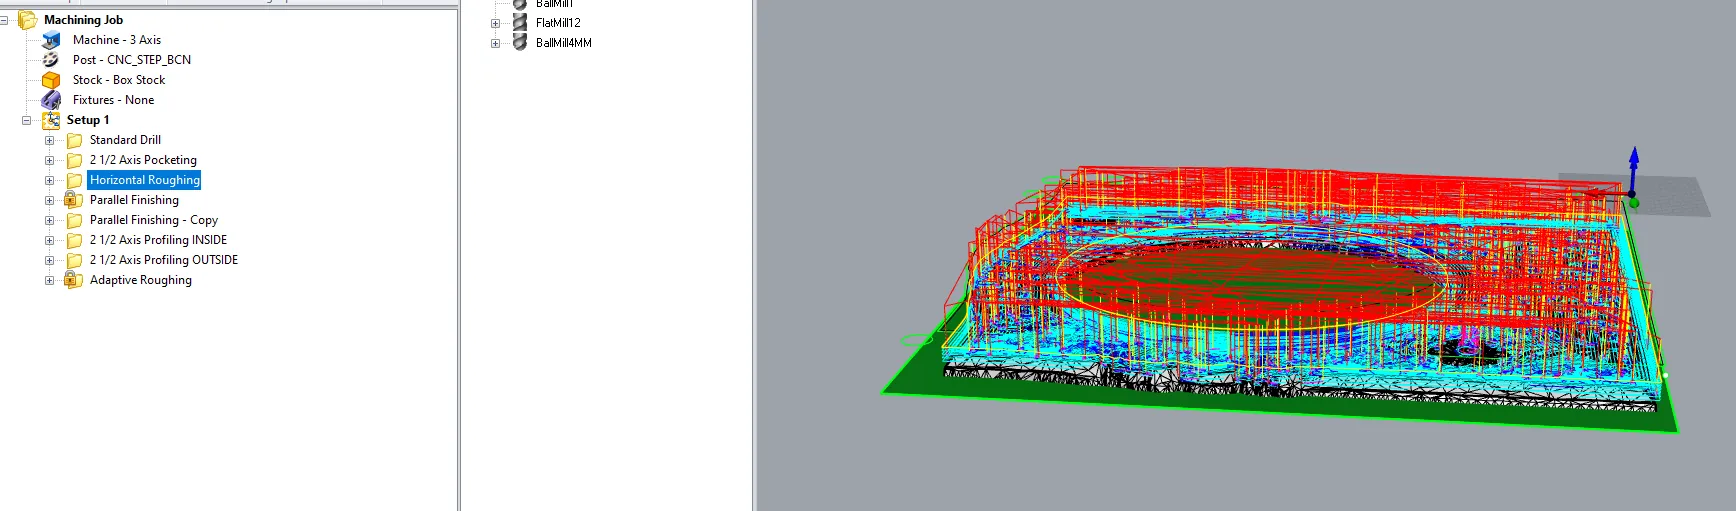
Horizontal roughing: clearing material before the finish pass.
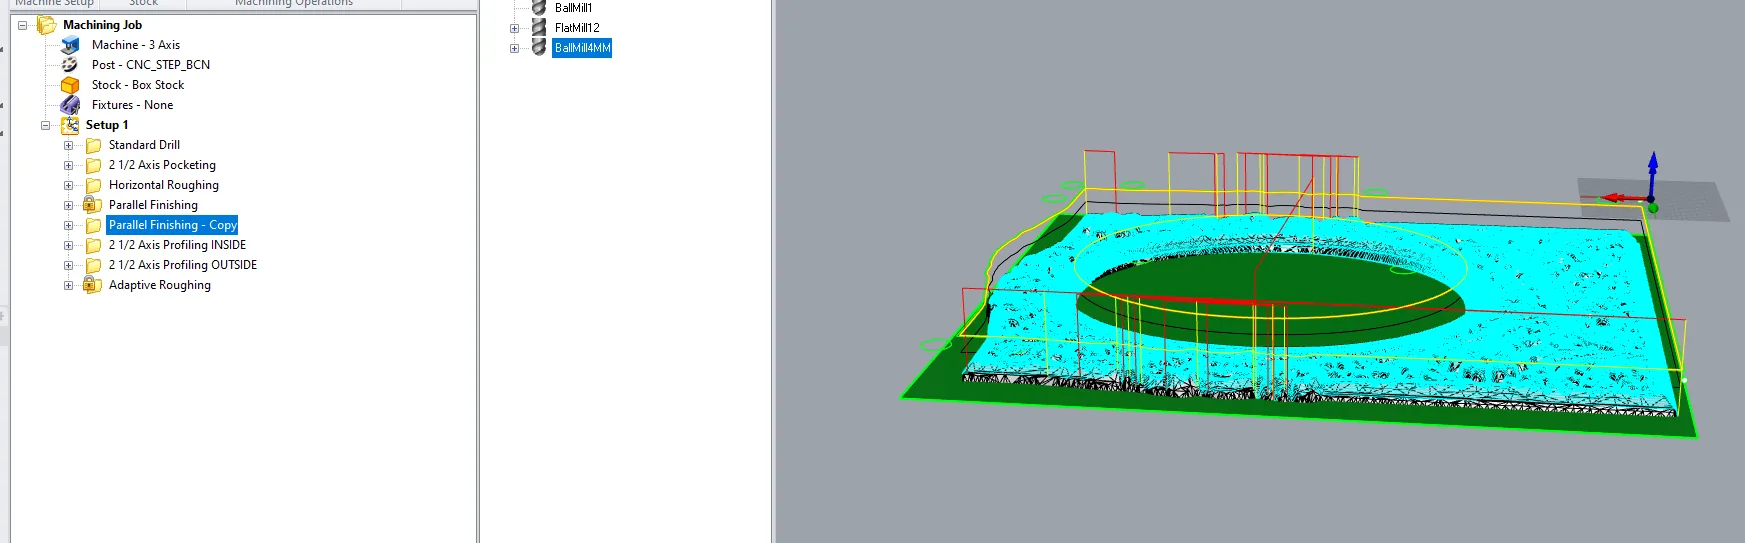
Parallel finishing: the 4 mm ball pass that carves the relief.
Inside and outside profiling: cutting the oval through and the frame free.
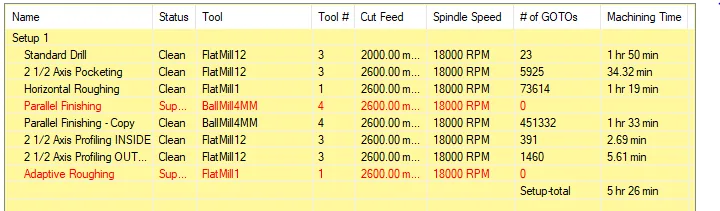
The operation list and per-step times (matches the table above).
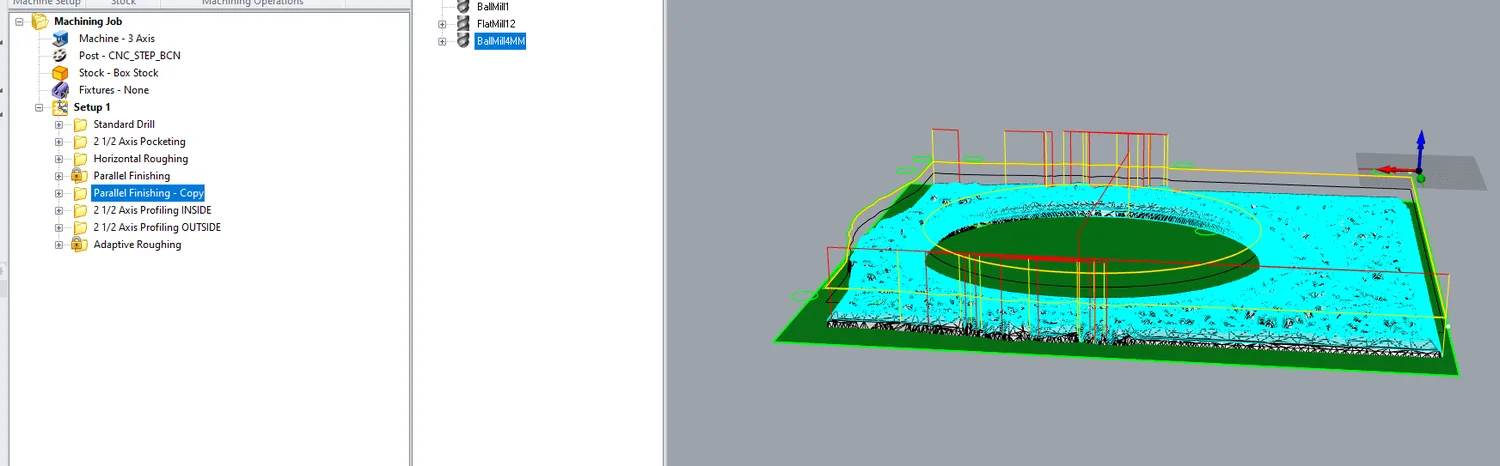
The 4 mm ball parallel-finishing pass in RhinoCAM — the operation that carves the botanical detail.
Carving the botanical relief into pine on the CNC router.
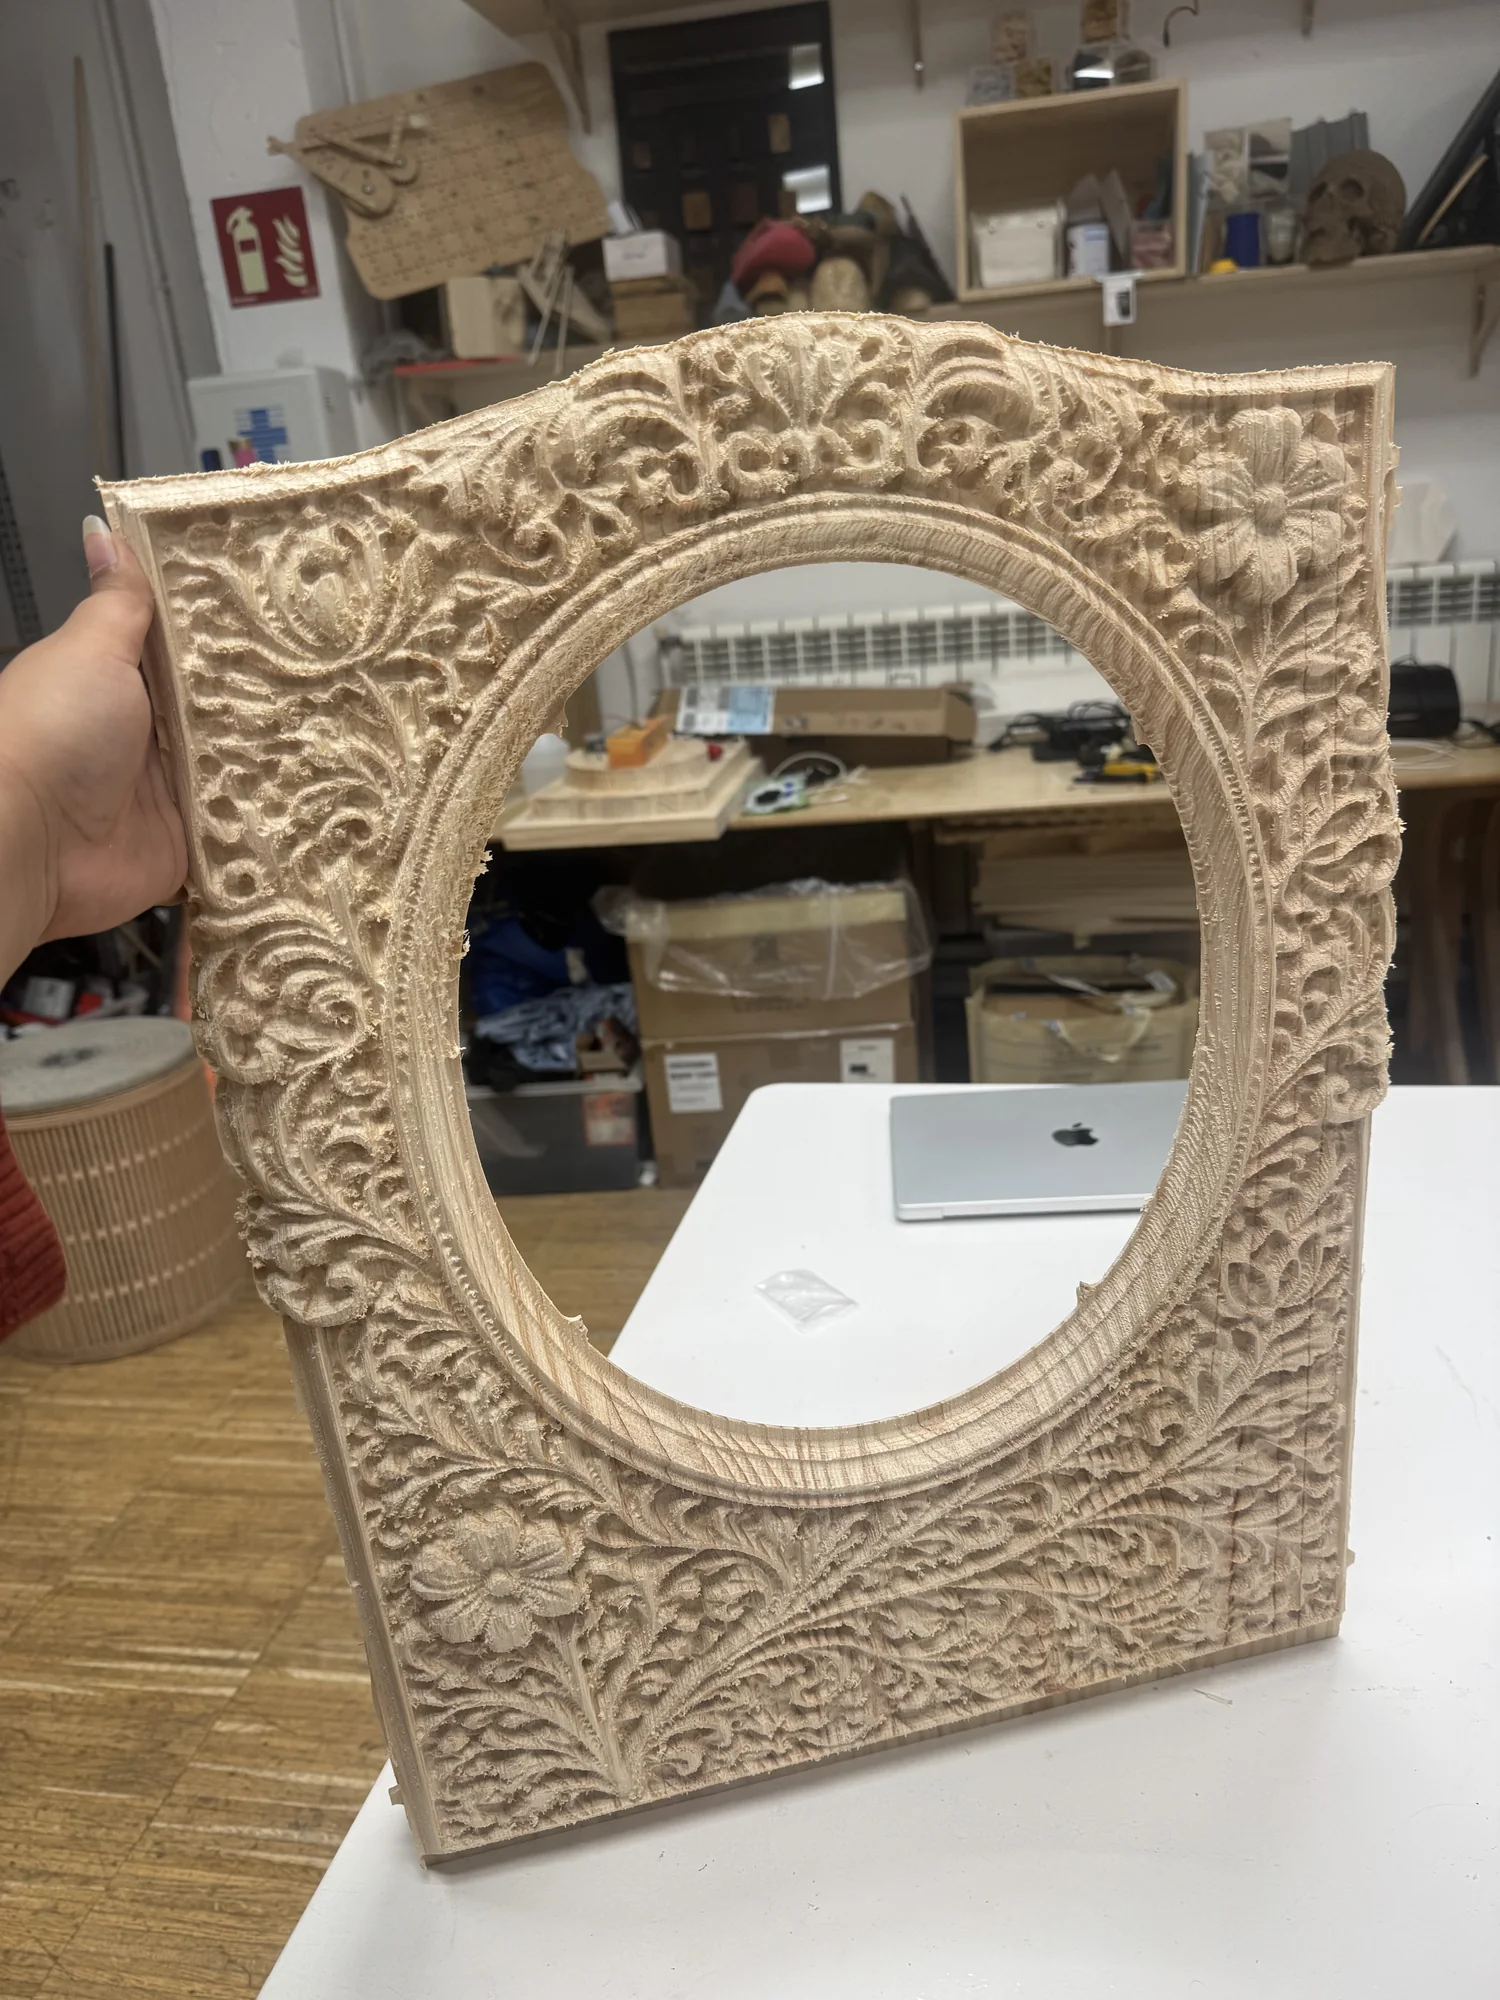
Fresh off the machine — the full botanical relief and the oval cut clean through, before sanding.
The frame is one of two CNC pieces. The second is the back/body panel — a flatter pine board with its own oval aperture and two milled side channels that the assembly seats into. The carved face and this body stack together to make the cavity that holds the monitor and electronics.
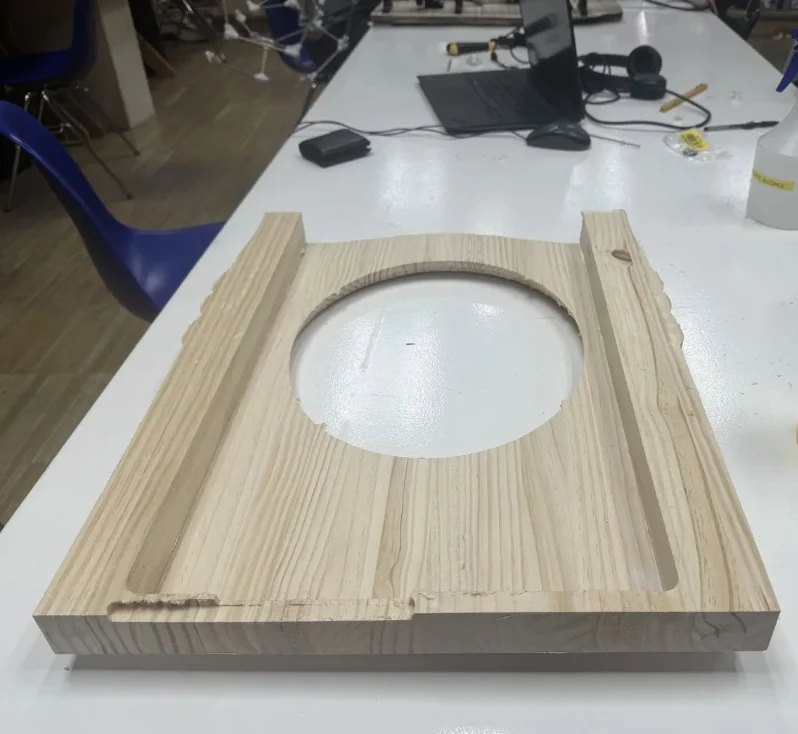
The back/body panel — oval aperture and side channels milled to seat the layers.
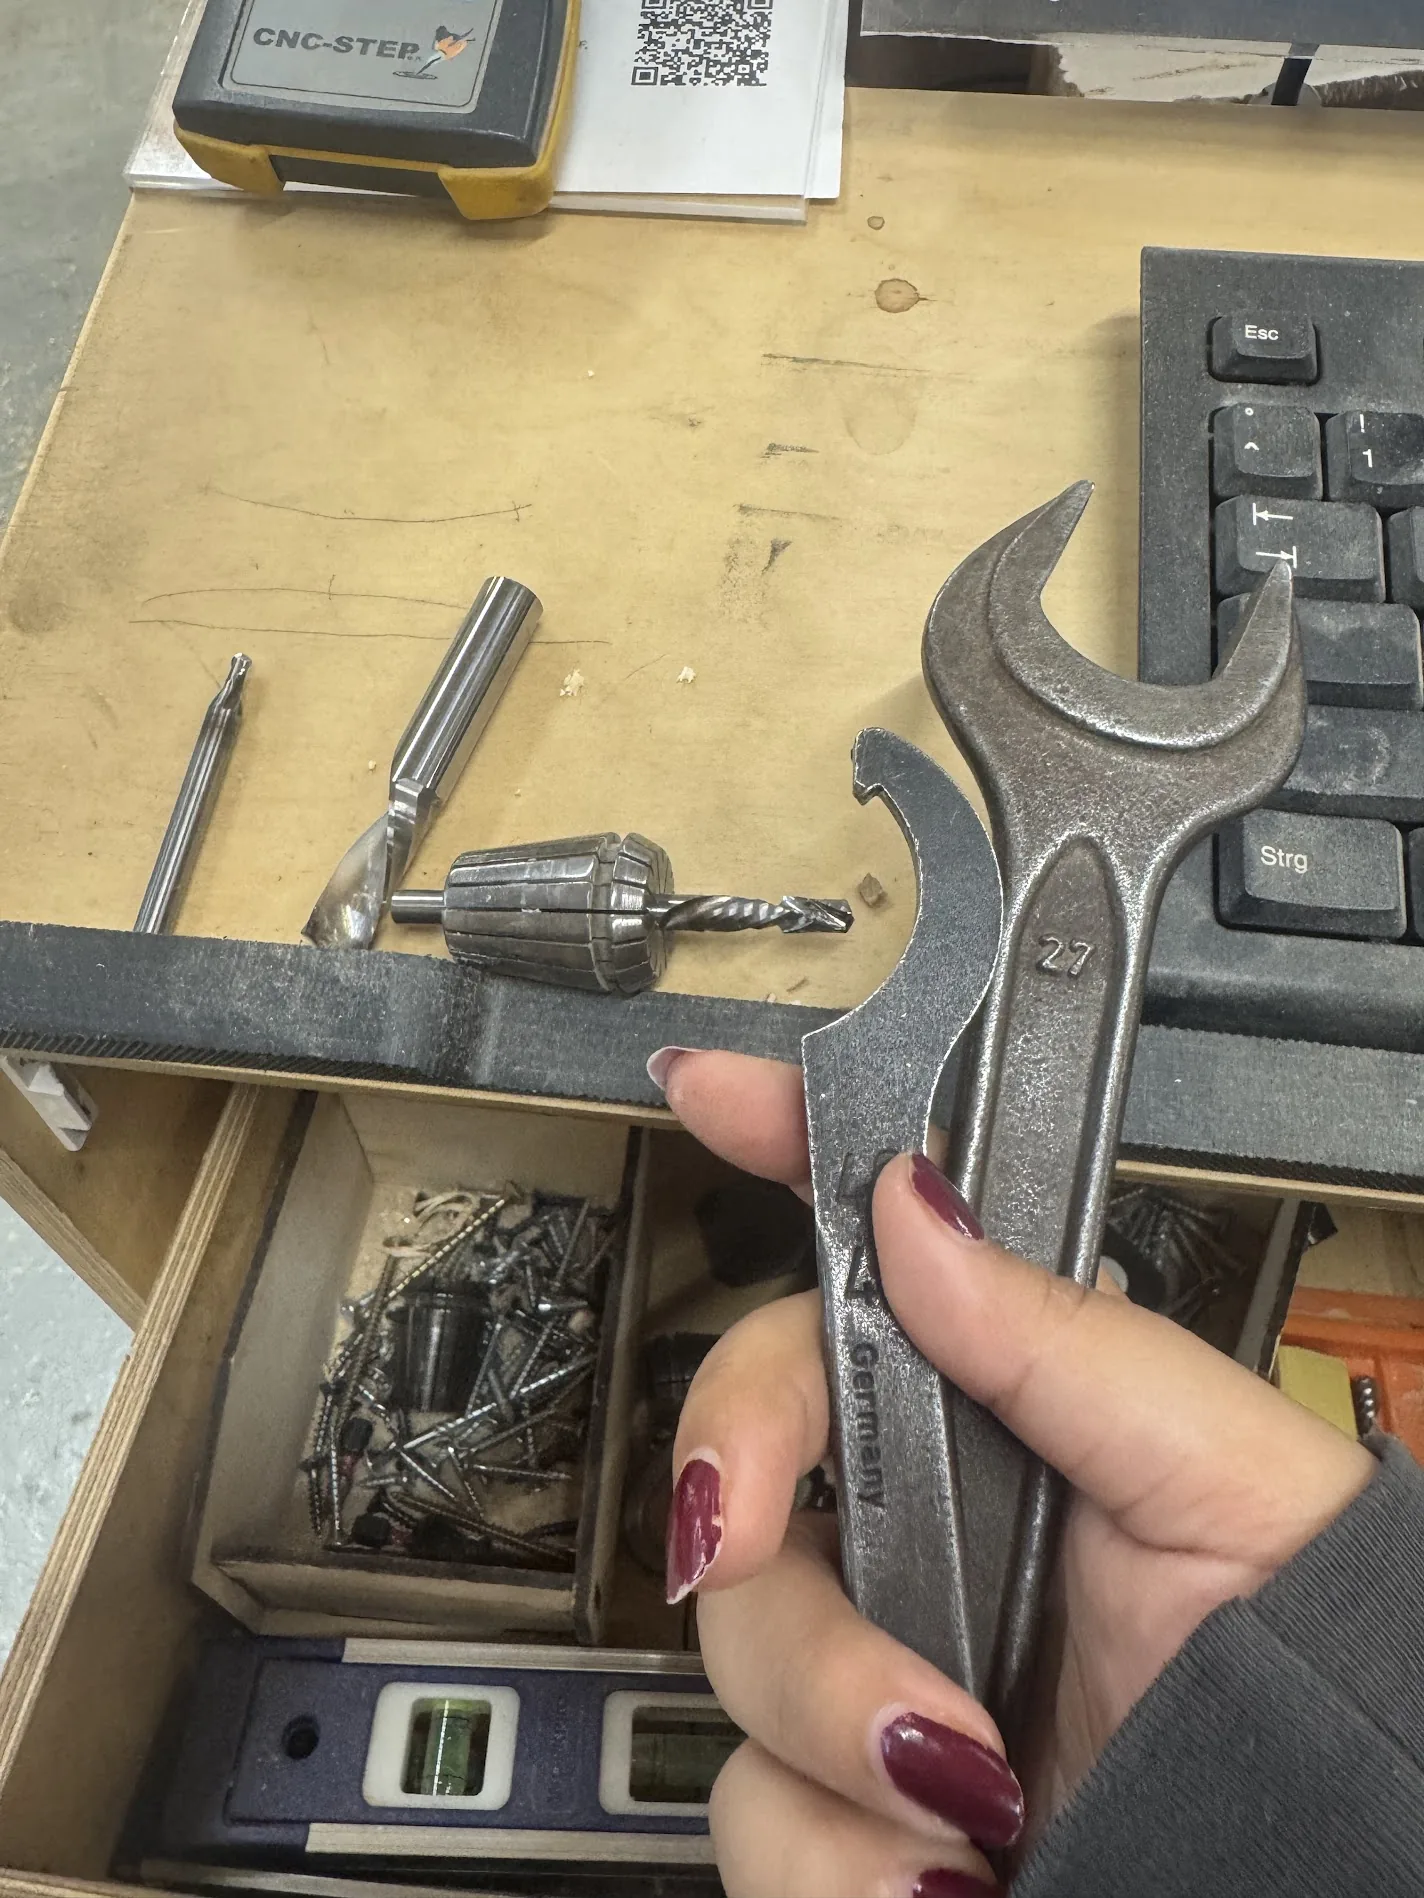
The tooling — 4 mm ball, flat end mills, and drill, with the 27 mm collet spanner for tool changes.
Safety: ear protection, eye protection and the lab's dust extraction throughout — this was my first time running a machine this size, supervised by the lab instructors (see acknowledgements).

Kitted up at the CNC — ear and eye protection on.
Electronics — milled XIAO board
A custom XIAO ESP32-S3 carrier board, designed in KiCad and milled in-house on single-sided copper. It reads the IR/PIR sensor, drives the NeoPixels, and talks to the mini PC over USB serial — full wiring in the Electronics section below. Two PIR modules were bench-tested first to pick the one with the cleanest trigger range for wall distance.
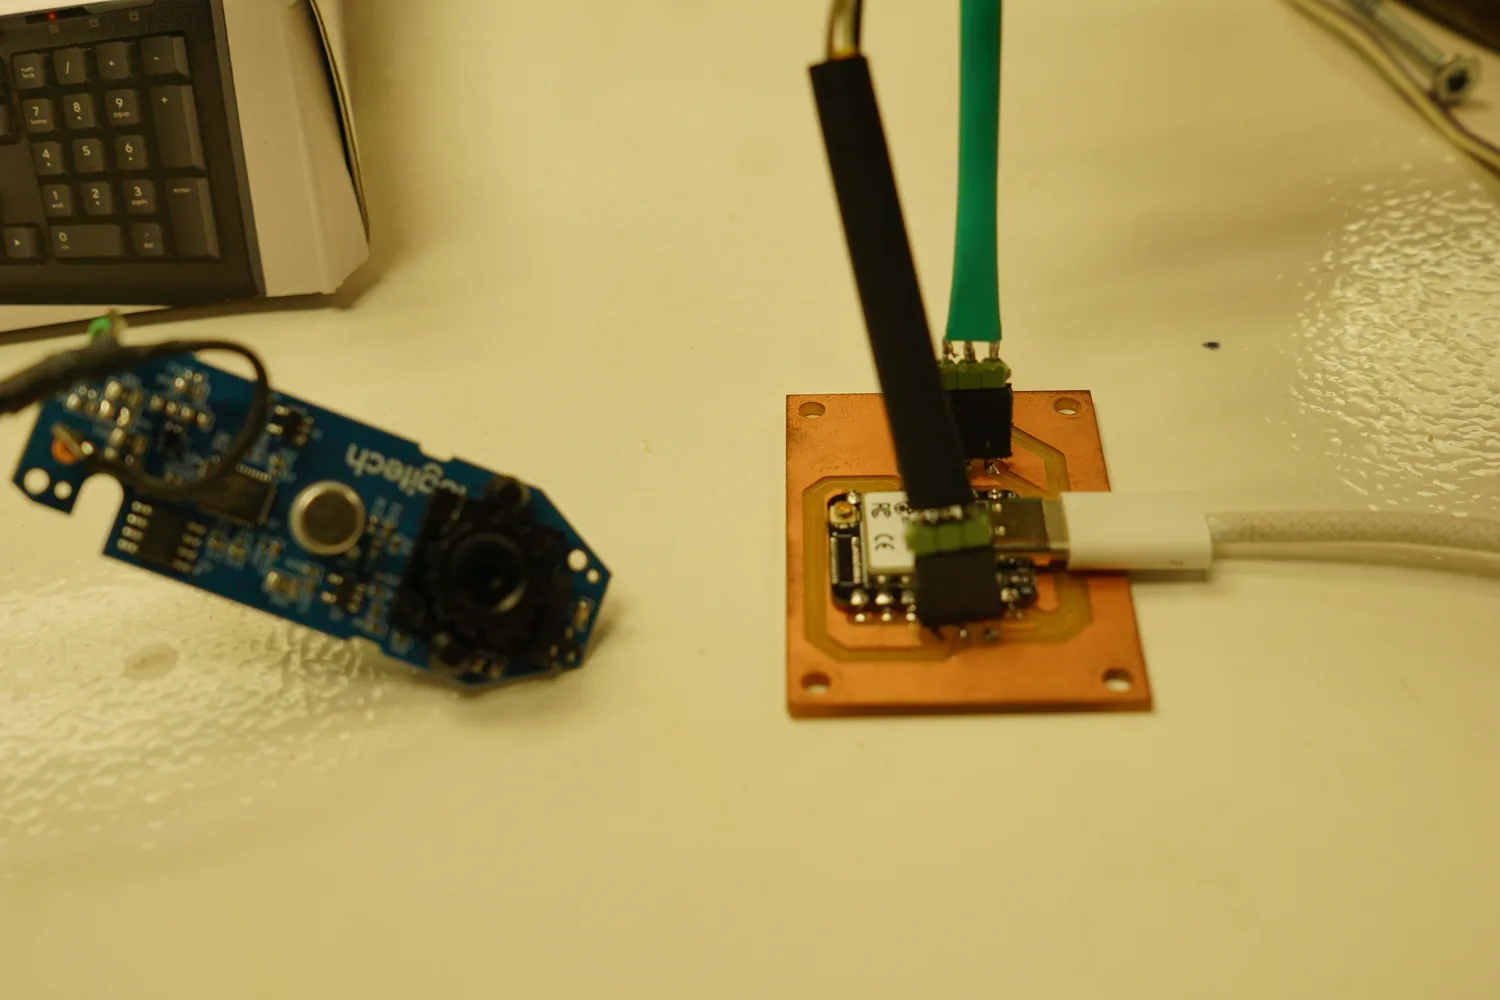
Bring-up — the board and the (bare) webcam tested together before integration.
Additive — printed mounts
A 3D-printed curved arch holds the webcam at the top of the oval; a printed box holds the acrylic letter with the PIR dome recessed at its base; printed spacers set the 10–25 mm air gap and keep cabling tidy.
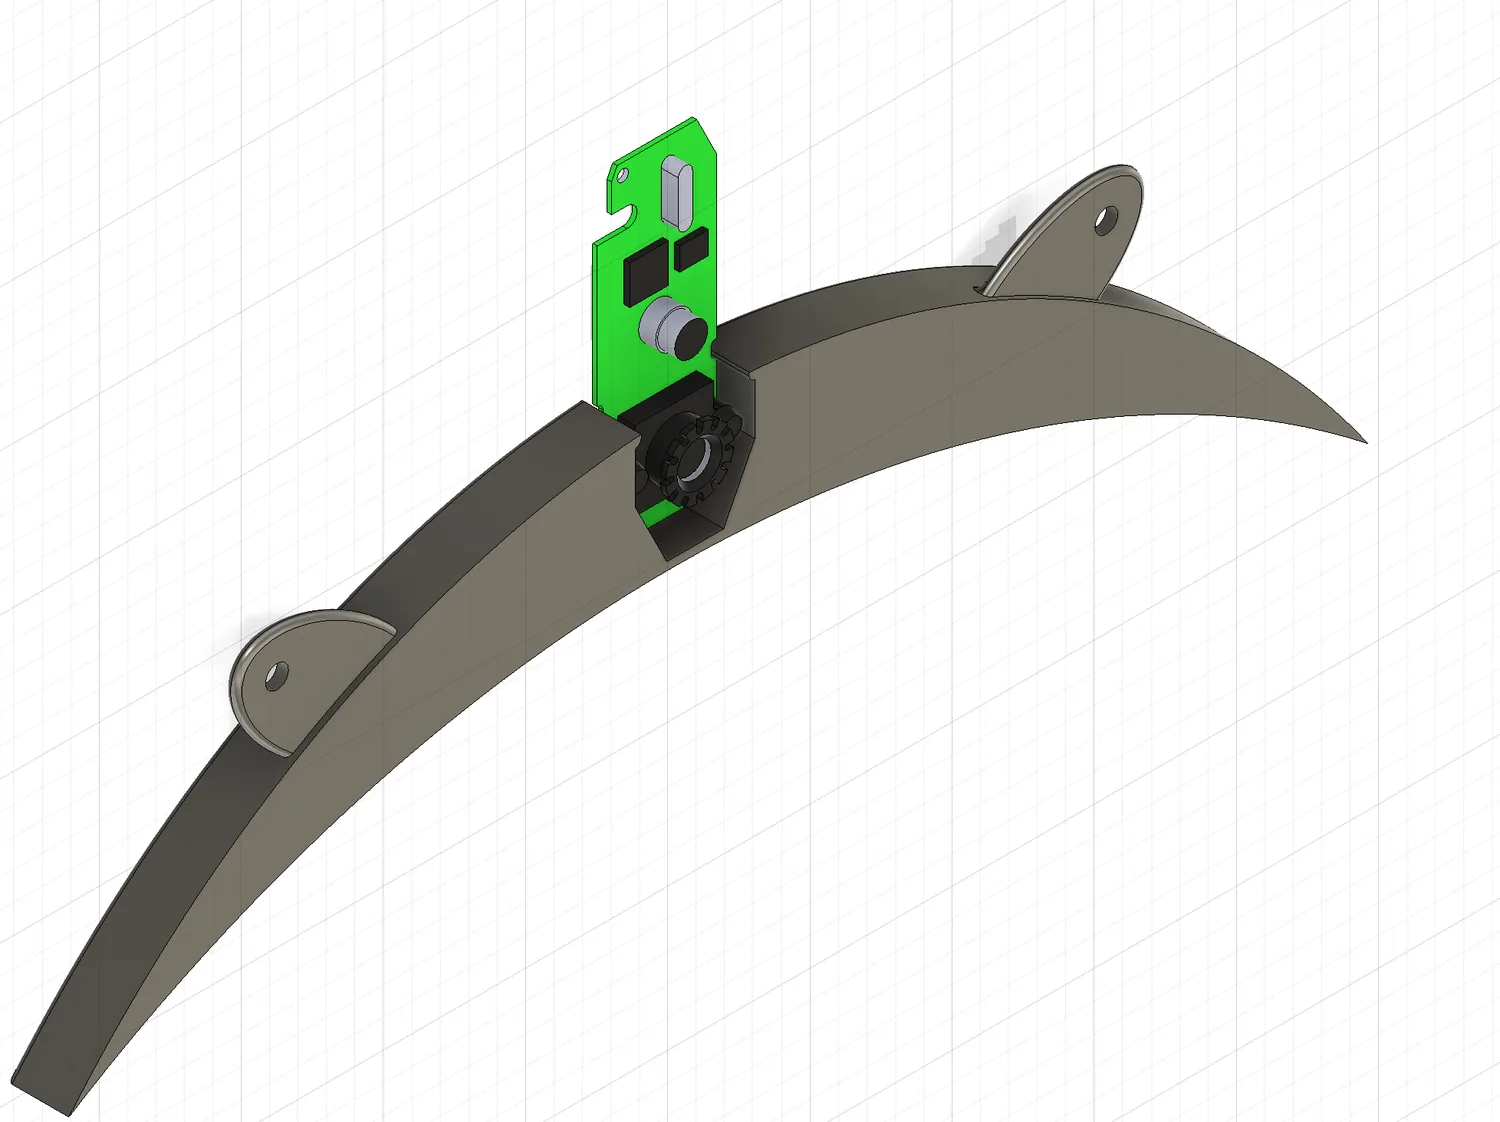
The webcam arch — a curved bracket aiming the camera through the film.
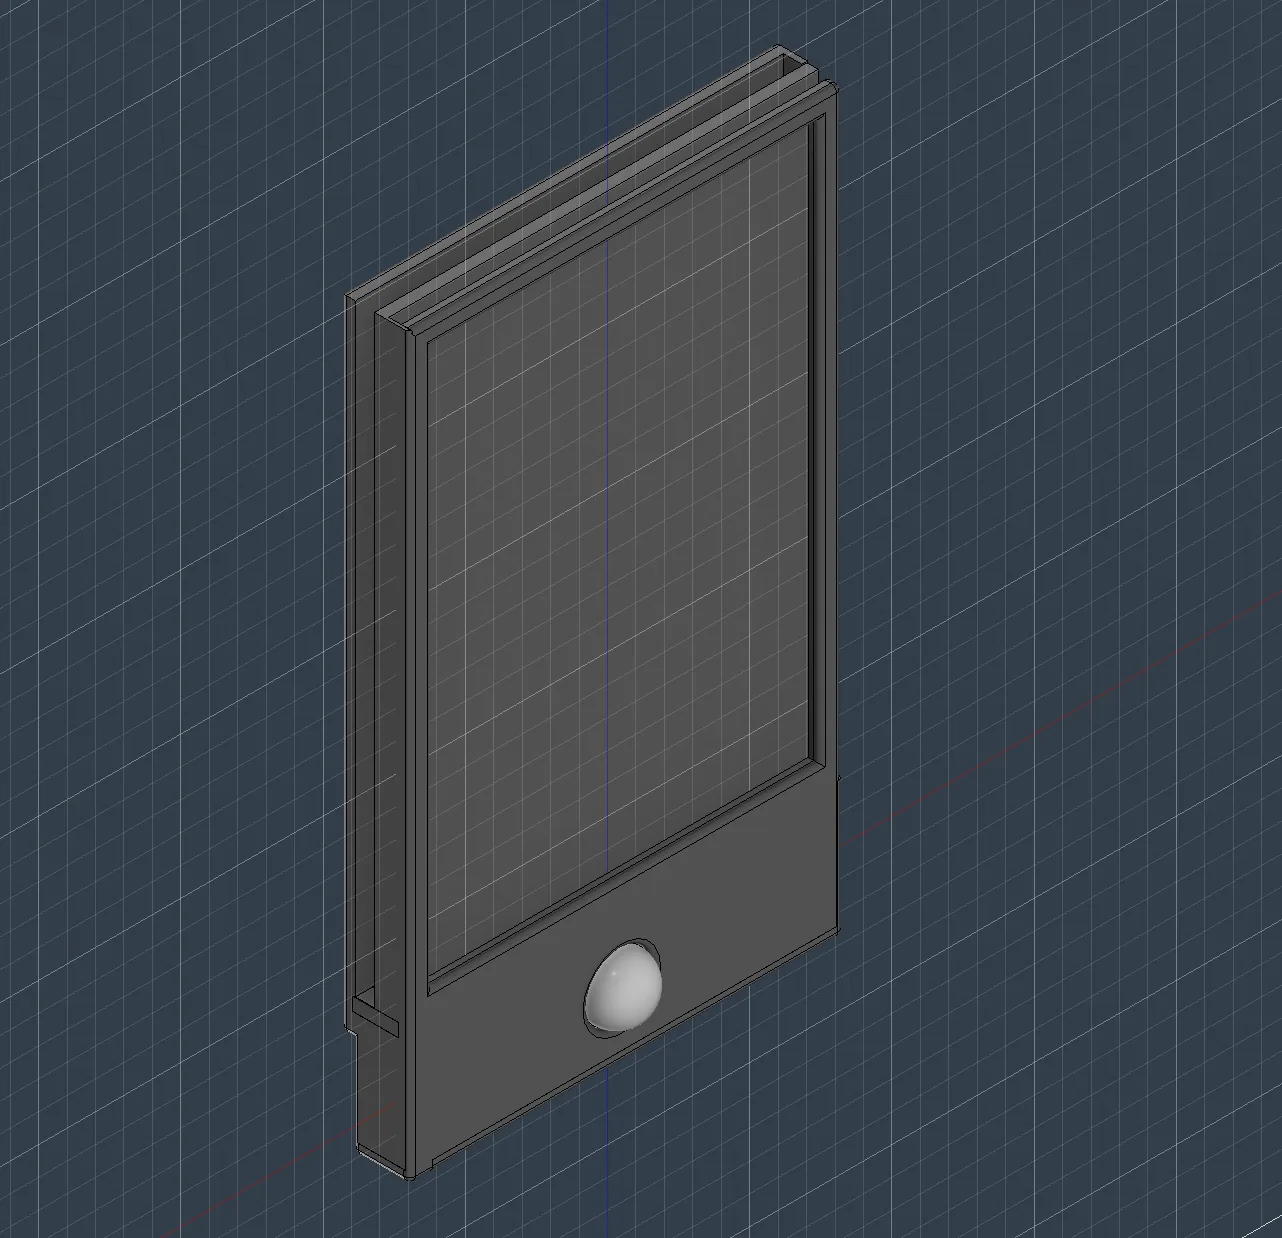
The letter box — houses the acrylic letter, PIR dome at the base.
Laser — the letter & the optics
My grandmother's handwriting was centerline-traced in Rhino and laser-marked into acrylic; the one-way mirror film was squeegeed onto the acrylic that sits in front of the screen. Bubble-free, it reads as a mirror when the display is dark and lets the simulation show through when it's lit.
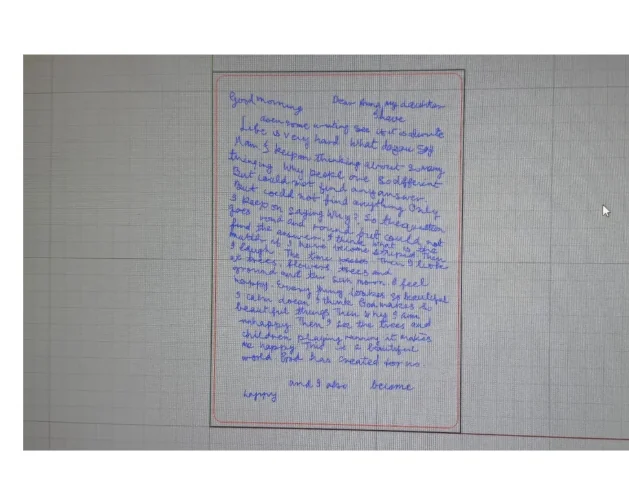
The laser job — handwriting as mark strokes (blue) inside the cut outline (red).
| Operation | Power | Speed | Time |
|---|---|---|---|
| Cut (outline) | 70 | 1.1 | 2 m |
| Mark (handwriting) | 12 | 1.8 | 58 m |
The handwriting is a low-power vector mark — one score per stroke, not a raster engrave — which is why it takes nearly an hour while the outline cut is two minutes. The shallow score is what catches the NeoPixel light cleanly.
Testing the laser-marked letter edge-lit by the NeoPixels, flashed from the XIAO.
Applying the one-way mirror film to the acrylic.
Electronics
The XIAO ESP32-S3 is the embedded controller, wired as three subsystems:
| Function | Pin | Component |
|---|---|---|
| NeoPixel letter light | D2 → LED_DATA | J3 header (5V / DATA / GND) |
| IR / PIR motion sensor | D4 ← SIGNAL | J2 header (3V3 / SIG / GND) |
| Serial to mini PC | USB D+ / D− | Existing USB — no extra hardware |
The board is deliberately minimal — a XIAO ESP32-S3 (M1), a single 100µF electrolytic cap (C1) for bulk decoupling on the 5V rail, and two 3-pin headers. The XIAO drives the NeoPixel data line directly; there is no series resistor. Nets: 5V, 3V3, GND, LED_DATA, SIGNAL. The KiCad schematic, board, and copper (F.Cu) files are in the archive.
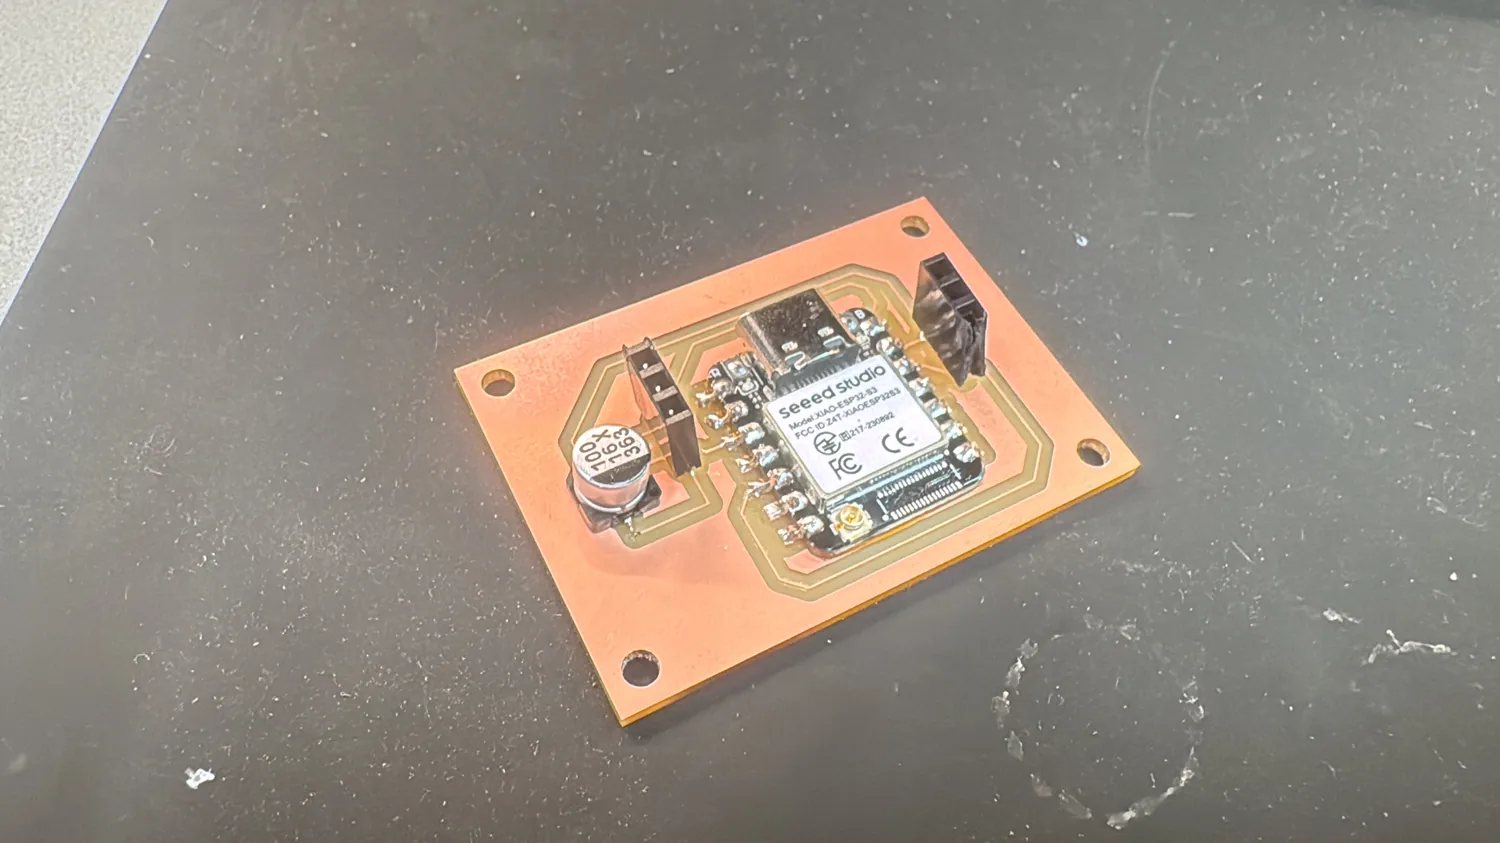
The milled board — XIAO ESP32-S3 (M1), 100µF cap (C1), J2 (IR) and J3 (LED) headers.
One flag carried from design: D4 is also the I²C SDA line on the XIAO. If an ambient-light sensor (I²C) is added later, the PIR signal moves to D6/D7 to avoid a conflict.
System Integration
Maya's Mirror is a seven-layer stack, front to back: CNC carved pine frame → acrylic + one-way mirror film → 10–25 mm air gap → 24″ monitor → custom XIAO PCB → ThinkCentre mini PC → frosted acrylic back panel and wood sides. Overall ~520 × 720 × 120 mm. Full integration detail is on the System Integration week →.
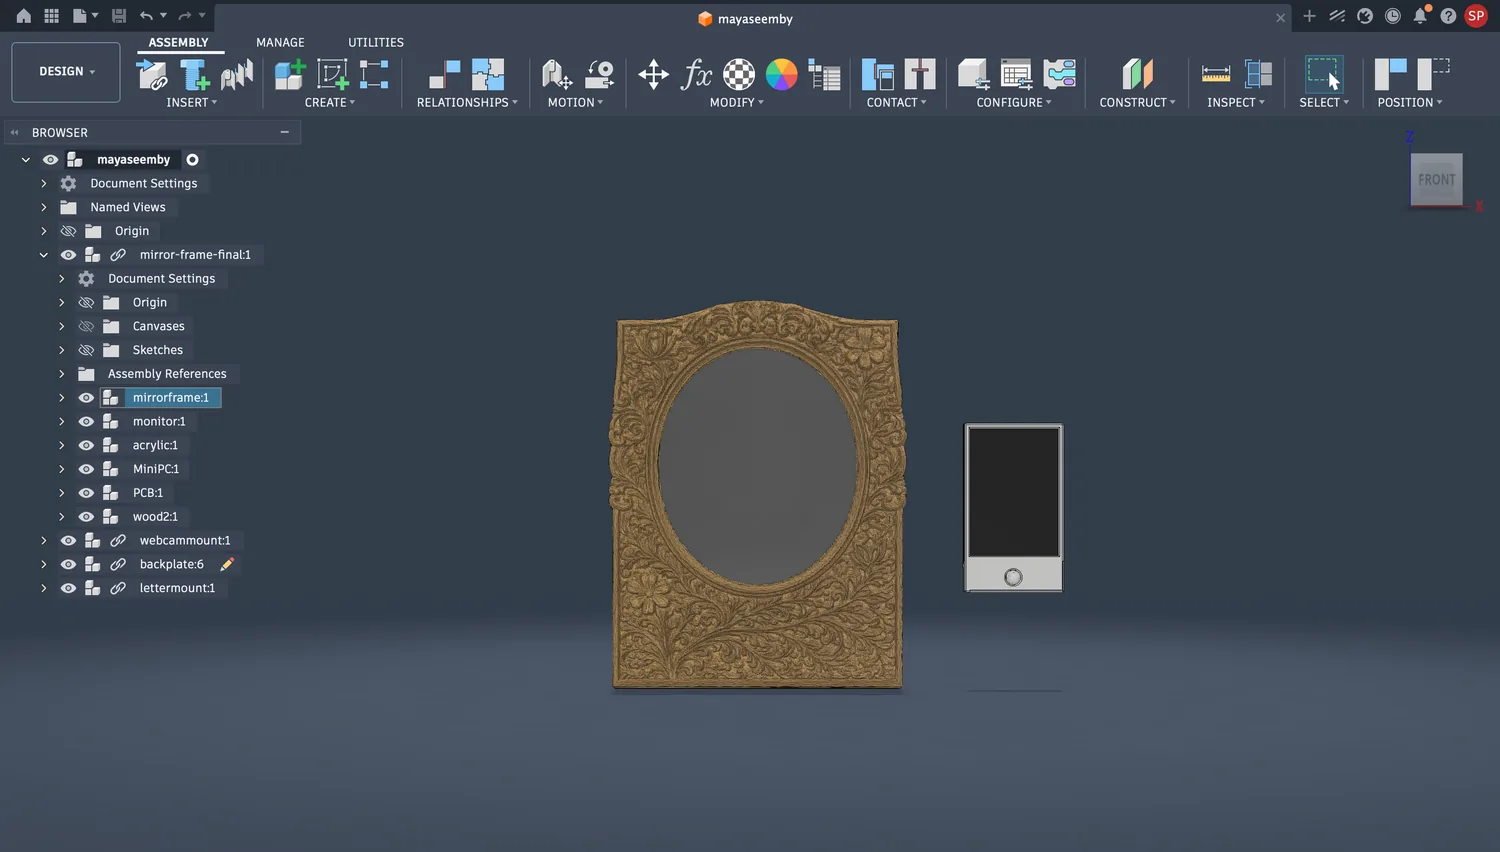
Front: the carved frame and mirror, letter box beside it.
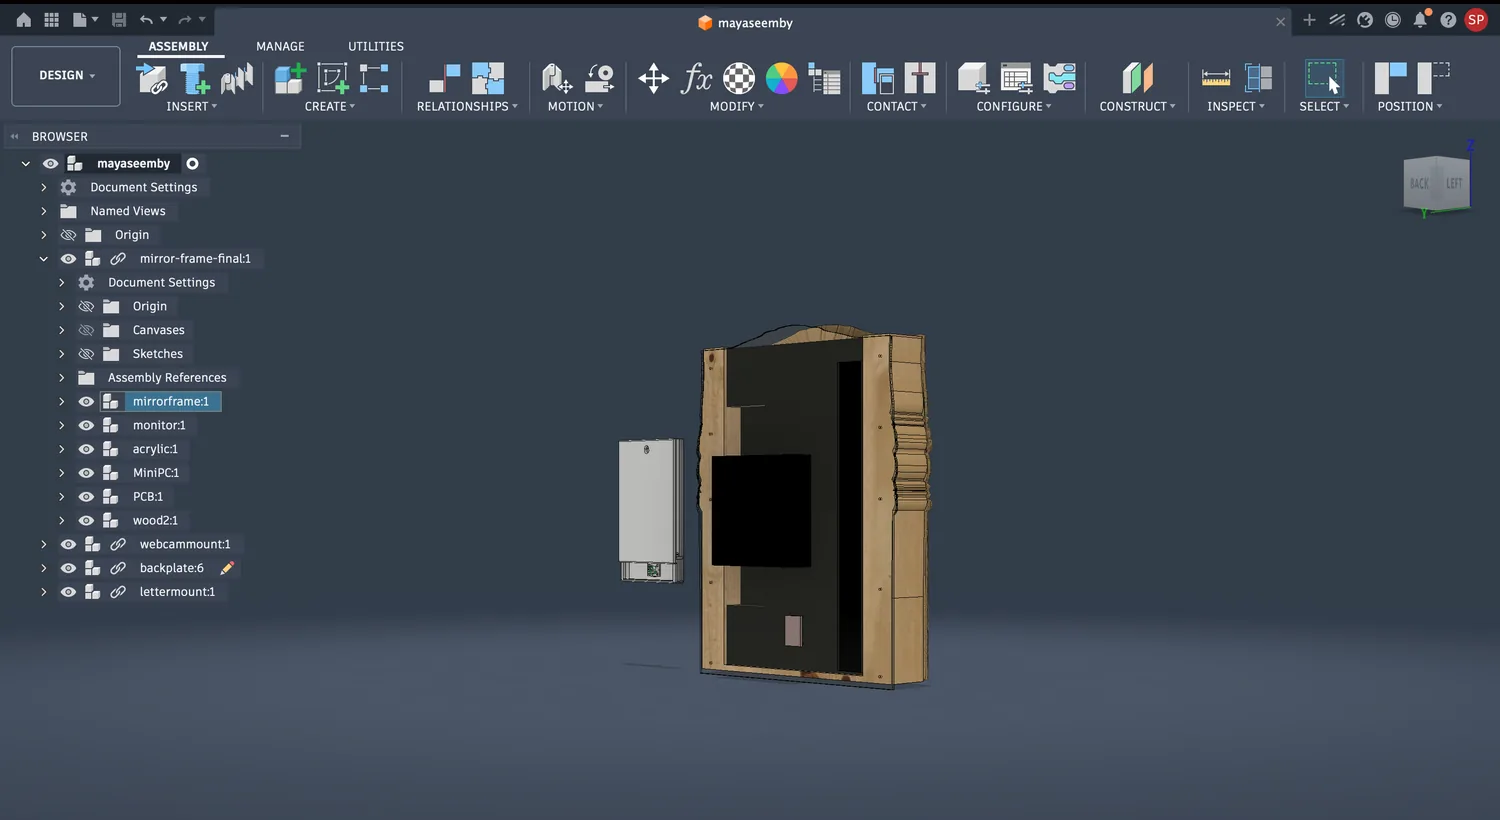
Back: the screen cavity inside the wood body, every part named in the tree.
The whole assembly modelled in Fusion as one file, every subsystem as its own body (mirrorframe, monitor, acrylic, MiniPC, PCB, wood, webcammount, backplate, lettermount).
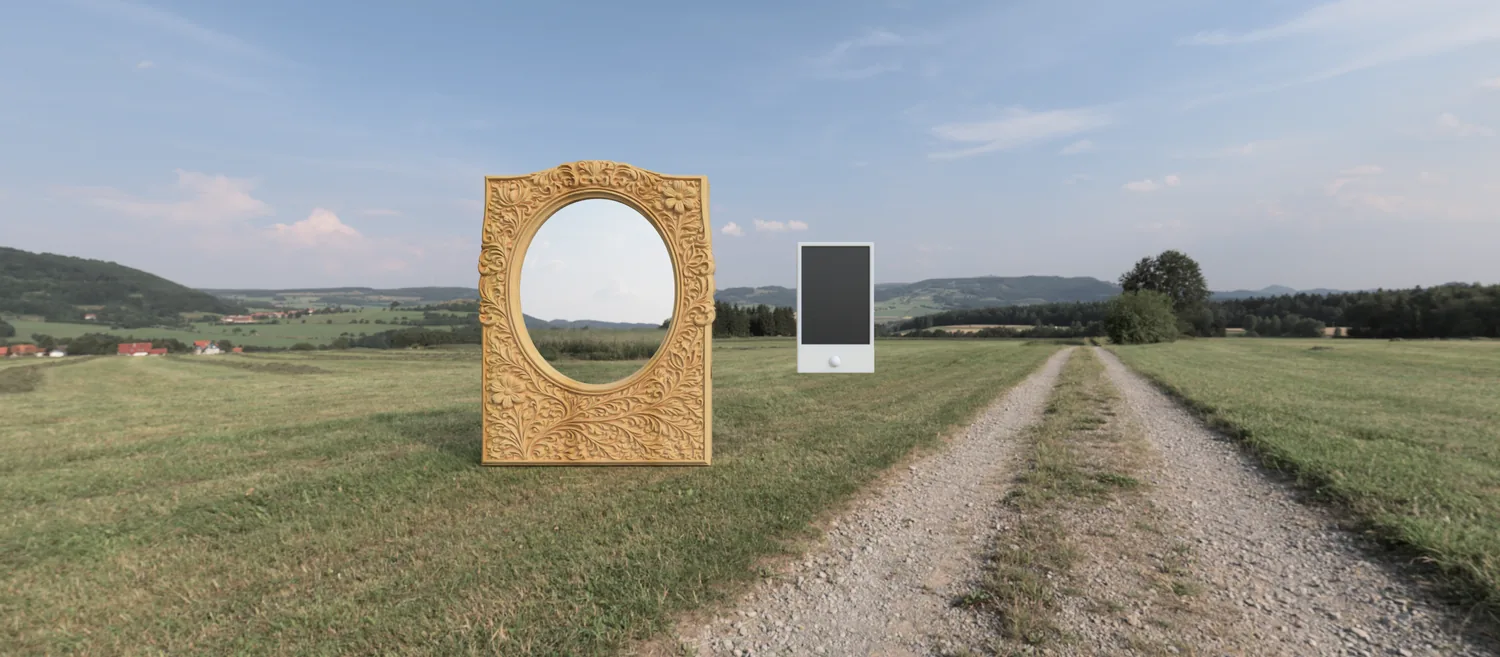
The resolved design rendered in context, both pieces: the carved mirror reflecting the sky and the letter box beside it.
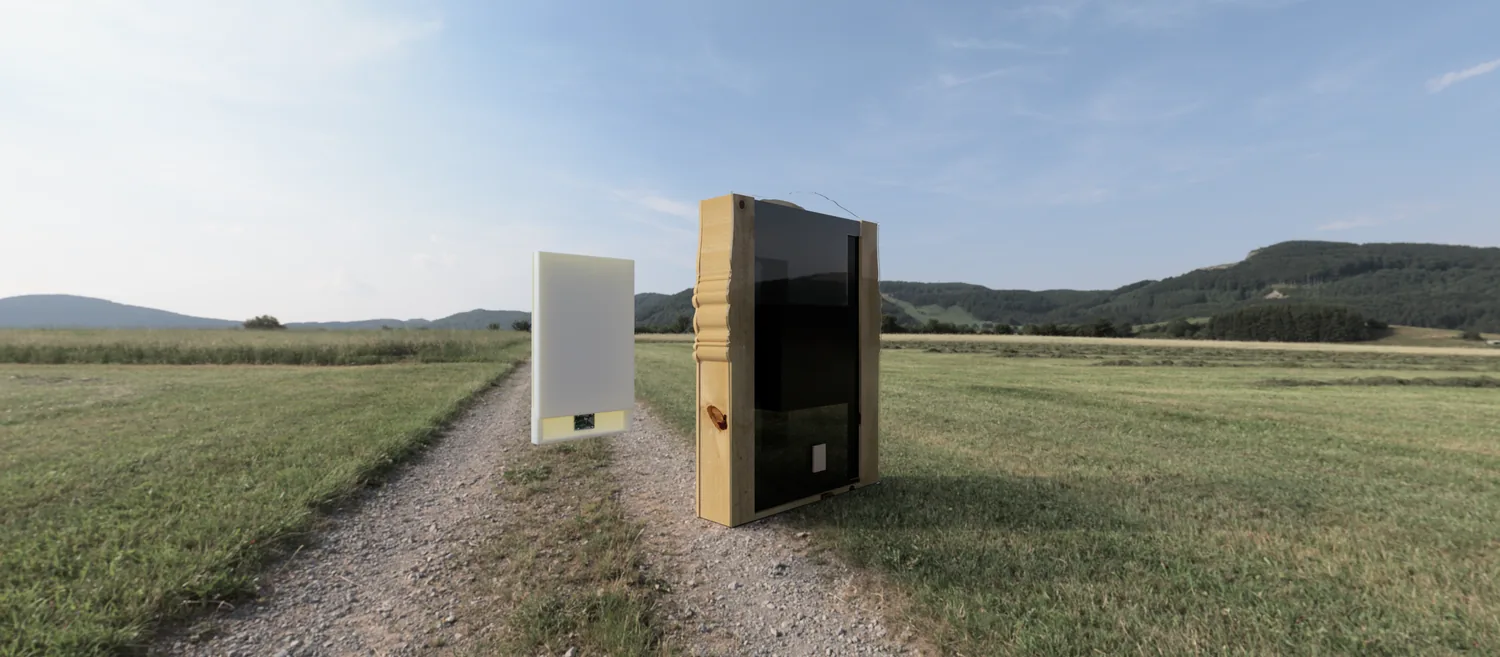
From the side: the depth of the frame and the screen reading dark through the one-way mirror.
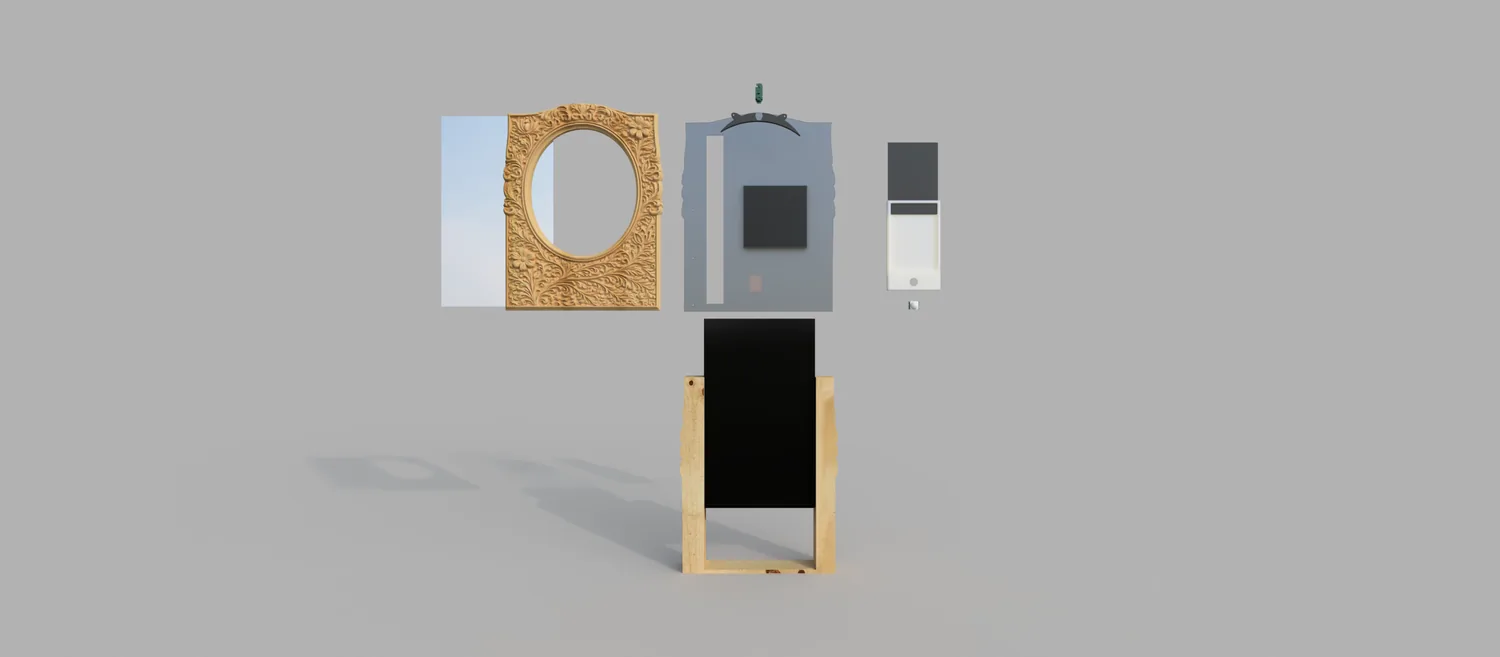
The full assembly exploded: the carved frame and mirror, the back panel with the webcam mount and PCB, the wood pocket holding the screen and mini PC, and the letter box at right.
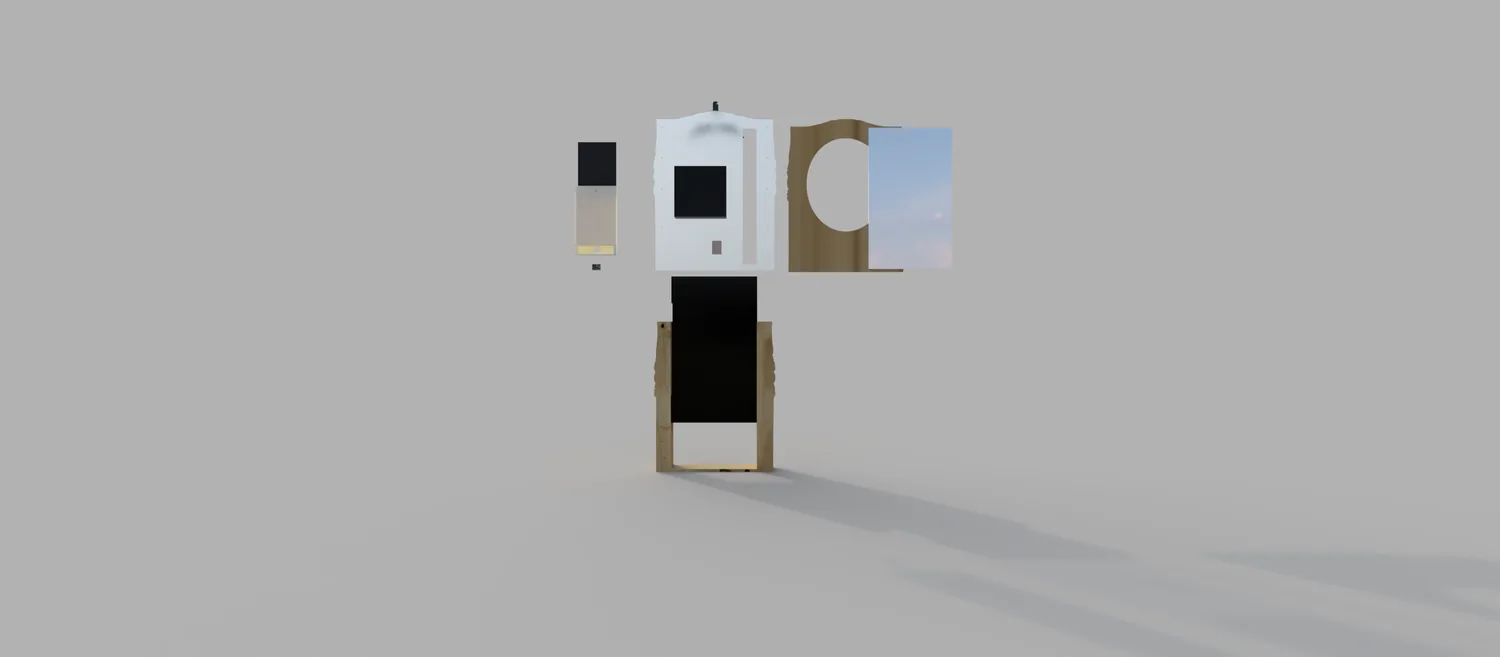
The same explosion from an angle, showing how the layers stack in depth.
A turntable of the full assembly render.
The trickiest integration question was mounting the mini PC without a bulky bracket. The answer: open the Lenovo ThinkCentre and drill it to the monitor's VESA pattern so the computer becomes its own mount, collapsing the two thickest layers into one. The frame and side walls were cut to one shared outline and glued, with a monitor-sized pocket left open at the top as a ventilation slot.
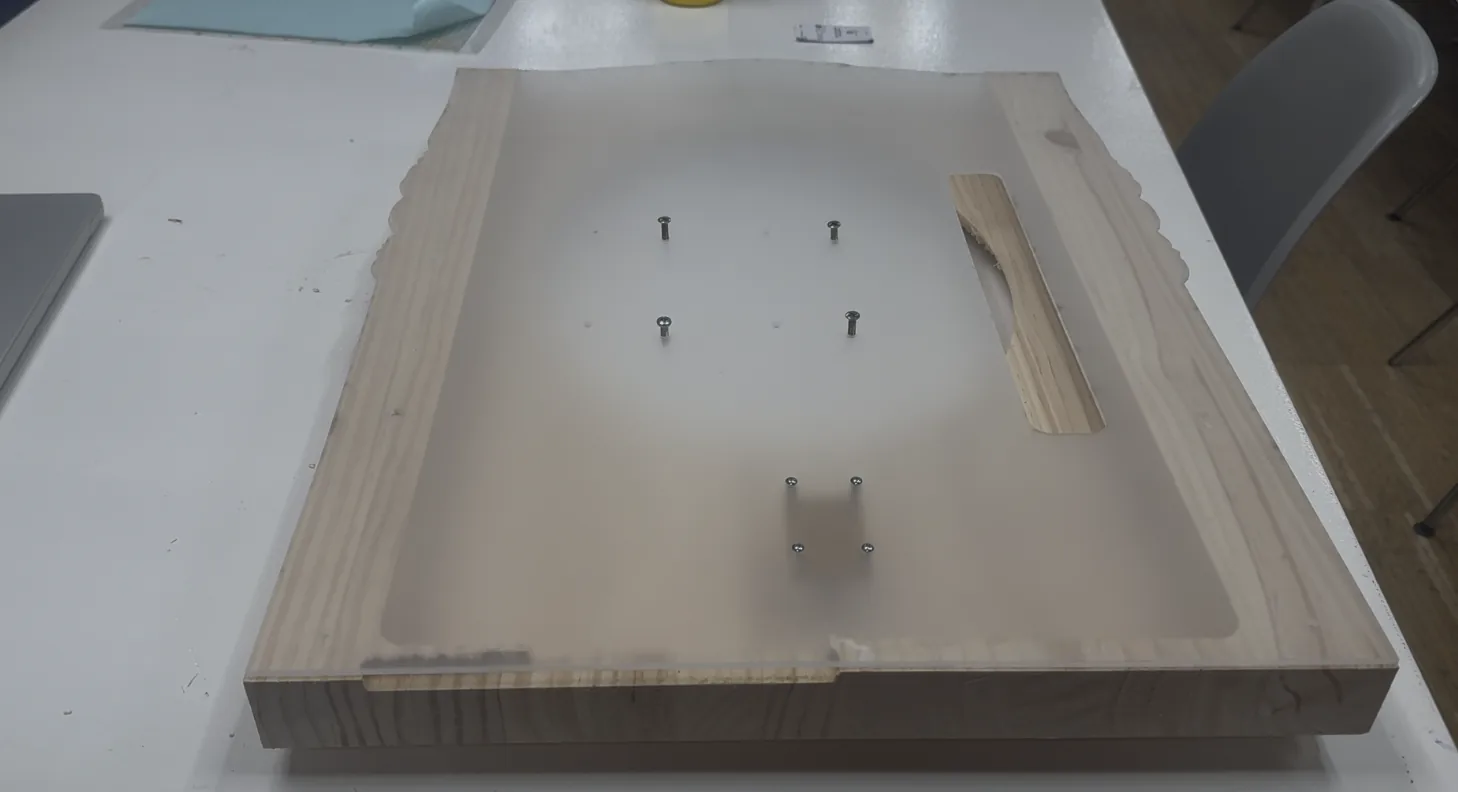
The integrated back — frosted acrylic panel doubling as cover and VESA mounting plate, with a cut handle slot for transport.
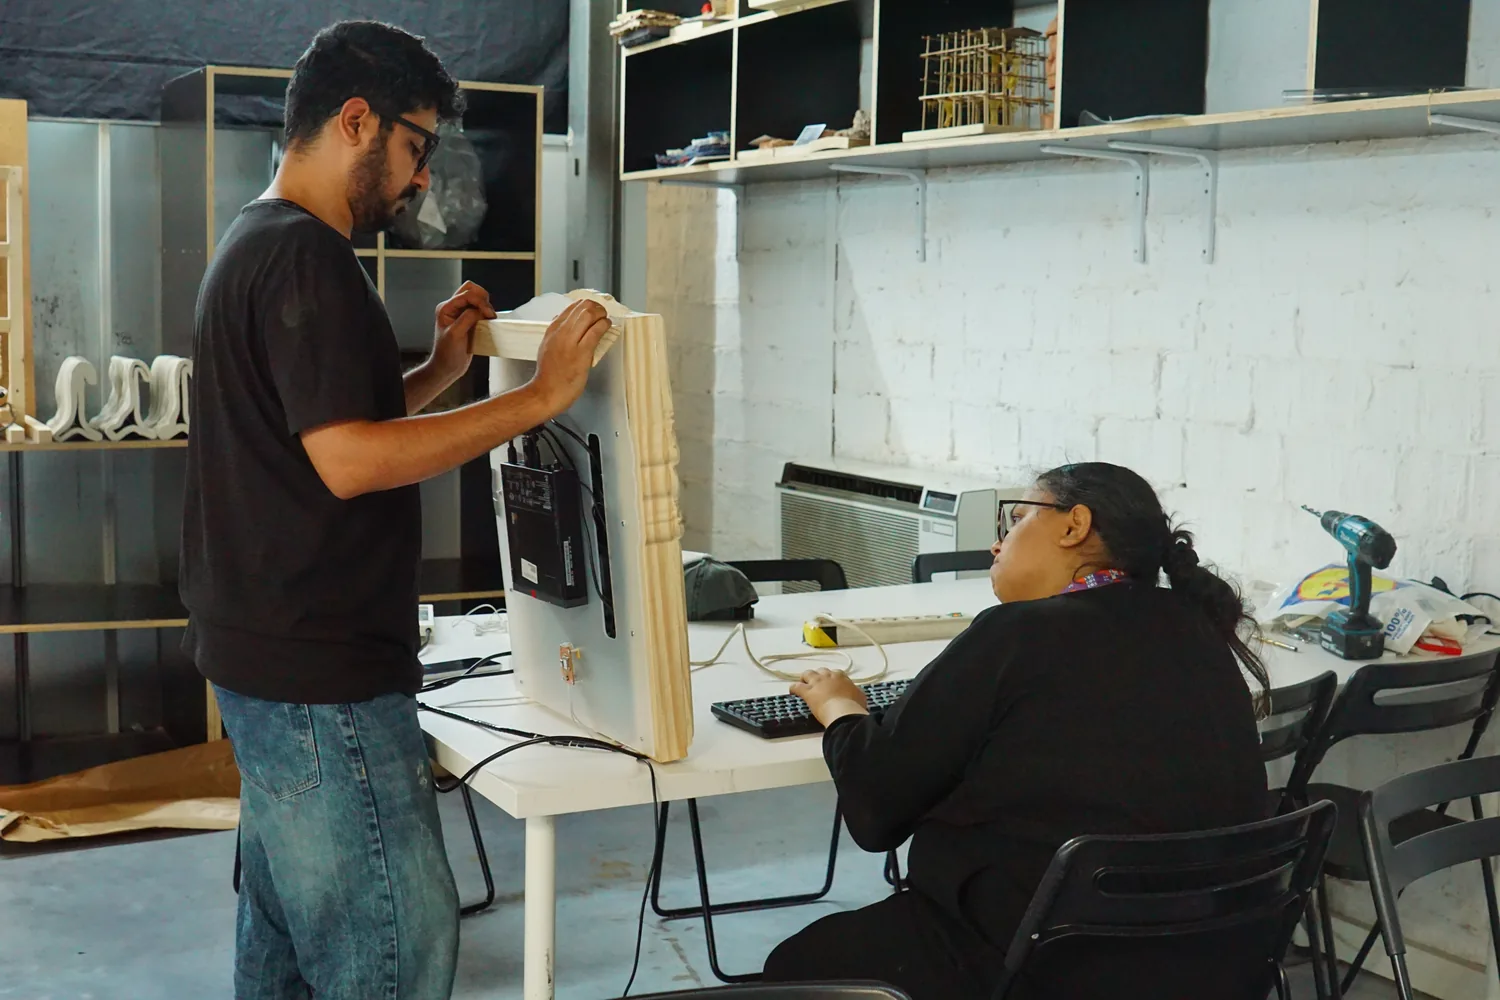
Final assembly — fitting the carved face onto the stack.
Bill of Materials
Bought items are the display, compute, camera, and optical film; everything structural and electronic is fabricated. Buy prices are current retail; made parts use Fab Lab stock and are estimated. (Estimates — to be reconciled against receipts.)
| Item | Spec | Qty | Make / Buy | Source | Cost |
|---|---|---|---|---|---|
| Monitor | Philips 24E1N1100A, 24″ FHD IPS | 1 | Buy | Amazon.es | €79 |
| Mini PC | Lenovo ThinkCentre M910q, i5-6400T, 8GB, 240GB | 1 | Buy | Refurb marketplace | €140 |
| Webcam | Logitech C270 HD, 720p | 1 | Buy | Amazon.es | €25 |
| One-way mirror film | Applied to back of acrylic | 1 | Buy | Amazon.es | €10 |
| Acrylic sheet | Clear, cut to aperture + letter | 1 | Make (laser) | Fab Lab stock | €10–20 |
| Pine (frame) | CNC-carved relief | 1 | Make (CNC) | Fab Lab stock | €20–40 |
| Custom PCB | XIAO ESP32-S3, milled board + parts | 1 | Make (mill) | Lab + Seeed XIAO | €20–25 |
| Sensors / wiring | PIR, NeoPixels, connectors | — | Buy | Amazon.es | €15–25 |
| 3D-printed parts | PLA+, webcam arch, letter box, spacers | — | Make (print) | Fab Lab filament | €5–10 |
| Estimated total | ~€300–350 | ||||
What Worked, What Didn't
What worked
- The physarum model produces genuinely organic growth on a live face.
- MediaPipe FaceMesh in the browser is low-latency and needs no server.
- The carved frame and the laser-marked letter read as one ritual object, not a gadget.
- Cutting the frame and sides to one shared outline made them self-align when glued.
- Mounting the mini PC to the monitor's VESA collapsed the two thickest layers into one.
What didn't
- Early facial-patch distortion was too horror-coded — abandoned.
- L-system vines were too mechanical; the Asaro overlay was beautiful but too abstract.
- The two-sided PCB failed to mill twice before I redesigned it single-sided with a 0Ω bridge.
- Triggering through the XIAO heated the mini PC and spawned duplicate kiosk windows — hence the wireless-keyboard workaround.
How It Was Evaluated
I presented the piece for the global review and showed it publicly at IAAC. Against the Fab Academy final-project requirements and the experience it's meant to deliver:
- Runs unattended — the PIR drives the letter lighting on its own; the visual experience is advanced by a wireless-keyboard spacebar (the deliberate workaround above).
- The arc reads — partly — some first-time viewers perceived the reflection-to-garden transformation without explanation. The dissolution landed more reliably than the "why," which is honest feedback about where the narrative needs work.
- Range of processes — demonstrates 2D/3D design, additive + subtractive fabrication, custom electronics, embedded programming, and system integration.
- Made not bought — frame, PCB, enclosure, optics, letter, and software are all fabricated in-house.
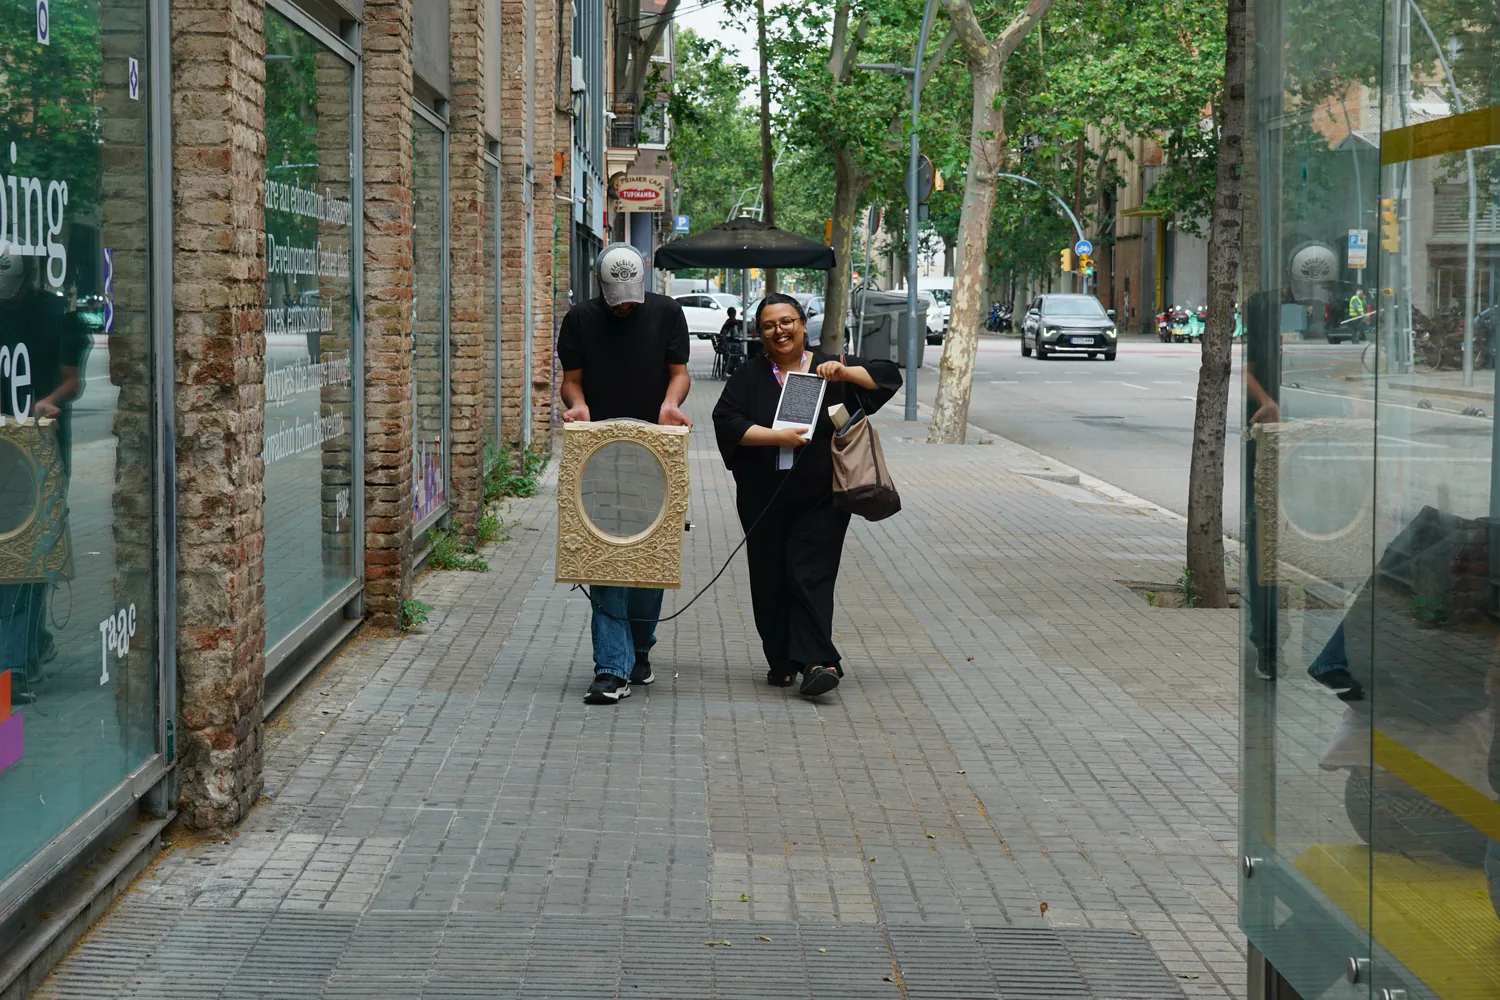
Carrying the piece to IAAC — independently operable and built to be moved.
Implications & What's Next
The biggest next step is a smaller, editionable version: instead of a monitor and mini PC, drop a phone or iPad inside to act as both screen and camera, and fabricate the body fully 3D-printed or milled from a small block of wood on the desktop mill. That makes the generative-portrait method repeatable — so other people's handwriting and stories could drive it, turning a personal memorial into a shared one. Beyond that: the real three-motion PIR interaction (dropping the spacebar), and — given my work on smell as a design material — a scent layer as another route to memory beyond the visual. The questions it raises about memory, identity, and interfaces map onto the research directions I want to pursue next.
Acknowledgements
Before I came here I didn't know how to use a power screwdriver. These people are the reason I could make anything.
- Fab Lab Barcelona & IAAC — for providing me with everything I could dream of.
- My batchmates — Yara and Felix, for helping me when I was scared to use power tools and woodworking; Tareq, for always answering my Rhino troubles; Gabriel, for enduring my beginner-level 3D-printing questions and being my late-in-lab partner; Gennaro, for the most valuable advice while I was whining — "shut up Shiv"; Dhrish, for teaching me the fundamentals of Blender; Guillermo, for helping us document the detailed milling processes; and Pedro, for entertaining my prank ideas. Aditya for being here and helping through all the logistics of carrying this mammoth around.
- My instructors — Dani, my instructor, without whose constant check-ins nothing was possible (and without whom no celebration of success was ever good enough); Julia, for the best advice when I was stuck and for helping me brainstorm back to basics; Adai, for help in every corner I was worried about; Santi, for the insight tucked inside casual talks; Luciana, for brightening our days when we were slumping; and Shyam and Gabriel, for being patient and consistent with this mammoth of a CNC ask. Without these and many other instructors who helped me in passing, I'd have been clueless, and probably injured.
- My family — my grandmother Maya, and my mother Anna, to whom this letter was addressed. Special thanks to my dad who despite his limited attention span did try to read through my documentation.
- The Fab network — Neil and the countless instructors across the Fab Academy circuit who, despite being virtual, motivated and guided us to make really big choices.
Design Files & Source
All original design files are hosted here in the archive — no external hosting. Every file is listed individually below.
- deck-maya.pdf — the full presentation deck
- physarum.html — the live WebGL + MediaPipe simulation (current version)
- ellipse-mask.html — the mirror/reflection rest-state app
- maya.kicad_sch · maya.kicad_pcb · maya.kicad_pro · maya-F_Cu.svg — the board (schematic, layout, project, copper)
- maya-firmware.ino : the embedded firmware (PIR read, NeoPixel control, USB-HID spacebar trigger)
- matalaser.svg — the letter, centerline-traced for laser-marking
- Mirror2.svg — botanical frame relief artwork
- mirroroutline.svg — mirror oval cut outline
- mirrorspacer.stl · spacers.stl — air-gap spacers
- newmount_gcode.3mf — webcam arch print · spacers_plate_1_gcode.3mf — spacer plate
- cnc-toolpaths.zip — all six RhinoCAM toolpaths (.nc: drill, pocket, rough, ball-finish, inside/outside profile). The CAM setup screenshots are in the CNC section above.
- mayaseembyfinal.stl · woodpocket.f3d · newmount.f3d : the frame (STL export), the back/body pocket, and the webcam mount (Fusion 360 source)
- step-parts.zip : the full assembly as individual STEP solids. Individual parts: mirrorframe · acrylic · monitor · backplate · woodpocket · cammount · Webcam · Lens · PCB · MiniPC · BodyLetter · Letter · PCBletter · PIR
- path24-7-7.svg · path39-2-9.svg : additional vector path exports
- Maya.pdf — frame multiview drawing
- LICENSE.txt — the split license