Week 1. Fab Principles and Practices. Project Management
Week Assignment
Group assignment:
Objectives for Week 1
- Plan and sketch a potential final project.
- Work through a git tutorial.
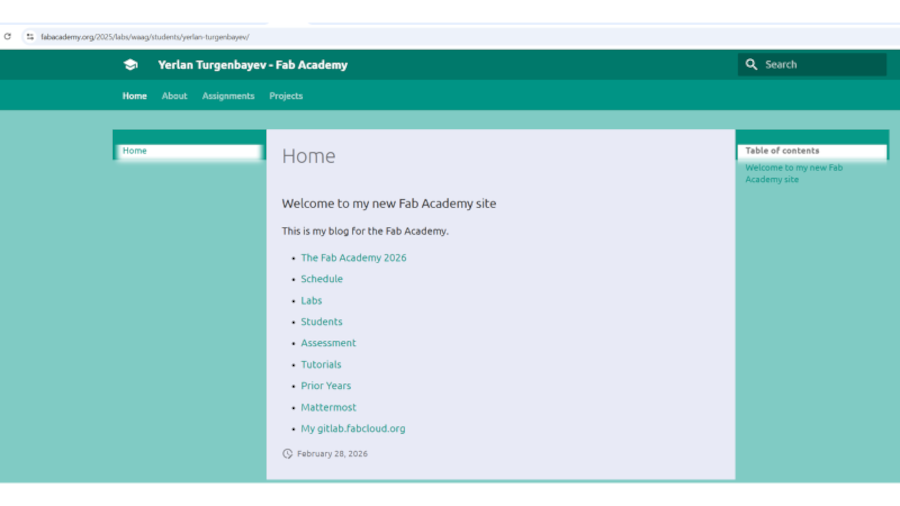
- Build a personal site in the class archive describing you and your final project.
- read, sign the student/instructor/lab agreements,and commit to your repos
- work through a git tutorial
- build a personal site in the class archive
- describing you and your final project
Learning outcomes
-
Communicate an initial project proposal
-
Identify and utilise version control protocol(s)
-
Explore and use website development tool(s)
Have you answered these questions?
-
Sketched your final project idea(s)
-
Described briefly what it will do and who will use it
-
Made a website and described how you did it
-
Created a section about yourself on that website
-
Added a page with your sketch and description of your final project idea(s)
-
Documented steps for setting up your Git repository and adding files to it
-
Pushed to your class GitLab repository
-
Signed and uploaded Student Agreement
Assignment objectives
The main objective of Week 1 was to understand the Fab Academy documentation process, set up my personal website, connect my local computer to the Fab Academy GitLab repository, and describe my initial final project idea.
For this week, I had to complete the following tasks:
- work through a Git tutorial;
- create and configure my personal website in the Fab Academy archive;
- document how I set up Git, GitLab, SSH, MkDocs, and my local working environment;
- push my documentation to the Fab Academy GitLab repository;
- describe and sketch my initial final project idea;
- upload and sign the Fab Academy Student Agreement.
This week was important because all future Fab Academy assignments will be documented on this website. Therefore, I needed to learn not only how to create the website, but also how to manage files, commit changes, and publish updates through GitLab.
My workflow during Week 1
My work during Week 1 followed this sequence:
- I studied the Fab Academy project management tutorials.
- I installed the required software: Git, Visual Studio Code, Python, and MkDocs.
- I configured Git with my username and email.
- I generated an SSH key pair on my computer.
- I added the public SSH key to my GitLab FabCloud account.
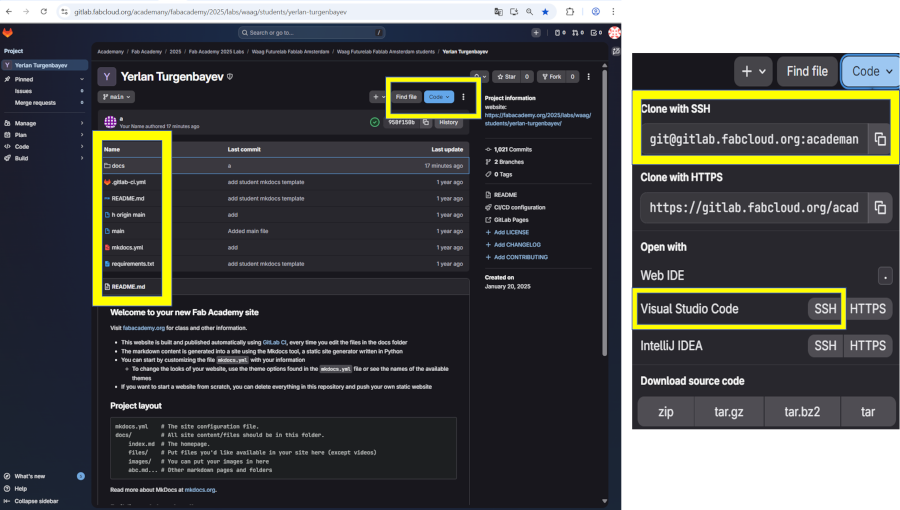
- I cloned my Fab Academy repository to my computer.
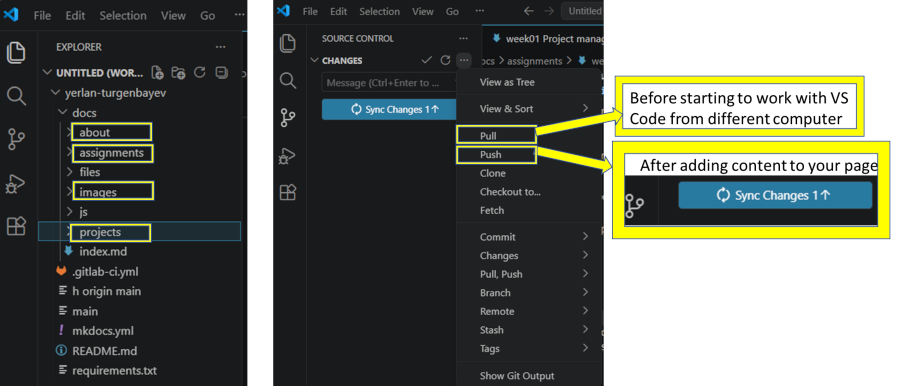
- I opened the repository in Visual Studio Code.
- I edited Markdown files for my website.
- I tested the website locally with MkDocs.
- I committed and pushed the changes to GitLab.
- I checked the published website online.
- I updated the final project page with my own sketch and project description.
I started practicing with the Fab Academy tutorial where it has Principles & Practices, Project Management containing the following resources:
-
Git Simple Cheat Sheet Fast guide to upload and update your repo to the GIT repo of Fab Academy
-
Git Extended Cheat Sheet Full guide to GIT for Fab Academy
-
Migrating Git Repository Original tutorial by: Krisjanis Rijnieks
-
Setting up MkDocs Original tutorial by: Krisjanis Rijnieks
-
HTML Basics Original tutorial by: Krisjanis Rijnieks
-
HTML+CSS Here you can find more resources about working with HTML+CSS.
-
Git vs. Mercurial Summary
-
Webpage templates Reference Links A collection of simple and beautiful templates, also you can find here useful resources.
-
Resize Images using Gimp Tutorial for compressing many image files to web siz.
This can be found from the Fab Academy’s gitlab page too.
It is necessary to download the following resources:
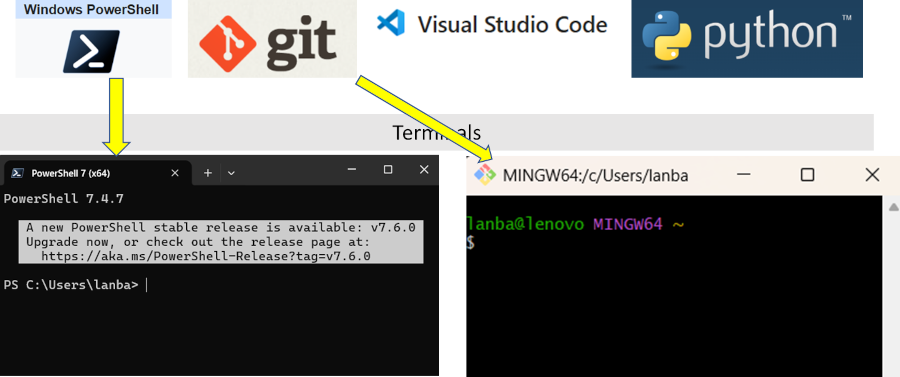
PowerShell - to Install PowerShell 7 on Windows - PowerShell is a cross-platform task automation solution made up of a command-line shell, a scripting language, and a configuration management framework. PowerShell runs on Windows, Linux, and macOS.
GIT - to Install Git - Git was built to work on the Linux kernel, meaning that it was built to handle repositories with tens of millions of lines of code from the start. Speed and performance has always been a primary design goal of Git.
Visual Studio Code (VS Code) - to Install VS Code - VS Code is the open source AI code editor
Python - to Install Python - Python is a programming language
SETUP on GitLab
After installing Git opened command line and added my Git username and set my email as GitLab repo was created, which informed by the email from FabAcademy. Then the account was created at https://fablabs.io/ which direct to the Fab Academy Project Page - https://gitlab.fabcloud.org/dashboard/home
git config –-global user.name “YOUR_USERNAME”
and configured my email address for uploading
git config -–global user.email “yerlan.turgenbayev@yu.edu.kz”
then it was confirmed with the command
cat ~/.gitconfig
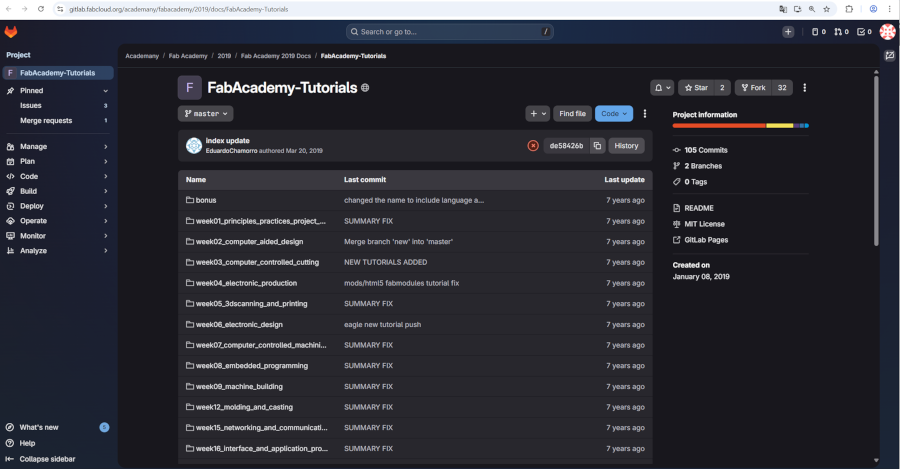
Webpage project was located in the fabcloud
In the project folder the student page was located.
The student page appeared.
Setting up SSH key for GitLab
SSH is used to connect my local computer with the Fab Academy GitLab repository securely. It allows me to push and pull files without entering my username and password every time.
According to the GitLab SSH documentation, the correct process has three main steps: generate an SSH key pair, add the public key to the GitLab account, and verify the SSH connection.
Step 1. Generate a new SSH key
In PowerShell, I generated a new ED25519 SSH key with the following command:
  bash
  ssh-keygen -t ed25519 -C "yerlan.turgenbayev@yu.edu.kz"
This command created two files:
  id_ed25519       # private key, - never be shared
  id_ed25519.pub   # public key, - the file to copy to GitLab
Step 2. Start the SSH agent and add the key
  Start-Service ssh-agent
  ssh-add "$env:USERPROFILE\.ssh\id_ed25519"
Step 3. Copy the public SSH key
To copy the public key, I used:
Get-Content "$env:USERPROFILE\.ssh\id_ed25519.pub"
Only the public key was copied. The public key starts with:
ssh-ed25519
The private key must not be copied, uploaded, or published.
Step 4. Add the public key in GitLab
To add the SSH key in GitLab FabCloud, I followed this path: GitLab FabCloud → User profile icon → Preferences / Settings → SSH Keys
Then I pasted the public key into the Key field and clicked Add key.
Step 5. Test the SSH connection
After adding the key, I tested the connection with:
ssh -T git@gitlab.fabcloud.org
When the connection worked, GitLab returned a welcome message. This confirmed that my computer was connected to GitLab through SSH.
These are the essential Git commands:
  git add index.html – Adds a specific file to the staging area. Alternatively, use git add . to stage all modified and new files at once.
  git pull – Downloads the latest version of the repository to ensure you are working with the most updated copy.
  git merge – Integrates changes from different branches into your working copy.
  git commit -m “describe your changes” – Saves your updates with a descriptive message about the modifications made.
  git push – Uploads your committed changes to the remote repository.
  git init - To create a local git repository in our store folder
  git status - To see what is changed since the last commit
  git add - To add a specific list of files
  git log - To check the history of commits
Markdown, Python, and MkDocs
Markdown is a lightweight markup language used to write documentation. It does not require Python by itself. A Markdown file can be written in any text editor, including Visual Studio Code, and saved with the .md extension.
In my Fab Academy website, Markdown is used to write the content of the pages. MkDocs then converts these Markdown files into a static website.
Python was needed not for writing Markdown, but for installing and running MkDocs on my local computer. MkDocs is a static site generator written in Python. I used it to preview and test my website locally before pushing changes to GitLab.
The corrected relationship is: - Markdown = language for writing documentation - Python = required to install and run MkDocs - MkDocs = tool that converts Markdown files into a static website - GitLab = platform that stores the repository and publishes the website
After having the Git and GitLab setup, building personal website is the next step.
The MkDocswas recommended by Fab Academy to use it as it is a easy and a static site generator designed for project documentation.
Before installing MkDocs, It is required to have Python.
Python is a programming language used for developing websites, games, applications, artificial intelligence, and automation tools and it helps run MkDocs and handle the behind-the-scenes part of the website.
I used PIP, whiuch is a package manager to install, update, and uninstall external libraries and modules required for your projects for Python. The following I used the following pip commands for installing, uninstalling, and managing packages, as well as installing all dependencies from a requirements.txt file were used to work with Python.
  pip install package_name       # install a package
  pip uninstall package_name     # remove a package
  pip show package_name          # show info about a package
  pip list                       # show all installed packages
  pip freeze                     # list all packages (for requirements.txt)
  pip install -r requirements.txt # install all packages from a file
This page https://github.com/mkdocs/catalog?tab=readme-ov-file#-git-repos–info has MkDocs projects and plugins and its content has the following:
- Git
- 🎨 Theming 31 projects
- 💻 API documentation building 26 projects
- 💬 Blogging 7 projects
- 📊 Charts, Images, Tables & Graphs 40 projects
- 🤖 Code execution, variables & templating 22 projects
- 🌲 Git repos & info 12 projects
- 🌈 HTML processing & CSS styling 16 projects
- 📎 Integrations with other tools 13 projects
- 🌍 Internationalization & localization 3 projects
- 🔗 Links & references 24 projects
- 🧩 Markdown extensions 28 projects
- 🧭 Navigation & page building 28 projects
- ✅ Quality checks (code blocks, spelling, etc.) 6 projects
- 🔍 Search & tables of content 5 projects
- 🍱 Site conversion (PDF/ePUB/etc.) 11 projects
- 🔧 Site building, site management 22 projects
- 📁 Snippets & includes (reusing contents) 9 projects
The I installed the MkDocs with following commands:
pip install mkdocs # install MkDocs
the Material theme installed
pip install mkdocs-material # install Material theme (optional)
To run the local server and preview the website, I used:
mkdocs serve
This command opened the website locally at:
http://127.0.0.1:8000/
Then its installed version checked and upgraded.
  mkdocs --version
  mkdocs -h
  pip install --upgrade pip
All required plugins, including the Git-based date localization plugin and the Python modules were installed:
  pip install mkdocs mkdocs-material mkdocs-git-revision-date-localized-plugin
  python -c "import material, mkdocs_git_revision_date_localized"
Integration of MkDocs to GITLAB on POWERSHELL
After editing my documentation in Visual Studio Code, I used the following Git workflow.
First, I checked the status of changed files:
git status
Then I added the modified files:
git add .
After that, I committed the changes with a clear message:
git commit -m "Update Week 1 documentation"
Finally, I pushed the changes to the Fab Academy GitLab repository:
git push
After pushing the changes, GitLab rebuilt and published the website. I checked the online version to make sure the page was updated correctly.
Difficulties I faced
During Week 1, I faced several difficulties.
First, I did not clearly understand the difference between a public SSH key and a private SSH key. Later I learned that only the public key should be added to GitLab, while the private key must always remain secret on my computer.
Second, I initially described Markdown and Python incorrectly. I wrote as if Python was needed to use Markdown. After reviewing the process, I understood that Markdown can be used without Python. Python is only needed to install and run MkDocs for local website testing.
Third, I had difficulties understanding the full documentation workflow. At first, I saw Git, GitLab, SSH, MkDocs, Markdown, and VS Code as separate tools. After practicing, I understood that they work together as one documentation system.
Fourth, I made many spelling and typing mistakes in my documentation. I corrected the text using spell-checking and AI-based language support.
Finally, I understood that Fab Academy documentation should not only show final results. It should also explain the process, mistakes, corrections, and learning steps.
What I learned
During Week 1, I learned that project management in Fab Academy is not only about uploading files. It is about creating a clear and reproducible documentation process.
I learned how Git, GitLab, SSH, Markdown, MkDocs, Python, and Visual Studio Code work together. Git tracks changes, GitLab stores and publishes the repository, SSH provides secure connection, Markdown is used for writing documentation, MkDocs builds the website, Python runs MkDocs locally, and VS Code is used for editing files.
I also learned that good documentation should explain not only successful steps, but also mistakes, difficulties, and corrections. This is important because Fab Academy documentation should show the learning process.
Additional exercise with HTML and CSS code
“HTML and CSS Codes”
```
About.html
// Changing the design of about page
html and css code () {
// <!DOCTYPE html>
<html>
<head>
<meta charset="utf-8">
<meta charset="UTF-8">
<meta name="viewport" content="width=device-width, initial-scale=1.0">
<title>Your name - Fab Academy</title>
<link rel="stylesheet" href="style.css">
<link rel="stylesheet" href="./style.css" />
<link rel="preconnect" href="https://fonts.googleapis.com">
<link rel="preconnect" href="https://fonts.gstatic.com" crossorigin>
<link href="https://fonts.google.com/specimen/Libre+Baskerville" rel="stylesheet">
<style>
body {
background-color: antiquewhite;
}
h1{color: whitesmoke;
background-color: darkseagreen;
}
h2{
color: #FAF8F1;
background-color: #C58940;
}
p
{
color: navy;
margin: 0;
padding: 0;
}
ul
{
color: navy;
margin: 0;
padding: 0;
}
</style>
</head>
<body>
<div class="container"></div>
<div class="navbar-inner">
<a href="index.html">Weekly Assignments</a>
<a href="final-project.html">Final Project</a>
<a href="about.html">About me</a>
</div>
</div>
<div class="content">
<h1>About me</h1>
<img src="./images/avatar-photo.jpg" alt="Photo of Your name" />
<!-- While this is an image from the images folder. Never use absolute paths (starting with /) when linking local images, always relative. -->
<h1>Yerlan Turgenbayev</h1>
</div><p>
Yessenov University <br/>
District 32<br/>
Aktau <br/>
Kazakhstan <br/>
</a>
<h2>Academic background</h2>
<p> I have the following academic degrees </p>
<ul>
<li>a Bachelor's degree in Physics Electronics at Al-Farabi Kazakh National University</li>
<li>a Master's degree in Management of Technology at NYU Poly, USA</li>
<li> PhD in Public Administration at Yessenov University.</li>
</ul>
<h2>Work experience</h2>
<footer>
<p>Copyright 2025 <Your name> - Creative Commons Attribution Non Commercial </p>
<p>Source code hosted at <a href="https://gitlab.fabcloud.org/academany/fabacademy/2025/labs/waag/students/yerlan-turgenbayev" target="_blank">gitlab.fabcloud.org</a></p>
</footer>
</body>
</html>;
}
```
This code represents my practice with updating HTML and CSS codes, which are fundamental technologies for building and styling web pages. The code consists of two main sections: the HTML and CSS code snippet at the top and the rendered webpage output at the bottom.
The first section displays the HTML structure of a simple personal webpage. The document starts with the basic HTML boilerplate, including the DOCTYPE declaration and html, head, and body tags. The head section contains metadata such as the title, character encoding (UTF-8), and linked stylesheets to apply CSS styling to the webpage. The CSS styles, defined within a - style tag, control the page’s appearance, including the background colors, font styles, margins, and alignment. The CSS defines styles for elements such as the header, navigation bar, sections, and footer to create a structured layout.
The body section includes multiple sections, such as a header, navigation bar, main content area, and footer. The header displays the page title and an image, while the main section presents biographical information and educational background. A navigation bar with menu links allows easy access to different sections of the site. The footer contains contact details and copyright information.
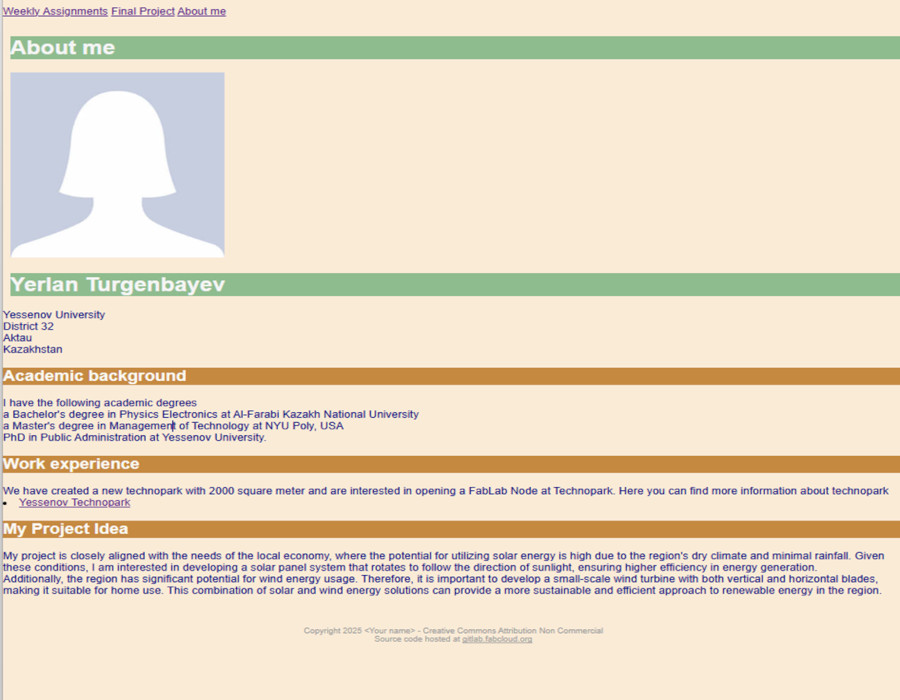
The updated HTML and CSS codes gave the visual representation of the webpage based on the HTML and CSS code. The final output consists of a two-column layout, with a sidebar labeled “About me” that includes a placeholder profile image. The main content section displays the user’s name, biography, and educational background. The design follows a simple and structured layout, using different background colors for contrast and readability.
Through this practice, I improved my HTML structuring and CSS styling skills, focusing on layout design, text formatting, and color customization. This exercise helped strengthen my understanding of frontend web development, which is essential for creating personal webpages, portfolios, and structured web layouts.