I am a software engineer with over a decade experience in project cost management. I am passionate about AI and ioT and also a Fab Academy Student at Fab Lab Oulu.
This week focused on embedded programming fundamentals. Our group compared different microcontroller toolchains,
while individually I explored the ESP-WROOM-32 architecture and implemented both local I/O interactions and wireless communication.
Tasks
Group Assignment:
Compare toolchains for Arduino Nano, ESP-WROOM-32 (Arduino IDE), and ESP32 (MicroPython)
Document development workflows for different architectures
Individual Assignment:
Study ESP-WROOM-32 datasheet
Program microcontroller with local I/O and wireless communication
Simulate program operation
Process explanation
Group Assignment
As part of the group assignment, I collaborated with Lauri Hallman and Shahmeer Adnan Rana to explore these microcontrollers specifically.
Key Finding: MicroPython enables rapid prototyping but uses more memory. Arduino IDE
provides better low-level control for both platforms and is faster in speed (almost 100 times as stated by our instructor Toni).
Individual Assignment
ESP-WROOM-32 Datasheet Insights
Key Specifications
Core: Xtensa LX6 Dual-Core @ 240MHz
Memory: 520KB SRAM, 4MB Flash
Wireless: WiFi 802.11 b/g/n, Bluetooth 4.2
GPIO: 38 programmable pins
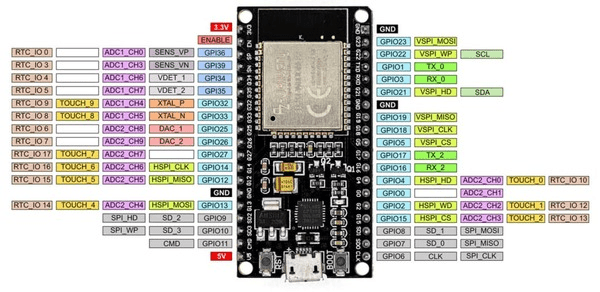
Fig 1 - ESP32S Pinout Diagram
Critical Learnings:
Maximum GPIO current: 12mA (source)/ 28mA (sink)
ADC non-linearity: ±6 dB at 11-bit resolution
Deep sleep current consumption: 10μA
ESP32 Programming
I physically programmed my ESP-32S, with my already installed Arduino IDE installed on my system, as this is not my first rodeo, but I’ll walk you through the setup stage and let’s experience it again together.
Hardware Requirements
ESP32S Development Board
Micro USB cable
Computer with Arduino IDE installed
Arduino IDE Configuration
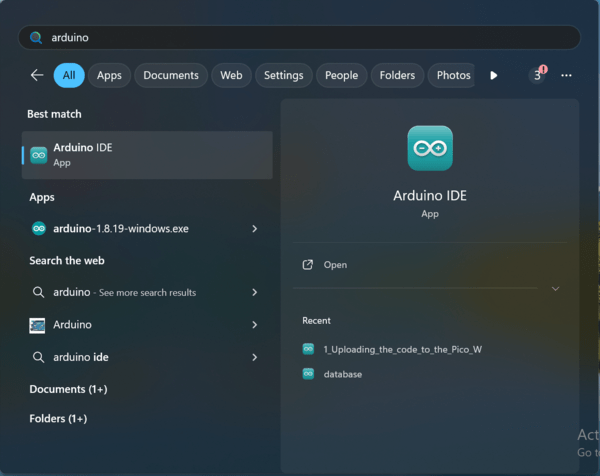
Step 1: Open Arduino
Since I had Arduino already installed on my system, I clicked the Windows start menu and typed "Arduino" to access it. Arduino can also be installed from their website: https://www.arduino.cc/en/software
Figure 2: Startup Arduino.
Step 2: Access Preferences
See below the default screen or sketch you would see on Arduino IDE, then go to File > Preferences:
Figure 3: Arduino default sketch.
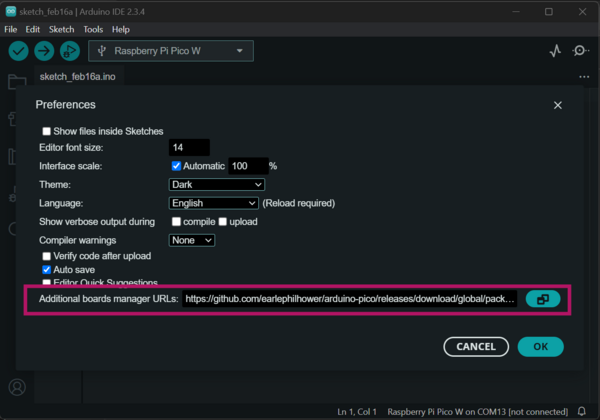
Step 3: Additional board manager
Add ESP32 board URL in the “Additional boards manager URLs” (you can obtain the URL by searching on Arduino page for the GitHub link):
https://raw.githubusercontent.com/espressif/arduino-esp32/gh-pages/package_esp32_index.json
Figure 4: Additional board manager.
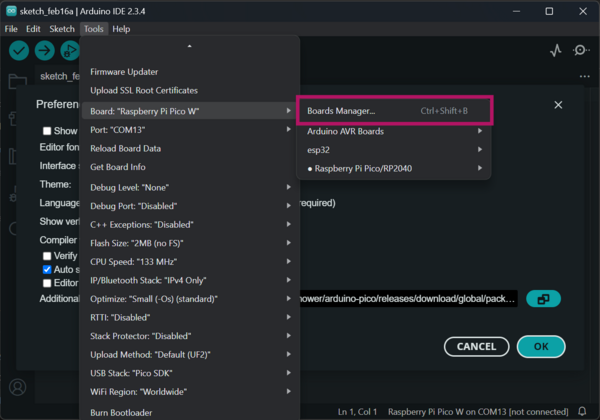
Step 4: ESP-32 Board Support
Install ESP32 board support via Tools > Board > Boards Manager:
Figure 5: Boards manager.
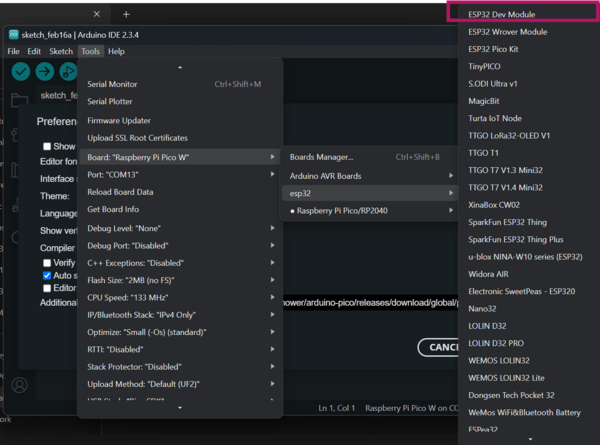
Step 5: ESP-32 Dev Module
Select "ESP32 Dev Module" from Tools > Board:
Figure 6: ESP32 Development Module.
Basic Program Structure
void setup() {
    // Initialization code
    // Runs once at startup
}

void loop() {
    // Main program code
    // Runs repeatedly
}
GPIO Operations - Digital I/O Exploration
I explored programming the LED on the board with the following program. This program is a modification of the LED blinking code given to us by Toni (my local instructor). This program will:
Slowly fade the LED in
Hold at full brightness briefly
Do three quick flashes
Slowly fade out
Pause in darkness before starting again
// Pin definitions
#define LED_PIN 2    // Onboard LED
#define BUTTON_PIN 0 // Boot button

void setup() {
    pinMode(LED_PIN, OUTPUT);
    ledcSetup(0, 5000, 8);  // Channel 0, 5KHz, 8-bit resolution
    ledcAttachPin(LED_PIN, 0);  // Attach LED pin to channel 0
}

void loop() {
    // Dramatic fade in
    for(int i = 0; i < 255; i++) {
        ledcWrite(0, i);
        delay(5);  // Slow, dramatic rise
    }
    delay(200);  // Dramatic pause at peak brightness

    // Quick flash sequence
    for(int j = 0; j < 3; j++) {
        ledcWrite(0, 0);
        delay(50);
        ledcWrite(0, 255);
        delay(50);
    }

    // Dramatic fade out
    for(int i = 255; i >= 0; i--) {
        ledcWrite(0, i);
        delay(10);  // Slower, more dramatic fall
    }

    delay(500);  // Dramatic pause in darkness
}
Other operations observed from the ESP-32S:
Analog Operations
Serial Communication
Wi-Fi Connectivity
Basic Wi-Fi Client
Timer and Interrupt Handling
Summer 2024 Humidity and Temperature IoT Project in Super FabLab Oulu
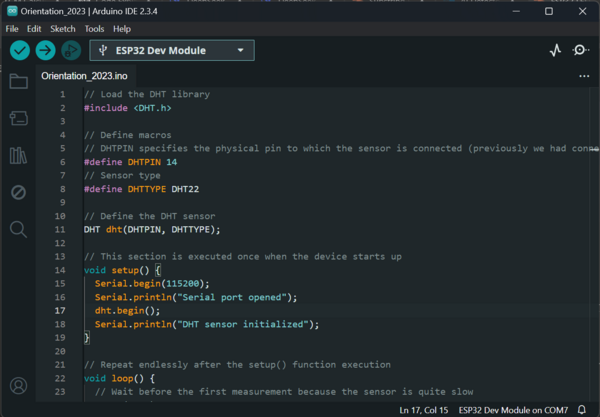
An example of WiFi implementation in a microcontroller was done during my summer internship at FabLab Oulu, where we (interns)
designed an ioT freashers course at the University of Oulu, on “measurement of humidity and temperature” using the DHT22 and the PICO-W. See code snippet below:
Figure 7: Code snippet for Humidity and Temperature measurement (Raspberry Pico W)
In embedded systems development, managing memory constraints, ensuring power-efficient communication, and using simulation are key to creating reliable, efficient devices.
This week I observed a trade off, in terms of usability (micropython) and language friendly implementation of programming micro-controllers, against efficiency using C programming (which is less friendly).
Optimization, memory usage efficiency, power-efficient and extra features like Wi-Fi has become a norm. A delicate balance of these mix should be aimed at in order for example not to drain resources like battery life.
Simulation platforms also helps in testing system behavior in various conditions, identifying issues early and ensuring robust performance. These practices are essential for building functional and optimized embedded systems.
Main Difficulties
Upload Fails:
Hold BOOT button while uploadingCheck USB cable connectionVerify correct board selection
Wi-Fi Connection Issues:
Check credentialsMonitor signal strengthImplement reconnection logic
Memory Leaks:
Use heap monitoring toolsImplement proper cleanupWatch for fragmentation
Main Learnings
Embedded Toolchains:
Exploration of different embedded programming toolchains, gaining hands-on experience.
Microcontroller Programming:
programming a microcontroller to interact with input/output devices
Coding:
Coding the ESP-32S, using loops and conditional statements to change the on-board blinking pattern.