Week 14
Interface and Application Programming
Week Overview
This week focused on building a complete end-to-end interface between a no-code mobile application and custom embedded hardware using MQTT. On the software side, I designed an App Inventor 2 app with Connect, Disconnect and Voice Input buttons, leveraging the UrsPahoMqttClient extension to publish speech-recognized text to the topic fabacademy/message on broker.emqx.io. On the hardware side, my ANDRU board (XIAO ESP32-C3) subscribed to that same topic and displayed incoming messages on a 4×8×8 LED matrix using the MD_Parola library. This exercise reinforced key IoT concepts—protocol selection, addressing, publish/subscribe workflows—and showcased a natural voice-based UI driving real-world output on embedded devices.
Group Assignment
As part of the group assignment, we documented:
- Compare as many tool options as possible.
- Document your work on the group work page and reflect on your individual page what you learned.
Individual Assignment
MQTT Communication with LED Matrix
For the individual assignment of week 14, I developed an application that integrates MQTT protocol with a 4-module 8x8 LED matrix, using my custom-designed board called ANDRU (created during week 8). This application allows messages to be displayed on the matrix, which are sent from a mobile phone through voice recognition using an application developed in App Inventor. The UrsPahoMqttClient extension was used to enable MQTT communication in the app, connecting to the public broker broker.emqx.io.
The ANDRU board is based on the XIAO ESP32 C3 microcontroller and connects to Wi-Fi to subscribe to the topic fabacademy/message using the client ID ANDRUClient2025. When a message is received, it is displayed on the LED matrix using the MD_Parola library.
Hardware Setup: ANDRU Board and LED Matrix
The hardware used for this application consists of my custom board ANDRU, designed in week 8 and based on the XIAO ESP32 C3. It includes connections to power, SPI communication, and digital outputs. The LED matrix used is composed of four 8x8 MAX7219 modules connected in series.
The matrix was connected to the board using the following pins: 5V (power), GND (ground), MOSI, MISO, and SCK (SPI interface). The control of the matrix is handled through the MD_Parola and MD_MAX72XX libraries.
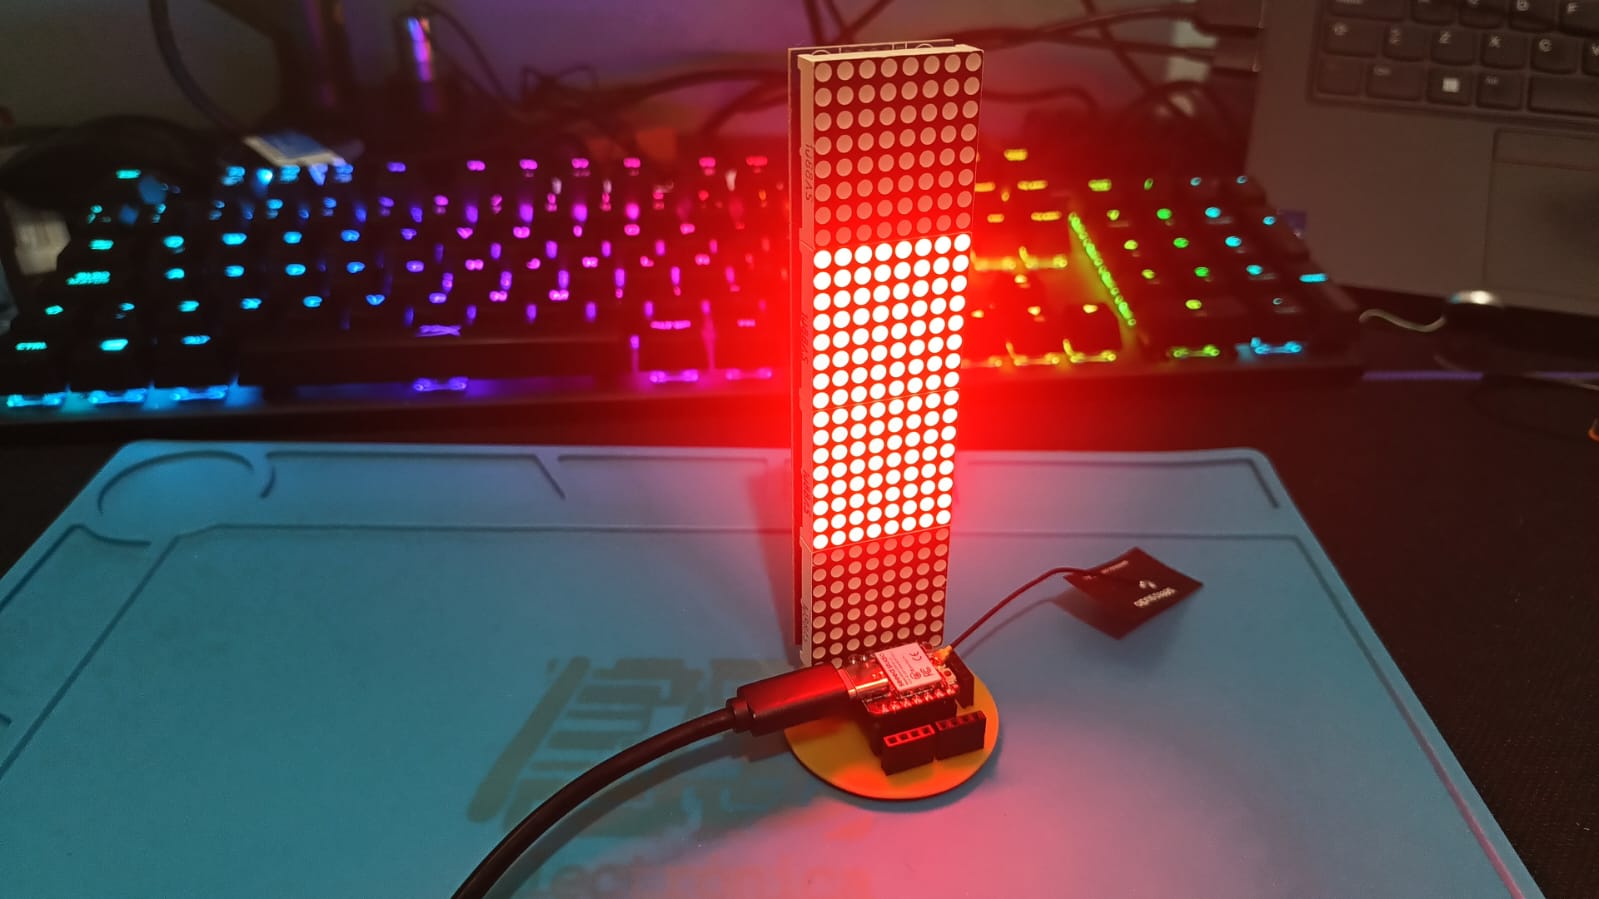
Matrix LED Physical Assembly
Photo showing the real wiring and position of the matrix connected to ANDRU board.
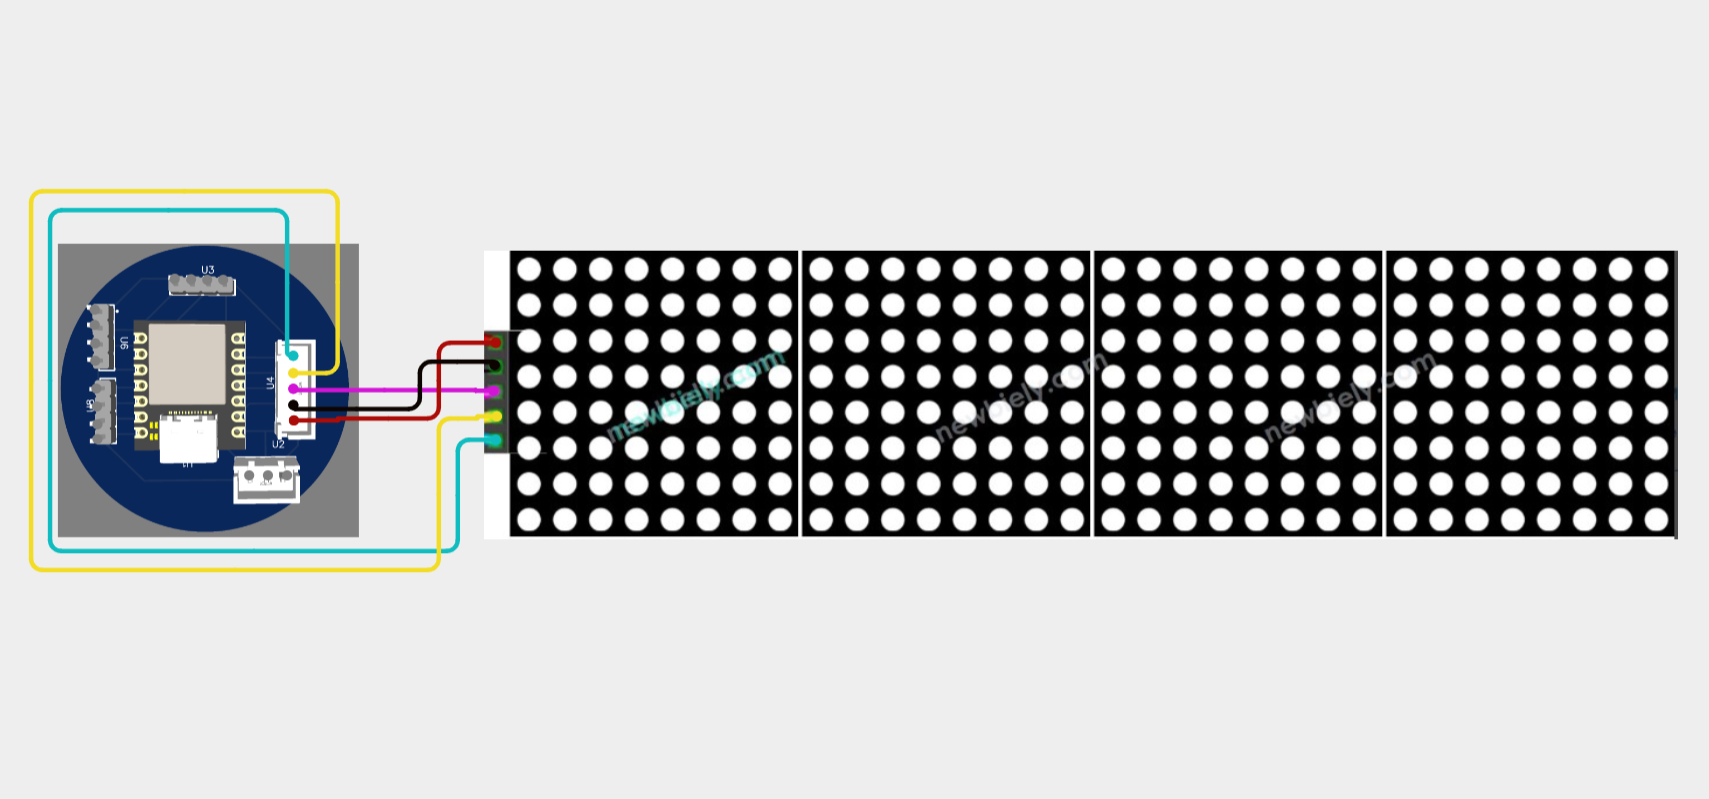
ANDRU Board Schematic
Wiring and connection schematic of the ANDRU board with LED matrix.
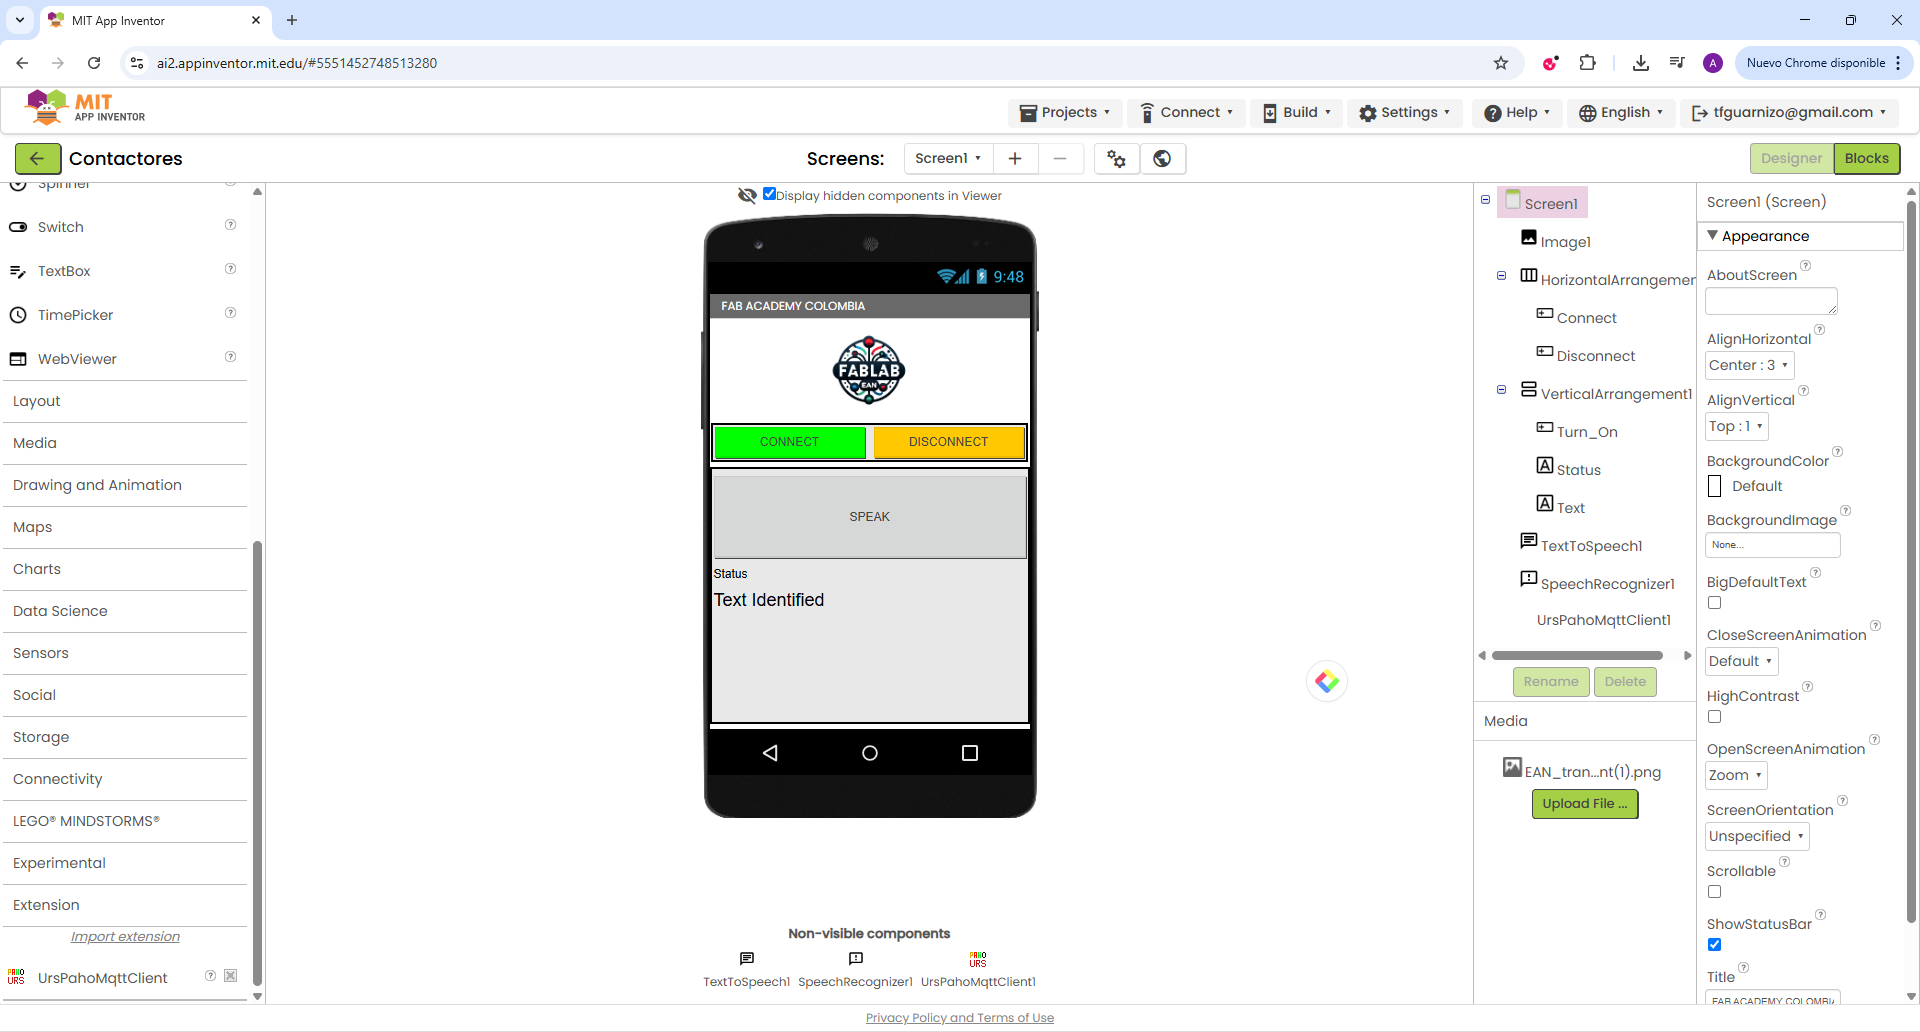
Mobile Application (App Inventor)
I built the mobile interface in App Inventor 2, using three main buttons:
- Connect – establishes the MQTT connection via the
UrsPahoMqttClientextension. - Disconnect – cleanly closes the MQTT connection.
- Voice Input – activates the built-in speech recognizer; once I speak, the app publishes the text to the topic
fabacademy/messageonbroker.emqx.io.
App Inventor Block Diagram
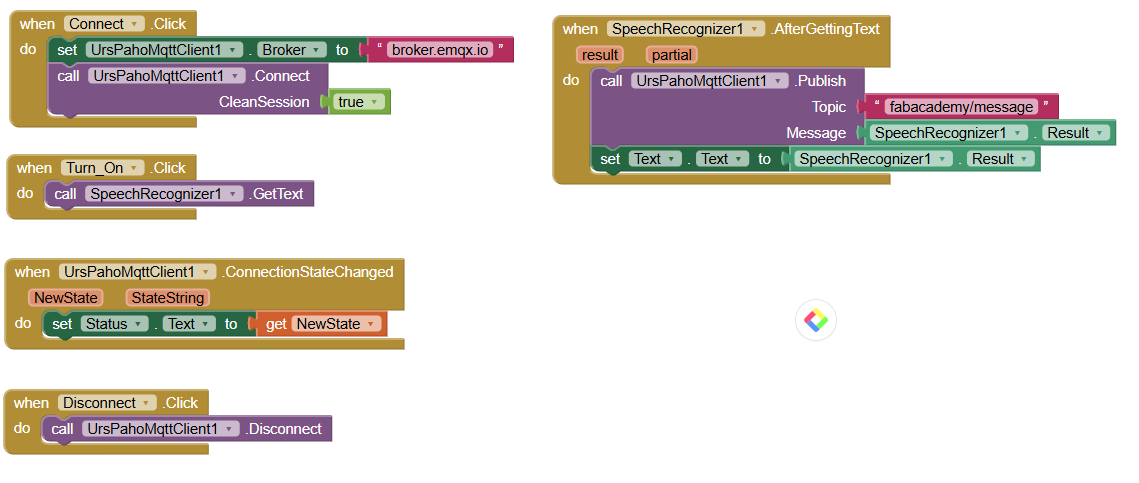
This block diagram shows the core logic in App Inventor 2:
• When Connect is clicked, the UrsPahoMqttClient’s Broker property is set to “broker.emqx.io” and Connect is called.
• The Turn On (Voice) button triggers the speech recognizer (GetText), and upon receiving text, the app publishes it to fabacademy/message and updates a label with the recognized phrase.
• A Disconnect button cleanly closes the MQTT session.
• Connection state changes update a status label with the current MQTT client state.
Arduino Sketch for LED Matrix Display
On the ANDRU board (XIAO ESP32 C3), I used the WiFi and PubSubClient libraries to connect to the broker and subscribe to fabacademy/message. Incoming payloads are then displayed on the 4×8×8 LED matrix via the MD_Parola library.
                #include <WiFi.h>
                #include <PubSubClient.h>
                #include <MD_Parola.h>
                #include <MD_MAX72XX.h>
                #include <SPI.h>

                // Define hardware type and number of devices
                #define HARDWARE_TYPE MD_MAX72XX::FC16_HW
                #define MAX_DEVICES 4

                // Define pin connections
                #define DATA_PIN 10
                #define CS_PIN   9
                #define CLK_PIN  8

                // Create a Parola object
                MD_Parola display = MD_Parola(HARDWARE_TYPE, DATA_PIN, CLK_PIN, CS_PIN, MAX_DEVICES);

                const char* ssid     = "ANLI";
                const char* password = "Actua1455";

                const char* mqtt_server = "broker.emqx.io";
                const char* mqtt_Client = "ANDRUClient2025";
                const char* mqtt_Topic_Sub ="fabacademy/message";

                WiFiClient espClient;
                PubSubClient client(espClient);
                long lastMsg = 0;
                char msg[50];
                int value = 0;

                String messageTemp = "";
                bool newMessage = false;


                void setup() {
                  // put your setup code here, to run once:
                  Serial.begin(115200);
                  setup_wifi();

                  client.setServer(mqtt_server, 1883);
                  client.setCallback(callback);

                  display.begin();
                  display.setIntensity(3);
                  display.displayClear();
                  display.displaySuspend(false);
                }

                void setup_wifi() {
                  delay(10);
                  // We start by connecting to a WiFi network
                  Serial.println();
                  Serial.print("Connecting to ");
                  Serial.println(ssid);

                  WiFi.begin(ssid, password);

                  while (WiFi.status() != WL_CONNECTED) {
                    delay(500);
                    Serial.print(".");
                  }

                  Serial.println("");
                  Serial.println("WiFi connected");
                  Serial.println("IP address: ");
                  Serial.println(WiFi.localIP());
                }

                void callback(char* topic, byte* message, unsigned int length) {
                  Serial.print("Message arrived on topic: ");
                  Serial.print(topic);
                  Serial.print(". Message: ");

                  if (String(topic) == mqtt_Topic_Sub) {
                    messageTemp = "";
                    for (int i = 0; i < length; i++) {
                            messageTemp += (char)message[i];
                    }
                    Serial.println(messageTemp);
                    newMessage = true;
                }
                }

                void reconnect() {
                  // Loop until we're reconnected
                  while (!client.connected()) {
                    Serial.print("Attempting MQTT connection...");
                    // Attempt to connect
                    if (client.connect(mqtt_Client)) {
                      Serial.println("connected");
                      // Subscribe
                      client.subscribe(mqtt_Topic_Sub);
                    } else {
                      Serial.print("failed, rc=");
                      Serial.print(client.state());
                      Serial.println(" try again in 5 seconds");
                      // Wait 5 seconds before retrying
                      delay(5000);
                    }
                  }
                }

                void loop() {

                if (newMessage) {
                    display.displayClear();
                    Serial.println(newMessage);
                    Serial.println(messageTemp.c_str());
                    display.displayScroll(messageTemp.c_str(), PA_LEFT, PA_SCROLL_LEFT, 100);
                    newMessage = false;
                  }

                  if (display.displayAnimate()) {
                    display.displayReset(); // solo si quieres que repita
                  }

                  if (!client.connected()) {
                    reconnect();
                  }
                  client.loop();
                }
Testing & Demonstration
In this demo, tapping the “Voice Input” button launches speech recognition on the phone. The spoken phrase is published via MQTT to fabacademy/message on broker.emqx.io. The ANDRU board subscribes to that topic, receives the text, and scrolls it across the 4×8×8 LED matrix.
Personal Reflections
- I discovered how straightforward it is to bridge a no-code mobile app with custom hardware using MQTT, making rapid IoT prototyping possible without building a backend.
- Integrating speech recognition taught me the value of natural interfaces—speaking a short command felt intuitive and reduced the need for manual input.
- Using the UrsPahoMqttClient extension in App Inventor highlighted how powerful community-built tools can simplify complex protocols.
- Seeing my voice-generated text scroll across a physical LED matrix closed the loop on an end-to-end system, reinforcing the interplay between digital and embedded design.