Molding & Casting
After having to deal with electronics for the past few weeks, it’s finally time to work on some 3D design, molding, and casting 😭
Scheduling
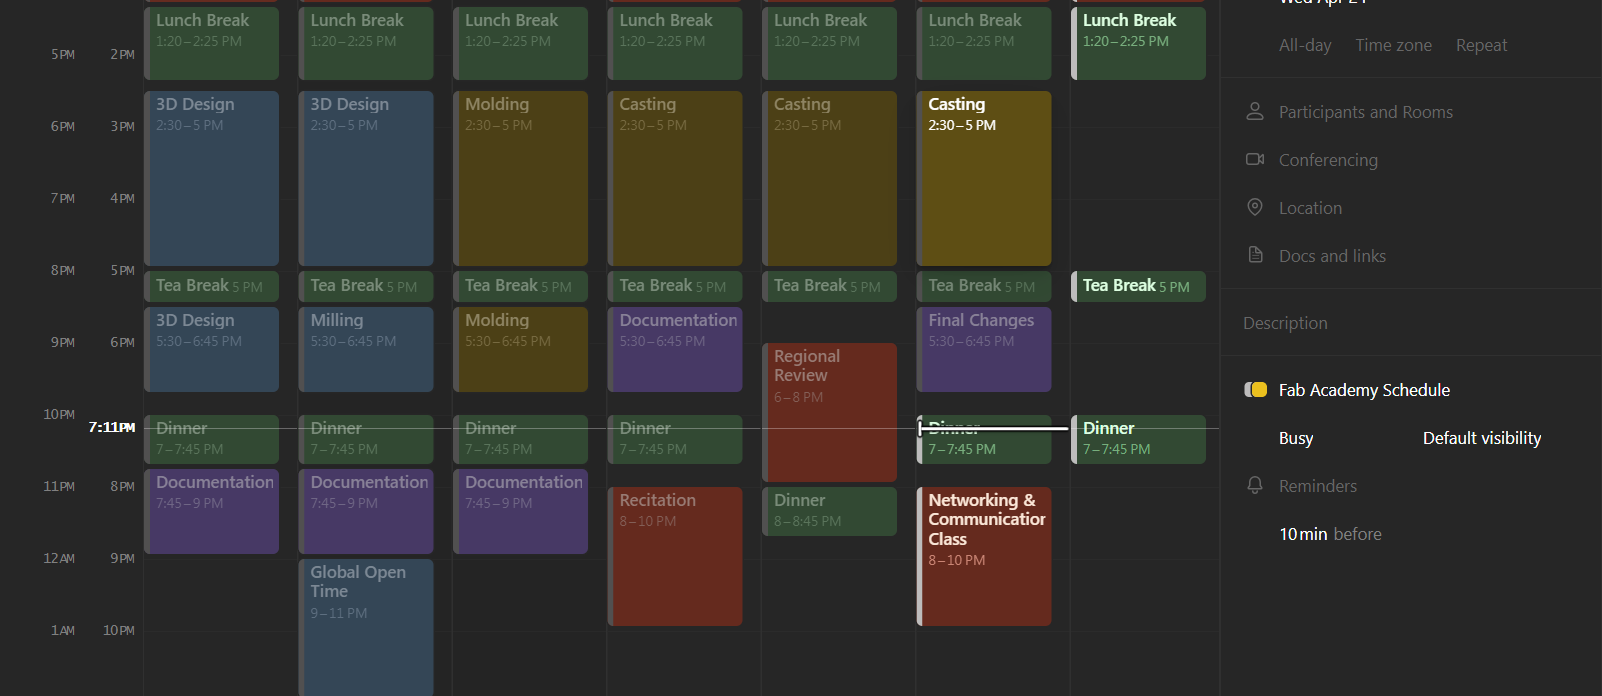
Before I started off everything for this week, I made a schedule on my Notion calendar like usual.
Fusion360
![]()
Autodesk Fusion 360 is a powerful 3D computer-aided design (CAD), computer-aided engineering (CAE), and computer-aided manufacturing (CAM) software. Ideal for product design and engineering, it offers collaborative tools, parametric modeling, and cloud-based storage, allowing teams to create, simulate, and manufacture innovative designs in a unified platform.
Getting Started
If you don’t have Fusion360, you can sign up at this link:
(Once your account is set up, click on “Create” and then select the appropriate workspace for your project.)
If you are unable to download the software (very common), you can use the browser version.
Fusion Tools
This week, I explored and used some new tools that I haven’t before. I used these tools multiple times, so I’ll be explaining them in this section.
Canvas
The canvas tool in Fusion 360 allows you to import images or sketches onto a plane in the workspace, helping in referencing or design visualization.

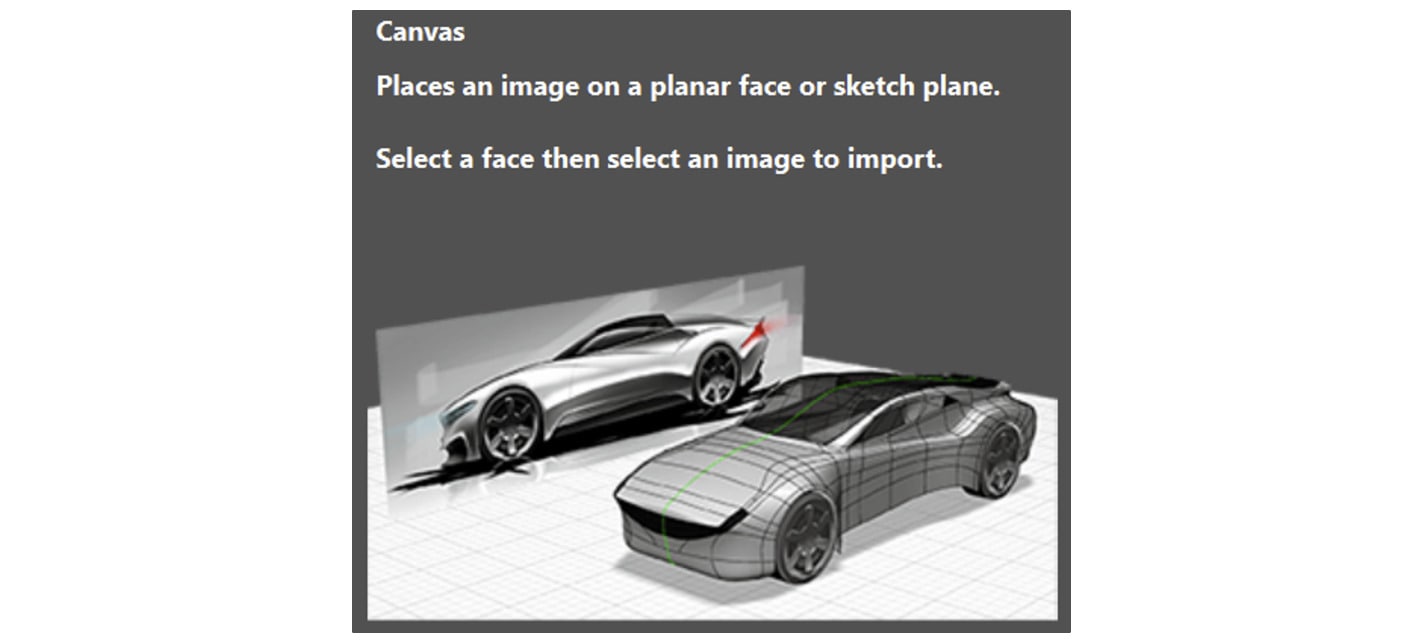
Once you’ve selected your image, choose your canvas plane, and then modify your dimensions as needed.

Control Point Spline
The control point spline enables users to create smooth and customizable curves by adjusting control points along the spline path, providing precise control over shape and curvature.

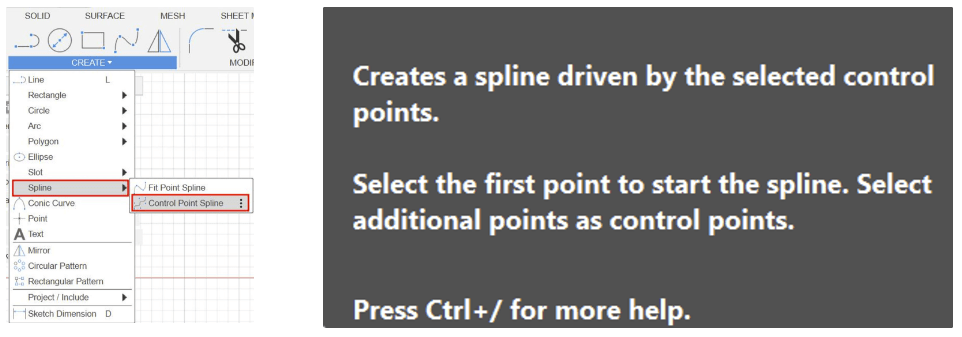
Here’s how the tool works:
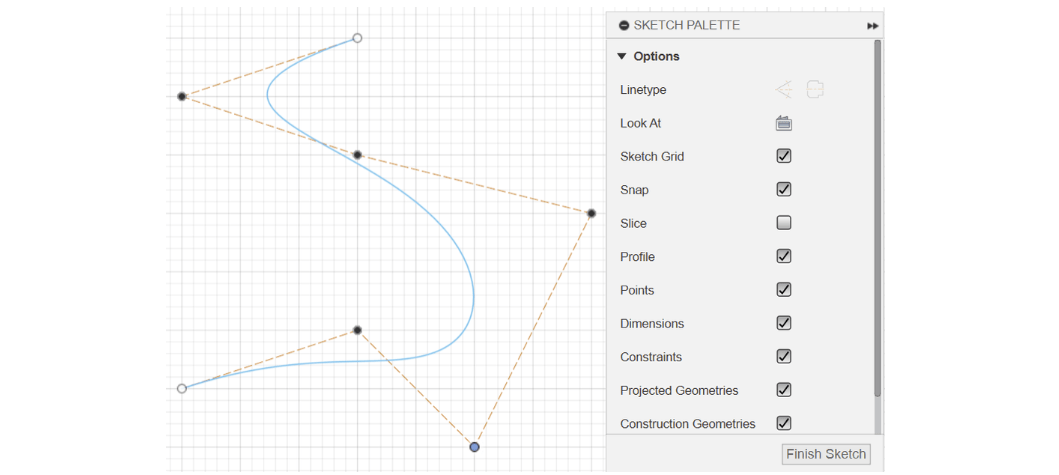
Once the tool is active, use your cursor to create different points along your path.
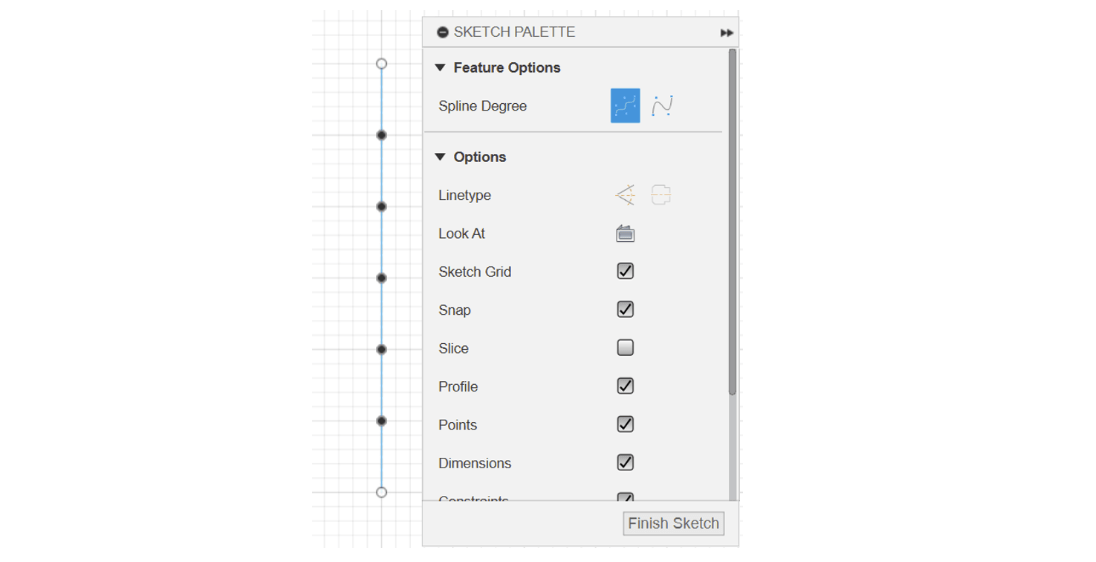
Then, adjust the points to manipulate your path to whatever you’d like. You get used to the movements after a bit of practice
To pair this up with the Canvas tool, here’s what I did:
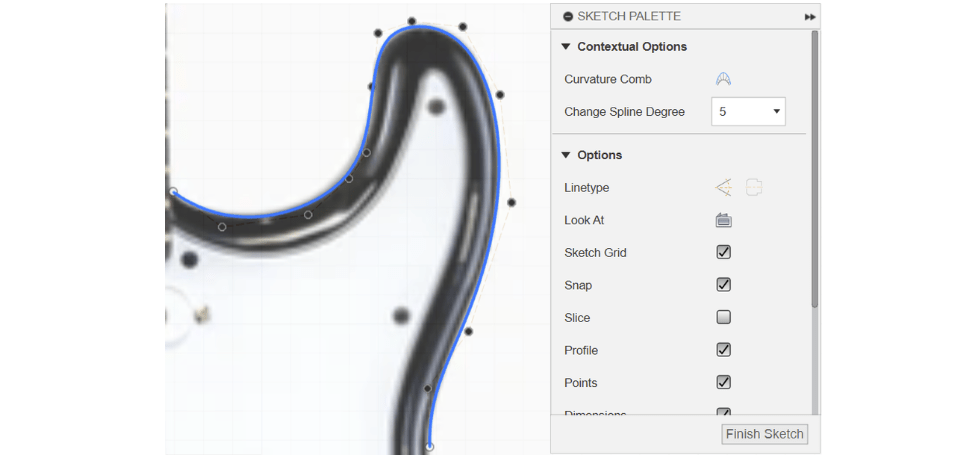
Once I had my reference image projected on the XY plane, I created a rough outline of the guitar body.
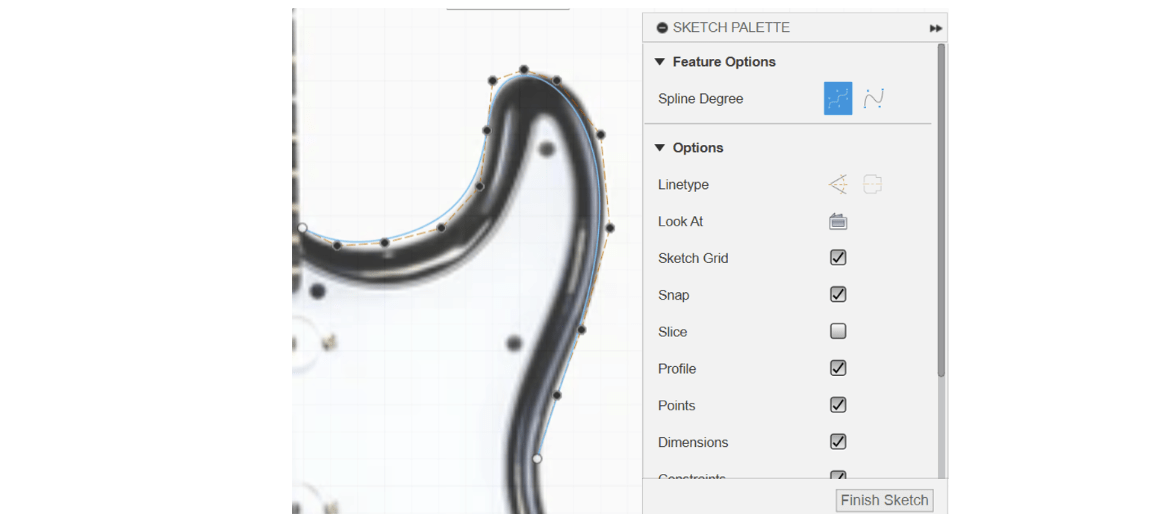
After that, I moved the points so that the outline fit the guitar image.
That’s it for the new tools! Every other tool in this weeks documentation is either a basic tool, or has been covered in the past.
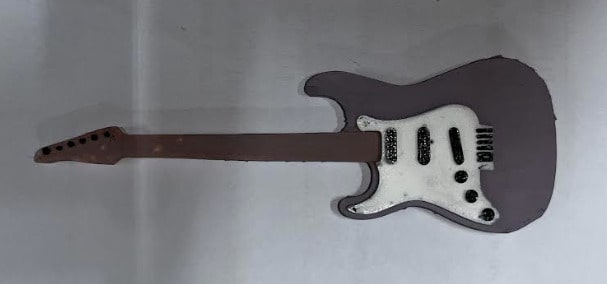
My Electric Guitar
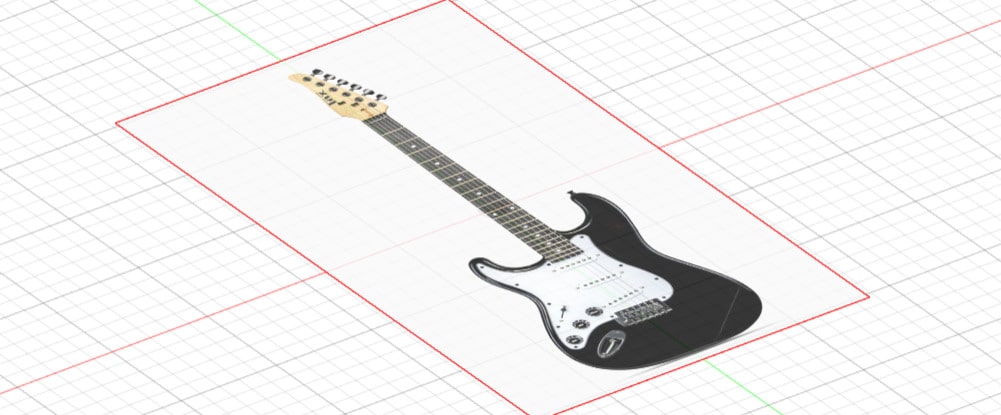
I’ve always wanted to create an electric guitar model on Fusion360, but I didn’t really have the skillset to do so. But after exploring online resources and playing around with the software, I realized that it wasn’t that hard, so I decided to tackle that this week.
I needed a reference image first, so I went on Google and found a pretty good model on this website. I screenshotted it, and then uploaded it to my workspace (the XY plane) using the Canvas tool.
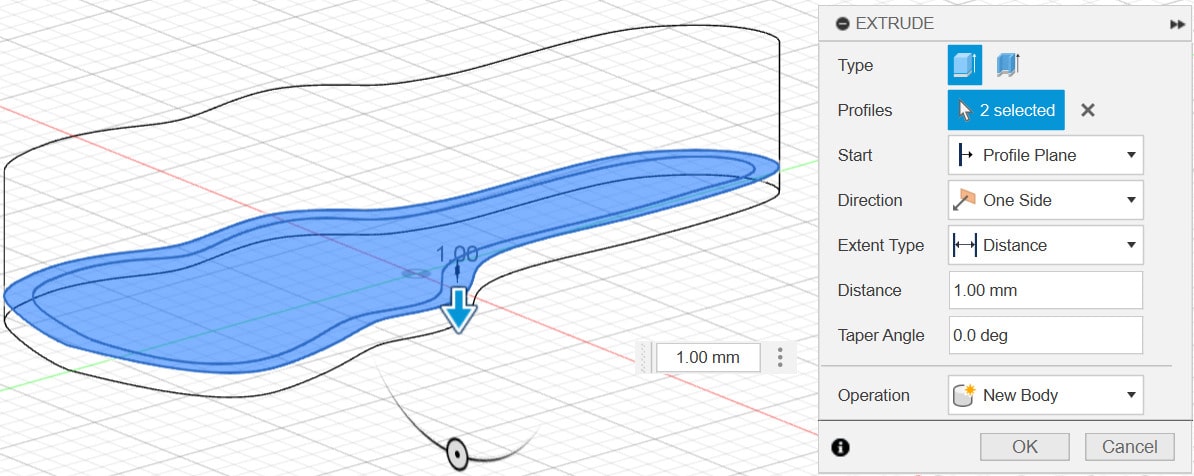
After that, I created a sketch on the same plane, and used the control point spline tool to create an outline of the main body. After I created the outline, I extruded the sketch by 1mm.
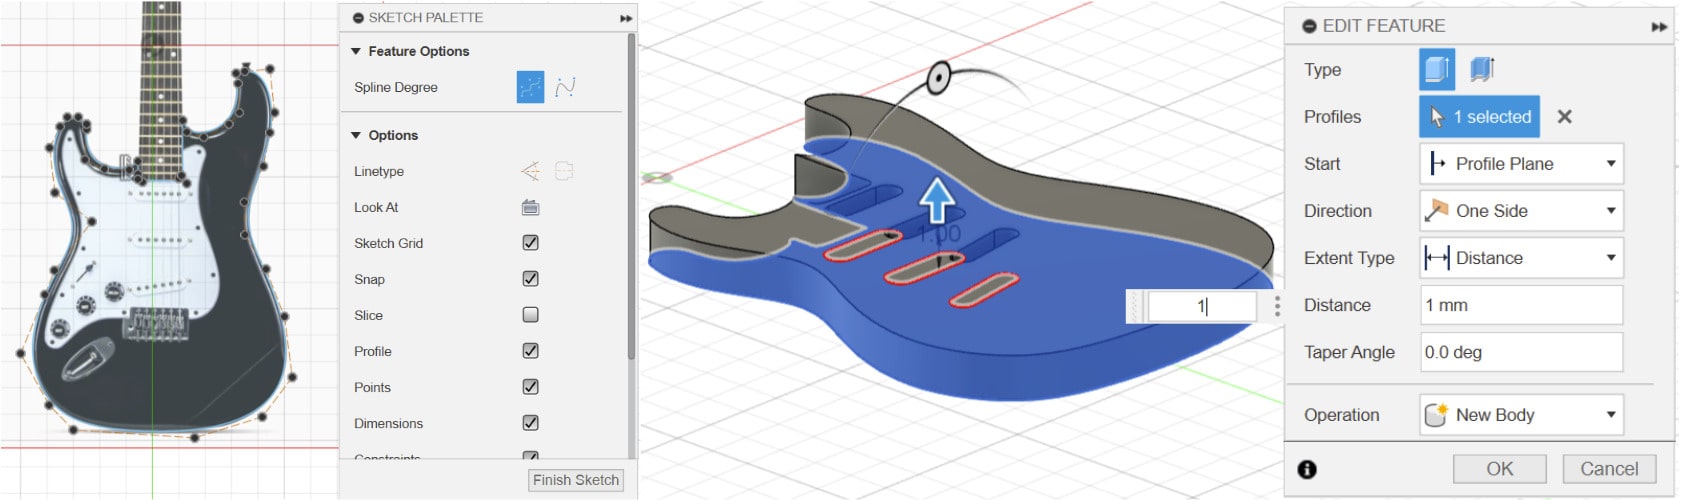
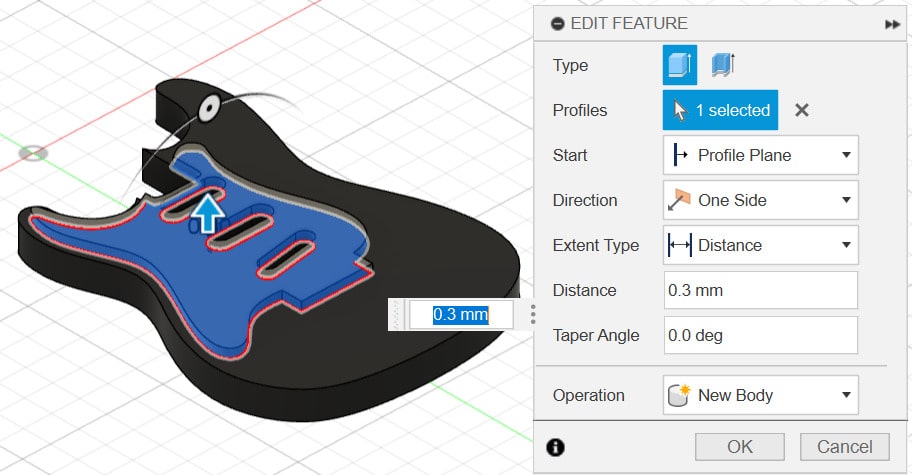
I repeated this process for the white extrusion above the body we just made, but the extrusion value was 0.3mm.
Things are looking pretty good. Now, I went back to the first sketch that I made, and added the slot shapes using circles and lines. I extruded these slots by 1.5mm. Then I went back to the body that we just extruded, and created a new sketch on it (which consisted of more slot shapes).
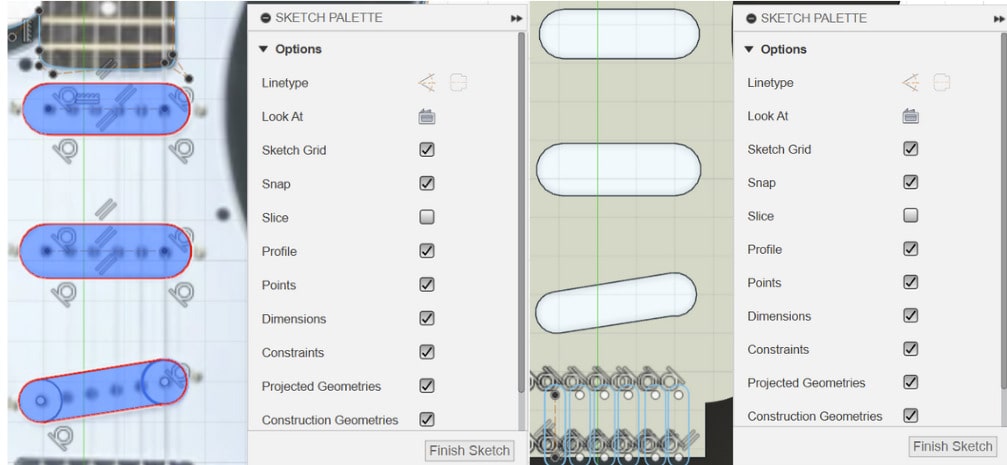
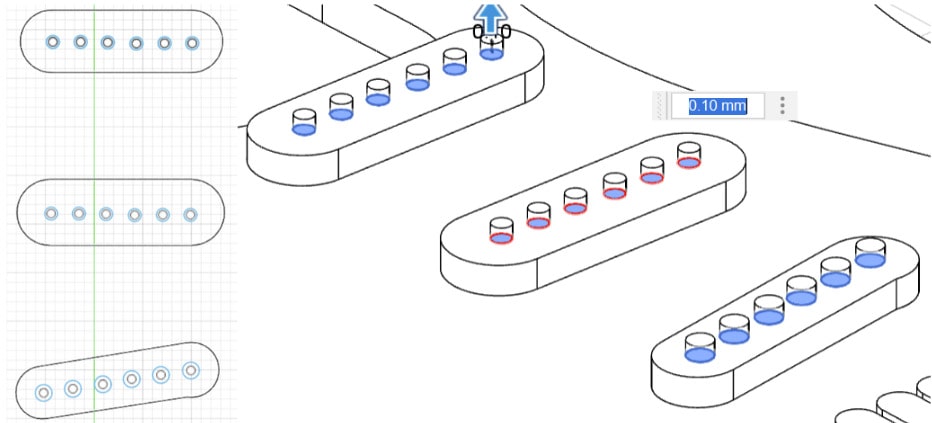
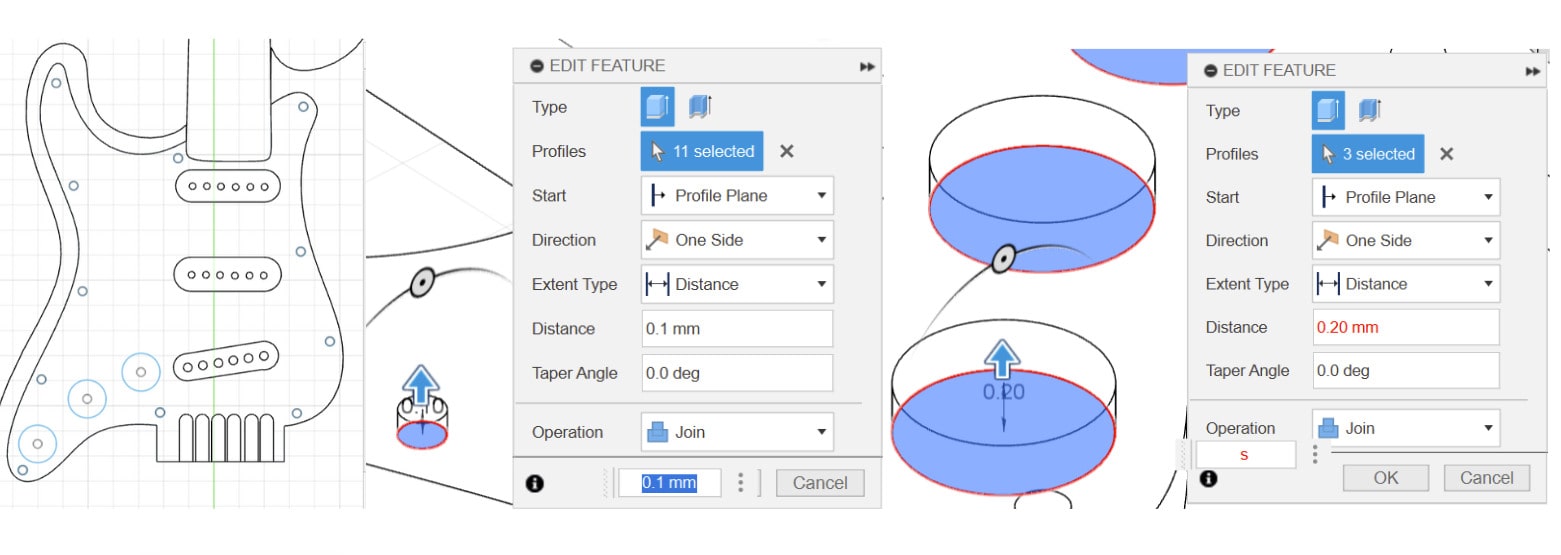
Now that we have 3 slots, it’s time to add some detail. I created a new sketch on the slots that we just added, and then drew 5 small circles on each slot. I extruded these circles by 0.1mm.
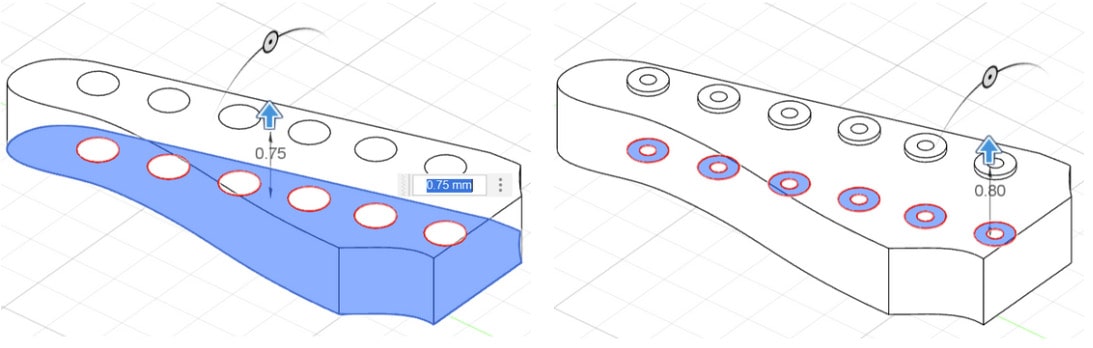
Time to move onto the head of the guitar. I followed the same procedure to create a basic outline of the head. But I already had the circle sketches ready.
I extruded the main base by 0.75mm, the larger circles by 0.8mm, and the smaller circles by 0.9mm.
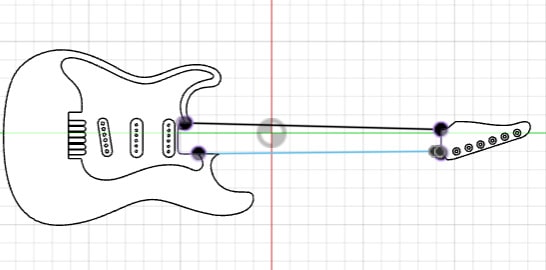
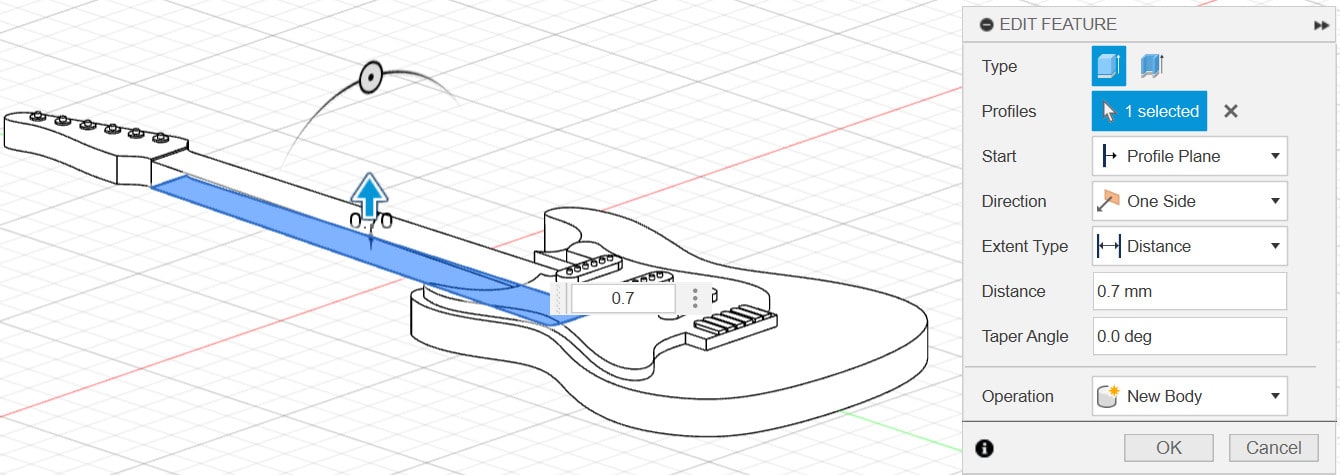
For the neck of the guitar, I connected the head and body with 2 lines, and then I extruded the new sketch by 0.7mm.
Now we’re done with the basic structure of the guitar! I decided to add some more details to the body, so I added some circular shapes. I extruded the smaller circles by 0.1mm, and the larger ones by 0.2mm
Add some textures to your liking, and we’re done !!!
Here’s a render of the guitar:
Finally, we need to add a base and walls for the silicon. So, I created another sketch around the guitar that’s slightly larger, and then extruded it by 5mm.
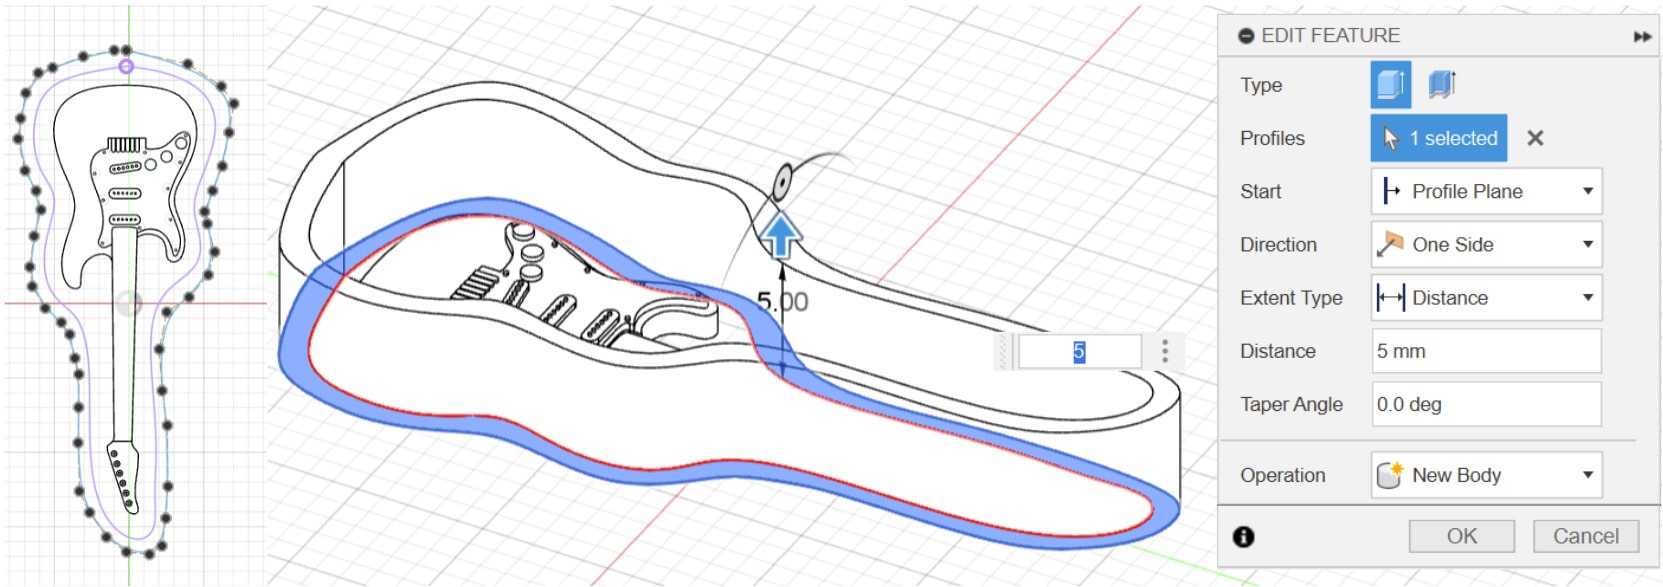
Finally, I selected the space between the guitar and the walls, and extruded that by 1mm.
Here’s the final render of the model:
3D Printing
I exported my design as an STL file, and then moved onto PrusaSlicer.
Slicing in 3D printing is basically slicing a digital model into horizontal layers so the printer can create the object layer by layer, using settings like layer thickness and print speed to determine its final look.
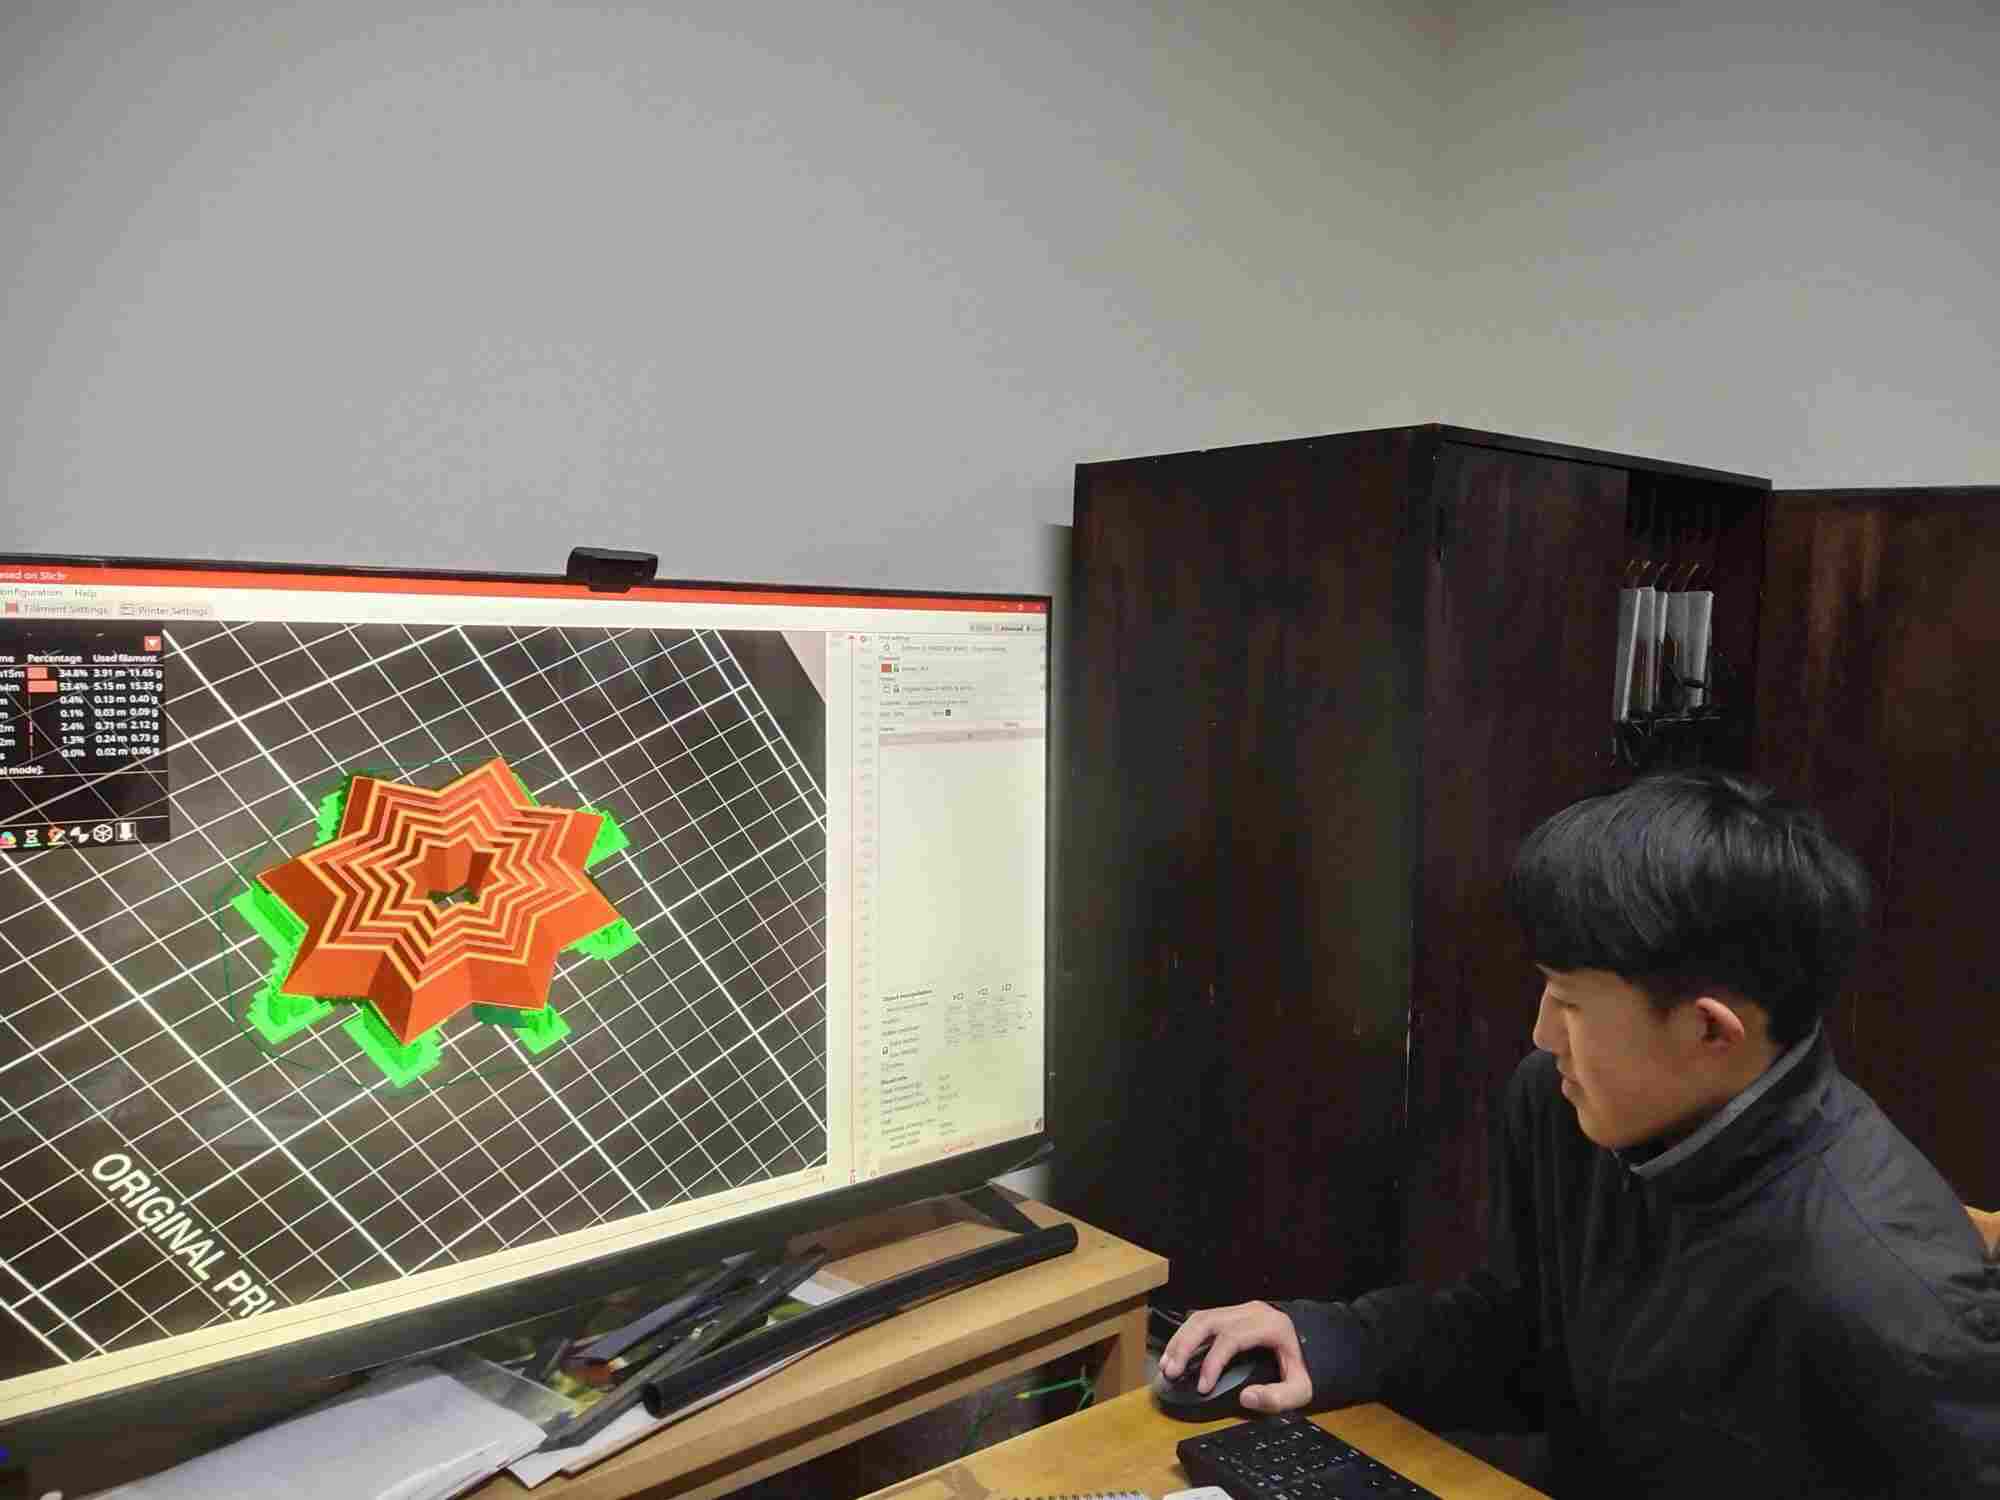
Everyone that I know here uses the PrusaSlicer to create a g-code of their design. You can download it here, and then set it up (all you need to do is select the printer that you’ll be using).
When I was getting this video for my documentation, I realized that there was no need for the walls to be that high, so I stopped the print and moved onto the next part !!!
Molding
What is molding?
Molding involves shaping materials like plastic or rubber by pouring or injecting them into molds to create physical objects. This process allows for the rapid production of custom parts or prototypes with precise shapes and dimensions.
To start off for the week, I’m going to use Silicone 😨 (specifically the SORTA-Clear™ 37)
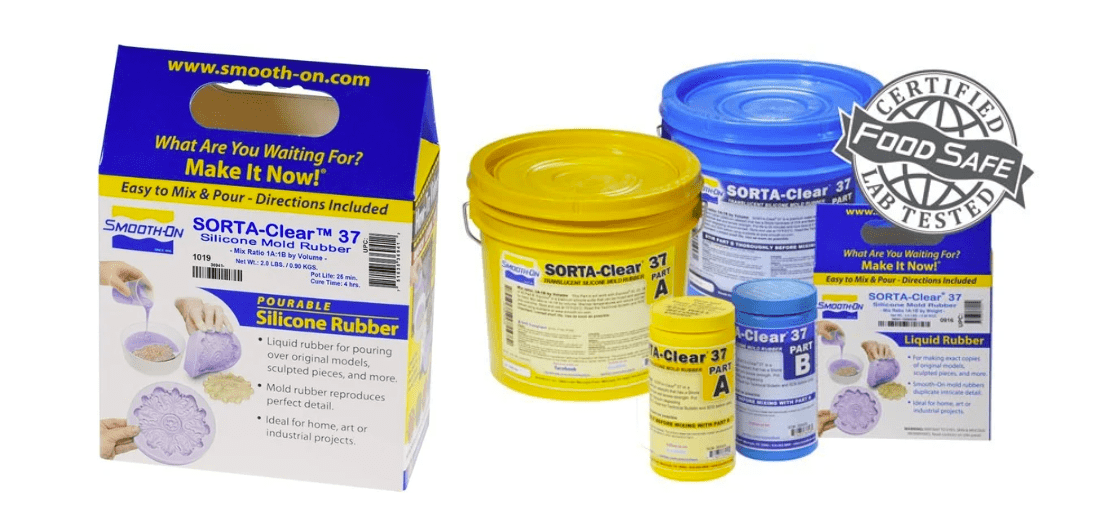
SORTA-Clear™ 37
SORTA-Clear™ Series rubbers are premium water clear translucent silicone rubbers (platinum catalyst) which cure at room temperature with negligible shrinkage. SORTA-Clear™ 37 has Shore 37A hardness and features high tensile and tear strength. This product also offers the convenience of a 1A:1B by volume mix ratio.
- Smooth-On, Inc.
SAFETY PRECAUTIONS
We’re dealing with chemicals this week, so it’s always important to lay some ground rules to follow during your molding and casting process.
- Ventilation: Make sure you have good ventilation in your workspace to prevent exposure to fumes or airborne particles during the molding and casting process.
- Protective Gear: Wear appropriate personal protective equipment (PPE) such as gloves, safety glasses, and respiratory protection to protect yourself against contact with chemicals, hot surfaces, or airborne particles. Make sure that your work surface is also safe from any of the materials that you may use !!!
- Material Handling: Follow proper handling procedures for materials, including storing them in designated areas, avoiding skin contact with chemicals, and using tools like spatulas or syringes for mixing.
- Cleanup: Always clean up any spills as soon as possible to avoid further accidents.
- Training: Make sure that all individuals involved in the molding and casting process are adequately trained in safe handling practices and emergency procedures.
- Emergency Preparedness: Always have emergency supplies, such as a first aid kit available.
So now that we’ve cleared that up, here’s everything that you’ll need for the molding process:
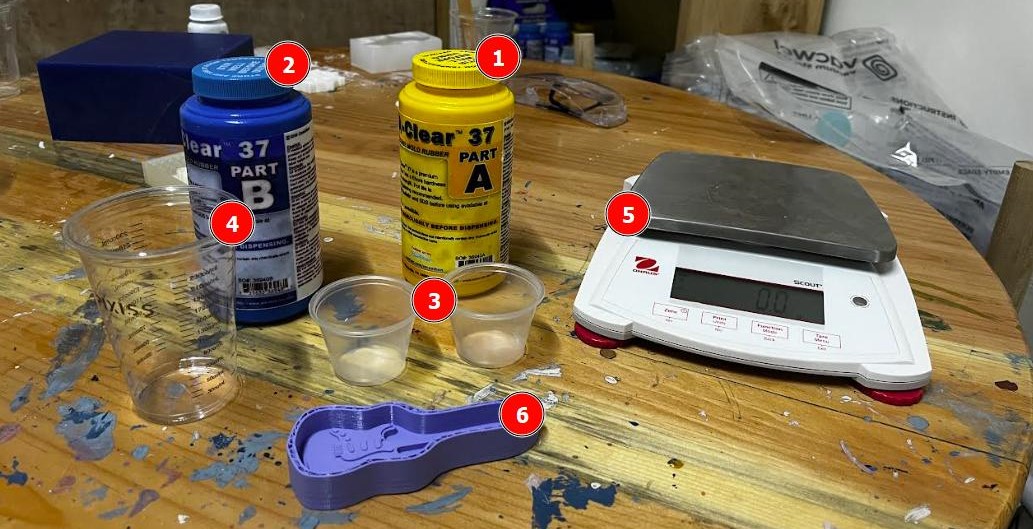
- SORTA-Clear™ 37 PART A
- SORTA-Clear™ 37 PART B
- Small mixing cups
- A large mixing cup
- A measuring scale (optional but recommended)
- Your design
Once you have all of your components ready, you’re good to start !!!
To start off, put on your gloves, and then measure out equal parts of your SORTA-Clear™ 37 PART A and PART B in your small cups (I measured out 20mL per cup).

Then, combine them into a larger cup and mix for about 3 minutes. Once you’re done mixing, pour the mixture into your design, and then tap it to get as many of the air bubbles out as possible.
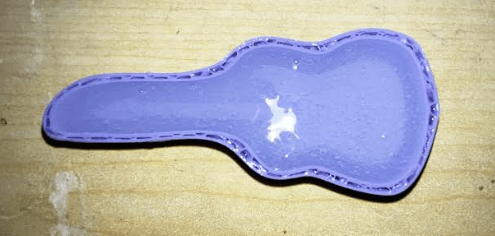
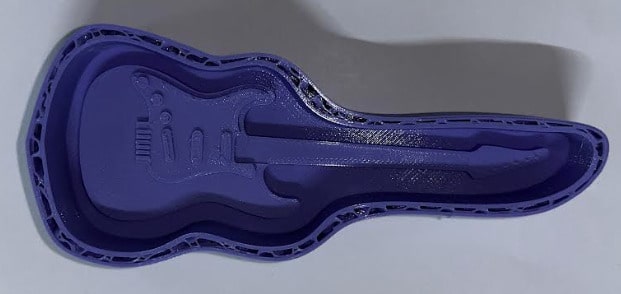
Once you’re done, let the silicon set for about 4 hours. My silicon started setting at 2:10PM, and I was able to remove it at 6:10PM. Demolding is the process of extracting your mold from your 3D design, and you’d usually use a powder or lubricant to make this process easier (called a demolding agent), but my mold came out quite easily.
Casting
The first material that I’ll be casting this week is the Smooth-Cast™ 305.

The Smooth-Cast™ 300 Series of liquid plastics are ultra-low viscosity casting resins that yield castings that are bright white and virtually bubble free. Vacuum degassing is not necessary. They offer the convenience of a 1A:1B by volume or 100A:90B by weight mix ratio. The differences between them are pot life and demold time.
- Smooth-On, Inc.
You’ll need the same materials as the molding process, except, substitute the SORTA-Clear™ 37 with the Smooth-Cast™ 305.
When you’re pouring out your PART A and PART B, make sure that you’re measuring out 10A:9B, or 1A:1B if you’re comparing by volume. Then, mix your solution for about 3 minutes and from my experience, the solution gets really hot, so be careful!
This mixture cures in about 30 minutes, so you can experiment with multiple combinations and see how it works.
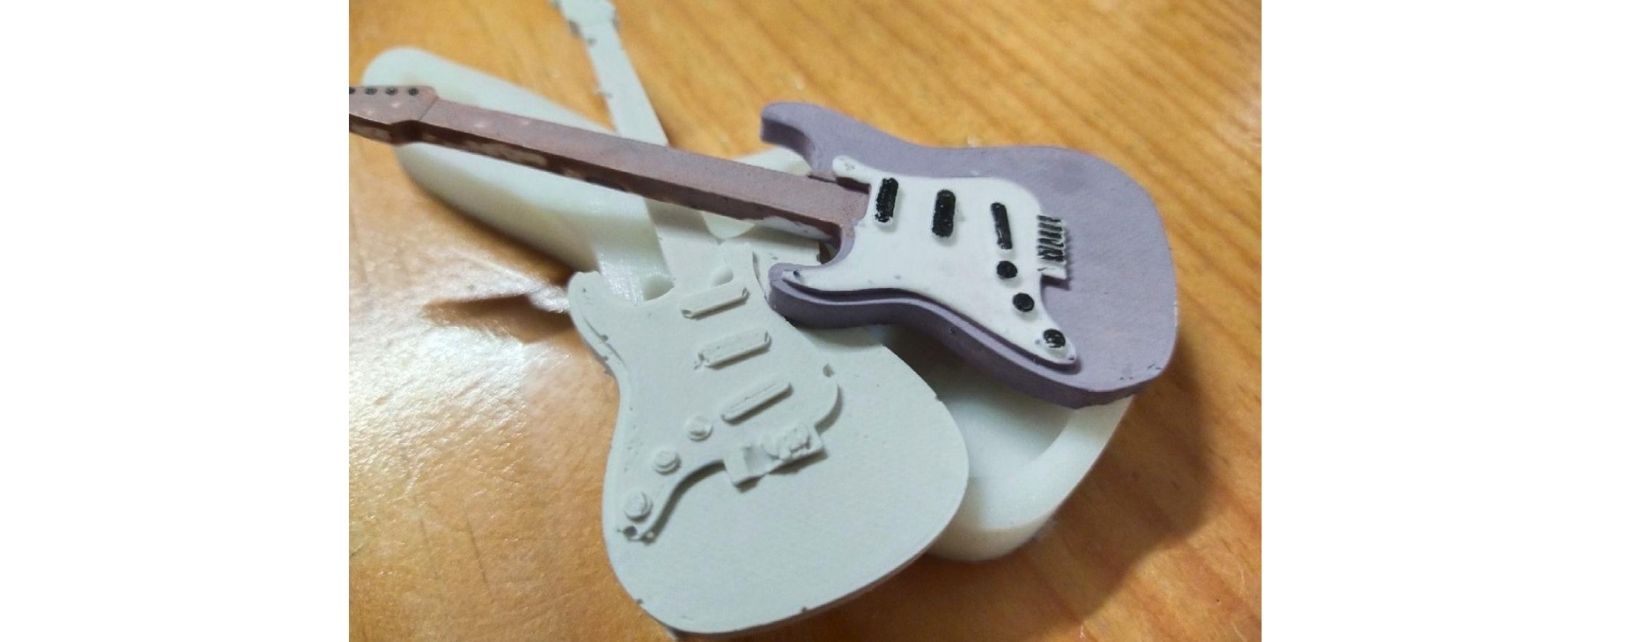
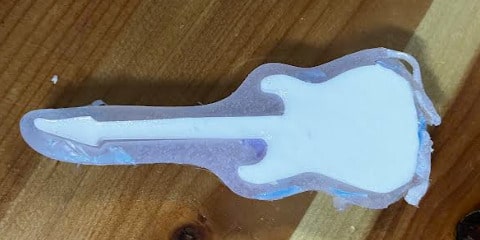
It was at this point where I encountered problem #1 😨, but after solving it, this is how my casting came out !!!
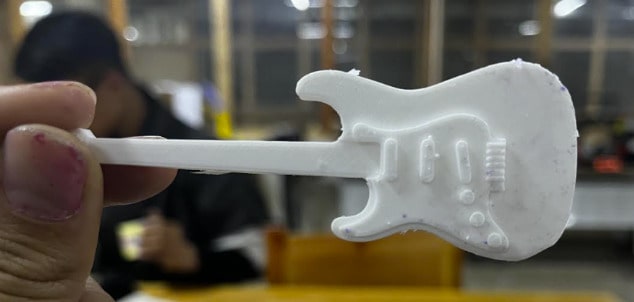
I thought it looked a bit plain, so I decided to clean it up a bit, and pair it up with some acrylic paint.
Sobbing Emoji
Our team also decided to try out the subtractive manufacturing method of producing a mold design. So, we decided to create something for a chocolate cast, and decided that creating emojis would be a pretty cute idea. I decided to create the most versatile and arguably the best emoji that was ever made: 😭
Fusion360
The design process of this emoji was relatively easy.
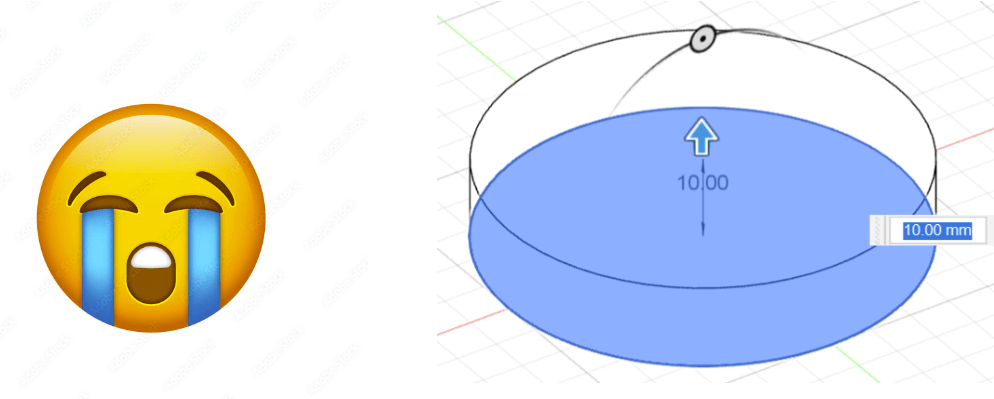
I started off by creating a circular sketch with a diameter of 50mm. This was so that I knew how to place my canvas.
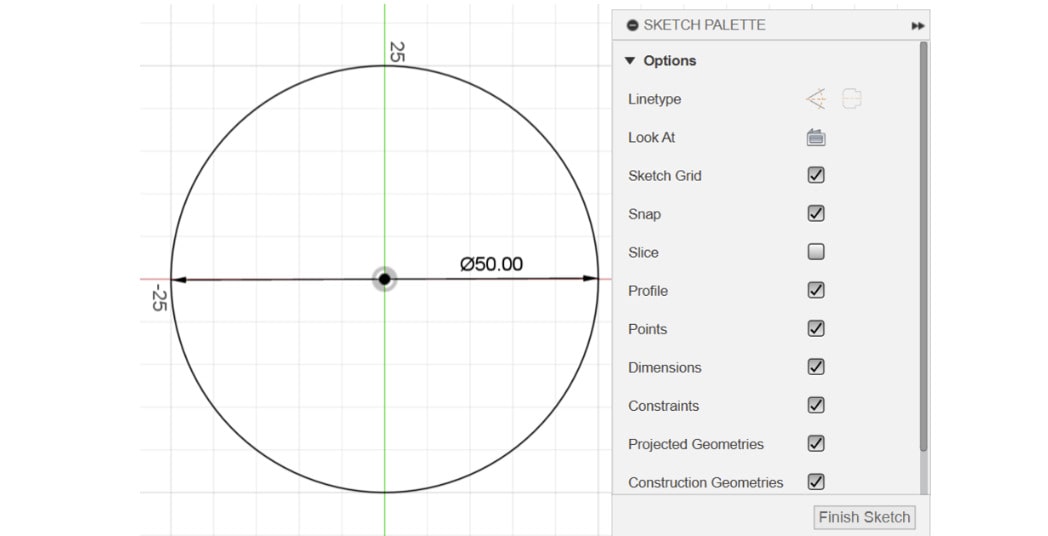
Then, I imported my reference image that I found on Google, and then extruded my circle by 10mm.
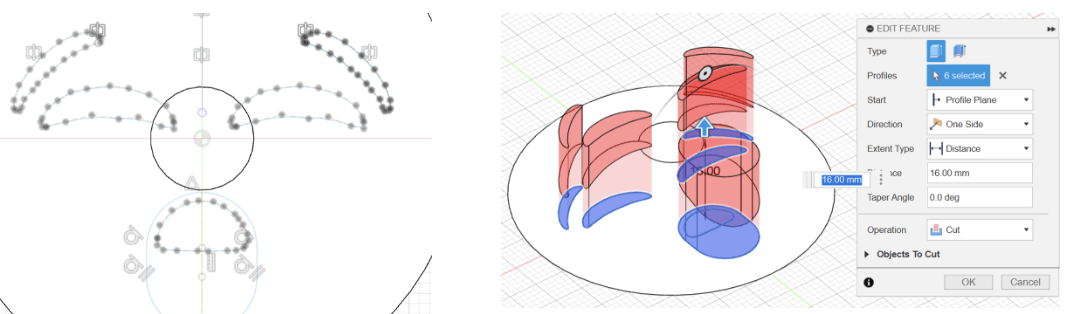
After that, I went back to the first circular sketch that I made, and traced out the details using the control point spline tool. After I had my points, I extruded the details under the “cut” setting.
I realised that I left out the mouth details, so I extruded that too, and then I was done ! All I needed to do was to export my file as an stl, and then mill it.
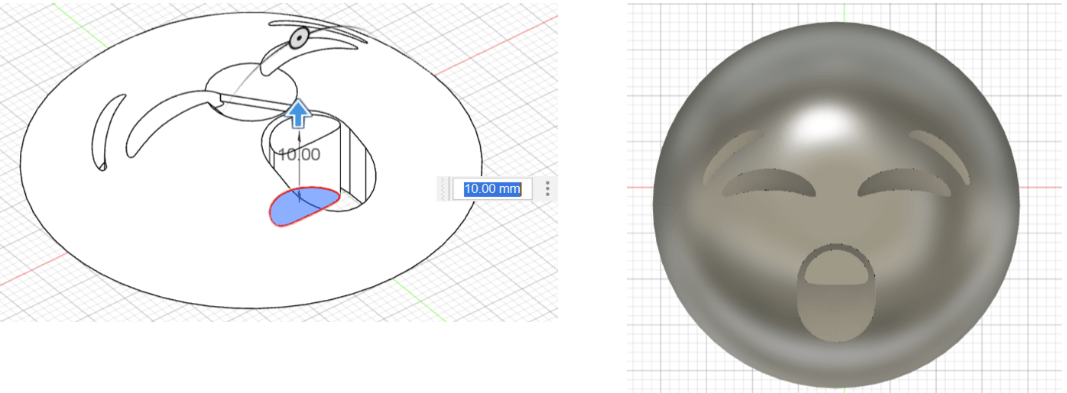
Here’s the final render of the emoji:
MODELA Player 4
MODELA Player 4 is a software application designed for controlling Roland’s MODELA desktop milling machines, providing intuitive tools for importing, editing, and milling 3D designs.
I don’t really know how to download this software because it was already installed on the milling PC in our lab. I did some research online but I think that it was discontinued (not sure though 😬)
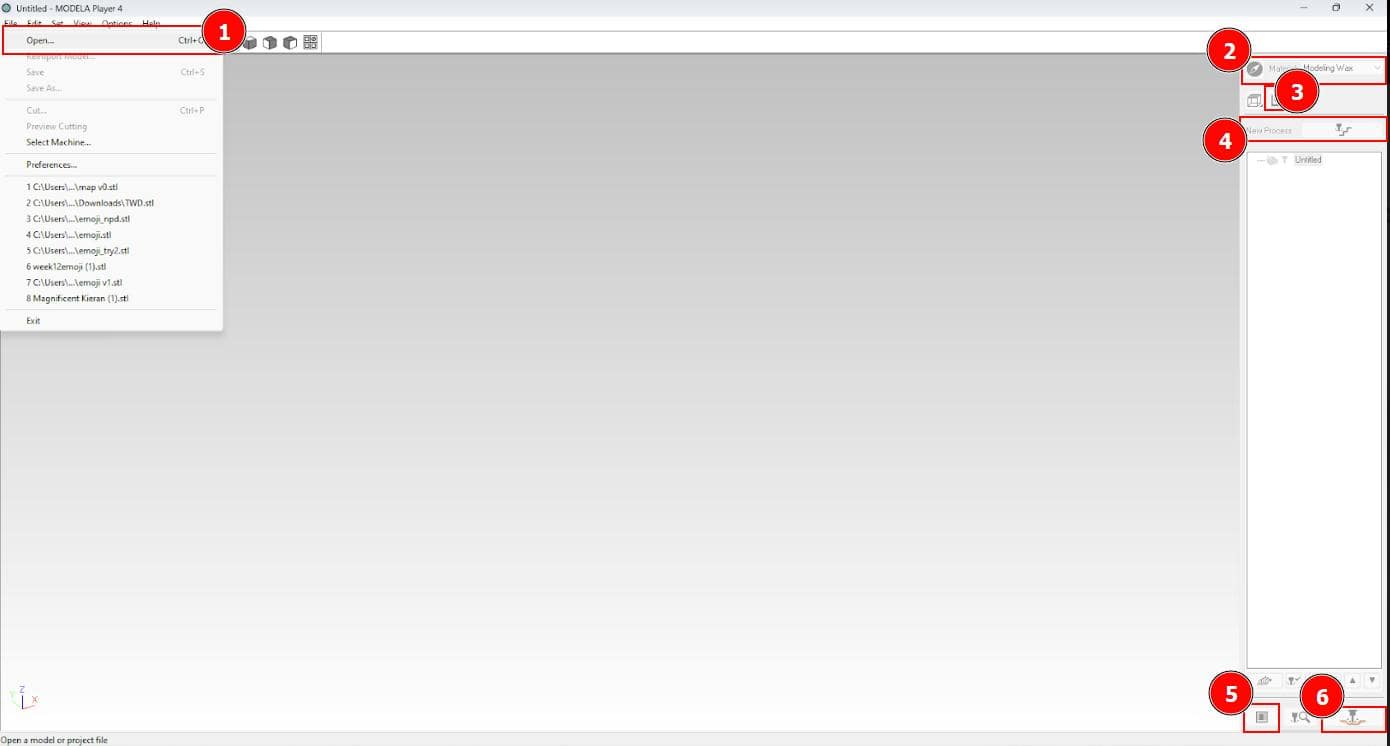
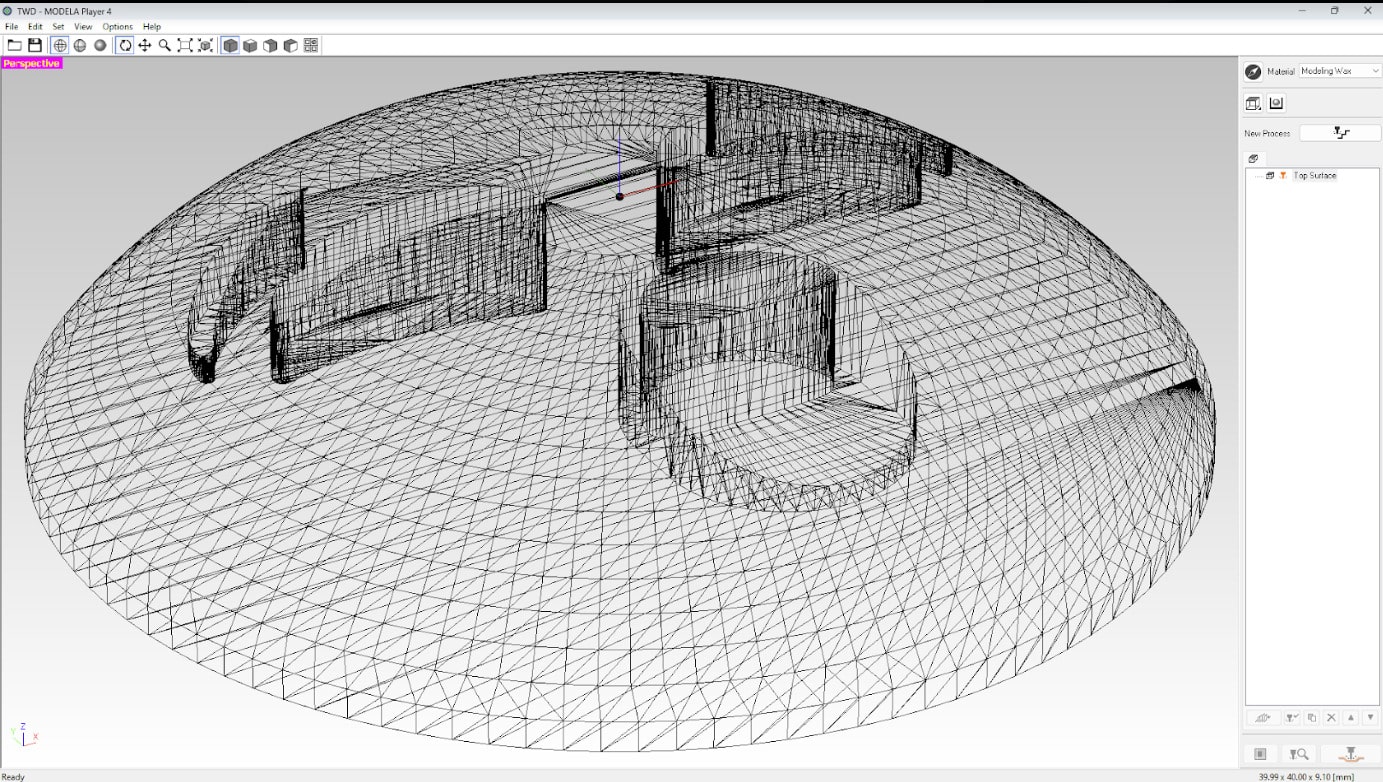
To start, open the software and then open your stl. file.
Here’s a breakdown of the process in steps.
-
Open your stl. file
-
Make sure that you’re using the correct material setting
- I used “Modelling Wax”
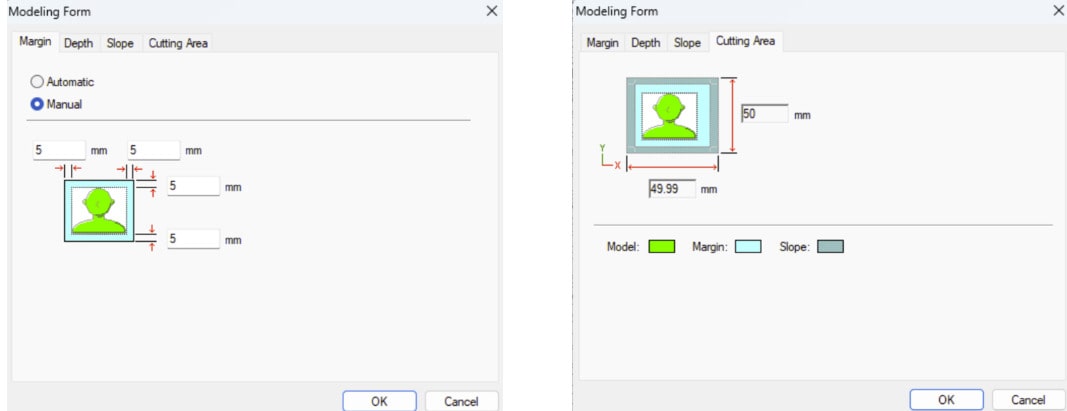
- Open the “Modelling Form” settings
- Set up your Margin and then Cutting area
- Click on “New Processes”
This part is divided into 2: Roughing and Finishing:
4.1 Roughing
Open a roughing file, and then make sure that your drill bit is correct (I used the 3.75mm Square drill bit).
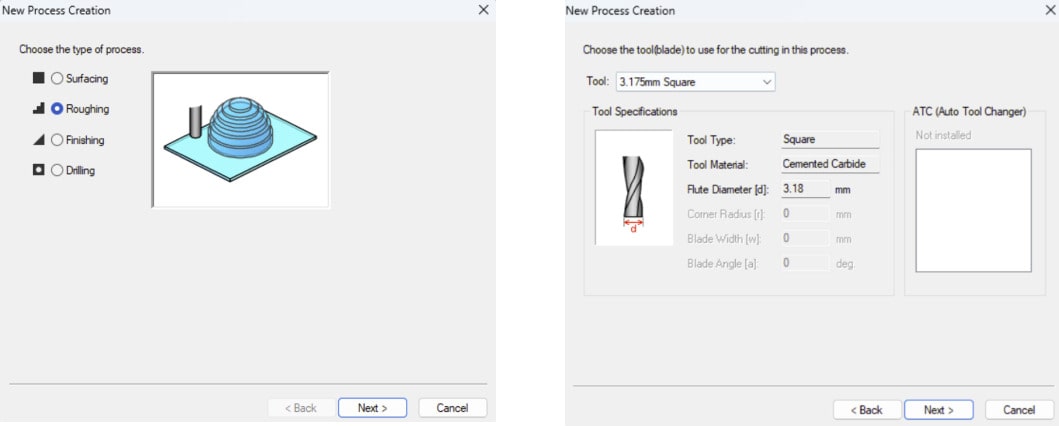
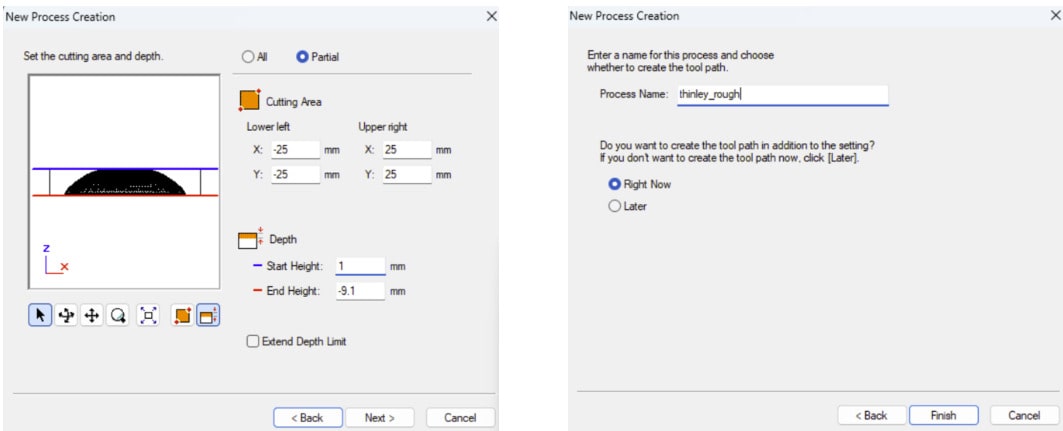
Then, go to the “Partial Tab” (important), and set your start height to 1mm, and then save your file.
4.2 Finishing
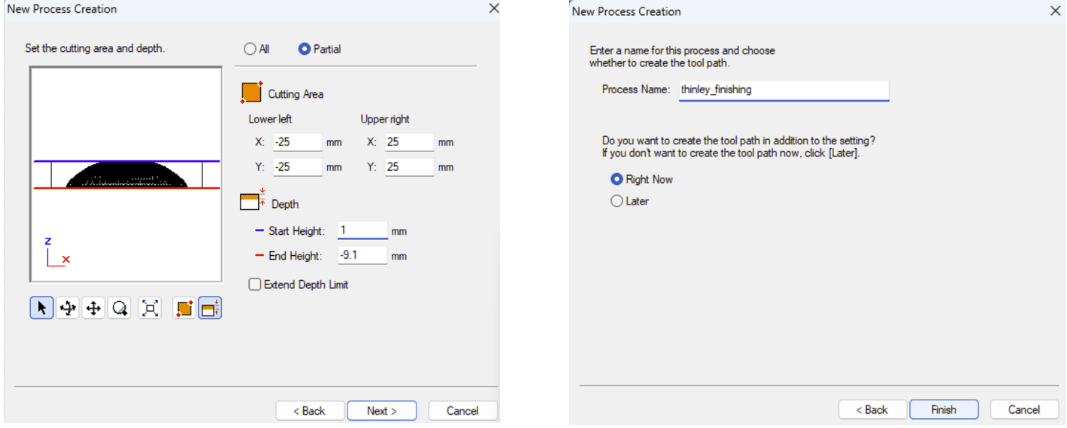
Similarly, open a finishing file, and then make sure that your drill bit is correct (usually ball for a good finish).
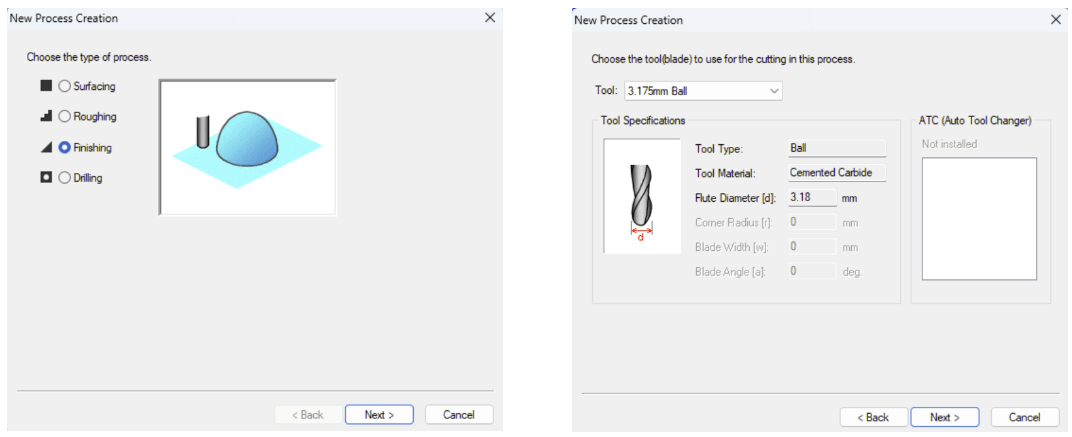
And do the same as we did for the roughing file.
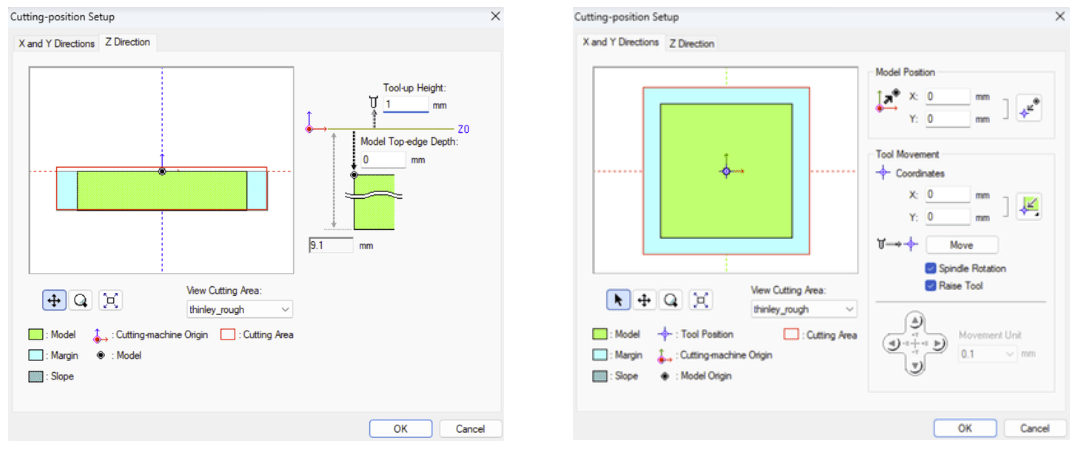
- Open the “Cutting Processes Setup” settings
Check your setup for your XY and then Z axes. For the Z-axis, I changed my Toolup height to 1mm.
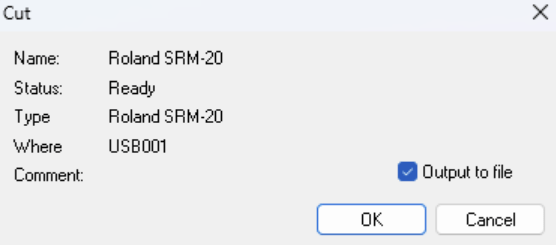
- Click on “Cut”
Finally, click on Cut and choose your file locations.
Milling
I’m using the regular milling machine we have at our Fab Lab, the monoFab SRM-20
Here’s how it came out!
The drill bits are the 1/8 square bit and ball bit, and my modelling wax was 5.2cm x 7.7cm x 3.9cm.
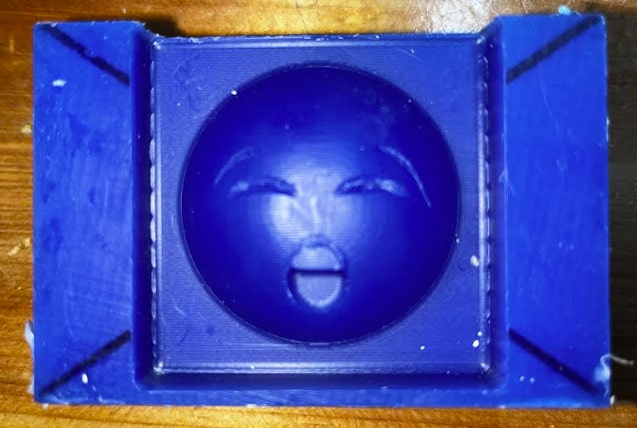
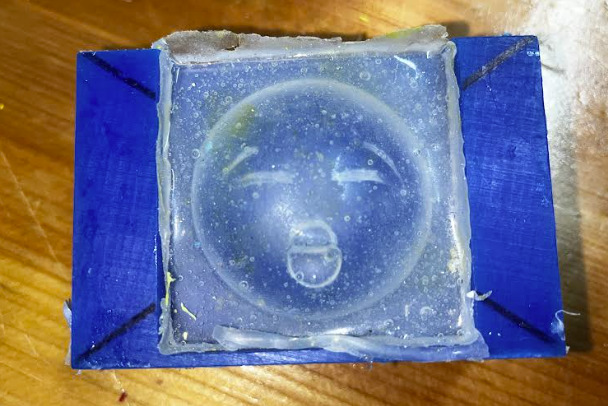
Molding
I used the same silicon as the electric guitar, so the processes were the same. However, this time, the silicon set in 3 hours (woah). There are a lot of bubbles in the mold, but the surface was smooth, so we should be good to go.
Casting
For the emoji, I’m using the USG Ultimate Drystone™ Casting Media.
The mixing ratio is 2:10, and make sure to add powder to water, and not the other way around !
After mixing for a bit, I poured the mixture into my silicon mold, and then let it set. 2 hours later, here’s how it came out:

Comparison
Both of the different methods came out really clean, but the 3D printed cast was a bit more rough than the one that was milled. But at the end of the day, they both have their own pros and conns. The 3D printed cast has a lot more room for detailing and customization, especially because it’s additive manufacturing, but the milled cast comes out much smoother. You can choose whichever method you’d like depending on your job and what needs to be done !!
Problem #1
Once I had my Silicon ready, I decided that it would be a fun idea to add some coloring. I used the SO-Strong™ liquid urethane colorants that I found in our molding and casting section. I wanted to create a nice purple, but when I was adding the colourant, my mix was either too red, or too blue, and I ended up adding wayyy too much colorant. This ruined my silicon and it didn’t set at all.
Reflection
After machine designing, this week was an amazing change. I’ve always heard about casting online but I’ve never really done the process first-hand, so I’m really happy that I was able to try this out. I’ve learned a lot about the process, the safety measures, as well as a better idea of what to do if I want to mass manufacture anything. This week was really fun, and I had an amazing time.
This website was created using a template provided by Mr. Anith Ghalley and was used with his permission.*