Assignment

  • Group assignments:
  • Characterize your lasercutter's focus, power, speed, rate, kerf, joint clearance and types. Document your work to the group work page and reflect on your individual page what you learned.
  • Individual assignments:
  • Design, lasercut, and document a parametric construction kit, accounting for the lasercutter kerf, which can be assembled in multiple ways. Cut something on the vinyl cutter.

    All the important links are Here

    Learning outcomes

  • Demonstrate and describe parametric 2D modelling processes.
  • Identify and explain processes involved in using the laser cutter.
  • Develop, evaluate and construct a parametric construction kit.
  • Identify and explain processes involved in using the vinyl cutter.
  • Group Assignments

    Group Assignment

    Laser Cutter

    Your Image Description

    What is it and How it works

    A laser cutter is a machine that uses a high-powered laser to cut materials such as wood, metal, and acrylic with precision and accuracy.A laser cutter works by focusing a high-powered laser beam onto a material's surface. This intense heat either melts, burns, or vaporizes the material, creating precise cuts or etchings. The machine follows a digital design or pattern, directing the laser along specific paths to create the desired shapes or designs with high accuracy and speed.

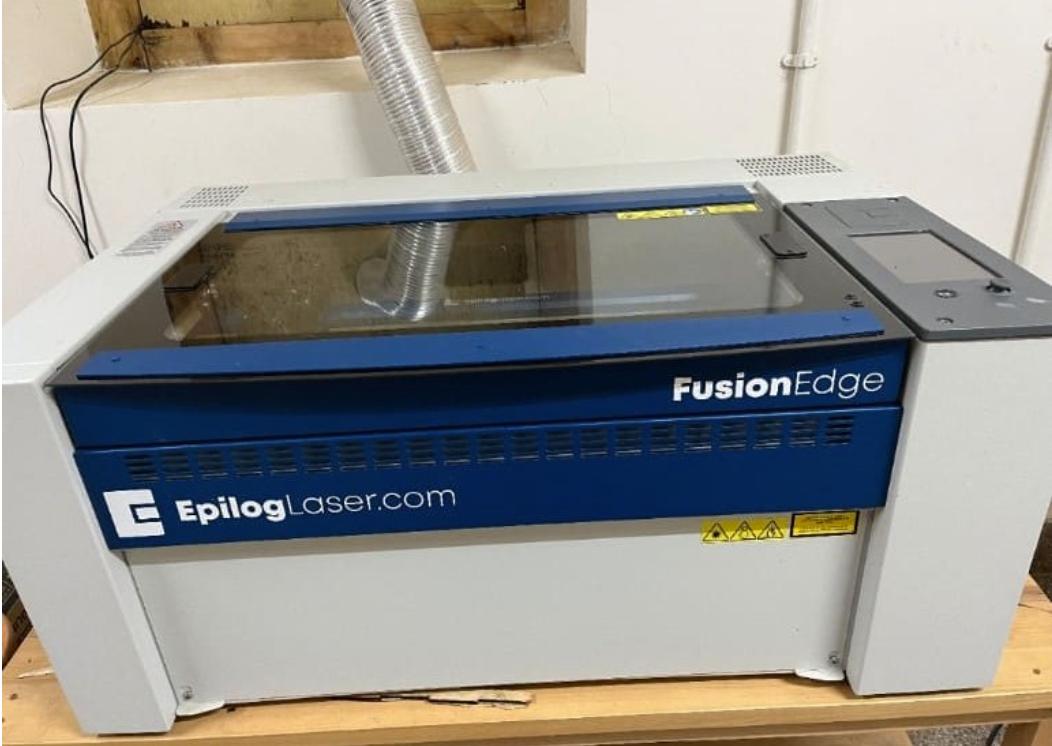
    The laser printer I have at my lab is Epilog fusion edge 12/24

    For a very detailed information on this laser printer, please have a look

    Technical Description

      • Model: Fusion Edge 24
      • Description: The Fusion Edge 24 is a laser cutting and engraving machine designed for precision and versatility in various fabrication applications.
      • Cutting Area: 24” x 12” (610 x 305 mm)
      • Description: The cutting area refers to the maximum dimensions within which the laser can cut or engrave materials. In the case of the Fusion Edge 24, it can handle materials within a 24-inch by 12-inch area.
      • Laser Type: Sealed CO2 Laser
      • Description: This laser cutter utilizes a sealed CO2 laser as its cutting and engraving source. CO2 lasers are known for their efficiency and effectiveness in a wide range of materials, including wood, acrylic, plastic, and more.
      • Laser Power: Up to 120 Watts
      • Description: The Fusion Edge 24 offers laser power options that can range up to 120 watts. This range of power settings allows for precise control over the intensity of the laser beam, enabling users to work with different materials and achieve various cutting and engraving effects.
      • Optional Accessories: Autofocus System
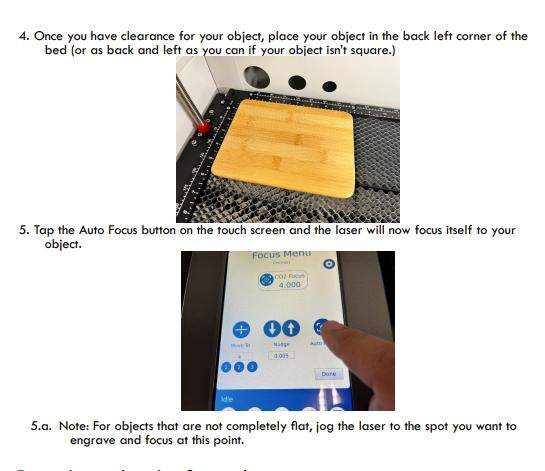
      • Description: The Fusion Edge 24 offers an optional autofocus system for automatic focal adjustment. This feature enhances ease of use and ensures optimal focus for cutting and engraving tasks, particularly when working with materials of varying thicknesses or irregular surfaces.The autofocus system is shown in the "operating machine"part
      • Importance: Autofocusing in laser cutting ensures precise and consistent results by adjusting the focal point of the laser beam to match the material's surface. It enhances accuracy, efficiency, and ease of use, making it crucial for achieving high-quality cuts and engravings across various materials and thicknesses.
    Your Image Description

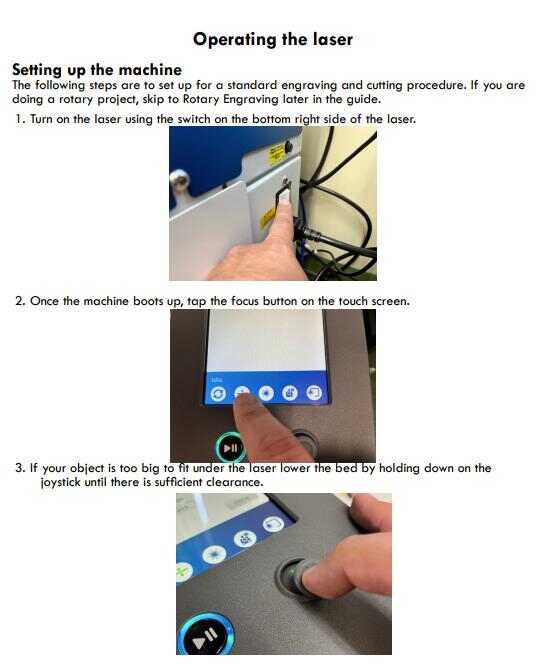
    Operating the Machine

    For a very detailed guide on operating and using the laser printer, I highly recommend you to go through this guide for its very informative description like the one below

    Image 1
    Image 2

    Laser Cutter Safety

    Dos:

    • Stay attentive: Never operate the laser cutter while unattended. Always monitor the machine during operation.
    • Keep the area clear: Ensure the workspace is free of clutter, combustible materials, and volatile solvents like acetone, alcohol, or gasoline.
    • Use Air Assist: Always use the system's Air Assist feature, especially during vector cutting, to minimize the risk of fire.
    • Clean the machine: Regularly clean the laser system to prevent the buildup of cutting and engraving residue, which can create a fire hazard.
    • Have a fire extinguisher: Keep a properly maintained and inspected fire extinguisher nearby. Consider using a Halotron extinguisher for clean and effective suppression.
    • Connect to a vent: Always operate the laser cutter with a properly functioning exhaust system to remove smoke, debris, and harmful compounds generated during engraving or cutting.
    • Observe general precautions: Avoid disassembling the machine while it's plugged in, do not attempt to defeat door interlocks, and never view directly into the beam of the Laser Diode Pointer.

    Don'ts:

    • Operate unvented: Never use the laser cutter without a properly operating vent to the outside or to a filtration unit.
    • Engrave or cut PVC: Avoid engraving or cutting materials containing PVC or vinyl, as this can produce a corrosive agent that damages the machine.
    • Run unattended: Never leave the laser cutter running without someone watching the system. This reduces the risk of fire in case of improper settings or mechanical/electrical failures.
    • Vector cut unattended: Avoid laser cutting any material without supervision, especially during vector cutting, as the buildup of heat can pose a significant fire risk.
    • Operate with open doors: Never operate the laser cutter with any covers or enclosures removed. The invisible laser beam is very dangerous.
    • Use improper ducting: Always use rigid or flexible metal ducting for exhaust connections to prevent fire hazards.

    Safety Precautions:

    • Training: Ensure operators are adequately trained in the safe operation of the laser cutter.
    • Emergency procedures: Establish clear procedures for handling emergencies, including fire suppression and evacuation plans.
    • Regular maintenance: Conduct regular maintenance checks and adhere to manufacturer's guidelines for upkeep.
    • Protective gear: Provide operators with appropriate personal protective equipment (PPE), such as safety glasses and gloves.

    Kerf

    A kerf is the width of material removed during cutting, like laser cutting or sawing. It's the gap or groove created in the material as it's cut.

    Your Image Description

    Firstly, to undertand "kerf" better, lets learn what a pressfit design is, where the "kerf" is applicable for better undertanding. A press fit design involves creating two or more parts that fit together tightly without the need for additional fasteners like screws or glue. The parts are designed with interlocking features, such as tabs and slots, that require pressure to assemble, resulting in a secure and stable connection.

    Now picture this,You're crafting a press-fit design, envisioning two pieces fitting together like puzzle pieces. You measure the slot width to be exactly the same as the material thickness, thinking you've nailed it. But wait! The laser cutter has a mischievous streak. It sneaksily removes a tiny bit of material during cutting, widening the gap just enough to throw off your perfect fit. Suddenly, your press-fit masterpiece turns into a wobbly mess, like trying to squeeze into skinny jeans after a hearty meal! To outsmart the laser's shenanigans, you've got to factor in this sneaky "kerf" width and adjust your design accordingly. Keep those lasers in check, and let's keep those press-fits puzzle-perfect!

    Designing with Laser Cutter Kerf

    Designing with the laser cutter kerf requires adjusting slot widths using the formula material_thickness - kerf = slot_width. For precise press fit assemblies, this ensures parts fit snugly despite material removal during cutting.

    material_thickness-kerf = sloth_width

    Speed,Power and Measuring kerf

    Our instructor kindly demonstrated us the process of knowing different cuts, setting and kerf.

    Firstly we created different circles and laser cut it with different speed and power.Through that process we learned the perfect power and speed for good laser cut outcomes.

    Your Image Description

    To measure kerf we drew finger joints with different dimensions and to measure the sloth_widths accurately we used the tool digital caliper.

    This is the result of measuring the kerf of the dimensions of the cuts in the cardboard by the machine.

    The formula is: Kerf = (intended cut - actual cut )/2

    Your Image Description

    It seems lazy but I used notion's AI to calculate my kerf by asking it to create a table with 3 colums. I entered the values and asked it to subtract the two values and write the answers in the third column. Then I asked it to find the average kerf.

    Your Image Description

    Individual Assignments

    When developing parameters for the model, I aimed to establish a logical and interconnected framework where each parameter relates to others in a meaningful way. I identified key base or control parameters that serve as foundational elements guiding other measurements. For instance, in the case of press-fit kits, using 'material thickness + kerf' as a base parameter ensures consistency and precision in designing interlocking components. This base dimension forms the cornerstone upon which other parameters build, with each parameter mathematically tied to this foundation. By structuring parameters in this manner, I sought to create a coherent and intuitive system that facilitates efficient and accurate modeling processes.

    Designing 2-D parametric design

    Parametric Designing

    Image 4 Image 2

    I used Mr.Sanjay Surage's documentation as an inspiration for my pressfit parametric design. Thank you Mr.Sanjay Surage

  • Setting up the parameters
  • Please ignore my speliling for "slot" as "sloth"

    Your Image Description
  • FOR THIS HEXAGON
  • Image 1
    Image 2
    Your Image Description
  • FOR THIS RECTANGLE
  • Image 1
    Image 2
    Your Image Description
  • FOR THIS SQUARE
  • Image 1
    Image 2
  • Using the Chamfer tool
  • Image 1
    Image 2
  • Exporting it
  • Image 1
    Image 2
    Your Image Description
  • After saving or exporting it as a DXF file and a SVG file, export it agin to the inkscape software on the device connected to the machine. And arrange it as you like and duplicate it as much as you want.
  • Your Image Description

    Laser Cutting

    Firstly to start laser cutting it is essential to understand and know the control panel.

    Your Image Description

    Then to laser cut your design adjust it to the size of your wanting and the printing area.

    Your Image Description
    Your Image Description

    Then import your material

    Your Image Description
  • The steps I took in these were to auto focus and start printing.
  • Your Image Description
    Your Image Description

    Then start laser cutting

    Your Image Description
    Your Image Description
  • FIRST ATTEMPT
  • Your Image Description
  • This is me happy with how it was turning out
  • Your Image Description
  • The cut was successful, it stood strong and rigid
  • Your Image Description
  • I continued with the rest of the laser cutting after it worked.
  • Your Image Description

    RESULT

    Robot Dog

    Image 1 Image 2
    Image 3 Image 4

    Cat tower

    Image 1 Image 2

    I made this with pieces from my friends pressfit design.

    Please visit their website on how to make the parts

    Damzang Chimi Seldon Ngawang Pemo Drukpa

    Vinyl Cutter

    Your Image Description

    The model of the vinyl cutter we have the lab is the Roland GS-24 also known as the Roland CAMM-1 GS-24

    Your Image Description

    What is it and How it works

    A vinyl cutter is a machine used to precisely cut designs, shapes, and lettering from vinyl sheets or rolls. It operates by using a sharp blade to follow digital designs created in vector graphics software. A vinyl cutter works like a printer, but instead of printing, it cuts out shapes and letters from vinyl sheets. You design your artwork on a computer, then send it to the vinyl cutter. The cutter has a small blade that moves back and forth, cutting the design out of the vinyl while leaving the backing sheet untouched. Once cut, you can peel away the excess vinyl, leaving your design ready to stick onto surfaces like walls, windows, or clothing.

    for the user's manual and installation guide for macintosh and windows, please have a look

    for more informationa and for the original labelled diagrams,please visit here

    I got my labelled diagrams from the above website

    Your Image Description
    Your Image Description
    Image 1
    Image 2

    Design

    I will be using the sticker I created last week, that is a traced bitmap of a butterlamp sketch I drew.

    Your Image Description

    This was my first time using the vinyl cutter and I aslo decided to print another one. I chose a combination of funny pictures of the fab DGI team including my instructor.

    For the softwares I used like inkscape and Gimp, look at my assignment of week 2 for the detailed process

    For the design I wanted the pictures to include the people, so I found individual pictures since I didn't have any picture which included all of us. Then I took out the background of all the pictures and combined them. I did all of these in the Gimp software I had learned the week before.

    Firstly, I edited the pictures in Gimp

    Your Image Description

    Then I saved the file and exported it in inkscape. This is how it looks when it is saved

    Your Image Description

    Then export it in inkscape

    Your Image Description

    Then trace the bitmap

    Your Image Description

    Hoorey! You have finished tracing the bitmap, your sticker is ready!

    Now the moment you have been awaiting for, PRINTING IT!

    Extracting contour line from your sticker

    Image 1
    Image 2
    Image 1
    Image 2

    Deciding on Vinyl Cutter Settings

    Deciding on vinyl cutter settings involves a combination of factors including the type of vinyl being used, the intricacy of the design, and the capabilities of the cutter itself. For the Roland CAMM-1 GS-24, specific settings such as cut depth, cut pressure, and cut speed are crucial for achieving clean and precise cuts.

    Cut Depth:

    This refers to how deeply the cutter blade penetrates the vinyl material. The appropriate cut depth depends on the thickness of the vinyl. For the Roland CAMM-1 GS-24, a typical cut depth setting might range from 0.05mm to 0.3mm, depending on the specific vinyl being used.

    Cut Pressure:

    This determines the force with which the cutter blade presses down onto the vinyl material. Higher cut pressure is needed for thicker or denser vinyl, while lighter pressure is suitable for thinner materials. For the Roland CAMM-1 GS-24, cut pressure settings typically range from 10g to 300g, depending on the vinyl type and thickness.

    Cut Speed:

    This controls how quickly the cutter blade moves across the vinyl material. Faster speeds are generally used for simpler designs or larger cutouts, while slower speeds are preferred for intricate designs or smaller details. The Roland CAMM-1 GS-24 typically offers cut speed settings ranging from 10mm/s to 500mm/s.

    In determining the specific settings to use, it's essential to conduct test cuts on a small piece of the same vinyl material you plan to use for your project. Start with the manufacturer's recommended settings based on the type of vinyl, and then adjust the settings incrementally as needed to achieve the desired results. Take note of factors like blade wear, blade angle, and material condition, as these can also affect cutting performance. Through experimentation and fine-tuning, you can optimize the vinyl cutter settings for your specific requirements and achieve high-quality cuts with the Roland CAMM-1 GS-24.

    Dont forget to set the origin! Setting the origin on the Roland vinyl cutter ensures precise alignment, consistency in cuts and efficient material usage..

    To set the origin use the controllers and choose the place where you would like to start printing your sticker then hold onto the origin button until it displays the text, "ORIGIN SET".

    Your Image Description
    1. Design Import: Start by importing your design into the cutting software. Make sure to check the scale and position of the design within the cutting area to ensure accuracy.
    2. Configure Cutting Settings: Adjust the cutting parameters such as speed, and pressure based on the type and thickness of the vinyl material you're using. This step ensures clean and precise cuts.
    3. Perform Test Cut: Before cutting the full design, perform a test cut on a small piece of vinyl to verify that the settings are correct. This allows you to make any necessary adjustments without wasting material.
    4. Send Design to Cutter: Once satisfied with the test cut, send the design to the vinyl cutter for cutting. Ensure that the cutter is set to "cut" mode and ready to proceed.
    5. Monitor Cutting Process: Keep an eye on the cutting process to ensure that the vinyl is being cut accurately and there are no issues such as material shifting or blade misalignment.
    6. Apply Sticker: After cutting is complete, carefully peel away the excess vinyl surrounding your design. Then, using tweezer, transfer the sticker onto the desired surface
    7. Final Touches: Smooth out any air bubbles and ensure that the sticker is firmly adhered to the surface.
    Your Image Description

    Weeding

    Transfer film is commonly used to move stickers or vinyl decals from the vinyl backing onto the desired surface. Transfer film, also known as transfer tape, is a thin, adhesive-backed material that allows you to lift the cut vinyl design off its backing and transfer it smoothly onto another surface without distortion or damage.

    "Weeding" refers to the process of removing the excess vinyl material from around the design after it has been cut. This process can vary in difficulty depending on the intricacy of the design and the type of vinyl being used.

    For simpler designs with fewer intricate details, weeding is generally easier and quicker. It involves carefully peeling away the excess vinyl material using a weeding tool or your fingers, leaving behind only the desired design on the backing sheet.

    However, for designs with intricate details or small lettering, weeding can be more challenging and time-consuming. In such cases, it requires patience and precision to remove the excess vinyl without accidentally lifting or damaging the design elements.

    The weeding process typically involves the following steps:

    1. After the vinyl design has been cut by the cutter, carefully remove the excess vinyl material from around the design using a weeding tool or your fingers. Start by peeling away a corner of the excess vinyl and gradually work your way around the design.
    2. Pay close attention to small details and intricate areas, ensuring that you remove all unwanted vinyl pieces while leaving the design intact.
    3. Once the weeding process is complete, apply transfer film over the entire design. Press down firmly to ensure that the transfer film adheres to the vinyl design.
    4. Gently peel off the backing sheet, leaving the vinyl design attached to the transfer film.
    5. Carefully position the transfer film with the vinyl design onto the desired surface, ensuring proper alignment.
    6. Press down firmly on the transfer film to adhere the vinyl design to the surface. Use a squeegee or similar tool to smooth out any air bubbles and ensure proper adhesion.
    7. Finally, slowly peel away the transfer film, leaving behind the vinyl design on the surface.

    By following these steps and practicing patience and precision, you can achieve clean and professional-looking results when weeding vinyl cut designs.

    Personally, weeding was not hard since my design was not that intricate, it was simply removed by using a tweezer easily.

    Your Image Description

    Reflection on Weekly Assignment

    Reflecting on my work for this week's assignment, I've learned a great deal about vinyl cutting and the intricacies involved in achieving precise cuts and transferring designs onto various surfaces.

    One of the key takeaways is the importance of understanding the parameters of the vinyl cutter, such as cut depth, cut pressure, and cut speed, and how they influence the final outcome of the cut designs. Experimenting with different settings and materials allowed me to optimize the cutting process and achieve high-quality results.

    Additionally, I gained a deeper understanding of the weeding process and the significance of transfer film in transferring vinyl designs accurately onto surfaces. Weeding can be a meticulous task, especially for intricate designs, but with patience and precision, it can lead to professional-looking results.

    Overall, this assignment has expanded my knowledge and skills in the realm of vinyl cutting and has provided valuable insights into the techniques and considerations involved in working with vinyl materials. I look forward to applying these learnings in future projects and continuing to refine my skills in this area.

    My fusion360 file

    My butterlamp .svg file is in the week 2 assignment

    This is my inkscape file for the funny sticker