Week 1 - Project Management and Website Setup
Project Management
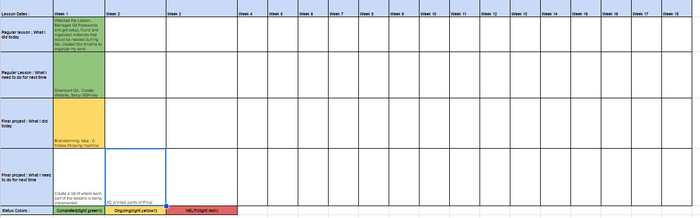
The first part of this week focuses on project management. To keep myself accountable and on schedule, I created a google sheets with each date and what I need to do on said dates.
Website Setup for a Windows Computer
Before I explain the process, shout out to Richard Shan, Adam Stone, and Adrian Torres Documentation and Help that made my website work.
Step 1
Also make sure you have a folder made to house your Fab Files
Step 2
Getting an SSH key from your personal computer :
tell your computer what your github account is by inputting:
git config –-global user.name “firstName.lastName”
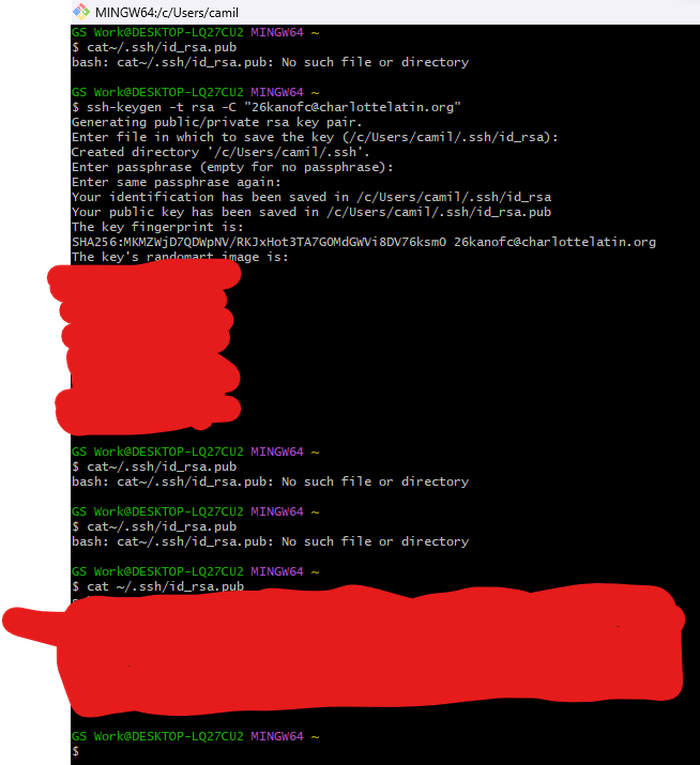
then, check if you have a pre-existing SSH key by using :
cat ~/.ssh/id_rsa.pub
If you get a message saying you don't have a SSH Key, then create one through :
ssh-keygen -t rsa -C “your_email”
Hit enter until the keys randart image appears
finally, to see the public key needed to link your computer to Git, type :
cat ~/.ssh/id_rsa.pub
Copy that long string by highlighting and right clicking for copy
Step 3
Open GitLab and click on profile button in the top left area
Go to "edit profile" and click on SSH Keys in the left side menu.
Select "Add new key" and paste your SSH Key

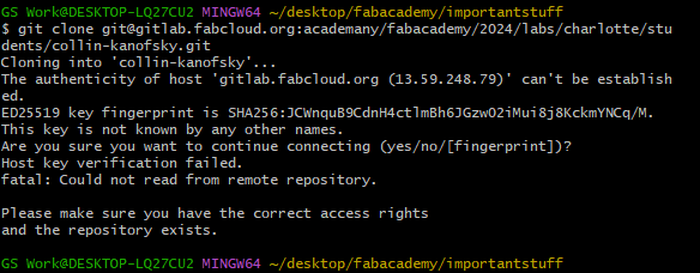
Step 4 - cloning the repo
This next step is optional, but highly recommended. We are now going to clone our repo so we have a copy on our computer at all times. This ensures you don't lose things in an accident and also allows you to work offline
open up windows powershell and navigate into your Fab Folder :
cd ______
Helpful Tip = Hit tab after cd to get possible options(don't forget the space after cd when doing this)
Enter gitlab and click the blue code button.
Then, click the clipboard with a dotted box icon below and to the right of the "clone with SSH Key" text.
Now that we have Git's SSH clone key, go back to powershell and type :
git clone Your_git_SSH_Key_Here
When this command finished, a new file should be created under your name in your fab folder
Step 5
Now that we have cloned and connected the repo, we will now add mkdocs onto our computer and fab file.
To start, open up windows powershell and go to your fab folder(Not the First.Lastname file from Git)
cd ____
Then, we install mkdocs using :
pip install mkdocs
If you are having problems that say "pip is not recognized", Richard Shan says that "pip3 install mkdocs" will work

Step 6
Last step before we start writing our website, we need to create a new mkdocs file for us to write on.
Once again, enter your fab folder, then the First-Last name folder in windows powershell and type the command below with your git dir name(Usually first and last name):
mkdocs new FirstName-LastName
This initializes mkdocs and allows us to use the command below to actually create the file.
mkdocs serve
Yay! Now the powershell weirdness of the website building is done!
Pushing to the remote website, Theme changing, and helpful tips
Pushing Code
Whenever you are done with your changes in code, you need to push it to the remote GitLab repo. This will update the public website for everyone to see. Use these 3 commands in the order given to push code :
git add --all
git commit -m "Name the commit in these brackets"
git push
After pushing code, you can ensure that the code makes it into your website by going into GitLab and opening pipelines under the build button
The pipeline viewer is a super useful tool because it shows you when your push is completed and if your push fails, you can view the error and even the lines of code that caused the failure.
Theme
When I tried to change the theme of my website, the first theme I went to was a template theme called makethedocs. However, it was too basic for me, so after a long time of searching, trial and error, and working together with other people, I finally found how to change it.
I used the premade themes in this catalog
The catalog told me that to use a theme, I must enter the mkdocs.yml file and change the theme to the premade theme name. Then, I had to do a
pip install __whatever the template you chose said to put__
Finally and most importantly, I had to open the requirement text file and write (EX:)
mkdocs-material
or whatever you wrote when you did the pip install
When I pushed my theme with these steps, it finally worked!
Tips and Tricks
Easy and Fast Website Check
To view your website without going through git commits and pipelines, use
mkdocs serve
This will give you a IP address that only works on your computer and any time you save changes in VS code, it will auto update
Commit Tips
When doing commits, name your commits with a lot of detail so if something gets lost, you can easily find an old version
Creating New Pages
To add a new page to your website, create a blank text file and select markdown as your file language. Then write a title, save the file(ctrl+S) and make sure it saves in the docs folder with the index. Now you can delete the text if you want and the name will remain the same
Example of adding Videos easily using HTML
Ex :
 <video width="320" height="240" controls>
  <source src="\Pictures\Week 2\BeatSaberCompressed.mp4" type="video/mp4">
</video>
Final Project Brainstorming
I started brainstorming by coming up with Ideas, I also asked people around me about their problems in life and even my grandmother came up with an idea about a light bulb inserter. After thinking through the many ideas, I finally set my sight on a frisbee launcher.
Next, I drew out how I envisioned the launcher to look and work.

Finally, I planned out what I would be learning each week and what part of my final project would incorporate each week.

Reflection :
Week 1 of Fab Academy taught me how to find, utilize, and organize many different sources of information and my Fab gitLab repo. I also learned about the use of windows powershell and how to navigate it swiftly. Lastly, I gained a good final project Idea and am super exited to design it.