13. Networking and communication
At the begining, we have done the group assignement here. I participate to the communication part.
Hero shot
1. Creating the card
This week, my aim is to make a card that has a temperature and luminosity sensor, and to send this data to a web page. I’m doing this because in my final project, I’ll need to know the temperature in my cabinet to know if I need to activate fans to cool the air. The light sensor will be used to measure turbidity. I have an LED at a defined wavelength, and I measure the amount of light that passes through my reactor. This gives me a rough idea of the density of the microalgae and how fast they are growing. First I created the card like this:
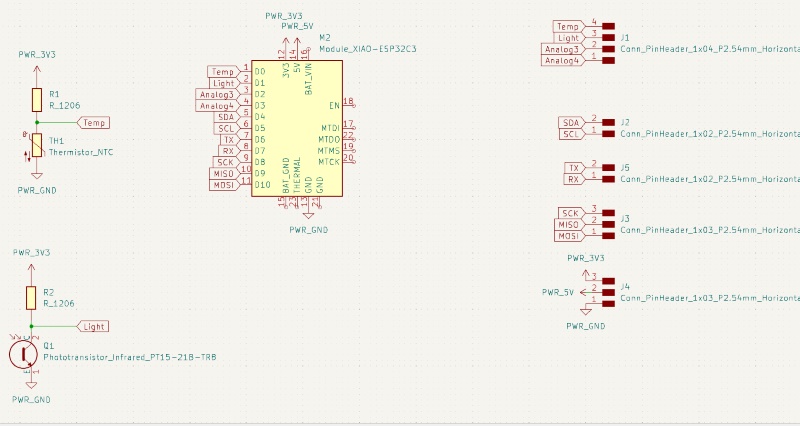
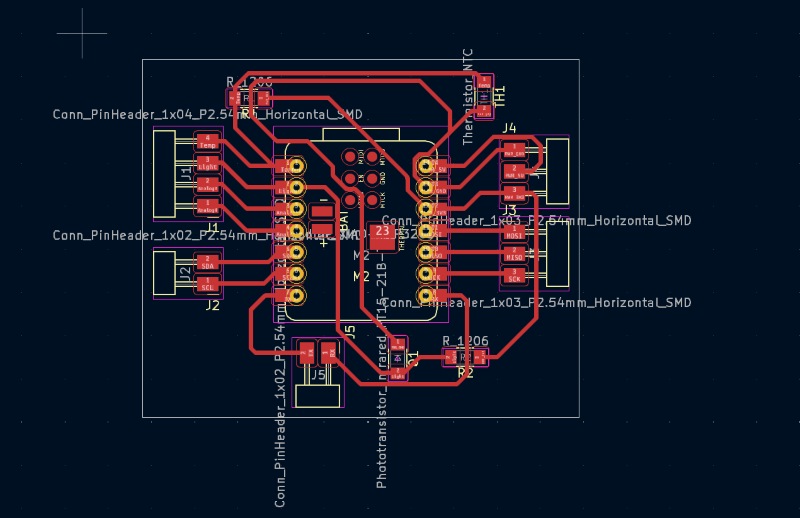
I’ve deliberately added lots of pins for future sensors or other things, depending on future needs.
After soldering, my board didn’t work, and I had to unboot it. One of the problems was that one of my tracks hadn’t cut properly.
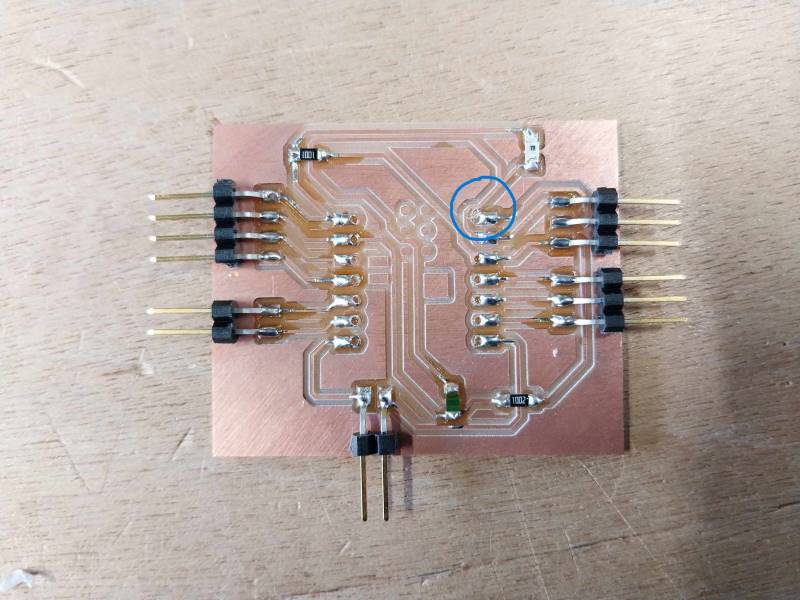
I also had a problem with my light sensor which wasn’t soldered properly and caused my microcontroller to crash. I also randomly get a type 2 error, whether the ESP 32 is new or not. After reconnecting and restarting the Ardwino IDE, the problem is usually solved. I haven’t found an explanation for this problem, which also occurs on other PCs.
2. Going online
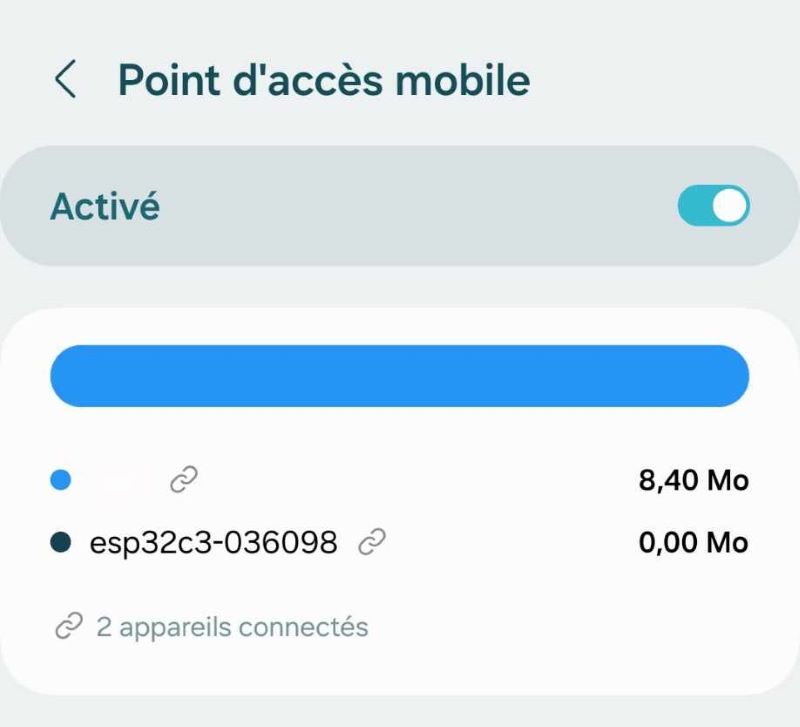
To start with, I tried to set up one of the ESP32-C3’s site exepmle. I turned my esp into a Wi-Fi access point with this code:
#include "WiFi.h"
void setup()
{
  Serial.begin(115200);
  WiFi.softAP("ESP_AP", "123456789");
}

void loop()
{
  Serial.print("Host Name:");
  Serial.println(WiFi.softAPgetHostname());
  Serial.print("Host IP:");
  Serial.println(WiFi.softAPIP());
  Serial.print("Host IPV6:");
  Serial.println(WiFi.softAPIP());
  Serial.print("Host SSID:");
  Serial.println(WiFi.SSID());
  Serial.print("Host Broadcast IP:");
  Serial.println(WiFi.softAPBroadcastIP());
  Serial.print("Host mac Address:");
  Serial.println(WiFi.softAPmacAddress());
  Serial.print("Number of Host Connections:");
  Serial.println(WiFi.softAPgetStationNum());
  Serial.print("Host Network ID:");
  Serial.println(WiFi.softAPNetworkID());
  Serial.print("Host Status:");
  Serial.println(WiFi.status());
  delay(1000);
}
The code worked, and I was able to connect with my phone on it.

I then tried to send a file from my ESP, asking ChatGPT 3.5 for a code to do this. I got this code, and modified the ssid, password and host part. But it didn’t work.
#include <WiFi.h>

const char* ssid = "AndroidAP";
const char* password = "*****";

const char* host = "92.184.***.***";
const int port = 80;

void setup() {
  Serial.begin(9600);
  delay(1000);

  Serial.println("Connecting to WiFi");
  WiFi.begin(ssid, password);
  while (WiFi.status() != WL_CONNECTED) {
    delay(1000);
    Serial.println("Connecting to WiFi...");
  }
  Serial.println("Connected to WiFi");
}

void loop() {
  WiFiClient client;
  if (client.connect(host, port)) {
    float temperature = 25.5;
    client.print(temperature);
    client.stop();
    Serial.println("Temperature sent: " + String(temperature));
  } else {
    Serial.println("Failed to connect to server");
  }
  delay(5000);
}

With the help of Luc HANNEUSE, we looked for a simpler way of setting it up, and he showed me an example of the Ardwino IDE (hello server). But for some reason, the code didn’t work on different ESP32s and on different computers.
#include <WiFi.h>
#include <NetworkClient.h>
#include <WebServer.h>
#include <ESPmDNS.h>

const char* ssid = "oooo";
const char* password = "mdp";

WebServer server(80);

const int led = 13;

void handleRoot() {
  digitalWrite(led, 1);
  server.send(200, "text/plain", "hello from esp32!");
  digitalWrite(led, 0);
}

void handleNotFound() {
  digitalWrite(led, 1);
  String message = "File Not Found\n\n";
  message += "URI: ";
  message += server.uri();
  message += "\nMethod: ";
  message += (server.method() == HTTP_GET) ? "GET" : "POST";
  message += "\nArguments: ";
  message += server.args();
  message += "\n";
  for (uint8_t i = 0; i < server.args(); i++) {
    message += " " + server.argName(i) + ": " + server.arg(i) + "\n";
  }
  server.send(404, "text/plain", message);
  digitalWrite(led, 0);
}

void setup(void) {
  pinMode(led, OUTPUT);
  digitalWrite(led, 0);
  Serial.begin(115200);
  WiFi.mode(WIFI_STA);
  WiFi.begin(ssid, password);
  Serial.println("");

  // Wait for connection
  while (WiFi.status() != WL_CONNECTED) {
    delay(500);
    Serial.print(".");
  }
  Serial.println("");
  Serial.print("Connected to ");
  Serial.println(ssid);
  Serial.print("IP address: ");
  Serial.println(WiFi.localIP());

  if (MDNS.begin("esp32")) {
    Serial.println("MDNS responder started");
  }

  server.on("/", handleRoot);

  server.on("/inline", []() {
    server.send(200, "text/plain", "this works as well");
  });

  server.onNotFound(handleNotFound);

  server.begin();
  Serial.println("HTTP server started");
}

void loop(void) {
  server.handleClient();
  delay(2);//allow the cpu to switch to other tasks
}
So I decided to make things simpler by making two ESP32s communicate with each other. With the help of this site I set up these two codes: Connection tests between 2 esp 32
Transmitter :
#include <WiFi.h>
#include <WiFiUdp.h>

WiFiUDP udp;
char packetBuffer[255];
unsigned int localPort = 9999;
const char *ssid = "Livebox-****";
const char *password = "******";

void setup() {
    Serial.begin(115200);
    // Connect to Wifi network.
    WiFi.begin(ssid, password);
    while (WiFi.status() != WL_CONNECTED) {
        delay(500);
        Serial.print(F("."));
    }
    udp.begin(localPort);
    Serial.printf("UDP server : %s:%i \n", WiFi.localIP().toString().c_str(), localPort);
}

void loop() {
    static int compte = 0;
    compte++;
    sprintf(packetBuffer, "%d", compte);
    udp.beginPacket("192.168.1.14", localPort);
    udp.printf(packetBuffer);
    udp.endPacket();
    Serial.println("Packet sent");
    delay(500);
}
Recever :
#include <WiFi.h>
#include <WiFiUdp.h>

WiFiUDP udp;
char packetBuffer[255];
unsigned int localPort = 9999;
const char *ssid = "Livebox-****";
const char *password = "******";

void setup() {
    Serial.begin(115200);
    // Connect to Wifi network.
    WiFi.begin(ssid, password);
    while (WiFi.status() != WL_CONNECTED) {
        delay(500);
        Serial.print(F("."));
    }
    udp.begin(localPort);
    Serial.printf("UDP Client : %s:%i \n", WiFi.localIP().toString().c_str(), localPort);
}

void loop() {
    int packetSize = udp.parsePacket();
    if (packetSize) {
        udp.read(packetBuffer, 255);
        Serial.print("Received data: ");
        Serial.println(packetBuffer);
    }
    delay(500);
}
After several modifications, in particular with ChatGPT, I managed to get the ESPs to connect to each other and to connect to the Wi-Fi, but not to send any information.
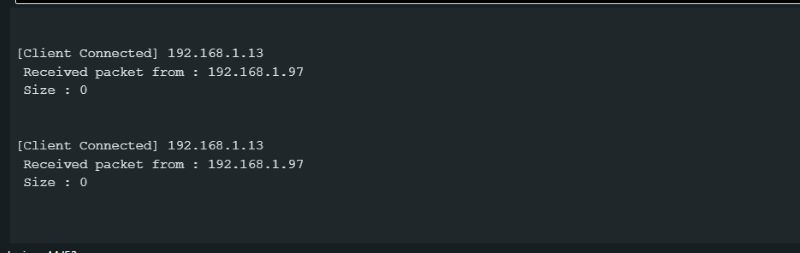
The IP addresses vary by 1 each time (192.168.1.13 and 192.168.1.14) and I don’t know if that’s where the error is coming from.
3. Sending orders from a web page
With Luc’s help, I came across Theo’s doc who had based his work on Tommy Desrocher’s website. Tommy has made a superb video where he explains the whole process of connecting an ESP32 to a web interface. By following his instructions and modifying his code a little, I can do this:
#include <WiFi.h>
#include <WebServer.h>

const char *ssid = "Livebox-****";
const char *password = "******";
WebServer server(80);

const int led = 4;
bool etatLed = 0;
char texteEtatLed[2][10] = {"ETEINTE!","ALLUMEE!"};

void handleRoot()
{
    String page = "<!DOCTYPE html>";

    page += "<html lang='fr'>";

    page += "<head>";
    page += "    <title>Serveur ESP32</title>";
    page += "    <meta http-equiv='refresh' content='60' name='viewport' content='width=device-width, initial-scale=1' charset='UTF-8' />";
    page += "    <link rel='stylesheet' href='https://www.w3schools.com/w3css/4/w3.css'>";
    page += "</head>";

    page += "<body>";
    page += "    <div class='w3-card w3-green w3-padding-small w3-jumbo w3-center'>";
    page += "        <p>ETAT LED: "; page += texteEtatLed[etatLed]; + "</p>";
    page += "    </div>";

    page += "    <div class='w3-bar'>";
    page += "        <a href='/on' class='w3-bar-item w3-button w3-border w3-jumbo' style='width:50%; height:50%;'>ON</a>";
    page += "        <a href='/off' class='w3-bar-item w3-button w3-border w3-jumbo' style='width:50%; height:50%;'>OFF</a>";
    page += "    </div>";

    page += "    <div class='w3-center w3-padding-16'>";
    page += "    </div>";

    page += "</body>";

    page += "</html>";

    server.setContentLength(page.length());
    server.send(200, "text/html", page);
}

void handleOn()
{
    etatLed = 0;
    digitalWrite(led, 0);
    server.sendHeader("Location","/");
    server.send(303);
}

void handleOff()
{
    etatLed = 1;
    digitalWrite(led, 1);
    server.sendHeader("Location","/");
    server.send(303);
}

void handleNotFound()
{
    server.send(404, "text/plain", "404: Not found");
}

void setup()
{
    Serial.begin(115200);
    delay(1000);
    Serial.println("\n");

    pinMode(led, OUTPUT);
    digitalWrite(led, LOW);

    WiFi.persistent(false);
    WiFi.begin(ssid, password);
    Serial.print("Tentative de connexion...");

    while (WiFi.status() != WL_CONNECTED)
    {
        Serial.print(".");
        delay(100);
    }

    Serial.println("\n");
    Serial.println("Connexion etablie!");
    Serial.print("Adresse IP: ");
    Serial.println(WiFi.localIP());

    server.on("/", handleRoot);
    server.on("/on", handleOn);
    server.on("/off", handleOff);
    server.onNotFound(handleNotFound);
    server.begin();

    Serial.println("Serveur web actif!");
}

void loop()
{
    server.handleClient();
}
The code works!
4. The files
Here you can find the INO files, by order of apperence 1, 2, 3, 4, 5, 6