- Ideas and research
- Current project idea
Final Project Research
Ideas and research
Before I started Fabacademy I planned on having a clear vision for my final project before the start of the Bootcamp. Of course here we are in week 1 and I haven’t made a decision yet (or even started thinking about a concrete project). I do have some vague conceptual ideas on paper so that’s where I start my brainstorm.
Key concepts & possible starting points:
- fashion performance machines, synth suit, masks
- mechanical art machine
- textile fabrication machines/tools
- wearable installations/sound interfaces
- living machines, ridiculous machines, somewhat functional but mostly silly
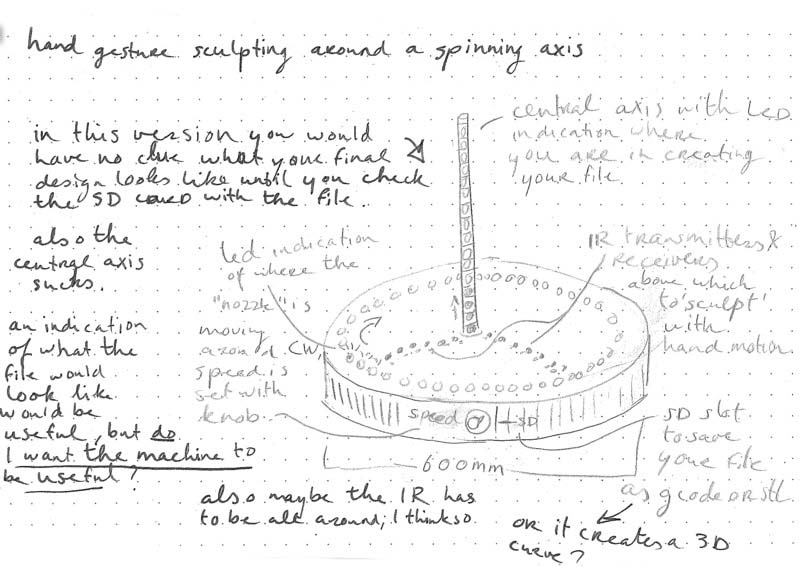
- polar pottery machine that you can use with gcode manipulation
Possible project explorations
Polar pottery printer
Reseach
Concept
An idea I’ve had for a while is building a polar 3D printer that you can do live gcode manipulation with. The way I imagine it to work is by having a bunch of IR sensors positioned around the print bed that detect when you make hand gestures towards the printing machine. These gestures are then translated into a manipulated gcode path, making it possible to live sculpt the 3D print without touching it. So it’s touchless pottery! It would be nice if it would be a paper/cotton pulp or biomaterial printer, or a pellet printer suited for shredded parts. Below is the brainstorm on paper.

It would probably print without loading a sliced 3D model. Instead, it would have buttons to start and stop extrusion and knobs to change speed and starting location (relative to the center of the circular print bed). Then, when you interact with the IR sensors, it changes the relative location of the extruder in the direction: when you ‘push’ the print inwards, the nozzle moves closer towards the center of the bed, creating a ‘dent’ in the print. When I write it down like this, it probably wouldn’t need gcode at all. I think it would be cool if it’s possible to do it with gcode, so you can then save the gcode after it’s printed, as a digital copy of the print.

Another option is if you could load a 3D model and manipulate that live; I think it should be possible, either by:
- overriding the stepper motor of the X/Y axis (mechanically?)
- gradually adding and subtracting values from the distance from the center in the gcode directly right before the next line is sending
- or by moving the bed relative to the nozzle.
Some issues that I can see already:
- It will probably only have the magical effect I envision if the printer is pretty fast, so it would have to be able to extrude fast too
- It is a printer, and I didn’t want to make a printer
Since I didn’t really want to make a printer, but do really like the idea of touchless pottery, I also imagined a version without the entire printing module. This would be more like a magical sculpting machine.
Sound suit
For most of the first week, I got kind of stuck on this idea of the polar pottery printer. However before I started the Fabacademy I really wanted to do something with textiles: either a tool to create textiles, or an e-textiles wearable piece. So I continued my exploration with research and another brainstorm.
Research
Fabacademy projects on sound & interaction:
- MIDI keyboard based on standard chords used in film music by Bas Pijls
- Playing the 3D printer as an instrument by David McCallum
- Theremin
- Kinetic MIDI controller
Other projects on sound & interaction:
- Simpe MIDI keyboard
- Power glove MIDI controller
- Everything that Look Mum No Computer makes
- Big and loud rhythm machine
- Infrared harp
- FM synthesis
- Sound visualisation
- Floppy disk drive that gets up when you spill coffee
- Belly Horn by Dianne Verdonk
- DIY Wahwah pedal
- Plasma speaker
- Scraping for gold, installation that draws
Wearable projects:
- Circuit Dress
- Terpsitone (making sound with your whole body)
- Stretchy touchpad DIY
- Bend sensor DIY
- Mask with optic fibers
- E-textiles suit
- One man acid band
- Paparazzi Lover
- Modular e-textiles synth
- Musical jacket
- Conductive feathers
- Stretch circuit bodysuit
- Fabricademy wearable with motion and light
Concept
I really like the idea of crafting a suit that would function as one big audio installation, so I continued on that trail. It could be something like a modular synthesizer or a MIDI controller suit. Since I don’t really know how audio works yet, I would start by creating a simple sound synthesizer during one of the electronics weeks. Henk mentioned the Atari punk console with a 555 Timer IC so that would be a good start to get familiar with how sound works.
When looking into audio and its terminology I ran into the word ‘patch’, which reminded me of patches and patchwork in textiles. From there the idea of a patch suit emerged:


Projects with the RP2040 (that we have in the lab):
- Drone synth
- MIDI synth
- Hackaday
- Samd51 or Xiao board with i2s arduino audio library; you can play 16 bits audio like that
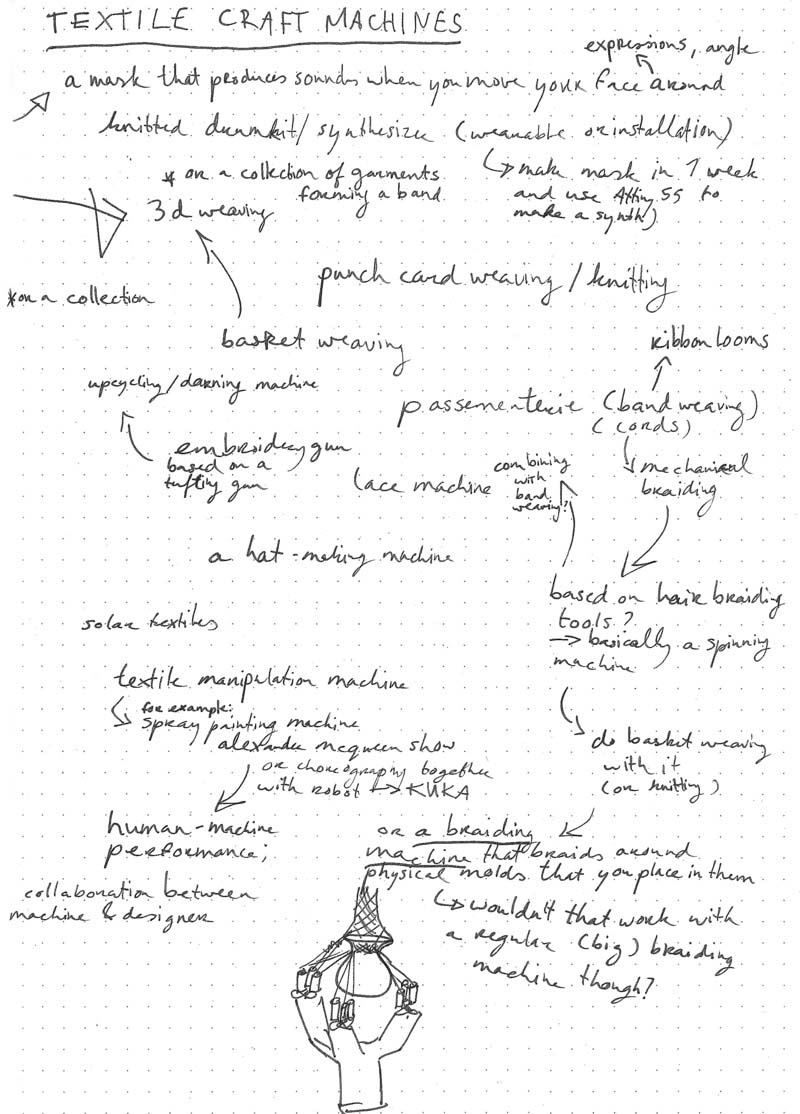
Machines to make textiles
Starting with more research and another brainstorm; this research didn’t really culminate into a project idea yet. To be continued?
Research
Fabacademy projects:
Rope making:
- Braiders for hair: they’re basically mini spinning machines or cord braiding machines which is fun
- DIY rope making machine
- Arduino based DIY braiding machine
- 3D printed braiding machine with more threads
- Here one made made of Meccano
- Industrial braiding machine
Reflection I
(February 3) I need to simplify my project because now it’s still really vague and big. Also Henk keeps saying that audio is harder than I think which I find frustrating because I still wanna do it, but I also have a habit of underestimating how long things take but I also want to challenge myself. Since it’s not really working out so far for me by trying to come up with more feasible projects that I’m excited about by thinking really hard and trying to imagine how it would work, I think I have to change my approach. I started by analyzing the way I worked when I was still in art school. A workflow that generally worked for me is:
- starting with a couple of concepts and writing them down
- doing visual research online and in the library, and accidentally stumbling upon similar and contrasting themes to combine with my research
- craft a vaguely coherent visual story and translate ideas into design methods
- try out a lot (usually a combination of 3D prototyping, for fashion this would be moulage on myself) and document thoroughly
- reflection, filter out a lot of research, do more research, discussing work
- new try-outs
- reflect again, try again
- get to the core ideas in the collection
- keep them loosely in mind and return to them when you don’t know what you’re doing anymore
- turn everything into a a coherent story
I tend to work in a very process based experimental manner, with a direction but one that can continuously shift and definitely not with a clear vision of what the final project will look like. I have to find a way to blend my chaotic way of working with the fabacademy way of planning and spiral development. I think what I need to do is craft a story, an experience, a reason why I’m making what I’ll be making. I like projects that are fun and clever and not overly complicated, projects that are a twist on what a machine is supposed to do.
Taking a step back
So, after two days of being frustrated and stubborn I did realize that Henk was probably right (but I needed to come to this conclusion myself). A synthesizer suit might be a little bit much as a final project and may actually fall into the bad category according to the student bootcamp presentation:
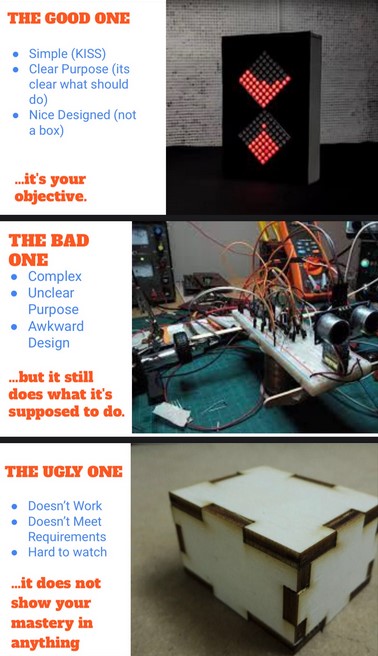
KISS stands for Keep It Simple Stupid. I didn’t document it so I forgot, but now I wrote it down :-) Even though I love chaotic projects, I think now that maybe it’s better to not make it complicated from the start. Also I just have to make a choice, because I have to model the final project in this week, and now I’m wasting time by constantly changing my mind. I can always change it later.
Exploring new ideas
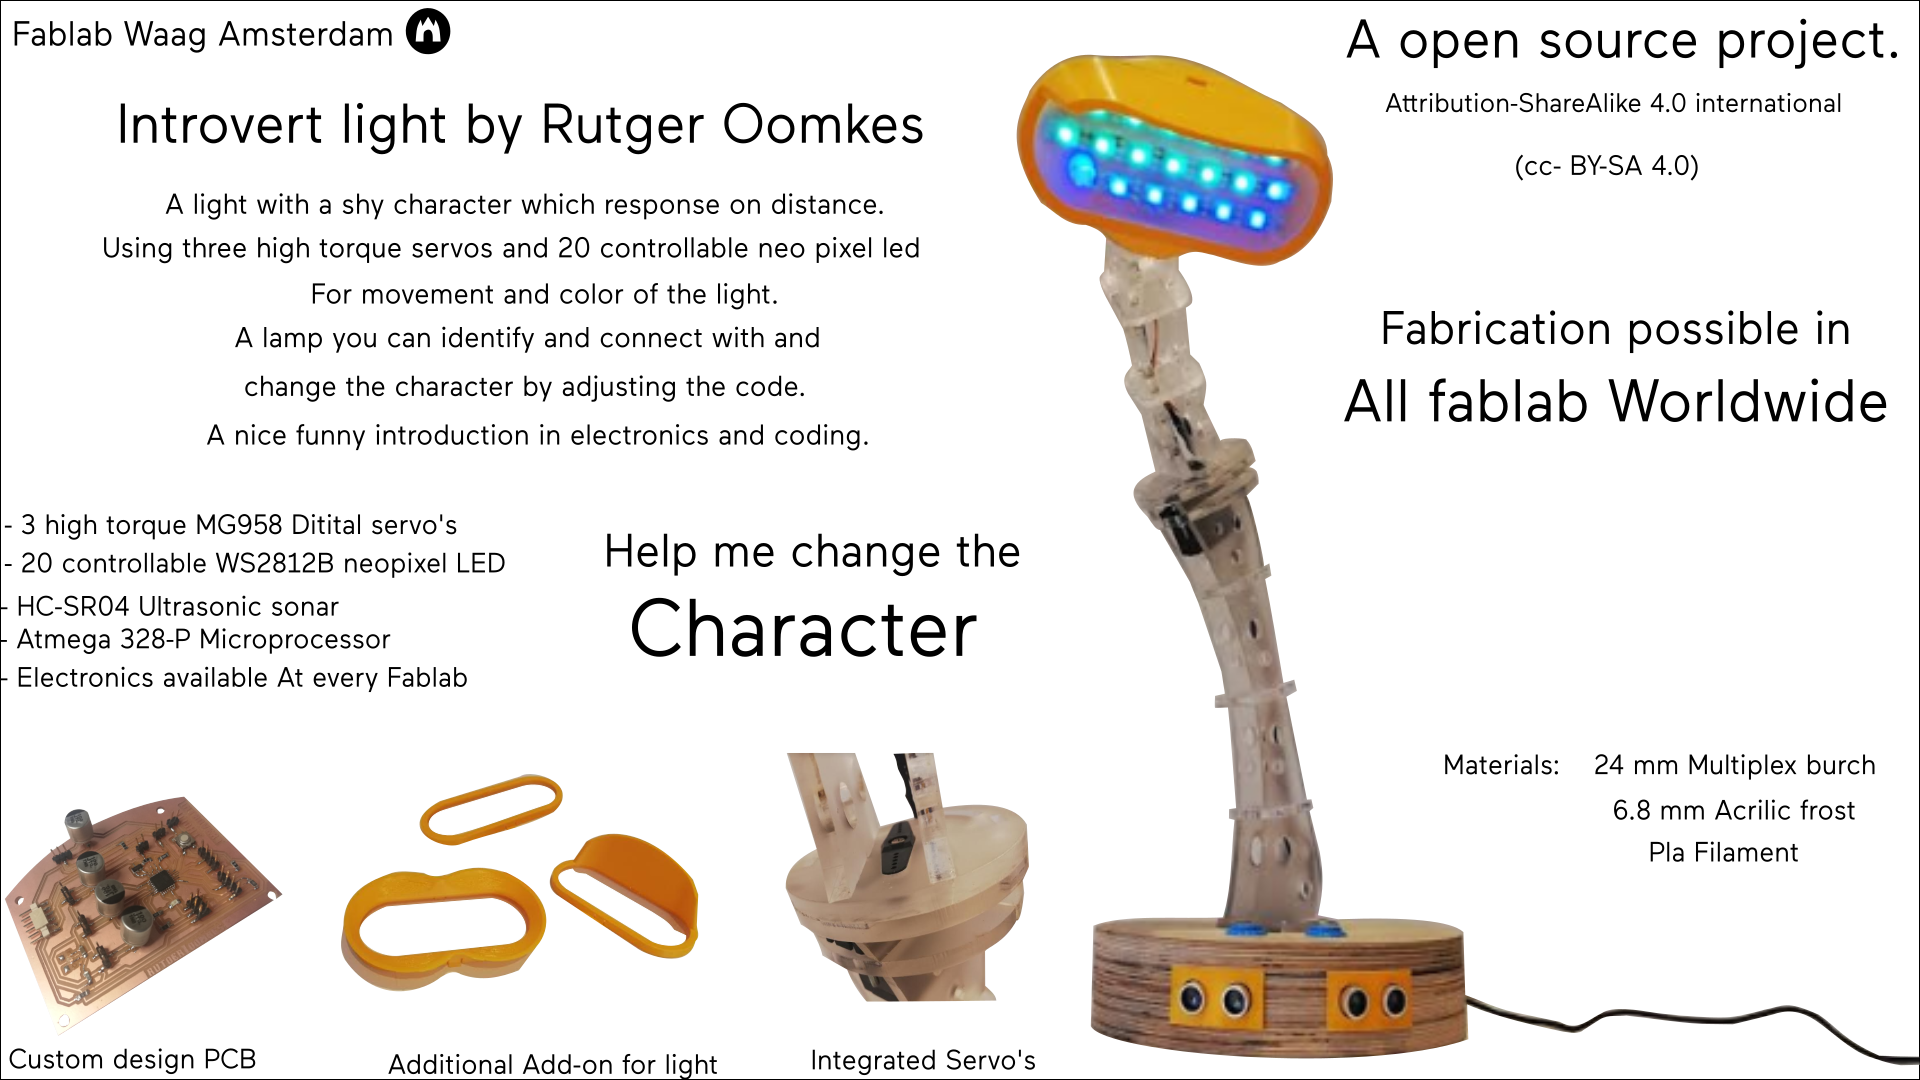
I started looking for a new way of coming up with ideas. Inspired by Rutger Oomkes’ Introvert Light I decided to make a spreadsheet of emotions and objects, and try to come up with projects combining an emotion with an object. Since I would like to make something with e-textiles, I focused on soft objects and wearables, but I also added a paintbrush as a starting point, because making a generative art tool is still on my wish list. Some of the outcomes from this list:
- Vengeful scarf: when you tie the scarf, it starts contracting and trying to choke the wearer (https://www.kobakant.at/DIY/?p=5276)
- Lively paintbrush: a paintbrush that starts painting patterns for you (based on radial patterns and/or moving up and down back and forth), it paints different shapes according to what it’s painting on (or based on a knob or some variable sensor input) with included ink reservoir; it’s a portable paintbrush plotter for people like me who are bad at drawing. it would probably be more in the shape of a big tool (painting gun) because of all of the electronics, a handheld pen plotter
- Sympathetic pillow: when you hug the pillow, it produces comforting vibrations and low tones to soothe the person interacting with it
- Anxious chair: chair that screams when you go sit on it
- Dreamy blanket: blanket that folds into meditative patterns throughout the day
- Sympathetic blanket: when you wrap the blanket around your body (or an object), the blanket contracts (with nitinol wires in a smocked stitch such as https://www.kobakant.at/DIY/?p=5276) to hug the wearer. maybe it starts contracting when a metal snap button is closed
- Impatient basket: a basket that shakes and tries to walk away by wiggling if it doesn’t get anything put into it for too long, like a dramatic cat
- Proud earrings: earrings that fold open like a peacocks tail whenever its wearer gets attention
- Scared jacket: a jacket that is startled by sounds and shows it through nitinol motion: fabric rises as if it has goosebumps or like a cat that makes itself bigger
Mask ideas
- Shy mask: a mask that always tries to blend into its environment by detecting environment colors and mirrors them with light (neopixels or rgb leds)
- Dreamy mask: embroidered flipdot display mask that shows animated simplified emotions or geometric patterns depending on facial movement, or it could react to its environment or motion (shaking your head detected by gyroscope) or it could be sound-activated (inspired by http://www.ireneposch.net/the-embroidered-computer/)
- Sad mask: a woven mask is tensioned (with nitinol?) so it goes from an open translucent weave to tight opaque fabric to hide the face so you can cry in peace
- Lost mask: a mask that tries to sing to its environment, echoing it like a parrot; the sound is recorded, goes through a filter (wahwah, or speed changed), then plays back (there are really simple arduino projects like https://www.hackster.io/gadgetprogrammers/diy-auto-voice-record-and-playback-7a47d7 so it should be doable)
- Disgruntled mask: a mask that makes a lot of sound when you open your mouth, to make you shut up again; motion would be detected with a knitted stretch sensor; it could even be with a tone function but the amplification has to be good and the sound has to come from the mask; it’s a screaming mask
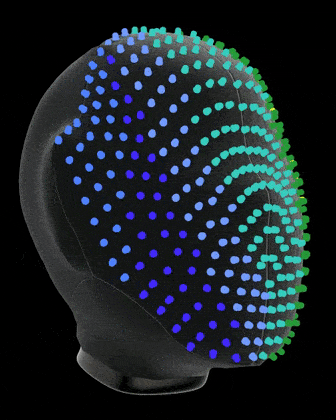
- Proud mask: mask that tries to stand out the most in any environment by checking the colors of the environment and then showing the most contrasting colors with lights covering the entire head (360 degrees, think Margiela masks) (https://www.keyence.com/ss/products/sensor/sensorbasics/color/info/)
- Embarassed mask: a mask that opens up like the Chalayan dress or a Tesla door when it’s confident and closes down when it’s embarassed; alternatively it would react to sound or motion around it
- Suspicious mask: a mask that responds people getting closer, the closer you get to it the more sound it makes (with speakers on the cheeks); distance could be mapped to different sounds; or it could be a 360 degrees patchwork face mask noise machine similar to my sound suit idea but not as big

I’m interested in emotional machines and sensitive textiles, and technology interacting with our environment and body. Looking at the list above, there are a couple of recurring techniques that I’m currently most interested in, which are:
- mapping motion input to visual (light or flipdots) or sound output
- mapping sound input to motion output (mostly nitinol)
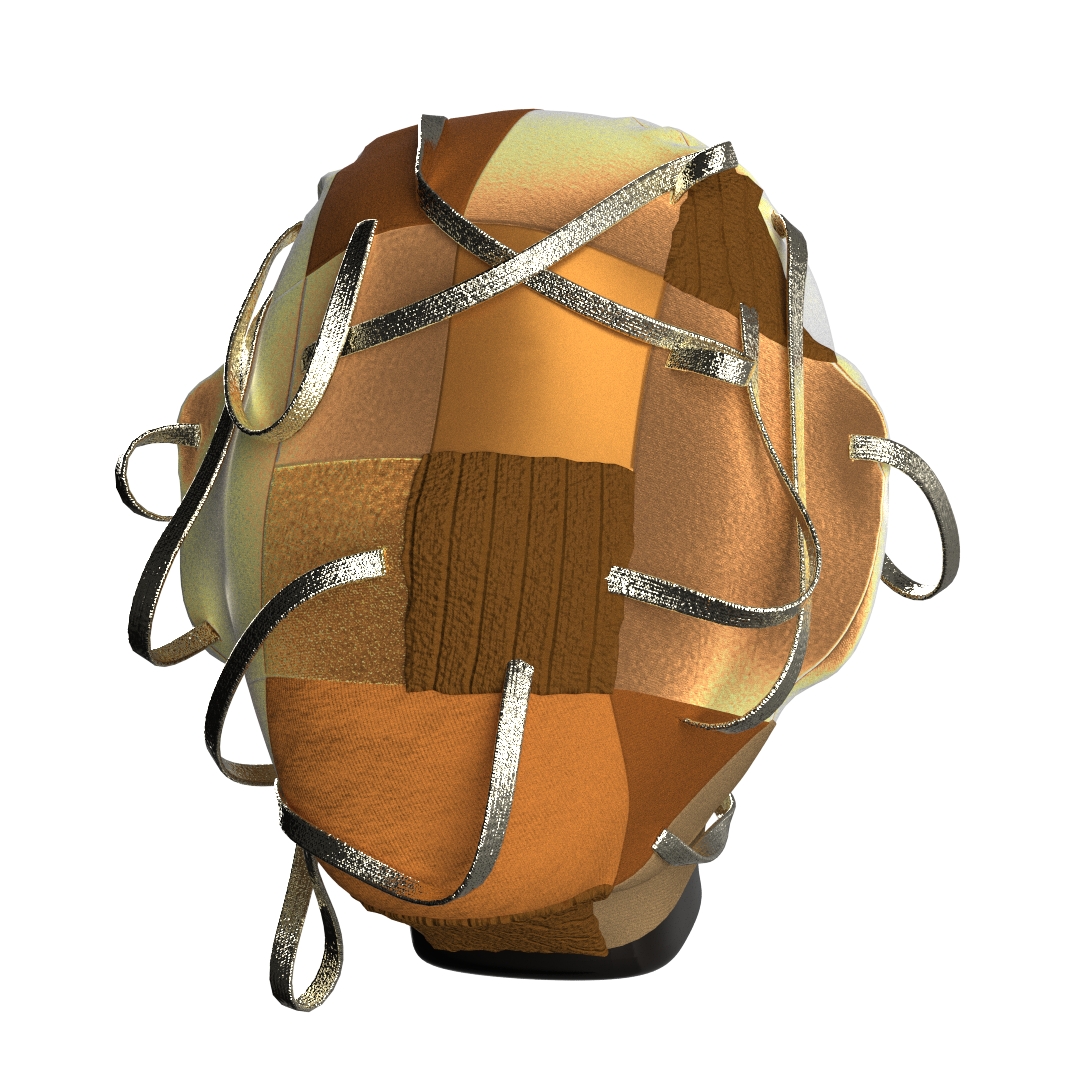
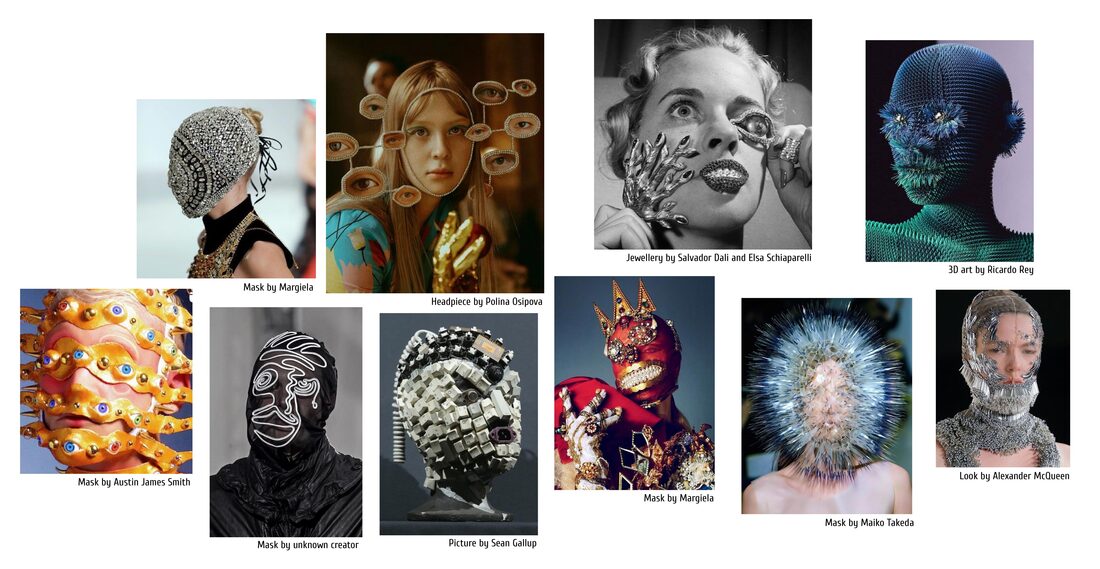
Since I seem to be mostly interested in masks (I don’t mean masks like we’ve had during covid, I mean full coverage masks inspired by Margiela), I decided to continue from there. During the modeling week, I worked on the base of the mask, and tried the version with RGB LEDs:
Patchwork synthesizer idea
I would like to make a synthesizer that can be patched differently depending on how e-textiles patches are connected around the head. It should be actuated by moving the head around, moving the jaw and touching the head. I want the speakers to be integrated.
Inspiration:
Model rendered in CLO3D:
What would be cool is to have two masks that interact with each other. When the wearers speak, a microphone picks up the pitch and/or volume of the sounds, and translates this into amplified sound waves that pass through a filter or multiple filters/effects (pitch shift, distortion) depending on various variable textile sensors. So when you try to speak, you are overridden by the mask that ‘speaks’ for you. The other mask then responds to the sound generated by the first mask. Maybe the first mask then also responds to that, and you get a feedback loop of masks responding to each to each other: ‘singing’ to each other.
It would be nice if there is also a visual aspect to it, for example with neopixels changing according to pitch. I want to use the input and output weeks to try this out in a smaller scale, and the networking week to get the boards to communicate with each other.
It’s a project blurring the boundaries between human communication and computer communication: you become one with the mask and have some control over it, but you lose control over the output very quickly and the masks take over.
Projects that I can use as a reference:
- Vocoder https://en.wikipedia.org/wiki/Vocoder
- Analog modulation with an opamp, generating the other signal with a raspberry pi
https://forum.pjrc.com/threads/42355-Real-Time-(Working)-Vocoder https://www.instructables.com/Build-an-analog-vocoder/ https://github.com/malacalypse/rp2040_i2s_example/blob/master/i2s.pio
Audio research
Since I want to do something with audio but I barely know the basics, it’s time to get acquainted with various audio concepts and machines.
- Sequencer: basically something that plays a sequence of sounds
- Synth sequencer: plays a sequence of voltages
- Baby 8 sequencer: simple sequencer that uses a 4017 counter chip (https://hackaday.com/2016/01/14/oh-baby-baby10-build-a-classic-analog-music-sequencer/)
- MIDI: musical instrument digital interface
- BLE: bluetooth low energy, can be used to make wireless midi devices
- BLE MIDI library with ESP32
- MIDI theremin
- https://www.hongkiat.com/blog/open-source-hardware-synths/
- https://www.pschatzmann.ch/home/2021/11/05/arduino-audio-tools-audio-effects/
Links for future reference
- I2S microphone input devices
- 8 step tone sequencer
- I2S sound tutorial for ESP32
- ESP32 with SD and microphone
- RP2040 PDM microphone
- Online tone generator
- https://blog.native-instruments.com/audio-filters-guide/

Sound Libraries
Links that Rico shared about speakers during Global Open Time:
- https://www.youtube.com/watch?v=GxWsq91Njwg
- https://www.youtube.com/watch?v=4f5aYQnkp3Q
- https://www.youtube.com/watch?v=A4NCodkoGk4
- https://www.youtube.com/watch?v=Wrizk-TqsGY
(Analog) Oscillators - notes
Notes on this video
- Analog oscillators aren’t programmed but do their thing because electricity does it’s magic
- 3 components
- Logic inverter schmid trigger over two pins connected
- Capacitor connected to ground
- Resistor from input to output of logic inverter
- The relationship between the resistor and capacitor determines the pitch
- 1 microfarad is a good start
- The higher the capacitor value, the lower the pitch
- The higher the resistor value, the lower the pitch
- The logic inverter looks at the voltage at 1 (at the capacitor) and outputs at 2 high if voltage is 0 and low if voltage is 5/9/whatever volt
- A smaller cap is full more quickly so it switches between high and low faster
- A smaller resistor let’s more current through filling the capacitor up more quickly
- Resistors are way easier to work variably with than capacitors
- Your body or graphite as a resistor: 0,1 microfarad nf
- Stepped oscillator: combining two of the circuits above to create notes with a clear step in between them instead of smooth transitions like when it’s just one
- Pitch: sound > frequency: light
I2S
I2S is a protocol for sound data transfer and it was built as a connection standard for digital audio devices
The I2S protocol manages PCM data on a bus that consists of at least the following three connection lines:
- SCK – The Serial Clock Line, sometimes referred to as the “bit clock line”.
- WS – Word Select, which selects between the Left and Right audio channels.
- SD – Serial Data, the PCM audio data.
https://docs.arduino.cc/learn/built-in-libraries/i2s


More on this during input and output devices weeks; I didn’t get anything working yet.
Current project idea
Since audio wasn’t working out very much and I’m going to work on a cool project relating to technology and crafts at Waag, I figured I might as well change my project idea one last time and get started on building right away. This plan is way easier to do spiral development for, and it has more interesting mechanical design aspects than the sound mask idea, which was mostly a lot of programming and electronics, but had barely any challenges in the actual physical design since I turned the voice into the most important input. I wasn’t hyped about it anymore, so I changed. I don’t have any more time to change project idea again, so this is what I’m working on now. We’ll see where it goes!
So: my current idea is to make an offline live controllable modular brush plotter. I want the machine to drive on fabric in a path that is both determined by the machine and for and to use natural dyes made in the Textilelab.
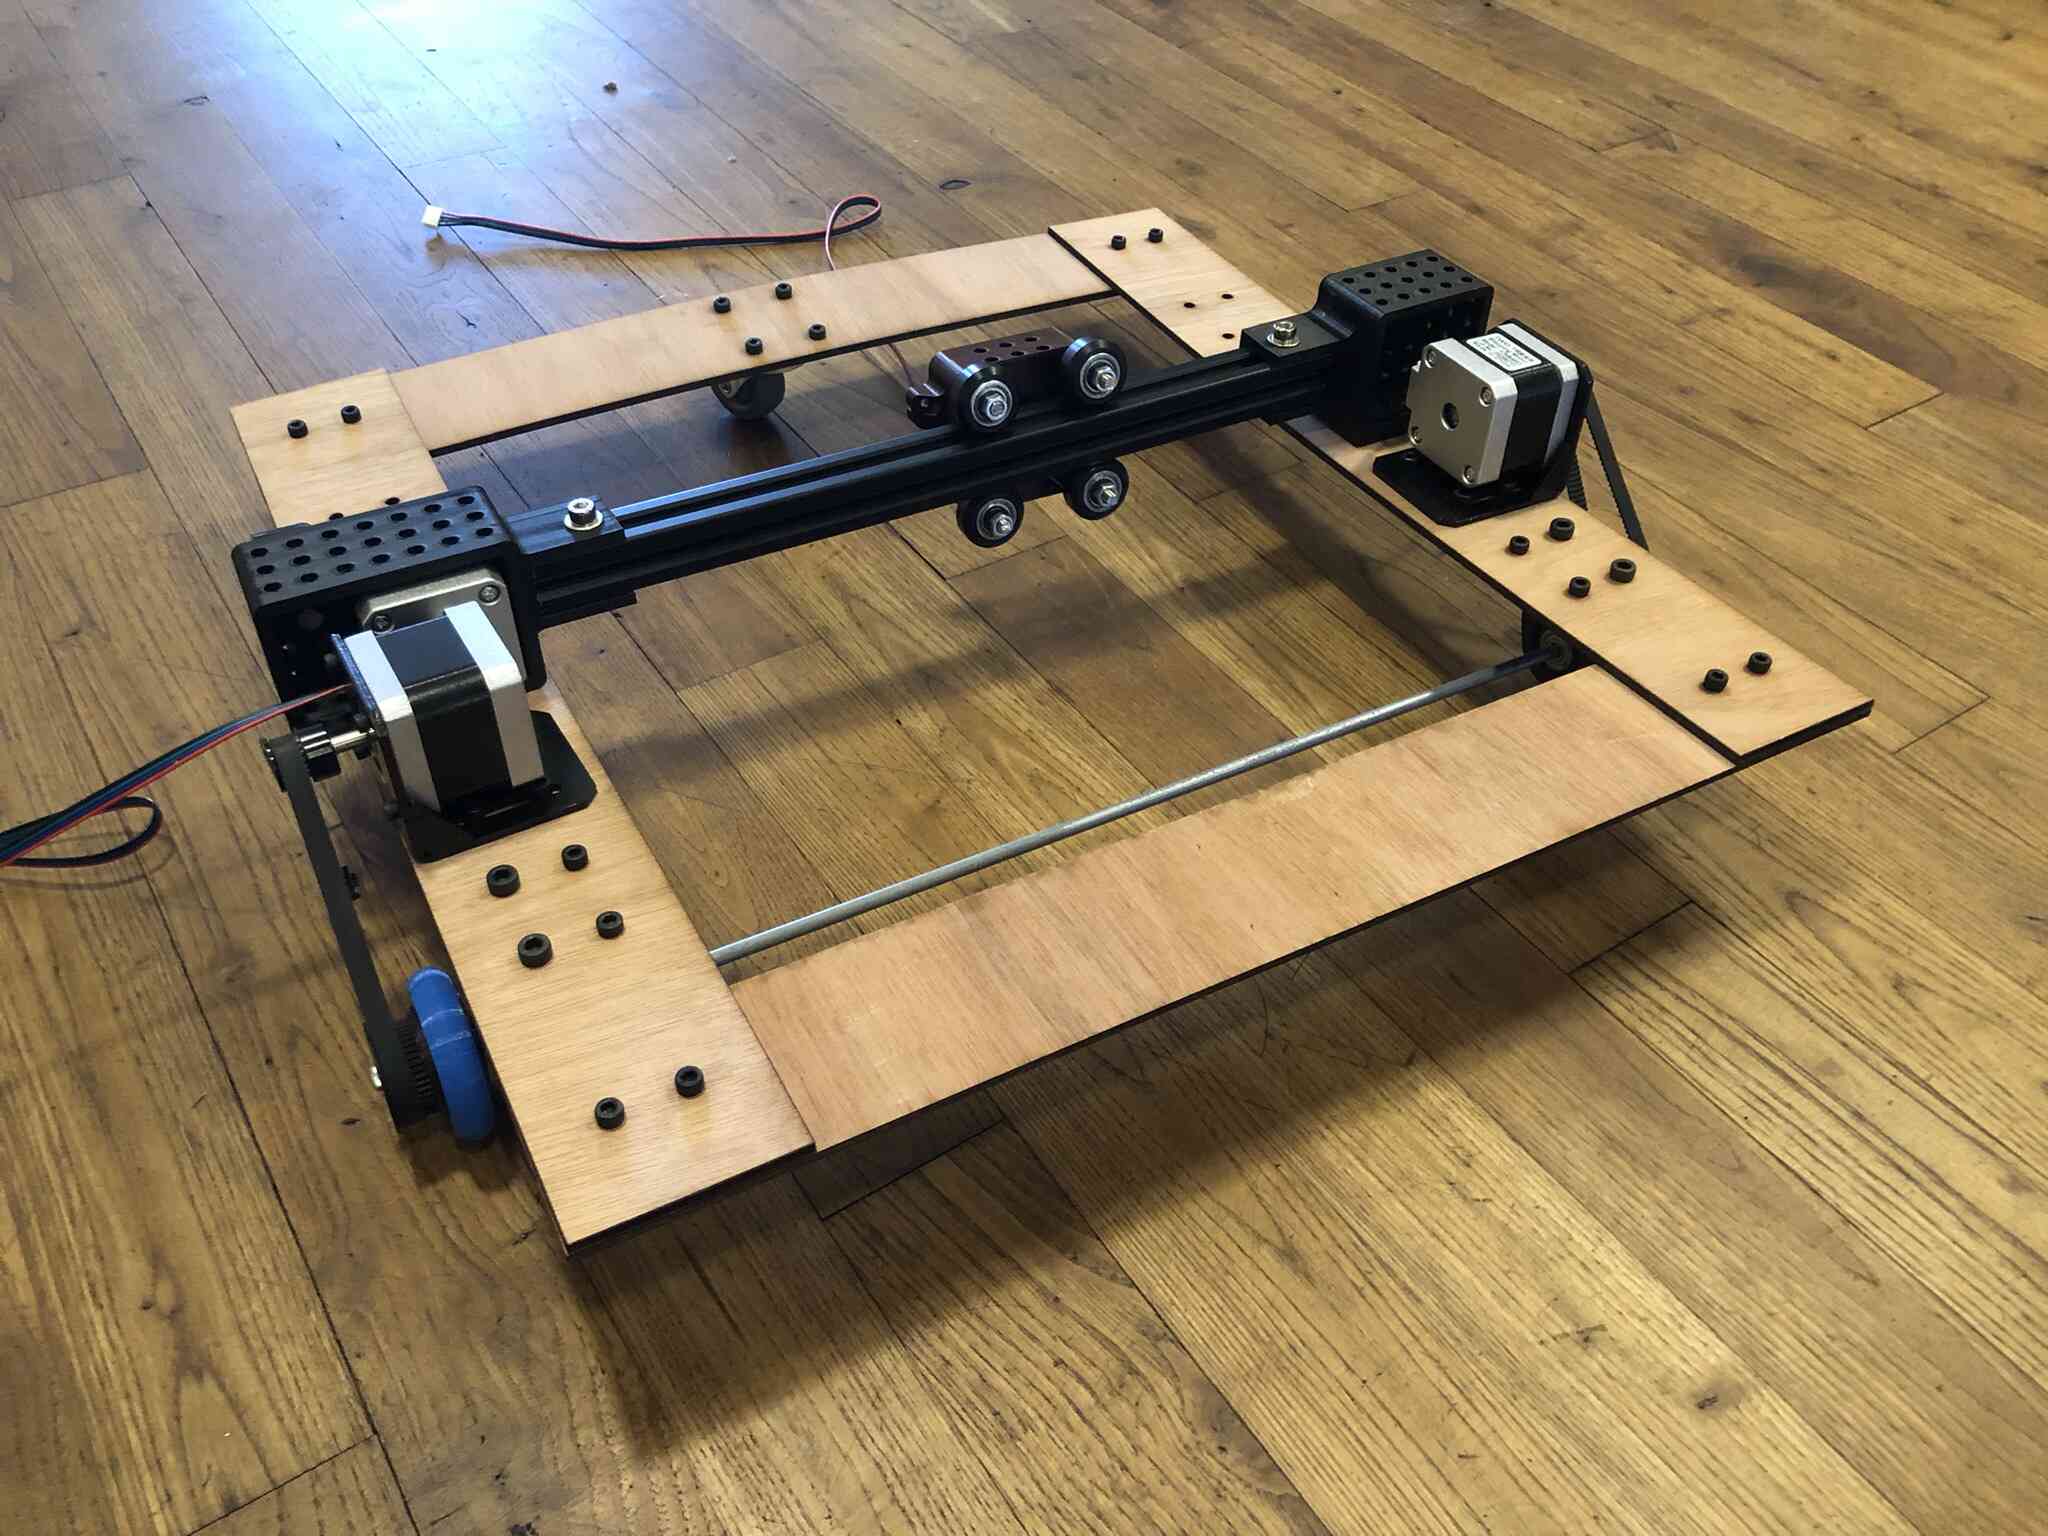
I’m someone who learns by doing most and since I don’t have a very good mechanical insight, I’ve started making a prototype to then build on. Usually when I start making the plan keeps evolving, but I’m trying to adapt my way of working for spiral development. Current prototype that I’m working on:
Project development page
Click here for the project development page
Human-machine collaborative print design robot
First iteration
Features:
- Driving path on the Y axis is pre-programmed and controlled by two stepper motors. Ideally, it can go straight or do sinewave motion, which is controlled by a potentiometer. First spiral is just making it go in a straight line back and forward
- X axis is an urumbu axis controlled by one stepper motor. The path is determined by a bunch of preprogrammed routes that you can switch between with a button
- The brush module can have all kinds of custom brushes. Ink reservoir is included. The brush moves with a servo motor and moves up and down with a mini servo motor or solenoid
- Brush stroke is controlled by a modular e-textiles input device that detects variable resistance for the brush stroke (how hard it’s pushing down the brush and the way the brush is moving), and a capacitive touch button that you can press to bring the brush up and down
- It would be cool if you could record and loop a motion pattern, by pressing a button you start recording and by pressing again you stop the recording and the pattern starts repeating itself
- It would also be cool if the input device is wearable for a performative aspect
- Power comes from a big 12V rechargeable battery
Second iteration
As usual I want to keep changing my final project idea, but I’m staying with the brush plotter idea and the electronics that I have now, so 3 stepper motors, two servos and two e-textiles input devices. Instead of having a little robot on wheels, I could also make something with these same ingredients that is a bit more of an installation. I’m thinking about these machines by Jean Tinguely:


I could have the fabric (or paper to start with) on a roll at the top and the bottom and use the two steppers to guide it through a frame. I could also start with a frame where the fabric doesn’t move to make my life a bit easier.
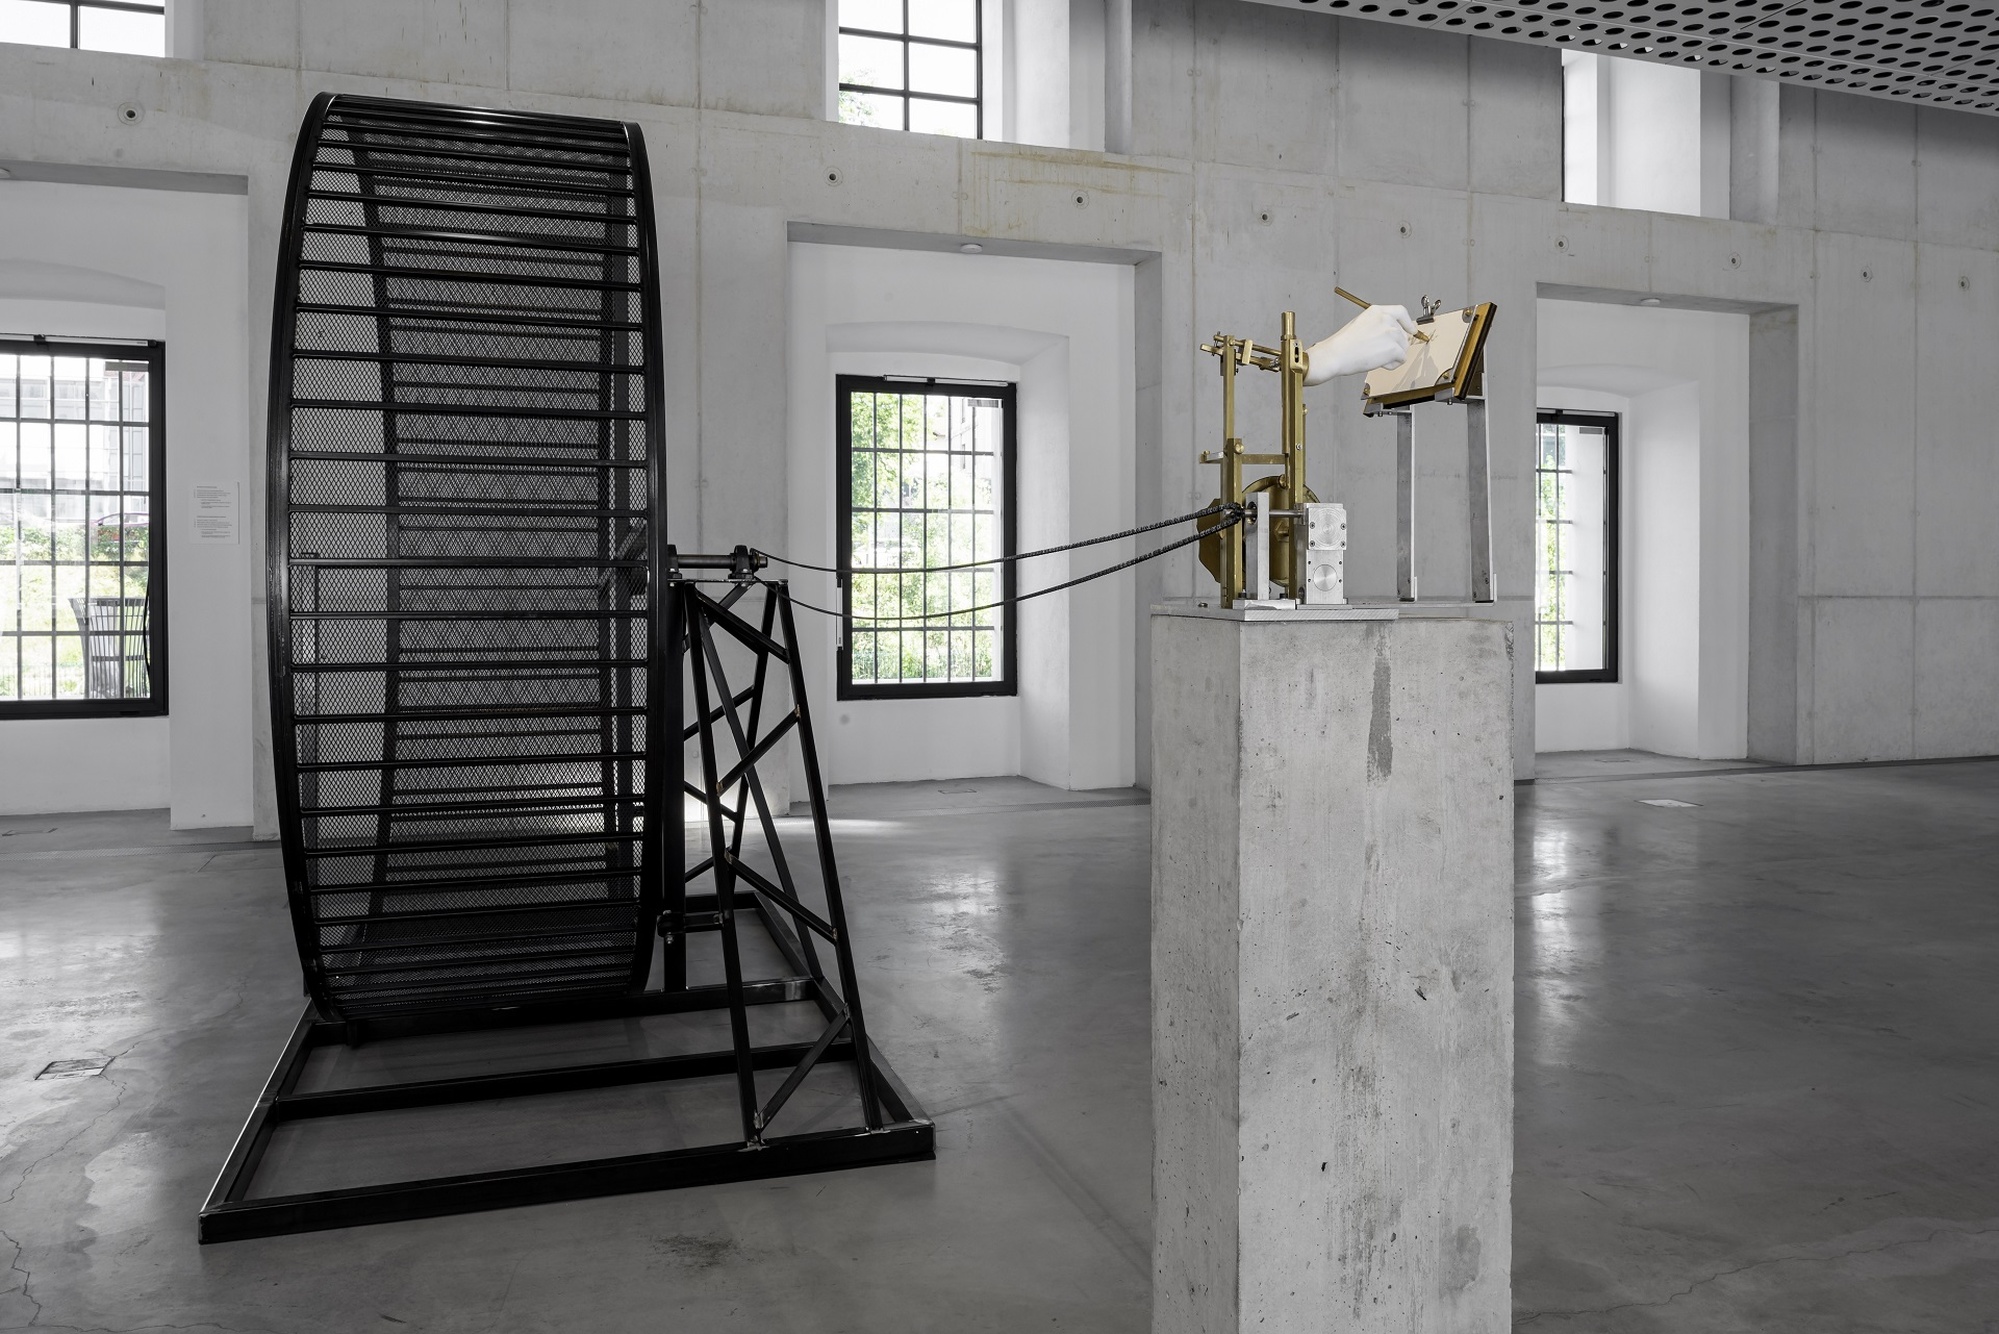
I also am still in love with this installation by Meta Grgurevič called Scraping for Gold. The hand moves and draws when someone is walking in the big wheel, and the motion is determined by an intricate cam/follower mechanism. I could make something like this with my machine, where the motion is determined by the input devices and using stepper motors to position the brush on the fabric.
This 5 bar linkage plotter inspired me greatly; I could adapt this principle to control the two stepper motors with my two input devices:

Research
- http://academy.cba.mit.edu/classes/output_devices/DRV8428/hello.DRV8428-D11C.jpg
- Pen plotter car on wheels
- https://ab.cba.mit.edu/quentinbolsee/beehive-axes
- https://www.instructables.com/2-Potentiometers-2-Servos-Controlled-Motion-With-A/
- https://www.youtube.com/watch?v=JhHSXCLsN4k
- A really big list of all kinds of plotters
- Very cute bristle bot and brush bot
- Could do something with two vibrating motors and a brush module and walk over a surface like that
- https://gizmodo.com/the-duograph-makes-creating-pretty-spiral-patterns-a-sn-1774553474
- https://www.thisiscolossal.com/2016/03/cycloid-drawing-machine/
In Fabacademy:
- Brush Paint Machine
- Calligraphy human/machine relations
- http://archive.fabacademy.org/2017/fablabbahrain/students/999/week14/week14.html
- http://fabacademy.org/2018/labs/fablabulb/ga_machine_design.html
-
http://archive.fabacademy.org/fabacademy2016/fablabbcn2016/students/375/week10/
- Would be cool to have a brush with a gyroscope like I made before, that is translated into the movement of the brush of the machine.
- Should also have a look at the tentacle control used by Samson.
Mechanisms Fourbar linkage:
- The crank is the link that rotates fully and is usually connected to the motor; it is often the shortest link
- The rocker is the link that moves back and forth
- The link in between them is the couple
- The last link is the ground (doesn’t have to be an actual link)
A point on the couple describes a surface:


Five bar linkage:

For the input device I could make another easle with a big knit that people have to interact with, so it’s one ‘painting’ that creates the other ‘painting’. Playful interactions!