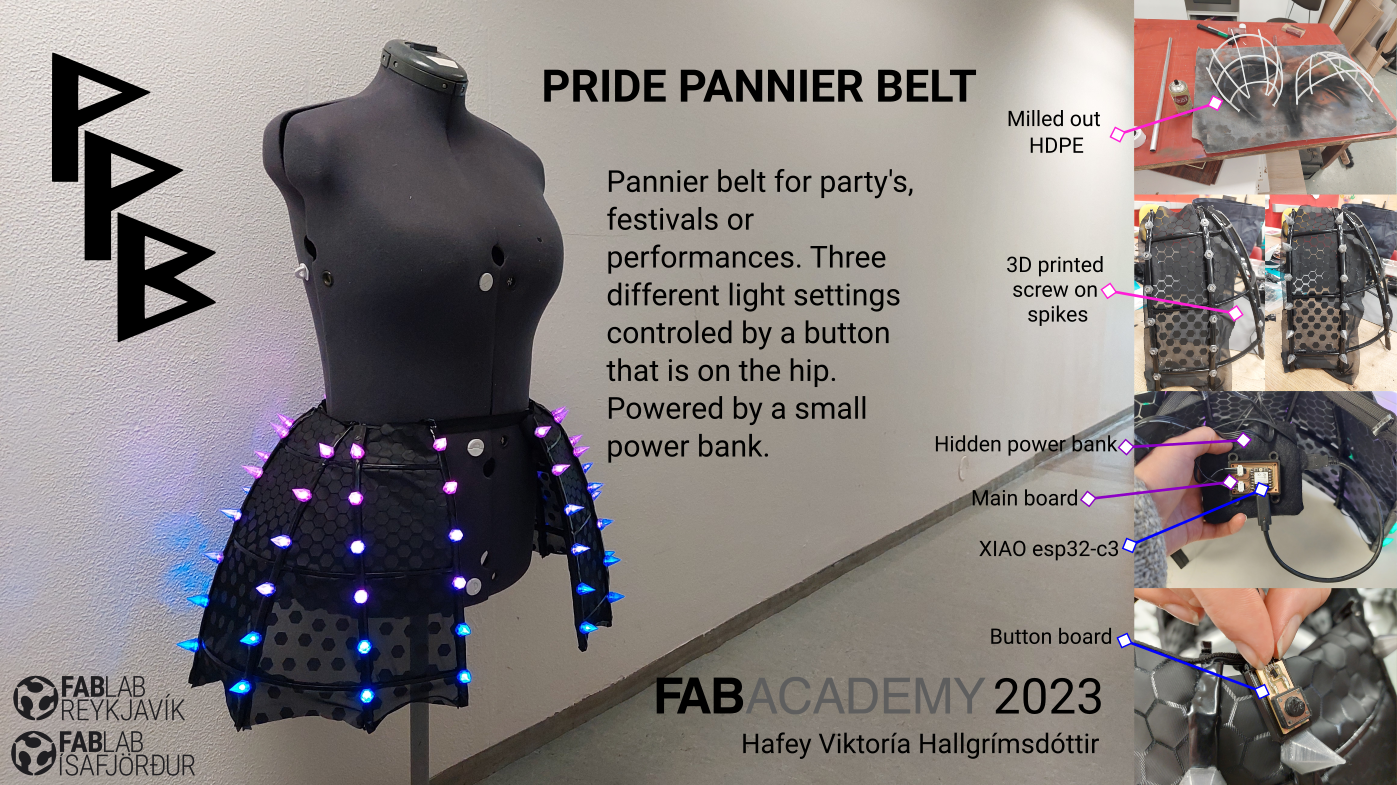
Final project
Poster
First cketch
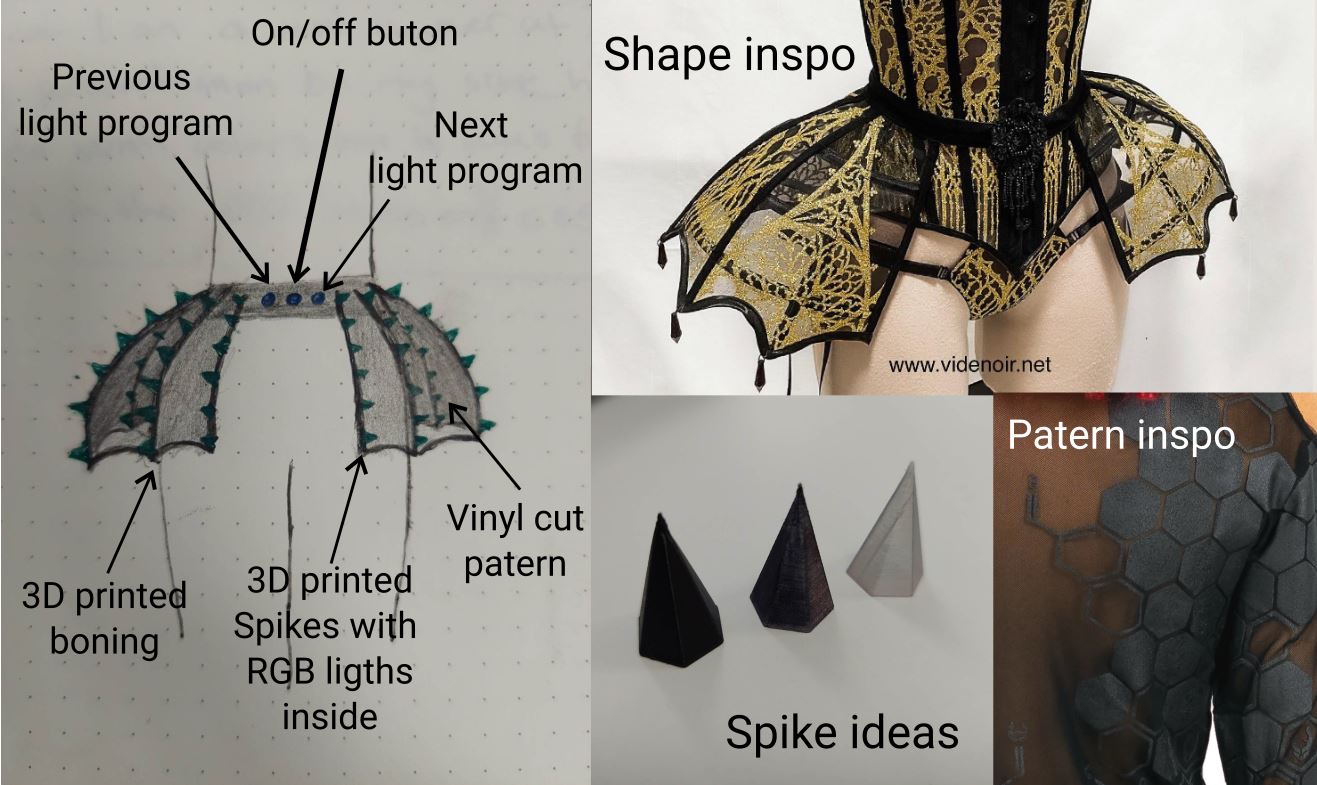
My idea is to make a pannier belt that is made with 3D printed boning, vinyl cut pattern on the fabric and 3D printed spikes with RGB led lights insight. The plan is to have a few different programs of lights, some still, I would like to both di the pride flag and the bi flag color but also some flowy moving programs.
Bottom of spike modeled in Fusion 360
This is from Week 2
This is from week 2 Week 2 My knowledge of fusion 360 is pretty limited I have really only done one project in it before, but my coworkers use it allot so I decided that it would be my pick for 3D modeling.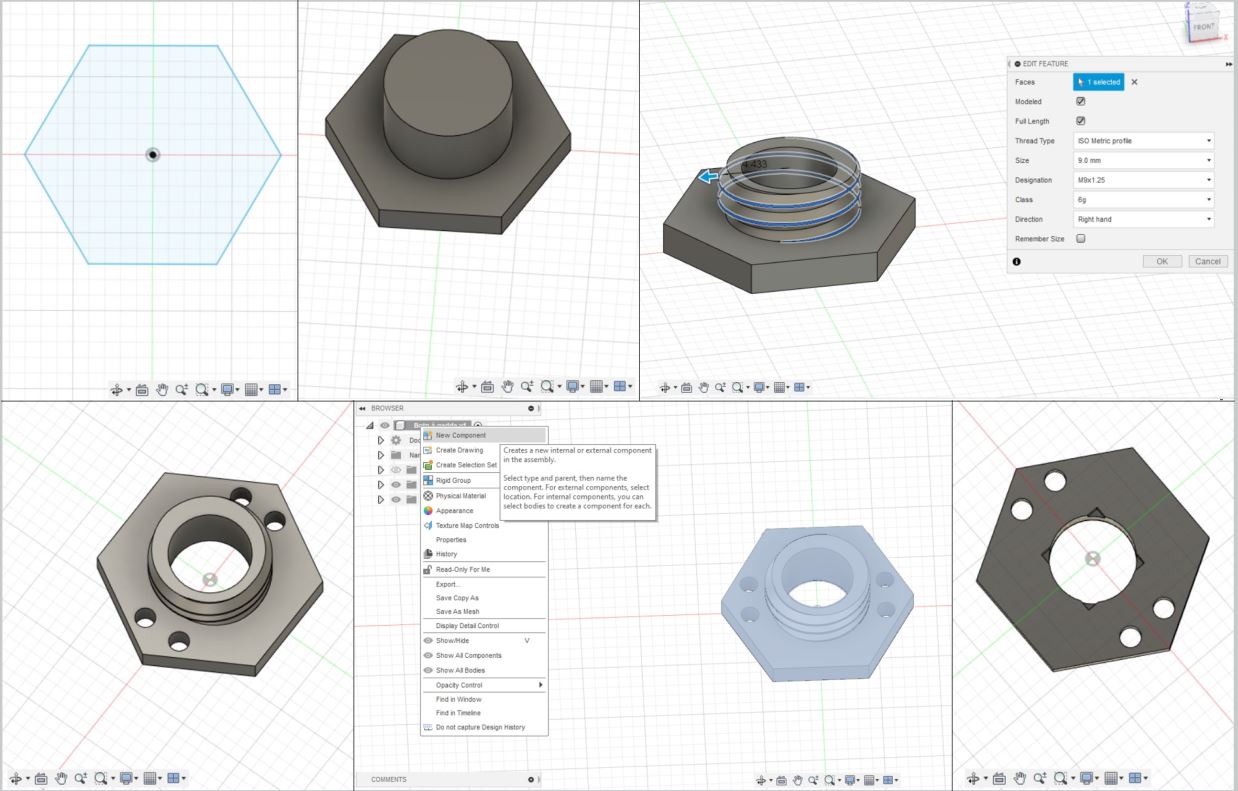
Holow spike modeled in Fusion 360, screw part
This is from Week 2
I tried to make the spike all in one go but was not successful, I realized that the roof tool fills even if you have two walls so I did the screw part separate and then the hollow spike separate.
Holow spike modeled in Fusion 360, spike part
This is from Week 2
To make the spike I went in to sketch and made a hexagon and a line from the middle of the hexagon to 21mm height, selected both and use the tools loft. Made another one the same way only a little smaller to take out of the bigger one to make 0.5mm thick walls.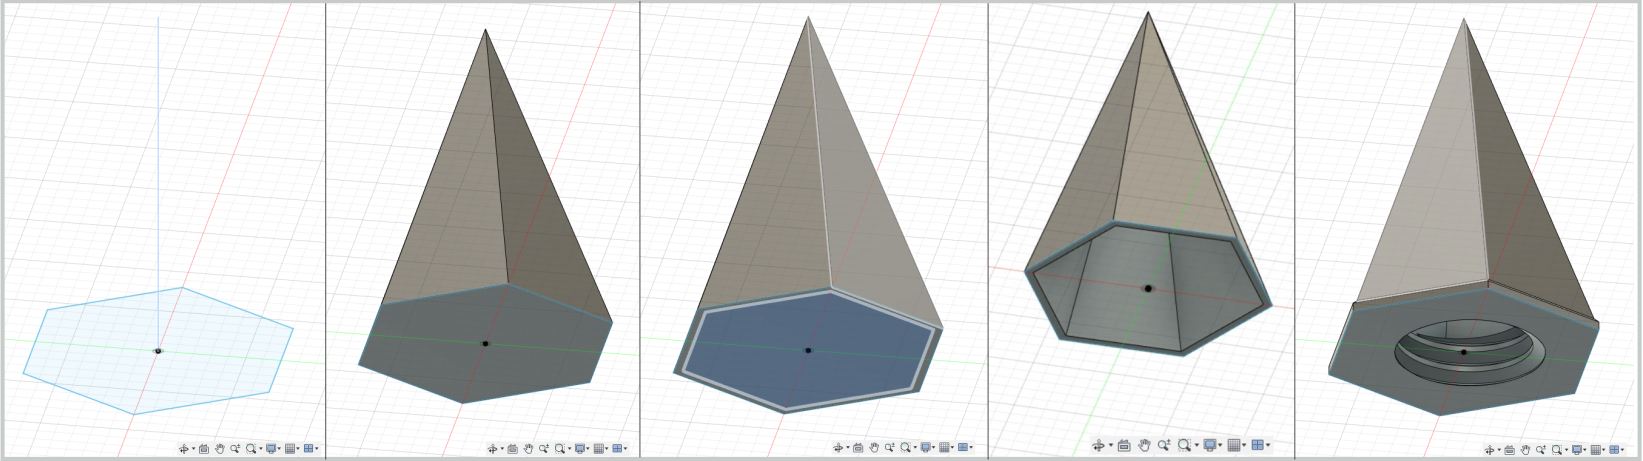
Patern tests
This is from Week 3
I made hexagons in Inkscape, first making them with equal spacing but then putting bigger spaces and more random of a pattern. I made them into cutting lines and cut them in the vinyl cutter, I plucked and then heat pressed on a very thin see through fabric.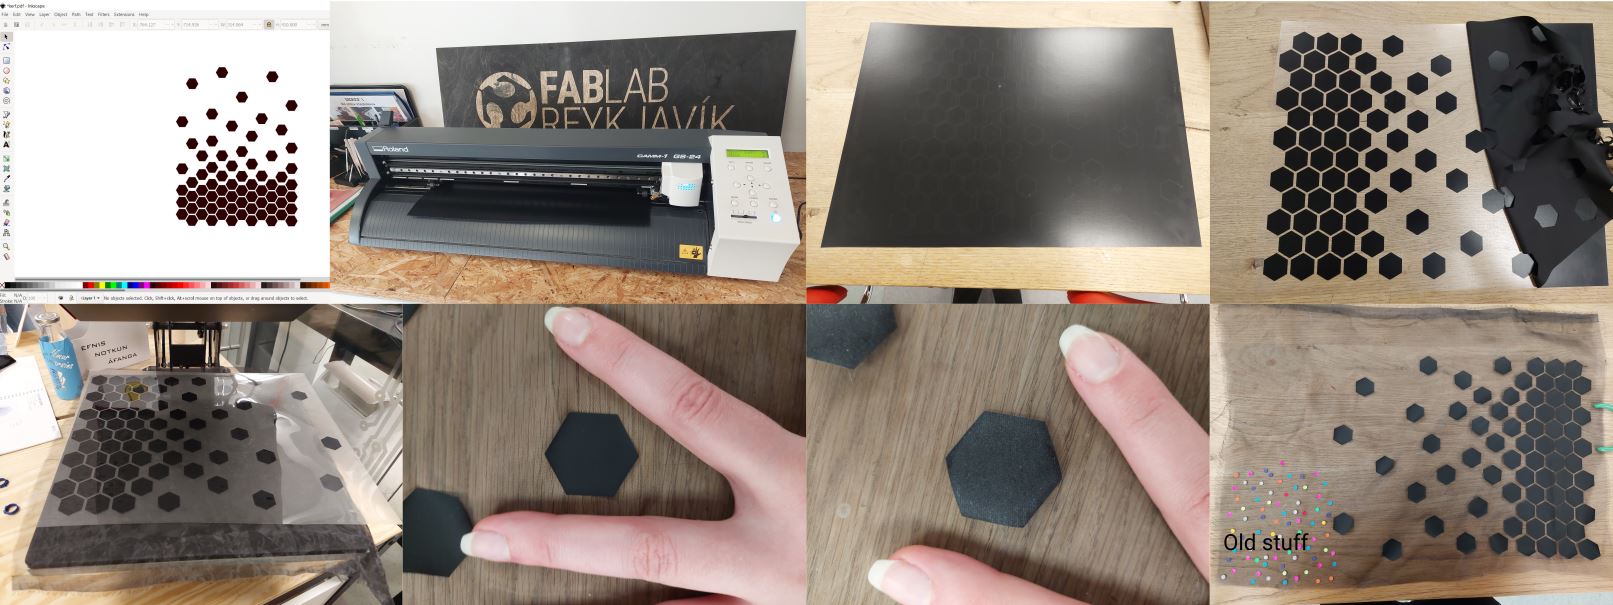
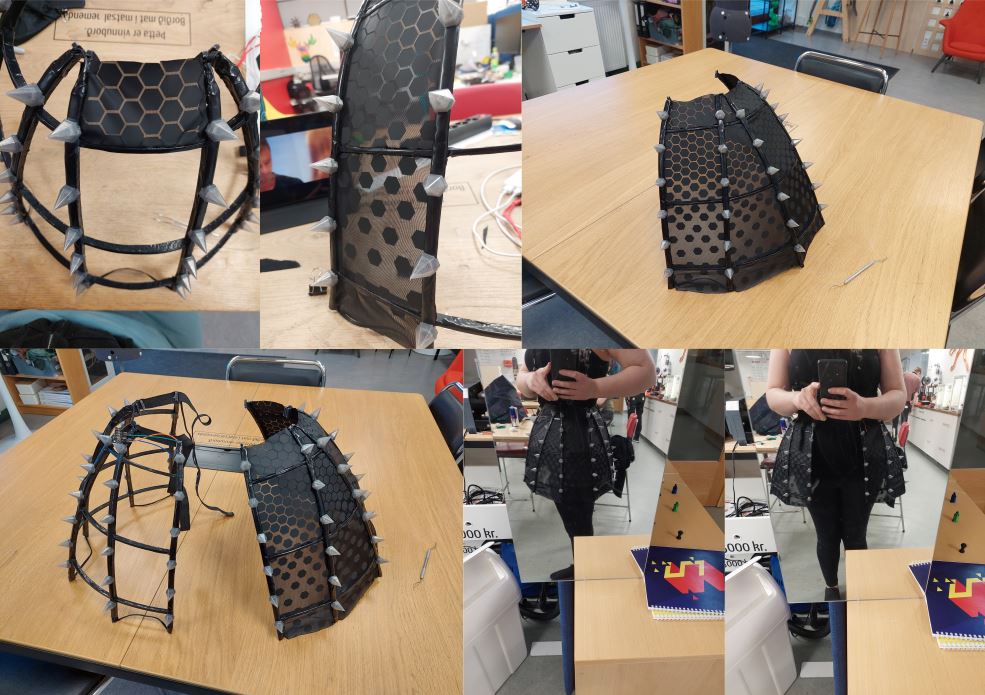
The start of the prototyping
To do the first part of prototyping the hip cage I drew up a cage and cut out in cardboard just see how it looks and if I needed to make any changes, I changed it a bit and did one more and that one looked good. I also wanted to see if there was any problem powering the led strip with the power bank but that worked well.
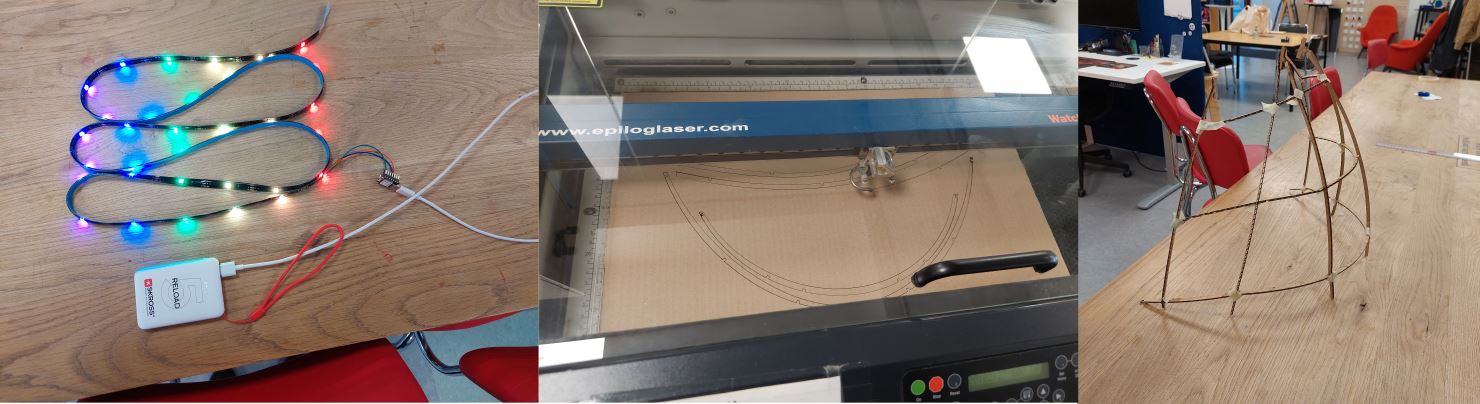
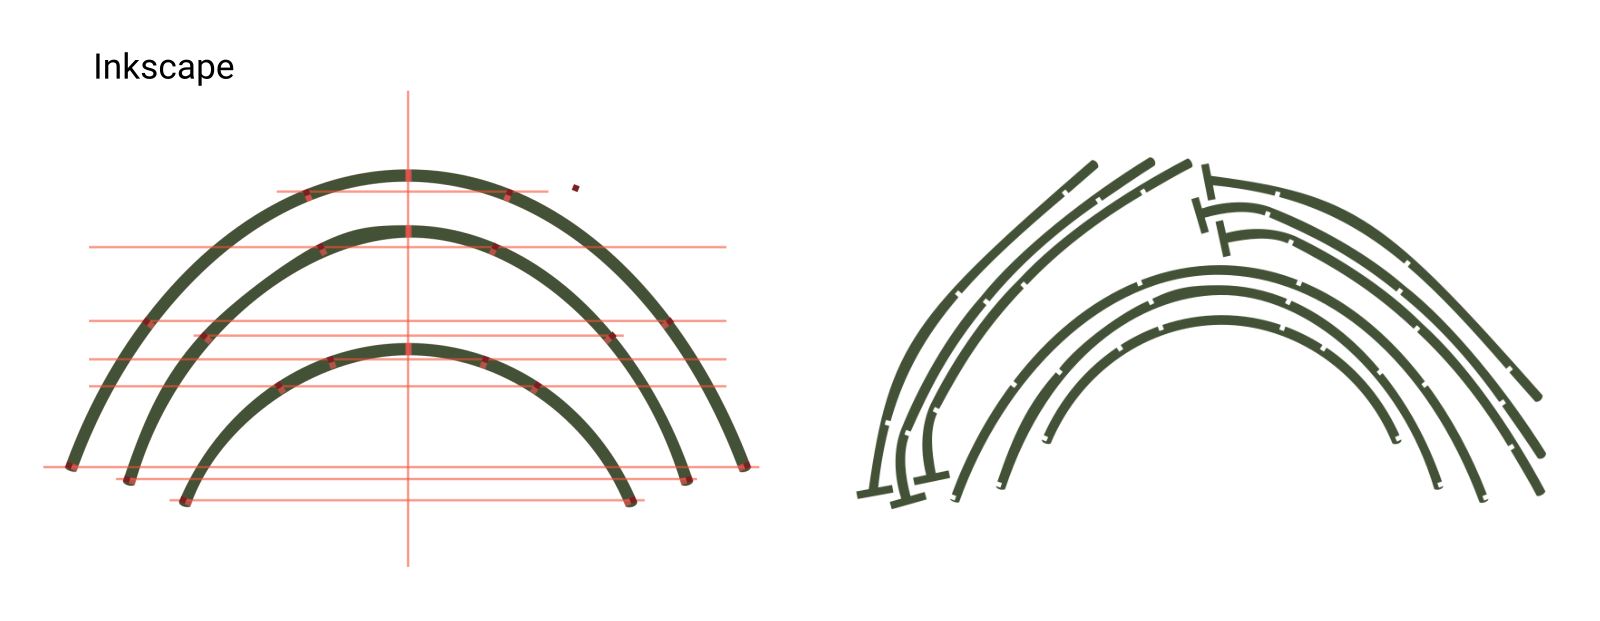
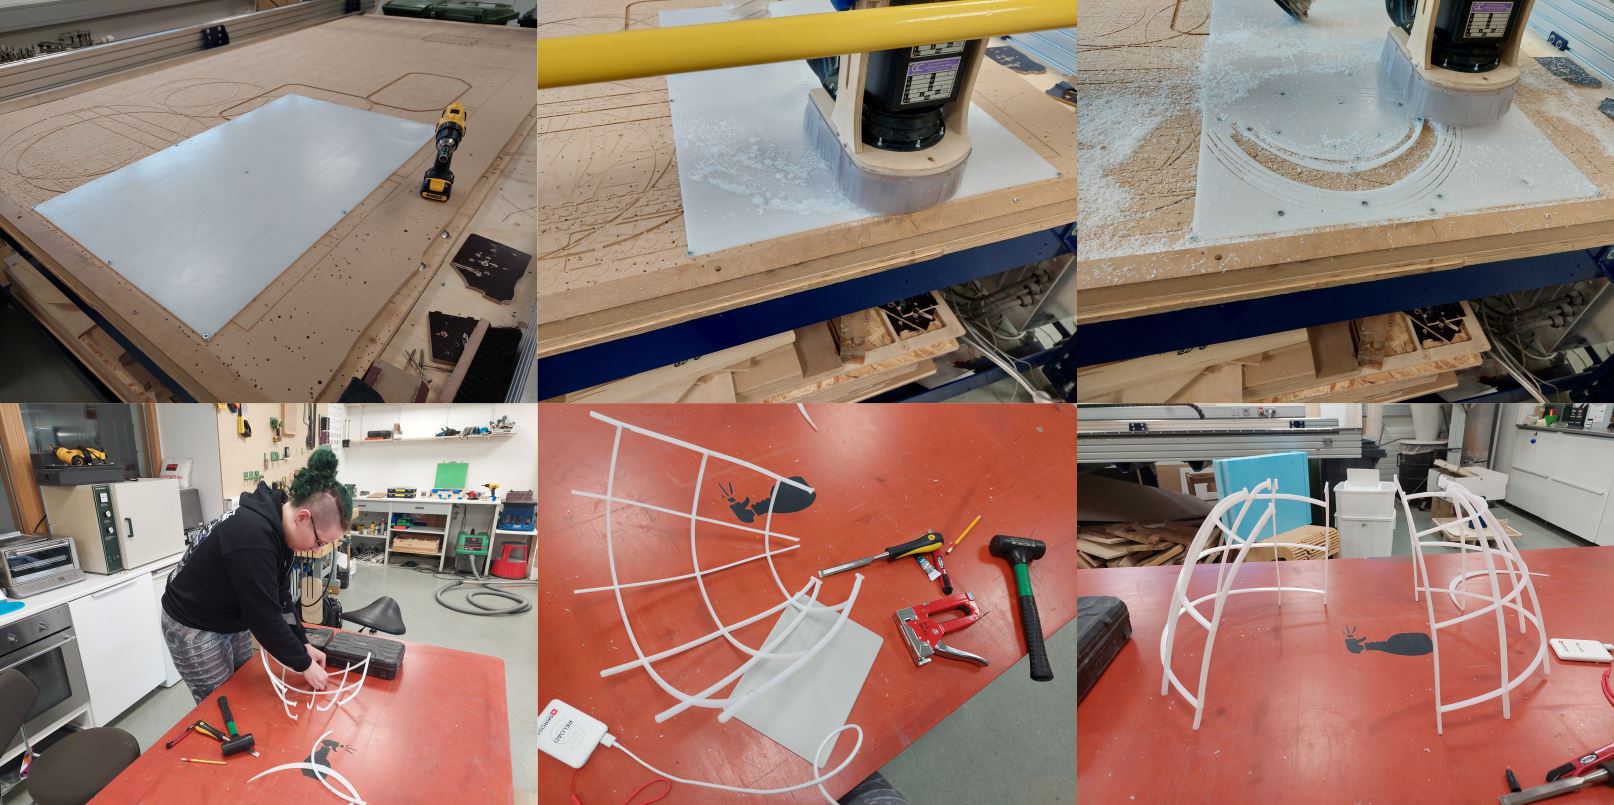
Making the hip cage
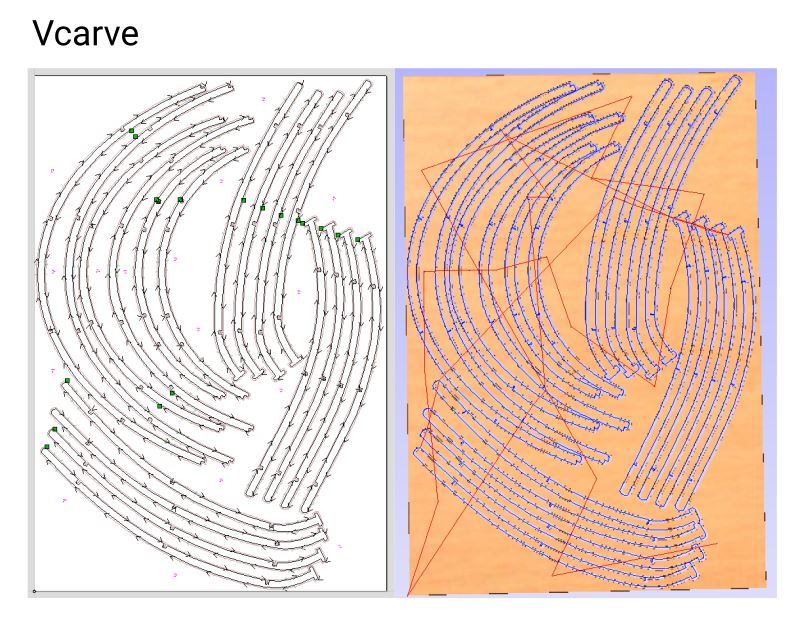
To make the hip cage I used the same file as I had used when laser cutting in the cardboard but put it in the right thickness since the cardboard was around 3mm and the HDPE is 4mm. I also took some time to make it more perfect, and symmetrical. I saved the file as pdf and put into Vcarve, I ended up needing to put holes for some additional screws because it did tend to pull up even though I did have tabs but after that it worked fine.
I was putting it together when I realized glue does not hold well to HDPE so I took out the staple gun, that did a good job holding everything together.
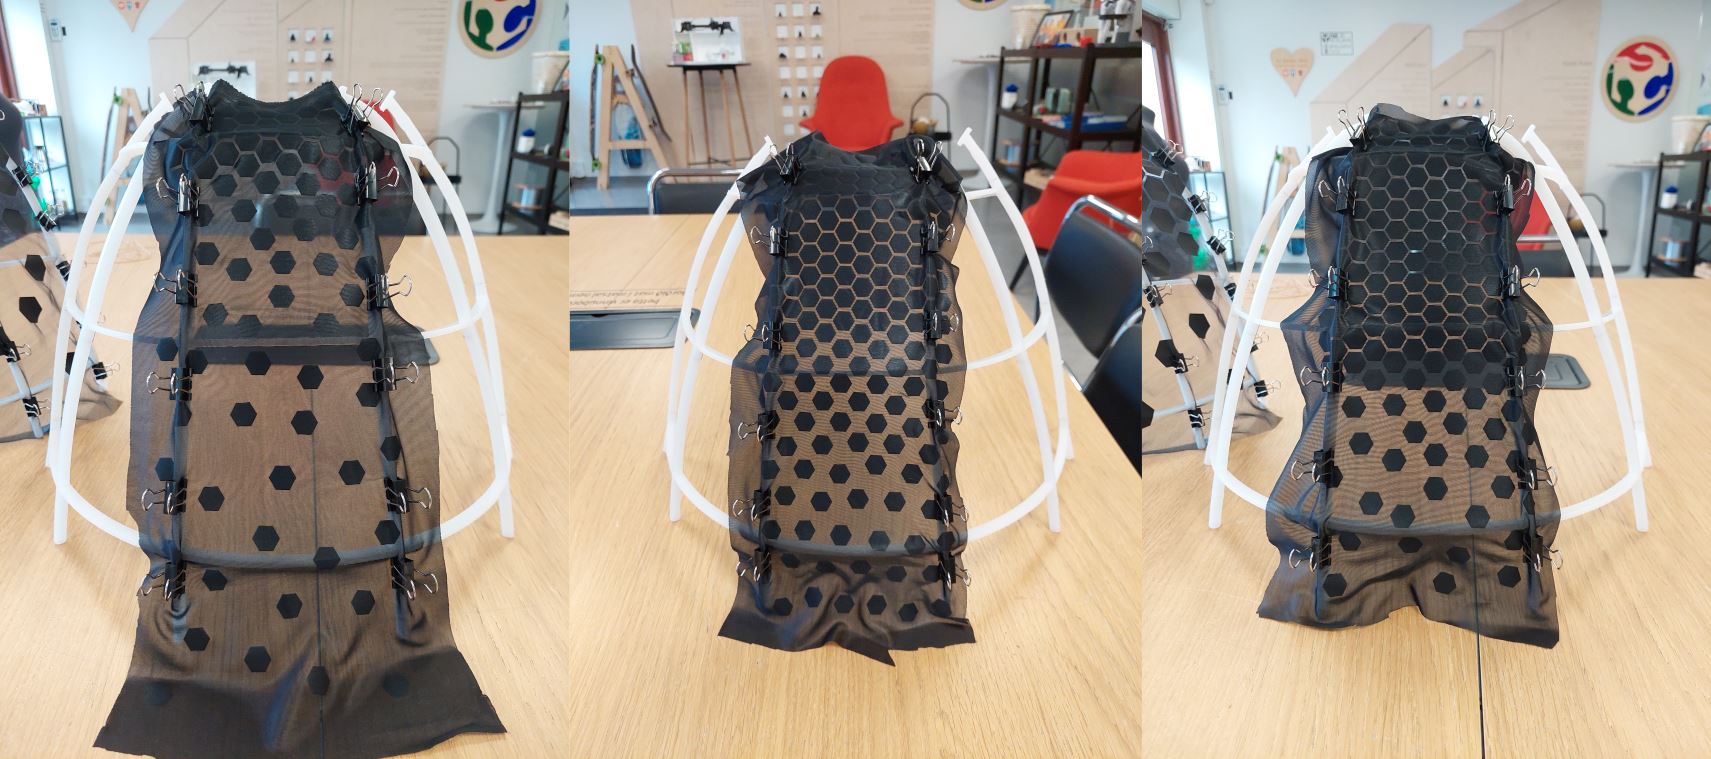
Testing the patern
I took the pattern that I had made in week 3 and pinned it on to see how it would look, I was not as fond of it as I thought I would be so I got another material from home that was darker and I wanted to make the hexagons smaller.
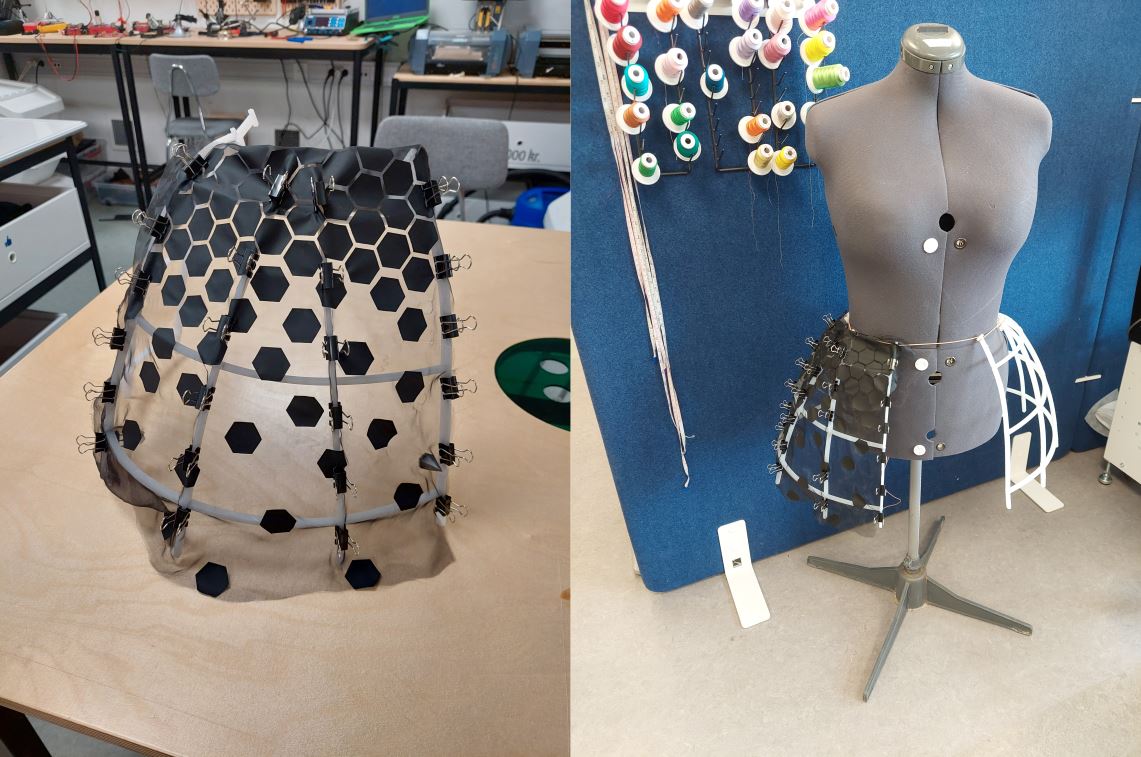
I did three test and picked the one in the middle to use as the pattern for the project.
Spraying it black
Once I realized that glue did not hold on to the HDPE I had little hope for the spray but wanted to try, I tool leftovers and sanded with different sandpaper and sprayed it black, the 240 sandpaper did the best by far so I sanded and sprayed the hip cage but I still knew that slowly it would come off so I had to think of something else.

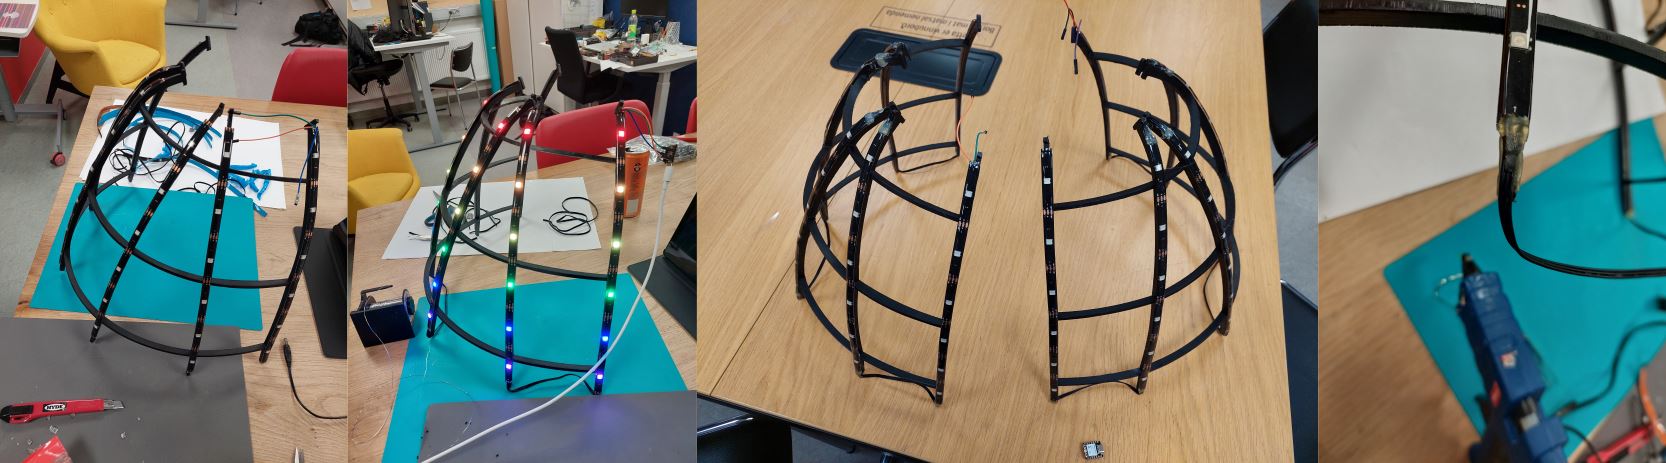
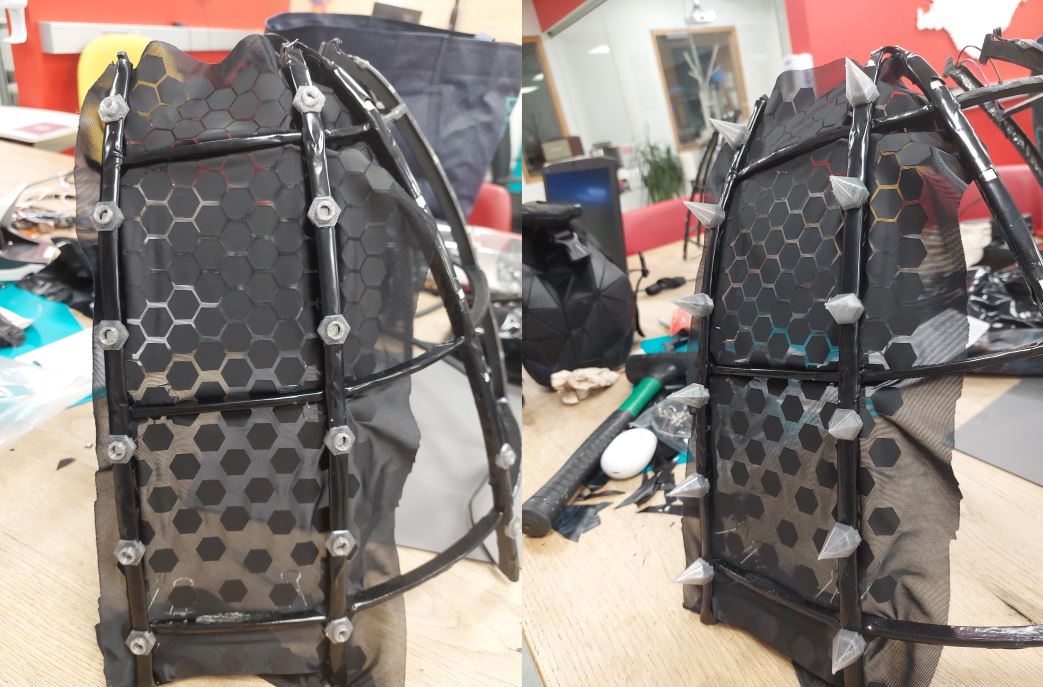
Led stripes
I cut the led stripes into stripes of six leds, put them on the cage, they already had glue on them so I just stuck them on. I took silicon covered wires, three in a row, power, data and GND and soldered them on between the strips, I had to be careful what way the stripes turn because one way is data in and the other data out. I took a hot glue gun and put hot glue over the ends to protect them.
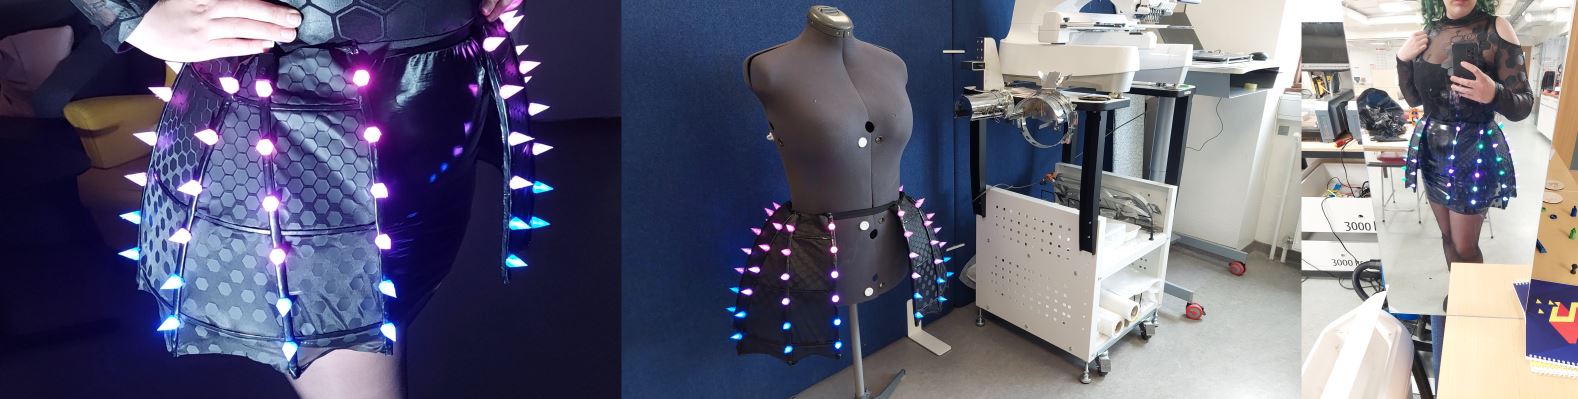
Covering the hip cage
After a little thinking I thought to cover the cage with the leds on in a black plastic material that I used for last year’s Halloween costume. I covered it all and glued together on the back with super glue.
Screw on spikes
Since I changed the plan a little bit I had to change the bottom of the spikes. I did one test that was not working so I made the one I would use. I took the holes out and made the bottom a little thicker than I made the shape of the led strip and cut that out from the bottom. I did not need to do more since the first spikes did come out really well.
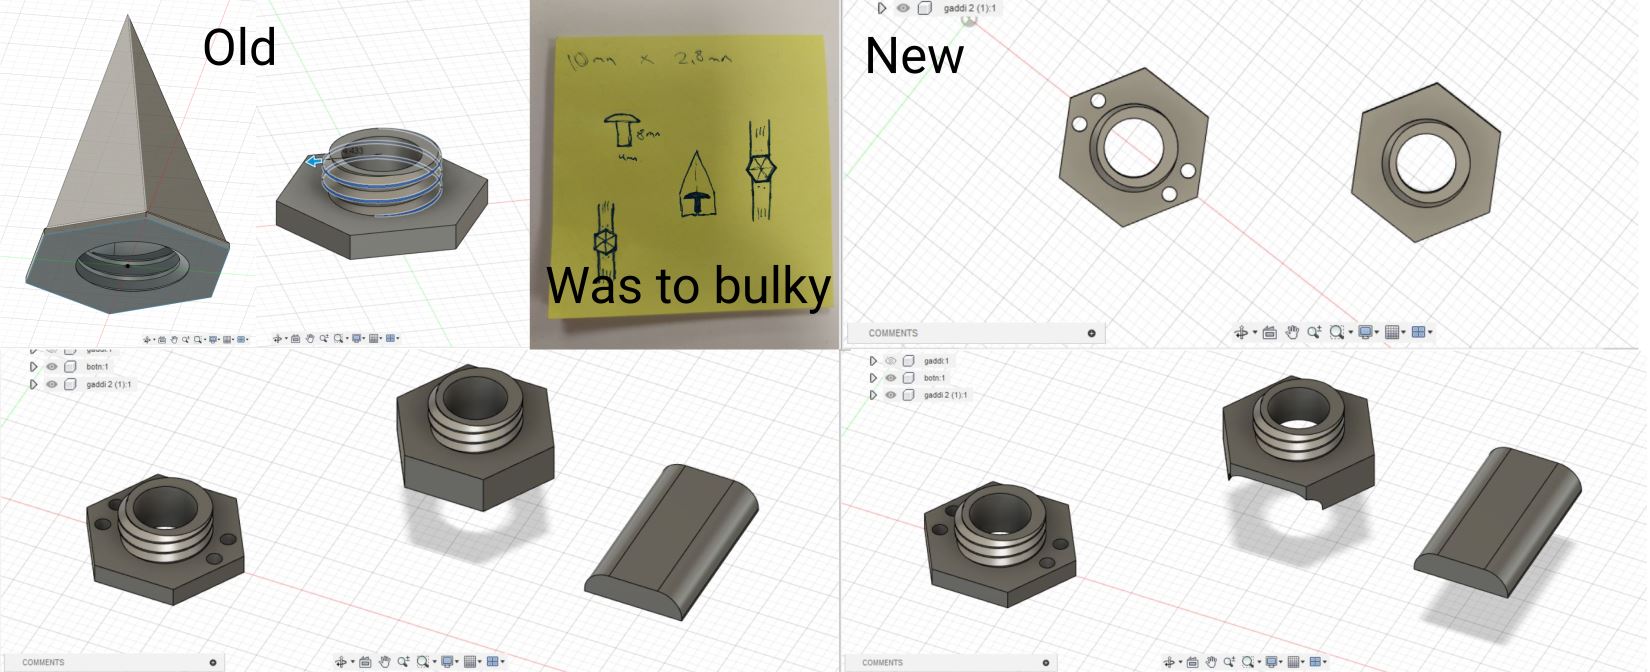
I 3D printed half at a time, I used organic support like I did in This is from Week 2
I glued the bottom onto the hip cage and screwed the top on.
Lights in spikes
To see how the lights are in the spikes I made a rainbow lights but I didn’t want to set each light individually so I tried to define each row, how ever that did not work, I asked ChatGBT what I was doing wrong and it turns out that I was supposed to use const int, after that it worked very well.

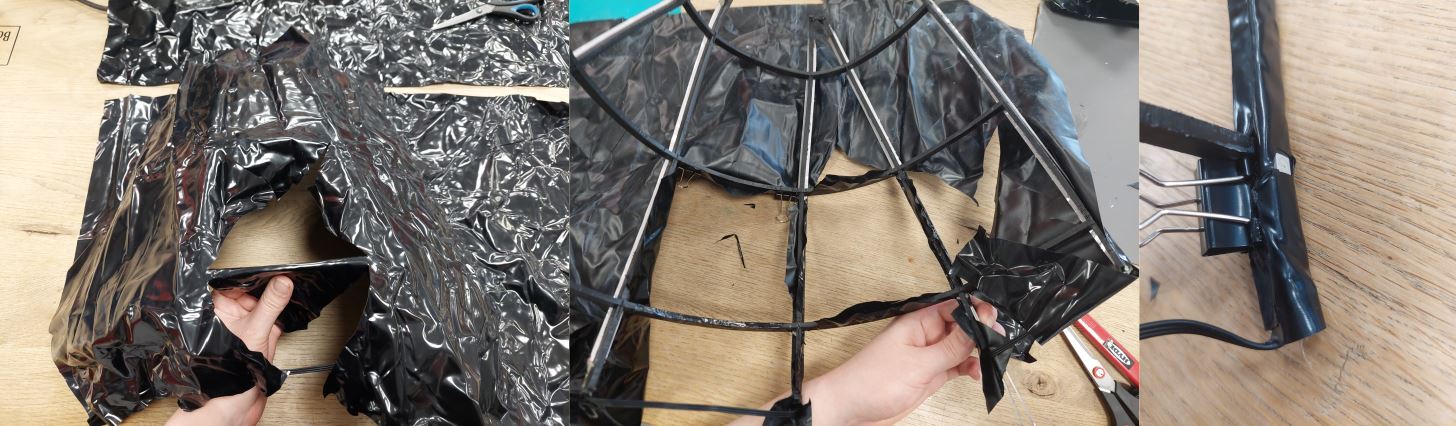
Putting on the fabric
I vinyl cut the pattern and heat pressed it onto the fabric, I glued the fabric on from the back but had it go all the way to the front, this was hard at first since I had to hold pressure and the glue would stick to what I was using to hold the pressure. For a little bit I used the paper on the double sided tape but that would fast rip so I found some green plastic scraper and the super glue did not stick to that, after that things starting going faster. I did need to make a little additional fabric for the bottom as I needed a little more for the bottom.
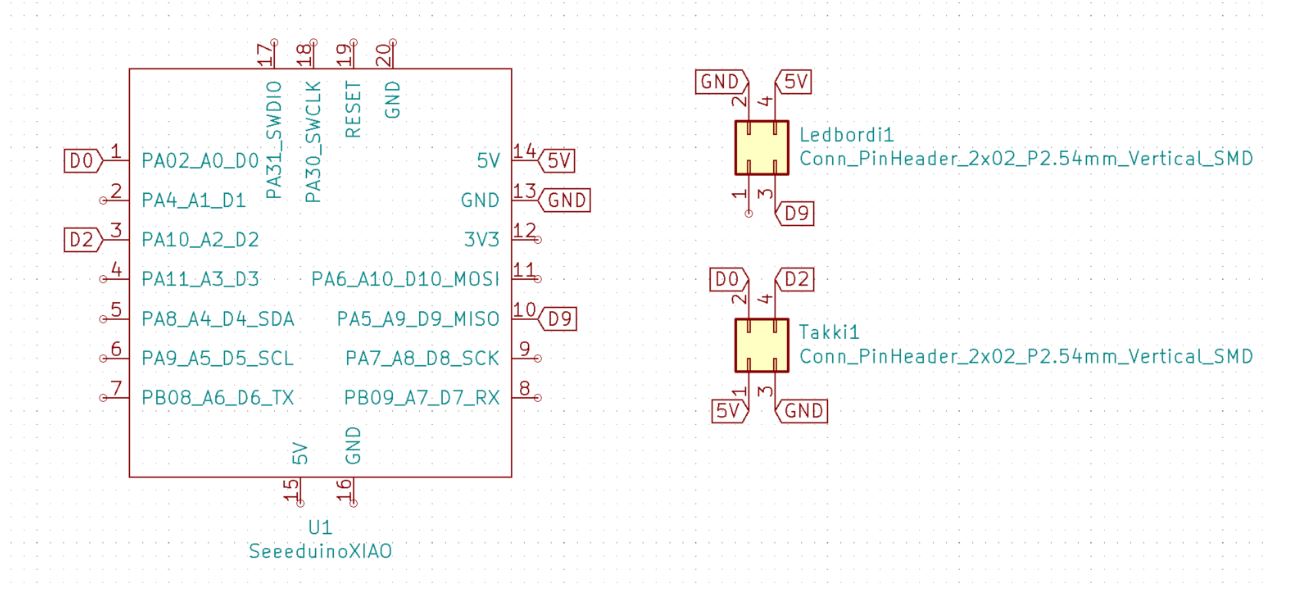
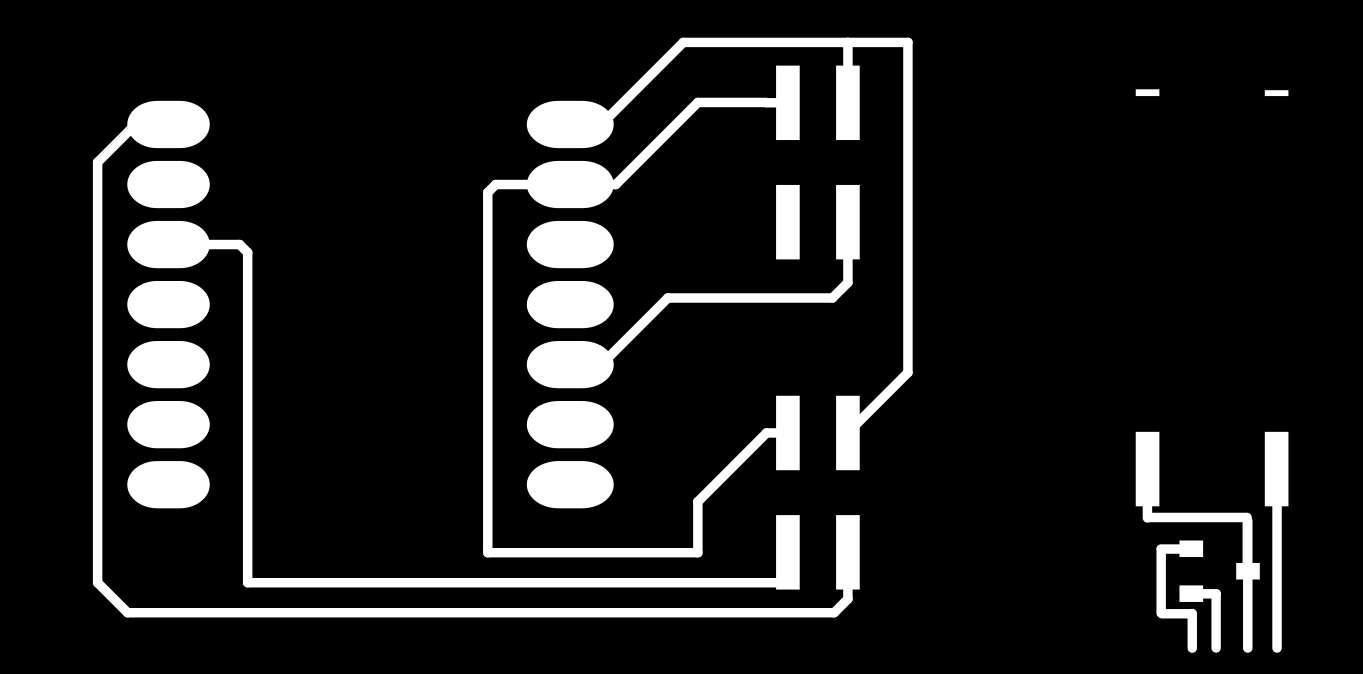
Making the boards
The boards for my final project were quite simple. I made the main board in Kicad and the button board in Inkscape, to see how to use Kicad see Week 6. I exported the main board to Inkscape and got it ready to be milled out, it came out great so I soldered everything on.
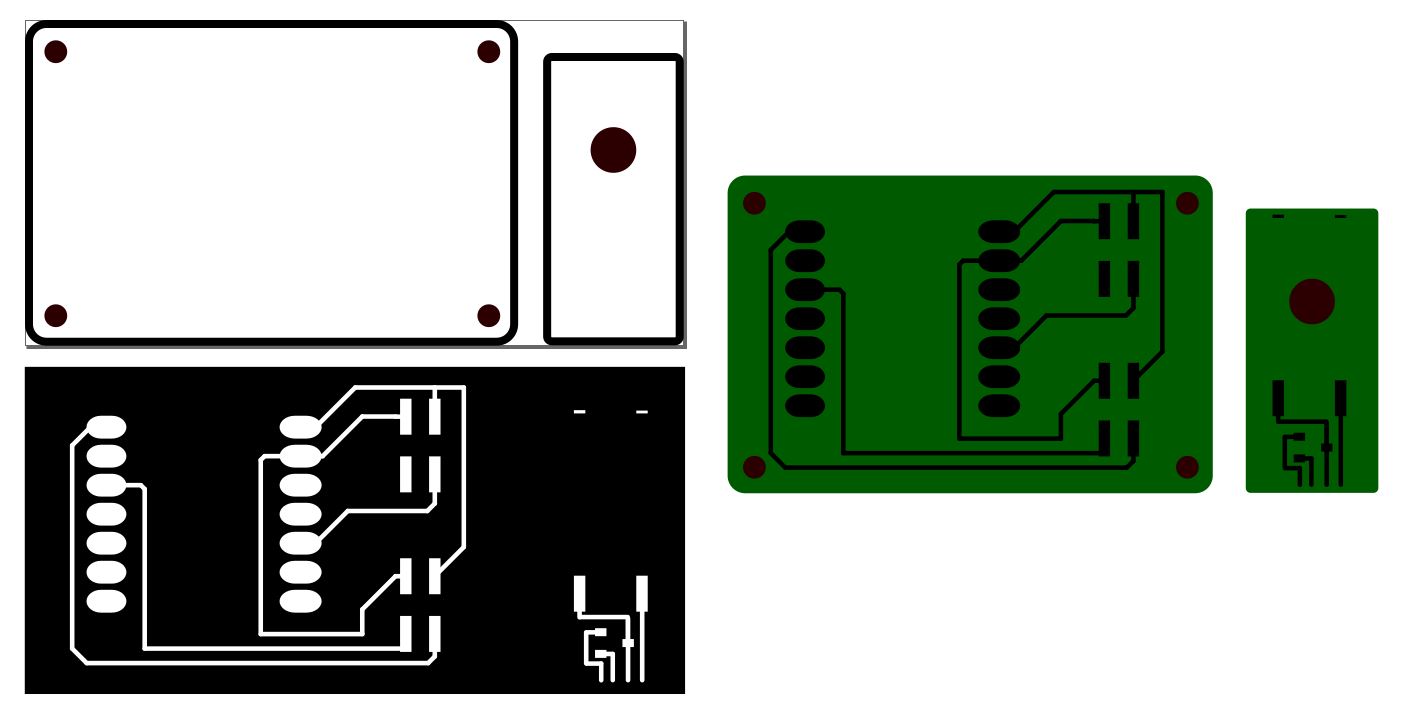
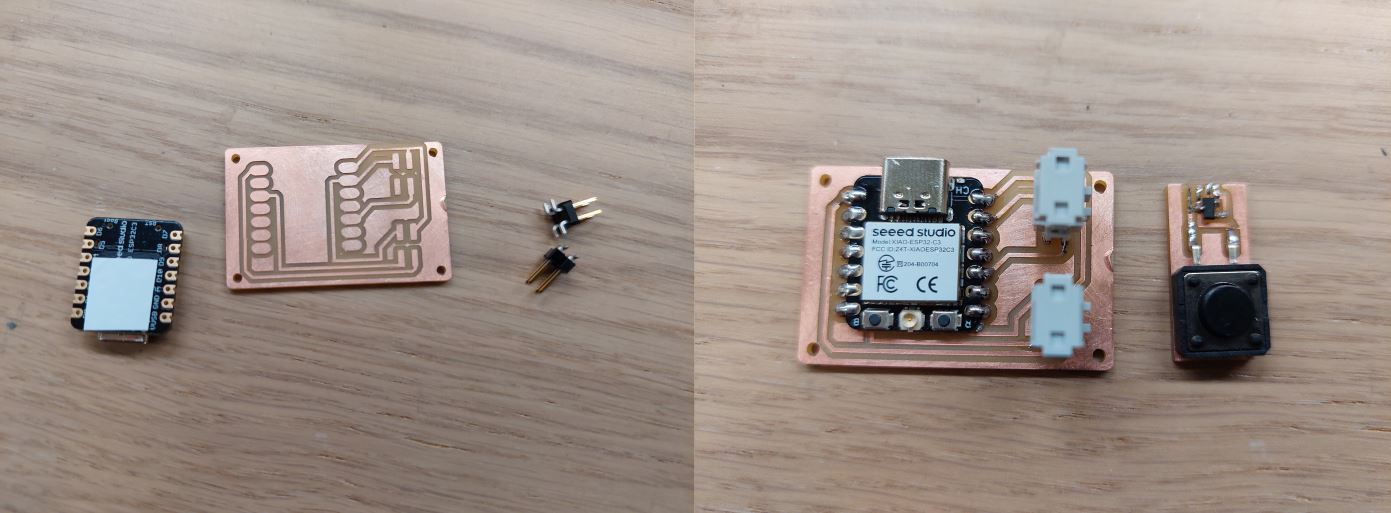
Making the board cases
I was a bit running out of time so I just made the board cases in Tinkercad, I imported the svg of the boards and just built around them.

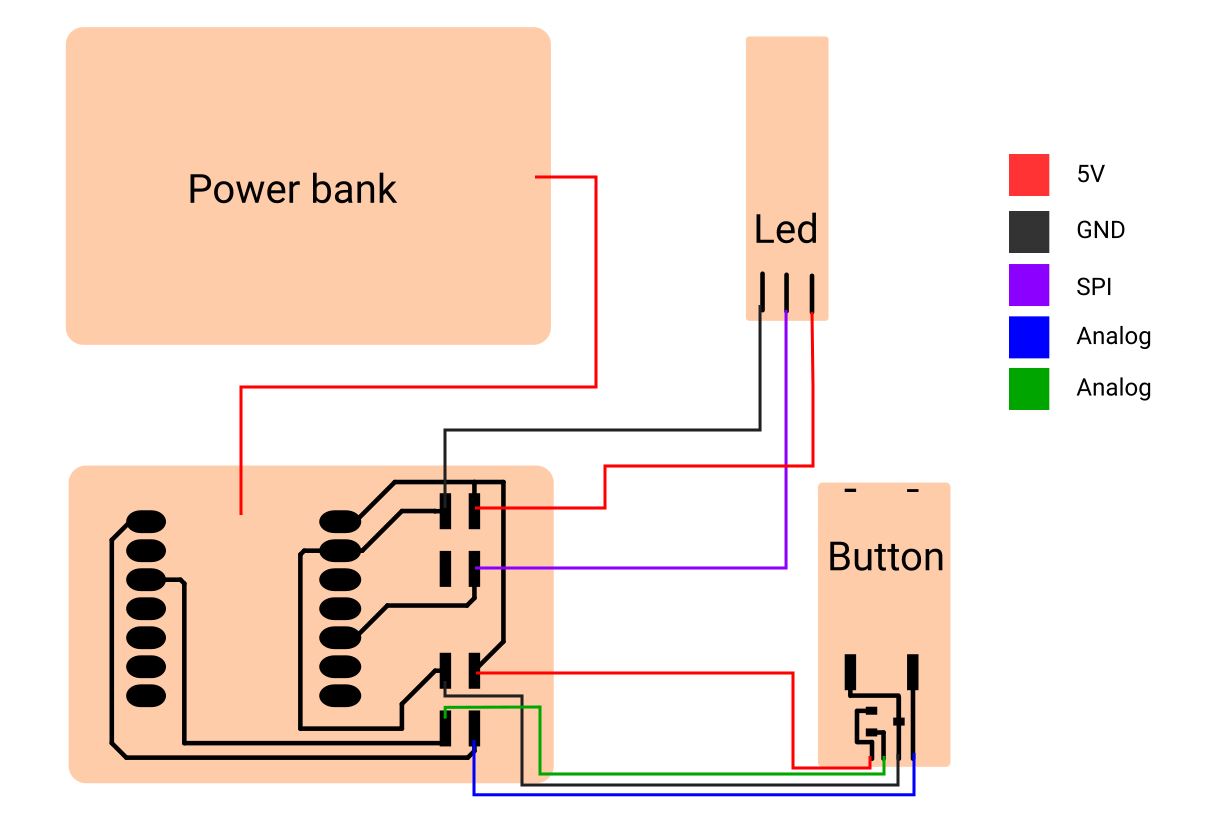
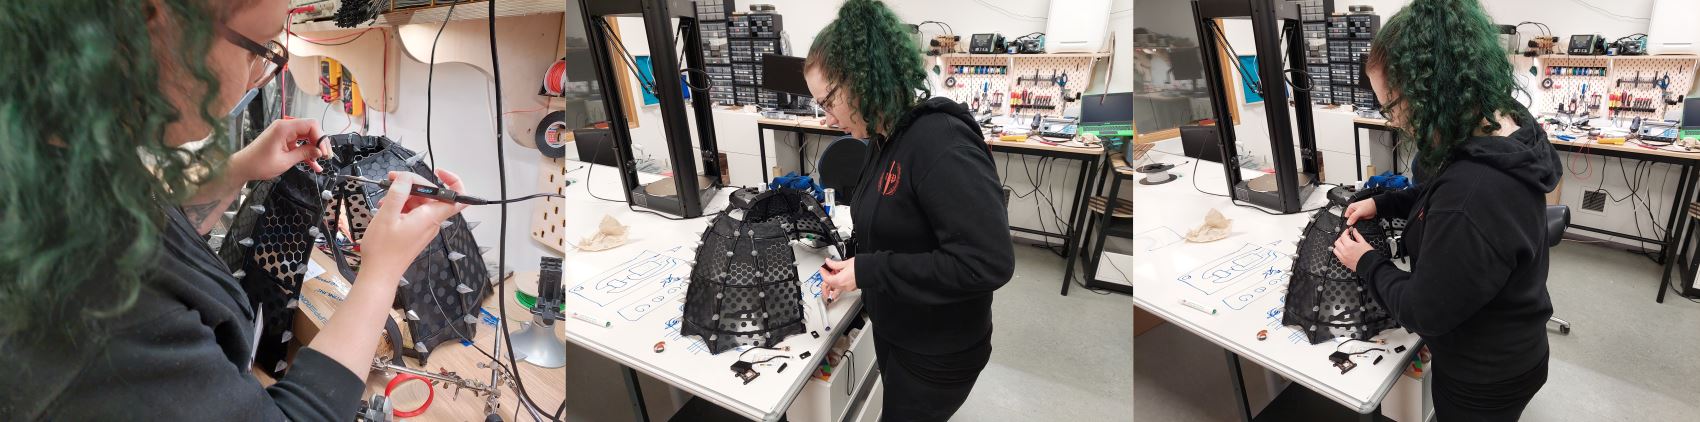
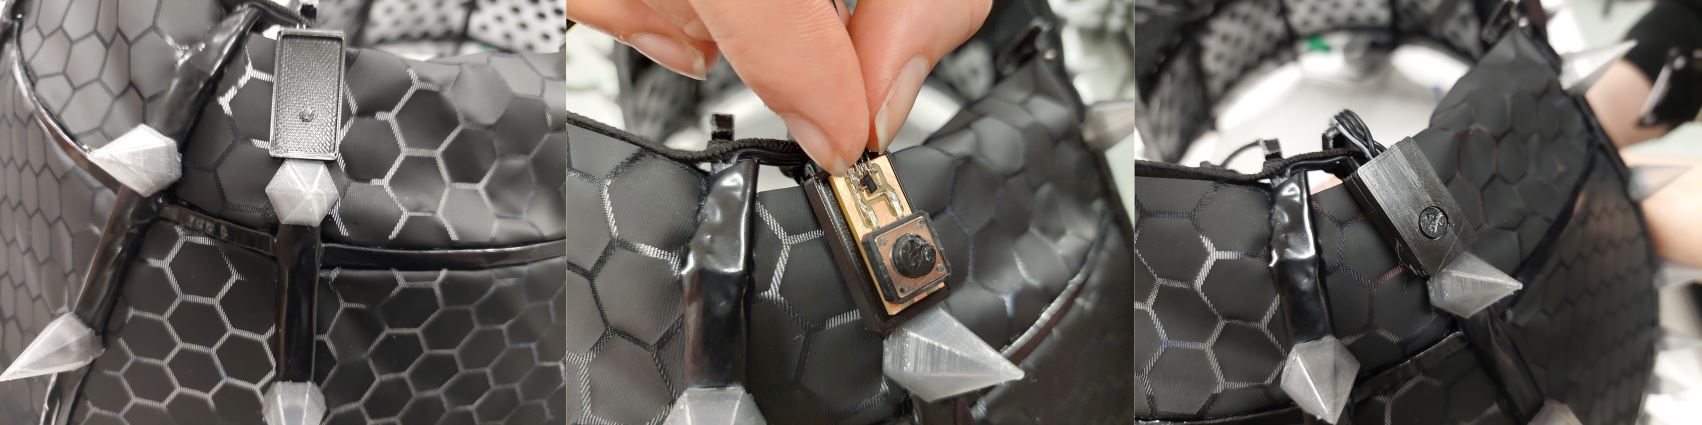
Conecting the boards
I connected everything together with silicone covered wire and put the boards in the cases.
I sewed a little pouch to hold the power bank and the main board is on that pouch. You can see two separate sections of wires one goes to the led strip and the other goes to the button.
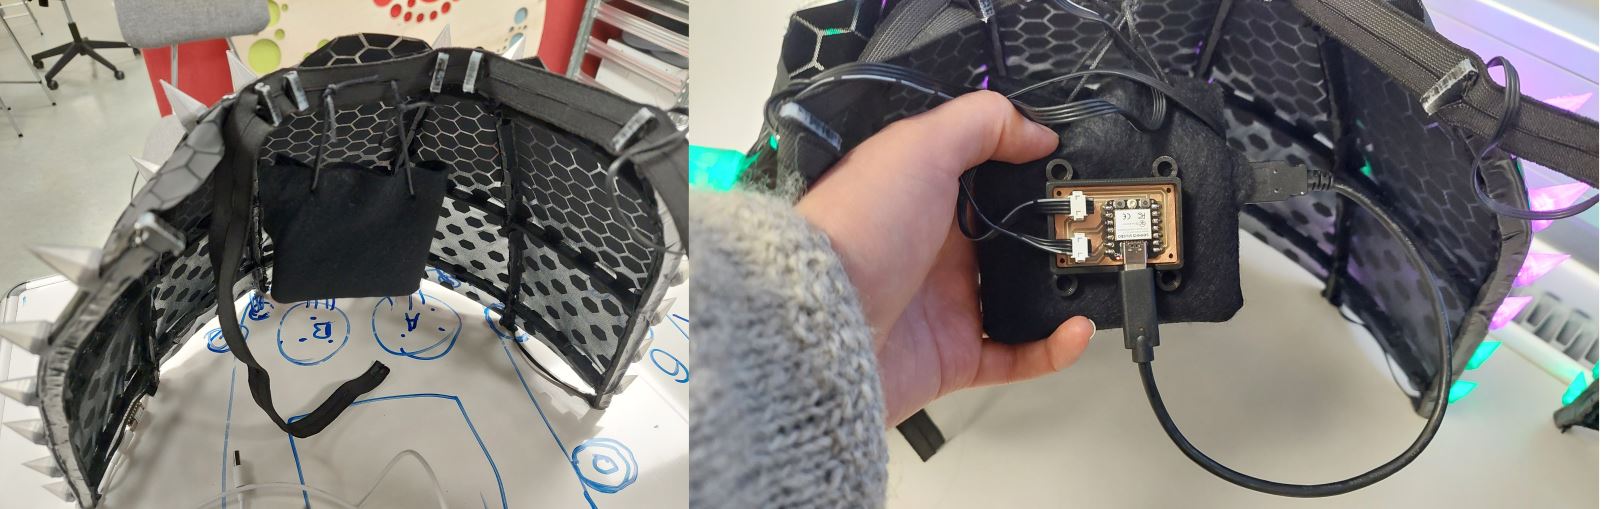
Here you can see the button and how well the case hides it, there are four wires connected to the button board, power, GND and two data, that is because I added a hall sensor for future use.
The code
The code was a little bit tricky, having it change with the press of a button and the two pride flags were no problem but I wanted the green and purple flicker and I got ChatGBT to make that for me but I could not use it in the button controlled code so I ended up having to have the flickering be just for an x amount of time and that way I could use it.
//made partly with help from ChatGBT
//arduino program to control a LED and button
//LED is on pin 9
//button is on pin 0
//when button is pressed once LED turns on
//when button is pressed twice LED turns off
//when button is pressed three times LED blinks three times
//when button is pressed four times LED blinks like crazy
#include
#define BUTTON D0
#define LED_PIN 9 // Change this to the appropriate pin for your setup
#define NUM_LEDS 72 // Number of LEDs in your strip
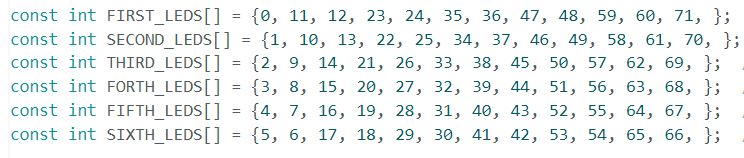
const int FIRST_LEDS[] = {0, 11, 12, 23, 24, 35, 36, 47, 48, 59, 60, 71, }; // LED indices for the first row
const int SECOND_LEDS[] = {1, 10, 13, 22, 25, 34, 37, 46, 49, 58, 61, 70, }; // LED indices for the second row
const int THIRD_LEDS[] = {2, 9, 14, 21, 26, 33, 38, 45, 50, 57, 62, 69, }; // LED indices for the third row
const int FORTH_LEDS[] = {3, 8, 15, 20, 27, 32, 39, 44, 51, 56, 63, 68, }; // LED indices for the fourth row
const int FIFTH_LEDS[] = {4, 7, 16, 19, 28, 31, 40, 43, 52, 55, 64, 67, }; // LED indices for the fifth row
const int SIXTH_LEDS[] = {5, 6, 17, 18, 29, 30, 41, 42, 53, 54, 65, 66, }; // LED indices for the sixth row
CRGB leds[NUM_LEDS];
//variable to keep track of how manny button presses
int buttonPresses = 0;
void setup() {
Serial.begin(115200);
delay(10);
pinMode(LED_PIN, OUTPUT);
pinMode(BUTTON, INPUT_PULLUP);
FastLED.addLeds(leds, NUM_LEDS);
FastLED.show(); // Initialize the LED strip with the initial colors
}
//loop function
void loop() {
//if button is pressed
if (digitalRead(BUTTON) == HIGH) {
//increment buttonPresses
buttonPresses++;
//if buttonPresses is greater than 5
Serial.println(buttonPresses);
if (buttonPresses > 3) {
//reset buttonPresses to 0
buttonPresses = 0;
}
//if buttonPresses is 1
if (buttonPresses == 1) {
randomColorChange();
}
//if buttonPresses is 2
if (buttonPresses == 2) {
//turn off LED
// Assign color to the first set of LEDs (first row)
setLEDsColor(FIRST_LEDS, sizeof(FIRST_LEDS) / sizeof(FIRST_LEDS[0]), CRGB(214, 2, 112));
// Show the updated colors on the LED strip
FastLED.show();
delay(0);
// Assign color to the second set of LEDs (second row)
setLEDsColor(SECOND_LEDS, sizeof(FIRST_LEDS) / sizeof(FIRST_LEDS[0]), CRGB(214, 2, 112));
// Show the updated colors on the LED strip
FastLED.show();
delay(0);
// Assign color to the third set of LEDs (third row)
setLEDsColor(THIRD_LEDS, sizeof(FIRST_LEDS) / sizeof(FIRST_LEDS[0]), CRGB(128, 0, 180));
// Show the updated colors on the LED strip
FastLED.show();
delay(0);
// Assign color to the fourth set of LEDs (fourth row)
setLEDsColor(FORTH_LEDS, sizeof(FIRST_LEDS) / sizeof(FIRST_LEDS[0]), CRGB(128, 0, 180));
// Show the updated colors on the LED strip
FastLED.show();
delay(0);
// Assign color to the fifth set of LEDs (fifth row)
setLEDsColor(FIFTH_LEDS, sizeof(FIRST_LEDS) / sizeof(FIRST_LEDS[0]), CRGB(0, 0, 255));
// Show the updated colors on the LED strip
FastLED.show();
delay(0);
// Assign color to the sixth set of LEDs (sixth row)
setLEDsColor(SIXTH_LEDS, sizeof(FIRST_LEDS) / sizeof(FIRST_LEDS[0]), CRGB(0, 0, 255));
// Show the updated colors on the LED strip
FastLED.show();
delay(0);
}
//if buttonPresses is 3
if (buttonPresses == 3) {
//blink LED three times
for (int i = 0; i < 3; i++) {
// Assign color to the first set of LEDs (first row)
setLEDsColor(FIRST_LEDS, sizeof(FIRST_LEDS) / sizeof(FIRST_LEDS[0]), CRGB(255, 0, 0));
// Show the updated colors on the LED strip
FastLED.show();
delay(0);
// Assign color to the second set of LEDs (second row)
setLEDsColor(SECOND_LEDS, sizeof(FIRST_LEDS) / sizeof(FIRST_LEDS[0]), CRGB(255, 128, 0));
// Show the updated colors on the LED strip
FastLED.show();
delay(0);
// Assign color to the third set of LEDs (third row)
setLEDsColor(THIRD_LEDS, sizeof(FIRST_LEDS) / sizeof(FIRST_LEDS[0]), CRGB(255, 255, 0));
// Show the updated colors on the LED strip
FastLED.show();
delay(0);
// Assign color to the fourth set of LEDs (forth row)
setLEDsColor(FORTH_LEDS, sizeof(FIRST_LEDS) / sizeof(FIRST_LEDS[0]), CRGB(0, 255, 0));
// Show the updated colors on the LED strip
FastLED.show();
delay(0);
// Assign color to the fifth set of LEDs (fifth row)
setLEDsColor(FIFTH_LEDS, sizeof(FIRST_LEDS) / sizeof(FIRST_LEDS[0]), CRGB(0, 0, 255));
// Show the updated colors on the LED strip
FastLED.show();
delay(0);
// Assign color to the sixth set of LEDs (sixth row)
setLEDsColor(SIXTH_LEDS, sizeof(FIRST_LEDS) / sizeof(FIRST_LEDS[0]), CRGB(128, 0, 128));
// Show the updated colors on the LED strip
FastLED.show();
delay(0);
}
}
//wait for button to be released
while (digitalRead(BUTTON) == HIGH) {
}
}
}
void randomColorChange() {
for (int i = 0; i < 200; i++) {
// Randomly change the colors of LEDs between green and purple rapidly
for (int j = 0; j < NUM_LEDS; j++) {
if (random(2) == 0) {
leds[j] = CRGB::Green;
} else {
leds[j] = CRGB::Purple;
}
}
FastLED.show();
delay(30);
}
}
void setLEDsColor(const int* ledIndices, int numLEDs, const CRGB& color) {
for (int i = 0; i < numLEDs; i++) {
leds[ledIndices[i]] = color;
}
}
void setLEDsColor(const int* ledIndices, const CRGB& color) {
int numLEDs = sizeof(ledIndices) / sizeof(ledIndices[0]);
for (int i = 0; i < numLEDs; i++) {
leds[ledIndices[i] - 1] = color; // Subtract 1 from LED index to account for array indexing starting from 0
}
}
After final touches
After everything was working and connected I needed to make it look a bit better, I cut the bottom of the fabric on the pannier belt inward in half circle shapes and covered the ends with the same plastic material as earlier. I covered the elastic with the same plastic material so it would be the belt part and inside that were the wires so now no wires are visible.
Bill off materials
Leftovers - 4mm HDPE., see-through fabric, plastic material from last year’s Halloween costume. From the my lab - a staple gun, black textile vinyl, hot glue gun, silicone covered wires, button, copper board and connecting pins. Seeedstudios - XIAO esp32-c3. Amazon- Led stripes. Local hardware store (BYKO) - bunch of superglue. Local nerd store (NEXUS) - black primer spray paint. Local crafts store (A4) - elastic band. Local 3D store (3D verk) - see-through gray HTPLA.License
The license I chose is CC BY-NC which you can read more about here, but in short any one is allowed to use my design al long as they credit me and it is not for commercial use.

Final results
Video
Links
All the files
Download Arduino file Download board cut png file Download board edge png file Download board kicad Download board cases .stl file Download cnc screw placement sbp file Download cnc hip cage sbp file Download hip cage pdf file Download Spike .stl file Download boton of spikes .stl file Download patern pdf file Download patern botom pdf file