14. Interface and Application Programming
Here are my code files for this week. -files
Planning
I thought about the multiple things I could do. My labmates had stated Unity was cool, along with Processing, a great tool for writing an interface. However, I was really interested in using this week to learn Python. I had always wanted to program using python to make acutal things happen on the desktop, but had never really learned how. Therefore, I decided to use VSCode to run some python code with my computer’s interpreter to make a GUI for an input device. I decided to use the DHT20 temp/humidity sensor, since the code to read and write over serial was pretty simple. I also used the board I had milled for input week.
Serial Communication
One thing I still didn’t have a grasp of was how I was supposed to communicate ther sensor values to a python code which displays it on a UI. I navigated to the Fab Academy page, where I looked under device interfaces. I learned about pySerial, which is the software form of Serial communication I would have with the readings from the sensor. I also found this video which did something similar to what I was doing. I noticed he mentioned you needed Pyserial as well. He seemed to be upplaoding code in the Arduino IDE and using the basic Serial.Print to send the values, then read them through using import serial in his python code. Mostly understanding the concept and steps required, I began the coding.
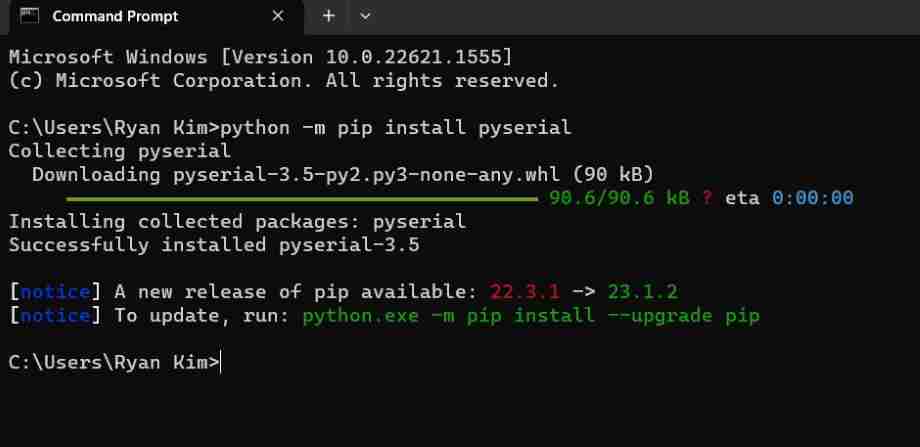
To install pySerial, I learned I needed to use the package manager pip, which I learned about while setting up MkDocs for my website. I navigated to the command prompt terminal for my computer, and ran pip install pyserial. I noticed there was an update for version 3.5, which was what the user in the video above used, so I ran python.exe -m pip install --upgrade pip to upgrade it.
Programming
Once I had everything set up, it was time to start programming
First, I navigated to the Arduino IDE and uploaded the basic serial printing code for the DHT 20 sensor. For wiring, I followed the basic SDA and SCL pins I had learned about during Inputs week. I quickly ran the code to make sure I was getting readings in the Arduino IDE serial monitor, which I was.
Next, I moved onto python. I had never technically really coded in python, but I had some overview due to my use of micropython when uploading embedded programs via Thonny to the RP2040s. In this case, however, I used Arduino. I first tried uploading the basic code of the serial readings of the temperature and humidity. The basic code was as below.
import serial
import time

ser = serial.Serial('COM3', 115200, timeout=1)
# I switched COM5 to COM3 to match what port my XIAO was connected to
time.sleep(2)

for i in range(600):
   line = ser.readline().decode("utf-8")
   print(line)
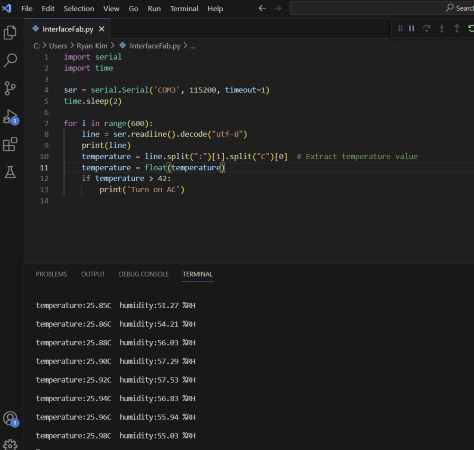
I ran the code debugger implemented in VScode, and I got an error stating that COM 3 was busy. I tried changing the port in the code, and I also tried using the '/dev/ttyUSB0' code, but none seemed to work. I tried unplugging and doing the bootloader for the XIAO just in case something might be wrong with the USB, but no success.
Finally, I decided to simply close the Arduino IDE, since the port was “busy” and the Arduino IDE was the only one using it. I was scared closing this might cause problems with the serial communication, but it was fine due to the use of flash memory. Once I closed this, I ran the code, and I got readings! One thing to mention was that I changed the int part to float after getting this error.

UI/Tkinter
Now that I knew I could get readings and integer values, I moved onto programming the UI. I wanted to first try to make a simple display of the readings. I decided to use TKinter, since I noticed it was used with python. TKinter is the python binding of the TK GUI toolkit, allowing us to simply use the library to make a GUI in python.
However, I was terrible at python, and had never written big programs before. However, to optimize my learning of python, I decided to go through some tkinter example videos, codes, to get a better understanding of how to use TKinter commands.
After lots of looking at videos, Dr Gershenfeld’s example code, and Alaric Pan’s final project code, I got a basic understanding of how to use tkinter. I wrote this code, building on top of ther serial code from above, simply making and “rooting” the GUI.
import serial
import time
import tkinter as tk

# Serial port configuration
ser = serial.Serial('COM3', 115200, timeout=1)
time.sleep(2)

# Tkinter GUI setup
root = tk.Tk()
root.title("Temperature and Humidity Monitor")

temperature_label = tk.Label(root, text="Temperature: ")
temperature_label.pack()

humidity_label = tk.Label(root, text="Humidity: ")
humidity_label.pack()

def update_values():
    line = ser.readline().decode("utf-8")
    temperature, humidity = line.strip().split(",")
    temperature_label.config(text="Temperature: " + temperature + "C")
    humidity_label.config(text="Humidity: " + humidity + "%")
    root.after(1000, update_values)

update_values()
root.mainloop()
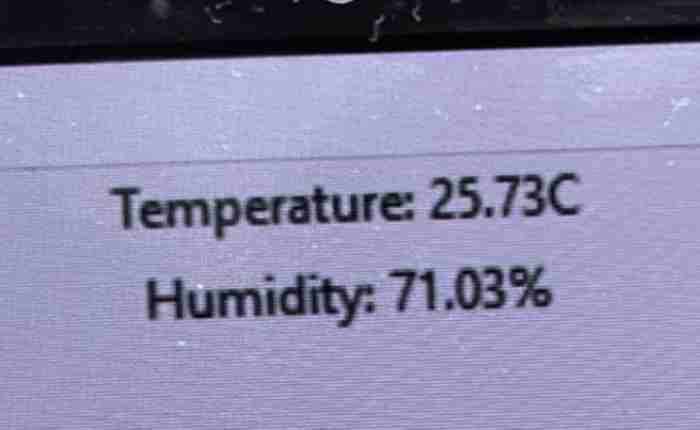
I uploaded it, crossed my fingers, and to my surprise it showed up first time. There were no readings for some reason, but the fact that I had utilized python to code something on my computer for the first time was enough to make me very happy.
Now that I had gotten the initizliation of the GUI, I had to figure out the coding issue. I couldn’t figure it out, so I used ChatGPT. I told it what I was trying to do, gave it my Arduino and python code, and asked why it wasn’t displaying. ChatGPT figured out that the serial data does not contain both temp and humidity values separated by commas. It fixed my update_values to this.
def update_values():
    line = ser.readline().decode("utf-8").strip()
    if line.startswith("temperature:") and "humidity:" in line:
        temperature = line.split("temperature:")[1].split("C")[0].strip()
        humidity = line.split("humidity:")[1].split("%RH")[0].strip()
        temperature_label.config(text="Temperature: " + temperature + "C")
        humidity_label.config(text="Humidity: " + humidity + "%")
    root.after(1000, update_values)
I uploaded, and it fixed the error. I got readings in the actual UI!
I spent some time playing around with the format. I learned how to change colors, size, etc.
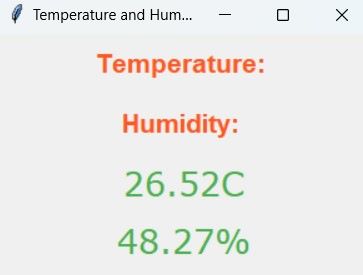
I next moved onto trying to make it more interactive. Rather than just displaying values, I wanted to be able to do seomthign with it. I decided to start off with the most basic: buttons. My idea was that when I run the code, it sends me to a page saying “Hello Ryan”, and there are two buttons underneath, saying temp and humidity. If I click on one of them, it displays that value.
The code was actually super straightforward. I first set the frames, which I learned were differnt storage areas of widgets.
hello_frame_label = tk.Label(hello_frame, text="Hello Ryan", font=label_font, padx=10, pady=10)
hello_frame_label.pack()

temperature_label = tk.Label(temp_frame, text="Temperature: ", font=label_font, padx=10, pady=10)
temperature_label.pack()

temperature_value = tk.Label(temp_frame, text="", font=value_font, padx=10, pady=5)
temperature_value.pack()

humidity_label = tk.Label(humidity_frame, text="Humidity: ", font=label_font, padx=10, pady=10)
humidity_label.pack()

humidity_value = tk.Label(humidity_frame, text="", font=value_font, padx=10, pady=5)
humidity_value.pack()
I then defined the functions for the three options.
def show_hello_page():
    hello_frame.pack()
    temp_frame.pack_forget()
    humidity_frame.pack_forget()

def show_temp_page():
    hello_frame.pack_forget()
    temp_frame.pack()
    humidity_frame.pack_forget()

def show_humidity_page():
    hello_frame.pack_forget()
    temp_frame.pack_forget()
    humidity_frame.pack()
For the rest, I just made two buttons and used ChatGPT’s method of parsing the sensor data from the Arduino IDE. Also, I was able to use thisdocumentation site as a tool to learna about ways to customize visual attributes. In my case, I decided to mess with the font. Here is my full code.
# author-Ryan Kim
# date- 5/05/2023


import serial
import time
import tkinter as tk
from tkinter import font

# Serial port configuration
ser = serial.Serial('COM3', 115200, timeout=1)
time.sleep(2)

root = tk.Tk()
root.title("Temperature and Humidity Monitor")

label_font = font.Font(family="Helvetica", size=16, weight="bold")
value_font = font.Font(family="Verdana", size=20)

hello_frame = tk.Frame(root)
temp_frame = tk.Frame(root)
humidity_frame = tk.Frame(root)

hello_frame_label = tk.Label(hello_frame, text="Hello Ryan", font=label_font, padx=10, pady=10)
hello_frame_label.pack()

temperature_label = tk.Label(temp_frame, text="Temperature: ", font=label_font, padx=10, pady=10)
temperature_label.pack()

temperature_value = tk.Label(temp_frame, text="", font=value_font, padx=10, pady=5)
temperature_value.pack()

humidity_label = tk.Label(humidity_frame, text="Humidity: ", font=label_font, padx=10, pady=10)
humidity_label.pack()

humidity_value = tk.Label(humidity_frame, text="", font=value_font, padx=10, pady=5)
humidity_value.pack()

# Navigation functions
def show_hello_page():
    hello_frame.pack()
    temp_frame.pack_forget()
    humidity_frame.pack_forget()

def show_temp_page():
    hello_frame.pack_forget()
    temp_frame.pack()
    humidity_frame.pack_forget()

def show_humidity_page():
    hello_frame.pack_forget()
    temp_frame.pack_forget()
    humidity_frame.pack()

temp_button = tk.Button(root, text="Temperature", font=label_font, command=show_temp_page)
temp_button.pack()

humidity_button = tk.Button(root, text="Humidity", font=label_font, command=show_humidity_page)
humidity_button.pack()

# Update values function
def update_values():
    line = ser.readline().decode("utf-8").strip()
    if line.startswith("temperature:") and "humidity:" in line:
        temperature = line.split("temperature:")[1].split("C")[0].strip()
        humidity = line.split("humidity:")[1].split("%RH")[0].strip()
        temperature_value.config(text=temperature + "C")
        humidity_value.config(text=humidity + "%")
    root.after(1000, update_values)

update_values()

show_hello_page()

window_width = 300
window_height = 200
screen_width = root.winfo_screenwidth()
screen_height = root.winfo_screenheight()
x = int((screen_width / 2) - (window_width / 2))
y = int((screen_height / 2) - (window_height / 2))
root.geometry(f"{window_width}x{window_height}+{x}+{y}")

# Run the Tkinter event loop
root.mainloop()
Here is a video of the simple user interface working.
Group Work
This week our group was able to compare tool options. Having learned the basics of Tkinter, I wrote up some facts about the Tkinter Python Library. Here is a link to our documentation. I briefly read through what other options there were, in which I learned the broad and great amounts of ways that I can program an application or interface.
Reflection
This week was very interesting. I did not know that running code could program an application directly on my laptop! I also didn’t realize how simple some of the tools were. Though I consider myself a beginner at this, it is defintely something I want to look into more.