In this assignment I have to make something big on the CNC machine.
Numerical control (also Computer Numerical Control, and commonly called CNC) is the automated control of machining tools (drills, boring tools, lathes) and 3D printers by means of a computer. A CNC machine processes a piece of material (metal, plastic, wood, ceramic, or composite) to meet specifications by following a coded programmed instruction and without a manual operator.
Learning:
- Group Assignment
- Safety
- Tooling
- Cutting Condition
- Individual Assignment
- Fusion 360 Design
- File Setup (CAM)
- Shopbot CNC Machine
- Assembly and Installation
Group Assignments
Safety
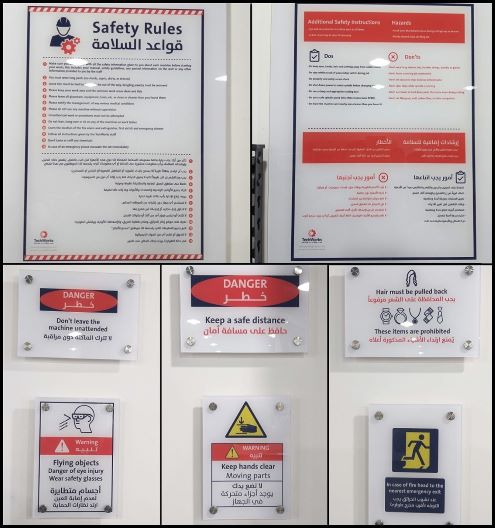
First of all, this week we will work with big machine, we need to know it at least a little before dealing with it.
Safety cautions and procedures must be considered while working on CNC machine. Please read, understand and apply all caution signs.
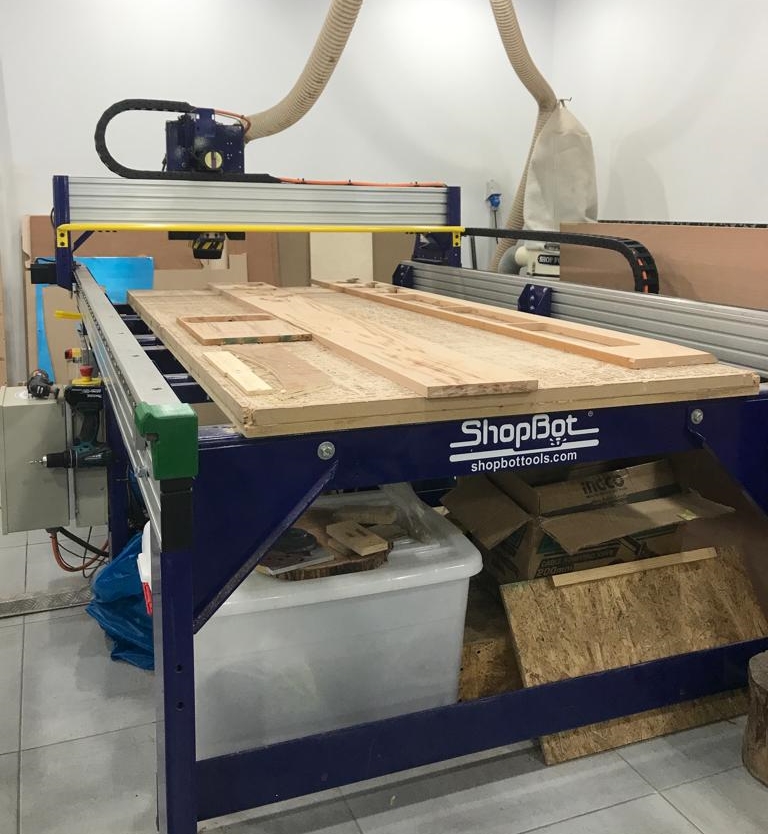
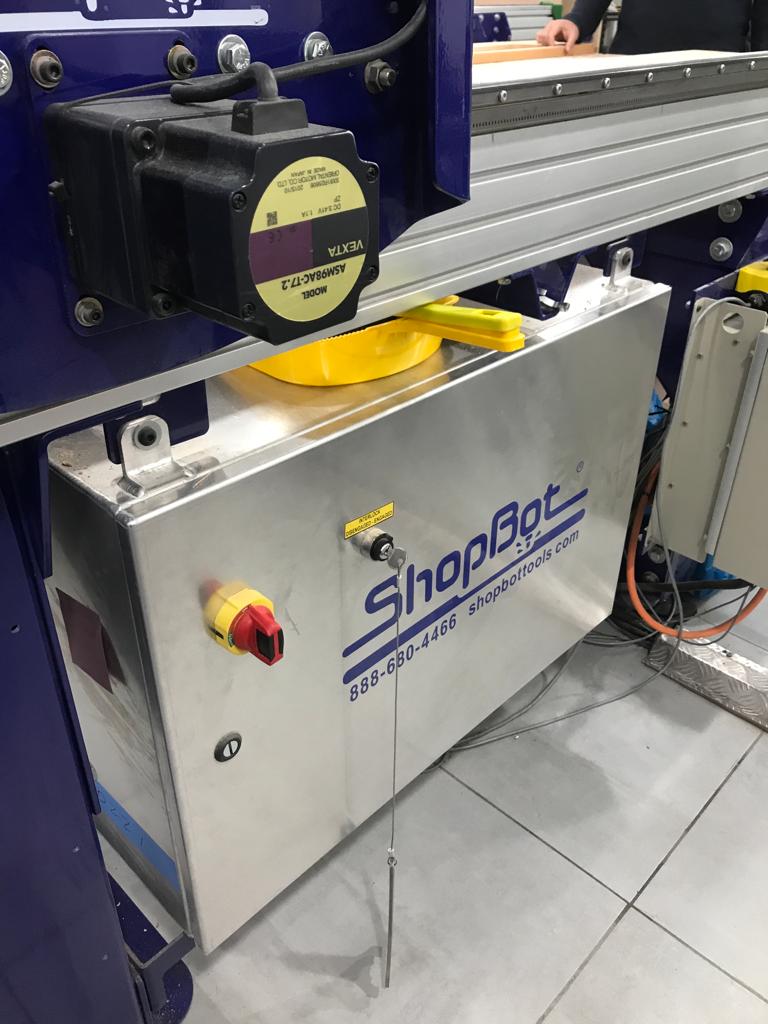
We worked with ShopBot PRSalpha ATC 96-60-8 CNC Machine.
It's an affordable full-sized gantry tool for CNC cutting, drilling, carving and machining of wood, plastic, aluminum and other materials.
It has a bed of size 2440mm x 1220mm and has a rapid transit speeds of 1800 inches per minute and cutting speeds of up to 600 inches per minute.
Tooling
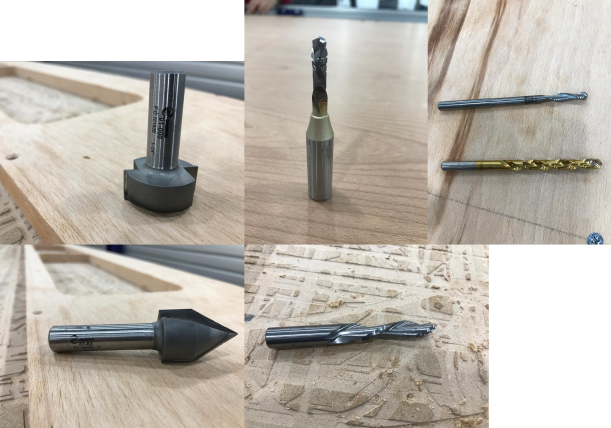
We visually inspected different types of endmills and used two of them to complete our tests. We study the Carbide Tipped - Spoilboard Surfacing , V-Carve, End Mills, etc. Each has designed for a specific purpose and all can be used in a CNC router.
- 91-000 Carbide Tipped - Spoilboard Surfacing
- Solid Carbide router, 2 flute, downcut
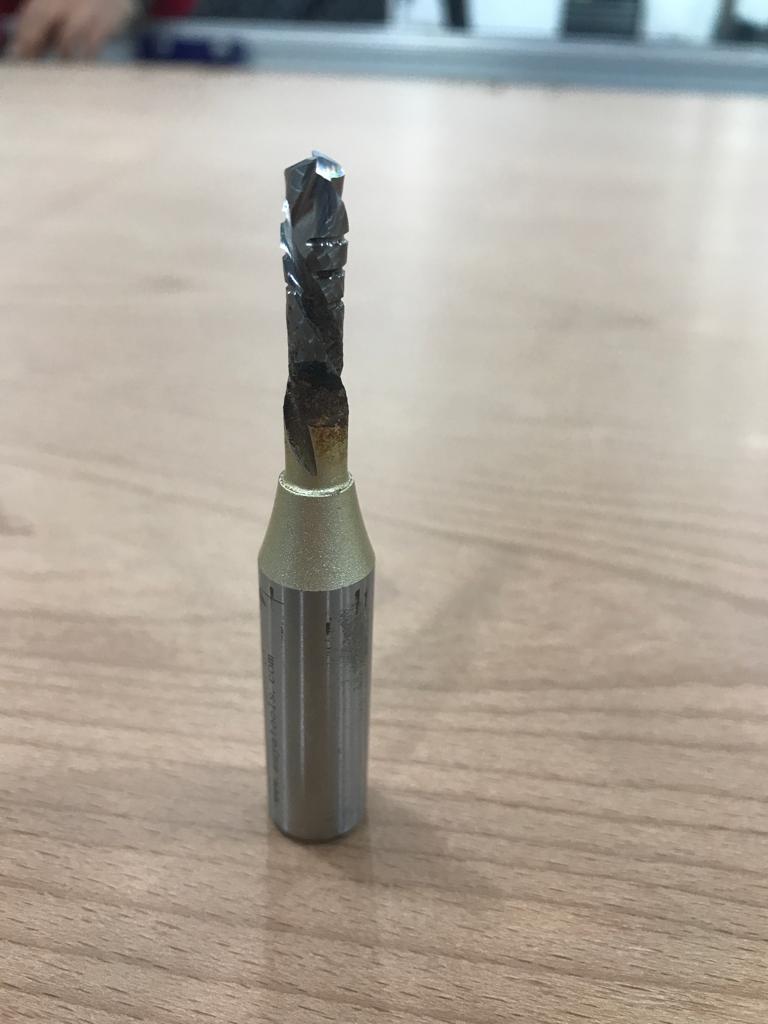
- 60-100PLR Solid Carbide - Polaris Compression
- Carbide Tipped router, 2 flute, V Bottom
- Solid Carbide drill, 2 flute, 8 facet
Cutting Condition
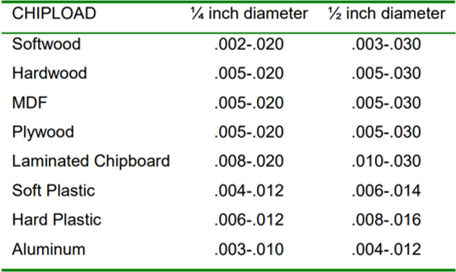
Most manufacturers provide optimal speeds and feeds for their bits as  . There are numerous calculators available online that can provide rough numbers. These calculators should work fine but may not be optimized for each particular bit. The manufacturer will still be the best resource, as most reputable companies have information and live support available to help users of their tools utilize them properly.
- Chip Load = per cutting edge and it refers to the size of the chip material after it has been machined.
- IPS = Inches Per Second.
- IPM = Inches Per Minute.
- RPM = Revolutions Per Minute.
- # of cutting edges = # of flutes.
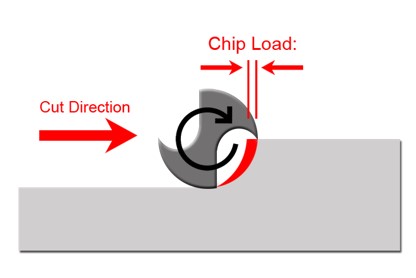
𝐹𝑒𝑒𝑑 𝑅𝑎𝑡𝑒 (𝐼𝑃𝑀) = 𝑅𝑃𝑀 × 𝐶ℎ𝑖𝑝 𝐿𝑜𝑎𝑑 × # 𝑜𝑓 𝑐𝑢𝑡𝑡𝑖𝑛𝑔 𝑒𝑑𝑔𝑒𝑠
Individual Assignments
Fusion 360 Design
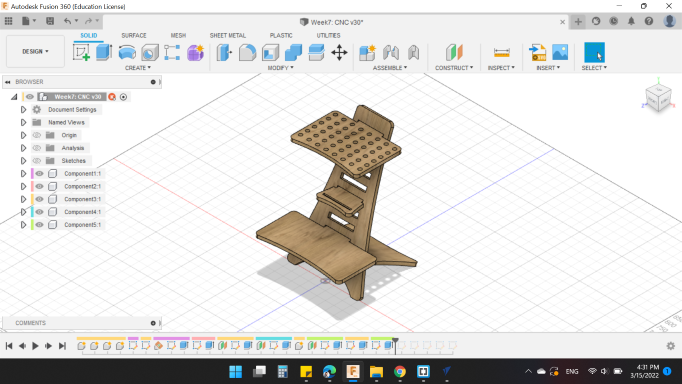
I wanted to make something big, I thought a lot about something I needed so much, then I had an idea about stand for laptop looks like HumbleWorks Standing Desk.
I used Fusion 360 for my design.
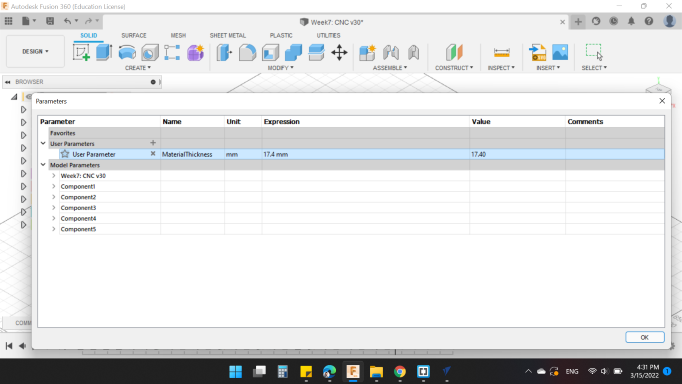
First of all, I measured the thickness of the wood board that I wanted to used, and it was 17.4 mm.
So, I made a parameter named by MaterialThickness with 17.4 mm.
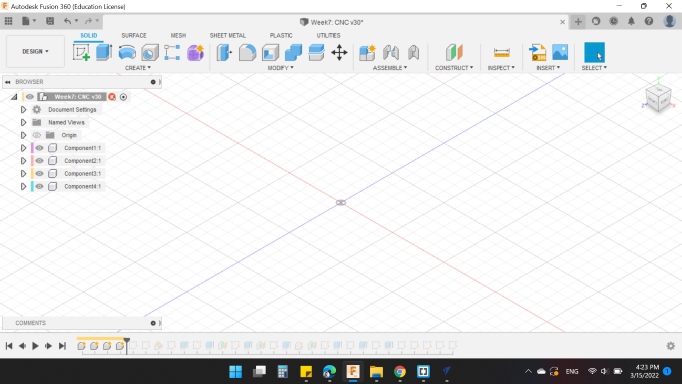
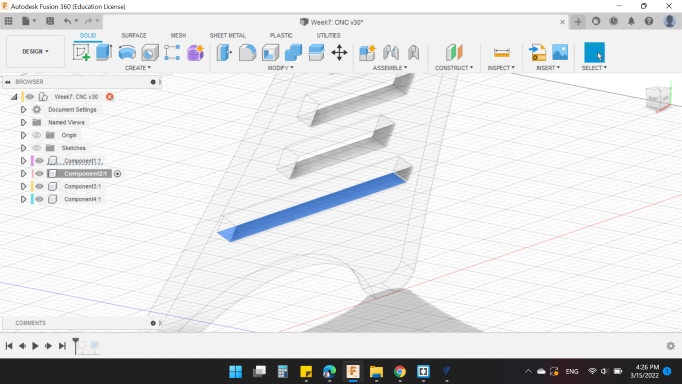
Then, I created 4 components for the 4 parts that the design include.
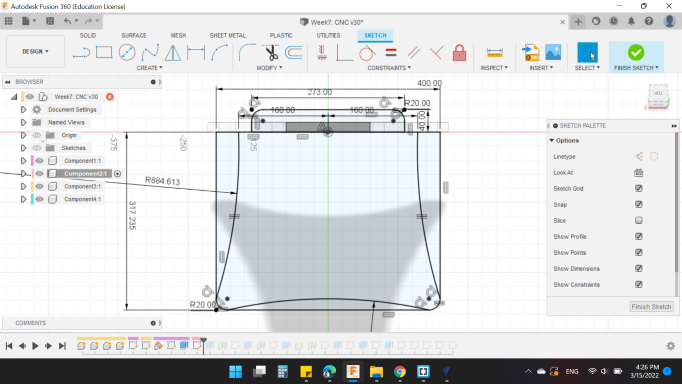
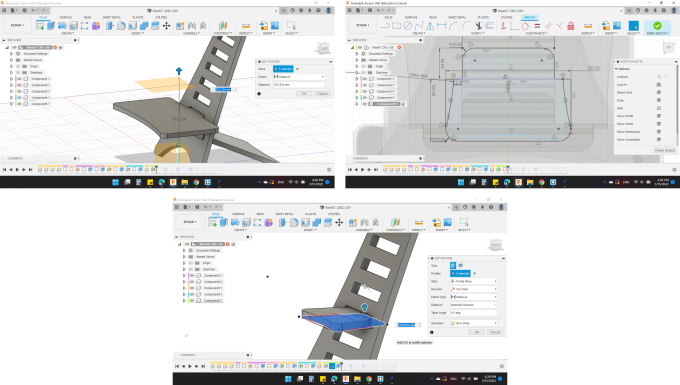
I started with sketch the main parts. The Back and the Support.
The back is tilted about the x-axis by 66 degree. And the back is raised from the ground by 150 mm.
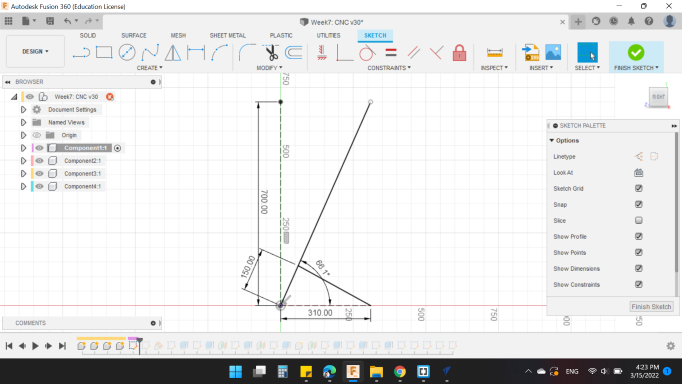
So, next I created a new plan tilted by the same angle.
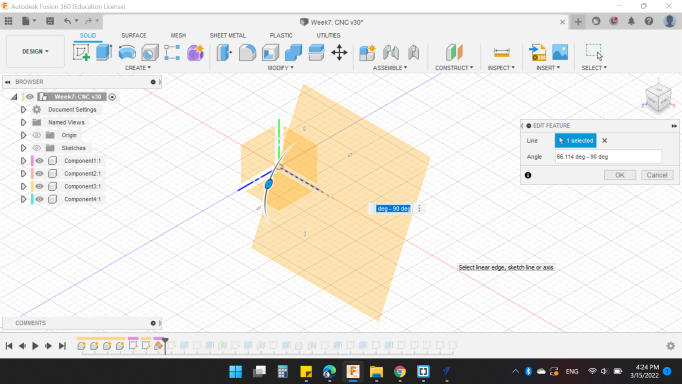
Then, sketched the back as shown.
And extruded with the MateialThickness parameter.
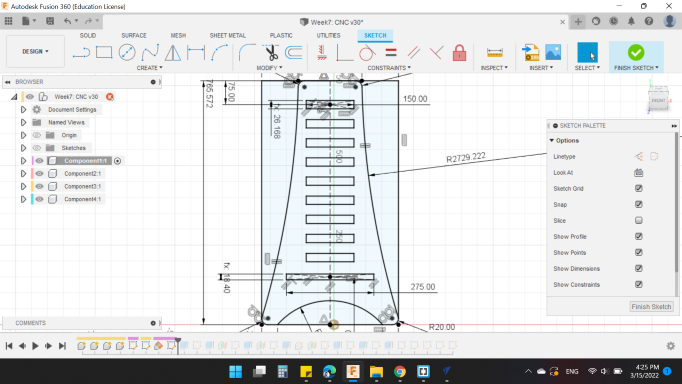
For the support part, the sketch was from the last slot of the back.
And the sketch as shown too.
With extruded with the same parameter MateialThickness.
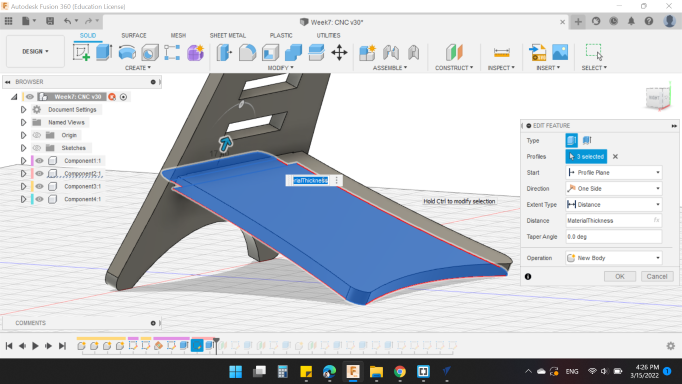
For the third part, same steps, (Plan, Sketch and Extrude).
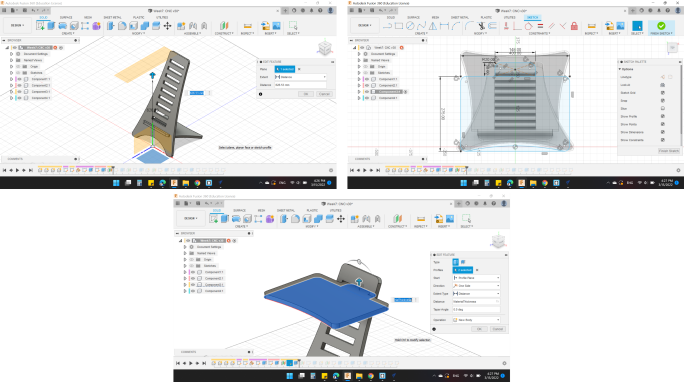
Also, for the fourth part.

And the fifth too.
Next, I came back for the third part.
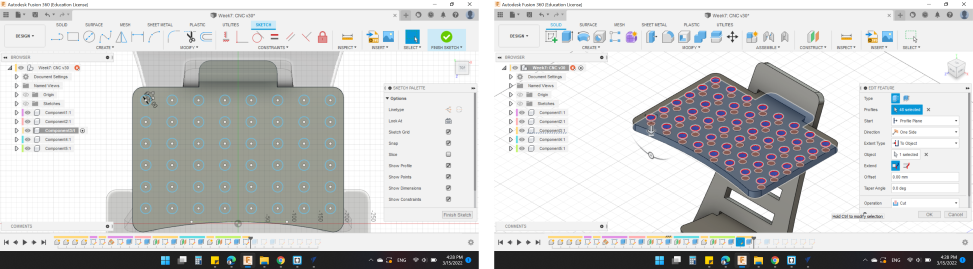
It's for the laptop, so to increase the area where hot air can escape from the device and to prevent it from getting too hot, I decided to add circular holes.
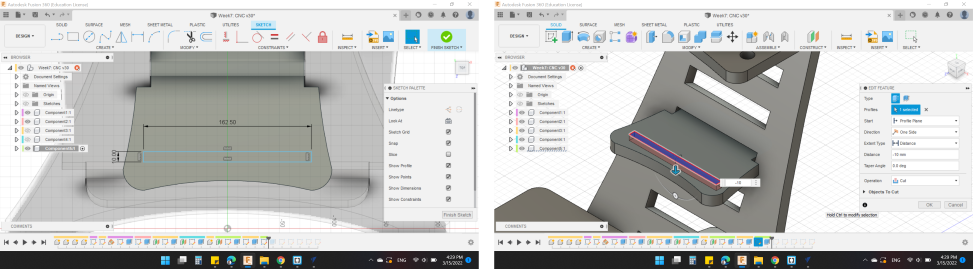
And for the fifth part, I decided to add a slot by the same length and thickness for my mobile as a stand for it.
With wood apperance looks good.
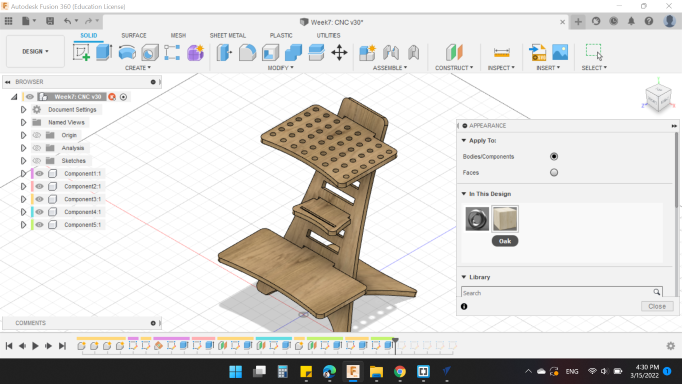
Finally, Project all parts to take the last sketches to be cut.
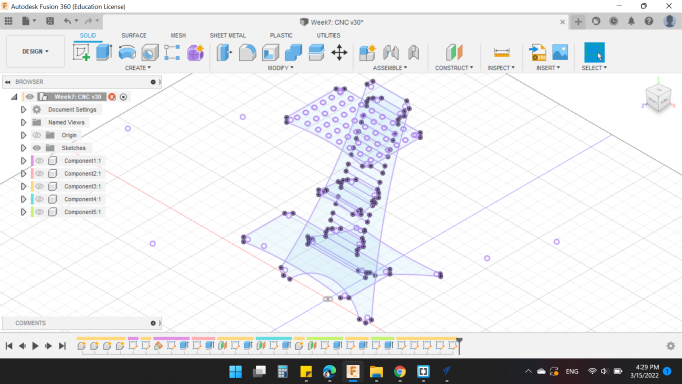
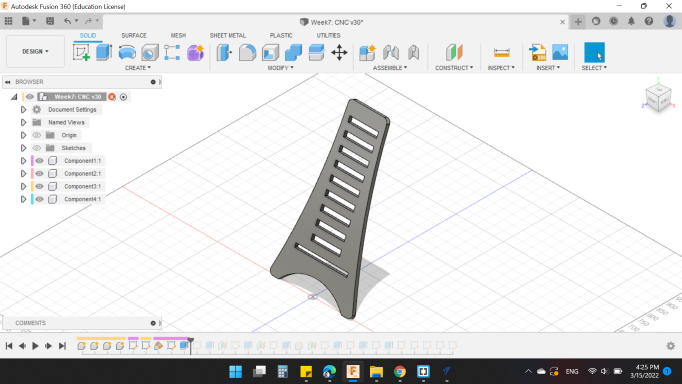
Here's my design 🙂.
And how will assembly.
File Setup (CAM)

Here's another interesting new software I'm learning this week which is Slicer V-Carve.
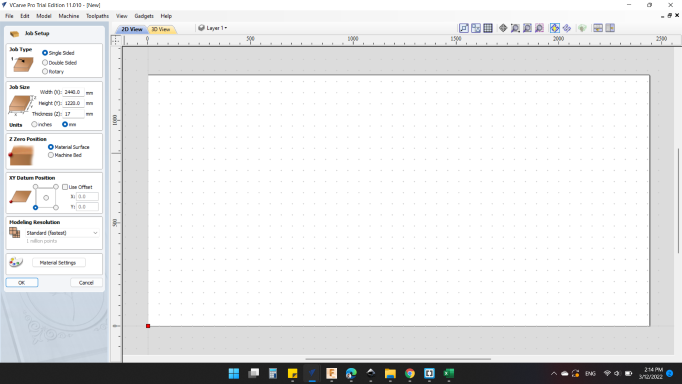
I opened the software then from Job Setup. The setup as following:
- Job Type
- Single Sided.
- Job Size
- Width (X): 2440 mm.
- Height (Y): 1220 mm.
- Thickness (Z): 17.4 mm.
- Z Zero Position
- Material Surface.
- XY Datum Position
- Left-Bottom.
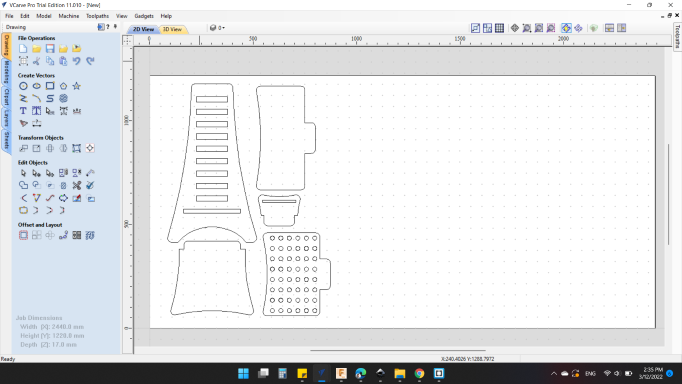
After pressed OK, Drawing window appeared. Here all operations for you 2D model will move.
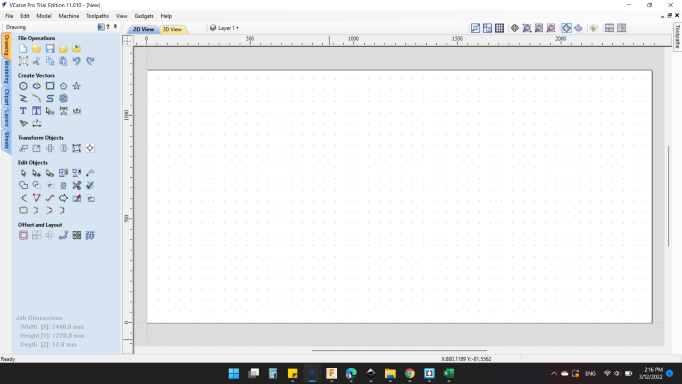
Then, from File > Import > Import Vectors you can opened your parts.

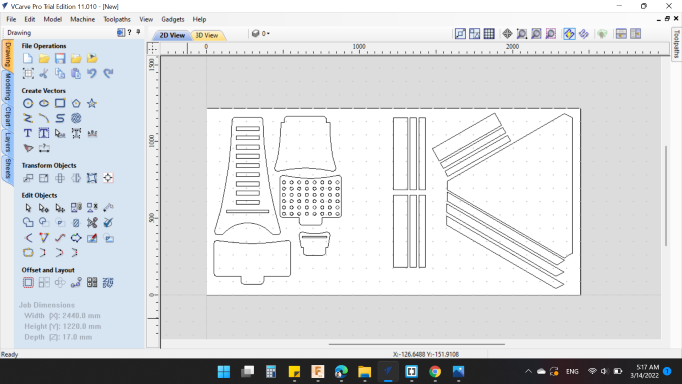
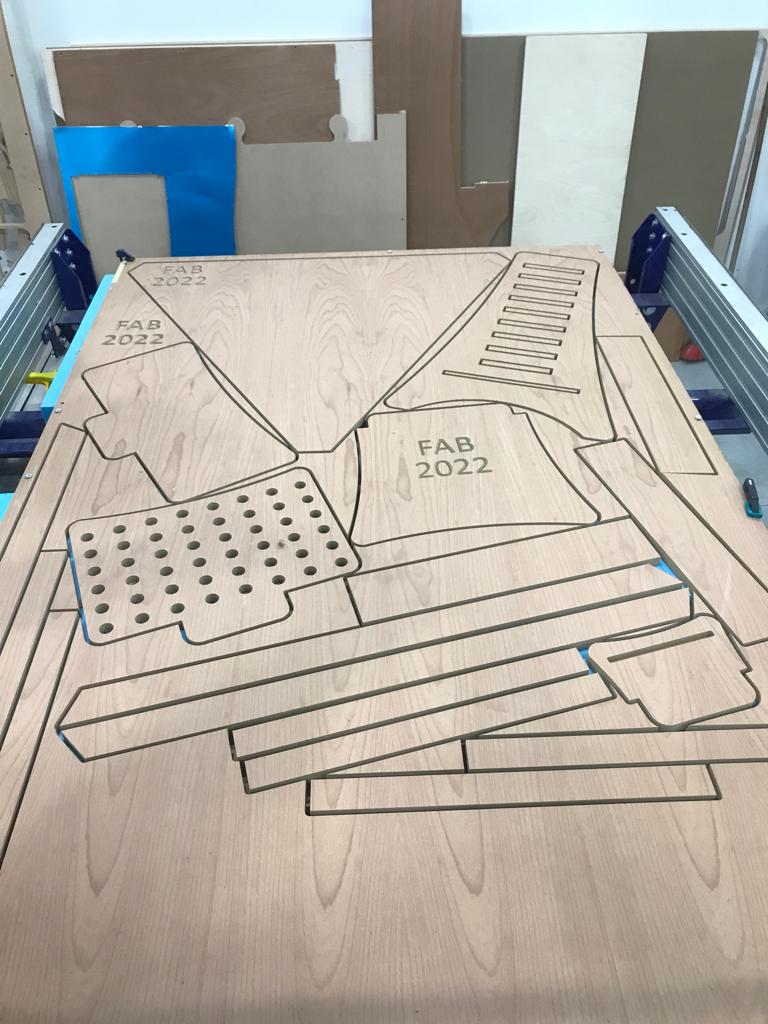
I selected all 5 sketches, and align them together in order to make use of board size as much as possible.
Also, to save more time, my partner Zayd puted his files with my files.
In order to arrange them appropriately and earn more wood board, I clicked on -- ![]() -- Nesting - Nest Selected Objects.
-- Nesting - Nest Selected Objects.
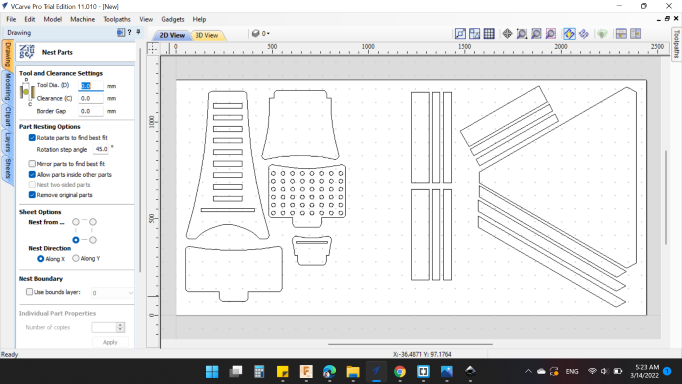
Tool and Clearance Settings
- Tool Dia. (D): 6 mm
- Clearance (C): 1 mm
- Boarder Gap: 30 mm
Part Nesting Options
- Rotate Part to find the best fit "YES"
- Rotation step angle 1 degree
- Mirror parts to find the best fit "YES"
- Allow parts to inside others part"NO"
- Remove original parts "YES"
Sheet Options
- Nest from ... Left-Bottom
- Nest direction Along X
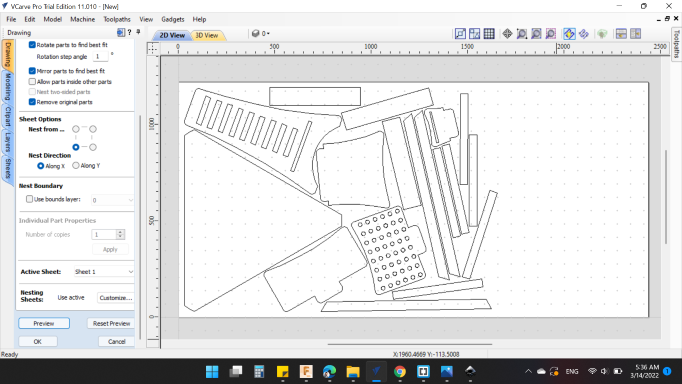
Then clicked on Preview to showed the parts. And OK to move back to the main page.
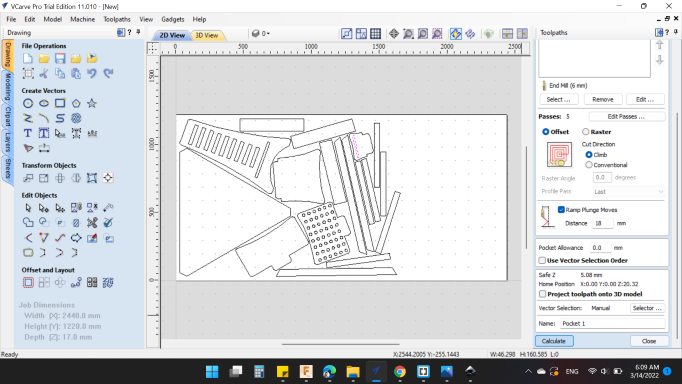
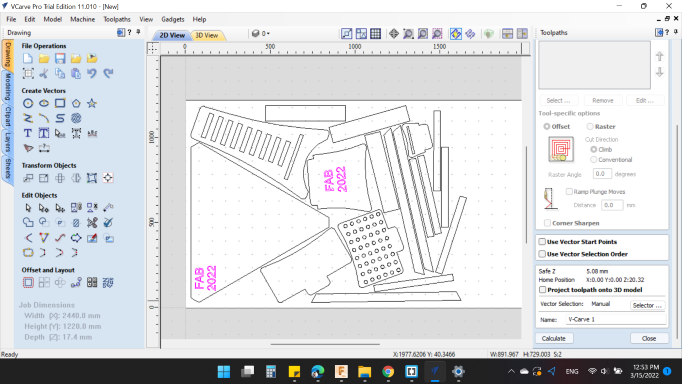
Then, from the Toolpaths on the right, I clicked on -- ![]() -- Pocket Toolpath to make the 2D pocket operations.
-- Pocket Toolpath to make the 2D pocket operations.
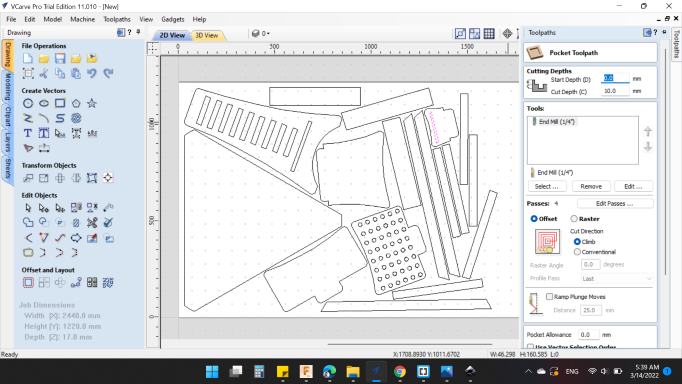
The 2D Pocket Toolpath shows the needed operations.
Cutting Depths
- Start Depth (D): 0 mm
- Cutting Depth (C): 10 mm
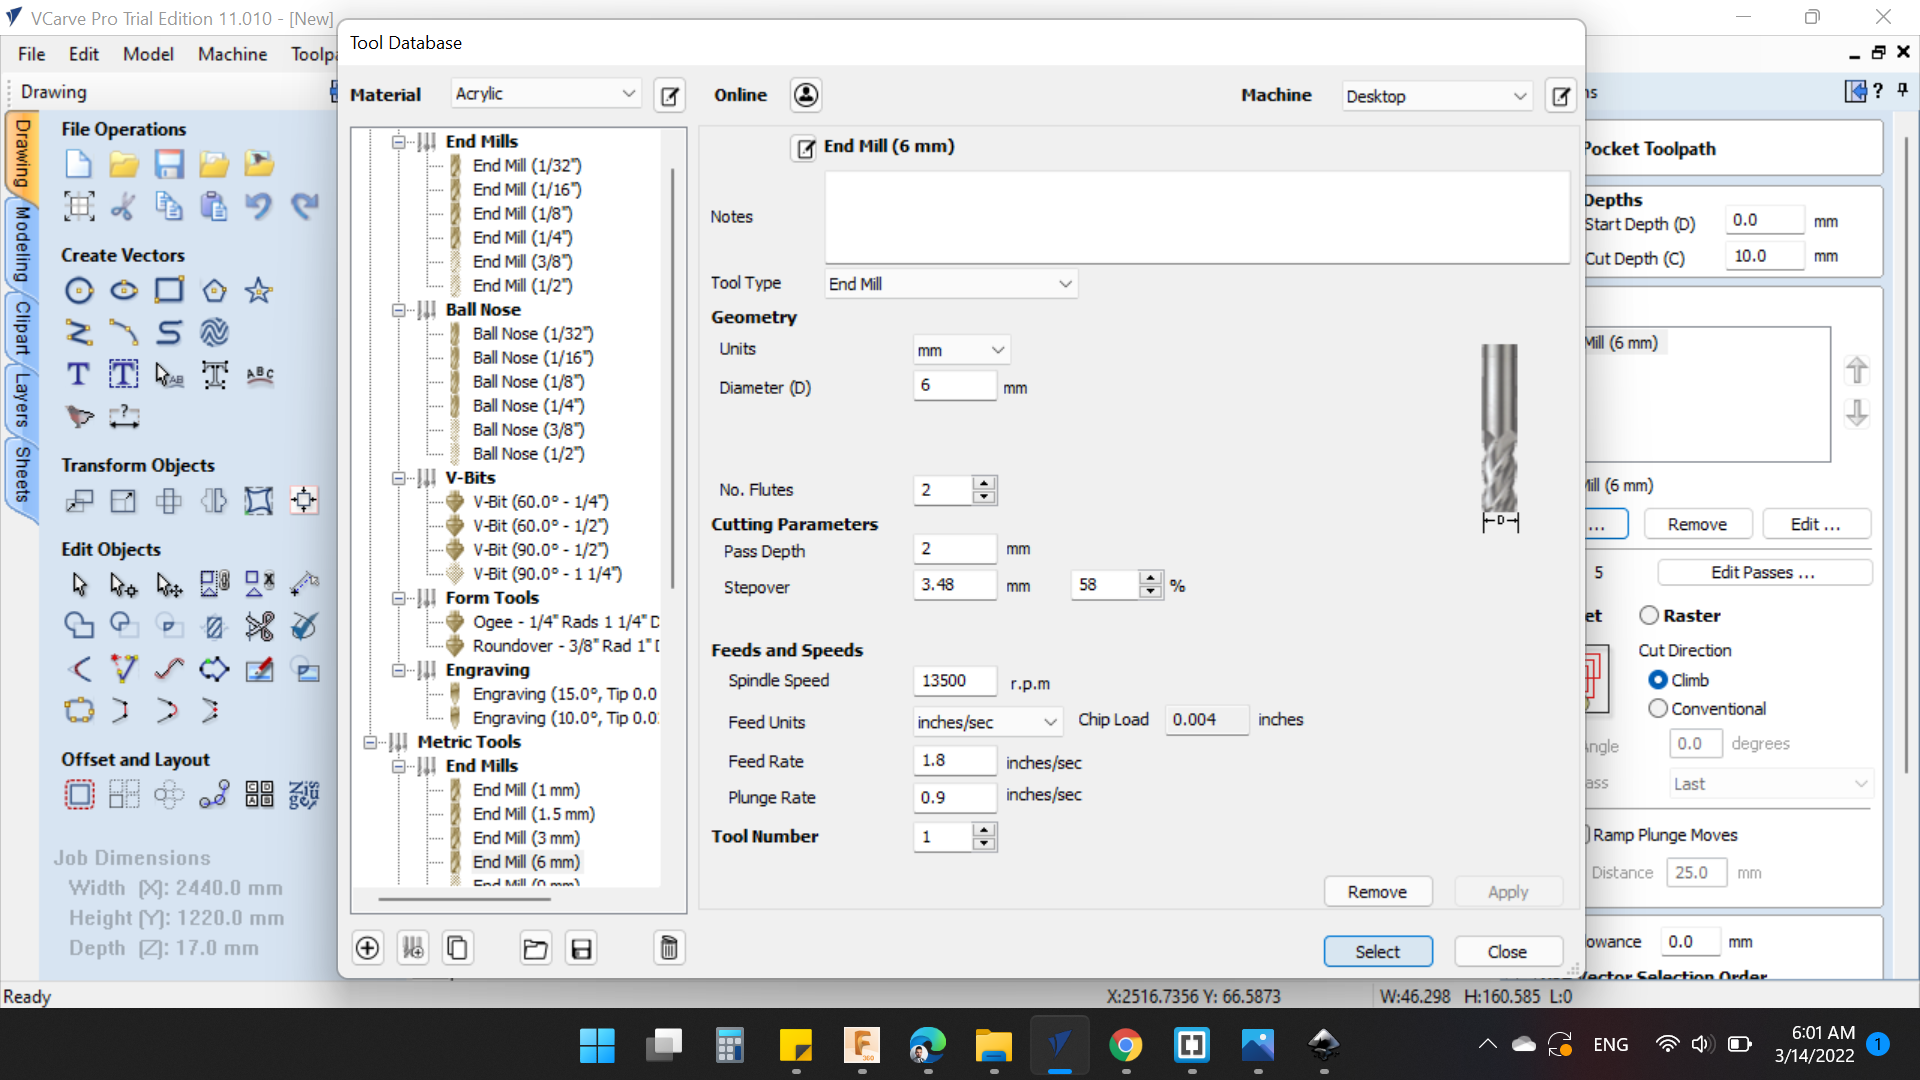
The tool is Compression Spiral 6 mm D.
Tools "select".
-
Geometry
-
Units: mm.
-
Diameter: 6 mm.
-
No. Fluts: 2.
-
Cutting Parameters
-
Pass Despth: 2 mm.
-
Stepover: 3.48 mm. / 58 %.
-
Feeds and Speeds
-
Spindle Speed: 13500 r.p.m.
-
Feed Units: inches/sec.
-
Chip Load: 0.004 inches.
-
Feed Rate: 1.8 inches/sec.
-
Plunge Rate: 0.9 inches/sec.
-
Tool Number: 1.
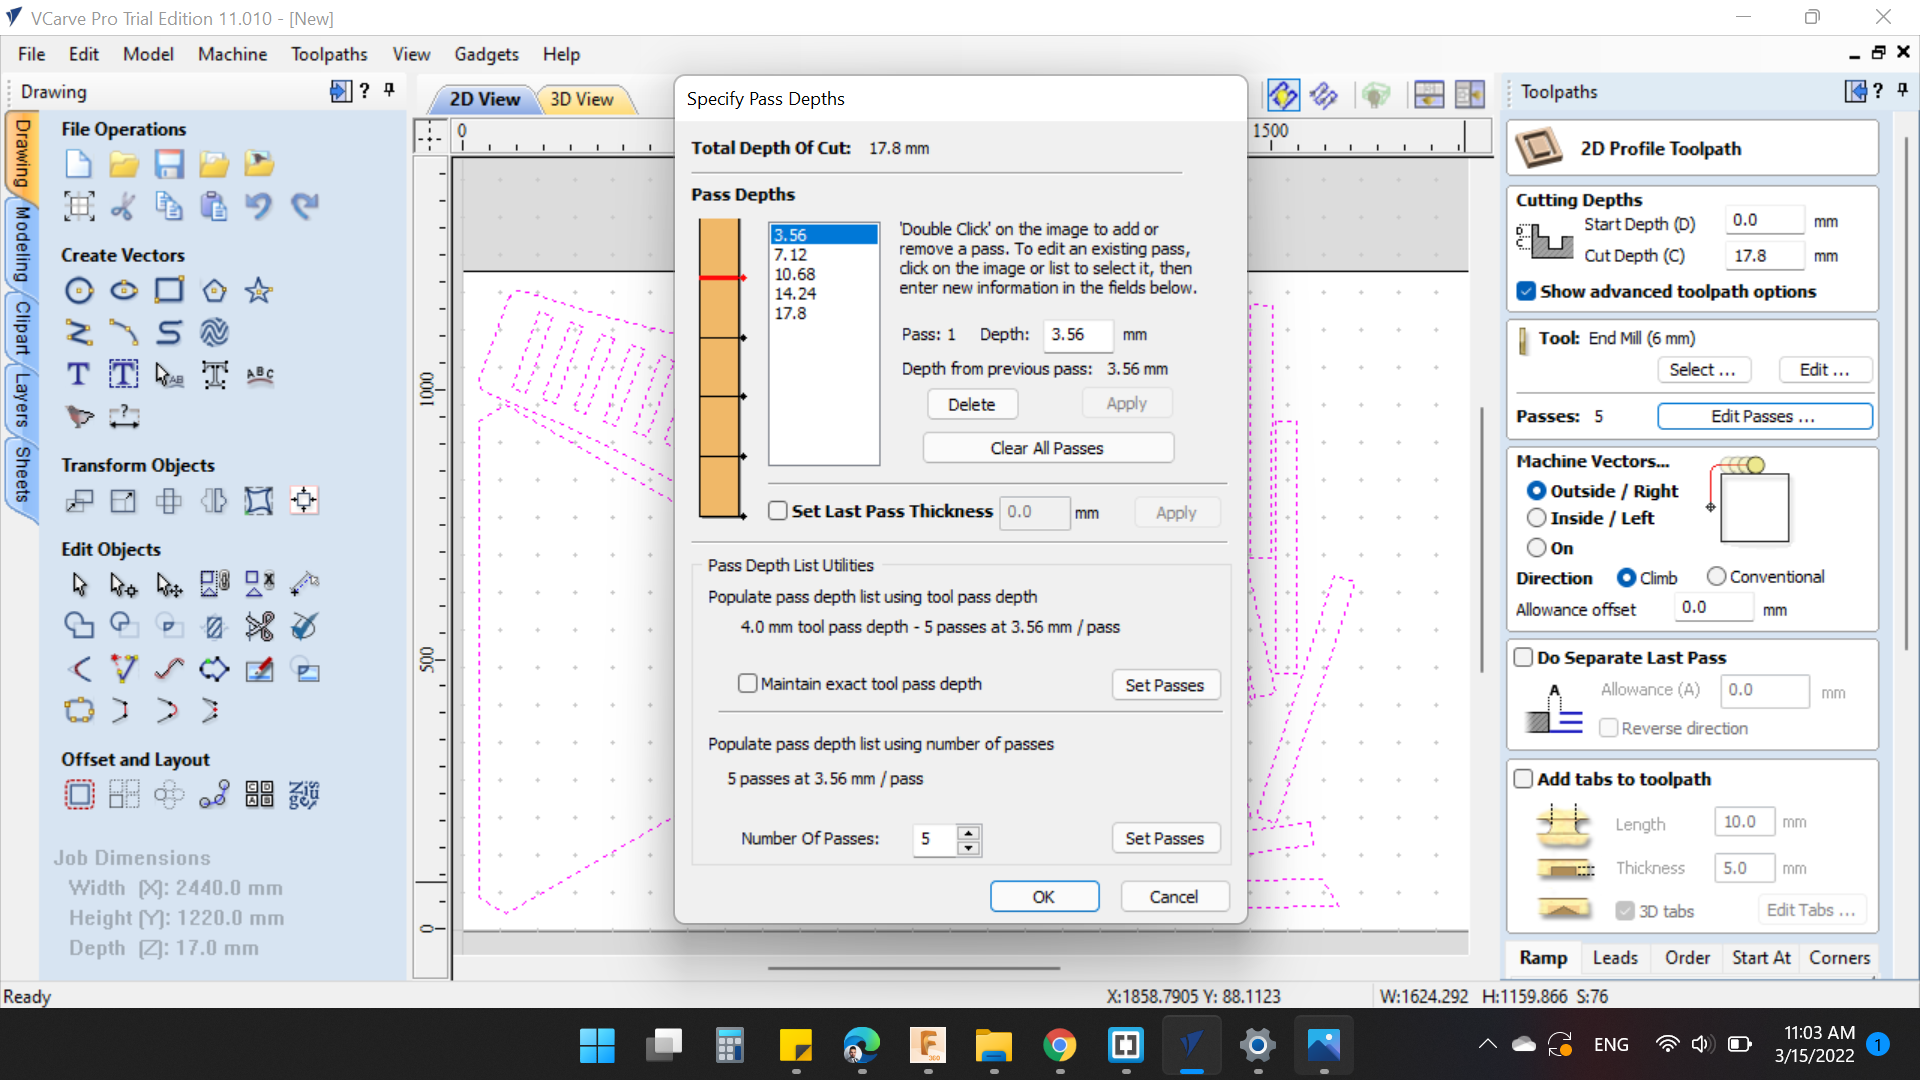
Passes
- Number Of Passes 3
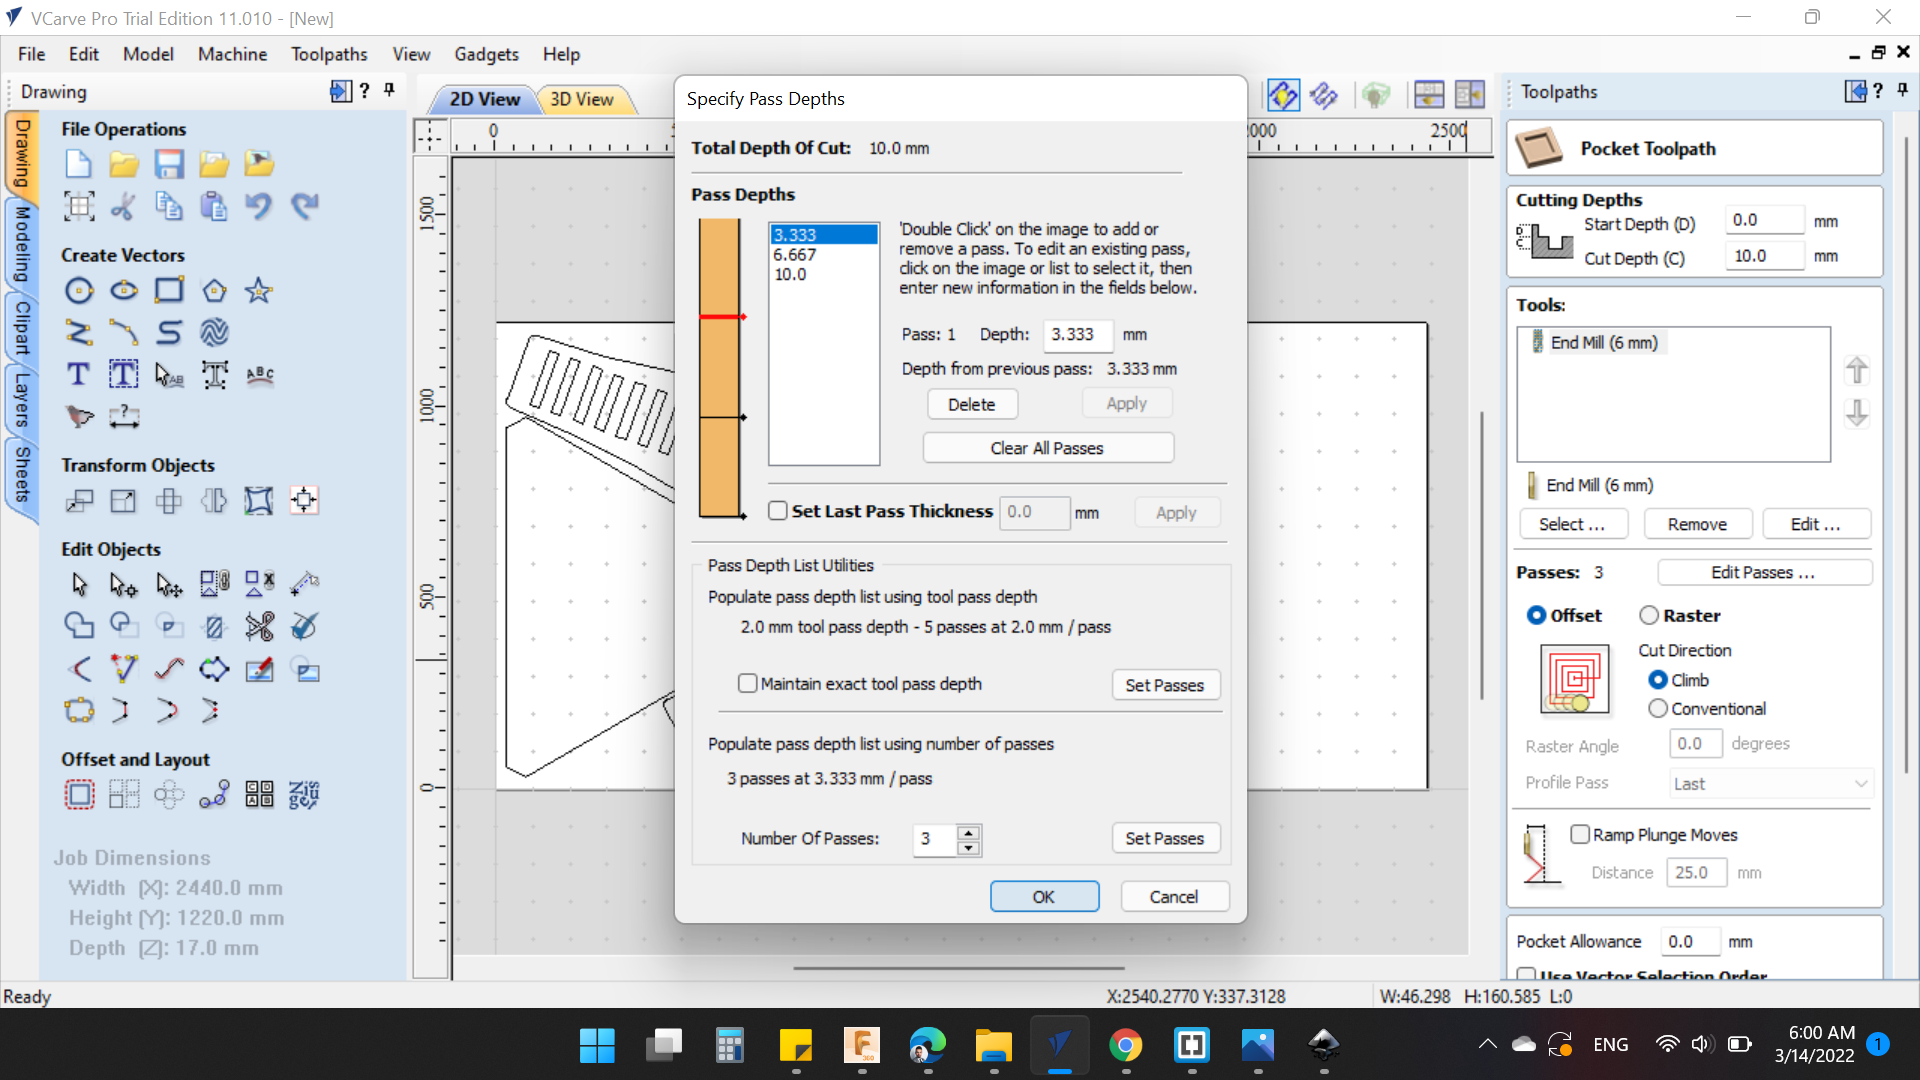
Ramp Plunge Moves, should be 3 times tool diameter.
- Distance 18 mm
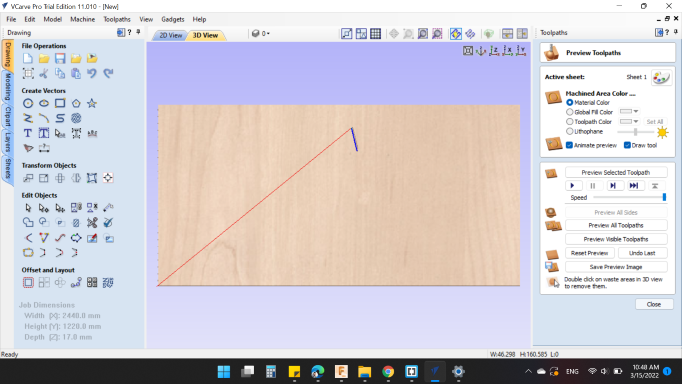
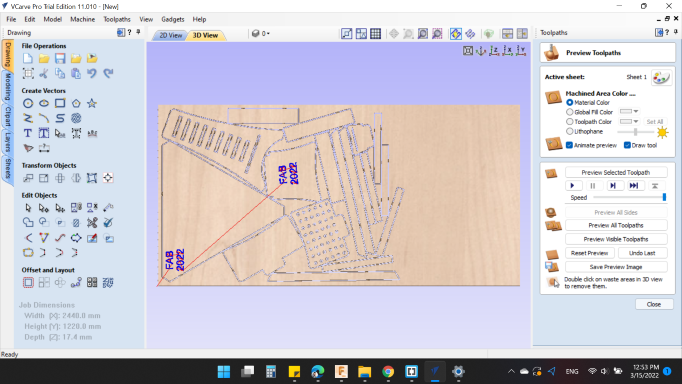
Finally I clicked on "Calculate" to shows the tool path in the simulation window. You can to it by press on -- ![]() -- Preview Toolpaths too.
-- Preview Toolpaths too.
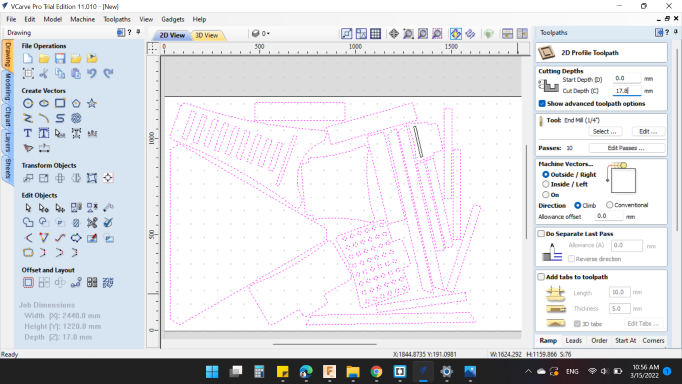
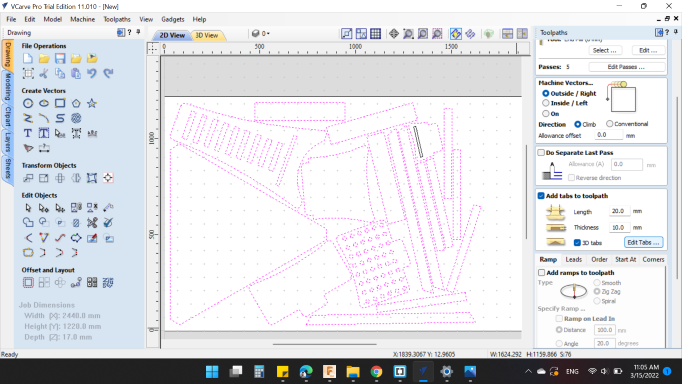
Then, from the Toolpaths on the right, I clicked on Profile Toolpath -- ![]() -- to make the 2D cuts operations for the whole lines.
-- to make the 2D cuts operations for the whole lines.
The 2D Profile Toolpath shows the needed operations.
Cutting Depths
- Start Depth (D): 0 mm
- Cutting Depth (C): 17.8 mm
Tools "select".
-
Geometry
-
Units: mm.
-
Diameter: 6 mm.
-
No. Fluts: 2.
-
Cutting Parameters
-
Pass Despth: 4 mm.
-
Stepover: 2.4 mm. / 40 %.
-
Feeds and Speeds
-
Spindle Speed: 13500 r.p.m.
-
Feed Units: inches/sec.
-
Chip Load: 0.004 inches.
-
Feed Rate: 1.8 inches/sec.
-
Plunge Rate: 0.9 inches/sec.
-
Tool Number: 1.

Passes
- Number Of Passes 5
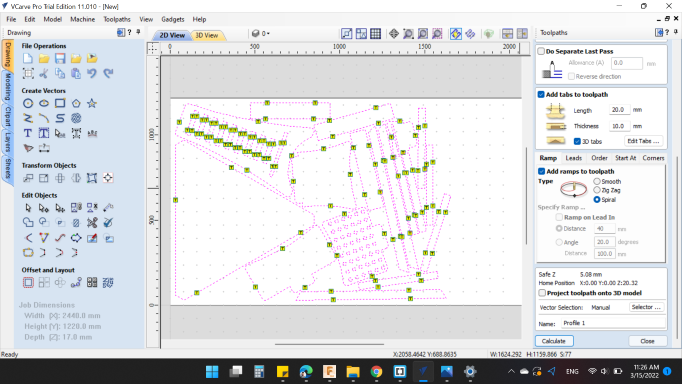
And add Tabs from Add tabs to toolpath. The settings is:
- Length: 20 mm
- Thickness: 10 mm
- 3D Tabs: "YES"
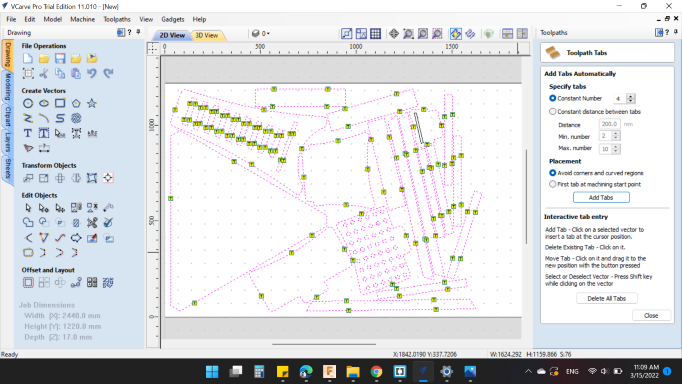
To distribute the tabs, I clicked on "Edit Tabs"
Add Tabs Automatically
Specify tabs
- Constant Number: 4
Placement
- Avoid corners and curved regions"YES"
The, Add Tabs.
Last but not least, I eneabled Ramp option from Add ramps to toolpath and the type is "Spiral".
Finally I clicked on "Calculate" to prepare the tool path. When I clicked, a WARNING Box appeared, this warning that the Material thickness is 17.4mm and the Maximum tool depth is 17.8mm. To ensure all parts are cutted.
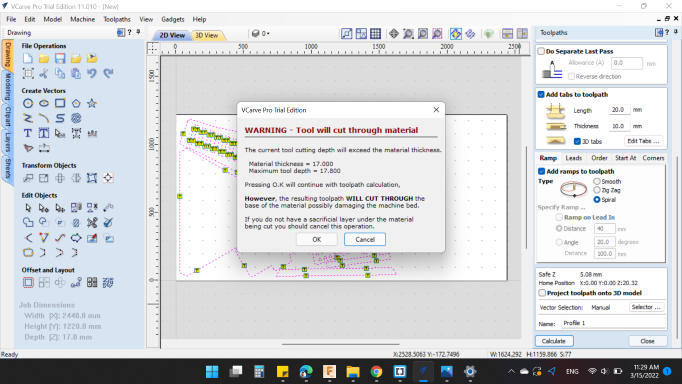
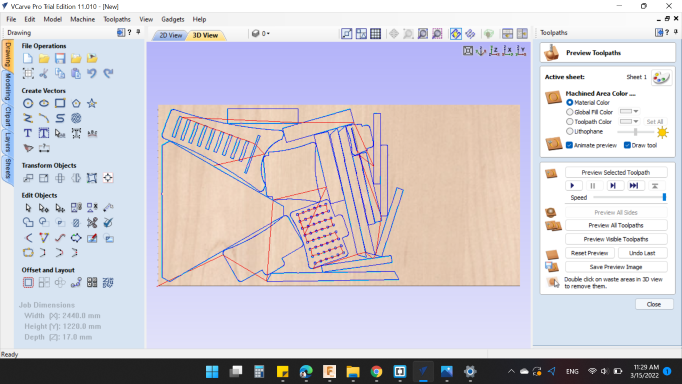
And the simulation for whole toolpath.
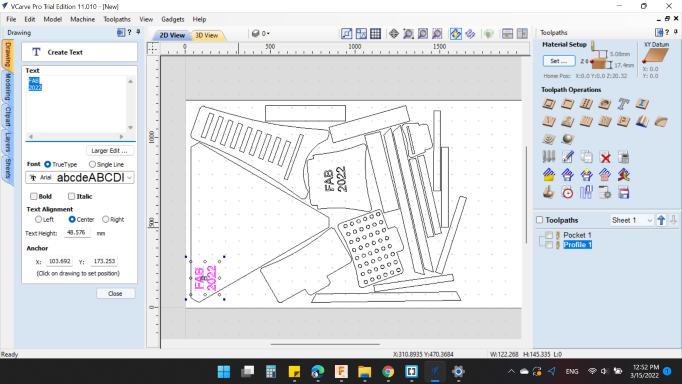
Before generating the G Code, I wanted to add an inscription or text using a V-Bit tool.
From LMT.ONSROUD >>> Carbide Tipped router, 2 flute, Lettering Bit..

So, from -- ![]() -- Draw Text, I wrote FAB 2022.
-- Draw Text, I wrote FAB 2022.
Then, I clicked on -- ![]() -- V-Carve / Engraving Toolpath.
-- V-Carve / Engraving Toolpath.
Cutting Depths
- Start Depth (D): 0 mm
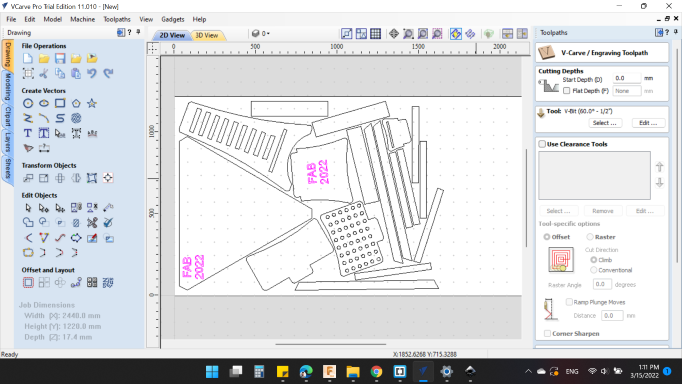
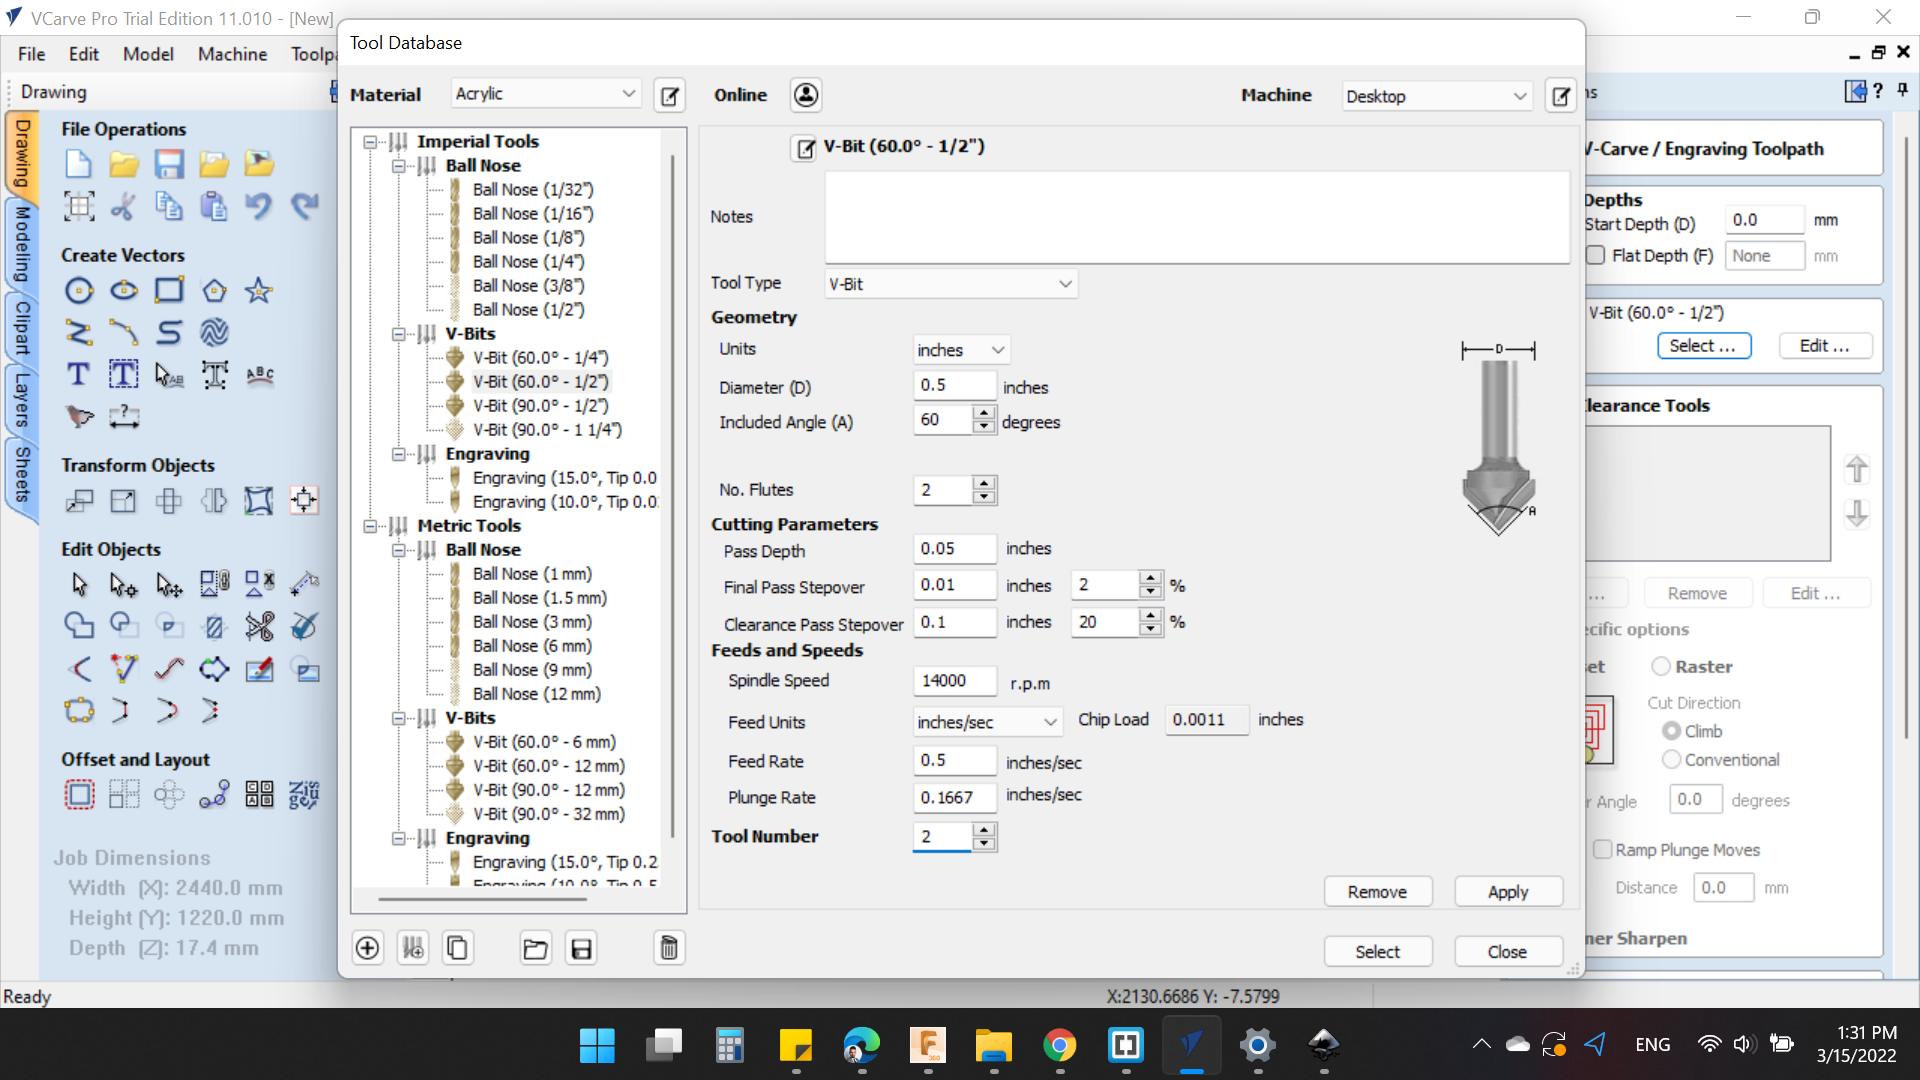
Tools "select".
-
Geometry
-
Units: inches.
-
Diameter: 0.5 inches.
-
Includes Angle: 60 degree.
-
No. Fluts: 2.
-
Cutting Parameters
-
Pass Despth: 0.05 inches.
-
Final Pass Stepover: 0.01 inches. / 2 %.
-
Clearance Pass Stepover: 0.1 inches. / 20 %.
-
Feeds and Speeds
-
Spindle Speed: 13500 r.p.m.
-
Feed Units: inches/sec.
-
Chip Load: 0.0011 inches.
-
Feed Rate: 0.5 inches/sec.
-
Plunge Rate: 0.1667 inches/sec.
-
Tool Number: 2.
Finally I clicked on "Calculate" to prepare the tool path.
And the simulation for whole toolpath.
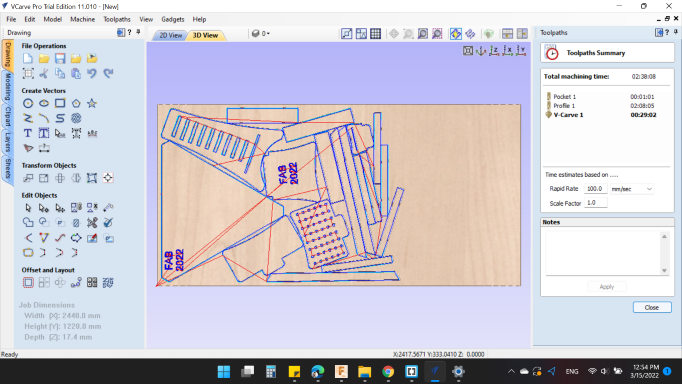
To know the time required to cut, I clicked on -- ![]() -- Summary of all toolpaths.
-- Summary of all toolpaths.
The Total Machining Time: 02:38:08.
- Pocket 1 00:01:01
- Profile 1 02:08:05
- V-Carve 00:29:02
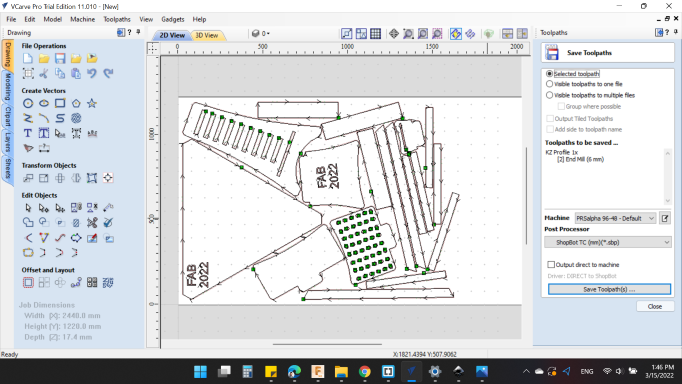
Finally after make sure that the process is good based on the simulation, I ckicked on -- ![]() -- Save Toolpath.
-- Save Toolpath.
Shopbot CNC Machine

The ShopBot PRSalpha ATC 96-60-8 is an affordable full-sized gantry tool for CNC cutting, drilling, carving and machining of wood, plastic, aluminum and other materials.
It has a bed of size 2440mm x 1220mm and has a rapid transit speeds of 1800 inches per minute and cutting speeds of up to 600 inches per minute.
Before starting any process, you must be warm up the machine. To do that I operated the machine from the Control Box and turn the key to ENGAGED.
Then, I open the -- ![]() -- Shopbot Command Console.
-- Shopbot Command Console.
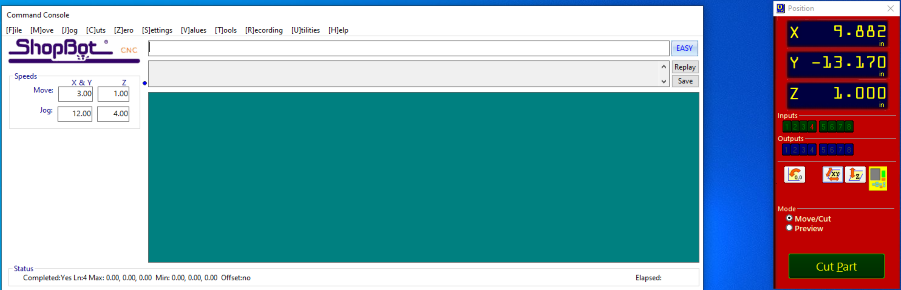
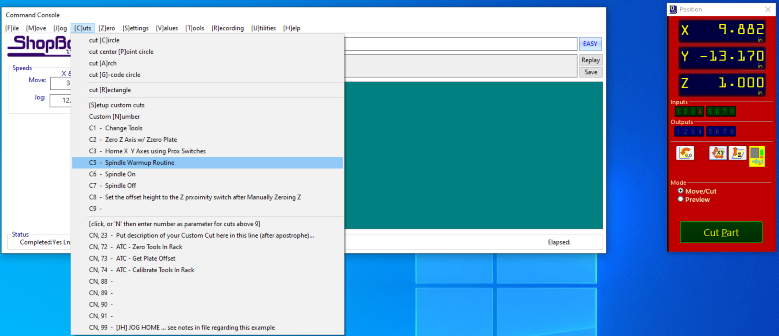
I cliked on [C]uts then C5 - Spindle Warmup Routine. The machine will warmup for 10 minutes.
After the warmup, I installed the wood board to the bed.
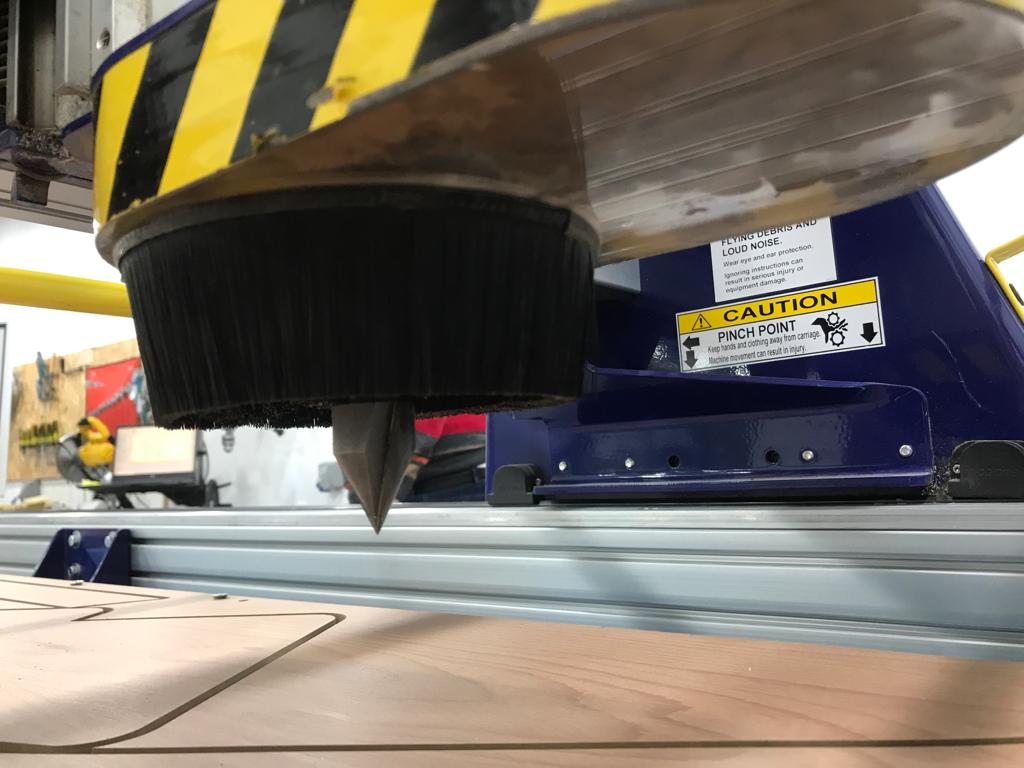
Then I installed the Compression Spiral 6 mm End Mill.
To move the axes, I clicked on -- ![]() -- SKey Pad.
-- SKey Pad.
First, I moved the [X,Y] to the postion that I want, Which is the corner that I selected on the V-Carve in Setup process.
Then I clikced on the zero for [X,Y] -- ![]() .
.

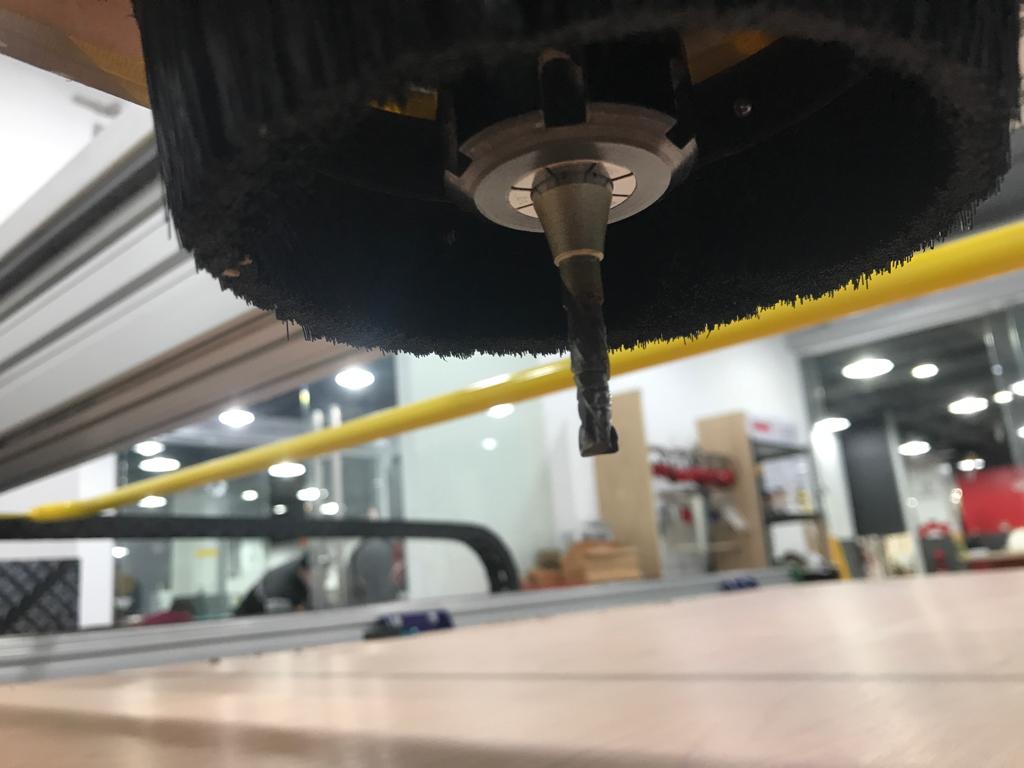
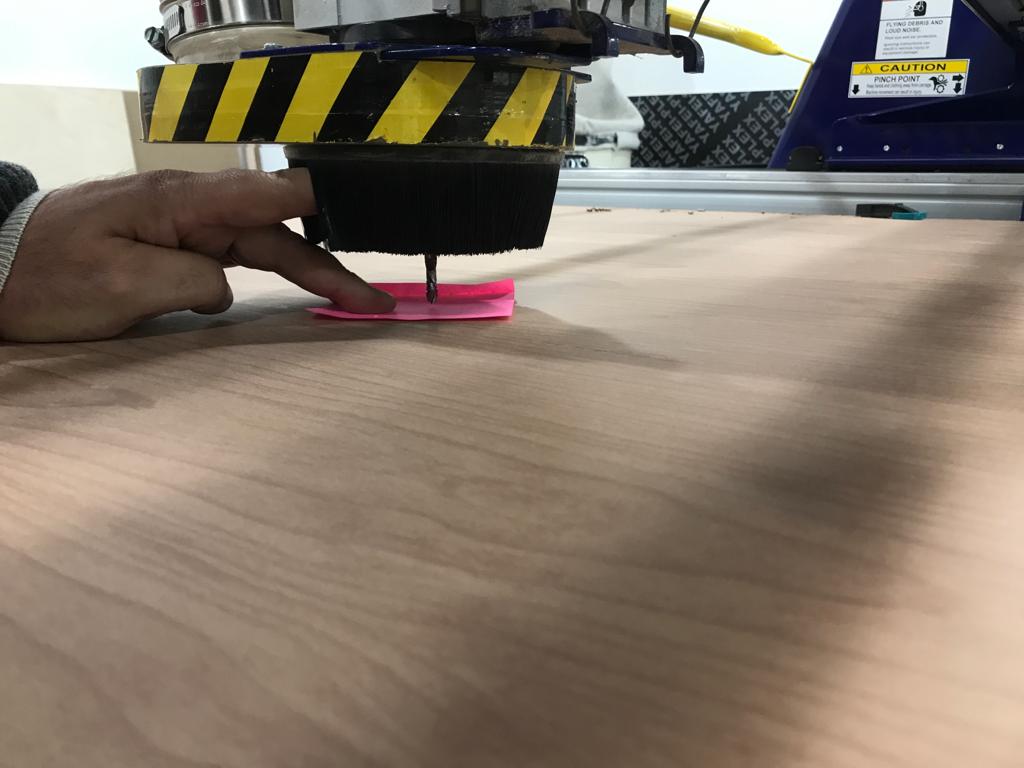
For the [Z] axis, you can download the [Z] axis until you notice it touches the bed, or you can use the plate to zeroing it self.
I used the first way, with a piece of paper. I putted the paper under the spindle and lower the spindle until the paper don't move.
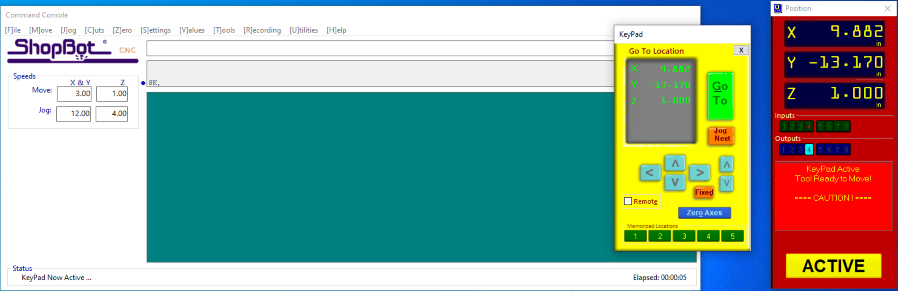
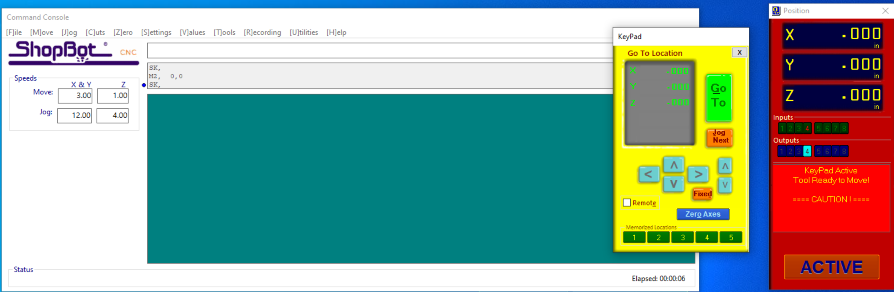
Here's the 3 Axes are zeroing.
Then I clicked on --  -- to open the job. A new window appeared, Then I clicked on --
  .
.
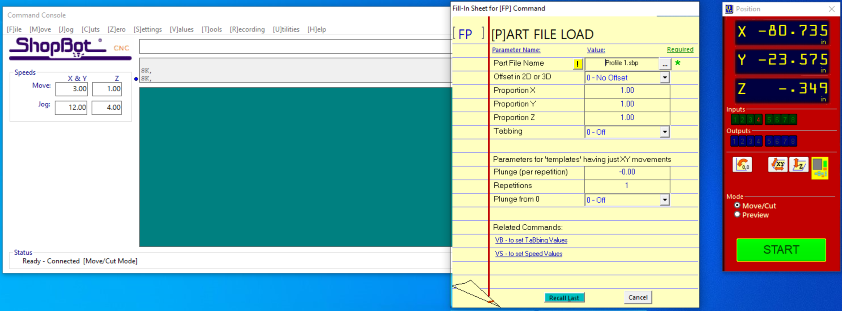
A new window appeared to Now start Router/Spindle, before clicked on "OK", I pressed on green start button on the control.

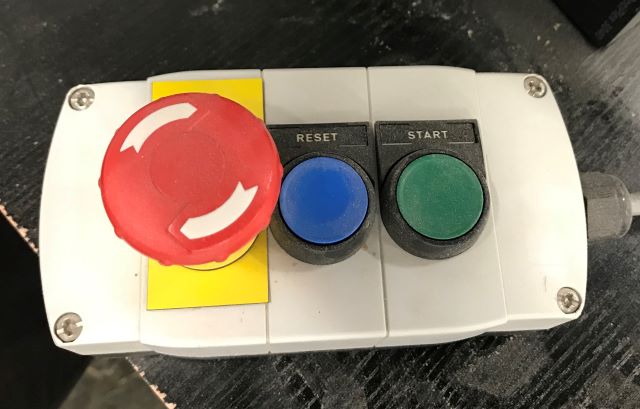
In this way the spindle start running, then I clicked on "OK".
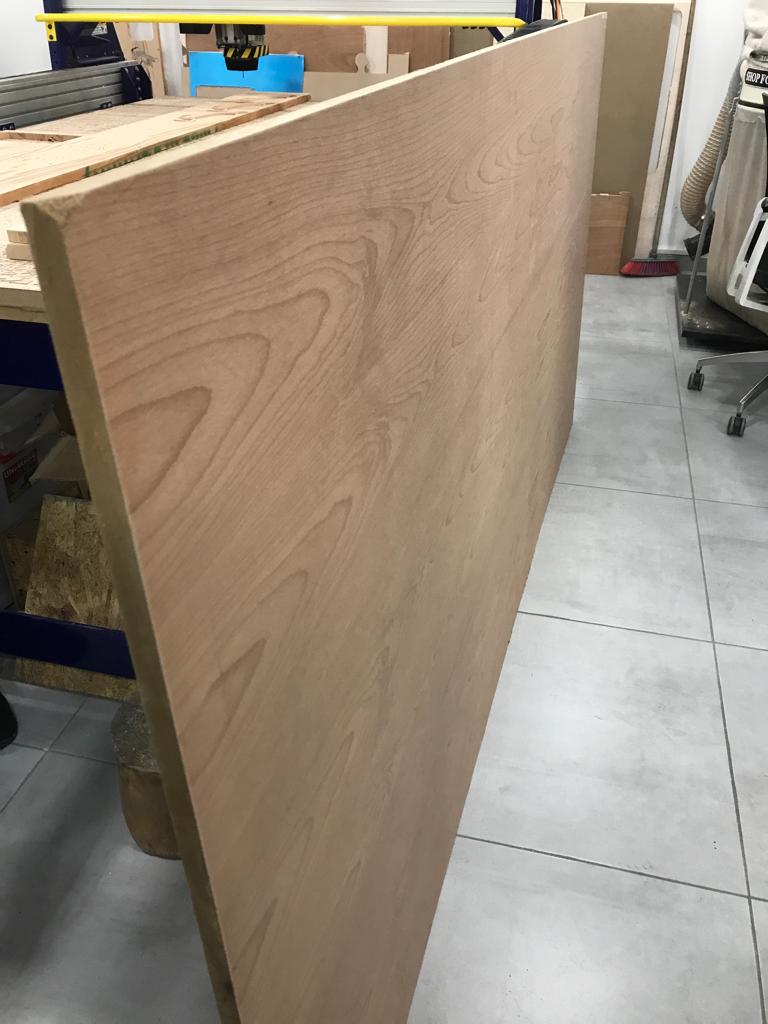
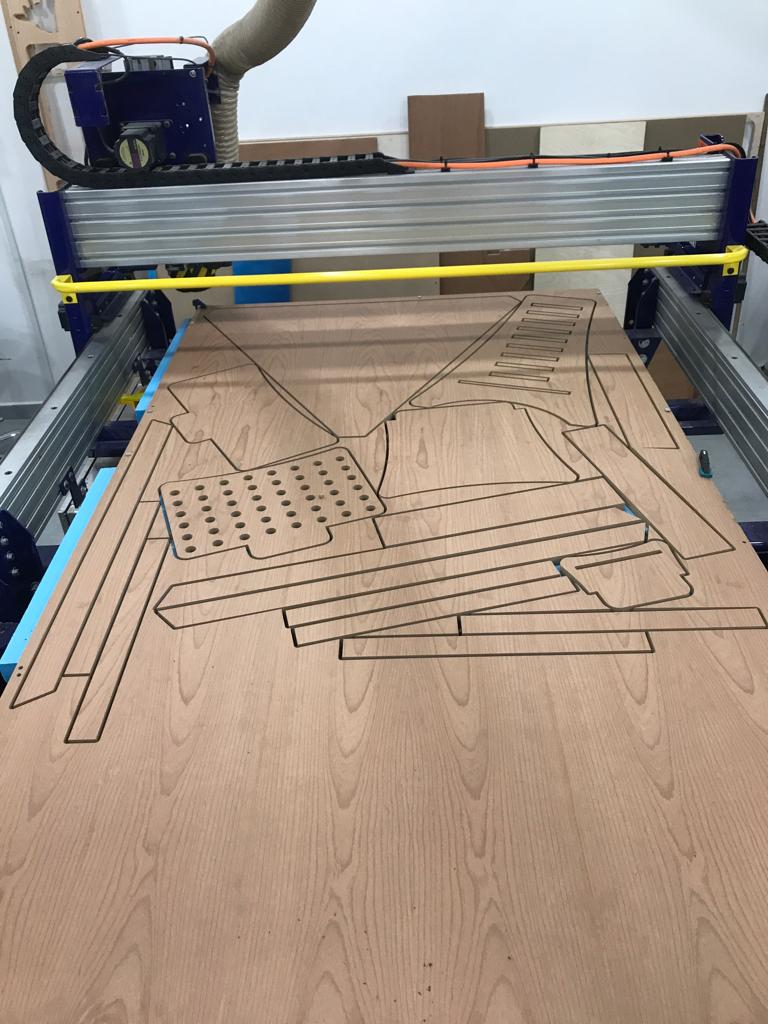
Here's the first 2 job, Pocket & Profile : ).
Then, I changed the tool to the V-Bit 60 degree.
Finally, all jobs are done : ).
Assembly and Installation
I disassembled and removed the pieces from the wood board using the Multi Tool. Then assembled the parts together as shown 👇:
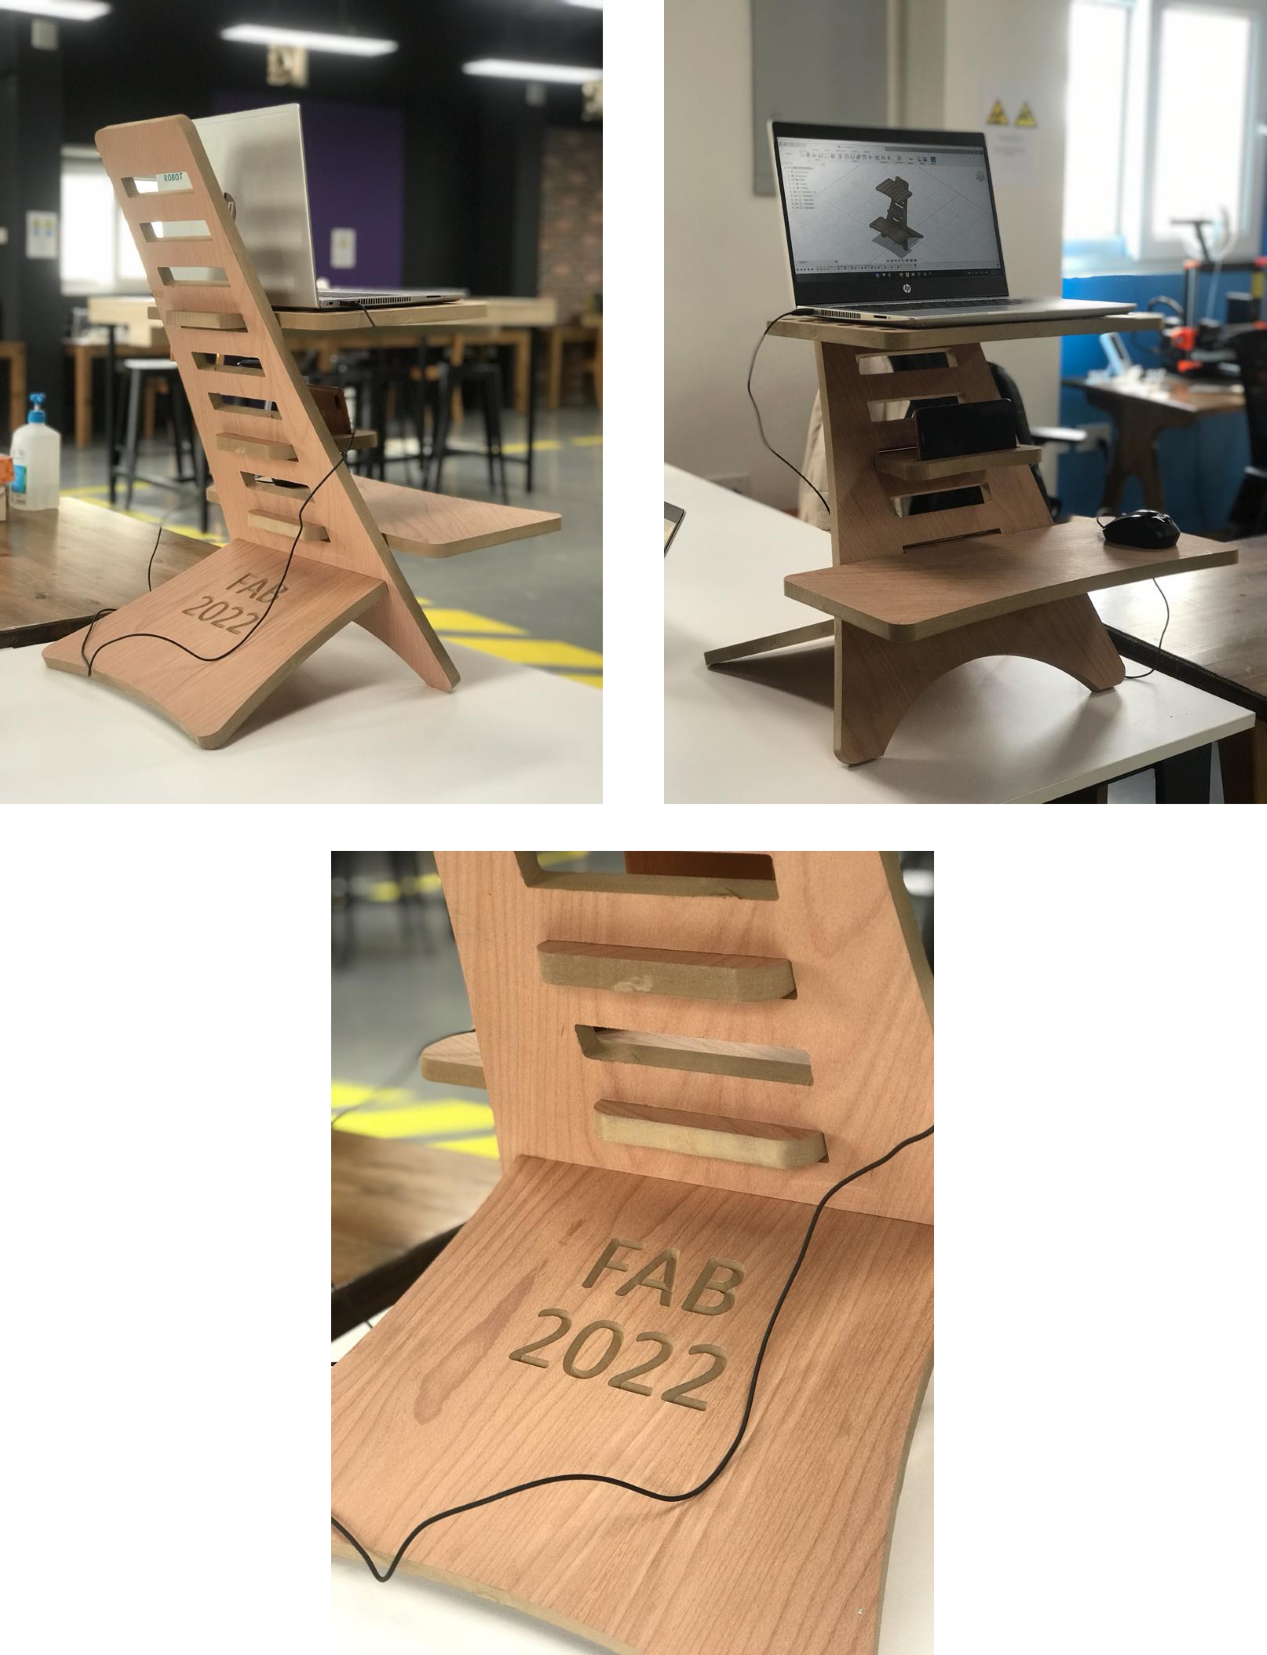
Last finally this week 😅😁
You can download my files here: