This week's assignment is to program the board we designed 2 weeks ago using low level programming. To do that we have to read the datasheet for the microcontroller we used which is ATtiny44.
When I milled and soldered my board two weeks ago, I wanted to make sure everything works fine and to do that I used the Arduino IDE to program it.
Learning:
- Group Assignment
- Feature Comparison
- Programming ATtiny44 using avr-dude
- Programming ATmega328P Using Arduino UNO Board
- AVR-dude Vs. Arduino
- Individual Assignment
- Fixing the problem
-
Datasheet
-
Microcontroller #1 / ATtiny45
-
Microcontroller #2 / ATtiny44
-
Microcontroller #3 / ATmega328p
- Arduino Reference
-
Programming
-
Code #1 / Blink
-
Code #2 / Blink with Push Button
-
Code #3 / Fading
-
Code #4 / Push Button as Toggle Switch
Group Assignments
In this part we compared between two AVR families, ATtiny44 from tinyAVR family and ATmega328P from megaAVR family. For ATtiny44 we used avr-dude and FabTinyISP programmer and for ATmega328P we used Arduino UNO board.
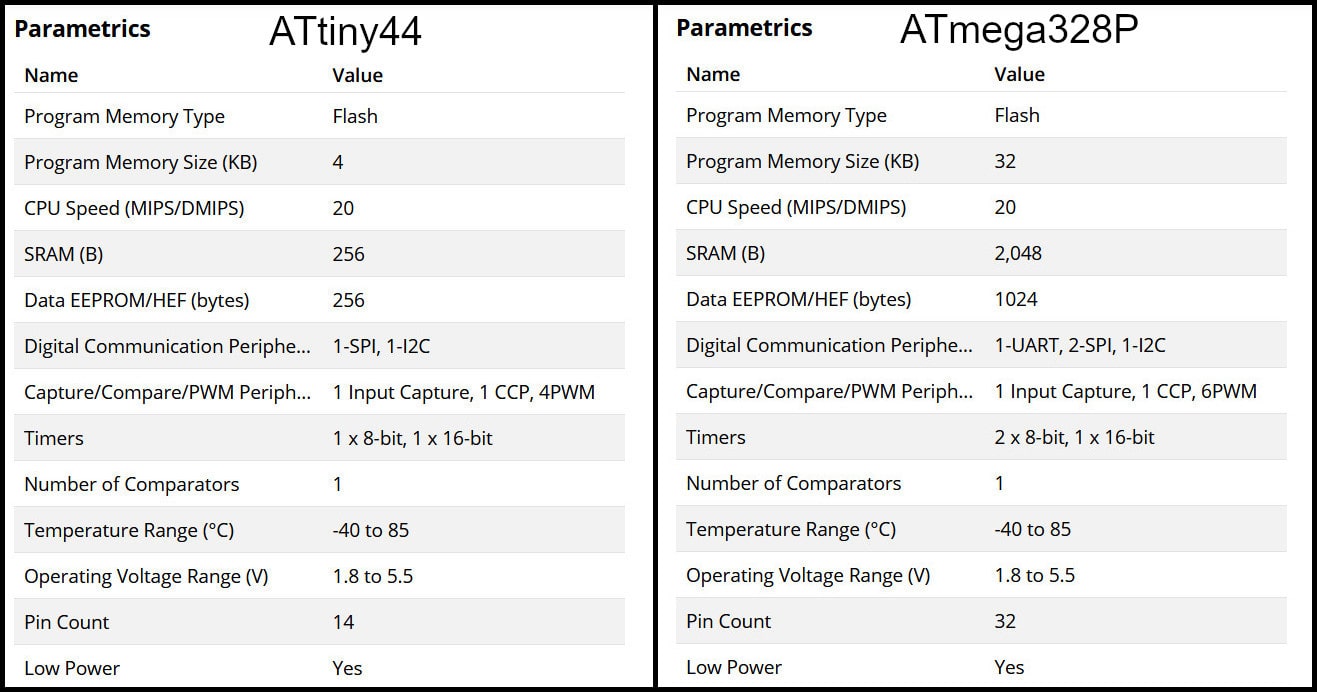
Feature Comparison
The table below compares bwteen the two MCUs. “tinyAVR microcontrollers (MCUs) are optimized for applications that require performance, power efficiency and ease of use in a small package”, where “megaAVR microcontrollers (MCUs) are the ideal choice for designs that need some extra muscle. For applications requiring large amounts of code.”
Programming ATtiny44 using AVR-dude
Write the program in C language using Notepad++ text editor. In the Makefile, define settings like programmer, target MCU, clock rate and lfuse. Using “make” command, build the hex file to be uploaded to target MCU. Connect the FabTinyISP prorammer to USB and ISP cable between programmer and target board. Using the command defined in Makefile “make program-avr-fuses”, program the lfuse to target MCU. Using the command defined in Makefile “make program-avr”, upload the hex file to target MCU.
Programming ATmega328P Using Arduino UNO Board
Write code using Arduino commands. The target MCU should have the right bootloader burnt to be used on Arduino Uno board. Connect the board to USB and uplad the hex file. To butn a bootloader to a fresh ATmega328P, you can check the built in example from Arduino.
AVR-dude Vs. Arduino
Programming in C enables users to have more control and optimized execution. The code written in C occupies less memory than the code written in Arduino. Also, code written in C executes faster. Keep in mind to program in C, the MCU should not have a bootloader burn to it, which saves the flash memory needed for the bootloader.
Individual Assignments
Fixing the problem
As I mentioned in the week6 "Electronics Design", about that not all LEDs work when the board is connected by ISP Pin Headers or via Voltage Regulator.

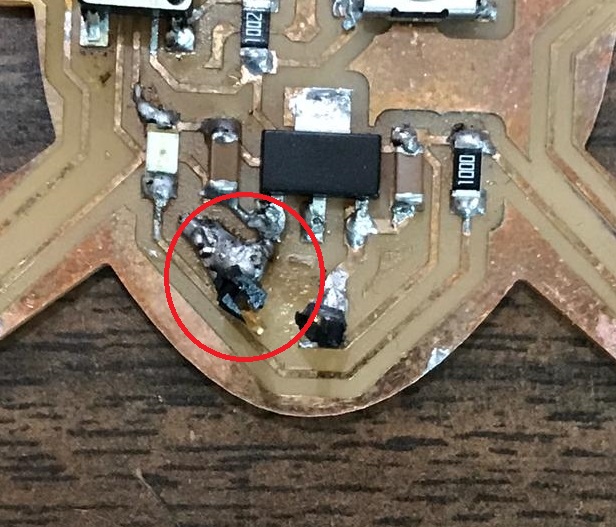
When I was soldering the 2 pins for voltage regulator, by mistake I cutted the GND trace as shown in the picture below
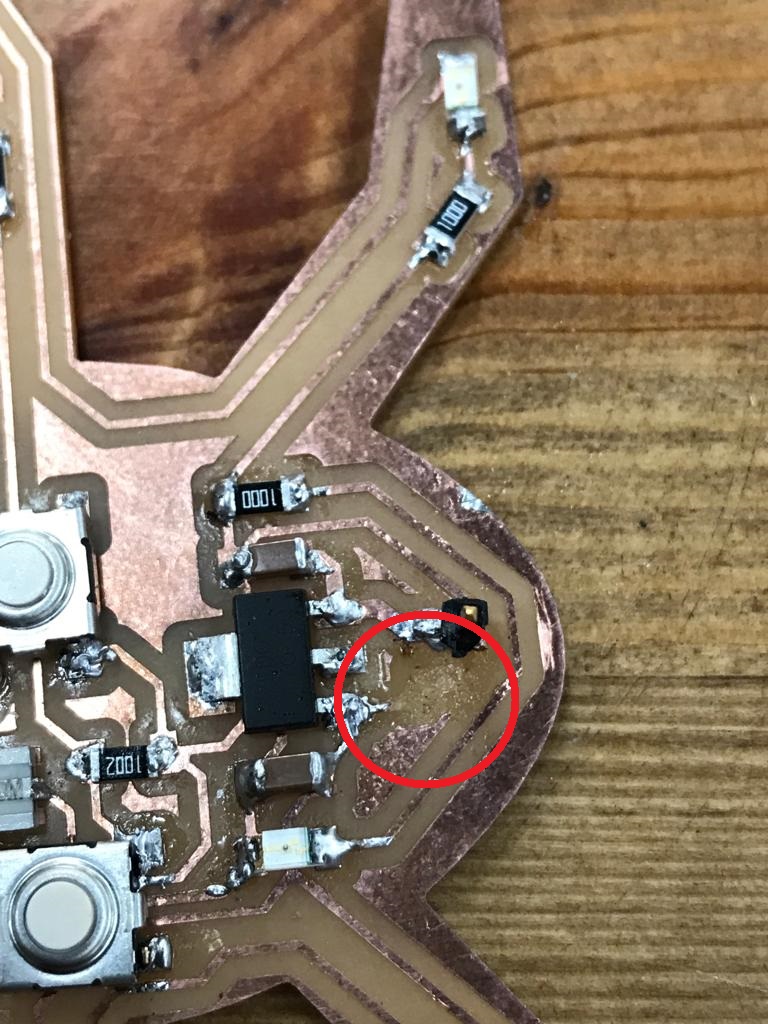
So I used the remaining piece of copper and soldered the wire to it, but I forgot the second end of the wire which is connected to the rest of the LEDs.
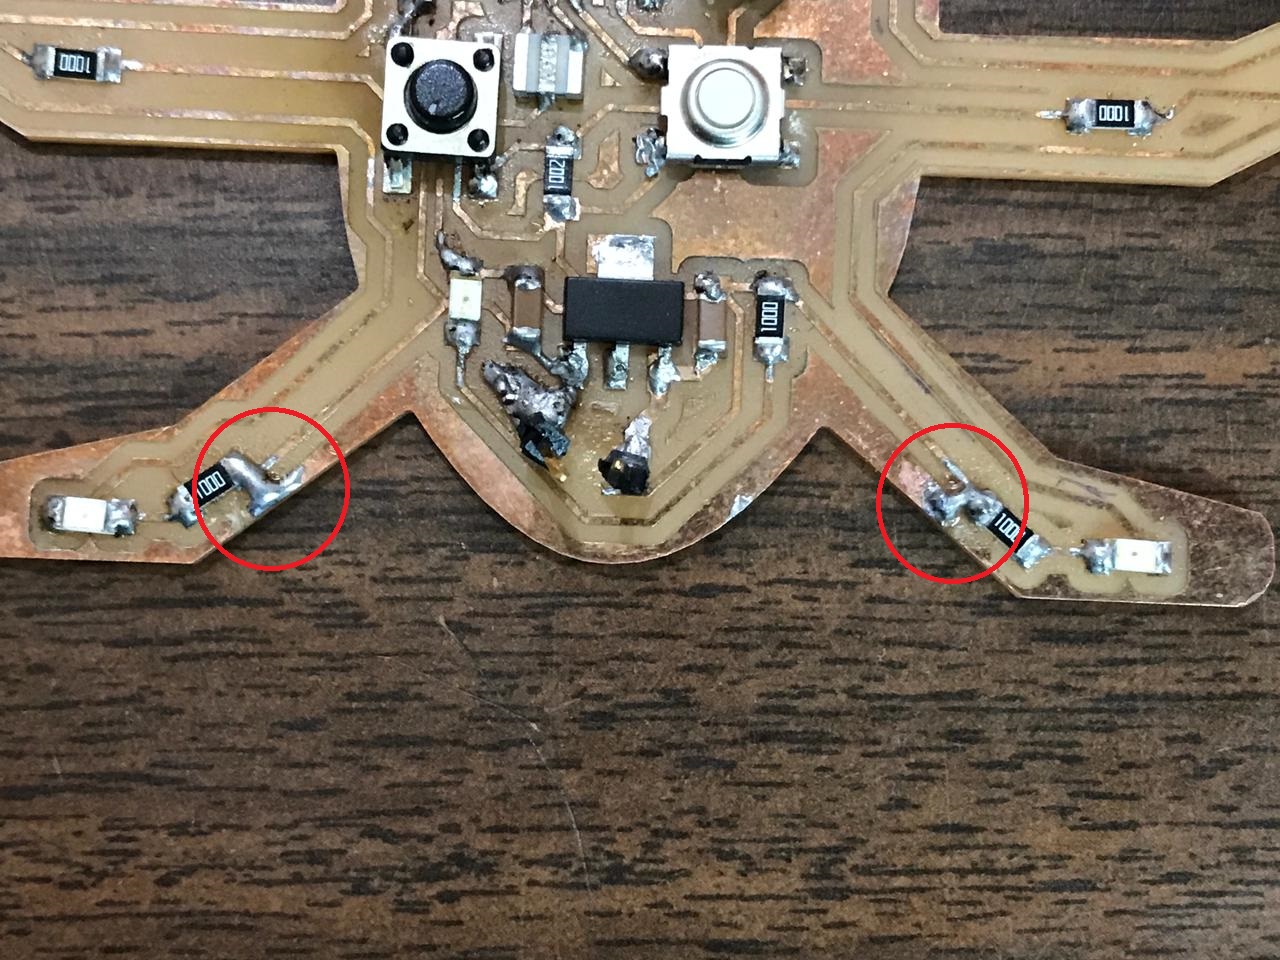
The solution I made aimed at not distorting the PCB as much as possible, which is that I used the remaining copper front part of the pieces, and soldered two points with the two resistors, so that they were connected to each other, thus connecting all the LEDs together.
Datasheet
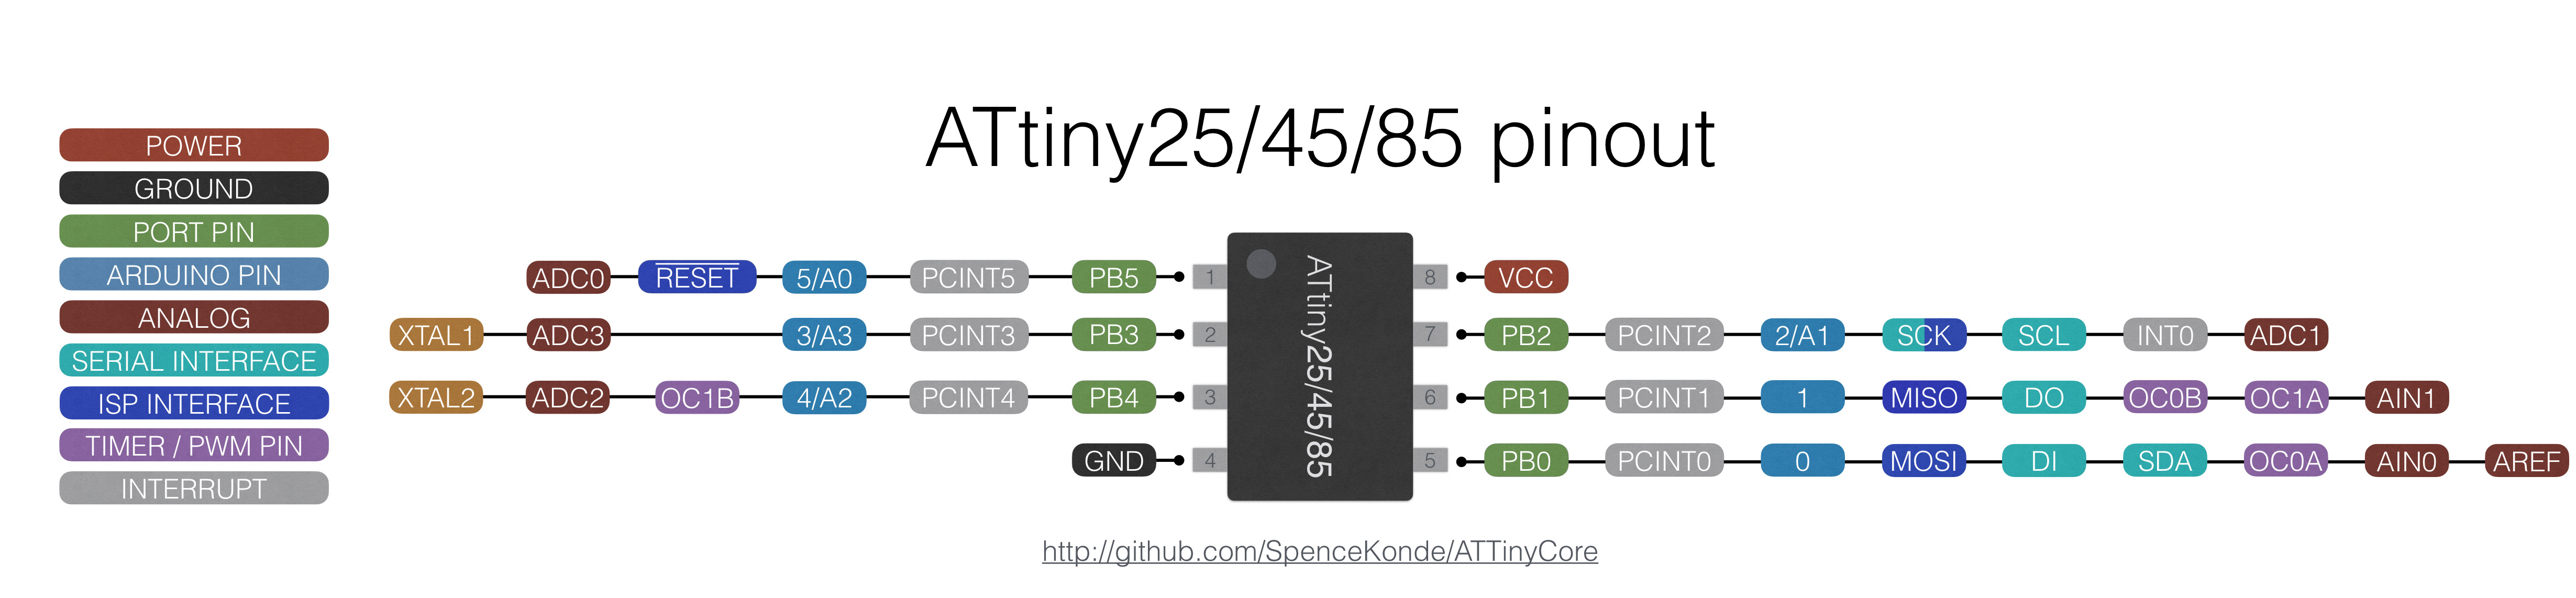
Microcontroller #1 / ATtiny45
ATTINY45 is high performance, low power controller from ATMEL. It is an 8 bit controller based on Advanced RISC architecture. It is one of members of ATTINYXX series, popular because of its small size and features.
Pin Configuration:
ATTINY45 is an 8 pin iC as shown in the ATtiny45 pin diagram below. All I/O pins of the chip here have more than one function.

Features
- High Performance, Low Power AVR® 8-Bit Microcontroller
-
I/O and Packages
-
Six Programmable I/O Lines
-
8-pin PDIP, 8-pin SOIC, 20-pad QFN/MLF, and 8-pin TSSOP (only ATtiny45/V)
-
Operating Voltage
-
1.8 - 5.5V for ATtiny25V/45V/85V
-
2.7 - 5.5V for ATtiny25/45/85
-
Speed Grade
-
ATtiny25V/45V/85V: 0 – 4 MHz @ 1.8 - 5.5V, 0 - 10 MHz @ 2.7 - 5.5V
-
ATtiny25/45/85: 0 – 10 MHz @ 2.7 - 5.5V, 0 - 20 MHz @ 4.5 - 5.5V
-
Low Power Consumption
-
Active Mode:
- 1 MHz, 1.8V: 300 µA
-
Power-down Mode:
- 0.1 µA at 1.8V
Applications:
- Used in development boards
- Hobby projects
- Drivers
- Industrial control systems
- Power Regulation systems
- Analog signal measuring and manipulations
- Embedded systems like coffee machine, vending machine
- Display units
2D Model:
All measurements are in millimeters.

Microcontroller #2 / ATtiny44
ATtiny44 is a low-power CMOS 8-bit microcontroller based on the AVR enhanced RISC architecture. By executing powerful instructions in a single clock cycle, the ATtiny44 achieves throughputs approaching 1 MIPS per MHz allowing the system designer to optimize power consumption versus processing speed.
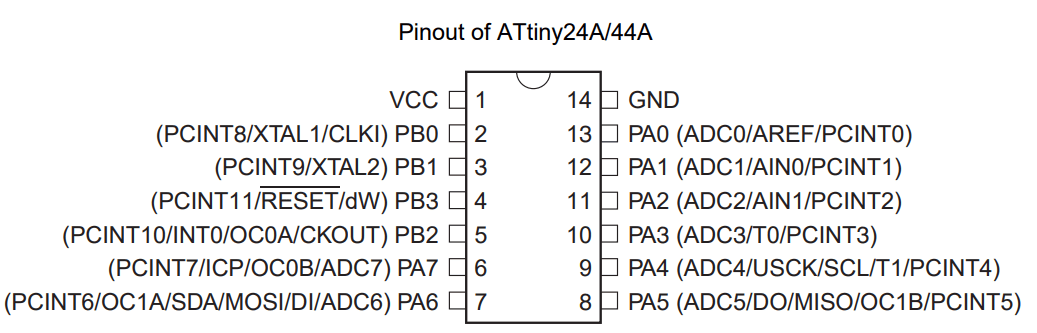
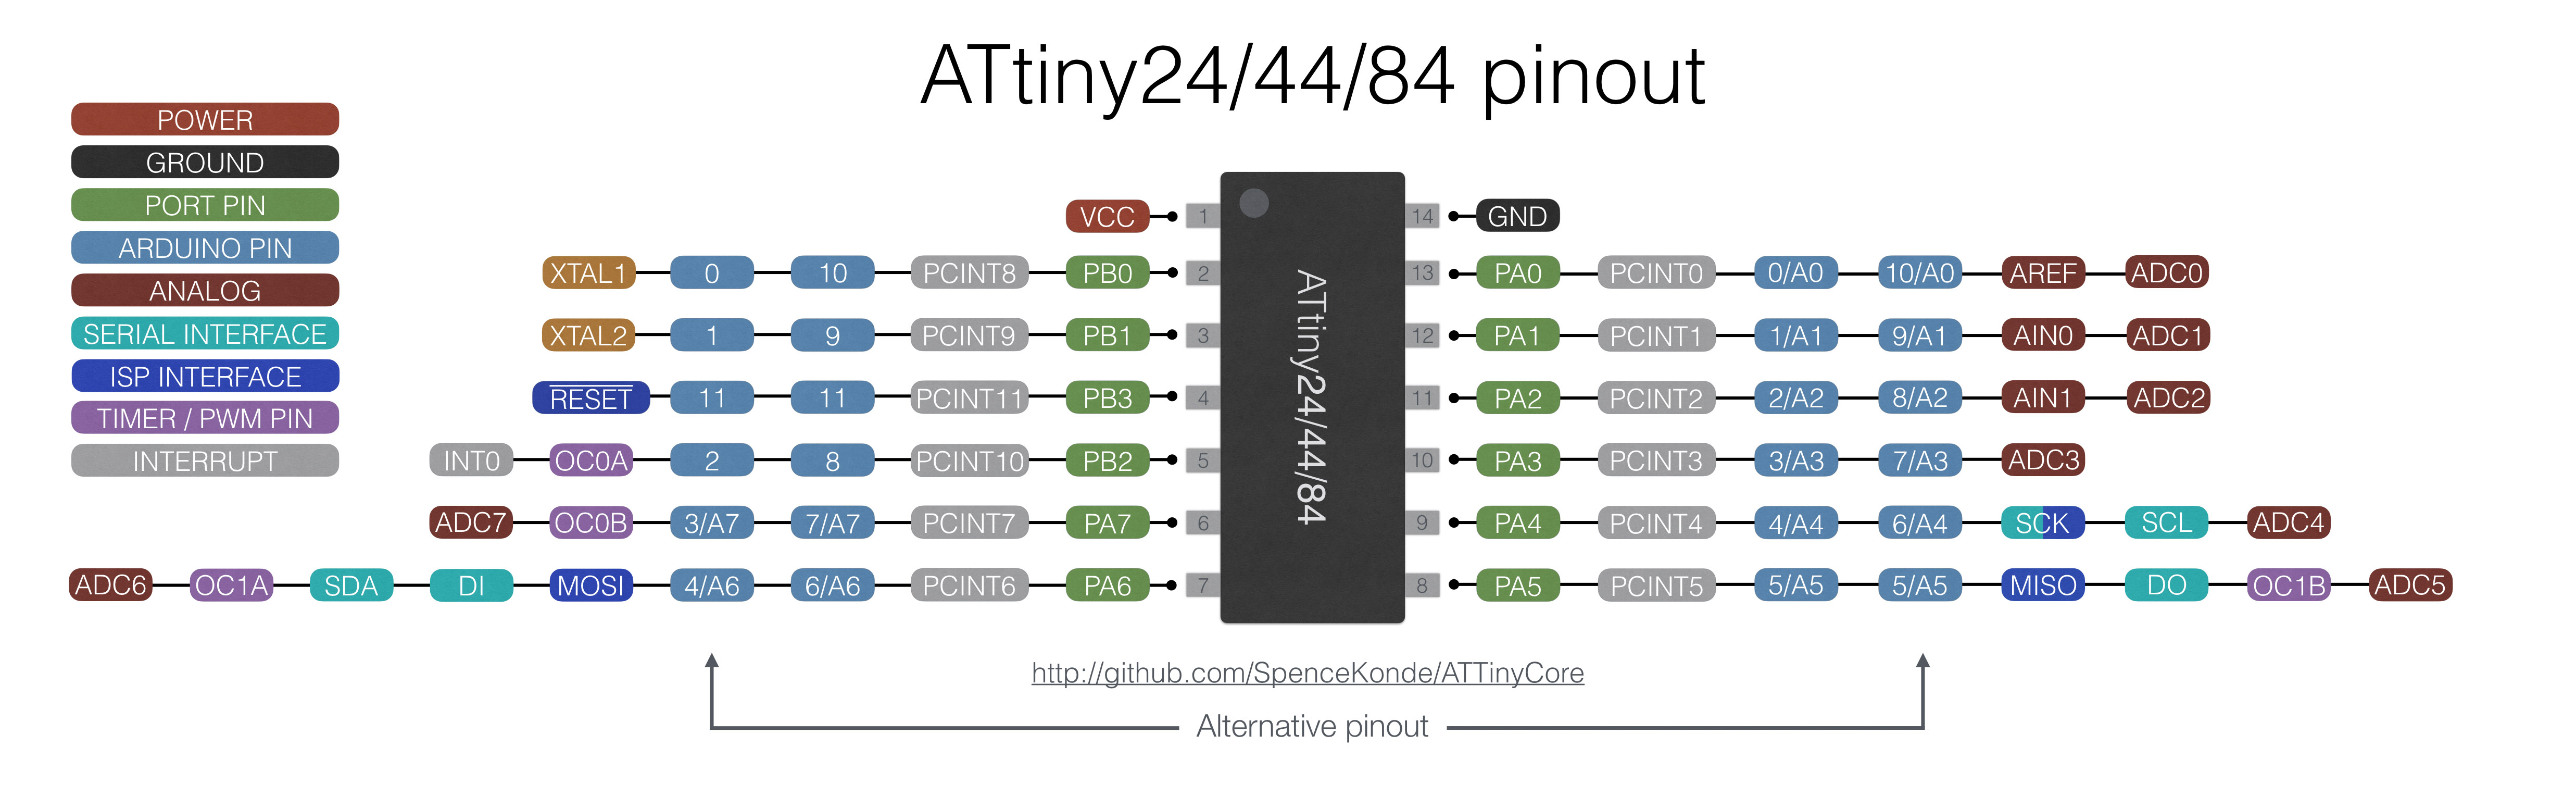
For my PCB "HEXI_01", the connection was as picture below:
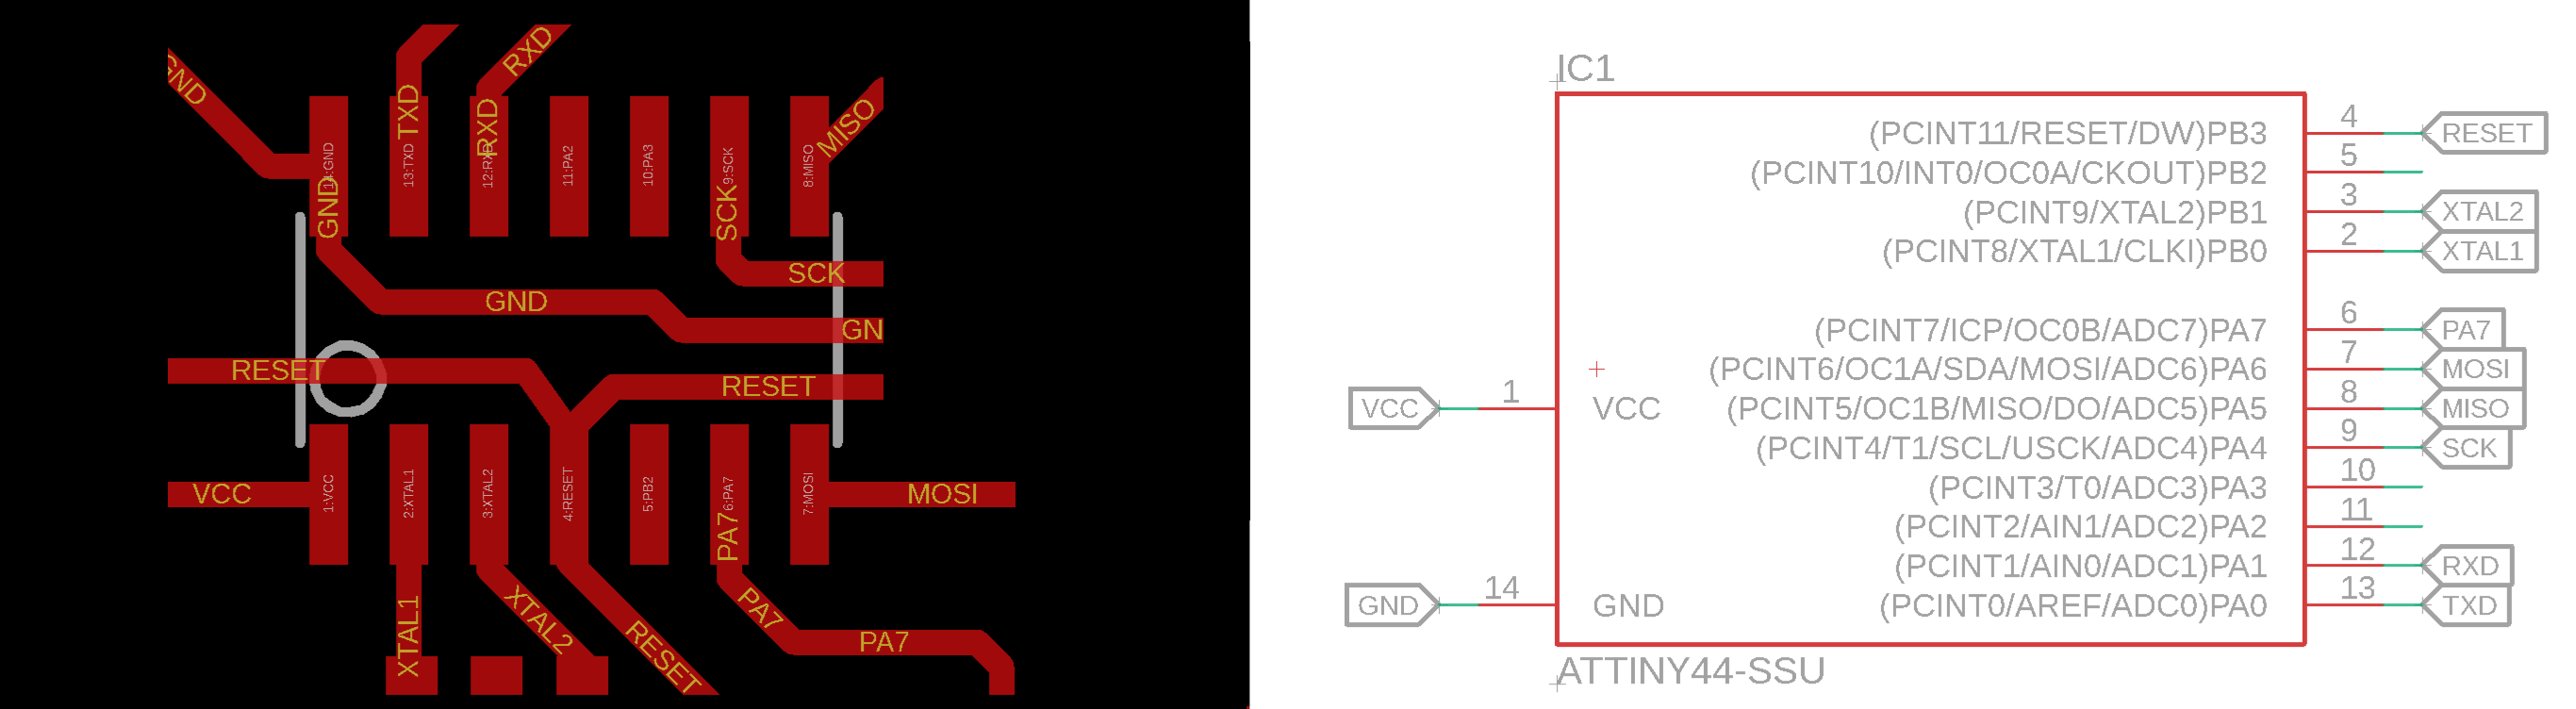
- 1 VCC >> VCC
- 2 PB0 >> XTAL1
- 3 PB1 >> XTAL2
- 4 PB3 >> RESET
- 6 PA7 >> Push Button
- 7 PA6 >> MOSI (LEDs)
- 8 PA5 >> MISO
- 9 PA4 >> SCK
- 12 PA1 >> RXD
- 13 PA0 >> TXD
- 14 GND >> GND
Features
- High Performance, Low Power AVR® 8-Bit Microcontroller
-
I/O and packages
-
14-pin SOIC, 20-pin QFN/MLF: Twelve programmable I/O lines
-
Operating Voltage
-
2.7 - 5.5V for Atmel ATtiny24/44/84
-
Temperature range:
-
Automotive temperature range:
-
Speed Grade
-
Atmel ATtiny24/44/84: 0 - 8MHz at 2.7 - 5.5V, 0 - 16MHz at 4.5 - 5.5V
-
Low Power Consumption
-
Active mode: 1MHz, 2.7V: 800µA
-
Power-down mode: 2.7V: 2.0µA
Applications:
- Used in development boards
- Hobby projects
- Drivers
- Industrial control systems
- Power Regulation systems
- Analog signal measuring and manipulations
- Embedded systems like coffee machine, vending machine
- Display units
2D Model:
All measurements are in millimeters.
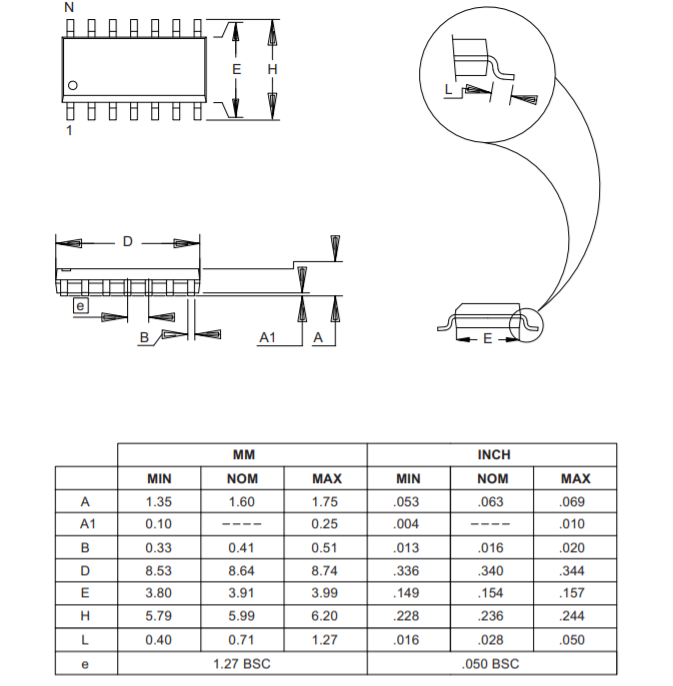
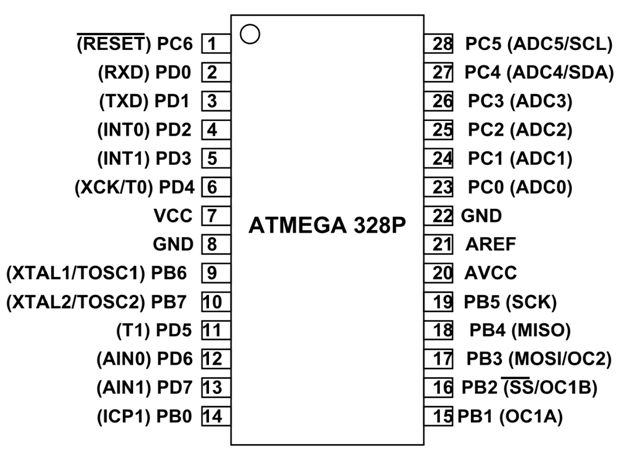
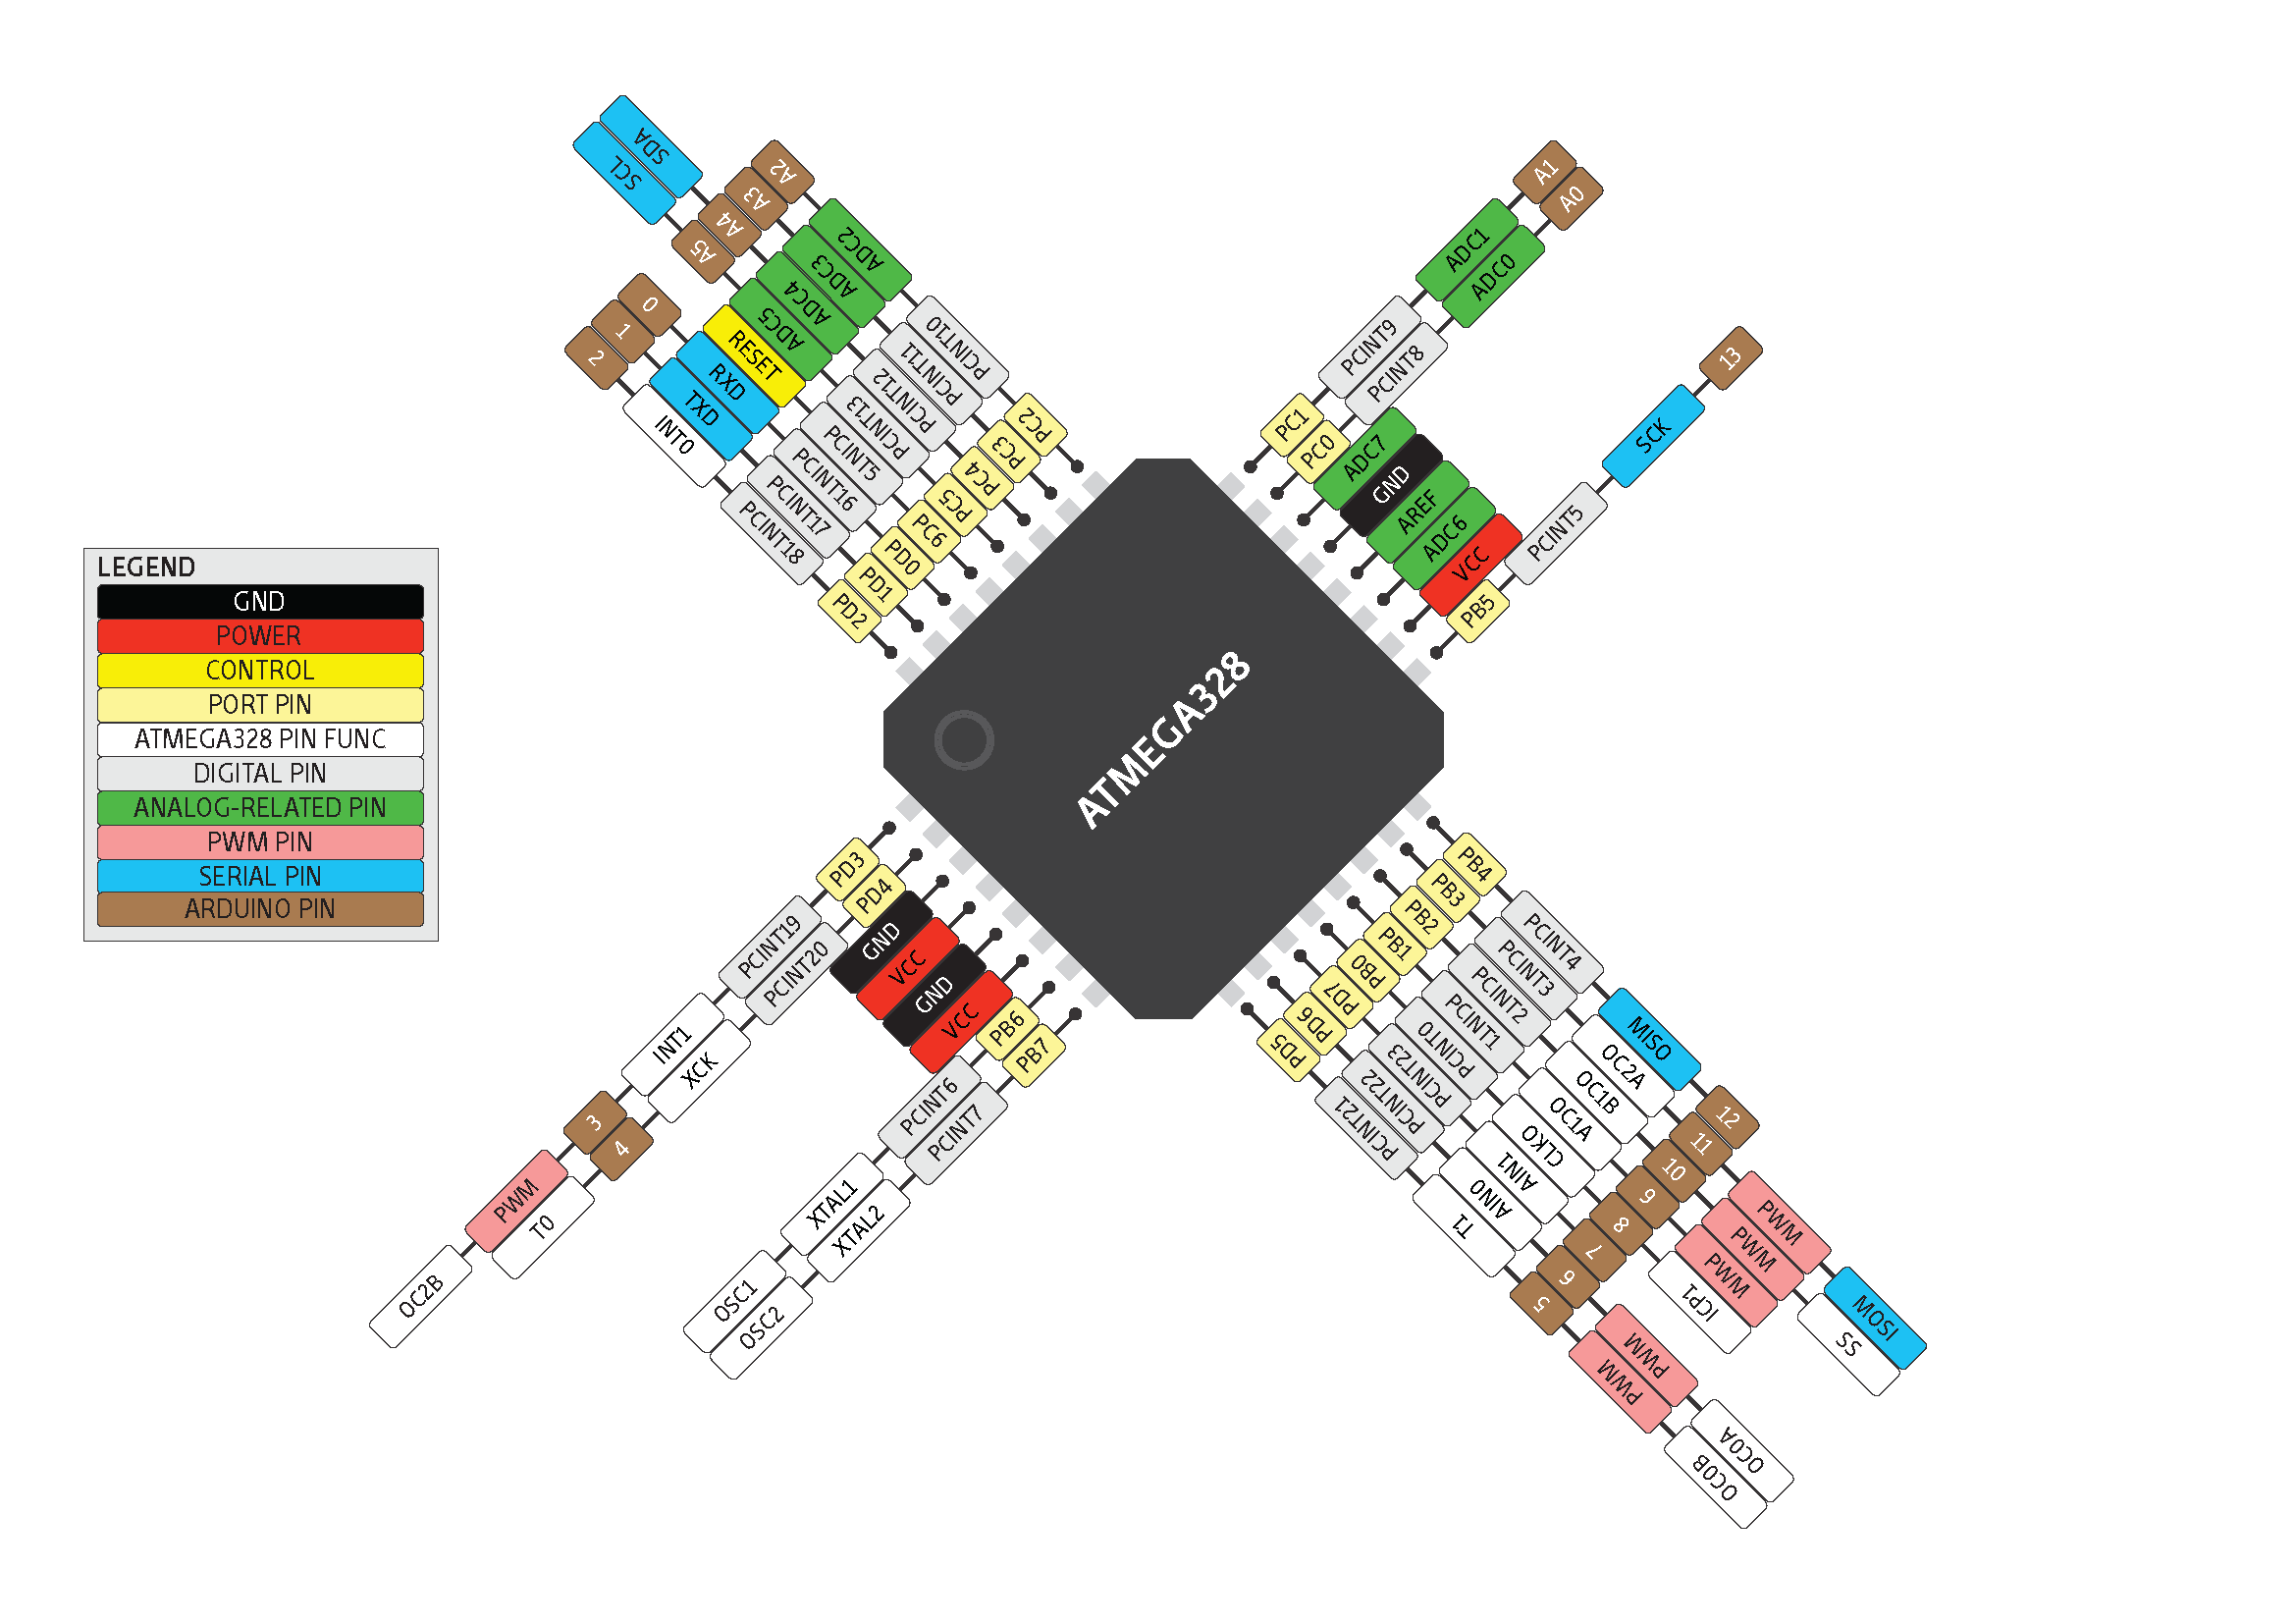
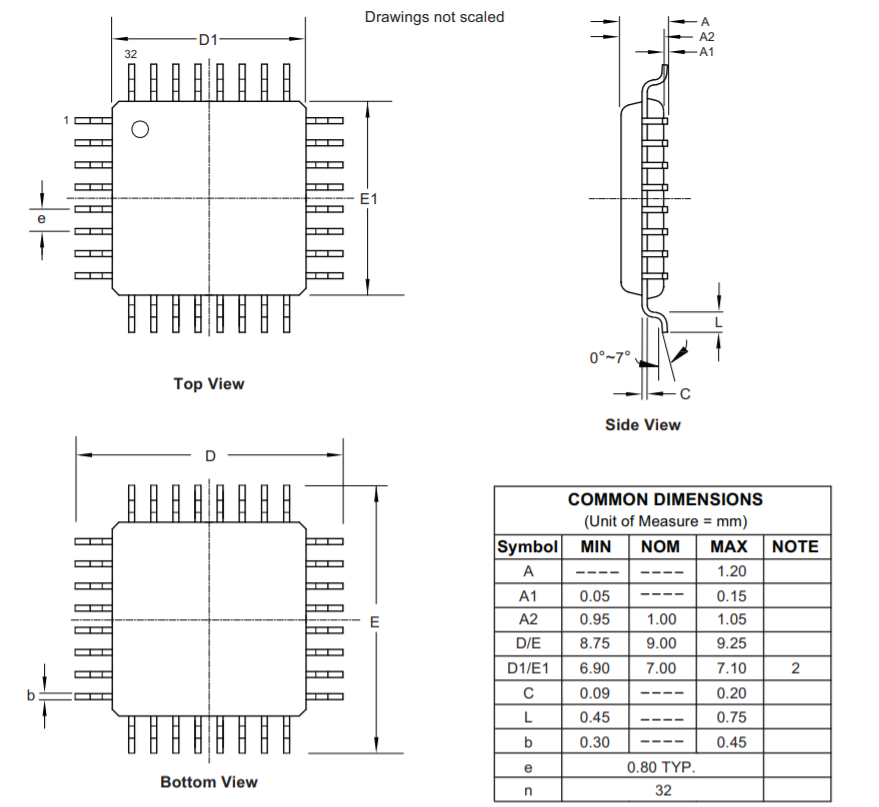
Microcontroller #3 / ATmega328p
ATMEGA328P is high performance, low power controller from Microchip. ATMEGA328P is an 8-bit microcontroller based on AVR RISC architecture. It is the most popular of all AVR controllers as it is used in ARDUINO boards.
There is no major functional difference between ATmega 328 and ATmega 328p except for power. This microcontrollers are mostly used in Arduino's. The Atmega 328 function the same like Atmega 328p but the 328p has very low power consumption using the ATMEL's PicoPower Features. Hence P stands for PicoPower.
Pin Configuration:
ATMEGA328P is a 28 pin chip as shown in pin diagram below. Many pins of the chip here have more than one function.
Features
- High Performance, Low Power AVR® 8-Bit Microcontroller
-
I/O and packages
-
23 programmable I/O lines
-
32-lead TQFP, and 32-pad QFN/MLF
-
Operating Voltage
-
2.7V to 5.5V for ATmega328P
-
Temperature range:
-
Automotive temperature range: –40°C to +125°C
-
Speed Grade
-
0 to 8MHz at 2.7 to 5.5V (automotive temperature range: –40°C to +125°C)
-
0 to 16MHz at 4.5 to 5.5V (automotive temperature range: –40°C to +125°C)
-
Low Power Consumption
-
Active mode: 1.5mA at 3V - 4MHz
-
Power-down mode: 1µA at 3V
Applications:
- Used in ARDUINO UNO, ARDUINO NANO and ARDUINO MICRO boards
- Industrial control systems
- Digital data processing
- Analog signal measuring and manipulations.
- Motor control systems
- Display units
- Embedded systems like coffee machine, vending machine
- Display units
2D Model:
All measurements are in millimeters.
Arduino Reference
Arduino programming language can be divided in three main parts: Structure, Functions and Variables.
I learned about the Arduino references, and how I can write the code without any syntax or compilation error.
The basic structure of the Arduino programming language is fairly simple and runs in at least two parts. These two required parts, or functions, enclose blocks of statements:
-
void setup()
{
statements;
}
void loop()
{
statements;
}
- Defined as Output: The pin should put out a voltage. For example: with this pin a LED is meant to light up.
- Defined as an Input: The board should read out a voltage. For example: A switch is actuated. The board recognized this, because it gets a voltage on the Input pin.
Void Setup:
The Setup will be performed only once. Use it to initialize the variables, pin modes, start using libraries, etc. for example what Pin (slot for cables) should be an input and what should be an output on the boards.
-
void setup()
{
pinMode(pin1, OUTPUT); // sets the 'pin1' as output
pinMode(pin2, INPUT); // sets the 'pin2' as input
}
Void Loop:
This loop part will be continuously repeated by the board. It start the sketch from beginning to end and starts again from the beginning and so on.
Use it to actively control the Arduino board.
-
void loop()
{
digitalWrite(pin, HIGH); // turns 'pin' on
delay(1000); // pauses for one second
digitalWrite(pin, LOW); // turns 'pin' off
delay(1000); // pauses for one second
}
Functions
A function is a block of code that has a name and a block of statements that are executed when the function is called.
-
type functionName(parameters)
{
statements;
}
-
{} Curly Braces
-
Curly braces (also referred to as just "braces" or "curly brackets") define the beginning and end of function blocks and statement blocks such as the void loop() function and the for and if statements
-
; Semicolon
-
A semicolon must be used to end a statement and separate elements of the program.
A semicolon is also used to separate elements in a for loop. -
/*… */ Block Comments
-
Block comments, or multi-line comments, are areas of text ignored by the program and are used for large text descriptions of code or comments that help others understand parts of the program. They begin with /* and end with */ and can span multiple lines.
-
// Line Comments
-
Single line comments begin with // and end with the next line of code. Like block comments, they are ignored by the program and take no memory space.
variables
A variable is a way of naming and storing a numerical value for later use by the program. As their namesake suggests, variables are numbers that can be continually changed as opposed to constants whose value never changes. A variable needs to be declared and optionally assigned to the value needing to be stored.
-
byte
-
Byte stores an 8-bit numerical value without decimal points. They have a range of 0-255.
-
int
-
Integers are the primary datatype for storage of numbers without decimal points and store a 16-bit value with a range of 32,767 to -32,768.
-
long
-
Extended size datatype for long integers, without decimal points, stored in a 32-bit value with a range of 2,147,483,647 to -2,147,483,648.
-
float
-
A datatype for floating-point numbers, or numbers that have a decimal point. Floatingpoint numbers have greater resolution than integers and are stored as a 32-bit value with a range of 3.4028235E+38 to -3.4028235E+38.
-
char
-
A Char used to store a character value. Character literals are written in single quotes, like this: 'A’. However, characters are stored as numbers. This means that it is possible to do arithmetic operations on characters, in which the ASCII value of the character is used. For example, 'A' + 1 has the value 66, since the ASCII value of the capital letter A is 65.
Operators
An Operator is a symbol that tells the compiler to perform specific mathematical or logical functions.
C language is rich in built-in operators and provides the following types of operators:
- Arithmetic Operators
- Comparison Operators
- Boolean Operators
- Compound Operators
- y = y + 3;
- x = x - 7;
- i = j * 6;
- r = r / 5;
Arithmetic Operators
Arithmetic operators include addition, subtraction, multiplication, and division. They return the sum, difference, product, or quotient (respectively) of two operands.
- x ++ // same as x = x + 1, or increments x by +1
- x -- // same as x = x - 1, or decrements x by -1
- x += y // same as x = x + y, or increments x by +y
- x -= y // same as x = x - y, or decrements x by -y
- x *= y // same as x = x * y, or multiplies x by y
- x /= y // same as x = x / y, or divides x by y
Compound Operators
Compound assignments combine an arithmetic operation with a variable assignment.
- x == y // x is equal to y
- x != y // x is not equal to y
- x < y // x is less than y
- x > y // x is greater than y
- x <= y // x is less than or equal to y
- x >= y // x is greater than or equal to y
Comparison Operators
Comparisons of one variable or constant against another are often used in if statements to test if a specified condition is true.
-
Logical AND:
-
if (x > 0 && x < 5) // true only if both
// expressions are true -
Logical OR:
-
if (x > 0 || y > 0) // true if either
// expressions are true -
Logical NOT:
-
if (!x > 0) // true only if both
// expressions are false
Boolean Operators
Logical operators are usually a way to compare two expressions and return a TRUE or FALSE depending on the operator. There are three logical operators, AND, OR, and NOT, that are often used in if statements:
Constants
The Arduino language has a few predefined values, which are called constants. They are used to make the programs easier to read. Constants are classified in groups.
true/false
These are Boolean constants that define logic levels. FALSE is easily defined as 0 (zero) while TRUE is often defined as 1, but can also be anything else except zero. So in a Boolean sense, -1, 2, and -200 are all also defined as TRUE.
-
if (b == TRUE);
{
doSomething;
}
high/low
These constants define pin levels as HIGH or LOW and are used when reading or writing to digital pins. HIGH is defined as logic level 1, ON, or 5 volts while LOW is logic level 0, OFF, or 0 volts.
-
digitalWrite(13, HIGH);
input/output
Constants used with the pinMode() function to define the mode of a digital pin as either INPUT or OUTPUT.
-
pinMode(13, OUTPUT);
pinMode(pin, mode)
Used in void setup() to configure a specified pin to behave either as an INPUT or an OUTPUT.
-
pinMode(pin, OUTPUT); // sets ‘pin’ to output
Arduino digital pins default to inputs, so they don't need to be explicitly declared as inputs with pinMode(). Pins configured as INPUT are said to be in a high-impedance state.
digitalRead(pin)
Reads the value from a specified digital pin with the result either HIGH or LOW. The pin can be specified as either a variable or constant (0-13).
-
value = digitalRead(Pin); // sets 'value' equal to the input pin
digitalWrite(pin, value)
Outputs either logic level HIGH or LOW at (turns on or off) a specified digital pin. The pin can be specified as either a variable or constant (0-13).
-
digitalWrite(pin, HIGH); // sets 'pin' to high
analogRead(pin)
Reads the value from a specified analog pin with a 10-bit resolution. This function only works on the analog in pins (0-5). The resulting integer values range from 0 to 1023.
-
value = analogRead(pin); // sets 'value' equal to 'pin'
analogWrite(pin, value)
Writes a pseudo-analog value using hardware enabled pulse width modulation (PWM) to an output pin marked PWM. On newer Arduinos with the ATmega168 chip, this function works on pins 3, 5, 6, 9, 10, and 11. Older Arduinos with an ATmega8 only support pins 9, 10, and 11. The value can be specified as a variable or constant with a value from 0-255.
-
analogWrite(pin, value); // writes 'value' to analog 'pin'
Programming
Code #1 / Blink
Turns an LEDs on for one second, then off for half second, repeatedly.
The first thing you do is to initialize led pin as an output pin with the line
pinMode(led, OUTPUT);
In the main loop, you turn the LED on with the line:
digitalWrite(led, HIGH);
This supplies 5 volts to the led anode. That creates a voltage difference across the pins of the leds, and lights it up.
Then you turn it off with the line:
digitalWrite(led, LOW);
That takes the led pin back to 0 volts, and turns the leds off.
In between the on and the off, you want enough time for a person to see the change, so the:
delay(500);
tell the board to do nothing for 500 milliseconds, or half second.

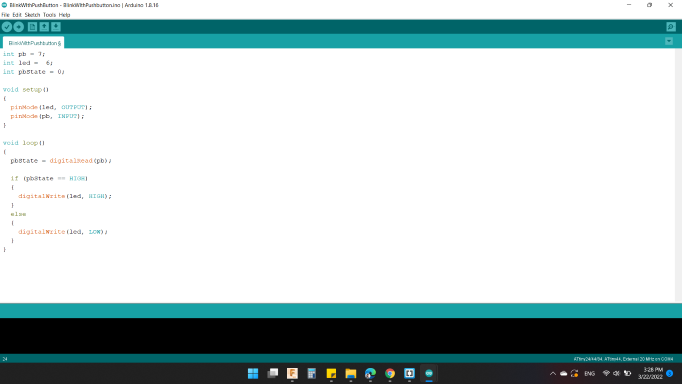
Code #2 / Blink with Push Button
Pushbuttons or switches connect two points in a circuit when you press them. This example turns on the leds when you press the button.
In addition to the previous code, I defined the Push Button as INPUT through the command:
pinMode(pb, INPUT);
Then, read the state of the pushbutton value by:
pbState = digitalRead(pb);
Next, check if the pushbutton is pressed. If it is, the pbState is HIGH:
if (pbState == HIGH)
So, turn leds on:
digitalWrite(led, HIGH);
If not, which is
else
turn leds off:
digitalWrite(led, LOW);
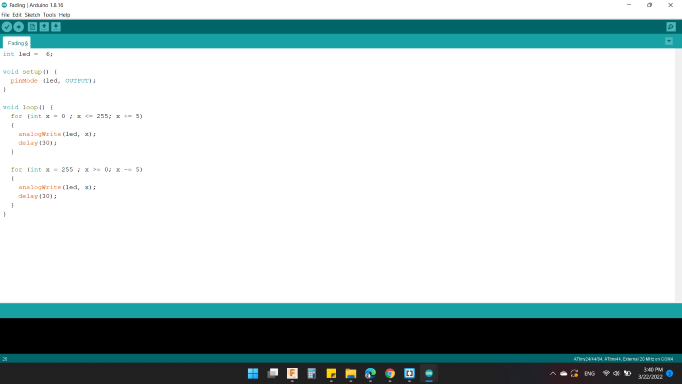
Code #3 / Fading
This example shows how to fade an LED using the analogWrite() function.
As the first code initialize led pin as an output pin with the line
pinMode(led, OUTPUT);
fade in from min to max in increments of 5 points:
for (int x = 0 ; x <= 255 ; x += 5)
Sets the value (range from 0 to 255):
analogWrite(led, x);
wait for 30 milliseconds to see the dimming effect in fade in:
delay(30);
Next, to fade out from max to min in increments of 5 points:
for (int x = 255 ; x >= 0; x -= 5)
Sets the value (range from 0 to 255):
analogWrite(led, x);
wait for 30 milliseconds to see the dimming effect in fade out:
delay(30);
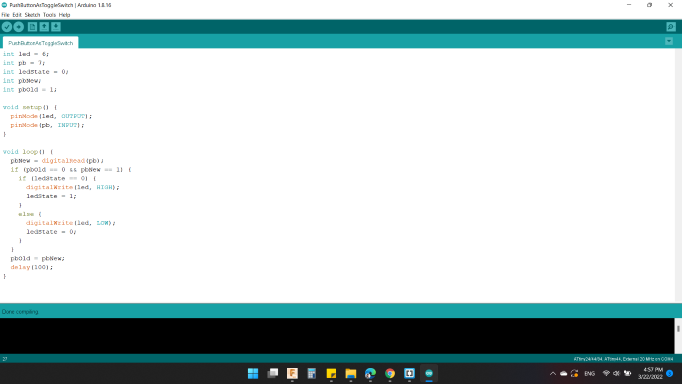
Code #4 / Push Button as Toggle Switch
If you press and release the button, the LED comes on, and then if you press and release the button again, the LED goes off.
As the first code initialize led pin as an output pin and Push Button as INPUT with the line
pinMode(led, OUTPUT);
pinMode(pb, INPUT);
Then, read the state of the pushbutton value by
pbNew = digitalRead(pb);
Old condition of the button equal 0 meaning was not pressed, and also the new condition of the button equal 1 meaning we pressed the button, so the if condition is right, so do what is required within if condition
if (pbOld == 0 && pbNew == 1)
The first condition means if the leds state is 0, meaning that it is turned off
if (ledState == 0)
So, Turned on the leds
digitalWrite(led, HIGH);
And, make the leds state to 1 means they are on.
ledState = 1;
Else, if the leds state is 1 or they are on, turned them off
digitalWrite(led, LOW);
And, make the leds state to 0 means they are off.
ledState = 0;
Last but not least, make the Push Button Old one equal to the Push Button New
pbOld = pbNew;
To avoid bounce in real pressed, use a delay for that
delay(100);
You can download my files here: