This week we learned about molding and casting. We had to experiment with three stage molding and casting. It was a very interesting week, allowing me to experiment with different materials and production techniques.
Learning:
- Group Assignment
- Molding and Casting Materials
- Safety and Technical Datasheet
- Machinable Wax
- Material Test Casts
- Individual Assignment
- Design the Wax Mold
- Preparing the CAM
- Fabrication with Shopbot CNC Machine
- Creating the Silicone Mold
- Connect the LED's
- Manufacture the Box
- Casting the Resin
Group Assignments
In this part we read and reviewed the technical and safety datasheet of casting and molding material we have in the lab.
Molding and Casting Materials
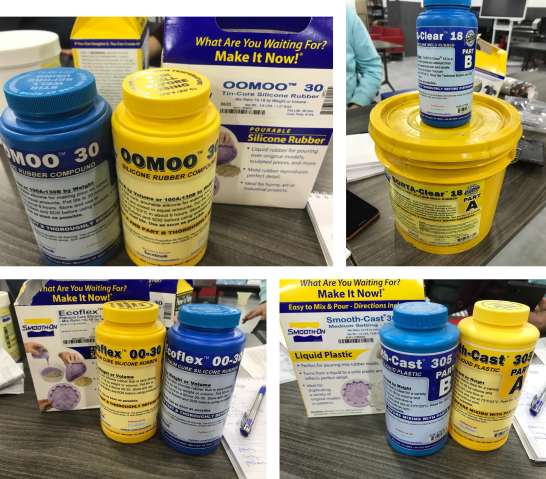
The image below show the materials available in the lab.
-
OOMOO™ 30
-
Silicone Rubber-Tin Cure
-
Ecoflex™ 00-30
-
Silicone Rubber-Tin Cure
-
SORTA-Clear™ 18
-
Silicone Rubber-Platinum Cure
-
Smooth-Cast® 305
-
Liquid Plastic
The first three material are liquid silicone rubber and the last one is liquid plastic.
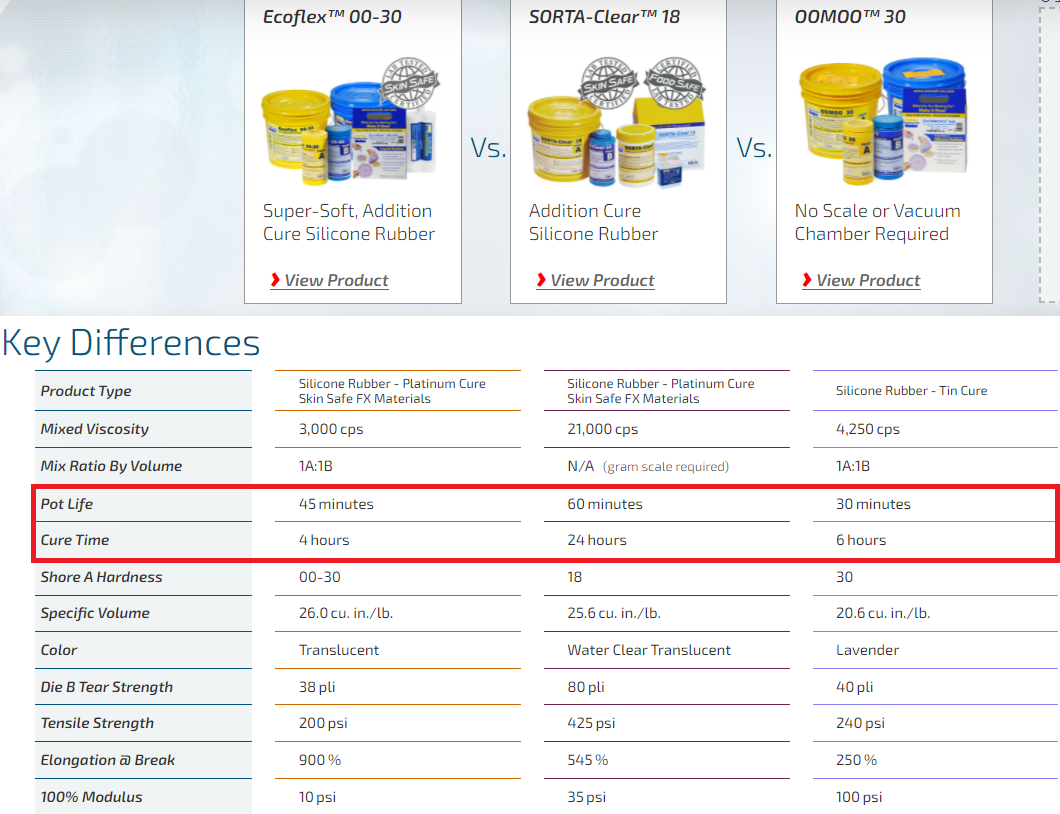
The image lists the key differences between the three liquid rubber materials. For example, there are operational differences like pot life and cure time, and there are finish differences like end product color.
Safety and Technical Datasheet
Technical and safety datasheets are linked for each material. The technical datasheet provides operational data like technical specs and processing recommendations. The safety datasheet describes different hazards associated to the material and risk levels. Note that SORTA-Clear™ 18 is the only safe food material.
- OOMOO™ 30
- Ecoflex™ 00-30
- SORTA-Clear™ 18
- Smooth-Cast® 305
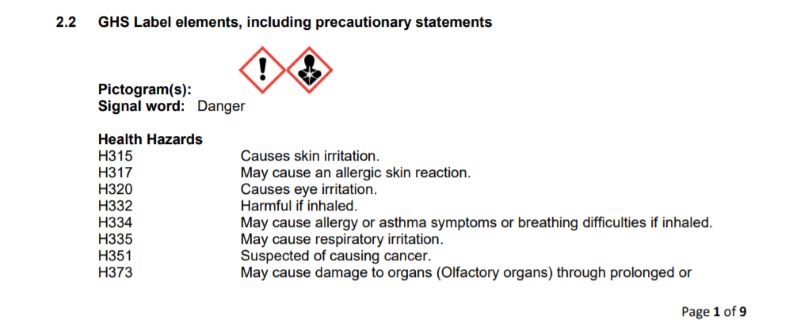
For example, the following risks are listed in the safety datasheet of Smooth-Cast® 305.
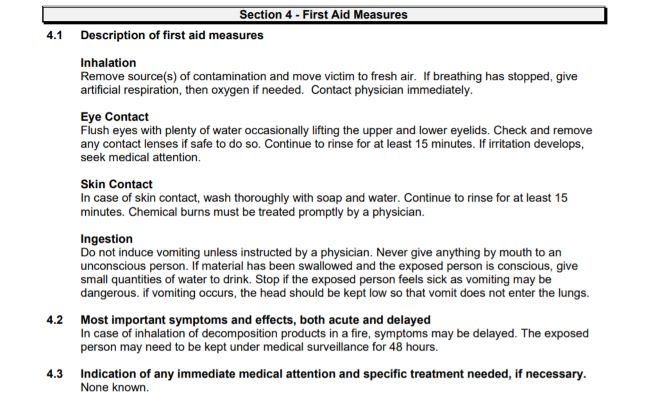
And also, the following first aid measures are listed in the safety datasheet for the same material.
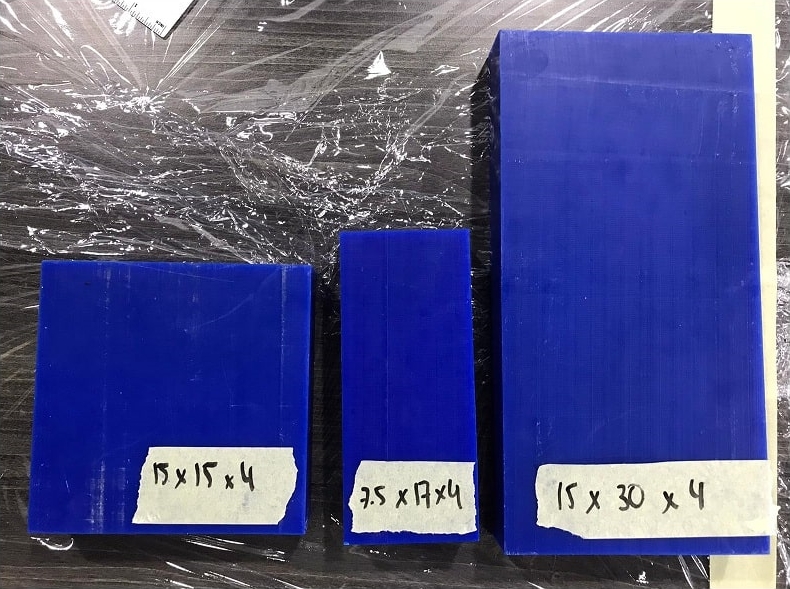
Machinable Wax
In the lab we have 3 sizes of machinable wax (dimensions in cm).
Material Test Casts
We did a test on the materials, first we made the mold.
Then we made the test cast using SORTA-Clear™ 18 silicone rubbers. We followed the mixing guides in technical datasheets for the material.
Finally, we got the mold from SORTA-Clear™ 18 silicone rubber

Individual Assignments
Design the Wax Mold
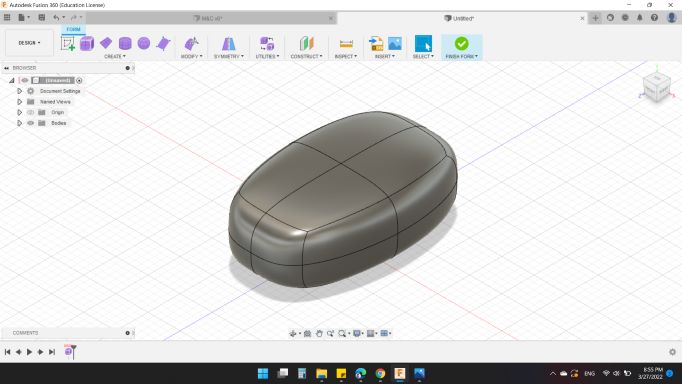
As my way of design, I started with my friend Fusion 360 to design my HEXI Robot mold.
I started with Foam workspace, and created a Box as the body of my design.
Then, with Modify tool, I changed the geometry.
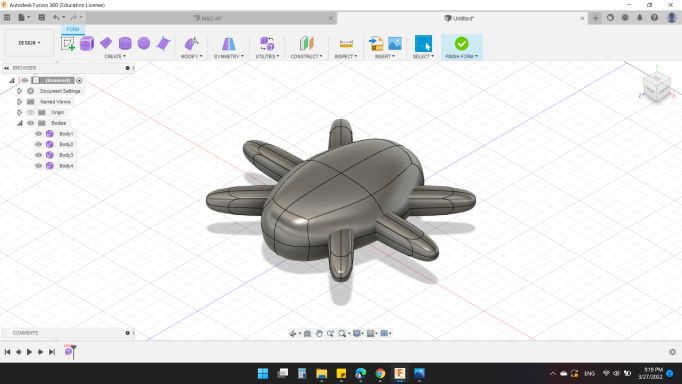
Next, I created an Offset Plan from the right plan to design the legs.
So, with some "Boxs" and "Modify" options, plus the Mirror-Duplicated option, I created the 6 legs.
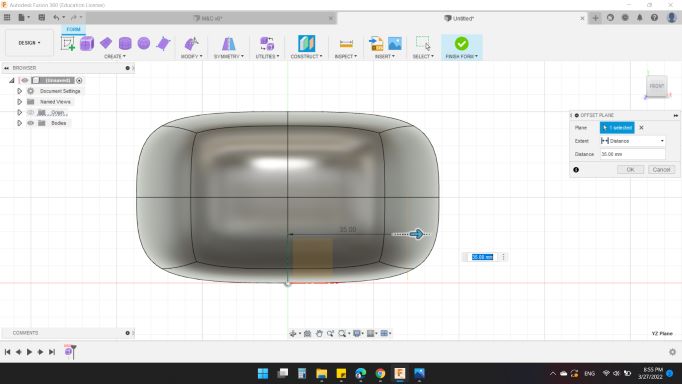
Next, I wanted to put a text on the body. So, with "Offset Plan" from the bottom.
I wrote HEXI ROBOT // FAB 2022.
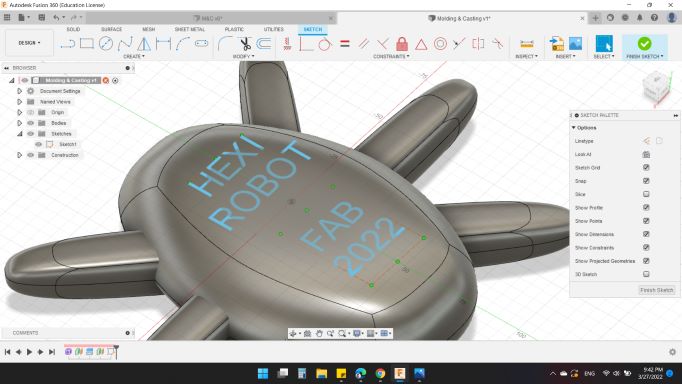
Then extruded with both direction in order to ensure all letters are touched the body.

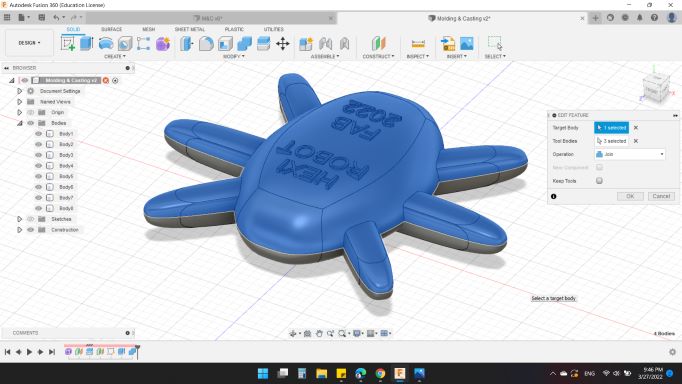
Sooo, here's my robot design :)
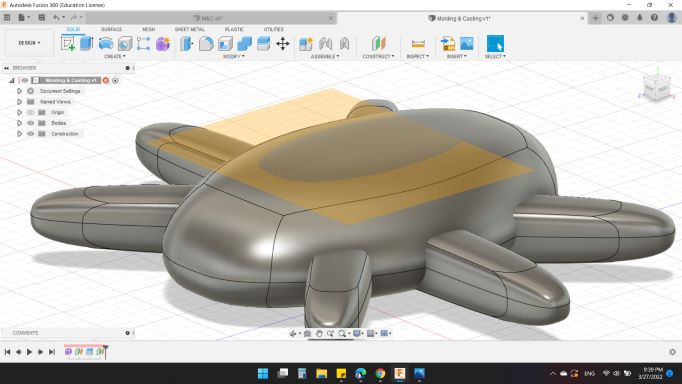
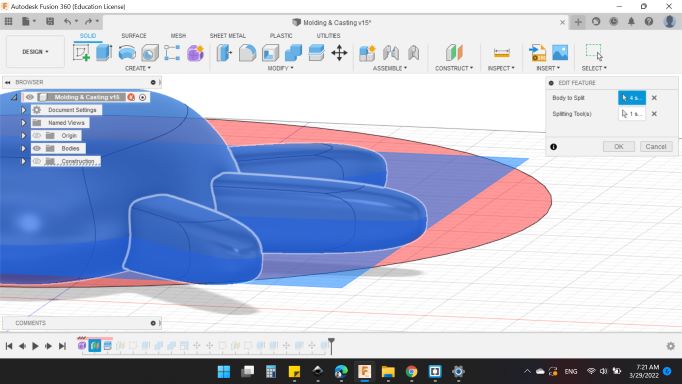
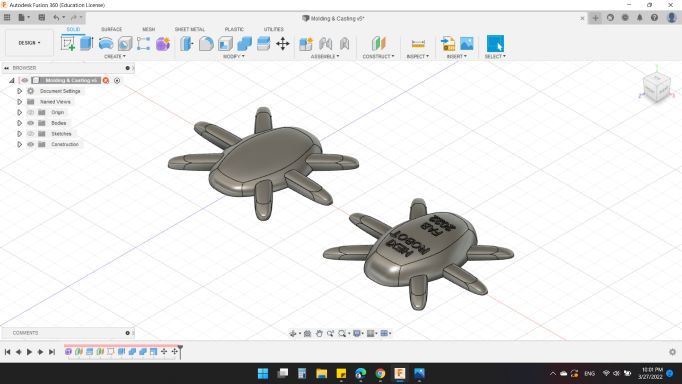
Next, I wanted to Split the body into middle of it. So, I created a Plan for it.
Then, for Body to Split I choosed HEXI body, and for Splitting Tools was the plan that I created from a second
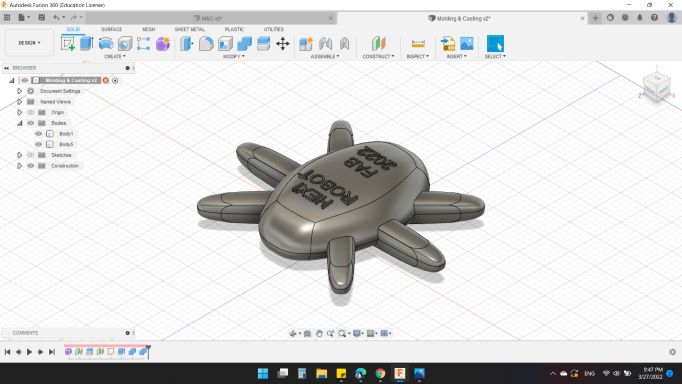
Next, important thing, I collected the parts together. So from Combine tool, I choose all top parts to be the first half of the body. And all bottom parts to be the second half of the body.
Now I have the body separated each half separately.
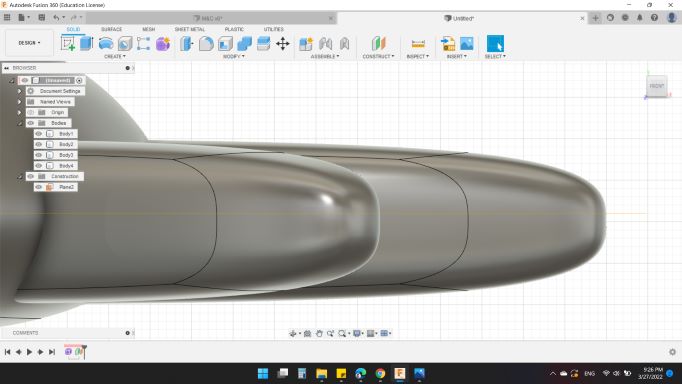
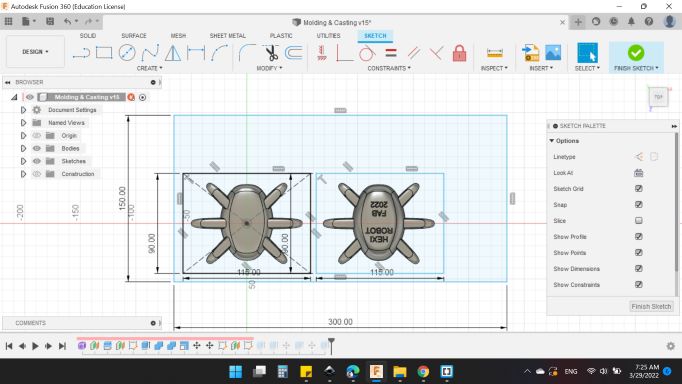
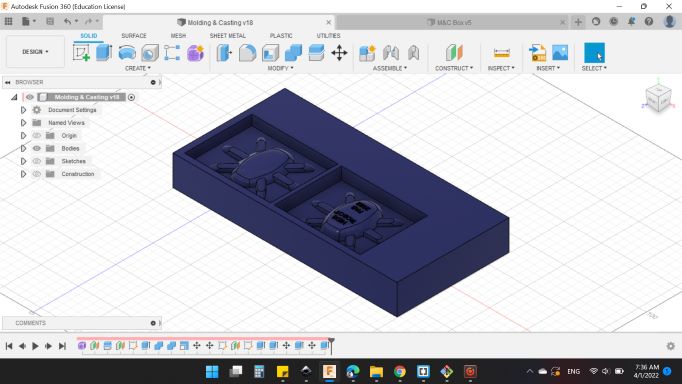
Next, to design the Wax Mold.
I sketched the rectangular with the bottom dimensions as the wax mold we have, and drawed two small rectangles to contained the two parts.
Then, Extruded the rectangular with thickness of 40mm.
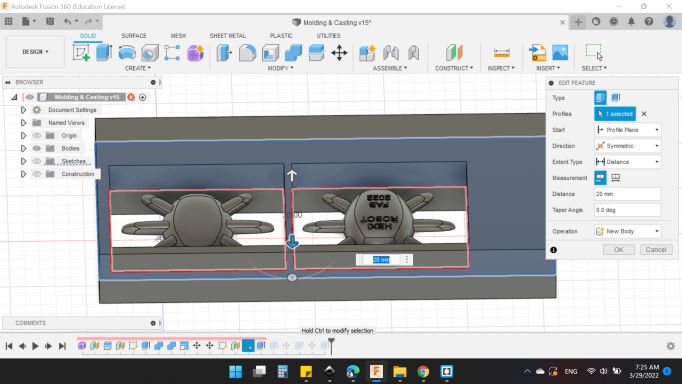
And for the two rectangulars, extruded them to the bottom side of the mold.
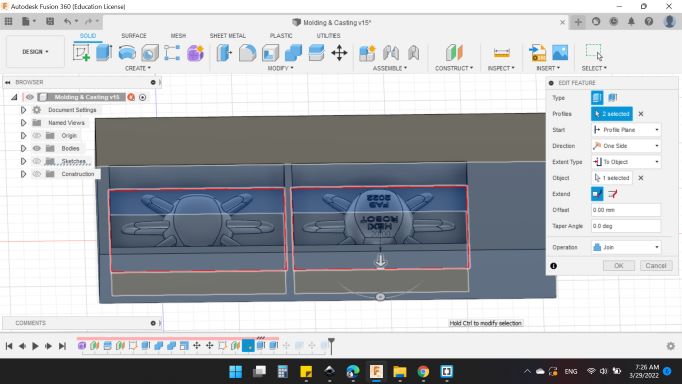
Finally here's my mold :).
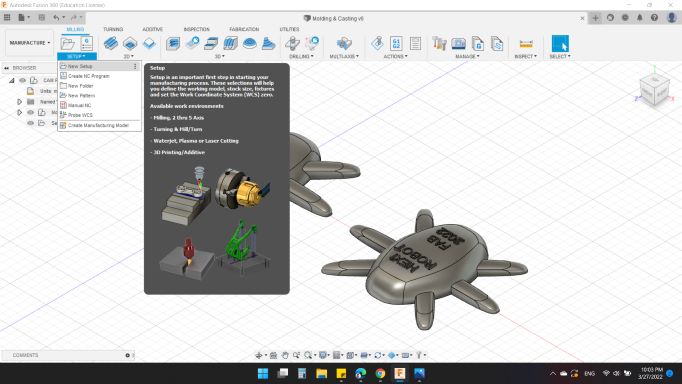
Preparing the CAM
In this section, I started preparing the design to the machine which mean CAM with Fusion 360.
So from MANUFACTURE to moving to the workspace.
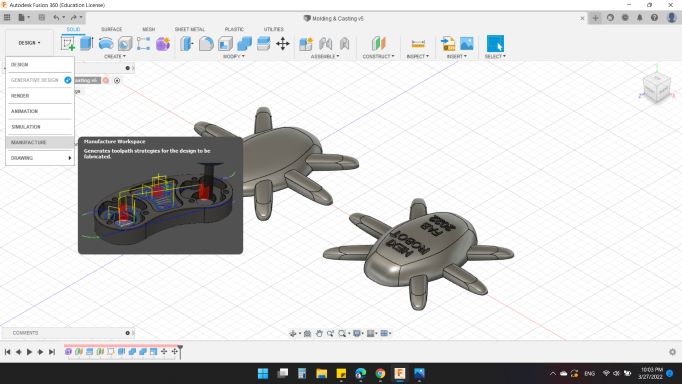
Here's the CAM workspace from Fuion 360.
Before starting, the workpiece must be prepared for fabrication, so we need to setup the stock from New Setup.
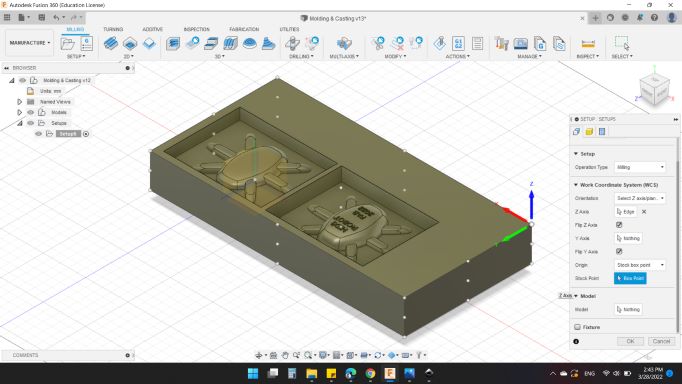
First from "Setup" window:
-
Setup
-
Operation Type: Milling
-
Work Coordinate System (WCS)
-
Orientation: Select Z axis/plan & Y axis
-
Z Axis: "Selected"
-
Origin: Stock box point
-
Model
-
Model: CAM Component.
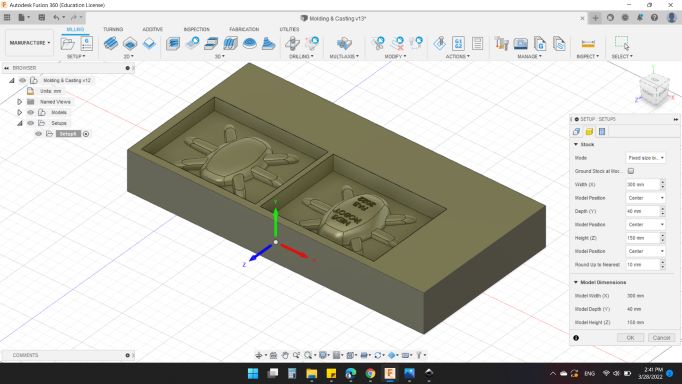
Second from "Stock" window:
-
Stock
-
Model: Fixed Size Box
-
Width (X): 300 mm
-
Model Position: Center
-
Width (Y): 150 mm
-
Model Position: Center
-
Width (Z): 40 mm
-
Model Position: Center
-
Round Up to Nearest: 10 mm
Next to select the Milling type.
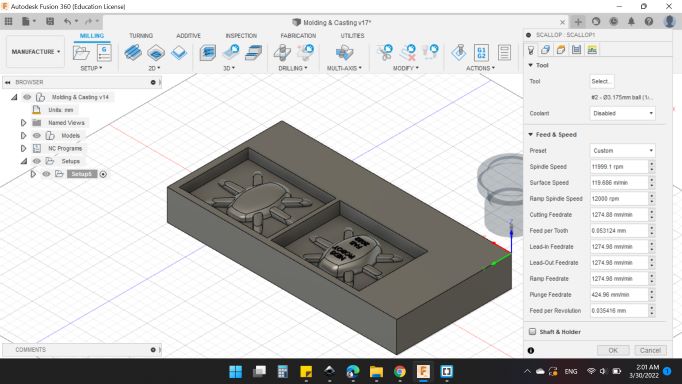
I clicked on 3D > Adaptive Clearing to make the roughing process.
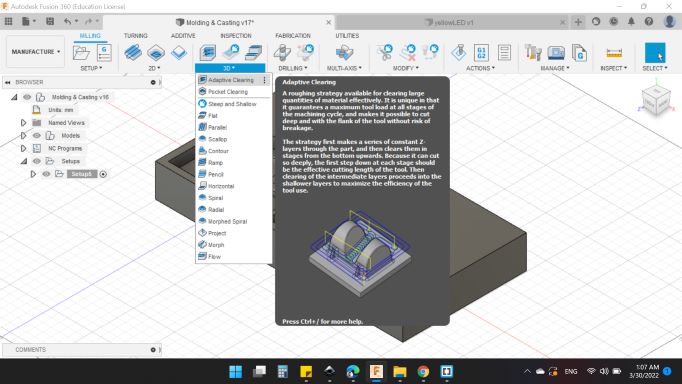
Several tabs have been shown.
First on Tool
-
Tool
- Tool: Select.
- Coolent: Disabled.
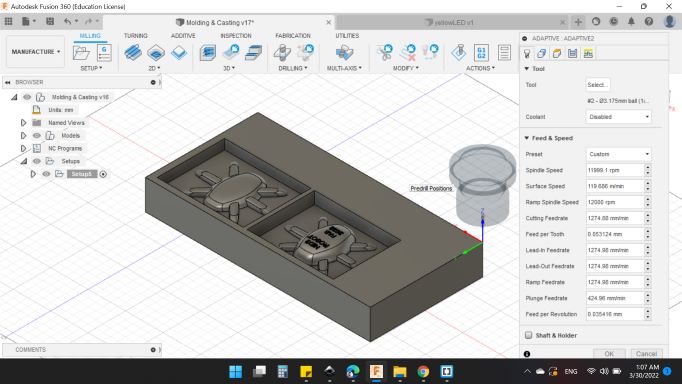
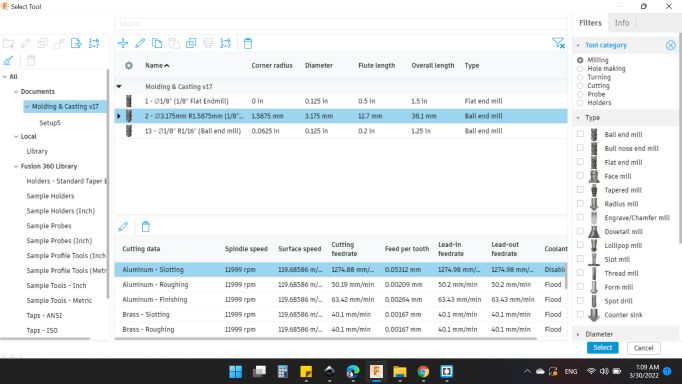
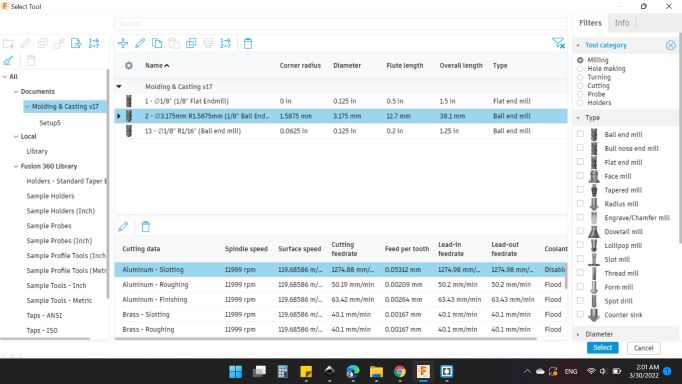
a new tab shown for tools.
I selected 2 - 3.175mm R1.5875mm (1/8" Ball Emdmill).
-
Feed & Speed
- Spindle Speed: 11999.1 rpm.
- Surface Speed: 119.686 m/min.
- Ramp Spindle Speed: 12000 rpm.
- Cutting Feedrate: 1274.88 m/min.
- Feed Per Tooth: 0.053124 mm.
- Lead-In Feedrate: 1264.98 mm/min.
- Lead-Out Feedrate: 1264.98 mm/min.
- Ramp Feedrate: 1264.98 mm/min.
- Plunge Feedrate: 424.96 mm/min.
- Feed Per Revolution: 0.035416 mm.
-
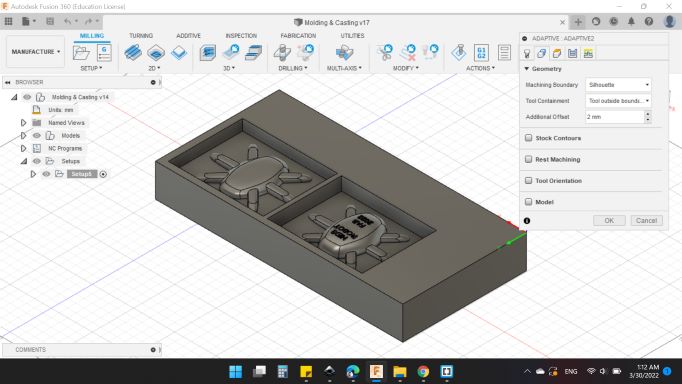
Geometry
- Machining Boundary: Silhouette.
- Tool Containment: Tool Outside Boundary.
- Additional Offset: 2 mm.
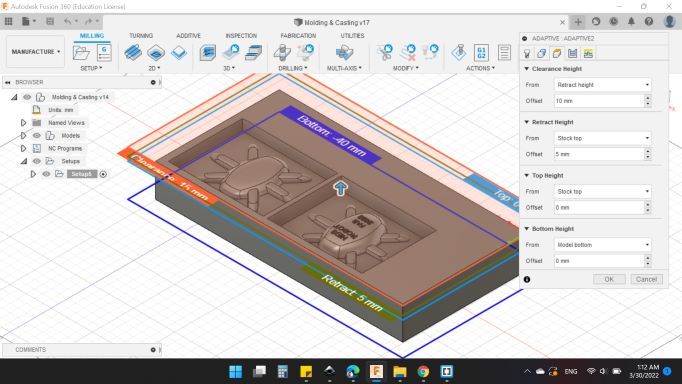
-
Heights
-
Clearance Height
-
From: Retracted Height
-
Offset: 10 mm.
-
Retracted Height
-
From: Stock Top
-
Offset: 5 mm.
-
Top Height
-
From: Stock Top
-
Offset: 5 mm.
-
Bottom Height
-
From: Model Bottom
-
Offset: 0 mm.
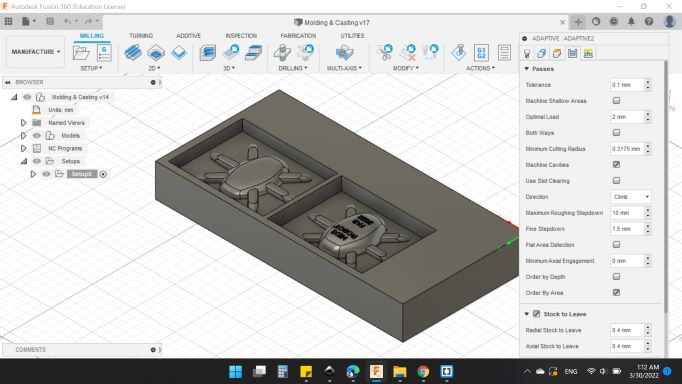
-
Passes
-
Passes
-
Tolerance: 0.1 mm.
-
Optimal Load: 2 mm.
-
Minimum Cutting Raduis: 0.3175 mm.
-
Machine Cavities "YES"
-
Direction: Climb.
-
Maximum Roughing Stepdown: 10 mm.
-
Fine Stepdown: 1.5 mm.
-
Mimimum Axial Engagement: 0 mm.
-
Order by Area: "YES"
-
Stock to Leave
-
Radial Stock to Leave: 0.4 mm.
-
Axial Stock to Leave: 0.4 mm.
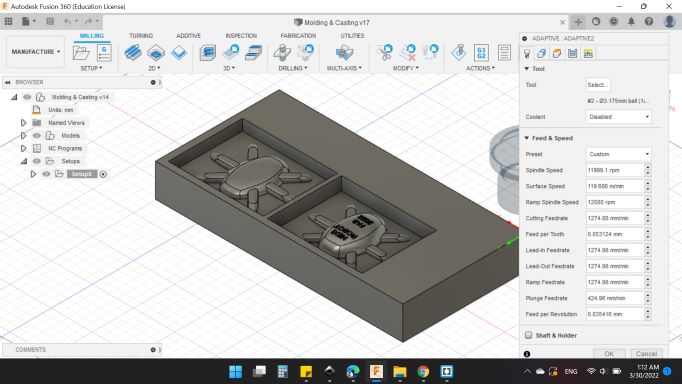
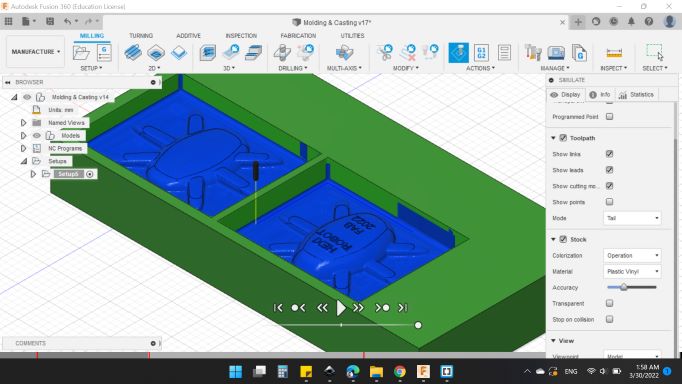
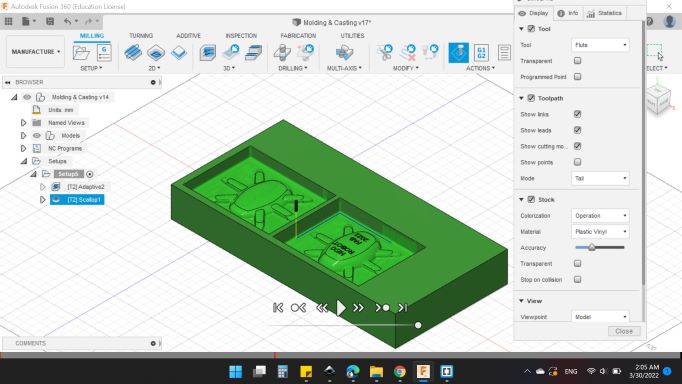
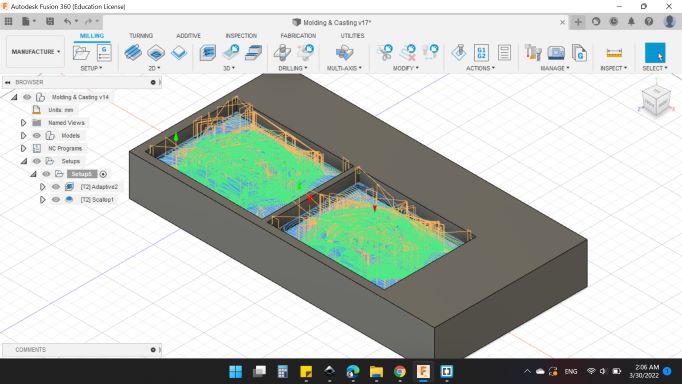
Next after done with the process, I went to ACTIONS > Simulate to simulate the tool path.
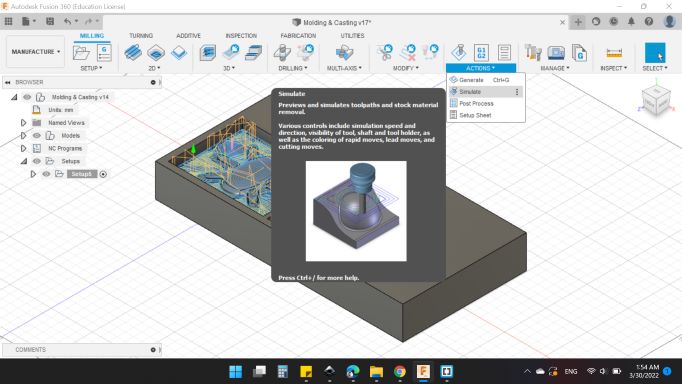
Here's the simulation window, you can adjustment the view and what to show and what to hide.
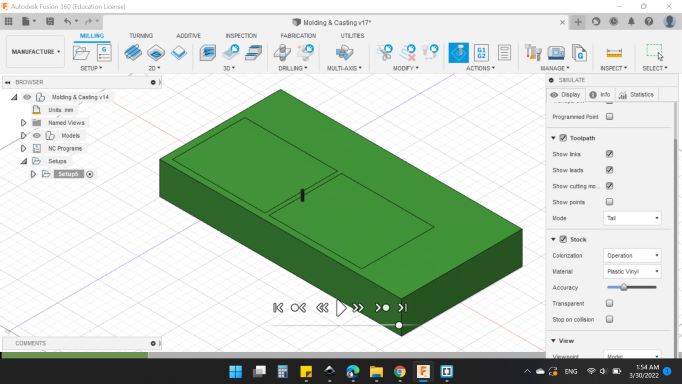
The first tool path "Roughing" looks good.
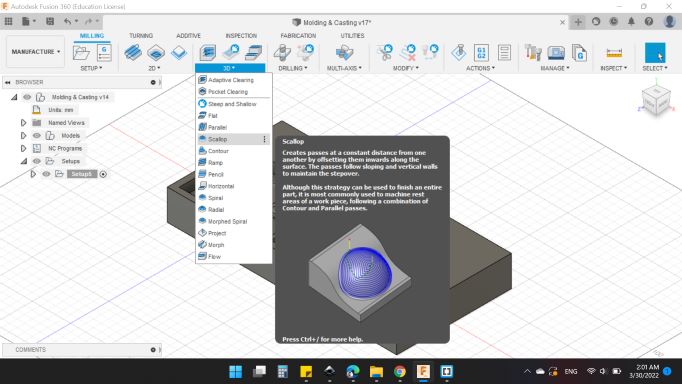
The second process will be "Finishing".
So, from 3D > Scallop to make the finishing process.
As before,
First on Tool
-
Tool
- Tool: Select.
- Coolent: Disabled.

The same tool as before, I selected 2 - 3.175mm R1.5875mm (1/8" Ball Emdmill).
-
Feed & Speed
- Spindle Speed: 11999.1 rpm.
- Surface Speed: 119.686 m/min.
- Ramp Spindle Speed: 12000 rpm.
- Cutting Feedrate: 1274.88 m/min.
- Feed Per Tooth: 0.053124 mm.
- Lead-In Feedrate: 1264.98 mm/min.
- Lead-Out Feedrate: 1264.98 mm/min.
- Ramp Feedrate: 1264.98 mm/min.
- Plunge Feedrate: 424.96 mm/min.
- Feed Per Revolution: 0.035416 mm.
-
Geometry
-
Machining Boundary: Selection.
-
Machining Boundary Selection: "2 Chains".
-
Tool Containment: Tool Center on boundary.
-
Additional Offset: -2 mm.
-
Contact Only: "YES".
-
Machining Ares Using Boundaries: "YES".
-
Boundary Overlap: 0 mm.
-
Slop
-
From Slop Angle: 0 deg.
-
To Slop Angle: 90 deg.
-
Heights
-
Clearance Height
-
From: Retracted Height
-
Offset: 10 mm.
-
Retracted Height
-
From: Stock Top
-
Offset: 5 mm.
-
Top Height
-
From: Stock Top
-
Offset: 0 mm.
-
Bottom Height
-
From: Model Bottom
-
Offset: 0 mm.
-
Passes
-
Passes
-
Tolerance: 0.05 mm.
-
Link from Inside to Outside: "YES".
-
Inside/Outside Direction: Inside -> Out.
-
Limit Number of Stepover: "NO".
-
Stepover: 0.35 mm.
-
Direction: Both Ways.
-
Up/Down Milling: Up Milling.
-
Up/Down Shallow Angle: 1 deg.

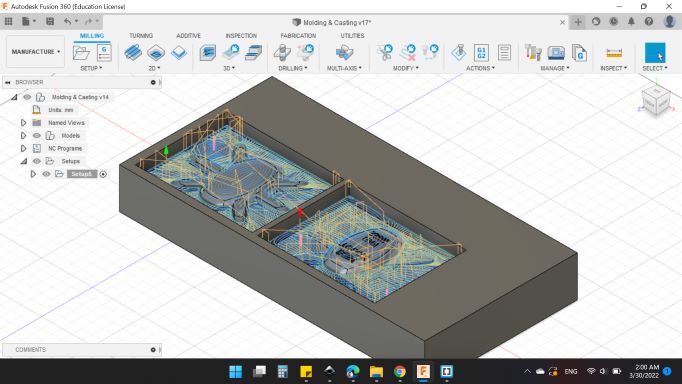
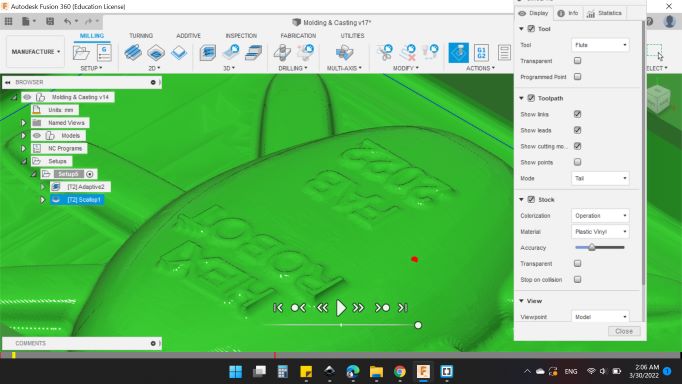
Next after done with the process, I went to Actions > Simulate to simulate the tool path too.
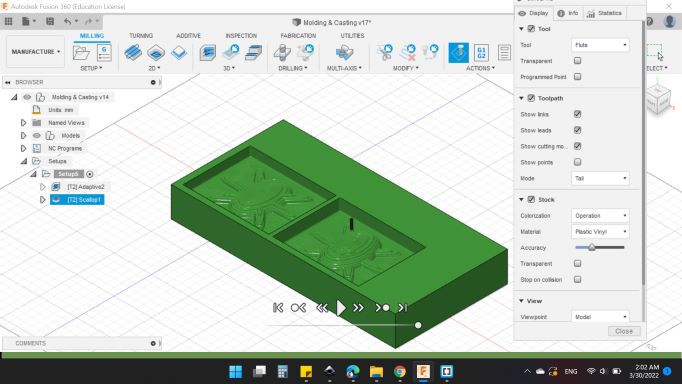
Here's the simulation window, you can adjustment the view and what to show and what to hide too.
I noticed that the text will shown clearly.
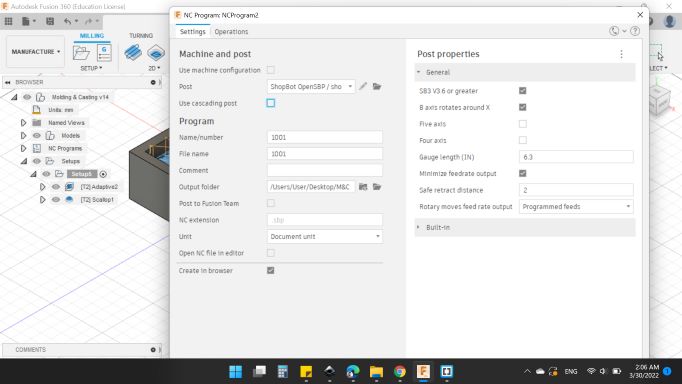
Finally, it's time to genarete the G-Code.
So, from ACTIONS > Post Process.
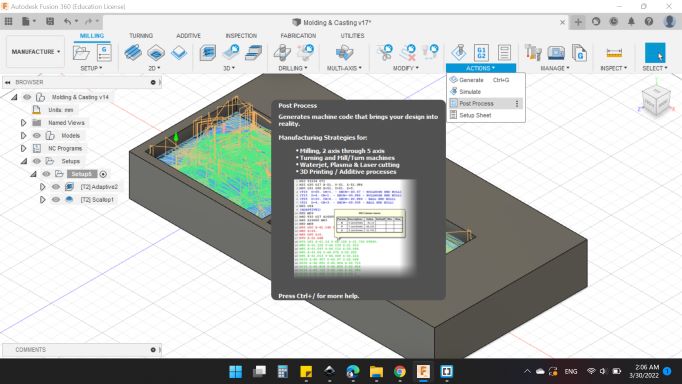
-
Settings
-
Machine and Post
-
Post: ShopBot OpenSBP / Shopbot.
-
Program
-
Name/Number: 1001.
Then Post.
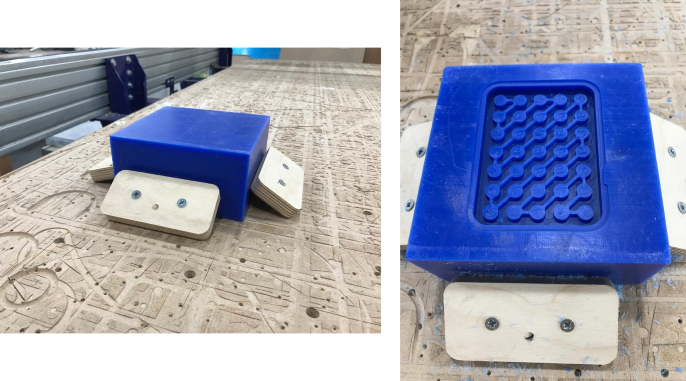
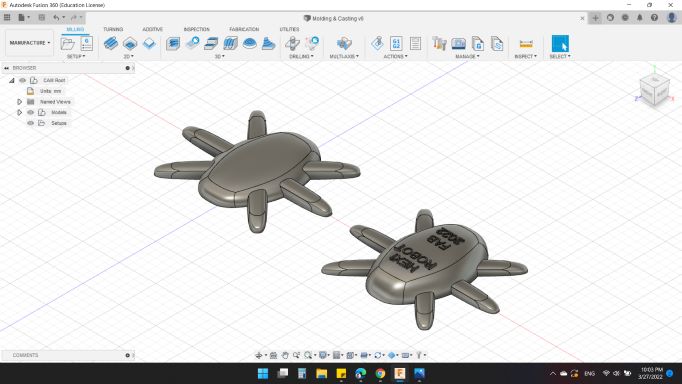
Fabrication with Shopbot CNC Machine
My Wax Mold have a dimensions of: 300 x 150 x 40 mm.
I fixed to the waste board of the CNC with some wood blocks and screws.

Then, I inserted the cutting tool which is 1/8" Ball nose.
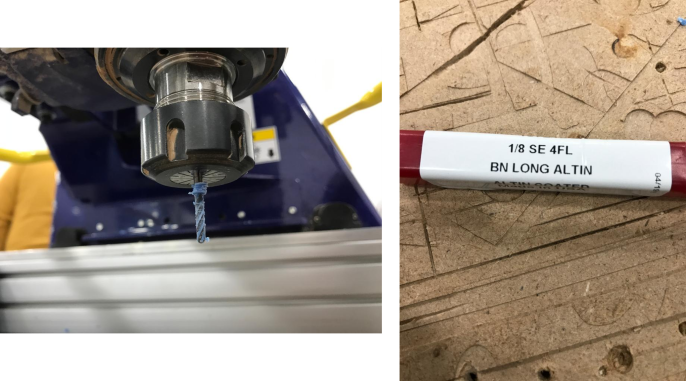
Next, X, Y & Z to be zero.
Last, I runned the machine.
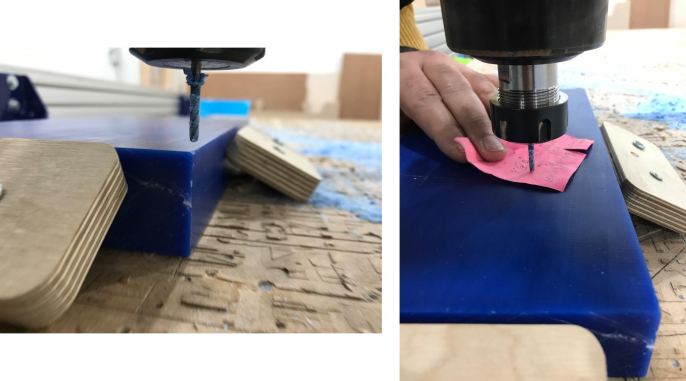
The first job is Roughing, so many lines like stairs are show.
Then the next job was Finishing.
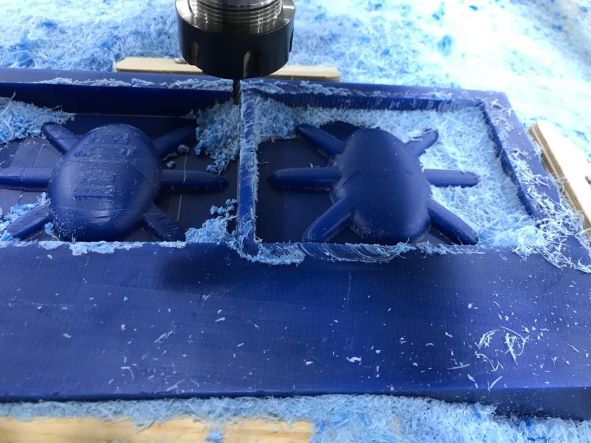
I realized some roughness and lines at the end, and that's saden actually 😭
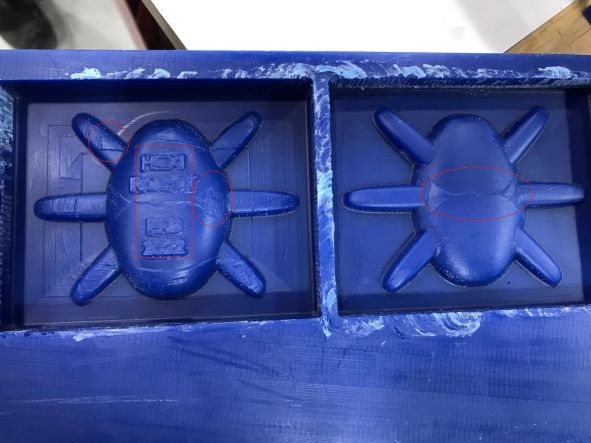
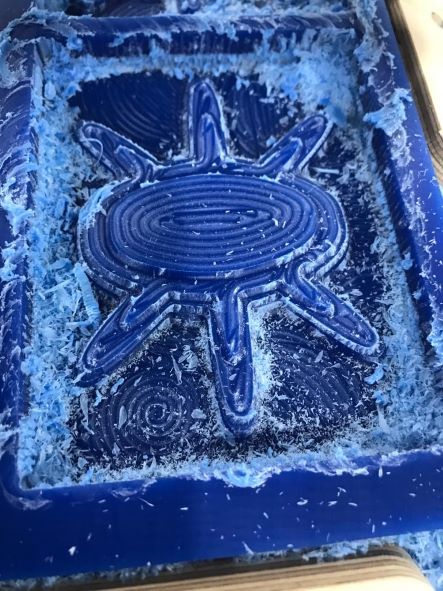
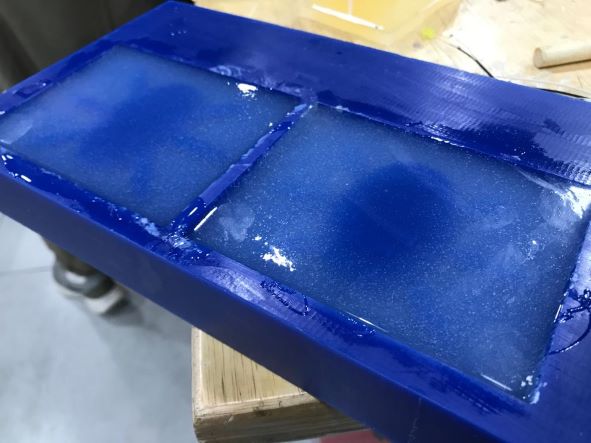
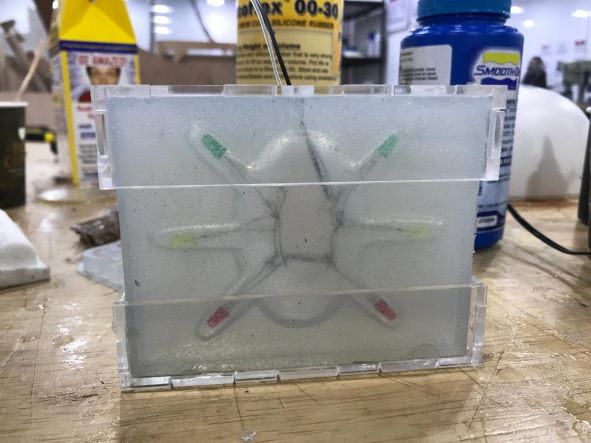
Creating the Silicone Mold
After cleaning the mold from cutting effects, I added the oil and wiped off the excess so that only the texture of the surface remained lubricated.
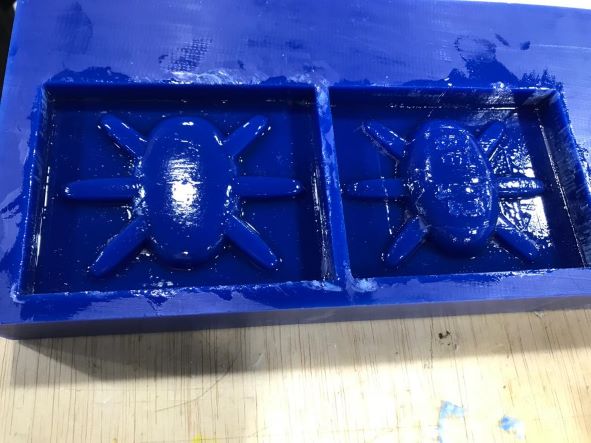
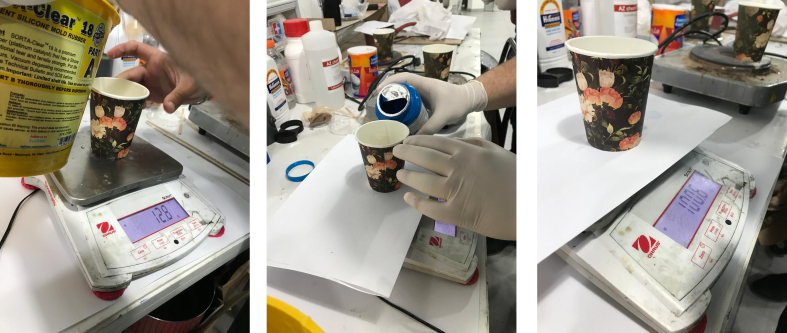
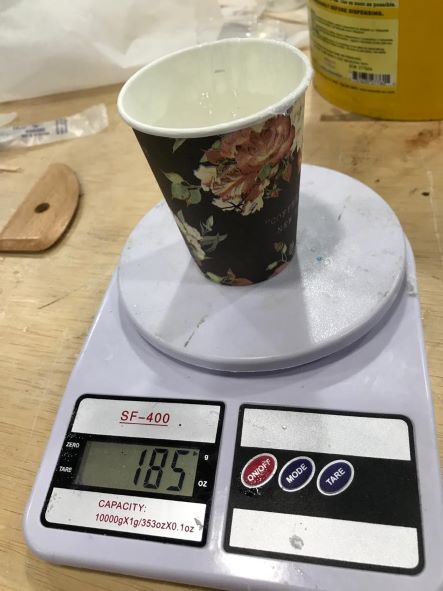
For the silicone mold, I used SORTA-Clear 18 Part A & B.
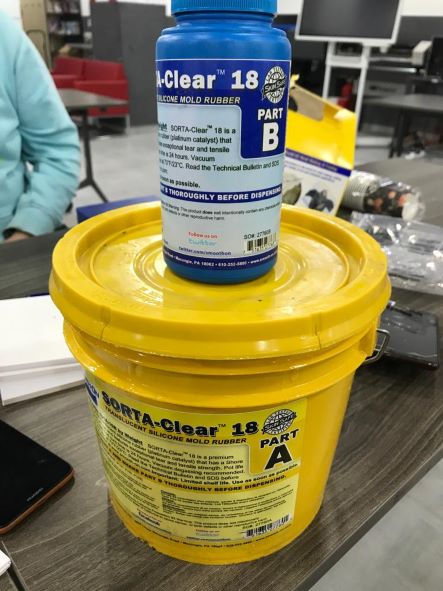
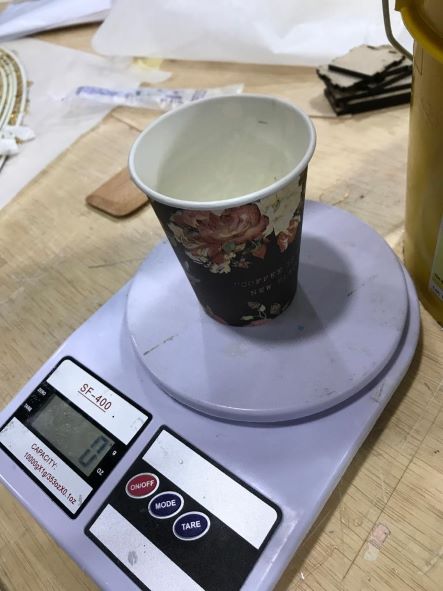
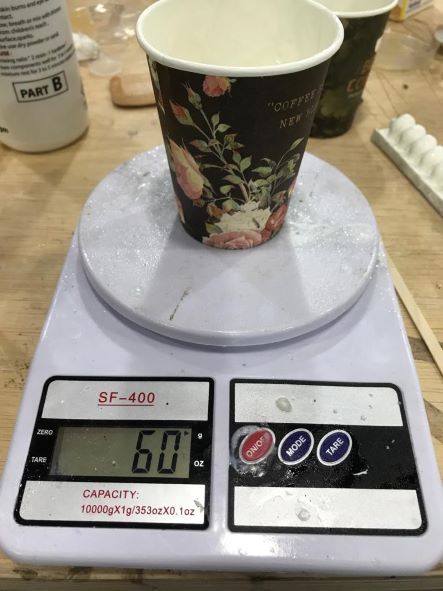
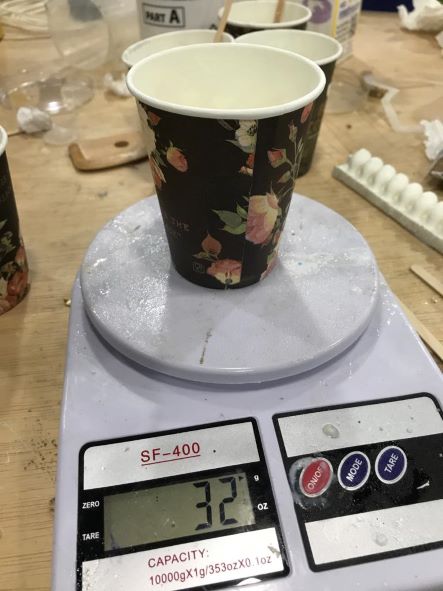
First, I put an empty glass on the scale and whistled the reading.
Then I poured Part A in an amount appropriate to the needs of the mold, as the weighed 185 g.
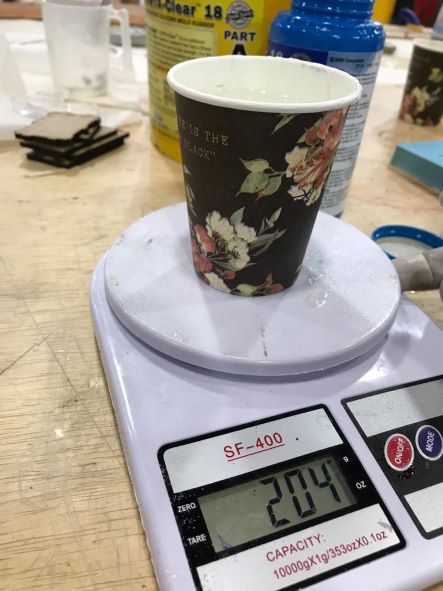
For Part B as the instructions the ratio 100A:10B, So 185A:18.5B. The total wight was 204 g.
Then, I mixed the two part.
After mixing and making sure that the two materials combined with each other, I poured into the mold.
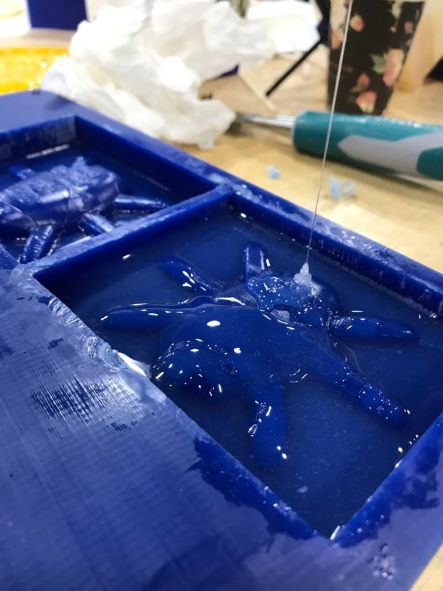
And here's the results 😁
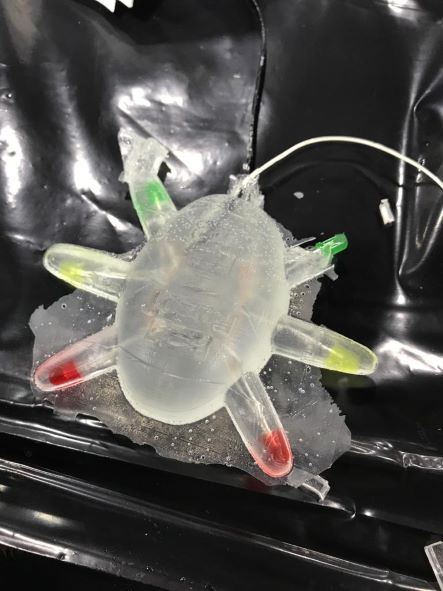
Connect the LED's
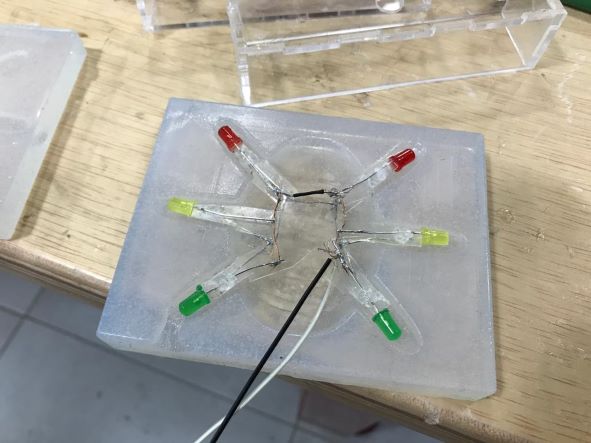
While the mold takes an entire day to dry, I decided to add a little touch to the final product. I decided to install interior LEDs.
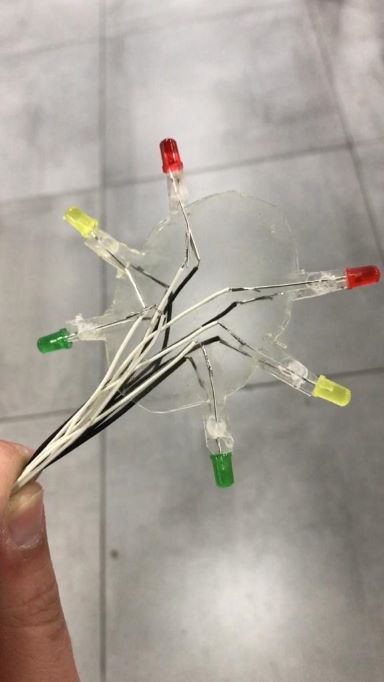
As the Electronics Design week, I decided to add 6 LEDs on each leg of the HEXI, so I used 3 colors (Red, Yellow and Green) as a traffic light 😂
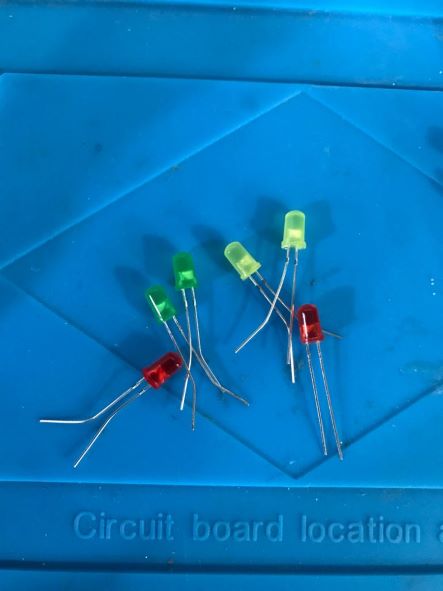
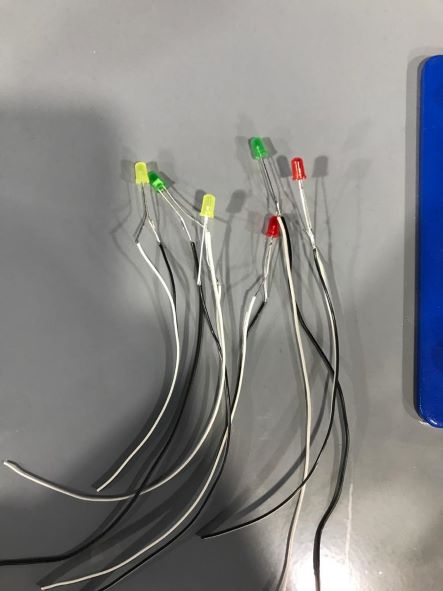
I used two colors for the wires, black for the GND, and white for the power.
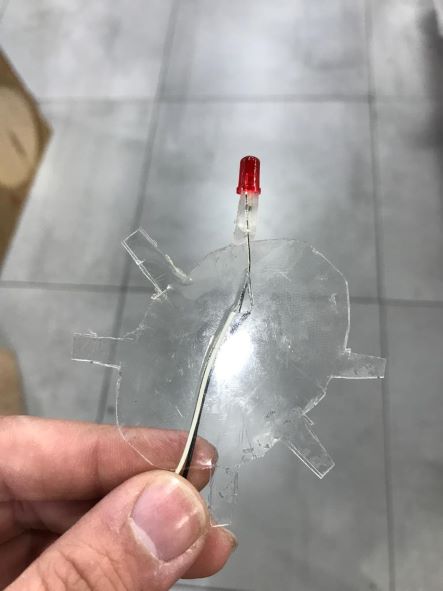
In order to be able to put the lamps in the correct position while pouring, I decided to cut a small transparent plate and glued the LEDs on it.
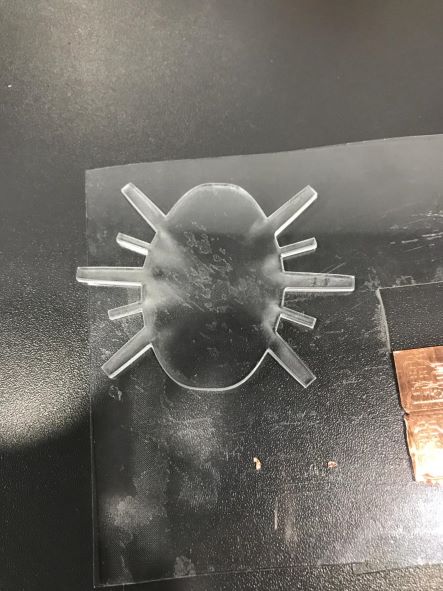
Here's the first LED glued to the transparent plate.
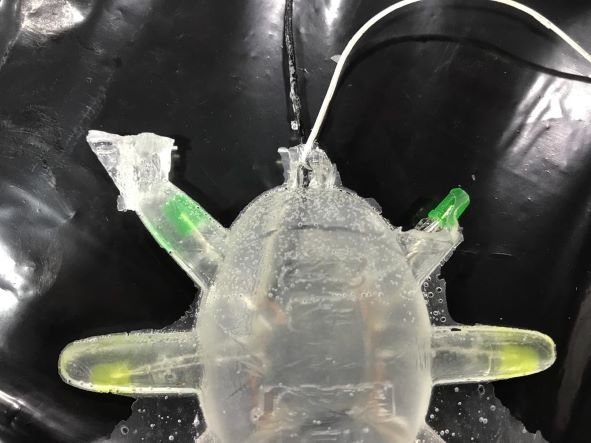
And here's the 6 LEDs together
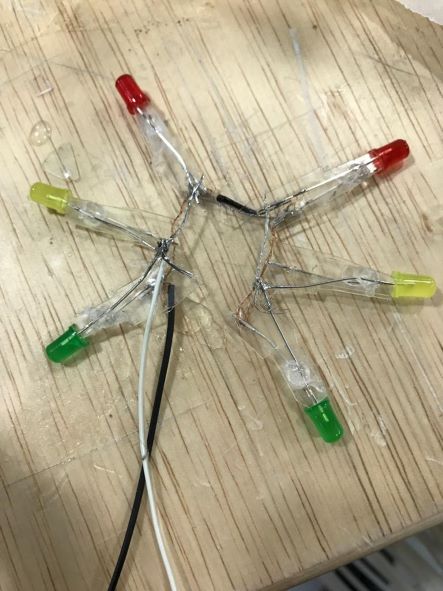
After assembling all the wires, I noticed that the number of wires was a lot, so I decided to get rid of them all (I mean the arrangement of the view).
I decided to connect all the LEDs to each other, so that the negative together, and the positive together, so only two wires come out (Positive and GND).
Manufacture the Box
When designing the wax mold, I forgot to include Pins & Holes. So, I came with idea of designing a box to contain the silicon model.
As always, Fusion 360 is the solution.
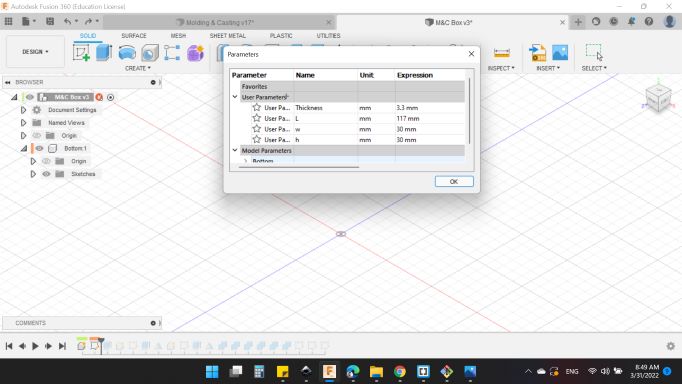
First of all, I created a parameters that to easily modify the dimensions if I measured something wrong.
I have 4 parametrs:
- Thickness: 3.3 mm.
- Length (L): 117 mm.
- Width (W): 30 mm.
- Hight (H): 30 mm.
So, I started with the bottom side.
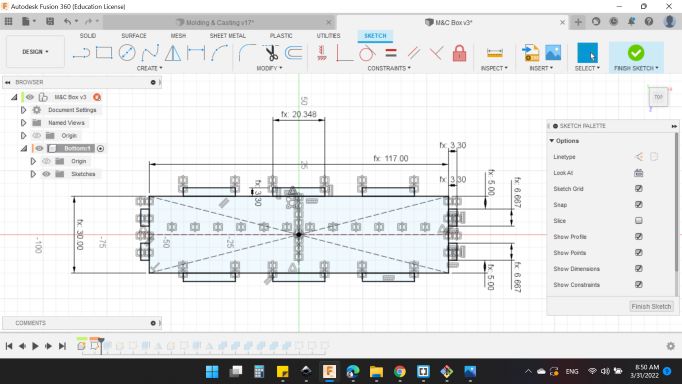
Then extruded by thickness value.
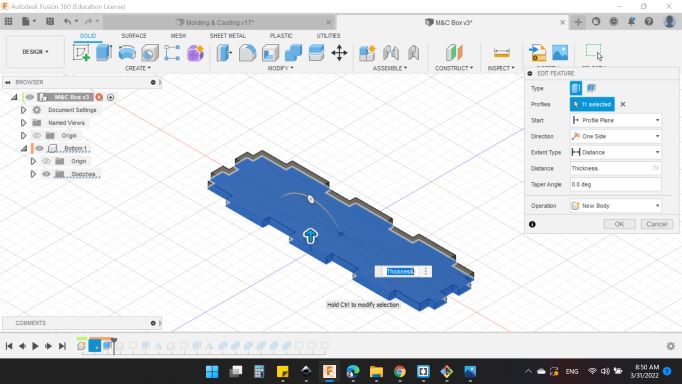
Next, I created the right side and extruded by the thickness value and mirrored the left side.
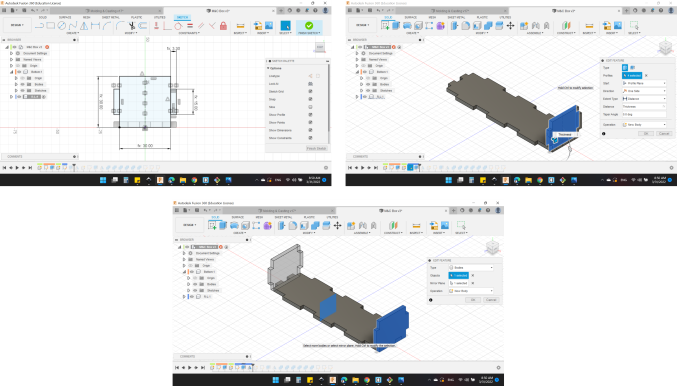
For the front side, same steps.
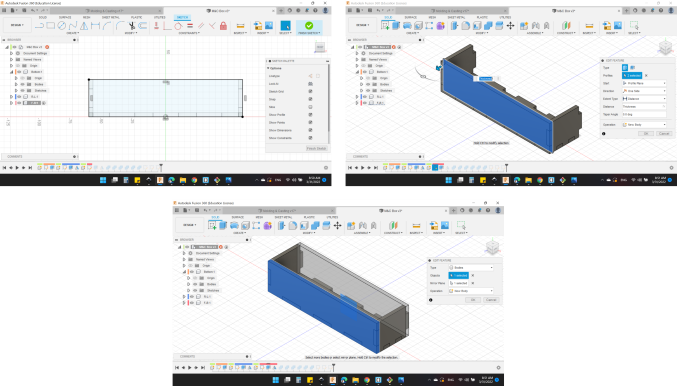
Finally, Compound the whole parts together.
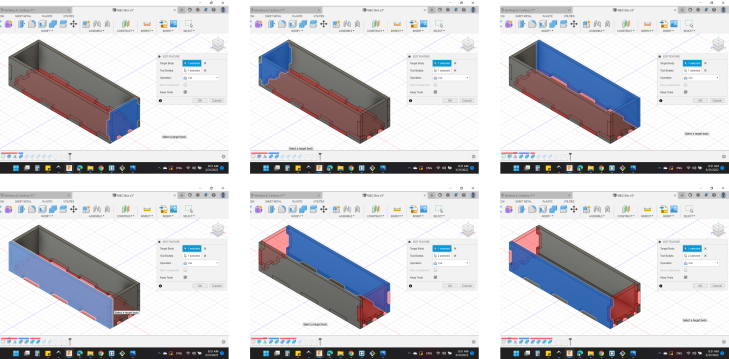
And here's the final design.
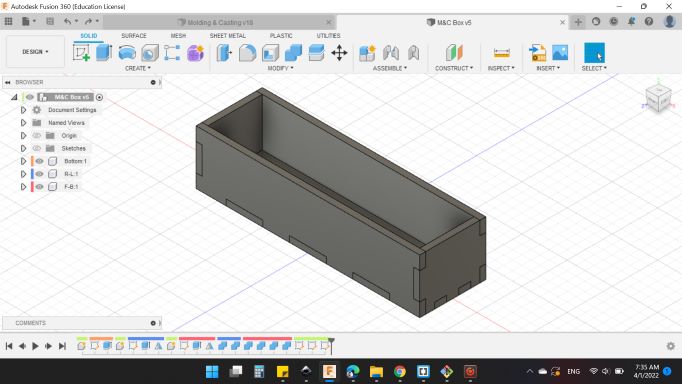
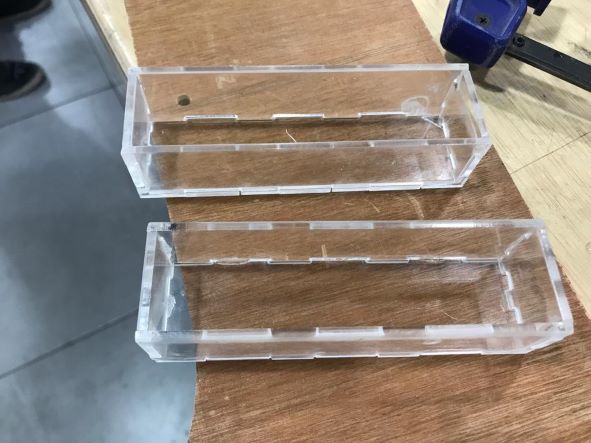
With the Laser machine, I manufactured the acrylic box.

I manufactured two boxes, one for the top side and one for the bottom side.
Casting the Resin
After waiting a whole day, the silicone has dried and is ready to use.
I tried to get the mold out of the wax, but I couldn't, so I used a simple trick, which is to use a medical syringe that Ameen told me about it. The syringe blows air into the mold, thus inflating it and leaving the mold out of the wax.
So here's the mold coming out smoothly.
And here are the two sides silicone mold.
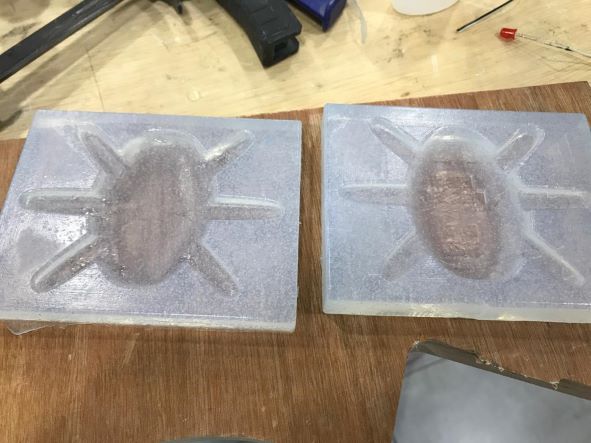
The way the LEDs are placed in the mold will be like this.
I used Erco resin drom  .
.
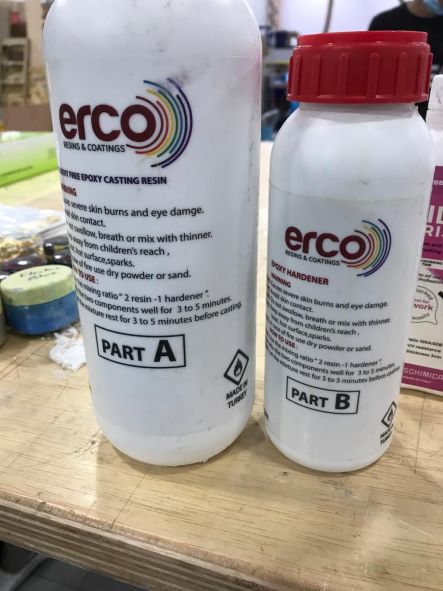
Part A is 2 times Part B. So I poured 60 g of Part A.
And Part B almost the half 30 g.
Then mixed the two parts together for 5 minutes and pouring into the mold.
Here's the mold with the resin material.
After finishing and making sure that the resin was dry, I took out the piece.
Finally, my HEXI is done 😁
Unfortunately, the upper leg in green led did not the resin reach it 😔, I'll fix it later.
And here's the crucial moment, I plugged in the wires, calibrated the appropriate voltage and current, turned on, and it worked!
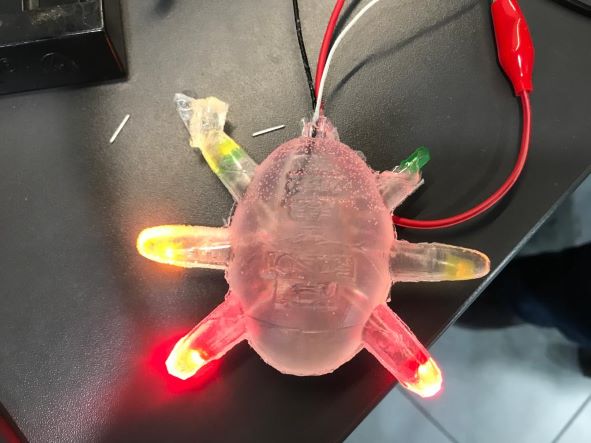
It looks amazing 😀
You can download my files here: